How Facebook Core Systems’ Shruti Padmanabha transitioned from PhD candidate to Research Scientist

Our expert teams of Facebook scientists and engineers work quickly and collaboratively to solve some of the world’s most complex technology challenges. Many researchers join Facebook from top research institutions around the world, often maintaining their academic connections through industry collaborations, partnerships, workshops, and other programs.

While some researchers come to work at Facebook after extensive careers in academia, others make the transition toward the beginning of their career. Shruti Padmanabha, who joined Facebook after receiving her PhD in computer science and engineering, is one such example.

Padmanabha is a Research Scientist on the Disaster Recovery team within Facebook Core Systems. Her focus is on building distributed systems that are reliable and tolerant to failures in their hardware and service dependency stack. Padmanabha’s journey with Facebook Core Systems began with a PhD internship, an experience that encouraged her to switch fields from computer architecture to distributed systems.

We sat down with Padmanabha to learn more about her experience joining Facebook full-time directly after earning her PhD, as well as her current research projects, the differences between industry and PhD research, and her academic community engagement efforts. Padmanabha also offers advice for PhDs looking to transition to industry after graduation.

Tell us about your experience in academia before joining Facebook.

After earning an undergraduate degree in electrical engineering in India, I moved to Michigan to pursue my master’s and PhD in computer science and engineering at the University of Michigan, in Ann Arbor. I was interested in how low-level circuits came together to form computers, and started working research problems in computer architecture. Specifically, I focused on energy-efficient general-purpose architectures (like those that drive desktops).

What excited me about grad school was the opportunity to continuously extend state-of-the-art technology. There, I learned the importance of communication, both written and in person, and to navigate myself in a male-dominated environment (I was the first and only woman in my adviser’s lab!) by leaning on and volunteering in underrepresented groups for grad students. I also found passion in teaching and mentorship activities.

But foremost, I valued the company of the brightest peers and network that being in grad school brought me. It was a proud feeling to be treated as a peer by professors that I greatly respected!

What has your journey with Facebook been like so far?

My first experience at Facebook was a 2015 summer internship in Core Systems. This internship was a leap for me since my expertise was in computer architecture, not in distributed systems. I worked on a proposal to improve energy efficiency of Facebook data centers by dynamically scaling machine tiers based on traffic patterns. The insights we gained from this early experimental work influenced the design of some of our production capacity management systems today.

During my internship, I had the opportunity to work on challenging problems for state-of-the-art technologies and to work with smart, driven peers. I liked that I could innovate on problems with more immediate, real-world applications than in academia. This is why I decided to pursue a full-time position at Facebook after 27 years in school.

When I joined, I was given the choice of being a computer architect on another Facebook team or to switch fields and rejoin Core Systems. I had a very positive internship experience on the Core Systems team, and I liked that they maintained strong academic collaborations, so I decided to permanently switch fields and move to distributed systems.

My first position was on an exploratory team that was trying to think of novel ways to distribute Facebook systems in data centers of different sizes and in different geological locations, which gave me a crash course in real-world distributed systems of all kinds. It also provided me with the unique opportunity to learn about the physical side of designing data centers at Facebook’s scale, from power transformers to submarine network backbones to CDNs.

I’ve learned that there’s always room to learn new things and grow within Core Systems. To keep a healthy flow of fresh information flowing, I lead biweekly brown bag sessions where teams present technical achievements and design challenges, as well as help present introductory infrastructure classes to Facebook n00bs.

What are you currently working on?

My current focus is on improving fault tolerance and reliability at Facebook. Facebook’s service infrastructure consists of a complex web of hundreds of interconnected microservices that change dynamically throughout the day. These services run on 11 data centers, which are designed in house and located across the globe.

At this scale, failures are bound to happen — like a single host losing power, a power transformer getting hit by lightning, a hurricane posing a risk to an entire data center, a single code change leading to a cascading failure, and so on. Our team’s focus is to help design Facebook’s services in a way that such failures are tolerated gracefully and transparently to the user.

Our OSDI paper from 2018 talks about one mitigation approach of draining traffic away from failing data centers. Justin Meza and I also gave a talk at Systems@Scale 2019 where we described the problem of handling power outages at a sub–data center scale. The solution required building solutions that span the stack — from respreading hardware resources across the data center floor to balancing services across them.

What are some of the ways you’ve shown up in the academic community?

I’ve stayed in touch with the academic community by attending conferences, participating in program committees, and mentoring interns. I served on the program committees for a few academic conferences (ISCA, HPCA), as well as for Grace Hopper. I enjoy participating in events where I can reach out to PhD candidates directly, especially those from underrepresented groups. For instance, I moderated a panel at MICRO 2020 on Tips and Strategies for PhD candidates looking for jobs in industry, and participated in the Research@ panel in GHC 2017.

At Facebook Core Systems, we maintain and encourage a strong tie to academia, in terms of both publishing at top systems conferences and awarding research grants to academic researchers, for which I also had the opportunity to help out.

What are some main differences between doing PhD research and doing industry research?

In a PhD candidacy, one’s work tends to be fairly independent and self-driven. In industry, on the other hand, projects are distributed across team members who are equally invested in its success. I had to deliberately change my academic mindset of being solely responsible for the delivery of a project to working in a collaborative environment as an individual contributor.

Industry research also might have the advantage of mature infrastructure and access to real-world data. To me, not having to build/hack simulators and micro-benchmarks was a breath of fresh air. At Core Systems, development progresses from a proof of concept to being tested and rolled out in production relatively quickly.

I’ve also observed a difference in how projects are prioritized in industry and how success is measured. Within Core Systems, we have the freedom to choose the most important problems that need to be worked on within the scope of company-wide goals and build long-term visions for their solutions. Half-yearly reviews are the checkpoints for measuring success toward this vision.

For computer science PhDs curious about transitioning to industry after completing their dissertation, where would you recommend they start?

Explore different sides of the industry through internships, and leverage your professional networks. We’re fortunate that, in our field, internships are usually plentiful. Experiment with different kinds of internships at research labs and product groups if you can. These opportunities will not only give you a window into the kind of career you could build in the industry but also help you build connections with industry researchers. Many industry jobs and internships have rather generic-sounding descriptions that make it hard to envision the work involved, so it’s best to get hands-on experience.

Also, leverage connections through your adviser and alumni network, and engage with industry researchers at conferences. Be sure to discuss the breadth of research at their company and their job interview processes. Lastly, don’t be afraid to step outside of your research comfort zone to try something new!

The post How Facebook Core Systems’ Shruti Padmanabha transitioned from PhD candidate to Research Scientist appeared first on Facebook Research.

Read More

Introducing the AWS Panorama Device SDK: Scaling computer vision at the edge with AWS Panorama-enabled devices

Introducing the AWS Panorama Device SDK: Scaling computer vision at the edge with AWS Panorama-enabled devices

Yesterday, at AWS re:Invent, we announced AWS Panorama, a new Appliance and Device SDK that allows organizations to bring computer vision to their on-premises cameras to make automated predictions with high accuracy and low latency. With AWS Panorama, companies can use compute power at the edge (without requiring video streamed to the cloud) to improve their operations by automating monitoring and visual inspection tasks like evaluating manufacturing quality, finding bottlenecks in industrial processes, and assessing worker safety within their facilities. The AWS Panorama Appliance is a hardware device that customers can install on their network to connect to existing cameras within your facility, to run computer vision models on multiple concurrent video streams.

This post covers how the AWS Panorama Device SDK helps device manufacturers build a broad portfolio of AWS Panorama-enabled devices. Scaling computer vision at the edge requires purpose-built devices that cater to specific customer needs without compromising security and performance. However, creating such a wide variety of computer vision edge devices is hard for device manufacturers because they need to do the following:

  • Integrate various standalone cloud services to create an end-to-end computer vision service that works with their edge device and provides a scalable ecosystem of applications for customers.
  • Invest in choosing and enabling silicon according to customers’ performance and cost requirements.

The AWS Panorama Device SDK addresses these challenges.

AWS Panorama Device SDK

The AWS Panorama Device SDK powers the AWS Panorama Appliance and allows device manufacturers to build AWS Panorama-enabled edge appliances and smart cameras. With the AWS Panorama Device SDK, device manufacturers can build edge computer vision devices for a wide array of use cases across industrial, manufacturing, worker safety, logistics, transportation, retail analytics, smart building, smart city, and other segments. In turn, customers have the flexibility to choose the AWS Panorama-enabled devices that meet their specific performance, design, and cost requirements.

The following diagram shows how the AWS Panorama Device SDK allows device manufacturers to build AWS Panorama-enabled edge appliances and smart cameras.

The AWS Panorama Device SDK includes the following:

  • Core controller – Manages AWS Panorama service orchestration between the cloud and edge device. The core controller provides integration to media processing and hardware accelerator on-device along with integration to AWS Panorama applications.
  • Silicon abstraction layer – Provides device manufacturers the ability to enable AWS Panorama across various silicon platforms and devices.

Edge devices integrated with the AWS Panorama Device SDK can offer all AWS Panorama service features, including camera stream onboarding and management, application management, application deployment, fleet management, and integration with event management business logic for real-time predictions, via the AWS Management Console. For example, a device integrated with the AWS Panorama Device SDK can automatically discover camera streams on the network, and organizations can review the discovered video feeds and name or group them on the console. Organizations can use the console to create applications by choosing a model and pairing it with business logic. After the application is deployed on the target device through the console, the AWS Panorama-enabled device runs the machine learning (ML) inference locally to enable high-accuracy and low-latency predictions.

To get device manufacturers started, the AWS Panorama Device SDK provides them with a device software stack for computer vision, sample code, APIs, and tools to enable and test their respective device for the AWS Panorama service. When ready, device manufacturers can work with the AWS Panorama team to finalize the integration of the AWS Panorama Device SDK and run certification tests ahead of their commercial launch.

Partnering with NVIDIA and Ambarella to enable the AWS Panorama Device SDK on their leading edge AI platforms

The AWS Panorama Device SDK will support the NVIDIA® Jetson product family and Ambarella CV 2x product line as the initial partners to build the ecosystem of hardware-accelerated edge AI/ML devices with AWS Panorama.

“Ambarella is in mass production today with CVflow AI vision processors for the enterprise, embedded, and automotive markets. We’re excited to partner with AWS to enable the AWS Panorama service on next-generation smart cameras and embedded systems for our customers. The ability to effortlessly deploy computer vision applications to Ambarella SoC-powered devices in a secure, optimized fashion is a powerful tool that makes it possible for our customers to rapidly bring the next generation of AI-enabled products to market.”

– Fermi Wang, CEO of Ambarella


“The world’s first computer created for AI, robotics, and edge computing, NVIDIA® Jetson AGX Xavier™ delivers massive computing performance to handle demanding vision and perception workloads at the edge. Our collaboration with AWS on the AWS Panorama Appliance powered by the NVIDIA Jetson platform accelerates time to market for enterprises and developers by providing a fully managed service to deploy computer vision from cloud to edge in an easily extensible and programmable manner.”

– Deepu Talla, Vice President and General Manager of Edge Computing at NVIDIA

Enabling edge appliances and smart cameras with the AWS Panorama Device SDK

Axis Communications, ADLINK Technology, Basler AG, Lenovo, STANLEY Security, and Vivotek will be using the AWS Panorama Device SDK to build AWS Panorama-enabled devices in 2021.

We’re excited to collaborate to accelerate computer vision innovation with AWS Panorama and explore the advantages of the Axis Camera Application Platform (ACAP), our open application platform that offers users an expanded ecosystem, an accelerated development process, and ultimately more innovative, scalable, and reliable network solutions.”

– Johan Paulsson, CTO of Axis Communications AB


“The integration of AWS Panorama on ADLINK’s industrial vision systems makes for truly plug-and-play computer vision at the edge. In 2021, we will be making AWS Panorama-powered ADLINK NEON cameras powered by NVIDIA Jetson NX Xavier available to customers to drive high-quality computer vision powered outcomes much, much faster. This allows ADLINK to deliver AI/ML digital experiments and time to value for our customers more rapidly across logistics, manufacturing, energy, and utilities use cases.”

– Elizabeth Campbell, CEO of ADLINK USA


“Basler is looking forward to continuing our technology collaborations in machine learning with AWS in 2021. We will be expanding our solution portfolio to include AWS Panorama to allow customers to develop AI-based IoT applications on an optimized vision system from the edge to the cloud. We will be integrating AWS Panorama with our AI Vision Solution Kit, reducing the complexity and need for additional expertise in embedded hardware and software components, providing developers with a new and efficient approach to rapid prototyping, and enabling them to leverage the ecosystem of AWS Panorama computer vision application providers and systems integrators.”

– Arndt Bake, Chief Marketing Officer at Basler AG


“Going beyond traditional security applications, VIVOTEK developed its AI-driven video analytics from smart edge cameras to software applications. We are excited that we will be able to offer enterprises advanced flexibility and functionality through the seamless integration with AWS Panorama. What makes this joint force more powerful is the sufficient machine learning models that our solutions can benefit from AWS Cloud. We look forward to a long-term collaboration with AWS.”

– Joe Wu, Chief Technology Officer at VIVOTEK Inc.

Next steps

Join now to become a device partner and build edge computer vision devices with the AWS Panorama Device SDK.


About the Authors

As a Product Manager on the AWS AI Devices team, Shardul Brahmbhatt currently focuses on AWS Panorama. He is deeply passionate about building products that drive adoption of AI at the Edge.


Kamal Garg leads strategic hardware partnerships for AWS AI Devices. He is deeply passionate about incubating technology ecosystems that optimize the customer and developer experience . Over the last 5+ years, Kamal has developed strategic relationships with leading silicon and connected device manufacturers for next generation services like Alexa, A9 Visual Search, Prime Video, AWS IoT, Sagemaker Neo, Sagemaker Edge, and AWS Panorama.

Read More

Configuring autoscaling inference endpoints in Amazon SageMaker

Configuring autoscaling inference endpoints in Amazon SageMaker

Amazon SageMaker is a fully managed service that provides every developer and data scientist with the ability to quickly build, train, and deploy machine learning (ML) models at scale. Amazon SageMaker removes the heavy lifting from each step of the ML process to make it easier to develop high-quality models. You can one-click deploy your ML models for making low latency inferences in real-time on fully managed inference endpoints. Autoscaling is an out-of-the-box feature that monitors your workloads and dynamically adjusts the capacity to maintain steady and predictable performance at the possible lowest cost. When the workload increases, autoscaling brings more instances online. When the workload decreases, autoscaling removes unnecessary instances, helping you reduce your compute cost.

The following diagram is a sample architecture that showcases how a model is invoked for inference using an Amazon SageMaker endpoint.

Amazon SageMaker automatically attempts to distribute your instances across Availability Zones. So, we strongly recommend that you deploy multiple instances for each production endpoint for high availability. If you’re using a VPC, configure at least two subnets in different Availability Zones so Amazon SageMaker can distribute your instances across those Availability Zones.

Amazon SageMaker supports four different ways to implement horizontal scaling of Amazon SageMaker endpoints. You can configure some of these policies using the Amazon SageMaker console, the AWS Command Line Interface (AWS CLI), or the AWS SDK’s Application Auto Scaling API for the advanced options. In this post, we showcase how to configure using the boto3 SDK for Python and outline different scaling policies and patterns. 

Prerequisites

This post assumes that you have a functional Amazon SageMaker endpoint deployed. Models are hosted within an Amazon SageMaker endpoint; you can have multiple model versions being served via the same endpoint. Each model is referred to as a production variant.

If you’re new to Amazon SageMaker and have not created an endpoint yet, complete the steps in Identifying bird species on the edge using the Amazon SageMaker built-in Object Detection algorithm and AWS DeepLens until the section Testing the model to develop and host an object detection model.

If you want to get started directly with this post, you can also fetch a model from the MXNet model zoo. For example, if you plan to use ResidualNet152, you need the model definition and the model weights inside a tarball. You can also create custom models that can be hosted as an Amazon SageMaker endpoint. For instructions on building a tarball with Gluon and Apache MXNet, see Deploying custom models built with Gluon and Apache MXNet on Amazon SageMaker.

Configuring autoscaling

The following are the high-level steps for creating a model and applying a scaling policy:

  1. Use Amazon SageMaker to create a model or bring a custom model.
  2. Deploy the model.

If you use the MXNet estimator to train the model, you can call deploy to create an Amazon SageMaker endpoint:

# Train my estimator
mxnet_estimator = MXNet('train.py',
                framework_version='1.6.0',
                py_version='py3',
                instance_type='ml.p2.xlarge',
                instance_count=1)

mxnet_estimator.fit('s3://my_bucket/my_training_data/')

# Deploy my estimator to an Amazon SageMaker endpoint and get a Predictor
predictor = mxnet_estimator.deploy(instance_type='ml.m5.xlarge',
                initial_instance_count=1)#Instance_count=1 is not recommended for production use. Use this only for experimentation.

If you use a pretrained model like ResidualNet152, you can create an MXNetModel object and call deploy to create the Amazon SageMaker endpoint:

mxnet_model = MXNetModel(model_data='s3://my_bucket/pretrained_model/model.tar.gz',
                         role=role,
                         entry_point='inference.py',
                         framework_version='1.6.0',
                         py_version='py3')
predictor = mxnet_model.deploy(instance_type='ml.m5.xlarge',#
                               initial_instance_count=1)
  1. Create a scaling policy and apply the scaling policy to the endpoint. The following section discusses your scaling policy options.

Scaling options

You can define minimum, desired, and maximum number of instances per endpoint and, based on the autoscaling configurations, instances are managed dynamically. The following diagram illustrates this architecture.

To scale the deployed Amazon SageMaker endpoint, first fetch its details:

import pprint
import boto3
from sagemaker import get_execution_role
import sagemaker
import json

pp = pprint.PrettyPrinter(indent=4, depth=4)
role = get_execution_role()
sagemaker_client = boto3.Session().client(service_name='sagemaker')
endpoint_name = 'name-of-the-endpoint'
response = sagemaker_client.describe_endpoint(EndpointName=endpoint_name)
pp.pprint(response)

#Let us define a client to play with autoscaling options
client = boto3.client('application-autoscaling') # Common class representing Application Auto Scaling for SageMaker amongst other services

Simple scaling or TargetTrackingScaling

Use this option when you want to scale based on a specific Amazon CloudWatch metric. You can do this by choosing a specific metric and setting threshold values. The recommended metrics for this option are average CPUUtilization or SageMakerVariantInvocationsPerInstance.

SageMakerVariantInvocationsPerInstance is the average number of times per minute that each instance for a variant is invoked. CPUUtilization is the sum of work handled by a CPU. 

The following code snippets show how to scale using these metrics. You can also push custom metrics to CloudWatch or use other metrics. For more information, see Monitor Amazon SageMaker with Amazon CloudWatch.

resource_id='endpoint/' + endpoint_name + '/variant/' + 'AllTraffic' # This is the format in which application autoscaling references the endpoint

response = client.register_scalable_target(
    ServiceNamespace='sagemaker', #
    ResourceId=resource_id,
    ScalableDimension='sagemaker:variant:DesiredInstanceCount',
    MinCapacity=1,
    MaxCapacity=2
)

#Example 1 - SageMakerVariantInvocationsPerInstance Metric
response = client.put_scaling_policy(
    PolicyName='Invocations-ScalingPolicy',
    ServiceNamespace='sagemaker', # The namespace of the AWS service that provides the resource. 
    ResourceId=resource_id, # Endpoint name 
    ScalableDimension='sagemaker:variant:DesiredInstanceCount', # SageMaker supports only Instance Count
    PolicyType='TargetTrackingScaling', # 'StepScaling'|'TargetTrackingScaling'
    TargetTrackingScalingPolicyConfiguration={
        'TargetValue': 10.0, # The target value for the metric. - here the metric is - SageMakerVariantInvocationsPerInstance
        'PredefinedMetricSpecification': {
            'PredefinedMetricType': 'SageMakerVariantInvocationsPerInstance', # is the average number of times per minute that each instance for a variant is invoked. 
        },
        'ScaleInCooldown': 600, # The cooldown period helps you prevent your Auto Scaling group from launching or terminating 
                                # additional instances before the effects of previous activities are visible. 
                                # You can configure the length of time based on your instance startup time or other application needs.
                                # ScaleInCooldown - The amount of time, in seconds, after a scale in activity completes before another scale in activity can start. 
        'ScaleOutCooldown': 300 # ScaleOutCooldown - The amount of time, in seconds, after a scale out activity completes before another scale out activity can start.
        
        # 'DisableScaleIn': True|False - ndicates whether scale in by the target tracking policy is disabled. 
                            # If the value is true , scale in is disabled and the target tracking policy won't remove capacity from the scalable resource.
    }
)

#Example 2 - CPUUtilization metric
response = client.put_scaling_policy(
    PolicyName='CPUUtil-ScalingPolicy',
    ServiceNamespace='sagemaker',
    ResourceId=resource_id,
    ScalableDimension='sagemaker:variant:DesiredInstanceCount',
    PolicyType='TargetTrackingScaling',
    TargetTrackingScalingPolicyConfiguration={
        'TargetValue': 90.0,
        'CustomizedMetricSpecification':
        {
            'MetricName': 'CPUUtilization',
            'Namespace': '/aws/sagemaker/Endpoints',
            'Dimensions': [
                {'Name': 'EndpointName', 'Value': endpoint_name },
                {'Name': 'VariantName','Value': 'AllTraffic'}
            ],
            'Statistic': 'Average', # Possible - 'Statistic': 'Average'|'Minimum'|'Maximum'|'SampleCount'|'Sum'
            'Unit': 'Percent'
        },
        'ScaleInCooldown': 600,
        'ScaleOutCooldown': 300
    }
)

With the scale-in cooldown period, the intention is to scale-in conservatively to protect your application’s availability, so scale-in activities are blocked until the cooldown period has expired. With the scale-out cooldown period, the intention is to continuously (but not excessively) scale out. After Application Auto Scaling successfully scales out using a target tracking scaling policy, it starts to calculate the cooldown time.

Step scaling

This is an advanced type of scaling where you define additional policies to dynamically adjust the number of instances to scale based on size of the alarm breach. This helps you configure a more aggressive response when demand reaches a certain level. The following code is an example of a step scaling policy based on the OverheadLatency metric:

#Example 3 - OverheadLatency metric and StepScaling Policy
response = client.put_scaling_policy(
    PolicyName='OverheadLatency-ScalingPolicy',
    ServiceNamespace='sagemaker',
    ResourceId=resource_id,
    ScalableDimension='sagemaker:variant:DesiredInstanceCount',
    PolicyType='StepScaling', 
    StepScalingPolicyConfiguration={
        'AdjustmentType': 'ChangeInCapacity', # 'PercentChangeInCapacity'|'ExactCapacity' Specifies whether the ScalingAdjustment value in a StepAdjustment 
                                              # is an absolute number or a percentage of the current capacity.
        'StepAdjustments': [ # A set of adjustments that enable you to scale based on the size of the alarm breach.
            {
                'MetricIntervalLowerBound': 0.0, # The lower bound for the difference between the alarm threshold and the CloudWatch metric.
                 # 'MetricIntervalUpperBound': 100.0, # The upper bound for the difference between the alarm threshold and the CloudWatch metric.
                'ScalingAdjustment': 1 # The amount by which to scale, based on the specified adjustment type. 
                                       # A positive value adds to the current capacity while a negative number removes from the current capacity.
            },
        ],
        # 'MinAdjustmentMagnitude': 1, # The minimum number of instances to scale. - only for 'PercentChangeInCapacity'
        'Cooldown': 120,
        'MetricAggregationType': 'Average', # 'Minimum'|'Maximum'
    }
)

Scheduled scaling

You can use this option when you know that the demand follows a particular schedule in the day, week, month, or year. This helps you specify a one-time schedule or a recurring schedule or cron expressions along with start and end times, which form the boundaries of when the autoscaling action starts and stops. See the following code:

#Example 4 - Scaling based on a certain schedule.
response = client.put_scheduled_action(
    ServiceNamespace='sagemaker',
    Schedule='at(2020-10-07T06:20:00)', # yyyy-mm-ddThh:mm:ss You can use one-time schedule, cron, or rate
    ScheduledActionName='ScheduledScalingTest',
    ResourceId=resource_id,
    ScalableDimension='sagemaker:variant:DesiredInstanceCount',
    #StartTime=datetime(2020, 10, 7), #Start date and time for when the schedule should begin
    #EndTime=datetime(2020, 10, 8), #End date and time for when the recurring schedule should end
    ScalableTargetAction={
        'MinCapacity': 2,
        'MaxCapacity': 3
    }
)

On-demand scaling

Use this option only when you want to increase or decrease the number of instances manually. This updates the endpoint weights and capacities without defining a trigger. See the following code:

response = client.update_endpoint_weights_and_capacities(EndpointName=endpoint_name,
                            DesiredWeightsAndCapacities=[
                                {
                                    'VariantName': 'string',
                                    'DesiredWeight': ...,
                                    'DesiredInstanceCount': 123
                                }
                            ])

Comparing scaling methods

Each of these methods, when successfully applied, results in the addition of instances to an already deployed Amazon SageMaker endpoint. When you make a request to update your endpoint with autoscaling configurations, the status of the endpoint moves to Updating. While the endpoint is in this state, other update operations on this endpoint fail. You can monitor the state by using the DescribeEndpoint API. There is no traffic interruption while instances are being added to or removed from an endpoint.

When creating an endpoint, we specify initial_instance_count; this value is only used at endpoint creation time. That value is ignored afterward, and autoscaling or on-demand scaling uses the change in desiredInstanceCount to set the instance count behind an endpoint.

Finally, if you do use UpdateEndpoint to deploy a new EndpointConfig to an endpoint, to retain the current number of instances, you should set RetainAllVariantProperties to true.

Considerations for designing an autoscaling policy to scale your ML workload

You should consider the following when designing an efficient autoscaling policy to minimize traffic interruptions and be cost-efficient:

  • Traffic patterns and metrics – Especially consider traffic patterns that involve invoking the inference logic. Then determine which metrics these traffic patterns affect the most. Or what metric is the inference logic sensitive to (such as GPUUtilization, CPUUtilization, MemoryUtilization, or Invocations) per instance? Is the inference logic GPU bound, memory bound, or CPU bound?
  • Custom metrics – If it’s a custom metric that needs to be defined based on the problem domain, we have the option of deploying a custom metrics collector. With a custom metrics collector, you have an additional option of fine-tuning the granularity of metrics collection and publishing.
  • Threshold – After we decide on our metrics, we need to decide on the threshold. In other words, how to detect the increase in load, based on the preceding metric, within a time window that allows for the addition of an instance and for your inference logic to be ready to serve inference. This consideration also governs the measure of the scale-in and scale-out cooldown period.
  • Autoscaling – Depending on the application logic’s tolerance to autoscaling, there should be a balance between over-provisioning and autoscaling. Depending on the workload, if you select a specialized instance such as Inferentia, the throughput gains might alleviate the need to autoscale to a certain degree.
  • Horizontal scaling – When we have these estimations, it’s time to consider one or more strategies that we enlist in this post to deploy for horizontal scaling. Some work particularly well in certain situations. For example, we strongly recommend that you use a target tracking scaling policy to scale on a metric such as average CPU utilization or the SageMakerVariantInvocationsPerInstance metric. But a good guideline is to empirically derive an apt scaling policy based on your particular workload and above factors. You can start with a simple target tracking scaling policy, and you still have the option to use step scaling as an additional policy for a more advanced configuration. For example, you can configure a more aggressive response when demand reaches a certain level.

Retrieving your scaling activity log

When you want to see all the scaling policies attached to your Amazon SageMaker endpoint, you can use describe_scaling_policies, which helps you understand and debug the different scaling configurations’ behavior:

response = client.describe_scaling_policies(
    ServiceNamespace='sagemaker'
)

for i in response['ScalingPolicies']:
    print('')
    pp.pprint(i['PolicyName'])
    print('')
    if('TargetTrackingScalingPolicyConfiguration' in i):
        pp.pprint(i['TargetTrackingScalingPolicyConfiguration']) 
    else:
        pp.pprint(i['StepScalingPolicyConfiguration'])
    print('')

Conclusion

For models facing unpredictable traffic, Amazon SageMaker autoscaling helps economically respond to the demand and removes the undifferentiated heavy lifting of managing the inference infrastructure. One of the best practices of model deployment is to perform load testing. Determine the appropriate thresholds for your scaling policies and choose metrics based on load testing. For more information about load testing, see Amazon EC2 Testing Policy and Load test and optimize an Amazon SageMaker endpoint using automatic scaling.

References

For additional references, see the following:


About the Authors

Chaitanya Hazarey is a Machine Learning Solutions Architect with the Amazon SageMaker Product Management team. He focuses on helping customers design and deploy end-to-end ML pipelines in production on AWS. He has set up multiple such workflows around problems in the areas of NLP, Computer Vision, Recommender Systems, and AutoML Pipelines.


Pavan Kumar Sunder is a Senior R&D Engineer with Amazon Web Services. He provides technical guidance and helps customers accelerate their ability to innovate through showing the art of the possible on AWS. He has built multiple prototypes around AI/ML, IoT, and Robotics for our customers.


Rama Thamman is a Software Development Manager with the AI Platforms team, leading the ML Migrations team.

Read More

What’s around the turn in 2021? AWS DeepRacer League announces new divisions, rewards, and community leagues

What’s around the turn in 2021? AWS DeepRacer League announces new divisions, rewards, and community leagues

AWS DeepRacer allows you to get hands on with machine learning (ML) through a fully autonomous 1/18th scale race car driven by reinforcement learning, a 3D racing simulator on the AWS DeepRacer console, a global racing league, and hundreds of customer-initiated community races.

The action is already underway at the Championship Cup at AWS re:Invent 2020, with the Wildcard round of racing coming to a close and Round 1 Knockouts officially underway, streaming live on Twitch (updated schedule coming soon). Check out the Championship Cup blog for up-to-date news and schedule information.

We’ve got some exciting announcements about the upcoming 2021 racing season. The AWS DeepRacer League is introducing new skill-based Open and Pro racing divisions in March 2021, with five times as many opportunities for racers to win prizes, and recognition for participation and performance. Another exciting new feature coming in 2021 is the expansion of community races into community leagues, enabling organizations and racing enthusiasts to set up their own racing leagues and race with their friends over multiple races. But first, we’ve got a great deal for racers in December!

December ‘tis the season for racing

Start your engines and hit the tracks in December for less! We’re excited to announce that starting Dec 1, 2020 through Dec. 31, 2020 we’re reducing the cost of training and evaluation for AWS DeepRacer by over 70% (from $3.50 to $1 per hour) for the duration of AWS re:Invent 2020. It’s a great time to learn, compete, and get excited for what’s coming up next year.]

Introducing new racing divisions and digital rewards in 2021

The AWS DeepRacer League’s 2021 season will introduce new skill-based Open and Pro racing divisions. The new racing divisions include five times as many opportunities for racers of all skill levels to win prizes and recognition for participation and performance. AWS DeepRacer League’s new Open and Pro divisions enable all participants to win prizes by splitting the current Virtual Circuit monthly leaderboard into two skill-based divisions to level the competition, each with their own prizes, while maintaining a high level of competitiveness in the League.

The Open division is where all racers begin their ML journey and rewards participation each month with new vehicle customizations and other rewards. Racers can earn their way into the Pro division each month by finishing in the top 10 percent of time trial results. The Pro division celebrates competition and accomplishment with DeepRacer merchandise, DeepRacer Evo cars, exclusive prizes, and qualification to the Championship Cup at re:Invent 2021.

Similar to previous seasons, winners of the Pro division’s monthly race automatically qualify for the Championship Cup with an all-expenses paid trip to re:Invent 2021 for a chance to lift the 2021 Cup, receive a $10,000 machine learning education scholarship, and an F1 Grand Prix experience for two. Starting with the 2021 Virtual Circuit Pre-Season, racers can win multiple prizes each month—including dozens of customizations to personalize your car in the Virtual Circuit (such as car bodies, paint colors, and wraps), several official AWS DeepRacer branded items (such as racing jackets, hats, and shirts), and hundreds of DeepRacer Evo cars, complete with stereo cameras and LiDAR.

Participating in Open and Pro Division races can earn you new digital rewards, like this new racing skin for your virtual racing fun!

“The DeepRacer League has been a fantastic way for thousands of people to test out their newly learnt machine learning skills.“ says AWS Hero and AWS Machine Learning Community Founder, Lyndon Leggate. “Everyone’s competitive spirit quickly shows through and the DeepRacer community has seen tremendous engagement from members keen to learn from each other, refine their skills, and move up the ranks. The new 2021 league format looks incredible and the Open and Pro divisions bring an interesting new dimension to racing! It’s even more fantastic that everyone will get more chances for their efforts to be rewarded, regardless of how long they’ve been racing. This will make it much more engaging for everyone and I can’t wait to take part!”

Empowering organizations to create their own leagues with multi-race seasons and admin tools

With events flourishing around the globe virtually, we’ll soon offer the ability for racers to not only create their own race, but also create multiple races, similar to the monthly Virtual Circuit, with community leagues. Race organizers will be able to set up the whole season, decide on qualification rounds, and use bracket elimination for head-to-head races finalists.

Organizations and individuals can race with their friends and colleagues with Community races.

The new series of tools enables race organizers to run their own events, including access to racer information, model training details, and logs to engage with their audience and develop learnings from participants. Over the past year, organizations such as Capital One, JPMC, Accenture, and Moody’s have already successfully managed internal AWS DeepRacer leagues. Now, even more organizations, schools, companies, and private groups of friends can use AWS DeepRacer and the community leagues as a fun learning tool to actively develop their ML skills.

“We have observed huge participation and interest in AWS DeepRacer events,” says Chris Thomas, Managing Director of Technology & Innovation at Moody’s Accelerator. “They create opportunities for employees to challenge themselves, collaborate with colleagues, and enhance ML skills. We view this as a success from the tech side with the additional benefit of growing our innovation culture.“

AWS re:Invent is a great time to learn more about ML

As you get ready for what’s in store for 2021, don’t forget that registration is still open for re:Invent 2020. Be sure to check out our three informative virtual sessions to help you along your ML journey with AWS DeepRacer:Get rolling with Machine Learning on AWS DeepRacer”, “Shift your Machine Learning model into overdrive with AWS DeepRacer analysis tools” and “Replicate AWS DeepRacer architecture to master the track with SageMaker Notebooks.” You can take all the courses during re:Invent or learn at your own speed. It’s up to you. Register for re:Invent today and find out more on when these sessions are available to watch live or on-demand. 

Start training today and get ready for the 2021 season

Remember to take advantage of the December cost reductions for training and evaluation for AWS DeepRacer by over 70% (from $3.50 to $1 per hour) for the duration of AWS re:Invent 2020. Take advantage of these low rates today and get ready for the AWS DeepRacer League 2021 season. Now is a great time to get rolling with ML and AWS DeepRacer. Watch this page for schedule and video updates all through AWS re:Invent 2020. Let’s get ready to race!


About the Author

Dan McCorriston is a Senior Product Marketing Manager for AWS Machine Learning. He is passionate about technology, collaborating with developers, and creating new methods of expanding technology education. Out of the office he likes to hike, cook and spend time with his family.

Read More

Experiments with the ICML 2020 Peer-Review Process

Experiments with the ICML 2020 Peer-Review Process

This post is cross-listed on hunch.net 

The International Conference on Machine Learning (ICML) is a flagship machine learning conference that in 2020 received 4,990 submissions and managed a pool of 3,931 reviewers and area chairs. Given that the stakes in the review process are high — the careers of researchers are often significantly affected by the publications in top venues — we decided to scrutinize several components of the peer-review process in a series of experiments. Specifically, in conjunction with the ICML 2020 conference, we performed three experiments that target: resubmission policies, management of reviewer discussions, and reviewer recruiting. In this post, we summarize the results of these studies.

Resubmission Bias

Motivation. Several leading ML and AI conferences have recently started requiring authors to declare previous submission history of their papers. In part, such measures are taken to reduce the load on reviewers by discouraging resubmissions without substantial changes. However, this requirement poses a risk of bias in reviewers’ evaluations.

Research question. Do reviewers get biased when they know that the paper they are reviewing was previously rejected from a similar venue?

Procedure. We organized an auxiliary conference review process with 134 junior reviewers from 5 top US schools and 19 papers from various areas of ML. We assigned participants 1 paper each and asked them to review the paper as if it was submitted to ICML. Unbeknown to participants, we allocated them to a test or control condition uniformly at random:

  • Control. Participants review the papers as usual.
  • Test. Before reading the paper, participants are told that the paper they review is a resubmission.

Hypothesis. We expect that if the bias is present, reviewers in the test condition should be harsher than in the control. 

Key findings. Reviewers give almost one point lower score (95% Confidence Interval: [0.24, 1.30]) on a 10-point Likert item for the overall evaluation of a paper when they are told that a paper is a resubmission. In terms of narrower review criteria, reviewers tend to underrate “Paper Quality” the most.

Implications. Conference organizers need to evaluate a trade-off between envisaged benefits such as the hypothetical reduction in the number of submissions and the potential unfairness introduced to the process by the resubmission bias. One option to reduce the bias is to postpone the moment in which the resubmission signal is revealed until after the initial reviews are submitted. This finding must also be accounted for when deciding whether the reviews of rejected papers should be publicly available on systems like openreview.net and others. 

Details. http://arxiv.org/abs/2011.14646

Herding Effects in Discussions

Motivation. Past research on human decision making shows that group discussion is susceptible to various biases related to social influence. For instance, it is documented that the decision of a group may be biased towards the opinion of the group member who proposes the solution first. We call this effect herding and note that, in peer review, herding (if present) may result in undesirable artifacts in decisions as different area chairs use different strategies to select the discussion initiator.

Research question. Conditioned on a set of reviewers who actively participate in a discussion of a paper, does the final decision of the paper depend on the order in which reviewers join the discussion?

Procedure. We performed a randomized controlled trial on herding in ICML 2020 discussions that involved about 1,500 papers and 2,000 reviewers. In peer review, the discussion takes place after the reviewers submit their initial reviews, so we know prior opinions of reviewers about the papers. With this information, we split a subset of ICML papers into two groups uniformly at random and applied different discussion-management strategies to them: 

  • Positive Group. First ask the most positive reviewer to start the discussion, then later ask the most negative reviewer to contribute to the discussion.
  • Negative Group. First ask the most negative reviewer to start the discussion, then later ask the most positive reviewer to contribute to the discussion.

Hypothesis. The only difference between the strategies is the order in which reviewers are supposed to join the discussion. Hence, if the herding is absent, the strategies will not impact submissions from the two groups disproportionately. However, if the herding is present, we expect that the difference in the order will introduce a difference in the acceptance rates across the two groups of papers.

Key findings. The analysis of outcomes of approximately 1,500 papers does not reveal a statistically significant difference in acceptance rates between the two groups of papers. Hence, we find no evidence of herding in the discussion phase of peer review.

Implications. Regarding the concern of herding which is found to occur in other applications involving people, discussion in peer review does not seem to be susceptible to this effect and hence no specific measures to counteract herding in peer-review discussions are needed.

Details. https://arxiv.org/abs/2011.15083

Novice Reviewer Recruiting

Motivation.  A surge in the number of submissions received by leading ML and  AI conferences has challenged the sustainability of the review process by increasing the burden on the pool of qualified reviewers. Leading conferences have been addressing the issue by relaxing the seniority bar for reviewers and inviting very junior researchers with limited or no publication history, but there is mixed evidence regarding the impact of such interventions on the quality of reviews. 

Research question. Can very junior reviewers be recruited and guided such that they enlarge the reviewer pool of leading ML and AI conferences without compromising the quality of the process?

Procedure. We implemented a twofold approach towards managing novice reviewers:

  • Selection. We evaluated reviews written in the aforementioned auxiliary conference review process involving 134 junior reviewers, and invited 52 of these reviewers who produced the strongest reviews to join the reviewer pool of ICML 2020. Most of these 52 “experimental” reviewers come from the population not considered by the conventional way of reviewer recruiting used in ICML 2020.
  • Mentoring. In the actual conference, we provided these experimental reviewers with a senior researcher as a point of contact who offered additional mentoring.

Hypothesis. If our approach allows to bring strong reviewers to the pool, we expect experimental reviewers to perform at least as good as reviewers from the main pool on various metrics, including the quality of reviews as rated by area chairs.

Key findings. A combination of the selection and mentoring mechanisms results in reviews of at least comparable and on some metrics even higher-rated quality as compared to the conventional pool of reviews: 30% of reviews written by the experimental reviewers exceeded the expectations of area chairs (compared to only 14% for the main pool).

Implications. The experiment received positive feedback from participants who appreciated the opportunity to become a reviewer in ICML 2020 and from authors of papers used in the auxiliary review process who received a set of useful reviews without submitting to a real conference. Hence, we believe that a promising direction is to replicate the experiment at a larger scale and evaluate the benefits of each component of our approach.

Details. http://arxiv.org/abs/2011.15050

Conclusion

All in all, the experiments we conducted in ICML 2020 reveal some useful and actionable insights about the peer-review process. We hope that some of these ideas will help to design a better peer-review pipeline in future conferences.

We thank ICML area chairs, reviewers, and authors for their tremendous efforts. We would also like to thank the Microsoft Conference Management Toolkit (CMT) team for their continuous support and implementation of features necessary to run these experiments, the authors of papers contributed to the auxiliary review process for their responsiveness, and participants of the resubmission bias experiment for their enthusiasm. Finally, we thank Ed Kennedy and Devendra Chaplot for their help with designing and executing the experiments.

The post is based on joint works with Nihar B. Shah, Aarti Singh, Hal Daumé III, and Charvi Rastogi.

Read More

Private package installation in Amazon SageMaker running in internet-free mode

Private package installation in Amazon SageMaker running in internet-free mode

Amazon SageMaker Studio notebooks and Amazon SageMaker notebook instances are internet-enabled by default. However, many regulated industries, such as financial industries, healthcare, telecommunications, and others, require that network traffic traverses their own Amazon Virtual Private Cloud (Amazon VPC) to restrict and control which traffic can go through public internet. Although you can disable direct internet access to Sagemaker Studio notebooks and notebook instances, you need to ensure that your data scientists can still gain access to popular packages. Therefore, you may choose to build your own isolated dev environments that contain your choice of packages and kernels.

In this post, we learn how to set up such an environment for Amazon SageMaker notebook instances and SageMaker Studio. We also describe how to integrate this environment with AWS CodeArtifact, which is a fully managed artifact repository that makes it easy for organizations of any size to securely store, publish, and share software packages used in your software development process.

Solution overview

In this post, we cover the following steps: 

  1. Set up the Amazon SageMaker for internet-free mode.
  2. Set up the Conda repository using Amazon Simple Storage Service (Amazon S3). You create a bucket that hosts your Conda channels.
  3. Set up the Python Package Index (PyPI) repository using CodeArtifact. You create a repository and set up AWS PrivateLink endpoints for CodeArtifact.
  4. Build an isolated dev environment with Amazon SageMaker notebook instances. In this step, you use the lifecycle configuration feature to build a custom Conda environment and configure your PyPI client.
  5. Install packages in SageMaker Studio notebooks. In this last step, you can create a custom Amazon SageMaker image and install the packages through Conda or pip client.

Setting up Amazon SageMaker for internet-free mode

We assume that you have already set up a VPC that lets you provision a private, isolated section of the AWS Cloud where you can launch AWS resources in a virtual network. You use it to host Amazon SageMaker and other components of your data science environment. For more information about building secure environments or well-architected pillars, see the following whitepaper, Financial Services Industry Lens: AWS Well-Architected Framework.

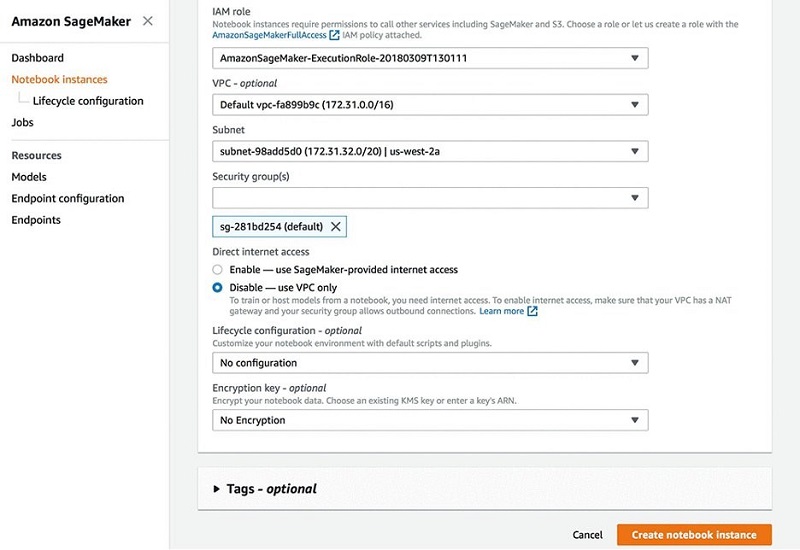
Creating an Amazon SageMaker notebook instance

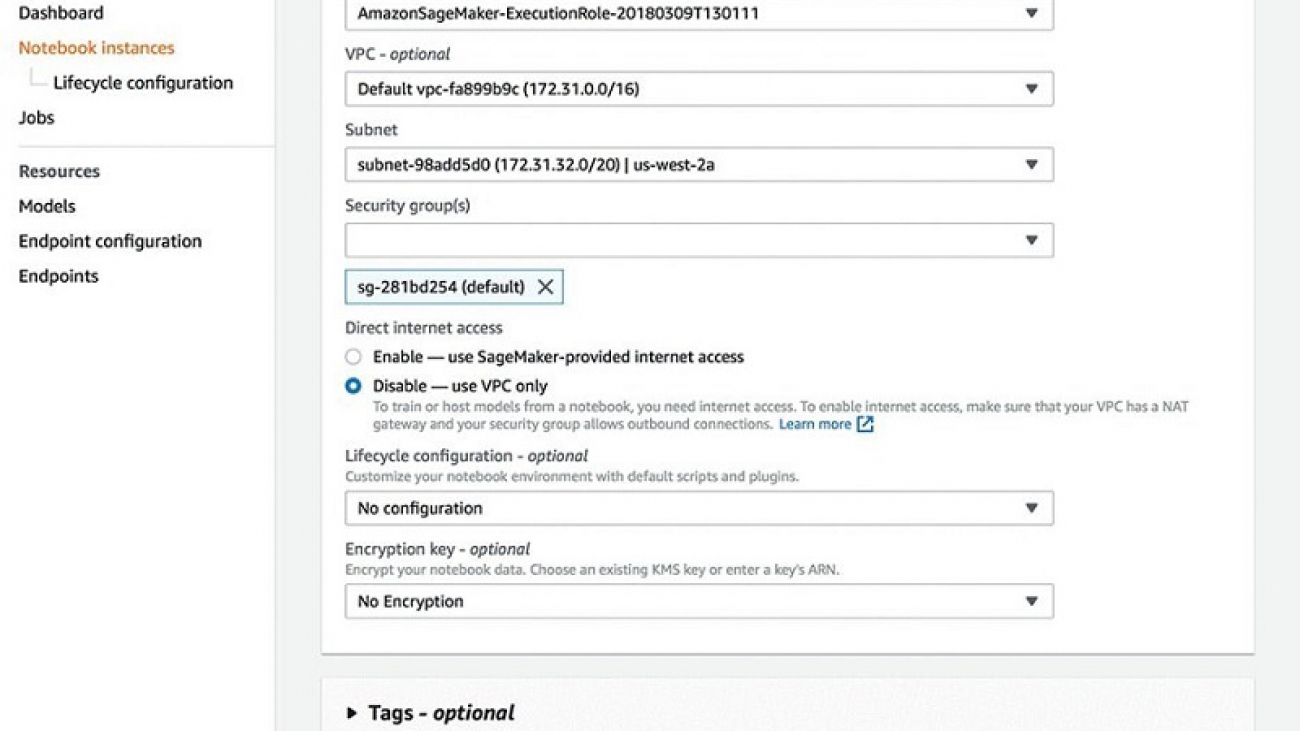
You can disable internet access for Amazon SageMaker notebooks, and also associate them to your secure VPC environment, which allows you to apply network-level control, such as access to resources through security groups, or to control ingress and egress traffic of data.

  1. On the Amazon SageMaker console, choose Notebook instances in the navigation pane.
  2. Choose Create notebook instance.
  3. For IAM role, choose your role.
  4. For VPC, choose your VPC.
  5. For Subnet, choose your subnet.
  6. For Security groups(s), choose your security group.
  7. For Direct internet access, select Disable — use VPC only.
  8. Choose Create notebook instance.

  1. Connect to your notebook instance from your VPC instead of connecting over the public internet.

Amazon SageMaker notebook instances support VPC interface endpoints. When you use a VPC interface endpoint, communication between your VPC and the notebook instance is conducted entirely and securely within the AWS network instead of the public internet. For instructions, see Creating an interface endpoint.

Setting up SageMaker Studio

Similar to Amazon SageMaker notebook instances, you can launch SageMaker Studio in a VPC of your choice, and also disable direct internet access to add an additional layer of security.

  1. On the Amazon SageMaker console, choose Amazon SageMaker Studio in the navigation pane.
  2. Choose Standard setup.
  3. To disable direct internet access, in the Network section, select the VPC only network access type for when you onboard to Studio or call the CreateDomain API.

Doing so prevents Amazon SageMaker from providing internet access to your SageMaker Studio notebooks.

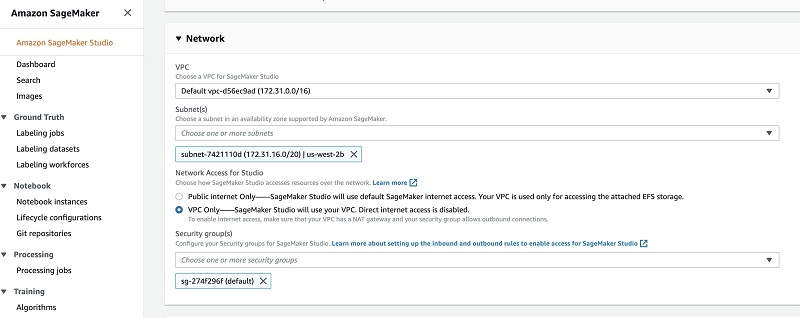
  1. Create interface endpoints (via AWS PrivateLink) to access the following (and other AWS services you may require):
    1. Amazon SageMaker API
    2. Amazon SageMaker runtime
    3. Amazon S3
    4. AWS Security Token Service (AWS STS)
    5. Amazon CloudWatch

Setting up a custom Conda repository using Amazon S3

Amazon SageMaker notebooks come with multiple environments already installed. The different Jupyter kernels in Amazon SageMaker notebooks are separate Conda environments. If you want to use an external library in a specific kernel, you can install the library in the environment for that kernel. This is typically done using conda install. When you use a conda command to install a package, Conda environment searches a set of default channels, which are usually online or remote channels (URLs) that host the Conda packages. However, because we assume the notebook instances don’t have internet access, we modify those Conda channel paths to a private repository where our packages are stored.

  1. Build such custom channel is to create a bucket in Amazon S3.
  2. Copy the packages into the bucket.

These packages can be either approved packages among the organization or the custom packages built using conda build. These packages need to be indexed periodically or as soon as there is an update. The methods to index packages are out of scope of this post.

Because we set up the notebook to not allow direct internet access, the notebook can’t connect to the S3 buckets that contain the channels unless you create a VPC endpoint.

  1. Create an Amazon S3 VPC endpoint to send the traffic through the VPC instead of the public internet.

By creating a VPC endpoint, you allow your notebook instance to access the bucket where you stored the channels and its packages.

  1. We recommend that you also create a custom resource-based bucket policy that allows only requests from your private VPC to access to your S3 buckets. For instructions, see Endpoints for Amazon S3.
  2. Replace the default channels of the Conda environment in your Amazon SageMaker notebooks with your custom channel (we do that in the next step when we build the isolated dev environment):
    # remove default channel from the .condarc
    conda config --remove channels 'defaults'
    # add the conda channels to the .condarc file
    conda config --add channels 's3://user-conda-repository/main/'
    conda config --add channels 's3://user-conda-repository/condaforge/'

Setting up a custom PyPI repository using CodeArtifact

Data scientists typically use package managers such as pip, maven, npm, and others to install packages into their environments. By default, when you use pip to install a package, it downloads the package from the public PyPI repository. To secure your environment, you can use private package management tools either on premises, such as Artifactory or Nexus, or on AWS, such as CodeArtifact. This allows you to allow access only to approved packages and perform safety checks. Alternatively, you may choose use a private PyPI mirror set up on Amazon Elastic Container Service (Amazon ECS) or AWS Fargate to mirror the public PyPI repository in your private environment. For more information on this approach, see Building Secure Environments.

If you want to use pip to install Python packages, you can use CodeArtifact to control access to and validate the safety of the Python packages. CodeArtifact is a managed artifact repository service to help developers and organizations securely store and share the software packages used in your development, build, and deployment processes. The CodeArtifact integration with AWS Identity and Access Management (IAM), support for AWS CloudTrail, and encryption with AWS Key Management Service (AWS KMS) gives you visibility and the ability to control who has access to the packages.

You can configure CodeArtifact to fetch software packages from public repositories such as PyPI. PyPI helps you find and install software developed and shared by the Python community. When you pull a package from PyPI, CodeArtifact automatically downloads and stores application dependencies from the public repositories, so recent versions are always available to you.

Creating a repository for PyPI

You can create a repository using the CodeArtifact console or the AWS Command Line Interface (AWS CLI). Each repository is associated with the AWS account that you use when you create it. The following screenshot shows the view of choosing your AWS account on the CodeArtifact console.

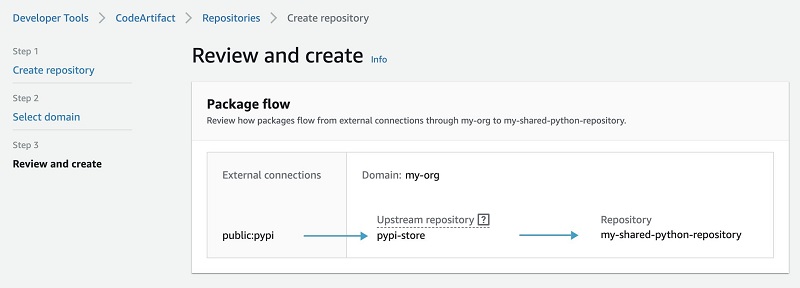
A repository can have one or more CodeArtifact repository associated with it as an upstream repository. It can facilitate two needs.

Firstly, it allows a package manager client to access the packages contained in more than one repository using a single URL endpoint.

Secondly, when you create a repository, it doesn’t contain any packages. If an upstream repository has an external connection to a public repository, the repositories that are downstream from it can pull packages from that public repository. For example, the repository my-shared-python-repository has an upstream repository named pypi-store, which acts as an intermediate repository that connects your repository to an external connection (your PyPI repository). In this case, a package manager that is connected to my-shared-python-repository can pull packages from the PyPI public repository. The following screenshot shows this package flow.

For instructions on creating a CodeArtifact repository, see Software Package Management with AWS CodeArtifact.

Because we disable internet access for the Amazon SageMaker notebooks, in the next section, we set up AWS PrivateLink endpoints to make sure all the traffic for installing the package in the notebooks traverses through the VPC.

Setting up AWS PrivateLink endpoints for CodeArtifact

You can configure CodeArtifact to use an interface VPC endpoint to improve the security of your VPC. When you use an interface VPC endpoint, you don’t need an internet gateway, NAT device, or virtual private gateway. To create VPC endpoints for CodeArtifact, you can use the AWS CLI or Amazon VPC console. For this post, we use the Amazon Elastic Compute Cloud (Amazon EC2) create-vpc-endpoint AWS CLI command. The following two VPC endpoints are required so that all requests to CodeArtifact are in the AWS network.

The following command creates an endpoint to access CodeArtifact repositories:

aws ec2 create-vpc-endpoint --vpc-id vpcid --vpc-endpoint-type Interface 
  --service-name com.amazonaws.region.codeartifact.api --subnet-ids subnetid 
  --security-group-ids groupid

The following command creates an endpoint to access package managers and build tools:

aws ec2 create-vpc-endpoint --vpc-id vpcid --vpc-endpoint-type Interface 
  --service-name com.amazonaws.region.codeartifact.repositories --subnet-ids subnetid 
  --security-group-ids groupid --private-dns-enabled

CodeArtifact uses Amazon S3 to store package assets. To pull packages from CodeArtifact, you must create a gateway endpoint for Amazon S3. See the following code:

aws ec2 create-vpc-endpoint --vpc-id vpcid --service-name com.amazonaws.region.s3 
  --route-table-ids routetableid

Building your dev environment

Amazon SageMaker periodically updates the Python and dependency versions in the environments installed on the Amazon SageMaker notebook instances (when you stop and start) or in the images launched in SageMaker Studio. This might cause some incompatibility if you have your own managed package repositories and dependencies. You can freeze your dependencies in internet-free mode so that:

  • You’re not affected by periodic updates from Amazon SageMaker to the base environment
  • You have better control over the dependencies in your environments and can get ample time to update or upgrade your dependencies

Using Amazon SageMaker notebook instancesartifcat

To create your own dev environment with specific versions of Python and dependencies, you can use lifecycle configuration scripts. A lifecycle configuration provides shell scripts that run only when you create the notebook instance or whenever you start one. When you create a notebook instance, you can create a new lifecycle configuration and the scripts it uses or apply one that you already have. Amazon SageMaker has a lifecycle config script sample that you can use and modify to create isolated dependencies as described earlier. With this script, you can do the following:

  • Build an isolated installation of Conda
  • Create a Conda environment with it
  • Make the environment available as a kernel in Jupyter

This makes sure that dependencies in that kernel aren’t affected by the upgrades that Amazon SageMaker periodically roles out to the underlying AMI. This script installs a custom, persistent installation of Conda on the notebook instance’s EBS volume, and ensures that these custom environments are available as kernels in Jupyter. We add Conda and CodeArtifact configuration to this script.

The on-create script downloads and installs a custom Conda installation to the EBS volume via Miniconda. Any relevant packages can be installed here.

  1. Set up CodeArtifact.
  2. Set up your Conda channels.
  3. Install ipykernel to make sure that the custom environment can be used as a Jupyter kernel.
  4. Make sure the notebook instance has internet connectivity to download the Miniconda installer.

The on-create script installs the ipykernel library so you can use create custom environments as Jupyter kernels, and uses pip install and conda install to install libraries. You can adapt the script to create custom environments and install the libraries that you want. Amazon SageMaker doesn’t update these libraries when you stop and restart the notebook instance, so you can make sure that your custom environment has specific versions of libraries that you want. See the following code:

#!/bin/bash

 set -e
 sudo -u ec2-user -i <<'EOF'
 unset SUDO_UID

 # Configure common package managers to use CodeArtifact
 aws codeartifact login --tool pip --domain my-org --domain-owner <000000000000> --repository  my-shared-python-repository  --endpoint-url https://vpce-xxxxx.api.codeartifact.us-east-1.vpce.amazonaws.com 

 # Install a separate conda installation via Miniconda
 WORKING_DIR=/home/ec2-user/SageMaker/custom-miniconda
 mkdir -p "$WORKING_DIR"
 wget https://repo.anaconda.com/miniconda/Miniconda3-4.6.14-Linux-x86_64.sh -O "$WORKING_DIR/miniconda.sh"
 bash "$WORKING_DIR/miniconda.sh" -b -u -p "$WORKING_DIR/miniconda" 
 rm -rf "$WORKING_DIR/miniconda.sh"

 # Create a custom conda environment
 source "$WORKING_DIR/miniconda/bin/activate"

 # remove default channel from the .condarc 
 conda config --remove channels 'defaults'
 # add the conda channels to the .condarc file
 conda config --add channels 's3://user-conda-repository/main/'
 conda config --add channels 's3://user-conda-repository/condaforge/'

 KERNEL_NAME="custom_python"
 PYTHON="3.6"

 conda create --yes --name "$KERNEL_NAME" python="$PYTHON"
 conda activate "$KERNEL_NAME"

 pip install --quiet ipykernel

 # Customize these lines as necessary to install the required packages
 conda install --yes numpy
 pip install --quiet boto3

 EOF

The on-start script uses the custom Conda environment created in the on-create script, and uses the ipykernel package to add that as a kernel in Jupyter, so that they appear in the drop-down list in the Jupyter New menu. It also logs in to CodeArtifact to enable installing the packages from the custom repository. See the following code:

#!/bin/bash

set -e

sudo -u ec2-user -i <<'EOF'
unset SUDO_UID

# Get pip artifact
/home/ec2-user/SageMaker/aws/aws codeartifact login --tool pip --domain <my-org> --domain-owner <xxxxxxxxx> --repository  <my-shared-python-repository.  --endpoint-url <https://vpce-xxxxxxxx.api.codeartifact.us-east-1.vpce.amazonaws.com> 

WORKING_DIR=/home/ec2-user/SageMaker/custom-miniconda/
source "$WORKING_DIR/miniconda/bin/activate"

for env in $WORKING_DIR/miniconda/envs/*; do
    BASENAME=$(basename "$env")
    source activate "$BASENAME"
    python -m ipykernel install --user --name "$BASENAME" --display-name "Custom ($BASENAME)"
done


EOF

echo "Restarting the Jupyter server.."
restart jupyter-server

CodeArtifact authorization tokens are valid for a default period of 12 hours. You can add a cron job to the on-start script to refresh the token automatically, or log in to CodeArtifact again in the Jupyter notebook terminal.

Using SageMaker Studio notebooks

You can create your own custom Amazon SageMaker images in your private dev environment in SageMaker Studio. You can add the custom kernels, packages, and any other files required to run a Jupyter notebook in your image. It gives you the control and flexibility to do the following:

  • Install your own custom packages in the image
  • Configure the images to be integrated with your custom repositories for package installation by users

For example, you can install a selection of R or Python packages when building the image:

# Dockerfile
RUN conda install --quiet --yes 
    'r-base=4.0.0' 
    'r-caret=6.*' 
    'r-crayon=1.3*' 
    'r-devtools=2.3*' 
    'r-forecast=8.12*' 
    'r-hexbin=1.28*'

Or you can set up the Conda in the image to just use your own custom channels in Amazon S3 to install packages by changing the configuration of Conda channels:

# Dockerfile
RUN 
    # add the conda channels to the .condarc file
    conda config --add channels 's3://my-conda-repository/_conda-forge/' && 
    conda config --add channels 's3://my-conda-repository/main/' && 
    # remove defaults from the .condarc 
    conda config --remove channels 'defaults'

You should use the CodeArtifact login command in SageMaker Studio to fetch credentials for use with pip:

# PyPIconfig.py
# Configure common package managers to use CodeArtifact
 aws codeartifact login --tool pip --domain my-org --domain-owner <000000000000> --repository  my-shared-python-repository  --endpoint-url https://vpce-xxxxx.api.codeartifact.us-east-1.vpce.amazonaws.com 

CodeArtifact needs authorization tokens. You can add a cron job into the image to run the above command periodically. Alternatively, you can execute it manually when the notebooks get started. To make it simple for your users, you can add the preceding command to a shell script (such as PyPIConfig.sh) and copy the file into to the image to be loaded in SageMaker Studio. In your Dockerfile, add the following command:

# Dockerfile
COPY PyPIconfig.sh /home/PyPIconfig.sh

For ease of use, the PyPIconfig.sh is available in /home on SageMaker Studio. You can easily run it to configure your pip client in SageMaker Studio and fetch an authorization token from CodeArtifact using your AWS credentials.

Now, you can build and push your image into Amazon Elastic Container Repository (Amazon ECR). Finally, attach the image to multiple users (by attaching to a domain) or a single user (by attaching to the user’s profile) in SageMaker Studio. The following screenshot shows the configuration on the SageMaker Studio control panel.

For more information about building a custom image and attaching it to SageMaker Studio, see Bring your own custom SageMaker image tutorial.

Installing the packages

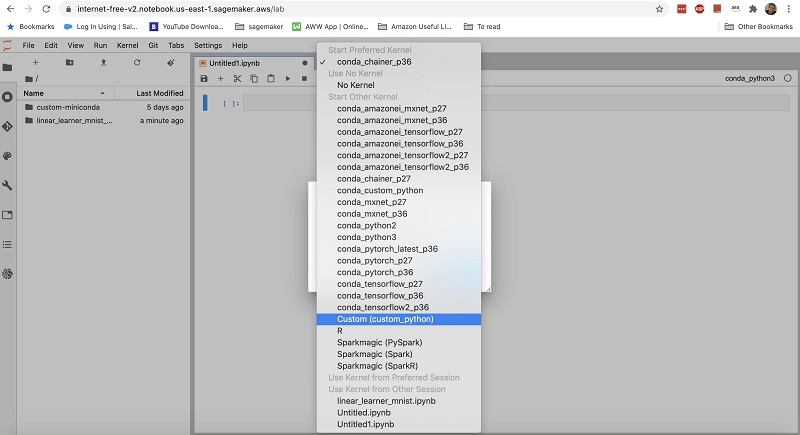
In Amazon SageMaker notebook instances, as soon as you start the Jupyter notebook, you see a new kernel in Jupyter in the drop-down list of kernels (see the following screenshot). This environment is isolated from other default Conda environments.

In your notebook, when you use pip install <package name>, the Python package manager client connects to your custom repository instead of the public repositories. Also, if you use conda install <package name>, the notebook instance uses the packages in your Amazon S3 channels to install it. See the following screenshot of this code.

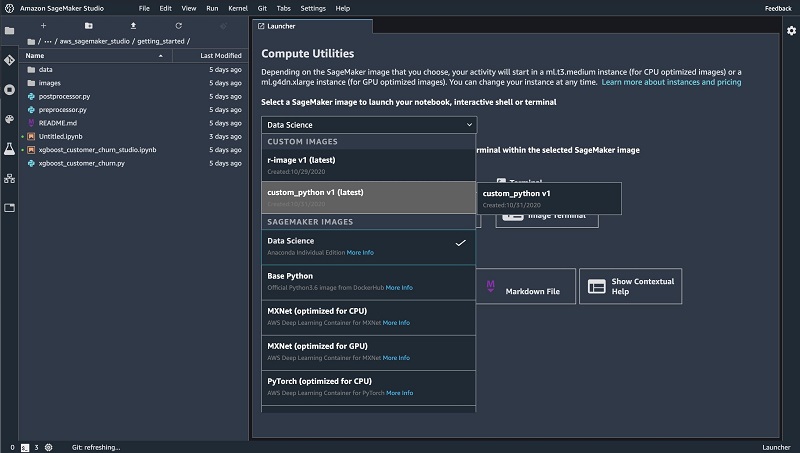
In SageMaker Studio, the custom images appear in the image selector dialog box of the SageMaker Studio Launcher. As soon as you select your own custom image, the kernel you installed in the image appears in the kernel selector dialog box. See the following screenshot.

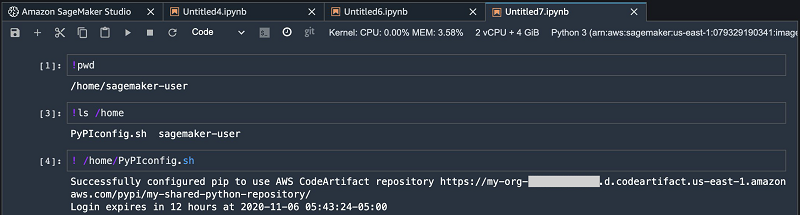
As mentioned before, CodeArtifact authorization tokens are valid for a default period of 12 hours. If you’re using CodeArtifact, you can open a terminal or notebook in SageMaker Studio and run the PyPIconfig.sh file to configure your client or refresh your expired token:

# Configure PyPI package managers to use CodeArtifact
 /home/pyPIconfig.sh

The following screenshot shows your view in SageMaker Studio.

Conclusion

This post demonstrated how to build a private environment for Amazon SageMaker notebook instances and SageMaker Studio to have better control over the dependencies in your environments. To build the private environment, we used the lifecycle configuration feature in notebook instances. The sample lifecycle config scripts are available on the GitHub repo. To install custom packages in SageMaker Studio, we built a custom image and attached it to SageMaker Studio. For more information about this feature, see Bringing your own custom container image to Amazon SageMaker Studio notebooks. For this solution, we used CodeArtifact, which makes it easy to build a PyPI repository for approved Python packages across the organization. For more information, see Software Package Management with AWS CodeArtifact.

Give the CodeArtifact a try, and share your feedback and questions in the comments.


About the Author

Saeed Aghabozorgi Ph.D. is senior ML Specialist in AWS, with a track record of developing enterprise level solutions that substantially increase customers’ ability to turn their data into actionable knowledge. He is also a researcher in the artificial intelligence and machine learning field.


Stefan Natu is a Sr. Machine Learning Specialist at AWS. He is focused on helping financial services customers build end-to-end machine learning solutions on AWS. In his spare time, he enjoys reading machine learning blogs, playing the guitar, and exploring the food scene in New York City.

Read More

Securing data analytics with an Amazon SageMaker notebook instance and Kerberized Amazon EMR cluster

Securing data analytics with an Amazon SageMaker notebook instance and Kerberized Amazon EMR cluster

Ever since Amazon SageMaker was introduced at AWS re:Invent 2017, customers have used the service to quickly and easily build and train machine learning (ML) models and directly deploy them into a production-ready hosted environment. SageMaker notebook instances provide a powerful, integrated Jupyter notebook interface for easy access to data sources for exploration and analysis. You can enhance the SageMaker capabilities by connecting the notebook instance to an Apache Spark cluster running on Amazon EMR. It gives data scientists and engineers a common instance with shared experience where they can collaborate on AI/ML and data analytics tasks.

If you’re using a SageMaker notebook instance, you may need a way to allow different personas (such as data scientists and engineers) to do different tasks on Amazon EMR with a secure authentication mechanism. For example, you might use the Jupyter notebook environment to build pipelines in Amazon EMR to transform datasets in the data lake, and later switch personas and use the Jupyter notebook environment to query the prepared data and perform advanced analytics on it. Each of these personas and actions may require their own distinct set of permissions to the data.

To address this requirement, you can deploy a Kerberized EMR cluster. Amazon EMR release version 5.10.0 and later supports MIT Kerberos, which is a network authentication protocol created by the Massachusetts Institute of Technology (MIT). Kerberos uses secret-key cryptography to provide strong authentication so passwords or other credentials aren’t sent over the network in an unencrypted format.

This post walks you through connecting a SageMaker notebook instance to a Kerberized EMR cluster using SparkMagic and Apache Livy. Users are authenticated with Kerberos Key Distribution Center (KDC), where they obtain temporary tokens to impersonate themselves as different personas before interacting with the EMR cluster with appropriately assigned privileges.

This post also demonstrates how a Jupyter notebook uses PySpark to download the COVID-19 database in CSV format from the Johns Hopkins GitHub repository. The data is transformed and processed by Pandas and saved to an S3 bucket in columnar Parquet format referenced by an Apache Hive external table hosted on Amazon EMR.

Solution walkthrough

The following diagram depicts the overall architecture of the proposed solution. A VPC with two subnets are created: one public, one private. For security reasons, a Kerberized EMR cluster is created inside the private subnet. It needs access to the internet to access data from the public GitHub repo, so a NAT gateway is attached to the public subnet to allow for internet access.

The Kerberized EMR cluster is configured with a bootstrap action in which three Linux users are created and Python libraries are installed (Pandas, requests, and Matplotlib).

You can set up Kerberos authentication a few different ways (for more information, see Kerberos Architecture Options):

  • Cluster dedicated KDC
  • Cluster dedicated KDC with Active Directory cross-realm trust
  • External KDC
  • External KDC integrated with Active Directory

The KDC can have its own user database or it can use cross-realm trust with an Active Directory that holds the identity store. For this post, we use a cluster dedicated KDC that holds its own user database. First, the EMR cluster has security configuration enabled to support Kerberos and is launched with a bootstrap action to create Linux users on all nodes and install the necessary libraries. A bash step is launched right after the cluster is ready to create HDFS directories for the Linux users with default credentials that are forced to change as soon as the users log in to the EMR cluster for the first time.

A SageMaker notebook instance is spun up, which comes with SparkMagic support. The Kerberos client library is installed and the Livy host endpoint is configured to allow for the connection between the notebook instance and the EMR cluster. This is done through configuring the SageMaker notebook instance’s lifecycle configuration feature. We provide sample scripts later in this post to illustrate this process.

Fine-grained user access control for EMR File System

The EMR File System (EMRFS) is an implementation of HDFS that all EMR clusters use for reading and writing regular files from Amazon EMR directly to Amazon Simple Storage Service (Amazon S3). The Amazon EMR security configuration enables you to specify the AWS Identity and Access Management (IAM) role to assume when a user or group uses EMRFS to access Amazon S3. Choosing the IAM role for each user or group enables fine-grained access control for EMRFS on multi-tenant EMR clusters. This allows different personas to be associated with different IAM roles to access Amazon S3.r 

Deploying the resources with AWS CloudFormation

You can use the provided AWS CloudFormation template to set up this architecture’s building blocks, including the EMR cluster, SageMaker notebook instance, and other required resources. The template has been successfully tested in the us-east-1 Region.

Complete the following steps to deploy the environment:

  1. Sign in to the AWS Management Console as an IAM power user, preferably an admin user.
  2. Choose Launch Stack to launch the CloudFormation template:

  1. Choose Next.

  1. For Stack name, enter a name for the stack (for example, blog).
  2. Leave the other values as default.
  3. Continue to choose Next and leave other parameters at their default.
  4. On the review page, select I acknowledge that AWS CloudFormation might create IAM resources with custom names.
  5. Choose Create stack.

Wait until the status of the stack changes from CREATE_IN_PROGRESS to CREATE_COMPLETE. The process usually takes about 10–15 minutes.

After the environment is complete, we can investigate what the template provisioned.

Notebook instance lifecycle configuration

Lifecycle configurations perform the following tasks to ensure a successful Kerberized authentication between the notebook and EMR cluster:

  • Configure the Kerberos client on the notebook instance
  • Configure SparkMagic to use Kerberos authentication

You can view your provisioned lifecycle configuration, SageEMRConfig, on the Lifecycle configuration page on the SageMaker console.

The template provisioned two scripts to start and create your notebook: start.sh and create.sh, respectively. The scripts replace {EMRDNSName} with your own EMR cluster primary node’s DNS hostname during the CloudFormation deployment.

EMR cluster security configuration

Security configurations in Amazon EMR are templates for different security setups. You can create a security configuration to conveniently reuse a security setup whenever you create a cluster. For more information, see Use Security Configurations to Set Up Cluster Security.

To view the EMR security configuration created, complete the following steps:

  1. On the Amazon EMR console, choose Security configurations.
  2. Expand the security configuration created. Its name begins with blog-securityConfiguration.

Two IAM roles are created as part of the solution in the CloudFormation template, one for each EMR user (user1 and user2). The two users are created during the Amazon EMR bootstrap action.

  1. Choose the role for user1, blog-allowEMRFSAccessForUser1.

The IAM console opens and shows the summary for the IAM role.

  1. Expand the policy attached to the role blog-emrFS-user1.

This is the S3 bucket the CloudFormation template created to store the COVID-19 datasets.

  1. Choose {} JSON.

You can see the policy definition and permissions to the bucket named blog-s3bucket-xxxxx.

  1. Return to the EMR security configuration.
  2. Choose the IAM policy for user2, blog-allowEMRFSAccessForUser2.
  3. Expand the policy attached to the role, blog-emrFS-user2.
  4. Choose {} JSON.

You can see the policy definition and permissions to the bucket named my-other-bucket.

Authenticating with Kerberos

To use these IAM roles, you authenticate via Kerberos from the notebook instance to the EMR cluster KDC. The authenticated user inherits the permissions associated with the policy of the IAM role defined in the Amazon EMR security configuration.

To authenticate with Kerberos in the SageMaker notebook instance, complete the following steps:

  1. On the SageMaker console, under Notebook, choose Notebook instances.
  2. Locate the instance named SageEMR.
  3. Choose Open JupyterLab.

  1. On the File menu, choose New.
  2. Choose Terminal.

  1. Enter kinit followed by the username user2.
  2. Enter the user’s password.

The initial default password is pwd2. The first time logging in, you’re prompted to change the password.

  1. Enter a new password.

  1. Enter klist to view the Kerbereos ticket for user2.

After your user is authenticated, they can access the resources associated with the IAM role defined in Amazon EMR.

Running the example notebook

To run your notebook, complete the following steps:

  1. Choose the Covid19-Pandas-Spark example notebook.

  1. Choose the Run (▶) icon to progressively run the cells in the example notebook.


When you reach the cell in the notebook to save the Spark DataFrame (sdf) to an internal hive table, you get an Access Denied error.

This step fails because the IAM role associated with Amazon EMR user2 doesn’t have permissions to write to the S3 bucket blog-s3bucket-xxxxx.

  1. Navigate back to the Terminal
  2. Enter kinit followed by the username user1.
  3. Enter the user’s password.

The initial default password is pwd1. The first time logging in, you’re prompted to change the password.

  1. Enter a new password.

  1. Restart the kernel.
  2. Run all cells in the notebook by choosing Kernel and choosing Restart Kernel and Run All Cells.

This re-establishes a new Livy session with the EMR cluster using the new Kerberos token for user1.

The notebook uses Pandas and Matplotlib to process and transform the raw COVID-19 dataset into a consumable format and visualize it.

The notebook also demonstrates the creation of a native Hive table in HDFS and an external table hosted on Amazon S3, which are queried by SparkSQL. The notebook is self-explanatory; you can follow the steps to complete the demo.

Restricting principal access to Amazon S3 resources in the IAM role

The CloudFormation template by default allows any principal to assume the role blog-allowEMRFSAccessForUser1. This is apparently too permissive. We need to further restrict the principals that can assume the role.

  1. On the IAM console, under Access management, choose Roles.
  2. Search for and choose the role blog-allowEMRFSAccessForUser1.

  1. On the Trust relationship tab, choose Edit trust relationship.

  1. Open a second browser window to look up your EMR cluster’s instance profile role name.

You can find the instance profile name on the IAM console by searching for the keyword instanceProfileRole. Typically, the name looks like <stack name>-EMRClusterinstanceProfileRole-xxxxx.

  1. Modify the policy document using the following JSON file, providing your own AWS account ID and the instance profile role name:
    {
        "Version": "2012-10-17",
        "Statement": [
            {
               "Effect": "Allow", 
    		 "Principal":{
      "AWS":[
               "arn:aws:iam::<account id>:role/<EMR Cluster instanceProfile Role name>"
            ]
    		 },
               "Action": "sts:AssumeRole"
            }
        ]
    }

  1. Return to the first browser window.
  2. Choose Update Trust Policy.

This makes sure that only the EMR cluster’s users are allowed to access their own S3 buckets.

Cleaning up

You can complete the following steps to clean up resources deployed for this solution. This also deletes the S3 bucket, so you should copy the contents in the bucket to a backup location if you want to retain the data for later use.

  1. On the CloudFormation console, choose Stacks.
  2. Select the slack deployed for this solution.
  3. Choose Delete.

Summary

We walked through the solution using a SageMaker notebook instance authenticated with a Kerberized EMR cluster via Apache Livy, and processed a public COVID-19 dataset with Pandas before saving it in Parquet format in an external Hive table. The table references the data hosted in an Amazon S3 bucket. We provided a CloudFormation template to automate the deployment of necessary AWS services for the demo. We strongly encourage you to use these managed and serverless services such as Amazon Athena and Amazon QuickSight for your specific use cases in production.


About the Authors

James Sun is a Senior Solutions Architect with Amazon Web Services. James has over 15 years of experience in information technology. Prior to AWS, he held several senior technical positions at MapR, HP, NetApp, Yahoo, and EMC. He holds a PhD from Stanford University.


Graham Zulauf is a Senior Solutions Architect. Graham is focused on helping AWS’ strategic customers solve important problems at scale.

Read More