Multi-model endpoints (MMEs) are a powerful feature of Amazon SageMaker designed to simplify the deployment and operation of machine learning (ML) models. With MMEs, you can host multiple models on a single serving container and host all the models behind a single endpoint. The SageMaker platform automatically manages the loading and unloading of models and scales resources based on traffic patterns, reducing the operational burden of managing a large quantity of models. This feature is particularly beneficial for deep learning and generative AI models that require accelerated compute. The cost savings achieved through resource sharing and simplified model management makes SageMaker MMEs an excellent choice for you to host models at scale on AWS.
Recently, generative AI applications have captured widespread attention and imagination. Customers want to deploy generative AI models on GPUs but at the same time are conscious of costs. SageMaker MMEs support GPU instances and is a great option for these types of applications. Today, we are excited to announce TorchServe support for SageMaker MMEs. This new model server support gives you the advantage of all the benefits of MMEs while still using the serving stack that TorchServe customers are most familiar with. In this post, we demonstrate how to host generative AI models, such as Stable Diffusion and Segment Anything Model, on SageMaker MMEs using TorchServe and build a language-guided editing solution that can help artists and content creators develop and iterate their artwork faster.
Solution overview
Language-guided editing is a common cross-industry generative AI use case. It can help artists and content creators work more efficiently to meet content demand by automating repetitive tasks, optimizing campaigns, and providing a hyper-personalized experience for the end customer. Businesses can benefit from increased content output, cost savings, improved personalization, and enhanced customer experience. In this post, we demonstrate how you can build language-assisted editing features using MME TorchServe that allow you to erase any unwanted object from an image and modify or replace any object in an image by supplying a text instruction.
The user experience flow for each use case is as follows:
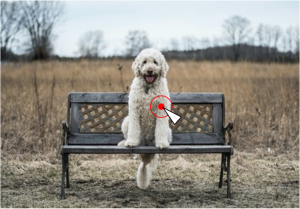
- To remove an unwanted object, the select the object from the image to highlight it. This action sends the pixel coordinates and the original image to a generative AI model, which generates a segmentation mask for the object. After confirming the correct object selection, you can send the original and mask images to a second model for removal. The detailed illustration of this user flow is demonstrated below.
|
|
|
|
| Step 1: Select an object (“dog”) from the image | Step 2: Confirm the correct object is highlighted | Step 3: Erase the object from the image |


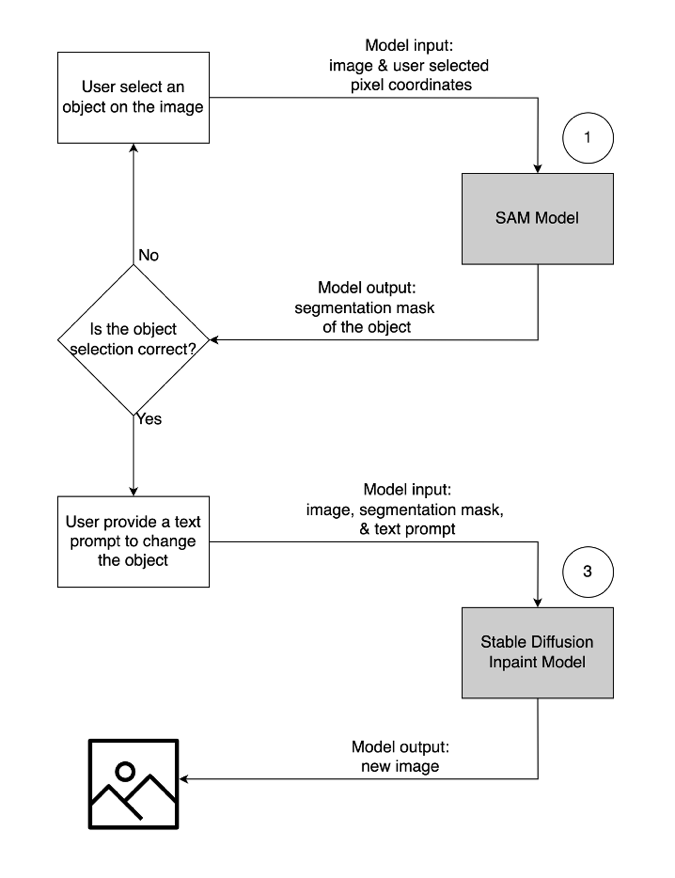
- To modify or replace an object, the select and highlight the desired object, following the same process as described above. Once you confirm the correct object selection, you can modify the object by supplying the original image, the mask, and a text prompt. The model will then change the highlighted object based on the provided instructions. A detailed illustration of this second user flow is as follows.
|
|
|
|
| Step 1: Select an object (“vase”) from the image | Step 2: Confirm the correct object is highlighted | Step 3: Provide a text prompt (“futuristic vase”) to modify the object |


To power this solution, we use three generative AI models: Segment Anything Model (SAM), Large Mask Inpainting Model (LaMa), and Stable Diffusion Inpaint (SD). Here are how these models been utilized in the user experience workflow:
| To remove an unwanted object | To modify or replace an object |
|
|
|
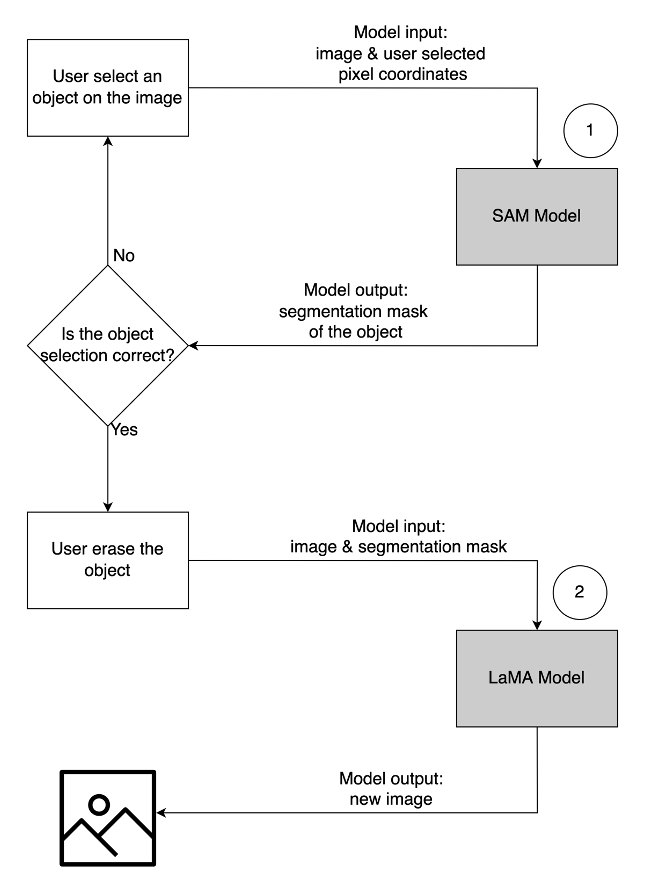
- Segment Anything Model (SAM) is used to generate a segment mask of the object of interest. Developed by Meta Research, SAM is an open-source model that can segment any object in an image. This model has been trained on a massive dataset known as SA-1B, which comprises over 11 million images and 1.1 billion segmentation masks. For more information on SAM, refer to their website and research paper.
- LaMa is used to remove any undesired objects from an image. LaMa is a Generative Adversarial Network (GAN) model specializes in fill missing parts of images using irregular masks. The model architecture incorporates image-wide global context and a single-step architecture that uses Fourier convolutions, enabling it to achieve state-of-the-art results at a faster speed. For more details on LaMa, visit their website and research paper.
- SD 2 inpaint model from Stability AI is used to modify or replace objects in an image. This model allows us to edit the object in the mask area by providing a text prompt. The inpaint model is based on the text-to-image SD model, which can create high-quality images with a simple text prompt. It provides additional arguments such as original and mask images, allowing for quick modification and restoration of existing content. To learn more about Stable Diffusion models on AWS, refer to Create high-quality images with Stable Diffusion models and deploy them cost-efficiently with Amazon SageMaker.
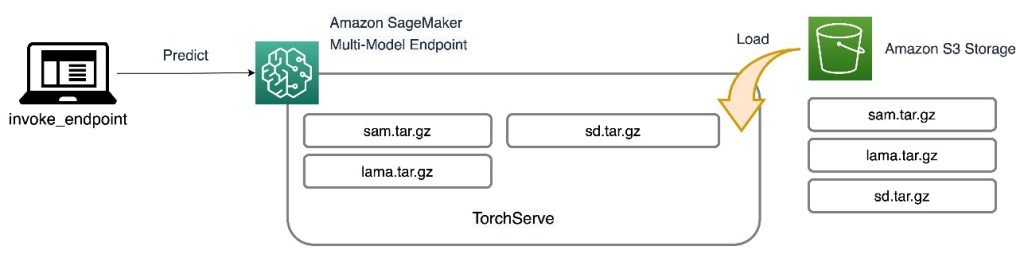
All three models are hosted on SageMaker MMEs, which reduces the operational burden from managing multiple endpoints. In addition to that, using MME eliminates concerns about certain models being underutilized because resources are shared. You can observe the benefit from improved instance saturation, which ultimately leads to cost savings. The following architecture diagram illustrates how all three models are served using SageMaker MMEs with TorchServe.
We have published the code to implement this solution architecture in our GitHub repository. To follow along with the rest of the post, use the notebook file. It is recommended to run this example on a SageMaker notebook instance using the conda_python3 (Python 3.10.10) kernel.
Extend the TorchServe container
The first step is to prepare the model hosting container. SageMaker provides a managed PyTorch Deep Learning Container (DLC) that you can retrieve using the following code snippet:
# Use SageMaker PyTorch DLC as base image
baseimage = sagemaker.image_uris.retrieve(
    framework="pytorch",
    region=region,
    py_version="py310",
    image_scope="inference",
    version="2.0.0",
    instance_type="ml.g5.2xlarge",
)
print(baseimage)
Because the models require resources and additional packages that are not on the base PyTorch DLC, you need to build a Docker image. This image is then uploaded to Amazon Elastic Container Registry (Amazon ECR) so we can access directly from SageMaker. The custom installed libraries are listed in the Docker file:
ARG BASE_IMAGE

FROM $BASE_IMAGE

#Install any additional libraries
RUN pip install segment-anything-py==1.0
RUN pip install opencv-python-headless==4.7.0.68
RUN pip install matplotlib==3.6.3
RUN pip install diffusers
RUN pip install tqdm
RUN pip install easydict
RUN pip install scikit-image
RUN pip install xformers
RUN pip install tensorflow
RUN pip install joblib
RUN pip install matplotlib
RUN pip install albumentations==0.5.2
RUN pip install hydra-core==1.1.0
RUN pip install pytorch-lightning
RUN pip install tabulate
RUN pip install kornia==0.5.0
RUN pip install webdataset
RUN pip install omegaconf==2.1.2
RUN pip install transformers==4.28.1
RUN pip install accelerate
RUN pip install ftfy
Run the shell command file to build the custom image locally and push it to Amazon ECR:
%%capture build_output

reponame = "torchserve-mme-demo"
versiontag = "genai-0.1"

# Build our own docker image
!cd workspace/docker && ./build_and_push.sh {reponame} {versiontag} {baseimage} {region} {account}
Prepare the model artifacts
The main difference for the new MMEs with TorchServe support is how you prepare your model artifacts. The code repo provides a skeleton folder for each model (models folder) to house the required files for TorchServe. We follow the same four-step process to prepare each model .tar file. The following code is an example of the skeleton folder for the SD model:
workspace
|--sd
   |-- custom_handler.py
   |-- model-config.yaml
The first step is to download the pre-trained model checkpoints in the models folder:
import diffusers
import torch
import transformers

pipeline = diffusers.StableDiffusionInpaintPipeline.from_pretrained(
    "stabilityai/stable-diffusion-2-inpainting", torch_dtype=torch.float16
)

sd_dir = "workspace/sd/model"
pipeline.save_pretrained(sd_dir)
The next step is to define a custom_handler.py file. This is required to define the behavior of the model when it receives a request, such as loading the model, preprocessing the input, and postprocessing the output. The handle method is the main entry point for requests, and it accepts a request object and returns a response object. It loads the pre-trained model checkpoints and applies the preprocess and postprocess methods to the input and output data. The following code snippet illustrates a simple structure of the custom_handler.py file. For more detail, refer to the TorchServe handler API.
def initialize(self, ctx: Context):

def preprocess(self, data):

def inference(self, data):

def handle(self, data, context):
    requests = self.preprocess(data)
    responses = self.inference(requests)

    return responses
The last required file for TorchServe is model-config.yaml. The file defines the configuration of the model server, such as number of workers and batch size. The configuration is at a per-model level, and an example config file is shown in the following code. For a complete list of parameters, refer to the GitHub repo.
minWorkers: 1
maxWorkers: 1
batchSize: 1
maxBatchDelay: 200
responseTimeout: 300
The final step is to package all the model artifacts into a single .tar.gz file using the torch-model-archiver module:
!torch-model-archiver --model-name sd --version 1.0 --handler workspace/sd/custom_handler.py --extra-files workspace/sd/model --config-file workspace/sam/model-config.yaml --archive-format no-archive!cd sd && tar cvzf sd.tar.gz .
Create the multi-model endpoint
The steps to create a SageMaker MME are the same as before. In this particular example, you spin up an endpoint using the SageMaker SDK. Start by defining an Amazon Simple Storage Service (Amazon S3) location and the hosting container. This S3 location is where SageMaker will dynamically load the models base on invocation patterns. The hosting container is the custom container you built and pushed to Amazon ECR in the earlier step. See the following code:
# This is where our MME will read models from on S3.
multi_model_s3uri = output_path
Then you want to define a MulitDataModel that captures all the attributes like model location, hosting container, and permission access:
print(multi_model_s3uri)
model = Model(
    model_data=f"{multi_model_s3uri}/sam.tar.gz",
    image_uri=container,
    role=role,
    sagemaker_session=smsess,
    env={"TF_ENABLE_ONEDNN_OPTS": "0"},
)

mme = MultiDataModel(
    name="torchserve-mme-genai-" + datetime.now().strftime("%Y-%m-%d-%H-%M-%S"),
    model_data_prefix=multi_model_s3uri,
    model=model,
    sagemaker_session=smsess,
)
print(mme)
The deploy() function creates an endpoint configuration and hosts the endpoint:
mme.deploy(
    initial_instance_count=1,
    instance_type="ml.g5.2xlarge",
    serializer=sagemaker.serializers.JSONSerializer(),
    deserializer=sagemaker.deserializers.JSONDeserializer(),
)
In the example we provided, we also show how you can list models and dynamically add new models using the SDK. The add_model() function copies your local model .tar files into the MME S3 location:
# Only sam.tar.gz visible!
list(mme.list_models())

models = ["sd/sd.tar.gz", "lama/lama.tar.gz"]
for model in models:
    mme.add_model(model_data_source=model)
Invoke the models
Now that we have all three models hosted on an MME, we can invoke each model in sequence to build our language-assisted editing features. To invoke each model, provide a target_model parameter in the predictor.predict() function. The model name is just the name of the model .tar file we uploaded. The following is an example code snippet for the SAM model that takes in a pixel coordinate, a point label, and dilate kernel size, and generates a segmentation mask of the object in the pixel location:
img_file = "workspace/test_data/sample1.png"
img_bytes = None

with Image.open(img_file) as f:
    img_bytes = encode_image(f)

gen_args = json.dumps(dict(point_coords=[750, 500], point_labels=1, dilate_kernel_size=15))

payload = json.dumps({"image": img_bytes, "gen_args": gen_args}).encode("utf-8")

response = predictor.predict(data=payload, target_model="/sam.tar.gz")
encoded_masks_string = json.loads(response.decode("utf-8"))["generated_image"]
base64_bytes_masks = base64.b64decode(encoded_masks_string)

with Image.open(io.BytesIO(base64_bytes_masks)) as f:
    generated_image_rgb = f.convert("RGB")
    generated_image_rgb.show()
To remove an unwanted object from an image, take the segmentation mask generated from SAM and feed that into the LaMa model with the original image. The following images show an example.
 |
|
|
| Sample image | Segmentation mask from SAM | Erase the dog using LaMa |
To modify or replace any object in an image with a text prompt, take the segmentation mask from SAM and feed it into SD model with the original image and text prompt, as shown in the following example.
|
|
 |
 |
| Sample image | Segmentation mask from SAM | Replace using SD model with text prompt “a hamster on a bench” |
Cost savings
The benefits of SageMaker MMEs increase based on the scale of model consolidation. The following table shows the GPU memory usage of the three models in this post. They are deployed on one g5.2xlarge instance by using one SageMaker MME.
| Model | GPU Memory (MiB) |
| Segment Anything Model | 3,362 |
| Stable Diffusion In Paint | 3,910 |
| Lama | 852 |
You can see cost savings when hosting the three models with one endpoint, and for use cases with hundreds or thousands of models, the savings are much greater.
For example, consider 100 Stable Diffusion models. Each of the models on its own could be served by an ml.g5.2xlarge endpoint (4 GiB memory), costing $1.52 per instance hour in the US East (N. Virginia) Region. To provide all 100 models using their own endpoint would cost $218,880 per month. With a SageMaker MME, a single endpoint using ml.g5.2xlarge instances can host four models simultaneously. This reduces production inference costs by 75% to only $54,720 per month. The following table summarizes the differences between single-model and multi-model endpoints for this example. Given an endpoint configuration with sufficient memory for your target models, steady state invocation latency after all models have been loaded will be similar to that of a single-model endpoint.
| Single-model endpoint | Multi-model endpoint | |
| Total endpoint price per month | $218,880 | $54,720 |
| Endpoint instance type | ml.g5.2xlarge | ml.g5.2xlarge |
| CPU Memory capacity (GiB) | 32 | 32 |
| GPU Memory capacity (GiB) | 24 | 24 |
| Endpoint price per hour | $1.52 | $1.52 |
| Number of instances per endpoint | 2 | 2 |
| Endpoints needed for 100 models | 100 | 25 |
Clean up
After you are done, please follow the instructions in the cleanup section of the notebook to delete the resources provisioned in this post to avoid unnecessary charges. Refer to Amazon SageMaker Pricing for details on the cost of the inference instances.
Conclusion
This post demonstrates the language-assisted editing capabilities made possible through the use of generative AI models hosted on SageMaker MMEs with TorchServe. The example we shared illustrates how we can use resource sharing and simplified model management with SageMaker MMEs while still utilizing TorchServe as our model serving stack. We utilized three deep learning foundation models: SAM, SD 2 Inpainting, and LaMa. These models enable us to build powerful capabilities, such as erasing any unwanted object from an image and modifying or replacing any object in an image by supplying a text instruction. These features can help artists and content creators work more efficiently and meet their content demands by automating repetitive tasks, optimizing campaigns, and providing a hyper-personalized experience. We invite you to explore the example provided in this post and build your own UI experience using TorchServe on a SageMaker MME.
To get started, see Supported algorithms, frameworks, and instances for multi-model endpoints using GPU backed instances.
About the authors
 |
James Wu is a Senior AI/ML Specialist Solution Architect at AWS. helping customers design and build AI/ML solutions. James’s work covers a wide range of ML use cases, with a primary interest in computer vision, deep learning, and scaling ML across the enterprise. Prior to joining AWS, James was an architect, developer, and technology leader for over 10 years, including 6 years in engineering and 4 years in marketing & advertising industries. |
 |
Li Ning is a senior software engineer at AWS with a specialization in building large-scale AI solutions. As a tech lead for TorchServe, a project jointly developed by AWS and Meta, her passion lies in leveraging PyTorch and AWS SageMaker to help customers embrace AI for the greater good. Outside of her professional endeavors, Li enjoys swimming, traveling, following the latest advancements in technology, and spending quality time with her family. |
 |
Ankith Gunapal is an AI Partner Engineer at Meta (PyTorch). He is passionate about model optimization and model serving, with experience ranging from RTL verification, embedded software, computer vision, to PyTorch. He holds a Master’s in Data Science and a Master’s in Telecommunications. Outside of work, Ankith is also an electronic dance music producer. |
 |
Saurabh Trikande is a Senior Product Manager for Amazon SageMaker Inference. He is passionate about working with customers and is motivated by the goal of democratizing machine learning. He focuses on core challenges related to deploying complex ML applications, multi-tenant ML models, cost optimizations, and making deployment of deep learning models more accessible. In his spare time, Saurabh enjoys hiking, learning about innovative technologies, following TechCrunch and spending time with his family. |
 |
Subhash Talluri is a Lead AI/ML solutions architect of the Telecom Industry business unit at Amazon Web Services. He’s been leading development of innovative AI/ML solutions for Telecom customers and partners worldwide. He brings interdisciplinary expertise in engineering and computer science to help build scalable, secure, and compliant AI/ML solutions via cloud-optimized architectures on AWS. |