Amazon Comprehend Custom Classification API enables you to easily build custom text classification models using your business-specific labels without learning ML. For example, your customer support organization can use Custom Classification to automatically categorize inbound requests by problem type based on how the customer has described the issue. You can use custom classifiers to automatically label support emails with appropriate issue types, routing customer phone calls to the right agents, and categorizing social media posts into user segments.
For custom classification, you start by creating a training job with a ground truth dataset comprising a collection of text and corresponding category labels. Upon completing the job, you have a classifier that can classify any new text into one or more named categories. When the custom classification model classifies a new unlabeled text document, it predicts what it has learned from the training data. Sometimes you may not have a training dataset with various language patterns, or once you deploy the model, you start seeing completely new data patterns. In these cases, the model may not be able to classify these new data patterns accurately. How can we ensure continuous model training to keep it up to date with new data and patterns?
In this two part blog series, we discuss an architecture pattern that allows you to build an active learning workflow for Amazon Comprehend custom classification models. The first post will describe a workflow comprising real-time classification, feedback pipelines and human review workflows using Amazon Augmented AI (Amazon A2I). The second post will cover the automated model building using the human reviewed data, selecting the best model, and automated deployment of an endpoint of the chosen model.
Feedback loops play a pivotal role in keeping the models up to date. This feedback helps the models learn about their misclassifications and learn the right ones. This process of teaching the models continuously through feedback and deploying them is called active learning.
For every prediction Amazon Comprehend Custom Classification makes, it also gives a confidence score associated with its prediction. This architecture proposes that you set an acceptable threshold and only accept the predictions with a confidence score that exceeds the threshold. All the predictions that have a confidence score less than the desired threshold are flagged for human review. The human decides whether to accept the model’s prediction or correct it.
In some instances, the model may be confident about its predictions, but the classification might be wrong. In these scenarios, the end-user applications that receive the model predictions can request explicit feedback from its users on the prediction quality. A human moderator reviews this explicit feedback and reclassifies instances where the feedback was negative. This process of generating human-verified data and using it for model retraining helps keep the models up to date, reduce data drift, and achieve higher model accuracy.
Feedback Workflow Architecture.
In this section, we discuss an architectural pattern for implementing an end-to-end active learning workflow for custom classification models in Amazon Comprehend using Amazon A2I. The active learning workflow comprises the following components:
- Real-time classification
- Feedback loops
- Human classification
- Model building
- Model selection
- Model deployment
The following diagram illustrates this architecture covering the first three components. In the following sections, we walk you through each step in the workflow.
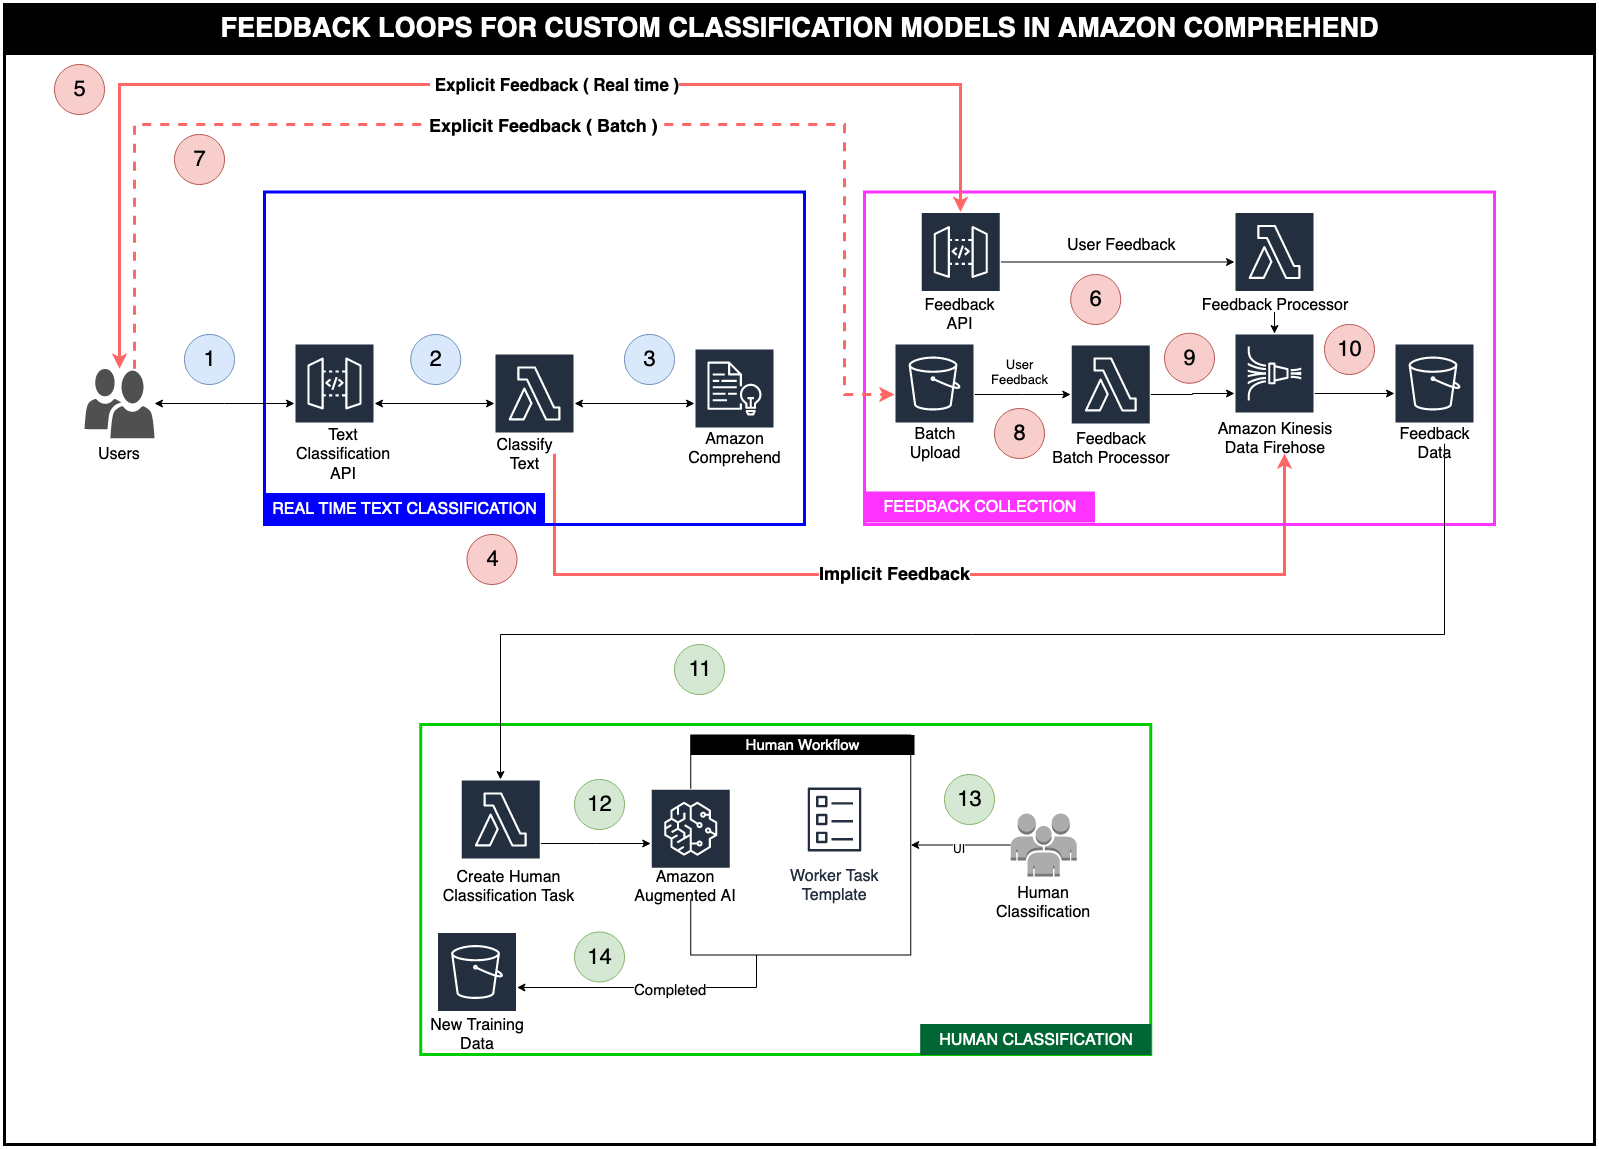
Real-time classification
To use custom classification in Amazon Comprehend, you need to create a custom classification job that reads a ground truth dataset from an Amazon Simple Storage Service (Amazon S3) bucket and builds a classification model. After the model builds successfully, you can create an endpoint that allows you to make real-time classifications of unlabeled text. This stage is represented by steps 1–3 in the preceding architecture:
- The end-user application calls an API Gateway endpoint with a text that needs to be classified.
- The API Gateway endpoint then calls an AWS Lambda function configured to call an Amazon Comprehend endpoint.
- The Lambda function calls the Amazon Comprehend endpoint, which returns the unlabeled text classification and a confidence score.
Feedback collection
When the endpoint returns the classification and the confidence score during the real-time classification, you can send instances with low-confidence scores to human review. This type of feedback is called implicit feedback.
- The Lambda function sends the implicit feedback to an Amazon Kinesis Data Firehose.
The other type of feedback is called explicit feedback and comes from the application’s end-users that use the custom classification feature. This type of feedback comprises the instances of text where the user wasn’t happy with the prediction. Explicit feedback can be sent either in real-time through an API or a batch process.
- End-users of the application submit explicit real-time feedback through an API Gateway endpoint.
- The Lambda function backing the API endpoint transforms the data into a standard feedback format and writes it to the Kinesis Data Firehose delivery stream.
- End-users of the application can also submit explicit feedback as a batch file by uploading it to an S3 bucket.
- A trigger configured on the S3 bucket triggers a Lambda function.
- The Lambda function transforms the data into a standard feedback format and writes it to the delivery stream.
- Both the implicit and explicit feedback data gets sent to a delivery stream in a standard format. All this data is buffered and written to an S3 bucket.
Human classification
The human classification stage includes the following steps:
- A trigger configured on the feedback bucket in Step 10 invokes a Lambda function.
- The Lambda function creates Amazon A2I human review tasks for all the feedback data received.
- Workers assigned to the classification jobs log in to the human review portal and either approve the classification by the model or classify the text with the right labels.
- After the human review, all these instances are stored in an S3 bucket and used for retraining the models. Part 2 of this series covers the retraining workflow.
Solution overview
The next few sections of the post go over how to set up this architecture in your AWS account. We classify news into four categories: World, Sports, Business, and Sci/Tech, using the AG News dataset for custom classification, and set up the implicit and explicit feedback loop. You need to complete two manual steps:
- Create an Amazon Comprehend custom classifier and an endpoint.
- Create an Amazon SageMaker private workforce, worker task template, and human review workflow.
After this, you run the provided AWS CloudFormation template to set up the rest of the architecture.
Prerequisites
Before you get started, download the dataset and upload it to Amazon S3. This dataset comprises a collection of news articles and their corresponding category labels. We have created a training dataset called train.csv from the original dataset and made it available for download.
The following screenshot shows a sample of the train.csv file.

After you download the train.csv file, upload it to an S3 bucket in your account for reference during training. For more information about uploading files, see How do I upload files and folders to an S3 bucket?
Creating a custom classifier and an endpoint
To create your classifier for classifying news, complete the following steps:
- On the Amazon Comprehend console, choose Custom Classification.
- Choose Train classifier.
- For Name, enter
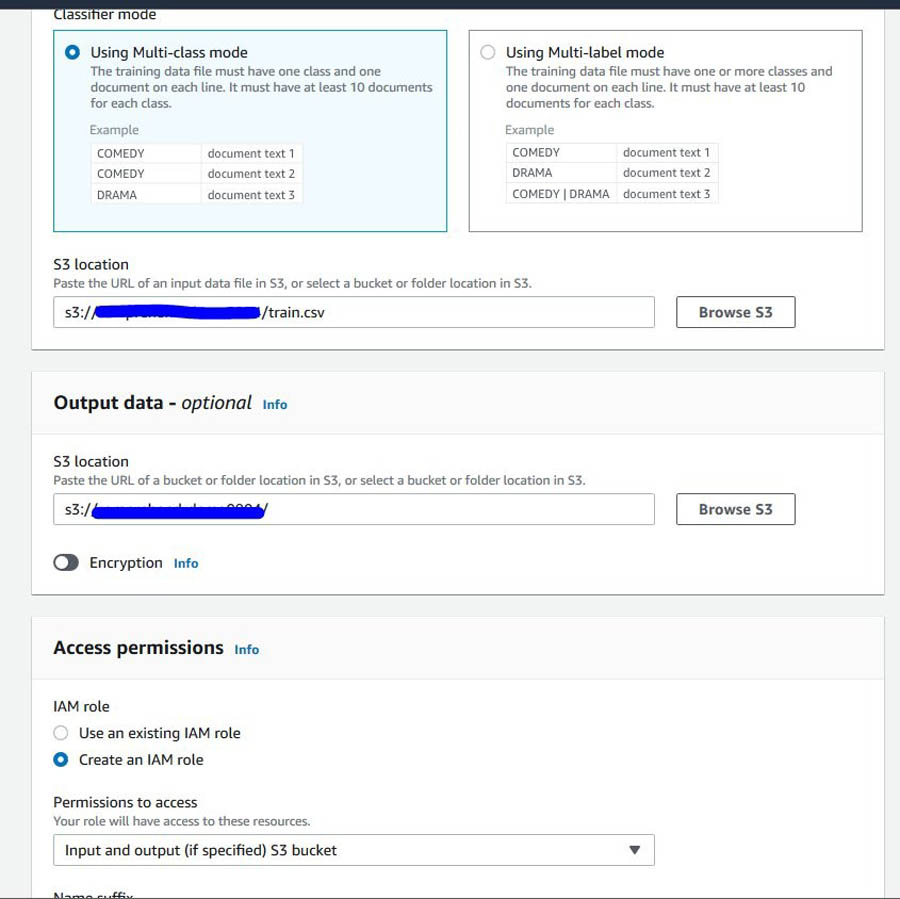
news-classifier-demo. - Select Using Multi-class mode.
- For Training data S3 location, enter the path for train.csv in your S3 bucket, for example,
s3://<your-bucketname>/train.csv. - For Output data S3 location, enter the S3 bucket path where you want the output, such as
s3://<your-bucketname>/. - For IAM role, select Create an IAM role.
- For Permissions to access, choose Input and output (if specified) S3 bucket.
- For Name suffix, enter
ComprehendCustom.
- Scroll down and choose Train Classifier to start the training process.
The training takes some time to complete. You can either wait to create an endpoint or come back to this step later after finishing the steps in the section Creating a private workforce, worker task template, and human review workflow.
Creating a custom classifier real-time endpoint
To create your endpoint, complete the following steps:
- On the Amazon Comprehend console, choose Custom Classification.
- From the Classifiers list, choose the name of the custom model for which you want to create the endpoint and select your model
news-classifier-demo. - From the Actions drop-down menu, choose Create endpoint.
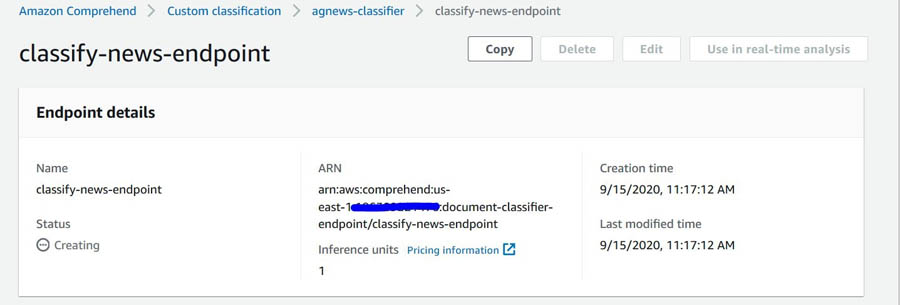
- For Endpoint name, enter
classify-news-endpointand give it one inference unit. - Choose Create endpoint
- Copy the endpoint ARN as shown in the following screenshot. You use it when running the CloudFormation template in a future step.
Creating a private workforce, worker task template, and human review workflow.
This section walks you through creating a private workforce in Amazon SageMaker, a worker task template, and your human review workflow.
Creating a labeling workforce
- For this post, you will create a private work team and add only one user (you) to it. For instructions, see Create a Private Workforce (Amazon SageMaker Console).
- Once the user accepts the invitation, you will have to add him to the workforce. For instructions, see the Add a Worker to a Work Team section the Manage a Workforce (Amazon SageMaker Console)
Creating a worker task template
To create a worker task template, complete the following steps:
- On the Amazon A2I console, choose Worker task templates.
- Choose to Create a template.
- For Template name, enter
custom-classification-template. - For Template type, choose Custom,
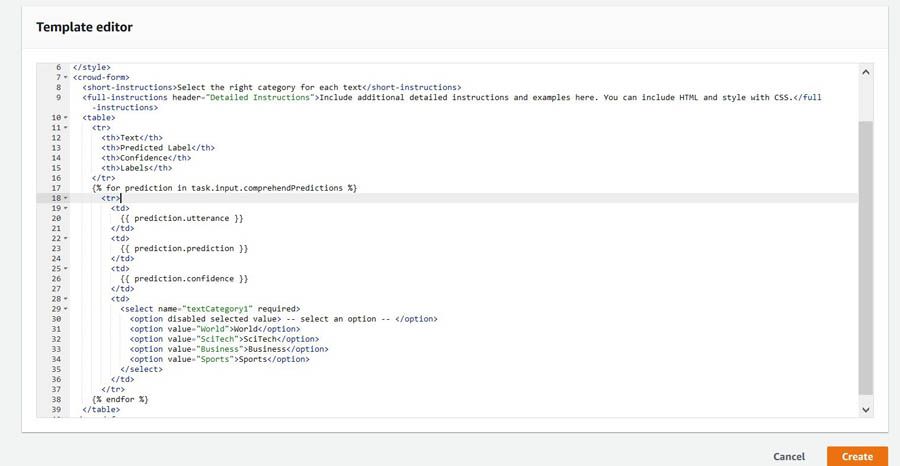
- In the Template editor, enter the following GitHub UI template code.
- Choose Create.
Creating a human review workflow
To create your human review workflow, complete the following steps:
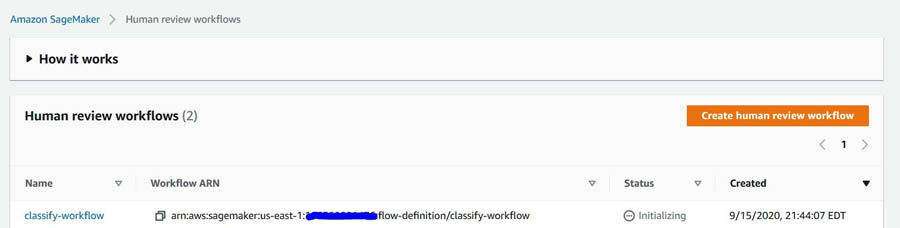
- On the Amazon A2I console, choose Human review workflows.
- Choose Create human review workflow.
- For Name, enter
classify-workflow. - Specify an S3 bucket to store output:
s3://<your bucketname>/.
Use the same bucket where you downloaded your train.csv in the prerequisite step.
- For IAM role, select Create a new role.
- For Task type, choose Custom.
- Under Worker task template creation, select the custom classification template you created.
- For Task description, enter
Read the instructions and review the document. - Under Workers, select Private.
- Use the drop-down list to choose the private team that you created.
- Choose Create.
- Copy the workflow ARN (see the following screenshot) to use when initializing the CloudFormation parameters.
Deploying the CloudFormation template to set up active learning feedback
Now that you have completed the manual steps, you can run the CloudFormation template to set up this architecture’s building blocks, including the real-time classification, feedback collection, and the human classification.
Before deploying the CloudFormation template, make sure you have the following to pass as parameters:
- Custom classifier endpoint ARN
- Amazon A2I workflow ARN
- Choose Launch Stack:
![]()
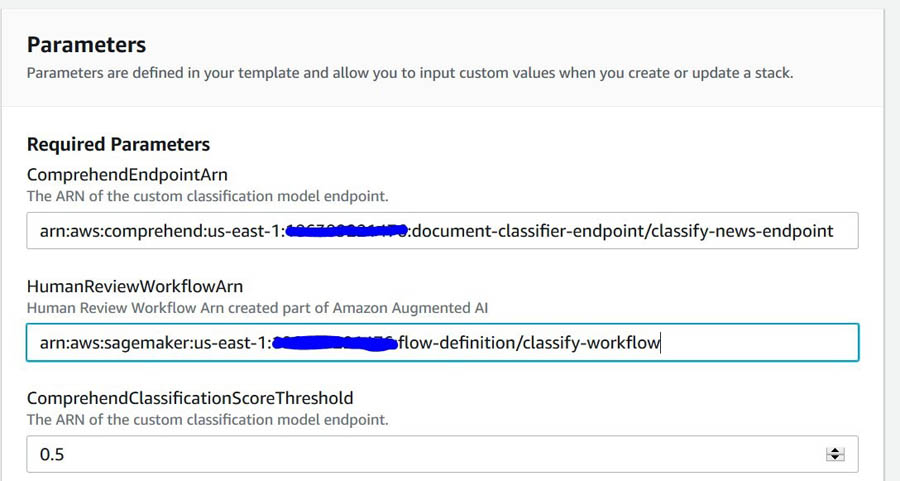
- Enter the following parameters:
- ComprehendEndpointARN – The endpoint ARN you copied.
- HumanReviewWorkflowARN – The workflow ARN you copied.
- ComrehendClassificationScoreThreshold – Enter 0.5, which means a 50% threshold for low confidence score.
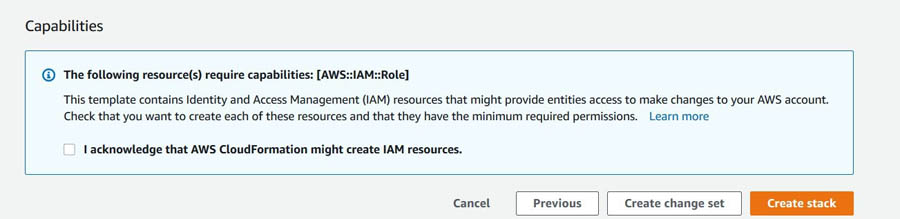
- Choose Next until the Capabilities
- Select the check-box to provide acknowledgment to AWS CloudFormation to create AWS Identity and Access Management (IAM) resources and expand the template.
For more information about these resources, see AWS IAM resources.
- Choose Create stack.
Wait until the status of the stack changes from CREATE_IN_PROGRESS to CREATE_COMPLETE.
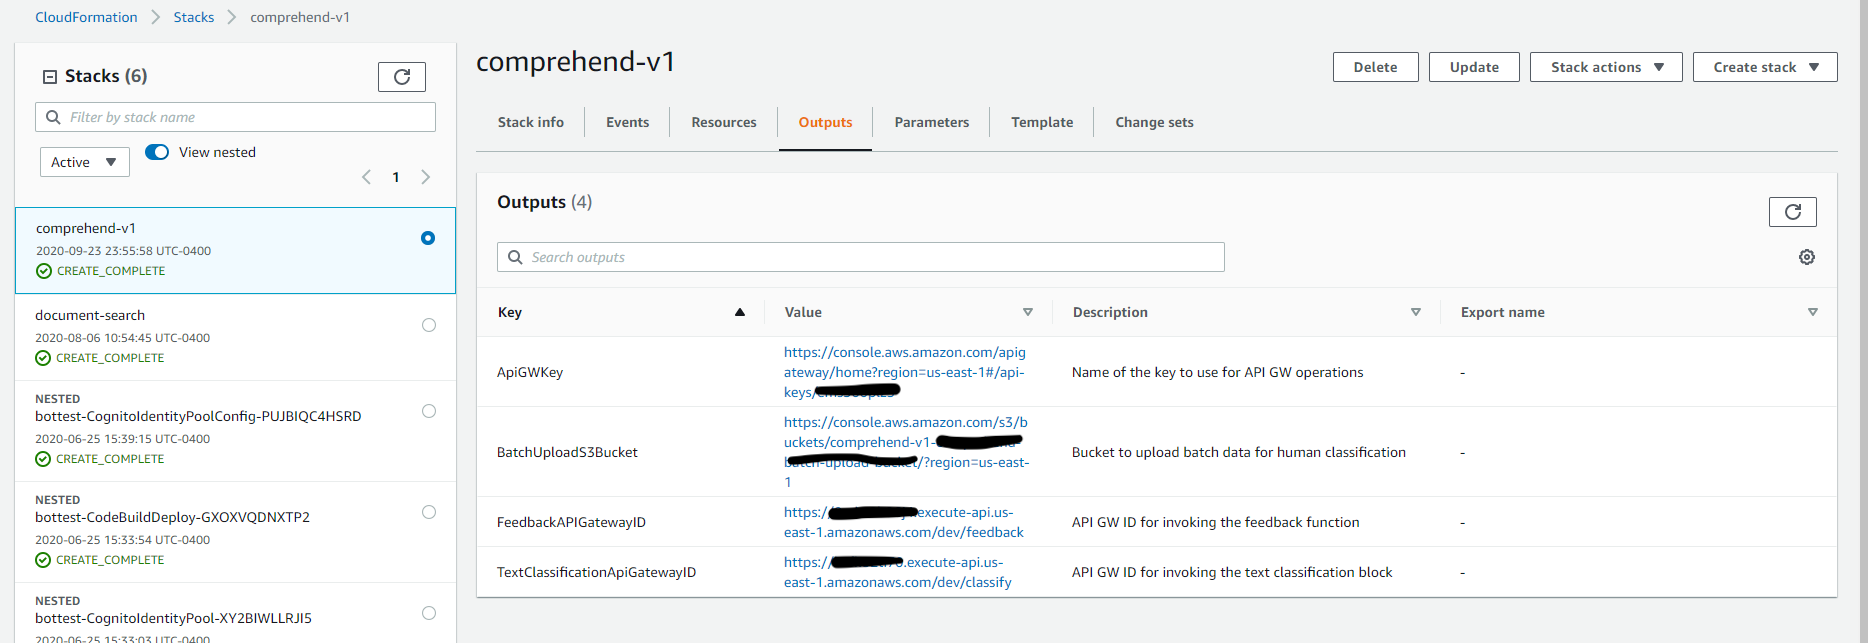
- On the Outputs tab of the stack (see the following screenshot), copy the value for
BatchUploadS3Bucket,FeedbackAPIGatewayID, andTextClassificationAPIGatewayIDto interact with the feedback loop. - Both the TextClassificationAPI and FeedbackAPI will require and API key to interact with them. The Cloudformtion output
ApiGWKeyrefers to the name of the API key. Currently this API key is associated with a usage plan that allows 2000 requests per month. - On the API Gateway console, choose either the TextClassification API or the the FeedbackAPI. Choose API Keys from the left navigation. Choose your API key from step 7. Expand the API key section in the right pane and copy the value.
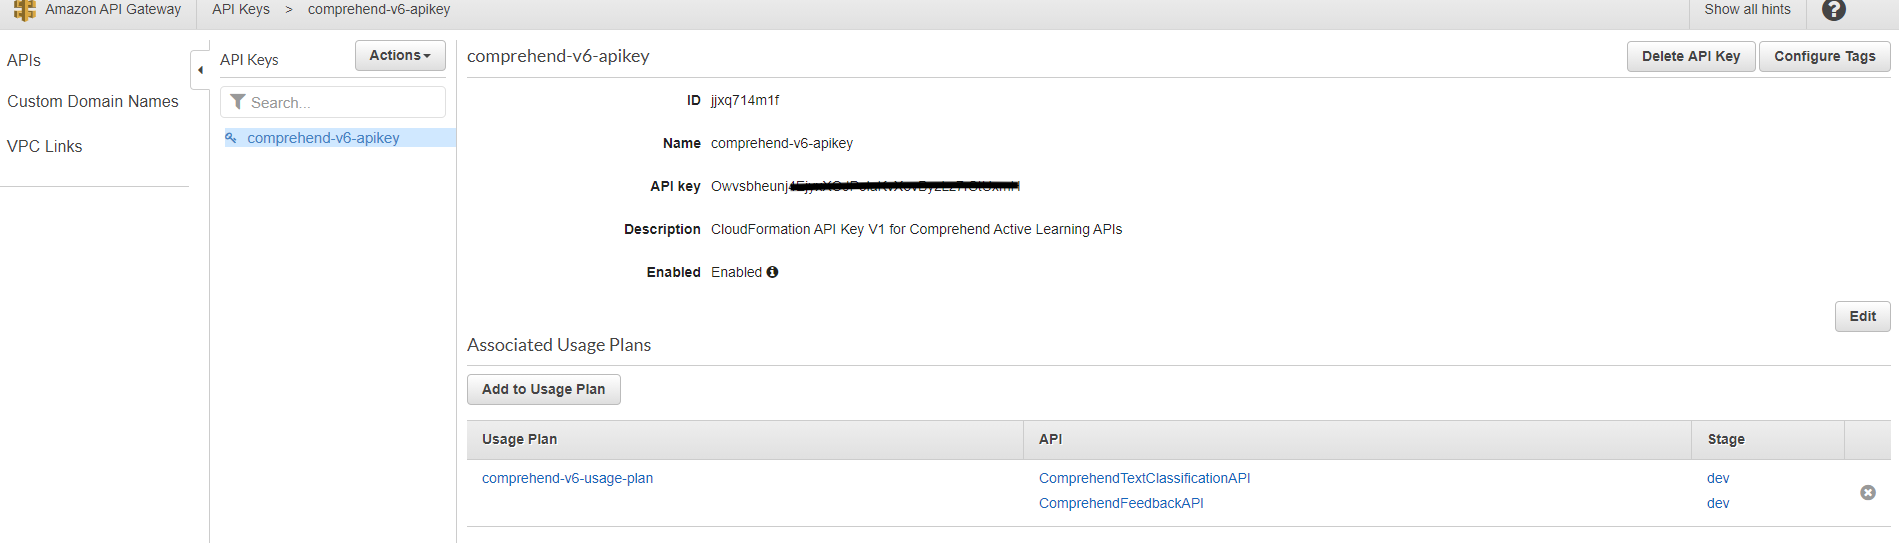
- You can manage the usage plan by following the instructions on, Create, configure, and test usage plans with the API Gateway console.
- You can also add fine grained authentication and authorization to your APIs. For more information on securing your APIs, you can follow instructions on Controlling and managing access to a REST API in API Gateway.
Testing the feedback loop
In this section, we walk you through testing your feedback loop, including real-time classification, implicit and explicit feedback, and human review tasks.
Real-time classification
To interact and test these APIs, you need to download Postman.
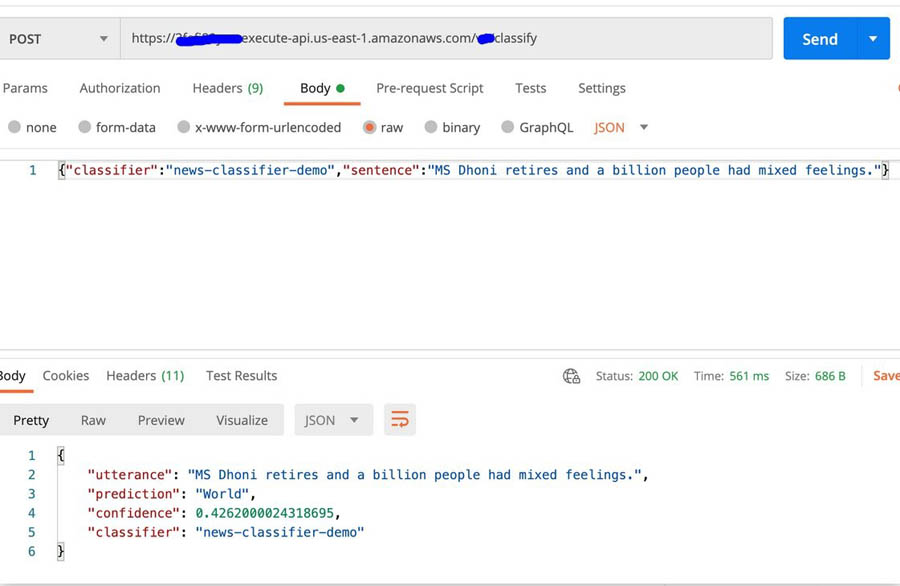
The API Gateway endpoint receives an unlabeled text document from a client application and internally calls the custom classification endpoint, which returns the predicted label and a confidence score.
- Open Postman and enter the
TextClassificationAPIGatewayURL in POST method. - In the Headers section, configure the API key. x-api-key : << Your API key >>
- In the text field, enter the following JSON code (make sure you have JSON selected and enable raw):
{"classifier":"<your custom classifier name>", "sentence":"MS Dhoni retires and a billion people had mixed feelings."}- Choose Send.
You get a response back with a confidence score and class, as seen in the following screenshot.
Implicit feedback
When the endpoint returns the classification and the confidence score during the real-time classification, you can route all the instances where the confidence score doesn’t meet the threshold to human review. This type of feedback is called implicit feedback. For this post, we set the threshold as 0.5 as an input to the CloudFormation stack parameter.
You can change this threshold when deploying the CloudFormation template based on your needs.
Explicit feedback
The explicit feedback comes from the end-users of the application that uses the custom classification feature. This type of feedback comprises the instances of text where the user wasn’t happy with the prediction. You can send the predicted label by the model’s explicit feedback through the following methods:
- Real time through an API, which is usually triggered through a like/dislike button on a UI.
- Batch process, where a file with a collection of misclassified utterances is put together based on a user survey conducted by the customer outreach team.
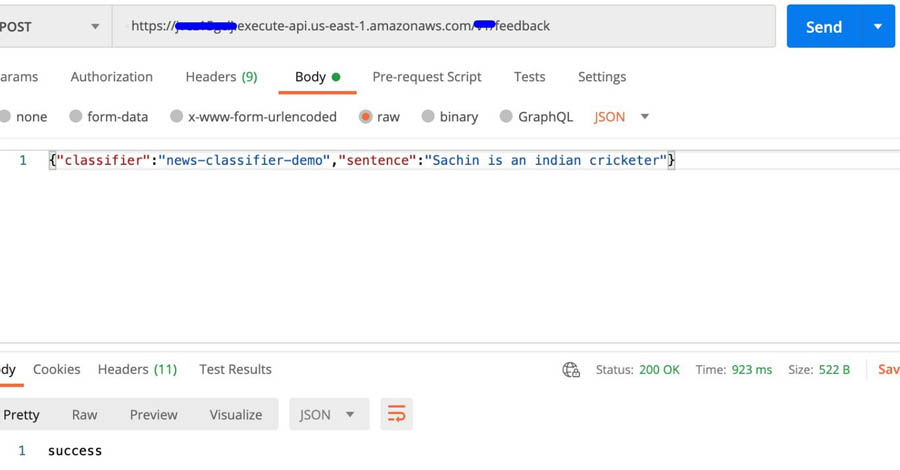
Invoking the explicit real-time feedback loop
To test the Feedback API, complete the following steps:
- Open Postman and enter the
FeedbackAPIGatewayIDvalue from your CloudFormation stack output in POST method. - In the Headers section, configure the API key.
x-api-key : << Your API key >> - In the text field, enter the following JSON code (for
classifier, enter the classifier you created, such asnews-classifier-demo, and make sure you have JSON selected and enable raw):
{"classifier":"<your custom classifier name>","sentence":"Sachin is Indian Cricketer."}- Choose Send.
Submitting explicit feedback as a batch file
Download the following test feedback JSON file, populate it with your data, and upload it into the BatchUploadS3Bucket created when you deployed your CloudFormation template. The following code shows some sample data in the file:
{
   "classifier":"news-classifier-demo",
   "sentences":[
      "US music firms take legal action against 754 computer users alleged to illegally swap music online.",
      "A gamer spends $26,500 on a virtual island that exists only in a PC role-playing game."
   ]
}
Uploading the file triggers the Lambda function that starts your human review loop.
Human review tasks
All the feedback collected through the implicit and explicit methods is sent for human classification. The labeling workforce can include Amazon Mechanical Turk, private teams, or AWS Marketplace vendors. For this post, we create a private workforce. The URL to the labeling portal is located on the Amazon SageMaker console, on the Labeling workforces page, on the Private tab.
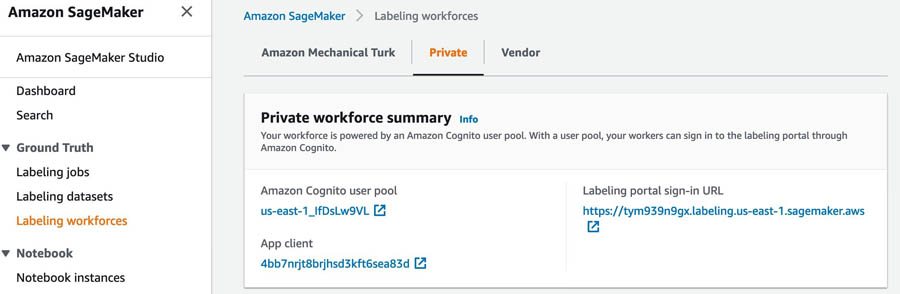
After you log in, you can see the human review tasks assigned to you. Select the task to complete and choose Start working.

You see the tasks displayed based on the worker template used when creating the human workflow.

After you complete the human classification and submit the tasks, the human-reviewed data is stored in the S3 bucket you configured when creating the human review workflow. Go to Amazon Sagemaker-> Human review workflows->output location:
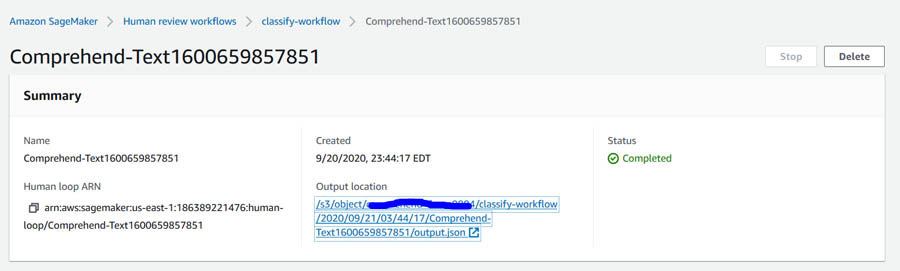
This human-reviewed data is used to retrain the custom classification model to learn newer patterns and improve its overall accuracy. Below is screenshot of the human annotated output file output.json in S3 bucket:

The process of retraining the models with human-reviewed data, selecting the best model, and automatically deploying the new endpoints completes the active learning workflow. We cover these remaining steps in Part 2 of this series.
Cleaning up
To remove all resources created throughout this process and prevent additional costs, complete the following steps:
- On the Amazon S3 console, delete the S3 bucket that contains the training dataset.
- On the Amazon Comprehend console, delete the endpoint and the classifier.
- On the Amazon A2I console, delete the human review workflow, worker template, and the private workforce.
- On the AWS CloudFormation console, delete the stack you created. (This removes the resources the CloudFormation template created.)
Conclusion
Amazon Comprehend helps you build scalable and accurate natural language processing capabilities without any machine learning experience. This post provides a reusable pattern and infrastructure for active learning workflows for custom classification models. The feedback pipelines and human review workflow help the custom classifier learn new data patterns continuously. The second part of this series covers the automatic model building, selection, and deployment of custom classification models.
For more information, see Custom Classification. You can discover other Amazon Comprehend features and get inspiration from other AWS blog posts about how to use Amazon Comprehend beyond classification.
About the Authors
 Shanthan Kesharaju is a Senior Architect in the AWS ProServe team. He helps our customers with AI/ML strategy, architecture, and develop products with a purpose. Shanthan has an MBA in Marketing from Duke University and an MS in Management Information Systems from Oklahoma State University.
 Mona Mona is an AI/ML Specialist Solutions Architect based out of Arlington, VA. She works with World Wide Public Sector team and helps customers adopt machine learning on a large scale. She is passionate about NLP and ML Explainability areas in AI/ML.
 Joyson Neville Lewis obtained his master’s in Information Technology from Rutgers University in 2018. He has worked as a Software/Data engineer before diving into the Conversational AI domain in 2019, where he works with companies to connect the dots between business and AI using voice and chatbot solutions. Joyson joined Amazon Web Services in February of 2018 as a Big Data Consultant for AWS Professional Services team in NYC.