The process of extracting, cleaning, manipulating, and encoding data from raw sources and preparing it to be consumed by machine learning (ML) algorithms is an important, expensive, and time-consuming part of data science. Managing these data pipelines for either training or inference is a challenge for data science teams, however, and can take valuable time away that could be better used towards experimenting with new features or optimizing model performance with different algorithms or hyperparameter tuning.
Many ML use cases such as churn prediction, fraud detection, or predictive maintenance rely on models trained from historical datasets that build up over time. The set of feature engineering steps a data scientist defined and performed on historical data for one time period needs to be applied towards any new data after that period, as models trained from historic features need to make predictions on features derived from the new data. Instead of manually performing these feature transformations on new data as it arrives, data scientists can create a data preprocessing pipeline to perform the desired set of feature engineering steps that runs automatically whenever new raw data is available. Decoupling the data engineering from the data science in this way can be a powerful time-saving practice when done well.
Workflow orchestration tools like AWS Step Functions or Apache Airflow are typically used by data engineering teams to build these kinds of extract, transform, and load (ETL) data pipelines. Although these tools offer comprehensive and scalable options to support many data transformation workloads, data scientists may prefer to use a toolset specific to ML workloads. Amazon SageMaker supports the end-to-end lifecycle for ML projects, including simplifying feature preparation with SageMaker Data Wrangler and storage and feature serving with SageMaker Feature Store.
In this post, we show you how a data scientist working on a new ML use case can use both Data Wrangler and Feature Store to create a set of feature transformations, perform them over a historical dataset, and then use SageMaker Pipelines to automatically transform and store features as new data arrives daily.
For more information about SageMaker Data Wrangler, Feature Store, and Pipelines, we recommend the following resources:
- Introducing Amazon SageMaker Data Wrangler, a Visual Interface to Prepare Data for Machine Learning
- Understanding the key capabilities of Amazon SageMaker Feature Store
- New – Amazon SageMaker Pipelines Brings DevOps Capabilities to your Machine Learning Projects
Overview of solution
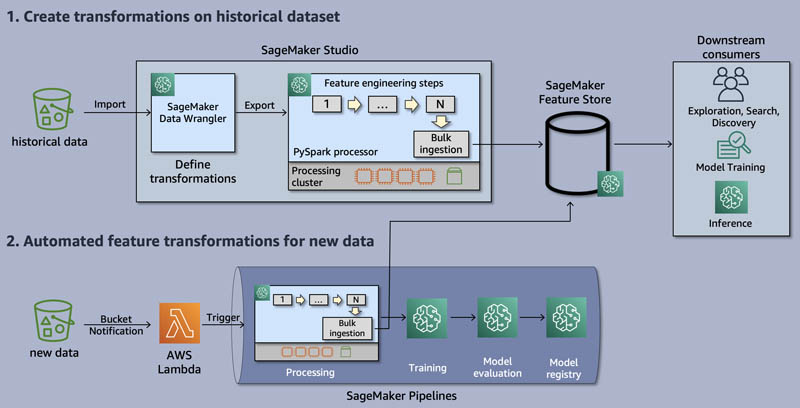
The following diagram shows an example end-to-end process from receiving a raw dataset to using the transformed features for model training and predictions. This post describes how to set up your architecture such that each new dataset arriving in Amazon Simple Storage Service (Amazon S3) automatically triggers a pipeline that performs a set of predefined transformations with Data Wrangler and stores the resulting features in Feature Store. You can visit our code repo to try it out in your own account.
Before we set up the architecture for automating feature transformations, we first explore the historical dataset with Data Wrangler, define the set of transformations we want to apply, and store the features in Feature Store.
Dataset
To demonstrate feature pipeline automation, we use an example of preparing features for a flight delay prediction model. We use flight delay data from the US Department of Transportation’s Bureau of Transportation Statistics (BTS), which tracks the on-time performance of domestic US flights. After you try out the approach with this example, you can experiment with the same pattern on your own datasets.
Each record in the flight delay dataset contains information such as:
- Flight date
- Airline details
- Origin and destination airport details
- Scheduled and actual times for takeoff and landing
- Delay details
Once the features have been transformed, we can use them to train a machine learning model to predict future flight delays.

Prerequisites
For this walkthrough, you should have the following prerequisites:
- An AWS account
- A SageMaker Studio domain with the
AmazonSageMakerFeatureStoreAccessmanaged policy attached to the AWS Identity and Access Management (IAM) execution role - An S3 bucket
Upload the historical dataset to Amazon S3
Our code repo provides a link to download the raw flight delay dataset used in this example. The directory flight-delay-data contains two CSV files covering two time periods with the same columns. One file contains flight data from Jan 1, 2020, through March 30, 2020. The second file contains flight data for a single day: March 31, 2020. We use the first file for the initial feature transformations. We use the second file to test our feature pipeline automation. In this example, we store the raw dataset in the default S3 bucket associated with our Studio domain, but this isn’t required.
Feature engineering with Data Wrangler
Whenever a data scientist starts working on a new ML use case, the first step is typically to explore and understand the available data. Data Wrangler provides a fast and easy way to visually inspect datasets and perform exploratory data analysis. In this post, we use Data Wrangler within the Studio IDE to analyze the airline dataset and create the transformations we later automate.
A typical model may have dozens or hundreds of features. To keep our example simple, we show how to create the following feature engineering steps using Data Wrangler:
- One-hot encoding the airline carrier column
- Adding a record identifier feature and an event timestamp feature, so that we can export to Feature Store
- Adding a feature with the aggregate daily count of delays from each origin airport
Data Wrangler walkthrough
To start using Data Wrangler, complete the following steps:
- In a Studio domain, on the Launcher tab, choose New data flow.
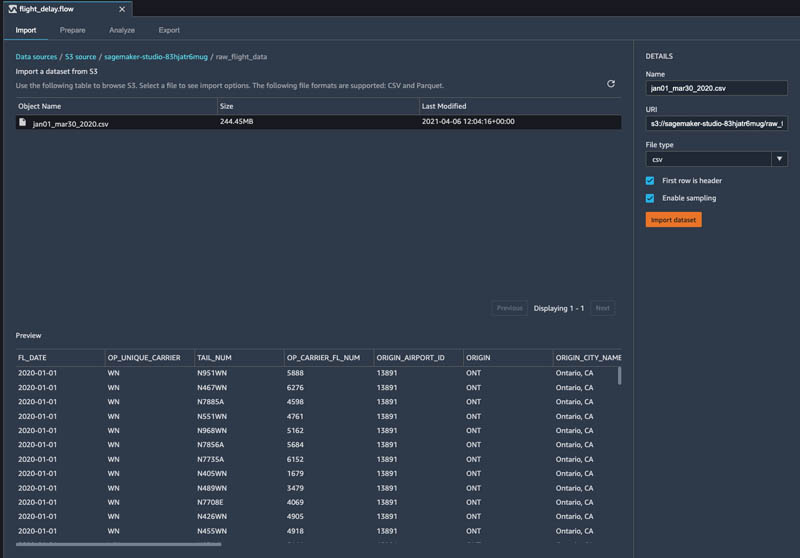
- Import the flight delay dataset
jan01_mar30_2020.csvfrom its location in Amazon S3.
Data Wrangler shows you a preview of the data before importing.
- Choose Import dataset.
You’re ready to begin exploring and feature engineering.
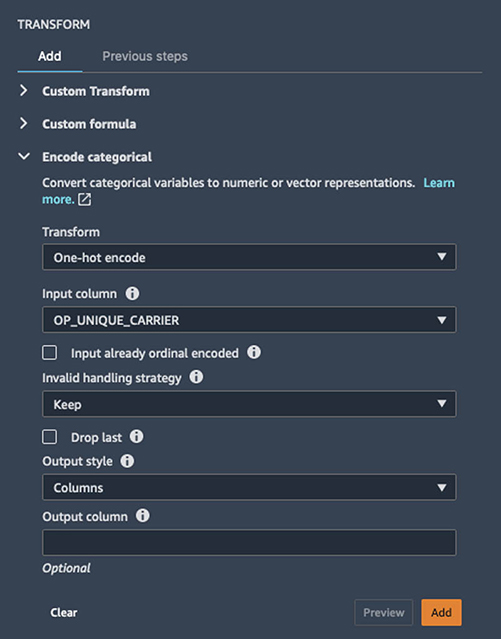
Because ML algorithms typically require all input features to be numeric for training and inference, it’s common to transform categorical features into a numerical representation. Here we use one-hot encoding for the airline carrier column, which transforms it into several binary columns, one for each airline carrier present in the data.
- Choose the + icon next to the dataset and choose Add Transform.
- For the field
OP_UNIQUE_CARRIER, select one-hot encoding. - Under Encode Categorical, for Output Style, choose Columns.
Feature Store requires a unique RecordIdentifier field for each record ingested into the store, so we add a new column to our dataset, RECORD_ID which is a concatenation of four fields: OP_CARRIER_FL_NUM, ORIGIN, DEP_TIME, and DEST. It also requires an EventTime feature for each record, so we add a timestamp to FL_DATE in a new column called EVENT_TIME. Here we use Data Wrangler’s custom transform option with Pandas:
df['RECORD_ID']= df['OP_CARRIER_FL_NUM'].astype(str) +df['ORIGIN']+df['DEP_TIME'].astype(str)+df['DEST']

df['EVENT_TIME']=df['FL_DATE'].astype(str)+'T00:00:00Z'
To predict delays for certain flights each day, it’s useful to create aggregated features based on the entities present in the data over different time windows. Providing an ML algorithm with these kinds of features can deliver a powerful signal over and above what contextual information is available for a single record in this raw dataset. Here, we calculate the number of delayed flights from each origin airport over the last day using Data Wrangler’s custom transform option with PySpark SQL:
SELECT *, SUM(ARR_DEL15) OVER w1 as NUM_DELAYS_LAST_DAY
FROM df WINDOW w1 AS (PARTITION BY ORIGIN order by
cast('EVENT_TIME' AS timestamp)
RANGE INTERVAL 1 DAY PRECEDING)
In a real use case, we’d likely spend a lot of time at this stage exploring the data, defining transformations, and creating more features. After defining all of the transformations to perform over the dataset, you can export the resulting ML features to Feature Store.
- On the Export tab, choose </> under Steps. This displays a list of all the steps you have created.
- Choose the last step, then choose Export Step.
- On the Export Step drop-down menu, choose Feature Store.
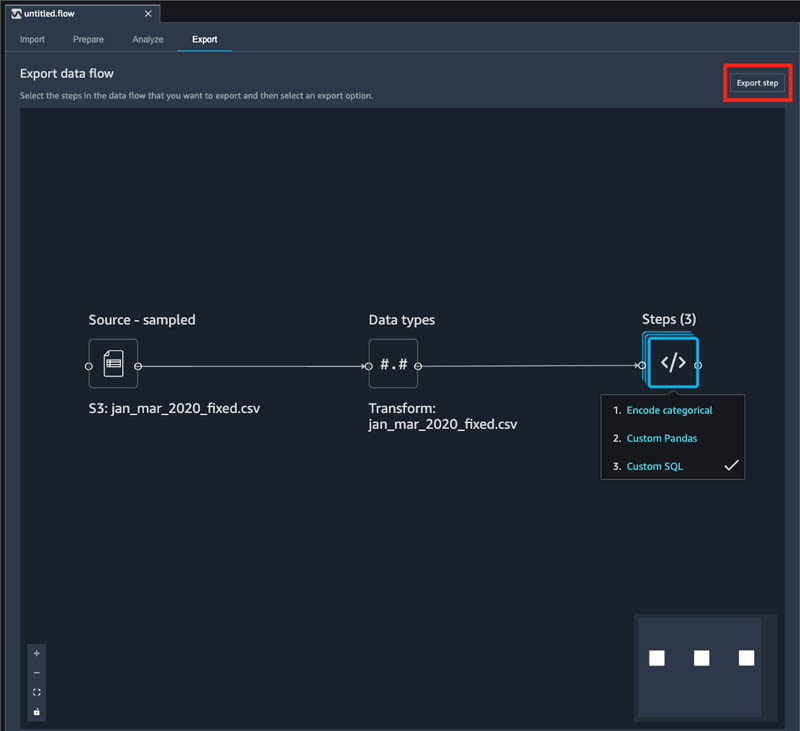
SageMaker generates a Jupyter notebook for you and opens it in a new tab in Studio. This notebook contains everything needed to run the transformations over our historical dataset and ingest the resulting features into Feature Store.
Store features in Feature Store
Now that we’ve defined the set of transformations to apply to our dataset, we need to perform them over the set of historical records and store them in Feature Store, a purpose-built store for ML features, so that we can easily discover and reuse them without needing to reproduce the same transformations from the raw dataset as we have done here. For more information about the capabilities of Feature Store, see Understanding the key capabilities of Amazon SageMaker Feature Store.
Running all code cells in the notebook created in the earlier section completes the following:
- Creates a feature group
- Runs a SageMaker Processing job that uses our historical dataset and defined transformations from Data Wrangler as input
- Ingests the newly transformed historical features into Feature Store
- Select the kernel Python 3 (Data Science) in the newly opened notebook tab.
- Read through and explore the Jupyter notebook.
- In the Create FeatureGroup section of the generated notebook, update the following fields for event time and record identifier with the column names we created in the previous Data Wrangler step (if using your own dataset, your names may differ):
record_identifier_name = "RECORD_ID"
event_time_feature_name = "EVENT_TIME"
- Choose Run and then choose Run All Cells.
Automate data transformations for future datasets
After the Processing job is complete, we’re ready to move on to creating a pipeline that is automatically triggered when new data arrives in Amazon S3, which reproduces the same set of transformations on the new data and constantly refreshes the Feature Store, without any manual intervention needed.
- Open a new terminal in Studio and clone our repo by running
git clone https://github.com/aws-samples/amazon-sagemaker-automated-feature-transformation.git - Open the Jupyter notebook called
automating-feature-transformation-pipeline.ipynbin a new tab
This notebook walks through the process of creating a new pipeline that runs whenever any new data arrives in the designated S3 location.
- After running the code in that notebook, we upload one new day’s worth of flight delay data,
mar31_2020.csv, to Amazon S3.
A run of our newly created pipeline is automatically triggered to create features from this data and ingest them into Feature Store. You can monitor progress and see past runs on the Pipelines tab in Studio.

Our example pipeline only has one step to perform feature transformations, but you can easily add subsequent steps like model training, deployment, or batch predictions if it fits your particular use case. For a more in-depth look at SageMaker Pipelines, see Building, automating, managing, and scaling ML workflows using Amazon SageMaker Pipelines.
We use an S3 event notification with a AWS Lambda function destination to trigger a run of the feature transformation pipeline, but you can also schedule pipeline runs using Amazon EventBridge, which enables you to automate pipelines to respond automatically to events such as training job or endpoint status changes, or even configure your feature pipeline to run on a specific schedule.
Conclusion
In this post, we showed how you can use a combination of Data Wrangler, Feature Store, and Pipelines to transform data as it arrives in Amazon S3 and store the engineered features automatically into Feature Store. We hope you try this solution and let us know what you think. We’re always looking forward to your feedback, either through your usual AWS support contacts or on the SageMaker Discussion Forum.
About the Authors
 Muhammad Khas is a Solutions Architect working in the Public Sector team at Amazon Web Services. He enjoys supporting customers in using artificial intelligence and machine learning to enhance their decision-making. Outside of work, Muhammad enjoys swimming and horseback riding.
 Megan Leoni is an AI/ML Specialist Solutions Architect for AWS, helping customers across Europe, Middle East, and Africa design and implement ML solutions. Prior to joining AWS, Megan worked as a data scientist building and deploying real-time fraud detection models.
 Mark Roy is a Principal Machine Learning Architect for AWS, helping customers design and build AI/ML solutions. Mark’s work covers a wide range of ML use cases, with a primary interest in computer vision, deep learning, and scaling ML across the enterprise. He has helped companies in many industries, including insurance, financial services, media and entertainment, healthcare, utilities, and manufacturing. Mark holds six AWS certifications, including the ML Specialty Certification. Prior to joining AWS, Mark was an architect, developer, and technology leader for over 25 years, including 19 years in financial services.