This is the first in a two-part series on the Amazon SageMaker Ground Truth hierarchical labeling workflow and dashboards. In Part 1, we look at creating multi-step labeling workflows for hierarchical label taxonomies using AWS Step Functions. In Part 2 (coming soon), we look at how to build dashboards for analyzing dataset annotations and worker performance metrics on data lakes generated as output from the complex workflows and derive insights.
Data labeling often requires a single data object to include multiple types of annotations, or multi-type, such as 2D boxes (bounding boxes), lines, and segmentation masks, all on a single image. Additionally, to create high-quality machine learning (ML) models using labeled data, you need a way to monitor the quality of the labels. You can do this by creating a workflow in which labeled data is audited and adjusted as needed. This post introduces a solution to address both of these labeling challenges using an automotive dataset, and you can extend this solution for use with any type of dataset.
For our use case, assume you have a large quantity of automotive video data filmed from one or more angles on a moving vehicle (for example, some Multi-Object Tracking (MOT) scenes) and you want to annotate the data using multiple types of annotations. You plan to use this data to train a cruise control, lane-keeping ML algorithm. Given the task at hand, it’s imperative that you use high-quality labels to train the model.
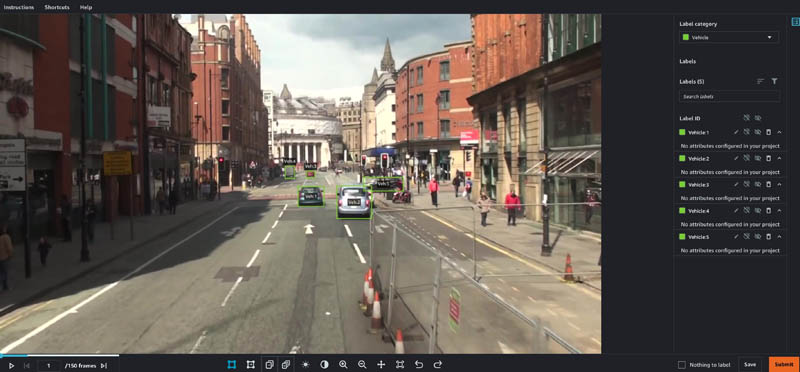
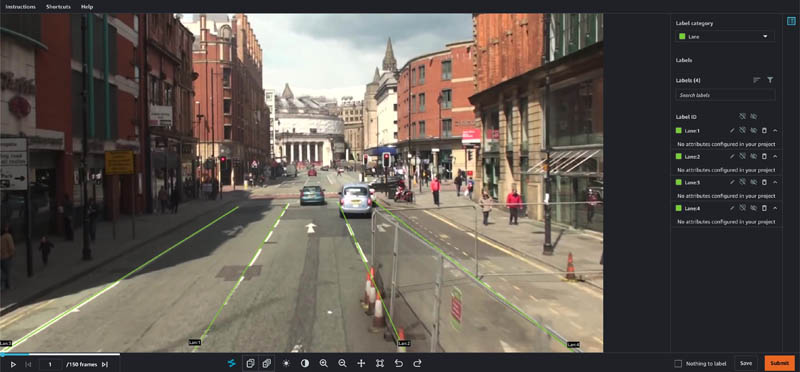
First, you must identify the types of annotations you want to add to your video frames. Some of the most important objects to label for this use case are other vehicles in the frame, road boundaries, and lanes. To do this, you define a hierarchical label taxonomy, which defines the type of labels you want to add to each video, and the order in which you want the labels to be added. The Ground Truth video tracking labeling job supports bounding box, polyline, polygon, and keypoint annotations. In this use case, vehicles are annotated using 2-dimensional boxes, or bounding boxes, and road boundaries and curves are annotated with a series of flexible lines segments, referred to as polylines.
Second, you need to establish a workflow to ensure label quality. To do this, you can create an audit workflow to verify the labels generated by your pipeline are of high enough quality to be useful for model training. In this audit workflow, you can greatly improve label accuracy by building a multi-step review pipeline that allows annotations to be audited, and if necessary, adjusted by a second reviewer who may be a subject matter expert.
Based on the size of the dataset and data objects, you should also consider the time and resources required to create and maintain this pipeline. Ideally, you want this series of labeling jobs to be started automatically, only requiring human operation to specify the input data and workflow.
The solution used in this post uses Ground Truth, AWS CloudFormation, Step Functions, and Amazon DynamoDB to create a series of labeling jobs that run in a parallel and hierarchical fashion. You use a hierarchical label taxonomy to create labeling jobs of different modalities (polylines and bounding boxes), and you add secondary human review steps to improve annotation quality and final results.
For this post, we demonstrate the solution in the context of the automotive space, but you can easily apply this general pipeline to labeling pipelines involving images, videos, text, and more. In addition, we demonstrate a workflow that is extensible, allowing you to reduce the total number of frames that need human review by adding automated quality checks and maintaining data quality at scale. In this use case, we use these checks to find anomalies in MOT time series data like video object tracking annotations.
We walk through a use case in which we generate multiple types of annotations for an automotive scene. Specifically, we run four labeling jobs per input video clip: an initial labeling of vehicles, initial labeling of lanes, and then an adjustment job per initial job with a separate quality assurance workforce.
We demonstrate the various extension points in our Step Function workflow that can allow you to run automated quality assurance checks. This allows for clip filtering between and after jobs have completed, which can result in high-quality annotations for a fraction of the cost.
AWS services used to implement this solution
This solution creates and manages Ground Truth labeling jobs to label video frames using multiple types of annotations. Ground Truth has native support for video datasets through its video frame object tracking task type.
This task type allows workers to create annotations across a series of video frames, providing tools to predict the next location of a bounding box in subsequent frames. It also supports multiple annotation types such as bounding boxes or polylines through the label category configuration files provided during job creation. We use these tools in this tutorial, running a job for vehicle bounding boxes and a job for lane polylines.

We use Step Functions to manage the labeling job. This solution abstracts labeling job creation so that you specify the overall workflow you want to run using a hierarchical label taxonomy, and all job management is handled by Step Functions.
The solution is implemented using CloudFormation templates that you can deploy in your AWS account. The interface to the solution is an API managed by Amazon API Gateway, which provides the ability to submit annotation tasks to the solution, which are then translated into Ground Truth labeling jobs.
Estimated costs
By deploying and using this solution, you incur the maximum cost of approximately $20 other than human labeling costs because it only uses fully managed compute resources on demand. Amazon Simple Storage Service (Amazon S3), AWS Lambda, Amazon SageMaker, API Gateway, Amazon Simple Notification Service (Amazon SNS), Amazon Simple Queue Service (Amazon SQS), AWS Glue, and Step Functions are included in the AWS Free Tier, with charges for additional use. For more information, see the following pricing pages:
Ground Truth pricing depends on the type of workforce that you use. If you’re a new user of Ground Truth, we suggest that you use a private workforce and include yourself as a worker to test your labeling job configuration. For more information, see Amazon SageMaker Ground Truth pricing.
Solution overview
In this two-part series, we discuss an architecture pattern that allows you to build a pipeline for orchestrating multi-step data labeling workflows that have workers add different types of annotation in parallel using Ground Truth. You also learn how you can analyze the dataset annotations produced by the workflow as well as worker performance. The first post covers the Step Functions workflow that automates advanced ML data labeling workflows using Ground Truth for chaining and hierarchical label taxonomies. The second post describes how to build data lakes on dataset annotations from Ground Truth and worker metrics and use these data lakes to derive insights or analyze the performance of your workers and dataset annotation quality using advanced analytics.
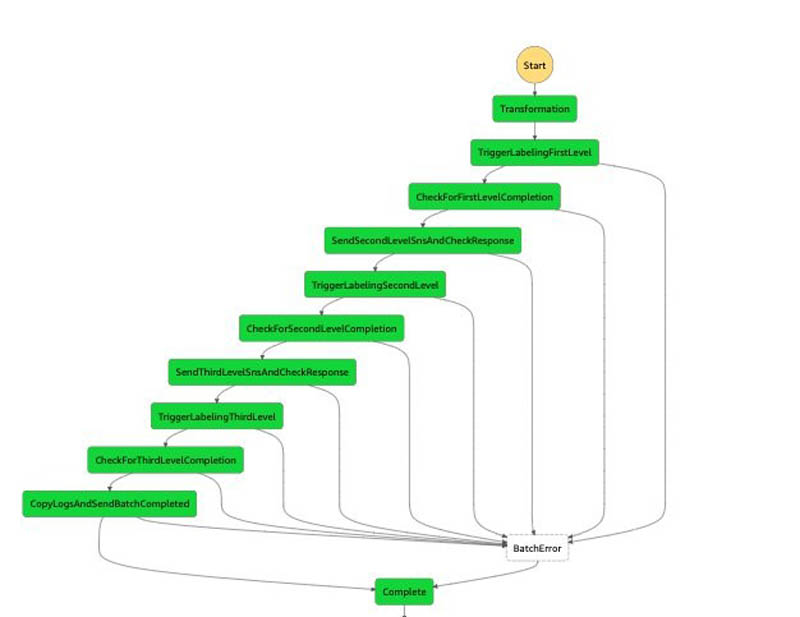
The following diagram depicts the hierarchical workflow, which you can use to run groups of labeling jobs in sequential steps, or levels, in which each labeling job in a single level runs in parallel.

The solution is composed of two main parts:
- Use an API to trigger the orchestration workflow.
- Run the individual steps of the workflow to achieve the labeling pipeline.
Trigger the orchestration workflow with an API
The CloudFormation template launched in this solution uses API Gateway to expose an endpoint for you to trigger batch labeling jobs. After you send the post request to the API Gateway endpoint, it runs a Lambda function to trigger the workflow.
The following table contains the two main user-facing APIs relevant to running batch, which represents multi-level labeling jobs.
| URL | Request Type | Description |
| {endpointUrl}/batch/create | POST | API triggers a new batch of labeling jobs |
| {endpointUrl}/batch/show | GET | APIs describe current state of the batch job run |
Run the workflow
For the orchestration of steps, we use Step Functions as a managed solution. When the batch job creation API is triggered, a Lambda function triggers a Step Functions workflow like the following. This begins the annotation input processing.
Let’s discuss the steps in more detail.
Transformation step
The first step is to preprocess the data. The current implementation converts the notebook inputs into the internal manifest file data type shared across multiple steps. This step doesn’t currently perform any complex processing, but you can further customize this step by adding custom data preprocessing logic to this function. For example, if your dataset was encoded in raw videos, you could perform frame splitting and manifest generation within transformation rather than in a separate notebook. Alternatively, if you’re using this solution to create a 3D point cloud labeling pipeline, you may want to add logic to extract pose data in a world coordinate system using the camera and LiDAR extrinsic matrices.
TriggerLabelingFirstLevel
When the data preprocessing is complete, the Ground Truth API operation CreateLabelingJob is used to launch labeling jobs. These labeling jobs are responsible for annotating datasets that are tied to the first level.
CheckForFirstLevelComplete
This step waits for the FIRST_LEVEL Ground Truth labeling jobs triggered from the TriggerLabelingFirstStep. When the job trigger is complete, this step waits for all the created labeling jobs to complete. An external listener Lambda function monitors the status of the labeling jobs, and when all the pending labeling jobs are done, it runs the sendTokenSucess API to signal to this state to proceed to the next step. Failure cases are handled using appropriate error clauses and timeouts in the step definition.
SendSecondLevelSNSAndCheckResponse
This step performs postprocessing on the output of the first-level job. For example, if your requirements are to only send 10% of frames to the adjustment jobs, you can implement this logic here by filtering the set of outputs from the first job.
TriggerLabelingSecondLevel
When the data postprocessing from the first-level is complete, CreateLabelingJobs is used to launch labeling jobs to complete annotations at the second level. At this stage, a private workforce reviews the quality of annotations of the first-level labeling jobs and updates annotations as needed.
CheckForSecondLevelComplete
This step is the same wait step as CheckForFirstLevelComplete, but this step simply waits for the jobs that are created from the second level.
SendThirdLevelSNSAndCheckResponse
This step is the same post-processing step as SendSecondLevelSNSAndCheckResponse, but this step does the postprocessing of the second-level output and feeds as input to the third-level labeling job.
TriggerLabelingThirdLevel
This is the same logic as TriggerLabelingSecondLevel, but the labeling jobs are triggered that are annotated as third level. At this stage, the private workforce is updating annotations for quality of the second-level labeling job.
CopyLogsAndSendBatchCompleted
This Lambda function logs and sends SNS messages to notify users that the batch is complete. It’s also a placeholder for any post-processing logic that you may want to run. Common postprocessing includes transforming the labeled data into a format compatible with a customer-specific data format.
Prerequisites
Before getting started, make sure you have the following prerequisites:
- An AWS account.
- A notebook AWS Identity and Access Management (IAM) role with the permissions required to complete this walkthrough. Your IAM role must have the required permissions attached. If you don’t require granular permission, attach the following AWS managed policies:
AmazonS3FullAccessAmazonAPIGatewayInvokeFullAccessAmazonSageMakerFullAccess
- Familiarity with Ground Truth, AWS CloudFormation, and Step Functions.
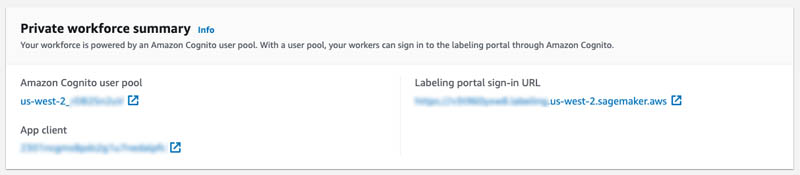
- A SageMaker workforce. For this post, we use a private workforce. You can create a workforce on the SageMaker console. Note the Amazon Cognito user pool identifier and the app client identifier after your workforce is created. You use these values to tell the CloudFormation stack deployment which workforce to create work teams, which represent the group of labelers. You can find these values in the Private workforce summary section on the console after you create your workforce, or when you call DescribeWorkteam.
The following GIF demonstrates how to create a private workforce. For step-by-step instructions, see Create an Amazon Cognito Workforce Using the Labeling Workforces Page.
Launch the CloudFormation stack
Now that we’ve seen the structure of the solution, we deploy it into our account so we can run an example workflow. All our deployment steps are managed by AWS CloudFormation—it creates resources in Lambda, Step Functions, DynamoDB, and API Gateway for you.
You can launch the stack in AWS Region us-east-1 on the CloudFormation console by choosing Launch Stack:
![]()
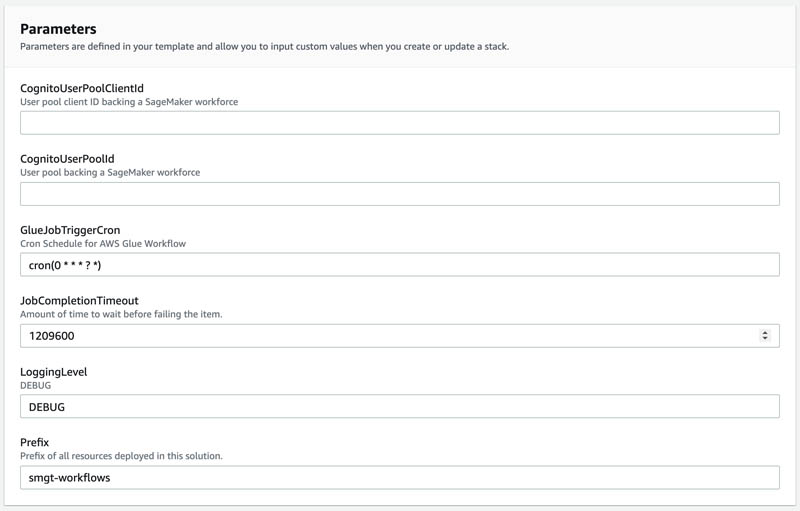
On the CloudFormation console, select Next, and then modify the following template parameters to customize the solution.
You can locate the CognitoUserPoolClientId and CognitoUserPoolId in the SageMaker console.
- CognitoUserPoolClientId: App client ID of your private workforce.
- CognitoUserPoolId: ID of the user pool associated with your private workforce.
To locate these values in the console:
- Open the SageMaker console at https://console.aws.amazon.com/sagemaker/
- Select Labeling workforces in the navigation pane.
- Choosing the Private
- Use the values in the Private work team summary Use the App client for the CognitoUserPoolClientId and use Amazon Cognito user pool for the CognitoUserPoolId.
For this tutorial, you can use the default values for the following parameters.
- GlueJobTriggerCron: Cron expression to use when scheduling reporting AWS Glue cron job. The results from annotations generated with SageMaker Ground Truth and worker performance metrics are used to create a dashboard in Amazon QuickSight. This will be explained in detail as part of second part. The outputs from SageMaker annotations and worker performance metrics shows up in Athena queries after processing the data with AWS Glue. By default, AWS Glue cron jobs run every hour.
- JobCompletionTimeout: Number of seconds to wait before treating a labeling job as failed and moving to the BatchError state.
- LoggingLevel: This is used internally and can be ignored. Logging level to change verbosity of logs. Accepts values DEBUG and PROD.
Prefix: A prefix to use when naming resources used to creating and manage labeling jobs and worker metrics.
To launch the stack in a different AWS Region, use the instructions found in the README of the GitHub repository.
After you deploy the solution, two new work teams are in the private workforce you created earlier: smgt-workflow-first-level and smgt-workflow-second-level. These are the default work teams used by the solution if no overrides are specified, and the smgt-workflow-second-level work team is used for labeling second-level and third-level jobs. You should add yourself to both work teams to see labeling tasks created by the solution. To learn how to add yourself to a private work team, see Add or Remove Workers.
You also need to go the the API Gateway console and look for the deployed API prefixed with smgt-workflow and note its ID. The notebook needs to reference this ID so it can determine which API URL to call.
Launch the notebook
After you deploy the solution into your account, you’re ready to launch a notebook to interact with it and start new workflows. In this section, we walk through the following steps:
- Set up and access the notebook instance.
- Obtain the example dataset.
- Prepare Ground Truth input files.
Set up the SageMaker notebook instance
In this example notebook, you learn how to map a simple taxonomy consisting of a vehicle class and a lane class to Ground Truth label category configuration files. A label category configuration file is used to define the labels that workers use to annotation your images. Next, you learn how to launch and configure the solution that runs the pipeline using a CloudFormation template. You can also further customize this code, for example by customizing the batch creation API call to run labeling for a different combination of task types.
To create a notebook instance and access the notebook used in this post, complete the following steps:
- Create a notebook instance with the following parameters:
- Use ml.t2.medium to launch the notebook instance.
- Increase the ML storage volume size to at least 10 GB.
- Select the notebook IAM role described in prerequisites. This role allows your notebook to upload your dataset to Amazon S3 and call the solution APIs.
- Open Jupyter Lab or Jupyter to access your notebook instances.
- In Jupyter, choose the SageMaker Examples In Jupyter Lab, choose the SageMaker icon.
- Choose Ground Truth Labeling Jobs and then choose the job sagemaker_ground_truth_workflows.ipynb.
- If you’re using Jupyter, choose Use to copy the notebook to your instance and run it. If you’re in Jupyter lab, choose Create a Copy.
Obtain the example dataset
Complete the following steps to set up your dataset:
- Download MOT17.zip using the Download Dataset section of the notebook.
This download is approximately 5 GB and takes several minutes.
- Unzip MOT17.zip using the notebook’s Unzip dataset
- Under the Copy Data to S3 header, run the cell to copy one set of video frames dataset to Amazon S3.
Prepare the Ground Truth input files
To use the solution, we need to create a manifest file. This file tells Ground Truth where your dataset is. We also need two label category configuration files to describe our label names, and the labeling tool to use for each (bounding box or polyline).
- Run the cells under Generate Manifest to obtain a list of frames in a video from the dataset. We take 150 frames at half the frame rate of the video as an example.
- Continue running cells under Generate Manifest to build a sequence file describing our video frames, and then to create a manifest file referring to our sequence file.
- Run the cell under Generate Label Category Configuration Files to create two new files: a vehicle label configuration file (which uses the bounding box tool), and a lane label configuration file (which uses the polyline tool).
- Copy the manifest file and label the category configuration files to Amazon S3 by running the Send data to S3
At this point, you have prepared all inputs to the labeling jobs and are ready to begin operating the solution.
To learn more about Ground Truth video frame labeling jobs and chaining, see the following references:
Run an example workflow
In this section, we walk through the steps to run an example workflow on the automotive dataset. We create a multi-modality workflow, perform both initial and audit labeling, then view our completed annotations.
Create a workflow batch
This solution orchestrates a workflow of Ground Truth labeling jobs to run both video object tracking bounding box jobs and polyline jobs, as well as automatically create adjustment jobs after the initial labeling. This workflow batch is configured through the batch_create API available to the solution.
Run the cell under Batch Creation Demo in the notebook. This passes your input manifest and label category configuration S3 URIs to a new workflow batch.
The cell should output the ID of the newly created workflow batch, for example:
Batch processor successfully triggered with BatchId : nb-ccb0514cComplete the first round of labeling tasks
To simulate workers completing labeling, we log in as a worker in the first-level Ground Truth work team and complete the labeling task.
- Run the cell under Sign-in To Worker Portal to get a link to log in to the worker portal.
An invitation should have already been sent to your email address if you invited yourself to the solution-generated first-level and second-level work teams.
- Log in and wait for the tasks to appear in the worker portal.
Two tasks should be available, one with ending in vehicle and one ending in lane, corresponding to the two jobs we created during workflow batch creation.
- Open each task and add some dummy labels by choosing and dragging on the image frames.
- Choose Submit on each task.
Complete the second round of labeling tasks
Our workflow specified we wanted adjustment jobs auto-launched for each first-level job. We now complete the second round of labeling tasks.
- Still in the worker portal, wait for tasks with
vehicle-auditandlane-auditto appear. - Open each task in the worker portal, noting that the prior level’s labels are still visible.
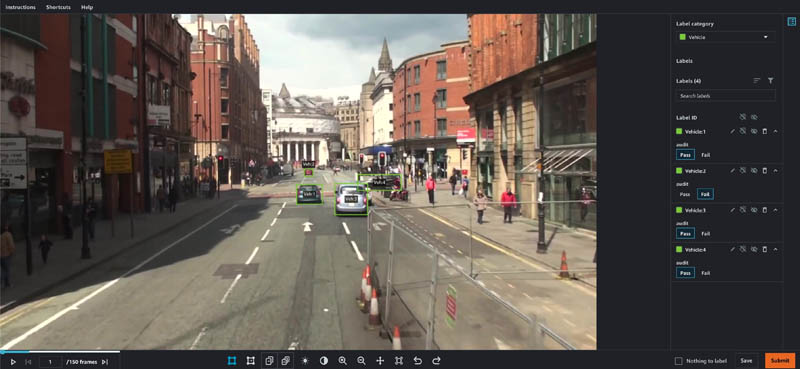
These adjustment tasks could be performed by a more highly trained quality assurance group in a different work team.
- Make adjustments as desired and choose Pass or Fail on each annotation.
- When you’re finished, choose Submit.

View the completed annotations
We can view details about the completed workflow batch by running the batch show API.
- Run the cell under Batch Show Demo.
This queries the solution’s database for all complete workflow run batches, and should output your batch ID when your batch is complete.
- We can get more specific details about a batch by running the cell under Batch Detailed Show Demo.
This takes the ID of a batch in the system and returns status information and the locations of all input and output manifests for each created job.
- Copy and enter the field
jobOutputS3Urlfor any of the jobs and verify the manifest file for that job is downloaded.
This file contains a reference to your input data sequence as well as the S3 URI of the output annotations for each sequence.
Final results
When all labeling jobs in the pipeline are complete, an SNS message is published on the default status SNS topic. You can subscribe to SNS topics using an email address for verifying the solution’s functionality. The message includes the batch ID used during batch creation, a message about the batch completion, and the same information the batch/show API provides under a batchInfo key. You can parse this message to extract metadata about the completed labeling jobs in the second level of the pipeline.
{
    "batchId": "nb-track-823f6d3e",
    "message": "Batch processing has completed successfully.",
    "batchInfo": {
        "batchId": "nb-track-823f6d3e",
        "status": "COMPLETE",
        "inputLabelingJobs": [
            {
                "jobName": "nb-track-823f6d3e-vehicle",
                "taskAvailabilityLifetimeInSeconds": "864000",
                "inputConfig": {
                    "inputManifestS3Uri": "s3://smgt-workflow-1-322552456788-us-west-2-batch-input/tracking_manifests/MOT17-13-SDP.manifest"
                },
                "jobModality": "VideoObjectTracking",
                "taskTimeLimitInSeconds": "604800",
                "maxConcurrentTaskCount": "100",
                "workteamArn": "arn:aws:sagemaker:us-west-2:322552456788:workteam/private-crowd/smgt-workflow-1-first-level",
                "jobType": "BATCH",
                "jobLevel": "1",
                "labelCategoryConfigS3Uri": "s3://smgt-workflow-1-322552456788-us-west-2-batch-input/tracking_manifests/vehicle_label_category.json"
            },
            {
                "jobName": "nb-track-823f6d3e-lane",
                "taskAvailabilityLifetimeInSeconds": "864000",
                "inputConfig": {
                    "inputManifestS3Uri": "s3://smgt-workflow-1-322552456788-us-west-2-batch-input/tracking_manifests/MOT17-13-SDP.manifest"
                },
                "jobModality": "VideoObjectTracking",
                "taskTimeLimitInSeconds": "604800",
                "maxConcurrentTaskCount": "100",
                "workteamArn": "arn:aws:sagemaker:us-west-2:322552456788:workteam/private-crowd/smgt-workflow-1-first-level",
                "jobType": "BATCH",
                "jobLevel": "1",
                "labelCategoryConfigS3Uri": "s3://smgt-workflow-1-322552456788-us-west-2-batch-input/tracking_manifests/lane_label_category.json"
            },
            {
                "jobName": "nb-track-823f6d3e-vehicle-audit",
                "taskAvailabilityLifetimeInSeconds": "864000",
                "inputConfig": {
                    "chainFromJobName": "nb-track-823f6d3e-vehicle"
                },
                "jobModality": "VideoObjectTrackingAudit",
                "taskTimeLimitInSeconds": "604800",
                "maxConcurrentTaskCount": "100",
                "workteamArn": "arn:aws:sagemaker:us-west-2:322552456788:workteam/private-crowd/smgt-workflow-1-first-level",
                "jobType": "BATCH",
                "jobLevel": "2"
            },
            {
                "jobName": "nb-track-823f6d3e-lane-audit",
                "taskAvailabilityLifetimeInSeconds": "864000",
                "inputConfig": {
                    "chainFromJobName": "nb-track-823f6d3e-lane"
                },
                "jobModality": "VideoObjectTrackingAudit",
                "taskTimeLimitInSeconds": "604800",
                "maxConcurrentTaskCount": "100",
                "workteamArn": "arn:aws:sagemaker:us-west-2:322552456788:workteam/private-crowd/smgt-workflow-1-first-level",
                "jobType": "BATCH",
                "jobLevel": "2"
            }
        ],
        "firstLevel": {
            "status": "COMPLETE",
            "numChildBatches": "2",
            "numChildBatchesComplete": "2",
            "jobLevels": [
                {
                    "batchId": "nb-track-823f6d3e-first_level-nb-track-823f6d3e-lane",
                    "batchStatus": "COMPLETE",
                    "labelingJobName": "nb-track-823f6d3e-lane",
                    "labelAttributeName": "nb-track-823f6d3e-lane-ref",
                    "labelCategoryS3Uri": "s3://smgt-workflow-1-322552456788-us-west-2-batch-input/tracking_manifests/lane_label_category.json",
                    "jobInputS3Uri": "s3://smgt-workflow-1-322552456788-us-west-2-batch-input/tracking_manifests/MOT17-13-SDP.manifest",
                    "jobInputS3Url": "https://smgt-workflow-1-322552456788-us-west-2-batch-input.s3.amazonaws.com/tracking_manifests/MOT17-13-SDP.manifest?...",
                    "jobOutputS3Uri": "s3://smgt-workflow-1-322552456788-us-west-2-batch-processing/batch_manifests/VideoObjectDetection/nb-track-823f6d3e-first_level-nb-track-823f6d3e-lane/output/nb-track-823f6d3e-lane/manifests/output/output.manifest",
                    "jobOutputS3Url": "https://smgt-workflow-1-322552456788-us-west-2-batch-processing.s3.amazonaws.com/batch_manifests/VideoObjectDetection/nb-track-823f6d3e-first_level-nb-track-823f6d3e-lane/output/nb-track-823f6d3e-lane/manifests/output/output.manifest?..."
                },
                {
                    "batchId": "nb-track-823f6d3e-first_level-nb-track-823f6d3e-vehicle",
                    "batchStatus": "COMPLETE",
                    "labelingJobName": "nb-track-823f6d3e-vehicle",
                    "labelAttributeName": "nb-track-823f6d3e-vehicle-ref",
                    "labelCategoryS3Uri": "s3://smgt-workflow-1-322552456788-us-west-2-batch-input/tracking_manifests/vehicle_label_category.json",
                    "jobInputS3Uri": "s3://smgt-workflow-1-322552456788-us-west-2-batch-input/tracking_manifests/MOT17-13-SDP.manifest",
                    "jobInputS3Url": "https://smgt-workflow-1-322552456788-us-west-2-batch-input.s3.amazonaws.com/tracking_manifests/MOT17-13-SDP.manifest?...",
                    "jobOutputS3Uri": "s3://smgt-workflow-1-322552456788-us-west-2-batch-processing/batch_manifests/VideoObjectTracking/nb-track-823f6d3e-first_level-nb-track-823f6d3e-vehicle/output/nb-track-823f6d3e-vehicle/manifests/output/output.manifest",
                    "jobOutputS3Url": "https://smgt-workflow-1-322552456788-us-west-2-batch-processing.s3.amazonaws.com/batch_manifests/VideoObjectTracking/nb-track-823f6d3e-first_level-nb-track-823f6d3e-vehicle/output/nb-track-823f6d3e-vehicle/manifests/output/output.manifest?..."
                }
            ]
        },
        "secondLevel": {
            "status": "COMPLETE",
            "numChildBatches": "2",
            "numChildBatchesComplete": "2",
            "jobLevels": [
                {
                    "batchId": "nb-track-823f6d3e-second_level-nb-track-823f6d3e-vehicle-audit",
                    "batchStatus": "COMPLETE",
                    "labelingJobName": "nb-track-823f6d3e-vehicle-audit",
                    "labelAttributeName": "nb-track-823f6d3e-vehicle-audit-ref",
                    "labelCategoryS3Uri": "s3://smgt-workflow-1-322552456788-us-west-2-batch-processing/label_category_input/nb-track-823f6d3e-second_level-nb-track-823f6d3e-vehicle-audit/category-file.json",
                    "jobInputS3Uri": "s3://smgt-workflow-1-322552456788-us-west-2-batch-processing/batch_manifests/VideoObjectTracking/nb-track-823f6d3e-first_level-nb-track-823f6d3e-vehicle/output/nb-track-823f6d3e-vehicle/manifests/output/output.manifest",
                    "jobInputS3Url": "https://smgt-workflow-1-322552456788-us-west-2-batch-processing.s3.amazonaws.com/batch_manifests/VideoObjectTracking/nb-track-823f6d3e-first_level-nb-track-823f6d3e-vehicle/output/nb-track-823f6d3e-vehicle/manifests/output/output.manifest?...",
                    "jobOutputS3Uri": "s3://smgt-workflow-1-322552456788-us-west-2-batch-processing/batch_manifests/VideoObjectTrackingAudit/nb-track-823f6d3e-second_level-nb-track-823f6d3e-vehicle-audit/output/nb-track-823f6d3e-vehicle-audit/manifests/output/output.manifest",
                    "jobOutputS3Url": "https://smgt-workflow-1-322552456788-us-west-2-batch-processing.s3.amazonaws.com/batch_manifests/VideoObjectTrackingAudit/nb-track-823f6d3e-second_level-nb-track-823f6d3e-vehicle-audit/output/nb-track-823f6d3e-vehicle-audit/manifests/output/output.manifest?..."
                },
                {
                    "batchId": "nb-track-823f6d3e-second_level-nb-track-823f6d3e-lane-audit",
                    "batchStatus": "COMPLETE",
                    "labelingJobName": "nb-track-823f6d3e-lane-audit",
                    "labelAttributeName": "nb-track-823f6d3e-lane-audit-ref",
                    "labelCategoryS3Uri": "s3://smgt-workflow-1-322552456788-us-west-2-batch-processing/label_category_input/nb-track-823f6d3e-second_level-nb-track-823f6d3e-lane-audit/category-file.json",
                    "jobInputS3Uri": "s3://smgt-workflow-1-322552456788-us-west-2-batch-processing/batch_manifests/VideoObjectDetection/nb-track-823f6d3e-first_level-nb-track-823f6d3e-lane/output/nb-track-823f6d3e-lane/manifests/output/output.manifest",
                    "jobInputS3Url": "https://smgt-workflow-1-322552456788-us-west-2-batch-processing.s3.amazonaws.com/batch_manifests/VideoObjectDetection/nb-track-823f6d3e-first_level-nb-track-823f6d3e-lane/output/nb-track-823f6d3e-lane/manifests/output/output.manifest?...",
                    "jobOutputS3Uri": "s3://smgt-workflow-1-322552456788-us-west-2-batch-processing/batch_manifests/VideoObjectDetectionAudit/nb-track-823f6d3e-second_level-nb-track-823f6d3e-lane-audit/output/nb-track-823f6d3e-lane-audit/manifests/output/output.manifest",
                    "jobOutputS3Url": "https://smgt-workflow-1-322552456788-us-west-2-batch-processing.s3.amazonaws.com/batch_manifests/VideoObjectDetectionAudit/nb-track-823f6d3e-second_level-nb-track-823f6d3e-lane-audit/output/nb-track-823f6d3e-lane-audit/manifests/output/output.manifest?..."
                }
            ]
        },
        "thirdLevel": {
            "status": "COMPLETE",
            "numChildBatches": "0",
            "numChildBatchesComplete": "0",
            "jobLevels": []
        }
    },
    "token": "arn:aws:states:us-west-2:322552456788:execution:smgt-workflow-1-batch-process:nb-track-823f6d3e-8432b929",
    "status": "SUCCESS"
}
Within each job metadata blob, a jobOutputS3Url field contains a presigned URL to access the output manifest of this particular job. The output manifest contains the results of data labeling in augmented manifest format, which you can parse to retrieve annotations by indexing the JSON object with <jobName>-ref. This field points to an S3 location containing all annotations for the given video clip.
{
    "source-ref": "s3://smgt-workflow-1-322552456788-us-west-2-batch-input/tracking_manifests/MOT17-13-SDP_seq.json",
    "nb-track-93aa7d01-vehicle-ref": "s3://smgt-workflow-1-322552456788-us-west-2-batch-processing/batch_manifests/VideoObjectTracking/nb-track-93aa7d01-first_level-nb-track-93aa7d01-vehicle/output/nb-track-93aa7d01-vehicle/annotations/consolidated-annotation/output/0/SeqLabel.json",
    "nb-track-93aa7d01-vehicle-ref-metadata": {
        "class-map": {"0": "Vehicle"},
        "job-name": "labeling-job/nb-track-93aa7d01-vehicle",
        "human-annotated": "yes",
        "creation-date": "2021-04-05T17:43:02.469000",
        "type": "groundtruth/video-object-tracking",
    },
    "nb-track-93aa7d01-vehicle-audit-ref": "s3://smgt-workflow-1-322552456788-us-west-2-batch-processing/batch_manifests/VideoObjectTrackingAudit/nb-track-93aa7d01-second_level-nb-track-93aa7d01-vehicle-audit/output/nb-track-93aa7d01-vehicle-audit/annotations/consolidated-annotation/output/0/SeqLabel.json",
    "nb-track-93aa7d01-vehicle-audit-ref-metadata": {
        "class-map": {"0": "Vehicle"},
        "job-name": "labeling-job/nb-track-93aa7d01-vehicle-audit",
        "human-annotated": "yes",
        "creation-date": "2021-04-05T17:55:33.284000",
        "type": "groundtruth/video-object-tracking",
        "adjustment-status": "unadjusted",
    },
}
For example, for bounding box jobs, the SeqLabel.json file contains bounding box annotations for each annotated frame (in this case, only the first frame is annotated):
{
  "tracking-annotations": [
    {
      "annotations": [
        {
          "height": 66,
          "width": 81,
          "top": 547,
          "left": 954,
          "class-id": "0",
          "label-category-attributes": {},
          "object-id": "3c02d0f0-9636-11eb-90fe-6dd825b8de95",
          "object-name": "Vehicle:1"
        },
        {
          "height": 98,
          "width": 106,
          "top": 545,
          "left": 1079,
          "class-id": "0",
          "label-category-attributes": {},
          "object-id": "3d957ee0-9636-11eb-90fe-6dd825b8de95",
          "object-name": "Vehicle:2"
        }
      ],
      "frame-no": "0",
      "frame": "000001.jpg",
      "frame-attributes": {}
    }
  ]
}
Because the batch completion SNS message contains all output manifest files from the jobs launched in parallel, you can perform any postprocessing of your annotations based on this message. For example, if you have a specific serialization format for these annotations that combines vehicle bounding boxes and lane annotations, you can get the output manifest of the lane job as well as the vehicle job, then merge based on frame number and convert to your desired final format.
To learn more about Ground Truth output data formats, see Output Data.
Clean up
To avoid incurring future charges, run the Clean up section of the notebook to delete all the resources including S3 objects and the CloudFormation stack. When the deletion is complete, make sure to stop and delete the notebook instance that is hosting the current notebook script.
Conclusion
This two-part series provides you with a reference architecture to build an advanced data labeling workflow comprised of a multi-step data labeling pipeline, adjustment jobs, and data lakes for corresponding dataset annotations and worker metrics as well as updated dashboards.
In this post, you learned how to take video frame data and trigger a workflow to run multiple Ground Truth labeling jobs, generating two different types of annotations (bounding boxes and polylines). You also learned how you can extend the pipeline to audit and verify the labeled dataset and how to retrieve the audited results. Lastly, you saw how to reference the current progress of batch jobs using the BatchShow API.
For more information about the data lake for Ground Truth dataset annotations and worker metrics from Ground Truth, check back to the Ground Truth blog for the second blog post in this series(coming soon).
Try out the notebook and customize it for your input datasets by adding additional jobs or audit steps, or by modifying the data modality of the jobs. Further customization of solution could include, but is not limited, to:
- Adding additional types of annotations such as semantic segmentation masks or keypoints
- Adding automated quality assurance and filtering to the Step Functions workflow to only send low-quality annotations to the next level of review
- Adding third or fourth levels of quality review for additional, more specialized types of reviews
This solution is built using serverless technologies on top of Step Functions, which makes it highly customizable and applicable for a wide variety of applications.
About the Authors
 Vidya Sagar Ravipati is a Deep Learning Architect at the Amazon ML Solutions Lab, where he leverages his vast experience in large-scale distributed systems and his passion for machine learning to help AWS customers across different industry verticals accelerate their AI and cloud adoption. Previously, he was a Machine Learning Engineer in Connectivity Services at Amazon who helped to build personalization and predictive maintenance platforms.
 Jeremy Feltracco is a Software Development Engineer with the Amazon ML Solutions Lab at Amazon Web Services. He uses his background in computer vision, robotics, and machine learning to help AWS customers accelerate their AI adoption.
 Jae Sung Jang is a Software Development Engineer. His passion lies with automating manual process using AI Solutions and Orchestration technologies to ensure business execution.
 Talia Chopra is a Technical Writer in AWS specializing in machine learning and artificial intelligence. She works with multiple teams in AWS to create technical documentation and tutorials for customers using Amazon SageMaker, MxNet, and AutoGluon.