GAN is a generative ML model that is widely used in advertising, games, entertainment, media, pharmaceuticals, and other industries. You can use it to create fictional characters and scenes, simulate facial aging, change image styles, produce chemical formulas synthetic data, and more.
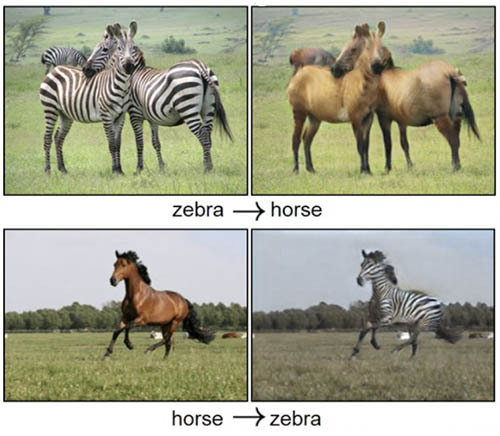
For example, the following images show the effect of picture-to-picture conversion.
The following images show the effect of synthesizing scenery based on semantic layout.

This post walks you through building your first GAN model using Amazon SageMaker. This is a journey of learning GAN from the perspective of practical engineering experiences, as well as opening a new AI/ML domain of generative models.
We also introduce a use case of one of the hottest GAN applications in the synthetic data generation area. We hope this gives you a tangible sense on how GAN is used in real-life scenarios.
Overview of solution
Among the following two pictures of handwritten digits, one of them is actually generated by a GAN model. Can you tell which one?
 |
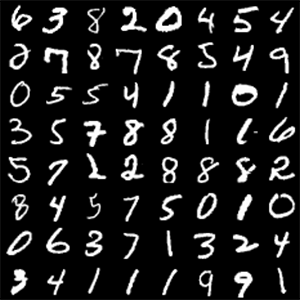 |
The main topic of this article is to use ML techniques to generate synthetic handwritten digits. To achieve this goal, you personally experience the training of a GAN model. Generating synthetic handwritten digits is basically the same as the basic principles and engineering processes of portrait generation, although their data, algorithm complexity, and accuracy requirements are different.
Generative Adversarial Networks by Ian Goodfellow et al. is a deep neural network architecture consisting of a generator network and a discriminator network. The generator synthesizes data and tries to deceive the discriminator, whereas the discriminator authenticates the data and tries to correctly identify all synthesized data. In the process of training iterations, the two networks continue to evolve and confront until they reach an equilibrium state (Nash equilibrium). The discriminator can no longer recognize synthesized data anymore, at which point the training process is over.
To train a GAN model, we need to start with some tools and services that are efficient and necessary for ML practices on AWS. As the working environment, SageMaker is a fully managed ML service. It offers all mainstream ML frameworks as managed container images, such as Scikit-Learn, XGBoost, MXNet, TensorFlow, PyTorch, and more. The SageMaker SDK is an open-source development kit for SageMaker that allows you to use SageMaker and other AWS services, for example, accessing data in an Amazon Simple Storage Service (Amazon S3) bucket, or training a model with a managed Amazon Elastic Compute Cloud (Amazon EC2) instance.
With SageMaker end-to-end ML functionality, you can focus on the model building work and easily train a variety of GAN models, without overheads in infrastructure and framework maintenance.
The following diagram illustrates our architecture.

The training data comes from the S3 storage bucket, and is loaded into the local storage of the training instance. The managed training frameworks and managed algorithms serve in the form of container images in Amazon Elastic Container Registry (Amazon ECR), which are combined with the custom training code when the training container is launched. The training output is collected and sent to a specified S3 bucket. In the following sections, we learn how to use these resources via the SageMaker SDK.
We use AWS services such as Amazon SageMaker and Amazon S3, which incur certain cloud resource usage fees.
Set up the development environment
SageMaker provides a managed Jupyter notebook instance, for model building, training, and more. You can carry out ML activities effectively and easily via Jupyter notebooks. For instructions on setting up your Jupyter notebook working environment, see Get Started with Amazon SageMaker Notebook Instances.
Alternatively, you may want to work with Amazon SageMaker Studio. For instructions, see Get Started with Studio Notebooks.
Download the source code
The source code is available in SageMaker Examples GitHub repository.
- On the Git menu, choose Clone a Repository.
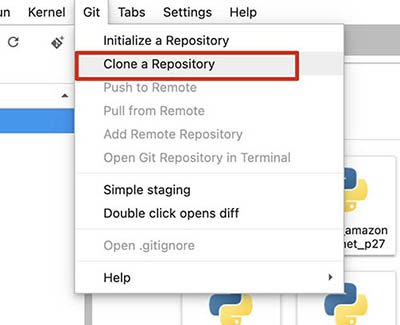
- Enter the clone URI of the repository (
https://github.com/aws/amazon-sagemaker-examples.git). - Choose Clone.

When the download is complete, browse the source code structure through the file browser.
- Open the notebook
build_gan_with_pytorch.ipynb, which is under the folder/amazon-sagemaker-examples/advanced_functionality/pytorch_bring_your_own_gan/.

- In the Select Kernel pop-up, choose conda_pytorch_latest_p36.

If using a Studio environment, select the Python3 (PyTorch 1.6 Python 3.6 GPU Optimized) kernel instead.
The code and notebooks used in this post are available on GitHub, and are all verified with Python 3.6, PyTorch 1.5, and SageMaker-managed JupyterLab.
Deep convolutional generative adversarial network (DCGAN)
In 2016, Alec Radford et al. published the paper “Unsupervised Representation Learning with Deep Convolutional Generative Adversarial Networks”. This pioneered the application of convolutional neural networks to GAN. In the algorithm design, the full connected layers are replaced with convolutional layers, which improves the stability of training in the image generation scenarios.
Network structure
The generator network uses a stride transposed convolutional layers to improve the resolution of the tensor. The input shape is (batch_size, 100) and the output shape is (batch_size, 64, 64, 3). In other words, the network accepts a 100-dimensional uniform distribution vector, and then undergoes continuous transformation until the final image is generated.
The discriminator network receives pictures in (64, 64, 3) format, uses 2D convolutional layers for downsampling, and finally passes them to the full connected layer for classification.

The training process of the DCGAN model can be roughly divided into three sub-processes.

Firstly, the generator network uses a random number as input to generate a synthetic picture. Then it uses the authentic picture and the synthetic picture to train the discriminator network and update the parameters. Finally, it updates the generator network parameters.
Code structure
The file structure of the project directory pytorch_bring_your_own_gan is as follows:
The file train.py contains three classes: the generator network Generator, the discriminator network Discriminator, and a wrapper class for a single batch training process. See the following code:
The train.py file also contains several functions, which are used to facilitate training of the networks of Generator and Discriminator. Some of the major functions are as follows:
Model development
During development, you may run the train.py script directly from the Linux command line. You can specify input data channels, model hyperparameters, and training output storage via command line arguments (for more information, see Use PyTorch with the SageMaker Python SDK):
Such design of the training script parameter not only provides a good debugging method, but also is a protocol and prerequisite for integration with SageMaker containers. This takes into account the flexibility of model development and the portability of the training environment.
Model training and validation
Find and open the notebook file build_gan_with_pytorch.ipynb, which introduces and runs the training process. Some of the code in this section is omitted; refer to the notebook for details.
Download data
Many public datasets are available on the internet that are very helpful for ML engineering and scientific research, such as algorithm study and evaluation. We use the MNIST dataset, which is a handwritten digits dataset, to train a DCGAN model, and eventually generate some synthetic handwritten digits. See the following code:
Prepare the data
The PyTorch framework has a torchvision.datasets package, which provides access to several datasets. You can use the following commands to read the pre-downloaded MNIST dataset from local storage, for later use:
The SageMaker SDK creates a default S3 bucket for you to access various files and data that you may need in the ML engineering lifecycle. We can get the name of this bucket through the default_bucket method of the sagemaker.session.Session class in the SageMaker SDK:
The SageMaker SDK provides tools for operating AWS services. For example, the S3Downloader class is used to download objects in Amazon S3, and S3Uploader is used to upload local files to Amazon S3. You upload the dataset files to Amazon S3 for model training. During model training, we don’t download data from the internet in order to avoid network latency caused by fetching data from the internet. This also avoids possible security risks due to direct access to the internet. See the following code:
Train the model
Via the sagemaker.get_execution_role() method, the notebook can get the role pre-assigned to the notebook instance. This role is used to obtain training resources, such as downloading training framework images, allocating EC2 instances, and so on.
The hyperparameters used in the model training task can be defined in the notebook so that it’s separated from the algorithm and training code. The hyperparameters are passed in when the training task is created and dynamically combined with the training task. See the following code:
The PyTorch class from the sagemaker.pytorch package is an estimator for the PyTorch framework. You can use it to create and run training tasks. In the parameter list, instance_type specifies the type of the training instance, such as CPU or GPU instances. The directory containing the training script and model code is specified by source_dir, and the training script name must be clearly defined by entry_point. These parameters are passed to the training job along with other parameters, and they determine the environment settings of the training task. See the following code:
Pay special attention to the use_spot_instances parameter. The value of True here means that you want to use Spot Instances to train the model. Because ML training usually requires a large amount of computing resources to run for a long time, using Spot Instances can help you control your cost. Spot Instances may save cost up to 90% vs. On-Demand Instances. Depending on the instance type, Region, and time, the actual price might be different.
You have created a PyTorch object, and you can use it to fit pre-uploaded training data on Amazon S3. The following command initiates the training job, and the training data is loaded into the training instance local storage in the form of an input channel named MNIST. When the training task starts, the training data is already available on the local file system of the training instance, and the training script train.py can access the data from the local disk afterwards.
Depending on the training instance you choose, the training process may last from dozens of minutes to hours. We recommend setting the wait parameter to False, which detaches the notebook from the training job. In scenarios with long training time and many training logs, it can prevent the notebook context from being lost due to network interruption or session timeout. After the notebook is detached from the training task, the output is temporarily invisible. Run the following code to allow the notebook to obtain and resume the previous training session:
Because the model was designed to use the GPU power to accelerate training, it’s much faster on GPU instances than on CPU instances. For example, the g4dn.2xlarge instance take about 12 minutes, whereas the c5.xlarge instance may take more than 6 hours. The current model doesn’t support multi-instance training, so an instance_count parameter with a value more than 1 doesn’t bring extra benefits in training time optimization.
When the training job is complete, the trained model is collected and uploaded to Amazon S3. The upload location is specified by the output_path parameter, which is provided when creating the PyTorch object.
Test the model
You download the trained model from Amazon S3 to the local file system of the notebook instance, where this Jupyter notebook is running. The following code loads and runs the model, and then generates a picture of handwritten digits from a random number as input:

Use case: Synthetic data boosting handwritten text recognition
GAN and DCGAN have been derived into a remarkable number of variants that address different problems in their respective domains. Let’s look at one use case, which is designed to reduce the effort and cost in data collection and annotation, as well as improve the performance of a handwriting text recognition system.
ScrabbleGAN (see also the GitHub repo), introduced by scientists from Amazon, is a semi-supervised approach to synthesize handwritten text images that are versatile both in style and lexicon. It relies on a novel generative model that can generate images of words with an arbitrary length. The generator can manipulate the resulting text style, for instance, whether the text is cursive, or how thin the pen stroke is.

Problem definition
Optical character recognition (OCR), especially handwritten text recognition (HTR) systems, have seen significant performance improvements in the deep learning era. However, deep learning-based HTR is limited by the number of training examples. In other words, data gathering and labeling are challenging and costly tasks.
Targeting the lack of versatile, annotated handwritten text, and the difficulty to obtain it, Amazon scientists introduced a semi-supervised learning solution by creating realistic, synthesized text, reducing the need for annotations and enriching the variety of training data in both style and lexicon.
Network architecture
In contrast to the vast majority of text-related networks that rely on recurrent neural networks (RNNs), ScrabbleGAN introduces a novel fully convolutional handwritten text generation architecture, which allows for arbitrarily long outputs. This architecture learns character embeddings without the need for character-level annotation.
Handwriting is a local process—each letter is influenced by its predecessor and successor. The attention of the synthesizer is focused on the immediate neighbors of the current letter, and the generator G is designed to mimic this process. Instead of generating the image out of an entire word representation, each convolutional-upsampling layer widens the receptive field, as well as the overlap between two neighboring characters. This overlap allows adjacent characters to interact, and creates a smooth transition. The style of each image is controlled by a noise vector z given as input to the network. To generate the same style for the entire word or sentence, this noise vector is kept constant throughout the generation of all the characters in the input.

The purpose of the discriminator D is to identify synthetic images generated by G from the real ones. It also discriminates between such images based on the handwriting output style. The discriminator architecture has to account for the varying length of the generated image, therefore it’s designed to be convolutional, and is essentially a concatenation of separate binary classifiers with overlapping receptive fields. Because it’s designed not to rely on character-level annotations, it doesn’t use class supervision for each of these classifiers, therefore unlabeled images can be used to train D. A pooling layer aggregates scores from all classifiers into the final discriminator output.
While discriminator D promotes real-looking images, the recognizer R promotes readable text, in essence identifying between gibberish and real text. Generated images are penalized by comparing the recognized text in the output of R to the one that was given as input to G. R is trained only on real, labeled, handwritten samples.
Most recognition networks use a recurrent module, which learns an implicit language model that helps it identify the correct character even if it’s not written clearly. Although this quality is usually desired in a handwriting recognition model, in this synthetic data case, it may lead the network to correctly read characters that weren’t written clearly by the generator G. Therefore, the recurrent head of the recognition network isn’t excluded, and only the convolutional backbone is used.
Conclusion
The PyTorch framework, one of the most popular deep learning frameworks, has been advancing rapidly, and is widely recognized and applied in recent years. More and more new models have been composed with PyTorch, and a remarkable number of existing models are being migrated from other frameworks to PyTorch. It has already become one of the de facto mainstream deep learning frameworks.
SageMaker is closely integrated with a variety of AWS services, such as EC2 instances of various types, Amazon S3, and Amazon ECR. It provides an end-to-end, consistent ML experience for ML practitioners of all frameworks. SageMaker continues to support mainstream ML frameworks, including PyTorch. ML algorithms and models developed with PyTorch can be easily transplanted to a SageMaker environment by using the fully managed Jupyter notebook, Spot training instances, Amazon ECR, the SageMaker SDK, and more. This lowers the overhead of ML engineering and infrastructure operation, improves productivity and efficiency, and reduces operation and maintenance costs.
Synthetic data, generated by GAN, is rich and versatile in features, and can be produced in substantial amounts. Therefore, you can use it to improve the performance of a model by enriching the training set. Moreover, this technique can reduce effort and cost in data gathering and labeling.
DCGAN is a landmark in the field of generative adversarial networks, and it’s the cornerstone of many modern complex generative adversarial networks today. We explore some of the most recent and interesting variants of GANs in later posts. The introduction and engineering practices discussed in this post can help you understand the principles and engineering methods for GAN in general. Try out your first generative model, available as an example of SageMaker, have fun, and see you next time.
About the Author
 Laurence MIAO, Solutions Architect at AWS. Laurence is specialized in AI/ML. He helps customers empower their business with AI/ML on AWS. Before AWS, Laurence served in a variety of software projects and organizations. His tech spectrum covers high-performance internet applications, enterprise information system integration, DevOps, cloud computing, and Machine Learning.