Sometimes it’s hard to find the right words to describe what you’re looking for. As the adage goes, “A picture is worth a thousand words.” Often, it’s easier to show a physical example or image than to try to describe an item with words, especially when using a search engine to find what you’re looking for.
In this post, you build a visual image search application from scratch in under an hour, including a full-stack web application for serving the visual search results.
Visual search can improve customer engagement in retail businesses and e-commerce, particularly for fashion and home decoration retailers. Visual search allows retailers to suggest thematically or stylistically related items to shoppers, which retailers would struggle to achieve by using a text query alone. According to Gartner, “By 2021, early adopter brands that redesign their websites to support visual and voice search will increase digital commerce revenue by 30%.”
High-level example of visual searching
Amazon SageMaker is a fully managed service that provides every developer and data scientist with the ability to build, train, and deploy machine learning (ML) models quickly. Amazon Elasticsearch Service (Amazon ES) is a fully managed service that makes it easy for you to deploy, secure, and run Elasticsearch cost-effectively at scale. Amazon ES offers k-Nearest Neighbor (KNN) search, which can enhance search in similar use cases such as product recommendations, fraud detection, and image, video, and semantic document retrieval. Built using the lightweight and efficient Non-Metric Space Library (NMSLIB), KNN enables high-scale, low-latency, nearest neighbor search on billions of documents across thousands of dimensions with the same ease as running any regular Elasticsearch query.
The following diagram illustrates the visual search architecture.

Overview of solution
Implementing the visual search architecture consists of two phases:
- Building a reference KNN index on Amazon ES from a sample image dataset.
- Submitting a new image to the Amazon SageMaker endpoint and Amazon ES to return similar images.
KNN reference index creation
In this step, from each image you extract 2,048 feature vectors from a pre-trained Resnet50 model hosted in Amazon SageMaker. Each vector is stored to a KNN index in an Amazon ES domain. For this use case, you use images from FEIDEGGER, a Zalando research dataset consisting of 8,732 high-resolution fashion images. The following screenshot illustrates the workflow for creating KNN index.

The process includes the following steps:
- Users interact with a Jupyter notebook on an Amazon SageMaker notebook instance.
- A pre-trained Resnet50 deep neural net from Keras is downloaded, the last classifier layer is removed, and the new model artifact is serialized and stored in Amazon Simple Storage Service (Amazon S3). The model is used to start a TensorFlow Serving API on an Amazon SageMaker real-time endpoint.
- The fashion images are pushed through the endpoint, which runs the images through the neural network to extract the image features, or embeddings.
- The notebook code writes the image embeddings to the KNN index in an Amazon ES domain.
Visual search from a query image
In this step, you present a query image from the application, which passes through the Amazon SageMaker hosted model to extract 2,048 features. You use these features to query the KNN index in Amazon ES. KNN for Amazon ES lets you search for points in a vector space and find the “nearest neighbors” for those points by Euclidean distance or cosine similarity (the default is Euclidean distance). When it finds the nearest neighbors vectors (for example, k = 3 nearest neighbors) for a given image, it returns the associated Amazon S3 images to the application. The following diagram illustrates the visual search full-stack application architecture.

The process includes the following steps:
- The end-user accesses the web application from their browser or mobile device.
- A user-uploaded image is sent to Amazon API Gateway and AWS Lambda as a base64 encoded string and is re-encoded as bytes in the Lambda function.
- A publicly readable image URL is passed as a string and downloaded as bytes in the function.
- The bytes are sent as the payload for inference to an Amazon SageMaker real-time endpoint, and the model returns a vector of the image embeddings.
- The function passes the image embedding vector in the search query to the k-nearest neighbor in the index in the Amazon ES domain. A list of k similar images and their respective Amazon S3 URIs is returned.
- The function generates pre-signed Amazon S3 URLs to return back to the client web application, used to display similar images in the browser.
AWS services
To build the end-to-end application, you use the following AWS services:
- AWS Amplify – AWS Amplify is a JavaScript library for front-end and mobile developers building cloud-enabled applications. For more information, see the GitHub repo.
- Amazon API Gateway – A fully managed service to create, publish, maintain, monitor, and secure APIs at any scale.
- AWS CloudFormation – AWS CloudFormation gives developers and businesses an easy way to create a collection of related AWS and third-party resources and provision them in an orderly and predictable fashion.
- Amazon ES – A managed service that makes it easy to deploy, operate, and scale Elasticsearch clusters at scale.
- AWS IAM – AWS Identity and Access Management (IAM) enables you to manage access to AWS services and resources securely.
- AWS Lambda – An event-driven, serverless computing platform that runs code in response to events and automatically manages the computing resources the code requires.
- Amazon SageMaker – A fully managed end-to-end ML platform to build, train, tune, and deploy ML models at scale.
- AWS SAM– AWS Serverless Application Model (AWS SAM) is an open-source framework for building serverless applications.
- Amazon S3 – An object storage service that offers an extremely durable, highly available, and infinitely scalable data storage infrastructure at very low cost.
Prerequisites
For this walkthrough, you should have an AWS account with appropriate IAM permissions to launch the CloudFormation template.
Deploying your solution
You use a CloudFormation stack to deploy the solution. The stack creates all the necessary resources, including the following:
- An Amazon SageMaker notebook instance to run Python code in a Jupyter notebook
- An IAM role associated with the notebook instance
- An Amazon ES domain to store and retrieve image embedding vectors into a KNN index
- Two S3 buckets: one for storing the source fashion images and another for hosting a static website
From the Jupyter notebook, you also deploy the following:
- An Amazon SageMaker endpoint for getting image feature vectors and embeddings in real time.
- An AWS SAM template for a serverless back end using API Gateway and Lambda.
- A static front-end website hosted on an S3 bucket to demonstrate a real-world, end-to-end ML application. The front-end code uses ReactJS and the Amplify JavaScript library.
To get started, complete the following steps:
- Sign in to the AWS Management Console with your IAM user name and password.
- Choose Launch Stack and open it in a new tab:

- On the Quick create stack page, select the check box to acknowledge the creation of IAM resources.
- Choose Create stack.

- Wait for the stack to complete executing.
You can examine various events from the stack creation process on the Events tab. When the stack creation is complete, you see the status CREATE_COMPLETE.
You can look on the Resources tab to see all the resources the CloudFormation template created.
- On the Outputs tab, choose the SageMakerNotebookURL value.
This hyperlink opens the Jupyter notebook on your Amazon SageMaker notebook instance that you use to complete the rest of the lab.

You should be on the Jupyter notebook landing page.
- Choose visual-image-search.ipynb.

Building a KNN index on Amazon ES
For this step, you should be at the beginning of the notebook with the title Visual image search. Follow the steps in the notebook and run each cell in order.
You use a pre-trained Resnet50 model hosted on an Amazon SageMaker endpoint to generate the image feature vectors (embeddings). The embeddings are saved to the Amazon ES domain created in the CloudFormation stack. For more information, see the markdown cells in the notebook.
Continue when you reach the cell Deploying a full-stack visual search application in your notebook.
The notebook contains several important cells.
To load a pre-trained ResNet50 model without the final CNN classifier layer, see the following code (this model is used just as an image feature extractor):
#Import Resnet50 model
model = tf.keras.applications.ResNet50(weights='imagenet', include_top=False,input_shape=(3, 224, 224),pooling='avg')
You save the model as a TensorFlow SavedModel format, which contains a complete TensorFlow program, including weights and computation. See the following code:
#Save the model in SavedModel format
model.save('./export/Servo/1/', save_format='tf')
Upload the model artifact (model.tar.gz) to Amazon S3 with the following code:
#Upload the model to S3
sagemaker_session = sagemaker.Session()
inputs = sagemaker_session.upload_data(path='model.tar.gz', key_prefix='model')
inputs
You deploy the model into an Amazon SageMaker TensorFlow Serving-based server using the Amazon SageMaker Python SDK. The server provides a super-set of the TensorFlow Serving REST API. See the following code:
#Deploy the model in Sagemaker Endpoint. This process will take ~10 min.
from sagemaker.tensorflow.serving import Model

sagemaker_model = Model(entry_point='inference.py', model_data = 's3://' + sagemaker_session.default_bucket() + '/model/model.tar.gz',
                        role = role, framework_version='2.1.0', source_dir='./src' )

predictor = sagemaker_model.deploy(initial_instance_count=3, instance_type='ml.m5.xlarge')
Extract the reference images features from the Amazon SageMaker endpoint with the following code:
# define a function to extract image features
from time import sleep

sm_client = boto3.client('sagemaker-runtime')
ENDPOINT_NAME = predictor.endpoint

def get_predictions(payload):
    return sm_client.invoke_endpoint(EndpointName=ENDPOINT_NAME,
                                           ContentType='application/x-image',
                                           Body=payload)

def extract_features(s3_uri):
    key = s3_uri.replace(f's3://{bucket}/', '')
    payload = s3.get_object(Bucket=bucket,Key=key)['Body'].read()
    try:
        response = get_predictions(payload)
    except:
        sleep(0.1)
        response = get_predictions(payload)

    del payload
    response_body = json.loads((response['Body'].read()))
    feature_lst = response_body['predictions'][0]

    return s3_uri, feature_lst
You define Amazon ES KNN index mapping with the following code:
#Define KNN Elasticsearch index mapping
knn_index = {
    "settings": {
        "index.knn": True
    },
    "mappings": {
        "properties": {
            "zalando_img_vector": {
                "type": "knn_vector",
                "dimension": 2048
            }
        }
    }
}
Import the image feature vector and associated Amazon S3 image URI into the Amazon ES KNN Index with the following code:
# defining a function to import the feature vectors corrosponds to each S3 URI into Elasticsearch KNN index
# This process will take around ~3 min.


def es_import(i):
    es.index(index='idx_zalando',
             body={"zalando_img_vector": i[1],
                   "image": i[0]}
            )

process_map(es_import, result, max_workers=workers)
Building a full-stack visual search application
Now that you have a working Amazon SageMaker endpoint for extracting image features and a KNN index on Amazon ES, you’re ready to build a real-world full-stack ML-powered web app. You use an AWS SAM template to deploy a serverless REST API with API Gateway and Lambda. The REST API accepts new images, generates the embeddings, and returns similar images to the client. Then you upload a front-end website that interacts with your new REST API to Amazon S3. The front-end code uses Amplify to integrate with your REST API.
- In the following cell, prepopulate a CloudFormation template that creates necessary resources such as Lambda and API Gateway for full-stack application:
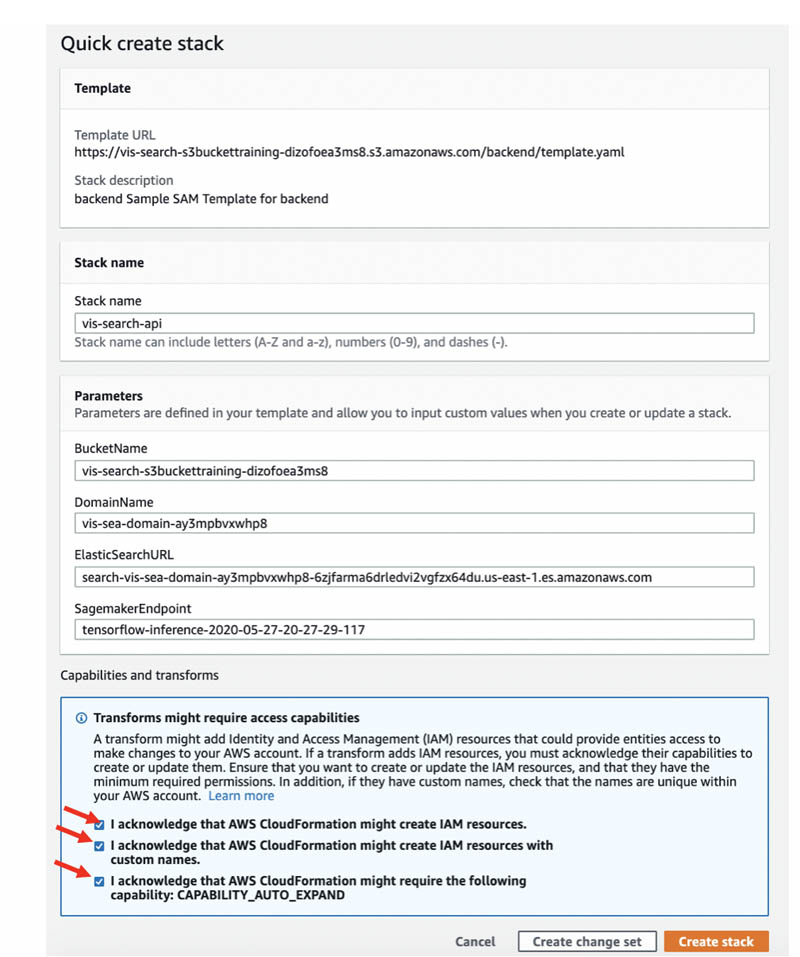
s3_resource.Object(bucket, 'backend/template.yaml').upload_file('./backend/template.yaml', ExtraArgs={'ACL':'public-read'}) sam_template_url = f'https://{bucket}.s3.amazonaws.com/backend/template.yaml' # Generate the CloudFormation Quick Create Link print("Click the URL below to create the backend API for visual search:n") print(( 'https://console.aws.amazon.com/cloudformation/home?region=us-east-1#/stacks/create/review' f'?templateURL={sam_template_url}' '&stackName=vis-search-api' f'¶m_BucketName={outputs["s3BucketTraining"]}' f'¶m_DomainName={outputs["esDomainName"]}' f'¶m_ElasticSearchURL={outputs["esHostName"]}' f'¶m_SagemakerEndpoint={predictor.endpoint}' ))The following screenshot shows the output: a pre-generated CloudFormation template link.

- Choose the link.
You are sent to the Quick create stack page.
- Select the check boxes to acknowledge the creation of IAM resources, IAM resources with custom names, and
CAPABILITY_AUTO_EXPAND. - Choose Create stack.
After the stack creation is complete, you see the status CREATE_COMPLETE. You can look on the Resources tab to see all the resources the CloudFormation template created.
- After the stack is created, proceed through the cells.
The following cell indicates that your full-stack application, including front-end and back-end code, are successfully deployed:
print('Click the URL below:n')
print(outputs['S3BucketSecureURL'] + '/index.html')
The following screenshot shows the URL output.

- Choose the link.
You are sent to the application page, where you can upload an image of a dress or provide the URL link of a dress and get similar dresses.

- When you’re done testing and experimenting with your visual search application, run the last two cells at the bottom of the notebook:
# Delete the endpoint
predictor.delete_endpoint()

# Empty S3 Contents
training_bucket_resource = s3_resource.Bucket(bucket)
training_bucket_resource.objects.all().delete()

hosting_bucket_resource = s3_resource.Bucket(outputs['s3BucketHostingBucketName'])
hosting_bucket_resource.objects.all().delete()
These cells terminate your Amazon SageMaker endpoint and empty your S3 buckets to prepare you for cleaning up your resources.
Cleaning up
To delete the rest of your AWS resources, go to the AWS CloudFormation console and delete the vis-search-api and vis-search stacks.

Conclusion
In this post, we showed you how to create an ML-based visual search application using Amazon SageMaker and the Amazon ES KNN index. You used a pre-trained Resnet50 model trained on an ImageNet dataset. However, you can also use other pre-trained models, such as VGG, Inception, and MobileNet, and fine-tune with your own dataset.
A GPU instance is recommended for most deep learning purposes. Training new models is faster on a GPU instance than a CPU instance. You can scale sub-linearly when you have multi-GPU instances or if you use distributed training across many instances with GPUs. However, we used CPU instances for this use case so that you can complete the walkthrough under the AWS Free Tier.
For more information about the code sample in the post, see the GitHub repo. For more information about Amazon ES, see the following:
- How can I improve indexing performance on my Elasticsearch cluster?
- Amazon Elasticseach Service Best Practices
- Reducing cost for small Amazon Elasticsearch Service domains
About the Authors
 Amit Mukherjee is a Sr. Partner Solutions Architect with AWS. He provides architectural guidance to help partners achieve success in the cloud. He has a special interest in AI and machine learning. In his spare time, he enjoys spending quality time with his family.
 Laith Al-Saadoon is a Sr. Solutions Architect with a focus on data analytics at AWS. He spends his days obsessing over designing customer architectures to process enormous amounts of data at scale. In his free time, he follows the latest in machine learning and artificial intelligence.