Amazon SageMaker Data Wrangler reduces the time that it takes to aggregate and prepare data for machine learning (ML) from weeks to minutes in Amazon SageMaker Studio, the first fully integrated development environment (IDE) for ML. With Data Wrangler, you can simplify the process of data preparation and feature engineering, and complete each step of the data preparation workflow, including data selection, cleansing, exploration, and visualization, from a single visual interface. You can import data from multiple data sources such as Amazon Simple Storage Service (Amazon S3), Amazon Redshift, Snowflake, and 26 federated query data sources supported by Amazon Athena.
Starting today, when importing data from Athena data sources, you can configure the S3 query output location and data retention period to import data in Data Wrangler to control where and how long Athena stores the intermediary data. In this post, we walk you through this new feature.
Solution overview
Athena is an interactive query service that makes it easy to browse the AWS Glue Data Catalog, and analyze data in Amazon S3 and 26 federated query data sources using standard SQL. When you use Athena to import data, you can use Data Wrangler’s default S3 location for the Athena query output, or specify an Athena workgroup to enforce a custom S3 location. Previously, you had to implement cleanup workflows to remove this intermediary data, or manually set up S3 lifecycle configuration to control storage cost and meet your organization’s data security requirements. This is a big operational overhead, and not scalable.
Data Wrangler now supports custom S3 locations and data retention periods for your Athena query output. With this new feature, you can change the Athena query output location to a custom S3 bucket. You now have a default data retention policy of 5 days for the Athena query output, and you can change this to meet your organization’s data security requirements. Based on the retention period, the Athena query output in the S3 bucket gets cleaned up automatically. After you import the data, you can perform exploratory data analysis on this dataset and store the clean data back to Amazon S3.
The following diagram illustrates this architecture.

For our use case, we use a sample bank dataset to walk through the solution. The workflow consists of the following steps:
- Download the sample dataset and upload it to an S3 bucket.
- Set up an AWS Glue crawler to crawl the schema and store the metadata schema in the AWS Glue Data Catalog.
- Use Athena to access the Data Catalog to query data from the S3 bucket.
- Create a new Data Wrangler flow to connect to Athena.
- When creating the connection, set the retention TTL for the dataset.
- Use this connection in the workflow and store the clean data in another S3 bucket.
For simplicity, we assume that you have already set up the Athena environment (steps 1–3). We detail the subsequent steps in this post.
Prerequisites
To set up the Athena environment, refer to the User Guide for step-by-step instructions, and complete steps 1–3 as outlined in the previous section.
Import your data from Athena to Data Wrangler
To import your data, complete the following steps:
- On the Studio console, choose the Resources icon in the navigation pane.
- Choose Data Wrangler on the drop-down menu.
- Choose New flow.

- On the Import tab, choose Amazon Athena.

A detail page opens where you can connect to Athena and write a SQL query to import from the database. - Enter a name for your connection.

- Expand Advanced configuration.
When connecting to Athena, Data Wrangler uses Amazon S3 to stages the queried data. By default, this data is staged at the S3 locations3://sagemaker-{region}-{account_id}/athena/with a retention period of 5 days. - For Amazon S3 location of query results, enter your S3 location.
- Select Data retention period and set the data retention period (for this post, 1 day).
If you deselect this option, the data will persist indefinitely.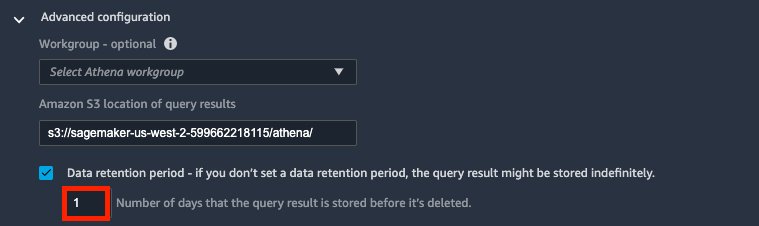 Behind the scenes, Data Wrangler attaches an S3 lifecycle configuration policy to that S3 location to automatically clean up. See the following example policy:
You need
s3:GetLifecycleConfigurationands3:PutLifecycleConfigurationfor your SageMaker execution role to correctly apply the lifecycle configuration policies. Without these permissions, you get error messages when you try to import the data.The following error message is an example of missing the
GetLifecycleConfigurationpermission.

The following error message is an example of missing the
PutLifecycleConfigurationpermission.
- Optionally, for Workgroup, you can specify an Athena workgroup.
An Athena workgroup isolates users, teams, applications, or workloads into groups, each with its own permissions and configuration settings. When you specify a workgroup, Data Wrangler inherits the workgroup setting defined in Athena. For example, if a workgroup has an S3 location defined to store query results and enable Override client side settings, you can’t edit the S3 query result location. By default, Data Wrangler also saves the Athena connection for you. This is displayed as a new Athena tile in the Import tab. You can always reopen that connection to query and bring different data into Data Wrangler.

- Deselect Save connection if you don’t want to save the connection.

- To configure the Athena connection, choose None for Sampling to import the entire dataset.

For large datasets, Data Wrangler allows you to import a subset of your data to build out your transformation workflow, and only process the entire dataset when you’re ready. This speeds up the iteration cycle and save processing time and cost. To learn more about different data sampling options available, visit Amazon SageMaker Data Wrangler now supports random sampling and stratified sampling. - For Data catalog¸ choose AwsDataCatalog.
- For Database, choose your database.

Data Wrangler displays the available tables. You can choose each table to check the schema and preview the data.

- Enter the following code in the query field:
- Choose Run to preview the data.
- If everything looks good, choose Import.
- Enter a dataset name and choose Add to import the data into your Data Wrangler workspace.

Analyze and process data with Data Wrangler
After you load the data in to Data Wrangler, you can do exploratory data analysis (EDA) and prepare the data for machine learning.
- Choose the plus sign next to the
bank-datadataset in the data flow, and choose Add analysis.
Data Wrangler provides built-in analyses, including a Data Quality and Insights Report, data correlation, a pre-training bias report, a summary of your dataset, and visualizations (such as histograms and scatter plots). Additionally, you can create your own custom visualization.
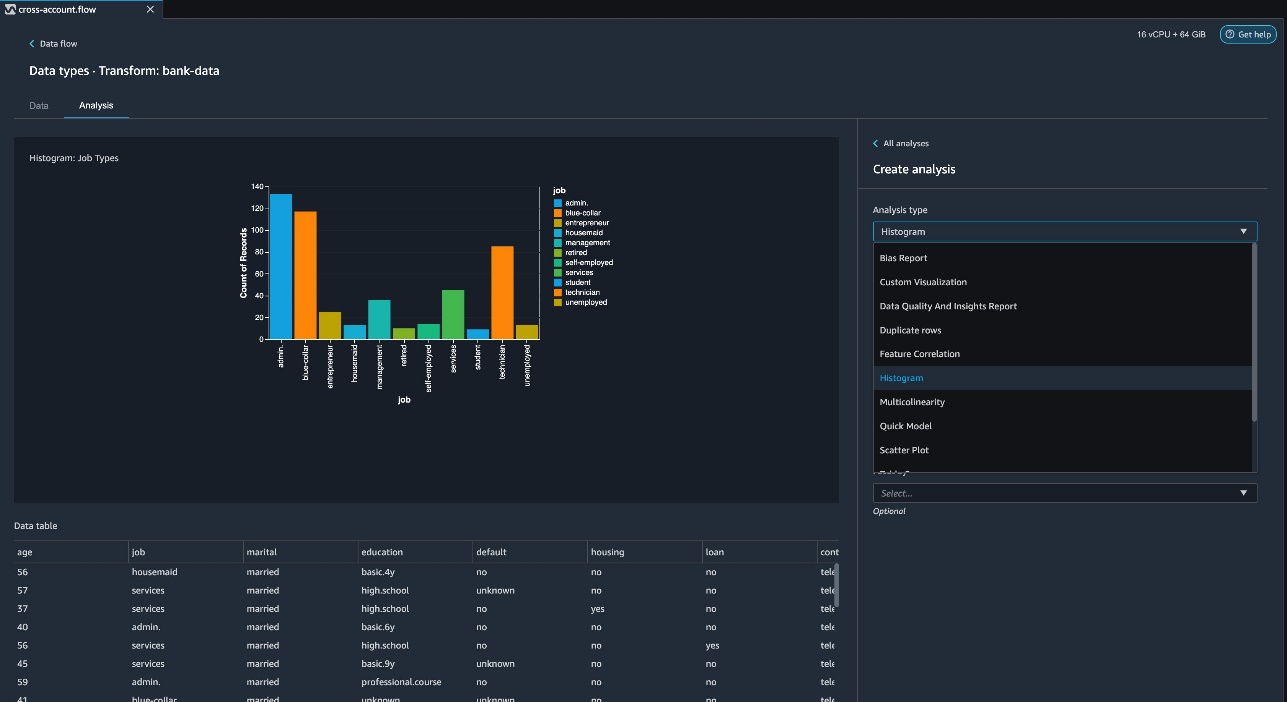
- For Analysis type¸ choose Data Quality and Insight Report.
This automatically generates visualizations, analyses to identify data quality issues, and recommendations for the right transformations required for your dataset. - For Target column, choose Y.
- Because this is a classification problem statement, for Problem type, select Classification.
- Choose Create.

Data Wrangler creates a detailed report on your dataset. You can also download the report to your local machine.

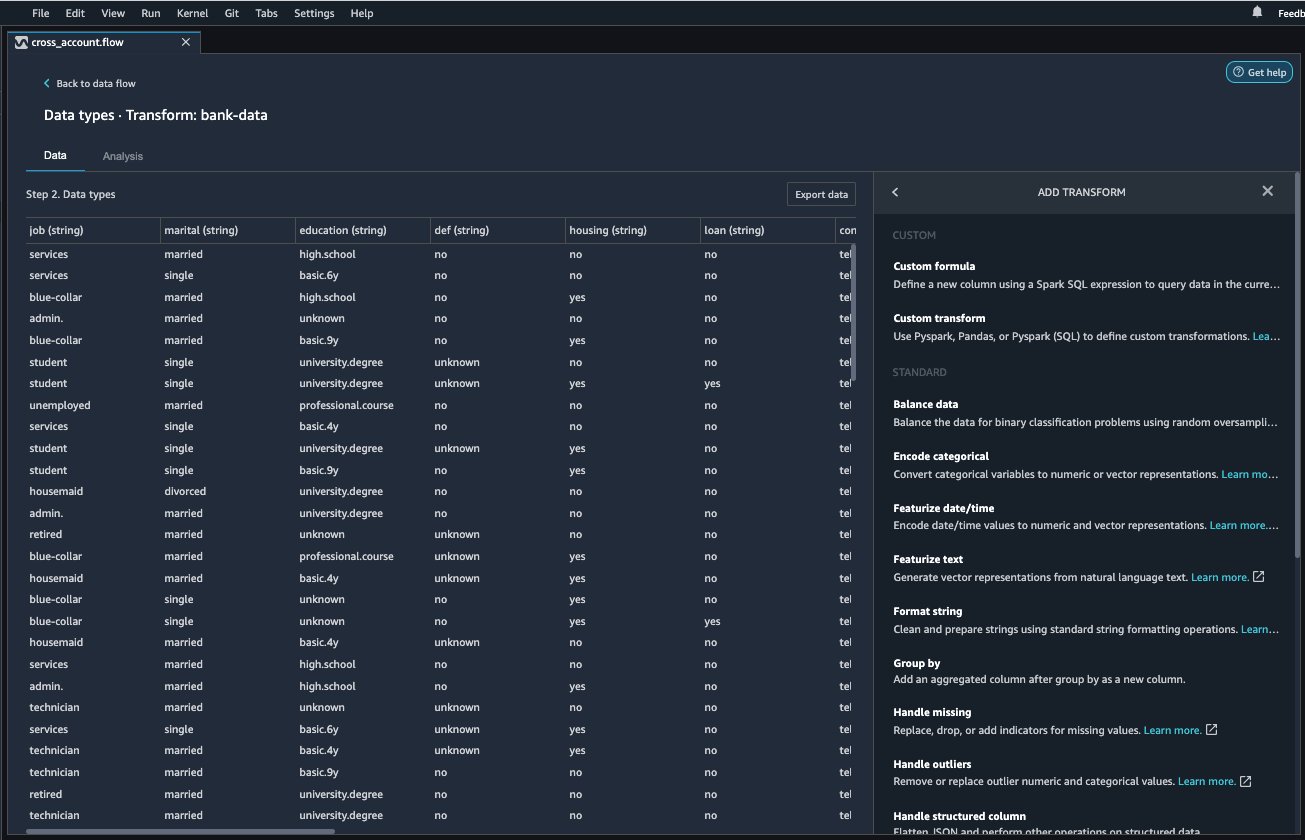
- For data preparation, choose the plus sign next to the bank-data dataset in the data flow, and choose Add transform.
- Choose Add step to start building your transformations.

At the time of this writing, Data Wrangler provides over 300 built-in transformations. You can also write your own transformations using Pandas or PySpark.
You can now start building your transforms and analyses based on your business requirements.
Clean up
To avoid ongoing costs, delete the Data Wrangler resources using the steps below when you’re finished.
- Select Running Instances and Kernels icon.
- Under RUNNING APPS, click on the shutdown icon next to the
sagemaker-data-wrangler-1.0 app. - Choose Shut down all to confirm.

Conclusion
In this post, we provided an overview of customizing your S3 location and enabling S3 lifecycle configurations for importing data from Athena to Data Wrangler. With this feature, you can store intermediary data in a secured S3 location, and automatically remove the data copy after the retention period to reduce the risk for unauthorized access to data. We encourage you to try out this new feature. Happy building!
To learn more about Athena and SageMaker, visit the Athena User Guide and Amazon SageMaker Documentation.
About the authors
 Meenakshisundaram Thandavarayan is a Senior AI/ML specialist with AWS. He helps hi-tech strategic accounts on their AI and ML journey. He is very passionate about data-driven AI.
 Harish Rajagopalan is a Senior Solutions Architect at Amazon Web Services. Harish works with enterprise customers and helps them with their cloud journey.
 James Wu is a Senior AI/ML Specialist Solution Architect at AWS. helping customers design and build AI/ML solutions. James’s work covers a wide range of ML use cases, with a primary interest in computer vision, deep learning, and scaling ML across the enterprise. Prior to joining AWS, James was an architect, developer, and technology leader for over 10 years, including 6 years in engineering and 4 years in marketing & advertising industries.