Amazon SageMaker is a fully managed service that provides every developer and data scientist with the ability to quickly build, train, and deploy machine learning (ML) models at scale. Amazon SageMaker removes the heavy lifting from each step of the ML process to make it easier to develop high-quality models. You can one-click deploy your ML models for making low latency inferences in real-time on fully managed inference endpoints. Autoscaling is an out-of-the-box feature that monitors your workloads and dynamically adjusts the capacity to maintain steady and predictable performance at the possible lowest cost. When the workload increases, autoscaling brings more instances online. When the workload decreases, autoscaling removes unnecessary instances, helping you reduce your compute cost.
The following diagram is a sample architecture that showcases how a model is invoked for inference using an Amazon SageMaker endpoint.
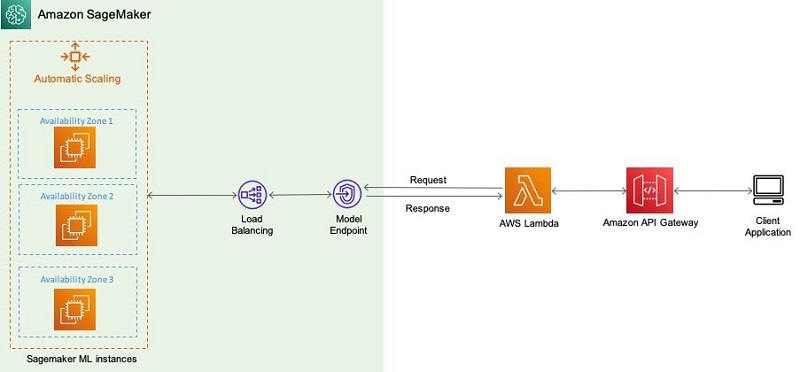
Amazon SageMaker automatically attempts to distribute your instances across Availability Zones. So, we strongly recommend that you deploy multiple instances for each production endpoint for high availability. If you’re using a VPC, configure at least two subnets in different Availability Zones so Amazon SageMaker can distribute your instances across those Availability Zones.
Amazon SageMaker supports four different ways to implement horizontal scaling of Amazon SageMaker endpoints. You can configure some of these policies using the Amazon SageMaker console, the AWS Command Line Interface (AWS CLI), or the AWS SDK’s Application Auto Scaling API for the advanced options. In this post, we showcase how to configure using the boto3 SDK for Python and outline different scaling policies and patterns.
Prerequisites
This post assumes that you have a functional Amazon SageMaker endpoint deployed. Models are hosted within an Amazon SageMaker endpoint; you can have multiple model versions being served via the same endpoint. Each model is referred to as a production variant.
If you’re new to Amazon SageMaker and have not created an endpoint yet, complete the steps in Identifying bird species on the edge using the Amazon SageMaker built-in Object Detection algorithm and AWS DeepLens until the section Testing the model to develop and host an object detection model.
If you want to get started directly with this post, you can also fetch a model from the MXNet model zoo. For example, if you plan to use ResidualNet152, you need the model definition and the model weights inside a tarball. You can also create custom models that can be hosted as an Amazon SageMaker endpoint. For instructions on building a tarball with Gluon and Apache MXNet, see Deploying custom models built with Gluon and Apache MXNet on Amazon SageMaker.
Configuring autoscaling
The following are the high-level steps for creating a model and applying a scaling policy:
- Use Amazon SageMaker to create a model or bring a custom model.
- Deploy the model.
If you use the MXNet estimator to train the model, you can call deploy to create an Amazon SageMaker endpoint:
# Train my estimator
mxnet_estimator = MXNet('train.py',
                framework_version='1.6.0',
                py_version='py3',
                instance_type='ml.p2.xlarge',
                instance_count=1)

mxnet_estimator.fit('s3://my_bucket/my_training_data/')

# Deploy my estimator to an Amazon SageMaker endpoint and get a Predictor
predictor = mxnet_estimator.deploy(instance_type='ml.m5.xlarge',
                initial_instance_count=1)#Instance_count=1 is not recommended for production use. Use this only for experimentation.
If you use a pretrained model like ResidualNet152, you can create an MXNetModel object and call deploy to create the Amazon SageMaker endpoint:
mxnet_model = MXNetModel(model_data='s3://my_bucket/pretrained_model/model.tar.gz',
                         role=role,
                         entry_point='inference.py',
                         framework_version='1.6.0',
                         py_version='py3')
predictor = mxnet_model.deploy(instance_type='ml.m5.xlarge',#
initial_instance_count=1)- Create a scaling policy and apply the scaling policy to the endpoint. The following section discusses your scaling policy options.
Scaling options
You can define minimum, desired, and maximum number of instances per endpoint and, based on the autoscaling configurations, instances are managed dynamically. The following diagram illustrates this architecture.

To scale the deployed Amazon SageMaker endpoint, first fetch its details:
import pprint
import boto3
from sagemaker import get_execution_role
import sagemaker
import json

pp = pprint.PrettyPrinter(indent=4, depth=4)
role = get_execution_role()
sagemaker_client = boto3.Session().client(service_name='sagemaker')
endpoint_name = 'name-of-the-endpoint'
response = sagemaker_client.describe_endpoint(EndpointName=endpoint_name)
pp.pprint(response)

#Let us define a client to play with autoscaling options
client = boto3.client('application-autoscaling') # Common class representing Application Auto Scaling for SageMaker amongst other services
Simple scaling or TargetTrackingScaling
Use this option when you want to scale based on a specific Amazon CloudWatch metric. You can do this by choosing a specific metric and setting threshold values. The recommended metrics for this option are average CPUUtilization or SageMakerVariantInvocationsPerInstance.
SageMakerVariantInvocationsPerInstance is the average number of times per minute that each instance for a variant is invoked. CPUUtilization is the sum of work handled by a CPU.
The following code snippets show how to scale using these metrics. You can also push custom metrics to CloudWatch or use other metrics. For more information, see Monitor Amazon SageMaker with Amazon CloudWatch.
resource_id='endpoint/' + endpoint_name + '/variant/' + 'AllTraffic' # This is the format in which application autoscaling references the endpoint

response = client.register_scalable_target(
    ServiceNamespace='sagemaker', #
    ResourceId=resource_id,
    ScalableDimension='sagemaker:variant:DesiredInstanceCount',
    MinCapacity=1,
    MaxCapacity=2
)

#Example 1 - SageMakerVariantInvocationsPerInstance Metric
response = client.put_scaling_policy(
    PolicyName='Invocations-ScalingPolicy',
    ServiceNamespace='sagemaker', # The namespace of the AWS service that provides the resource.
    ResourceId=resource_id, # Endpoint name
    ScalableDimension='sagemaker:variant:DesiredInstanceCount', # SageMaker supports only Instance Count
    PolicyType='TargetTrackingScaling', # 'StepScaling'|'TargetTrackingScaling'
    TargetTrackingScalingPolicyConfiguration={
        'TargetValue': 10.0, # The target value for the metric. - here the metric is - SageMakerVariantInvocationsPerInstance
        'PredefinedMetricSpecification': {
            'PredefinedMetricType': 'SageMakerVariantInvocationsPerInstance', # is the average number of times per minute that each instance for a variant is invoked.
        },
        'ScaleInCooldown': 600, # The cooldown period helps you prevent your Auto Scaling group from launching or terminating
                                # additional instances before the effects of previous activities are visible.
                                # You can configure the length of time based on your instance startup time or other application needs.
                                # ScaleInCooldown - The amount of time, in seconds, after a scale in activity completes before another scale in activity can start.
        'ScaleOutCooldown': 300 # ScaleOutCooldown - The amount of time, in seconds, after a scale out activity completes before another scale out activity can start.

        # 'DisableScaleIn': True|False - ndicates whether scale in by the target tracking policy is disabled.
                            # If the value is true , scale in is disabled and the target tracking policy won't remove capacity from the scalable resource.
    }
)

#Example 2 - CPUUtilization metric
response = client.put_scaling_policy(
    PolicyName='CPUUtil-ScalingPolicy',
    ServiceNamespace='sagemaker',
    ResourceId=resource_id,
    ScalableDimension='sagemaker:variant:DesiredInstanceCount',
    PolicyType='TargetTrackingScaling',
    TargetTrackingScalingPolicyConfiguration={
        'TargetValue': 90.0,
        'CustomizedMetricSpecification':
        {
            'MetricName': 'CPUUtilization',
            'Namespace': '/aws/sagemaker/Endpoints',
            'Dimensions': [
                {'Name': 'EndpointName', 'Value': endpoint_name },
                {'Name': 'VariantName','Value': 'AllTraffic'}
            ],
            'Statistic': 'Average', # Possible - 'Statistic': 'Average'|'Minimum'|'Maximum'|'SampleCount'|'Sum'
            'Unit': 'Percent'
        },
        'ScaleInCooldown': 600,
        'ScaleOutCooldown': 300
    }
)
With the scale-in cooldown period, the intention is to scale-in conservatively to protect your application’s availability, so scale-in activities are blocked until the cooldown period has expired. With the scale-out cooldown period, the intention is to continuously (but not excessively) scale out. After Application Auto Scaling successfully scales out using a target tracking scaling policy, it starts to calculate the cooldown time.
Step scaling
This is an advanced type of scaling where you define additional policies to dynamically adjust the number of instances to scale based on size of the alarm breach. This helps you configure a more aggressive response when demand reaches a certain level. The following code is an example of a step scaling policy based on the OverheadLatency metric:
#Example 3 - OverheadLatency metric and StepScaling Policy
response = client.put_scaling_policy(
    PolicyName='OverheadLatency-ScalingPolicy',
    ServiceNamespace='sagemaker',
    ResourceId=resource_id,
    ScalableDimension='sagemaker:variant:DesiredInstanceCount',
    PolicyType='StepScaling',
    StepScalingPolicyConfiguration={
        'AdjustmentType': 'ChangeInCapacity', # 'PercentChangeInCapacity'|'ExactCapacity' Specifies whether the ScalingAdjustment value in a StepAdjustment
                                              # is an absolute number or a percentage of the current capacity.
        'StepAdjustments': [ # A set of adjustments that enable you to scale based on the size of the alarm breach.
            {
                'MetricIntervalLowerBound': 0.0, # The lower bound for the difference between the alarm threshold and the CloudWatch metric.
                 # 'MetricIntervalUpperBound': 100.0, # The upper bound for the difference between the alarm threshold and the CloudWatch metric.
                'ScalingAdjustment': 1 # The amount by which to scale, based on the specified adjustment type.
                                       # A positive value adds to the current capacity while a negative number removes from the current capacity.
            },
        ],
        # 'MinAdjustmentMagnitude': 1, # The minimum number of instances to scale. - only for 'PercentChangeInCapacity'
        'Cooldown': 120,
        'MetricAggregationType': 'Average', # 'Minimum'|'Maximum'
    }
)
Scheduled scaling
You can use this option when you know that the demand follows a particular schedule in the day, week, month, or year. This helps you specify a one-time schedule or a recurring schedule or cron expressions along with start and end times, which form the boundaries of when the autoscaling action starts and stops. See the following code:
#Example 4 - Scaling based on a certain schedule.
response = client.put_scheduled_action(
    ServiceNamespace='sagemaker',
    Schedule='at(2020-10-07T06:20:00)', # yyyy-mm-ddThh:mm:ss You can use one-time schedule, cron, or rate
    ScheduledActionName='ScheduledScalingTest',
    ResourceId=resource_id,
    ScalableDimension='sagemaker:variant:DesiredInstanceCount',
    #StartTime=datetime(2020, 10, 7), #Start date and time for when the schedule should begin
    #EndTime=datetime(2020, 10, 8), #End date and time for when the recurring schedule should end
    ScalableTargetAction={
        'MinCapacity': 2,
        'MaxCapacity': 3
    }
)
On-demand scaling
Use this option only when you want to increase or decrease the number of instances manually. This updates the endpoint weights and capacities without defining a trigger. See the following code:
response = client.update_endpoint_weights_and_capacities(EndpointName=endpoint_name,
                            DesiredWeightsAndCapacities=[
                                {
                                    'VariantName': 'string',
                                    'DesiredWeight': ...,
                                    'DesiredInstanceCount': 123
                                }
                            ])
Comparing scaling methods
Each of these methods, when successfully applied, results in the addition of instances to an already deployed Amazon SageMaker endpoint. When you make a request to update your endpoint with autoscaling configurations, the status of the endpoint moves to Updating. While the endpoint is in this state, other update operations on this endpoint fail. You can monitor the state by using the DescribeEndpoint API. There is no traffic interruption while instances are being added to or removed from an endpoint.
When creating an endpoint, we specify initial_instance_count; this value is only used at endpoint creation time. That value is ignored afterward, and autoscaling or on-demand scaling uses the change in desiredInstanceCount to set the instance count behind an endpoint.
Finally, if you do use UpdateEndpoint to deploy a new EndpointConfig to an endpoint, to retain the current number of instances, you should set RetainAllVariantProperties to true.
Considerations for designing an autoscaling policy to scale your ML workload
You should consider the following when designing an efficient autoscaling policy to minimize traffic interruptions and be cost-efficient:
- Traffic patterns and metrics – Especially consider traffic patterns that involve invoking the inference logic. Then determine which metrics these traffic patterns affect the most. Or what metric is the inference logic sensitive to (such as
GPUUtilization,CPUUtilization,MemoryUtilization, orInvocations) per instance? Is the inference logic GPU bound, memory bound, or CPU bound? - Custom metrics – If it’s a custom metric that needs to be defined based on the problem domain, we have the option of deploying a custom metrics collector. With a custom metrics collector, you have an additional option of fine-tuning the granularity of metrics collection and publishing.
- Threshold – After we decide on our metrics, we need to decide on the threshold. In other words, how to detect the increase in load, based on the preceding metric, within a time window that allows for the addition of an instance and for your inference logic to be ready to serve inference. This consideration also governs the measure of the scale-in and scale-out cooldown period.
- Autoscaling – Depending on the application logic’s tolerance to autoscaling, there should be a balance between over-provisioning and autoscaling. Depending on the workload, if you select a specialized instance such as Inferentia, the throughput gains might alleviate the need to autoscale to a certain degree.
- Horizontal scaling – When we have these estimations, it’s time to consider one or more strategies that we enlist in this post to deploy for horizontal scaling. Some work particularly well in certain situations. For example, we strongly recommend that you use a target tracking scaling policy to scale on a metric such as average CPU utilization or the
SageMakerVariantInvocationsPerInstancemetric. But a good guideline is to empirically derive an apt scaling policy based on your particular workload and above factors. You can start with a simple target tracking scaling policy, and you still have the option to use step scaling as an additional policy for a more advanced configuration. For example, you can configure a more aggressive response when demand reaches a certain level.
Retrieving your scaling activity log
When you want to see all the scaling policies attached to your Amazon SageMaker endpoint, you can use describe_scaling_policies, which helps you understand and debug the different scaling configurations’ behavior:
response = client.describe_scaling_policies(
    ServiceNamespace='sagemaker'
)

for i in response['ScalingPolicies']:
    print('')
    pp.pprint(i['PolicyName'])
    print('')
    if('TargetTrackingScalingPolicyConfiguration' in i):
        pp.pprint(i['TargetTrackingScalingPolicyConfiguration'])
    else:
        pp.pprint(i['StepScalingPolicyConfiguration'])
    print('')
Conclusion
For models facing unpredictable traffic, Amazon SageMaker autoscaling helps economically respond to the demand and removes the undifferentiated heavy lifting of managing the inference infrastructure. One of the best practices of model deployment is to perform load testing. Determine the appropriate thresholds for your scaling policies and choose metrics based on load testing. For more information about load testing, see Amazon EC2 Testing Policy and Load test and optimize an Amazon SageMaker endpoint using automatic scaling.
References
For additional references, see the following:
- Define a scaling policy
- Load testing your autoscaling configuration
- ApplicationAutoScaling API
- CustomizedMetricSpecification metric
- Publishing Custom Metrics
- Deploy MXNet models
About the Authors
 Chaitanya Hazarey is a Machine Learning Solutions Architect with the Amazon SageMaker Product Management team. He focuses on helping customers design and deploy end-to-end ML pipelines in production on AWS. He has set up multiple such workflows around problems in the areas of NLP, Computer Vision, Recommender Systems, and AutoML Pipelines.
 Pavan Kumar Sunder is a Senior R&D Engineer with Amazon Web Services. He provides technical guidance and helps customers accelerate their ability to innovate through showing the art of the possible on AWS. He has built multiple prototypes around AI/ML, IoT, and Robotics for our customers.
 Rama Thamman is a Software Development Manager with the AI Platforms team, leading the ML Migrations team.