Convolutional neural networks (CNNs) achieve state-of-the-art results in tasks such as image classification and object detection. They are used in many diverse applications, such as in autonomous driving to detect traffic signs and objects on the street, in healthcare to more accurately classify anomalies in image-based data, and in retail for inventory management.
However, CNNs act as a black box, which can be problematic in applications where it’s critical to understand how predictions are made. Also, after the model is deployed, the data used for inference may follow a very different distribution compared to the data from which the model was trained. This phenomenon is commonly referred to as data drift, and can lead to incorrect model predictions. In this context, understanding and being able to explain what leads to an incorrect model prediction is important.
Techniques such as class activation maps and saliency maps allow you to visualize how a CNN model makes a decision. These maps rendered as heat maps reveal the parts of an image that are critical in the prediction. The following example images are from the German Traffic Sign dataset: the image on the left is the input into a fine-tuned ResNet model, which predicts the image class 25 (Road work). The right image shows the input image overlaid with a heat map, where red indicates the most relevant and blue the least relevant pixels for predicting the class 25.
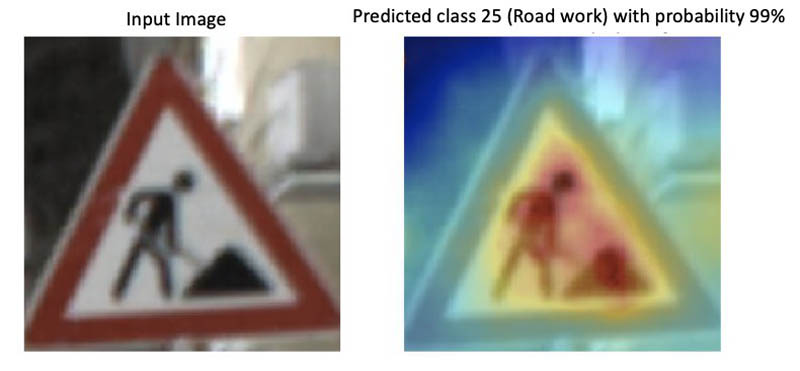
Visualizing the decisions of a CNN is especially helpful if a model makes an incorrect prediction and it’s not clear why. It also helps you figure out whether the training datasets require more representative samples or if there is bias in the dataset. For example, if you have an object detection model to find obstacles in road traffic and the training dataset only contains samples taken during summer, it likely won’t perform well during winter because it hasn’t learned that objects could be covered in snow.
In this post, we deploy a model for traffic sign classification and set up Amazon SageMaker Model Monitor to automatically detect unexpected model behavior, such as consistently low prediction scores or overprediction of certain image classes. When Model Monitor detects an issue, we use Amazon SageMaker Debugger to obtain visual explanations of the deployed model. You can do this by updating the endpoint to emit tensors during inference and using those tensors to compute saliency maps. To reproduce the different steps and results listed in this post, clone the repository amazon-sagemaker-analyze-model-predictions into your Amazon SageMaker notebook instance or from within your Amazon SageMaker Studio and run the notebook.
Defining a SageMaker model
This post uses a ResNet18 model trained to distinguish between 43 categories of traffic signs using the German Traffic Sign dataset [2]. When given an input image, the model outputs probabilities for the different image classes. Each class corresponds to a different traffic sign category. We have fine-tuned the model and uploaded its weights to the GitHub repo.
Before you can deploy the model to Amazon SageMaker, you need to archive and upload its weights to Amazon Simple Storage Service (Amazon S3). Enter the following code in a Jupyter notebook cell:
sagemaker_session.upload_data(path='model.tar.gz', key_prefix='model')You use Amazon SageMaker hosting services to set up a persistent endpoint to get predictions from the model. Therefore, you need to define a PyTorch model object that takes the Amazon S3 path of the model archive. Define an entry_point file pretrained_model.py that implements the model_fn and transform_fn functions. You use those functions during hosting to make sure that the model is correctly loaded inside the inference container and that incoming requests are properly processed. See the following code:
from sagemaker.pytorch.model import PyTorchModel

model = PyTorchModel(model_data = 's3://' + sagemaker_session.default_bucket() + '/model/model.tar.gz',
                     role = role,
                     framework_version = '1.5.0',
                     source_dir='entry_point',
                     entry_point = 'pretrained_model.py',
                     py_version='py3')
Setting up Model Monitor and deploying the model
Model Monitor automatically monitors machine learning models in production and alerts you when it detects data quality issues. In this solution, you capture the inputs and outputs of the endpoint and create a monitoring schedule to let Model Monitor inspect the collected data and model predictions. The DataCaptureConfig API specifies the fraction of inputs and outputs that Model Monitor stores in a destination Amazon S3 bucket. In the following example, the sampling percentage is set to 50%:
from sagemaker.model_monitor import DataCaptureConfig

data_capture_config = DataCaptureConfig(
    enable_capture=True,
    sampling_percentage=50,
    destination_s3_uri='s3://' + sagemaker_session.default_bucket() + '/endpoint/data_capture'
)
To deploy the endpoint to an ml.m5.xlarge instance, enter the following code:
predictor = model.deploy(initial_instance_count=1,
                        instance_type='ml.m5.xlarge',
                        data_capture_config=data_capture_config)

endpoint_name = predictor.endpoint
Running inference with test images
Now you can invoke the endpoint with a payload that contains serialized input images. The endpoint calls the transform_fn function to preprocess the data before performing model inference. The endpoint returns the predicted classes of the image stream as a list of integers, encoded in a JSON string. See the following code:
#invoke payload
response = runtime.invoke_endpoint(EndpointName=endpoint_name, Body=payload)
response_body = response['Body']
#get results
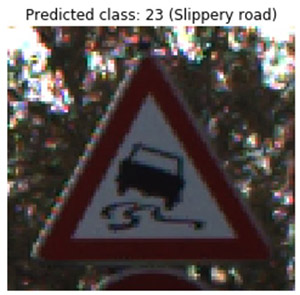
result = json.loads(response_body.read().decode())You can now visualize some test images and their predicted class. In the following visualization, the traffic sign images are what was sent to the endpoint for prediction, and the top labels are the corresponding predictions received from the endpoint. The following image shows that the endpoint correctly predicted class 23 (Slippery road).
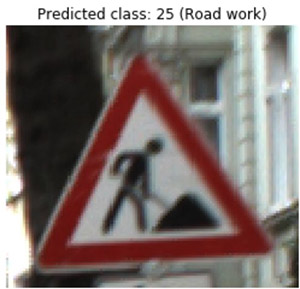
The following image shows that the endpoint correctly predicted class 25 (Road work).
Creating a Model Monitor schedule
Next, we demonstrate how to set up a monitoring schedule using Model Monitor. Model Monitor provides a built-in container to create a baseline that calculates constraints and statistics such as mean, quantiles, and standard deviation. You can then launch a monitoring schedule that periodically kicks off a processing job to inspect collected data, compare the data against the given constraints, and generate a violations report.
For this use case, you create a custom container that performs a simple model sanity check: it runs an evaluation script that counts the predicted image classes. If the model predicts a particular street sign more often than other classes, or if confidence scores are consistently low, it indicates an issue.
For example, with a given input image, the model returns a list of predicted classes ranked based on the confidence score. If the top three predictions correspond to unrelated classes, each with confidence score below 50% (for example, Stop sign as the first prediction, Turn left as the second, and Speed limit 180 km/h as the third), you may not want to trust those predictions.
For more information about building your custom container and uploading it to Amazon Elastic Container Registry (Amazon ECR) see the notebook. The following code creates a Model Monitor object where you indicate the location of the Docker image in Amazon ECR and the environment variables that the evaluation script requires. The container’s entry point file is the evaluation script.
monitor = ModelMonitor(
    role=role,
    image_uri='%s.dkr.ecr.us-west-2.amazonaws.com/sagemaker-processing-container:latest' %my_account_id,
    instance_count=1,
    instance_type='ml.m5.xlarge',
    env={'THRESHOLD':'0.5'}
)
Next, define and attach a Model Monitor schedule to the endpoint. It runs your custom container on an hourly basis. See the following code:
from sagemaker.model_monitor import CronExpressionGenerator
from sagemaker.processing import ProcessingInput, ProcessingOutput

destination = 's3://' + sagemaker_session.default_bucket() + '/endpoint/monitoring_schedule'
processing_output = ProcessingOutput(output_name='model_outputs', source='/opt/ml/processing/outputs', destination=destination)
output = MonitoringOutput(source=processing_output.source, destination=processing_output.destination)

monitor.create_monitoring_schedule(
    output=output,
    endpoint_input=predictor.endpoint,
    schedule_cron_expression=CronExpressionGenerator.hourly()
)
As previously described, the script evaluation.py performs a simple model sanity check: it counts the model predictions. Model Monitor saves model inputs and outputs as JSON-line formatted files in Amazon S3. They are downloaded in the processing container under /opt/ml/processing/input. You can then load the predictions via ['captureData']['endpointOutput']['data']. See the following code:
for file in files:
    content = open(file).read()
   for entry in content.split('n'):
        prediction = json.loads(entry)['captureData']['endpointOutput']['data']
You can track the status of the processing job in CloudWatch and also in SageMaker Studio. In the following screenshot, SageMaker Studio shows that no issues were found.
![]()
Capturing unexpected model behavior
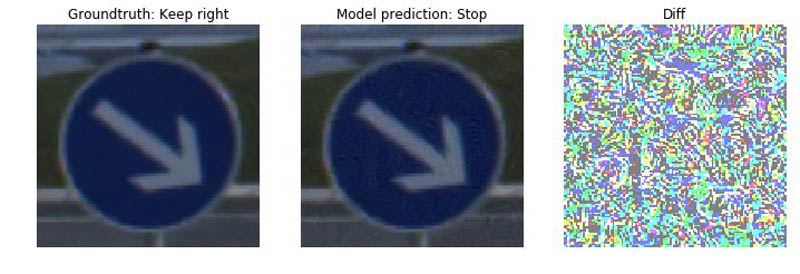
Now that the schedule is defined, you’re ready to monitor the model in real time. To verify that the setup can capture unexpected behavior, you enforce false predictions. To achieve this, we use AdvBox Toolkit [3], which introduces perturbations at the pixel level such the model doesn’t recognize correct classes any longer. Such perturbations are also known as adversarial attacks, and are typically invisible to human observers. We converted some test images that are now predicted as Stop signs. In the following set of images, the image is the original, the middle is the adversarial image, and the right is the difference between both. The original and adversarial images look similar, but the adversarial isn’t classified correctly.
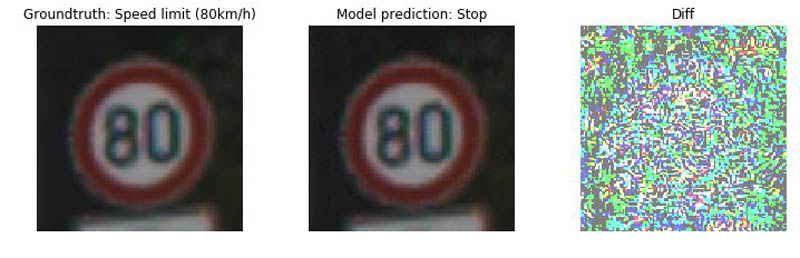
The following set of images shows another incorrectly classified sign.
When Model Monitor schedules the next processing job, it analyzes the predictions that were captured and stored in Amazon S3. The job counts the predicted image classes; if one class is predicted more than 50% of the time, it raises an issue. Because we sent adversarial images to the endpoint, you can now see an abnormal count for the image class 14 (Stop). You can track the status of the processing job in SageMaker Studio. In the following screenshot, SageMaker Studio shows that the last scheduled job found an issue.

You can get further details from the Amazon CloudWatch logs: the processing job prints a dictionary where the key is one of 43 image classes and the value is the count. For instance, in the following output, the endpoint predicted the image class 9 (No passing) twice and an abnormal count for class 14 (Stop). It predicted this class 322 times out of 400 total predictions, which is higher than the 50% threshold. The values of the dictionary are also stored as CloudWatch metrics, so you can create graphs of the metric data using the CloudWatch console.
Warning: Class 14 ('Stop sign') predicted more than 80 % of the time which is above the threshold
Predicted classes {9: 2, 19: 2, 25: 1, 14: 322, 13: 5, 5: 1, 8: 10, 18: 1, 31: 4, 26: 8, 33: 4, 36: 4, 29: 20, 12: 8, 22: 4, 6: 4}
Now that the processing job found an issue, it’s time to get further insights. When looking at the preceding test images, there’s no significant difference between the original and the adversarial images. To get a better understanding of what the model saw, you can use the technique described in the paper Full-Gradient Representation for Neural Network Visualization [1], which uses importance scores of input features and intermediate feature maps. In the following section, we show how to configure Debugger to easily retrieve these variables as tensors without having to modify the model itself. We also go into more detail about how to use those tensors to compute saliency maps.
Creating a Debugger hook configuration
To retrieve the tensors, you need to update the pretrained model Python script, pretrained_model.py, which you ran at the very beginning to set up an Amazon SageMaker PyTorch model. We created a Debugger hook configuration in model_fn, and the hook takes a customized string into the parameter, include_regex, which passes regular expressions of the full or partial names of tensors that we want to collect. In the following section, we show in detail how to compute saliency maps. The computation requires bias and gradients from intermediate layers such as BatchNorm and downsampling layers and the model inputs. To obtain the tensors, indicate the following regular expression:
'.*bn|.*bias|.*downsample|.*ResNet_input|.*image'Store the tensors in your Amazon SageMaker default bucket. See the following code:
def model_fn(model_dir):

    #load model
    model = resnet.resnet18()
    model.load_state_dict(torch.load(model_dir))
    model.eval()

    #hook configuration
    save_config = smd.SaveConfig(mode_save_configs={
        smd.modes.PREDICT: smd.SaveConfigMode(save_interval=1)
    })

    hook = Hook("s3://" + sagemaker_session.default_bucket() + "tensors",
                    save_config=save_config,
                    include_regex='.*bn|.*bias|.*downsample|.*ResNet_input|.*image' )

    #register hook
    hook.register_module(model)

    #set mode
    hook.set_mode(modes.PREDICT)

    return model
Create a new PyTorch model using the new entry point script pretrained_model_with_debugger_hook.py:
model = PyTorchModel(model_data = 's3://' + sagemaker_session.default_bucket() + '/model/model.tar.gz',
                        role = role,
                        framework_version = '1.3.1',
                        source_dir='code',
                        entry_point = 'pretrained_model_with_debugger_hook.py',
                        py_version='py3')
Update the existing endpoint using the new PyTorch model object that took the modified model script with the Debugger hook:
predictor = model.deploy(
        instance_type = 'ml.m5.xlarge',
        initial_instance_count=1,
        endpoint_name=endpoint_name,
        data_capture_config=data_capture_config,
        update_endpoint=True)
Now, whenever an inference request is made, the endpoint records tensors and uploads them to Amazon S3. You can now compute saliency maps to get visual explanations from the model.
Analyzing incorrect predictions with Debugger
A classification model typically outputs an array of probabilities between 0 and 1, where each entry corresponds to a label in the dataset. For example, in the case of MNIST (10 classes), a model may produce the following prediction for the input image with digit 8: [0.08, 0, 0, 0, 0, 0, 0.12, 0, 0.5, 0.3], meaning the image is predicted to be 0 with 8% probability, 6 with 12% probability, 8 with 50% probability, and 9 with 30% probability. To generate a saliency map, you take the class with the highest probability (for this use case, class 8) and map the score back to previous layers in the network to identify the important neurons for this prediction. CNNs consist of many layers, so an importance score for each intermediate value that shows how each value contributed to the prediction is calculated.
You can use the gradients of the predicted outcome from the model with respect to the input to determine the importance scores. The gradients show how much the output changes when inputs are changing. To record them, register a backward hook on the layer outputs and trigger a backward call during inference. We have configured the Debugger hook to capture the relevant tensors.
After you update the endpoint and perform some inference requests, you can create a trial object, which enables you to access, query, and filter the data that Debugger saved. See the following code:
from smdebug.trials import create_trial

trial = create_trial('s3://' + sagemaker_session.default_bucket() + '/endpoint/tensors')
With Debugger, you can access the data via trial.tensor().value(). For example, to get the bias tensor of the first BatchNorm layer of the first inference request, enter the following code:
trial.tensor('ResNet_bn1.bias').value(step_num=0, mode=modes.PREDICT).The function trial.steps(mode=modes.PREDICT) returns the number of steps available, which corresponds to the number of inference requests recorded.
In the following steps, you compute saliency maps based on the FullGrad method, which aggregates input gradients and feature-level bias gradients.
Computing implicit biases
In the FullGrad method, the BatchNorm layers of ResNet18 introduce an implicit bias. You can compute the implicit bias by retrieving the running mean, variance, and the weights of the layer. See the following code:
weight = trial.tensor(weight_name).value(step_num=step, mode=modes.PREDICT)
running_var = trial.tensor(running_var_name).value(step_num=step, mode=modes.PREDICT)
running_mean = trial.tensor(running_mean_name).value(step_num=step, mode=modes.PREDICT)
implicit_bias = - running_mean / np.sqrt(running_var) * weight
Multiplying gradients and biases
Bias is the sum of explicit and implicit bias. You can retrieve the gradients of the output with respect to the feature maps and compute the product of bias and gradients. See the following code:
gradient = trial.tensor(gradient_name).value(step_num=step, mode=modes.PREDICT)
bias = trial.tensor(bias_name).value(step_num=step, mode=modes.PREDICT)
bias = bias + implicit_bias
bias_gradient = normalize(np.abs(bias * gradient))
Interpolating and aggregating
Intermediate layers typically don’t have the same dimensions as the input image, so you need to interpolate them. You do this for all bias gradients and aggregate the results. The overall sum is the saliency map that you overlay as the heat map on the original input image. See the following code:
for channel in range(bias_gradient.shape[1]):
    interpolated = scipy.ndimage.zoom(bias_gradient[0,channel,:,:], image_size/bias_gradient.shape[2], order=1)
   saliency_map += interpolated
Results
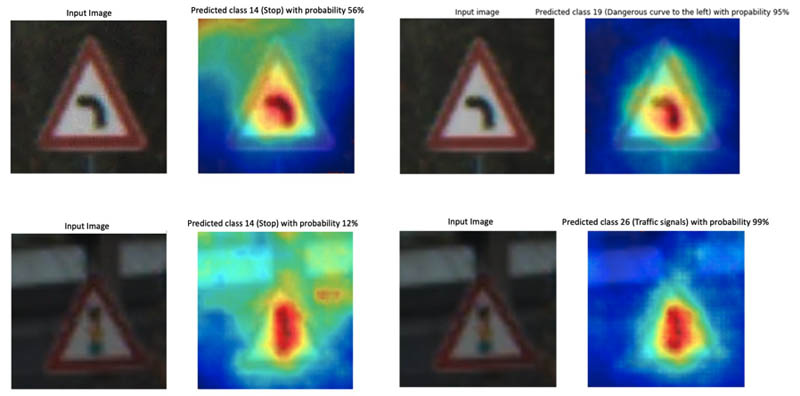
In this section, we include some examples of adversarial images that the model classified as stop signs. The images on the right show the model input overlaid with the saliency map. Red indicates the part that had the largest influence in the model prediction, and may indicate the location of pixel perturbations. You can see, for instance, that relevant object features are no longer taken into account by the model, and in most cases the confidence scores are low.
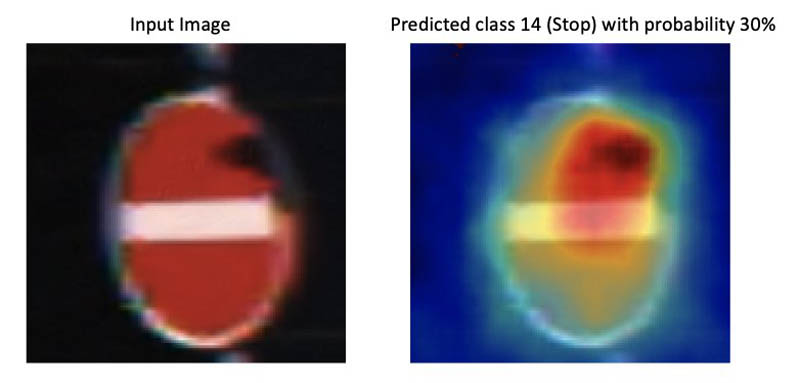
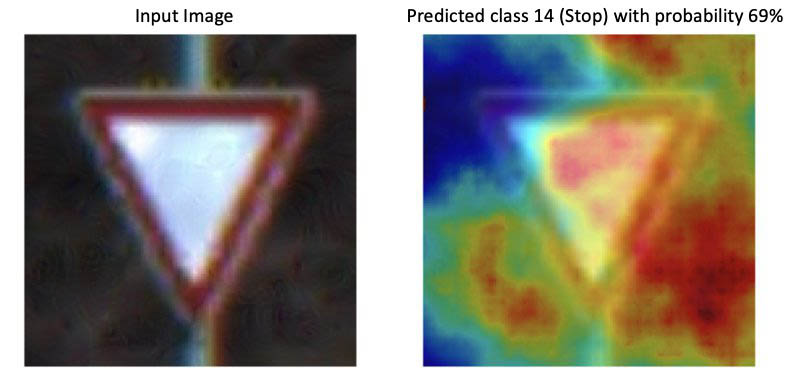
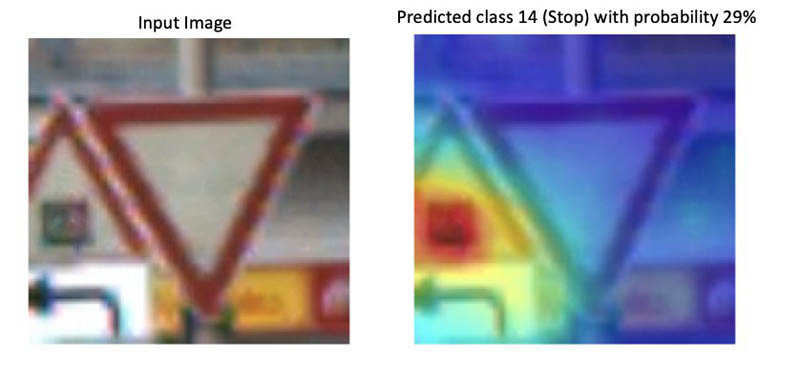
For comparison, we also perform inference with original (non-adversarial) images. In the following image sets, the image on the left is the adversarial image and the corresponding saliency map for the predicted image class Stop. The right images show the original input image (non-adversarial) and the corresponding saliency map for the predicted image class (which corresponds to the ground-truth label). In the case of non-adversarial images, the model only focuses on relevant object features and therefore predicts the correct image class with a high probability. In the case of adversarial images, the model takes many other features outside of the relevant object into account, which is caused by the random pixel perturbations.
Summary
This post demonstrated how to use Amazon SageMaker Model Monitor and Amazon SageMaker Debugger to automatically detect unexpected model behavior and to get visual explanations from a CNN. For more information, see the GitHub repo.
References
- [1] Suraj Srinivas, Francois Fleuret, Full-gradient representation for neural network visualization, Advances in Neural Information Processing Systems (NeurIPS), 2019
- [2] Johannes Stallkamp, Marc Schlipsing, Jan Salmen, Christian Igel, The German traffic sign recognition benchmark: A multi-class classification competition, The 2011 International Joint Conference on Neural Networks, 2011
- [3] Dou Goodman, Hao Xin, Wang Yang, Wu Yuesheng, Xiong Junfeng, Zhang Huan, Advbox: a toolbox to generate adversarial examples that fool neural networks
About the Authors
 Nathalie Rauschmayr is an Applied Scientist at AWS, where she helps customers develop deep learning applications.
 Vikas Kumar is Senior Software Engineer for AWS Deep Learning, focusing on building scalable deep learning systems and providing insights into deep learning models. Prior to this Vikas has worked on building distributed databases and service discovery software. In his spare time he enjoys reading and music.
 Satadal Bhattacharjee is Principal Product Manager at AWS AI. He leads the machine learning engine PM team on projects such as SageMaker and optimizes machine learning frameworks such as TensorFlow, PyTorch, and MXNet.