Intelligent document processing (IDP) is a common use case for customers on AWS. You can utilize Amazon Comprehend and Amazon Textract for a variety of use cases ranging from document extraction, data classification, and entity extraction. One specific industry that uses IDP is insurance. They use IDP to automate data extraction for common use cases such as claims intake, policy servicing, quoting, payments, and next best actions. However, in some cases, an office receives a document with complex, label-less information. This is normally difficult for optical character recognition (OCR) software to capture, and identifying relationships and key entities becomes a challenge. The solution is often requires manual human entry to ensure high accuracy.
In this post, we demonstrate how you can use named entity recognition (NER) for documents in their native formats in Amazon Comprehend to address these challenges.
Solution overview
In an insurance scenario, an insurer might receive a demand letter from an attorney’s office. The demand letter includes information such as what law office is sending the letter, who their client is, and what actions are required to satisfy their requests, as shown in the following example:
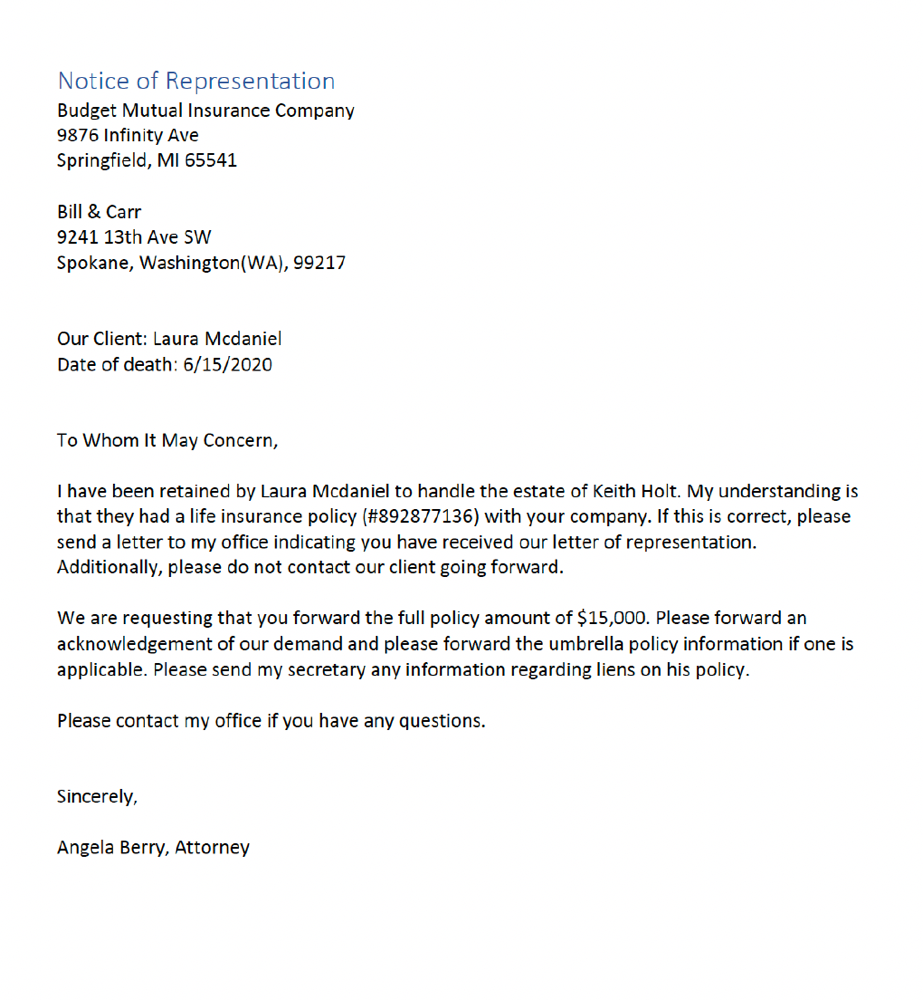
Because of the varied locations that this information could be found in a demand letter, these documents are often forwarded to an individual adjuster, who takes the time to read through the letter to determine all the necessary information required to proceed with a claim. The document may have multiple names, addresses, and requests that each need to be classified. If the client is mixed up with the beneficiary, or the addresses are switched, delays could add up and negative consequences could impact the company and customers. Because there are often small differences between categories like addresses and names, the documents are often processed by humans rather than using an IDP approach.
The preceding example document has many instances of overlapping entity values (entities that share similar properties but aren’t related). Examples of this are the address of the law office vs. the address of the insurance company or the names of the different individuals (attorney name, beneficiary, policy holder). Additionally, there is positional information (where the entity is positioned within the document) that a traditional text-only algorithm might miss. Therefore, traditional recognition techniques may not meet requirements.
In this post, we use named entity recognition in Amazon Comprehend to solve these challenges. The benefit of using this method is that the custom entity recognition model uses both the natural language and positional information of the text to accurately extract custom entities that may otherwise be impacted when flattening a document, as demonstrated in our preceding example of overlapping entity values. For this post, we use an AWS artificially created dataset of legal requisition and demand letters for life insurance, but you can use this approach across any industry and document that may benefit from spatial data in custom NER training. The following diagram depicts the solution architecture:
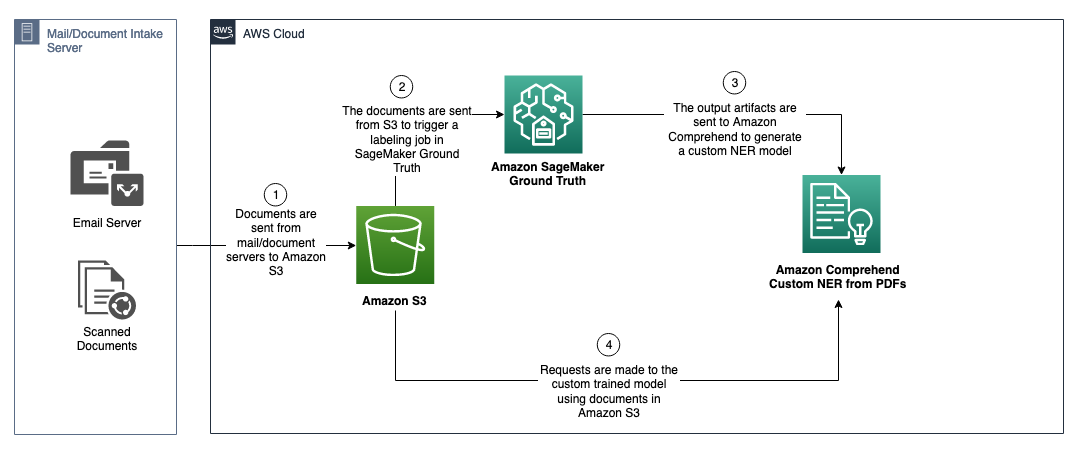
We implement the solution with the following high-level steps:
- Clone the repository containing the sample dataset.
- Create an Amazon Simple Storage Service (Amazon S3) bucket.
- Create and train your custom entity recognition model.
- Use the model by running an asynchronous batch job.
Prerequisites
You need to complete the following prerequisites to use this solution:
- Install Python 3.8.x.
- Make sure you have pip installed.
- Install and configure the AWS Command Line Interface (AWS CLI).
- Configure your AWS credentials.
Annotate your documents
To train a custom entity recognition model that can be used on your PDF, Word, and plain text documents, you need to first annotate PDF documents using a custom Amazon SageMaker Ground Truth annotation template that is provided by Amazon Comprehend. For instructions, see Custom document annotation for extracting named entities in documents using Amazon Comprehend.
We recommend a minimum of 250 documents and 100 annotations per entity to ensure good quality predictions. With more training data, you’re more likely to produce a higher-quality model.
When you’ve finished annotating, you can train a custom entity recognition model and use it to extract custom entities from PDF, Word, and plain text documents for batch (asynchronous) processing.
For this post, we have already labeled our sample dataset, and you don’t have to annotate the documents provided. However, if you want to use your own documents or adjust the entities, you have to annotate the documents. For instructions, see Custom document annotation for extracting named entities in documents using Amazon Comprehend.
We extract the following entities (which are case sensitive):
Law FirmLaw Office AddressInsurance CompanyInsurance Company AddressPolicy Holder NameBeneficiary NamePolicy NumberPayoutRequired ActionSender
The dataset provided is entirely artificially generated. Any mention of names, places, and incidents are either products of the author’s imagination or are used fictitiously. Any resemblance to actual events or locales or persons, living or dead, is entirely coincidental.
Clone the repository
Start by cloning the repository by running the following command:
The repository contains the following files:
Create an S3 bucket
To create an S3 bucket to use for this example, complete the following steps:
- On the Amazon S3 console, choose Buckets in the navigation pane.
- Choose Create bucket.

- Note the name of the bucket you just created.
To reuse the annotations that we already made for the dataset, we have to modify the output.manifest file and reference the bucket we just created.
- Modify the file by running the following commands:
When the script is finished running, you receive the following message:
We can now begin training our model.
Create and train the model
To start training your model, complete the following steps:
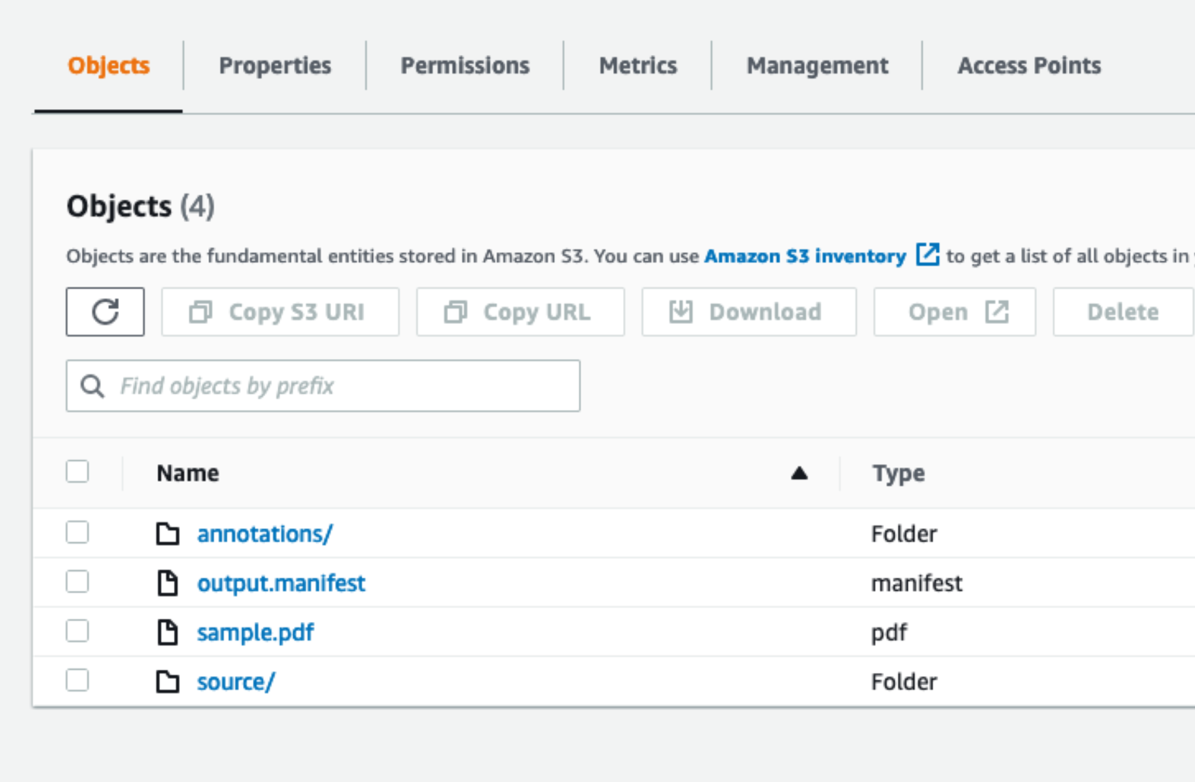
- On the Amazon S3 console, upload the
/sourcefolder,/annotationsfolder,output.manifest, andsample.pdffiles.
Your bucket should look similar to the following screenshot.
- On the Amazon Comprehend console, under Customization in the navigation pane, choose Custom entity recognition.
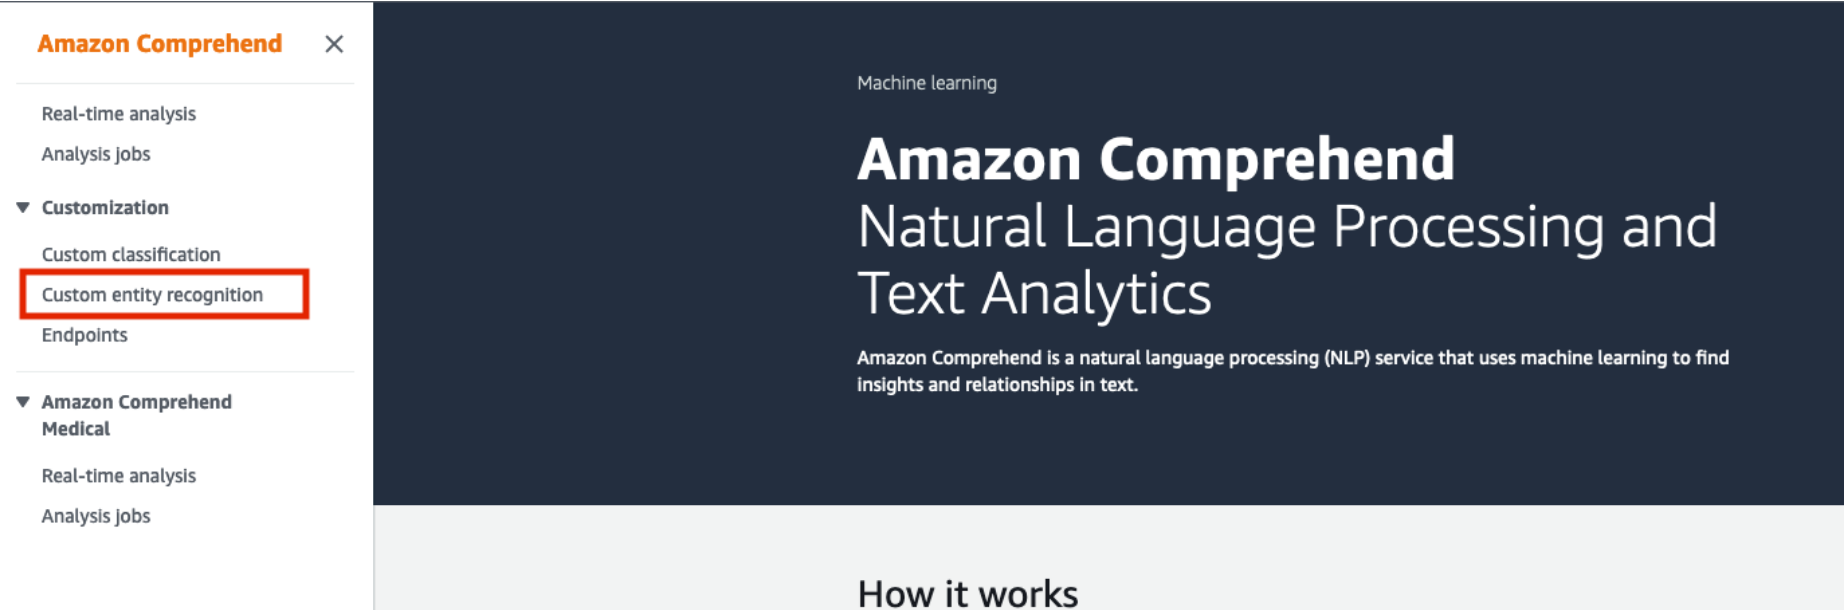
- Choose Create new model.

- For Model name, enter a name.
- For Language, choose English.
- For Custom entity type, add the following case-sensitive entities:
Law FirmLaw Office AddressInsurance CompanyInsurance Company AddressPolicy Holder NameBeneficiary NamePolicy NumberPayoutRequired ActionSender

- In Data specifications, for Data format, select Augmented manifest to reference the manifest we created when we annotated the documents.
- For Training model type, select PDF, Word Documents.
This specifies the type of documents you’re using for training and inference.
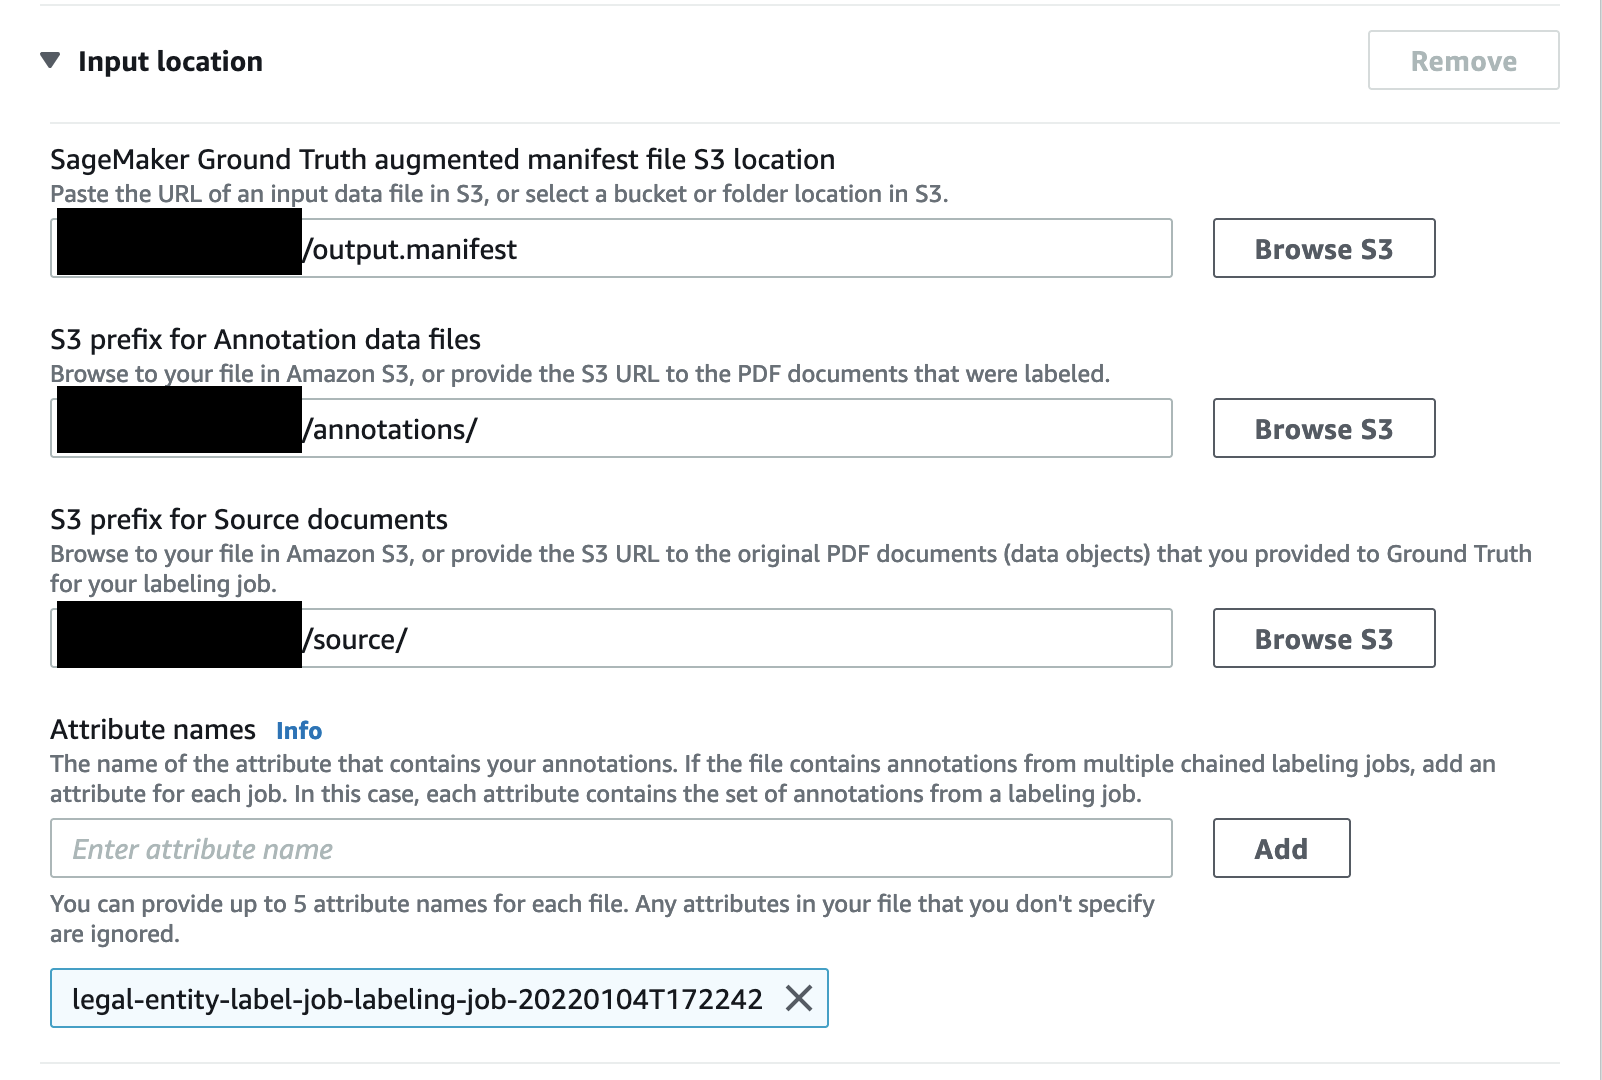
- For SageMaker Ground Truth augmented manifest file S3 location, enter the location of the
output.manifestfile in your S3 bucket. - For S3 prefix for Annotation data files, enter the path to the
annotationsfolder. - For S3 prefix for Source documents, enter the path to the
sourcefolder. - For Attribute names, enter
legal-entity-label-job-labeling-job-20220104T172242.
The attribute name corresponds to the name of the labeling job you create for annotating the documents. For the pre-annotated documents, we use the name legal-entity-label-job-labeling-job-20220104T172242. If you choose to annotate your documents, substitute this value with the name of your annotation job.
- Create a new AWS Identity and Access Management (IAM) role and give it permissions to the bucket that contains all your data.
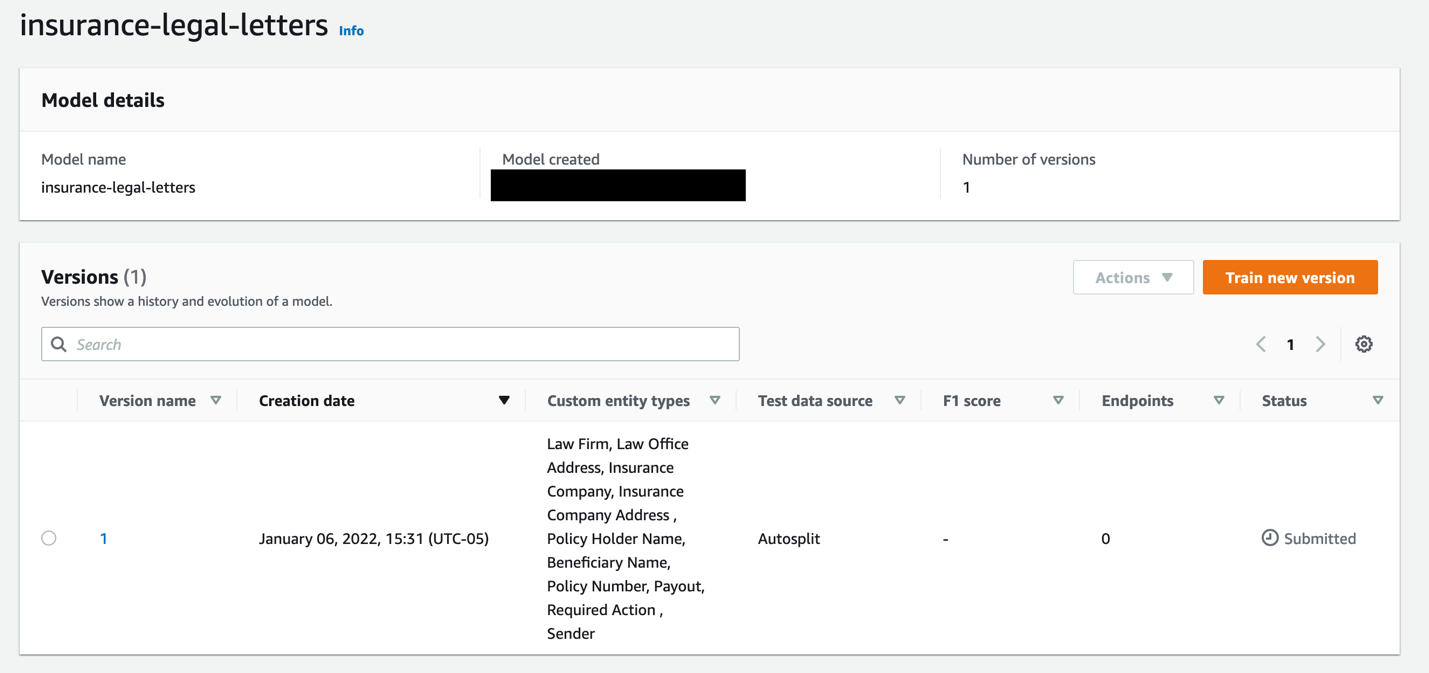
- Finish creating the model (select the Autosplit option for your data source to see similar metrics to those in the following screenshots).
Now your recognizer model is visible on the dashboard with the model training status and metrics.
The model may take several minutes to train.
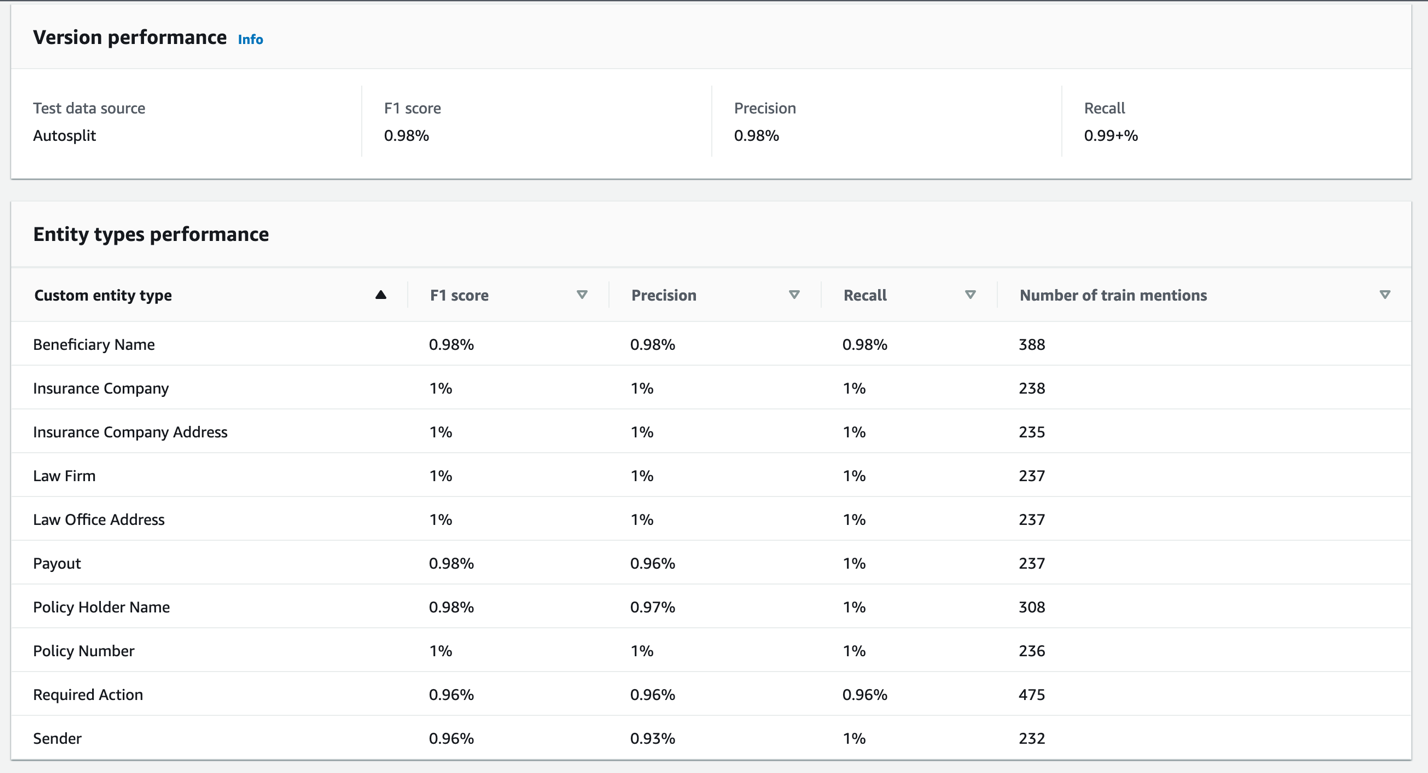
The following screenshot shows your model metrics when the training is complete.
Use the custom entity recognition model
To use the custom entity recognition models trained on PDF documents, we create a batch job to process them asynchronously.
- On the Amazon Comprehend console, choose Analysis jobs.
- Choose Create job.
- Under Input data, enter the Amazon S3 location of the annotated PDF documents to process (for this post, the
sample.pdffile).

- For Input format, select One document per file.
- Under Output Data, enter the Amazon S3 location you want them to populate in. For this post, we create a new folder called
analysis-outputin the S3 bucket containing all source PDF documents, annotated documents, and manifest. - Use an IAM role with permissions to the
sample.pdffolder.
You can use the role created earlier.
- Choose Create job.
This is an asynchronous job so it may take a few minutes to complete processing. When the job is complete, you get link to the output. When you open this output, you see a series of files as follows:
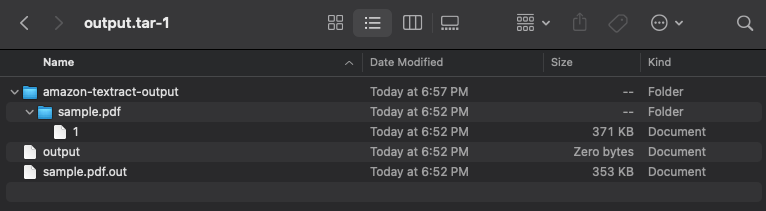
You can open the file sample.pdf.out in your preferred text editor. If you search for the Entities Block, you can find the entities identified in the document. The following table shows an example.
| Type | Text | Score |
| Insurance Company | Budget Mutual Insurance Company | 0.999984086 |
| Insurance Company Address | 9876 Infinity Aven Springfield, MI 65541 | 0.999982051 |
| Law Firm | Bill & Carr | 0.99997298 |
| Law Office Address | 9241 13th Ave SWn Spokane, Washington (WA),99217 | 0.999274625 |
| Beneficiary Name | Laura Mcdaniel | 0.999972464 |
| Policy Holder Name | Keith Holt | 0.999781546 |
| Policy Number | (#892877136) | 0.999950143 |
| Payout | $15,000 | 0.999980728 |
| Sender | Angela Berry | 0.999723455 |
| Required Action | We are requesting that you forward the full policy amount of Please forward ann acknowledgement of our demand and please forward the umbrella policy information if one isn applicable. Please send my secretary any information regarding liens on his policy. | 0.999989449 |
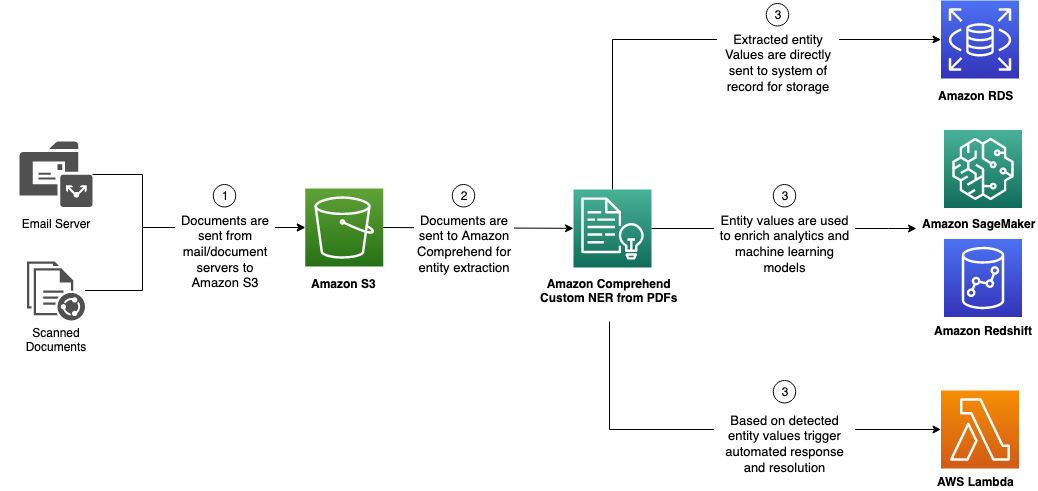
Expand the solution
You can choose from a myriad of possibilities for what to do with the detected entities, such as the following:
- Ingest them into a backend system of record
- Create a searchable index based on the extracted entities
- Enrich machine learning and analytics using extracted entity values as parameters for model training and inference
- Configure back-office flows and triggers based on detected entity value (such as specific law firms or payout values)
The following diagram depicts these options:
Conclusion
Complex document types can often be impediments to full-scale IDP automation. In this post, we demonstrated how you can build and use custom NER models directly from PDF documents. This method is especially powerful for instances where positional information is especially pertinent (similar entity values and varied document formats). Although we demonstrated this solution by using legal requisition letters in insurance, you can extrapolate this use case across healthcare, manufacturing, retail, financial services, and many other industries.
To learn more about Amazon Comprehend, visit the Amazon Comprehend Developer Guide.
About the Authors
 Raj Pathak is a Solutions Architect and Technical advisor to Fortune 50 and Mid-Sized FSI (Banking, Insurance, Capital Markets) customers across Canada and the United States. Raj specializes in Machine Learning with applications in Document Extraction, Contact Center Transformation and Computer Vision.
 Enzo Staton is a Solutions Architect with a passion for working with companies to increase their cloud knowledge. He works closely as a trusted advisor and industry specialists with customers around the country.