In the previous post we went over the theoretical foundations of automatic differentiation and reviewed the implementation in PyTorch. In this post, we will be showing the parts of PyTorch involved in creating the graph and executing it. In order to understand the following contents, please read @ezyang’s wonderful blog post about PyTorch internals.
Autograd components
First of all, let’s look at where the different components of autograd live:
tools/autograd: Here we can find the definition of the derivatives as we saw in the previous post derivatives.yaml, several python scripts and a folder called templates. These scripts and the templates are used at building time to generate the C++ code for the derivatives as specified in the yaml file. Also, the scripts here generate wrappers for the regular ATen functions so that the computational graph can be constructed.
torch/autograd: This folder is where the autograd components that can be used directly from python are located. In function.py we find the actual definition of torch.autograd.Function, a class used by users to write their own differentiable functions in python as per the documentation. functional.py holds components for functionally computing the jacobian vector product, hessian, and other gradient related computations of a given function.
The rest of the files have additional components such as gradient checkers, anomaly detection, and the autograd profiler.
torch/csrc/autograd: This is where the graph creation and execution-related code lives.
All this code is written in C++, since it is a critical part that is required to be extremely performant. Here we have several files that implement the engine, metadata storage, and all the needed components. Alongside this, we have several files whose names start with python_, and their main responsibility is to allow python objects to be used in the autograd engine.
Graph Creation
Previously, we described the creation of a computational graph. Now, we will see how PyTorch creates these graphs with references to the actual codebase.
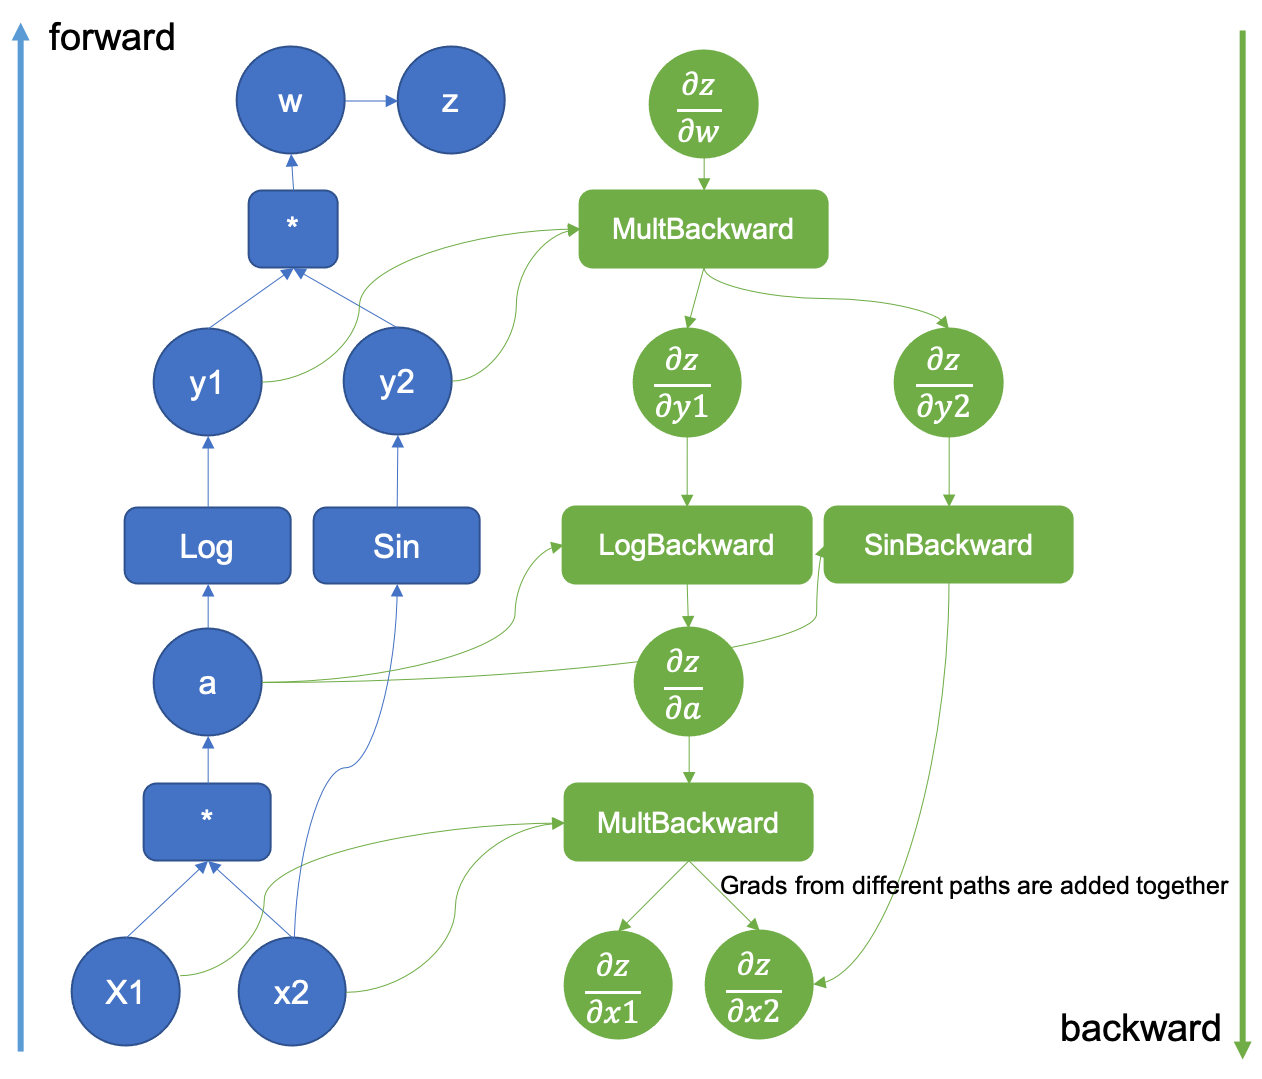
Figure 1: Example of an augmented computational graph
It all starts when in our python code, where we request a tensor to require the gradient.
>>> x = torch.tensor([0.5, 0.75], requires_grad=True)
When the required_grad flag is set in tensor creation, c10 will allocate an AutogradMeta object that is used to hold the graph information.
void TensorImpl::set_requires_grad(bool requires_grad) {
  ...
  if (!autograd_meta_)
    autograd_meta_ = impl::GetAutogradMetaFactory()->make();
    autograd_meta_->set_requires_grad(requires_grad, this);
}
The AutogradMeta object is defined in torch/csrc/autograd/variable.h as follows:
struct TORCH_API AutogradMeta : public c10::AutogradMetaInterface {
  std::string name_;

  Variable grad_;
  std::shared_ptr<Node> grad_fn_;
  std::weak_ptr<Node> grad_accumulator_;
  // other fields and methods
  ...
};
The most important fields in this structure are the computed gradient in grad_ and a pointer to the function grad_fn that will be called by the engine to produce the actual gradient. Also, there is a gradient accumulator object that is used to add together all the different gradients where this tensor is involved as we will see in the graph execution.
Graphs, Nodes and Edges.
Now, when we call a differentiable function that takes this tensor as an argument, the associated metadata will be populated. Let’s suppose that we call a regular torch function that is implemented in ATen. Let it be the multiplication as in our previous blog post example. The resulting tensor has a field called grad_fn that is essentially a pointer to the function that will be used to compute the gradient of that operation.
>>> x = torch.tensor([0.5, 0.75], requires_grad=True)
>>> v = x[0] * x[1]
>>> v
tensor(0.3750, grad_fn=<MulBackward0>)
Here we see that the tensors’ grad_fn has a MulBackward0 value. This function is the same that was written in the derivatives.yaml file, and its C++ code was generated automatically by all the scripts in tools/autograd. It’s auto-generated source code can be seen in torch/csrc/autograd/generated/Functions.cpp.
variable_list MulBackward0::apply(variable_list&& grads) {
  std::lock_guard<std::mutex> lock(mutex_);

  IndexRangeGenerator gen;
  auto self_ix = gen.range(1);
  auto other_ix = gen.range(1);
  variable_list grad_inputs(gen.size());
  auto& grad = grads[0];
  auto self = self_.unpack();
  auto other = other_.unpack();
  bool any_grad_defined = any_variable_defined(grads);
  if (should_compute_output({ other_ix })) {
    auto grad_result = any_grad_defined ? (mul_tensor_backward(grad, self, other_scalar_type)) : Tensor();
    copy_range(grad_inputs, other_ix, grad_result);
  }
  if (should_compute_output({ self_ix })) {
    auto grad_result = any_grad_defined ? (mul_tensor_backward(grad, other, self_scalar_type)) : Tensor();
    copy_range(grad_inputs, self_ix, grad_result);
  }
  return grad_inputs;
}
The grad_fn objects inherit from the TraceableFunction class, a descendant of Node with just a property set to enable tracing for debugging and optimization purposes. A graph by definition has nodes and edges, so these functions are indeed the nodes of the computational graph that are linked together by using Edge objects to enable the graph traversal later on.
The Node definition can be found in the torch/csrc/autograd/function.h file.
struct TORCH_API Node : std::enable_shared_from_this<Node> {
 ...
 /// Evaluates the function on the given inputs and returns the result of the
  /// function call.
  variable_list operator()(variable_list&& inputs) {
  ...
  }

protected:
  /// Performs the `Node`'s actual operation.
  virtual variable_list apply(variable_list&& inputs) = 0;
  …
  edge_list next_edges_;
Essentially we see that it has an override of the operator () that performs the call to the actual function, and a pure virtual function called apply. The automatically generated functions override this apply method as we saw in the MulBackward0 example above. Finally, the node also has a list of edges to enable graph connectivity.
The Edge object is used to link Nodes together and its implementation is straightforward.
struct Edge {
  ...
  /// The function this `Edge` points to.
  std::shared_ptr<Node> function;
  /// The identifier of a particular input to the function.
  uint32_t input_nr;
};
It only requires a function pointer (the actual grad_fn objects that the edges link together), and an input number that acts as an id for the edge.
Linking nodes together
When we invoke the product operation of two tensors, we enter into the realm of autogenerated code. All the scripts that we saw in tools/autograd fill a series of templates that wrap the differentiable functions in ATen. These functions have code to construct the backward graph during the forward pass.
The gen_variable_type.py script is in charge of writing all this wrapping code. This script is called from the tools/autograd/gen_autograd.py during the pytorch build process and it will output the automatically generated function wrappers to torch/csrc/autograd/generated/.
Let’s take a look at how the tensor multiplication generated function looks like. The code has been simplified, but it can be found in the torch/csrc/autograd/generated/VariableType_4.cpp file when compiling pytorch from source.
at::Tensor mul_Tensor(c10::DispatchKeySet ks, const at::Tensor & self, const at::Tensor & other) {
  ...
  auto _any_requires_grad = compute_requires_grad( self, other );
  std::shared_ptr<MulBackward0> grad_fn;
  if (_any_requires_grad) {
    // Creates the link to the actual grad_fn and links the graph for backward traversal
    grad_fn = std::shared_ptr<MulBackward0>(new MulBackward0(), deleteNode);
    grad_fn->set_next_edges(collect_next_edges( self, other ));
    ...
  }
  …
  // Does the actual function call to ATen
  auto _tmp = ([&]() {
    at::AutoDispatchBelowADInplaceOrView guard;
    return at::redispatch::mul(ks & c10::after_autograd_keyset, self_, other_);
  })();

  auto result = std::move(_tmp);
    if (grad_fn) {
       // Connects the result to the graph
      set_history(flatten_tensor_args( result ), grad_fn);
  }
  ...
  return result;
}
Let’s walk through the most important lines of this code.
First of all, the grad_fn object is created with: ` grad_fn = std::shared_ptr(new MulBackward0(), deleteNode);`.
After the grad_fn object is created, the edges used to link the nodes together are created by using the grad_fn->set_next_edges(collect_next_edges( self, other )); calls.
struct MakeNextFunctionList : IterArgs<MakeNextFunctionList> {
  edge_list next_edges;
  using IterArgs<MakeNextFunctionList>::operator();
  void operator()(const Variable& variable) {
    if (variable.defined()) {
      next_edges.push_back(impl::gradient_edge(variable));
    } else {
      next_edges.emplace_back();
    }
  }
  void operator()(const c10::optional<Variable>& variable) {
    if (variable.has_value() && variable->defined()) {
      next_edges.push_back(impl::gradient_edge(*variable));
    } else {
      next_edges.emplace_back();
    }
  }
};

template <typename... Variables>
edge_list collect_next_edges(Variables&&... variables) {
  detail::MakeNextFunctionList make;
  make.apply(std::forward<Variables>(variables)...);
  return std::move(make.next_edges);
}
Given an input variable (it’s just a regular tensor), collect_next_edges
will create an Edge object by calling impl::gradient_edge
 Edge gradient_edge(const Variable& self) {
    // If grad_fn is null (as is the case for a leaf node), we instead
    // interpret the gradient function to be a gradient accumulator, which will
    // accumulate its inputs into the grad property of the variable. These
    // nodes get suppressed in some situations, see "suppress gradient
    // accumulation" below. Note that only variables which have `requires_grad =
    // True` can have gradient accumulators.
    if (const auto& gradient = self.grad_fn()) {
      return Edge(gradient, self.output_nr());
    } else {
      return Edge(grad_accumulator(self), 0);
    }
  }
To understand how edges work, let’s assume that an early executed function produced two output tensors, both with their grad_fn set, each tensor also has an output_nr property with the order in which they were returned. When creating the edges for the current grad_fn, an Edge object per input variable will be created. The edges will point to the variable’s grad_fn and will also track the output_nr to establish ids used when traversing the graph. In the case that the input variables are “leaf”, i.e. they were not produced by any differentiable function, they don’t have a grad_fn attribute set. A special function called a gradient accumulator is set by default as seen in the above code snippet.
After the edges are created, the grad_fn graph Node object that is being currently created will hold them using the set_next_edges function. This is what connects grad_fns together, producing the computational graph.
 void set_next_edges(edge_list&& next_edges) {
    next_edges_ = std::move(next_edges);
    for(const auto& next_edge : next_edges_) {
      update_topological_nr(next_edge);
    }
  }
Now, the forward pass of the function will execute, and after the execution set_history will connect the output tensors to the grad_fn Node.
inline void set_history(
    at::Tensor& variable,
    const std::shared_ptr<Node>& grad_fn) {
  AT_ASSERT(grad_fn);
  if (variable.defined()) {
    // If the codegen triggers this, you most likely want to add your newly added function
    // to the DONT_REQUIRE_DERIVATIVE list in tools/autograd/gen_variable_type.py
    TORCH_INTERNAL_ASSERT(isDifferentiableType(variable.scalar_type()));
    auto output_nr =
        grad_fn->add_input_metadata(variable);
    impl::set_gradient_edge(variable, {grad_fn, output_nr});
  } else {
    grad_fn->add_input_metadata(Node::undefined_input());
  }
}
set_history calls set_gradient_edge, which just copies the grad_fn and the output_nr to the AutogradMeta object that the tensor has.
 void set_gradient_edge(const Variable& self, Edge edge) {
    auto* meta = materialize_autograd_meta(self);
    meta->grad_fn_ = std::move(edge.function);
    meta->output_nr_ = edge.input_nr;
    // For views, make sure this new grad_fn_ is not overwritten unless it is necessary
    // in the VariableHooks::grad_fn below.
    // This logic is only relevant for custom autograd Functions for which multiple
    // operations can happen on a given Tensor before its gradient edge is set when
    // exiting the custom Function.
    auto diff_view_meta = get_view_autograd_meta(self);
    if (diff_view_meta && diff_view_meta->has_bw_view()) {
      diff_view_meta->set_attr_version(self._version());
    }
  }
This tensor now will be the input to another function and the above steps will be all repeated. Check the animation below to see how the graph is created.
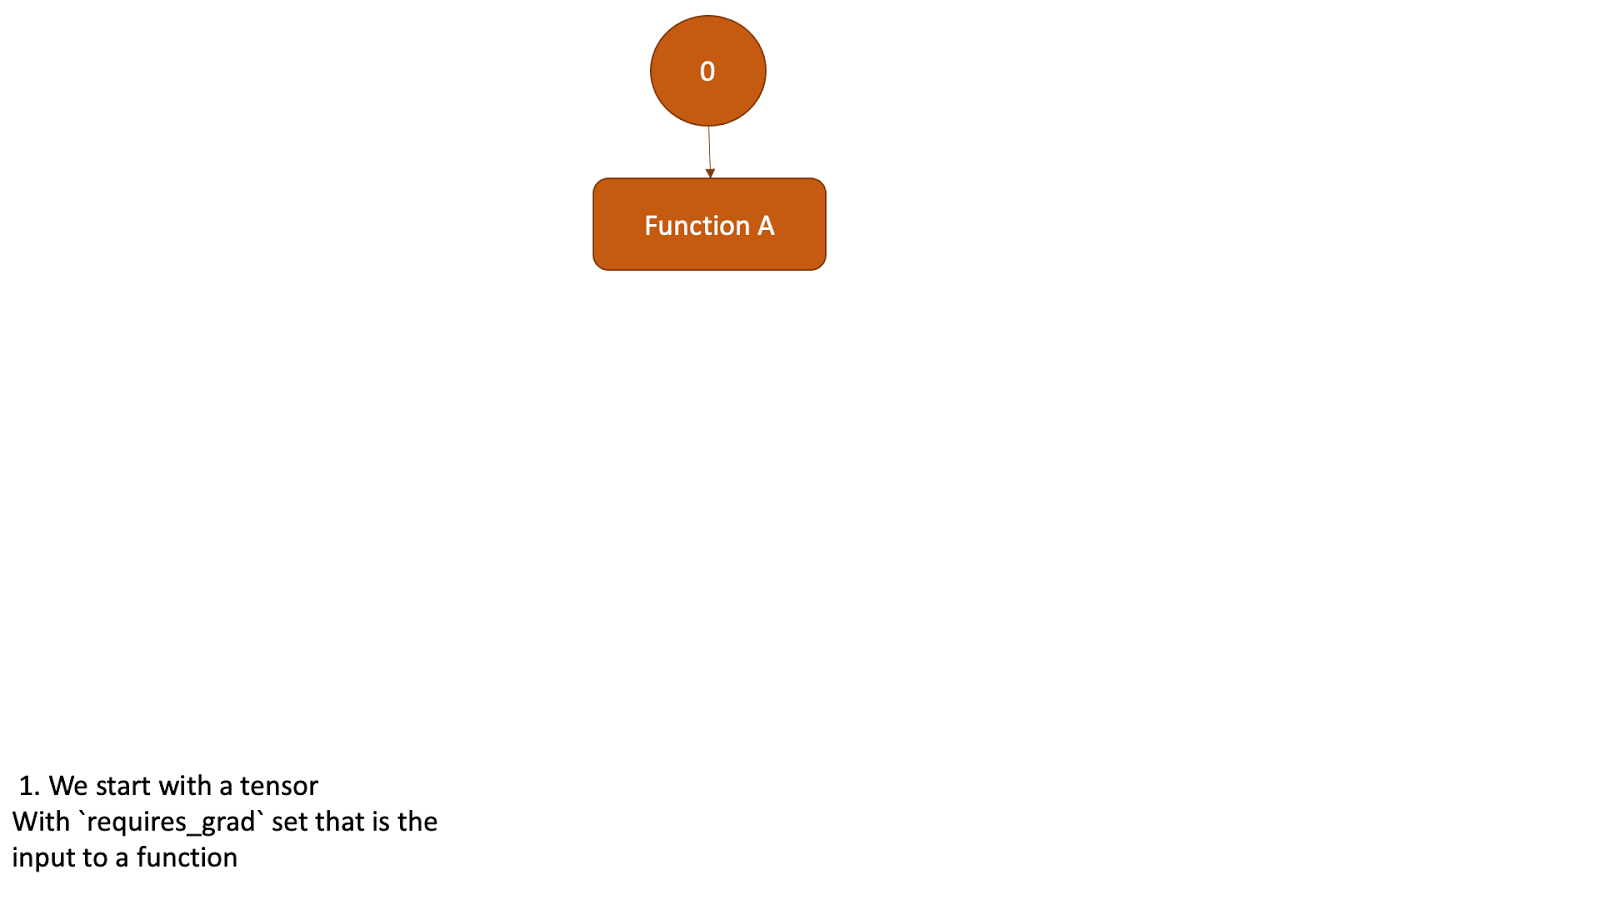
Figure 2: Animation that shows the graph creation
Registering Python Functions in the graph
We have seen how autograd creates the graph for the functions included in ATen. However, when we define our differentiable functions in Python, they are also included in the graph!
An autograd python defined function looks like the following:
class Exp(torch.autograd.Function):
     @staticmethod
     def forward(ctx, i):
         result = i.exp()
         ctx.save_for_backward(result)
         return result

     @staticmethod
     def backward(ctx, grad_output):
         result, = ctx.saved_tensors
         return grad_output * result

# Call the function
Exp.apply(torch.tensor(0.5, requires_grad=True))
# Outputs: tensor(1.6487, grad_fn=<ExpBackward>)
In the above snippet autograd detected our python function when creating the graph. All of this is possible thanks to the Function class. Let’s take a look at what happens when we call apply.
apply is defined in the torch._C._FunctionBase class, but this class is not present in the python source. _FunctionBase is defined in C++ by using the python C API to hook C functions together into a single python class. We are looking for a function named THPFunction_apply.
PyObject *THPFunction_apply(PyObject *cls, PyObject *inputs)
{

  // Generates the graph node
  THPObjectPtr backward_cls(PyObject_GetAttrString(cls, "_backward_cls"));
  if (!backward_cls) return nullptr;
  THPObjectPtr ctx_obj(PyObject_CallFunctionObjArgs(backward_cls, nullptr));
  if (!ctx_obj) return nullptr;
  THPFunction* ctx = (THPFunction*)ctx_obj.get();

  auto cdata = std::shared_ptr<PyNode>(new PyNode(std::move(ctx_obj)), deleteNode);
  ctx->cdata = cdata;

  // Prepare inputs and allocate context (grad fn)
  // Unpack inputs will collect the edges
  auto info_pair = unpack_input<false>(inputs);
  UnpackedInput& unpacked_input = info_pair.first;
  InputFlags& input_info = info_pair.second;

   // Initialize backward function (and ctx)
  bool is_executable = input_info.is_executable;
  cdata->set_next_edges(std::move(input_info.next_edges));
  ctx->needs_input_grad = input_info.needs_input_grad.release();
  ctx->is_variable_input = std::move(input_info.is_variable_input);

  // Prepend ctx to input_tuple, in preparation for static method call
  auto num_args = PyTuple_GET_SIZE(inputs);
  THPObjectPtr ctx_input_tuple(PyTuple_New(num_args + 1));
  if (!ctx_input_tuple) return nullptr;
  Py_INCREF(ctx);
  PyTuple_SET_ITEM(ctx_input_tuple.get(), 0, (PyObject*)ctx);
  for (int i = 0; i < num_args; ++i) {
    PyObject *arg = PyTuple_GET_ITEM(unpacked_input.input_tuple.get(), i);
    Py_INCREF(arg);
    PyTuple_SET_ITEM(ctx_input_tuple.get(), i + 1, arg);
  }

  // Call forward
  THPObjectPtr tensor_outputs;
  {
    AutoGradMode grad_mode(false);
    THPObjectPtr forward_fn(PyObject_GetAttrString(cls, "forward"));
    if (!forward_fn) return nullptr;
    tensor_outputs = PyObject_CallObject(forward_fn, ctx_input_tuple);
    if (!tensor_outputs) return nullptr;
  }

  // Here is where the outputs gets the tensors tracked
  return process_outputs(cls, cdata, ctx, unpacked_input, inputs, std::move(tensor_outputs),
                         is_executable, node);
  END_HANDLE_TH_ERRORS
}
Although this code is hard to read at first due to all the python API calls, it essentially does the same thing as the auto-generated forward functions that we saw for ATen:
Create a grad_fn object.
Collect the edges to link the current grad_fn with the input tensors one.
Execute the function forward.
Assign the created grad_fn to the output tensors metadata.
The grad_fn object is created in:
  // Generates the graph node
  THPObjectPtr backward_cls(PyObject_GetAttrString(cls, "_backward_cls"));
  if (!backward_cls) return nullptr;
  THPObjectPtr ctx_obj(PyObject_CallFunctionObjArgs(backward_cls, nullptr));
  if (!ctx_obj) return nullptr;
  THPFunction* ctx = (THPFunction*)ctx_obj.get();

  auto cdata = std::shared_ptr<PyNode>(new PyNode(std::move(ctx_obj)), deleteNode);
  ctx->cdata = cdata;
Basically, it asks the python API to get a pointer to the Python object that can execute the user-written function. Then it wraps it into a PyNode object that is a specialized Node object that calls the python interpreter with the provided python function when apply is executed during the forward pass. Note that in the code cdata is the actual Node object that is part of the graph. ctx is the object that is passed to the python forward/backward functions and it is used to store autograd related information by both, the user’s function and PyTorch.
As in the regular C++ functions we also call collect_next_edges to track the inputs grad_fn objects, but this is done in unpack_input:
template<bool enforce_variables>
std::pair<UnpackedInput, InputFlags> unpack_input(PyObject *args) {
  ...
  flags.next_edges = (flags.is_executable ? collect_next_edges(unpacked.input_vars) : edge_list());
  return std::make_pair(std::move(unpacked), std::move(flags));
}
After this, the edges are assigned to the grad_fn by just doing cdata->set_next_edges(std::move(input_info.next_edges)); and the forward function is called through the python interpreter C API.
Once the output tensors are returned from the forward pass, they are processed and converted to variables inside the process_outputs function.
PyObject* process_outputs(PyObject *op_obj, const std::shared_ptr<PyNode>& cdata,
                          THPFunction* grad_fn, const UnpackedInput& unpacked,
                          PyObject *inputs, THPObjectPtr&& raw_output, bool is_executable,
                          torch::jit::Node* node) {
  ...
  _wrap_outputs(cdata, grad_fn, unpacked.input_vars, raw_output, outputs, is_executable);
  _trace_post_record(node, op_obj, unpacked.input_vars, outputs, is_inplace, unpack_output);
  if (is_executable) {
    _save_variables(cdata, grad_fn);
  } ...
  return outputs.release();
}
Here, _wrap_outputs is in charge of setting the forward outputs grad_fn to the newly created one. For this, it calls another _wrap_outputs function defined in a different file, so the process here gets a little confusing.
static void _wrap_outputs(const std::shared_ptr<PyNode>& cdata, THPFunction *self,
    const variable_list &input_vars, PyObject *raw_output, PyObject *outputs, bool is_executable)
{
  auto cdata_if_executable = is_executable ? cdata : nullptr;
 ...

  // Wrap only the tensor outputs.
  // This calls csrc/autograd/custom_function.cpp
  auto wrapped_outputs = _wrap_outputs(input_vars, non_differentiable, dirty_inputs, raw_output_vars, cdata_if_executable);
...
}
The called _wrap_outputs is the one in charge of setting the autograd metadata in the output tensors:
std::vector<c10::optional<Variable>> _wrap_outputs(const variable_list &input_vars,
  const std::unordered_set<at::TensorImpl*> &non_differentiable,
  const std::unordered_set<at::TensorImpl*> &dirty_inputs,
  const at::ArrayRef<c10::optional<Variable>> raw_outputs,
  const std::shared_ptr<Node> &cdata) {


  std::unordered_set<at::TensorImpl*> inputs;
  …
  // Sets the grad_fn and output_nr of an output Variable.
  auto set_history = [&](Variable& var, uint32_t output_nr, bool is_input, bool is_modified,
                         bool is_differentiable) {
    // Lots of checks
    if (!is_differentiable) {
     ...
    } else if (is_input) {
      // An input has been returned, but it wasn't modified. Return it as a view
      // so that we can attach a new grad_fn to the Variable.
      // Run in no_grad mode to mimic the behavior of the forward.
      {
        AutoGradMode grad_mode(false);
        var = var.view_as(var);
      }
      impl::set_gradient_edge(var, {cdata, output_nr});
    } else if (cdata) {
      impl::set_gradient_edge(var, {cdata, output_nr});
    }
  };
And this is where set_gradient_edge was called and this is how a user-written python function gets included in the computational graph with its associated backward function!
Closing remarks
This blog post is intended to be a code overview on how PyTorch constructs the actual computational graphs that we discussed in the previous post. The next entry will deal with how the autograd engine executes these graphs.