The ability to scale machine learning operations (MLOps) at an enterprise is quickly becoming a competitive advantage in the modern economy. When firms started dabbling in ML, only the highest priority use cases were the focus. Businesses are now demanding more from ML practitioners: more intelligent features, delivered faster, and continually maintained over time. An effective MLOps strategy requires a unified platform that can orchestrate and automate complex data processing and ML tasks, and integrates with the latest tooling to best complete those tasks.
This post demonstrates the value of using Amazon Managed Workflows for Apache Airflow (Amazon MWAA) to orchestrate an ML pipeline using the popular XGBoost (eXtreme Gradient Boosting) algorithm. For more advanced and comprehensive MLOps capabilities, including a purpose-built model orchestration framework and a continuous integration and continuous delivery (CI/CD) service for ML, readers are encouraged to check out Amazon SageMaker Pipelines.
Why Airflow for orchestration
Customers choose Apache Airflow and specifically Amazon MWAA for several reasons, but three stand out:
- Airflow is Python-based – Airflow, as a Python-based tool, enjoys the benefits of an imperative programming paradigm. This enables developers to programmatically define how tasks are to be done. Tools that are declarative, such as AWS Step Functions, only allow you to define what is to be done. When orchestrating ML pipelines, the ability to directly define the control flow is often required to navigate complex workflows.
- Directed Acyclic Graph (DAG) workflow management – Airflow provides a DAG interface as a simple mechanism for defining and running complex workflows with dependencies. These DAG workflows are visualized through a GUI for operations management.
- Extensibility – Airflow operators provide a structured way to perform common tasks using reusable modules. This capability is extensible and providers are free to develop custom Airflow operators that integrate with their tools and services. Many cloud-based services are supported. These operators provide useful abstraction, repeatability, and an API. In the context of big data and ML, these operators are especially valuable because they provide a way to orchestrate sometimes very long-running data pipelines or asynchronous ML processes such as model training.
Set up an Amazon MWAA environment
To create your Amazon MWAA environment, complete the following steps:
- On the Amazon MWAA console, choose Create environment.
- For Name, enter a unique name.
- For Airflow version, choose the version to use. For this post, we use Airflow v2.0.2. We also include code for Airflow v1.10.12.

- In the Dag code in the Amazon S3 section, specify the Amazon Simple Storage Service (Amazon S3) bucket where Amazon MWAA can find the DAGs,
plugins.zipfile, andrequirements.txtfile.

Airflow configuration for XGBoost
An XGBoost model requires a specific configuration in the Managed Airflow environment. The core.enable_xcom_pickling parameter must be set to True. The reason for this is the trained XGBoost model needs to be serialized in order to save it as a file in Amazon S3. Certain Python objects (like datetime) can’t be serialized without converting the Python object hierarchy into a byte stream through a process called pickling.

Requirements.txt file
Upload a requirements.txt file to the Amazon S3 location you specified in the Amazon MWAA setup. To support this demonstration, the requirements.txt file should have the following entries:
boto3==1.17.49
sagemaker==1.72.0
s3fs==0.5.1
Orchestrate an XGBoost ML pipeline
Our ML pipeline is a simplified three-step pipeline:
- Data preprocessing using AWS Glue. Real pipelines could require numerous processing steps for data cleaning and featuring engineering. Although Amazon SageMaker Pipelines provides a similar functionality, we use AWS Glue to illustrate how different AWS services or third-party tools and services are orchestrated in a single pipeline.
- Train an XGBoost model using a SageMaker training job.
- Deploy the trained model as a real-time inference endpoint.
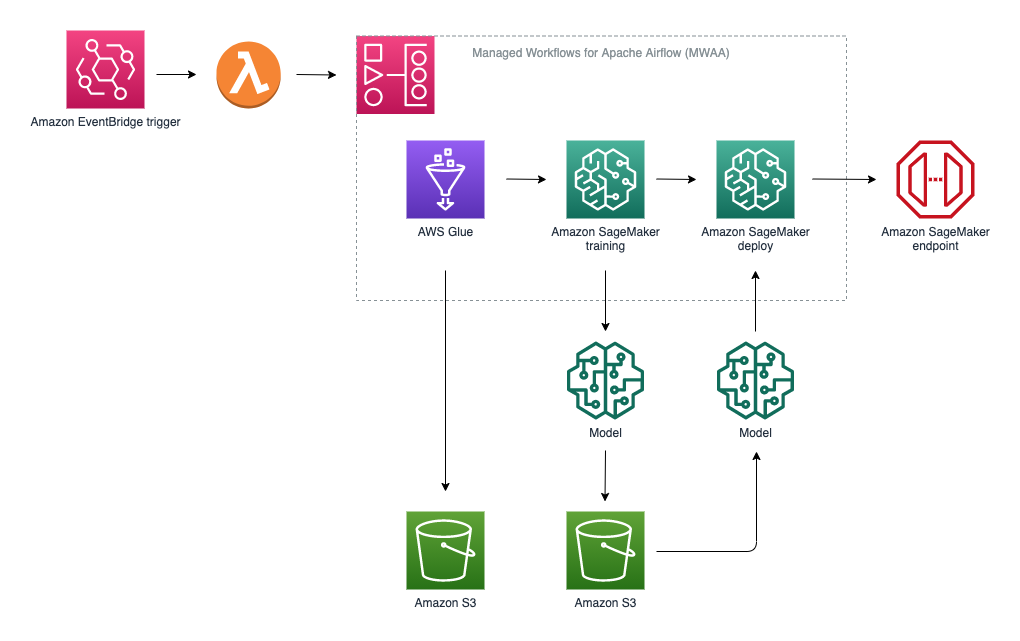
Solution architecture
Our ML pipeline is pictured in the following diagram. We use AWS Lambda to invoke DAGs with a Lambda function. We also use Amazon EventBridge to trigger Lambda functions. For more information, see Tutorial: Schedule AWS Lambda functions using EventBridge.
Stage the AWS Glue script
In our demo, we create the AWS Glue job dynamically using a PySpark script saved in Amazon S3. Copy the glue_etl.py file provided in the source code repo to an Amazon S3 location.

Set DAG configuration values
To keep things simple, we use a config.py file to import any environment-specific configurations rather than define it in the main DAG script. You can view the config.py file in its entirety on GitHub. A best practice is to use AWS Secrets Manager to store configuration and secrets information (as of this writing, AWS Systems Manager Parameter Store isn’t a supported backend on Amazon MWAA). Detailed documentation on how to securely store secrets in AWS Secrets Manager for Amazon MWAA is available here.
Upload the updated config.py file to the DAG directory.

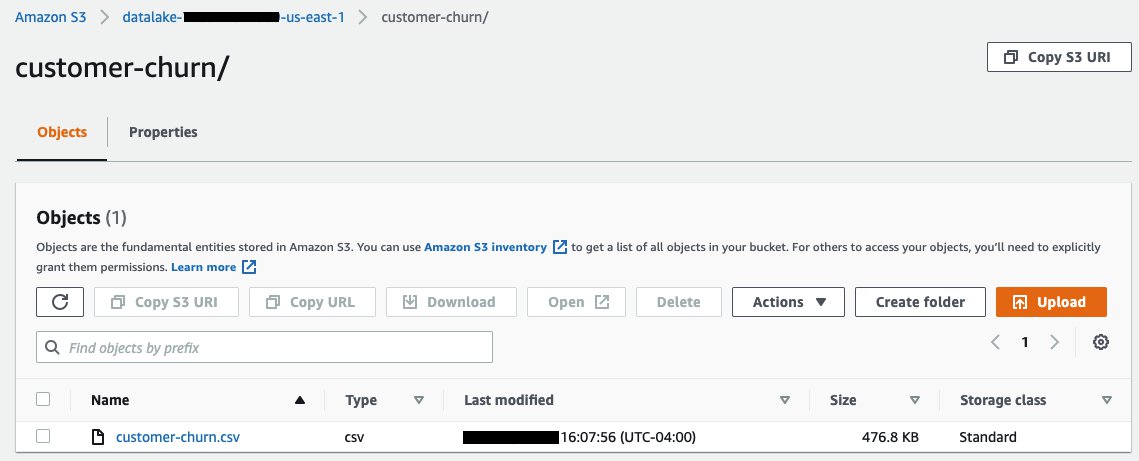
Stage the customer churn training data
The customer churn dataset is mentioned in the book Discovering Knowledge in Data by Daniel T. Larose. It’s attributed by the author to the University of California Irvine Repository of Machine Learning Datasets. The dataset is publicly available and provided in the GitHub repo.
Upload the customer-churn.csv file to the Amazon S3 location you specified in the config.py file.
Construct the DAG
For our demonstration, the DAG consists of four primary sections:
- Import statements
- DAG operator configuration
- DAG task definitions
- DAG task dependency definition
Import statements
Because Airflow is Python-based, the DAG file is a simple Python file and the modules for Airflow are imported just as they would be for any Python application.
Some services have native Airflow operators available that manage asynchronous API calls and polling to determine success or failure of orchestrated tasks. We recommend using native operators wherever possible. AWS services that don’t have native Airflow operators, like AWS Glue, can still be orchestrated in Airflow using AWS SDKs called from the general PythonOperator.
For nearly all AWS services, the AWS SDK for Python (Boto3) provides service-level access to the APIs. This SDK provides a high degree of control, but also a lower level of abstraction. For ML pipelines using SageMaker, you can use the SageMaker Python SDK. This is a streamlined SDK abstracted specifically for ML experimentation.
The following import statements include general Airflow modules and operators, native Airflow operators for SageMaker, and the Boto3 and SageMaker SDKs:
# Airflow Operators
import airflow
from airflow.models import DAG
from airflow.utils.dates import days_ago
from airflow.operators.python_operator import PythonOperator

# Airflow Sagemaker Operators
from airflow.providers.amazon.aws.operators.sagemaker_training import SageMakerTrainingOperator
from airflow.providers.amazon.aws.operators.sagemaker_endpoint import SageMakerEndpointOperator
from airflow.providers.amazon.aws.hooks.base_aws import AwsBaseHook

# AWS SDK for Python
import boto3

# Amazon SageMaker SDK
import sagemaker
from sagemaker.amazon.amazon_estimator import get_image_uri
from sagemaker.estimator import Estimator
from sagemaker.session import s3_input

# Airflow SageMaker Configuration
from sagemaker.workflow.airflow import training_config
from sagemaker.workflow.airflow import model_config_from_estimator
from sagemaker.workflow.airflow import deploy_config_from_estimator

# Configuration variables
import config
Other import statements are needed to support this demonstration; refer to the GitHub repo for the full code.
DAG operator configuration
The DAG and DAG tasks are defined based on the operators invoked to run each task.
For the AWS Glue task, we invoke the PythonOperator using the SDK for Python to create a client for AWS Glue. To keep the DAG code tidy, we abstract the AWS Glue client code in a helper function called preprocess_glue. We stage the glue_etl.py (referenced in the GitHub repo) in Amazon S3 so it can be loaded when the AWS Glue job is created. See the following code:
def preprocess_glue():
  """preprocess data using glue for etl"""

  # not best practice to hard code location
  glue_script_location = 's3://{}/{}'.format(config.GLUE_JOB_SCRIPT_S3_BUCKET, config.GLUE_JOB_SCRIPT_S3_KEY)
  glue_client = boto3.client('glue')

  # instantiate the Glue ETL job
  response = glue_client.create_job(
    Name=glue_job_name,
    Description='PySpark job to extract the data and split in to training and validation data sets',
    Role=config.GLUE_ROLE_NAME,
    ExecutionProperty={
      'MaxConcurrentRuns': 2
    },
    Command={
      'Name': 'glueetl',
      'ScriptLocation': glue_script_location,
      'PythonVersion': '3'
    },
    DefaultArguments={
      '--job-language': 'python'
    },
    GlueVersion='1.0',
    WorkerType='Standard',
    NumberOfWorkers=2,
    Timeout=60
    )

  # execute the previously instantiated Glue ETL job
  response = glue_client.start_job_run(
    JobName=response['Name'],
    Arguments={
      '--S3_SOURCE': config.DATA_S3_SOURCE,
      '--S3_DEST': config.DATA_S3_DEST,
      '--TRAIN_KEY': 'train/',
      '--VAL_KEY': 'validation/'
    }
  )
We create a helper function that returns the ARN of the SageMaker role:
def get_sagemaker_role_arn(role_name, region_name):
    iam = boto3.client("iam", region_name=region_name)
    response = iam.get_role(RoleName=role_name)
    return response["Role"]["Arn"]
The XGBoost estimator requires the SageMaker role, container image, and hyperparameters, which we collect using a hook into SageMaker:
hook = AwsBaseHook(aws_conn_id="airflow-sagemaker", client_type="sagemaker")
sess = hook.get_session(region_name=config.REGION_NAME)
sagemaker_role = get_sagemaker_role_arn(config.SAGEMAKER_ROLE_NAME, config.REGION_NAME)
container = get_image_uri(sess.region_name, "xgboost")
hyperparameters = {
    "max_depth":"5",
    "eta":"0.2",
    "gamma":"4",
    "min_child_weight":"6",
    "subsample":"0.8",
    "objective":"binary:logistic",
    "num_round":"100"
}
With the parameters defined, we can create the estimator object:
xgb_estimator = Estimator(
    image_name=container,
    hyperparameters=hyperparameters,
    role=sagemaker_role,
    sagemaker_session=sagemaker.session.Session(sess),
    train_instance_count=1,
    train_instance_type='ml.m5.4xlarge',
    train_volume_size=5,
    output_path=config.SAGEMAKER_MODEL_S3_DEST
)
This estimator object is an input parameter into the training configuration. We need to define other training parameters:
# create unique name with guid
sagemaker_taining_job_name=config.SAGEMAKER_TRAINING_JOB_NAME_PREFIX+'-{}'.format(guid)

# define S3 locations for training & validation data processed using Glue
sagemaker_training_data = s3_input(config.SAGEMAKER_TRAINING_DATA_S3_SOURCE, content_type=config.SAGEMAKER_CONTENT_TYPE)
sagemaker_validation_data = s3_input(config.SAGEMAKER_VALIDATION_DATA_S3_SOURCE, content_type=config.SAGEMAKER_CONTENT_TYPE)

sagemaker_training_inputs = {
  'train': sagemaker_training_data,
  'validation': sagemaker_validation_data
  }
Let’s take a closer look at the arguments for sagemaker_training_inputs. The XGBoost algorithm supports both LIBSVM and CSV text formats for training and validation datasets. However, LIBSVM is supported by default. This means that we must specify CSV explicitly so XGBoost interprets our data correctly. The content type is set as text/csv in our custom DAG configuration file. We use CSV because it’s the most common data file format familiar to all ML practitioners.
With these parameters defined, we can create the training config object:
training_config = training_config(
  estimator=xgb_estimator,
  inputs=sagemaker_training_inputs,
  job_name=sagemaker_taining_job_name
)
For native Airflow SageMaker operators, you can construct and reference well-defined configuration objects when invoking the operators.
The next configuration definition is for the SageMaker endpoint:
# create unique name using guid
sagemaker_model_name=config.SAGEMAKER_MODEL_NAME_PREFIX+'-{}'.format(guid)
sagemaker_endpoint_name=config.SAGEMAKER_ENDPOINT_NAME_PREFIX+'-{}'.format(guid)
For this simple pipeline, we use the deploy_config_from_estimator API option in the SageMaker SDK to export an Airflow deploy config directly from the SageMaker XGBoost estimator (the endpoint_name parameter must be 63 characters or less):
endpoint_config = deploy_config_from_estimator(
  estimator=xgb_estimator,
  task_id="train",
  task_type="training",
  initial_instance_count=1,
  instance_type="ml.m4.xlarge",
  model_name=sagemaker_model_name,
  endpoint_name=sagemaker_endpoint_name
)
For more information about how we set up the model training and deployment configuration, including how we used the SageMaker SDK sagemaker.workflow.airflow APIs, see the GitHub repo.
With the operator configuration complete, we’re ready to put it all together to define our DAG.
DAG task definitions
For the XGBoost model training task, we invoke the SageMakerTrainingOperator. For the endpoint deployment task, we invoke the SageMakerEndpointOperator. It’s important to note the separation of concerns: we create a model using the SageMakerModelOperator but configure the SageMaker endpoint using the SageMakerEndpointConfigOperator. This provides added granular control over the creation and deployment of the model. See the following code:
args = {"owner": "airflow", "start_date": airflow.utils.dates.days_ago(2), 'depends_on_past': False}

with DAG(
    dag_id=config.AIRFLOW_DAG_ID,
    default_args=args,
    start_date=days_ago(2),
    schedule_interval=None,
    concurrency=1,
    max_active_runs=1,
) as dag:
    process_task = PythonOperator(
      task_id="process",
      dag=dag,
      #provide_context=False,
      python_callable=preprocess_glue,
    )

    train_task = SageMakerTrainingOperator(
      task_id = "train",
      config = training_config,
      aws_conn_id = "airflow-sagemaker",
      wait_for_completion = True,
      check_interval = 60, #check status of the job every minute
      max_ingestion_time = None, #allow training job to run as long as it needs, change for early stop
    )

    endpoint_deploy_task = SageMakerEndpointOperator(
      task_id = "endpoint-deploy",
      config = endpoint_config,
      aws_conn_id = "sagemaker-airflow",
      wait_for_completion = True,
      check_interval = 60, #check status of endpoint deployment every minute
      max_ingestion_time = None,
      operation = 'create', #change to update if you are updating rather than creating an endpoint
    )
DAG task dependency definition
After we define the tasks, we set the dependencies of the tasks. Airflow implements the right shift logical operator (>>) to define downstream dependencies and the left shift logical operator (<<) to define upstream dependencies. In our example, we only define downstream dependencies:
# set the dependencies between tasks
process_task >> train_task >> endpoint_deploy_task
When the completed DAG is uploaded to the designated Amazon S3 location, Amazon MWAA automatically ingests the DAG. The graph view visually shows the task dependencies. You can trigger the DAG manually from the console during iterative testing, or as we described earlier, from an external source such as EventBridge and a Lambda function. Each task is highlighted depending on the stage of completion, as shown in the following screenshot. Dark green indicates successful completion of the task.

Test the deployed endpoint
After the endpoint-deploy task is complete, we can view the endpoint on the SageMaker console. The SageMaker endpoint is a real-time inference endpoint. SageMaker takes care of deploying, hosting, and exposing the HTTPS endpoint.

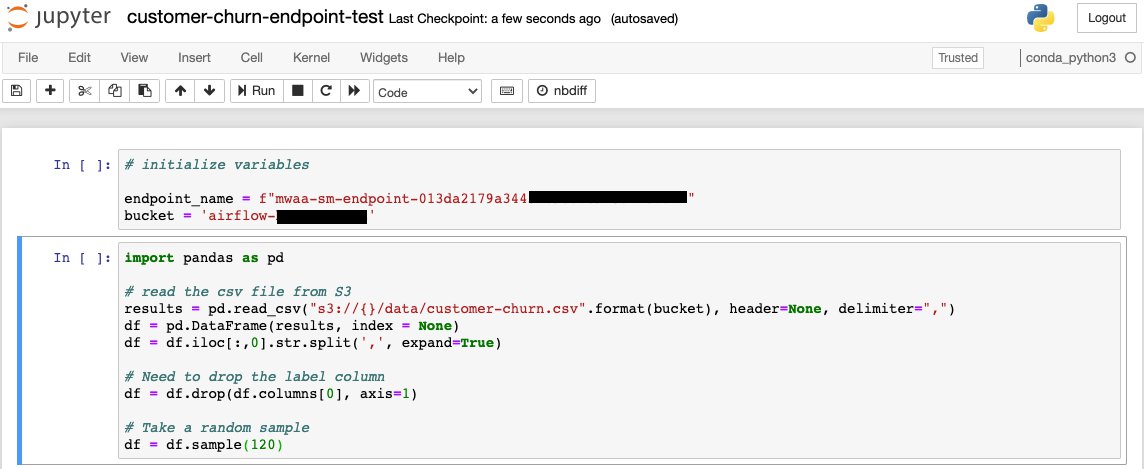
We can test the deployed endpoint with a SageMaker notebook.
Follow these steps to set up a SageMaker notebook environment:
- Launch a SageMaker notebook instance.
- On the Notebook instances page, open your notebook instance by choosing either Open JupyterLab for the JupyterLab interface or Open Jupyter for the classic Jupyter view.
- Choose Upload to import the test notebook available in the GitHub repo.

Prepare a test sample
We use Pandas DataFrames to create a test dataset out of the customer churn dataset that was used for training. For the test dataset, we must drop the label column, which is the first column. We also take a random sample of the dataset using the Pandas DataFrame sample method.
Request inferences
Now that we have our sampled test data, we use the Boto3 library to create a SageMaker runtime client. We use the client when we invoke our endpoint, pass it test data, and receive an inference value.

Conclusion
You can use Amazon MWAA to orchestrate and automate complex ML pipelines from the data processing stage through model training and endpoint deployment. You can set special configuration options in the Amazon MWAA environment to support popular ML frameworks like XGBoost.
In this post, we demonstrated how to dynamically create and run an AWS Glue job to preprocess training and validation data. We showed how to construct the DAG to support this ML pipeline, including the import statements, the DAG operator configuration, the DAG task definitions, and the DAG dependency definition. We demonstrated the difference between using native Airflow operators vs. invoking AWS SDK API calls from a generic PythonOperator.
Amazon MWAA is a highly versatile orchestration tool that enterprises can use to operationalize and scale their ML capabilities.
About the authors
 Justin Leto is a Sr. Solutions Architect at Amazon Web Services with specialization in big data analytics and machine learning. His passion is helping customers achieve better cloud adoption. In his spare time, he enjoys offshore sailing and playing jazz piano. He lives in Manhattan with his wife Veera.
 David Ehrlich is a Machine Learning Specialist at Amazon Web Services. He is passionate about helping customers unlock the true potential of their data. In his spare time, he enjoys exploring the different neighborhoods in New York City, going to comedy clubs, and traveling.
 Shreyas Subramanian is a AI/ML specialist Solutions Architect, and helps customers by using Machine Learning to solve their business challenges using AWS services.