Amazon SageMaker Data Wrangler makes it faster for data scientists and engineers to prepare data for machine learning (ML) applications by using a visual interface. Previously, when you created a Data Wrangler data flow, you could choose different export options to easily integrate that data flow into your data processing pipeline. Data Wrangler offers export options to Amazon Simple Storage Service (Amazon S3), SageMaker Pipelines, and SageMaker Feature Store, or as Python code. The export options create a Jupyter notebook and require you to run the code to start a processing job facilitated by SageMaker Processing.
We’re excited to announce the general release of destination nodes and the Create Job feature in Data Wrangler. This feature gives you the ability to export all the transformations that you made to a dataset to a destination node with just a few clicks. This allows you to create data processing jobs and export to Amazon S3 purely via the visual interface without having to generate, run, or manage Jupyter notebooks, thereby enhancing the low-code experience. To demonstrate this new feature, we use the Titanic dataset and show how to export your transformations to a destination node.
Prerequisites
Before we learn how to use destination nodes with Data Wrangler, you should already understand how to access and get started with Data Wrangler. You also need to know what a data flow means with context to Data Wrangler and how to create one by importing your data from the different data sources Data Wrangler supports.
Solution overview
Consider the following data flow named example-titanic.flow:
- It imports the Titanic dataset three times. You can see these different imports as separate branches in the data flow.
- For each branch, it applies a set of transformations and visualizations.
- It joins the branches into a single node with all the transformations and visualizations.
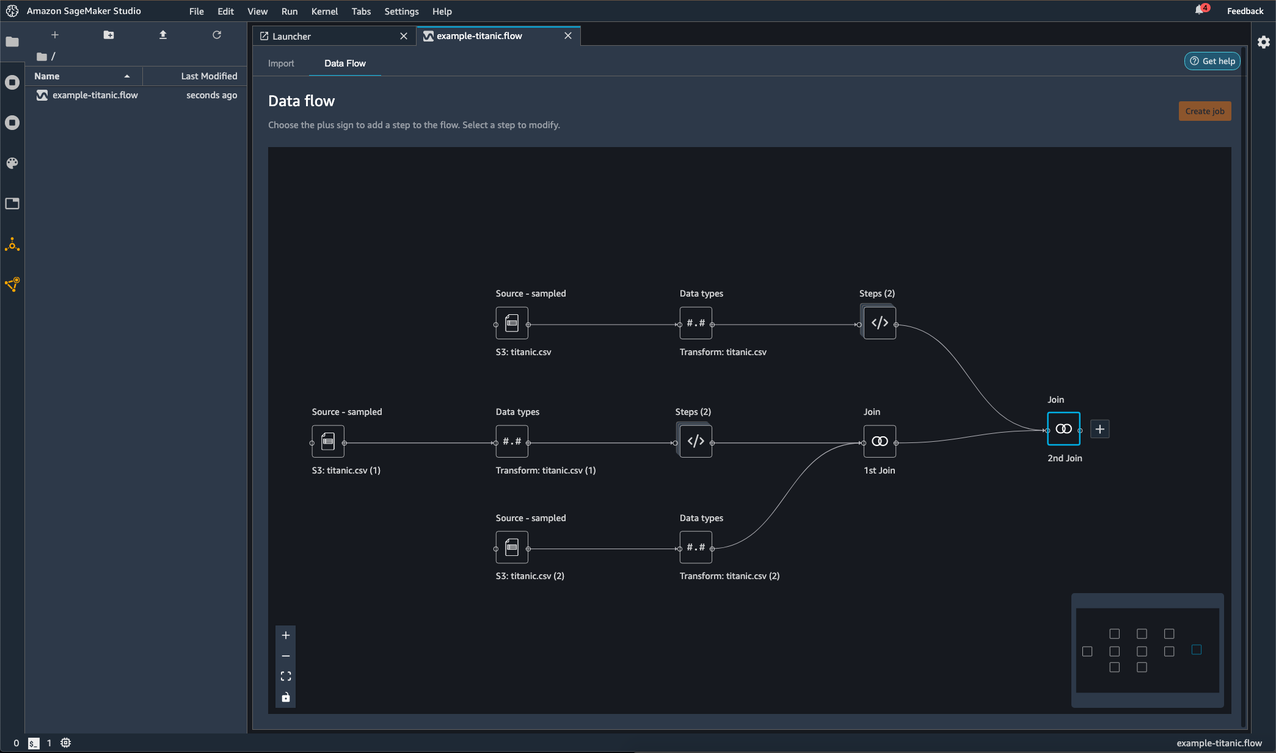
With this flow, you might want to process and save parts of your data to a specific branch or location.
In the following steps, we demonstrate how to create destination nodes, export them to Amazon S3, and create and launch a processing job.
Create a destination node
You can use the following procedure to create destination nodes and export them to an S3 bucket:
- Determine what parts of the flow file (transformations) you want to save.
- Choose the plus sign next to the nodes that represent the transformations that you want to export. (If it’s a collapsed node, you must select the options icon (three dots) for the node).

- Hover over Add destination.

- Choose Amazon S3.

- Specify the fields as shown in the following screenshot.
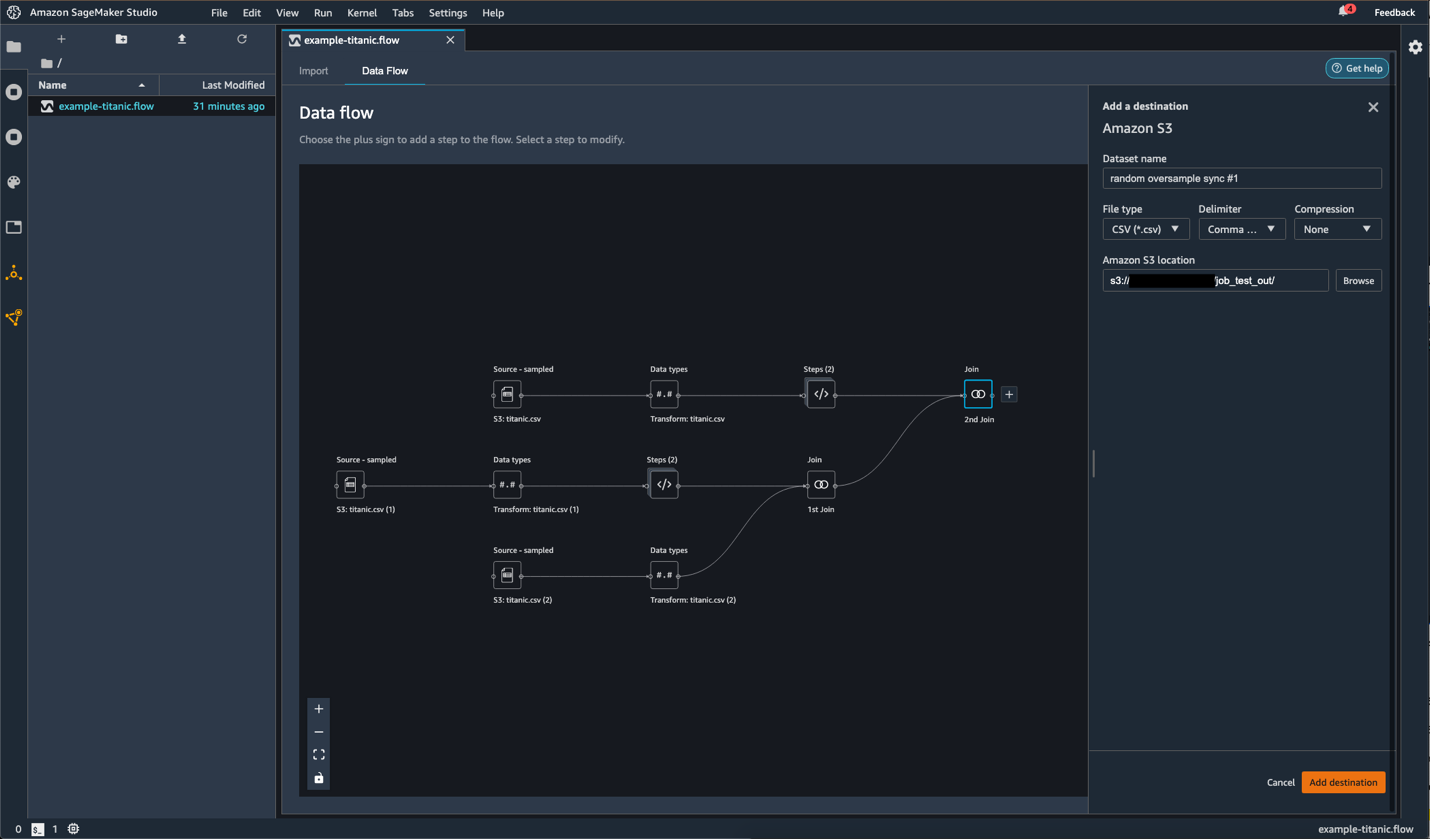
- For the second join node, follow the same steps to add Amazon S3 as a destination and specify the fields.
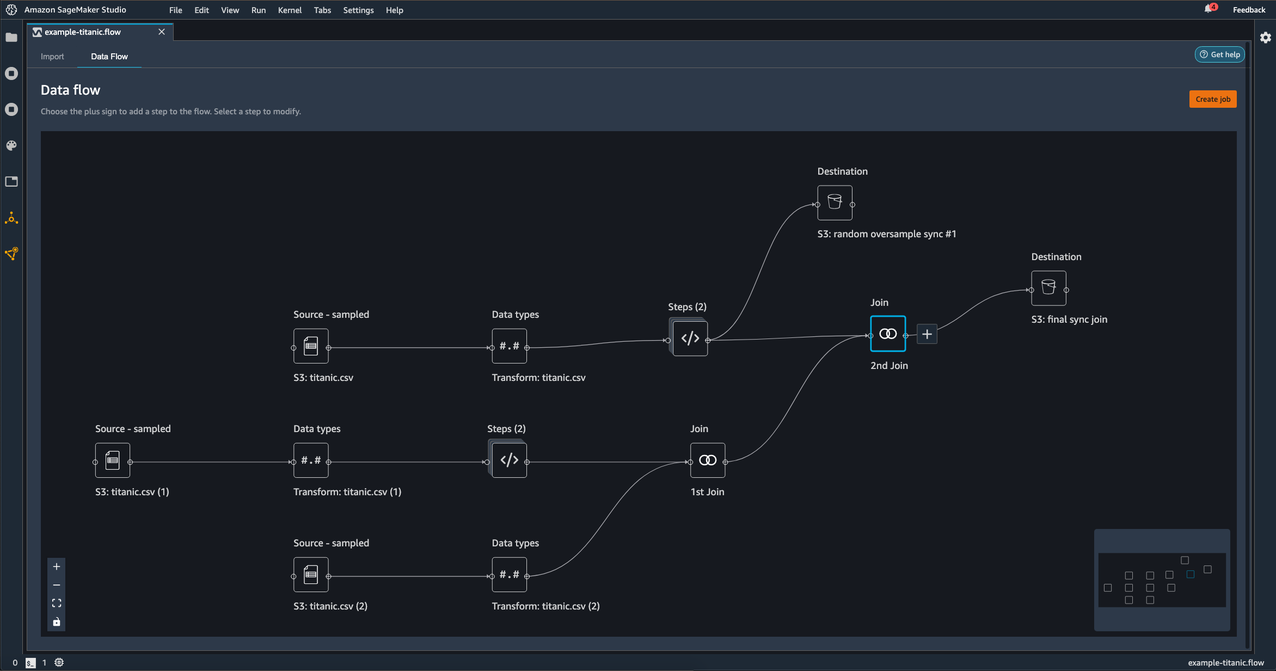
You can repeat these steps as many times as you need for as many nodes you want in your data flow. Later on, you pick which destination nodes to include in your processing job.
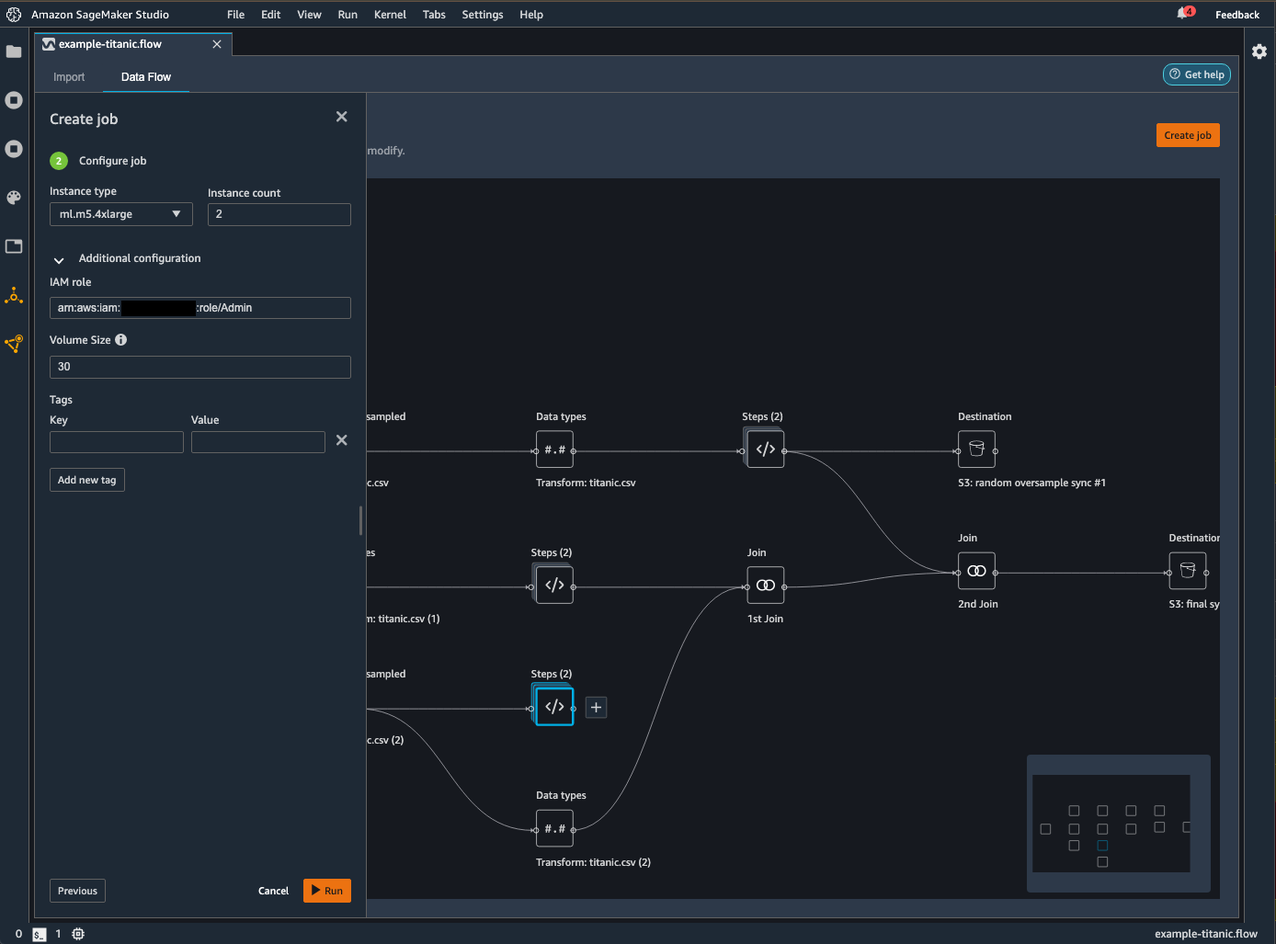
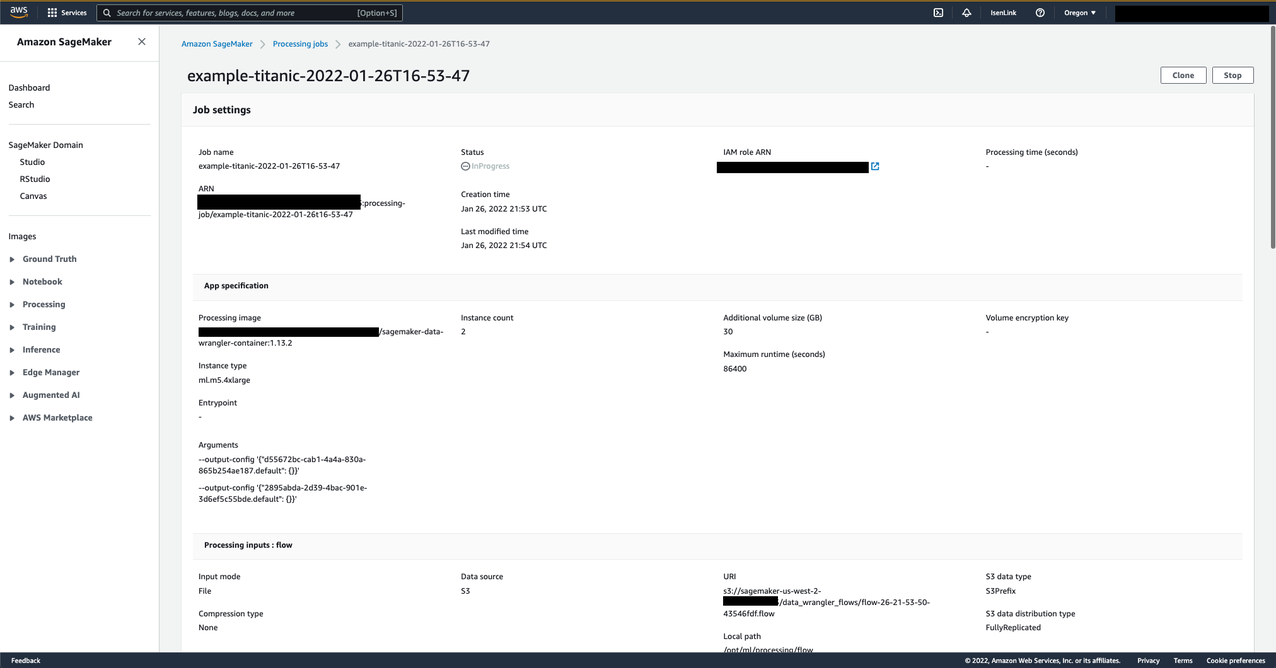
Launch a processing job
Use the following procedure to create a processing job and choose the destination node where you want to export to:
- On the Data Flow tab, choose Create job.
- For Job name¸ enter the name of the export job.
- Select the destination nodes you want to export.
- Optionally, specify the AWS Key Management Service (AWS KMS) key ARN.
The KMS key is a cryptographic key that you can use to protect your data. For more information about KMS keys, see the AWS Key Developer Guide.
- Choose Next, 2. Configure job.

- Optionally, you can configure the job as per your needs by changing the instance type or count, or adding any tags to associate with the job.
- Choose Run to run the job.
A success message appears when the job is successfully created.

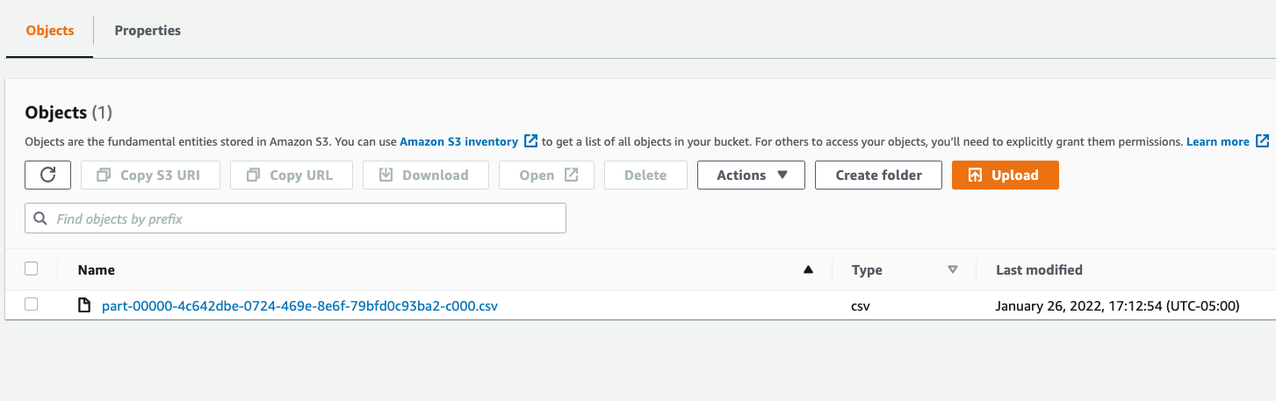
View the final data
Finally, you can use the following steps to view the exported data:
- After you create the job, choose the provided link.
A new tab opens showing the processing job on the SageMaker console.
- When the job is complete, review the exported data on the Amazon S3 console.
You should see a new folder with the job name you chose.

- Choose the job name to view a CSV file (or multiple files) with the final data.
FAQ
In this section, we address a few frequently asked questions about this new feature:
- What happened to the Export tab? With this new feature, we removed the Export tab from Data Wrangler. You can still facilitate the export functionality via the Data Wrangler generated Jupyter notebooks from any nodes you created in the data flow with the following steps:
-
- Choose the plus sign next to the node that you want to export.
- Choose Export to.
- Choose Amazon S3 (via Jupyter Notebook).
- Run the Jupyter notebook.

- How many destinations nodes can I include in a job? There is a maximum of 10 destinations per processing job.
- How many destination nodes can I have in a flow file? You can have as many destination nodes as you want.
- Can I add transformations after my destination nodes? No, the idea is destination nodes are terminal nodes that have no further steps afterwards.
- What are the supported sources I can use with destination nodes? As of this writing, we only support Amazon S3 as a destination source. Support for more destination source types will be added in the future. Please reach out if there is a specific one you would like to see.
Summary
In this post, we demonstrated how to use the newly launched destination nodes to create processing jobs and save your transformed datasets directly to Amazon S3 via the Data Wrangler visual interface. With this additional feature, we have enhanced the tool-driven low-code experience of Data Wrangler.
As next steps, we recommend you try the example demonstrated in this post. If you have any questions or want to learn more, see Export or leave a question in the comment section.
About the Authors
 Alfonso Austin-Rivera is a Front End Engineer at Amazon SageMaker Data Wrangler. He is passionate about building intuitive user experiences that spark joy. In his spare time, you can find him fighting gravity at a rock-climbing gym or outside flying his drone.
 Parsa Shahbodaghi is a Technical Writer in AWS specializing in machine learning and artificial intelligence. He writes the technical documentation for Amazon SageMaker Data Wrangler and Amazon SageMaker Feature Store. In his free time, he enjoys meditating, listening to audiobooks, weightlifting, and watching stand-up comedy. He will never be a stand-up comedian, but at least his mom thinks he’s funny.
 Balaji Tummala is a Software Development Engineer at Amazon SageMaker. He helps support Amazon SageMaker Data Wrangler and is passionate about building performant and scalable software. Outside of work, he enjoys reading fiction and playing volleyball.
 Arunprasath Shankar is an Artificial Intelligence and Machine Learning (AI/ML) Specialist Solutions Architect with AWS, helping global customers scale their AI solutions effectively and efficiently in the cloud. In his spare time, Arun enjoys watching sci-fi movies and listening to classical music.