TensorFlow is an open-source machine learning (ML) library widely used to develop neural networks and ML models. Those models are usually trained on multiple GPU instances to speed up training, resulting in expensive training time and model sizes up to a few gigabytes. After they’re trained, these models are deployed in production to produce inferences. They can be synchronous, asynchronous, or batch-based workloads. Those endpoints need to be highly scalable and resilient in order to process from zero to millions of requests. This is where AWS Lambda can be a compelling compute service for scalable, cost-effective, and reliable synchronous and asynchronous ML inferencing. Lambda offers benefits such as automatic scaling, reduced operational overhead, and pay-per-inference billing.
This post shows you how to use any TensorFlow model with Lambda for scalable inferences in production with up to 10 GB of memory. This allows us to use ML models in Lambda functions up to a few gigabytes. For this post, we use TensorFlow-Keras pre-trained ResNet50 for image classification.
Overview of solution
Lambda is a serverless compute service that lets you run code without provisioning or managing servers. Lambda automatically scales your application by running code in response to every event, allowing event-driven architectures and solutions. The code runs in parallel and processes each event individually, scaling with the size of the workload, from a few requests per day to hundreds of thousands of workloads. The following diagram illustrates the architecture of our solution.

You can package your code and dependencies as a container image using tools such as the Docker CLI. The maximum container size is 10 GB. After the model for inference is Dockerized, you can upload the image to Amazon Elastic Container Registry (Amazon ECR). You can then create the Lambda function from the container imaged stored in Amazon ECR.
Prerequisites
For this walkthrough, you should have the following prerequisites:
- An AWS account
- The AWS Command Line Interface (AWS CLI) installed and configured to interact with AWS services locally
- The Docker CLI
Implementing the solution
We use a pre-trained model from the TensorFlow Hub for image classification. When an image is uploaded to an Amazon Simple Storage Service (Amazon S3) bucket, a Lambda function is invoked to detect the image and print it to the Amazon CloudWatch logs. The following diagram illustrates this workflow.

To implement the solution, complete the following steps:
- On your local machine, create a folder with the name
lambda-tensorflow-example. - Create a
requirements.txtfile in that directory. - Add all the needed libraries for your ML model. For this post, we use TensorFlow 2.4.
- Create an
app.pyscript that contains the code for the Lambda function. - Create a Dockerfile in the same directory.
The following text is an example of the requirements.txt file to run TensorFlow code for our use case:
# List all python libraries for the lambda
tensorflow==2.4.0
tensorflow_hub==0.11
The Python code is placed in app.py. The inference function in app.py needs to follow a specific structure to be invoked by the Lambda runtime. For more information about handlers for Lambda, see AWS Lambda function handler in Python. See the following code:
import json
import boto3
import numpy as np
import PIL.Image as Image

import tensorflow as tf
import tensorflow_hub as hub

IMAGE_WIDTH = 224
IMAGE_HEIGHT = 224

IMAGE_SHAPE = (IMAGE_WIDTH, IMAGE_HEIGHT)
model = tf.keras.Sequential([hub.KerasLayer("model/")])
model.build([None, IMAGE_WIDTH, IMAGE_HEIGHT, 3])

imagenet_labels= np.array(open('model/ImageNetLabels.txt').read().splitlines())
s3 = boto3.resource('s3')

def lambda_handler(event, context):
  bucket_name = event['Records'][0]['s3']['bucket']['name']
  key = event['Records'][0]['s3']['object']['key']

  img = readImageFromBucket(key, bucket_name).resize(IMAGE_SHAPE)
  img = np.array(img)/255.0

  prediction = model.predict(img[np.newaxis, ...])
  predicted_class = imagenet_labels[np.argmax(prediction[0], axis=-1)]

  print('ImageName: {0}, Prediction: {1}'.format(key, predicted_class))

def readImageFromBucket(key, bucket_name):
  bucket = s3.Bucket(bucket_name)
  object = bucket.Object(key)
  response = object.get()
  return Image.open(response['Body'])
The following Dockerfile for Python 3.8 uses the AWS provided open-source base images that can be used to create container images. The base images are preloaded with language runtimes and other components required to run a container image on Lambda.
# Pull the base image with python 3.8 as a runtime for your Lambda
FROM public.ecr.aws/lambda/python:3.8
# Install OS packages for Pillow-SIMD
RUN yum -y install tar gzip zlib freetype-devel
gcc
ghostscript
lcms2-devel
libffi-devel
libimagequant-devel
libjpeg-devel
libraqm-devel
libtiff-devel
libwebp-devel
make
openjpeg2-devel
rh-python36
rh-python36-python-virtualenv
sudo
tcl-devel
tk-devel
tkinter
which
xorg-x11-server-Xvfb
zlib-devel
&& yum clean all
# Copy the earlier created requirements.txt file to the container
COPY requirements.txt ./
# Install the python requirements from requirements.txt
RUN python3.8 -m pip install -r requirements.txt
# Replace Pillow with Pillow-SIMD to take advantage of AVX2
RUN pip uninstall -y pillow && CC="cc -mavx2" pip install -U --force-reinstall pillow-simd
# Copy the earlier created app.py file to the container
COPY app.py ./
# Download ResNet50 and store it in a directory
RUN mkdir model
RUN curl -L https://tfhub.dev/google/imagenet/resnet_v1_50/classification/4?tf-hub-format=compressed -o ./model/resnet.tar.gz
RUN tar -xf model/resnet.tar.gz -C model/
RUN rm -r model/resnet.tar.gz
# Download ImageNet labels
RUN curl https://storage.googleapis.com/download.tensorflow.org/data/ImageNetLabels.txt -o ./model/ImageNetLabels.txt
# Set the CMD to your handler
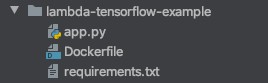
CMD ["app.lambda_handler"]Your folder structure should look like the following screenshot.
You can build and push the container image to Amazon ECR with the following bash commands. Replace the <AWS_ACCOUNT_ID> with your own AWS account ID and also specify a <REGION>.
# Build the docker image
docker build -t  lambda-tensorflow-example .

# Create a ECR repository
aws ecr create-repository --repository-name lambda-tensorflow-example --image-scanning-configuration scanOnPush=true --region <REGION>

# Tag the image to match the repository name
docker tag lambda-tensorflow-example:latest <AWS_ACCOUNT_ID>.dkr.ecr.<REGION>.amazonaws.com/lambda-tensorflow-example:latest

# Register docker to ECR
aws ecr get-login-password --region <REGION> | docker login --username AWS --password-stdin <AWS_ACCOUNT_ID>.dkr.ecr.<REGION>.amazonaws.com

# Push the image to ECR
docker push <AWS_ACCOUNT_ID>.dkr.ecr.<REGION>.amazonaws.com/lambda-tensorflow-example:latest
If you want to test your model inference locally, the base images for Lambda include a Runtime Interface Emulator (RIE) that allows you to also locally test your Lambda function packaged as a container image to speed up the development cycles.
Creating an S3 bucket
As a next step, we create an S3 bucket to store the images used to predict the image class.
- On the Amazon S3 console, choose Create bucket.
- Give the S3 bucket a name, such as
tensorflow-images-for-inference-<Random_String>and replace the <Random_String> with a random value. - Choose Create bucket.
Creating the Lambda function with the TensorFlow code
To create your Lambda function, complete the following steps:
- On the Lambda console, choose Functions.
- Choose Create function.
- Select Container image.
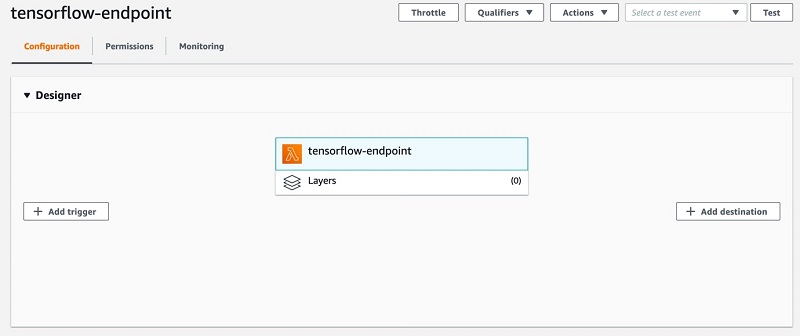
- For Function name, enter a name, such as
tensorflow-endpoint. - For Container image URI, enter the earlier created
lambda-tensorflow-examplerepository.

- Choose Browse images to choose the latest image.
- Click Create function to initialize the creation of it.
- To improve the Lambda runtime, increase the function memory to at least 6 GB and timeout to 5 minutes in the Basic settings.
For more information about function memory and timeout settings, see New for AWS Lambda – Functions with Up to 10 GB of Memory and 6 vCPUs.
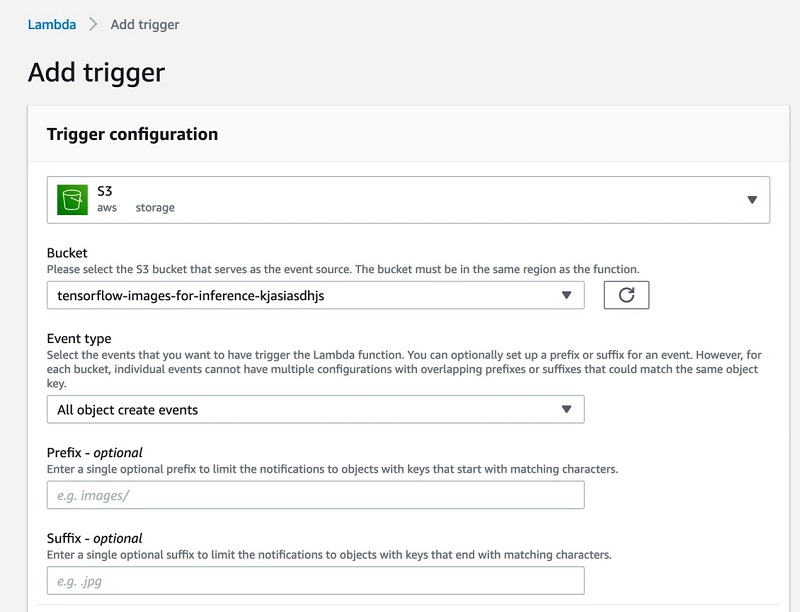
Connecting the S3 bucket to your Lambda function
After the successful creation of the Lambda function, we need to add a trigger to it so that whenever a file is uploaded to the S3 bucket, the function is invoked.
- On the Lambda console, choose your function.
- Choose Add trigger.
- Choose S3.
- For Bucket, choose the bucket you created earlier.
After the trigger is added, you need to allow the Lambda function to connect to the S3 bucket by setting the appropriate AWS Identity and Access Management (IAM) rights for its execution role.
- On the Permissions tab for your function, choose the IAM role.
- Choose Attach policies.
- Search for
AmazonS3ReadOnlyAccessand attach it to the IAM role.
Now you have configured all the necessary services to test your function. Upload a JPG image to the created S3 bucket by opening the bucket in the AWS management console and clicking Upload. After a few seconds, you can see the result of the prediction in the CloudWatch logs. As a follow-up step, you could store the predictions in an Amazon DynamoDB table.
After uploading a JPG picture to the S3 bucket we will get the predicted image class as a result printed to CloudWatch. The Lambda function will be triggered by EventBridge and pull the image from the bucket. As an example, we are going to use the picture of this parrot to get predicted by our inference endpoint.
In the CloudWatch logs the predicted class is printed. Indeed, the model predicts the correct class for the picture (macaw):

Performance
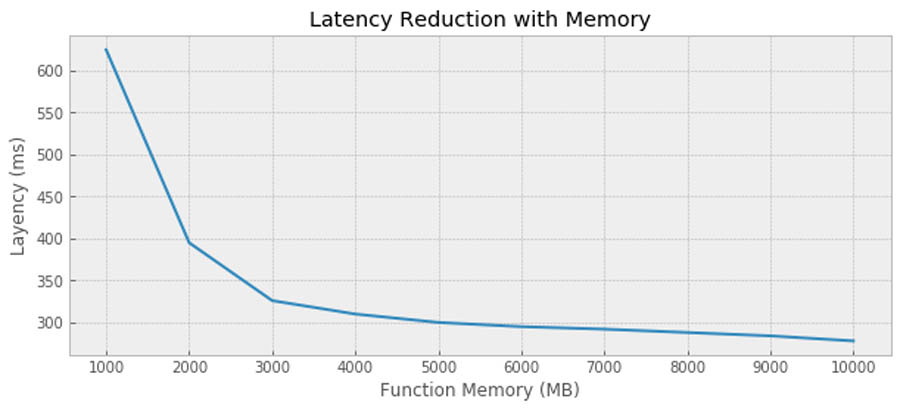
In order to achieve optimal performance, you can try various levels of memory setting (which linearly changes the assigned vCPU, to learn more, read this AWS News Blog). In the case of our deployed model, we realize most performance gains at about 3GB – 4GB (~2vCPUs) setting and gains beyond that are relatively low. Different models see different level of performance improvement by increased amount of CPU so it is best to determine this experimentally for your own model. Additionally, it is highly recommended that you compile your source code to take advantage of Advanced Vector Extensions 2 (AVX2) on Lambda that further increases the performance by allowing vCPUs to run higher number of integer and floating-point operations per clock cycle.
Conclusion
Container image support for Lambda allows you to customize your function even more, opening up a lot of new use cases for serverless ML. You can bring your custom models and deploy them on Lambda using up to 10 GB for the container image size. For smaller models that don’t need much computing power, you can perform online training and inference purely in Lambda. When the model size increases, cold start issues become more and more important and need to be mitigated. There is also no restriction on the framework or language with container images; other ML frameworks such as PyTorch, Apache MXNet, XGBoost, or Scikit-learn can be used as well!
If you do require GPU for your inference, you can consider using containers services such as Amazon Elastic Container Service (Amazon ECS), Kubernetes, or deploy the model to an Amazon SageMaker endpoint.
About the Author
 Jan Bauer is a Cloud Application Developer at AWS Professional Services. His interests are serverless computing, machine learning, and everything that involves cloud computing.