Prepare for Genshin Impact, Coming to GeForce NOW in Limited Beta

GeForce NOW is charging into the new year at full force.

This GFN Thursday comes with the news that Genshin Impact, the popular open-world action role-playing game, will be coming to the cloud this year, arriving in a limited beta.

Plus, this year’s CES announcements were packed with news for GeForce NOW. Battlefield 4: Premium Edition and Battlefield V: Definitive Edition join the exhilarating collection of Electronic Arts titles streaming from the cloud. Plus, a GeForce NOW promotion is available for AT&T 5G customers, and GeForce NOW will be streaming on Samsung TVs later this year.

And, as always, for the first GFN Thursday of the month, we’ve got the list of new games joining the GeForce NOW library. In January, eight titles are joining the cloud, with two ready to start streaming this week.

Genshin Impact Coming to GeForce NOW

Get ready for an epic fantasy adventure, Traveler. Genshin Impact is coming to GeForce NOW in a limited beta for GeForce NOW users on Windows PCs. To learn if you have access to the beta, members with a miHoYo account can search for Genshin Impact in the GeForce NOW Windows app to see if the beta is available.

Play Genshin Impact on GeForce NOW
Discover the world of Teyvat. Piamon will do her best to be a great guide!

You are a traveler from another world, stranded in the mysterious and fantastic land of Teyvat. Embark on a journey to reunite with your lost sibling and explore the seven districts, each presided over by seven elemental gods known as the Archons.

Manipulate and master the various elements to defeat enemies and solve challenging puzzles. Meet the inhabitants of Teyvat and build up your party from over 40 playable characters — with more to come — each with unique abilities, stories, personalities and combat styles.

Experience an immersive campaign, charge head-on into battles solo or invite friends to join your adventures in a vast magical world.

ICYMI: GeForce NOW Announcements From CES

GeForce NOW at CES
GeForce NOW is kicking off the new year by bringing more games, more devices and more networks to our cloud gaming ecosystem.

Members can now play Battlefield 4: Premium Edition to embrace unrivaled destruction and experience the ultimate war in Battlefield V: Definitive Edition, streaming from the cloud.

These new additions will join the existing EA catalog available to GeForce NOW members, which includes the massively popular, high-speed hero shooter Apex Legends, already streamed by more than 1 million members.

For the mobile gamer, AT&T and NVIDIA have joined forces as collaborators in 5G technical innovation to deliver one of the world’s best gaming experiences. To celebrate, a special promotion for certain AT&T 5G subscribers is ongoing.

Going from the small screen to the big screen, look for GeForce NOW to arrive on select Samsung TVs later this year.

Our CES blog has more information on these announcements.

Joining in January

Rainbow Six Extraction on GeForce NOW
Grab your gadgets and choose your operator in Tom Clancy’s Rainbow Six Extraction, streaming in January.

A new month (and a whole new year) means a new batch of games. 2022 kicks off with eight new titles coming throughout January.

Coming to GeForce NOW on January 20th is Tom Clancy’s Rainbow Six Extraction. Join millions of players in the Rainbow Six universe. Go it alone or in a squad of three in thrilling co-op gameplay. Pick from 18 unique Operators and enter the containment zone to take on the ever-evolving, lethal alien threat known as the Archaens.

Gear up for two games arriving this week:

Also coming in January:

  • The Anacrusis (New release on Steam, Jan. 13)
  • Tom Clancy’s Rainbow Six Extraction (New release on Ubisoft Connect, Jan. 20)
  • Mortal Online 2 (Early access on Steam)
  • Ready or Not (Early access on Steam)
  • Fly Corp (Steam)
  • Garfield Kart – Furious Racing (Steam)

We make every effort to launch games on GeForce NOW as close to their release as possible, but, in some instances, games may not be available immediately.

More From December

On top of the games announced in December, some extra games made it to the cloud last month — including some of Epic Games Store’s 15 days of free games promotion. Check out these additions:

What are you planning to play this weekend? Let us know on Twitter or in the comments below.

The post Prepare for Genshin Impact, Coming to GeForce NOW in Limited Beta appeared first on The Official NVIDIA Blog.

Read More

How Abigail Annkah is using AI to improve maps in Africa

As a university student, Abigail Annkah fell in love with mathematics, which soon led to her interest in artificial intelligence. After graduating from the African Institute for Mathematical Sciences, Abigail made it through the competitive process to become an AI resident at Google Research, Accra. After her residency, Google offered her a job and she’s now a research software engineer working on several high-profile projects.

As Google grows its presence in Accra, we spoke to Abigail about the mapping project that motivates her, starting a new job while becoming a mother and the importance of inspiring young girls to enter STEM careers.


How did your science background lead you to Google?

I did my undergraduate degree in Bachelor of Science Statistics at the University of Ghana, finishing with a combined major in Mathematics and Statistics. During the second year of study, I stumbled upon Computational Maths, leading to my first taste of coding. I started taking extra credit courses, which really kickstarted my entry into AI. Then I joined the first cohort of the African Masters of Machine Intelligence program at African Institute for Mathematical Sciences with the support of Google and Facebook. The program intends to bridge the AI education gap in Africa and strengthen the growing data science ecosystem in the region — this was my first exposure to the world of Machine Learning.

A picture of Abigail and lots of people outside the entrance to The African Institute for Mathematical Sciences

Abigail and her cohort at The African Institute for Mathematical Sciences

I quickly developed an interest in using data-driven approaches to solving pressing societal challenges, leading me to work on biochemical image segmentation for my master’s thesis. I then joined the Google AI center in Ghana as an AI resident and after two years gained a full-time role as a research software engineer. There, I used my expertise in computer vision to help build better image segmentation models that led to significant improvement of Google maps. This project created new possibilities for using improved satellite imagery analysis tools for purposes like disaster response or census planning.


Is there a specific project you’re especially proud to have worked on?

The aforementioned Google maps project — also known as the Open Buildings open-access dataset project — is close to my heart as an African. Open Buildings uses AI to provide a digital footprint of building locations and geometry across most of Africa. Our aim is to map Africa’s built environment using satellite imagery, and I dedicated almost all my residency to contributing to that work.

Cities in Africa aren’t constructed the same as in other parts of the world. For example, AI models in a U.S. city won’t be as useful here but the problem is actually bigger than just one product. Many large-scale digital maps today are usually missing that AI context. It was exciting to see the potential and unanticipated use cases that helped us refine the dataset, and we saw it make an impact on local communities. For example, the data we collected about buildings can also be used to analyze the density of the built landscape for environmental science purposes.

After identifying and adding millions of previously unmapped buildings to our dataset, we decided to open source the dataset, making it available for anyone to download.


How do you hope your work inspires the next generation of young scientists in STEM?

That’s a funny question because sometimes I think I haven’t gone that far in my career — but that’s only because I want to achieve so much more. When I’ve spoken to students they always ask about my journey to Google, especially starting a new role as a new mother. I want them to look at me and think if she did it, then I can do it too! It’s really important to me that my work reaches people so that they in turn can reach out to others when they achieve career success.

I’m very pleased there are more programs today encouraging girls and women to get into STEM. I was fortunate enough to participate in one of these programs early on, and it helped me get where I am today. Currently, the Accra team is launching Mind the Gap in Ghana and I get to interact with young students to inspire them to pursue STEM along with other members of the team.


How did you balance motherhood with your new position at Google?

Having a newborn at home while start my residency was stressful, especially following a difficult pregnancy. I was anxious about how much of myself I could give to my work, but I was able to make valuable contributions to the work and still be a trusted member of the team. When I became a full-time researcher, I thought to myself that if I can succeed as a working mother, then I should have confidence that I had earned this position. I also had a great maternity package and a super supportive team. I had a support system where I could ask colleagues, “How did you get through this? What did you do?” I didn’t have to figure out everything on my own.


Who are your heroes in real life?

I think the younger me is my greatest hero! I’ve had so many amazing people pushing me, but whenever I hit a roadblock, she’s the one who inspires me and reminds me that yes I can.

Read More

Teamwork Makes AVs Work: NVIDIA and Deloitte Deliver Turnkey Solutions for AV Developers

Autonomous vehicles are born in the data center, which is why NVIDIA and Deloitte are delivering a strong foundation for developers to deploy robust self-driving technology.

At CES this week, the companies detailed their collaboration, which is aimed at easing the biggest pain points in AV development. Deloitte, a leading global consulting firm, is pairing with NVIDIA to offer a range of services for data generation, collection, ingestion, curation, labeling and deep neural network (DNN) training with NVIDIA DGX SuperPOD.

Building AVs requires massive amounts of data. A fleet of 50 test vehicles driving six hours a day generates 1.6 petabytes daily — if all that data were stored on standard 1GB flash drives, they’d cover more than 100 football fields. Yet that isn’t enough.

On top of this collected data, AV training and validation requires data from rare and dangerous scenarios that the vehicle may encounter, but could be difficult to come across in standard data gathering. That’s where simulated data comes in.

NVIDIA DGX systems and advanced training tools enable streamlined, large-scale DNN training and optimization. Using the power of GPUs and AI, developers can seamlessly collect and curate data to comprehensively train DNNs for autonomous vehicle perception, planning, driving and more.

Developers can also train and test these DNNs in simulation with NVIDIA DRIVE Sim, a physically accurate, cloud-based simulation platform. It taps into NVIDIA’s core technologies — including NVIDIA RTX, Omniverse and AI — to deliver a wide range of real-world scenarios for AV development and validation.

DRIVE Sim can generate high-fidelity synthetic data with ground truth using NVIDIA Omniverse Replicator to train the vehicle’s perception systems or test the decision-making processes.

It can also be connected to the AV stack in software-in-the-loop or hardware-in-the-loop configurations to validate the complete integrated system.

“The robust AI infrastructure provided by NVIDIA DGX SuperPOD is paving the way for our clients to develop transformative autonomous driving solutions for safer and more efficient transportation,” said Ashok Divakaran, Connected and Autonomous Vehicle Lead at Deloitte.

A Growing Partnership

Deloitte is at the forefront of AI innovation, services and research, including AV development.

In March, it announced the launch of the Deloitte Center for AI Computing, a first-of-its-kind center designed to accelerate the development of innovative AI solutions for its clients.

The center is built on NVIDIA DGX A100 systems to bring together the supercomputing architecture and expertise that Deloitte clients require as they become AI-fueled organizations.

This collaboration now extends to AV development, using robust AI infrastructure to architect solutions for truly intelligent transportation.

NVIDIA DGX POD is the foundation, providing an AI compute infrastructure based on a scalable, tested reference architecture featuring up to eight DGX A100 systems, NVIDIA networking and high-performance storage.

To further scale AV development and speed time to results, customers can choose the NVIDIA DGX SuperPOD, which includes 20 or more DGX systems plus networking and storage.

With Deloitte’s long-standing work with the automotive industry and investment in AI innovation, combined with the unprecedented compute of NVIDIA DGX systems, developers will have access to the best AV training solutions for truly revolutionary products.

Deloitte’s leadership in AI is paired with a broad and deep set of technical capabilities and services. Among its ranks are more than 5,500 systems integration developers, 2,000 data scientists and 4,500 cybersecurity practitioners. In 2020, Deloitte was named the global leader in worldwide system integration services by the International Data Corporation.

Deloitte also has deep experience with the automotive industry, serving three-quarters of the Fortune 1000 automotive companies.

Streamlined Solutions

With combined experience and cutting-edge technology, NVIDIA and Deloitte are offering robust data center solutions for AV developers, encompassing infrastructure, data management, machine learning operations and synthetic data generation.

These services begin with Infrastructure-as-a-Service, which provides management of the DGX SuperPOD infrastructure in an on-prem or co-location environment. Experts design and set up this AI infrastructure, as well as provide ongoing infra operations, for streamlined and efficient AV development.

With Data-Management-as-a-Service, developers can use tools for data ingestion and curation, enabling scale and automation for DNN training.

NVIDIA and Deloitte can also improve data scientist productivity up to 30 percent with MLOps-as-a-Service. This turnkey solution deploys and supports enterprise-grade MLOps software to train DNNs and accelerate accuracy.

Finally, NVIDIA and Deloitte make it possible to curate specific scenarios for comprehensive DNN training with Synthetic Data Generation-as-a-Service. Developers can take advantage of simulation expertise to generate high-fidelity training data to cover the rare and hazardous situations AVs must be able to handle safely.

Equipped with these invaluable tools, AV developers now have the capability to ease some of the largest bottlenecks in DNN training to deliver safer, more efficient transportation.

The post Teamwork Makes AVs Work: NVIDIA and Deloitte Deliver Turnkey Solutions for AV Developers appeared first on The Official NVIDIA Blog.

Read More

How Wix empowers customer care with AI capabilities using Amazon Transcribe

With over 200 million users worldwide, Wix is a leading cloud-based development platform for building fully personalized, high-quality websites. Wix makes it easy for anyone to create a beautiful and professional web presence. When Wix started, it was easy to understand user sentiment and identify product improvement opportunities because the user base was small. Such information could include the quality of support operations, product issues, and feature requests.

Thousands of Wix customer care experts support tens of thousands of calls a day in various languages from countries around the world. Wix previously used user surveys to measure user sentiment regarding the company brand, products, services, or interactions with customer care agents. At best, we managed to receive feedback on 12% of our calls. In addition, this process was manual and limited in coverage. We were losing sight of important information crucial to customer success. This is where machine learning (ML) can solve many of these challenges.

ML capabilities such as automatic speech recognition enables you to process 100% of your customer conversations and improve your ability to understand and serve your customers. With accurate call transcripts, you can unlock further insights such as sentiment, trending issues, and agent effectiveness at resolving calls. Sentiment analysis is the use of natural language processing (NLP), a subfield of ML that determines whether data is positive, negative, or neutral. This helps agents and supervisors better understand and anticipate customer needs while enabling them to make informed decisions using actionable insights.

Wix wanted to expand visibility of customer conversation sentiment to 100% with the help of ML. In this post, we explain how Wix used Amazon Transcribe, a speech to text service, accurately redacted personally identifiable information (PII) from phone calls and other customer interactions from other channels, to develop a sentiment analysis system that can effectively determine how users feel throughout an interaction with customer care agents.

How we integrated Amazon Transcribe

Building a sentiment analysis service requires three main components:

  • A data store for audio calls and transcribed data. For our solution, we used Amazon Simple Storage Service (Amazon S3).
  • An automatic speech recognition ML model (Amazon Transcribe) for converting audio into text transcriptions.
  • A sentiment analysis ML model for predicting sentiment.

For transcription (speech to text), we evaluated three leading vendors. The predominant parameters were accuracy, ease of use, and features for the call center use case (such as PII redaction). We found Amazon Transcribe to be the leading solution. The following are some of the differentiating capabilities:

  • Custom vocabulary, is a list of specific words that you want Amazon Transcribe to recognize in your audio input. These are generally domain-specific words, phrases, or proper nouns that Amazon Transcribe isn’t recognizing. Custom vocabularies worked well to capture Wix’s specific terminology and phrases, such as the company name. The following is an example of the vocabulary we used:
Phrase Sounds Like
Wix weeks
Wix picks
Wix.com weeks-dot-com
Wix.com wix-that-come
Wix Professionals Wix-affection-als

After you upload your custom vocabulary list, you can use it for a transcription job.

  • Channel identification in which Amazon Transcribe takes an audio file or stream that has multiple channels, transcribes each channel, and distinguishes between two different speakers (such as the agent and caller) automatically.
  • Automatic redaction of PII data from output and a blocklist of words and phrases.
  • Custom language models allow you to submit training data (a corpus of text data) to train custom language models that target domain-specific use cases and improve transcription accuracy. For example, you can provide Amazon Transcribe with industry-specific terms or acronyms that it might not otherwise recognize.

Custom language models are more powerful than custom vocabularies, because they can utilize a larger corpus of data, allow for tuning data, and understand individual terms as well as context. Because of the additional data and training involved, custom language models can produce significant accuracy improvements. To supercharge your accuracy, you can combine custom vocabularies with custom language models.

With these customization features, boosted the accuracy of Amazon Transcribe to specifically understand how users interact with Wix products and services. We first used a custom language model to produce transcriptions, then used custom vocabulary to replace words (as seen in the preceding examples). Then we trained with additional labeled data such as manually labeled transcriptions from real calls and knowledge base articles related to various vertical domains such as stores and payments.

Word error rate (WER) is the most common way to measure accuracy. WER counts how many words need to be changed to reach 100% accuracy. After we completed our model training with the customization features mentioned, we managed to increase the transcription accuracy (in US English) to 92% (8% WER).

92% is great, but we’re not done yet; we will continue to improve our transcription accuracy.

For sentiment analysis, we decided to develop a proprietary sentiment model that was tailored to identify sentiment regarding specific Wix features and data, and enabled custom integrations across various internal services.

Architecture overview

The following diagram illustrates our solution architecture and workflow.

We start the process by listening for events (via a webhook) of calls that are completed. For every incoming new call, we download the call in audio format (.mp3) and save it to Amazon S3 with call metadata such as user ID and job ID.

When the audio download is complete, we start an asynchronous Amazon Transcribe transcription job. We receive a response (JSON) that consists of a list where each transcribed word is defined as a row containing additional metadata. We can then aggregate sentences based on stopwords or gaps in given timestamps between words.

Amazon Transcribe can have a response time of 1–10 minutes for a call lasting 30–120 minutes. To tackle this issue, we built a service that manages the asynchronous jobs and maintains consistency and synchronization of predefined steps. For example, we define the order of what steps need to be completed in the job before others can.

After the transcription is complete and returned from Amazon Transcribe, we save it to Amazon S3 for future use, and pass it on to our sentiment analysis model for processing. The response for sentiment ranges on a scale of 0–1 (0 being positive and 1 being negative). Finally, we save and log the results for future use.

Conclusion and next steps

Going forward, we want not only to better predict the sentiment of calls and chats, but to also understand and predict the root cause. This approach of combining predictive analytics with proactive care requires innovation and is yet to be tackled at scale.

With sentiment analysis, we can detect and trigger proactive care based on negative sentiment. We can also utilize the findings to improve visibility for our product managers on how our users feel about certain products and features, including negative trends related to specific releases.

Sentiment analysis is just one example of the many use cases that we can achieve with Amazon Transcribe.

In the future, we plan to use Amazon Transcribe to understand not just how users feel, but what topics they’re talking about. This can help us reach an even greater depth of what is needed to increase user success. For example, we can determine which products and features need urgent care, how to improve our customer care interactions across channels, and how to predict and prevent escalations from even happening.

We encourage you to try Amazon Transcribe and review the Developer Guide for more details.


About the Authors

Assaf Elovic is Head of R&D at Wix, leading all customer care engineering efforts in the fields of virtual assistants, predictive analysis, and proactive care. Prior to this role, Assaf was an entrepreneur specializing in conversational user interfaces and NLP. Assaf holds a B.Sc. in Computer Science and B.A. in Economics from IDC Hertzylia.

Mykhailo Ulianchenko is an Engineering Manager at Customer Care, Wix. His teams are responsible for delivering data-driven products that help Wix to provide the best customer care service.  Prior to the managerial position, Mykhailo was working as a software engineer in server, mobile and front-end areas. He is a big fan of extreme sports and Brazilian jiu-jitsu.

Vitalii Kloz is a Software Engineer at Wix.com, working on building flexible and resilient applications to automate data pipelines at Wix and, particularly, to enhance users’ experience with Wix Customer Care by providing data-driven insights using Machine Learning. Vitalii holds B.Sc in Computer Science from Kyiv University and is currently studying for M.Sc.

Yaniv Vaknin is a Machine Learning Specialist at Amazon Web Services. Prior to AWS, Yaniv held leadership positions with AI startups and Enterprise including co-founder and CEO of Dipsee.ai. Yaniv works with AWS customers to harness the power of Machine Learning to solve real world tasks and derive value. In his spare time, Yaniv enjoys playing soccer with his boys.

Gili Nachum is a senior AI/ML Specialist Solutions Architect in the AWS EMEA ML team. Gili is passionate about ML and in specific the cost and performance challenges of training deep learning models. Previously Gili was a SW architect working on Big Data, and Search.

Read More

How to approach conversation design with Amazon Lex: Building and testing (Part 3)

In parts one and two of our guide to conversation design with Amazon Lex, we discussed how to gather requirements for your conversational AI application and draft conversational flows. In this post, we help you bring all the pieces together. You’ll learn how draft an interaction model to deliver natural conversational experiences, and how to test and tune your application.

This is the final post in a series on conversational design.

Draft an interaction model

In the second post of this series, you identified some use cases that you wanted to automate and wrote sample interactions between a user and your application. In this post, we use these use cases to build an Amazon Lex framework, called an interaction model, but first, let’s review some important definitions.

An interaction model defines the tasks that your application can help a user accomplish in a structure that a bot can understand. In your interaction model, you define the five major components for Amazon Lex: intents, sample utterances, slot names, slot values, and slot synonyms. You can make an interaction model (also called a bot definition) in whatever format works best for you and your team, such as in a spreadsheet or directly on the Amazon Lex console.

We start by defining intents. An intent is a user’s goal—what is the user trying to accomplish when they interact with your bot? Continuing with the banking bot example, a user goal might be something like blocking a card or opening a bank account. For example, in the following dialog, the user’s intent is to set up a recurring payment.

Turn Participant Dialog Notes
1 Amazon Lex Thanks for contacting Your Favorite Loan Company. What can I help you with today?
1 Customer I wanna set up a recurring payment.
2 Amazon Lex Your current balance is [$200.00]. That includes an overdue balance of [$100.00]. A payment of [$200.00] is due on October 15th. To set up a recurring payment, you’ll need the routing number and the account number. Do you have that information ready? Can customers change their debit date? Or only the account?
2 Customer No
3 Amazon Lex Okay. I can wait. Let me know when you have the information.
3 Customer

I’m ready.

4 Amazon Lex To start, what’s the 9-digit routing number?
4 Customer 999-999-999
5 Amazon Lex And what’s the account number?
5 Customer 1234 567 890

Each intent should come directly from a use case that you previously established in the earlier steps. We go into more detail about how to define intents later in this post.

Continuing on, a prompt label is a value defined by the application’s designer that maps to something the bot says.

A sample utterance is something the user says to the bot that is defined in the interaction model to help the bot classify customer intent. For example, if you’re creating an intent for opening a bank account, you’d likely want to include utterances like “open an account,” “help with opening an account,” or “How can I open a bank account?” The idea behind sample utterances is that by defining a class of utterances with similar semantic content, the bot can use these to make an educated guess about what the user’s goal is. Even if you don’t define every possible utterance (and you shouldn’t), the bot can guess what the user is trying to do.

A slot is a piece of information that the user provides in order to accomplish their goal. For example, if a customer wants to open a bank account, we need to know the type of account. We can use a slot to collect those account types, and name it something that builders will understand, like AccountType. Slots can be either required or optional, depending on the use case. For example, you might need a required slot like BirthDate to authenticate your user, but collect an optional slot type of AccountType to disambiguate between the different accounts a user might have. Slot values are the pieces of information that you want the bot to recognize as a slot, like “checking” or “savings.” Synonyms are alternate ways of saying a slot value, like “ISA” or “deposit account.”

Finally, a slot corresponding utterance is an utterance that contains a slot value, but doesn’t contain an intent, such as “to my savings account” or “it’s for my savings account.” In these utterances, you can’t tell what the user is trying to accomplish without the context of the rest of the conversation, but they do contain valuable slot information that you need the bot to capture.

The bot also has some available actions, ElicitIntent and ElicitSlot, which mean that the bot is either trying to capture the user’s intent or the bot is looking to gather some slot information.

Now that you’ve defined the values for all these components and put all those pieces together, you’ve created the first draft of an interaction model. Here’s an example, complete with the bot’s available actions.

Turn user stories into intents and slots

From your user stories, you’ve identified the use cases that you want your application to be able to help your users fulfill, such as blocking a bank card due to fraud or opening a new credit card. Make a complete list of all use cases that you developed. Now, it’s time to work backwards from the use cases to create user intents.

Start by getting a group of people together from all different teams of your organization—business analysts, technical pros, and leadership team members should all be present. Ask each person to create a list of possible things that they might reasonably say to a human agent or to an AI application for help with their use case. For example, if your use case is to open an account, you might list things like “I’d like to open a bank account,” “Can you help me open a new account?” or “Opening a savings account.” Be flexible with what you write. Have each person write 10–20 utterances per use case. Keep in mind the variety available in human language:

  • Verb variation – Open, start, begin, get started, establish
  • Noun variation – Account, savings, first credit card, new customer
  • Phrase or full sentence – Open account, I’d like to open an account
  • Statements versus questions – I want to open an account, Can you help me with getting started with a new account?
  • Implicit understanding – I’m a new customer, Help for new customers
  • Tone (formal or informal) – I need some assistance with opening a new high-yield savings account, I wanna open a new card

Now, compare with each other. Combine all the utterances into a team-wide list, and organize them with the most frequent utterances first. You can use these as a head start on your sample utterances. Try to classify each utterance into a single use case. You might think that this seems easy or obvious, since you just created these utterances directly from a list of use cases, but you might be surprised by how ambiguous human language can be.

Now that you have your utterances and your use cases, decide on which ones you want to turn into intents for your bot. Again, this requires input from your team to complete successfully, but here are some basic strategies. For each use case that you created utterances for and classified utterances for, you should turn that into an intent. If you find that you’re running into lots of ambiguity and having trouble classifying utterances, you should make a judgment call with your team about how you want to handle those tricky cases. You can merge use cases into a single intent if you find that there is too much similarity between the utterances, or you can split use cases up into more fine-grained intents if a single intent has too much variety in the utterances to classify them successfully.

Another strategy for dealing with these ambiguous utterances is to use slots. If you have an assortment of similarly defined intents, like OpenACreditCard and OpenADebitCard, you might find that utterances like “open a card” cause confusion in the model. After all, as a human being, it’s tough to decide just from that utterance whether the card is credit or debit card without more information. You can use slots to help by defining them in the model as a required piece of information, so that the bot looks for the words “credit” or “debit” in the utterance. Then, if those slots aren’t filled, use that information to surface a disambiguation prompt like “Would you like to open a new credit card or a new debit card?” to help get the necessary information. You should keep a running list of utterances that are difficult to classify and use them for testing to see how users navigate these tricky situations.

Remember that design is an iterative process and that no single interaction model will be perfect on the first try. This is why we continue with the next steps of prototyping and testing in order to build a successful conversational application.

Prototype your design

Given the often ambiguous nature of designing a conversational AI system, prototyping your design is crucial. Prototyping is a great way to gather meaningful feedback from real users in realistic contexts. In a design prototype, you want to build a simple way to test your design and gather feedback, without investing too much time building the software, because the design isn’t even finalized yet.

Following our example from earlier, we can build out a simple prototype to evaluate our user experience and amend our design as needed. Let’s build a mini-prototype with two intents: ReportCreditCardFraudIntent and OpenANewCreditCardAccountIntent.

ReportCreditCardFraudIntent
Unknown charge on my account
I think someone stole my card
Credit card fraud department
Fraudulent charges on my account
OpenANewCreditCardAccountIntent
Open a new account
Help with opening a credit card
Open a credit card account
I want to open a credit card

Before we even build these intents on the Amazon Lex console, we can make a prototype to make sure that we’re covering the most common utterances that a user might say. One simple way to do this would be to engage a few potential end-users, provide them with a scenario like pretending their card was stolen, and have them provide a few utterances. You can match this against what you’ve outlined and collected with your team, and use this data to help enhance your design. You might find that users are very unlikely to just say “credit card” at the open menu, or you might find that it’s the most common utterance. Gathering information from a likely pool of users helps you understand your customers better to make your design more robust.

The preceding example is a quick way to test your initial designs without much code. Other examples for prototyping your design would be Wizard of Oz (where the designer plays the role of the bot opposite a user who doesn’t necessarily know they’re talking to a human) or visual prototypes to help visualize the best experience (like a video simulating a chat window).

Test and tune your bot

Now that you’ve gathered all the different elements of your design, and the experience has been built and integrated, you can start testing.

The first step is to test against the design documentation you’ve put together (the sample dialogs, conversation flows, and interaction model). Thoroughly test all the different intents, slots, slot values, paths, and error handling flows that you’ve designed, going step by step through each one. The following is an example list of things to test:

  • Intent classification – Is the bot correctly predicting the intent for all utterances?
  • Slot values – Is the bot correctly recognizing all the possible slot values? For example, if you’re using a slot with phone numbers over voice, does the bot recognize both “one zero zero” and “one hundred” as valid inputs?
  • Error handling – Are there places in the flow where you get stuck in a loop? Does the bot correctly recover if some kind of error occurs?
  • Prompts – Are the prompts eliciting the expected response? Is the wording clear and understandable for all users?

The following is a sample test plan for a call center bot that you can use to guide your own testing.

Test ID Scenario Steps to test Utterance Successful?
Sample_100 You notice a fraudulent charge on your account Call number yes
Sample_100 Say “credit card fraud” Credit card fraud yes
Sample_100 Say or enter date of birth when prompted January 1, 1980 yes

After testing, you may find that your bot requires some tuning. Go through your interaction model and add in any commonly missed utterances, new intents or slots, or change the wording in problematic prompts that are losing users along the way. This is a great place to explore an automated testing framework to expedite the testing process, but manual testing offers different insights about the user experience that can help alert you to any usability defects before launch.

Finally, you should also provide your users with a way to test what you’ve built against the business requirements that you defined in part one of this series. You need to make sure that before you launch your application to production it handles all customer requests and fulfills the business requirements that you received. Before beginning user testing, define the test plan with all stakeholders so it’s clear to everyone on the team how you define success. Make sure that at this point, you’ve developed your application in an environment that is as close as possible to the production environment, so that any feedback from this testing provides insight for production. Provide testers with the test plan and clearly document the results, so that it’s easy to use the data from testing to make decisions about how best to move forward.

After you’ve launched your application, the work isn’t done! Design is an iterative experience and continually requires fresh perspectives to improve. As part of the business requirements, you should define how you’ll monitor the health of the system in order to identify issues, such as missed utterances. For example, you might want to explore an analytics framework dashboard or a business intelligence dashboard to help spot gaps in utterance coverage or places where users exit early. Use this information to improve your interaction model, test the new design, and ultimately, tune your application.

Conclusion

In this series, we covered all the important basics for creating a great conversational experience using Amazon Lex. We encourage you to test and iterate through your design multiple times to ensure the best possible customer experience. Keeping these best practices in mind, we hope you explore all the different and creative ways that humans interface with the technology around us.

And remember that we at AWS Professional Services and our extensive AWS Partner Network are available to help you and your team through the process. Whether you’re only in need of consultation and advice, or whether you need full access to a designer, our goal is to help you achieve the best conversational interface for you and your customers.


About the Authors

Nancy Clarke is a Conversation Designer with the AWS Professional Services Natural Language AI team. When she’s not at her desk, you’ll find her gardening, hiking, or re-reading the Lord of the Rings for the billionth time.

Rosie Connolly is a Conversation Designer with the AWS Professional Services Natural Language AI team. A linguist by training, she has worked with language in some form for over 15 years. When she’s not working with customers, she enjoys running, reading, and dreaming of her future on American Ninja Warrior.

Claire Mitchell is a Design Strategy Lead with the AWS Professional Services AWS Professional Services Emerging Technologies Intelligence Practice—Solutions team. Occasionally she spends time exploring speculative design practices, textiles, and playing the drums.

Read More

Deploying ML models using SageMaker Serverless Inference (Preview)

Amazon SageMaker Serverless Inference (Preview) was recently announced at re:Invent 2021 as a new model hosting feature that lets customers serve model predictions without having to explicitly provision compute instances or configure scaling policies to handle traffic variations. Serverless Inference is a new deployment capability that complements SageMaker’s existing options for deployment that include: SageMaker Real-Time Inference for workloads with low latency requirements in the order of milliseconds, SageMaker Batch Transform to run predictions on batches of data, and SageMaker Asynchronous Inference for inferences with large payload sizes or requiring long processing times.

Serverless Inference means that you don’t need to configure and manage the underlying infrastructure hosting your models. When you host your model on a Serverless Inference endpoint, simply select the memory and max concurrent invocations. Then, SageMaker will automatically provision, scale, and terminate compute capacity based on the inference request volume. SageMaker Serverless Inference also means that you only pay for the duration of running the inference code and the amount of data processed, not for idle time. Moreover, you can scale to zero to optimize your inference costs.

Serverless Inference is a great choice for customers that have intermittent or unpredictable prediction traffic. For example, a document processing service used to extract and analyze data on a periodic basis. Customers that choose Serverless Inference should make sure that their workloads can tolerate cold starts. A cold start can occur when your endpoint doesn’t receive traffic for a period of time. It can also occur when your concurrent requests exceed the current request usage. The cold start time will depend on your model size, how long it takes to download, and your container startup time.

Let’s look at how it works from a high level view.

How it works

A Serverless Inference endpoint can be setup using the AWS Management Console, any standard AWS SDKs, or the AWS CLI. Because Serverless Inference uses the same APIs as SageMaker Hosting persistent endpoints to configure and deploy endpoints, the steps to create a Serverless Inference endpoint are identical. The only modification required is changes to configuration parameters that are setup on your endpoint configuration.

To create a Serverless Inference endpoint, you perform three basic steps:

Step 1: Create a SageMaker Model that packages your model artifacts for deployment on SageMaker using the CreateModel API. This step can also be done via AWS CloudFormation using the AWS::SageMaker::Model resource.

Step 2: Create an endpoint configuration using the CreateEndpointConfig API and the new configuration ServerlessConfig options, or selecting the serverless option in the AWS Management Console as shown in the following image. Note that this step can also be done via AWS CloudFormation using the AWS::SageMaker::EndpointConfig resource. You must specify the Memory Size which, at a minimum, should be as big as your runtime model object, and the Max Concurrency, which represents the max concurrent invocations for a single endpoint.

Step 3: Finally, using the endpoint configuration that you created in Step 2, create your endpoint using either the AWS Management Console, or programmatically using the CreateEndpoint API. This step can also be done via AWS CloudFormation using the AWS::SageMaker::Endpoint resource.

That’s it! Then, SageMaker creates an HTTPS URL that you can use to invoke your endpoint through your client applications using the existing runtime client and the invoke_endpoint request.

Deep Dive

Next, we’ll dive deeper into the high-level steps above by showcasing a detailed how-to for creating a new SageMaker Serverless Inference endpoint.

Setup and training

For preview the following regions are supported so make sure to create a SageMaker Notebook Instance or SageMaker Studio Notebook in one of these regions: us-east-1, us-east-2, us-west-2, eu-west-1, ap-northeast-1, and ap-southeast-2. For this example, we’ll be using the Amazon provided XGBoost Algorithm to solve a regression problem with the Abalone dataset. The notebook code can be found in the sagemaker-examples repository.

First, we must setup the appropriate SDK clients and retrieve the public dataset for model training. Note that an upgrade to the SDK may be required if you are running on an older version.

# Setup clients
import boto3
import sagemaker
from sagemaker.estimator import Estimator

#client setup
client = boto3.client(service_name="sagemaker")
runtime = boto3.client(service_name="sagemaker-runtime")

boto_session = boto3.session.Session()
region = boto_session.region_name
print(region)
sagemaker_session = sagemaker.Session()
base_job_prefix = "xgboost-example"
role = sagemaker.get_execution_role()
print(role)
default_bucket = sagemaker_session.default_bucket()
s3_prefix = base_job_prefix
training_instance_type = "ml.m5.xlarge"

# retrieve data
!aws s3 cp s3://sagemaker-sample-files/datasets/tabular/uci_abalone/train_csv/abalone_dataset1_train.csv .
# upload data to S3
!aws s3 cp abalone_dataset1_train.csv s3://{default_bucket}/xgboost-regression/train.csv

After setting up the clients and downloading the data that will be used to train the model, we can now prepare for model training using SageMaker Training Jobs. In the following, we are performing the steps to configure and fit our model that will be deployed to a serverless endpoint.

from sagemaker.inputs import TrainingInput
training_path = f"s3://{default_bucket}/xgboost-regression/train.csv"
train_input = TrainingInput(training_path, content_type="text/csv")

model_path = f"s3://{default_bucket}/{s3_prefix}/xgb_model"

# retrieve xgboost image
image_uri = sagemaker.image_uris.retrieve(
    framework="xgboost",
    region=region,
    version="1.0-1",
    py_version="py3",
    instance_type=training_instance_type,
)

# Configure Training Estimator
xgb_train = Estimator(
    image_uri=image_uri,
    instance_type=training_instance_type,
    instance_count=1,
    output_path=model_path,
    sagemaker_session=sagemaker_session,
    role=role,
)

# Set Hyperparameters
xgb_train.set_hyperparameters(
    objective="reg:linear",
    num_round=50,
    max_depth=5,
    eta=0.2,
    gamma=4,
    min_child_weight=6,
    subsample=0.7,
    silent=0,
)

# Fit model
xgb_train.fit({"train": train_input})

Model creation

Next, we must package our model for deployment on SageMaker. For the Model Creation step, we need two parameters: Image and ModelDataUrl.

Image points to the container image for inference. Because we are using a SageMaker managed container, we retrieved this for training under the variable image_uri, and we can use the same image for inference. If you are bringing your own custom container, then you must supply your own container image that is compatible for hosting on SageMaker as you would today for hosting a SageMaker Hosting persistent endpoint.

ModelDataUrl points to the Amazon Simple Storage Service (S3) URL for the trained model artifact that we will pull from the training estimator.

# Retrieve model data from training job
model_artifacts = xgb_train.model_data
model_artifacts
from time import gmtime, strftime
model_name = "xgboost-serverless" + strftime("%Y-%m-%d-%H-%M-%S", gmtime())
print("Model name: " + model_name)

# dummy environment variables
byo_container_env_vars = {"SAGEMAKER_CONTAINER_LOG_LEVEL": "20", "SOME_ENV_VAR": "myEnvVar"}
create_model_response = client.create_model(
 ModelName=model_name,
 Containers=[
 {
 "Image": image_uri,
 "Mode": "SingleModel",
 "ModelDataUrl": model_artifacts,
 "Environment": byo_container_env_vars,
 }
 ],
 ExecutionRoleArn=role,
)

print("Model Arn: " + create_model_response["ModelArn"])

We can now use our created model to work with creating an Endpoint Configuration, which is where you will add a serverless configuration.

Endpoint configuration creation

Up until now, the steps look identical to if you were deploying a SageMaker Hosting endpoint. This next step is the same. However, you’ll take advantage of a new serverless configuration option in your endpoint configuration. There are two inputs required, and they can be configured to meet your use case:

  • MaxConcurrency: This can be set from 1 to 50.
  • Memory Size: This can be the following values: 1024 MB, 2048 MB, 3072 MB, 4096 MB, 5120 MB, or 6144 MB.
xgboost_epc_name = "xgboost-serverless-epc" + strftime("%Y-%m-%d-%H-%M-%S", gmtime())

endpoint_config_response = client.create_endpoint_config(
    EndpointConfigName=xgboost_epc_name,
    ProductionVariants=[
        {
        "VariantName": "byoVariant",
        "ModelName": model_name,
        "ServerlessConfig": {
        "MemorySizeInMB": 4096,
        "MaxConcurrency": 1,
        },
        },
    ],
)
print("Endpoint Configuration Arn: " + endpoint_config_response["EndpointConfigArn"])

The configuration above indicates that this endpoint should be deployed as a serverless endpoint because we specified configuration options in ServerlessConfig.

Endpoint creation and invocation

Next, we use the Endpoint Configuration to create our endpoint using the create_endpoint function.

The following step should take a few minutes to deploy successfully.

endpoint_name = "xgboost-serverless-ep" + strftime("%Y-%m-%d-%H-%M-%S", gmtime())
create_endpoint_response = client.create_endpoint(
    EndpointName=endpoint_name,
    EndpointConfigName=xgboost_epc_name,
)

print("Endpoint Arn: " + create_endpoint_response["EndpointArn"])

# wait for endpoint to reach a terminal state (InService) using describe endpoint
import time
describe_endpoint_response = client.describe_endpoint(EndpointName=endpoint_name)
while describe_endpoint_response["EndpointStatus"] == "Creating":
 describe_endpoint_response = client.describe_endpoint(EndpointName=endpoint_name)
 print(describe_endpoint_response["EndpointStatus"])
 time.sleep(15)

describe_endpoint_response

The created endpoint should display the Serverless Configuration that you provided in the previous step.

Now we can invoke the endpoint with a sample data point from the Abalone dataset.

response = runtime.invoke_endpoint(
    EndpointName=endpoint_name,
    Body=b".345,0.224414,.131102,0.042329,.279923,-0.110329,-0.099358,0.0",
    ContentType="text/csv",
)

print(response["Body"].read())

Monitoring

Serverless Inference emits metrics to Amazon CloudWatch. These metrics include the metrics that are emitted for SageMaker Hosting persistent endpoints, such as MemoryUtilization and Invocations, as well as a new metric called ModelSetupTime. This new metric tracks the time that it takes to launch new compute resources for your serverless endpoint.

Conclusion

In this post, we covered the high level steps for using Serverless Inference, as well as a deep dive on a specific example to help you get started with the new feature using the example provided in SageMaker examples on GitHub. Serverless Inference is currently launched in preview, so we don’t yet recommend it for production workloads. There are some features that Serverless Inference doesn’t support yet, such as SageMaker Model Monitor, Multi-Model Endpoints, and Serial Inference Pipelines.

Please check out the Feature Exclusions portion of the documentation for additional information. The SageMaker Serverless Inference Documentation is also a great resource for diving deeper into Serverless Inference capabilities, and we’re excited to start getting customer feedback!


About the Authors

Ram Vegiraju is a ML Architect with the SageMaker Service team. He focuses on helping customers build and optimize their AI/ML solutions on Amazon SageMaker. In his spare time, he loves traveling and writing.

Shelbee Eigenbrode is a Principal AI and Machine Learning Specialist Solutions Architect at Amazon Web Services (AWS). She holds six AWS certifications and has been in technology for 23 years spanning multiple industries, technologies, and roles. She is currently focusing on combining her DevOps and ML background to deliver and manage ML workloads at scale. With over 35 patents granted across various technology domains, she has a passion for continuous innovation and using data to drive business outcomes. Shelbee co-founded the Denver chapter of Women in Big Data.

Michael Pham is a Software Development Engineer in the Amazon SageMaker team. His current work focuses on helping developers efficiently host machine learning models. In his spare time he enjoys Olympic weightlifting, reading, and playing chess.

Rishabh Ray Chaudhury is a Senior Product Manager with Amazon SageMaker, focusing on Machine Learning inference. He is passionate about innovating and building new experiences for Machine Learning customers on AWS to help scale their workloads. In his spare time, he enjoys traveling and cooking. You can find him on LinkedIn.

Read More

Build and visualize a real-time fraud prevention system using Amazon Fraud Detector

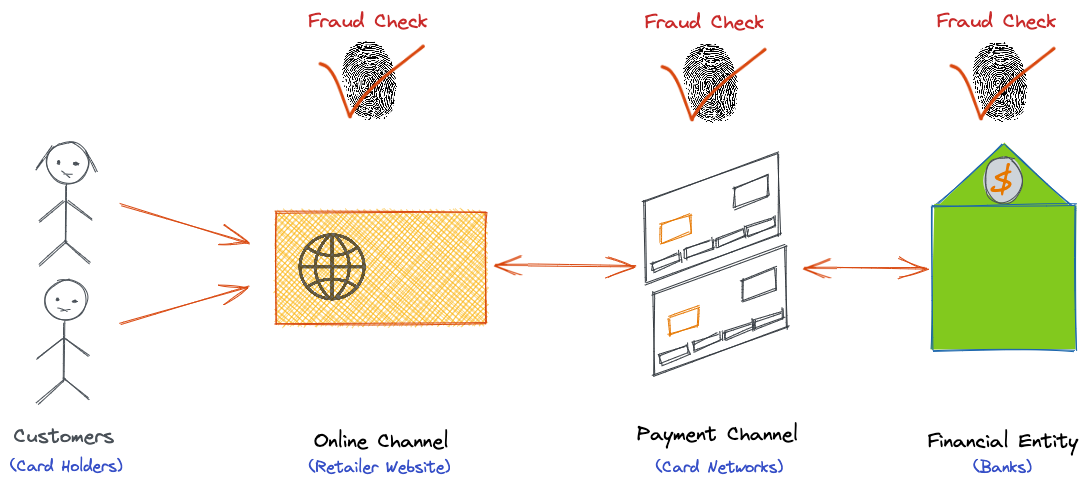
We’re living in a world of everything-as-an-online-service. Service providers from almost every industry are in the race to feature the best user experience for their online channels like web portals and mobile applications. This raises a new challenge. How do we stop illegal and fraudulent behaviors without impacting typical legitimate interactions? This challenge is even greater for organizations that offer paid services. These organizations need to validate payment transactions against fraudulent behaviors in your customer-facing applications. Although subsequent checks are performed by financial entities such as card networks and banks that run the payment transaction, the service providers remain responsible for the end-to-end payment process.

Organizations from all around the world have long implemented rule-based fraud detection systems. The following is an example of a sample rule:

if IP_ADDRESS_LOCATION is ’Japan’ 
and CUST_ADDRESS_COUNTRY is ‘Japan’ 
and CUSTOMER_PHONE_LOC is ‘Spain’ 
then
	Investigate 

Although these systems are easy to implement, they’re not scalable for everyday new fraud trends, because fraudsters are constantly looking for new loopholes to exploit and ways to hijack those static rules. As a result, new rules must be added every day. This can lead to thousands of rules, making the system difficult to maintain.

More advanced ways are needed to detect and stop losses from fraud that may be damaging organizations’ revenue and brand reputation. In this post, we discuss how to create a real-time fraud prevention system using Amazon Fraud Detector.

Solution overview

Emerging technologies like AI and machine learning (ML) can provide a solution that shifts from enforcing rule-based validations to using validations based on learning from examples and trends directly found in the transaction data. By specifying the key features that may contribute to fraudulent behavior, such as customer-related information (card number, email, IP address, and location) and transaction-related information (time, amount, and currency). An ML model can utilize statistical algorithms to identify trends such as the customer’s frequency of purchases, spending patterns, points of interest, and how long their account has been active.

AWS offers AI and ML services to help you achieve this. Amazon Fraud Detector is a scalable, fully managed service that makes it easy to use ML to detect online fraud in real time. It helps you build, deploy, and manage fraud detection models that can also combine ML and rules to ensure successful onboarding for your existing rules that can effectively stop fraudulent scenarios.

Although Amazon Fraud Detector helps you detect fraudulent behaviors, we still need to make sure this is happening without impacting legitimate interactions. To do so, we need two additional components to reduce the processing latency and handle failures: an event store and event processor.

The first component that we need to introduce is an event store to centrally manage and exchange event messages. Apache Kafka is a scalable, durable, and highly available event store for mission-critical applications. It’s designed to support high throughput of thousands of messages per second while providing milliseconds latency. It also decouples the transaction’s producers from consumers by buffering the data so that each consumer can consume the data at their own pace. This is useful if we experience a sudden increase in traffic. For example, let’s assume that on average, your website has tens of payment transactions per second. Then you release a new product that becomes very popular. You start having thousands of checkouts per second. If you’re not using a buffer like Apache Kafka, this traffic spike can overwhelm your backend applications, and potentially lead to downtime.

Amazon Managed Streaming for Apache Kafka (Amazon MSK) is a low-cost, fully managed Apache Kafka service that we use as a temporary durable store for our payment transactions

The second component that we need is a mission-critical stream processor, that we can use to apply fraud detection logic in real time within the E2E payment transaction journey. This stream processor must be scalable to deal with massive amounts of transactions, and reliable to process transactions with a very low latency, while being able to gracefully recover from a failure as if the failure had never happened.

Apache Flink is a popular open-source framework and distributed processing engine for transforming and analyzing data streams in real time. Apache Flink has been designed to perform computations at in-memory speed and at scale. Applications can run continuously with minimal downtime; it uses a recovery mechanism that is based on consistent checkpoints of an application’s state. In case of a failure, the application is restarted and its state is loaded from the latest checkpoint. Furthermore, Apache Flink provides a powerful API to transform, aggregate, and enrich events, and supports exactly-once semantics. Therefore, Apache Flink is a great fit for our stream processing requirements.

Amazon Kinesis Data Analytics is a fully managed service that provides the underlying infrastructure for your Apache Flink applications. It enables you to quickly build and run those applications with low operational overhead. For our solution, we use it to consume payment transactions stored in Amazon MSK and coordinate with Amazon Fraud Detector to detect the fraudulent transactions in real time.

Solution details

The solution in this post provides two use cases that are built on top of the Transaction Fraud Insights model created in the post Detect online transaction fraud with Amazon Fraud Detector.

The first use case demonstrates fraud prevention by identifying fraudulent transactions, flagging them to be blocked, and sending an alert notification. The second, writes all transactions in real time to Amazon OpenSearch Service (successor to Amazon Elasticsearch Service), this enables real-time transaction reporting using OpenSearch Dashboards.

The following architecture diagram illustrates the overall flow.

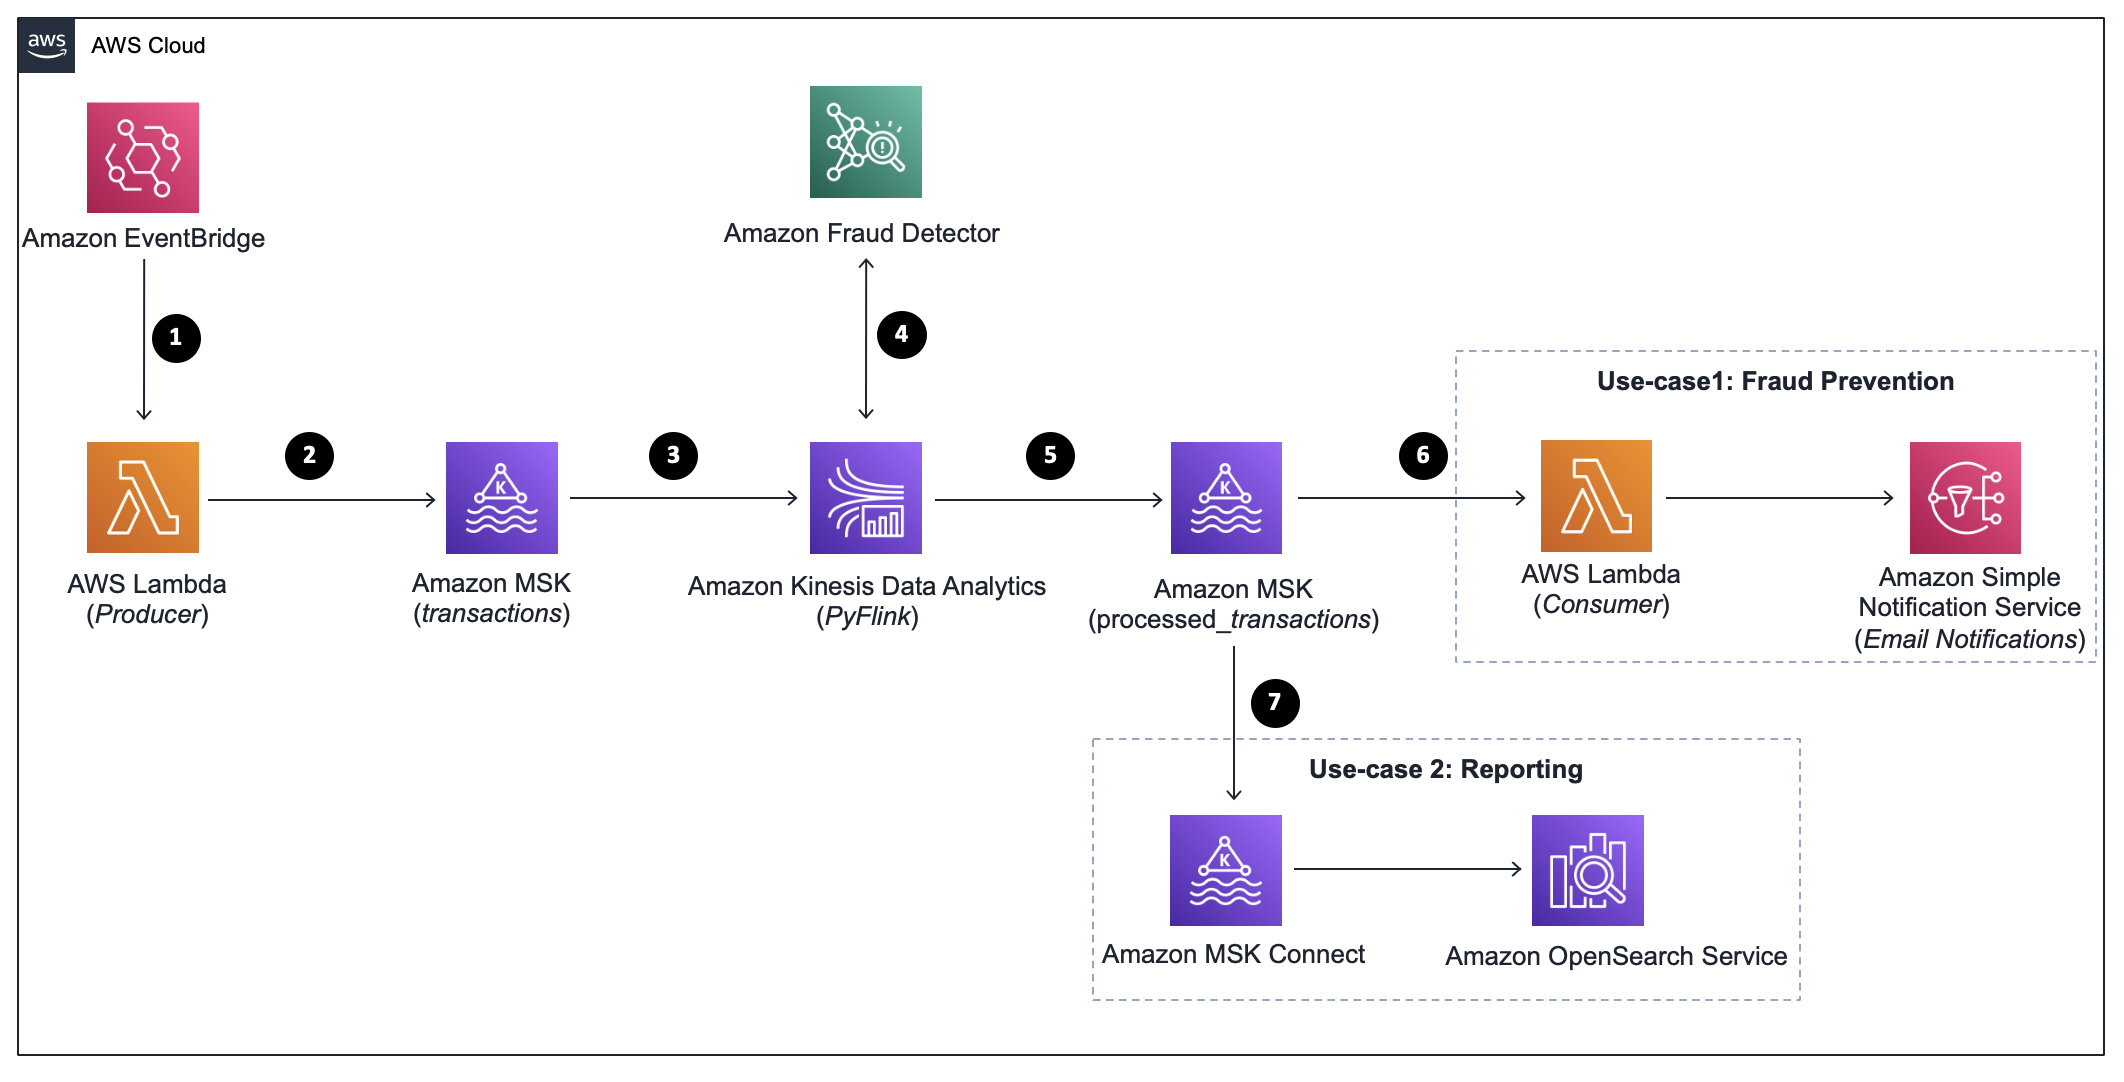
In the following subsections, we provide details about each step in the architecture and the two use cases. The steps are as follows:

  1. Schedule the transactions producer.
  2. Generate payment transactions.
  3. Process the input transactions.
  4. Get fraud predictions.
  5. Sink the fraud outcome.
  6. Send email notifications.
  7. Visualize real time dashboard.

In subsequent sections, we walk through the steps to deploy the solution with AWS CloudFormation, enable the solution, and visualize the data in OpenSearch Dashboards.

Schedule the transactions producer

The transaction producer runs as an AWS Lambda function. The function is scheduled to run every minute using an Amazon EventBridge rule.

Generate payment transactions

We use a Lambda function that generates synthetic transactions. Each transaction is defined by two sets of data: entities and events.

An entity represents who is performing the transaction such as customer’s details. To enhance the accuracy of the fraud detection model, we use a reference dataset that contains entities used earlier while training the model.

An event represents the transaction-related metrics such as amount and currency. For this, we use faker and random Python libraries.

Each transaction is written into an input Amazon MSK topic called transactions. The following is a sample transaction record:

{
"transaction_amt": 7,
"email_address": "synthetic@example.com",
"ip_address": "27.67.182.10",
"transaction_currency": "USD",
"event_id": "09a62617-a4af-40f3-926b-a0808c92015c",
"entity_id": "269-37-3393",
"event_time": "2021-11-09T22:56:43.62265",
"billing_longitude": "-80.771",
"billing_state": "VA",
"user_agent": "Opera/8.70.(Windows NT 6.0; mk-MK)",
"billing_street": "370 Synthetic Courts",
"billing_city": "Pulaski",
"card_bin": "423768",
"customer_name": "Synthetic Zamzam",
"product_category": "misc_pos",
"customer_job": "Synthetic Creator",
"phone": "412-515-4616-28430",
"billing_latitude": "37.0567",
"billing_zip": "24301"
}

Process the input transactions

To process the payment transactions in real time, Apache Flink provides the Table API, which allows intuitive processing using relational operators such as selection, filter, and join. For this post, we use the PyFlink Table API running as a Kinesis data analytics application.

The application does the following:

  1. Reads the transactions from the input topic transactions.
  2. Calls Amazon Fraud Detector APIs to get fraud predictions.
  3. Writes the results to an output topic on the same MSK cluster.

To read data from and write data into an Amazon MSK topics, we use the out-of-the-box Kafka connector provided by Apache Flink.

Get fraud predictions

The Kinesis data analytics application calls the Amazon Fraud Detector GetEventPrediction API to get the predictions in real time. Because this is considered a custom logic, we use Python user-defined functions (UDFs) to call this API.

For detection, we use a Transaction Fraud Insights model that uses feature engineering to dynamically calculate information about your customers, such as their frequency of purchases, spending patterns, and how long their account has been active. Those aggregates are calculated during training and inference. Because Amazon Fraud Detector aggregates data on entities, it’s useful if the inference data contain entities that are already known to the model. This is because in the online transactions’ context, models indicate lower fraud risk for entities with a high number of legitimate transactions.

Apart from that, to improve model accuracy in production, typically, we frequently retrain the model with a more recent dataset. By default, Amazon Fraud Detector automatically stores event data when you generate predictions. These events are available for future model trainings. We then deploy a new detector version from the newly trained model. This new detector version can be published and become the active version, and therefore all requests to GetEventPrediction API go to this new version. To avoid any downtime in our Kinesis data analytics application, we don’t specify a detector version in our call. When the version is not specified, the detector’s active version is used. This allows us to change the detector version while being fully transparent from our Kinesis data analytics application.

Sink the fraud outcome

The Kinesis data analytics application writes the output containing the transaction outcome (fraud prediction) into an output Amazon MSK topic called processed_transactions. Writing the output back to Kafka gives us the benefits we discussed earlier. Moreover, it enables us to consume the same output by different use cases concurrently.

Apache Flink supports different guarantee models: exactly-once, at-most-once, and at-least-once. In our solution, we use Flink’s Kafka sink connector to sink the results to the output topic. This connector supports at-least-once (default) or exactly-once. For this post, we use at-least-once, but you can easily enable exactly-once using the connector options. However, setting the consistency guarantees to exactly-once has an impact on latency because Flink uses two-phase commits and Kafka transactions to guarantee exactly-once. For more information, see An Overview of End-to-End Exactly-Once Processing in Apache Flink.

Send email notifications

To notify downstream services about suspicious transactions, the solution uses a Lambda function to consume records from the processed_transactions topic. The function evaluates the outcome of each transaction and if the outcome is block, it triggers an Amazon Simple Notification Service (Amazon SNS) notification to notify you by email.

Visualize real-time dashboard

To power real-time dashboards, the solution uses Kafka Connect to sink the data in real time to an Amazon OpenSearch Service domain. This makes the data available for visualization as soon as it is indexed in OpenSearch. Kafka Connect is a scalable and reliable framework to stream data between a Kafka cluster and external systems such as databases, Amazon Simple Storage Service (Amazon S3), and OpenSearch.

Amazon MSK Connect, is a feature of Amazon MSK, enables you to run fully managed Apache Kafka Connect workloads on AWS. MSK Connect is fully compatible with Kafka Connect, enabling you to lift and shift your Kafka Connect applications with zero code changes.

The connector used simply creates an index in Amazon OpenSearch Service with the same name as the output topic in Amazon MSK. If throughput is very high, you need to roll over your indices periodically to stay within the recommended shard size (10–50 GB). Alternatively, you can write the data into an OpenSearch data stream by creating an index template and then configuring the connector to use it. Data streams simplify this process and enforce a setup that best suits append-only time-series data. Because our use case doesn’t have the volume you would normally get with time-series data, we write the output to an index instead.

Each event is indexed into a different document in OpenSearch. The document ID is set to topic+partition+offset. Therefore, if the same Kafka record is written twice to OpenSearch, the same document will be updated because the document ID will have the same offset. This ensures exactly-once delivery.

Prerequisites

The solution builds on top of the post Detect online transaction fraud with new Amazon Fraud Detector features. We use the same schema as the sample dataset used in the post.

The solution code is available in our GitHub repo. Before proceeding, complete the following prerequisites:

  1. Create a Transaction Fraud Insights model and a publish a detector as per the steps in that post.
  2. Follow the instruction on GitHub to package and upload the solution artifacts to an Amazon S3 bucket. The newly created S3 bucket should have 4 artifacts,
    • Lambda functions code – lambda-functions.zip
    • Flink code – RealTimeFraudPrevention.zip
    • Kafka connector – confluentinc-kafka-connect-elasticsearch-11.1.3.zip
    • Pre-created OpenSearch dashboard NDJSON file – dashboard.ndjson

Deploy the solution using AWS CloudFormation

You use CloudFormation templates to create all the necessary resources for the data pipeline. Complete the following steps:

  1. Choose Launch Stack and navigate to the Region where the Amazon Fraud Detector model is deployed.
  2. Choose Next.
  3. For Stack name, enter a name for your stack. The stack name must satisfy the regular expression pattern: [a-z][a-z0-9-]+ and must be fewer than 15 characters long. The default is fraud-prevention.
  4. Enter the following parameters:
    • For BucketName, enter the bucket name where the solution artifacts are stored.
    • For S3SourceCodePath, enter the S3 key for the Lambda functions .zip file, the default is lambda-functions.zip
    • For S3connectorPath, enter the S3 key for the Kafka connector .zip file, the default is confluentinc-kafka-connect-elasticsearch-11.1.6.zip
    • For YourEmail, enter the email that receives Amazon SNS notifications.
    • For KafkaInputTopic, enter the input topic name, the default is transactions
    • For KafkaOutputTopic, enter the output topic name. We recommend keeping the default value because we use it later in the pre-created OpenSearch dashboard, the default is processed_transactions
    • For FraudDetectorName, enter the detector name, the default is transaction_fraud_detector
    • For FraudDetectorEventName, enter the Amazon Fraud Detector event resource name, the default is transaction_event
    • For FraudDetectorEntityType, enter the Amazon Fraud Detector entity type resource name, the default is customer
    • For OpenSearchMasterUsername, enter the username of the OpenSearch Service domain, the default is admin
    • For OpenSearchMasterPassword, enter the password of the OpenSearch Service domain. The password must meet the following requirements:
      1. Minimum 8 characters long.
      2. Contains at least one uppercase letter, one lowercase letter, one digit, and one special character.
  5. Follow the wizard to create the stack.

Enable the solution

After the stack is successfully created, you can see that the status of the MSK cluster is Updating. The reason for this is that we used a custom resource in the CloudFormation template to change the configuration of the MSK cluster. For the purpose of this post, we set the auto.create.topics.enable to true. This setting enables automatic creation of topics on the server.

After the status of the MSK cluster changes to Active, complete the following steps to enable the solution:

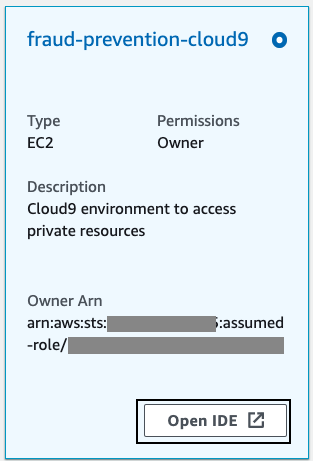
  1. On the AWS Cloud9 console, you should see an AWS Cloud9 environment provisioned by the CloudFormation template.
  2. Choose Open IDE.
  3. On the AWS CloudFormation console, navigate to the stack you deployed and choose the Outputs tab.
  4. Copy the value of the EnableEventRule key and run it in your AWS Cloud9 terminal. It should follow the following format:
    aws events enable-rule --name <Event_bridge_rule_name>

  5. Go back to the CloudFormation stack Outputs tab and copy the value of the EnableEventSourceMapping key and run it in your AWS Cloud9 terminal. It should follow the following format:
    aws lambda update-event-source-mapping --uuid <UUID> --enabled

Visualize the data in OpenSearch Dashboards

Now that that data is flowing through the system, we can create a simple dashboard to visualize this data in real time. To save you development time and effort, we pre-created a sample dashboard that you can import directly into OpenSearch Dashboards. The dashboard file creates all the necessary objects required by the dashboard, including index patterns, visuals, and the dashboard.

The pre-created template uses an OpenSearch index pattern of processed_transactions*, which is the same prefix as the default Amazon MSK output topic name. Complete the following steps to import the dashboards:

  1. On the AWS CloudFormation console, navigate to the stack you deployed and choose the Outputs tab.
  2. Take note of the OpenSearch dashboard link including the trailing /_dashboards.
  3. In the AWS Cloud9 terminal, download dashboard.ndjson (the Amazon OpenSearch Service dashboard object NDJSON file):
    wget https://github.com/aws-samples/realtime-fraud-prevention/blob/main/Artifacts/dashboard.ndjson

  4. Use curl to run the following command to generate the appropriate authorization cookies needed to import the dashboards:
    curl -X POST <OpenSearch_dashboard_link>/auth/login -H "osd-xsrf: true" -H "content-type:application/json" -d '{"username":"<username>", "password" : "<password>"} ' -c auth.txt

  5. Run the following command to import all objects defined in the NDJSON file:
    curl -XPOST <OpenSearch_dashboard_link>/api/saved_objects/_import -H "osd-xsrf:true" -b auth.txt --form file=@dashboard.ndjson

Now the dashboard is immediately available in OpenSearch Dashboards. However, because the Amazon OpenSearch Service domain is provisioned in a private VPC, you must have VPN access to the VPC or use a bastion host be able to access OpenSearch Dashboards..

  1. Follow the instruction on GitHub to access OpenSearch Dashboards.
  2. After logging in to OpenSearch you will find a new sample fraud detection dashboard, which is updated in real time.

You’ve now created a sample dashboard.

Clean up

To clean up after using this solution, complete the following steps:

Conclusion

In this post, we showcased a simple, cost-effective, and efficient solution to detect and stop fraud. The solution uses open-source frameworks and tools like Apache Kafka, Apache Flink, and OpenSearch coupled with ML-based fraud detection mechanism using Amazon Fraud Detector. The solution is designed to process transactions (and identify fraud) in the range of milliseconds, and therefore has no negative impact on the experience of legitimate customers.

You can integrate this solution with your current transaction processing application to protect revenue losses that occur from fraud. This can be achieved by modifying the source code available on GitHub to replace the Lambda producer and consumer with your own application microservices.


About the Authors

Ahmed Zamzam is a Specialist Solutions Architect for Analytics AWS. He supports SMB customers in the UK in their digital transformation and cloud journey to AWS, and specializes in streaming and search. Outside of work, he loves traveling, playing tennis, and cycling.

Karim Hammouda is a Specialist Solutions Architect for Analytics at AWS with a passion for data integration, data analysis, and BI. He works with AWS customers to design and build analytics solutions that contribute to their business growth. In his free time, he likes to watch TV documentaries and play video games with his son.

Read More

‘AI Dungeon’ Creator Nick Walton Uses AI to Generate Infinite Gaming Storylines

What started as Nick Walton’s college hackathon project grew into AI Dungeon, a popular text adventure game with over 1.5 million users.

Walton is the co-founder and CEO of Latitude, a Utah-based startup that uses AI to create unique gaming storylines.

He spoke with NVIDIA AI Podcast host Noah Kravitz about how natural language processing methods can generate infinite open-ended adventure plots for interactive games like AI Dungeon, which draws an average of 150,000 new players each month.

Key Points From This Episode:

  • In AI Dungeon, players type in their actions or responses to prompts — for example, “You’re about to enter a world of endless possibilities, where you can do absolutely anything you can imagine … Will you proceed?” — and AI keeps the story going.
  • Unlike other text adventure games that use pre-written content, AI Dungeon offers infinite unique possibilities for each storyline, as the AI adapts and responds to almost any user input.
  • Users can dive into adventures individually or in multiplayer mode, which allows players with distinct characters to take turns interacting with the AI within the same game session. To kick off the story, they can choose from a list of initial prompts or create custom adventures.

Tweetables:

“There’s something really compelling here in this ability to have stories that can go anywhere.” — Nick Walton [3:30]

In gaming and in the world, AI enables “new experiences that are no longer static and predetermined, but dynamic and alive.” — Nick Walton [7:16]

You Might Also Like:

GANTheftAuto: Harrison Kinsley on AI-Generated Gaming Environments

Humans playing games against machines is nothing new, but now computers can develop games for people to play. Programming enthusiast and social media influencer Harrison Kinsley created GANTheftAuto, an AI-based neural network that generates a playable chunk of the classic video game Grand Theft Auto V.

Matt Ginsberg Built a GPU-Powered Crossword Solver to Take on Top Word Nerds

Dr.Fill, the crossword puzzle-playing AI created by Matt Ginsberg — serial entrepreneur, pioneering AI researcher and former research professor — scored higher than any humans earlier this year at the American Crossword Puzzle Tournament.

Maya Ackerman on LyricStudio, an AI-Based Writing Songwriting Assistant

Maya Ackerman is the CEO of WaveAI, a Silicon Valley startup using AI and machine learning to, as the company motto puts it, “unlock new heights of human creative expression.” The startup’s LyricStudio software is an AI-based lyric and poetry writing assistant.

Subscribe to the AI Podcast

Get the AI Podcast through iTunes, Google Podcasts, Google Play, Castbox, DoggCatcher, Overcast, PlayerFM, Pocket Casts, Podbay, PodBean, PodCruncher, PodKicker, Soundcloud, Spotify, Stitcher and TuneIn. If your favorite isn’t listed here, drop us a note.

Make the AI Podcast Better

Have a few minutes to spare? Fill out this listener survey. Your answers will help us make a better podcast.

The post ‘AI Dungeon’ Creator Nick Walton Uses AI to Generate Infinite Gaming Storylines appeared first on The Official NVIDIA Blog.

Read More