As of April 30, 2024 Amazon Q Business is generally available. Amazon Q Business is a conversational assistant powered by generative artificial intelligence (AI) that enhances workforce productivity by answering questions and completing tasks based on information in your enterprise systems. Your employees can access enterprise content securely and privately using web applications built with Amazon Q Business. The success of these applications depends on two key factors: first, that an end-user of the application is only able to see responses generated from documents they have been granted access to, and second, that each user’s conversation history is private, secure, and accessible only to the user.
Amazon Q Business operationalizes this by validating the identity of the user every time they access the application so that the application can use the end-user’s identity to restrict tasks and answers to documents that the user has access to. This outcome is achieved with a combination of AWS IAM Identity Center and Amazon Q Business. IAM Identity Center stores the user identity, is the authoritative source of identity information for Amazon Q Business applications, and validates the user’s identity when they access an Amazon Q Business application. You can configure IAM Identity Center to use your enterprise identity provider (IdP)—such as Okta or Microsoft Entra ID—as the identity source. Amazon Q Business makes sure that access control lists (ACLs) for enterprise documents being indexed are matched to the user identities provided by IAM Identity Center, and that these ACLs are honored every time the application calls Amazon Q Business APIs to respond to user queries.
In this post, we show how IAM Identity Center acts as a gateway to steer user identities created by your enterprise IdP as the identity source, for Amazon Q Business, and how Amazon Q Business uses these identities to respond securely and confidentially to user queries. We use an example of a generative AI employee assistant built with Amazon Q Business, demonstrate how to set it up to only respond using enterprise content that each employee has permissions to access, and show how employees are able to converse securely and privately with this assistant.
Solution overview
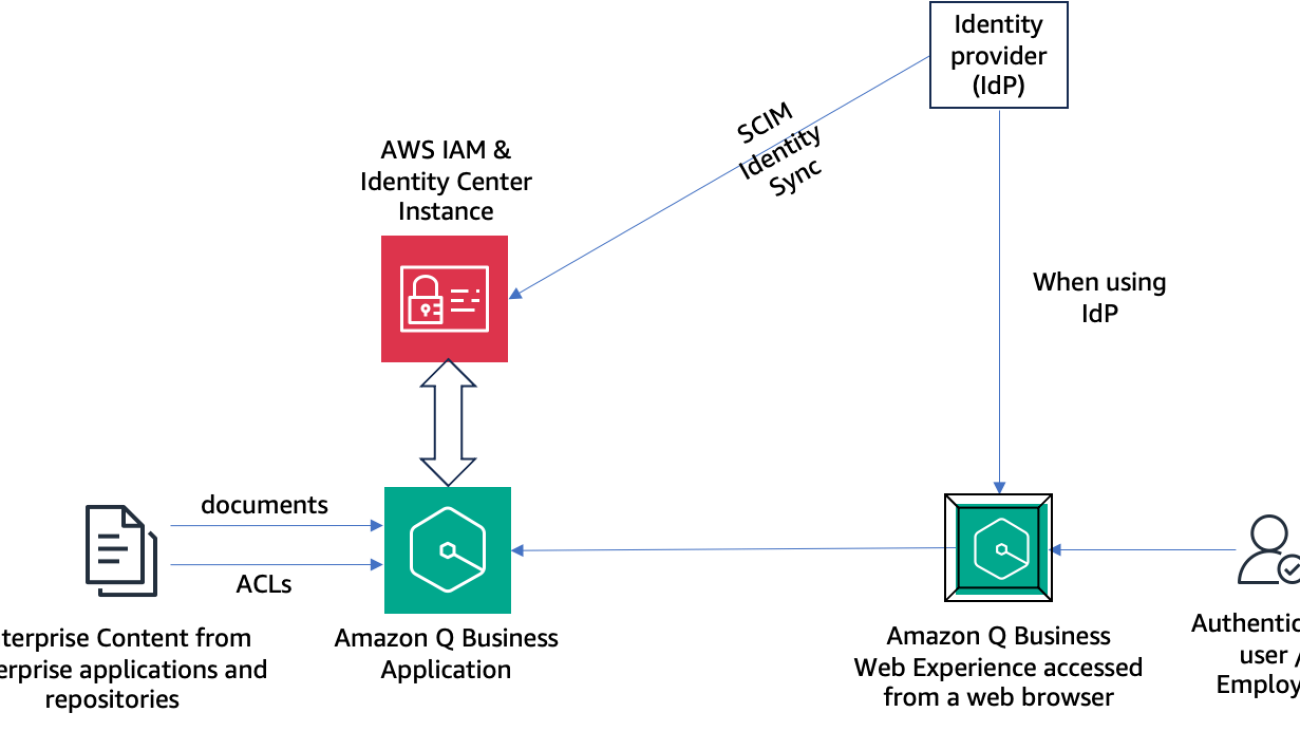
The following diagram shows a high-level architecture of how the enterprise IdP, IAM Identity Center instance, and Amazon Q Business application interact with each other to enable an authenticated user to securely and privately interact with an Amazon Q Business application using an Amazon Q Business web experience from their web browser.

When using an external IdP such as Okta, users and groups are first provisioned in the IdP and then automatically synchronized with the IAM Identity Center instance using the SCIM protocol. When a user starts the Amazon Q Business web experience, they are authenticated with their IdP using single sign-on, and the tokens obtained from the IdP are used by Amazon Q Business to validate the user with IAM Identity Center. After validation, a chat session is started with the user.
The sample use case in this post uses an IAM Identity Center account instance with its identity source configured as Okta, which is used as the IdP. Then we ingest content from Atlassian Confluence. The Amazon Q Business built-in connector for Confluence ingests the local users and groups configured in Confluence, as well as ACLs for the spaces and documents, to the Amazon Q Business application index. These users from the data source are matched with the users configured in the IAM Identity Center instance, and aliases are created in Amazon Q Business User Store for correct ACL enforcement.
Prerequisites
To implement this solution for the sample use case of this post, you need an IAM Identity Center instance and Okta identity provider as identity source. We provide more information about these resources in this section.
IAM Identity Center instance
An Amazon Q Business application requires an IAM Identity Center instance to be associated with it. There are two types of IAM Identity Center instances: an organization instance and an account instance. Amazon Q Business applications can work with either type of instance. These instances store the user identities that are created by an IdP, as well as the groups to which the users belong.
For production use cases, an IAM Identity Center organization instance is recommended. The advantage of an organization instance is that it can be used by an Amazon Q Business application in any AWS account in AWS Organizations, and you only pay once for a user in your company, if you have multiple Amazon Q Business applications spread across several AWS accounts and you use organization instance. Many AWS enterprise customers use Organizations, and have IAM Identity Center organization instances associated with them.
For proof of concept and departmental use cases, or in situations when an AWS account is not part of an AWS Organization and you don’t want to create a new AWS organization, you can use an IAM Identity Center account instance to enable an Amazon Q Business application. In this case, only the Amazon Q Business application configured in the AWS account in which the account instance is created will be able to use that instance.
Amazon Q Business implements a per-user subscription fee. A user is billed only one time if they are uniquely identifiable across different accounts and different Amazon Q Business applications. For example, if multiple Amazon Q Business applications are within a single AWS account, a user that is uniquely identified by an IAM Identity Center instance tied to this account will only be billed one time for using these applications. If your organization has two accounts, and you have an organization-level IAM Identity Center instance, a user who is uniquely identified in the organization-level instance will be billed only one time even though they access applications in both accounts. However, if you have two account-level IAM Identity Center instances, a user in one account can’t be identified as the same user in another account because there is no central identity. This means that the same user will be billed twice. We therefore recommend using organization-level IAM Identity Center instances for production use cases to optimize costs.
In both these cases, the Amazon Q Business application needs to be in the same AWS Region as the IAM Identity Center instance.
Identity source
If you already use an IdP such as Okta or Entra ID, you can continue to use your preferred IdP with Amazon Q Business applications. In this case, the IAM Identity Center instance is configured to use the IdP as its identity source. The users and user groups from the IdP can be automatically synced to the IAM Identity Center instance using SCIM. Many AWS enterprise customers already have this configured for their IAM Identity Center organization instance. For more information about all the supported IdPs, see Getting started tutorials. The process is similar for IAM Identity Center organization instances and account instances.
AWS IAM Identity Center instance configured with Okta as the identity source
The following screenshot shows the IAM Identity Center application configured in Okta, and the users and groups from the Okta configuration assigned to this application.

The following screenshot shows the IAM Identity Center instance user store after configuring Okta as the identity source. Here the user and group information is automatically provisioned (synchronized) from Okta into IAM Identity Center using the System for Cross-domain Identity Management (SCIM) v2.0 protocol.

Configure an Amazon Q Business application with IAM Identity Center enabled
Complete the following steps to create an Amazon Q Business application and enable IAM Identity Center:
- On the Amazon Q Business console, choose Create application.
- For Application name, enter a name.
- Unless you need to change the AWS Identity and Access Management (IAM) role for the application or customize encryption settings, keep the default settings.
- Choose Create.

- On the Select retriever page, unless you want to configure a preexisting Amazon Kendra index as a retriever, or you need to configure storage units for more than 20,000 documents, you can continue with the default settings.
- Choose Next.
For more information about Amazon Q Business retrievers, refer to Creating and selecting a retriever for an Amazon Q Business application.

- On the Connect data sources page, for Data sources, choose Confluence.

The following instructions demonstrate how to configure the Confluence data source. These may differ for other data sources.
- For Data source name, enter a name.
- For Source¸ select Confluence Cloud.
- For Confluence URL, enter the Confluence URL.

- For Authentication, select Basic authentication.
- For AWS Secrets Manager secret, choose an AWS Secrets Manager secret.
- For Virtual Private Cloud, choose No VPC.
- For IAM role, choose Create a new service role.
- For Role name¸ either go with the provided name or edit it for your new role.

- For Sync scope, select the contents to sync.

- For Sync mode, select Full sync.
- For Frequency, choose Run on demand.

- For Field mappings, leave the defaults.
- Choose Add data source.

- Choose Next.
- On the Add groups and users page, choose Add groups and users.

- In the pop-up window, choose Get started.

- Search for users based on their display name or groups, then choose the user or group you want to add to the application.

- Add more users as needed.
- Choose Assign.

- You will see the following screen:

- Choose subscription for each user by clicking on the Choose subscription pull down and then selecting the check mark.

- After choosing subscription for all the users, your screen will look as below. Unless you want to change the service role, choose Create application.

After the application is created, you will see the application settings page, as shown in the following screenshot.

Employee AI assistant use case
To illustrate how you can build a secure and private generative AI assistant for your employees using Amazon Q Business applications, let’s take a sample use case of an employee AI assistant in an enterprise corporation. Two new employees, Mateo Jackson and Mary Major, have joined the company on two different projects, and have finished their employee orientation. They have been given corporate laptops, and their accounts are provisioned in the corporate IdP. They have been told to get help from the employee AI assistant for any questions related to their new team member activities and their benefits.
The company uses Confluence to manage their enterprise content. The sample Amazon Q application used to run the scenarios for this post is configured with a data source using the built-in connector for Confluence to index the enterprise Confluence spaces used by employees. The example uses three Confluence spaces: AnyOrgApp Project, ACME Project Space, and AJ-DEMO-HR-SPACE. The access permissions for these spaces are as follows:
- AJ-DEMO-HR-SPACE – All employees, including Mateo and Mary
- AnyOrgApp Project – Employees assigned to the project including Mateo
- ACME Project Space – Employees assigned to the project including Mary
Let’s look at how Mateo and Mary experience their employee AI assistant.
Both are provided with the URL of the employee AI assistant web experience. They use the URL and sign in to the IdP from the browsers of their laptops. Mateo and Mary both want to know about their new team member activities and their fellow team members. They ask the same questions to the employee AI assistant but get different responses, because each has access to separate projects. In the following screenshots, the browser window on the left is for Mateo Jackson and the one on the right is for Mary Major. Mateo gets information about the AnyOrgApp project and Mary gets information about the ACME project.

Mateo chooses Sources under the question about team members to take a closer look at the team member information, and Mary choosing Sources under the question for new team member onboarding activities. The following screenshots show their updated views.

Mateo and Mary want to find out more about the benefits their new job offers and how the benefits are applicable to their personal and family situations.
The following screenshot shows that Mary asks the employee AI assistant questions about her benefits and eligibility.

Mary can also refer to the source documents.

The following screenshot shows that Mateo asks the employee AI assistant different questions about his eligibility.

Mateo looks at the following source documents.

Both Mary and Mateo first want to know their eligibility for benefits. But after that, they have different questions to ask. Even though the benefits-related documents are accessible by both Mary and Mateo, their conversations with employee AI assistant are private and personal. The assurance that their conversation history is private and can’t be seen by any other user is critical for the success of a generative AI employee productivity assistant.
Clean up
If you created a new Amazon Q Business application to try out the integration with IAM Identity Center, and don’t plan to use it further, unsubscribe and remove assigned users from the application and delete it so that your AWS account does not accumulate costs.
To unsubscribe and remove users go to the application details page and select Manage access and subscriptions.

Select all the users, and then use the Edit button to choose Unsubscribe and remove as shown below.

Delete the application after removing the users, going back to the application details page and selecting Delete.

Conclusion
For enterprise generative AI assistants such as the one shown in this post to be successful, they must respect access control as well as assure the privacy and confidentiality of every employee. Amazon Q Business and IAM Identity Center provide a solution that authenticates each user and validates the user identity at each step to enforce access control along with privacy and confidentiality.
To achieve this, IAM Identity Center acts as a gateway to sync user and group identities from an IdP (such as Okta), and Amazon Q Business uses IAM Identity Center-provided identities to uniquely identify a user of an Amazon Q Business application (in this case, an employee AI assistant). Document ACLs and local users set up in the data source (such as Confluence) are matched up with the user and group identities provided by IAM Identity Center. At query time, Amazon Q Business answers questions from users utilizing only those documents that they are provided access to by the document ACLs.
If you want to know more, take a look at the Amazon Q Business launch blog post on AWS News Blog, and refer to Amazon Q Business User Guide. For more information on IAM Identity Center, refer to the AWS IAM Identity Center User Guide.
About the Authors
 Abhinav Jawadekar is a Principal Solutions Architect in the Amazon Q Business service team at AWS. Abhinav works with AWS customers and partners to help them build generative AI solutions on AWS.
 Venky Nagapudi is a Senior Manager of Product Management for Q Business, Amazon Comprehend and Amazon Translate. His focus areas on Q Business include user identity management, and using offline intelligence from documents to improve Q Business accuracy and helpfulness.


 Ami Dani is a Senior Technical Program Manager at AWS focusing on AI/ML services. During her career, she has focused on delivering transformative software development projects for the federal government and large companies in industries as diverse as advertising, entertainment, and finance. Ami has experience driving business growth, implementing innovative training programs and successfully managing complex, high-impact projects. She is a strategic problem-solver and collaborative partner, consistently delivering results that exceed expectations.
 Gopikrishnan Anilkumar is a Senior Technical Product Manager on the Amazon Transcribe team. He has 10 years of product management experience across a variety of domains and is passionate about AI/ML. Outside of work, Gopikrishnan loves to travel and enjoys playing cricket.


 Mukesh Karki is GM of Amazon Q Business.
 Tracy Daugherty is GM of Amazon Quicksight.


 Ville Tuulos is a co-founder and CEO of Outerbounds, a developer-friendly ML/AI platform. He has been developing infrastructure for ML and AI for over two decades in academia and as a leader at a number of companies. At Netflix, he led the ML infrastructure team that created Metaflow, a popular open-source, human-centric foundation for ML/AI systems. He is also the author of a book, Effective Data Science Infrastructure, published by Manning.
 Eddie Mattia is in scientific computing and more recently building machine learning developer tools. He has worked as a researcher in academia, in customer-facing and engineering roles at MLOps startups, and as a product manager at Intel. Currently, Eddie is working to improve the open-source Metaflow project and is building tools for AI researchers and MLOps developers at Outerbounds.
 Vidyasagar specializes in high performance computing, numerical simulations, optimization techniques and software development across industrial and academic environments. At AWS, Vidyasagar is a Senior Solutions Architect developing predictive models, generative AI and simulation technologies. Vidyasagar has a PhD from the California Institute of Technology.
 Diwakar Bansal is an AWS Senior Specialist focused on business development and go-to-market for GenAI and Machine Learning accelerated computing services. Diwakar has led product definition, global business development, and marketing of technology products in the fields of IOT, Edge Computing, and Autonomous Driving focusing on bringing AI and Machine leaning to these domains. Diwakar is passionate about public speaking and thought leadership in the Cloud and GenAI space.
 Sadaf Rasool is a Machine Learning Engineer with the Annapurna ML Accelerator team at AWS. As an enthusiastic and optimistic AI/ML professional, he holds firm to the belief that the ethical and responsible application of AI has the potential to enhance society in the years to come, fostering both economic growth and social well-being.
 Scott Perry is a Solutions Architect on the Annapurna ML accelerator team at AWS. Based in Canada, he helps customers deploy and optimize deep learning training and inference workloads using AWS Inferentia and AWS Trainium. His interests include large language models, deep reinforcement learning, IoT, and genomics.


 Pradeep Prabhakaran is a Customer Solutions Architect at Cohere. In his current role at Cohere, Pradeep acts as a trusted technical advisor to customers and partners, providing guidance and strategies to help them realize the full potential of Cohere’s cutting-edge Generative AI platform. Prior to joining Cohere, Pradeep was a Principal Customer Solutions Manager at Amazon Web Services, where he led Enterprise Cloud transformation programs for large enterprises. Prior to AWS, Pradeep has held various leadership positions at consulting companies such as Slalom, Deloitte, and Wipro. Pradeep holds a Bachelor’s degree in Engineering and is based in Dallas, TX.
 James Yi is a Senior AI/ML Partner Solutions Architect at Amazon Web Services. He spearheads AWS’s strategic partnerships in Emerging Technologies, guiding engineering teams to design and develop cutting-edge joint solutions in GenAI. He enables field and technical teams to seamlessly deploy, operate, secure, and integrate partner solutions on AWS. James collaborates closely with business leaders to define and execute joint Go-To-Market strategies, driving cloud-based business growth. Outside of work, he enjoys playing soccer, traveling, and spending time with his family.