Welcome to a New Era of Building in the Cloud with Generative AI on AWS

Welcome to a New Era of Building in the Cloud with Generative AI on AWS

We believe generative AI has the potential over time to transform virtually every customer experience we know. The number of companies launching generative AI applications on AWS is substantial and building quickly, including adidas, Booking.com, Bridgewater Associates, Clariant, Cox Automotive, GoDaddy, and LexisNexis Legal & Professional, to name just a few. Innovative startups like Perplexity AI are going all in on AWS for generative AI. Leading AI companies like Anthropic have selected AWS as their primary cloud provider for mission-critical workloads, and the place to train their future models. And global services and solutions providers like Accenture are reaping the benefits of customized generative AI applications as they empower their in-house developers with Amazon CodeWhisperer.

These customers are choosing AWS because we are focused on doing what we’ve always done—taking complex and expensive technology that can transform customer experiences and businesses and democratizing it for customers of all sizes and technical abilities. To do this, we’re investing and rapidly innovating to provide the most comprehensive set of capabilities across the three layers of the generative AI stack. The bottom layer is the infrastructure to train Large Language Models (LLMs) and other Foundation Models (FMs) and produce inferences or predictions. The middle layer is easy access to all of the models and tools customers need to build and scale generative AI applications with the same security, access control, and other features customers expect from an AWS service. And at the top layer, we’ve been investing in game-changing applications in key areas like generative AI-based coding. In addition to offering them choice and—as they expect from us—breadth and depth of capabilities across all layers, customers also tell us they appreciate our data-first approach, and trust that we’ve built everything from the ground up with enterprise-grade security and privacy.

This week we took a big step forward, announcing many significant new capabilities across all three layers of the stack to make it easy and practical for our customers to use generative AI pervasively in their businesses.

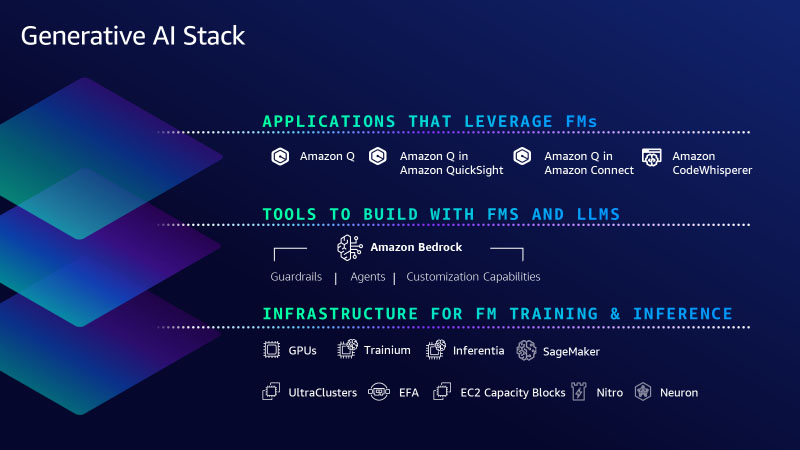
Bottom layer of the stack: AWS Trainium2 is the latest addition to deliver the most advanced cloud infrastructure for generative AI

The bottom layer of the stack is the infrastructure—compute, networking, frameworks, services—required to train and run LLMs and other FMs. AWS innovates to offer the most advanced infrastructure for ML. Through our long-standing collaboration with NVIDIA, AWS was the first to bring GPUs to the cloud more than 12 years ago, and most recently we were the first major cloud provider to make NVIDIA H100 GPUs available with our P5 instances. We continue to invest in unique innovations that make AWS the best cloud to run GPUs, including the price-performance benefits of the most advanced virtualization system (AWS Nitro), powerful petabit-scale networking with Elastic Fabric Adapter (EFA), and hyper-scale clustering with Amazon EC2 UltraClusters (thousands of accelerated instances co-located in an Availability Zone and interconnected in a non-blocking network that can deliver up to 3,200 Gbps for massive-scale ML training). We are also making it easier for any customer to access highly sought-after GPU compute capacity for generative AI with Amazon EC2 Capacity Blocks for ML—the first and only consumption model in the industry that lets customers reserve GPUs for future use (up to 500 deployed in EC2 UltraClusters) for short duration ML workloads.

Several years ago, we realized that to keep pushing the envelope on price performance we would need to innovate all the way down to the silicon, and we began investing in our own chips. For ML specifically, we started with AWS Inferentia, our purpose-built inference chip. Today, we are on our second generation of AWS Inferentia with Amazon EC2 Inf2 instances that are optimized specifically for large-scale generative AI applications with models containing hundreds of billions of parameters. Inf2 instances offer the lowest cost for inference in the cloud while also delivering up to four times higher throughput and up to ten times lower latency compared to Inf1 instances. Powered by up to 12 Inferentia2 chips, Inf2 are the only inference-optimized EC2 instances that have high-speed connectivity between accelerators so customers can run inference faster and more efficiently (at lower cost) without sacrificing performance or latency by distributing ultra-large models across multiple accelerators. Customers like Adobe, Deutsche Telekom, and Leonardo.ai have seen great early results and are excited to deploy their models at scale on Inf2.

On the training side, Trn1 instances—powered by AWS’s purpose-built ML training chip, AWS Trainium—are optimized to distribute training across multiple servers connected with EFA networking. Customers like Ricoh have trained a Japanese LLM with billions of parameters in mere days. Databricks is getting up to 40% better price-performance with Trainium-based instances to train large-scale deep learning models. But with new, more capable models coming out practically every week, we are continuing to push the boundaries on performance and scale, and we are excited to announce AWS Trainium2, designed to deliver even better price performance for training models with hundreds of billions to trillions of parameters. Trainium2 should deliver up to four times faster training performance than first-generation Trainium, and when used in EC2 UltraClusters should deliver up to 65 exaflops of aggregate compute. This means customers will be able to train a 300 billion parameter LLM in weeks versus months. Trainium2’s performance, scale, and energy efficiency are some of the reasons why Anthropic has chosen to train its models on AWS, and will use Trainium2 for its future models. And we are collaborating with Anthropic on continued innovation with both Trainium and Inferentia. We expect our first Trainium2 instances to be available to customers in 2024.

We’ve also been doubling down on the software tool chain for our ML silicon, specifically in advancing AWS Neuron, the software development kit (SDK) that helps customers get the maximum performance from Trainium and Inferentia. Since introducing Neuron in 2019 we’ve made substantial investments in compiler and framework technologies, and today Neuron supports many of the most popular publicly available models, including Llama 2 from Meta, MPT from Databricks, and Stable Diffusion from Stability AI, as well as 93 of the top 100 models on the popular model repository Hugging Face. Neuron plugs into popular ML frameworks like PyTorch and TensorFlow, and support for JAX is coming early next year. Customers are telling us that Neuron has made it easy for them to switch their existing model training and inference pipelines to Trainium and Inferentia with just a few lines of code.

Nobody else offers this same combination of choice of the best ML chips, super-fast networking, virtualization, and hyper-scale clusters. And so, it’s not surprising that some of the most well-known generative AI startups like AI21 Labs, Anthropic, Hugging Face, Perplexity AI, Runway, and Stability AI run on AWS. But, you still need the right tools to effectively leverage this compute to build, train, and run LLMs and other FMs efficiently and cost-effectively. And for many of these startups, Amazon SageMaker is the answer. Whether building and training a new, proprietary model from scratch or starting with one of the many popular publicly available models, training is a complex and expensive undertaking. It’s also not easy to run these models cost-effectively. Customers must acquire large amounts of data and prepare it. This typically involves a lot of manual work cleaning data, removing duplicates, enriching and transforming it. Then they have to create and maintain large clusters of GPUs/accelerators, write code to efficiently distribute model training across clusters, frequently checkpoint, pause, inspect and optimize the model, and manually intervene and remediate hardware issues in the cluster. Many of these challenges aren’t new, they’re some of the reasons why we launched SageMaker six years ago—to break down the many barriers involved in model training and deployment and give developers a much easier way. Tens of thousands of customers use Amazon SageMaker, and an increasing number of them like LG AI Research, Perplexity AI, AI21, Hugging Face, and Stability AI are training LLMs and other FMs on SageMaker. Just recently, Technology Innovation Institute (creators of the popular Falcon LLMs) trained the largest publicly available model—Falcon 180B—on SageMaker. As model sizes and complexity have grown, so has SageMaker’s scope.

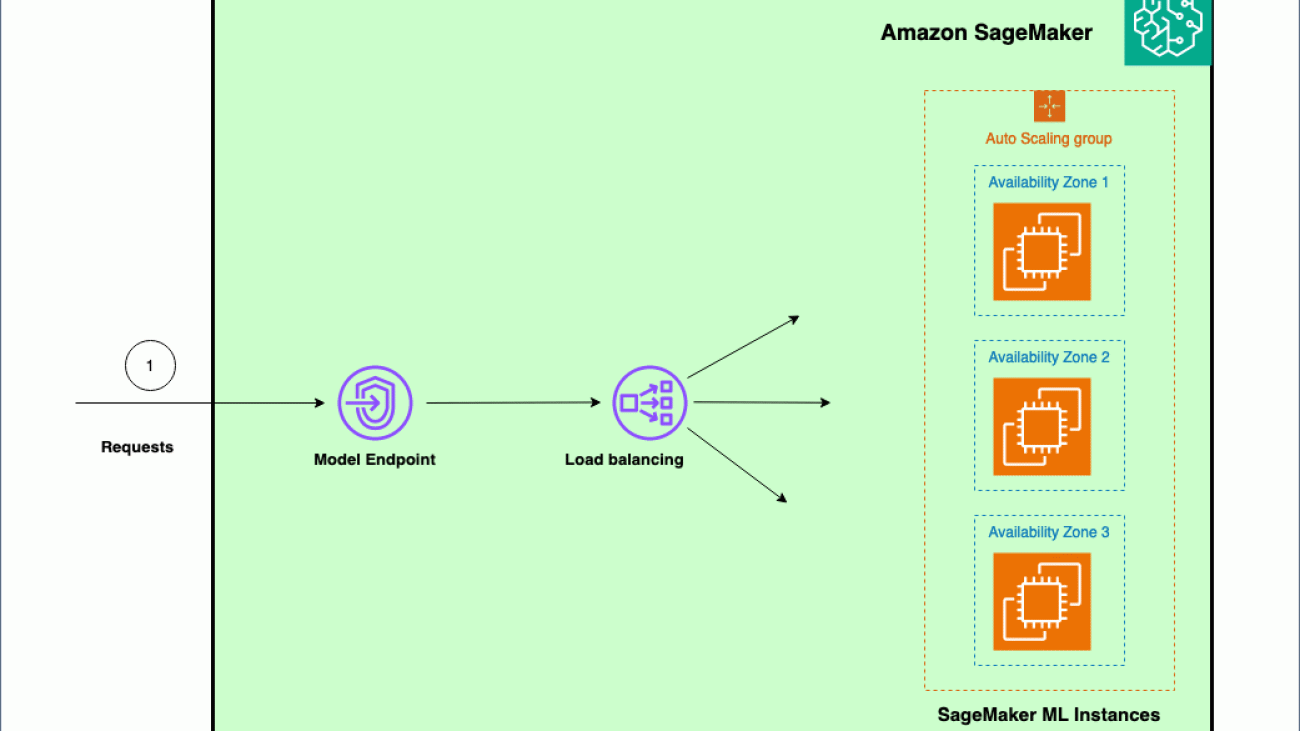
Over the years, we’ve added more than 380 game-changing features and capabilities to Amazon SageMaker like automatic model tuning, distributed training, flexible model deployment options, tools for ML OPs, tools for data preparation, feature stores, notebooks, seamless integration with human-in-the-loop evaluations across the ML lifecycle, and built-in features for responsible AI. We keep innovating rapidly to make sure SageMaker customers are able to keep building, training, and running inference for all models—including LLMs and other FMs. And we’re making it even easier and more cost-effective for customers to train and deploy large models with two new capabilities. First, to simplify training we’re introducing Amazon SageMaker HyperPod which automates more of the processes required for high-scale fault-tolerant distributed training (e.g., configuring distributed training libraries, scaling training workloads across thousands of accelerators, detecting and repairing faulty instances), speeding up training by as much as 40%. As a result, customers like Perplexity AI, Hugging Face, Stability, Hippocratic, Alkaid, and others are using SageMaker HyperPod to build, train, or evolve models. Second, we’re introducing new capabilities to make inference more cost-effective while reducing latency. SageMaker now helps customers deploy multiple models to the same instance so that they can share compute resources—reducing inference cost by 50% (on average). SageMaker also actively monitors instances that are processing inference requests and intelligently routes requests based on which instances are available—achieving 20% lower inference latency (on average). Conjecture, Salesforce, and Slack are already using SageMaker for hosting models due to these inference optimizations.

Middle layer of the stack: Amazon Bedrock adds new models and a wave of new capabilities make it even easier for customers to securely build and scale generative AI applications

While a number of customers will build their own LLMs and other FMs, or evolve any number of the publicly available options, many will not want to spend the resources and time to do this. For them, the middle layer of the stack offers these models as a service. Our solution here, Amazon Bedrock, allows customers to choose from industry-leading models from Anthropic, Stability AI, Meta, Cohere, AI21, and Amazon, customize them with their own data, and leverage all of the same leading security, access controls, and features they are used to in AWS—all through a managed service. We made Amazon Bedrock generally available in late September, and customer response has been overwhelmingly positive. Customers from around the world and across virtually every industry are excited to use Amazon Bedrock. adidas is enabling developers to get quick answers on everything from “getting started” info to deeper technical questions. Booking.com intends to use generative AI to write up tailored trip recommendations for every customer. Bridgewater Associates is developing an LLM-powered Investment Analyst Assistant to help generate charts, compute financial indicators, and summarize results. Carrier is making more precise energy analytics and insights accessible to customers so they reduce energy consumption and cut carbon emissions. Clariant is empowering its team members with an internal generative AI chatbot to accelerate R&D processes, support sales teams with meeting preparation, and automate customer emails. GoDaddy is helping customers easily set up their businesses online by using generative AI to build their websites, find suppliers, connect with customers, and more. Lexis Nexis Legal & Professional is transforming legal work for lawyers and increasing their productivity with Lexis+ AI conversational search, summarization, and document drafting and analysis capabilities. Nasdaq is helping to automate investigative workflows on suspicious transactions and strengthen their anti–financial crime and surveillance capabilities. All of these—and many more—diverse generative AI applications are running on AWS.

We are excited about the momentum for Amazon Bedrock, but it is still early days. What we’ve seen as we’ve worked with customers is that everyone is moving fast, but the evolution of generative AI continues at a rapid pace with new options and innovations happening practically daily. Customers are finding there are different models that work better for different use cases, or on different sets of data. Some models are great for summarization, others are great for reasoning and integration, and still others have really awesome language support. And then there is image generation, search use cases, and more—all coming from both proprietary models and from models that are publicly available to anyone. And in times when there is so much that is unknowable, the ability to adapt is arguably the most valuable tool of all. There is not going to be one model to rule them all. And certainly not just one technology company providing the models that everyone uses. Customers need to be trying out different models. They need to be able to switch between them or combine them within the same use case. This means they need a real choice of model providers (which the events of the past 10 days have made even more clear). This is why we invented Amazon Bedrock, why it resonates so deeply with customers, and why we are continuing to innovate and iterate quickly to make building with (and moving between) a range of models as easy as an API call, put the latest techniques for model customization in the hands of all developers, and keep customers secure and their data private. We’re excited to introduce several new capabilities that will make it even easier for customers to build and scale generative AI applications:

  • Expanding model choice with Anthropic Claude 2.1, Meta Llama 2 70B, and additions to the Amazon Titan family. In these early days, customers are still learning and experimenting with different models to determine which ones they want to use for various purposes. They want to be able to easily try the latest models, and also test to see which capabilities and features will give them the best results and cost characteristics for their use cases. With Amazon Bedrock, customers are only ever one API call away from a new model. Some of the most impressive results customers have experienced these last few months are from LLMs like Anthropic’s Claude model, which excels at a wide range of tasks from sophisticated dialog and content generation to complex reasoning while maintaining a high degree of reliability and predictability. Customers report that Claude is much less likely to produce harmful outputs, easier to converse with, and more steerable compared to other FMs, so developers can get their desired output with less effort. Anthropic’s state-of-the-art model, Claude 2, scores above the 90th percentile on the GRE reading and writing exams, and similarly on quantitative reasoning. And now, the newly released Claude 2.1 model is available in Amazon Bedrock. Claude 2.1 delivers key capabilities for enterprises such as an industry-leading 200K token context window (2x the context of Claude 2.0), reduced rates of hallucination, and significant improvements in accuracy, even at very long context lengths. Claude 2.1 also includes improved system prompts – which are model instructions that provide a better experience for end users – while also reducing the cost of prompts and completions by 25%.

    For a growing number of customers who want to use a managed version of Meta’s publicly available Llama 2 model, Amazon Bedrock offers Llama 2 13B, and we’re adding Llama 2 70B. Llama 2 70B is suitable for large-scale tasks such as language modeling, text generation, and dialogue systems. The publicly available Llama models have been downloaded more than 30M times, and customers love that Amazon Bedrock offers them as part of a managed service where they don’t need to worry about infrastructure or have deep ML expertise on their teams. Additionally, for image generation, Stability AI offers a suite of popular text-to-image models. Stable Diffusion XL 1.0 (SDXL 1.0) is the most advanced of these, and it is now generally available in Amazon Bedrock. The latest edition of this popular image model has increased accuracy, better photorealism, and higher resolution.

    Customers are also using Amazon Titan models, which are created and pretrained by AWS to offer powerful capabilities with great economics for a variety of use cases. Amazon has a 25 year track record in ML and AI—technology we use across our businesses—and we have learned a lot about building and deploying models. We have carefully chosen how we train our models and the data we use to do so. We indemnify customers against claims that our models or their outputs infringe on anyone’s copyright. We introduced our first Titan models in April of this year. Titan Text Lite—now generally available—is a succinct, cost-effective model for use cases like chatbots, text summarization, or copywriting, and it is also compelling to fine-tune. Titan Text Express—also now generally available—is more expansive, and can be used for a wider range of text-based tasks, such as open-ended text generation and conversational chat. We offer these text model options to give customers the ability to optimize for accuracy, performance, and cost depending on their use case and business requirements. Customers like Nexxiot, PGA Tour, and Ryanair are using our two Titan Text models. We also have an embeddings model, Titan Text Embeddings, for search use cases and personalization. Customers like Nasdaq are seeing great results using Titan Text Embeddings to enhance capabilities for Nasdaq IR Insight to generate insights from 9,000+ global companies’ documents for sustainability, legal, and accounting teams. And we’ll continue to add more models to the Titan family over time. We are introducing a new embeddings model, Titan Multimodal Embeddings, to power multimodal search and recommendation experiences for users using images and text (or a combination of both) as inputs. And we are introducing a new text-to-image model, Amazon Titan Image Generator. With Titan Image Generator, customers across industries like advertising, e-commerce, and media and entertainment can use a text input to generate realistic, studio-quality images in large volumes and at low cost. We are excited about how customers are responding to Titan Models, and you can expect that we’ll continue to innovate here.

  • New capabilities to customize your generative AI application securely with your proprietary data: One of the most important capabilities of Amazon Bedrock is how easy it is to customize a model. This becomes truly exciting for customers because it’s where generative AI meets their core differentiator—their data. However, it is really important that their data remains secure, that they have control of it along the way, and that model improvements are private to them. There are a few ways that you can do this, and Amazon Bedrock offers the broadest selection of customization options across multiple models). The first is fine tuning. Fine tuning a model in Amazon Bedrock is easy. You simply select the model and Amazon Bedrock makes a copy of it. Then you point to a few labeled examples (e.g., a series of good question-answer pairs) that you store in Amazon Simple Storage Service (Amazon S3), and Amazon Bedrock “incrementally trains” (augments the copied model with the new information) on these examples, and the result is a private, more accurate fine-tuned model that delivers more relevant, customized responses. We are excited to announce that fine tuning is generally available for Cohere Command, Meta Llama 2, Amazon Titan Text (Lite and Express), Amazon Titan Multimodal Embeddings, and in preview for Amazon Titan Image Generator. And, through our collaboration with Anthropic, we will soon provide AWS customers early access to unique features for model customization and fine-tuning of its state-of-the-art model Claude.

    A second technique for customizing LLMs and other FMs for your business is retrieval augmented generation (RAG), which allows you to customize a model’s responses by augmenting your prompts with data from multiple sources, including document repositories, databases, and APIs. In September, we introduced a RAG capability, Knowledge Bases for Amazon Bedrock, that securely connects models to your proprietary data sources to supplement your prompts with more information so your applications deliver more relevant, contextual, and accurate responses. Knowledge Bases is now generally available with an API that performs the entire RAG workflow from fetching text needed to augment a prompt, to sending the prompt to the model, to returning the response. Knowledge Bases supports databases with vector capabilities that store numerical representations of your data (embeddings) that models use to access this data for RAG, including Amazon OpenSearch Service, and other popular databases like Pinecone and Redis Enterprise Cloud (Amazon Aurora and MongoDB vector support coming soon).

    The third way you can customize models in Amazon Bedrock is with continued pre-training. With this method, the model builds on its original pre-training for general language understanding to learn domain-specific language and terminology. This approach is for customers who have large troves of unlabeled, domain-specific information and want to enable their LLMs to understand the language, phrases, abbreviations, concepts, definitions, and jargon unique to their world (and business). Unlike in fine-tuning, which takes a fairly small amount of data, continued pre-training is performed on large data sets (e.g., thousands of text documents). Now, pre-training capabilities are available in Amazon Bedrock for Titan Text Lite and Titan Text Express.

  • General availability of Agents for Amazon Bedrock to help execute multistep tasks using systems, data sources, and company knowledge. LLMs are great at having conversations and generating content, but customers want their applications to be able to do even more—like take actions, solve problems, and interact with a range of systems to complete multi-step tasks like booking travel, filing insurance claims, or ordering replacement parts. And Amazon Bedrock can help with this challenge. With agents, developers select a model, write a few basic instructions like “you are a cheerful customer service agent” and “check product availability in the inventory system,” point the selected model to the right data sources and enterprise systems (e.g., CRM or ERP applications), and write a few AWS Lambda functions to execute the APIs (e.g., check availability of an item in the ERP inventory). Amazon Bedrock automatically analyzes the request and breaks it down into a logical sequence using the selected model’s reasoning capabilities to determine what information is needed, what APIs to call, and when to call them to complete a step or solve a task. Now generally available, agents can plan and perform most business tasks—from answering customer questions about your product availability to taking their orders—and developers don’t need to be familiar with machine learning, engineer prompts, train models, or manually connect systems. And Bedrock does all of this securely and privately, and customers like Druva and Athene are already using them to improve the accuracy and speed of development of their generative AI applications.
  • Introducing Guardrails for Amazon Bedrock so you can apply safeguards based on your use case requirements and responsible AI policies. Customers want to be sure that interactions with their AI applications are safe, avoid toxic or offensive language, stay relevant to their business, and align with their responsible AI policies. With guardrails, customers can specify topics to avoid, and Amazon Bedrock will only provide users with approved responses to questions that fall in those restricted categories. For example, an online banking application can be set up to avoid providing investment advice, and remove inappropriate content (such as hate speech and violence). In early 2024, customers will also be able to redact personally identifiable information (PII) in model responses. For example, after a customer interacts with a call center agent the customer service conversation is often summarized for record keeping, and guardrails can remove PII from those summaries. Guardrails can be used across models in Amazon Bedrock (including fine-tuned models), and with Agents for Amazon Bedrock so customers can bring a consistent level of protection to all of their generative AI applications.

Top layer of the stack: Continued innovation makes generative AI accessible to more users

At the top layer of the stack are applications that leverage LLMs and other FMs so that you can take advantage of generative AI at work. One area where generative AI is already changing the game is in coding. Last year, we introduced Amazon CodeWhisperer, which helps you build applications faster and more securely by generating code suggestions and recommendations in near real-time. Customers like Accenture, Boeing, Bundesliga, The Cigna Group, Kone, and Warner Music Group are using CodeWhisperer to increase developer productivity—and Accenture is enabling up to 50,000 of their software developers and IT professionals with Amazon CodeWhisperer. We want as many developers as possible to be able to get the productivity benefits of generative AI, which is why CodeWhisperer offers recommendations for free to all individuals.

However, while AI coding tools do a lot to make developers’ lives easier, their productivity benefits are limited by their lack of knowledge of internal code bases, internal APIs, libraries, packages and classes. One way to think about this is that if you hire a new developer, even if they’re world-class, they’re not going to be that productive at your company until they understand your best practices and code. Today’s AI-powered coding tools are like that new-hire developer. To help with this, we recently previewed a new customization capability in Amazon CodeWhisperer that securely leverages a customer’s internal code base to provide more relevant and useful code recommendations. With this capability, CodeWhisperer is an expert on your code and provides recommendations that are more relevant to save even more time. In a study we did with Persistent, a global digital engineering and enterprise modernization company, we found that customizations help developers complete tasks up to 28% faster than with CodeWhisperer’s general capabilities. Now a developer at a healthcare technology company can ask CodeWhisperer to “import MRI images associated with the customer ID and run them through the image classifier“ to detect anomalies. Because CodeWhisperer has access to the code base it can provide much more relevant suggestions that include the import locations of the MRI images and customer IDs. CodeWhisperer keeps customizations completely private, and the underlying FM does not use them for training, protecting customers’ valuable intellectual property. AWS is the only major cloud provider that offers a capability like this to everyone.

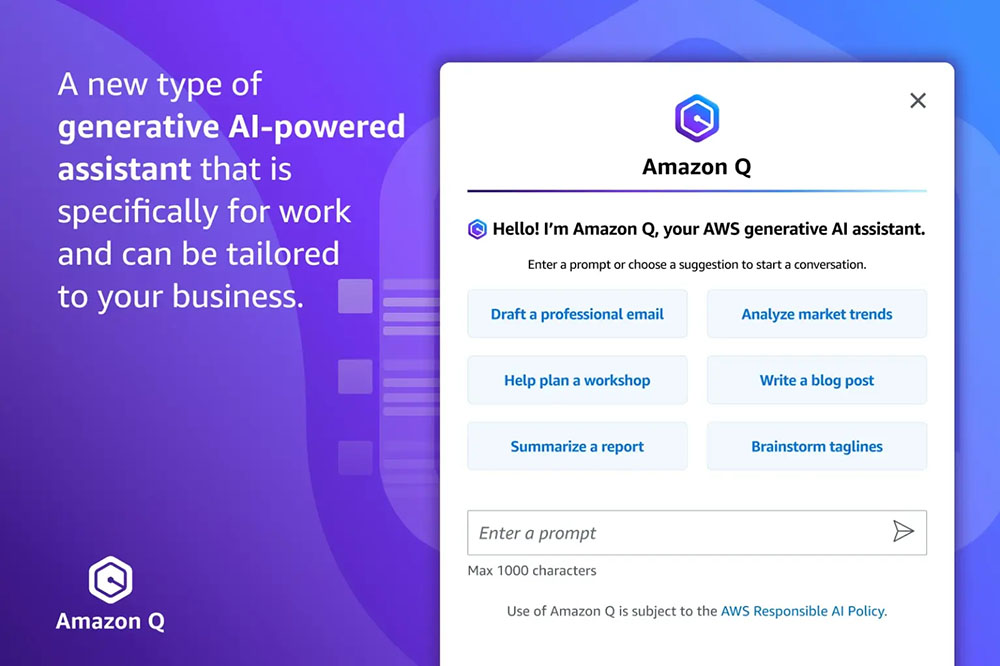
Introducing Amazon Q, the generative AI-powered assistant tailored for work

Developers certainly aren’t the only ones who are getting hands on with generative AI—millions of people are using generative AI chat applications. What early providers have done in this space is exciting and super useful for consumers, but in a lot of ways they don’t quite “work” at work. Their general knowledge and capabilities are great, but they don’t know your company, your data, your customers, your operations, or your business. That limits how much they can help you. They also don’t know much about your role—what work you do, who you work with, what information you use, and what you have access to. These limitations are understandable because these assistants don’t have access to your company’s private information, and they weren’t designed to meet the data privacy and security requirements companies need to give them this access. It’s hard to bolt on security after the fact and expect it to work well. We think we have a better way, which will allow every person in every organization to use generative AI safely in their day-to-day work.

We are excited to introduce Amazon Q, a new type of generative AI-powered assistant that is specifically for work and can be tailored to your business. Q can help you get fast, relevant answers to pressing questions, solve problems, generate content, and take actions using the data and expertise found in your company’s information repositories, code, and enterprise systems. When you chat with Amazon Q, it provides immediate, relevant information and advice to help streamline tasks, speed decision-making, and help spark creativity and innovation at work. We have built Amazon Q to be secure and private, and it can understand and respect your existing identities, roles, and permissions and use this information to personalize its interactions. If a user doesn’t have permission to access certain data without Q, they can’t access it using Q either. We have designed Amazon Q to meet stringent enterprise customers’ requirements from day one—none of their content is used to improve the underlying models.

Amazon Q is your expert assistant for building on AWS: We’ve trained Amazon Q on 17 years’ worth of AWS knowledge and experience so it can transform the way you build, deploy, and operate applications and workloads on AWS. Amazon Q has a chat interface in the AWS Management Console and documentation, your IDE (via CodeWhisperer), and your team chat rooms on Slack or other chat apps. Amazon Q can help you explore new AWS capabilities, get started faster, learn unfamiliar technologies, architect solutions, troubleshoot, upgrade, and much more —it’s an expert in AWS well-architected patterns, best practices, documentation, and solutions implementations. Here are some examples of what you can do with your new AWS expert assistant:

  • Get crisp answers and guidance on AWS capabilities, services, and solutions: Ask Amazon Q to “Tell me about Agents for Amazon Bedrock,” and Q will give you a description of the feature plus links to relevant materials. You can also Ask Amazon Q virtually any question about how an AWS service works (e.g., “What are the scaling limits on a DynamoDB table?” “What is Redshift Managed Storage?”), or how to best architect any number of solutions (“What are the best practices for building event-driven architectures?”). And Amazon Q will pull together succinct answers and always cite (and link to) its sources.
  • Choose the best AWS service for your use case, and get started quickly: Ask Amazon Q “What are the ways to build a Web app on AWS? ” and it will provide a list of potential services like AWS Amplify, AWS Lambda, and Amazon EC2 with the advantages of each. From there you can narrow down the options by helping Q understand your requirements, preferences, and constraints (e.g., “Which of these would be best if I want to use containers?” or “Should I use a relational or non-relational database?”). Finish up with “How do I get started?” and Amazon Q will outline some basic steps and point you towards additional resources.
  • Optimize your compute resources: Amazon Q can help you select Amazon EC2 instances. If you ask it to “Help me find the right EC2 instance to deploy a video encoding workload for my gaming app with the highest performance”, Q will get you a list of instance families with reasons for each suggestion. And, you can ask any number of follow up questions to help find the best choice for your workload.
  • Get assistance debugging, testing, and optimizing your code: If you encounter an error while coding in your IDE, you can ask Amazon Q to help by saying, “My code has an IO error, can you provide a fix?” and Q will generate the code for you. If you like the suggestion, you can ask Amazon Q to add the fix to your application. Since Amazon Q is in your IDE, it understands the code you are working on and knows where to insert the fix. Amazon Q can also create unit tests (“Write unit tests for the selected function”) that it can insert into your code and you can run. Finally, Amazon Q can tell you ways to optimize your code for higher performance. Ask Q to “Optimize my selected DynamoDB query,” and it will use its understanding of your code to provide a natural language suggestion on what to fix along with the accompanying code you can implement in one click.
  • Diagnose and troubleshoot issues: If you encounter issues in the AWS Management Console, like EC2 permissions errors or Amazon S3 configuration errors, you can simply press the “Troubleshoot with Amazon Q” button, and it will use its understanding of the error type and service where the error is located to give you a suggestions for a fix. You can even ask Amazon Q to troubleshoot your network (e.g., “Why can’t I connect to my EC2 instance using SSH?”) and Q will analyze your end-to-end configuration and provide a diagnosis (e.g., “This instance appears to be in a private subnet, so public accessibility may need to be established”).
  • Ramp up on a new code base in no time: When you chat with Amazon Q in your IDE, it combines its expertise in building software with an understanding of your code—a powerful pairing! Previously, if you took over a project from someone else, or you were new to the team, you might have to spend hours manually reviewing the code and documentation to understand how it works and what it does. Now, since Amazon Q understands the code in your IDE, you can simply ask Amazon Q to explain the code (“Provide me with a description of what this application does and how it works”) and Q will give you details like which services the code uses and what different functions do (e.g., Q might answer with something like, “This application is building a basic support ticket system using Python Flask and AWS Lambda” and go on to describe each of its core capabilities, how they are implemented, and much more).
  • Clear your feature backlog faster: You can even ask Amazon Q to guide you through and automate much of the end-to-end process of adding a feature to your application in Amazon CodeCatalyst, our unified software development service for teams. To do this, you just assign Q a backlog task from your issues list – just like you would a teammate – and Q generates a step-by-step plan for how it will build and implement the feature. Once you approve the plan, Q will write the code and present the suggested changes to you as a code review. You can request rework (if necessary), approve and/or deploy!
  • Upgrade your code in a fraction of the time: Most developers actually only spend a fraction of their time writing new code and building new applications. They spend a lot more of their cycles on painful, sloggy areas like maintenance and upgrades. Take language version upgrades. A large number of customers continue using older versions of Java because it will take months—even years—and thousands of hours of developer time to upgrade. Putting this off has real costs and risks—you miss out on performance improvements and are vulnerable to security issues. We think Amazon Q can be a game changer here, and are excited about Amazon Q Code Transformation, a feature which can remove a lot of this heavy lifting and reduce the time it takes to upgrade applications from days to minutes. You just open the code you want to update in your IDE, and ask Amazon Q to “/transform” your code. Amazon Q will analyze the entire source code of the application, generate the code in the target language and version, and execute tests, helping you realize the security and performance enhancements of the latest language versions. Recently, a very small team of Amazon developers used Amazon Q Code Transformation to upgrade 1,000 production applications from Java 8 to Java 17 in just two days. The average time per application was less than 10 minutes. Today Amazon Q Code Transformation performs Java language upgrades from Java 8 or Java 11 to Java 17. Coming next (and soon) is the ability to transform .NET Framework to cross-platform .NET (with even more transformations to follow in the future).

Amazon Q is your business expert: You can connect Amazon Q to your business data, information, and systems so that it can synthesize everything and provide tailored assistance to help people solve problems, generate content, and take actions that are relevant to your business. Bringing Amazon Q to your business is easy. It has 40+ built-in connectors to popular enterprise systems such as Amazon S3, Microsoft 365, Salesforce, ServiceNow, Slack, Atlassian, Gmail, Google Drive, and Zendesk. It can also connect to your internal intranet, wikis, and run books, and with the Amazon Q SDK, you can build a connection to whichever internal application you would like. Point Amazon Q at these repositories, and it will “ramp up” on your business, capturing and understanding the semantic information that makes your company unique. Then, you get your own friendly and simple Amazon Q web application so that employees across your company can interact with the conversational interface. Amazon Q also connects to your identity provider to understand a user, their role, and what systems they are permitted to access so that users can ask detailed, nuanced questions and get tailored results that include only information they are authorized to see. Amazon Q generates answers and insights that are accurate and faithful to the material and knowledge that you provide it, and you can restrict sensitive topics, block keywords, or filter out inappropriate questions and answers. Here are a few examples of what you can do with your business’s new expert assistant:

  • Get crisp, super-relevant answers based on your business data and information: Employees can ask Amazon Q about anything they might have previously had to search around for across all kinds of sources. Ask “What are the latest guidelines for logo usage?”, or “How do I apply for a company credit card?”, and Amazon Q will synthesize all of the relevant content it finds and come back with fast answers plus links to the relevant sources (e.g., brand portals and logo repositories, company T&E policies, and card applications).
  • Streamline day-to-day communications: Just ask, and Amazon Q can generate content (“Create a blog post and three social media headlines announcing the product described in this documentation”), create executive summaries (“Write a summary of our meeting transcript with a bulleted list of action items”), provide email updates (“Draft an email highlighting our Q3 training programs for customers in India”), and help structure meetings (“Create a meeting agenda to talk about the latest customer satisfaction report”).
  • Complete tasks: Amazon Q can help complete certain tasks, reducing the amount of time employees spend on repetitive work like filing tickets. Ask Amazon Q to “Summarize customer feedback on the new pricing offer in Slack,” and then request that Q take that information and open a ticket in Jira to update the marketing team. You can ask Q to “Summarize this call transcript,” and then “Open a new case for Customer A in Salesforce.” Amazon Q supports other popular work automation tools like Zendesk and Service Now.

Amazon Q is in Amazon QuickSight: With Amazon Q in QuickSight, AWS’s business intelligence service, users can ask their dashboards questions like “Why did the number of orders increase last month?” and get visualizations and explanations of the factors that influenced the increase. And, analysts can use Amazon Q to reduce the time it takes them to build dashboards from days to minutes with a simple prompt like “Show me sales by region by month as a stacked bar chart.” Q comes right back with that diagram, and you can easily add it to a dashboard or chat further with Q to refine the visualization (e.g., “Change the bar chart into a Sankey diagram,” or “Show countries instead of regions”). Amazon Q in QuickSight also makes it easier to use existing dashboards to inform business stakeholders, distill key insights, and simplify decision-making using data stories. For example, users may prompt Amazon Q to “Build a story about how the business has changed over the last month for a business review with senior leadership,” and in seconds, Amazon Q delivers a data-driven story that is visually compelling and is completely customizable. These stories can be shared securely throughout the organization to help align stakeholders and drive better decisions.

Amazon Q is in Amazon Connect: In Amazon Connect, our contact center service, Amazon Q helps your customer service agents provide better customer service. Amazon Q leverages the knowledge repositories your agents typically use to get information for customers, and then agents can chat with Amazon Q directly in Connect to get answers that help them respond more quickly to customer requests without needing to search through the documentation themselves. And, while chatting with Amazon Q for super-fast answers is great, in customer service there is no such thing as too fast. That’s why Amazon Q In Connect turns a live customer conversation with an agent into a prompt, and automatically providing the agent possible responses, suggested actions, and links to resources. For example, Amazon Q can detect that a customer is contacting a rental car company to change their reservation, generate a response for the agent to quickly communicate how the company’s change fee policies apply, and guide the agent through the steps they need to update the reservation.

Amazon Q is in AWS Supply Chain (Coming Soon): In AWS Supply Chain, our supply chain insights service, Amazon Q helps supply and demand planners, inventory managers, and trading partners optimize their supply chain by summarizing and highlighting potential stockout or overstock risks, and visualize scenarios to solve the problem. Users can ask Amazon Q “what,” “why,” and “what if” questions about their supply chain data and chat through complex scenarios and the tradeoffs between different supply chain decisions. For example, a customer may ask, “What’s causing the delay in my shipments and how can I speed things up?” to which Amazon Q may reply, “90% of your orders are on the east coast, and a big storm in the Southeast is causing a 24-hour delay. If you ship to the port of New York instead of Miami, you’ll expedite deliveries and reduce costs by 50%.”

Our customers are adopting generative AI quickly—they are training groundbreaking models on AWS, they are developing generative AI applications at record speed using Amazon Bedrock, and they are deploying game-changing applications across their organizations like Amazon Q. With our latest announcements, AWS is bringing customers even more performance, choice, and innovation to every layer of the stack. The combined impact of all the capabilities we’re delivering at re:Invent marks a major milestone toward meeting an exciting and meaningful goal: We are making generative AI accessible to customers of all sizes and technical abilities so they can get to reinventing and transforming what is possible.

Resources


About the Author

Swami Sivasubramanian is Vice President of Data and Machine Learning at AWS. In this role, Swami oversees all AWS Database, Analytics, and AI & Machine Learning services. His team’s mission is to help organizations put their data to work with a complete, end-to-end data solution to store, access, analyze, and visualize, and predict.

Read More

Package and deploy classical ML and LLMs easily with Amazon SageMaker, part 2: Interactive User Experiences in SageMaker Studio

Package and deploy classical ML and LLMs easily with Amazon SageMaker, part 2: Interactive User Experiences in SageMaker Studio

Amazon SageMaker is a fully managed service that enables developers and data scientists to quickly and easily build, train, and deploy machine learning (ML) models at scale. SageMaker makes it easy to deploy models into production directly through API calls to the service. Models are packaged into containers for robust and scalable deployments.

SageMaker provides a variety of options to deploy models. These options vary in the amount of control you have and the work needed at your end. The AWS SDK gives you most control and flexibility. It’s a low-level API available for Java, C++, Go, JavaScript, Node.js, PHP, Ruby, and Python. The SageMaker Python SDK is a high-level Python API that abstracts some of the steps and configuration, and makes it easier to deploy models. The AWS Command Line Interface (AWS CLI) is another high-level tool that you can use to interactively work with SageMaker to deploy models without writing your own code.

We are launching two new options that further simplify the process of packaging and deploying models using SageMaker. One way is for programmatic deployment. For that, we are offering improvements in the Python SDK. For more information, refer to Package and deploy classical ML and LLMs easily with Amazon SageMaker, part 1: PySDK Improvements. The second way is for interactive deployment. For that, we are launching a new interactive experience in Amazon SageMaker Studio. It will help you quickly deploy your own trained or foundational models (FMs) from Amazon SageMaker JumpStart with optimized configuration, and achieve predictable performance at the lowest cost. Read on to check out what the new interactive experience looks like.

New interactive experience in SageMaker Studio

This post assumes that you have trained one or more ML models or are using FMs from the SageMaker JumpStart model hub and are ready to deploy them. Training a model using SageMaker is not a prerequisite for deploying model using SageMaker. Some familiarity with SageMaker Studio is also assumed.

We walk you through how to do the following:

  • Create a SageMaker model
  • Deploy a SageMaker model
  • Deploy a SageMaker JumpStart large language model (LLM)
  • Deploy multiple models behind one endpoint
  • Test model inference
  • Troubleshoot errors

Create a SageMaker model

The first step in setting up a SageMaker endpoint for inference is to create a SageMaker model object. This model object is made up of two things: a container for the model, and the trained model that will be used for inference. The new interactive UI experience makes the SageMaker model creation process straightforward. If you’re new to SageMaker Studio, refer to the Developer Guide to get started.

  1. In the SageMaker Studio interface, choose Models in the navigation pane.
  2. On the Deployable models tab, choose Create.

Now all you need to do is provide the model container details, the location of your model data, and an AWS Identity and Access Management (IAM) role for SageMaker to assume on your behalf.

  1. For the model container, you can use one of the SageMaker pre-built Docker images that it provides for popular frameworks and libraries. If you choose to use this option, choose a container framework, a corresponding framework version, and a hardware type from the list of supported types.

Alternatively, you can specify a path to your own container stored in Amazon Elastic Container Registry (Amazon ECR).

  1. Next, upload your model artifacts. SageMaker Studio provides two ways to upload model artifacts:
    • First, you can specify a model.tar.gz either in an Amazon Simple Storage Service (Amazon S3) bucket or in your local path. This model.tar.gz must be structured in a format that is compliant with the container that you are utilizing.
    • Alternatively, it supports raw artifact uploading for PyTorch and XGBoost models. For these two frameworks, provide the model artifacts in the format the container expects. For example, for PyTorch this would be a model.pth. Note that your model artifacts also include an inference script for preprocessing and postprocessing. If you don’t provide an inference script, the default inference handlers for the container you have chosen will be implemented.
  2. After you select your container and artifact, specify an IAM role.
  3. Choose Create deployable model to create a SageMaker model.

The preceding steps demonstrate the simplest workflow. You can further customize the model creation process. For example, you can specify VPC details and enable network isolation to make sure that the container can’t make outbound calls on the public internet. You can expand the Advanced options section to see more options.

You can get guidance on the hardware for best price/performance ratio to deploy your endpoint by running a SageMaker Inference Recommender benchmarking job. To further customize the SageMaker model, you can pass in any tunable environment variables at the container level. Inference Recommender will also take a range of these variables to find the optimal configuration for your model serving and container.

After you create your model, you can see it on the Deployable models tab. If there was any issue found in the model creation, you will see the status in the Monitor status column. Choose the model’s name to view the details.

Deploy a SageMaker model

In the most basic scenario, all you need to do is select a deployable model from the Models page or an LLM from the SageMaker JumpStart page, select an instance type, set the initial instance count, and deploy the model. Let’s see what this process looks like in SageMaker Studio for your own SageMaker model. We discuss using LLMs later in this post.

  1. On the Models page, choose the Deployable models tab.
  2. Select the model to deploy and choose Deploy.
  3. The next step is to select an instance type that SageMaker will put behind the inference endpoint.

You want an instance that delivers the best performance at the lowest cost. SageMaker makes it straightforward for you to make this decision by showing recommendations. If you had benchmarked your model using SageMaker Inference Recommender during the SageMaker model creation step, you will see the recommendations from that benchmark on the drop-down menu.

Otherwise, you will see a list of prospective instances on the menu. SageMaker uses its own heuristics to populate the list in that case.

  1. Specify the initial instance count, then choose Deploy.

SageMaker will create an endpoint configuration and deploy your model behind that endpoint. After the model is deployed, you will see the endpoint and model status as In service. Note that the endpoint may be ready before the model.

This is also the place in SageMaker Studio where you will manage the endpoint. You can navigate to the endpoint details page by choosing Endpoints under Deployments in the navigation pane. Use the Add model and Delete buttons to change the models behind the endpoint without needing to recreate an endpoint. The Test inference tab enables you to test your model by sending test requests to one of the in-service models directly from the SageMaker Studio interface. You can also edit the auto scaling policy on the Auto-scaling tab on this page. More details on adding, removing, and testing models are covered in the following sections. You can see the network, security, and compute information for this endpoint on the Settings tab.

Customize the deployment

The preceding example showed how straightforward it is to deploy a single model with minimum configuration required from your side. SageMaker populates most of the fields for you, but you can customize the configuration. For example, it automatically generates a name for the endpoint. However, you can name the endpoint according to your preference, or use an existing endpoint on the Endpoint name drop-down menu. For existing endpoints, you will see only the endpoints that are in service at that time. You can use the Advanced options section to specify an IAM role, VPC details, and tags.

Deploy a SageMaker JumpStart LLM

To deploy a SageMaker JumpStart LLM, complete the following steps:

  1. Navigate to the JumpStart page in SageMaker Studio.
  2. Choose one of the partner names to browse the list of models available from that partner, or use the search feature to get to the model page if you know the name of the model.
  3. Choose the model you want to deploy.
  4. Choose Deploy.

Note that use of LLMs is subject to EULA and the terms and conditions of the provider.

  1. Accept the license and terms.
  2. Specify an instance type.

Many models from the JumpStart model hub come with a price-performance optimized default instance type for deployment. For models that don’t come with this default, you will be provided with a list of supported instance types on the Instance type drop-down menu. For benchmarked models, if you want to optimize the deployment specifically for either cost or performance to meet your specific use case, you can choose Alternate configurations to view more options that have been benchmarked with different combinations of total tokens, input length, and max concurrency. You can also select from other supported instances for that model.

  1. If using an alternate configuration, select your instance and choose Select.
  2. Choose Deploy to deploy the model.

You will see the endpoint and model status change to In service. You also have options to customize the deployment to meet your requirements in this case.

Deploy multiple models behind one endpoint

SageMaker enables you to deploy multiple models behind a single endpoint. This reduces hosting costs by improving endpoint utilization compared to using endpoints with only one model behind them. It also reduces deployment overhead because SageMaker manages loading models in memory and scaling them based on the traffic patterns to your endpoint. SageMaker Studio now makes it straightforward to do this.

  1. Get started by selecting the models that you want to deploy, then choose Deploy.
  2. Then you can create an endpoint with multiple models that have an allocated amount of compute that you define.

In this case, we use an ml.p4d.24xlarge instance for the endpoint and allocate the necessary number of resources for our two different models. Note that your endpoint is constrained to the instance types that are supported by this feature.

  1. If you start the flow from the Deployable models tab and want to add a SageMaker JumpStart LLM, or vice versa, you can make it an endpoint fronting multiple models by choosing Add model after starting the deployment workflow.
  2. Here, you can choose another FM from the SageMaker JumpStart model hub or a model using the Deployable Models option, which refers to models that you have saved as SageMaker model objects.
  3. Choose your model settings:
    • If the model uses a CPU instance, choose the number of CPUs and minimum number of copies for the model.
    • If the model uses a GPU instance, choose the number of accelerators and minimum number of copies for the model.
  4. Choose Add model.
  5. Choose Deploy to deploy these models to a SageMaker endpoint.

When the endpoint is up and ready (In service status), you’ll have two models deployed behind a single endpoint.

Test model inference

SageMaker Studio now makes it straightforward to test model inference requests. You can send the payload data directly using the supported content type, such as application or JSON, text or CSV, or use Python SDK sample code to make an invocation request from your programing environment like a notebook or local integrated development environment (IDE).

Note that the Python SDK example code option is available only for SageMaker JumpStart models, and it’s tailored for the specific model use case with input/output data transformation.

Troubleshoot errors

To help troubleshoot and look deeper into model deployment, there are tooltips on the resource Status label to show corresponding error and reason messages. There are also links to Amazon CloudWatch log groups on the endpoint details page. For single-model endpoints, the link to the CloudWatch container logs is conveniently located in the Summary section of the endpoint details. For endpoints with multiple models, the links to the CloudWatch logs are located on each row of the Models table view. The following are some common error scenarios for troubleshooting:

  • Model ping health check failure – The model deployment could fail because the serving container didn’t pass the model ping health check. To debug the issue, refer to the following container logs published by the CloudWatch log groups:
    /aws/sagemaker/Endpoints/[EndpointName]
    /aws/sagemaker/InferenceComponents/[InferenceComponentName]

  • Inconsistent model and endpoint configuration caused deployment failures – If the deployment failed by one of the following error messages, it means the selected model to deploy used a different IAM role, VPC configuration, or network isolation configuration. The remediation is to update the model details to use the same IAM role, VPC configuration, and network isolation configuration during the deployment flow. If you’re adding a model to an existing endpoint, you could recreate the model object to match the target endpoint configurations.
    Model and endpoint config have different execution roles. Please ensure the execution roles are consistent.
    Model and endpoint config have different VPC configurations. Please ensure the VPC configurations are consistent.
    Model and endpoint config have different network isolation configurations. Please ensure the network isolation configurations are consistent.

  • Not enough capacity to deploy more models on the existing endpoint infrastructure – If the deployment failed with the following error message, it means the current endpoint infrastructure doesn’t have enough compute or memory hardware resources to deploy the model. The remediation is to increase the maximum instance count on the endpoint or delete any existing models deployed on the endpoint to make room for new model deployment.
    There is not enough hardware resources on the instances for this endpoint to create a copy of the inference component. Please update resource requirements for this inference component, remove existing inference components, or increase the number of instances for this endpoint.

  • Unsupported instance type for multiple model endpoint deployment – If the deployment failed with the following error message, it means the selected instance type is currently not supported for the multiple model endpoint deployment. The remediation is to change the instance type to an instance that supports this feature and retry the deployment.
    The instance type is not supported for multiple models endpoint. Please choose a different instance type.

For other model deployment issues, refer to Supported features.

Clean up

Cleanup is also straightforward. You can remove one or more models from your existing SageMaker endpoint by selecting the specific model on the SageMaker console. To delete the whole endpoint, navigate to the Endpoints page, select the desired endpoint, choose Delete, and accept the disclaimer to proceed with deletion.

Conclusion

The enhanced interactive experience in SageMaker Studio allows data scientists to focus on model building and bringing their artifacts to SageMaker while abstracting out the complexities of deployment. For those who prefer a code-based approach, check out the low-code equivalent with the ModelBuilder class.

To learn more, visit the SageMaker ModelBuilder Python interface documentation and the guided deploy workflows in SageMaker Studio. There is no additional charge for the SageMaker SDK and SageMaker Studio. You pay only for the underlying resources used. For more information on how to deploy models with SageMaker, see Deploy models for inference.

Special thanks to Sirisha Upadhyayala, Melanie Li, Dhawal Patel, Sam Edwards and Kumara Swami Borra.


About the authors

Raghu Ramesha is a Senior ML Solutions Architect with the Amazon SageMaker Service team. He focuses on helping customers build, deploy, and migrate ML production workloads to SageMaker at scale. He specializes in machine learning, AI, and computer vision domains, and holds a master’s degree in Computer Science from UT Dallas. In his free time, he enjoys traveling and photography.

Deepak Garg is a Solutions Architect at AWS. He loves diving deep into AWS services and sharing his knowledge with customers. Deepak has background in Content Delivery Networks and Telecommunications

Ram Vegiraju is a ML Architect with the Amazon SageMaker Service team. He focuses on helping customers build and optimize their AI/ML solutions on Amazon SageMaker. In his spare time, he loves traveling and writing.

Marc Karp is an ML Architect with the Amazon SageMaker Service team. He focuses on helping customers design, deploy, and manage ML workloads at scale. In his spare time, he enjoys traveling and exploring new places.

Shiva Raaj Kotini works as a Principal Product Manager in the Amazon SageMaker Inference product portfolio. He focuses on model deployment, performance tuning, and optimization in SageMaker for inference.

Alwin (Qiyun) Zhao is a Senior Software Development Engineer with the Amazon SageMaker Inference Platform team. He is the lead developer of the deployment guardrails and shadow deployments, and he focuses on helping customers to manage ML workloads and deployments at scale with high availability. He also works on platform architecture evolutions for fast and secure ML jobs deployment and running ML online experiments at ease. In his spare time, he enjoys reading, gaming, and traveling.

Gaurav Bhanderi is a Front End engineer with AI platforms team in SageMaker. He works on delivering Customer facing UI solutions within AWS org. In his free time, he enjoys hiking and exploring local restaurants.

Read More

Package and deploy classical ML and LLMs easily with Amazon SageMaker, part 1: PySDK Improvements

Package and deploy classical ML and LLMs easily with Amazon SageMaker, part 1: PySDK Improvements

Amazon SageMaker is a fully managed service that enables developers and data scientists to quickly and effortlessly build, train, and deploy machine learning (ML) models at any scale. SageMaker makes it straightforward to deploy models into production directly through API calls to the service. Models are packaged into containers for robust and scalable deployments. Although it provides various entry points like the SageMaker Python SDK, AWS SDKs, the SageMaker console, and Amazon SageMaker Studio notebooks to simplify the process of training and deploying ML models at scale, customers are still looking for better ways to deploy their models for playground testing and to optimize production deployments.

We are launching two new ways to simplify the process of packaging and deploying models using SageMaker.

In this post, we introduce the new SageMaker Python SDK ModelBuilder experience, which aims to minimize the learning curve for new SageMaker users like data scientists, while also helping experienced MLOps engineers maximize utilization of SageMaker hosting services. It reduces the complexity of initial setup and deployment, and by providing guidance on best practices for taking advantage of the full capabilities of SageMaker. We provide detailed information and GitHub examples for this new SageMaker capability.

The other new launch is to use the new interactive deployment experience in SageMaker Studio. We discuss this in Part 2.

Deploying models to a SageMaker endpoint entails a series of steps to get the model ready to be hosted on a SageMaker endpoint. This involves getting the model artifacts in the correct format and structure, creating inference code, and specifying essential details like the model image URL, Amazon Simple Storage Service (Amazon S3) location of model artifacts, serialization and deserialization steps, and necessary AWS Identity and Access Management (IAM) roles to facilitate appropriate access permissions. Following this, an endpoint configuration requires determining the inference type and configuring respective parameters such as instance types, counts, and traffic distribution among model variants.

To further help our customers when using SageMaker hosting, we introduced the new ModelBuilder class in the SageMaker Python SDK, which brings the following key benefits when deploying models to SageMaker endpoints:

  • Unifies the deployment experience across frameworks – The new experience provides a consistent workflow for deploying models built using different frameworks like PyTorch, TensorFlow, and XGBoost. This simplifies the deployment process.
  • Automates model deployment – Tasks like selecting appropriate containers, capturing dependencies, and handling serialization/deserialization are automated, reducing manual effort required for deployment.
  • Provides a smooth transition from local to SageMaker hosted endpoint – With minimal code changes, models can be easily transitioned from local testing to deployment on a SageMaker endpoint. Live logs make debugging seamless.

Overall, SageMaker ModelBuilder simplifies and streamlines the model packaging process for SageMaker inference by handling low-level details and provides tools for testing, validation, and optimization of endpoints. This improves developer productivity and reduces errors.

In the following sections, we deep dive into the details of this new feature. We also discuss how to deploy models to SageMaker hosting using ModelBuilder, which simplifies the process. Then we walk you through a few examples for different frameworks to deploy both traditional ML models and the foundation models that power generative AI use cases.

Getting to know SageMaker ModelBuilder

The new ModelBuilder is a Python class focused on taking ML models built using frameworks, like XGBoost or PyTorch, and converting them into models that are ready for deployment on SageMaker. ModelBuilder provides a build() function, which generates the artifacts according the model server, and a deploy() function to deploy locally or to a SageMaker endpoint. The introduction of this feature simplifies the integration of models with the SageMaker environment, optimizing them for performance and scalability. The following diagram shows how ModelBuilder works on a high-level.

ModelBuilder class

The ModelBuilder class provide different options for customization. However, to deploy the framework model, the model builder just expects the model, input, output, and role:

class ModelBuilder(
    model, # model id or model object
    role_arn, # IAM role
    schema_builder, # defines the input and output
    mode, # select between local deployment and depoy to SageMaker Endpoints
    ...
)

SchemaBuilder

The SchemaBuilder class enables you to define the input and output for your endpoint. It allows the schema builder to generate the corresponding marshaling functions for serializing and deserializing the input and output. The following class file provides all the options for customization:

class SchemaBuilder(
    sample_input: Any,
    sample_output: Any,
    input_translator: CustomPayloadTranslator = None,
    output_translator: CustomPayloadTranslator = None
)

However, in most cases, just sample input and output would work. For example:

input = "How is the demo going?"
output = "Comment la démo va-t-elle?"
schema = SchemaBuilder(input, output)

By providing sample input and output, SchemaBuilder can automatically determine the necessary transformations, making the integration process more straightforward. For more advanced use cases, there’s flexibility to provide custom translation functions for both input and output, ensuring that more complex data structures can also be handled efficiently. We demonstrate this in the following sections by deploying different models with various frameworks using ModelBuilder.

Local mode experience

In this example, we use ModelBuilder to deploy XGBoost model locally. You can use Mode to switch between local testing and deploying to a SageMaker endpoint. We first train the XGBoost model (locally or in SageMaker) and store the model artifacts in the working directory:

# Train the model
model = XGBClassifier()
model.fit(X_train, y_train)
model.save_model(model_dir + "/my_model.xgb")

Then we create a ModelBuilder object by passing the actual model object, the SchemaBuilder that uses the sample test input and output objects (the same input and output we used when training and testing the model) to infer the serialization needed. Note that we use Mode.LOCAL_CONTAINER to specify a local deployment. After that, we call the build function to automatically identify the supported framework container image as well as scan for dependencies. See the following code:

model_builder_local = ModelBuilder(
    model=model,  
    schema_builder=SchemaBuilder(X_test, y_pred), 
    role_arn=execution_role, 
    mode=Mode.LOCAL_CONTAINER
)
xgb_local_builder = model_builder_local.build()

Finally, we can call the deploy function in the model object, which also provides live logging for easier debugging. You don’t need to specify the instance type or count because the model will be deployed locally. If you provided these parameters, they will be ignored. This function will return the predictor object that we can use to make prediction with the test data:

# note: all the serialization and deserialization is handled by the model builder.
predictor_local = xgb_local_builder.deploy(
# instance_type='ml.c5.xlarge',
# initial_instance_count=1
)

# Make prediction for test data. 
predictor_local.predict(X_test)

Optionally, you can also control the loading of the model and preprocessing and postprocessing using InferenceSpec. We provide more details later in this post. Using LOCAL_CONTAINER is a great way to test out your script locally before deploying to a SageMaker endpoint.

Refer to the model-builder-xgboost.ipynb example to test out deploying both locally and to a SageMaker endpoint using ModelBuilder.

Deploy traditional models to SageMaker endpoints

In the following examples, we showcase how to use ModelBuilder to deploy traditional ML models.

XGBoost models

Similar to the previous section, you can deploy an XGBoost model to a SageMaker endpoint by changing the mode parameter when creating the ModelBuilder object:

model_builder = ModelBuilder(
    model=model,  
    schema_builder=SchemaBuilder(sample_input=sample_input, sample_output=sample_output), 
    role_arn=execution_role, 
    mode=Mode.SAGEMAKER_ENDPOINT
)
xgb_builder = model_builder.build()
predictor = xgb_builder.deploy(
    instance_type='ml.c5.xlarge',
    initial_instance_count=1
)

Note that when deploying to SageMaker endpoints, you need to specify the instance type and instance count when calling the deploy function.

Refer to the model-builder-xgboost.ipynb example to deploy an XGBoost model.

Triton models

You can use ModelBuilder to serve PyTorch models on Triton Inference Server. For that, you need to specify the model_server parameter as ModelServer.TRITON, pass a model, and have a SchemaBuilder object, which requires sample inputs and outputs from the model. ModelBuilder will take care of the rest for you.

model_builder = ModelBuilder(
    model=model,  
    schema_builder=SchemaBuilder(sample_input=sample_input, sample_output=sample_output), 
    role_arn=execution_role,
    model_server=ModelServer.TRITON, 
    mode=Mode.SAGEMAKER_ENDPOINT
)

triton_builder = model_builder.build()

predictor = triton_builder.deploy(
    instance_type='ml.g4dn.xlarge',
    initial_instance_count=1
)

Refer to model-builder-triton.ipynb to deploy a model with Triton.

Hugging Face models

In this example, we show you how to deploy a pre-trained transformer model provided by Hugging Face to SageMaker. We want to use the Hugging Face pipeline to load the model, so we create a custom inference spec for ModelBuilder:

# custom inference spec with hugging face pipeline
class MyInferenceSpec(InferenceSpec):
    def load(self, model_dir: str):
        return pipeline("translation_en_to_fr", model="t5-small")
        
    def invoke(self, input, model):
        return model(input)
    
inf_spec = MyInferenceSpec()

We also define the input and output of the inference workload by defining the SchemaBuilder object based on the model input and output:

schema = SchemaBuilder(value,output)

Then we create the ModelBuilder object and deploy the model onto a SageMaker endpoint following the same logic as shown in the other example:

builder = ModelBuilder(
    inference_spec=inf_spec,
    mode=Mode.SAGEMAKER_ENDPOINT,  # you can change it to Mode.LOCAL_CONTAINER for local testing
    schema_builder=schema,
    image_uri=image,
)
model = builder.build(
    role_arn=execution_role,
    sagemaker_session=sagemaker_session,
)
predictor = model.deploy(
    initial_instance_count=1,
    instance_type='ml.g5.2xlarge'
)

Refer to model-builder-huggingface.ipynb to deploy a Hugging Face pipeline model.

Deploy foundation models to SageMaker endpoints

In the following examples, we showcase how to use ModelBuilder to deploy foundation models. Just like the models mentioned earlier, all that is required is the model ID.

Hugging Face Hub

If you want to deploy a foundation model from Hugging Face Hub, all you need to do is pass the pre-trained model ID. For example, the following code snippet deploys the meta-llama/Llama-2-7b-hf model locally. You can change the mode to Mode.SAGEMAKER_ENDPOINT to deploy to SageMaker endpoints.

model_builder = ModelBuilder(
    model="meta-llama/Llama-2-7b-hf",
    schema_builder=SchemaBuilder(sample_input, sample_output),
    model_path="/home/ec2-user/SageMaker/LoadTestResources/meta-llama2-7b", #local path where artifacts will be saved
    mode=Mode.LOCAL_CONTAINER,
    env_vars={
        # Llama 2 is a gated model and requires a Hugging Face Hub token.
        "HUGGING_FACE_HUB_TOKEN": "<YourHuggingFaceToken>"
 
    }
)
model = model_builder.build()
local_predictor = model.deploy()

For gated models on Hugging Face Hub, you need to request access via Hugging Face Hub and use the associated key by passing it as the environment variable HUGGING_FACE_HUB_TOKEN. Some Hugging Face models may require trusting remote code. It can be set as an environment variable as well using HF_TRUST_REMOTE_CODE. By default, ModelBuilder will use a Hugging Face Text Generation Inference (TGI) container as the underlying container for Hugging Face models. If you would like to use AWS Large Model Inference (LMI) containers, you can set up the model_server parameter as ModelServer.DJL_SERVING when you configure the ModelBuilder object.

A neat feature of ModelBuilder is the ability to run local tuning of the container parameters when you use LOCAL_CONTAINER mode. This feature can be used by simply running tuned_model = model.tune().

Refer to demo-model-builder-huggingface-llama2.ipynb to deploy a Hugging Face Hub model.

SageMaker JumpStart

Amazon SageMaker JumpStart also offers a number of pre-trained foundation models. Just like the process of deploying a model from Hugging Face Hub, the model ID is required. Deploying a SageMaker JumpStart model to a SageMaker endpoint is as straightforward as running the following code:

model_builder = ModelBuilder(
    model="huggingface-llm-falcon-7b-bf16",
    schema_builder=SchemaBuilder(sample_input, sample_output),
    role_arn=execution_role
)

sm_ep_model = model_builder.build()

predictor = sm_ep_model.deploy()

For all available SageMaker JumpStart model IDs, refer to Built-in Algorithms with pre-trained Model Table. Refer to model-builder-jumpstart-falcon.ipynb to deploy a SageMaker JumpStart model.

Inference component

ModelBulder allows you to use the new inference component capability in SageMaker to deploy models. For more information on inference components, see Reduce Model Deployment Costs By 50% on Average Using SageMaker’s Latest Features. You can use inference components for deployment with ModelBuilder by specifying endpoint_type=EndpointType.INFERENCE_COMPONENT_BASED in the deploy() method. You can also use the tune() method, which fetches the optimal number of accelerators, and modify it if required.

resource_requirements = ResourceRequirements(
    requests={
        "num_accelerators": 4,
        "memory": 1024,
        "copies": 1,
    },
    limits={},
)

goldfinch_predictor_2 = model_2.deploy(
    mode=Mode.SAGEMAKER_ENDPOINT,
    endpoint_type=EndpointType.INFERENCE_COMPONENT_BASED,
    ...
	
)

Refer to model-builder-inference-component.ipynb to deploy a model as an inference component.

Customize the ModelBuilder Class

The ModelBuilder class allows you to customize model loading using InferenceSpec.

In addition, you can control payload and response serialization and deserialization and customize preprocessing and postprocessing using CustomPayloadTranslator. Additionally, when you need to extend our pre-built containers for model deployment on SageMaker, you can use ModelBuilder to handle the model packaging process. In this following section, we provide more details of these capabilities.

InferenceSpec

InferenceSpec offers an additional layer of customization. It allows you to define how the model is loaded and how it will handle incoming inference requests. Through InferenceSpec, you can define custom loading procedures for your models, bypassing the default loading mechanisms. This flexibility is particularly beneficial when working with non-standard models or custom inference pipelines. The invoke method can be customized, providing you with the ability to tailor how the model processes incoming requests (preprocessing and postprocessing). This customization can be essential to ensure that the inference process aligns with the specific needs of the model. See the following code:

class InferenceSpec(abc.ABC):
    @abc.abstractmethod
    def load(self, model_dir: str):
        pass

    @abc.abstractmethod
    def invoke(self, input_object: object, model: object):
        pass

The following code shows an example of using this class:

class MyInferenceSpec(InferenceSpec):
    def load(self, model_dir: str):
        return // model object

    def invoke(self, input, model):
        return model(input)

CustomPayloadTranslator

When invoking SageMaker endpoints, the data is sent through HTTP payloads with different MIME types. For example, an image sent to the endpoint for inference needs to be converted to bytes at the client side and sent through the HTTP payload to the endpoint. When the endpoint receives the payload, it needs to deserialize the byte string back to the data type that is expected by the model (also known as server-side deserialization). After the model finishes prediction, the results need to be serialized to bytes that can be sent back through the HTTP payload to the user or client. When the client receives the response byte data, it needs to perform client-side deserialization to convert the bytes data back to the expected data format, such as JSON. At a minimum, you need to convert the data for the following (as numbered in the following diagram):

  1. Inference request serialization (handled by the client)
  2. Inference request deserialization (handled by the server or algorithm)
  3. Invoking the model against the payload
  4. Sending response payload back
  5. Inference response serialization (handled by the server or algorithm)
  6. Inference response deserialization (handled by the client)

The following diagram shows the process of serialization and deserialization during the invocation process.

In the following code snippet, we show an example of CustomPayloadTranslator when additional customization is needed to handle both serialization and deserialization in the client and server side, respectively:

from sagemaker.serve import CustomPayloadTranslator

# request translator
class MyRequestTranslator(CustomPayloadTranslator):
    # This function converts the payload to bytes - happens on client side
    def serialize_payload_to_bytes(self, payload: object) -> bytes:
        # converts the input payload to bytes
        ... ...
        return  //return object as bytes
        
    # This function converts the bytes to payload - happens on server side
    def deserialize_payload_from_stream(self, stream) -> object:
        # convert bytes to in-memory object
        ... ...
        return //return in-memory object
        
# response translator 
class MyResponseTranslator(CustomPayloadTranslator):
    # This function converts the payload to bytes - happens on server side
    def serialize_payload_to_bytes(self, payload: object) -> bytes:
        # converts the response payload to bytes
        ... ...
        return //return object as bytes
    
    # This function converts the bytes to payload - happens on client side
    def deserialize_payload_from_stream(self, stream) -> object:
        # convert bytes to in-memory object
        ... ...
        return //return in-memory object

In the demo-model-builder-pytorch.ipynb notebook, we demonstrate how to easily deploy a PyTorch model to a SageMaker endpoint using ModelBuilder with the CustomPayloadTranslator and the InferenceSpec class.

Stage model for deployment

If you want to stage the model for inference or in the model registry, you can use model.create() or model.register(). The enabled model is created on the service, and then you can deploy later. See the following code:

model_builder = ModelBuilder(
    model=model,  
    schema_builder=SchemaBuilder(X_test, y_pred), 
    role_arn=execution_role, 
)
deployable_model = model_builder.build()

deployable_model.create() # deployable_model.register() for model registry

Use custom containers

SageMaker provides pre-built Docker images for its built-in algorithms and the supported deep learning frameworks used for training and inference. If a pre-built SageMaker container doesn’t fulfill all your requirements, you can extend the existing image to accommodate your needs. By extending a pre-built image, you can use the included deep learning libraries and settings without having to create an image from scratch. For more details about how to extend the pre-built containers, refer to SageMaker document. ModelBuilder supports use cases when bringing your own containers that are extended from our pre-built Docker containers.

To use your own container image in this case, you need to set the fields image_uri and model_server when defining ModelBuilder:

model_builder = ModelBuilder(
    model=model,  # Pass in the actual model object. its "predict" method will be invoked in the endpoint.
    schema_builder=SchemaBuilder(X_test, y_pred), # Pass in a "SchemaBuilder" which will use the sample test input and output objects to infer the serialization needed.
    role_arn=execution_role, 
    image_uri=image_uri, # REQUIRED FOR BYOC: Passing in image hosted in personal ECR Repo
    model_server=ModelServer.TORCHSERVE, # REQUIRED FOR BYOC: Passing in model server of choice
    mode=Mode.SAGEMAKER_ENDPOINT,
    dependencies={"auto": True, "custom": ["protobuf==3.20.2"]}
)

Here, the image_uri will be the container image ARN that is stored in your account’s Amazon Elastic Container Registry (Amazon ECR) repository. One example is shown as follows:

# Pulled the xgboost:1.7-1 DLC and pushed to personal ECR repo
image_uri = "<your_account_id>.dkr.ecr.us-west-2.amazonaws.com/my-byoc:xgb"

When the image_uri is set, during the ModelBuilder build process, it will skip auto detection of the image as the image URI is provided. If model_server is not set in ModelBuilder, you will receive a validation error message, for example:

ValueError: Model_server must be set when image_uri is set. Supported model servers: {<ModelServer.TRITON: 5>, <ModelServer.DJL_SERVING: 4>, <ModelServer.TORCHSERVE: 1>}

As of the publication of this post, ModelBuilder supports bringing your own containers that are extended from our pre-built DLC container images or containers built with the model servers like Deep Java Library (DJL), Text Generation Inference (TGI), TorchServe, and Triton inference server.

Custom dependencies

When running ModelBuilder.build(), by default it automatically captures your Python environment into a requirements.txt file and installs the same dependency in the container. However, sometimes your local Python environment will conflict with the environment in the container. ModelBuilder provides a simple way for you to modify the captured dependencies to fix such dependency conflicts by allowing you to provide your custom configurations into ModelBuilder. Note that this is only for TorchServe and Triton with InferenceSpec. For example, you can specify the input parameter dependencies, which is a Python dictionary, in ModelBuilder as follows:

dependency_config = {
   "auto" = True,
   "requirements" = "/path/to/your/requirements.txt"
   "custom" = ["module>=1.2.3,<1.5", "boto3==1.16.*", "some_module@http://some/url"]
}
  
ModelBuilder(
    # Other params
    dependencies=dependency_config,
).build()

We define the following fields:

  • auto – Whether to try to auto capture the dependencies in your environment.
  • requirements – A string of the path to your own requirements.txt file. (This is optional.)
  • custom – A list of any other custom dependencies that you want to add or modify. (This is optional.)

If the same module is specified in multiple places, custom will have highest priority, then requirements, and auto will have lowest priority. For example, let’s say that during autodetect, ModelBuilder detects numpy==1.25, and a requirements.txt file is provided that specifies numpy>=1.24,<1.26. Additionally, there is a custom dependency: custom = ["numpy==1.26.1"]. In this case, numpy==1.26.1 will be picked when we install dependencies in the container.

Clean up

When you’re done testing the models, as a best practice, delete the endpoint to save costs if the endpoint is no longer required. You can follow the Clean up section in each of the demo notebooks or use following code to delete the model and endpoint created by the demo:

predictor.delete_model()
predictor.delete_endpoint()

Conclusion

The new SageMaker ModelBuilder capability simplifies the process of deploying ML models into production on SageMaker. By handling many of the complex details behind the scenes, ModelBuilder reduces the learning curve for new users and maximizes utilization for experienced users. With just a few lines of code, you can deploy models with built-in frameworks like XGBoost, PyTorch, Triton, and Hugging Face, as well as models provided by SageMaker JumpStart into robust, scalable endpoints on SageMaker.

We encourage all SageMaker users to try out this new capability by referring to the ModelBuilder documentation page. ModelBuilder is available now to all SageMaker users at no additional charge. Take advantage of this simplified workflow to get your models deployed faster. We look forward to hearing how ModelBuilder accelerates your model development lifecycle!

Special thanks to Sirisha Upadhyayala, Raymond Liu, Gary Wang, Dhawal Patel, Deepak Garg and Ram Vegiraju.


About the authors

Melanie Li, PhD, is a Senior AI/ML Specialist TAM at AWS based in Sydney, Australia. She helps enterprise customers build solutions using state-of-the-art AI/ML tools on AWS and provides guidance on architecting and implementing ML solutions with best practices. In her spare time, she loves to explore nature and spend time with family and friends.

Marc Karp is an ML Architect with the Amazon SageMaker Service team. He focuses on helping customers design, deploy, and manage ML workloads at scale. In his spare time, he enjoys traveling and exploring new places.

Sam Edwards, is a Cloud Engineer (AI/ML) at AWS Sydney specialized in machine learning and Amazon SageMaker. He is passionate about helping customers solve issues related to machine learning workflows and creating new solutions for them. Outside of work, he enjoys playing racquet sports and traveling.

Raghu Ramesha is a Senior ML Solutions Architect with the Amazon SageMaker Service team. He focuses on helping customers build, deploy, and migrate ML production workloads to SageMaker at scale. He specializes in machine learning, AI, and computer vision domains, and holds a master’s degree in Computer Science from UT Dallas. In his free time, he enjoys traveling and photography.

Shiva Raaj Kotini works as a Principal Product Manager in the Amazon SageMaker inference product portfolio. He focuses on model deployment, performance tuning, and optimization in SageMaker for inference.

Mohan Gandhi is a Senior Software Engineer at AWS. He has been with AWS for the last 10 years and has worked on various AWS services like EMR, EFA and RDS. Currently, he is focused on improving the SageMaker Inference Experience. In his spare time, he enjoys hiking and marathons.

Read More

New – Code Editor, based on Code-OSS VS Code Open Source now available in Amazon SageMaker Studio

New – Code Editor, based on Code-OSS VS Code Open Source now available in Amazon SageMaker Studio

Today, we are excited to announce support for Code Editor, a new integrated development environment (IDE) option in Amazon SageMaker Studio. Code Editor is based on Code-OSS, Visual Studio Code Open Source, and provides access to the familiar environment and tools of the popular IDE that machine learning (ML) developers know and love, fully integrated with the broader SageMaker Studio feature set. Code Editor enables you to choose from thousands of VS Code compatible extensions available in the Open-VSX extension gallery to further enhance your teams’ development experience. You can also maximize your team’s productivity by using seamless integration to AWS services through the AWS Toolkit for Visual Studio Code, including the AWS AI-powered coding companion, Amazon CodeWhisperer.

As with all IDE applications in SageMaker Studio, ML developers and engineers can select the underlying compute on demand, and swap it based on their needs without losing data. Additionally, your teams can manage their codebase version control and collaborate across teams through native GitHub integration and reduce time-to-coding by using the most popular ML frameworks right out of the box with the pre-configured Amazon SageMaker Distribution container image.

Getting started with Code Editor on Amazon SageMaker Studio

Your IT administrator can setup a new SageMaker Studio domain or migrate an existing one to the new SageMaker Studio experience, which includes Code Editor. See Onboard to Amazon SageMaker Domain using Quick setup for more details. You can then launch Code Editor with a simple click in your Amazon SageMaker Studio environment.

  1. After the domain is setup, launch SageMaker Studio’s new experience from the console or the pre-signed URL your administrator provided. You can find the Code Editor IDE in both the Applications section in the left-side panel and the Overview section, as shown in the following screenshot:
  2. On the Code Editor details page, choose Create Code Editor Space. Then enter a name for your space and choose Create space:
  3. On the Code Editor Space details page, choose your underlying configuration, including:
    1. The underlying Amazon Elastic Compute Cloud (Amazon EC2) instance type.
    2. An Amazon Elastic Block Storage (Amazon EBS) volume size (this can range from 5GB to 16TB).
    3. The container image to use (you will have a SageMaker Distribution image for both CPU and GPU available at launch).
    4. A lifecycle configuration script to run in case you want customize your environment at app creation.
    5. A shared Amazon Elastic File System (Amazon EFS) to mount in your Code Editor space (this needs to be configured by your administrator when provisioning your domain).
  4. After providing your space configuration details, choose Run space to provision your space resources.

If you have chosen a fast-launch instance with the default SageMaker Distribution as image, your Code Editor space will be available in less than a minute. If you have added lifecycle configurations to the space, then it might take additional time to install dependencies from that script.

After your resources are provisioned, the space details page will show an Open Code Editor button.

  1. Choose Open CodeEditor to launch the IDE.

The code editor IDE will launch in a new browser tab.

Code Editor features

Code Editor comes with a unique set of features to increase the productivity of your ML team:

  1. Fully managed infrastructure – The Code Editor IDE runs on fully managed infrastructure. Amazon SageMaker takes care of keeping the instances up-to date with the latest security patches and upgrades.
  2. Dial resources up and down – With Code Editor, you can seamlessly change the underlying resources (e.g., instance type, EBS volume size) on which Code Editor is running. This is beneficial for developers who want to run workloads with changing compute, memory and storage needs.
  3. SageMaker provided images – Code Editor is preconfigured with the SageMaker Distribution as the default image. This container image has all the most popular ML frameworks supported by SageMaker, along with SageMaker Python SDK, boto3, and other AWS and data science specific libraries installed. This significantly reduces the time you spend setting up your environment and decreases the complexity of managing package dependencies in your ML project.
  4. Amazon CodeWhisperer integration – Code Editor also comes with generative AI capabilities powered by Amazon CodeWhisperer. This native integration enables you to boost your productivity by generating code suggestions within the IDE.
  5. Integration with other AWS services – You get native integration with Amazon Simple Storage Service (S3) buckets, Amazon Elastic Container Registry (ECR) repositories, Amazon RedShift, Amazon CloudWatch, and more via the AWS Toolkit for VS Code which simplifies development in cloud.

Architecture details

When launching Code Editor in SageMaker Studio, you’re creating a new application that runs as a container in an EC2 instance of the type you selected when configuring your Code Editor space. SageMaker Studio handles the provisioning of underlying resources for you in a service managed account. The following diagram depicts a simplified version of the Code Editor IDE application architecture:

For a given user profile, you can launch multiple Code Editor spaces, with a variety of ML instance types (including accelerated computing instances). Each space defines the attached EBS volume size, the instance type and the type of application to run in the space (for example, Code Editor). When users run the space, the underlying EC2 instance is provisioned and a SageMaker Studio Code Editor app is instantiated, based on the selected container image. The EBS volume is persisted across Start/Stop cycles of the IDE app. If users stop the Code Editor app (for example, to save on compute costs), the compute resources are stopped but the EBS volume is preserved and re-attached to the instance at restart.

All Code Editor applications run isolated; if you need to share data across applications, you can attach a shared Amazon Elastic File System (EFS) drive.

In order for your Code Editor IDE to use the pre-installed AWS Toolkit extension for VS Code and use integrated AWS services such as Amazon CodeWhisperer or data sources such as Amazon S3 and Amazon Redshift you have to make sure that:

  • Your SageMaker Studio user profile’s execution role has appropriate permissions to use the services you want to work with.
  • You have a way to communicate to those services in case you have a VPC-only mode SageMaker Studio domain. For more details on the requirements to use AWS services in a VPC-only mode Studio domain, refer to Connect SageMaker Studio Notebooks in a VPC to External Resources.

Solution overview

In the following sections, we share how you can develop an example ML project with Code Editor on Amazon SageMaker Studio. We will deploy a Mistral-7B large language model (LLM) model into an Amazon SageMaker real-time endpoint using a built-in container from HuggingFace. In this example, Code Editor can be used by an ML engineering team who needs advanced IDE features to debug their code and deploy the endpoint. You can find the sample code in this GitHub repo. We show how you can structure your code for easy collaboration between team members, how you can use the AWS Toolkit for VS Code and Amazon Code Whisperer to speed up your development, and how to deploy the Mistral-7B model on a SageMaker endpoint. Let’s walk through some of the common developer tasks in the IDE.

Interacting with AWS services directly from your IDE

Out of the box, Code Editor comes with the AWS Toolkit for Visual Studio Code to provide you with an integrated experience to other AWS services during your project. Based on your SageMaker Studio user profile AWS Identity and Access Management (IAM) permission, you can interact with data in your Amazon S3 buckets, find container images in Amazon ECR, visualize Amazon CloudWatch logs for your SageMaker endpoint, and take advantage of other features to run your end-to-end ML project from your IDE.

Structure your code repository for effortless collaboration

You can structure your project repository to maximize the productivity of your team. For example, you can setup a single repository, aiming to strike a balance between common Python project conventions and your team collaboration needs.

Your code repository can contain a .vscode folder with all the necessary files for standardizing dependencies, extensions, and configurations across the different team members. Refer to the following animation for reference.

You can share dependencies across team members through a requirements.txt file. You can also specify a config.yaml file to share the launch primitives for your SageMaker endpoint. Your Code Editor session will share the same dependencies and config as your team members, and allow you to quickly develop and debug you inference code and endpoint

Develop and debug your code in the IDE

In the following example, we show how you can develop and debug your inference.py script that will be used in your SageMaker endpoint:

Generate code and test cases with Amazon CodeWhisperer

As part of the AWS Toolkit in your Code Editor, Amazon CodeWhisperer allows you to build faster and more securely with an AI coding companion. It can provide you with real-time code suggestions, is optimized for use with AWS services, and comes with built-in security scanning. In our example we use Amazon CodeWhisperer to generate whole line and full function code to deploy and test your SageMaker endpoint

Deploying your LLM into a SageMaker endpoint

You can deploy your model to a SageMaker endpoint from your IDE and monitor its status directly from SageMaker Studio.

As you scale your ML project into a production-ready application, Code Editor and the AWS Toolkit will allow you to manage and monitor your LLM application’s resources as you build, deploy, and run it.

Conclusion

Code Editor is available in all AWS Regions where Amazon SageMaker Studio is available (except GovCloud), and you only pay for the underlying compute and storage resources within SageMaker or other AWS services, based on your usage.

To get started with Code Editor on Amazon SageMaker Studio, you can use the AWS Free Tier, with 250 hours of ml.t3.medium instance on Amazon SageMaker Studio per month for the first 2 months. For more details, refer to Amazon SageMaker Pricing.


About the Authors

Eric Peña is a Senior Technical Product Manager in the AWS Artificial Intelligence Platforms team, working on Amazon SageMaker Interactive Machine Learning. He currently focuses on IDE integrations on SageMaker Studio. He holds an MBA degree from MIT Sloan and outside of work enjoys playing basketball and football.

Vikesh Pandey is a Machine Learning Specialist Solutions Architect at AWS, helping customers from financial industries design and build solutions on generative AI and ML. Outside of work, Vikesh enjoys trying out different cuisines and playing outdoor sports.

Bruno Pistone is an AI/ML Specialist Solutions Architect for AWS based in Milan. He works with large customers helping them to deeply understand their technical needs and design AI and Machine Learning solutions that make the best use of the AWS Cloud and the Amazon Machine Learning stack. His expertise include: Machine Learning end to end, Machine Learning Industrialization, and Generative AI. He enjoys spending time with his friends and exploring new places, as well as travelling to new destinations.

Giuseppe Angelo Porcelli is a Principal Machine Learning Specialist Solutions Architect for Amazon Web Services. With several years software engineering and an ML background, he works with customers of any size to understand their business and technical needs and design AI and ML solutions that make the best use of the AWS Cloud and the Amazon Machine Learning stack. He has worked on projects in different domains, including MLOps, computer vision, and NLP, involving a broad set of AWS services. In his free time, Giuseppe enjoys playing football.

Sofian Hamiti is an AI/ML specialist Solutions Architect at AWS. He helps customers across industries accelerate their AI/ML journey by helping them build and operationalize end-to-end machine learning solutions.

Read More

Scale foundation model inference to hundreds of models with Amazon SageMaker – Part 1

Scale foundation model inference to hundreds of models with Amazon SageMaker – Part 1

As democratization of foundation models (FMs) becomes more prevalent and demand for AI-augmented services increases, software as a service (SaaS) providers are looking to use machine learning (ML) platforms that support multiple tenants—for data scientists internal to their organization and external customers. More and more companies are realizing the value of using FMs to generate highly personalized and effective content for their customers. Fine-tuning FMs on your own data can significantly boost model accuracy for your specific use case, whether it be sales email generation using page visit context, generating search answers tailored to a company’s services, or automating customer support by training on historical conversations.

Providing generative AI model hosting as a service enables any organization to easily integrate, pilot test, and deploy FMs at scale in a cost-effective manner, without needing in-house AI expertise. This allows companies to experiment with AI use cases like hyper-personalized sales and marketing content, intelligent search, and customized customer service workflows. By using hosted generative models fine-tuned on trusted customer data, businesses can deliver the next level of personalized and effective AI applications to better engage and serve their customers.

Amazon SageMaker offers different ML inference options, including real-time, asynchronous, and batch transform. This post focuses on providing prescriptive guidance on hosting FMs cost-effectively at scale. Specifically, we discuss the quick and responsive world of real-time inference, exploring different options for real-time inference for FMs.

For inference, multi-tenant AI/ML architectures need to consider the requirements for data and models, as well as the compute resources that are required to perform inference from these models. It’s important to consider how multi-tenant AI/ML models are deployed—ideally, in order to optimally utilize CPUs and GPUs, you have to be able to architect an inferencing solution that can enhance serving throughput and reduce cost by ensuring that models are distributed across the compute infrastructure in an efficient manner. In addition, customers are looking for solutions that help them deploy a best-practice inferencing architecture without needing to build everything from scratch.

SageMaker Inference is a fully managed ML hosting service. It supports building generative AI applications while meeting regulatory standards like FedRAMP. SageMaker enables cost-efficient scaling for high-throughput inference workloads. It supports diverse workloads including real-time, asynchronous, and batch inferences on hardware like AWS Inferentia, AWS Graviton, NVIDIA GPUs, and Intel CPUs. SageMaker gives you full control over optimizations, workload isolation, and containerization. It enables you to build generative AI as a service solution at scale with support for multi-model and multi-container deployments.

Challenges of hosting foundation models at scale

The following are some of the challenges in hosting FMs for inference at scale:

  • Large memory footprint – FMs with tens or hundreds of billions of model parameters often exceed the memory capacity of a single accelerator chip.
  • Transformers are slow – Autoregressive decoding in FMs, especially with long input and output sequences, exacerbates memory I/O operations. This culminates in unacceptable latency periods, adversely affecting real-time inference.
  • Cost – FMs necessitate ML accelerators that provide both high memory and high computational power. Achieving high throughput and low latency without sacrificing either is a specialized task, requiring a deep understanding of hardware-software acceleration co-optimization.
  • Longer time-to-market – Optimal performance from FMs demands rigorous tuning. This specialized tuning process, coupled with the complexities of infrastructure management, results in elongated time-to-market cycles.
  • Workload isolation – Hosting FMs at scale introduces challenges in minimizing the blast-radius and handling noisy neighbors. The ability to scale each FM in response to model-specific traffic patterns requires heavy lifting.
  • Scaling to hundreds of FMs – Operating hundreds of FMs simultaneously introduces substantial operational overhead. Effective endpoint management, appropriate slicing and accelerator allocation, and model-specific scaling are tasks that compound in complexity as more models are deployed.

Fitness functions

Deciding on the right hosting option is important because it impacts the end-users rendered by your applications. For this purpose, we’re borrowing the concept of fitness functions, which was coined by Neal Ford and his colleagues from AWS Partner Thought Works in their work Building Evolutionary Architectures. Fitness functions provide a prescriptive assessment of various hosting options based on your objectives. Fitness functions help you obtain the necessary data to allow for the planned evolution of your architecture. They set measurable values to assess how close your solution is to achieving your set goals. Fitness functions can and should be adapted as the architecture evolves to guide a desired change process. This provides architects with a tool to guide their teams while maintaining team autonomy.

We propose considering the following fitness functions when it comes to selecting the right FM inference option at scale and cost-effectively:

  • Foundation model size – FMs are based on transformers. Transformers are slow and memory-hungry on generating long text sequences due to the sheer size of the models. Large language models (LLMs) are a type of FM that, when used to generate text sequences, need immense amounts of computing power and have difficulty accessing the available high bandwidth memory (HBM) and compute capacity. This is because a large portion of the available memory bandwidth is consumed by loading the model’s parameters and by the auto-regressive decoding process. As a result, even with massive amounts of compute power, FMs are limited by memory I/O and computation limits. Therefore, model size determines a lot of decisions, such as whether the model will fit on a single accelerator or require multiple ML accelerators using model sharding on the instance to run the inference at a higher throughput. Models with more than 3 billion parameters will generally start requiring multiple ML accelerators because the model might not fit into a single accelerator device.
  • Performance and FM inference latency – Many ML models and applications are latency critical, in which the inference latency must be within the bounds specified by a service-level objective. FM inference latency depends on a multitude of factors, including:
    • FM model size – Model size, including quantization at runtime.
    • Hardware – Compute (TFLOPS), HBM size and bandwidth, network bandwidth, intra-instance interconnect speed, and storage bandwidth.
    • Software environment – Model server, model parallel library, model optimization engine, collective communication performance, model network architecture, quantization, and ML framework.
    • Prompt – Input and output length and hyperparameters.
    • Scaling latency – Time to scale in response to traffic.
    • Cold start latency – Features like pre-warming the model load can reduce the cold start latency in loading the FM.
  • Workload isolation – This refers to workload isolation requirements from a regulatory and compliance perspective, including protecting confidentiality and integrity of AI models and algorithms, confidentiality of data during AI inference, and protecting AI intellectual property (IP) from unauthorized access or from a risk management perspective. For example, you can reduce the impact of a security event by purposefully reducing the blast-radius or by preventing noisy neighbors.
  • Cost-efficiency – To deploy and maintain an FM model and ML application on a scalable framework is a critical business process, and the costs may vary greatly depending on choices made about model hosting infrastructure, hosting option, ML frameworks, ML model characteristics, optimizations, scaling policy, and more. The workloads must utilize the hardware infrastructure optimally to ensure that the cost remains in check. This fitness function specifically refers to the infrastructure cost, which is part of the overall total cost of ownership (TCO). The infrastructure costs are the combined costs for storage, network, and compute. It’s also critical to understand other components of TCO, including operational costs and security and compliance costs. Operational costs are the combined costs of operating, monitoring, and maintaining the ML infrastructure. The operational costs are calculated as the number of engineers required based on each scenario and the annual salary of engineers, aggregated over a specific period. They automatically scale to zero per model when there’s no traffic to save costs.
  • Scalability – This includes:
    • Operational overhead in managing hundreds of FMs for inference in a multi-tenant platform.
    • The ability to pack multiple FMs in a single endpoint and scale per model.
    • Enabling instance-level and model container-level scaling based on workload patterns.
    • Support for scaling to hundreds of FMs per endpoint.
    • Support for the initial placement of the models in the fleet and handling insufficient accelerators.

Representing the dimensions in fitness functions

We use a spider chart, also sometimes called a radar chart, to represent the dimensions in the fitness functions. A spider chart is often used when you want to display data across several unique dimensions. These dimensions are usually quantitative, and typically range from zero to a maximum value. Each dimension’s range is normalized to one another, so that when we draw our spider chart, the length of a line from zero to a dimension’s maximum value will be the same for every dimension.

The following chart illustrates the decision-making process involved when choosing your architecture on SageMaker. Each radius on the spider chart is one of the fitness functions that you will prioritize when you build your inference solution.

Ideally, you’d like a shape that is equilateral across all sides (a pentagon). That shows that you are able to optimize across all fitness functions. But the reality is that it will be challenging to achieve that shape—as you prioritize one fitness function, it will affect the lines for the other radius. This means there will always be trade-offs depending on what is most important for your generative AI application, and you’ll have a graph that will be skewed towards a specific radius. This is the criteria that you may be willing to de-prioritize in favor of the others depending on how you view each function. In our chart, each fitness function’s metric weight is defined as such—the lower the value, the less optimal it is for that fitness function (with the exception of model size, in which case the higher the value, the larger the size of the model).

For example, let’s take a use case where you would like to use a large summarization model (such as Anthropic Claude) to create work summaries of service cases and customer engagements based on case data and customer history. We have the following spider chart.

Because this may involve sensitive customer data, you’re choosing to isolate this workload from other models and host it on a single-model endpoint, which can make it challenging to scale because you have to spin up and manage separate endpoints for each FM. The generative AI application you’re using the model with is being used by service agents in real time, so latency and throughput are a priority, hence the need to use larger instance types, such as a P4De. In this situation, the cost may have to be higher because the priority is isolation, latency, and throughput.

Another use case would be a service organization building a Q&A chatbot application that is customized for a large number of customers. The following spider chart reflects their priorities.

Each chatbot experience may need to be tailored to each specific customer. The models being used may be relatively smaller (FLAN-T5-XXL, Llama 7B, and k-NN), and each chatbot operates at a designated set of hours for different time zones each day. The solution may also have Retrieval Augmented Generation (RAG) incorporated with a database containing all the knowledge base items to be used with inference in real time. There isn’t any customer-specific data being exchanged through this chatbot. Cold start latencies are tolerable because the chatbots operate on a defined schedule. For this use case, you can choose a multi-model endpoint architecture, and may be able minimize cost by using smaller instance types (like a G5) and potentially reduce operational overhead by hosting multiple models on each endpoint at scale. With the exception of workload isolation, fitness functions in this use case may have more of an even priority, and trade-offs are minimized to an extent.

One final example would be an image generation application using a model like Stable Diffusion 2.0, which is a 3.5-billion-parameter model. Our spider chart is as follows.

This is a subscription-based application serving thousands of FMs and customers. The response time needs to be quick because each customer expects a fast turnaround of image outputs. Throughput is critical as well because there will be hundreds of thousands of requests at any given second, so the instance type will have to be a larger instance type, like a P4D that has enough GPU and memory. For this you can consider building a multi-container endpoint hosting multiple copies of the model to denoise image generation from one request set to another. For this use case, in order to prioritize latency and throughput and accommodate user demand, cost of compute and workload isolation will be the trade-offs.

Applying fitness functions to selecting the FM hosting option

In this section, we show you how to apply the preceding fitness functions in selecting the right FM hosting option on SageMaker FMs at scale.

SageMaker single-model endpoints

SageMaker single-model endpoints allow you to host one FM on a container hosted on dedicated instances for low latency and high throughput. These endpoints are fully managed and support auto scaling. You can configure the single-model endpoint as a provisioned endpoint where you pass in endpoint infrastructure configuration such as the instance type and count, where SageMaker automatically launches compute resources and scales them in and out depending on the auto scaling policy. You can scale to hosting hundreds of models using multiple single-model endpoints and employ a cell-based architecture for increased resiliency and reduced blast-radius.

When evaluating fitness functions for a provisioned single-model endpoint, consider the following:

  • Foundation model size – This is suitable if you have models that can’t fit into single ML accelerator’s memory and therefore need multiple accelerators in an instance.
  • Performance and FM inference latency – This is relevant for latency-critical generative AI applications.
  • Workload isolation – Your application may need Amazon Elastic Compute Cloud (Amazon EC2) instance-level isolation due to security compliance reasons. Each FM will get a separate inference endpoint and won’t share the EC2 instance with another other model. For example, you can isolate a HIPAA-related model inference workload (such as a PHI detection model) in a separate endpoint with a dedicated security group configuration with network isolation. You can isolate your GPU-based model inference workload from others based on Nitro-based EC2 instances like p4dn in order to isolate them from less trusted workloads. The Nitro System-based EC2 instances provide a unique approach to virtualization and isolation, enabling you to secure and isolate sensitive data processing from AWS operators and software at all times. It provides the most important dimension of confidential computing as an intrinsic, on-by-default set of protections from the system software and cloud operators. This option also supports deploying AWS Marketplace models provided by third-party model providers on SageMaker.

SageMaker multi-model endpoints

SageMaker multi-model endpoints (MMEs) allow you to co-host multiple models on a GPU core, share GPU instances behind an endpoint across multiple models, and dynamically load and unload models based on the incoming traffic. With this, you can significantly save cost and achieve the best price-performance.

MMEs are the best choice if you need to host smaller models that can all fit into a single ML accelerator on an instance. This strategy should be considered if you have a large number (up to thousands) of similar sized (fewer than 1 billion parameters) models that you can serve through a shared container within an instance and don’t need to access all the models at the same time. You can load the model that needs to be used and then unload it for a different model.

MMEs are also designed for co-hosting models that use the same ML framework because they use the shared container to load multiple models. Therefore, if you have a mix of ML frameworks in your model fleet (such as PyTorch and TensorFlow), a SageMaker endpoint with InferenceComponents is a better choice. We discuss InferenceComponents more later in this post.

Finally, MMEs are suitable for applications that can tolerate an occasional cold start latency penalty because infrequently used models can be off-loaded in favor of frequently invoked models. If you have a long tail of infrequently accessed models, a multi-model endpoint can efficiently serve this traffic and enable significant cost savings.

Consider the following when assessing when to use MMEs:

  • Foundation model size – You may have models that fit into single ML accelerator’s HBM on an instance and therefore don’t need multiple accelerators.
  • Performance and FM inference latency – You may have generative AI applications that can tolerate cold start latency when the model is requested and is not in the memory.
  • Workload isolation – Consider having all the models share the same container.
  • Scalability – Consider the following:
    • You can pack multiple models in a single endpoint and scale per model and ML instance.
    • You can enable instance-level auto scaling based on workload patterns.
    • MMEs support scaling to thousands of models per endpoint. You don’t need to maintain per-model auto scaling and deployment configuration.
    • You can use hot deployment whenever the model is requested by the inference request.
    • You can load the models dynamically as per the inference request and unload in response to memory pressure.
    • You can time share the underlying the resources with the models.
  • Cost-efficiency – Consider time sharing the resource across the models by dynamic loading and unloading of the models, resulting in cost savings.

SageMaker inference endpoint with InferenceComponents

The new SageMaker inference endpoint with InferenceComponents provides a scalable approach to hosting multiple FMs in a single endpoint and scaling per model. It provides you with fine-grained control to allocate resources (accelerators, memory, CPU) and set auto scaling policies on a per-model basis to get assured throughput and predictable performance, and you can manage the utilization of compute across multiple models individually. If you have a lot of models of varying sizes and traffic patterns that you need to host, and the model sizes don’t allow them to fit in a single accelerator’s memory, this is the best option. It also allows you to scale to zero to save costs, but your application latency requirements need to be flexible enough to account for a cold start time for models. This option allows you the most flexibility in utilizing your compute as long as container-level isolation per customer or FM is sufficient. For more details on the new SageMaker endpoint with InferenceComponents, refer to the detailed post Reduce model deployment costs by 50% on average using the latest features of Amazon SageMaker.

Consider the following when determining when you should use an endpoint with InferenceComponents:

  • Foundation model size – This is suitable for models that can’t fit into single ML accelerator’s memory and therefore need multiple accelerators in an instance.
  • Performance and FM inference latency – This is suitable for latency-critical generative AI applications.
  • Workload isolation – You may have applications where container-level isolation is sufficient.
  • Scalability – Consider the following:
    • You can pack multiple FMs in a single endpoint and scale per model.
    • You can enable instance-level and model container-level scaling based on workload patterns.
    • This method supports scaling to hundreds of FMs per endpoint. You don’t need to configure the auto scaling policy for each model or container.
    • It supports the initial placement of the models in the fleet and handling insufficient accelerators.
  • Cost-efficiency – You can scale to zero per model when there is no traffic to save costs.

Packing multiple FMs on same endpoint: Model grouping

Determining what inference architecture strategy you employ on SageMaker depends on your application priorities and requirements. Some SaaS providers are selling into regulated environments that impose strict isolation requirements—they need to have an option that enables them to offer to some or all of their FMs the option of being deployed in a dedicated model. But in order to optimize costs and gain economies of scale, SaaS providers need to also have multi-tenant environments where they host multiple FMs across a shared set of SageMaker resources. Most organizations will probably have a hybrid hosting environment where they have both single-model endpoints and multi-model or multi-container endpoints as part of their SageMaker architecture.

A critical exercise you will need to perform when architecting this distributed inference environment is to group your models for each type of architecture, you’ll need to set up in your SageMaker endpoints. The first decision you’ll have to make is around workload isolation requirements—you will need to isolate the FMs that need to be in their own dedicated endpoints, whether it’s for security reasons, reducing the blast-radius and noisy neighbor risk, or meeting strict SLAs for latency.

Secondly, you’ll need to determine whether the FMs fit into a single ML accelerator or require multiple accelerators, what the model sizes are, and what their traffic patterns are. Similar sized models that collectively serve to support a central function could logically be grouped together by co-hosting multiple models on an endpoint, because these would be part of a single business application that is managed by a central team. For co-hosting multiple models on the same endpoint, a grouping exercise needs to be performed to determine which models can sit in a single instance, a single container, or multiple containers.

Grouping the models for MMEs

MMEs are best suited for smaller models (fewer than 1 billion parameters that can fit into single accelerator) and are of similar in size and invocation latencies. Some variation in model size is acceptable; for example, Zendesk’s models range from 10–50 MB, which works fine, but variations in size that are a factor of 10, 50, or 100 times greater aren’t suitable. Larger models may cause a higher number of loads and unloads of smaller models to accommodate sufficient memory space, which can result in added latency on the endpoint. Differences in performance characteristics of larger models could also consume resources like CPU unevenly, which could impact other models on the instance.

The models that are grouped together on the MME need to have staggered traffic patterns to allow you to share compute across the models for inference. Your access patterns and inference latency also need to allow for some cold start time as you switch between models.

The following are some of the recommended criteria for grouping the models for MMEs:

  • Smaller models – Use models with fewer than 1 billion parameters
  • Model size – Group similar sized models and co-host into the same endpoint
  • Invocation latency – Group models with similar invocation latency requirements that can tolerate cold starts
  • Hardware – Group the models using the same underlying EC2 instance type

Grouping the models for an endpoint with InferenceComponents

A SageMaker endpoint with InferenceComponents is best suited for hosting larger FMs (over 1 billion parameters) at scale that require multiple ML accelerators or devices in an EC2 instance. This option is suited for latency-sensitive workloads and applications where container-level isolation is sufficient. The following are some of the recommended criteria for grouping the models for an endpoint with multiple InferenceComponents:

  • Hardware – Group the models using the same underlying EC2 instance type
  • Model size – Grouping the model based on model size is recommended but not mandatory

Summary

In this post, we looked at three real-time ML inference options (single endpoints, multi-model endpoints, and endpoints with InferenceComponents) in SageMaker to efficiently host FMs at scale cost-effectively. You can use the five fitness functions to help you choose the right SageMaker hosting option for FMs at scale. Group the FMs and co-host them on SageMaker inference endpoints using the recommended grouping criteria. In addition to the fitness functions we discussed, you can use the following table to decide which shared SageMaker hosting option is best for your use case. You can find code samples for each of the FM hosting options on SageMaker in the following GitHub repos: single SageMaker endpoint, multi-model endpoint, and InferenceComponents endpoint.

. Single-Model Endpoint Multi-Model Endpoint Endpoint with InferenceComponents
Model lifecycle API for management Dynamic through Amazon S3 path API for management
Instance types supported CPU, single and multi GPU, AWS Inferentia based Instances CPU, single GPU based instances CPU, single and multi GPU, AWS Inferentia based Instances
Metric granularity Endpoint Endpoint Endpoint and container
Scaling granularity ML instance ML instance Container
Scaling behavior Independent ML instance scaling Models are loaded and unloaded from memory Independent container scaling
Model pinning . Models can be unloaded based on memory Each container can be configured to be always loaded or unloaded
Container requirements SageMaker pre-built, SageMaker-compatible Bring Your Own Container (BYOC) MMS, Triton, BYOC with MME contracts SageMaker pre-built, SageMaker compatible BYOC
Routing options Random or least connection Random, sticky with popularity window Random or least connection
Hardware allocation for model Dedicated to single model Shared Dedicated for each container
Number of models supported Single Thousands Hundreds
Response streaming Supported Not supported Supported
Data capture Supported Not supported Not supported
Shadow testing Supported Not supported Not supported
Multi-variants Supported Not applicable Not supported
AWS Marketplace models Supported Not applicable Not supported

About the authors

Mehran Najafi, PhD, is a Senior Solutions Architect for AWS focused on AI/ML and SaaS solutions at Scale.

Dhawal Patel is a Principal Machine Learning Architect at AWS. He has worked with organizations ranging from large enterprises to mid-sized startups on problems related to distributed computing, and Artificial Intelligence. He focuses on Deep learning including NLP and Computer Vision domains. He helps customers achieve high performance model inference on SageMaker.

Rielah DeJesus is a Principal Solutions Architect at AWS who has successfully helped various enterprise customers in the DC, Maryland, and Virginia area move to the cloud. A customer advocate and technical advisor, she helps organizations like Heroku/Salesforce achieve success on the AWS platform. She is a staunch supporter of Women in IT and very passionate about finding ways to creatively use technology and data to solve everyday challenges.

Read More

Reduce model deployment costs by 50% on average using the latest features of Amazon SageMaker

Reduce model deployment costs by 50% on average using the latest features of Amazon SageMaker

As organizations deploy models to production, they are constantly looking for ways to optimize the performance of their foundation models (FMs) running on the latest accelerators, such as AWS Inferentia and GPUs, so they can reduce their costs and decrease response latency to provide the best experience to end-users. However, some FMs don’t fully utilize the accelerators available with the instances they’re deployed on, leading to an inefficient use of hardware resources. Some organizations deploy multiple FMs to the same instance to better utilize all of the available accelerators, but this requires complex infrastructure orchestration that is time consuming and difficult to manage. When multiple FMs share the same instance, each FM has its own scaling needs and usage patterns, making it challenging to predict when you need to add or remove instances. For example, one model may be used to power a user application where usage can spike during certain hours, whereas another model may have a more consistent usage pattern. In addition to optimizing costs, customers want to provide the best end-user experience by reducing latency. To do this, they often deploy multiple copies of a FM to field requests from users in parallel. Because FM outputs could range from a single sentence to multiple paragraphs, the time it takes to complete the inference request varies significantly, leading to unpredictable spikes in latency if the requests are routed randomly between instances. Amazon SageMaker now supports new inference capabilities that help you reduce deployment costs and latency.

You can now create inference component-based endpoints and deploy machine learning (ML) models to a SageMaker endpoint. An inference component (IC) abstracts your ML model and enables you to assign CPUs, GPU, or AWS Neuron accelerators, and scaling policies per model. Inference components offer the following benefits:

  • SageMaker will optimally place and pack models onto ML instances to maximize utilization, leading to cost savings.
  • SageMaker will scale each model up and down based on your configuration to meet your ML application requirements.
  • SageMaker will scale to add and remove instances dynamically to ensure capacity is available while keeping idle compute to a minimum.
  • You can scale down to zero copies of a model to free up resources for other models. You can also specify to keep important models always loaded and ready to serve traffic.

With these capabilities, you can reduce model deployment costs by 50% on average. The cost savings will vary depending on your workload and traffic patterns. Let’s take a simple example to illustrate how packing multiple models on a single endpoint can maximize utilization and save costs. Let’s say you have a chat application that helps tourists understand local customs and best practices built using two variants of Llama 2: one fine-tuned for European visitors and the other fine-tuned for American visitors. We expect traffic for the European model between 00:01–11:59 UTC and the American model between 12:00–23:59 UTC. Instead of deploying these models on their own dedicated instances where they will sit idle half the time, you can now deploy them on a single endpoint to save costs. You can scale down the American model to zero when it isn’t needed to free up capacity for the European model and vice versa. This allows you to utilize your hardware efficiently and avoid waste. This is a simple example using two models, but you can easily extend this idea to pack hundreds of models onto a single endpoint that automatically scales up and down with your workload.

In this post, we show you the new capabilities of IC-based SageMaker endpoints. We also walk you through deploying multiple models using inference components and APIs. Lastly, we detail some of the new observability capabilities and how to set up auto scaling policies for your models and manage instance scaling for your endpoints. You can also deploy models through our new simplified, interactive user experience. We also support advanced routing capabilities to optimize the latency and performance of your inference workloads.

Building blocks

Let’s take a deeper look and understand how these new capabilities work. The following is some new terminology for SageMaker hosting:

  • Inference component – A SageMaker hosting object that you can use to deploy a model to an endpoint. You can create an inference component by supplying the following:
    • The SageMaker model or specification of a SageMaker-compatible image and model artifacts.
    • Compute resource requirements, which specify the needs of each copy of your model, including CPU cores, host memory, and number of accelerators.
  • Model copy – A runtime copy of an inference component that is capable of serving requests.
  • Managed instance auto scaling – A SageMaker hosting capability to scale up or down the number of compute instances used for an endpoint. Instance scaling reacts to the scaling of inference components.

To create a new inference component, you can specify a container image and a model artifact, or you can use SageMaker models that you may have already created. You also need to specify the compute resource requirements such as the number of host CPU cores, host memory, or the number of accelerators your model needs to run.

When you deploy an inference component, you can specify MinCopies to ensure that the model is already loaded in the quantity that you require, ready to serve requests.

You also have the option to set your policies so that inference component copies scale to zero. For example, if you have no load running against an IC, the model copy will be unloaded. This can free up resources that can be replaced by active workloads to optimize the utilization and efficiency of your endpoint.

As inference requests increase or decrease, the number of copies of your ICs can also scale up or down based on your auto scaling policies. SageMaker will handle the placement to optimize the packing of your models for availability and cost.

In addition, if you enable managed instance auto scaling, SageMaker will scale compute instances according to the number of inference components that need to be loaded at a given time to serve traffic. SageMaker will scale up the instances and pack your instances and inference components to optimize for cost while preserving model performance. Although we recommend the use of managed instance scaling, you also have the option to manage the scaling yourself, should you choose to, through application auto scaling.

SageMaker will rebalance inference components and scale down the instances if they are no longer needed by inference components and save your costs.

Walkthrough of APIs

SageMaker has introduced a new entity called the InferenceComponent. This decouples the details of hosting the ML model from the endpoint itself. The InferenceComponent allows you to specify key properties for hosting the model like the SageMaker model you want to use or the container details and model artifacts. You also specify number of copies of the components itself to deploy, and number of accelerators (GPUs, Inf, or Trn accelerators) or CPU (vCPUs) required. This provides more flexibility for you to use a single endpoint for any number of models you plan to deploy to it in the future.

Let’s look at the Boto3 API calls to create an endpoint with an inference component. Note that there are some parameters that we address later in this post.

The following is example code for CreateEndpointConfig:

sagemaker_client.create_endpoint_config(
    EndpointConfigName=endpoint_config_name,
    ExecutionRoleArn=role,
    ProductionVariants=[{
        "VariantName": variant_name,
        "InstanceType": instance_type,
        "InitialInstanceCount": initial_instance_count,
        "ModelDataDownloadTimeoutInSeconds": model_data_download_timeout_in_seconds,
        "ContainerStartupHealthCheckTimeoutInSeconds": container_startup_health_check_timeout_in_seconds,
        {"ManagedInstanceScaling": {
            "Status": "ENABLED",
            "MinInstanceCount": initial_instance_count,
            "MaxInstanceCount": max_instance_count,
            }
        },
    }],
)

The following is example code for CreateEndpoint:

sagemaker_client.create_endpoint(
    EndpointName=endpoint_name,
    EndpointConfigName=endpoint_config_name,
)

The following is example code for CreateInferenceComponent:

sm_client.create_inference_component(
    InferenceComponentName=inference_component_name,
    EndpointName=endpoint_name,
    VariantName=variant_name,
    Specification={
        "Container": {
            "Image": inference_image_uri,
            "ArtifactUrl": s3_code_artifact,
        },
        "StartupParameters": {
            "ModelDataDownloadTimeoutInSeconds": 300,
            "ContainerStartupHealthCheckTimeoutInSeconds": 600,
        },
        "ComputeResourceRequirements": {"NumberOfAcceleratorDevicesRequired": 1, "MinMemoryRequiredInMb": 1024}
    },
    RuntimeConfig={"CopyCount": 1},
)

This decoupling of InferenceComponent to an endpoint provides flexibility. You can host multiple models on the same infrastructure, adding or removing them as your requirements change. Each model can be updated independently as needed. Additionally, you can scale models according to your business needs. InferenceComponent also allows you to control capacity per model. In other words, you can determine how many copies of each model to host. This predictable scaling helps you meet the specific latency requirements for each model. Overall, InferenceComponent gives you much more control over your hosted models.

In the following table, we show a side-by-side comparison of the high-level approach to creating and invoking an endpoint without InferenceComponent and with InferenceComponent. Note that CreateModel() is now optional for IC-based endpoints.

Step Model-Based Endpoints Inference Component-Based Endpoints
1 CreateModel(…) CreateEndpointConfig(…)
2 CreateEndpointConfig(…) CreateEndpoint(…)
3 CreateEndpoint(…) CreateInferenceComponent(…)
4 InvokeEndpoint(…) InvokeEndpoint(InferneceComponentName=’value’…)

The introduction of InferenceComponent allows you to scale at a model level. See Delve into instance and IC auto scaling for more details on how InferenceComponent works with auto scaling.

When invoking the SageMaker endpoint, you can now specify the new parameter InferenceComponentName to hit the desired InferenceComponentName. SageMaker will handle routing the request to the instance hosting the requested InferenceComponentName. See the following code:

smr_client = boto3.client("sagemaker-runtime") 
response_model = smr_client.invoke_endpoint( 
    InferenceComponentName=inference_component_name,
    EndpointName=endpoint_name, 
    Body=payload, 
    ContentType="application/json", )

By default, SageMaker uses random routing of the requests to the instances backing your endpoint. If you want to enable least outstanding requests routing, you can set the routing strategy in the endpoint config’s RoutingConfig:

sm_client.create_endpoint_config(
    EndpointConfigName=endpoint_config_name,
    ExecutionRoleArn=role,
    ProductionVariants=[{
        "VariantName": variant_name,
        "InstanceType": instance_type,
        "InitialInstanceCount": initial_instance_count,
        ...
        'RoutingConfig': {
                'RoutingStrategy': 'LEAST_OUTSTANDING_REQUESTS'
            }
    }],
)

Least outstanding requests routing routes to the specific instances that have more capacity to process requests. This will provide more uniform load-balancing and resource utilization.

In addition to CreateInferenceComponent, the following APIs are now available:

  • DescribeInferenceComponent
  • DeleteInferenceComponent
  • UpdateInferenceComponent
  • ListInferenceComponents

InferenceComponent logs and metrics

InferenceComponent logs are located in /aws/sagemaker/InferenceComponents/<InferenceComponentName>. All logs sent to stderr and stdout in the container are sent to these logs in Amazon CloudWatch.

With the introduction of IC-based endpoints, you now have the ability to view additional instance metrics, inference component metrics, and invocation metrics.

For SageMaker instances, you can now track the GPUReservation and CPUReservation metrics to see the resources reserved for an endpoint based on the inference components that you have deployed. These metrics can help you size your endpoint and auto scaling policies. You can also view the aggregate metrics associated with all models deployed to an endpoint.

SageMaker also exposes metrics at an inference component level, which can show a more granular view of the utilization of resources for the inference components that you have deployed. This allows you to get a view of how much aggregate resource utilization such as GPUUtilizationNormalized and GPUMemoryUtilizationNormalized for each inference component you have deployed that may have zero or many copies.

Lastly, SageMaker provides invocation metrics, which now tracks invocations for inference components aggregately (Invocations) or per copy instantiated (InvocationsPerCopy)

For a comprehensive list of metrics, refer to SageMaker Endpoint Invocation Metrics.

Model-level auto scaling

To implement the auto scaling behavior we described, when creating the SageMaker endpoint configuration and inference component, you define the initial instance count and initial model copy count, respectively. After you create the endpoint and corresponding ICs, to apply auto scaling at the IC level, you need to first register the scaling target and then associate the scaling policy to the IC.

When implementing the scaling policy, we use SageMakerInferenceComponentInvocationsPerCopy, which is a new metric introduced by SageMaker. It captures the average number of invocations per model copy per minute.

aas_client.put_scaling_policy(
    PolicyName=endpoint_name,
    PolicyType='TargetTrackingScaling',
    ServiceNamespace=service_namespace,
    ResourceId=resource_id,
    ScalableDimension=scalable_dimension,
    TargetTrackingScalingPolicyConfiguration={
        "PredefinedMetricSpecification": {
            "PredefinedMetricType": "SageMakerInferenceComponentInvocationsPerCopy",
        },
        "TargetValue": autoscaling_target_value,
        "ScaleInCooldown": 300,  # default
        "ScaleOutCooldown": 300,  # default
    },
)

After you set the scaling policy, SageMaker creates two CloudWatch alarms for each autoscaling target: one to trigger scale-out if in alarm for 3 minutes (three 1-minute data points) and one to trigger scale-in if in alarm for 15 minutes (15 1-minute data points), as shown in the following screenshot. The time to trigger the scaling action is usually 1–2 minutes longer than those minutes because it takes time for the endpoint to publish metrics to CloudWatch, and it also takes time for AutoScaling to react. The cool-down period is the amount of time, in seconds, after a scale-in or scale-out activity completes before another scale-out activity can start. If the scale-out cool-down is shorter than that the endpoint update time, then it takes no effect, because it’s not possible to update a SageMaker endpoint when it is in Updating status.

Note that, when setting up IC-level auto scaling, you need to make sure the MaxInstanceCount parameter is equal to or smaller than the maximum number of ICs this endpoint can handle. For example, if your endpoint is only configured to have one instance in the endpoint configuration and this instance can only host a maximum of four copies of the model, then the MaxInstanceCount should be equal to or smaller than 4. However, you can also use the managed auto scaling capability provided by SageMaker to automatically scale the instance count based on the required model copy number to fulfil the need of more compute resources. The following code snippet demonstrates how to set up managed instance scaling during the creation of the endpoint configuration. This way, when the IC-level auto scaling requires more instance count to host the model copies, SageMaker will automatically scale out the instance number to allow the IC-level scaling to be successful.

sagemaker_client.create_endpoint_config(
    EndpointConfigName=endpoint_config_name,
    ExecutionRoleArn=role,
    ProductionVariants=[{
        "VariantName": variant_name,
        "InstanceType": instance_type,
        "InitialInstanceCount": initial_instance_count,
        "ModelDataDownloadTimeoutInSeconds": model_data_download_timeout_in_seconds,
        "ContainerStartupHealthCheckTimeoutInSeconds": container_startup_health_check_timeout_in_seconds,
        {"ManagedInstanceScaling": {
            "Status": "ENABLED",
            "MinInstanceCount": initial_instance_count,
            "MaxInstanceCount": max_instance_count,
            }
        },
    }],
)

You can apply multiple auto scaling policies against the same endpoint, which means you will be able to apply the traditional auto scaling policy to the endpoints created with ICs and scale up and down based on the other endpoint metrics. For more information, refer to Optimize your machine learning deployments with auto scaling on Amazon SageMaker. However, although this is possible, we still recommend using managed instance scaling over managing the scaling yourself.

Conclusion

In this post, we introduced a new feature in SageMaker inference that will help you maximize the utilization of compute instances, scale to hundreds of models, and optimize costs, while providing predictable performance. Furthermore, we provided a walkthrough of the APIs and showed you how to configure and deploy inference components for your workloads.

We also support advanced routing capabilities to optimize the latency and performance of your inference workloads. SageMaker can help you optimize your inference workloads for cost and performance and give you model-level granularity for management. We have created a set of notebooks that will show you how to deploy three different models, using different containers and applying auto scaling policies in GitHub. We encourage you to start with notebook 1 and get hands on with the new SageMaker hosting capabilities today!


About the authors

James Park is a Solutions Architect at Amazon Web Services. He works with Amazon.com to design, build, and deploy technology solutions on AWS, and has a particular interest in AI and machine learning. In h is spare time he enjoys seeking out new cultures, new experiences,  and staying up to date with the latest technology trends. You can find him on LinkedIn.

Melanie Li, PhD, is a Senior AI/ML Specialist TAM at AWS based in Sydney, Australia. She helps enterprise customers build solutions using state-of-the-art AI/ML tools on AWS and provides guidance on architecting and implementing ML solutions with best practices. In her spare time, she loves to explore nature and spend time with family and friends.

Marc Karp is an ML Architect with the Amazon SageMaker Service team. He focuses on helping customers design, deploy, and manage ML workloads at scale. In his spare time, he enjoys traveling and exploring new places.

Alan TanAlan Tan is a Senior Product Manager with SageMaker, leading efforts on large model inference. He’s passionate about applying machine learning to the area of analytics. Outside of work, he enjoys the outdoors.

Raghu Ramesha is a Senior ML Solutions Architect with the Amazon SageMaker Service team. He focuses on helping customers build, deploy, and migrate ML production workloads to SageMaker at scale. He specializes in machine learning, AI, and computer vision domains, and holds a master’s degree in Computer Science from UT Dallas. In his free time, he enjoys traveling and photography.

Rupinder Grewal is a Sr Ai/ML Specialist Solutions Architect with AWS. He currently focuses on serving of models and MLOps on SageMaker. Prior to this role he has worked as Machine Learning Engineer building and hosting models. Outside of work he enjoys playing tennis and biking on mountain trails.

Dhawal Patel is a Principal Machine Learning Architect at AWS. He has worked with organizations ranging from large enterprises to mid-sized startups on problems related to distributed computing, and Artificial Intelligence. He focuses on Deep learning including NLP and Computer Vision domains. He helps customers achieve high performance model inference on SageMaker.

Saurabh Trikande is a Senior Product Manager for Amazon SageMaker Inference. He is passionate about working with customers and is motivated by the goal of democratizing machine learning. He focuses on core challenges related to deploying complex ML applications, multi-tenant ML models, cost optimizations, and making deployment of deep learning models more accessible. In his spare time, Saurabh enjoys hiking, learning about innovative technologies, following TechCrunch and spending time with his family.

Lakshmi Ramakrishnan is a Principal Engineer at Amazon SageMaker Machine Learning (ML) platform team in AWS, providing technical leadership for the product. He has worked in several engineering roles in Amazon for over 9 years. He has a Bachelor of Engineering degree in Information Technology from National Institute of Technology, Karnataka, India and a Master of Science degree in Computer Science from the University of Minnesota Twin Cities.

David Nigenda is a Senior Software Development Engineer on the Amazon SageMaker team, currently working on improving production machine learning workflows, as well as launching new inference features. In his spare time, he tries to keep up with his kids.

Read More

Minimize real-time inference latency by using Amazon SageMaker routing strategies

Minimize real-time inference latency by using Amazon SageMaker routing strategies

Amazon SageMaker makes it straightforward to deploy machine learning (ML) models for real-time inference and offers a broad selection of ML instances spanning CPUs and accelerators such as AWS Inferentia. As a fully managed service, you can scale your model deployments, minimize inference costs, and manage your models more effectively in production with reduced operational burden. A SageMaker real-time inference endpoint consists of an HTTPs endpoint and ML instances that are deployed across multiple Availability Zones for high availability. SageMaker application auto scaling can dynamically adjust the number of ML instances provisioned for a model in response to changes in workload. The endpoint uniformly distributes incoming requests to ML instances using a round-robin algorithm.

When ML models deployed on instances receive API calls from a large number of clients, a random distribution of requests can work very well when there is not a lot of variability in your requests and responses. But in systems with generative AI workloads, requests and responses can be extremely variable. In these cases, it’s often desirable to load balance by considering the capacity and utilization of the instance rather than random load balancing.

In this post, we discuss the SageMaker least outstanding requests (LOR) routing strategy and how it can minimize latency for certain types of real-time inference workloads by taking into consideration the capacity and utilization of ML instances. We talk about its benefits over the default routing mechanism and how you can enable LOR for your model deployments. Finally, we present a comparative analysis of latency improvements with LOR over the default routing strategy of random routing.

SageMaker LOR strategy

By default, SageMaker endpoints have a random routing strategy. SageMaker now supports a LOR strategy, which allows SageMaker to optimally route requests to the instance that is best suited to serve that request. SageMaker makes this possible by monitoring the load of the instances behind your endpoint, and the models or inference components that are deployed on each instance.

The following interactive diagram shows the default routing policy where requests coming to the model endpoints are forwarded in a random manner to the ML instances.

The following interactive diagram shows the routing strategy where SageMaker will route the request to the instance that has the least number of outstanding requests.

In general, LOR routing works well for foundational models or generative AI models when your model responds in hundreds of milliseconds to minutes. If your model response has lower latency (up to hundreds of milliseconds), you may benefit more from random routing. Regardless, we recommend that you test and identify the best routing algorithm for your workloads.

How to set SageMaker routing strategies

SageMaker now allows you to set the RoutingStrategy parameter while creating the EndpointConfiguration for endpoints. The different RoutingStrategy values that are supported by SageMaker are:

  • LEAST_OUTSTANDING_REQUESTS
  • RANDOM

The following is an example deployment of a model on an inference endpoint that has LOR enabled:

  1. Create the endpoint configuration by setting RoutingStrategy as LEAST_OUTSTANDING_REQUESTS:
    endpoint_config_response = sm_client.create_endpoint_config(
        EndpointConfigName=endpoint_config_name,
        ProductionVariants=[
            {
                "VariantName": "variant1",
                "ModelName": model_name,
                "InstanceType": "instance_type",
                "InitialInstanceCount": initial_instance_count,
    	…..
                "RoutingConfig": {
                    'RoutingStrategy': 'LEAST_OUTSTANDING_REQUESTS'}
            },
        ],
    )

  2. Create the endpoint using the endpoint configuration (no change):
    create_endpoint_response = sm_client.create_endpoint(
        EndpointName="endpoint_name", 
        EndpointConfigName="endpoint_config_name"
    )

Performance results

We ran performance benchmarking to measure the end-to-end inference latency and throughput of the codegen2-7B model hosted on ml.g5.24xl instances with default routing and smart routing endpoints. The CodeGen2 model belongs to the family of autoregressive language models and generates executable code when given English prompts.

In our analysis, we increased the number of ml.g5.24xl instances behind each endpoint for each test run as the number of concurrent users were increased, as shown in the following table.

Test Number of Concurrent Users Number of Instances
1 4 1
2 20 5
3 40 10
4 60 15
5 80 20

We measured the end-to-end P99 latency for both endpoints and observed an 4–33% improvement in latency when the number of instances were increased from 5 to 20, as shown in the following graph.

Similarly, we observed an 15–16% improvement in the throughput per minute per instance when the number of instances were increased from 5 to 20.

This illustrates that smart routing is able to improve the traffic distribution among the endpoints, leading to improvements in end-to-end latency and overall throughput.

Conclusion

In this post, we explained the SageMaker routing strategies and the new option to enable LOR routing. We explained how to enable LOR and how it can benefit your model deployments. Our performance tests showed latency and throughput improvements during real-time inferencing. To learn more about SageMaker routing features, refer to documentation. We encourage you to evaluate your inference workloads and determine if you are optimally configured with the routing strategy.


About the Authors

James Park is a Solutions Architect at Amazon Web Services. He works with Amazon.com to design, build, and deploy technology solutions on AWS, and has a particular interest in AI and machine learning. In h is spare time he enjoys seeking out new cultures, new experiences,  and staying up to date with the latest technology trends. You can find him on LinkedIn.

Venugopal Pai is a Solutions Architect at AWS. He lives in Bengaluru, India, and helps digital-native customers scale and optimize their applications on AWS.

David Nigenda is a Senior Software Development Engineer on the Amazon SageMaker team, currently working on improving production machine learning workflows, as well as launching new inference features. In his spare time, he tries to keep up with his kids.

Deepti Ragha is a Software Development Engineer in the Amazon SageMaker team. Her current work focuses on building features to host machine learning models efficiently. In her spare time, she enjoys traveling, hiking and growing plants.

Alan TanAlan Tan is a Senior Product Manager with SageMaker, leading efforts on large model inference. He’s passionate about applying machine learning to the area of analytics. Outside of work, he enjoys the outdoors.

Dhawal Patel is a Principal Machine Learning Architect at AWS. He has worked with organizations ranging from large enterprises to mid-sized startups on problems related to distributed computing, and Artificial Intelligence. He focuses on Deep learning including NLP and Computer Vision domains. He helps customers achieve high performance model inference on SageMaker.

Read More

Build and evaluate machine learning models with advanced configurations using the SageMaker Canvas model leaderboard

Build and evaluate machine learning models with advanced configurations using the SageMaker Canvas model leaderboard

Amazon SageMaker Canvas is a no-code workspace that enables analysts and citizen data scientists to generate accurate machine learning (ML) predictions for their business needs. Starting today, SageMaker Canvas supports advanced model build configurations such as selecting a training method (ensemble or hyperparameter optimization) and algorithms, customizing the training and validation data split ratio, and setting limits on autoML iterations and job run time, thus allowing users to customize model building configurations without having to write a single line of code. This flexibility can provide more robust and insightful model development. Non-technical stakeholders can use the no-code features with default settings, while citizen data scientists can experiment with various ML algorithms and techniques, helping them understand which methods work best for their data and optimize to ensure the model’s quality and performance.

In addition to model building configurations, SageMaker Canvas now also provides a model leaderboard. A leaderboard allows you to compare key performance metrics (for example, accuracy, precision, recall, and F1 score) for different models’ configurations to identify the best model for your data, thereby improving transparency into model building and helping you make informed decisions on model choices. You can also view the entire model building workflow, including suggested preprocessing steps, algorithms, and hyperparameter ranges in a notebook. To access these functionalities, sign out and sign back in to SageMaker Canvas and choose Configure model when building models.

In this post, we walk you through the process to use the new SageMaker Canvas advanced model build configurations to initiate an ensemble and hyperparameter optimization (HPO) training.

Solution overview

In this section, we show you step-by-step instructions for the new SageMaker Canvas advanced model build configurations to initiate an ensemble and hyperparameter optimization (HPO) training to analyze our dataset, build high-quality ML models, and see the model leaderboard to decide which model to publish for inference. SageMaker Canvas can automatically select the training method based on the dataset size, or you can select it manually. The choices are:

  • Ensemble: Uses the AutoGluon library to train several base models. To find the best combination for your dataset, ensemble mode runs 10 trials with different model and meta parameter settings. It then combines these models using a stacking ensemble method to create an optimal predictive model. In ensemble mode, SageMaker Canvas supports the following types of machine learning algorithms:
    • Light GBM: An optimized framework that uses tree-based algorithms with gradient boosting. This algorithm uses trees that grow in breadth rather than depth and is highly optimized for speed.
    • CatBoost: A framework that uses tree-based algorithms with gradient boosting. Optimized for handling categorical variables.
    • XGBoost: A framework that uses tree-based algorithms with gradient boosting that grows in depth rather than breadth.
    • Random forest: A tree-based algorithm that uses several decision trees on random sub-samples of the data with replacement. The trees are split into optimal nodes at each level. The decisions of each tree are averaged together to prevent overfitting and improve predictions.
    • Extra trees: A tree-based algorithm that uses several decision trees on the entire dataset. The trees are split randomly at each level. The decisions of each tree are average to prevent overfitting and to improve predictions. Extra trees add a degree of randomization in comparison to the random forest algorithm.
    • Linear models: A framework that uses a linear equation to model the relationship between two variables in observed data.
    • Neural network torch: A neural network model that’s implemented using Pytorch.
    • Neural network fast.ai: A neural network model that’s implemented using fast.ai.
  • Hyperparameter optimization (HPO): SageMaker Canvas finds the best version of a model by tuning hyperparameters using Bayesian optimization or multi-fidelity optimization while running training jobs on your dataset. HPO mode selects the algorithms that are most relevant to your dataset and selects the best range of hyperparameters to tune your models. To tune your models, HPO mode runs up to 100 trials (default) to find the optimal hyperparameters settings within the selected range. If your dataset size is less than 100 MB, Autopilot uses Bayesian optimization. Autopilot chooses multi-fidelity optimization if your dataset is larger than 100 MB. In multi-fidelity optimization, metrics are continuously emitted from the training containers. A trial that is performing poorly against a selected objective metric is stopped early. A trial that is performing well is allocated more resources. In HPO mode, SageMaker Canvas supports the following types of machine learning algorithms:
  • Linear learner: A supervised learning algorithm that can solve either classification or regression problems.
  • XGBoost: A supervised learning algorithm that attempts to accurately predict a target variable by combining an ensemble of estimates from a set of simpler and weaker models.
  • Deep learning algorithm: A multilayer perceptron (MLP) and feedforward artificial neural network. This algorithm can handle data that is not linearly separable.
  • Auto: Autopilot automatically chooses either ensemble mode or HPO mode based on your dataset size. If your dataset is larger than 100 MB, Autopilot chooses HPO. Otherwise, it chooses ensemble mode.

Prerequisites

For this post, you must complete the following prerequisites:

  1. Have an AWS account.
  2. Set up SageMaker Canvas. See Prerequisites for setting up Amazon SageMaker Canvas.
  3. Download the classic Titanic dataset to your local computer.

Create a model

We walk you through using the Titanic dataset and SageMaker Canvas to create a model that predicts which passengers survived the Titanic shipwreck. This is a binary classification problem. We focus on creating an Autopilot experiment using the ensemble training mode and compare the results of the F1 score and overall runtime with an Autopilot experiment using HPO training mode (100 trials).

Column name Description
Passengerid Identification number
Survivied Survival
Pclass Ticket class
Name Passenger name
Sex Sex
Age Age in years
Sibsp Number of siblings or spouses aboard the Titanic
Parch Number of parents or children aboard the Titanic
Ticket Ticket number
Fare Passenger fair
Cabin Cabin number
Emarked Port of embarkation

The Titanic dataset has 890 rows and 12 columns. It contains demographic information about the passengers (age, sex, ticket class, and so on) and the Survived (yes/no) target column.

  1. Start by importing the dataset into SageMaker Canvas. Name the dataset Titanic.
  2. Select the Titanic dataset and choose Create new model. Enter a name for the model, select Predictive Analysis as the problem type, and choose Create.
  3. Under Select a column to predict, use the Target column drop down to select Survived. The Survived target column is a binary data type with values of 0 (did not survive) and 1 (survived).

Configure and run the model

In the first experiment, you configure SageMaker Canvas to run an ensemble training on the dataset with accuracy as your objective metric. A higher accuracy score indicates that the model is making more correct predictions, while a lower accuracy score suggests the model is making more errors. Accuracy works well for balanced datasets. For ensemble training, select XGBoost, Random Forest, CatBoost, and Linear Models as your algorithms. Leave the data split at the default 80/20 for training and validation. And finally, configure the training job to run for a maximum job runtime of 1 hour.

  1. Begin by choosing Configure model.
  2. This brings up a modal window for Configure model. Select Advanced from the navigation pane.
  3. Start configuring your model by selecting Objective metric. For this experiment, select Accuracy. The accuracy score tells you how often the model’s predictions are correct overall.
  4. Select Training method and algorithms and select Ensemble. Ensemble methods in machine learning involve creating multiple models and then combining them to produce improved results. This technique is used to increase prediction accuracy by taking advantage of the strengths of different algorithms. Ensemble methods are known to produce more accurate solutions than a single model would, as demonstrated in various machine learning competitions and real-world applications.
  5. Select the various algorithms to use for the ensemble. For this experiment, select XGBoost, Linear, CatBoost, and Random Forest. Clear all other algorithms.
  6. Select Data split from the navigation pane. For this experiment, leave the default training and validation split as 80/20. The next iteration of the experiment uses a different split to see if it results in better model performance.
  7. Select Max candidates and runtime from the navigation pane and set the Max job runtime to 1 hour and choose Save.
  8. Choose Standard build to start the build.

At this point, SageMaker Canvas is invoking the model training based on the configuration you provided. Because you specified a max runtime for the training job of 1 hour, SageMaker Canvas will take up to an hour to run through the training job.

Review the results

Upon completion of the training job, SageMaker Canvas automatically brings you back into the Analyze view and shows the objective metrics results you had configured for the model training experiment. In this case, you see that the model accuracy is 86.034 percent.

  1. Choose the collapse arrow button next to Model leaderboard to review the model performance data.
  2. Select the Scoring tab to dive deeper into the model accuracy insights. The trained model is reporting that it can predict the not survived passengers correctly 89.72 percent of the time.
  3. Select the Advanced metrics tab to evaluate additional model performance details. Start by selecting Metrics table to review metrics details such as F1, Precision, Recall, and AUC.
  4. SageMaker Canvas also helps visualize the Confusion matrix for the trained model.
  5. And visualizes the Precision recall curve. An AUPRC of 0.86 signals high classification accuracy, which is good.
  6. Choose Model leaderboard to compare key performance metrics (such as accuracy, precision, recall, and F1 score) for different models evaluated by SageMaker Canvas to determine the best model for the data, based on the configuration you set for this experiment. The default model with the best performance is highlighted with the default model label on the model leaderboard.
  7. You can use the context menu at the side to dive deeper into the details of any of the models or to make a model the default model. Select View model details on the second model in the leaderboard to see details.
  8. SageMaker Canvas changes the view to show details of the selected model candidate. While details of the default model are already available, the alternate model detail view takes 10–15 minutes to paint the details.

Create a second model

Now that you’ve built, run, and reviewed a model, let’s build a second model for comparison.

  1. Return to the default model view by choosing X in the top corner. Now, choose Add version to create a new version of the model.
  2. Select the Titanic dataset you created initially, and then choose Select dataset.

SageMaker Canvas automatically loads the model with the target column already selected. In this second experiment, you switch to HPO training to see if it yields better results for the dataset. For this model, you keep the same objective metrics (Accuracy) for comparison with the first experiment and use the XGBoost algorithm for HPO training. You change the data split for training and validation to 70/30 and configure the max candidates and runtime values for the HPO job to 20 candidates and max job runtime as 1 hour.

Configure and run the model

  1. Begin the second experiment by choosing Configure model to configure your model training details.
  2. In the Configure model window, select Objective metric from the navigation pane. For the Objective metric, use the dropdown to select Accuracy, this lets you see and compare all version outputs side by side.
  3. Select Training method and algorithms. Select Hyperparameter optimization for the training method. Then, scroll down to select the algorithms.
  4. Select XGBoost for the algorithm. XGBoost provides parallel tree boosting that solves many data science problems quickly and accurately, and offers a large range of hyperparameters that can be tuned to improve and take full advantage of the XGBoost model.
  5. Select Data Split. For this model, set the training and validation data split to 70/30.
  6. Select Max candidates and runtime and set the values for the HPO job to 20 for the Max candidates and 1 hour for the Max job runtime. Choose Save to finish configuring the second model.
  7. Now that you’ve configured the second model, choose Standard build to initiate training.

SageMaker Canvas uses the configuration to start the HPO job. Like the first job, this training job will take up to an hour to complete.

Review the results

When the HPO training job is complete (or the max runtime expires), SageMaker Canvas displays the output of the training job based on with the default model and showing the model’s accuracy score.

  1. Choose Model leaderboard to view the list of all 20 candidate models from the HPO training run. The best model, based on the objective to find the best accuracy, is marked as default.

While the accuracy of the default model is the best, another model from the HPO job run has a higher area under the ROC curve (AUC) score. The AUC score is used to evaluate the performance of a binary classification model. A higher AUC indicates that the model is better at distinguishing between the two classes, with 1 being a perfect score and 0.5 indicating a random guess.

  1. Use the context menu to make the model with the higher AUC the default model. Select the context menu for that model and select Change to default model option in the line menu as shown in Figure 31 that follows.

SageMaker Canvas takes a few minutes to change the selected model to the new default model for version 2 of the experiment and move it to the top of the model list.

Compare the models

At this point, you have two versions of your model and can view them side by side by going to My models in SageMaker Canvas.

  1. Select Predict survival on the Titanic to see the available model versions.
  2. There are two versions and their performance is displayed in a tabular format for side-by-side comparison.
  3. You can see that version 1 of the model (which was trained using ensemble algorithms) has better accuracy. You can now use SageMaker Canvas to generate a SageMaker notebook—with code, comments, and instructions—to customize the AutoGluon trials and run the SageMaker Autopilot workflow without writing a single line of code. You can generate the SageMaker notebook by choosing the context menu and selecting View Notebook.
  4. The SageMaker notebook appears in a pop-up window. The notebook helps you inspect and modify the parameters proposed by SageMaker Canvas. You can interactively select one of the configurations proposed by SageMaker Canvas, modify it, and run a processing job to train models based on the selected configuration.

Inference

Now that you’ve identified the best model, you can use the context menu to deploy it to an endpoint for real-time inferencing.

Or use the context menu to operationalize your ML model in production by registering the machine learning (ML) model to the SageMaker model registry.

Cleanup

To avoid incurring future charges, delete the resources you created while following this post. SageMaker Canvas bills you for the duration of the session, and we recommend signing out of SageMaker Canvas when you’re not using it.

See Logging out of Amazon SageMaker Canvas for more details.

Conclusion

SageMaker Canvas is a powerful tool that democratizes machine learning, catering to both non-technical stakeholders and citizen data scientists. The newly introduced features, including advanced model build configurations and the model leaderboard, elevate the platform’s flexibility and transparency. This enables you to tailor your machine learning models to specific business needs without delving into code. The ability to customize training methods, algorithms, data splits, and other parameters empowers you to experiment with various ML techniques, fostering a deeper understanding of model performance.

The introduction of the model leaderboard is a significant enhancement, providing a clear overview of key performance metrics for different configurations. This transparency allows users to make informed decisions about model choices and optimizations. By displaying the entire model building workflow, including suggested preprocessing steps, algorithms, and hyperparameter ranges in a notebook, SageMaker Canvas facilitates a comprehensive understanding of the model development process.

To start your low-code/no-code ML journey, see Amazon SageMaker Canvas.

Special thanks to everyone who contributed to the launch:

Esha Dutta, Ed Cheung, Max Kondrashov, Allan Johnson, Ridhim Rastogi, Ranga Reddy Pallelra, Ruochen Wen, Ruinong Tian, Sandipan Manna, Renu Rozera, Vikash Garg, Ramesh Sekaran, and Gunjan Garg


About the Authors

Janisha Anand is a Senior Product Manager in the SageMaker Low/No Code ML team, which includes SageMaker Canvas and Autopilot. She enjoys coffee, staying active, and spending time with her family.

Indy Sawhney is a Senior Customer Solutions Leader with Amazon Web Services. Always working backwards from customer problems, Indy advises AWS enterprise customer executives through their unique cloud transformation journey. He has over 25 years of experience helping enterprise organizations adopt emerging technologies and business solutions. Indy is an area-of-depth specialist with the AWS Technical Field Community for artificial intelligence and machine learning (AI/ML), with specialization in generative AI and low-code/no-code (LCNC) SageMaker solutions.

Read More