Democratize computer vision defect detection for manufacturing quality using no-code machine learning with Amazon SageMaker Canvas

Democratize computer vision defect detection for manufacturing quality using no-code machine learning with Amazon SageMaker Canvas

Cost of poor quality is top of mind for manufacturers. Quality defects increase scrap and rework costs, decrease throughput, and can impact customers and company reputation. Quality inspection on the production line is crucial for maintaining quality standards. In many cases, human visual inspection is used to assess the quality and detect defects, which can limit the throughput of the line due to limitations of human inspectors.

The advent of machine learning (ML) and artificial intelligence (AI) brings additional visual inspection capabilities using computer vision (CV) ML models. Complimenting human inspection with CV-based ML can reduce detection errors, speed up production, reduce the cost of quality, and positively impact customers. Building CV ML models typically requires expertise in data science and coding, which are often rare resources in manufacturing organizations. Now, quality engineers and others on the shop floor can build and evaluate these models using no-code ML services, which can accelerate exploration and adoption of these models more broadly in manufacturing operations.

Amazon SageMaker Canvas is a visual interface that enables quality, process, and production engineers to generate accurate ML predictions on their own—without requiring any ML experience or having to write a single line of code. You can use SageMaker Canvas to create single-label image classification models for identifying common manufacturing defects using your own image datasets.

In this post, you will learn how to use SageMaker Canvas to build a single-label image classification model to identify defects in manufactured magnetic tiles based on their image.

Solution overview

This post assumes the viewpoint of a quality engineer exploring CV ML inspection, and you will work with sample data of magnetic tile images to build an image classification ML model to predict defects in the tiles for the quality check. The dataset contains more than 1,200 images of magnetic tiles, which have defects such as blowhole, break, crack, fray, and uneven surface. The following images provide an example of single-label defect classification, with a cracked tile on the left and a tile free of defects on the right.

In a real-world example, you can collect such images from the finished products in the production line. In this post, you use SageMaker Canvas to build a single-label image classification model that will predict and classify defects for a given magnetic tile image.

SageMaker Canvas can import image data from a local disk file or Amazon Simple Storage Service (Amazon S3). For this post, multiple folders have been created (one per defect type such as blowhole, break, or crack) in an S3 bucket, and magnetic tile images are uploaded to their respective folders. The folder called Free contains defect-free images.

There are four steps involved in building the ML model using SageMaker Canvas:

  1. Import the dataset of the images.
  2. Build and train the model.
  3. Analyze the model insights, such as accuracy.
  4. Make predictions.

Prerequisites

Before starting, you need to set up and launch SageMaker Canvas. This setup is performed by an IT administrator and involves three steps:

  1. Set up an Amazon SageMaker domain.
  2. Set up the users.
  3. Set up permissions to use specific features in SageMaker Canvas.

Refer to Getting started with using Amazon SageMaker Canvas and Setting Up and Managing Amazon SageMaker Canvas (for IT Administrators) to configure SageMaker Canvas for your organization.

When SageMaker Canvas is set up, the user can navigate to the SageMaker console, choose Canvas in the navigation pane, and choose Open Canvas to launch SageMaker Canvas.

The SageMaker Canvas application is launched in a new browser window.

After the SageMaker Canvas application is launched, you start the steps of building the ML model.

Import the dataset

Importing the dataset is the first step when building an ML model with SageMaker Canvas.

  1. In the SageMaker Canvas application, choose Datasets in the navigation pane.
  2. On the Create menu, choose Image.
  3. For Dataset name, enter a name, such as Magnetic-Tiles-Dataset.
  4. Choose Create to create the dataset.

After the dataset is created, you need to import images in the dataset.

  1. On the Import page, choose Amazon S3 (the magnetic tiles images are in an S3 bucket).

You have the choice to upload the images from your local computer as well.

  1. Select the folder in the S3 bucket where the magnetic tile images are stored and chose Import Data.

SageMaker Canvas starts importing the images into the dataset. When the import is complete, you can see the image dataset created with 1,266 images.

You can choose the dataset to check the details, such as a preview of the images and their label for the defect type. Because the images were organized in folders and each folder was named with the defect type, SageMaker Canvas automatically completed the labeling of the images based on the folder names. As an alternative, you can import unlabeled images, add labels, and perform labeling of the individual images at a later point of time. You can also modify the labels of the existing labeled images.

The image import is complete and you now have an images dataset created in the SageMaker Canvas. You can move to the next step to build an ML model to predict defects in the magnetic tiles.

Build and train the model

You train the model using the imported dataset.

  1. Choose the dataset (Magnetic-tiles-Dataset) and choose Create a model.
  2. For Model name, enter a name, such as Magnetic-Tiles-Defect-Model.
  3. Select Image analysis for the problem type and choose Create to configure the model build.

On the model’s Build tab, you can see various details about the dataset, such as label distribution, count of labeled vs. unlabeled images, and also model type, which is single-label image prediction in this case. If you have imported unlabeled images or you want to modify or correct the labels of certain images, you can choose Edit dataset to modify the labels.

You can build model in two ways: Quick build and Standard build. The Quick build option prioritizes speed over accuracy. It trains the model in 15–30 minutes. The model can be used for the prediction but it can’t be shared. It’s a good option to quickly check feasibility and accuracy of training a model with a given dataset. The Standard build chooses accuracy over speed, and model training can take between 2–4 hours.

For this post, you train the model using the Standard build option.

  1. Choose Standard build on the Build tab to start training the model.

The model training starts instantly. You can see the expected build time and training progress on the Analyze tab.

Wait until the model training is complete, then you can analyze model performance for the accuracy.

Analyze the model

In this case, it took less than an hour to complete the model training. When the model training is complete, you can check model accuracy on the Analyze tab to determine if the model can accurately predict defects. You see the overall model accuracy is 97.7% in this case. You can also check the model accuracy for each of the individual label or defect type, for instance 100% for Fray and Uneven but approximately 95% for Blowhole. This level of accuracy is encouraging, so we can continue the evaluation.

To better understand and trust the model, enable Heatmap to see the areas of interest in the image that the model uses to differentiate the labels. It’s based on the class activation map (CAM) technique. You can use the heatmap to identify patterns from your incorrectly predicted images, which can help improve the quality of your model.

On the Scoring tab, you can check precision and recall for the model for each of the labels (or class or defect type). Precision and recall are evaluation metrics used to measure the performance of a binary and multiclass classification model. Precision tells how good the model is at predicting a specific class (defect type, in this example). Recall tells how many times the model was able to detect a specific class.

Model analysis helps you understand the accuracy of the model before you use it for prediction.

Make predictions

After the model analysis, you can now make predictions using this model to identify defects in the magnetic tiles.

On the Predict tab, you can choose Single prediction and Batch prediction. In a single prediction, you import a single image from your local computer or S3 bucket to make a prediction about the defect. In batch prediction, you can make predictions for multiple images that are stored in a SageMaker Canvas dataset. You can create a separate dataset in SageMaker Canvas with the test or inference images for the batch prediction. For this post, we use both single and batch prediction.

For single prediction, on the Predict tab, choose Single prediction, then choose Import image to upload the test or inference image from your local computer.

After the image is imported, the model makes a prediction about the defect. For the first inference, it might take few minutes because the model is loading for the first time. But after the model is loaded, it makes instant predictions about the images. You can see the image and the confidence level of the prediction for each label type. For instance, in this case, the magnetic tile image is predicted to have an uneven surface defect (the Uneven label) and the model is 94% confident about it.

Similarly, you can use other images or a dataset of images to make predictions about the defect.

For the batch prediction, we use the dataset of unlabeled images called Magnetic-Tiles-Test-Dataset by uploading 12 test images from your local computer to the dataset.

On the Predict tab, choose Batch prediction and choose Select dataset.

Select the Magnetic-Tiles-Test-Dataset dataset and choose Generate predictions.

It will take some time to generate the predictions for all the images. When the status is Ready, choose the dataset link to see the predictions.

You can see predictions for all the images with confidence levels. You can choose any of the individual images to see image-level prediction details.

You can download the prediction in CSV or .zip file format to work offline. You can also verify the predicted labels and add them to your training dataset. To verify the predicted labels, choose Verify prediction.

In the prediction dataset, you can update labels of the individual images if you don’t find the predicted label correct. When you have updated the labels as required, choose Add to trained dataset to merge the images into your training dataset (in this example, Magnetic-Tiles-Dataset).

This updates the training dataset, which includes both your existing training images and the new images with predicted labels. You can train a new model version with the updated dataset and potentially improve the model’s performance. The new model version won’t be an incremental training, but a new training from scratch with the updated dataset. This helps keep the model refreshed with new sources of data.

Clean up

After you have completed your work with SageMaker Canvas, choose Log out to close the session and avoid any further cost.

When you log out, your work such as datasets and models remains saved, and you can launch a SageMaker Canvas session again to continue the work later.

SageMaker Canvas creates an asynchronous SageMaker endpoint for generating the predictions. To delete the endpoint, endpoint configuration, and model created by SageMaker Canvas, refer to Delete Endpoints and Resources.

Conclusion

In this post, you learned how to use SageMaker Canvas to build an image classification model to predict defects in manufactured products, to compliment and improve the visual inspection quality process. You can use SageMaker Canvas with different image datasets from your manufacturing environment to build models for use cases like predictive maintenance, package inspection, worker safety, goods tracking, and more. SageMaker Canvas gives you the ability to use ML to generate predictions without needing to write any code, accelerating the evaluation and adoption of CV ML capabilities.

To get started and learn more about SageMaker Canvas, refer to the following resources:


About the authors

Brajendra Singh is solution architect in Amazon Web Services working with enterprise customers. He has strong developer background and is a keen enthusiast for data and machine learning solutions.

Danny Smith is Principal, ML Strategist for Automotive and Manufacturing Industries, serving as a strategic advisor for customers. His career focus has been on helping key decision-makers leverage data, technology and mathematics to make better decisions, from the board room to the shop floor. Lately most of his conversations are on democratizing machine learning and generative AI.

Davide Gallitelli is a Specialist Solutions Architect for AI/ML in the EMEA region. He is based in Brussels and works closely with customers throughout Benelux. He has been a developer since he was very young, starting to code at the age of 7. He started learning AI/ML at university, and has fallen in love with it since then.

Read More

Navigating to Objects in the Real World

Navigating to Objects in the Real World

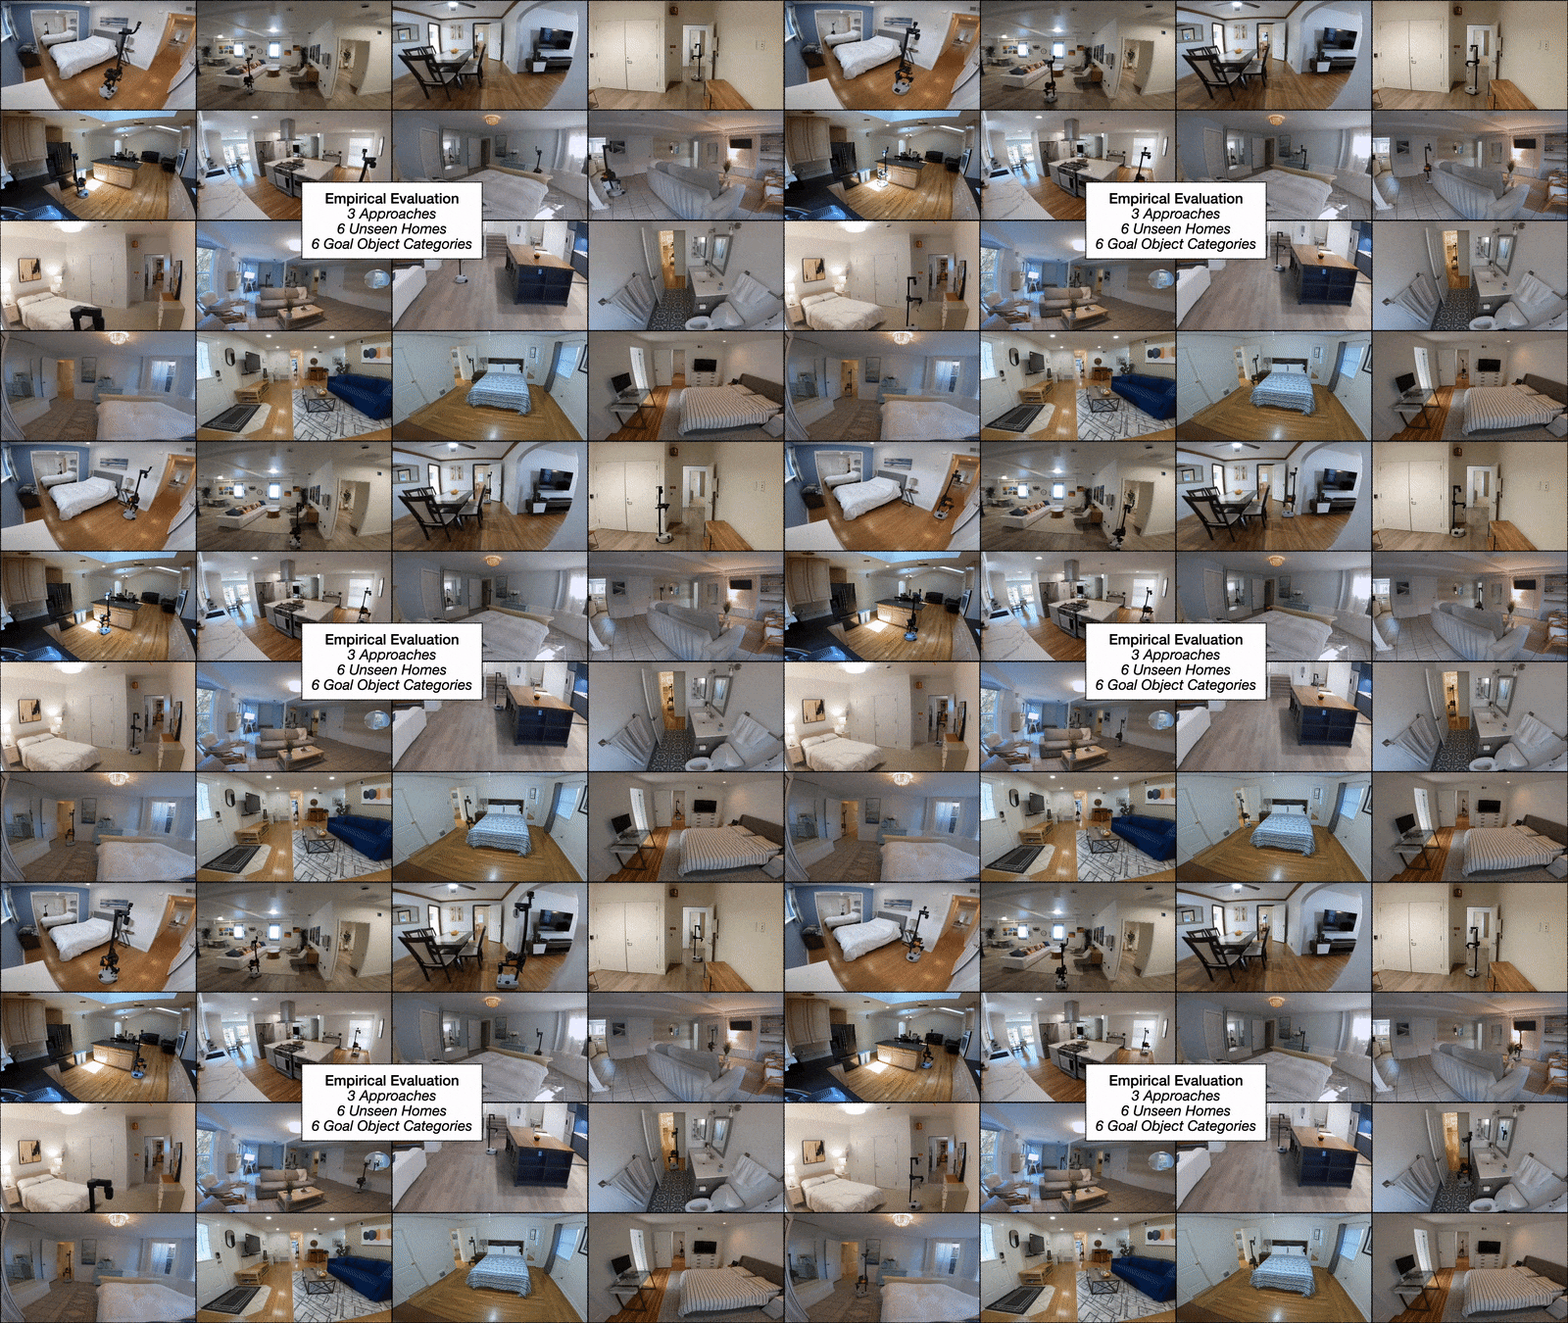
Empirical study: We evaluated three approaches for robots to navigate to objects in six visually diverse homes.

TLDR: Semantic navigation is necessary to deploy mobile robots in uncontrolled environments like our homes, schools, and hospitals. Many learning-based approaches have been proposed in response to the lack of semantic understanding of the classical pipeline for spatial navigation. But learned visual navigation policies have predominantly been evaluated in simulation. How well do different classes of methods work on a robot? We present a large-scale empirical study of semantic visual navigation methods comparing representative methods from classical, modular, and end-to-end learning approaches. We evaluate policies across six homes with no prior experience, maps, or instrumentation. We find that modular learning works well in the real world, attaining a 90% success rate. In contrast, end-to-end learning does not, dropping from 77% simulation to 23% real-world success rate due to a large image domain gap between simulation and reality. For practitioners, we show that modular learning is a reliable approach to navigate to objects: modularity and abstraction in policy design enable Sim-to-Real transfer. For researchers, we identify two key issues that prevent today’s simulators from being reliable evaluation benchmarks — (A) a large Sim-to-Real gap in images and (B) a disconnect between simulation and real-world error modes.

Object Goal Navigation

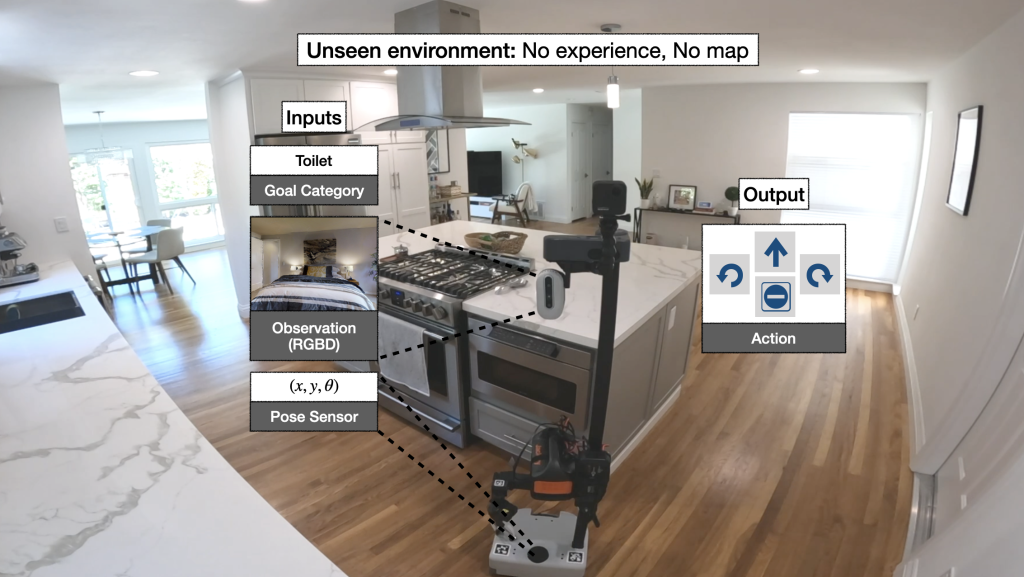
We instantiate semantic navigation with the Object Goal navigation task [Anderson 2018], where a robot starts in a completely unseen environment and is asked to find an instance of an object category, let’s say a toilet. The robot has access to only a first-person RGB and depth camera and a pose sensor (computed with LiDAR-based SLAM).

Problem definition: The robot must explore an unseen environment to find an object of interest from a first-person RGB-D camera and LiDAR-based pose sensor.

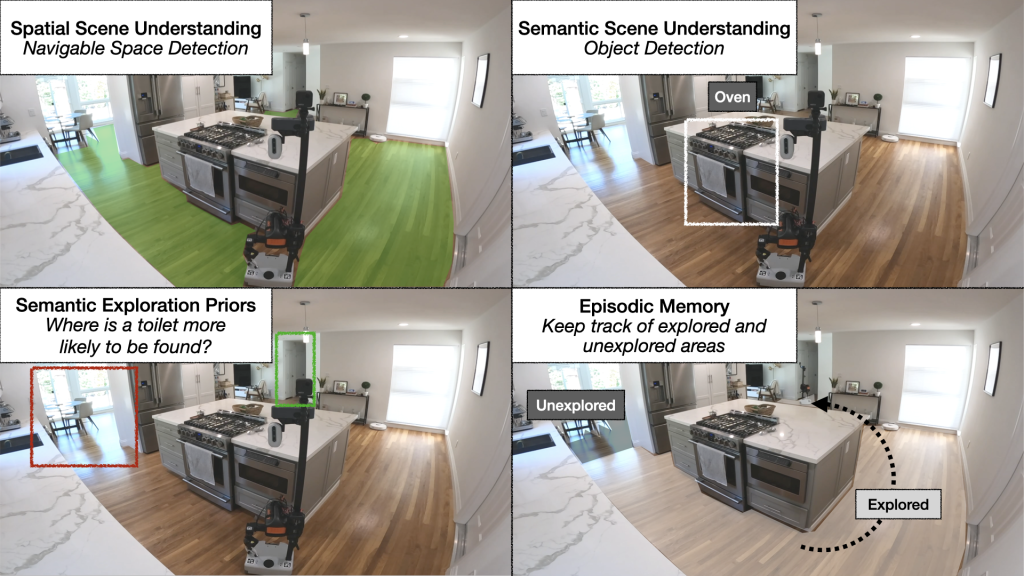
This task is challenging. It requires not only spatial scene understanding of distinguishing free space and obstacles and semantic scene understanding of detecting objects, but also requires learning semantic exploration priors. For example, if a human wants to find a toilet in this scene, most of us would choose the hallway because it is most likely to lead to a toilet. Teaching this kind of spatial common sense or semantic priors to an autonomous agent is challenging. While exploring the scene for the desired object, the robot also needs to remember explored and unexplored areas.

Problem challenges: The robot must distinguish free space from obstacles, detect relevant objects, infer where the target object is likely to be found, and keep track of explored areas.

Methods

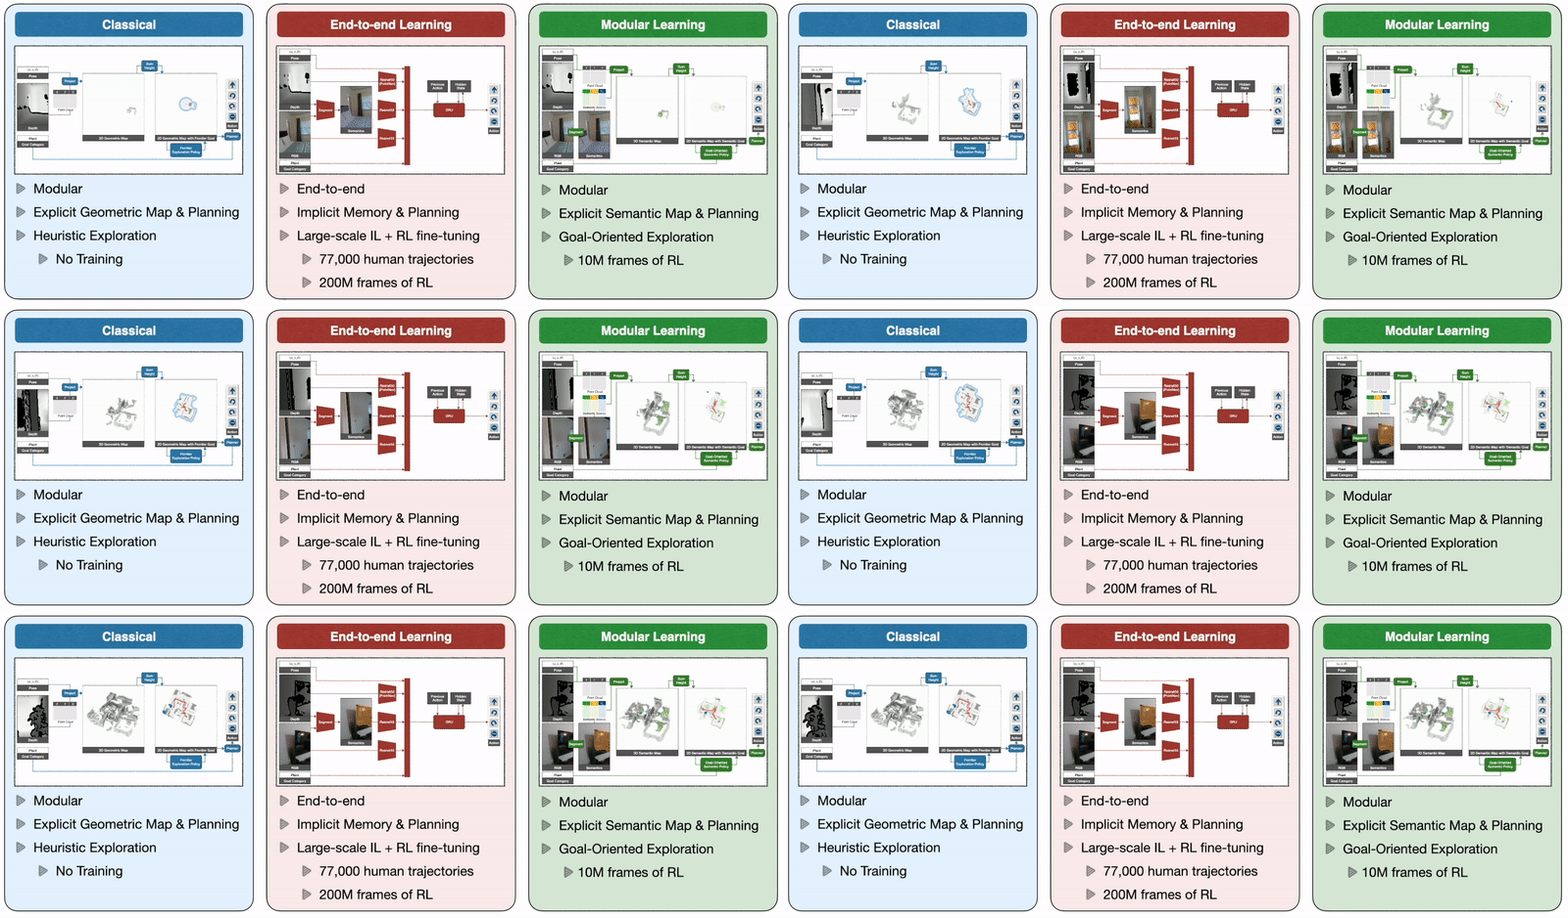
So how do we train autonomous agents capable of efficient navigation while tackling all these challenges? A classical approach to this problem builds a geometric map using depth sensors, explores the environment with a heuristic, like frontier exploration [Yamauchi 1997], which explores the closest unexplored region, and uses an analytical planner to reach exploration goals and the goal object as soon as it is in sight. An end-to-end learning approach predicts actions directly from raw observations with a deep neural network consisting of visual encoders for image frames followed by a recurrent layer for memory [Ramrakhya 2022]. A modular learning approach builds a semantic map by projecting predicted semantic segmentation using depth, predicts an exploration goal with a goal-oriented semantic policy as a function of the semantic map and the goal object, and reaches it with a planner [Chaplot 2020].

Three classes of methods: A classical approach builds a geometric map and explores with a heuristic policy, an end-to-end learning approach predicts actions directly from raw observations with a deep neural network, and a modular learning approach builds a semantic map and explores with a learned policy.

Large-scale Real-world Empirical Evaluation

While many approaches to navigate to objects have been proposed over the past few years, learned navigation policies have predominantly been evaluated in simulation, which opens the field to the risk of sim-only research that does not generalize to the real world. We address this issue through a large-scale empirical evaluation of representative classical, end-to-end learning, and modular learning approaches across 6 unseen homes and 6 goal object categories (chair, couch, plant, toilet, TV).

Empirical study: We evaluate 3 approaches in 6 unseen homes with 6 goal object categories.

Results

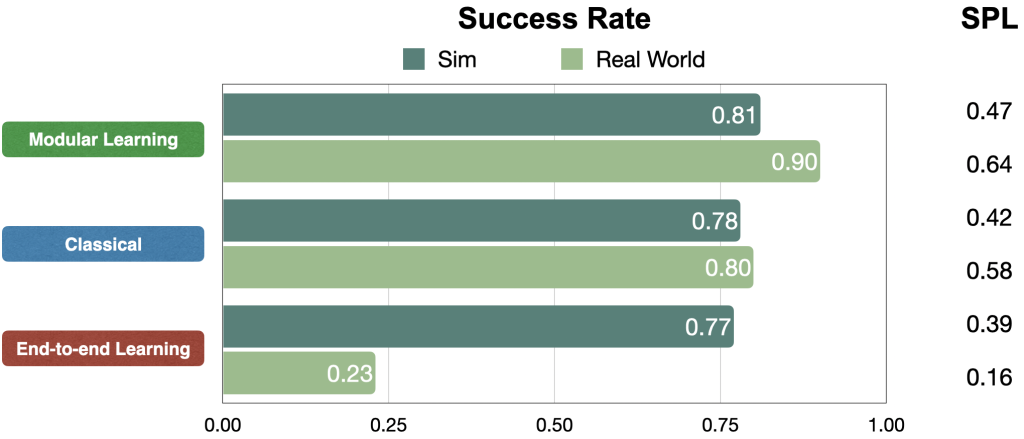
We compare approaches in terms of success rate within a limited budget of 200 robot actions and Success weighted by Path Length (SPL), a measure of path efficiency. In simulation, all approaches perform comparably. But in the real world, modular learning and classical approaches transfer really well while end-to-end learning fails to transfer.

Quantitative results: In simulation, all approaches perform comparably, at around 80% success rate. But in the real world, modular learning and classical approaches transfer really well, up from 81% to 90% and 78% to 80% success rates, respectively. While end-to-end learning fails to transfer, down from 77% to 23% success rate.

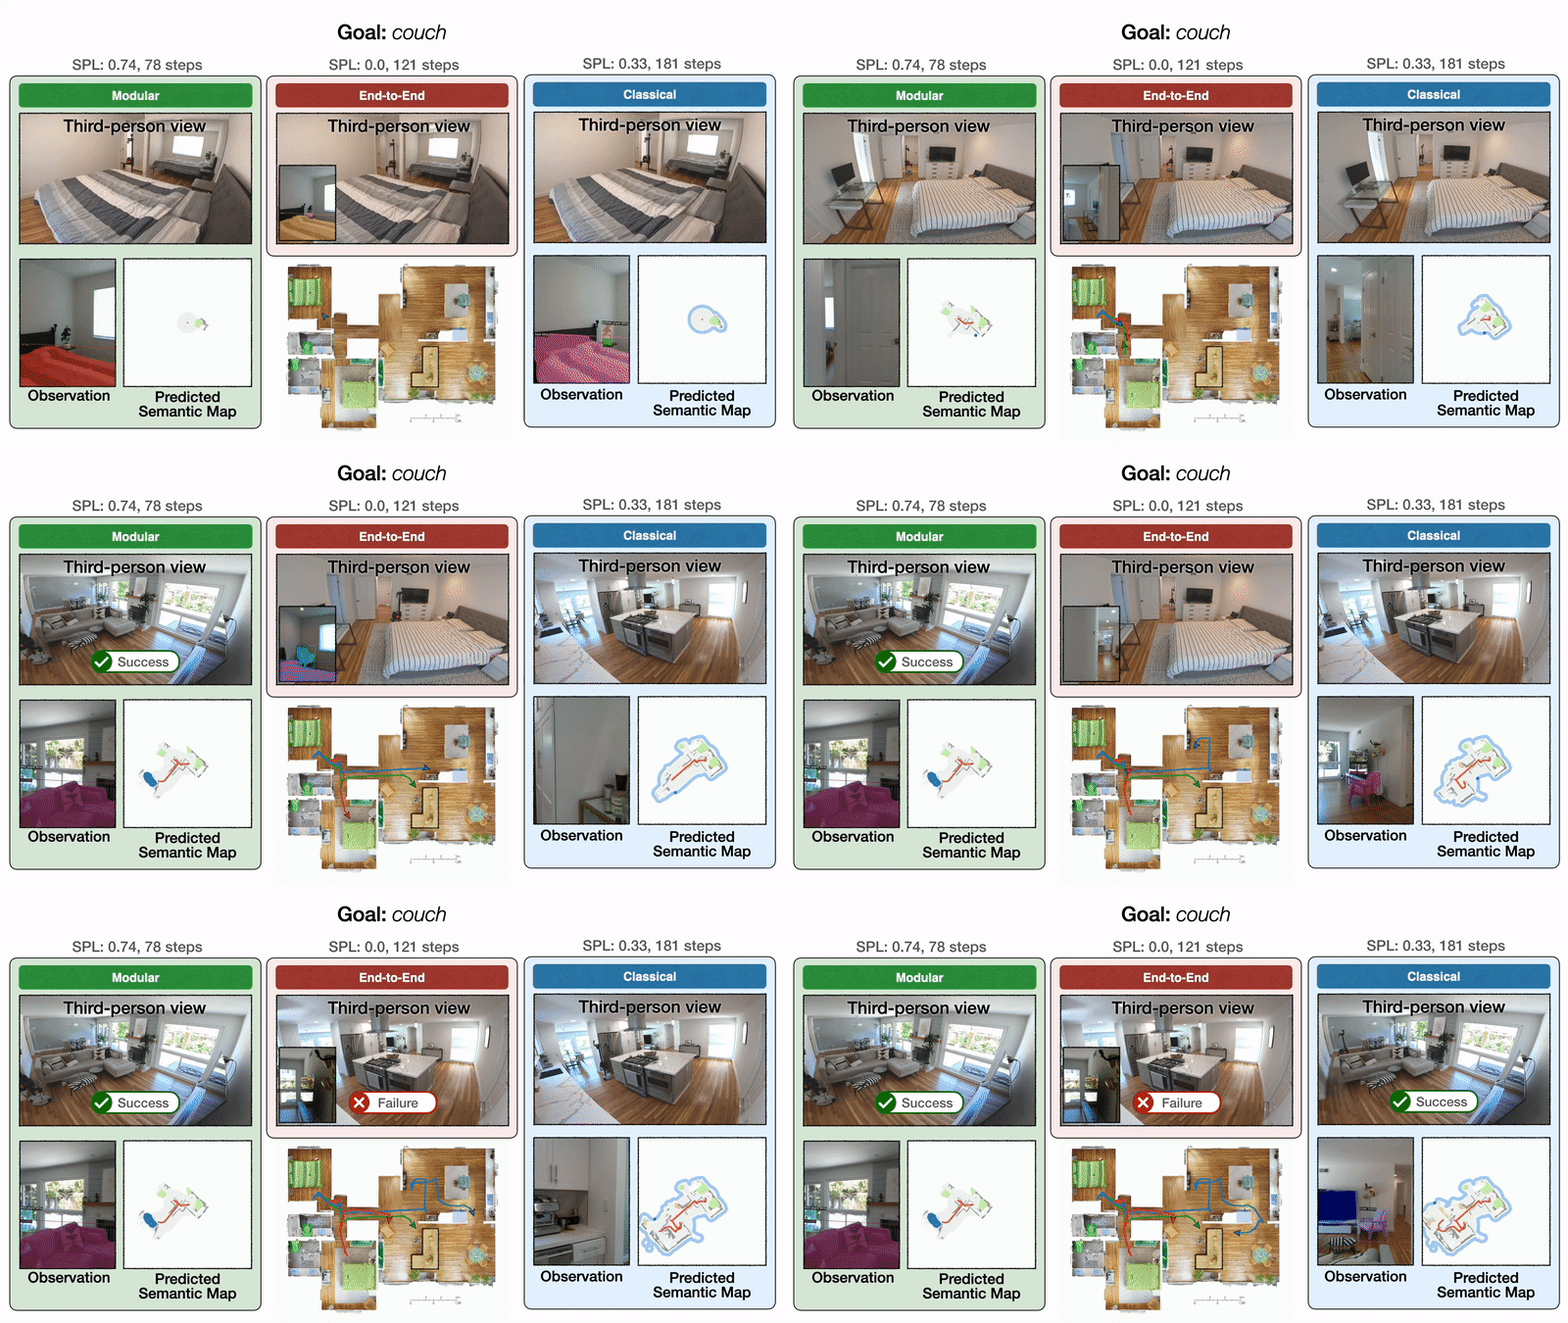
We illustrate these results qualitatively with one representative trajectory.

Qualitative results: All approaches start in a bedroom and are tasked with finding a couch. On the left, modular learning first successfully reaches the couch goal. In the middle, end-to-end learning fails after colliding too many times. On the right, the classical policy finally reaches the couch goal after a detour through the kitchen.

Result 1: Modular Learning is Reliable

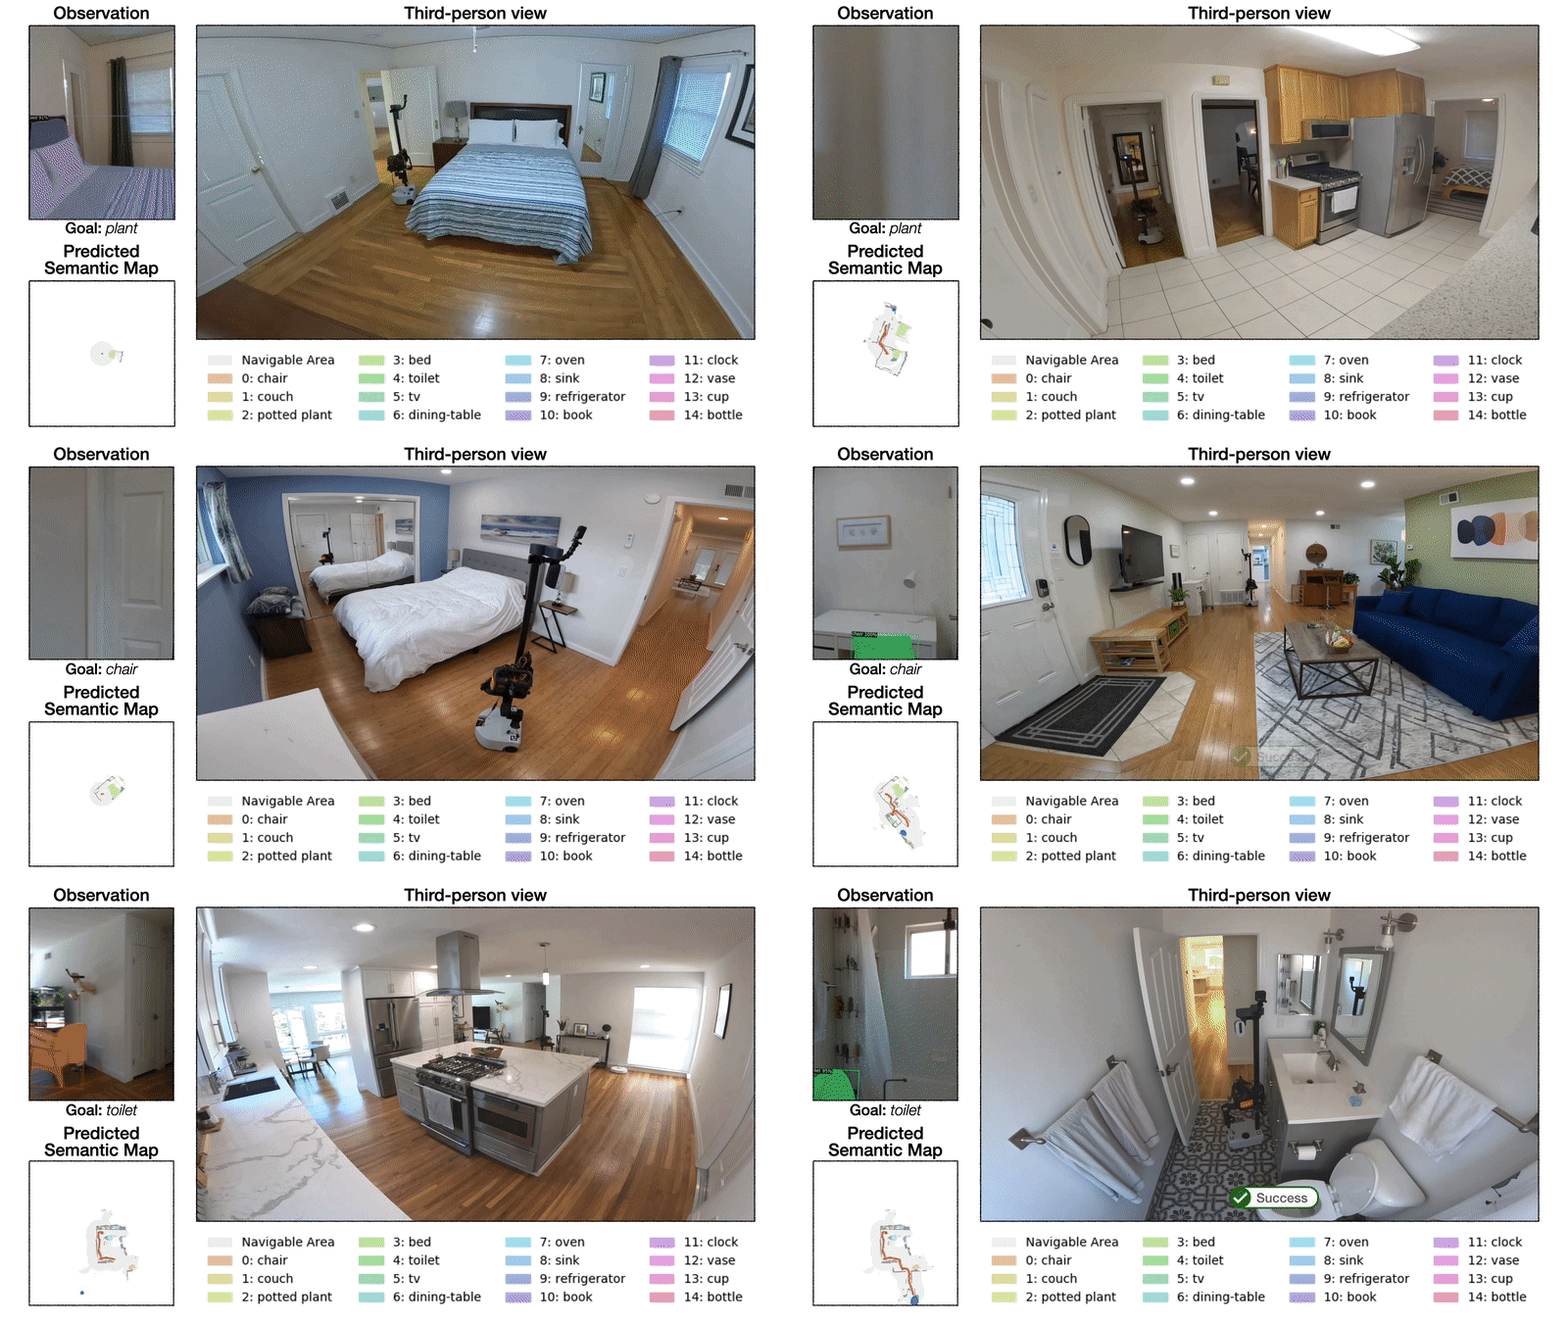
We find that modular learning is very reliable on a robot, with a 90% success rate.

Modular learning reliability: Here, we can see it finds a plant in a first home efficiently, a chair in a second home, and a toilet in a third.

Result 2: Modular Learning Explores more Efficiently than the Classical Approach

Modular learning improves by 10% real-world success rate over the classical approach. With a limited time budget, inefficient exploration can lead to failure.

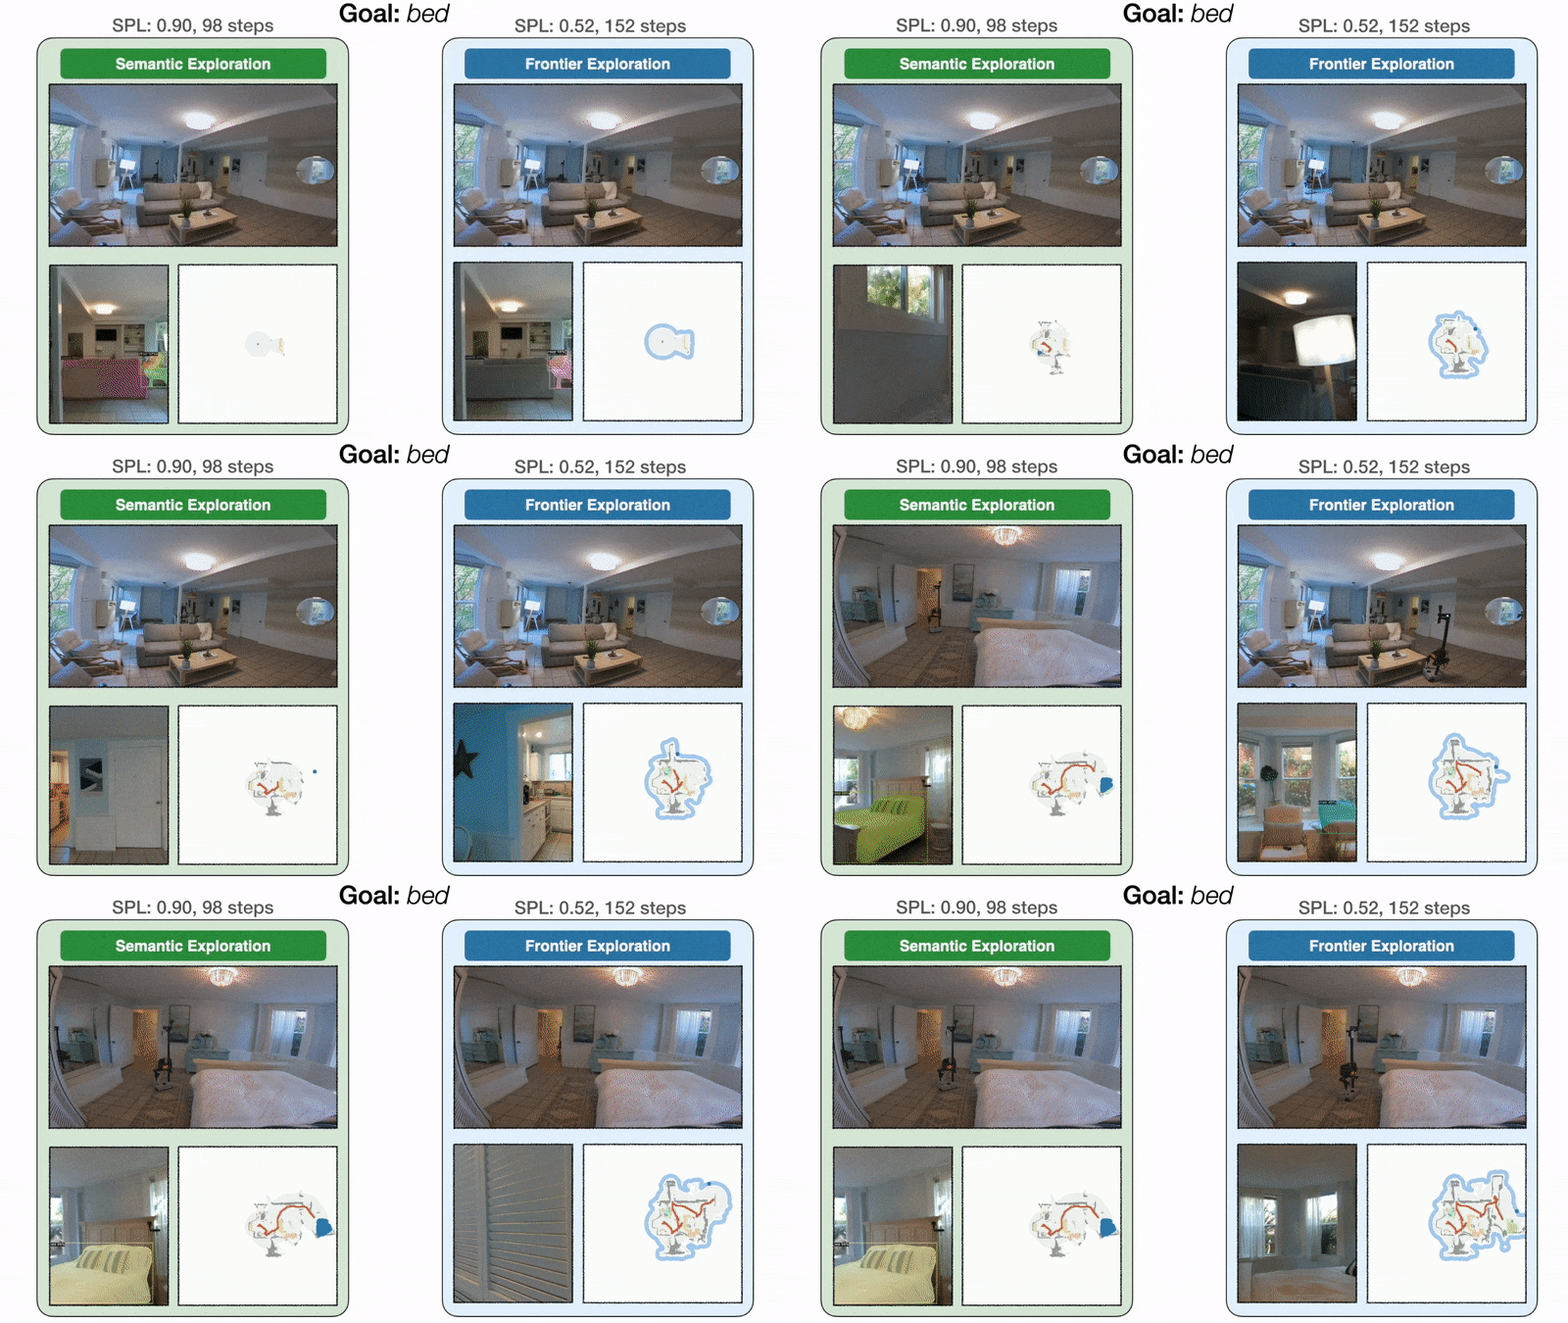
Modular learning exploration efficiency: On the left, the goal-oriented semantic exploration policy directly heads towards the bedroom and finds the bed in 98 steps with an SPL of 0.90. On the right, because frontier exploration is agnostic to the bed goal, the policy makes detours through the kitchen and the entrance hallway before finally reaching the bed in 152 steps with an SPL of 0.52.

Result 3: End-to-end Learning Fails to Transfer

While classical and modular learning approaches work well on a robot, end-to-end learning does not, at only 23% success rate.

End-to-end learning failure cases: The policy collides often, revisits the same places, and even fails to stop in front of goal objects when they are in sight.

Analysis

Insight 1: Why does Modular Transfer while End-to-end does not?

Why does modular learning transfer so well while end-to-end learning does not? To answer this question, we reconstructed one real-world home in simulation and conducted experiments with identical episodes in sim and reality.

Digital twin: We reconstructed one real-world home in simulation.

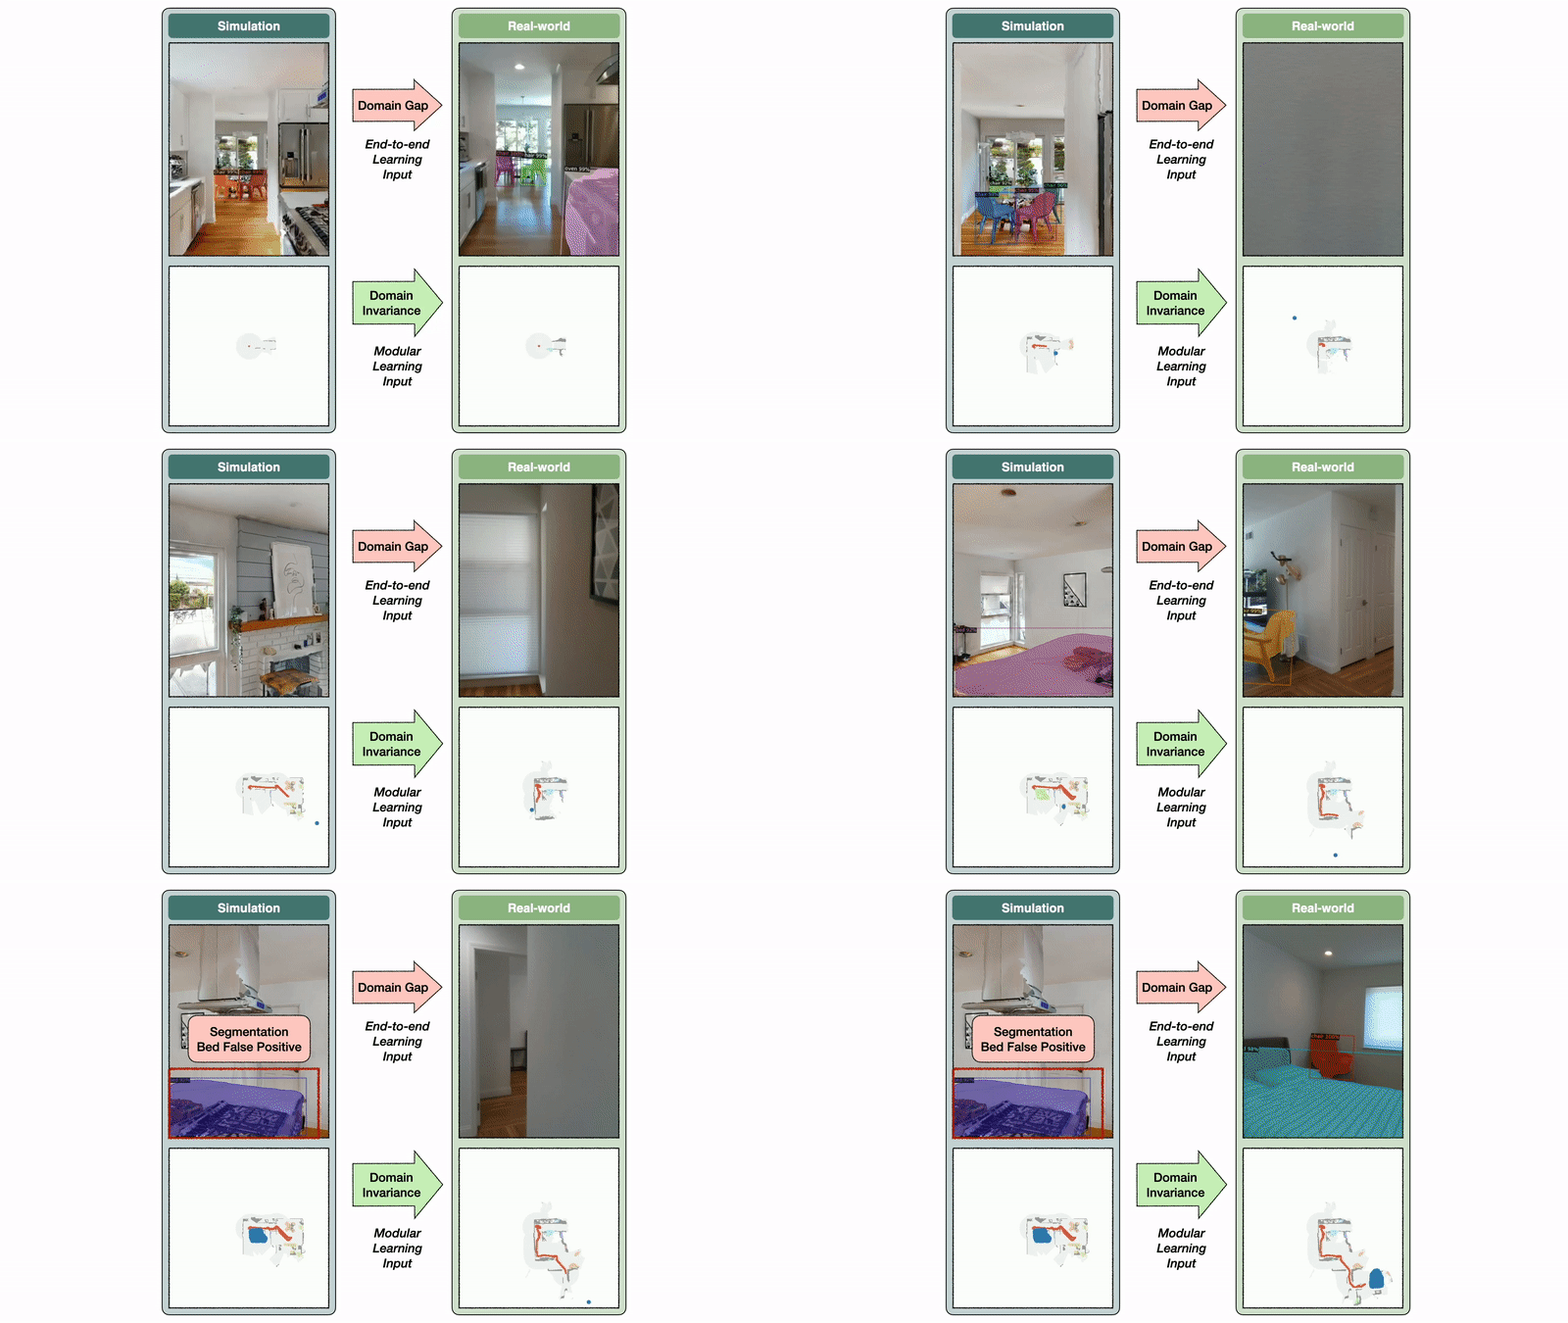
The semantic exploration policy of the modular learning approach takes a semantic map as input, while the end-to-end policy directly operates on the RGB-D frames. The semantic map space is invariant between sim and reality, while the image space exhibits a large domain gap.

Identical episodes: We conducted experiments with identical episodes in sim and reality. You can see that the semantic map space is invariant between sim and reality, while the image space has a large domain gap. In this example, this gap leads to a segmentation model trained on real images to predict a bed false positive in the kitchen.

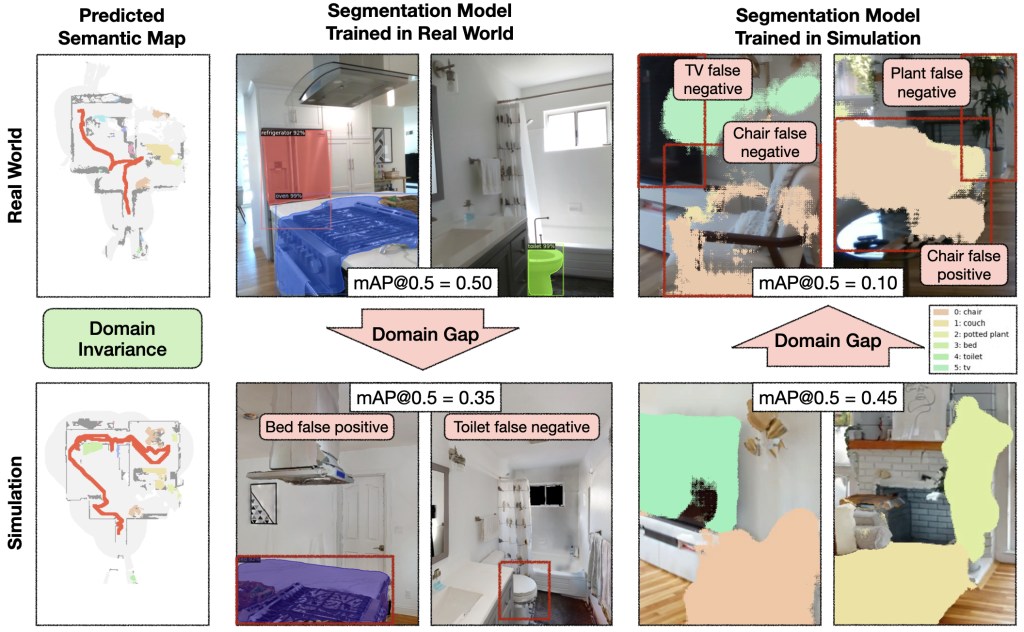
The semantic map domain invariance allows the modular learning approach to transfer well from sim to reality. In contrast, the image domain gap causes a large drop in performance when transferring a segmentation model trained in the real world to simulation and vice versa. If semantic segmentation transfers poorly from sim to reality, it is reasonable to expect an end-to-end semantic navigation policy trained on sim images to transfer poorly to real-world images.

Domain gaps and invariances: The image domain gap causes a large performance drop when transferring a segmentation model trained in the real-world to sim and vice versa.

Insight 2: Sim vs Real Gap in Error Modes for Modular Learning

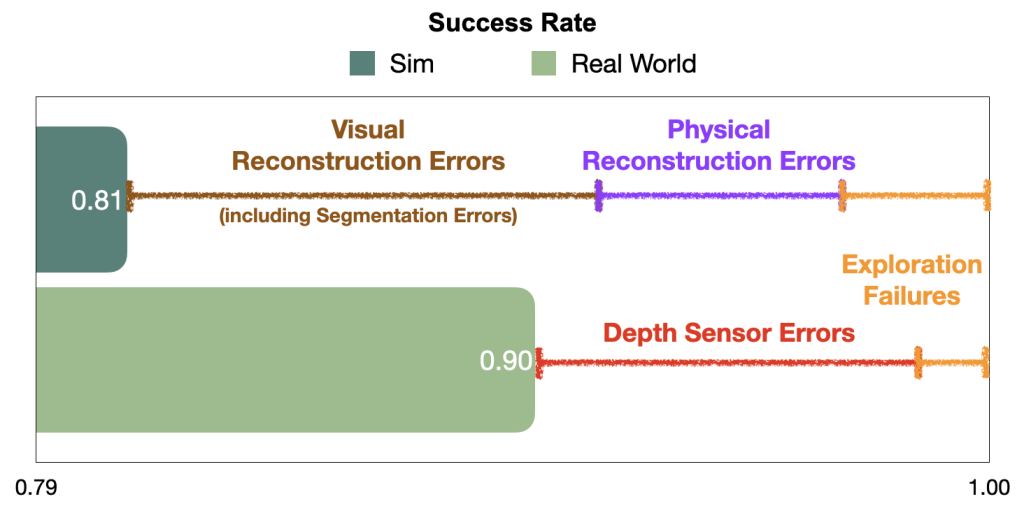
Surprisingly, modular learning works even better in reality than simulation. Detailed analysis reveals that a lot of the failures of the modular learning policy that occur in sim are due to reconstruction errors, both visual and physical, which do not happen in reality. In contrast, failures in the real world are predominantly due to depth sensor errors, while most semantic navigation benchmarks in simulation assume perfect depth sensing. Besides explaining the performance gap between sim and reality for modular learning, this gap in error modes is concerning because it limits the usefulness of simulation to diagnose bottlenecks and further improve policies. We show representative examples of each error mode and propose concrete steps forward to close this gap in the paper.

Disconnect between sim and real error modes: Failures of the modular learning policy in sim are largely due to reconstruction errors (10% visual and 5% physical out of the total 19% episode failures). Failures in the real world are predominantly due to depth sensor errors.

Takeaways

For practitioners:

  • Modular learning can reliably navigate to objects with 90% success

For researchers:

  • Models relying on RGB images are hard to transfer from sim to real => leverage modularity and abstraction in policies
  • Disconnect between sim and real error modes => evaluate semantic navigation on real robots

If you’ve enjoyed this post and would like to learn more, please check out the Science Robotics 2023 paper and talk. Code coming soon. Also, please don’t hesitate to reach out to Theophile Gervet!

Read More

Announcing the first Machine Unlearning Challenge

Announcing the first Machine Unlearning Challenge

Deep learning has recently driven tremendous progress in a wide array of applications, ranging from realistic image generation and impressive retrieval systems to language models that can hold human-like conversations. While this progress is very exciting, the widespread use of deep neural network models requires caution: as guided by Google’s AI Principles, we seek to develop AI technologies responsibly by understanding and mitigating potential risks, such as the propagation and amplification of unfair biases and protecting user privacy.

Fully erasing the influence of the data requested to be deleted is challenging since, aside from simply deleting it from databases where it’s stored, it also requires erasing the influence of that data on other artifacts such as trained machine learning models. Moreover, recent research [1, 2] has shown that in some cases it may be possible to infer with high accuracy whether an example was used to train a machine learning model using membership inference attacks (MIAs). This can raise privacy concerns, as it implies that even if an individual’s data is deleted from a database, it may still be possible to infer whether that individual’s data was used to train a model.

Given the above, machine unlearning is an emergent subfield of machine learning that aims to remove the influence of a specific subset of training examples — the “forget set” — from a trained model. Furthermore, an ideal unlearning algorithm would remove the influence of certain examples while maintaining other beneficial properties, such as the accuracy on the rest of the train set and generalization to held-out examples. A straightforward way to produce this unlearned model is to retrain the model on an adjusted training set that excludes the samples from the forget set. However, this is not always a viable option, as retraining deep models can be computationally expensive. An ideal unlearning algorithm would instead use the already-trained model as a starting point and efficiently make adjustments to remove the influence of the requested data.

Today we’re thrilled to announce that we’ve teamed up with a broad group of academic and industrial researchers to organize the first Machine Unlearning Challenge. The competition considers a realistic scenario in which after training, a certain subset of the training images must be forgotten to protect the privacy or rights of the individuals concerned. The competition will be hosted on Kaggle, and submissions will be automatically scored in terms of both forgetting quality and model utility. We hope that this competition will help advance the state of the art in machine unlearning and encourage the development of efficient, effective and ethical unlearning algorithms.

Machine unlearning applications

Machine unlearning has applications beyond protecting user privacy. For instance, one can use unlearning to erase inaccurate or outdated information from trained models (e.g., due to errors in labeling or changes in the environment) or remove harmful, manipulated, or outlier data.

The field of machine unlearning is related to other areas of machine learning such as differential privacy, life-long learning, and fairness. Differential privacy aims to guarantee that no particular training example has too large an influence on the trained model; a stronger goal compared to that of unlearning, which only requires erasing the influence of the designated forget set. Life-long learning research aims to design models that can learn continuously while maintaining previously-acquired skills. As work on unlearning progresses, it may also open additional ways to boost fairness in models, by correcting unfair biases or disparate treatment of members belonging to different groups (e.g., demographics, age groups, etc.).

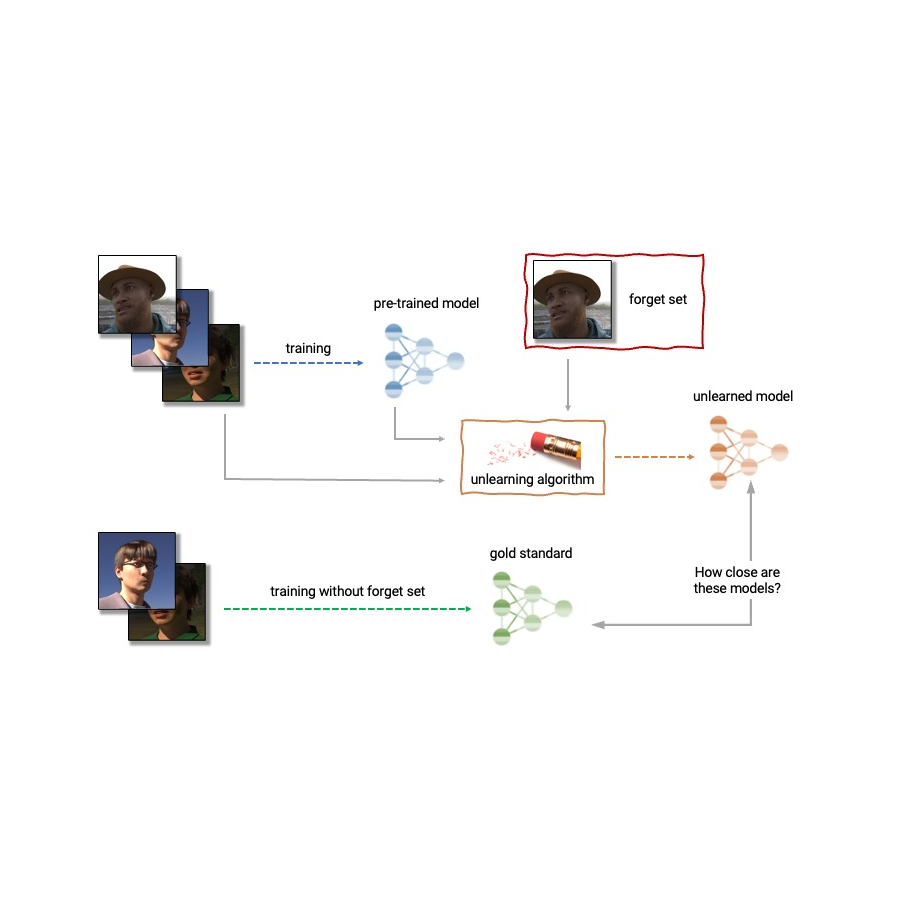
Anatomy of unlearning. An unlearning algorithm takes as input a pre-trained model and one or more samples from the train set to unlearn (the “forget set”). From the model, forget set, and retain set, the unlearning algorithm produces an updated model. An ideal unlearning algorithm produces a model that is indistinguishable from the model trained without the forget set.

Challenges of machine unlearning

The problem of unlearning is complex and multifaceted as it involves several conflicting objectives: forgetting the requested data, maintaining the model’s utility (e.g., accuracy on retained and held-out data), and efficiency. Because of this, existing unlearning algorithms make different trade-offs. For example, full retraining achieves successful forgetting without damaging model utility, but with poor efficiency, while adding noise to the weights achieves forgetting at the expense of utility.

Furthermore, the evaluation of forgetting algorithms in the literature has so far been highly inconsistent. While some works report the classification accuracy on the samples to unlearn, others report distance to the fully retrained model, and yet others use the error rate of membership inference attacks as a metric for forgetting quality [4, 5, 6].

We believe that the inconsistency of evaluation metrics and the lack of a standardized protocol is a serious impediment to progress in the field — we are unable to make direct comparisons between different unlearning methods in the literature. This leaves us with a myopic view of the relative merits and drawbacks of different approaches, as well as open challenges and opportunities for developing improved algorithms. To address the issue of inconsistent evaluation and to advance the state of the art in the field of machine unlearning, we’ve teamed up with a broad group of academic and industrial researchers to organize the first unlearning challenge.

Announcing the first Machine Unlearning Challenge

We are pleased to announce the first Machine Unlearning Challenge, which will be held as part of the NeurIPS 2023 Competition Track. The goal of the competition is twofold. First, by unifying and standardizing the evaluation metrics for unlearning, we hope to identify the strengths and weaknesses of different algorithms through apples-to-apples comparisons. Second, by opening this competition to everyone, we hope to foster novel solutions and shed light on open challenges and opportunities.

The competition will be hosted on Kaggle and run between mid-July 2023 and mid-September 2023. As part of the competition, today we’re announcing the availability of the starting kit. This starting kit provides a foundation for participants to build and test their unlearning models on a toy dataset.

The competition considers a realistic scenario in which an age predictor has been trained on face images, and, after training, a certain subset of the training images must be forgotten to protect the privacy or rights of the individuals concerned. For this, we will make available as part of the starting kit a dataset of synthetic faces (samples shown below) and we’ll also use several real-face datasets for evaluation of submissions. The participants are asked to submit code that takes as input the trained predictor, the forget and retain sets, and outputs the weights of a predictor that has unlearned the designated forget set. We will evaluate submissions based on both the strength of the forgetting algorithm and model utility. We will also enforce a hard cut-off that rejects unlearning algorithms that run slower than a fraction of the time it takes to retrain. A valuable outcome of this competition will be to characterize the trade-offs of different unlearning algorithms.

Excerpt images from the Face Synthetics dataset together with age annotations. The competition considers the scenario in which an age predictor has been trained on face images like the above, and, after training, a certain subset of the training images must be forgotten.

For evaluating forgetting, we will use tools inspired by MIAs, such as LiRA. MIAs were first developed in the privacy and security literature and their goal is to infer which examples were part of the training set. Intuitively, if unlearning is successful, the unlearned model contains no traces of the forgotten examples, causing MIAs to fail: the attacker would be unable to infer that the forget set was, in fact, part of the original training set. In addition, we will also use statistical tests to quantify how different the distribution of unlearned models (produced by a particular submitted unlearning algorithm) is compared to the distribution of models retrained from scratch. For an ideal unlearning algorithm, these two will be indistinguishable.

Conclusion

Machine unlearning is a powerful tool that has the potential to address several open problems in machine learning. As research in this area continues, we hope to see new methods that are more efficient, effective, and responsible. We are thrilled to have the opportunity via this competition to spark interest in this field, and we are looking forward to sharing our insights and findings with the community.

Acknowledgements

The authors of this post are now part of Google DeepMind. We are writing this blog post on behalf of the organization team of the Unlearning Competition: Eleni Triantafillou*, Fabian Pedregosa* (*equal contribution), Meghdad Kurmanji, Kairan Zhao, Gintare Karolina Dziugaite, Peter Triantafillou, Ioannis Mitliagkas, Vincent Dumoulin, Lisheng Sun Hosoya, Peter Kairouz, Julio C. S. Jacques Junior, Jun Wan, Sergio Escalera and Isabelle Guyon.

Read More

On-device diffusion plugins for conditioned text-to-image generation

On-device diffusion plugins for conditioned text-to-image generation

In recent years, diffusion models have shown great success in text-to-image generation, achieving high image quality, improved inference performance, and expanding our creative inspiration. Nevertheless, it is still challenging to efficiently control the generation, especially with conditions that are difficult to describe with text.

Today, we announce MediaPipe diffusion plugins, which enable controllable text-to-image generation to be run on-device. Expanding upon our prior work on GPU inference for on-device large generative models, we introduce new low-cost solutions for controllable text-to-image generation that can be plugged into existing diffusion models and their Low-Rank Adaptation (LoRA) variants.

Text-to-image generation with control plugins running on-device.

Background

With diffusion models, image generation is modeled as an iterative denoising process. Starting from a noise image, at each step, the diffusion model gradually denoises the image to reveal an image of the target concept. Research shows that leveraging language understanding via text prompts can greatly improve image generation. For text-to-image generation, the text embedding is connected to the model via cross-attention layers. Yet, some information is difficult to describe by text prompts, e.g., the position and pose of an object. To address this problem, researchers add additional models into the diffusion to inject control information from a condition image.

Common approaches for controlled text-to-image generation include Plug-and-Play, ControlNet, and T2I Adapter. Plug-and-Play applies a widely used denoising diffusion implicit model (DDIM) inversion approach that reverses the generation process starting from an input image to derive an initial noise input, and then employs a copy of the diffusion model (860M parameters for Stable Diffusion 1.5) to encode the condition from an input image. Plug-and-Play extracts spatial features with self-attention from the copied diffusion, and injects them into the text-to-image diffusion. ControlNet creates a trainable copy of the encoder of a diffusion model, which connects via a convolution layer with zero-initialized parameters to encode conditioning information that is conveyed to the decoder layers. However, as a result, the size is large, half that of the diffusion model (430M parameters for Stable Diffusion 1.5). T2I Adapter is a smaller network (77M parameters) and achieves similar effects in controllable generation. T2I Adapter only takes the condition image as input, and its output is shared across all diffusion iterations. Yet, the adapter model is not designed for portable devices.

The MediaPipe diffusion plugins

To make conditioned generation efficient, customizable, and scalable, we design the MediaPipe diffusion plugin as a separate network that is:

  • Plugable: It can be easily connected to a pre-trained base model.
  • Trained from scratch: It does not use pre-trained weights from the base model.
  • Portable: It runs outside the base model on mobile devices, with negligible cost compared to the base model inference.
Method    Parameter Size     Plugable     From Scratch     Portable
Plug-and-Play    860M*     ✔️        
ControlNet    430M*     ✔️        
T2I Adapter    77M     ✔️     ✔️    
MediaPipe Plugin    6M     ✔️     ✔️     ✔️
Comparison of Plug-and-Play, ControlNet, T2I Adapter, and the MediaPipe diffusion plugin.
* The number varies depending on the particulars of the diffusion model.

The MediaPipe diffusion plugin is a portable on-device model for text-to-image generation. It extracts multiscale features from a conditioning image, which are added to the encoder of a diffusion model at corresponding levels. When connecting to a text-to-image diffusion model, the plugin model can provide an extra conditioning signal to the image generation. We design the plugin network to be a lightweight model with only 6M parameters. It uses depth-wise convolutions and inverted bottlenecks from MobileNetv2 for fast inference on mobile devices.

Overview of the MediaPipe diffusion model plugin. The plugin is a separate network, whose output can be plugged into a pre-trained text-to-image generation model. Features extracted by the plugin are applied to the associated downsampling layer of the diffusion model (blue).

Unlike ControlNet, we inject the same control features in all diffusion iterations. That is, we only run the plugin once for one image generation, which saves computation. We illustrate some intermediate results of a diffusion process below. The control is effective at every diffusion step and enables controlled generation even at early steps. More iterations improve the alignment of the image with the text prompt and generate more detail.

Illustration of the generation process using the MediaPipe diffusion plugin.

Examples

In this work, we developed plugins for a diffusion-based text-to-image generation model with MediaPipe Face Landmark, MediaPipe Holistic Landmark, depth maps, and Canny edge. For each task, we select about 100K images from a web-scale image-text dataset, and compute control signals using corresponding MediaPipe solutions. We use refined captions from PaLI for training the plugins.

Face Landmark

The MediaPipe Face Landmarker task computes 478 landmarks (with attention) of a human face. We use the drawing utils in MediaPipe to render a face, including face contour, mouth, eyes, eyebrows, and irises, with different colors. The following table shows randomly generated samples by conditioning on face mesh and prompts. As a comparison, both ControlNet and Plugin can control text-to-image generation with given conditions.

Face-landmark plugin for text-to-image generation, compared with ControlNet.

Holistic Landmark

MediaPipe Holistic Landmarker task includes landmarks of body pose, hands, and face mesh. Below, we generate various stylized images by conditioning on the holistic features.

Holistic-landmark plugin for text-to-image generation.

Depth

Depth-plugin for text-to-image generation.

Canny Edge

Canny-edge plugin for text-to-image generation.

Evaluation

We conduct a quantitative study of the face landmark plugin to demonstrate the model’s performance. The evaluation dataset contains 5K human images. We compare the generation quality as measured by the widely used metrics, Fréchet Inception Distance (FID) and CLIP scores. The base model is a pre-trained text-to-image diffusion model. We use Stable Diffusion v1.5 here.

As shown in the following table, both ControlNet and the MediaPipe diffusion plugin produce much better sample quality than the base model, in terms of FID and CLIP scores. Unlike ControlNet, which needs to run at every diffusion step, the MediaPipe plugin only runs once for each image generated. We measured the performance of the three models on a server machine (with Nvidia V100 GPU) and a mobile phone (Galaxy S23). On the server, we run all three models with 50 diffusion steps, and on mobile, we run 20 diffusion steps using the MediaPipe image generation app. Compared with ControlNet, the MediaPipe plugin shows a clear advantage in inference efficiency while preserving the sample quality.

Model     FID↓     CLIP↑     Inference Time (s)
Nvidia V100     Galaxy S23
Base     10.32     0.26     5.0     11.5
Base + ControlNet     6.51     0.31     7.4 (+48%)     18.2 (+58.3%)
Base + MediaPipe Plugin     6.50     0.30     5.0 (+0.2%)     11.8 (+2.6%)
Quantitative comparison on FID, CLIP, and inference time.

We test the performance of the plugin on a wide range of mobile devices from mid-tier to high-end. We list the results on some representative devices in the following table, covering both Android and iOS.

Device     Android     iOS
    Pixel 4     Pixel 6     Pixel 7     Galaxy S23     iPhone 12 Pro     iPhone 13 Pro
Time (ms)     128     68     50     48     73     63
Inference time (ms) of the plugin on different mobile devices.

Conclusion

In this work, we present MediaPipe, a portable plugin for conditioned text-to-image generation. It injects features extracted from a condition image to a diffusion model, and consequently controls the image generation. Portable plugins can be connected to pre-trained diffusion models running on servers or devices. By running text-to-image generation and plugins fully on-device, we enable more flexible applications of generative AI.

Acknowledgments

We’d like to thank all team members who contributed to this work: Raman Sarokin and Juhyun Lee for the GPU inference solution; Khanh LeViet, Chuo-Ling Chang, Andrei Kulik, and Matthias Grundmann for leadership. Special thanks to Jiuqiang Tang, Joe Zou and Lu wang, who made this technology and all the demos running on-device.

Read More

Recommend and dynamically filter items based on user context in Amazon Personalize

Recommend and dynamically filter items based on user context in Amazon Personalize

Organizations are continuously investing time and effort in developing intelligent recommendation solutions to serve customized and relevant content to their users. The goals can be many: transform the user experience, generate meaningful interaction, and drive content consumption. Some of these solutions use common machine learning (ML) models built on historical interaction patterns, user demographic attributes, product similarities, and group behavior. Besides these attributes, context (such as weather, location, and so on) at the time of interaction can influence users’ decisions while navigating content.

In this post, we show how to use the user’s current device type as context to enhance the effectiveness of your Amazon Personalize-based recommendations. In addition, we show how to use such context to dynamically filter recommendations. Although this post shows how Amazon Personalize can be used for a video on demand (VOD) use case, it’s worth noting that Amazon Personalize can be used across multiple industries.

What is Amazon Personalize?

Amazon Personalize enables developers to build applications powered by the same type of ML technology used by Amazon.com for real-time personalized recommendations. Amazon Personalize is capable of delivering a wide array of personalization experiences, including specific product recommendations, personalized product reranking, and customized direct marketing. Additionally, as a fully managed AI service, Amazon Personalize accelerates customer digital transformations with ML, making it easier to integrate personalized recommendations into existing websites, applications, email marketing systems, and more.

Why is context important?

Using a user’s contextual metadata such as location, time of day, device type, and weather provides personalized experiences for existing users and helps improve the cold-start phase for new or unidentified users. The cold-start phase refers to the period when your recommendation engine provides non-personalized recommendations due to the lack of historical information regarding that user. In situations where there are other requirements to filter and promote items (say in news and weather), adding a user’s current context (season or time of day) helps improve accuracy by including and excluding recommendations.

Let’s take the example of a VOD platform recommending shows, documentaries, and movies to the user. Based on behavior analysis, we know VOD users tend to consume shorter-length content like sitcoms on mobile devices and longer-form content like movies on their TV or desktop.

Solution overview

Expanding on the example of considering a user’s device type, we show how to provide this information as context so that Amazon Personalize can automatically learn the influence of a user’s device on their preferred types of content.

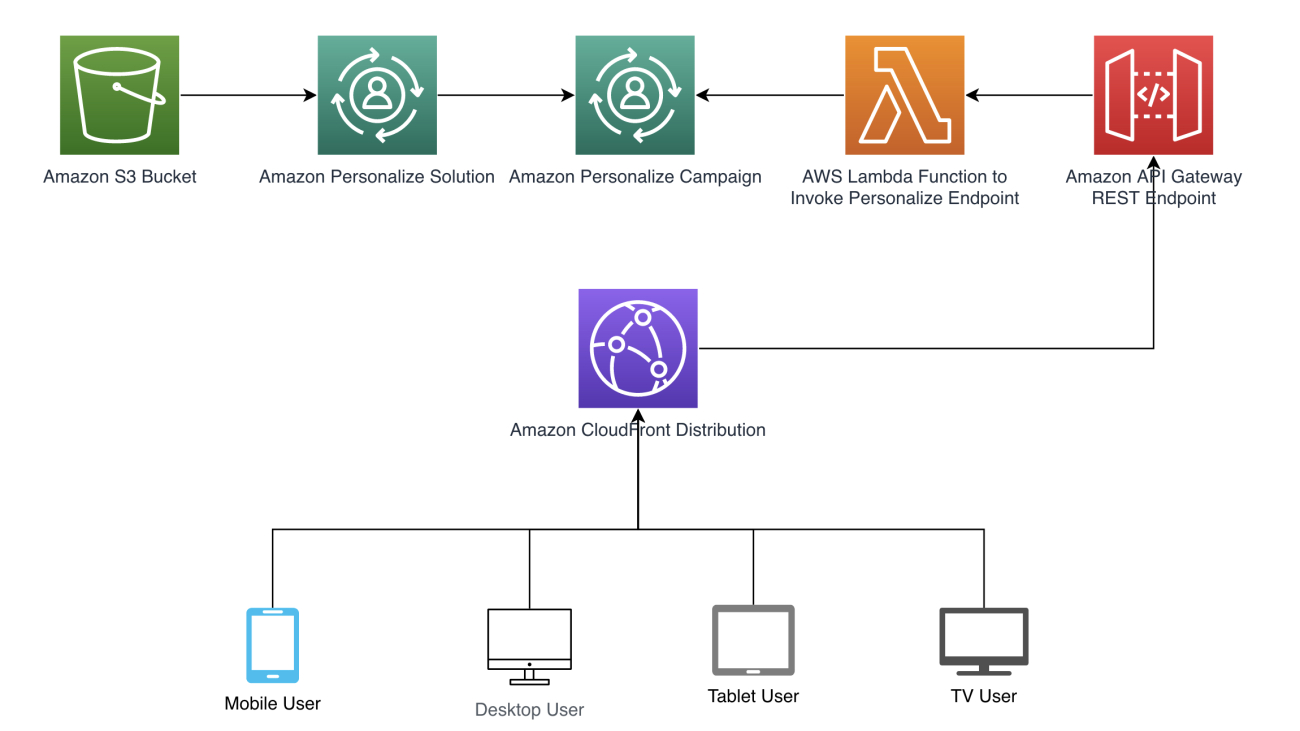
We follow the architecture pattern shown in the following diagram to illustrate how context can automatically be passed to Amazon Personalize. Automatically deriving context is achieved through Amazon CloudFront headers that are included in requests such as a REST API in Amazon API Gateway that calls an AWS Lambda function to retrieve recommendations. Refer to the full code example available at our GitHub repository. We provide a AWS CloudFormation template to create the necessary resources.

In following sections, we walk through how to set up each step of the sample architecture pattern.

Choose a recipe

Recipes are Amazon Personalize algorithms that are prepared for specific use cases. Amazon Personalize provides recipes based on common use cases for training models. For our use case, we build a simple Amazon Personalize custom recommender using the User-Personalization recipe. It predicts the items that a user will interact with based on the interactions dataset. Additionally, this recipe also uses items and users datasets to influence recommendations, if provided. To learn more about how this recipe works, refer to User-Personalization recipe.

Create and import a dataset

Taking advantage of context requires specifying context values with interactions so recommenders can use context as features when training models. We also have to provide the user’s current context at inference time. The interactions schema (see the following code) defines the structure of historical and real-time users-to-items interaction data. The USER_ID, ITEM_ID, and TIMESTAMP fields are required by Amazon Personalize for this dataset. DEVICE_TYPE is a custom categorical field that we are adding for this example to capture the user’s current context and include it in model training. Amazon Personalize uses this interactions dataset to train models and create recommendation campaigns.

{
    "type": "record",
    "name": "Interactions",
    "namespace": "com.amazonaws.personalize.schema",
    "fields": [
        {
            "name": "USER_ID",
            "type": "string"
        },
        {
            "name": "ITEM_ID",
            "type": "string"
        },
        {
            "name": "DEVICE_TYPE",
            "type": "string",
            "categorical": True
        },
        {
            "name": "TIMESTAMP",
            "type": "long"
        }
    ],
    "version": "1.0"
}

Similarly, the items schema (see the following code) defines the structure of product and video catalog data. The ITEM_ID is required by Amazon Personalize for this dataset. CREATION_TIMESTAMP is a reserved column name but it is not required. GENRE and ALLOWED_COUNTRIES are custom fields that we are adding for this example to capture the video’s genre and countries where the videos are allowed to be played. Amazon Personalize uses this items dataset to train models and create recommendation campaigns.

{
    "type": "record",
    "name": "Items",
    "namespace": "com.amazonaws.personalize.schema",
    "fields": [
        {
            "name": "ITEM_ID",
            "type": "string"
        },
        {
            "name": "GENRE",
            "type": "string",
            "categorical": True
        },
        {
            "name": "ALLOWED_COUNTRIES",
            "type": "string",
            "categorical": True
        },
        {
            "name": "CREATION_TIMESTAMP",
            "type": "long"
        }
    ],
    "version": "1.0"
}

In our context, historical data refers to end-user interaction history with videos and items on the VOD platform. This data is usually gathered and stored in application’s database.

For demo purposes, we use Python’s Faker library to generate some test data mocking the interactions dataset with different items, users, and device types over a 3-month period. After the schema and input interactions file location are defined, the next steps are to create a dataset group, include the interactions dataset within the dataset group, and finally import the training data into the dataset, as illustrated in the following code snippets:

create_dataset_group_response = personalize.create_dataset_group(
    name = "personalize-auto-context-demo-dataset-group"
)

create_interactions_dataset_response = personalize.create_dataset( 
    name = "personalize-auto-context-demo-interactions-dataset", 
    datasetType = ‘INTERACTIONS’, 
    datasetGroupArn = interactions_dataset_group_arn, 
    schemaArn = interactions_schema_arn 
)

create_interactions_dataset_import_job_response = personalize.create_dataset_import_job(
    jobName = "personalize-auto-context-demo-dataset-import",
    datasetArn = interactions_dataset_arn,
    dataSource = {
        "dataLocation": "s3://{}/{}".format(bucket, interactions_filename)
    },
    roleArn = role_arn
)

create_items_dataset_response = personalize.create_dataset( 
    name = "personalize-auto-context-demo-items-dataset", 
    datasetType = ‘ITEMS’, 
    datasetGroupArn = items_dataset_group_arn, 
    schemaArn = items_schema_arn 
)

create_items_dataset_import_job_response = personalize.create_dataset_import_job(
    jobName = "personalize-auto-context-demo-items-dataset-import",
    datasetArn = items_dataset_arn,
    dataSource = {
        "dataLocation": "s3://{}/{}".format(bucket, items_filename)
    },
    roleArn = role_arn
)

Gather historical data and train the model

In this step, we define the chosen recipe and create a solution and solution version referring to the previously defined dataset group. When you create a custom solution, you specify a recipe and configure training parameters. When you create a solution version for the solution, Amazon Personalize trains the model backing the solution version based on the recipe and training configuration. See the following code:

recipe_arn = "arn:aws:personalize:::recipe/aws-user-personalization"

create_solution_response = personalize.create_solution(
    name = "personalize-auto-context-demo-solution",
    datasetGroupArn = dataset_group_arn,
    recipeArn = recipe_arn
)

create_solution_version_response = personalize.create_solution_version(
    solutionArn = solution_arn
)

Create a campaign endpoint

After you train your model, you deploy it into a campaign. A campaign creates and manages an auto-scaling endpoint for your trained model that you can use to get personalized recommendations using the GetRecommendations API. In a later step, we use this campaign endpoint to automatically pass the device type as a context as a parameter and receive personalized recommendations. See the following code:

create_campaign_response = personalize.create_campaign(
    name = "personalize-auto-context-demo-campaign",
    solutionVersionArn = solution_version_arn
)

Create a dynamic filter

When getting recommendations from the created campaign, you can filter results based on custom criteria. For our example, we create a filter to satisfy the requirement of recommending videos that are only allowed to be played from user’s current country. The country information is passed dynamically from the CloudFront HTTP header.

create_filter_response = personalize.create_filter(
    name = 'personalize-auto-context-demo-country-filter',
    datasetGroupArn = dataset_group_arn,
    filterExpression = 'INCLUDE ItemID WHERE Items.ALLOWED_COUNTRIES IN ($CONTEXT_COUNTRY)'
)  

Create a Lambda function

The next step in our architecture is to create a Lambda function to process API requests coming from the CloudFront distribution and respond by invoking the Amazon Personalize campaign endpoint. In this Lambda function, we define logic to analyze the following CloudFront request’s HTTP headers and query string parameters to determine the user’s device type and user ID, respectively:

  • CloudFront-Is-Desktop-Viewer
  • CloudFront-Is-Mobile-Viewer
  • CloudFront-Is-SmartTV-Viewer
  • CloudFront-Is-Tablet-Viewer
  • CloudFront-Viewer-Country

The code to create this function is deployed through the CloudFormation template.

Create a REST API

To make the Lambda function and Amazon Personalize campaign endpoint accessible to the CloudFront distribution, we create a REST API endpoint set up as a Lambda proxy. API Gateway provides tools for creating and documenting APIs that route HTTP requests to Lambda functions. The Lambda proxy integration feature allows CloudFront to call a single Lambda function abstracting requests to the Amazon Personalize campaign endpoint. The code to create this function is deployed through the CloudFormation template.

Create a CloudFront distribution

When creating a CloudFront distribution, because this is a demo setup, we disable caching using a custom caching policy, ensuring the request goes to the origin every time. Additionally, we use an origin request policy specifying the required HTTP headers and query string parameters that are included in an origin request. The code to create this function is deployed through the CloudFormation template.

Test recommendations

When the CloudFront distribution’s URL is accessed from different devices (desktop, tablet, phone, and so on), we can see personalized video recommendations that are most relevant to their device. Also, if a cold user is presented, the recommendations tailored for user’s device are presented. In the following sample outputs, names of videos are only used for representation of their genre and runtime to make it relatable.

In the following code, a known user who loves comedy based on past interactions and is accessing from a phone device is presented with shorter sitcoms:

Recommendations for user:  460

ITEM_ID  GENRE                ALLOWED_COUNTRIES   
380      Comedy               RU|GR|LT|NO|SZ|VN   
540      Sitcom               US|PK|NI|JM|IN|DK   
860      Comedy               RU|GR|LT|NO|SZ|VN   
600      Comedy               US|PK|NI|JM|IN|DK   
580      Comedy               US|FI|CN|ES|HK|AE   
900      Satire               US|PK|NI|JM|IN|DK   
720      Sitcom               US|PK|NI|JM|IN|DK

The following known user is presented with feature films when accessing from a smart TV device based on past interactions:

Recommendations for user:  460

ITEM_ID  GENRE                ALLOWED_COUNTRIES   
780      Romance              US|PK|NI|JM|IN|DK   
100      Horror               US|FI|CN|ES|HK|AE   
400      Action               US|FI|CN|ES|HK|AE   
660      Horror               US|PK|NI|JM|IN|DK   
720      Horror               US|PK|NI|JM|IN|DK   
820      Mystery              US|FI|CN|ES|HK|AE   
520      Mystery              US|FI|CN|ES|HK|AE

A cold (unknown) user accessing from a phone is presented with shorter but popular shows:

Recommendations for user:  666

ITEM_ID  GENRE                ALLOWED_COUNTRIES   
940      Satire               US|FI|CN|ES|HK|AE   
760      Satire               US|FI|CN|ES|HK|AE   
160      Sitcom               US|FI|CN|ES|HK|AE   
880      Comedy               US|FI|CN|ES|HK|AE   
360      Satire               US|PK|NI|JM|IN|DK   
840      Satire               US|PK|NI|JM|IN|DK   
420      Satire               US|PK|NI|JM|IN|DK  

A cold (unknown) user accessing from a desktop is presented with top science fiction films and documentaries:

Recommendations for user:  666

ITEM_ID  GENRE                ALLOWED_COUNTRIES   
120      Science Fiction      US|PK|NI|JM|IN|DK   
160      Science Fiction      US|FI|CN|ES|HK|AE   
680      Science Fiction      RU|GR|LT|NO|SZ|VN   
640      Science Fiction      US|FI|CN|ES|HK|AE   
700      Documentary          US|FI|CN|ES|HK|AE   
760      Science Fiction      US|FI|CN|ES|HK|AE   
360      Documentary          US|PK|NI|JM|IN|DK 

The following known user accessing from a phone is returning filtered recommendations based on location (US):

Recommendations for user:  460

ITEM_ID  GENRE                ALLOWED_COUNTRIES   
300      Sitcom               US|PK|NI|JM|IN|DK   
480      Satire               US|PK|NI|JM|IN|DK   
240      Comedy               US|PK|NI|JM|IN|DK   
900      Sitcom               US|PK|NI|JM|IN|DK   
880      Comedy               US|FI|CN|ES|HK|AE   
220      Sitcom               US|FI|CN|ES|HK|AE   
940      Sitcom               US|FI|CN|ES|HK|AE 

Conclusion

In this post, we described how to use user device type as contextual data to make your recommendations more relevant. Using contextual metadata to train Amazon Personalize models will help you recommend products that are relevant to both new and existing users, not just from the profile data but also from a browsing device platform. Not only that, context like location (country, city, region, postal code) and time (day of the week, weekend, weekday, season) opens up the opportunity to make recommendations relatable to the user. You can run the full code example by using the CloudFormation template provided in our GitHub repository and cloning the notebooks into Amazon SageMaker Studio.


About the Authors


Gilles-Kuessan Satchivi
is an AWS Enterprise Solutions Architect with a background in networking, infrastructure, security, and IT operations. He is passionate about helping customers build Well-Architected systems on AWS. Before joining AWS, he worked in ecommerce for 17 years. Outside of work, he likes to spend time with his family and cheer on his children’s soccer team.

Aditya Pendyala is a Senior Solutions Architect at AWS based out of NYC. He has extensive experience in architecting cloud-based applications. He is currently working with large enterprises to help them craft highly scalable, flexible, and resilient cloud architectures, and guides them on all things cloud. He has a Master of Science degree in Computer Science from Shippensburg University and believes in the quote “When you cease to learn, you cease to grow.”

Prabhakar Chandrasekaran is a Senior Technical Account Manager with AWS Enterprise Support. Prabhakar enjoys helping customers build cutting-edge AI/ML solutions on the cloud. He also works with enterprise customers providing proactive guidance and operational assistance, helping them improve the value of their solutions when using AWS. Prabhakar holds six AWS and six other professional certifications. With over 20 years of professional experience, Prabhakar was a data engineer and a program leader in the financial services space prior to joining AWS.
Read More

Interactively fine-tune Falcon-40B and other LLMs on Amazon SageMaker Studio notebooks using QLoRA

Interactively fine-tune Falcon-40B and other LLMs on Amazon SageMaker Studio notebooks using QLoRA

Fine-tuning large language models (LLMs) allows you to adjust open-source foundational models to achieve improved performance on your domain-specific tasks. In this post, we discuss the advantages of using Amazon SageMaker notebooks to fine-tune state-of-the-art open-source models. We utilize Hugging Face’s parameter-efficient fine-tuning (PEFT) library and quantization techniques through bitsandbytes to support interactive fine-tuning of extremely large models using a single notebook instance. Specifically, we show how to fine-tune Falcon-40B using a single ml.g5.12xlarge instance (4 A10G GPUs), but the same strategy works to tune even larger models on p4d/p4de notebook instances.

Typically, the full precision representations of these very large models don’t fit into memory on a single or even several GPUs. To support an interactive notebook environment to fine-tune and run inference on models of this size, we use a new technique known as Quantized LLMs with Low-Rank Adapters (QLoRA). QLoRA is an efficient fine-tuning approach that reduces memory usage of LLMs while maintaining solid performance. Hugging Face and the authors of the paper mentioned have published a detailed blog post that covers the fundamentals and integrations with the Transformers and PEFT libraries.

Using notebooks to fine-tune LLMs

SageMaker comes with two options to spin up fully managed notebooks for exploring data and building machine learning (ML) models. The first option is fast start, collaborative notebooks accessible within Amazon SageMaker Studio, a fully integrated development environment (IDE) for ML. You can quickly launch notebooks in SageMaker Studio, dial up or down the underlying compute resources without interrupting your work, and even co-edit and collaborate on your notebooks in real time. In addition to creating notebooks, you can perform all the ML development steps to build, train, debug, track, deploy, and monitor your models in a single pane of glass in SageMaker Studio. The second option is a SageMaker notebook instance, a single, fully managed ML compute instance running notebooks in the cloud, which offers you more control over your notebook configurations.

For the remainder of this post, we use SageMaker Studio notebooks because we want to utilize SageMaker Studio’s managed TensorBoard experiment tracking with Hugging Face Transformer’s support for TensorBoard. However, the same concepts shown throughout the example code will work on notebook instances using the conda_pytorch_p310 kernel. It’s worth noting that SageMaker Studio’s Amazon Elastic File System (Amazon EFS) volume means you don’t need to provision a preordained Amazon Elastic Block Store (Amazon EBS) volume size, which is useful given the large size of model weights in LLMs.

Using notebooks backed by large GPU instances enables rapid prototyping and debugging without cold start container launches. However, it also means that you need to shut down your notebook instances when you’re done using them to avoid extra costs. Other options such as Amazon SageMaker JumpStart and SageMaker Hugging Face containers can be used for fine-tuning, and we recommend you refer to the following posts on the aforementioned methods to choose the best option for you and your team:

Prerequisites

If this is your first time working with SageMaker Studio, you first need to create a SageMaker domain. We also use a managed TensorBoard instance for experiment tracking, though that is optional for this tutorial.

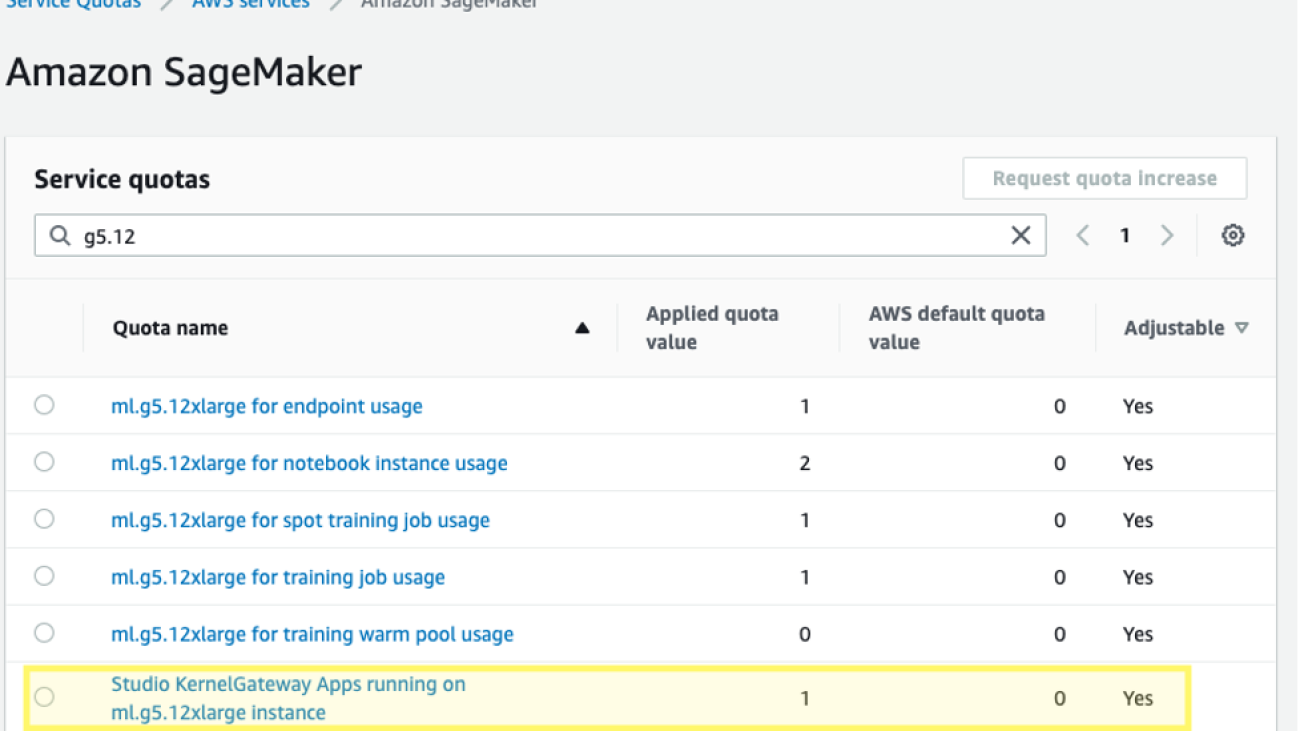
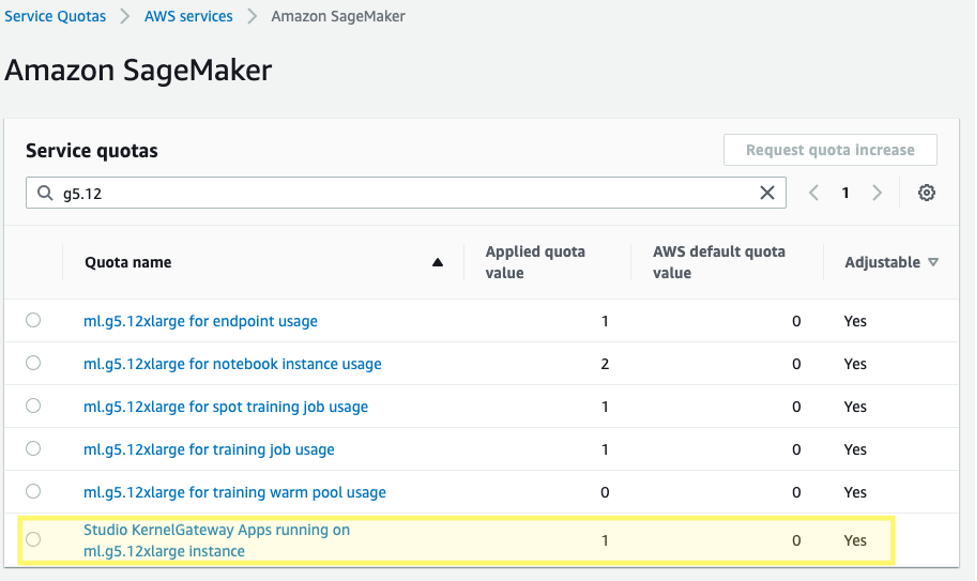
Additionally, you may need to request a service quota increase for the corresponding SageMaker Studio KernelGateway apps. For fine-tuning Falcon-40B, we use a ml.g5.12xlarge instance.

To request a service quota increase, on the AWS Service Quotas console, navigate to AWS services, Amazon SageMaker, and select Studio KernelGateway Apps running on ml.g5.12xlarge instances.

Get started

The code sample for this post can be found in the following GitHub repository. To begin, we choose the Data Science 3.0 image and Python 3 kernel from SageMaker Studio so that we have a recent Python 3.10 environment to install our packages.

We install PyTorch and the required Hugging Face and bitsandbytes libraries:

%pip install -q -U torch==2.0.1 bitsandbytes==0.39.1
%pip install -q -U datasets py7zr einops tensorboardX
%pip install -q -U git+https://github.com/huggingface/transformers.git@850cf4af0ce281d2c3e7ebfc12e0bc24a9c40714
%pip install -q -U git+https://github.com/huggingface/peft.git@e2b8e3260d3eeb736edf21a2424e89fe3ecf429d
%pip install -q -U git+https://github.com/huggingface/accelerate.git@b76409ba05e6fa7dfc59d50eee1734672126fdba

Next, we set the CUDA environment path using the installed CUDA that was a dependency of PyTorch installation. This is a required step for the bitsandbytes library to correctly find and load the correct CUDA shared object binary.

# Add installed cuda runtime to path for bitsandbytes
import os
import nvidia

cuda_install_dir = '/'.join(nvidia.__file__.split('/')[:-1]) + '/cuda_runtime/lib/'
os.environ['LD_LIBRARY_PATH'] =  cuda_install_dir

Load the pre-trained foundational model

We use bitsandbytes to quantize the Falcon-40B model into 4-bit precision so that we can load the model into memory on 4 A10G GPUs using Hugging Face Accelerate’s naive pipeline parallelism. As described in the previously mentioned Hugging Face post, QLoRA tuning is shown to match 16-bit fine-tuning methods in a wide range of experiments because model weights are stored as 4-bit NormalFloat, but are dequantized to the computation bfloat16 on forward and backward passes as needed.

model_id = "tiiuae/falcon-40b"
bnb_config = BitsAndBytesConfig(
	load_in_4bit=True,
	bnb_4bit_use_double_quant=True,
	bnb_4bit_quant_type="nf4",
	bnb_4bit_compute_dtype=torch.bfloat16
)

When loading the pretrained weights, we specify device_map=”auto" so that Hugging Face Accelerate will automatically determine which GPU to put each layer of the model on. This process is known as model parallelism.

# Falcon requires you to allow remote code execution. This is because the model uses a new architecture that is not part of transformers yet.
# The code is provided by the model authors in the repo.
model = AutoModelForCausalLM.from_pretrained(model_id, trust_remote_code=True, quantization_config=bnb_config, device_map="auto")

With Hugging Face’s PEFT library, you can freeze most of the original model weights and replace or extend model layers by training an additional, much smaller, set of parameters. This makes training much less expensive in terms of required compute. We set the Falcon modules that we want to fine-tune as target_modules in the LoRA configuration:

from peft import LoraConfig, get_peft_model

config = LoraConfig(
	r=8,
	lora_alpha=32,
	target_modules=[
		"query_key_value",
		"dense",
		"dense_h_to_4h",
		"dense_4h_to_h",
	],
	lora_dropout=0.05,
	bias="none",
	task_type="CAUSAL_LM"
)

model = get_peft_model(model, config)
print_trainable_parameters(model)
# Output: trainable params: 55541760 || all params: 20974518272|| trainable%: 0.2648058910327664

Notice that we’re only fine-tuning 0.26% of the model’s parameters, which makes this feasible in a reasonable amount of time.

Load a dataset

We use the samsum dataset for our fine-tuning. Samsum is a collection of 16,000 messenger-like conversations with labeled summaries. The following is an example of the dataset:

{
	"id": "13818513",
	"summary": "Amanda baked cookies and will bring Jerry some tomorrow.",
	"dialogue": "Amanda: I baked cookies. Do you want some?rnJerry: Sure!rnAmanda: I'll bring you tomorrow :-)"
}

In practice, you’ll want to use a dataset that has specific knowledge to the task you are hoping to tune your model on. The process of building such a dataset can be accelerated by using Amazon SageMaker Ground Truth Plus, as described in High-quality human feedback for your generative AI applications from Amazon SageMaker Ground Truth Plus.

Fine-tune the model

Prior to fine-tuning, we define the hyperparameters we want to use and train the model. We can also log our metrics to TensorBoard by defining the parameter logging_dir and requesting the Hugging Face transformer to report_to="tensorboard":

bucket = ”<YOUR-S3-BUCKET>”
log_bucket = f"s3://{bucket}/falcon-40b-qlora-finetune"

import transformers

# We set num_train_epochs=1 simply to run a demonstration

trainer = transformers.Trainer(
	model=model,
	train_dataset=lm_train_dataset,
	eval_dataset=lm_test_dataset,
	args=transformers.TrainingArguments(
		per_device_train_batch_size=8,
		per_device_eval_batch_size=8,
		logging_dir=log_bucket,
		logging_steps=2,
		num_train_epochs=1,
		learning_rate=2e-4,
		bf16=True,
		save_strategy = "no",
		output_dir="outputs",
		 report_to="tensorboard",
	),
	data_collator=transformers.DataCollatorForLanguageModeling(tokenizer, mlm=False),
)

Monitor the fine-tuning

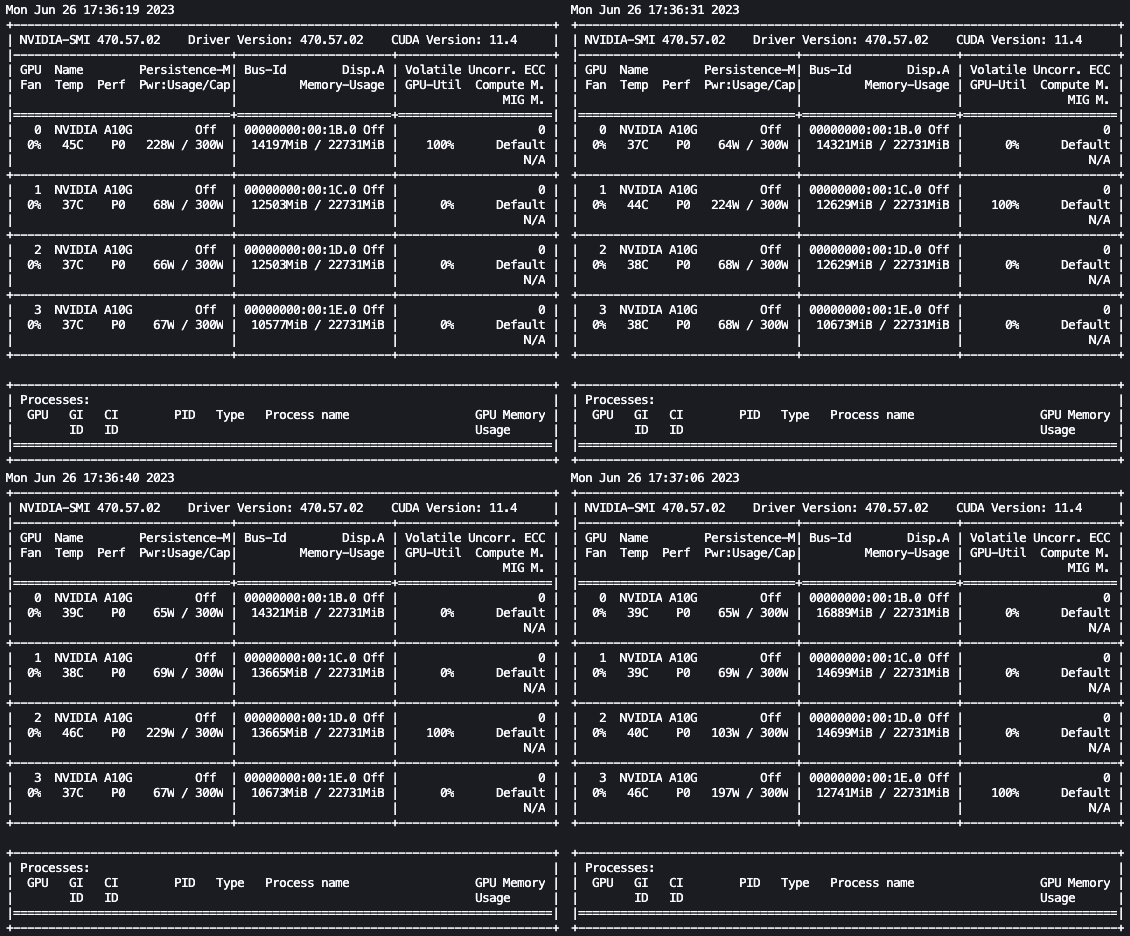
With the preceding setup, we can monitor our fine-tuning in real time. To monitor GPU usage in real time, we can run nvidia-smi directly from the kernel’s container. To launch a terminal running on the image container, simply choose the terminal icon at the top of your notebook.

From here, we can use the Linux watch command to repeatedly run nvidia-smi every half second:

watch -n 0.5 nvidia-smi

In the preceding animation, we can see that the model weights are distributed across the 4 GPUs and computation is being distributed across them as layers are processed serially.

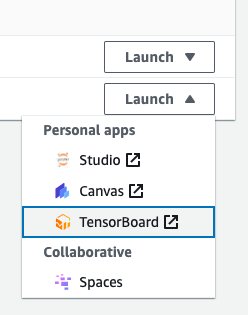
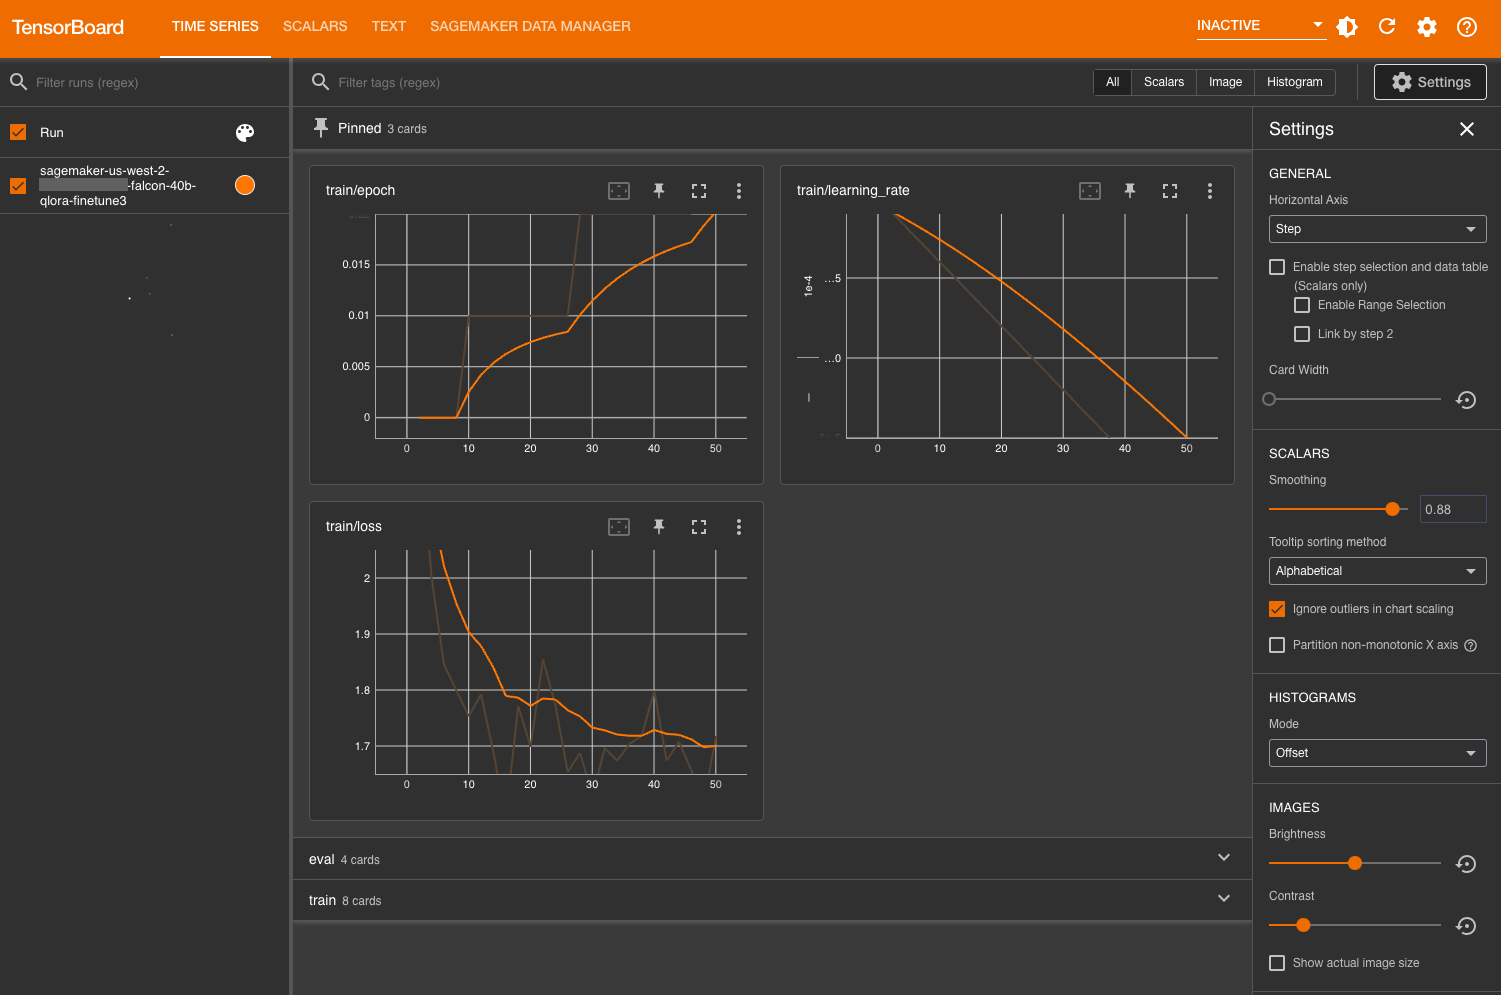
To monitor the training metrics, we utilize the TensorBoard logs that we write to the specified Amazon Simple Storage Service (Amazon S3) bucket. We can launch our SageMaker Studio domain user’s TensorBoard from the AWS SageMaker console:

After loading, you can specify the S3 bucket that you instructed the Hugging Face transformer to log to in order to view training and evaluation metrics.

Evaluate the model

After our model is finished training, we can run systematic evaluations or simply generate responses:

tokens_for_summary = 30
output_tokens = input_ids.shape[1] + tokens_for_summary

outputs = model.generate(inputs=input_ids, do_sample=True, max_length=output_tokens)
gen_text = tokenizer.batch_decode(outputs)[0]
print(gen_text)
# Sample output:
# Summarize the chat dialogue:
# Richie: Pogba
# Clay: Pogboom
# Richie: what a s strike yoh!
# Clay: was off the seat the moment he chopped the ball back to his right foot
# Richie: me too dude
# Clay: hope his form lasts
# Richie: This season he's more mature
# Clay: Yeah, Jose has his trust in him
# Richie: everyone does
# Clay: yeah, he really deserved to score after his first 60 minutes
# Richie: reward
# Clay: yeah man
# Richie: cool then
# Clay: cool
# ---
# Summary:
# Richie and Clay have discussed the goal scored by Paul Pogba. His form this season has improved and both of them hope this will last long

After you are satisfied with the model’s performance, you can save the model:

trainer.save_model("path_to_save")

You can also choose to host it in a dedicated SageMaker endpoint.

Clean up

Complete the following steps to clean up your resources:

  1. Shut down the SageMaker Studio instances to avoid incurring additional costs.
  2. Shut down your TensorBoard application.
  3. Clean up your EFS directory by clearing the Hugging Face cache directory:
    rm -R ~/.cache/huggingface/hub

Conclusion

SageMaker notebooks allow you to fine-tune LLMs in a quick and efficient manner in an interactive environment. In this post, we showed how you can use Hugging Face PEFT with bitsandbtyes to fine-tune Falcon-40B models using QLoRA on SageMaker Studio notebooks. Try it out, and let us know your thoughts in the comments section!

We also encourage you to learn more about Amazon generative AI capabilities by exploring SageMaker JumpStart, Amazon Titan models, and Amazon Bedrock.


About the Authors

Sean Morgan is a Senior ML Solutions Architect at AWS. He has experience in the semiconductor and academic research fields, and uses his experience to help customers reach their goals on AWS. In his free time, Sean is an active open-source contributor and maintainer, and is the special interest group lead for TensorFlow Addons.

Lauren MullennexLauren Mullennex is a Senior AI/ML Specialist Solutions Architect at AWS. She has a decade of experience in DevOps, infrastructure, and ML. She is also the author of a book on computer vision. Her other areas of focus include MLOps and generative AI.

Philipp Schmid is a Technical Lead at Hugging Face with the mission to democratize good machine learning through open source and open science. Philipp is passionate about productionizing cutting-edge and generative AI machine learning models. He loves to share his knowledge on AI and NLP at various meetups such as Data Science on AWS, and on his technical blog.

Read More

Breaking cross-modal boundaries in multimodal AI: Introducing CoDi, composable diffusion for any-to-any generation

Breaking cross-modal boundaries in multimodal AI: Introducing CoDi, composable diffusion for any-to-any generation

Imagine an AI model that can seamlessly generate high-quality content across text, images, video, and audio, all at once. Such a model would more accurately capture the multimodal nature of the world and human comprehension, seamlessly consolidate information from a wide range of sources, and enable strong immersion in human-AI interactions. This could transform the way humans interact with computers on various tasks, including assistive technology, custom learning tools, ambient computing, and content generation.

In a recent paper: Any-to-Any Generation via Composable Diffusion, Microsoft Azure Cognitive Service Research and UNC NLP present CoDi, a novel generative model capable of processing and simultaneously generating content across multiple modalities. CoDi allows for the synergistic generation of high-quality and coherent outputs spanning various modalities, from assorted combinations of input modalities. CoDi is the latest work of Microsoft’s Project i-Code, which aims to develop integrative and composable multimodal AI. Through extensive experiments, the researchers demonstrate CoDi’s remarkable capabilities.

The challenge of multimodal generative AI

The powerful cross-modal models that have emerged in recent years are mostly capable of generating or processing just one single modality. These models often face limitations in real-world applications where multiple modalities coexist and interact. Chaining modality-specific generative models together in a multi-step generation setting can be cumbersome and slow.

Moreover, independently generated unimodal streams may not be consistent and aligned when stitched together in a post-processing way, such as synchronized video and audio.

To address these challenges, the researchers propose Composable Diffusion (CoDi), the first model capable of simultaneously processing and generating arbitrary combinations of modalities. CoDi employs a novel composable generation strategy that involves building a shared multimodal space by bridging alignment in the diffusion process, enabling the synchronized generation of intertwined modalities, such as temporally aligned video and audio.

Spotlight: Microsoft Research Podcast

AI Frontiers: AI for health and the future of research with Peter Lee

Peter Lee, head of Microsoft Research, and Ashley Llorens, AI scientist and engineer, discuss the future of AI research and the potential for GPT-4 as a medical copilot.

The power of composable diffusion

A GIF of CoDi generation pipelines. The input modalities are listed vertically on the left side, including the text “Teddy bear on a skateboard, 4k”, a picture of Times Square, and the waveform of raining ambience. Input modalities are input to the CoDi model, depicted by a rectangular block, and output modalities are listed on the right side. Input modalities, CoDi, and output modalities connected by lines of different colors to represent different generation pipelines. The yellow line depicts that given an input of rain audio, CoDi can generate the text description “Raining, rain, moderate”. Depicted by red lines, CoDi can take in the image of Times Square together with the rain audio, to generate the audio of raining street. Finally, depicted by purple lines, the input modalities are the text “Teddy bear on a skateboard, 4k”, the picture of Times Square, and the raining audio; the output is a video with sound. In the video, a Teddy bear is skateboarding in the rain on the street of Times Square, and one can hear synchronized sound of skateboarding and rain.
Figure 1: CoDi can generate any combination of modalities from any mixture of input modalities.

Training a model to take any mixture of input modalities and flexibly generate any mixture of outputs presents significant computational and data requirements, as the number of combinations for the input and output modalities scales exponentially. And the scarcity of aligned training data for many groups of modalities makes it infeasible to train with all possible input-output combinations. To address these challenges, the researchers propose to build CoDi in a composable and integrative manner.

They start by training each individual modality-specific latent diffusion model (LDM) independently (these LDMs will be smoothly integrated later for joint generation). This approach ensures exceptional single-modality generation quality using widely available modality-specific training data. To allow CoDi to handle any mixture of inputs, input modalities like images, video, audio, and language are projected into the same semantic space. Consequently, the LDM of each modality can flexibly process any mixture of multimodal inputs. The multi-conditioning generation process is done by letting diffusers be conditioned on these inputs via a weighted sum of each input modality’s representation.

One of CoDi’s most significant innovations is its ability to handle many-to-many generation strategies, simultaneously generating any mixture of output modalities. To achieve this, CoDi adds a cross-attention module to each diffuser, and an environment encoder to project the latent variable of different LDMs into a shared latent space.

By freezing the parameters of the LDM and training only the cross-attention parameters and the environment encoder, CoDi can seamlessly generate any group of modalities without training on all possible generation modality combinations, reducing the training objectives to a more manageable number.

Showcasing CoDi’s capabilities

The research demonstrates the novel capacity of joint generation of multiple modalities, such as synchronized video and audio, given separate text, audio, and image prompts. Specifically, in the example shown below, the input text prompt is “teddy bear on a skateboard, 4k, high resolution”, the input image prompt is a picture of Times Square, and the input audio prompt is rain. The generated video, shown in Figure 2, is a teddy bear skateboarding in the rain at Times Square. The generated audio contains the sounds of rain, skateboarding, and street noise, which are synchronized with the video. This shows that CoDi can consolidate information from multiple input modalities and generate coherent and aligned outputs.

Figure 2: The video shows an example of CoDi generating video + audio from text, image and audio input. The input modalities are listed vertically on the left side, including the text “Teddy bear on a skateboard, 4k”, a picture of Times Square, and the waveform of raining ambience. The output is a video with sound. In the video, a Teddy bear is skateboarding in the rain on the street of Times Square. One can also hear synchronized sound of skateboarding and rain.

In addition to its strong joint-modality generation quality, CoDi is also capable of single-to-single modality generation and multi-conditioning generation. It outperforms or matches the unimodal state of the art for single-modality synthesis.

Potential real-world applications and looking forward

CoDi’s development unlocks numerous possibilities for real-world applications requiring multimodal integration. For example, in education, CoDi can generate dynamic, engaging materials catering to diverse learning styles, allowing learners to access information tailored to their preferences, while enhancing understanding and knowledge retention. CoDi can support some accessible experiences for people with disabilities, such as providing audio descriptions and visual cues for deaf or low-hearing individuals.

Composable Diffusion marks a significant step towards more engaging and holistic human-computer interactions, establishing a solid foundation for future investigations in generative artificial intelligence.

The post Breaking cross-modal boundaries in multimodal AI: Introducing CoDi, composable diffusion for any-to-any generation appeared first on Microsoft Research.

Read More

What Is Robotics Simulation?

What Is Robotics Simulation?

Robots are moving goods in warehouses, packaging foods and helping assemble vehicles  — when they’re not flipping burgers or serving lattes.

How did they get so skilled so fast? Robotics simulation.

Making leaps in progress, it’s transforming industries all around us.

Robotics Simulation Summarized

A robotics simulator places a virtual robot in virtual environments to test the robot’s software without requiring the physical robot. And the latest simulators can generate datasets to be used to train machine learning models that will run on the physical robots.

In this virtual world, developers create digital versions of robots, environments and other assets robots might encounter. These environments can obey the laws of physics and mimic real-world gravity, friction, materials and lighting conditions.

Who Uses Robotics Simulation? 

Robots boost operations at massive scale today. Some of the biggest and most innovative names in robots rely on robotics simulation.

Fulfillment centers handle tens of millions of packages a day, thanks to the operational efficiencies uncovered in simulation.

Amazon Robotics uses it to support its fulfillment centers. BMW Group taps into it to accelerate planning for its automotive assembly plants. Soft Robotics applies it to perfecting gripping for picking and placing foods for packaging.

Automakers worldwide are supporting their operations with robotics.

“Car companies employ nearly 14 million people. Digitalization will enhance the industry’s efficiency, productivity and speed,” said NVIDIA CEO Jensen Huang during his latest GTC keynote.

How Robotics Simulation Works, in Brief

An advanced robotics simulator begins by applying fundamental equations of physics. For example, it can use Newton’s laws of motion to determine how objects move over a small increment of time, or a timestep. It can also incorporate physical constraints of a robot, such as being composed of hinge-like joints, or being unable to pass through other objects.

Simulators use various methods to detect potential collisions between objects, identify contact points between colliding objects, and compute forces or impulses to prevent objects from passing through one another. Simulators can also compute sensor signals sought by a user, such as torques at robot joints or forces between a robot’s gripper and an object.

The simulator will then repeat this process for as many timesteps as the user requires. Some simulators — such as NVIDIA Isaac Sim, an application built on NVIDIA Omniverse — can also provide physically accurate visualizations of the simulator output at each timestep.

Using a Robotics Simulator for Outcomes

A robotics simulator user will typically import computer-aided design models of the robot and either import or generate objects of interest to build a virtual scene. A developer can use a set of algorithms to perform task planning and motion planning, and then prescribe control signals to carry out those plans. This enables the robot to perform a task and move in a particular way, such as picking up an object and placing it at a target location.

The developer can observe the outcome of the plans and control signals and then modify them as needed to ensure success. More recently, there’s been a shift toward machine learning-based methods. So instead of directly prescribing control signals, the user prescribes a desired behavior, like moving to a location without colliding. In this situation, a data-driven algorithm generates control signals based on the robot’s simulated sensor signals.

These algorithms can include imitation learning, in which human demonstrations can provide references, and reinforcement learning, where robots learn to achieve behaviors through intelligent trial-and-error, achieving years of learning quickly with an accelerated virtual experience.

Simulation Drives Breakthroughs

Simulation solves big problems. It is used to verify, validate and optimize robot designs and systems and their algorithms. Simulation also helps design facilities to be optimized for maximum efficiencies before construction or remodeling begins. This helps to reduce costly manufacturing change orders.

For robots to work safely among people, flawless motion planning is necessary. To handle delicate objects, robots need to be precise at making contact and grasping. These machines, as well as autonomous mobile robots and vehicle systems, are trained on vast sums of data to develop safe movement.

Drawing on synthetic data, simulations are enabling virtual advances that weren’t previously possible. Today’s robots born and raised in simulation will be used in the real world to solve all manner of problems.

Simulation Research Is Propelling Progress 

Driven by researchers, recent simulation advances are rapidly improving the capabilities and flexibility of robotics systems, which is accelerating deployments.

University researchers, often working with NVIDIA Research and technical teams, are solving problems in simulation that have real-world impact. Their work is expanding the potential for commercialization of new robotics capabilities across numerous markets.

Among them, robots are learning to cut squishy materials such as beef and chicken, fasten nuts and bolts for automotive assembly, as well as maneuver with collision-free motion planning for warehouses and manipulate hands with new levels of dexterity.

Such research has commercial promise across trillion-dollar industries.

High-Fidelity, Physics-Based Simulation Breakthroughs 

The ability to model physics, displayed in high resolution, ushered in the start of many industrial advances.

Researched for decades, simulations based on physics offer commercial breakthroughs today.

NVIDIA PhysX, part of Omniverse core technology, delivers high-fidelity physics-based simulations, enabling real-world experimentation in virtual environments.

PhysX enables development of the ability to assess grasp quality so that robots can learn to grasp unknown objects. PhysX is also highly capable for developing skills such as manipulation, locomotion and flight.

Launched into open source, PhysX 5 opens the doors for development of industrial applications everywhere. Today, roboticists can access PhysX as part of Isaac Sim, built on Omniverse.

The Nuts and Bolts of Assembly Simulation 

With effective grasping enabled, based on physics, the next step was to simulate more capable robotic maneuvering applicable to industries.

Assembly is a big one. It’s an essential part of building products for automotive, electronics, aerospace and medical industries. Assembly tasks include tightening nuts and bolts, soldering and welding, inserting electrical connections and routing cables.

Robotic assembly, however, is a long-standing work in progress. That’s because the physical manipulation complexity, part variability and high accuracy and reliability requirements make it extra tricky to complete successfully — even for humans.

That hasn’t stopped researchers and developers from trying, putting simulation to work in these interactions involving a lot of contact, and there are signs of progress.

NVIDIA robotics and simulation researchers in 2022 came up with a novel simulation approach to overcome the robotics assemble challenge using Isaac Sim. Their research paper, titled Factory: Fast Contact for Robotic Assembly, outlines a set of physics simulation methods and robot learning tools for achieving real-time and faster simulation for a wide range of interactions requiring lots of contact, including for assembly.

Solving the Sim-to-Real Gap for Assembly Scenarios 

Advancing the simulation work developed in the paper, researchers followed up with an effort to help solve what’s called the sim-to-real gap.

This gap is the difference between what a robot has learned in simulation and what it needs to learn to be ready for the real world.

In another paper, IndustReal: Transferring Contact-Rich Assembly Tasks from Simulation to Reality, researchers outlined a set of algorithms, systems and tools for solving assembly tasks in simulation and transferring these skills to real robots.

NVIDIA researchers have also developed a new, faster and more efficient method for teaching robot manipulation tasks in real life scenarios — opening drawers or dispensing soap — training significantly faster than the current standard.

The research paper RVT: Robotic View Transformer for 3D Object Manipulation uses a type of neural network called a multi-view transformer to produce virtual views from the camera input.

The work combines text prompts, video input and simulation to achieve 36x faster training time than the current state of the art — reducing the time needed to teach the robot from weeks to days —  with a 26 percent improvement in the robot’s task success rate.

Robots Hands Are Grasping Dexterity 

Researchers have taken on the challenge of creating more agile hands that can work in all kinds of settings and take on new tasks.

Developers are building robotic gripping systems to pick and place items, but creating highly capable hands with human-like dexterity has so far proven too complex. Using deep reinforcement learning can require billions of labeled images, making it impractical.

NVIDIA researchers working on a project, called DeXtreme, tapped into NVIDIA Isaac Gym and Omniverse Replicator to show that it could be used to train a robot hand to quickly manipulate a cube into a desired position. Tasks like this are challenging for robotics simulators because there is a large number of contacts involved in the manipulation and because the motion has to be fast to do the manipulation in a reasonable amount of time.

The advances in hand dexterity pave the way for robots to handle tools, making them more useful in industrial settings.

The DeXtreme project, which applies the laws of physics, is capable of training robots inside its simulated universe 10,000x faster than if trained in the real world. This equates to days of training versus years.

This simulator feat shows it has the ability to model contacts, which allows a sim-to-real transfer, a holy grail in robotics for hand dexterity.

Cutting-Edge Research on Robotic Cutting

Robots that are capable of cutting can create new market opportunities.

In 2021, a team of researchers from NVIDIA, University of Southern California, University of Washington, University of Toronto and Vector Institute, and University of Sydney won “Best Student Paper” at the Robotics: Science and Systems conference. The work, titled DiSECt: A Differentiable Simulation Engine for Autonomous Robotic Cutting, details a “differentiable simulator” for teaching robots to cut soft materials. Previously, robots trained in this area were unreliable.

The DiSECt simulator can accurately predict the forces on a knife as it presses and slices through common biological materials.

DiSECt relies on the finite element method, which is used for solving differential equations in mathematical modeling and engineering. Differential equations show how a rate of change, or derivative, in one variable relates to others. In robotics, differential equations usually describe the relationship between forces and movement.

Applying these principles, the DiSECt project holds promise for training robots in surgery and food processing, among other areas.

Teaching Collision-Free Motion for Autonomy 

So, robotic grasping, assembling, manipulating and cutting are all making leaps. But what about autonomous mobile robots that can safely navigate?

Currently, developers can train robots for specific settings — a factory floor, fulfillment center or manufacturing plant. Within that, simulations can solve problems for specific robots, such as palette jacks, robotic arms and walking robots. Amid these chaotic setups and robot types, there are plenty of people and obstacles to avoid. In such scenes, collision-free motion generation for unknown, cluttered environments is a core component of robotics applications.

Traditional motion planning approaches that attempt to address these challenges can come up short in unknown or dynamic environments. SLAM — or simultaneous localization and mapping —  can be used to generate 3D maps of environments with camera images from multiple viewpoints, but it requires revisions when objects move and environments are changed.

To help overcome some of these shortcomings, the NVIDIA Robotics research team has co-developed with the University of Washington a new model, dubbed Motion Policy Networks (or MπNets). MπNets is an end-to-end neural policy that generates collision-free motion in real time using a continuous stream of data coming from a single fixed camera. MπNets has been trained on more than 3 million motion planning problems using a pipeline of geometric fabrics from NVIDIA Omniverse and 700 million point clouds rendered in simulation. Training it on large datasets enables navigation of unknown environments in the real world.

Apart from directly learning a trajectory model as in MπNets, the team also recently unveiled a new point cloud-based collision model called CabiNet. With the CabiNet model, one can deploy general purpose pick-and-place policies of unknown objects beyond a tabletop setup. CabiNet was trained with over 650,000 procedurally generated simulated scenes and was evaluated in NVIDIA Isaac Gym. Training with a large synthetic dataset allowed it to generalize to even out-of-distribution scenes in a real kitchen environment, without needing any real data.

Simulation Benefits to Businesses  

Developers, engineers and researchers can quickly experiment with different kinds of robot designs in virtual environments, bypassing time-consuming and expensive physical testing methods.

Applying different kinds of robot designs, in combination with robot software, to test the robot’s programming in a virtual environment before building out the physical machine reduces risks of having quality issues to fix afterwards.

While this can vastly accelerate the development timeline, it can also drastically cut costs for building and testing robots and AI models while ensuring safety.

Additionally, robot simulation helps connect robots with business systems, such as inventory databases, so a robot knows where an item is located.

Simulation of cobots, or robots working with humans, promises to reduce injuries and make jobs easier, enabling more efficient delivery of all kinds of products.

And with packages arriving incredibly fast in homes everywhere, what’s not to like.

Learn about NVIDIA Isaac Sim, Jetson Orin, Omniverse Enterprise and Metropolis.

Learn more from this Deep Learning Institute course: Introduction to Robotic Simulations in Isaac Sim

Read More

Calm, Cool and Creative: MUE Studio Showcases 3D Scenes ‘In the NVIDIA Studio’

Calm, Cool and Creative: MUE Studio Showcases 3D Scenes ‘In the NVIDIA Studio’

Editor’s note: This post is part of our weekly In the NVIDIA Studio series, which celebrates featured artists, offers creative tips and tricks, and demonstrates how NVIDIA Studio technology improves creative workflows. 

MUE Studio, founded by 3D artists Minjin Kang and Mijoo Kim, specializes in art direction, photography and 3D design for campaigns and installations. It focuses on creating unique visual identities to help clients express themselves.

The creative duo behind the studio, based in New York, said they’ve always been fascinated with blurring the boundary between fantasy and reality in their work.

Together, they created the 3D video Somewhere in the World and a summer-themed series of artwork this week In the NVIDIA Studio, using Adobe After Effects, Autodesk 3ds Max and Unreal Engine 5.

GeForce RTX 4060 graphics cards are now available to order, starting at $299. The state-of-the-art NVIDIA Ada Lovelace architecture supercharges creative apps and productivity, while delivering immersive, AI-accelerated gaming with ray tracing and DLSS 3.

The GeForce RTX 4060 GPU has arrived.

Plus, Chaos Vantage 2 is now available, offering new benefits for creators on RTX GPUs — like the GeForce RTX 4060 — including NVIDIA AI Denoiser for smoother image quality, as well as the direct light reservoir sampling feature powered by NVIDIA RTX Direct Illumination (RTXDI) technology.

Chaos Vantage 2 Powered by NVIDIA RTX

Chaos Vantage is a high-quality 3D visualization tool for artists who use the V-Ray rendering software. It enables users to quickly explore and present their work in a fully ray-traced environment that can handle massive scenes based on large models. Vantage 2 adds powerful new capabilities, enabling architectural-visualization and visual-effects artists to convey their designs more effectively.

Vantage 2 features the new NVIDIA AI Denoiser, which automatically removes noise from images when rendering high-quality output. Its upscaling mode increases frame rates and responsiveness in interactive rendering for a smoother, more efficient experience in the viewport.

The update also adds direct light reservoir sampling, powered by NVIDIA RTXDI technology, enabling artists to scale multiple dynamic light sources to sizable scenes — lightning fast — with no impact on performance.

Rendered in Chaos Vantage 2. Image courtesy of © Brick Visual.

Rounding out the Vantage update are new scene states to turn design-validation presentations into interactive storyboards; support for realistic vegetation movement in the wind and interaction with animated characters; and enhancements for popular render elements like back to beauty, material and object masks for compositing in image-editing apps.

Learn more about Vantage 2, available now.

Enter the Minds of MUE Studio

When designing an environment, MUE Studio aims to create a minimalistic space that invites viewers “to enter and take a break,” said Kim.


This is the foundation of Somewhere in the World, as well as the studio’s summer-themed series of artwork. By intentionally setting the time of day, placing a specific object or choosing a remote location, the artists ensure these pieces can become a viewer’s personal path to tranquility.


“Our purpose is to provide comfort and inspire people to dream of a better world,” said Kang. “We really appreciate comments we’ve received, saying things like, ‘These images are calm,’ and ‘I would like to be present in that space.’ Such words fuel us as artists.”

Idyllic environments created by MUE Studio.

The visuals’ minimalist aesthetic was brought to life through the power of NVIDIA Studio laptops equipped with GeForce RTX 3090 graphics.

The duo began sculpting and modeling in Autodesk 3ds Max. RTX-accelerated AI denoising with the default Autodesk Arnold renderer made movement in the viewport highly interactive.

Feel the calm of MUE Studio’s artwork.

MUE Studio is especially interested in the human element of their art, the founders said. Kang focuses on the artistic tension between presence and absence, and Kim explores unique human cultures throughout the pieces.

The artists completed texture application, lighting and animations in Unreal Engine 5. RTX acceleration unlocked high-fidelity interactive visualization, leading to stunning photorealistic render quality.


Kim said MUE Studio’s go-to creative app for post-production is Adobe After Effects, which includes 30+ GPU-accelerated effects. The duo applied the app’s Sharpen, Brightness and Contrast and Gradient Ramp features when putting the finishing touches on their marvelous masterpieces.

Take a summer vacation.

“Our series of art provides an opportunity for viewers to momentarily escape reality, creating a safe, digital space where the community can relax and interact with one another,” Kang said.


Check out more of MUE Studio’s 3D creations on Instagram.

Minjin Kang and Mijoo Kim, the duo behind MUE Studio.

Follow NVIDIA Studio on Instagram, Twitter and Facebook. Access tutorials on the Studio YouTube channel and get updates directly in your inbox by subscribing to the Studio newsletter.

Read More

‘Remnant II’ Headlines 14 Games Joining GeForce NOW in July

‘Remnant II’ Headlines 14 Games Joining GeForce NOW in July

It’s a jam-packed July with 14 newly supported titles in the GeForce NOW library, including Remnant II from Gunfire Games and Gearbox Publishing.

Need a new adventure? Check out the nine additions streaming from the cloud this week.

Plus, the Steam Summer Sale kicks off this week, and many supported titles in the GeForce NOW library are available for cheap. Keep an eye out for promotional updates right in the GeForce NOW app.

New Jams for July

Jagged Alliance 3 on GeForce NOW
Hire mercs, meet interesting characters, and fight in tactically deep turn-based combat in Jagged Alliance 3, coming this month.

The GeForce NOW library is always expanding. July brings support for 14 more titles streaming from the cloud, including Remnant II, Jagged Alliance 3, Xenonauts 2 and more.

Upgrade to a GeForce NOW Ultimate membership to play these and more than 1,600 other titles at RTX 4080 quality, with support for 4K 120 frames per second gameplay and ultrawide resolutions. Priority and Ultimate members can also play supported titles with RTX ON for real-time cinematic lighting.

Check out the full list:

  • The Legend of Heroes: Trails into Reverie (New release on Steam, July 7)
  • Jagged Alliance 3 (New release on Steam, July 14)
  • Xenonauts 2 (Steam, July 18)
  • Viewfinder (Steam, July 18)
  • Techtonica (Steam, July 18)
  • Remnant II (Steam, July 25)
  • F1 Manager 2023 (Steam, July 31)
  • Embr (Steam)
  • MotoGP 23 (Steam)
  • OCTOPATH TRAVELER (Steam)
  • OCTOPATH TRAVELER II (Steam)
  • Pro Cycling Manager 2023 (Steam)
  • Riders Republic (Steam)
  • Starship Troopers: Extermination (Steam)

Jump into gaming with what’s new on GeForce NOW this week:

  • One Lonely Outpost (New release on Steam)
  • AEW: Fight Forever (New release on Steam, June 29)
  • Darkest Dungeon (Steam)
  • Darkest Dungeon II (Steam)
  • Derail Valley (Steam)
  • Age of Empires: Definitive Edition (Steam)
  • I Am Fish (Steam)
  • Golf Gang (Steam)
  • Contraband Police (Steam)

Juicy June

In addition to the 20 games announced in June, four extra joined GeForce NOW this month, including this week’s additions, One Lonely Outpost and AEW: Fight Forever, as well as:

Age of Empires II: Definitive Edition didn’t make it in June due to technical issues. Stay tuned to GFN Thursday for more updates.

What’s on your playlist this month? Let us know your answer on Twitter or in the comments below.

Read More