Meet the Maker: DIY Builder Takes AI to Bat for Calling Balls and Strikes

Baseball players have to think fast when batting against blurry-fast pitches. Now, AI might be able to assist.

Nick Bild, a Florida-based software engineer, has created an application that can signal to batters whether pitches are going to be balls or strikes. Dubbed Tipper, it can be fitted on the outer edge of glasses to show a green light for a strike or a red light for a ball.

Tipper uses image classification to alert the batter before the ball has traveled halfway to home plate. It relies on the NVIDIA Jetson edge AI platform for split-second inference, which triggers the lights.

He figures his application could be used to help as a training aid for batters to help recognize good pitches from bad. Pitchers also could use it to analyze whether any body language tips off batters on their delivery.

“Who knows, maybe umpires could rely on it. For those close calls, it might help to reduce arguments with coaches as well as the ire of fans,” said Bild.

About the Maker

Bild works in the telecom industry by day. By night, he turns his living room into a laboratory for Jetson experiments.

And Bild certainly knows how to have fun. And we’re not just talking about his living room-turned-batting cage. Self-taught on machine learning, Bild has applied his ML and Python chops to Jetson AGX Xavier for projects like ShAIdes, enabling gestures to turn on home lights.

Bild says machine learning is particularly useful to solve problems that are otherwise unapproachable. And for a hobbyist, he says, the cost of entry can also be prohibitively high.

His Inspiration

When Bild first heard about Jetson Nano, he saw it as a tool to bring his ideas to life on a small budget. He bought one the day it was first released and has been building devices with it ever since.

The first Jetson project he created was called DOOM Air. He learned image classification basics and put that to work to operate a computer that was projecting the blockbuster video game DOOM onto the wall, controlling the game with his body movements.

Jetson’s ease of use enabled early successes for Bild, encouraging him to take on more difficult projects, he says.

“The knowledge I picked up from building these projects gave me the basic skills I needed for a more elaborate build like Tipper,” he said.

His Favorite Jetson Projects

Bild likes many of his Jetson projects. His Deep Clean project is one favorite. It uses AI to track the places in a room touched by a person so that it can be sanitized.

But Tipper is Bild’s favorite Jetson project of all. Its pitch predictions are aided by a camera that can capture 100 frames per second. Facing the camera at the ball launcher — a Nerf gun —  it can capture two successive images of the ball early in flight.

Tipper was trained on “hundreds of images” of balls and strikes, he said. The result is that Jetson AGX Xavier classifies balls in the air to guide batters better than a first base coach.

As far as fun DIY AI, this one is a home run.

The post Meet the Maker: DIY Builder Takes AI to Bat for Calling Balls and Strikes appeared first on The Official NVIDIA Blog.

Read More

Translate and analyze text using SQL functions with Amazon Athena, Amazon Translate, and Amazon Comprehend

You have Amazon Simple Storage Service (Amazon S3) buckets full of files containing incoming customer chats, product reviews, and social media feeds, in many languages. Your task is to identify the products that people are talking about, determine if they’re expressing happy thoughts or sad thoughts, translate their comments into a single common language, and create copies of the data for your business analysts with this new information added to each record. Additionally, you need to remove any personally identifiable information (PII), such as names, addresses, and credit card numbers.

You already know how to use Amazon Athena to transform data in Amazon S3 using simple SQL commands and the built-in functions in Athena. Now you can also use Athena to translate and analyze text fields, thanks to Amazon Translate, Amazon Comprehend, and the power of Athena User Defined Functions (UDFs).

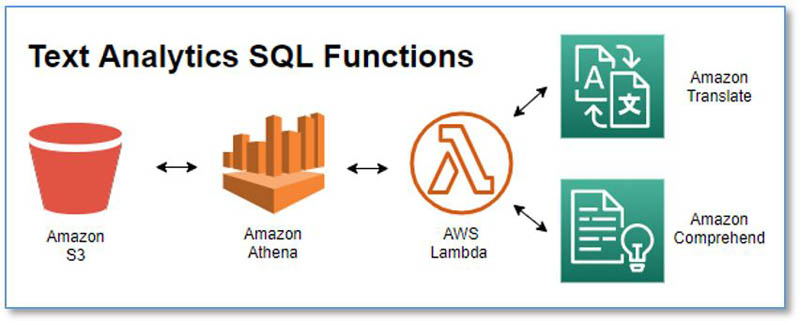
Athena is an interactive query service that makes it easy to analyze data stored in Amazon S3 using SQL. Amazon Comprehend is a Natural Language Processing (NLP) service that makes it easy to uncover insights from text. Amazon Translate is a neural machine translation service that delivers fast, high-quality, affordable, and customizable language translation. In this post, I show you how you can now use them together to perform the following actions:

  • Detect the dominant language of a text field
  • Detect the prevailing sentiment expressed—positive, negative, neither, or both
  • Detect or redact entities (such as items, places, or quantities)
  • Detect or redact PII
  • Translate text from one language to another

This post accomplishes the following goals:

  • Show you how to quickly set up the text analytics functions in your own AWS account (it’s fast and easy!)
  • Briefly explain how the functions work
  • Discuss performance and cost
  • Provide a tutorial where we do some text analytics on Amazon product reviews
  • Describe all the available functions

We include a list of all the available functions at the end of the post; the following code shows a few example queries and results:

USING FUNCTION detect_sentiment(text_col VARCHAR, lang VARCHAR) RETURNS VARCHAR TYPE LAMBDA_INVOKE WITH (lambda_name = 'textanalytics-udf') 
SELECT detect_sentiment('I am very happy', 'en') as sentiment
	sentiment
	POSITIVE

USING FUNCTION detect_pii_entities(text_col VARCHAR, lang VARCHAR) RETURNS VARCHAR TYPE LAMBDA_INVOKE WITH (lambda_name = 'textanalytics-udf') 
SELECT detect_pii_entities('I am Bob, I live in Herndon VA, and I love cars', 'en') as pii
	pii
	[["NAME","Bob"],["ADDRESS","Herndon VA"]]

USING FUNCTION redact_pii_entities(text_col VARCHAR, lang VARCHAR, type VARCHAR) RETURNS VARCHAR TYPE LAMBDA_INVOKE WITH (lambda_name = 'textanalytics-udf') 
SELECT redact_pii_entities('I am Bob, I live in Herndon VA, and I love cars', 'en', 'NAME,ADDRESS') as pii_redacted
	pii_redacted
	I am [NAME], I live in [ADDRESS], and I love cars

USING FUNCTION translate_text(text_col VARCHAR, sourcelang VARCHAR, targetlang VARCHAR, terminologyname VARCHAR) RETURNS VARCHAR TYPE LAMBDA_INVOKE WITH (lambda_name = 'textanalytics-udf') 
SELECT translate_text('It is a beautiful day in the neighborhood', 'auto', 'fr', NULL) as translated_text
	translated_text
	C'est une belle journée dans le quartier

Install the text analytics UDF

An Athena UDF uses AWS Lambda to implement the function capability. I discuss more details later in this post, but you don’t need to understand the inner workings to use the text analytics UDF, so let’s get started.

Install the prebuilt Lambda function with the following steps:

  1. Navigate to the TextAnalyticsUDFHandler application in the AWS Serverless Application Repository.
  2. In the Application settings section, keep the settings at their defaults.
  3. Select I acknowledge that this app creates custom IAM roles.
  4. Choose Deploy.

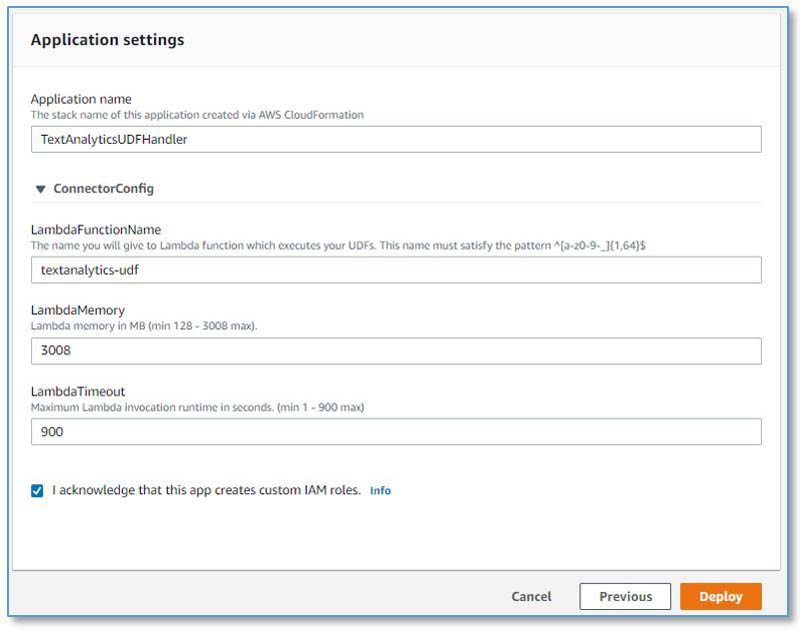
And that’s it! Now you have a new Lambda function called textanalytics-udf. You’re ready to try some text analytics queries in Athena.

If you prefer to build and deploy from the source code instead, see the directions at the end of the GitHub repository README.

Run your first text analytics query

If you’re new to Athena, you may want to review the Getting Started guide.

As of this writing, the Athena UDF feature is still in preview. To enable it, create an Athena workgroup named AmazonAthenaPreviewFunctionality and run all the UDF queries from that workgroup.

Enter the following query into the SQL editor:

USING FUNCTION detect_sentiment(text_col VARCHAR, lang VARCHAR) RETURNS VARCHAR TYPE LAMBDA_INVOKE WITH (lambda_name = 'textanalytics-udf') 
SELECT detect_sentiment('I am very happy', 'en') as sentiment

You get a simple POSITIVE result. Now try again, varying the input text—try something less positive to see how the returned sentiment value changes.

To get the sentiment along with confidence scores for each potential sentiment value, use the following query instead:

USING FUNCTION detect_sentiment_all(text_col VARCHAR, lang VARCHAR) RETURNS VARCHAR TYPE LAMBDA_INVOKE WITH (lambda_name = 'textanalytics-udf') 
SELECT detect_sentiment_all('I am very happy', 'en') as sentiment

Now you get a JSON string containing the sentiment and all the sentiment scores:

{"sentiment":"POSITIVE","sentimentScore":{"positive":0.999519,"negative":7.407639E-5,"neutral":2.7478999E-4,"mixed":1.3210243E-4}}

You can use the built-in JSON extraction functions in Athena on this result to extract the fields for further analysis.

How the UDF works

For more information about the Athena UDF framework, see Querying with User Defined Functions.

The Java class TextAnalyticsUDFHandler implements our UDF Lambda function handler. Each text analytics function has a corresponding public method in this class.

Athena invokes our UDF Lambda function with batches of input records. The TextAnalyticsUDFHandler subdivides these batches into smaller batches of up to 25 rows to take advantage of the Amazon Comprehend synchronous multi-document batch APIs where they are available (for example, for detecting language, entities, and sentiment). When there is no synchronous multi-document API available (such as for DetectPiiEntity and TranslateText), we use the single-document API instead.

Amazon Comprehend API service quotas provide guardrails to limit your cost exposure from unintentional high usage (we discuss this more in the following section). By default, the multi-document batch APIs process up to 250 records per second, and the single-document APIs process up to 20 records per second. Our UDFs use exponential back off and retry to throttle the request rate to stay within these limits. You can request increases to the transactions per second quota for APIs using the Quota Request Template on the AWS Management Console.

Amazon Comprehend and Amazon Translate each enforce a maximum input string length of 5,000 utf-8 bytes. Text fields that are longer than 5,000 utf-8 bytes are truncated to 5,000 bytes for language and sentiment detection, and split on sentence boundaries into multiple text blocks of under 5,000 bytes for translation and entity or PII detection and redaction. The results are then combined.

Optimizing cost

In addition to Athena query costs, the text analytics UDF incurs usage costs from Lambda and Amazon Comprehend and Amazon Translate. The amount you pay is a factor of the total number of records and characters that you process with the UDF. For more information, see AWS Lambda pricing, Amazon Comprehend pricing, and Amazon Translate pricing.

To minimize the costs, I recommend that you avoid processing the same records multiple times. Instead, materialize the results of the text analytics UDF by using CREATE TABLE AS SELECT (CTAS) queries to capture the results in a separate table that you can then cost-effectively query as often as needed without incurring additional UDF charges. Process newly arriving records incrementally using INSERT INTO…SELECT queries to analyze and enrich only the new records and add them to the target table.

Avoid calling the text analytics functions needlessly on records that you will subsequently discard. Write your queries to filter the dataset first using temporary tables, views, or nested queries, and then apply the text analytics functions to the resulting filtered records.

Always assess the potential cost before you run text analytics queries on tables with vary large numbers of records.

In this section, we provide two example cost assessments.

Example 1: Analyze the language and sentiment of tweets

Let’s assume you have 10,000 tweet records, with average length 100 characters per tweet. Your SQL query detects the dominant language and sentiment for each tweet. You’re in your second year of service (the Free Tier no longer applies). The cost details are as follows:

  • Size of each tweet = 100 characters
  • Number of units (100 character) per record (minimum is 3 units) = 3
  • Total Units: 10,000 (records) x 3 (units per record) x 2 (Amazon Comprehend requests per record) = 60,000
  • Price per unit = $0.0001
  • Total cost for Amazon Comprehend = [number of units] x [cost per unit] = 60,000 x $0.0001 = $6.00 

Example 2: Translate tweets

Let’s assume that 2,000 of your tweets aren’t in your local language, so you run a second SQL query to translate them. The cost details are as follows:

  • Size of each tweet = 100 characters
  • Total characters: 2,000 (records) * 100 (characters per record) x 1 (Translate requests per record) = 200,000
  • Price per character = $0.000015
  • Total cost for Amazon Translate = [number of characters] x [cost per character] = 200,000 x $0.000015 = $3.00

Analyze insights from customer reviews

It’s time to put our new text analytics queries to use.

For a tutorial on getting actionable insights from customer reviews, see Tutorial: Analyzing Insights from Customer Reviews with Amazon Comprehend. This post provides an alternate approach to the same challenge: using SQL queries powered by Athena and Amazon Comprehend.

The tutorial takes approximately 10 minutes to complete, and costs up to $6 for Amazon Comprehend—there is no cost if you’re eligible for the Free Tier.

Create a new database in Athena

Run the following query in the Athena query editor:

CREATE DATABASE IF NOT EXISTS comprehendresults;

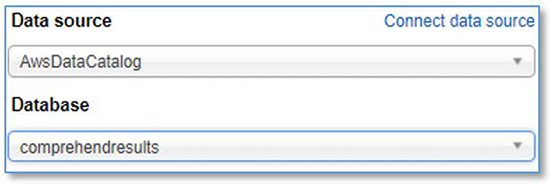
When connecting your data source, choose your new database.

Create a source table containing customer review data

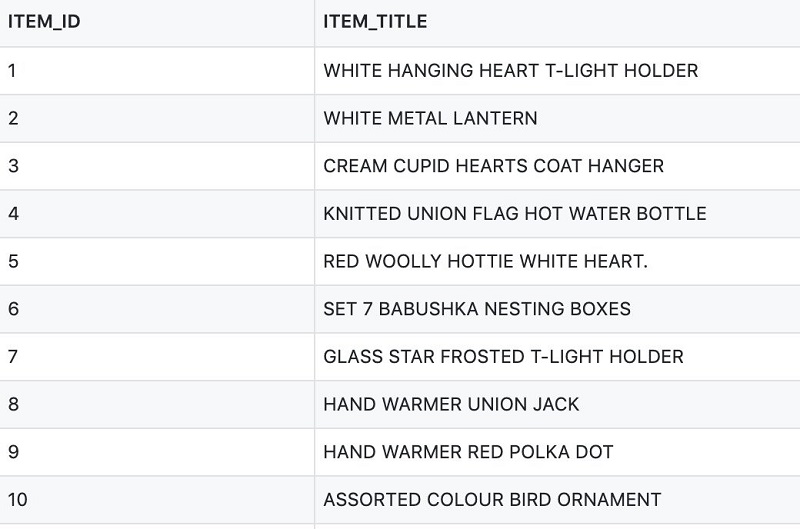
We use the Amazon Customer Reviews Dataset, conveniently hosted for public access in Amazon S3.

  1. Run the following query in the Athena query editor:
    CREATE EXTERNAL TABLE amazon_reviews_parquet(
      marketplace string, 
      customer_id string, 
      review_id string, 
      product_id string, 
      product_parent string, 
      product_title string, 
      star_rating int, 
      helpful_votes int, 
      total_votes int, 
      vine string, 
      verified_purchase string, 
      review_headline string, 
      review_body string, 
      review_date bigint, 
      year int)
    PARTITIONED BY (product_category string)
    ROW FORMAT SERDE 
      'org.apache.hadoop.hive.ql.io.parquet.serde.ParquetHiveSerDe' 
    STORED AS INPUTFORMAT 
      'org.apache.hadoop.hive.ql.io.parquet.MapredParquetInputFormat' 
    OUTPUTFORMAT 
      'org.apache.hadoop.hive.ql.io.parquet.MapredParquetOutputFormat'
    LOCATION
      's3://amazon-reviews-pds/parquet/'
    

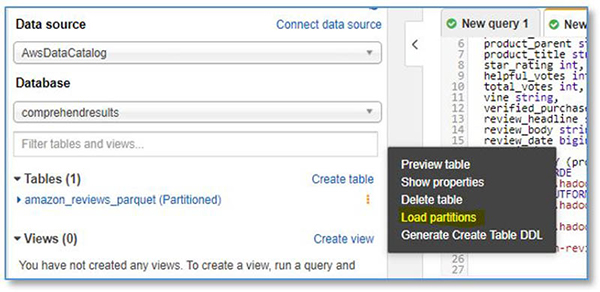
  1. Under Tables, find the new table amazon_reviews_parquet.
  2. From the options menu, choose Load partitions.
  1. Preview the new table, amazon_reviews_parquet.
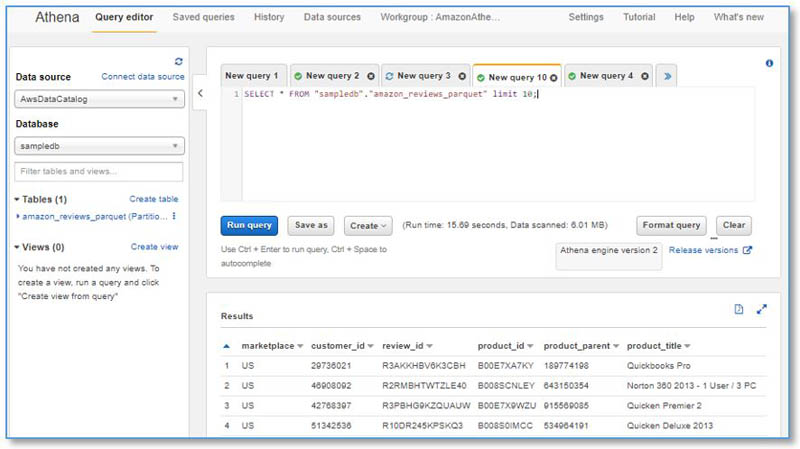
  1. Run the following query to assess the average review length:
    SELECT AVG(LENGTH(review_body)) AS average_review_length FROM amazon_reviews_parquet

The average review length is around 365 characters. This equates to 4 Amazon Comprehend units per record (1 unit = 100 characters).

Detect the language for each review

To detect the language of each review, run the following query in the Athena query editor—it takes just over 1 minute to run and costs $2:

CREATE TABLE amazon_reviews_with_language WITH (format='parquet') AS
USING FUNCTION detect_dominant_language(col1 VARCHAR) RETURNS VARCHAR TYPE LAMBDA_INVOKE WITH (lambda_name = 'textanalytics-udf')
SELECT *, detect_dominant_language(review_body) AS language
FROM amazon_reviews_parquet
LIMIT 5000

This query creates a new table, amazon_reviews_with_language, with one new column added: language. The LIMIT clause limits the number of records to 5,000.

Cost is calculated as: 5,000 (records) x 4 (units per record) x 1 (requests per record) x $0.0001 (Amazon Comprehend price per unit) = $2. 

Run the following query to see the detected language codes, with the corresponding count of reviews for each language:

SELECT language, count(*) AS count FROM amazon_reviews_with_language GROUP BY language ORDER BY count DESC

Detect sentiment and entities for each review

To detect sentiment, run the following query in the Athena query editor—it uses two text analytics functions, takes around 1 minute to run, and costs $4:

CREATE TABLE amazon_reviews_with_text_analysis WITH (format='parquet') AS
USING
   FUNCTION detect_sentiment_all(col1 VARCHAR, lang VARCHAR) RETURNS VARCHAR TYPE LAMBDA_INVOKE WITH (lambda_name = 'textanalytics-udf'),
   FUNCTION detect_entities_all(col1 VARCHAR, lang VARCHAR) RETURNS VARCHAR TYPE LAMBDA_INVOKE WITH (lambda_name = 'textanalytics-udf')
SELECT *, 
   detect_sentiment_all(review_body, language) AS sentiment,
   detect_entities_all(review_body, language) AS entities
FROM amazon_reviews_with_language
WHERE language IN ('ar', 'hi', 'ko', 'zh-TW', 'ja', 'zh', 'de', 'pt', 'en', 'it', 'fr', 'es')

This query creates a new table, amazon_reviews_with_text_analysis, with two additional columns added: sentiment and entities. The WHERE clause restricts the result set to the list of languages supported by Amazon Comprehend sentiment and entity detection.

Cost is calculated as: 5,000 (records) x 4 (units per record) x 2 (requests per record) x $0.0001 (Amazon Comprehend price per unit) = $4.

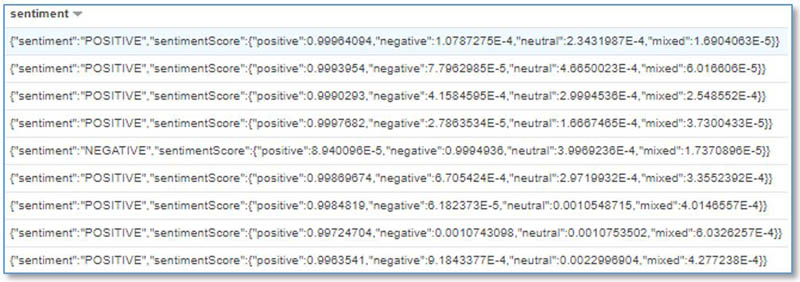
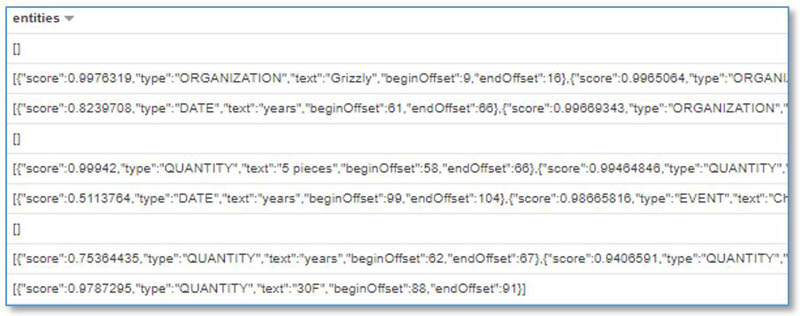
Preview the new table and inspect some of the values for the new sentiment and entities columns. They contain JSON strings with nested structures and fields.

The following screenshot shows the sentiment column details.

The following screenshot shows the entities column details.

Next, we use the JSON functions in Athena to prepare these columns for analysis.

Prepare sentiment for analysis

Run the following SQL query to create a new table containing sentiment and sentiment scores expanded into separate columns:

CREATE TABLE sentiment_results_final WITH (format='parquet') AS
SELECT 
   review_date, year, product_title, star_rating, language, 
   CAST(JSON_EXTRACT(sentiment,'$.sentiment') AS VARCHAR) AS sentiment,
   CAST(JSON_EXTRACT(sentiment,'$.sentimentScore.positive') AS DOUBLE ) AS positive_score,
   CAST(JSON_EXTRACT(sentiment,'$.sentimentScore.negative') AS DOUBLE ) AS negative_score,
   CAST(JSON_EXTRACT(sentiment,'$.sentimentScore.neutral') AS DOUBLE ) AS neutral_score,
   CAST(JSON_EXTRACT(sentiment,'$.sentimentScore.mixed') AS DOUBLE ) AS mixed_score,
   review_headline, review_body
FROM amazon_reviews_with_text_analysis

Preview the new sentiment_results_final table (see the following screenshot). Does the sentiment generally align with the text of the review_body field? How does it correlate with the star_rating? If you spot any dubious sentiment assignments, check the confidence scores to see if the sentiment was assigned with a low confidence.

Prepare entities for analysis

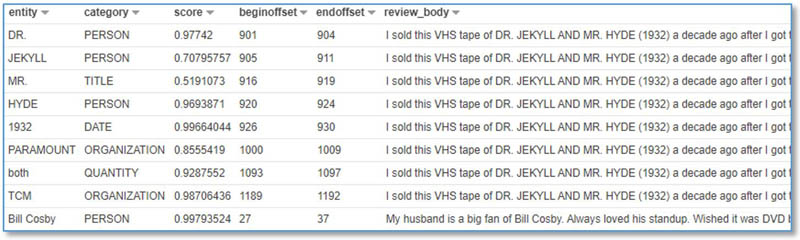
Run the following SQL query to create a new table containing detected entities unnested into separate rows (inner subquery), with each field in a separate column (outer query):

CREATE TABLE entities_results_final WITH (format='parquet') AS
SELECT 
   review_date, year, product_title, star_rating, language, 
   CAST(JSON_EXTRACT(entity_element, '$.text') AS VARCHAR ) AS entity,
   CAST(JSON_EXTRACT(entity_element, '$.type') AS VARCHAR ) AS category,
   CAST(JSON_EXTRACT(entity_element, '$.score') AS DOUBLE ) AS score,
   CAST(JSON_EXTRACT(entity_element, '$.beginOffset') AS INTEGER ) AS beginoffset,
   CAST(JSON_EXTRACT(entity_element, '$.endOffset') AS INTEGER ) AS endoffset,
   review_headline, review_body
FROM
(
   SELECT * 
   FROM
      (
      SELECT *,
      CAST(JSON_PARSE(entities) AS ARRAY(json)) AS entities_array
      FROM amazon_reviews_with_text_analysis
      )
   CROSS JOIN UNNEST(entities_array) AS t(entity_element)
)

Preview the contents of the new table, entities_results_final (see the following screenshot).

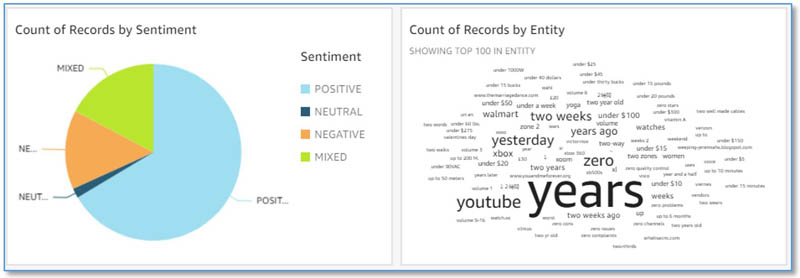
Visualize in Amazon QuickSight (optional)

As an optional step, you can visualize your results with Amazon QuickSight. For instructions, see Step 5: Visualizing Amazon Comprehend Output in Amazon QuickSight.

You can use the new word cloud visual type for entities, instead of tree map. In the word cloud chart menu, select Hide “other” categories.

You now have a dashboard with sentiment and entities visualizations that looks similar to the following screenshot.

Troubleshooting

If your query fails, check the Amazon CloudWatch metrics and logs generated by the UDF Lambda function.

  1. On the Lambda console, find the textanalytics-udf function.
  2. Choose Monitoring.

You can view the CloudWatch metrics showing how often the function ran, how long it runs for, how often it failed, and more.

  1. Choose View logs in CloudWatch to open the function log streams for additional troubleshooting insights.

For more information about viewing CloudWatch metrics via Lambda, see Using the Lambda console.

Additional use cases

There are many use cases for SQL text analytics functions. In addition to the example shown in this post, consider the following:

  • Simplify ETL pipelines by using incremental SQL queries to enrich text data with sentiment and entities, such as streaming social media streams ingested by Amazon Kinesis Data Firehose
  • Use SQL queries to explore sentiment and entities in your customer support texts, emails, and support cases
  • Prepare research-ready datasets by redacting PII from customer or patient interactions
  • Standardize many languages to a single common language

You may have additional use cases for these functions, or additional capabilities you want to see added, such as the following:

  • SQL functions to call custom entity recognition and custom classification models in Amazon Comprehend
  • SQL functions for de-identification—extending the entity and PII redaction functions to replace entities with alternate unique identifiers

Additionally, the implementation is open source, which means that you can clone the repo, modify and extend the functions as you see fit, and (hopefully) send us pull requests so we can merge your improvements back into the project and make it better for everyone.

Cleaning up

After you complete this tutorial, you might want to clean up any AWS resources you no longer want to use. Active AWS resources can continue to incur charges in your account.

  1. In Athena, run the following query to drop the database and all the tables:
    DROP DATABASE comprehendresults CASCADE

  1. In AWS CloudFormation, delete the stack serverlessrepo-TextAnalyticsUDFHandler.
  2. Cancel your QuickSight subscription.

Conclusion

I have shown you how to install the sample text analytics UDF Lambda function for Athena, so that you can use simple SQL queries to translate text using Amazon Translate, generate insights from text using Amazon Comprehend, and redact sensitive information. I hope you find this useful, and share examples of how you can use it to simplify your architectures and implement new capabilities for your business.

Please share your thoughts with us in the comments section, or in the issues section of the project’s GitHub repository.

Appendix: Available function reference

This section summarizes the functions currently provided. The README file provides additional details.

Detect language

This function uses the Amazon Comprehend BatchDetectDominantLanguage API to identify the dominant language based on the first 5,000 bytes of input text.

The following code returns a language code, such as fr for French or en for English:

USING FUNCTION detect_dominant_language(text_col VARCHAR) RETURNS VARCHAR TYPE LAMBDA_INVOKE WITH (lambda_name = 'textanalytics-udf') 
SELECT detect_dominant_language('il fait beau à Orlando') as language

The following code returns a JSON formatted array of language codes and corresponding confidence scores:

USING FUNCTION detect_dominant_language_all(text_col VARCHAR) RETURNS VARCHAR TYPE LAMBDA_INVOKE WITH (lambda_name = 'textanalytics-udf') 
SELECT detect_dominant_language_all('il fait beau à Orlando') as language_all

Detect sentiment

This function uses the Amazon Comprehend BatchDetectSentiment API to identify the sentiment based on the first 5,000 bytes of input text.

The following code returns a sentiment as POSITIVE, NEGATIVE, NEUTRAL, or MIXED:

USING FUNCTION detect_sentiment(text_col VARCHAR, lang VARCHAR) RETURNS VARCHAR TYPE LAMBDA_INVOKE WITH (lambda_name = 'textanalytics-udf') 
SELECT detect_sentiment('Joe is very happy', 'en') as sentiment

The following code returns a JSON formatted object containing detected sentiment and confidence scores for each sentiment value:

USING FUNCTION detect_sentiment_all(text_col VARCHAR, lang VARCHAR) RETURNS VARCHAR TYPE LAMBDA_INVOKE WITH (lambda_name = 'textanalytics-udf') 
SELECT detect_sentiment_all('Joe is very happy', 'en') as sentiment_all

Detect entities

This function uses the Amazon Comprehend DetectEntities API to identify PII. Input text longer than 5,000 bytes results in multiple Amazon Comprehend API calls.

The following code returns a JSON formatted object containing an array of entity types and values:

USING FUNCTION detect_entities(text_col VARCHAR, lang VARCHAR) RETURNS VARCHAR TYPE LAMBDA_INVOKE WITH (lambda_name = 'textanalytics-udf') 
SELECT detect_entities('His name is Joe, he lives in Richmond VA, he bought an Amazon Echo Show on January 5th, and he loves it', 'en') as entities

The following code returns a JSON formatted object containing an array of PII entity types, with their values, scores, and character offsets:

USING FUNCTION detect_entities_all(text_col VARCHAR, lang VARCHAR) RETURNS VARCHAR TYPE LAMBDA_INVOKE WITH (lambda_name = 'textanalytics-udf') 
SELECT detect_entities_all('His name is Joe, he lives in Richmond VA, he bought an Amazon Echo Show on January 5th, and he loves it', 'en') as entities_all

Redact entities

This function replaces entity values for the specified entity types with “[ENTITY_TYPE]”. Input text longer than 5,000 bytes results in multiple Amazon Comprehend API calls. See the following code:

USING FUNCTION redact_entities(text_col VARCHAR, lang VARCHAR, types VARCHAR) RETURNS VARCHAR TYPE LAMBDA_INVOKE WITH (lambda_name = 'textanalytics-udf') 
SELECT redact_entities('His name is Joe, he lives in Richmond VA, he bought an Amazon Echo Show on January 5th, and he loves it', 'en', 'ALL') as entities_redacted

The command returns a redacted version on the input string. Specify one or more entity types to redact by providing a comma-separated list of valid types in the types string parameter, or ALL to redact all types.

Detect PII

This function uses the DetectPiiEntities API to identify PII. Input text longer than 5,000 bytes results in multiple Amazon Comprehend API calls.

The following code returns a JSON formatted object containing an array of PII entity types and values:

USING FUNCTION detect_pii_entities(text_col VARCHAR, lang VARCHAR) RETURNS VARCHAR TYPE LAMBDA_INVOKE WITH (lambda_name = 'textanalytics-udf') 
SELECT detect_pii_entities('His name is Joe, his username is joe123 and he lives in Richmond VA', 'en') as pii

The following code returns a JSON formatted object containing an array of PII entity types, with their scores and character offsets:

USING FUNCTION detect_pii_entities_all(text_col VARCHAR, lang VARCHAR) RETURNS VARCHAR TYPE LAMBDA_INVOKE WITH (lambda_name = 'textanalytics-udf') 
SELECT detect_pii_entities_all('His name is Joe, his username is joe123 and he lives in Richmond VA', 'en') as pii_all

Redact PII

This function replaces the PII values for the specified PII entity types with “[PII_ENTITY_TYPE]”. Input text longer than 5,000 bytes results in multiple Amazon Comprehend API calls. See the following code:

USING FUNCTION redact_pii_entities(text_col VARCHAR, lang VARCHAR, types VARCHAR) RETURNS VARCHAR TYPE LAMBDA_INVOKE WITH (lambda_name = 'textanalytics-udf') 
SELECT redact_pii_entities('His name is Joe, his username is joe123 and he lives in Richmond VA', 'en', 'ALL') as pii_redacted

The function returns a redacted version on the input string. Specify one or more PII entity types to redact by providing a comma-separated list of valid types in the type string parameter, or ALL to redact all type.

Translate text

This function translates text from the source language to target language. Input text longer than 5,000 bytes results in multiple Amazon Translate API calls. See the following code:

USING FUNCTION translate_text(text_col VARCHAR, sourcelang VARCHAR, targetlang VARCHAR, customterminologyname VARCHAR) RETURNS VARCHAR TYPE LAMBDA_INVOKE WITH (lambda_name = 'textanalytics-udf') 
SELECT translate_text('It is a beautiful day in the neighborhood', 'auto', 'fr', NULL) as translated_text

The function returns the translated string. Optionally, auto-detect the source language (use auto as the language code, which uses Amazon Comprehend), and optionally specify a custom terminology (otherwise use NULL for customTerminologyName).


About the Author

Bob StrahanBob Strahan is a Principal Solutions Architect in the AWS Language AI Services team.

Read More

What Is Cloud Gaming?

Cloud gaming uses powerful, industrial-strength GPUs inside secure data centers to stream your favorite games over the internet to you. So you can play the latest games on nearly any device, even ones that can’t normally play that game.

But First, What Is Cloud Gaming?

While the technology is complex, the concept is simple.

Cloud gaming takes your favorite game, and instead of using the device in front of you to power it, a server — a powerful, industrial-strength PC — runs the game from a secure data center.

Gameplay is then streamed over the internet back to you, allowing you to play the latest games on nearly any device, even ones that are not capable of running can’t actually play that game.

Cloud gaming streams the latest games from powerful GPUs in remote data centers to nearly any device.

Video games are interactive, obviously. So, cloud gaming servers need to process information and render frames in real time. Unlike movies or TV shows that can provide a buffer — a few extra seconds of information that gets sent to your device before it’s time to be displayed — games are dependent on the user’s next keystroke or button press.

Introducing GeForce NOW

We started our journey to cloud gaming over 10 years ago, spending that time to optimize every millisecond of the pipeline that we manage, from the graphics cards in the data centers to the software on your local device.

Here’s how it works.

GeForce NOW is a service that takes a GeForce gaming PC’s power and flexibility and makes it accessible through the cloud. This gives you an always-on gaming rig that never needs upgrading, patching or updating — across all of your devices.

One of the things that makes GeForce NOW unique is that it connects to popular PC games stores — Steam, Epic Games Store, Ubisoft Connect and more — so gamers can play the same PC version of games their friends are playing.

It also means, if they already own a bunch of games, they can log in and start playing them. And if they have, or upgrade to, a gaming rig, they have access to download and play those games on that local PC.

GeForce NOW empowers you to take your PC games with you, wherever you go.

Gamers get an immersive PC gaming experience, instant access to the world’s most popular games and gaming communities, and the freedom to play on any device, at any time.

It’s PC gaming for those whose PCs have integrated graphics, for Macs and Chromebooks that don’t have access to the latest games, or for internet-connected mobile devices where PC gaming is only a dream.

Over 80 percent of GeForce NOW members are playing on devices that don’t meet the min spec for the games they’re playing.

To start, sign up for the service, download the app and begin your cloud gaming journey.

Powering PC Gaming from the Cloud

Cloud data centers with NVIDIA GPUs power the world’s most computationally complex tasks, from AI to data analytics and research. Combined with advanced GeForce PC gaming technologies, GeForce NOW delivers high-end PC gaming to passionate gamers.

NVIDIA RTX servers provide the backbone for GeForce NOW.

GeForce NOW data centers include NVIDIA RTX servers that feature RTX GPUs. These GPUs enable the holy grail of modern graphics: real-time ray tracing, and DLSS, NVIDIA’s groundbreaking AI rendering that boosts frame rates for uncompromised image quality. The hardware is supported with NVIDIA Game Ready Driver performance improvements.

Patented encoding technology — along with hardware acceleration in both video encoding and decoding, pioneered by NVIDIA more than a decade ago — allows for gameplay to be streamed at high frame rates, with low enough latency that most games will feel like the game is being played locally. Gameplay rendered in GeForce NOW data centers is converted into high-definition H.265 and H.264 video and streamed back to the gamer instantaneously.

The total time it takes from button press or keystroke to the action appearing on the screen is less than one-tenth of a second, faster than the blink of an eye.

Growing Cloud Gaming Around the World

With the ambition to deliver quality cloud gaming to all gamers, NVIDIA works with partners around the world including telecommunications and service providers to put GeForce NOW servers to work in their own data centers, ensuring lightning-fast connections.

Partners that have already deployed RTX cloud gaming servers include SoftBank and KDDI in Japan, LG Uplus in Korea, GFN.RU in Russia, Armenia, Azerbaijan, Belarus, Kazakhstan, Georgia, Moldova, Ukraine and Uzbekistan, Zain in Saudi Arabia and Taiwan Mobile in Taiwan.

Together with partners from around the globe, we’re scaling GeForce NOW to enable millions of gamers to play their favorite games, when and where they want.

Get started with your gaming adventures on GeForce NOW.

Editor’s note: This is the first in a series on the GeForce NOW game-streaming service, how it works, ways you can make the most of it, and where it’s going next. 

In our next blog, we’ll talk about how we bring your games to GeForce NOW.

Follow GeForce NOW on Facebook and Twitter and stay up to date on the latest features and game launches. 

The post What Is Cloud Gaming? appeared first on The Official NVIDIA Blog.

Read More

In the Drink of an AI: Startup Opseyes Instantly Analyzes Wastewater

Let’s be blunt. Potentially toxic waste is just about the last thing you want to get in the mail. And that’s just one of the opportunities for AI to make the business of analyzing wastewater better.

It’s an industry that goes far beyond just making sure water coming from traditional sewage plants is clean.

Just about every industry on earth — from computer chips to potato chips — relies on putting water to work, which means we’re all, literally, swimming in the stuff.

Just What the Doctor Ordered

That started to change, however, thanks to a conversation Opseyes founder Bryan Arndt, then a managing consultant with Denmark-based architecture and engineering firm Ramboll, had with his brother, a radiologist.

Arndt was intrigued when his brother described how deep learning was being set loose on medical images.

Arndt quickly realized that the same technology — deep learning — that helps radiologists analyze images of the human body faster and more accurately could almost instantly analyze images, taken through microscopes, of wastewater samples.

Faster Flow

The result, developed by Arndt and his colleagues at Ramboll, a wastewater industry leader for more than 50 years, dramatically speeds up an industry that’s long relied on sending tightly sealed samples of some of the stinkiest stuff on earth through the mail.

That’s critical when cities and towns and industries of all kinds are constantly taking water from lakes and rivers, like the Mississippi, treating it, and returning it to nature.

“We had one client find out their discharge was a quarter-mile, at best, from the intake for the next city’s water supply,” Arndt says. “Someone is always drinking what your tube is putting out.”

That makes wastewater enormously important.

Water, Water, Everywhere

It’s an industry that was kicked off by the 1972 U.S. Clean Water Act, a landmark not just in the United States, but globally.

Thanks to growing awareness of the importance of clean water, analysts estimate the global wastewater treatment market will be worth more than $210 billion by 2025.

The challenge: while almost every industry creates wastewater, wastewater expertise isn’t exactly ubiquitous.

Experts who can peer through a microscope and identify, say, the six most common bacterial “filaments” as they’re known in the industry, or critters such as tardigrades, are scarce.

You’ve Got … Ugh

That means samples of wastewater, or soil containing that water, have to be sent through the mail to get to these experts, who often have a backlog of samples to go through.

While Ardnt says people in his industry take precautions to seal potentially toxic waste and track it to ensure it gets to the right place, it’s still time-consuming.

The solution, Arndt realized, was to use deep learning to train an AI that could yield instantaneous results. To do this, last year Arndt reached out on social media to colleagues throughout the wastewater industry to send him samples.

Least Sexy Photoshoot Ever

He and his small team then spent months creating more than 6,000 images of these samples in Ramboll’s U.S. labs, where they build elaborate models of wastewater systems before deploying full-scale systems for clients. Think of it as the least sexy photoshoot, ever.

These images were then labeled and used by a data science  team lead by Robin Schlenga to train a convolutional neural network accelerated by NVIDIA GPUs. Launched last September after a year-and-a-half of development, Opseyes allows customers to use their smartphone to take a picture of a sample through a microscope and get answers within minutes.

It’s just another example of how expertise in companies seemingly far outside of tech can be transformed into an AI. After all, “no one wants to have to wait a week to know if it’s safe to take a sip of water,” Arndt says.

Bottoms up.

Featured image credit: Opseyes

The post In the Drink of an AI: Startup Opseyes Instantly Analyzes Wastewater appeared first on The Official NVIDIA Blog.

Read More

Setting up Amazon Personalize with AWS Glue

Data can be used in a variety of ways to satisfy the needs of different business units, such as marketing, sales, or product. In this post, we focus on using data to create personalized recommendations to improve end-user engagement. Most ecommerce applications consume a huge amount of customer data that can be used to provide personalized recommendations; however, that data may not be cleaned or in the right format to provide those valuable insights.

The goal of this post is to demonstrate how to use AWS Glue to extract, transform, and load your JSON data into a cleaned CSV format. We then show you how to run a recommendation engine powered by Amazon Personalize on your user interaction data to provide a tailored experience for your customers. The resulting output from Amazon Personalize is recommendations you can generate from an API.

A common use case is an ecommerce platform that collects user-item interaction data and suggests similar products or products that a customer may like. By the end of this post, you will be able to take your uncleaned JSON data and generate personalized recommendations based off of products each user has interacted with, creating a better experience for your end-users. For the purposes of this post, refer to this user-item-interaction dataset to build this solution.

The resources of this solution may incur a cost on your AWS account. For pricing information, see AWS Glue Pricing and Amazon Personalize Pricing.

The following diagram illustrates our solution architecture.

Prerequisites

For this post, you need the following:

For instructions on creating a bucket, see Step 1: Create your first S3 bucket. Make sure to attach the Amazon Personalize access policy.

These are very permissive policies; in practice it’s best to use least privilege and only give access where it’s needed. For instructions on creating a role, see Step 2: Create an IAM Role for AWS Glue.

Crawling your data with AWS Glue

We use AWS Glue to crawl through the JSON file to determine the schema of your data and create a metadata table in your AWS Glue Data Catalog. The Data Catalog contains references to data that is used as sources and targets of your ETL jobs in AWS Glue. AWS Glue is a serverless data preparation service that makes it easy to extract, clean, enrich, normalize, and load data. It helps prepare your data for analysis or machine learning (ML). In this section, we go through how to get your JSON data ready for Amazon Personalize, which requires a CSV file.

Your data can have different columns that you may not necessarily want or need to run through Amazon Personalize. In this post, we use the user-item-interaction.json file and clean that data using AWS Glue to only include the columns user_id, item_id, and timestamp, while also transforming it into CSV format. You can use a crawler to access your data store, extract metadata, and create table definitions in the Data Catalog. It automatically discovers new data and extracts schema definitions. This can help you gain a better understanding of your data and what you want to include while training your model.

The user-item-interaction JSON data is an array of records. The crawler treats the data as one object: just an array. We create a custom classifier to create a schema that is based on each record in the JSON array. You can skip this step if your data isn’t an array of records.

  1. On the AWS Glue console, under Crawlers, choose Classifiers.
  2. Choose Add classifier.
  3. For Classifier name¸ enter json_classifier.
  4. For Classifier type, select JSON.
  5. For JSON path, enter $[*].
  6. Choose Create.

Choose Create.

  1. On the Crawlers page, choose Add crawler.
  2. For Crawler name, enter json_crawler.
  3. For Custom classifiers, add the classifier you created.

For Custom classifiers, add the classifier you created.

  1. Choose Next.
  2. For Crawler source type, choose Data stores.
  3. Leave everything else as default and choose Next.
  4. For Choose a data store, enter the Amazon S3 path to your JSON data file.
  5. Choose Next.

Choose Next.

  1. Skip the section Add another data store.
  2. In the Choose an IAM role section, select Choose an existing IAM role.
  3. For IAM role, choose the role that you created earlier (AWSGlueServiceRole-xxx).
  4. Choose Next.

Choose Next.

  1. Leave the frequency as Run on Demand.
  2. On the Output page, choose Add database.
  3. For Database name, enter json_data.
  4. Choose Finish.
  5. Choose Run it now. 

You can also run your crawler by going to the Crawlers page, selecting your crawler, and choosing Run crawler.

Using AWS Glue to convert your files from CSV to JSON

After your crawler finishes running, go to the Tables page on the AWS Glue console. Navigate to the table your crawler created. Here you can see the schema of your data. Make note of the fields you want to use with your Amazon Personalize data. For this post, we want to keep the user_id, item_id, and timestamp columns for Amazon Personalize.

For this post, we want to keep the user_id, item_id, and timestamp columns for Amazon Personalize.

At this point, you have set up your database. Amazon Personalize requires CSV files, so you have to transform the data from JSON format into three cleaned CSV files that include only the data you need in Amazon Personalize. The following table shows examples of the three CSV files you can include in Amazon Personalize. It’s important to note that interactions data is required, whereas user and item data metadata is optional.

Dataset Type Required Fields Reserved Keywords
Users

USER_ID (string)

1 metadata field

Items

ITEM_ID (string)

1 metadata field

CREATION_TIMESTAMP(long)
Interactions

USER_ID (string)

ITEM_ID (string)

TIMESTAMP (long)


EVENT_TYPE (string)

IMPRESSION (string)

EVENT_VALUE (float,null)

It’s also important to make sure that you have at least 1,000 unique combined historical and event interactions in order to train the model. For more information about quotas, see Quotas in Amazon Personalize.

To save the data as a CSV, you need to run an AWS Glue job on the data. A job is the business logic that performs the ETL work in AWS Glue. The job changes the format from JSON into CSV. For more information about data formatting, see Formatting Your Input Data.

  1. On the AWS Glue Dashboard, choose AWS Glue Studio.

AWS Glue Studio is an easy-to-use graphical interface for creating, running, and monitoring AWS Glue ETL jobs.

  1. Choose Create and manage jobs.
  2. Select Source and target added to the graph.
  3. For Source, choose S3.
  4. For Target, choose S3.
  5. Choose Create.

Choose Create.

  1. Choose the data source S3 bucket.
  2. On the Data source properties – S3 tab, add the database and table we created earlier.

On the Data source properties – S3 tab, add the database and table we created earlier.

  1. On the Transform tab, select the boxes to drop user_login and location.

In this post, we don’t use any additional metadata to run our personalization algorithm.

In this post, we don’t use any additional metadata to run our personalization algorithm.

  1. Choose the data target S3 bucket.
  2. On the Data target properties – S3 tab, for Format, choose CSV.
  3. For S3 Target location, enter the S3 path for your target. 

For this post, we use the same bucket we used for the JSON file.

For this post, we use the same bucket we used for the JSON file.

  1. On the Job details page, for Name, enter a name for your job (for this post, json_to_csv).
  2. For IAM Role, choose the role you created earlier.

You should also have included the AmazonS3FullAccess policy earlier.

  1. Leave the rest of the fields at their default settings.

Leave the rest of the fields at their default settings.

  1. Choose Save.
  2. Choose Run.

It may take a few minutes for the job to run.

In your Amazon S3 bucket, you should now see the CSV file that you use in the next section.

Setting up Amazon Personalize

At this point, you have your data formatted in a file type that Amazon Personalize can use. Amazon Personalize is a fully managed service that uses ML and over 20 years of recommendation experience at Amazon.com to enable you to improve end-user engagement by powering real-time personalized product and content recommendations, and targeted marketing promotions. In this section, we go through how to create an Amazon Personalize solution to use your data to create personalized experiences.

  1. On the Amazon Personalize console, under New dataset groups, choose Get started.
  2. Enter the name for your dataset group.

A dataset group contains the datasets, solutions, and event ingestion API.

  1. Enter a dataset name, and enter in the schema details based on your data.

For this dataset, we use the following schema. You can change the schema according to the values in your dataset.

{
	"type": "record",
	"name": "Interactions",
	"namespace": "com.amazonaws.personalize.schema",
	"fields": [
		{
			"name": "USER_ID",
			"type": "string"
		},
		{
			"name": "ITEM_ID",
			"type": "string"
		},
		{
			"name": "TIMESTAMP",
			"type": "long"
		}
	],
	"version": "1.0"
}
  1. Choose Next.
  2. Enter your dataset import job name to import data from Amazon S3.

Make sure that your IAM service role has access to Amazon S3 and Amazon Personalize, and that your bucket has the correct bucket policy.

  1. Enter the path to your data (the Amazon S3 bucket from the previous section).
  2. On the Dashboard page for your dataset groups, under Upload datasets, import the user-item-interactions data (user data and item data are optional but can enhance the solution).

On the Dashboard page for your dataset groups, under Upload datasets,

We include an example item.csv file in the GitHub repo. The following screenshot shows an example of the item data.

The following screenshot shows an example of the item data.

  1. Under Create solutions, for Solutions training, choose Start.

A solution is a trained model of the data you provided with the algorithm, or recipe, that you select.

  1. For Solution name, enter aws-user-personalization.
  2. Choose Next.
  3. Review and choose Finish.
  4. On the dashboard, under Launch campaigns, for Campaign creation, choose Start.

A campaign allows your application to get recommendations from your solution version.

  1. For Campaign name, enter a name.
  2. Choose the solution you created.
  3. Choose Create campaign.

You have now successfully used the data from your data lake and created a recommendation model that can be used to get various recommendations. With this dataset, you can get personalized recommendations for houseware products based off the user’s interactions with other products in the dataset.

Using Amazon Personalize to get your recommendations

To test your solution, go to the campaign you created. In the Test campaign results section, under User ID, enter an ID to get recommendations for. A list of IDs shows up, along with a relative score. The item IDs correlate with specific products recommended.

The following screenshot shows a search for user ID 1. They have been recommended item ID 59, which correlates to a wooden picture frame. The score listed next to the item gives you the predicted relevance of each item to your user.

The following screenshot shows a search for user ID 1.

To learn more about Amazon Personalize scores, see Introducing recommendation scores in Amazon Personalize.

To generate recommendations, you can call the GetRecommendations or GetPersonalizedRanking API using the AWS Command Line Interface (AWS CLI) or a language-specific SDK. With Amazon Personalize, your recommendations can change as the user clicks on the items for more real-time use cases. For more information, see Getting Real-Time Recommendations.

Conclusion

AWS offers a wide range of AI/ML and analytics services that you can use to gain insights and guide better business decisions. In this post, you used a JSON dataset that included additional columns of data, and cleaned and transformed that data using AWS Glue. In addition, you built a custom model using Amazon Personalize to provide recommendations for your customers.

To learn more about Amazon Personalize, see the developer guide. Try this solution out and let us know if you have any questions in the comments.


About the Authors

Zoish PithwafaZoish Pithawala is a Startup Solutions Architect at Amazon Web Services based out of San Francisco. She primarily works with startup customers to help them build secure and scalable solutions on AWS.


Sam TranSam Tran is a Startup Solutions Architect at Amazon Web Services based out of Seattle. He focuses on helping his customers create well-architected solutions on AWS.

Read More

Lyra: A New Very Low-Bitrate Codec for Speech Compression

Posted by Alejandro Luebs, Software Engineer and Jamieson Brettle, Product Manager, Chrome

Connecting to others online via voice and video calls is something that is increasingly a part of everyday life. The real-time communication frameworks, like WebRTC, that make this possible depend on efficient compression techniques, codecs, to encode (or decode) signals for transmission or storage. A vital part of media applications for decades, codecs allow bandwidth-hungry applications to efficiently transmit data, and have led to an expectation of high-quality communication anywhere at any time.

As such, a continuing challenge in developing codecs, both for video and audio, is to provide increasing quality, using less data, and to minimize latency for real-time communication. Even though video might seem much more bandwidth hungry than audio, modern video codecs can reach lower bitrates than some high-quality speech codecs used today. Combining low-bitrate video and speech codecs can deliver a high-quality video call experience even in low-bandwidth networks. Yet historically, the lower the bitrate for an audio codec, the less intelligible and more robotic the voice signal becomes. Furthermore, while some people have access to a consistent high-quality, high-speed network, this level of connectivity isn’t universal, and even those in well connected areas at times experience poor quality, low bandwidth, and congested network connections.

To solve this problem, we have created Lyra, a high-quality, very low-bitrate speech codec that makes voice communication available even on the slowest networks. To do this, we’ve applied traditional codec techniques while leveraging advances in machine learning (ML) with models trained on thousands of hours of data to create a novel method for compressing and transmitting voice signals.

Lyra Overview
The basic architecture of the Lyra codec is quite simple. Features, or distinctive speech attributes, are extracted from speech every 40ms and are then compressed for transmission. The features themselves are log mel spectrograms, a list of numbers representing the speech energy in different frequency bands, which have traditionally been used for their perceptual relevance because they are modeled after human auditory response. On the other end, a generative model uses those features to recreate the speech signal. In this sense, Lyra is very similar to other traditional parametric codecs, such as MELP.

However traditional parametric codecs, which simply extract from speech critical parameters that can then be used to recreate the signal at the receiving end, achieve low bitrates, but often sound robotic and unnatural. These shortcomings have led to the development of a new generation of high-quality audio generative models that have revolutionized the field by being able to not only differentiate between signals, but also generate completely new ones. DeepMind’s WaveNet was the first of these generative models that paved the way for many to come. Additionally, WaveNetEQ, the generative model-based packet-loss-concealment system currently used in Duo, has demonstrated how this technology can be used in real-world scenarios.

A New Approach to Compression with Lyra
Using these models as a baseline, we’ve developed a new model capable of reconstructing speech using minimal amounts of data. Lyra harnesses the power of these new natural-sounding generative models to maintain the low bitrate of parametric codecs while achieving high quality, on par with state-of-the-art waveform codecs used in most streaming and communication platforms today. The drawback of waveform codecs is that they achieve this high quality by compressing and sending over the signal sample-by-sample, which requires a higher bitrate and, in most cases, isn’t necessary to achieve natural sounding speech.

One concern with generative models is their computational complexity. Lyra avoids this issue by using a cheaper recurrent generative model, a WaveRNN variation, that works at a lower rate, but generates in parallel multiple signals in different frequency ranges that it later combines into a single output signal at the desired sample rate. This trick enables Lyra to not only run on cloud servers, but also on-device on mid-range phones in real time (with a processing latency of 90ms, which is in line with other traditional speech codecs). This generative model is then trained on thousands of hours of speech data and optimized, similarly to WaveNet, to accurately recreate the input audio.

Comparison with Existing Codecs
Since the inception of Lyra, our mission has been to provide the best quality audio using a fraction of the bitrate data of alternatives. Currently, the royalty-free open-source codec Opus, is the most widely used codec for WebRTC-based VOIP applications and, with audio at 32kbps, typically obtains transparent speech quality, i.e., indistinguishable from the original. However, while Opus can be used in more bandwidth constrained environments down to 6kbps, it starts to demonstrate degraded audio quality. Other codecs are capable of operating at comparable bitrates to Lyra (Speex, MELP, AMR), but each suffer from increased artifacts and result in a robotic sounding voice.

Lyra is currently designed to operate at 3kbps and listening tests show that Lyra outperforms any other codec at that bitrate and is compared favorably to Opus at 8kbps, thus achieving more than a 60% reduction in bandwidth. Lyra can be used wherever the bandwidth conditions are insufficient for higher-bitrates and existing low-bitrate codecs do not provide adequate quality.

Clean Speech
Original
Opus@6kbps
Lyra@3kbps
Speex@3kbps
Noisy Environment
Original
Opus@6kbps
Lyra@3kbps
Speex@3kbps
Reference Opus@6kbps Lyra@3kbps

Ensuring Fairness
As with any ML based system, the model must be trained to make sure that it works for everyone. We’ve trained Lyra with thousands of hours of audio with speakers in over 70 languages using open-source audio libraries and then verifying the audio quality with expert and crowdsourced listeners. One of the design goals of Lyra is to ensure universally accessible high-quality audio experiences. Lyra trains on a wide dataset, including speakers in a myriad of languages, to make sure the codec is robust to any situation it might encounter.

Societal Impact and Where We Go From Here
The implications of technologies like Lyra are far reaching, both in the short and long term. With Lyra, billions of users in emerging markets can have access to an efficient low-bitrate codec that allows them to have higher quality audio than ever before. Additionally, Lyra can be used in cloud environments enabling users with various network and device capabilities to chat seamlessly with each other. Pairing Lyra with new video compression technologies, like AV1, will allow video chats to take place, even for users connecting to the internet via a 56kbps dial-in modem.

Duo already uses ML to reduce audio interruptions, and is currently rolling out Lyra to improve audio call quality and reliability on very low bandwidth connections. We will continue to optimize Lyra’s performance and quality to ensure maximum availability of the technology, with investigations into acceleration via GPUs and TPUs. We are also beginning to research how these technologies can lead to a low-bitrate general-purpose audio codec (i.e., music and other non-speech use cases).

Acknowledgements
Thanks to everyone who made Lyra possible including Jan Skoglund, Felicia Lim, Michael Chinen, Bastiaan Kleijn, Tom Denton, Andrew Storus, Yero Yeh (Chrome Media), Henrik Lundin, Niklas Blum, Karl Wiberg (Google Duo), Chenjie Gu, Zach Gleicher, Norman Casagrande, Erich Elsen (DeepMind).

Read More

Amazon Rekognition Custom Labels Community Showcase

In our Community Showcase, Amazon Web Services (AWS) highlights projects created by AWS Heroes and AWS Community Builders. 

We worked with AWS Machine Learning (ML) Heroes and AWS ML Community Builders to bring to life projects and use cases that detect custom objects with Amazon Rekognition Custom Labels.

The AWS ML community is a vibrant group of developers, data scientists, researchers, and business decision-makers that dive deep into artificial intelligence and ML concepts, contribute with real-world experiences, and collaborate on building projects together.

Amazon Rekognition is a fully managed computer vision service that allows developers to analyze images and videos for a variety of use cases, including face identification and verification, media intelligence, custom industrial automation, and workplace safety.

Detecting custom objects and scenes can be hard, and training and improving a computer vision model with growing data makes the problem more complex. Amazon Rekognition Custom Labels allows you to detect custom labeled objects and scenes with zero Jupyter notebook experience. For example, you can identify logos in streaming media, simplify preventative maintenance, and scale supply chain inventory management. ML practitioners, data scientists, and developers with no previous ML experience benefit by moving their models to production faster, while Amazon Rekognition Custom Labels takes care of the heavy lifting of model development.

In this post, we highlight a few externally published getting started guides and tutorials from AWS ML Heroes and AWS ML Community Builders that applied Amazon Rekognition to a wide variety of use cases, from at-home projects like a fridge inventory checker to an enterprise-level HVAC filter cleanliness detector.

AWS ML Heroes and AWS ML Community Builders

Classify LEGO bricks with Amazon Rekognition Custom Labels by Mike Chambers. In this video, Mike walks you through this fun use case to use Amazon Rekognition Custom Labels to detect 250 different LEGO bricks.

Training models using Satellite imagery on Amazon Rekognition Custom Labels by Rustem Feyzkhanov (with code samples). Satellite imagery is becoming a more and more important source of insights with the advent of accessible satellite data from sources such as the Sentinel-2 on Open Data on AWS. In this guide, Rustem shows how you can find agricultural fields with Amazon Rekognition Custom Labels.

Detecting insights from X-ray data with Amazon Rekognition Custom Labels by Olalekan Elesin (with code samples). Learn how to detect anomalies quickly and with low cost and resource investment with Amazon Rekognition Custom Labels.

Building Natural Flower Classifier using Amazon Rekognition Custom Labels by Juv Chan (with code samples). Building a computer vision model from scratch can be daunting task. In this step-by-step guide, you learn how to build a natural flower classifier using the Oxford Flower 102 dataset and Amazon Rekognition Custom Labels.

What’s in my Fridge by Chris Miller and Siaterlis Konstantinos. How many times have you gone to the grocery store and forgot your list, or weren’t sure if you needed to buy milk, beer, or something else? Learn how AWS ML Community members Chris Miller and Siaterlis Konstantinos used Amazon Rekognition Custom Labels and AWS DeepLens to build a fridge inventory checker to let AI do the heavy lifting on your grocery list.

Clean or dirty HVAC? Using Amazon SageMaker and Amazon Rekognition Custom Labels to automate detection by Luca Bianchi. How can you manage 1–3,000 cleanliness checks with zero ML experience or data scientist on staff? Learn how to detect clean and dirty HVACs using Amazon Rekognition Custom Labels and Amazon SageMaker from AWS ML Hero Luca Bianchi.

Conclusion

Getting started with Amazon Rekognition Custom Labels is simple. Learn more with the getting started guide and example use cases.

Whether you’re just getting started with ML, already an expert, or something in between, there is always something to learn. Choose from community-created and ML-focused blogs, videos, eLearning guides, and much more from the AWS ML community.

Are you interested in contributing to the community? Apply to the AWS Community Builders program.


The content and opinions in the preceding linked posts are those of the third-party authors and AWS is not responsible for the content or accuracy of those posts.


About the Author

Cameron Peron is Senior Marketing Manager for AWS Amazon Rekognition and the AWS AI/ML community. He evangelizes how AI/ML innovation solves complex challenges facing community, enterprise, and startups alike. Out of the office, he enjoys staying active with kettlebell-sport, spending time with his family and friends, and is an avid fan of Euro-league basketball.

Read More

NVIDIA Deep Learning Institute Releases New Accelerated Data Science Teaching Kit for Educators

As data grows in volume, velocity and complexity, the field of data science is booming.

There’s an ever-increasing demand for talent and skillsets to help design the best data science solutions. However, expertise that can help drive these breakthroughs requires students to have a foundation in various tools, programming languages, computing frameworks and libraries.

That’s why the NVIDIA Deep Learning Institute has released the first version of its Accelerated Data Science Teaching Kit for qualified educators. The kit has been co-developed with Polo Chau, from the Georgia Institute of Technology, and Xishuang Dong, from Prairie View A&M University, two highly regarded researchers and educators in the fields of data science and accelerating data analytics with GPUs.

“Data science unlocks the immense potential of data in solving societal challenges and large-scale complex problems across virtually every domain, from business, technology, science and engineering to healthcare, government and many more,” Chau said.

The free teaching materials cover fundamental and advanced topics in data collection and preprocessing, accelerated data science with RAPIDS, GPU-accelerated machine learning, data visualization and graph analytics.

Content also covers culturally responsive topics such as fairness and data bias, as well as challenges and important individuals from underrepresented groups.

This first release of the Accelerated Data Science Teaching Kit includes focused modules covering:

  • Introduction to Data Science and RAPIDS
  • Data Collection and Pre-processing (ETL)
  • Data Ethics and Bias in Data Sets
  • Data Integration and Analytics
  • Data Visualization
  • Distributed Computing with Hadoop, Hive, Spark and RAPIDS

More modules are planned for future releases.

All modules include lecture slides, lecture notes and quiz/exam problem sets, and most modules include hands-on labs with included datasets and sample solutions in Python and interactive Jupyter notebook formats. Lecture videos will be included for all modules in later releases.

DLI Teaching Kits also come bundled with free GPU resources in the form of Amazon Web Services credits for educators and their students, as well as free DLI online, self-paced courses and certificate opportunities.

“Data science is such an important field of study, not just because it touches every domain and vertical, but also because data science addresses important societal issues relating to gender, race, age and other ethical elements of humanity,“ said Dong, whose school is a Historically Black College/University.

This is the fourth teaching kit released by the DLI, as part of its program that has reached 7,000 qualified educators so far. Learn more about NVIDIA Teaching Kits.

The post NVIDIA Deep Learning Institute Releases New Accelerated Data Science Teaching Kit for Educators appeared first on The Official NVIDIA Blog.

Read More

What Is Conversational AI?

For a quality conversation between a human and a machine, responses have to be quick, intelligent and natural-sounding.

But up to now, developers of language-processing neural networks that power real-time speech applications have faced an unfortunate trade-off: Be quick and you sacrifice the quality of the response; craft an intelligent response and you’re too slow.

That’s because human conversation is incredibly complex. Every statement builds on shared context and previous interactions. From inside jokes to cultural references and wordplay, humans speak in highly nuanced ways without skipping a beat. Each response follows the last, almost instantly. Friends anticipate what the other will say before words even get uttered.

What Is Conversational AI? 

True conversational AI is a voice assistant that can engage in human-like dialogue, capturing context and providing intelligent responses. Such AI models must be massive and highly complex.

But the larger a model is, the longer the lag between a user’s question and the AI’s response. Gaps longer than just three-tenths of a second can sound unnatural.

With NVIDIA GPUs, conversational AI software, and CUDA-X AI libraries, massive, state-of-the-art language models can be rapidly trained and optimized to run inference in just a couple of milliseconds — thousandths of a second — which is a major stride toward ending the trade-off between an AI model that’s fast versus one that’s large and complex.

These breakthroughs help developers build and deploy the most advanced neural networks yet, and bring us closer to the goal of achieving truly conversational AI.

GPU-optimized language understanding models can be integrated into AI applications for such industries as healthcare, retail and financial services, powering advanced digital voice assistants in smart speakers and customer service lines. These high-quality conversational AI tools can allow businesses across sectors to provide a previously unattainable standard of personalized service when engaging with customers.

How Fast Does Conversational AI Have to Be?

The typical gap between responses in natural conversation is about 300 milliseconds. For an AI to replicate human-like interaction, it might have to run a dozen or more neural networks in sequence as part of a multilayered task — all within that 300 milliseconds or less.

Responding to a question involves several steps: converting a user’s speech to text, understanding the text’s meaning, searching for the best response to provide in context, and providing that response with a text-to-speech tool. Each of these steps requires running multiple AI models — so the time available for each individual network to execute is around 10 milliseconds or less.

If it takes longer for each model to run, the response is too sluggish and the conversation becomes jarring and unnatural.

Working with such a tight latency budget, developers of current language understanding tools have to make trade-offs. A high-quality, complex model could be used as a chatbot, where latency isn’t as essential as in a voice interface. Or, developers could rely on a less bulky language processing model that more quickly delivers results, but lacks nuanced responses.

NVIDIA Jarvis is an application framework for developers building highly accurate conversational AI applications that can run far below the 300-millisecond threshold required for interactive apps. Developers at enterprises can start from state-of-the-art models that have been trained for more than 100,000 hours on NVIDIA DGX systems

Enterprises can apply transfer learning with Transfer Learning Toolkit to fine-tune these models on their custom data. These models are better suited to understand company-specific jargon leading to higher user satisfaction. The models can be optimized with TensorRT, NVIDIA’s high-performance inference SDK, and deployed as services that can run and scale in the data center. Speech and vision can be used together to create apps that make interactions with devices natural and more human-like. Jarvis makes it possible for every enterprise to use world-class conversational AI technology that previously was only conceivable for AI experts to attempt. 

What Will Future Conversational AI Sound Like? 

Basic voice interfaces like phone tree algorithms (with prompts like “To book a new flight, say ‘bookings’”) are transactional, requiring a set of steps and responses that move users through a pre-programmed queue. Sometimes it’s only the human agent at the end of the phone tree who can understand a nuanced question and solve the caller’s problem intelligently.

Voice assistants on the market today do much more, but are based on language models that aren’t as complex as they could be, with millions instead of billions of parameters. These AI tools may stall during conversations by providing a response like “let me look that up for you” before answering a posed question. Or they’ll display a list of results from a web search rather than responding to a query with conversational language.

A truly conversational AI would go a leap further. The ideal model is one complex enough to accurately understand a person’s queries about their bank statement or medical report results, and fast enough to respond near instantaneously in seamless natural language.

Applications for this technology could include a voice assistant in a doctor’s office that helps a patient schedule an appointment and follow-up blood tests, or a voice AI for retail that explains to a frustrated caller why a package shipment is delayed and offers a store credit.

Demand for such advanced conversational AI tools is on the rise: an estimated 50 percent of searches will be conducted with voice by 2020, and, by 2023, there will be 8 billion digital voice assistants in use.

What Is BERT? 

BERT (Bidirectional Encoder Representations from Transformers) is a large, computationally intensive model that set the state of the art for natural language understanding when it was released last year. With fine-tuning, it can be applied to a broad range of language tasks such as reading comprehension, sentiment analysis or question and answer. 

Trained on a massive corpus of 3.3 billion words of English text, BERT performs exceptionally well — better than an average human in some cases — to understand language. Its strength is its capability to train on unlabeled datasets and, with minimal modification, generalize to a wide range of applications. 

The same BERT can be used to understand several languages and be fine-tuned to perform specific tasks like translation, autocomplete or ranking search results. This versatility makes it a popular choice for developing complex natural language understanding. 

At BERT’s foundation is the Transformer layer, an alternative to recurrent neural networks that applies an attention technique — parsing a sentence by focusing attention on the most relevant words that come before and after it. 

The statement “There’s a crane outside the window,” for example, could describe either a bird or a construction site, depending on whether the sentence ends with “of the lakeside cabin” or “of my office.” Using a method known as bidirectional or nondirectional encoding, language models like BERT can use context cues to better understand which meaning applies in each case.

Leading language processing models across domains today are based on BERT, including BioBERT (for biomedical documents) and SciBERT (for scientific publications).

How Does NVIDIA Technology Optimize Transformer-Based Models? 

The parallel processing capabilities and Tensor Core architecture of NVIDIA GPUs allow for higher throughput and scalability when working with complex language models — enabling record-setting performance for both the training and inference of BERT.

Using the powerful NVIDIA DGX SuperPOD system, the 340 million-parameter BERT-Large model can be trained in under an hour, compared to a typical training time of several days. But for real-time conversational AI, the essential speedup is for inference.

NVIDIA developers optimized the 110 million-parameter BERT-Base model for inference using TensorRT software. Running on NVIDIA T4 GPUs, the model was able to compute responses in just 2.2 milliseconds when tested on the Stanford Question Answering Dataset. Known as SQuAD, the dataset is a popular benchmark to evaluate a model’s ability to understand context.

The latency threshold for many real-time applications is 10 milliseconds. Even highly optimized CPU code results in a processing time of more than 40 milliseconds.

By shrinking inference time down to a couple milliseconds, it’s practical for the first time to deploy BERT in production. And it doesn’t stop with BERT — the same methods can be used to accelerate other large, Transformer-based natural language models like GPT-2, XLNet and RoBERTa.

To work toward the goal of truly conversational AI, language models are getting larger over time. Future models will be many times bigger than those used today, so NVIDIA built and open-sourced the largest Transformer-based AI yet: GPT-2 8B, an 8.3 billion-parameter language processing model that’s 24x bigger than BERT-Large.

Chart showing the growing number of parameters in deep learning language models

Learn How to Build Your Own Transformer-Based Natural Language Processing Applications

The NVIDIA Deep Learning Institute offers instructor-led, hands-on training on the fundamental tools and techniques for building Transformer-based natural language processing models for text classification tasks, such as categorizing documents. Taught by an expert, this in-depth, 8-hour workshop instructs participants in being able to:

  • Understand how word embeddings have rapidly evolved in NLP tasks, from  Word2Vec and recurrent neural network-based embeddings to Transformer-based contextualized embeddings.
  • See how Transformer architecture features, especially self-attention, are used to create language models without RNNs.
  • Use self-supervision to improve the Transformer architecture in BERT, Megatron and other variants for superior NLP results.
  • Leverage pre-trained, modern NLP models to solve multiple tasks such as text classification, NER and question answering.
  • Manage inference challenges and deploy refined models for live applications.

Earn a DLI certificate to demonstrate subject-matter competency and accelerate your career growth. Take this workshop at an upcoming GTC or request a workshop for your organization.

For more information on conversational AI, training BERT on GPUs, optimizing BERT for inference and other projects in natural language processing, check out the NVIDIA Developer Blog.

The post What Is Conversational AI? appeared first on The Official NVIDIA Blog.

Read More