Discover insights from Zendesk with Amazon Kendra intelligent search

Customer relationship management (CRM) is a critical tool that organizations maintain to manage customer interactions and build business relationships. Zendesk is a CRM tool that makes it easy for customers and businesses to keep in sync. Zendesk captures a wealth of customer data, such as support tickets created and updated by customers and service agents, community discussions, and helpful guides. With such a wealth of complex data, simple keyword searches don’t suffice when it comes to discovering meaningful, accurate customer information.

Now you can use the Amazon Kendra Zendesk connector to index your Zendesk service tickets, help guides, and community posts, and perform intelligent search powered by machine learning (ML). Amazon Kendra smartly and efficiently answers natural language-based queries using advanced natural language processing (NLP) techniques. It can learn effectively from your Zendesk data, extracting meaning and context.

This post shows how to configure the Amazon Kendra Zendesk connector to index your Zendesk domain and take advantage of Amazon Kendra intelligent search. We use an example of an illustrative Zendesk domain to discuss technical topics related to AWS services.

Overview of solution

Amazon Kendra was built for intelligent search using NLP. You can use Amazon Kendra to ask factoid questions, descriptive questions, and perform keyword searches. You can use the Amazon Kendra connector for Zendesk to crawl your Zendesk domain and index service tickets, guides, and community posts to discover answers for your questions faster.

In this post, we show how to use the Amazon Kendra connector for Zendesk to index data from your Zendesk domain for intelligent search.

Prerequisites

For this walkthrough, you should have the following prerequisites:

  • An AWS account
  • Administrator level access to your Zendesk domain
  • Privileges to create an Amazon Kendra index, AWS resources, and AWS Identity and Access Management (IAM) roles and policies
  • Basic knowledge of AWS services and working knowledge of Zendesk

Configure your Zendesk domain

Your Zendesk domain has a domain owner or administrator, service group administrators, and a customer. Sample service tickets, community posts, and guides have been created for the purpose of this walkthrough. A Zendesk API client with the unique identifier amazon_kendra is registered to create an OAuth token for accessing your Zendesk domain from Amazon Kendra for crawling and indexing. The following screenshot shows the details of the OAuth configuration for the Zendesk API client.

Configure the data source using the Amazon Kendra connector for Zendesk

You can add the Zendesk connector data source to an existing Amazon Kendra index or create a new index. Then complete the following steps to configure the Zendesk connector:

  1. On the Amazon Kendra console, open the index and choose Data sources in the navigation pane.
  2. Under Zendesk, choose Add connector.
  3. Choose Add connector.
  4. In the Specify data source details section, enter the name and description of your data source and choose Next.
  5. In the Define access and security section, for Zendesk URL, enter the URL to your Zendesk domain. Use the URL format https://<domain>.zendesk.com/.
  6. Under Authentication, you can either choose Create to add a new secret using the user OAuth token created for the amazon_kendra, or use an existing AWS Secrets Manager secret that has the user OAuth token for the Zendesk domain that you want the connector to access.
  7. Optionally, configure a new AWS secret for Zendesk API access.
  8. For IAM role, you can choose Create a new role or choose an existing IAM role configured with appropriate IAM policies to access the Secrets Manager secret, Amazon Kendra index, and data source.
  9. Choose Next.
  10. In the Configure sync settings section, provide information regarding your sync scope and run schedule.
  11. Choose Next.
  12. In the Set field mappings section, you can optionally configure the field mappings, or how the Zendesk field names are mapped to Amazon Kendra attributes or facets.
  13. Choose Next.
  14. Review your settings and confirm to add the data source.
  15. After the data source is created, select the data source and choose Sync Now.
  16. Choose Facet definition in the navigation pane.
  17. Select the check box in the Facetable column for the facet _category.

Run queries with the Amazon Kendra search console

Now that the data is synced, we can run a few search queries on the Amazon Kendra search console by navigating to the Search indexed content page.

For the first query, we ask Amazon Kendra a general question related to AWS service durability. The following screenshot shows the response. The suggested answer provides the correct answer to the query by applying natural language comprehension.

For our second query, let’s query Amazon Kendra to search for product issues from Zendesk service tickets. The following screenshot shows the response for the search, along with facets showing various categories of documents included in the result.

Notice the search result includes the URL to the source document as well. Choosing the URL takes us directly to the Zendesk service ticket page, as shown in the following screenshot.

Clean up

To avoid incurring future charges, clean up any resources created as part of this solution. Delete the Zendesk connector data source so any data indexed from the source is removed from the index. If you created a new Amazon Kendra index, delete the index as well.

Conclusion

In this post, we discussed how to configure the Amazon Kendra connector for Zendesk to crawl and index service tickets, community posts, and help guides. We showed how Amazon Kendra ML-based search enables your business leaders and agents to discover insights from your Zendesk content quicker and respond to customer needs faster.

To learn more about the Amazon Kendra connector for Zendesk, refer to the Amazon Kendra Developer Guide.


About the author

Rajesh Kumar Ravi is a Senior AI Services Solution Architect at Amazon Web Services specializing in intelligent document search with Amazon Kendra. He is a builder and problem solver, and contributes to the development of new ideas. He enjoys walking and loves to go on short hiking trips outside of work.

Read More

Amazon SageMaker Automatic Model Tuning now provides up to three times faster hyperparameter tuning with Hyperband

Amazon SageMaker Automatic Model Tuning introduces Hyperband, a multi-fidelity technique to tune hyperparameters as a faster and more efficient way to find an optimal model. In this post, we show how automatic model tuning with Hyperband can provide faster hyperparameter tuning—up to three times as fast.

The benefits of Hyperband

Hyperband presents two advantages over existing black-box tuning strategies: efficient resource utilization and a better time-to-convergence.

Machine learning (ML) models are increasingly training-intensive, involve complex models and large datasets, and require a lot of effort and resources to find the optimal hyperparameters. Traditional black-box search strategies, such as Bayesian, random search, or grid search, tend to scale linearly with the complexity of the ML problem at hand, requiring longer training time.

To speed up hyperparameter tuning and optimize training cost, Hyperband uses Asynchronous Successive Halving Algorithm (ASHA), a strategy that massively parallelizes hyperparameter tuning and automatically stops training jobs early by using previously evaluated configurations to predict whether a specific candidate is promising or not.

As we demonstrate in this post, Hyperband converges to the optimal objective metric faster than most black-box strategies and therefore saves training time. This allows you to tune larger-scale models where evaluating each hyperparameter configuration requires running an expensive training loop, such as in computer vision and natural language processing (NLP) applications. If you’re interested in finding the most accurate models, Hyperband also allows you to run your tuning jobs with more resources and converge to a better solution.

Hyperband with SageMaker

The new Hyperband approach implemented for hyperparameter tuning has a few new data elements changed through AWS API calls. Implementation via the AWS Management Console is not available at this time. Let’s look at some data elements introduced for Hyperband:

  • Strategy – This defines the hyperparameter approach you want to choose. A new value for Hyperband is introduced with this change. Valid values are Bayesian, random, and Hyperband.
  • MinResource – Defines the minimum number of epochs or iterations to be used for a training job before a decision is made to stop the training.
  • MaxResource – Specifies the maximum number of epochs or iterations to be used for a training job to achieve the objective. This parameter is not required if you have numbers of training epochs defined as a hyperparameter in the tuning job.

Implementation

The following sample code shows the tuning job config and training job definition:

tuning_job_config = {
    "ParameterRanges": {
    "Strategy": "Hyperband",
    "ResourceLimits": {
        "MaxNumberOfTrainingJobs":20,
        "MaxParallelTrainingJobs": 5},
    "StrategyConfig":{
        "HyperbandStrategyConfig":{
            "MinResource": 10,
            "MaxResource": 100}
            },
    "HyperParameterTuningJobObjective": {
        "MetricName": "validation:auc", 
        "Type": "Maximize"
        },
    "CategoricalParameterRanges": [],
    "ContinuousParameterRanges": [
    {
    "MaxValue": "1",
    "MinValue": "0",
    "Name": "eta",
    },
    {
    "MaxValue": "10",
    "MinValue": "1",
    "Name": "min_child_weight",
    },
    {
    "MaxValue": "2",
    "MinValue": "0",
    "Name": "alpha",
    },
    ],
    "IntegerParameterRanges": [
    {
    "MaxValue": "10",
    "MinValue": "1",
    "Name": "max_depth",
    }
    ],
    },

}

The preceding code defines strategy as Hyperband and also defines the lower and upper bound resource limits inside the strategy configuration using HyperbandStrategyConfig, which serves as a lever to control the training runtime. For more details on how to configure and run automatic model tuning, refer to Specify the Hyperparameter Tuning Job Settings.

Hyperband compared to black-box search

In this section, we perform two experiments to compare Hyperband to a black-box search.

First experiment

In the first experiment, given a binary classification task, we aim to optimize a three-layer fully-connected network on a synthetic data set, which contains 5000 data points. The hyperparameters for the network include the number of units per layer, the learning rate of the Adam optimizer, the L2 regularization parameter, and the batch size. The range of these parameters are:

  • Number of units per layer – 10 to 1e3
  • Learning rate – 1e-4 to 0.1
  • L2 regularization parameter – 1e-6 to 2
  • Batch size – 10 to 200

The following graph shows our findings.

Comparing Hyperband with other strategies, given a target accuracy of 96%, Hyperband can achieve this target in 357 seconds, while Bayesian needs 560 seconds and random search needs 614 seconds. Hyperband consistently finds a more optimal solution at any given wall-clock time budget. This shows a clear advantage of a multi-fidelity optimization algorithm.

Second experiment

In this second experiment, we consider the Cifar10 dataset and train ResNet-20, a popular network architecture for computer vision tasks. We run all experiments on ml.g4dn.xlarge instances and optimize the neural network through SGD. We also apply standard image augmentation including random flip and random crop. The search space contains the following parameters:

  • Mini-batch size: an integer from 4 to 512
  • Learning rate of SGD: a float from 1e-6 to 1e-1
  • Momentum of SGD: a float from 0.01 to 0.99
  • Weight decay: a float from 1e-5 to 1

The following graph illustrates our findings.

Given a target validation accuracy 0.87, Hyperband can reach it in fewer than 2000 seconds while Random and Bayesian require 10000 and almost 9000 seconds respectively. This amount to a speed-up factor of ~5x and ~4.5x for Hyperband on this task compared to Random and Bayesian strategies. This shows a clear advantage for the multi-fidelity optimization algorithm, which significantly reduces the wall-clock time it takes to tune your deep learning models.

Conclusion

SageMaker Automatic Model Tuning allows you to reduce the time to tune a model by automatically searching for the best hyperparameter configuration within the ranges that you specify. You can find the best version of your model by running training jobs on your dataset with several search strategies, such as black-box or multi-fidelity strategies.

In this post, we discussed how you can now use a multi-fidelity strategy called Hyperband in SageMaker to find the best model. The support for Hyperband makes it possible for SageMaker Automatic Model Tuning to tune larger-scale models where evaluating each hyperparameter configuration requires running an expensive training loop, such as in computer vision and NLP applications.

Finally, we saw how Hyperband further optimizes runtime compared to black-box strategies with early stopping by using previously evaluated configurations to predict whether a specific candidate is promising and, if not, stop the evaluation to reduce the overall time and compute cost. Using Hyperband in SageMaker also allows you to specify the minimum and maximum resource in the HyperbandStrategyConfig parameter for further runtime controls.

To learn more, visit Perform Automatic Model Tuning with SageMaker.


About the authors

Doug Mbaya is a Senior Partner Solution architect with a focus in data and analytics. Doug works closely with AWS partners, helping them integrate data and analytics solutions in the cloud.

Gopi Mudiyala is a Senior Technical Account Manager at AWS. He helps customers in the Financial Services industry with their operations in AWS. As a machine learning specialist, Gopi works to help customers succeed in their ML journey.

Xingchen Ma is an Applied Scientist at AWS. He works in the team owning the service for SageMaker Automatic Model Tuning.

Read More

Read webpages and highlight content using Amazon Polly

In this post, we demonstrate how to use Amazon Polly—a leading cloud service that converts text into lifelike speech—to read the content of a webpage and highlight the content as it’s being read. Adding audio playback to a webpage improves the accessibility and visitor experience of the page. Audio-enhanced content is more impactful and memorable, draws more traffic to the page, and taps into the spending power of visitors. It also improves the brand of the company or organization that publishes the page. Text-to-speech technology makes these business benefits attainable. We accelerate that journey by demonstrating how to achieve this goal using Amazon Polly.

This capability improves accessibility for visitors with disabilities, and could be adopted as part of your organization’s accessibility strategy. Just as importantly, it enhances the page experience for visitors without disabilities. Both groups have significant spending power and spend more freely from pages that use audio enhancement to grab their attention.

Overview of solution

PollyReadsThePage (PRTP)—as we refer to the solution—allows a webpage publisher to drop an audio control onto their webpage. When the visitor chooses Play on the control, the control reads the page and highlights the content. PRTP uses the general capability of Amazon Polly to synthesize speech from text. It invokes Amazon Polly to generate two artifacts for each page:

  • The audio content in a format playable by the browser: MP3
  • A speech marks file that indicates for each sentence of text:
    • The time during playback that the sentence is read
    • The location on the page the sentence appears

When the visitor chooses Play, the browser plays the MP3 file. As the audio is read, the browser checks the time, finds in the marks file which sentence to read at that time, locates it on the page, and highlights it.

PRTP allows the visitor to read in different voices and languages. Each voice requires its own pair of files. PRTP uses neural voices. For a list of supported neural voices and languages, see Neural Voices. For a full list of standard and neural voices in Amazon Polly, see Voices in Amazon Polly.

We consider two types of webpages: static and dynamic pages. In a static page, the content is contained within the page and changes only when a new version of the page is published. The company might update the page daily or weekly as part of its web build process. For this type of page, it’s possible to pre-generate the audio files at build time and place them on the web server for playback. As the following figure shows, the script PRTP Pre-Gen invokes Amazon Polly to generate the audio. It takes as input the HTML page itself and, optionally, a configuration file that specifies which text from the page to extract (Text Extract Config). If the extract config is omitted, the pre-gen script makes a sensible choice of text to extract from the body of the page. Amazon Polly outputs the files in an Amazon Simple Storage Service (Amazon S3) bucket; the script copies them to your web server. When the visitor plays the audio, the browser downloads the MP3 directly from the web server. For highlights, a drop-in library, PRTP.js, uses the marks file to highlight the text being read.Solution Architecture Diagram

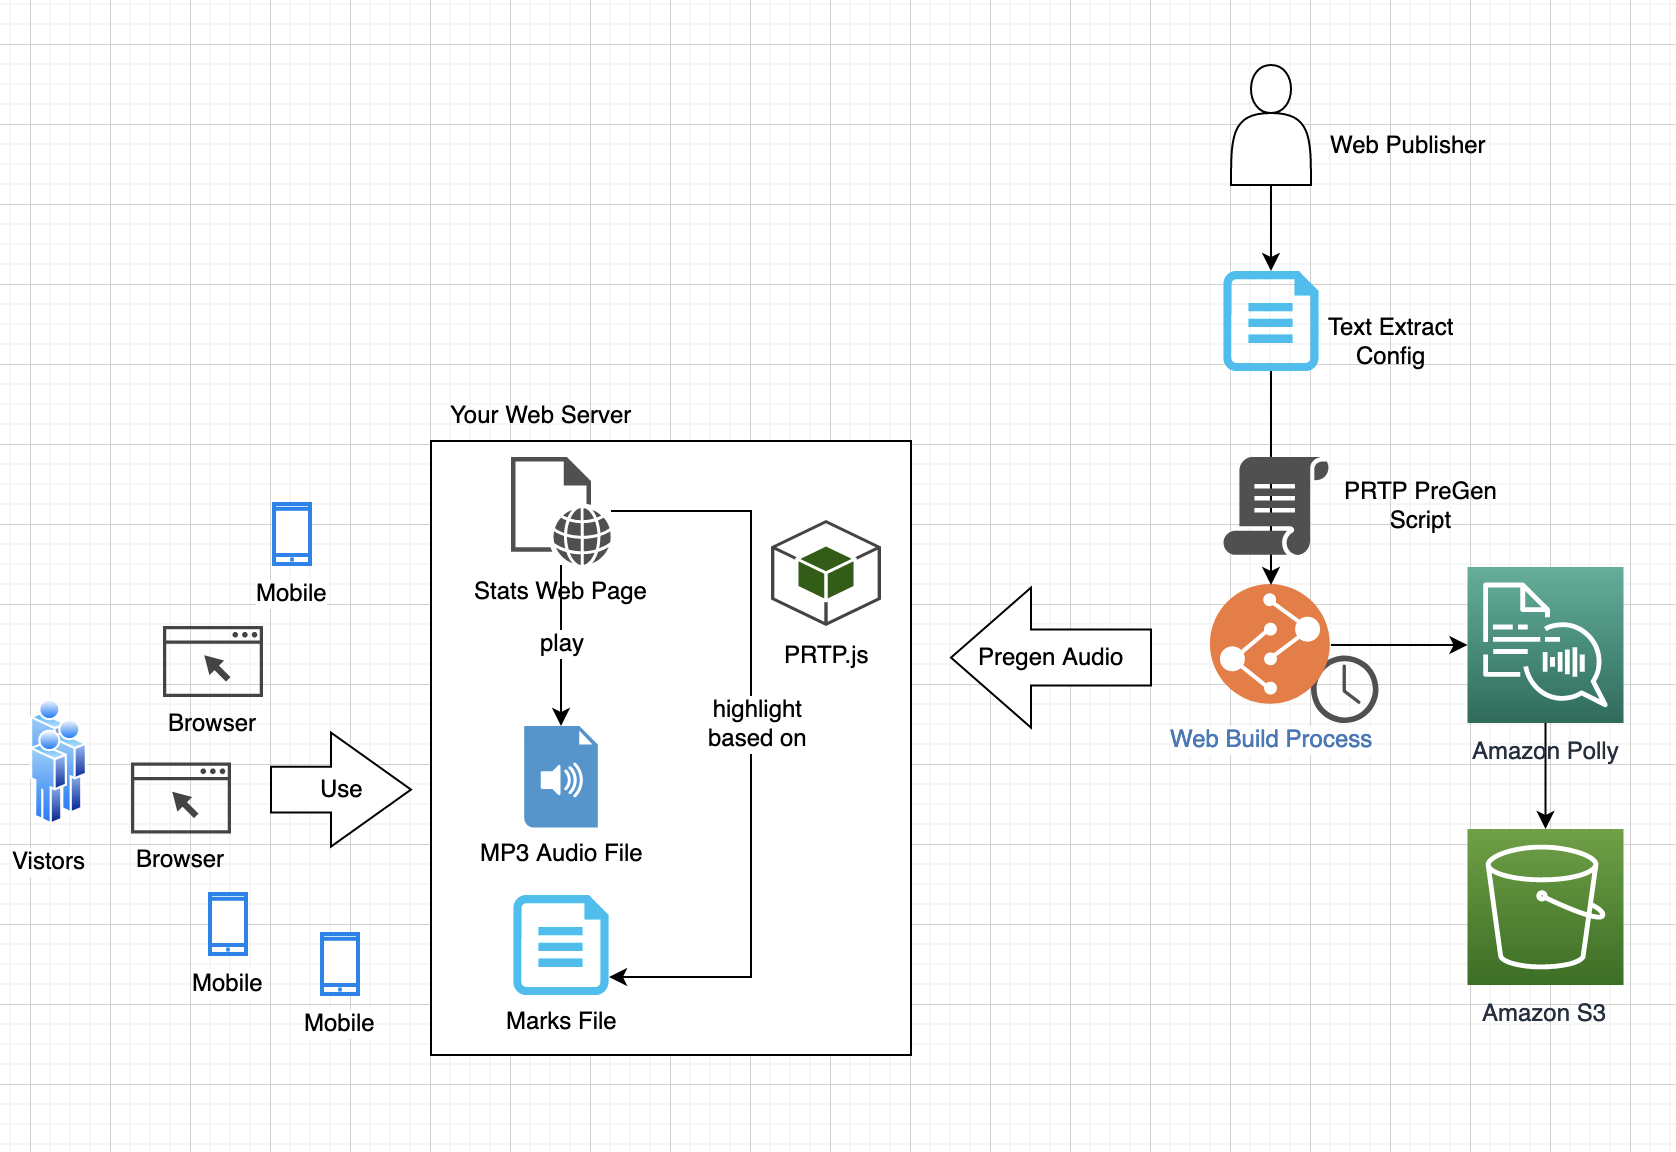
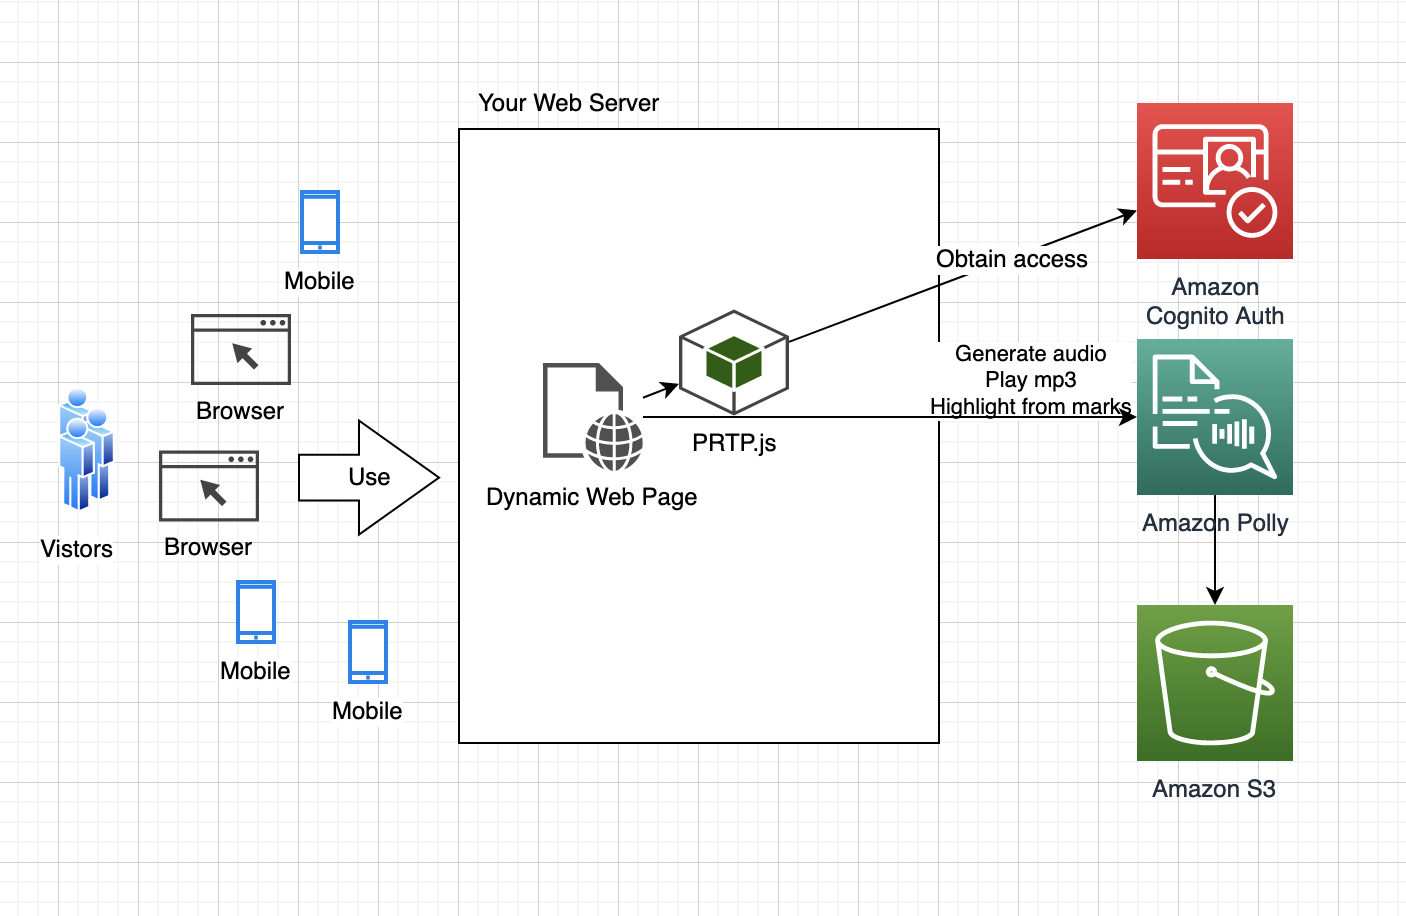
The content of a dynamic page changes in response to the visitor interaction, so audio can’t be pre-generated but must be synthesized dynamically. As the following figure shows, when the visitor plays the audio, the page uses PRTP.js to generate the audio in Amazon Polly, and it highlights the synthesized audio using the same approach as with static pages. To access AWS services from the browser, the visitor requires an AWS identity. We show how to use an Amazon Cognito identity pool to allow the visitor just enough access to Amazon Polly and the S3 bucket to render the audio.

Dynamic Content

Generating both Mp3 audio and speech marks requires the Polly service to synthesize the same input twice. Refer to the Amazon Polly Pricing Page to understand cost implications. Pre-generation saves costs because synthesis is performed at build time rather than on-demand for each visitor interaction.

The code accompanying this post is available as an open-source repository on GitHub.

To explore the solution, we follow these steps:

  1. Set up the resources, including the pre-gen build server, S3 bucket, web server, and Amazon Cognito identity.
  2. Run the static pre-gen build and test static pages.
  3. Test dynamic pages.

Prerequisites

To run this example, you need an AWS account with permission to use Amazon Polly, Amazon S3, Amazon Cognito, and (for demo purposes) AWS Cloud9.

Provision resources

We share an AWS CloudFormation template to create in your account a self-contained demo environment to help you follow along with the post. If you prefer to set up PRTP in your own environment, refer to instructions in README.md.

To provision the demo environment using CloudFormation, first download a copy of the CloudFormation template. Then complete the following steps:

  1. On the AWS CloudFormation console, choose Create stack.
  2. Choose With new resources (standard).
  3. Select Upload a template file.
  4. Choose Choose file to upload the local copy of the template that you downloaded. The name of the file is prtp.yml.
  5. Choose Next.
  6. Enter a stack name of your choosing. Later you enter this again as a replacement for <StackName>.
  7. You may keep default values in the Parameters section.
  8. Choose Next.
  9. Continue through the remaining sections.
  10. Read and select the check boxes in the Capabilities section.
  11. Choose Create stack.
  12. When the stack is complete, find the value for BucketName in the stack outputs.

We encourage you to review the stack with your security team prior to using it a production environment.

Set up the web server and pre-gen server in an AWS Cloud9 IDE

Next, on the AWS Cloud9 console, locate the environment PRTPDemoCloud9 created by the CloudFormation stack. Choose Open IDE to open the AWS Cloud9 environment. Open a terminal window and run the following commands, which clones the PRTP code, sets up pre-gen dependencies, and starts a web server to test with:

#Obtain PRTP code
cd /home/ec2-user/environment
git clone https://github.com/aws-samples/amazon-polly-reads-the-page.git

# Navigate to that code
cd amazon-polly-reads-the-page/setup

# Install Saxon and html5 Python lib. For pre-gen.
sh ./setup.sh <StackName>

# Run Python simple HTTP server
cd ..
./runwebserver.sh <IngressCIDR> 

For <StackName>, use the name you gave the CloudFormation stack. For <IngressCIDR>, specify a range of IP addresses allowed to access the web server. To restrict access to the browser on your local machine, find your IP address using https://whatismyipaddress.com/ and append /32 to specify the range. For example, if your IP is 10.2.3.4, use 10.2.3.4/32. The server listens on port 8080. The public IP address on which the server listens is given in the output. For example:

Public IP is

3.92.33.223

Test static pages

In your browser, navigate to PRTPStaticDefault.html. (If you’re using the demo, the URL is http://<cloud9host>:8080/web/PRTPStaticDefault.html, where <cloud9host> is the public IP address that you discovered in setting up the IDE.) Choose Play on the audio control at the top. Listen to the audio and watch the highlights. Explore the control by changing speeds, changing voices, pausing, fast-forwarding, and rewinding. The following screenshot shows the page; the text “Skips hidden paragraph” is highlighted because it is currently being read.

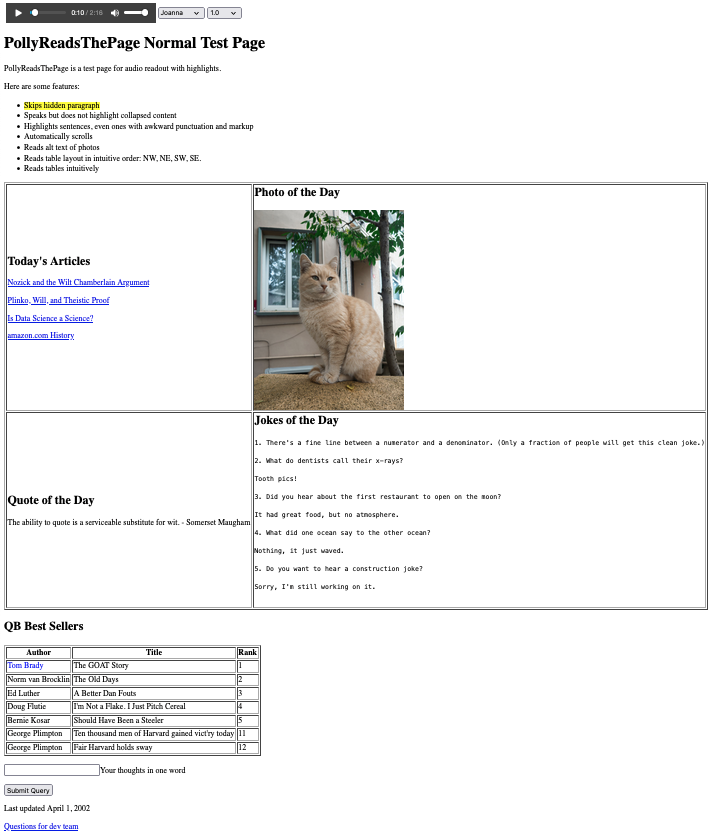
Try the same for PRTPStaticConfig.html and PRTPStaticCustom.html. The results are similar. For example, all three read the alt text for the photo of the cat (“Random picture of a cat”). All three read NE, NW, SE, and SW as full words (“northeast,” “northwest,” “southeast,” “southwest”), taking advantage of Amazon Polly lexicons.

Notice the main differences in audio:

  • PRTPStaticDefault.html reads all the text in the body of the page, including the wrapup portion at the bottom with “Your thoughts in one word,” “Submit Query,” “Last updated April 1, 2020,” and “Questions for the dev team.” PRTPStaticConfig.html and PRTPStaticCustom.html don’t read these because they explicitly exclude the wrapup from speech synthesis.
  • PRTPStaticCustom.html reads the QB Best Sellers table differently from the others. It reads the first three rows only, and reads the row number for each row. It repeats the columns for each row. PRTPStaticCustom.html uses a custom transformation to tailor the readout of the table. The other pages use default table rendering.
  • PRTPStaticCustom.html reads “Tom Brady” at a louder volume than the rest of the text. It uses the speech synthesis markup language (SSML) prosody tag to tailor the reading of Tom Brady. The other pages don’t tailor in this way.
  • PRTPStaticCustom.html, thanks to a custom transformation, reads the main tiles in NW, SW, NE, SE order; that is, it reads “Today’s Articles,” “Quote of the Day,” “Photo of the Day,” “Jokes of the Day.” The other pages read in the order the tiles appear in the natural NW, NE, SW, SE order they appear in the HTML: “Today’s Articles,” “Photo of the Day,” “Quote of the Day,” “Jokes of the Day.”

Let’s dig deeper into how the audio is generated, and how the page highlights the text.

Static pre-generator

Our GitHub repo includes pre-generated audio files for the PRPTStatic pages, but if you want to generate them yourself, from the bash shell in the AWS Cloud9 IDE, run the following commands:

# navigate to examples
cd /home/ec2-user/environment/amazon-polly-reads-the-page-blog/pregen/examples

# Set env var for my S3 bucket. Example, I called mine prtp-output
S3_BUCKET=prtp-output # Use output BucketName from CloudFormation

#Add lexicon for pronuniciation of NE NW SE NW
#Script invokes aws polly put-lexicon
./addlexicon.sh.

#Gen each variant
./gen_default.sh
./gen_config.sh
./gen_custom.sh

Now let’s look at how those scripts work.

Default case

We begin with gen_default.sh:

cd ..
python FixHTML.py ../web/PRTPStaticDefault.html  
   example/tmp_wff.html
./gen_ssml.sh example/tmp_wff.html generic.xslt example/tmp.ssml
./run_polly.sh example/tmp.ssml en-US Joanna 
   ../web/polly/PRTPStaticDefault compass
./run_polly.sh example/tmp.ssml en-US Matthew 
   ../web/polly/PRTPStaticDefault compass

The script begins by running the Python program FixHTML.py to make the source HTML file PRTPStaticDefault.html well-formed. It writes the well-formed version of the file to example/tmp_wff.html. This step is crucial for two reasons:

  • Most source HTML is not well formed. This step repairs the source HTML to be well formed. For example, many HTML pages don’t close P elements. This step closes them.
  • We keep track of where in the HTML page we find text. We need to track locations using the same document object model (DOM) structure that the browser uses. For example, the browser automatically adds a TBODY to a TABLE. The Python program follows the same well-formed repairs as the browser.

gen_ssml.sh takes the well-formed HTML as input, applies an XML stylesheet transformation (XSLT) transformation to it, and outputs an SSML file. (SSML is the language in Amazon Polly to control how audio is rendered from text.) In the current example, the input is example/tmp_wff.html. The output is example/tmp.ssml. The transform’s job is to decide what text to extract from the HTML and feed to Amazon Polly. generic.xslt is a sensible default XSLT transform for most webpages. In the following example code snippet, it excludes the audio control, the HTML header, as well as HTML elements like script and form. It also excludes elements with the hidden attribute. It includes elements that typically contain text, such as P, H1, and SPAN. For these, it renders both a mark, including the full XPath expression of the element, and the value of the element.

<!-- skip the header -->
<xsl:template match="html/head">
</xsl:template>

<!-- skip the audio itself -->
<xsl:template match="html/body/table[@id='prtp-audio']">
</xsl:template>

<!-- For the body, work through it by applying its templates. This is the default. -->
<xsl:template match="html/body">
<speak>
      <xsl:apply-templates />
</speak>
</xsl:template>

<!-- skip these -->
<xsl:template match="audio|option|script|form|input|*[@hidden='']">
</xsl:template>

<!-- include these -->
<xsl:template match="p|h1|h2|h3|h4|li|pre|span|a|th/text()|td/text()">
<xsl:for-each select=".">
<p>
      <mark>
          <xsl:attribute name="name">
          <xsl:value-of select="prtp:getMark(.)"/>
          </xsl:attribute>
      </mark>
      <xsl:value-of select="normalize-space(.)"/>
</p>
</xsl:for-each>
</xsl:template>

The following is a snippet of the SSML that is rendered. This is fed as input to Amazon Polly. Notice, for example, that the text “Skips hidden paragraph” is to be read in the audio, and we associate it with a mark, which tells us that this text occurs in the location on the page given by the XPath expression /html/body[1]/div[2]/ul[1]/li[1].

<speak>
<p><mark name="/html/body[1]/div[1]/h1[1]"/>PollyReadsThePage Normal Test Page</p>
<p><mark name="/html/body[1]/div[2]/p[1]"/>PollyReadsThePage is a test page for audio readout with highlights.</p>
<p><mark name="/html/body[1]/div[2]/p[2]"/>Here are some features:</p>
<p><mark name="/html/body[1]/div[2]/ul[1]/li[1]"/>Skips hidden paragraph</p>
<p><mark name="/html/body[1]/div[2]/ul[1]/li[2]"/>Speaks but does not highlight collapsed content</p>
…
</speak>

To generate audio in Amazon Polly, we call the script run_polly.sh. It runs the AWS Command Line Interface (AWS CLI) command aws polly start-speech-synthesis-task twice: once to generate MP3 audio, and again to generate the marks file. Because the generation is asynchronous, the script polls until it finds the output in the specified S3 bucket. When it finds the output, it downloads to the build server and copies the files to the web/polly folder. The following is a listing of the web folders:

  • PRTPStaticDefault.html
  • PRTPStaticConfig.html
  • PRTPStaticCustom.html
  • PRTP.js
  • polly/PRTPStaticDefault/Joanna.mp3, Joanna.marks, Matthew.mp3, Matthew.marks
  • polly/PRTPStaticConfig/Joanna.mp3, Joanna.marks, Matthew.mp3, Matthew.marks
  • polly/PRTPStaticCustom/Joanna.mp3, Joanna.marks, Matthew.mp3, Matthew.marks

Each page has its own set of voice-specific MP3 and marks files. These files are the pre-generated files. The page doesn’t need to invoke Amazon Polly at runtime; the files are part of the web build.

Config-driven case

Next, consider gen_config.sh:

cd ..
python FixHTML.py ../web/PRTPStaticConfig.html 
  example/tmp_wff.html
python ModGenericXSLT.py example/transform_config.json 
  example/tmp.xslt
./gen_ssml.sh example/tmp_wff.html example/tmp.xslt 
  example/tmp.ssml
./run_polly.sh example/tmp.ssml en-US Joanna 
  ../web/polly/PRTPStaticConfig compass
./run_polly.sh example/tmp.ssml en-US Matthew 
  ../web/polly/PRTPStaticConfig compass

The script is similar to the script in the default case, but the bolded lines indicate the main difference. Our approach is config-driven. We tailor the content to be extracted from the page by specifying what to extract through configuration, not code. In particular, we use the JSON file transform_config.json, which specifies that the content to be included are the elements with IDs title, main, maintable, and qbtable. The element with ID wrapup should be excluded. See the following code:

{
 "inclusions": [ 
 	{"id" : "title"} , 
 	{"id": "main"}, 
 	{"id": "maintable"}, 
 	{"id": "qbtable" }
 ],
 "exclusions": [
 	{"id": "wrapup"}
 ]
}

We run the Python program ModGenericXSLT.py to modify generic.xslt, used in the default case, to use the inclusions and exclusions that we specify in transform_config.json. The program writes the results to a temp file (example/tmp.xslt), which it passes to gen_ssml.sh as its XSLT transform.

This is a low-code option. The web publisher doesn’t need to know how to write XSLT. But they do need to understand the structure of the HTML page and the IDs used in its main organizing elements.

Customization case

Finally, consider gen_custom.sh:

cd ..
python FixHTML.py ../web/PRTPStaticCustom.html 
   example/tmp_wff.html
./gen_ssml.sh example/tmp_wff.html example/custom.xslt  
   example/tmp.ssml
./run_polly.sh example/tmp.ssml en-US Joanna 
   ../web/polly/PRTPStaticCustom compass
./run_polly.sh example/tmp.ssml en-US Matthew 
   ../web/polly/PRTPStaticCustom compass

This script is nearly identical to the default script, except it uses its own XSLT—example/custom.xslt—rather than the generic XSLT. The following is a snippet of the XSLT:

<!-- Use NW, SW, NE, SE order for main tiles! -->
<xsl:template match="*[@id='maintable']">
    <mark>
        <xsl:attribute name="name">
        <xsl:value-of select="stats:getMark(.)"/>
        </xsl:attribute>
    </mark>
    <xsl:variable name="tiles" select="./tbody"/>
    <xsl:variable name="tiles-nw" select="$tiles/tr[1]/td[1]"/>
    <xsl:variable name="tiles-ne" select="$tiles/tr[1]/td[2]"/>
    <xsl:variable name="tiles-sw" select="$tiles/tr[2]/td[1]"/>
    <xsl:variable name="tiles-se" select="$tiles/tr[2]/td[2]"/>
    <xsl:variable name="tiles-seq" select="($tiles-nw,  $tiles-sw, $tiles-ne, $tiles-se)"/>
    <xsl:for-each select="$tiles-seq">
         <xsl:apply-templates />  
    </xsl:for-each>
</xsl:template>   

<!-- Say Tom Brady load! -->
<xsl:template match="span[@style = 'color:blue']" >
<p>
      <mark>
          <xsl:attribute name="name">
          <xsl:value-of select="prtp:getMark(.)"/>
          </xsl:attribute>
      </mark>
      <prosody volume="x-loud">Tom Brady</prosody>
</p>
</xsl:template>

If you want to study the code in detail, refer to the scripts and programs in the GitHub repo.

Browser setup and highlights

The static pages include an HTML5 audio control, which takes as its audio source the MP3 file generated by Amazon Polly and residing on the web server:

<audio id="audio" controls>
  <source src="polly/PRTPStaticDefault/en/Joanna.mp3" type="audio/mpeg">
</audio>

At load time, the page also loads the Amazon Polly-generated marks file. This occurs in the PRTP.js file, which the HTML page includes. The following is a snippet of the marks file for PRTPStaticDefault:

{“time”:11747,“type”:“sentence”,“start”:289,“end”:356,“value”:“PollyReadsThePage is a test page for audio readout with highlights.“}
{“time”:15784,“type”:“ssml”,“start”:363,“end”:403,“value”:“/html/body[1]/div[2]/p[2]“}
{“time”:16427,“type”:“sentence”,“start”:403,“end”:426,“value”:“Here are some features:“}
{“time”:17677,“type”:“ssml”,“start”:433,“end”:480,“value”:“/html/body[1]/div[2]/ul[1]/li[1]“}
{“time”:18344,“type”:“sentence”,“start”:480,“end”:502,“value”:“Skips hidden paragraph”}
{“time”:19894,“type”:“ssml”,“start”:509,“end”:556,“value”:“/html/body[1]/div[2]/ul[1]/li[2]“}
{“time”:20537,“type”:“sentence”,“start”:556,“end”:603,“value”:“Speaks but does not highlight collapsed content”}

During audio playback, there is an audio timer event handler in PRTP.js that checks the audio’s current time, finds the text to highlight, finds its location on the page, and highlights it. The text to be highlighted is an entry of type sentence in the marks file. The location is the XPath expression in the name attribute of the entry of type SSML that precedes the sentence. For example, if the time is 18400, according to the marks file, the sentence to be highlighted is “Skips hidden paragraph,” which starts at 18334. The location is the SSML entry at time 17667: /html/body[1]/div[2]/ul[1]/li[1].

Test dynamic pages

The page PRTPDynamic.html demonstrates dynamic audio readback using default, configuration-driven, and custom audio extraction approaches.

Default case

In your browser, navigate to PRTPDynamic.html. The page has one query parameter, dynOption, which accepts values default, config, and custom. It defaults to default, so you may omit it in this case. The page has two sections with dynamic content:

  • Latest Articles – Changes frequently throughout the day
  • Greek Philosophers Search By Date – Allows the visitor to search for Greek philosophers by date and shows the results in a table

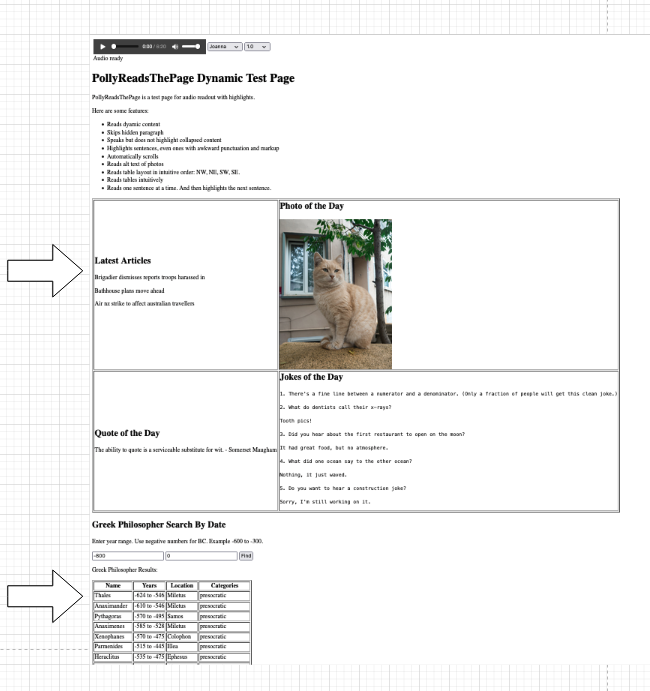
Create some content in the Greek Philosopher section by entering a date range of -800 to 0, as shown in the example. Then choose Find.

Now play the audio by choosing Play in the audio control.

Behind the scenes, the page runs the following code to render and play the audio:

   buildSSMLFromDefault();
   chooseRenderAudio();
   setVoice();

First it calls the function buildSSMLFromDefault in PRTP.js to extract most of the text from the HTML page body. That function walks the DOM tree, looking for text in common elements such as p, h1, pre, span, and td. It ignores text in elements that usually don’t contain text to be read aloud, such as audio, option, and script. It builds SSML markup to be input to Amazon Polly. The following is a snippet showing extraction of the first row from the philosopher table:

<speak>
...
  <p><mark name="/HTML[1]/BODY[1]/DIV[3]/DIV[1]/DIV[1]/TABLE[1]/TBODY[1]/TR[2]/TD[1]"/>Thales</p>
  <p><mark name="/HTML[1]/BODY[1]/DIV[3]/DIV[1]/DIV[1]/TABLE[1]/TBODY[1]/TR[2]/TD[2]"/>-624 to -546</p>
  <p><mark name="/HTML[1]/BODY[1]/DIV[3]/DIV[1]/DIV[1]/TABLE[1]/TBODY[1]/TR[2]/TD[3]"/>Miletus</p>
  <p><mark name="/HTML[1]/BODY[1]/DIV[3]/DIV[1]/DIV[1]/TABLE[1]/TBODY[1]/TR[2]/TD[4]"/>presocratic</p>
...
</speak>

The chooseRenderAudio function in PRTP.js begins by initializing the AWS SDK for Amazon Cognito, Amazon S3, and Amazon Polly. This initialization occurs only once. If chooseRenderAudio is invoked again because the content of the page has changed, the initialization is skipped. See the following code:

AWS.config.region = env.REGION
AWS.config.credentials = new AWS.CognitoIdentityCredentials({
            IdentityPoolId: env.IDP});
audioTracker.sdk.connection = {
   polly: new AWS.Polly({apiVersion: '2016-06-10'}),
   s3: new AWS.S3()
};

It generates MP3 audio from Amazon Polly. The generation is synchronous for small SSML inputs and asynchronous (with output sent to the S3 bucket) for large SSML inputs (greater than 6,000 characters). In the synchronous case, we ask Amazon Polly to provide the MP3 file using a presigned URL. When the synthesized output is ready, we set the src attribute of the audio control to that URL and load the control. We then request the marks file and load it the same way as in the static case. See the following code:

// create signed URL
const signer = new AWS.Polly.Presigner(pollyAudioInput, audioTracker.sdk.connection.polly);

// call Polly to get MP3 into signed URL
signer.getSynthesizeSpeechUrl(pollyAudioInput, function(error, url) {
  // Audio control uses signed URL
  audioTracker.audioControl.src =
    audioTracker.sdk.audio[audioTracker.voice];
  audioTracker.audioControl.load();

  // call Polly to get marks
  audioTracker.sdk.connection.polly.synthesizeSpeech(
    pollyMarksInput, function(markError, markData) {
    const marksStr = new
      TextDecoder().decode(markData.AudioStream);
    // load marks into page the same as with static
    doLoadMarks(marksStr);
  });
});

Config-driven case

In your browser, navigate to PRTPDynamic.html?dynOption=config. Play the audio. The audio playback is similar to the default case, but there are minor differences. In particular, some content is skipped.

Behind the scenes, when using the config option, the page extracts content differently than in the default case. In the default case, the page uses buildSSMLFromDefault. In the config-driven case, the page specifies the sections it wants to include and exclude:

const ssml = buildSSMLFromConfig({
	 "inclusions": [ 
	 	{"id": "title"}, 
	 	{"id": "main"}, 
	 	{"id": "maintable"}, 
	 	{"id": "phil-result"},
	 	{"id": "qbtable"}, 
	 ],
	 "exclusions": [
	 	{"id": "wrapup"}
	 ]
	});

The buildSSMLFromConfig function, defined in PRTP.js, walks the DOM tree in each of the sections whose ID is provided under inclusions. It extracts content from each and combines them together, in the order specified, to form an SSML document. It excludes the sections specified under exclusions. It extracts content from each section in the same way buildSSMLFromDefault extracts content from the page body.

Customization case

In your browser, navigate to PRTPDynamic.html?dynOption=custom. Play the audio. There are three noticeable differences. Let’s note these and consider the custom code that runs behind the scenes:

  • It reads the main tiles in NW, SW, NE, SE order. The custom code gets each of these cell blocks from maintable and adds them to the SSML in NW, SW, NE, SE order:
const nw = getElementByXpath("//*[@id='maintable']//tr[1]/td[1]");
const sw = getElementByXpath("//*[@id='maintable']//tr[2]/td[1]");
const ne = getElementByXpath("//*[@id='maintable']//tr[1]/td[2]");
const se = getElementByXpath("//*[@id='maintable']//tr[2]/td[2]");
[nw, sw, ne, se].forEach(dir => buildSSMLSection(dir, []));
  • “Tom Brady” is spoken loudly. The custom code puts “Tom Brady” text inside an SSML prosody tag:
if (cellText == "Tom Brady") {
   addSSMLMark(getXpathOfNode( node.childNodes[tdi]));
   startSSMLParagraph();
   startSSMLTag("prosody", {"volume": "x-loud"});
   addSSMLText(cellText);
   endSSMLTag();
   endSSMLParagraph();
}
  • It reads only the first three rows of the quarterback table. It reads the column headers for each row. Check the code in the GitHub repo to discover how this is implemented.

Clean up

To avoid incurring future charges, delete the CloudFormation stack.

Conclusion

In this post, we demonstrated a technical solution to a high-value business problem: how to use Amazon Polly to read the content of a webpage and highlight the content as it’s being read. We showed this using both static and dynamic pages. To extract content from the page, we used DOM traversal and XSLT. To facilitate highlighting, we used the speech marks capability in Amazon Polly.

Learn more about Amazon Polly by visiting its service page.

Feel free to ask questions in the comments.


About the authors

Mike Havey is a Solutions Architect for AWS with over 25 years of experience building enterprise applications. Mike is the author of two books and numerous articles. Visit his Amazon author page to read more.

Vineet Kachhawaha is a Solutions Architect at AWS with expertise in machine learning. He is responsible for helping customers architect scalable, secure, and cost-effective workloads on AWS.

Read More

Meet the Omnivore: Christopher Scott Constructs Architectural Designs, Virtual Environments With NVIDIA Omniverse

Editor’s note: This post is a part of our Meet the Omnivore series, which features individual creators and developers who use NVIDIA Omniverse to accelerate their 3D workflows and create virtual worlds.

Christopher Scott

Growing up in a military family, Christopher Scott moved more than 30 times, which instilled in him “the ability to be comfortable with, and even motivated by, new environments,” he said.

Today, the environments he explores — and creates — are virtual ones.

As chief technical director for 3D design and visualization services at Infinite-Compute, Scott creates physically accurate virtual environments using familiar architectural products in conjunction with NVIDIA Omniverse Enterprise, a platform for connecting and building custom 3D pipelines.

With a background in leading cutting-edge engineering projects for the U.S. Department of Defense, Scott now creates virtual environments focused on building renovation and visualization for the architecture, engineering, construction and operations (AECO) industry.

These true-to-reality virtual environments — whether of electrical rooms, manufacturing factories, or modern home designs — enable quick, efficient design of products, processes and facilities before bringing them to life in the real world.

They also help companies across AECO and other industries save money, speed project completion and make designs interactive for customers — as will be highlighted at NVIDIA GTC, a global conference on AI and the metaverse, running online Sept. 19-22.

“Physically accurate virtual environments help us deliver client projects faster, while maintaining a high level of quality and performance consistency,” said Scott, who’s now based in Austin, Texas. “The key value we offer clients is the ability to make better decisions with confidence.”

To construct his visualizations, Scott uses Omniverse Create and Omniverse Connectors for several third-party applications: Trimble SketchUp for 3D models for drawing and design; Autodesk Revit for 3D design and 2D annotation of buildings; and Unreal Engine for creating walkthrough simulations and 3D virtual spaces.

In addition, he uses software like Blender for visual effects, motion graphics and animation, and PlantFactory for modeling 3D vegetation, which gives his virtual spaces a lively and natural aesthetic.

Project Speedups With Omniverse

Within just four years, Scott went from handling 50 projects a year to more than 3,500, he said.

Around 80 of his projects each month include lidar-to-point-cloud work, a complex process that involves transforming spatial data into a collection of coordinates for 3D models for manufacturing and design.

Using Omniverse doubles productivity for this demanding workload, he said, as it offers physically accurate photorealism and rendering in real time, as well as live-sync collaboration across users.

“Previously, members of our team functioned as individual islands of productivity,” Scott said. “Omniverse gave us the integrated collaboration we desired to enhance our effectiveness and efficiency.”

At Omniverse’s core is Universal Scene Description — an open-source, extensible 3D framework and common language for creating virtual worlds.

“Omniverse’s USD standard to integrate outputs from multiple software programs allowed our team to collaborate on a source-of-truth project — letting us work across time zones much faster,” said Scott, who further accelerates his workflow by running it on NVIDIA RTX GPUs, including the RTX A6000 on Infinite-Compute’s on-demand cloud infrastructure.

“It became clear very soon after appreciating the depth and breadth of Omniverse that investing in this pipeline was not just enabling me to improve current operations,” he added. “It provides a platform for future growth — for my team members and my organization as a whole.”

While Scott says his work leans more technical than creative, he sees using Omniverse as a way to bridge these two sides of his brain.

“I’d like to think that adopting technologies like Omniverse to deliver cutting-edge solutions that have a meaningful and measurable impact on my clients’ businesses is, in its own way, a creative exercise, and perhaps even a work of art,” he said.

Join In on the Creation

Creators and developers across the world can download NVIDIA Omniverse for free, and enterprise teams can use the platform for their 3D projects.

Hear about NVIDIA’s latest AI breakthroughs powering graphics and virtual worlds at GTC, running online Sept. 19-22. Register free now and attend the top sessions for 3D creators and developers to learn more about how Omniverse can accelerate workflows.

Join the NVIDIA Omniverse User Group to connect with the growing community and see Scott’s work in Omniverse celebrated.

Check out artwork from other “Omnivores” and submit projects in the gallery. Connect your workflows to Omniverse with software from Adobe, Autodesk, Epic Games, Maxon, Reallusion and more.

Follow NVIDIA Omniverse on Instagram, Twitter, YouTube and Medium for additional resources and inspiration. Check out the Omniverse forums, and join our Discord server and Twitch channel to chat with the community.

The post Meet the Omnivore: Christopher Scott Constructs Architectural Designs, Virtual Environments With NVIDIA Omniverse appeared first on NVIDIA Blog.

Read More

PaLI: Scaling Language-Image Learning in 100+ Languages

PaLI: Scaling Language-Image Learning in 100+ Languages

Advanced language models (e.g., GPT, GLaM, PaLM and T5) have demonstrated diverse capabilities and achieved impressive results across tasks and languages by scaling up their number of parameters. Vision-language (VL) models can benefit from similar scaling to address many tasks, such as image captioning, visual question answering (VQA), object recognition, and in-context optical-character-recognition (OCR). Increasing the success rates for these practical tasks is important for everyday interactions and applications. Furthermore, for a truly universal system, vision-language models should be able to operate in many languages, not just one.

In “PaLI: A Jointly-Scaled Multilingual Language-Image Model”, we introduce a unified language-image model trained to perform many tasks and in over 100 languages. These tasks span vision, language, and multimodal image and language applications, such as visual question answering, image captioning, object detection, image classification, OCR, text reasoning, and others. Furthermore, we use a collection of public images that includes automatically collected annotations in 109 languages, which we call the WebLI dataset. The PaLI model pre-trained on WebLI achieves state-of-the-art performance on challenging image and language benchmarks, such as COCO-CaptionsTextCaps, VQAv2, OK-VQA, TextVQA and others. It also outperforms prior models’ multilingual visual captioning and visual question answering benchmarks.

Overview
One goal of this project is to examine how language and vision models interact at scale and specifically the scalability of language-image models. We explore both per-modality scaling and the resulting cross-modal interactions of scaling. We train our largest model to 17 billion (17B) parameters, where the visual component is scaled up to 4B parameters and the language model to 13B. 

The PaLI model architecture is simple, reusable and scalable. It consists of a Transformer encoder that processes the input text, and an auto-regressive Transformer decoder that generates the output text. To process images, the input to the Transformer encoder also includes “visual words” that represent an image processed by a Vision Transformer (ViT). A key component of the PaLI model is reuse, in which we seed the model with weights from previously-trained uni-modal vision and language models, such as mT5-XXL and large ViTs. This reuse not only enables the transfer of capabilities from uni-modal training, but also saves computational cost.

The PaLI model addresses a wide range of tasks in the language-image, language-only and image-only domain using the same API (e.g., visual-question answering, image captioning, scene-text understanding, etc.). The model is trained to support over 100 languages and tuned to perform multilingually for multiple language-image tasks.

Dataset: Language-Image Understanding in 100+ Languages
Scaling studies for deep learning show that larger models require larger datasets to train effectively. To unlock the potential of language-image pretraining, we construct WebLI, a multilingual language-image dataset built from images and text available on the public web.

WebLI scales up the text language from English-only datasets to 109 languages, which enables us to perform downstream tasks in many languages. The data collection process is similar to that employed by other datasets, e.g. ALIGN and LiT, and enabled us to scale the WebLI dataset to 10 billion images and 12 billion alt-texts.

In addition to annotation with web text, we apply the Cloud Vision API to perform OCR on the images, leading to 29 billion image-OCR pairs. We perform near-deduplication of the images against the train, validation and test splits of 68 common vision and vision-language datasets, to avoid leaking data from downstream evaluation tasks, as is standard in the literature. To further improve the data quality, we score image and alt-text pairs based on their cross-modal similarity, and tune the threshold to keep only 10% of the images, for a total of 1 billion images used for training PaLI.

Sampled images from WebLI associated with multilingual alt-text and OCR. The second image is by jopradier (original), used under the CC BY-NC-SA 2.0 license. Remaining images are also used with permission.
Statistics of recognized languages from alt-text and OCR in WebLI.
Image-text pair counts of WebLI and other large-scale vision-language datasets, CLIP, ALIGN and LiT.

Training Large Language-Image Models
Vision-language tasks require different capabilities and sometimes have diverging goals. Some tasks inherently require localization of objects to solve the task accurately, whereas some other tasks might need a more global view. Similarly, different tasks might require either long or compact answers. To address all of these objectives, we leverage the richness of the WebLI pre-training data and introduce a mixture of pre-training tasks, which prepare the model for a variety of downstream applications. To accomplish the goal of solving a wide variety of tasks, we enable knowledge-sharing between multiple image and language tasks by casting all tasks into a single generalized API (input: image + text; output: text), which is also shared with the pretraining setup. The objectives used for pre-training are cast into the same API as a weighted mixture aimed at both maintaining the ability of the reused model components and training the model to perform new tasks (e.g., split-captioning for image description, OCR prediction for scene-text comprehension, VQG and VQA prediction).

The model is trained in JAX with Flax using the open-sourced T5X and Flaxformer framework. For the visual component, we introduce and train a large ViT architecture, named ViT-e, with 4B parameters using the open-sourced BigVision framework. ViT-e follows the same recipe as the ViT-G architecture (which has 2B parameters). For the language component, we concatenate the dense token embeddings with the patch embeddings produced by the visual component, together as the input to the multimodal encoder-decoder, which is initialized from mT5-XXL. During the training of PaLI, the weights of this visual component are frozen, and only the weights of the multimodal encoder-decoder are updated.

Results
We compare PaLI on common vision-language benchmarks that are varied and challenging. The PaLI model achieves state-of-the-art results on these tasks, even outperforming very large models in the literature. For example, it outperforms the Flamingo model, which is several times larger (80B parameters), on several VQA and image-captioning tasks, and it also sustains performance on challenging language-only and vision-only tasks, which were not the main training objective.

PaLI (17B parameters) outperforms the state-of-the-art approaches (including SimVLM, CoCa, GIT2, Flamingo, BEiT3) on multiple vision-and-language tasks. In this plot we show the absolute score differences compared with the previous best model to highlight the relative improvements of PaLI. Comparison is on the official test splits when available. CIDEr score is used for evaluation of the image captioning tasks, whereas VQA tasks are evaluated by VQA Accuracy.

<!–

PaLI (17B parameters) outperforms the state-of-the-art approaches (including SimVLM, CoCa, GIT2, Flamingo, BEiT3) on multiple vision-and-language tasks. In this plot we show the absolute score differences compared with the previous best model to highlight the relative improvements of PaLI. Comparison is on the official test splits when available. CIDEr score is used for evaluation of the image captioning tasks, whereas VQA tasks are evaluated by VQA Accuracy.

–>

Model Scaling Results
We examine how the image and language model components interact with each other with regards to model scaling and where the model yields the most gains. We conclude that scaling both components jointly results in the best performance, and specifically, scaling the visual component, which requires relatively few parameters, is most essential. Scaling is also critical for better performance across multilingual tasks.

Scaling both the language and the visual components of the PaLI model contribute to improved performance. The plot shows the score differences compared to the PaLI-3B model: CIDEr score is used for evaluation of the image captioning tasks, whereas VQA tasks are evaluated by VQA Accuracy.
Multilingual captioning greatly benefits from scaling the PaLI models. We evaluate PaLI on a 35-language benchmark Crossmodal-3600. Here we present the average score over all 35 languages and the individual score for seven diverse languages.

Model Introspection: Model Fairness, Biases, and Other Potential Issues
To avoid creating or reinforcing unfair bias within large language and image models, important first steps are to (1) be transparent about the data that were used and how the model used those data, and (2) test for model fairness and conduct responsible data analyses. To address (1), our paper includes a data card and model card. To address (2), the paper includes results of demographic analyses of the dataset. We consider this a first step and know that it will be important to continue to measure and mitigate potential biases as we apply our model to new tasks, in alignment with our AI Principles.

Conclusion
We presented PaLI, a scalable multi-modal and multilingual model designed for solving a variety of vision-language tasks. We demonstrate improved performance across visual-, language- and vision-language tasks. Our work illustrates the importance of scale in both the visual and language parts of the model and the interplay between the two. We see that accomplishing vision and language tasks, especially in multiple languages, actually requires large scale models and data, and will potentially benefit from further scaling. We hope this work inspires further research in multi-modal and multilingual models.

Acknowledgements
We thank all the authors who conducted this research Soravit (Beer) Changpinyo, AJ Piergiovanni, Piotr Padlewski, Daniel Salz, Sebastian Goodman, Adam Grycner, Basil Mustafa, Lucas Beyer, Alexander Kolesnikov, Joan Puigcerver, Nan Ding, Keran Rong, Hassan Akbari,Gaurav Mishra, Linting Xue, Ashish Thapliyal, James Bradbury, Weicheng Kuo, Mojtaba Seyedhosseini, Chao Jia, Burcu Karagol Ayan, Carlos Riquelme, Andreas Steiner, Anelia Angelova, Xiaohua Zhai, Neil Houlsby, Radu Soricut. We also thank Claire Cui, Slav Petrov, Tania Bedrax-Weiss, Joelle Barral, Tom Duerig, Paul Natsev, Fernando Pereira, Jeff Dean, Jeremiah Harmsen, Zoubin Ghahramani, Erica Moreira, Victor Gomes, Sarah Laszlo, Kathy Meier-Hellstern, Susanna Ricco, Rich Lee, Austin Tarango, Emily Denton, Bo Pang, Wei Li, Jihyung Kil, Tomer Levinboim, Julien Amelot, Zhenhai Zhu, Xiangning Chen, Liang Chen, Filip Pavetic, Daniel Keysers, Matthias Minderer, Josip Djolonga, Ibrahim Alabdulmohsin, Mostafa Dehghani, Yi Tay, Elizabeth Adkison, James Cockerille, Eric Ni, Anna Davies, and Maysam Moussalem for their suggestions, improvements and support. We thank Tom Small for providing visualizations for the blogpost.

Read More

Use Amazon SageMaker Data Wrangler for data preparation and Studio Labs to learn and experiment with ML

Amazon SageMaker Studio Lab is a free machine learning (ML) development environment based on open-source JupyterLab for anyone to learn and experiment with ML using AWS ML compute resources. It’s based on the same architecture and user interface as Amazon SageMaker Studio, but with a subset of Studio capabilities.

When you begin working on ML initiatives, you need to perform exploratory data analysis (EDA) or data preparation before proceeding with model building. Amazon SageMaker Data Wrangler is a capability of Amazon SageMaker that makes it faster for data scientists and engineers to prepare data for ML applications via a visual interface. Data Wrangler reduces the time it takes to aggregate and prepare data for ML from weeks to minutes.

A key accelerator of feature preparation in Data Wrangler is the Data Quality and Insights Report. This report checks data quality and helps detect abnormalities in your data, so that you can perform the required data engineering to fix your dataset. You can use the Data Quality and Insights Report to perform an analysis of your data to gain insights into your dataset such as the number of missing values and number of outliers. If you have issues with your data, such as target leakage or imbalance, the insights report can bring those issues to your attention and help you identify the data preparation steps you need to perform.

Studio Lab users can benefit from Data Wrangler because data quality and feature engineering are critical for the predictive performance of your model. Data Wrangler helps with data quality and feature engineering by giving insights into data quality issues and easily enabling rapid feature iteration and engineering using a low-code UI.

In this post, we show you how to perform exploratory data analysis, prepare and transform data using Data Wrangler, and export the transformed and prepared data to Studio Lab to carry out model building.

Solution overview

The solution includes the following high-level steps:

  1. Create AWS account and admin user. This is a prerequisite
  2. Download the dataset churn.csv.
  3. Load the dataset to Amazon Simple Storage Service (Amazon S3).
  4. Create a SageMaker Studio domain and launch Data Wrangler.
  5. Import the dataset into the Data Wrangler flow from Amazon S3.
  6. Create the Data Quality and Insights Report and draw conclusions on necessary feature engineering.
  7. Perform the necessary data transforms in Data Wrangler.
  8. Download the Data Quality and Insights Report and the transformed dataset.
  9. Upload the data to a Studio Lab project for model training.

The following diagram illustrates this workflow.

Prerequisites

To use Data Wrangler and Studio Lab, you need the following prerequisites:

Build a data preparation workflow with Data Wrangler

To get started, complete the following steps:

  1. Upload your dataset to Amazon S3.
  2. On the SageMaker console, under Control panel in the navigation pane, choose Studio.
  3. On the Launch app menu next to your user profile, choose Studio.

    After you successfully log in to Studio, you should see a development environment like the following screenshot.
  4. To create a new Data Wrangler workflow, on the File menu, choose New, then choose Data Wrangler Flow.

    The first step in Data Wrangler is to import your data. You can import data from multiple data sources, such as Amazon S3, Amazon Athena, Amazon Redshift, Snowflake, and Databricks. In this example, we use Amazon S3.If you just want to see how Data Wrangler works, you can always choose Use sample dataset.
  5. Choose Import data.
  6. Choose Amazon S3.
  7. Choose the dataset you uploaded and choose Import.

    Data Wrangler enables you to either import the entire dataset or sample a portion of it.
  8. To quickly get insights on the dataset, choose First K for Sampling and enter 50000 for Sample size.

Understand data quality and get insights

Let’s use the Data Quality and Insights Report to perform an analysis of the data that we imported into Data Wrangler. You can use the report to understand what steps you need to take to clean and process your data. This report provides information such as the number of missing values and the number of outliers. If you have issues with your data, such as target leakage or imbalance, the insights report can bring those issues to your attention.

  1. Choose the plus sign next to Data types and choose Get data insights.
  2. For Analysis type, choose Data Quality and Insights Report.
  3. For Target column, choose Churn?.
  4. For Problem type¸ select Classification.
  5. Choose Create.

You’re presented with a detailed report that you can review and download. The report includes several sections such as quick model, feature summary, feature correlation, and data insights. The following screenshots provide examples of these sections.

Observations from the report

From the report, we can make the following observations:

  • No duplicate rows were found.
  • The State column appears to be quite evenly distributed, so the data is balanced in terms of state population.
  • The Phone column presents too many unique values to be of any practical use. Too many unique values make this column not useful. We can drop the Phone column in our transformation.
  • Based on feature correlation section of the report, Mins and Charge are highly correlated. We can remove one of them.

Transformation

Based on our observations, we want to make the following transformations:

  • Remove the Phone column because it has many unique values.
  • We also see several features that essentially have 100% correlation with one another. Including these feature pairs in some ML algorithms can create undesired problems, whereas in others it will only introduce minor redundancy and bias. Let’s remove one feature from each of the highly correlated pairs: Day Charge from the pair with Day Mins, Night Charge from the pair with Night Mins, and Intl Charge from the pair with Intl Mins.
  • Convert True or False in the Churn column to be a numerical value of 1 or 0.
  1. Return to the data flow and choose the plus sign next to Data types.
  2. Choose Add transform.
  3. Choose Add step.
  4. You can search for the transform you looking for (in our case, manage columns).
  5. Choose Manage columns.
  6. For Transform¸ choose Drop column.
  7. For Columns to drop¸ choose Phone, Day Charge, Eve Charge, Night Charge, and Intl Charge.
  8. Choose Preview, then choose Update.

    Let’s add another transform to perform a categorical encode on the Churn? column.
  9. Choose the transform Encode categorical.
  10. For Transform, choose Ordinal encode.
  11. For Input columns, choose the Churn? column.
  12. For Invalid handling strategy, choose Replace with NaN.
  13. Choose Preview, then choose Update.

Now True and False are converted to 1 and 0, respectively.

Now that we have a good understand of the data and have prepared and transformed the data for model building, we can move the data to Studio Lab for model building.

Upload the data to Studio Lab

To start using the data in Studio Lab, complete the following steps:

  1. Choose Export data to export to an S3 bucket.
  2. For Amazon S3 location, enter your S3 path.
  3. Specify the file type.
  4. Choose Export data.
  5. After you export the data, you can download the data from the S3 bucket to your local computer.
  6. Now you can go to Studio Lab and upload the file to Studio Lab.

    Alternatively, you can connect to Amazon S3 from Studio Lab. For more information, refer to Use external resources in Amazon SageMaker Studio Lab.
  7. Let’s install SageMaker and import Pandas.
  8. Import all libraries as required.
  9. Now we can read the CSV file.
  10. Let’s print churn to confirm the dataset is correct.

Now that you have the processed dataset in Studio Lab, you can carry out further steps required for model building.

Data Wrangler pricing

You can perform all the steps in this post for EDA or data preparation within Data Wrangler and pay for the simple instance, jobs, and storage pricing based on usage or consumption. No upfront or licensing fees are required.

Clean up

When you’re not using Data Wrangler, it’s important to shut down the instance on which it runs to avoid incurring additional fees. To avoid losing work, save your data flow before shutting Data Wrangler down.

  1. To save your data flow in Studio, choose File, then choose Save Data Wrangler Flow.
    Data Wrangler automatically saves your data flow every 60 seconds.
  2. To shut down the Data Wrangler instance, in Studio, choose Running Instances and Kernels.
  3. Under RUNNING APPS, choose the shutdown icon next to the sagemaker-data-wrangler-1.0 app.
  4. Choose Shut down all to confirm.

Data Wrangler runs on an ml.m5.4xlarge instance. This instance disappears from RUNNING INSTANCES when you shut down the Data Wrangler app.

After you shut down the Data Wrangler app, it has to restart the next time you open a Data Wrangler flow file. This can take a few minutes.

Conclusion

In this post, we saw how you can gain insights into your dataset, perform exploratory data analysis, prepare and transform data using Data Wrangler within Studio, and export the transformed and prepared data to Studio Lab and carry out model building and other steps.

With SageMaker Data Wrangler, you can simplify the process of data preparation and feature engineering, and complete each step of the data preparation workflow, including data selection, cleansing, exploration, and visualization from a single visual interface.


About the authors

Rajakumar Sampathkumar is a Principal Technical Account Manager at AWS, providing customers guidance on business-technology alignment and supporting the reinvention of their cloud operation models and processes. He is passionate about the cloud and machine learning. Raj is also a machine learning specialist and works with AWS customers to design, deploy, and manage their AWS workloads and architectures.

Meenakshisundaram Thandavarayan is a Senior AI/ML specialist with a passion to design, create and promote human-centered Data and Analytics experiences. He supports AWS Strategic customers on their transformation towards data driven organization.

James Wu is a Senior AI/ML Specialist Solution Architect at AWS. helping customers design and build AI/ML solutions. James’s work covers a wide range of ML use cases, with a primary interest in computer vision, deep learning, and scaling ML across the enterprise. Prior to joining AWS, James was an architect, developer, and technology leader for over 10 years, including 6 years in engineering and 4 years in marketing & advertising industries.

Read More

Our commitment on using AI to accelerate progress on global development goals

Our commitment on using AI to accelerate progress on global development goals

I joined Google earlier this year to lead a new function: Technology & Society. Our aim is to help connect research, people and ideas across Google to shape the future of our technology innovations and their impact on society for the better. A key area of focus is AI, a field I have studied and immersed myself in over the years. I recently met with a team at the Google AI Center in Ghana that is using advanced technology to address an ancient problem: detecting locust outbreaks which threaten food security and livelihoods for millions of people. And in India and Bangladesh, our Crisis Response teams are using our machine-learning-based forecasting to provide over 360 million people with alerts about upcoming floods.

Efforts like these make me optimistic about how AI can contribute to solving societal problems. They also reinforce how high the stakes are for people everywhere, especially as global forces threaten the progress we’ve made on health, prosperity and environmental issues.

AI for the Global Goals

As the United Nations General Assembly begins, the world will come together to discuss issues of global importance, including assessing progress towards the Sustainable Development Goals (SDGs) which provide a roadmap on economic growth, social inclusion and environmental protection. While it’s clear the global community has made significant strides in meeting the 17 interlinked goals since their adoption by 193 countries, challenges persist in every country. Currently, no country is on track to meet all the goals by 2030.

From the launch of the SDGs in 2015, Google has believed in their importance and looked for ways to support progress. We know that advanced technology, such as AI, can be a powerful tool in advancing these goals. Research that I co-led before joining Google found AI could contribute to progress on all the SDGs — a finding confirmed by the UN. In 2018 Google launched AI for Social Good, focusing applied research and grantmaking efforts on some of the most intractable issues. But we know more needs to be done.

So today we’re expanding our efforts with AI for the Global Goals, which will bring together research, technology and funding to accelerate progress on the SDGs. This commitment will include $25 million to support NGOs and social enterprises working with AI to accelerate progress towards these goals. Based on what we’ve learned so far, we believe that with the AI capabilities and financial support we will provide, grantees can cut in half the time or cost to achieve their goals. In addition to funding, where appropriate, we’ll provide Google.org Fellowships, where teams of Google employees work alongside organizations for up to six months. Importantly, projects will be open-sourced so other organizations can build on the work. All of Google’s work and contributions will be guided by our Responsible AI Principles.

Since 2018, we’ve been focusing applied research and grantmaking efforts on some of the most intractable issues with over 50 organizations in countries ranging from Japan to Kenya to Brazil. We’ve supported organizations making progress on emissions monitoring, antimicrobial image analysis and mental health for LGBTQ+ youth. Working side-by-side with these organizations has shown us the creative ways a thriving ecosystem of companies, nonprofits and universities can use AI. We think we can use the same model to help countries make progress on the SDGs.

A critical time for global progress

COVID-19, global conflict, and climate change have set us back. Fewer people have the opportunity to move out of poverty, inequitable access to healthcare and education continues, gender inequality persists, and environmental threats pose immediate and long-term risks. We know that AI and other advanced technology can help tackle these setbacks. For example, in a significant development for biology and human health, DeepMind used AI to predict 200 million protein structures. They open-sourced the structures in partnership with EMBL-EBI, giving over 500,000 biologists tools to accelerate work on drug discovery, treatment and therapies — thereby making it possible to tackle many of the world’s neglected diseases.

As someone who has spent the last several decades working at the nexus of technology and societal good, it matters deeply that progress here will benefit communities everywhere. No single organization alone will develop and deploy all the solutions we’ll need; we all need to do our part. We’re looking forward to continuing to partner with experts around the world and learning what we can accomplish together.

Read More