The ChatGPT app syncs your conversations, supports voice input, and brings our latest model improvements to your fingertips.OpenAI Blog
A quantum computing partnership with the University of Chicago and the University of Tokyo
 The University of Tokyo, the University of Chicago and Google establish a strategic partnership on quantum information science and engineering.Read More
Lihong Li wins 2023 Seoul Test of Time Award
The Amazon senior principal scientist coauthored a 2010 paper that introduced a new way to develop algorithms that make personalized recommendations for website users.Read More

Build a serverless meeting summarization backend with large language models on Amazon SageMaker JumpStart
AWS delivers services that meet customers’ artificial intelligence (AI) and machine learning (ML) needs with services ranging from custom hardware like AWS Trainium and AWS Inferentia to generative AI foundation models (FMs) on Amazon Bedrock. In February 2022, AWS and Hugging Face announced a collaboration to make generative AI more accessible and cost efficient.
Generative AI has grown at an accelerating rate from the largest pre-trained model in 2019 having 330 million parameters to more than 500 billion parameters today. The performance and quality of the models also improved drastically with the number of parameters. These models span tasks like text-to-text, text-to-image, text-to-embedding, and more. You can use large language models (LLMs), more specifically, for tasks including summarization, metadata extraction, and question answering.
Amazon SageMaker JumpStart is an ML hub that can helps you accelerate your ML journey. With JumpStart, you can access pre-trained models and foundation models from the Foundations Model Hub to perform tasks like article summarization and image generation. Pre-trained models are fully customizable for your use cases and can be easily deployed into production with the user interface or SDK. Most importantly, none of your data is used to train the underlying models. Because all data is encrypted and doesn’t leave the virtual private cloud (VPC), you can trust that your data will remain private and confidential.
This post focuses on building a serverless meeting summarization using Amazon Transcribe to transcribe meeting audio and the Flan-T5-XL model from Hugging Face (available on JumpStart) for summarization.
Solution overview
The Meeting Notes Generator Solution creates an automated serverless pipeline using AWS Lambda for transcribing and summarizing audio and video recordings of meetings. The solution can be deployed with other FMs available on JumpStart.
The solution includes the following components:
- A shell script for creating a custom Lambda layer
- A configurable AWS CloudFormation template for deploying the solution
- Lambda function code for starting Amazon Transcribe transcription jobs
- Lambda function code for invoking a SageMaker real-time endpoint hosting the Flan T5 XL model
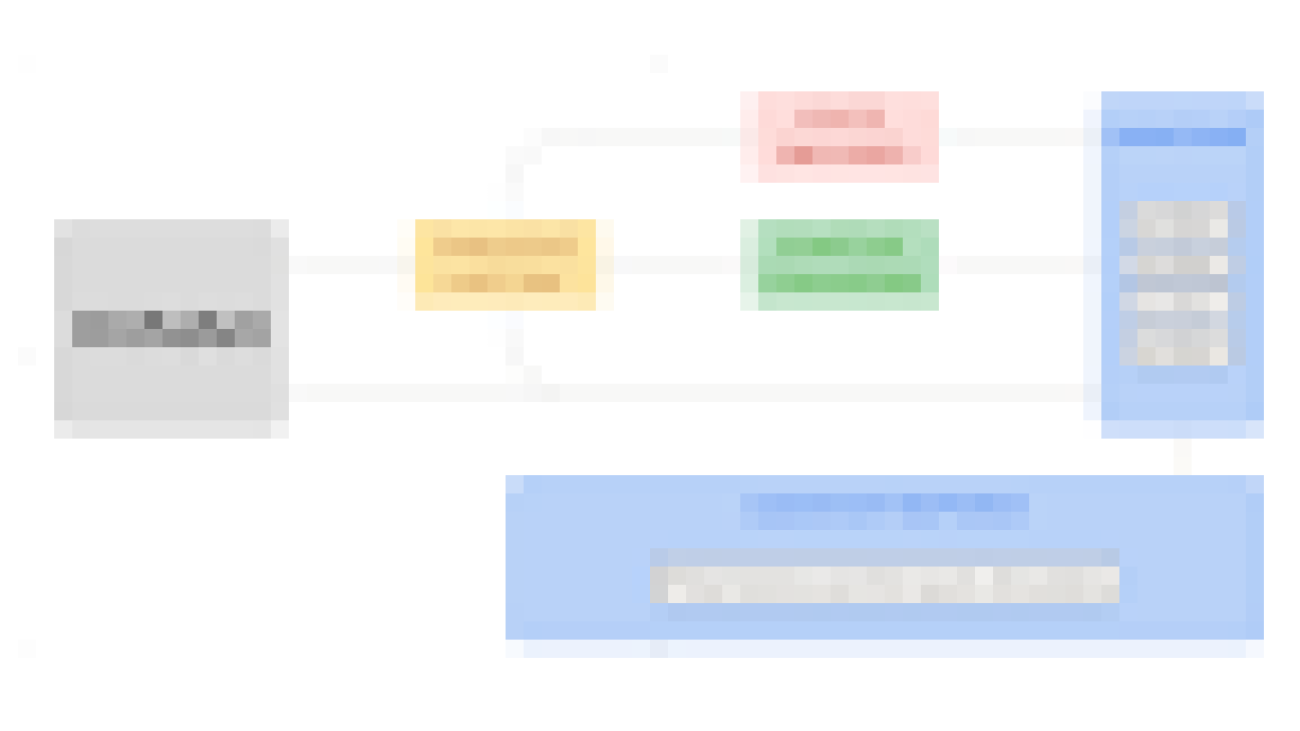
The following diagram illustrates this architecture.

As shown in the architecture diagram, the meeting recordings, transcripts, and notes are stored in respective Amazon Simple Storage Service (Amazon S3) buckets. The solution takes an event-driven approach to transcribe and summarize upon S3 upload events. The events trigger Lambda functions to make API calls to Amazon Transcribe and invoke the real-time endpoint hosting the Flan T5 XL model.
The CloudFormation template and instructions for deploying the solution can be found in the GitHub repository.
Real-time inference with SageMaker
Real-time inference on SageMaker is designed for workloads with low latency requirements. SageMaker endpoints are fully managed and support multiple hosting options and auto scaling. Once created, the endpoint can be invoked with the InvokeEndpoint API. The provided CloudFormation template creates a real-time endpoint with the default instance count of 1, but it can be adjusted based on expected load on the endpoint and as the service quota for the instance type permits. You can request service quota increases on the Service Quotas page of the AWS Management Console.
The following snippet of the CloudFormation template defines the SageMaker model, endpoint configuration, and endpoint using the ModelData and ImageURI of the Flan T5 XL from JumpStart. You can explore more FMs on Getting started with Amazon SageMaker JumpStart. To deploy the solution with a different model, replace the ModelData and ImageURI parameters in the CloudFormation template with the desired model S3 artifact and container image URI, respectively. Check out the sample notebook on GitHub for sample code on how to retrieve the latest JumpStart model artifact on Amazon S3 and the corresponding public container image provided by SageMaker.
Deploy the solution
For detailed steps on deploying the solution, follow the Deployment with CloudFormation section of the GitHub repository.
If you want to use a different instance type or more instances for the endpoint, submit a quota increase request for the desired instance type on the AWS Service Quotas Dashboard.
To use a different FM for the endpoint, replace the ImageURI and ModelData parameters in the CloudFormation template for the corresponding FM.
Test the solution
After you deploy the solution using the Lambda layer creation script and the CloudFormation template, you can test the architecture by uploading an audio or video meeting recording in any of the media formats supported by Amazon Transcribe. Complete the following steps:
- On the Amazon S3 console, choose Buckets in the navigation pane.
- From the list of S3 buckets, choose the S3 bucket created by the CloudFormation template named
meeting-note-generator-demo-bucket-<aws-account-id>. - Choose Create folder.
- For Folder name, enter the S3 prefix specified in the
S3RecordingsPrefixparameter of the CloudFormation template (recordingsby default). - Choose Create folder.

- In the newly created folder, choose Upload.

- Choose Add files and choose the meeting recording file to upload.
- Choose Upload.
Now we can check for a successful transcription.
- On the Amazon Transcribe console, choose Transcription jobs in the navigation pane.
- Check that a transcription job with a corresponding name to the uploaded meeting recording has the status In progress or Complete.

- When the status is Complete, return to the Amazon S3 console and open the demo bucket.
- In the S3 bucket, open the
transcripts/folder. - Download the generated text file to view the transcription.
We can also check the generated summary.
- In the S3 bucket, open the
notes/folder. - Download the generated text file to view the generated summary.
Prompt engineering
Even though LLMs have improved in the last few years, the models can only take in finite inputs; therefore, inserting an entire transcript of a meeting may exceed the limit of the model and cause an error with the invocation. To design around this challenge, we can break down the context into manageable chunks by limiting the number of tokens in each invocation context. In this sample solution, the transcript is broken down into smaller chunks with a maximum limit on the number of tokens per chunk. Then each transcript chunk is summarized using the Flan T5 XL model. Finally, the chunk summaries are combined to form the context for the final combined summary, as shown in the following diagram.

The following code from the GenerateMeetingNotes Lambda function uses the Natural Language Toolkit (NLTK) library to tokenize the transcript, then it chunks the transcript into sections, each containing up to a certain number of tokens:
Finally, the following code snippet combines the chunk summaries as the context to generate a final summary:
The full GenerateMeetingNotes Lambda function can be found in the GitHub repository.
Clean up
To clean up the solution, complete the following steps:
- Delete all objects in the demo S3 bucket and the logs S3 bucket.
- Delete the CloudFormation stack.
- Delete the Lambda layer.
Conclusion
This post demonstrated how to use FMs on JumpStart to quickly build a serverless meeting notes generator architecture with AWS CloudFormation. Combined with AWS AI services like Amazon Transcribe and serverless technologies like Lambda, you can use FMs on JumpStart and Amazon Bedrock to build applications for various generative AI use cases.
For additional posts on ML at AWS, visit the AWS ML Blog.
About the author
 Eric Kim is a Solutions Architect (SA) at Amazon Web Services. He works with game developers and publishers to build scalable games and supporting services on AWS. He primarily focuses on applications of artificial intelligence and machine learning.
Prepare training and validation dataset for facies classification using Snowflake integration and train using Amazon SageMaker Canvas
This post is co-written with Thatcher Thornberry from bpx energy.
Facies classification is the process of segmenting lithologic formations from geologic data at the wellbore location. During drilling, wireline logs are obtained, which have depth-dependent geologic information. Geologists are deployed to analyze this log data and determine depth ranges for potential facies of interest from the different types of log data. Accurately classifying these regions is critical for the drilling processes that follow.
Facies classification using AI and machine learning (ML) has become an increasingly popular area of investigation for many oil majors. Many data scientists and business analysts at large oil companies don’t have the necessary skillset to run advanced ML experiments on important tasks such as facies classification. To address this, we show you how to easily prepare and train a best-in-class ML classification model on this problem.
In this post, aimed primarily at those who are already using Snowflake, we explain how you can import both training and validation data for a facies classification task from Snowflake into Amazon SageMaker Canvas and subsequently train the model using a 3+ category prediction model.
Solution overview
Our solution consists of the following steps:
- Upload facies CSV data from your local machine to Snowflake. For this post, we use data from the following open-source GitHub repo.
- Configure AWS Identity and Access Management (IAM) roles for Snowflake and create a Snowflake integration.
- Create a secret for Snowflake credentials (optional, but advised).
- Import Snowflake directly into Canvas.
- Build a facies classification model.
- Analyze the model.
- Run batch and single predictions using the multi-class model.
- Share the trained model to Amazon SageMaker Studio.
Prerequisites
Prerequisites for this post include the following:
- An AWS account.
- Canvas set up, with an Amazon SageMaker user profile associated with it.
- A Snowflake account. For steps to create a Snowflake account, refer to How to: Create a Snowflake Free Trial Account
- The Snowflake CLI. For steps to connect to Snowflake by CLI, refer to SnowSQL, the command line interface for connecting to Snowflake. For steps to connect to to Snowflake by CLI, refer to Snowflake SnowSQL: Command Line Tool to access Snowflake.
- An existing database within Snowflake.
Upload facies CSV data to Snowflake
In this section, we take two open-source datasets and upload them directly from our local machine to a Snowflake database. From there, we set up an integration layer between Snowflake and Canvas.
- Download the training_data.csv and validation_data_nofacies.csv files to your local machine. Make note of where you saved them.
- Ensuring that you have the correct Snowflake credentials and have installed the Snowflake CLI desktop app, you can federate in. For more information, refer to Log into SnowSQL.

- Select the appropriate Snowflake warehouse to work within, which in our case is
COMPUTE_WH:

- Choose a database to use for the remainder of the walkthrough:
- Create a named file format that will describe a set of staged data to access or load into Snowflake tables.
This can be run either in the Snowflake CLI or in a Snowflake worksheet on the web application. For this post, we run a SnowSQL query in the web application. See Getting Started With Worksheets for instructions to create a worksheet on the Snowflake web application.

- Create a table in Snowflake using the CREATE statement.
The following statement creates a new table in the current or specified schema (or replaces an existing table).
It’s important that the data types and the order in which they appear are correct, and align with what is found in the CSV files that we previously downloaded. If they’re inconsistent, we’ll run into issues later when we try to copy the data across.

- Do the same for the validation database.
Note that the schema is a little different to the training data. Again, ensure that the data types and column or feature orders are correct.

- Load the CSV data file from your local system into the Snowflake staging environment:
- The following is the syntax of the statement for Windows OS:
- The following is the syntax of the statement for Mac OS:
The following screenshot shows an example command and output from within the SnowSQL CLI.

- Copy the data into the target Snowflake table.
Here, we load the training CSV data to the target table, which we created earlier. Note that you have to do this for both the training and validation CSV files, copying them into the training and validation tables, respectively.

- Verify that the data has been loaded into the target table by running a SELECT query (you can do this for both the training and validation data):

Configure Snowflake IAM roles and create the Snowflake integration
As a prerequisite for this section, please follow the official Snowflake documentation on how to configure a Snowflake Storage Integration to Access Amazon S3.
Retrieve the IAM user for your Snowflake account
Once you have successfully configured your Snowflake storage integration, run the following DESCRIBE INTEGRATION command to retrieve the ARN for the IAM user that was created automatically for your Snowflake account:

Record the following values from the output:
- STORAGE_AWS_IAM_USER_ARN – The IAM user created for your Snowflake account
- STORAGE_AWS_EXTERNAL_ID – The external ID needed to establish a trust relationship
Update the IAM role trust policy
Now we update the trust policy:
- On the IAM console, choose Roles in the navigation pane.
- Choose the role you created.
- On the Trust relationship tab, choose Edit trust relationship.
- Modify the policy document as shown in the following code with the DESC STORAGE INTEGRATION output values you recorded in the previous step.
- Choose Update trust policy.
Create an external stage in Snowflake
We use an external stage within Snowflake for loading data from an S3 bucket in your own account into Snowflake. In this step, we create an external (Amazon S3) stage that references the storage integration you created. For more information, see Creating an S3 Stage.
This requires a role that has the CREATE_STAGE privilege for the schema as well as the USAGE privilege on the storage integration. You can grant these privileges to the role as shown in the code in the next step.
Create the stage using the CREATE_STAGE command with placeholders for the external stage and S3 bucket and prefix. The stage also references a named file format object called my_csv_format:
Create a secret for Snowflake credentials
Canvas allows you to use the ARN of an AWS Secrets Manager secret or a Snowflake account name, user name, and password to access Snowflake. If you intend to use the Snowflake account name, user name, and password option, skip to the next section, which covers adding the data source.
To create a Secrets Manager secret manually, complete the following steps:
- On the Secrets Manager console, choose Store a new secret.
- For Select secret type¸ select Other types of secrets.
- Specify the details of your secret as key-value pairs.

The names of the key are case-sensitive and must be lowercase.
If you prefer, you can use the plaintext option and enter the secret values as JSON:
- Choose Next.
- For Secret name, add the prefix
AmazonSageMaker(for example, our secret isAmazonSageMaker-CanvasSnowflakeCreds). - In the Tags section, add a tag with the key SageMaker and value true.

- Choose Next.
- The rest of the fields are optional; choose Next until you have the option to choose Store to store the secret.
- After you store the secret, you’re returned to the Secrets Manager console.
- Choose the secret you just created, then retrieve the secret ARN.
- Store this in your preferred text editor for use later when you create the Canvas data source.
Import Snowflake directly into Canvas
To import your facies dataset directly into Canvas, complete the following steps:
- On the SageMaker console, choose Amazon SageMaker Canvas in the navigation pane.
- Choose your user profile and choose Open Canvas.
- On the Canvas landing page, choose Datasets in the navigation pane.
- Choose Import.

- Click on Snowflake in the below image and then immediately “Add Connection”.

- Enter the ARN of the Snowflake secret that we previously created, the storage integration name (
SAGEMAKER_CANVAS_INTEGRATION), and a unique connection name of your choosing. - Choose Add connection.

If all the entries are valid, you should see all the databases associated with the connection in the navigation pane (see the following example for NICK_FACIES).

- Choose the
TRAINING_DATAtable, then choose Preview dataset.
If you’re happy with the data, you can edit the custom SQL in the data visualizer.
- Choose Edit in SQL.
- Run the following SQL command before importing into Canvas. (This assumes that the database is called
NICK_FACIES. Replace this value with your database name.)
Something similar to the following screenshot should appear in the Import preview section.
- If you’re happy with the preview, choose Import data.

- Choose an appropriate data name, ensuring that it’s unique and fewer than 32 characters long.
- Use the following command to import the validation dataset, using the same method as earlier:
Build a facies classification model
To build your facies classification model, complete the following steps:
- Choose Models in the navigation pane, then choose New Model.
- Give your model a suitable name.
- On the Select tab, choose the recently imported training dataset, then choose Select dataset.
- On the Build tab, drop the
WELL_NAMEcolumn.
We do this because the well names themselves aren’t useful information for the ML model. They are merely arbitrary names that we find useful to distinguish between the wells themselves. The name we give a particular well is irrelevant to the ML model.
- Choose FACIES as the target column.
- Leave Model type as 3+ category prediction.
- Validate the data.
- Choose Standard build.
Your page should look similar to the following screenshot just before building your model.

After you choose Standard build, the model enters the analyze stage. You’re provided an expected build time. You can now close this window, log out of Canvas (in order to avoid charges), and return to Canvas at a later time.
Analyze the facies classification model
To analyze the model, complete the following steps:
- Federate back into Canvas.
- Locate your previously created model, choose View, then choose Analyze.
- On the Overview tab, you can see the impact that individual features are having on the model output.
- In the right pane, you can visualize the impact that a given feature (X axis) is having on the prediction of each facies class (Y axis).
These visualizations will change accordingly depending on the feature you select. We encourage you to explore this page by cycling through all 9 classes and 10 features.
- On the Scoring tab, we can see the predicted vs. actual facies classification.
- Choose Advanced metrics to view F1 scores, average accuracy, precision, recall, and AUC.
- Again, we encourage viewing all the different classes.
- Choose Download to download an image to your local machine.
In the following image, we can see a number of different advanced metrics, such as the F1 score. In statistical analysis, the F1 score conveys the balance between the precision and the recall of a classification model, and is computed using the following equation: 2*((Precision * Recall)/ (Precision + Recall)).

Run batch and single prediction using the multi-class facies classification model
To run a prediction, complete the following steps:
- Choose Single prediction to modify the feature values as needed, and get a facies classification returned on the right of the page.
You can then copy the prediction chart image to your clipboard, and also download the predictions into a CSV file.

- Choose Batch prediction and then choose Select dataset to choose the validation dataset you previously imported.
- Choose Generate predictions.
You’re redirected to the Predict page, where the Status will read Generating predictions for a few seconds.
After the predictions are returned, you can preview, download, or delete the predictions by choosing the options menu (three vertical dots) next to the predictions.

The following is an example of a predictions preview.

Share a trained model in Studio
You can now share the latest version of the model with another Studio user. This allows data scientists to review the model in detail, test it, make any changes that may improve accuracy, and share the updated model back with you.
The ability to share your work with a more technical user within Studio is a key feature of Canvas, given the key distinction between ML personas’ workflows. Note the strong focus here on collaboration between cross-functional teams with differing technical abilities.
- Choose Share to share the model.

- Choose which model version to share.
- Enter the Studio user to share the model with.
- Add an optional note.
- Choose Share.

Conclusion
In this post, we showed how with just a few clicks in Amazon SageMaker Canvas you can prepare and import your data from Snowflake, join your datasets, analyze estimated accuracy, verify which columns are impactful, train the best performing model, and generate new individual or batch predictions. We’re excited to hear your feedback and help you solve even more business problems with ML. To build your own models, see Getting started with using Amazon SageMaker Canvas.
About the Authors
 Nick McCarthy is a Machine Learning Engineer in the AWS Professional Services team. He has worked with AWS clients across various industries including healthcare, finance, sports, telecoms and energy to accelerate their business outcomes through the use of AI/ML. Working with the bpx data science team, Nick recently finished building bpx’s Machine Learning platform on Amazon SageMaker.
 Thatcher Thornberry is a Machine Learning Engineer at bpx Energy. He supports bpx’s data scientists by developing and maintaining the company’s core Data Science platform in Amazon SageMaker. In his free time he loves to hack on personal coding projects and spend time outdoors with his wife.

Into the Omniverse: Adobe Substance 3D, NVIDIA Omniverse Enhance Creative Freedom Within 3D Workflows
Editor’s note: This is the first installment of our monthly Into the Omniverse series, which highlights the latest advancements to NVIDIA Omniverse furthering the evolution of the metaverse with the OpenUSD framework, and showcases how artists, developers and enterprises can transform their workflows with the platform.
An update to the Omniverse Connector for Adobe Substance 3D Painter will save 3D creators across industries significant time and effort. New capabilities include an export feature using Universal Scene Description (OpenUSD), an open, extensible file framework enabling non-destructive workflows and collaboration in scene creation.
Benjamin Samar, technical director of video production company Elara Systems, is using the Adobe Substance 3D Painter Connector to provide a “uniquely human approach to an otherwise clinical discussion,” he said.
Samar and his team tapped the Connector to create an animated public-awareness video for sickle cell disease. The video aims to help adolescents experiencing sickle cell disease understand the importance of quickly telling an adult or a medical professional if they’re experiencing symptoms.
According to Samar, the Adobe Substance 3D Painter Connector for Omniverse was especially useful for setting up all of the video’s environments and characters — before bringing them into the USD Composer app for scene composition and real-time RTX rendering of the high-quality visuals.
“By using this Connector, materials were automatically imported, converted to Material Definition Language and ready to go inside USD Composer with a single click,” he said.
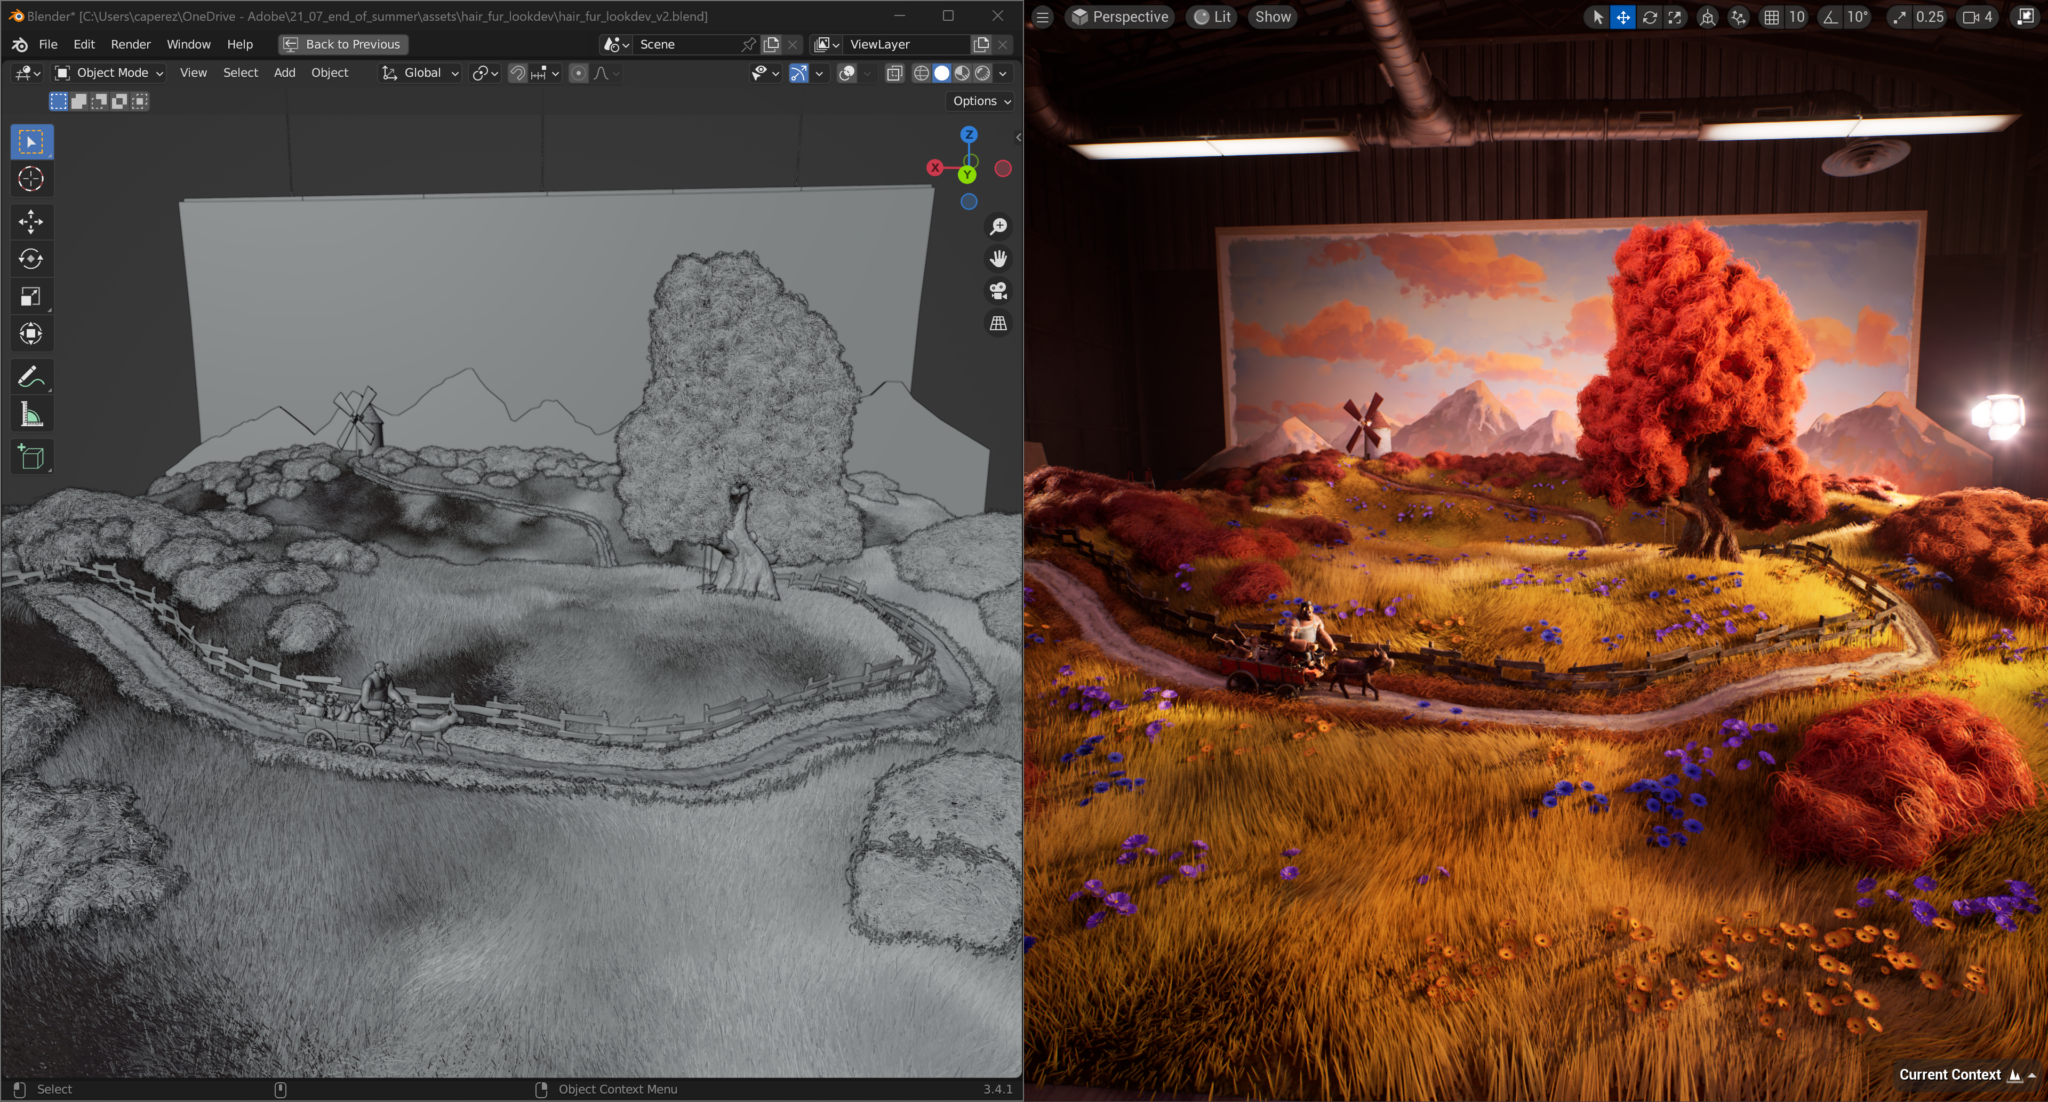
The Adobe Substance 3D Art and Development team itself uses Omniverse in their workflows. Their End of Summer project fostered collaboration and creativity among the Adobe artists in Omniverse, and resulted in stunningly rich and realistic visuals.
Learn more about how they used Adobe Substance 3D tools with Unreal Engine 5 and Omniverse in this on-demand NVIDIA GTC session, and get an exclusive behind-the-scenes look at Adobe’s NVIDIA Studio-accelerated workflows in the making of this project.
Plus, technical artists are using Adobe Substance 3D and Omniverse to create scratches and other defects on 3D objects to train vision AI models.
Adobe and Omniverse workflows offer creators improved efficiency and flexibility — whether they’re training AI models, animating an educational video to improve medical knowledge or bringing a warm summer scene to life.
And soon, the next release of the Adobe Substance 3D Painter Connector for Omniverse will further streamline their creative processes.
Connecting the Dots for a More Seamless Workflow
Version 203.0 of the Adobe Substance 3D Painter Connector for Omniverse, coming mid-June, will offer new capabilities that enable more seamless workflows.
Substance 3D Painter’s new OpenUSD export feature, compatible with version 8.3.0 of the app and above, allows users to export textures using any built-in or user-defined preset to dynamically build OmniPBR shaders — programs that calculate the appropriate levels of light, darkness and color during 3D rendering — in USD Composer.
To further speed and ease workflows, the Connector update will remove “rotating texture folders,” uniquely generated temporary directories that textures were exported to with each brush stroke.
With each change the artist makes, textures will now save over the same path, greatly speeding the process for locally saved projects.
Get Plugged Into the Omniverse
Discover the latest in AI, graphics and more by watching NVIDIA founder and CEO Jensen Huang’s COMPUTEX keynote on Sunday, May 28, at 8 p.m. PT.
#SetTheScene for your Adobe and Omniverse workflow by joining the latest community challenge. Share your best 3D environments on social media with the #SetTheScene hashtag for a chance to be featured on channels for NVIDIA Omniverse (Twitter, LinkedIn, Instagram) and NVIDIA Studio (Twitter, Facebook, Instagram).
The latest community challenge is here!
Show us your environment art made with #NVIDIAOmniverse like @TanjaLanggner who used #OpenUSD, @UnrealEngine, #Megascans, and USD Composer to #SetTheScene. pic.twitter.com/AguY1GDeUV
— NVIDIA Omniverse (@nvidiaomniverse) May 11, 2023


Get started with NVIDIA Omniverse by downloading the standard license free, or learn how Omniverse Enterprise can connect your team. Developers can get started with Omniverse resources.
Stay up to date on the platform by subscribing to the newsletter, and follow NVIDIA Omniverse on Instagram, Medium and Twitter. For more, join the Omniverse community and check out the Omniverse forums, Discord server, Twitch and YouTube channels.
Featured image courtesy of Adobe Substance 3D art and development team.
How generational differences affect consumer attitudes towards ads
Our research study, in collaboration with CrowdDNA, aims to understand people’s relationship with social media ads across different social media platforms.Read More
Using reinforcement learning for dynamic planning in open-ended conversations

As virtual assistants become ubiquitous, users increasingly interact with them to learn about new topics or obtain recommendations and expect them to deliver capabilities beyond narrow dialogues of one or two turns. Dynamic planning, namely the capability to look ahead and replan based on the flow of the conversation, is an essential ingredient for the making of engaging conversations with the deeper, open-ended interactions that users expect.
While large language models (LLMs) are now beating state-of-the-art approaches in many natural language processing benchmarks, they are typically trained to output the next best response, rather than planning ahead, which is required for multi-turn interactions. However, in the past few years, reinforcement learning (RL) has delivered incredible results addressing specific problems that involve dynamic planning, such as winning games and protein folding.
Today, we are sharing our recent advances in dynamic planning for human-to-assistant conversations, in which we enable an assistant to plan a multi-turn conversation towards a goal and adapt that plan in real-time by adopting an RL-based approach. Here we look at how to improve long interactions by applying RL to compose answers based on information extracted from reputable sources, rather than relying on content generated by a language model. We expect that future versions of this work could combine LLMs and RL in multi-turn dialogues. The deployment of RL “in the wild” in a large-scale dialogue system proved a formidable challenge due to the modeling complexity, tremendously large state and action spaces, and significant subtlety in designing reward functions.
What is dynamic planning?
Many types of conversations, from gathering information to offering recommendations, require a flexible approach and the ability to modify the original plan for the conversation based on its flow. This ability to shift gears in the middle of a conversation is known as dynamic planning, as opposed to static planning, which refers to a more fixed approach. In the conversation below, for example, the goal is to engage the user by sharing interesting facts about cool animals. To begin, the assistant steers the conversation to sharks via a sound quiz. Given the user’s lack of interest in sharks, the assistant then develops an updated plan and pivots the conversation to sea lions, lions, and then cheetahs.
 |
| The assistant dynamically modifies its original plan to talk about sharks and shares facts about other animals. |
Dynamic composition
To cope with the challenge of conversational exploration, we separate the generation of assistant responses into two parts: 1) content generation, which extracts relevant information from reputable sources, and 2) flexible composition of such content into assistant responses. We refer to this two-part approach as dynamic composition. Unlike LLM methods, this approach gives the assistant the ability to fully control the source, correctness, and quality of the content that it may offer. At the same time, it can achieve flexibility via a learned dialogue manager that selects and combines the most appropriate content.
In an earlier paper, “Dynamic Composition for Conversational Domain Exploration”, we describe a novel approach which consists of: (1) a collection of content providers, which offer candidates from different sources, such as news snippets, knowledge graph facts, and questions; (2) a dialogue manager; and (3) a sentence fusion module. Each assistant response is incrementally constructed by the dialogue manager, which selects candidates proposed by the content providers. The selected sequence of utterances is then fused into a cohesive response.
Dynamic planning using RL
At the core of the assistant response composition loop is a dialogue manager trained using off-policy RL, namely an algorithm that evaluates and improves a policy that is different from the policy used by the agent (in our case, the latter is based on a supervised model). Applying RL to dialogue management presents several challenges, including a large state space (as the state represents the conversation state, which needs to account for the whole conversation history) and an effectively unbounded action space (that may include all existing words or sentences in natural language).
We address these challenges using a novel RL construction. First, we leverage powerful supervised models — specifically, recurrent neural networks (RNNs) and transformers — to provide a succinct and effective dialogue state representation. These state encoders are fed with the dialogue history, composed of a sequence of user and assistant turns, and output a representation of the dialogue state in the form of a latent vector.
Second, we use the fact that a relatively small set of reasonable candidate utterances or actions can be generated by content providers at each conversation turn, and limit the action space to these. Whereas the action space is typically fixed in RL settings, because all states share the same action space, ours is a non-standard space in which the candidate actions may differ with each state, since content providers generate different actions depending on the dialogue context. This puts us in the realm of stochastic action sets, a framework that formalizes cases where the set of actions available in each state is governed by an exogenous stochastic process, which we address using Stochastic Action Q-Learning, a variant of the Q-learning approach. Q-learning is a popular off-policy RL algorithm, which does not require a model of the environment to evaluate and improve the policy. We trained our model on a corpus of crowd-compute–rated conversations obtained using a supervised dialogue manager.
 |
| Given the current dialogue history and a new user query, content providers generate candidates from which the assistant selects one. This process runs in a loop, and at the end the selected utterances are fused into a cohesive response. |
Reinforcement learning model evaluation
We compared our RL dialogue manager with a launched supervised transformer model in an experiment using Google Assistant, which conversed with users about animals. A conversation starts when a user triggers the experience by asking an animal-related query (e.g., “How does a lion sound?”). The experiment was conducted using an A/B testing protocol, in which a small percentage of Assistant users were randomly sampled to interact with our RL-based assistant while other users interacted with the standard assistant.
We found that the RL dialogue manager conducts longer, more engaging conversations. It increases conversation length by 30% while improving user engagement metrics. We see an increase of 8% in cooperative responses to the assistant’s questions — e.g., “Tell me about lions,” in response to “Which animal do you want to hear about next?” Although there is also a large increase in nominally “non-cooperative” responses (e.g., “No,” as a reply to a question proposing additional content, such as “Do you want to hear more?”), this is expected as the RL agent takes more risks by asking pivoting questions. While a user may not be interested in the conversational direction proposed by the assistant (e.g., pivoting to another animal), the user will often continue to engage in a dialogue about animals.
 |
| From the non-cooperative user response in the 3rd turn (“No.”) and the query “Make a dog sound,” in the 5th turn, the assistant recognizes that the user is mostly interested in animal sounds and modifies its plan, providing sounds and sound quizzes. |
In addition, some user queries contain explicit positive (e.g., “Thank you, Google,” or “I’m happy.”) or negative (e.g., “Shut up,” or “Stop.”) feedback. While an order of magnitude fewer than other queries, they offer a direct measure of user (dis)satisfaction. The RL model increases explicit positive feedback by 32% and reduces negative feedback by 18%.
Learned dynamic planning characteristics and strategies
We observe several characteristics of the (unseen) RL plan to improve user engagement while conducting longer conversations. First, the RL-based assistant ends 20% more turns in questions, prompting the user to choose additional content. It also better harnesses content diversity, including facts, sounds, quizzes, yes/no questions, open questions, etc. On average, the RL assistant uses 26% more distinct content providers per conversation than the supervised model.
Two observed RL planning strategies are related to the existence of sub-dialogues with different characteristics. Sub-dialogues about animal sounds are poorer in content and exhibit entity pivoting at every turn (i.e., after playing the sound of a given animal, we can either suggest the sound of a different animal or quiz the user about other animal sounds). In contrast, sub-dialogues involving animal facts typically contain richer content and have greater conversation depth. We observe that RL favors the richer experience of the latter, selecting 31% more fact-related content. Lastly, when restricting analysis to fact-related dialogues, the RL assistant exhibits 60% more focus-pivoting turns, that is, conversational turns that change the focus of the dialogue.
Below, we show two example conversations, one conducted by the supervised model (left) and the second by the RL model (right), in which the first three user turns are identical. With a supervised dialogue manager, after the user declined to hear about “today’s animal”, the assistant pivots back to animal sounds to maximize the immediate user satisfaction. While the conversation conducted by the RL model begins identically, it exhibits a different planning strategy to optimize the overall user engagement, introducing more diverse content, such as fun facts.
 |
| In the left conversation, conducted by the supervised model, the assistant maximizes the immediate user satisfaction. The right conversation, conducted by the RL model, shows different planning strategies to optimize the overall user engagement. |
Future research and challenges
In the past few years, LLMs trained for language understanding and generation have demonstrated impressive results across multiple tasks, including dialogue. We are now exploring the use of an RL framework to empower LLMs with the capability of dynamic planning so that they can dynamically plan ahead and delight users with a more engaging experience.
Acknowledgements
The work described is co-authored by: Moonkyung Ryu, Yinlam Chow, Orgad Keller, Ido Greenberg, Avinatan Hassidim, Michael Fink, Yossi Matias, Idan Szpektor and Gal Elidan. We would like to thank: Roee Aharoni, Moran Ambar, John Anderson, Ido Cohn, Mohammad Ghavamzadeh, Lotem Golany, Ziv Hodak, Adva Levin, Fernando Pereira, Shimi Salant, Shachar Shimoni, Ronit Slyper, Ariel Stolovich, Hagai Taitelbaum, Noam Velan, Avital Zipori and the CrowdCompute team led by Ashwin Kakarla. We thank Sophie Allweis for her feedback on this blogpost and Tom Small for the visualization.

GPT-NeoXT-Chat-Base-20B foundation model for chatbot applications is now available on Amazon SageMaker
Today we are excited to announce that Together Computer’s GPT-NeoXT-Chat-Base-20B language foundation model is available for customers using Amazon SageMaker JumpStart. GPT-NeoXT-Chat-Base-20B is an open-source model to build conversational bots. You can easily try out this model and use it with JumpStart. JumpStart is the machine learning (ML) hub of Amazon SageMaker that provides access to foundation models in addition to built-in algorithms and end-to-end solution templates to help you quickly get started with ML.
In this post, we walk through how to deploy the GPT-NeoXT-Chat-Base-20B model and invoke the model within an OpenChatKit interactive shell. This demonstration provides an open-source foundation model chatbot for use within your application.
JumpStart models use Deep Java Serving that uses the Deep Java Library (DJL) with deep speed libraries to optimize models and minimize latency for inference. The underlying implementation in JumpStart follows an implementation that is similar to the following notebook. As a JumpStart model hub customer, you get improved performance without having to maintain the model script outside of the SageMaker SDK. JumpStart models also achieve improved security posture with endpoints that enable network isolation.
Foundation models in SageMaker
JumpStart provides access to a range of models from popular model hubs, including Hugging Face, PyTorch Hub, and TensorFlow Hub, which you can use within your ML development workflow in SageMaker. Recent advances in ML have given rise to a new class of models known as foundation models, which are typically trained on billions of parameters and are adaptable to a wide category of use cases, such as text summarization, generating digital art, and language translation. Because these models are expensive to train, customers want to use existing pre-trained foundation models and fine-tune them as needed, rather than train these models themselves. SageMaker provides a curated list of models that you can choose from on the SageMaker console.
You can now find foundation models from different model providers within JumpStart, enabling you to get started with foundation models quickly. You can find foundation models based on different tasks or model providers, and easily review model characteristics and usage terms. You can also try out these models using a test UI widget. When you want to use a foundation model at scale, you can do so easily without leaving SageMaker by using pre-built notebooks from model providers. Because the models are hosted and deployed on AWS, you can rest assured that your data, whether used for evaluating or using the model at scale, is never shared with third parties.
GPT-NeoXT-Chat-Base-20B foundation model
Together Computer developed GPT-NeoXT-Chat-Base-20B, a 20-billion-parameter language model, fine-tuned from ElutherAI’s GPT-NeoX model with over 40 million instructions, focusing on dialog-style interactions. Additionally, the model is tuned on several tasks, such as question answering, classification, extraction, and summarization. The model is based on the OIG-43M dataset that was created in collaboration with LAION and Ontocord.
In addition to the aforementioned fine-tuning, GPT-NeoXT-Chat-Base-20B-v0.16 has also undergone further fine-tuning via a small amount of feedback data. This allows the model to better adapt to human preferences in the conversations. GPT-NeoXT-Chat-Base-20B is designed for use in chatbot applications and may not perform well for other use cases outside of its intended scope. Together, Ontocord and LAION collaborated to release OpenChatKit, an open-source alternative to ChatGPT with a comparable set of capabilities. OpenChatKit was launched under an Apache-2.0 license, granting complete access to the source code, model weights, and training datasets. There are several tasks that OpenChatKit excels at out of the box. This includes summarization tasks, extraction tasks that allow extracting structured information from unstructured documents, and classification tasks to classify a sentence or paragraph into different categories.
Let’s explore how we can use the GPT-NeoXT-Chat-Base-20B model in JumpStart.
Solution overview
You can find the code showing the deployment of GPT-NeoXT-Chat-Base-20B on SageMaker and an example of how to use the deployed model in a conversational manner using the command shell in the following GitHub notebook.
In the following sections, we expand each step in detail to deploy the model and then use it to solve different tasks:
- Set up prerequisites.
- Select a pre-trained model.
- Retrieve artifacts and deploy an endpoint.
- Query the endpoint and parse a response.
- Use an OpenChatKit shell to interact with your deployed endpoint.
Set up prerequisites
This notebook was tested on an ml.t3.medium instance in Amazon SageMaker Studio with the Python 3 (Data Science) kernel and in a SageMaker notebook instance with the conda_python3 kernel.
Before you run the notebook, use the following command to complete some initial steps required for setup:
Select a pre-trained model
We set up a SageMaker session like usual using Boto3 and then select the model ID that we want to deploy:
Retrieve artifacts and deploy an endpoint
With SageMaker, we can perform inference on the pre-trained model, even without fine-tuning it first on a new dataset. We start by retrieving the instance_type, image_uri, and model_uri for the pre-trained model. To host the pre-trained model, we create an instance of sagemaker.model.Model and deploy it. The following code uses ml.g5.24xlarge for the inference endpoint. The deploy method may take a few minutes.
Query the endpoint and parse the response
Next, we show you an example of how to invoke an endpoint with a subset of the hyperparameters:
The following is the response that we get:
Here, we have provided the payload argument "stopping_criteria": ["<human>"], which has resulted in the model response ending with the generation of the word sequence <human>. The JumpStart model script will accept any list of strings as desired stop words, convert this list to a valid stopping_criteria keyword argument to the transformers generate API, and stop text generation when the output sequence contains any specified stop words. This is useful for two reasons: first, inference time is reduced because the endpoint doesn’t continue to generate undesired text beyond the stop words, and second, this prevents the OpenChatKit model from hallucinating additional human and bot responses until other stop criteria are met.
Use an OpenChatKit shell to interact with your deployed endpoint
OpenChatKit provides a command line shell to interact with the chatbot. In this step, you create a version of this shell that can interact with your deployed endpoint. We provide a bare-bones simplification of the inference scripts in this OpenChatKit repository that can interact with our deployed SageMaker endpoint.
There are two main components to this:
- A shell interpreter (
JumpStartOpenChatKitShell) that allows for iterative inference invocations of the model endpoint - A conversation object (
Conversation) that stores previous human/chatbot interactions locally within the interactive shell and appropriately formats past conversations for future inference context
The Conversation object is imported as is from the OpenChatKit repository. The following code creates a custom shell interpreter that can interact with your endpoint. This is a simplified version of the OpenChatKit implementation. We encourage you to explore the OpenChatKit repository to see how you can use more in-depth features, such as token streaming, moderation models, and retrieval augmented generation, within this context. The context of this notebook focuses on demonstrating a minimal viable chatbot with a JumpStart endpoint; you can add complexity as needed from here.
A short demo to showcase the JumpStartOpenChatKitShell is shown in the following video.
The following snippet shows how the code works:
You can now launch this shell as a command loop. This will repeatedly issue a prompt, accept input, parse the input command, and dispatch actions. Because the resulting shell may be utilized in an infinite loop, this notebook provides a default command queue (cmdqueue) as a queued list of input lines. Because the last input is the command /quit, the shell will exit upon exhaustion of the queue. To dynamically interact with this chatbot, remove the cmdqueue.
Example 1: Conversation context is retained
The following prompt shows that the chatbot is able to retain the context of the conversation to answer follow-up questions:
Example 2: Classification of sentiments
In the following example, the chatbot performed a classification task by identifying the sentiments of the sentence. As you can see, the chatbot was able to classify positive and negative sentiments successfully.
Example 3: Summarization tasks
Next, we tried summarization tasks with the chatbot shell. The following example shows how the long text about Amazon Comprehend was summarized to one sentence and the chatbot was able to answer follow-up questions on the text:
Example 4: Extract structured information from unstructured text
In the following example, we used the chatbot to create a markdown table with headers, rows, and columns to create a project plan using the information that is provided in free-form language:
Example 5: Commands as input to chatbot
We can also provide input as commands like /hyperparameters to see hyperparameters values and /quit to quit the command shell:
These examples showcased just some of the tasks that OpenChatKit excels at. We encourage you to try various prompts and see what works best for your use case.
Clean up
After you have tested the endpoint, make sure you delete the SageMaker inference endpoint and the model to avoid incurring charges.
Conclusion
In this post, we showed you how to test and use the GPT-NeoXT-Chat-Base-20B model using SageMaker and build interesting chatbot applications. Try out the foundation model in SageMaker today and let us know your feedback!
This guidance is for informational purposes only. You should still perform your own independent assessment, and take measures to ensure that you comply with your own specific quality control practices and standards, and the local rules, laws, regulations, licenses and terms of use that apply to you, your content, and the third-party model referenced in this guidance. AWS has no control or authority over the third-party model referenced in this guidance, and does not make any representations or warranties that the third-party model is secure, virus-free, operational, or compatible with your production environment and standards. AWS does not make any representations, warranties or guarantees that any information in this guidance will result in a particular outcome or result.
About the authors
 Rachna Chadha is a Principal Solutions Architect AI/ML in Strategic Accounts at AWS. Rachna is an optimist who believes that the ethical and responsible use of AI can improve society in the future and bring economic and social prosperity. In her spare time, Rachna likes spending time with her family, hiking, and listening to music.
 Dr. Kyle Ulrich is an Applied Scientist with the Amazon SageMaker built-in algorithms team. His research interests include scalable machine learning algorithms, computer vision, time series, Bayesian non-parametrics, and Gaussian processes. His PhD is from Duke University and he has published papers in NeurIPS, Cell, and Neuron.
 Dr. Ashish Khetan is a Senior Applied Scientist with Amazon SageMaker built-in algorithms and helps develop machine learning algorithms. He got his PhD from University of Illinois Urbana-Champaign. He is an active researcher in machine learning and statistical inference, and has published many papers in NeurIPS, ICML, ICLR, JMLR, ACL, and EMNLP conferences.
Physics-constrained machine learning for scientific computing
Amazon researchers draw inspiration from finite-volume methods and adapt neural operators to enforce conservation laws and boundary conditions in deep-learning models of physical systems.Read More