 We worked with TONL, a stock image company, to create more representative datasets to help teams build more inclusive products.Read More

We worked with TONL, a stock image company, to create more representative datasets to help teams build more inclusive products.Read More
Editor’s note: This post is part of our weekly In the NVIDIA Studio series, which celebrates featured artists, offers creative tips and tricks, and demonstrates how NVIDIA Studio technology improves creative workflows. We’re also deep diving on new GeForce RTX 40 Series GPU features, technologies and resources, and how they dramatically accelerate content creation.
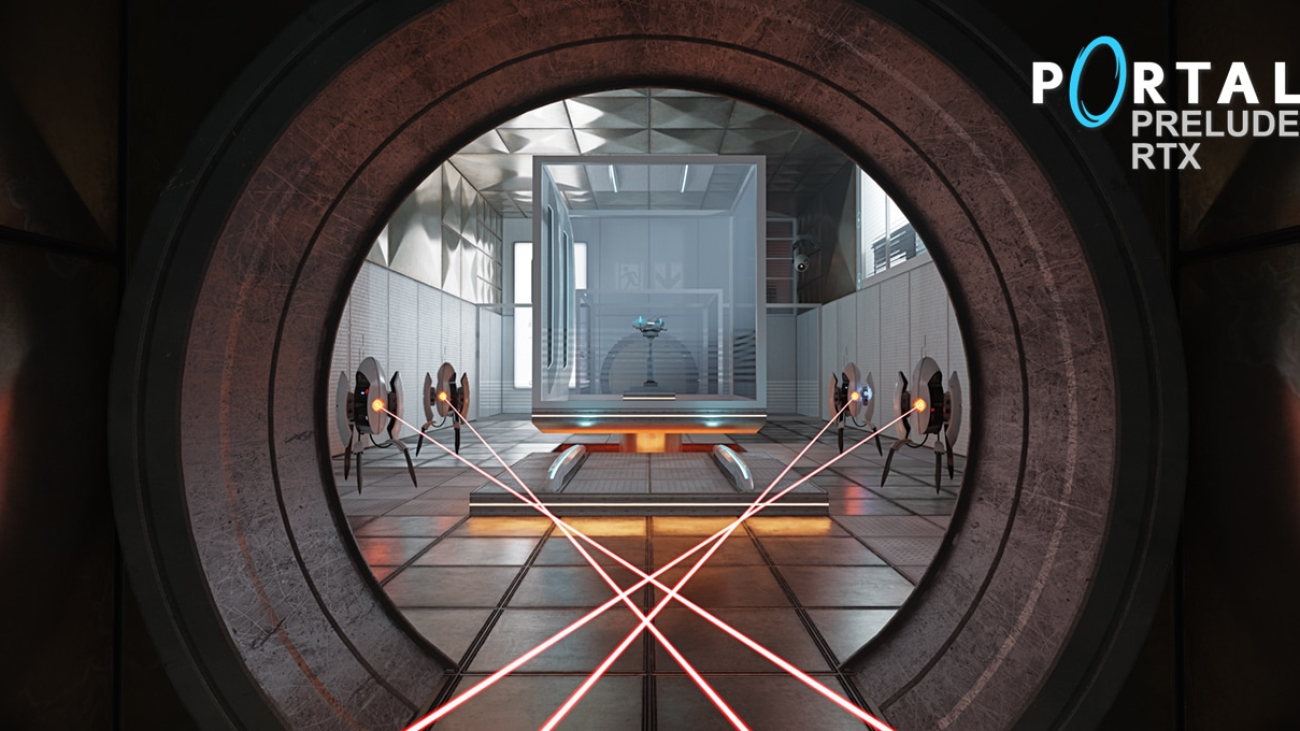
The Portal: Prelude RTX gaming mod — a remastering of the popular unofficial Portal prequel — comes with full ray tracing, DLSS 3 and RTX IO technology for cutting-edge, AI-powered graphics that rejuvenate the legendary mod for gamers, creators, developers and others to experience it anew.
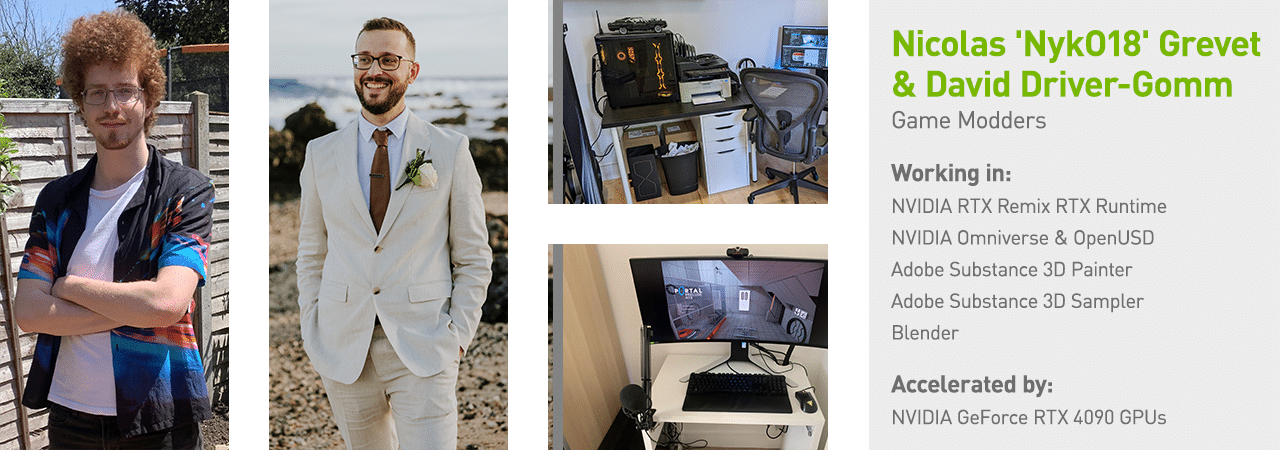
Nicolas “NykO18” Grevet, a software engineer behind Portal: Prelude, collaborated with modder David Driver-Gomm to create the project — which launched today as a free download on Steam — using NVIDIA RTX Remix. The free modding platform enables users to quickly create and share RTX mods for classic games. Learn about the duo’s workflow this week In the NVIDIA Studio.
Plus, this month, graphics card partners will begin to offer the 16GB version of the GeForce RTX 4060 Ti GPU, featuring the state-of-the-art NVIDIA Ada Lovelace architecture that supercharges creative apps and productivity while delivering immersive, AI-accelerated gaming with ray tracing and DLSS 3. The GPUs are well-suited for working in larger 3D scenes, editing videos in up to 12K resolution and running native AI foundation models.
All of this is backed by the July NVIDIA Studio Driver, which supports these latest updates and more, available for download today.
In addition, the NVIDIA Studio #StartToFinish community challenge is in full swing. Use the hashtag to submit a screenshot of a favorite project featuring its beginning and ending stages for a chance to be featured on the @NVIDIAStudio and @NVIDIAOmniverse social channels.
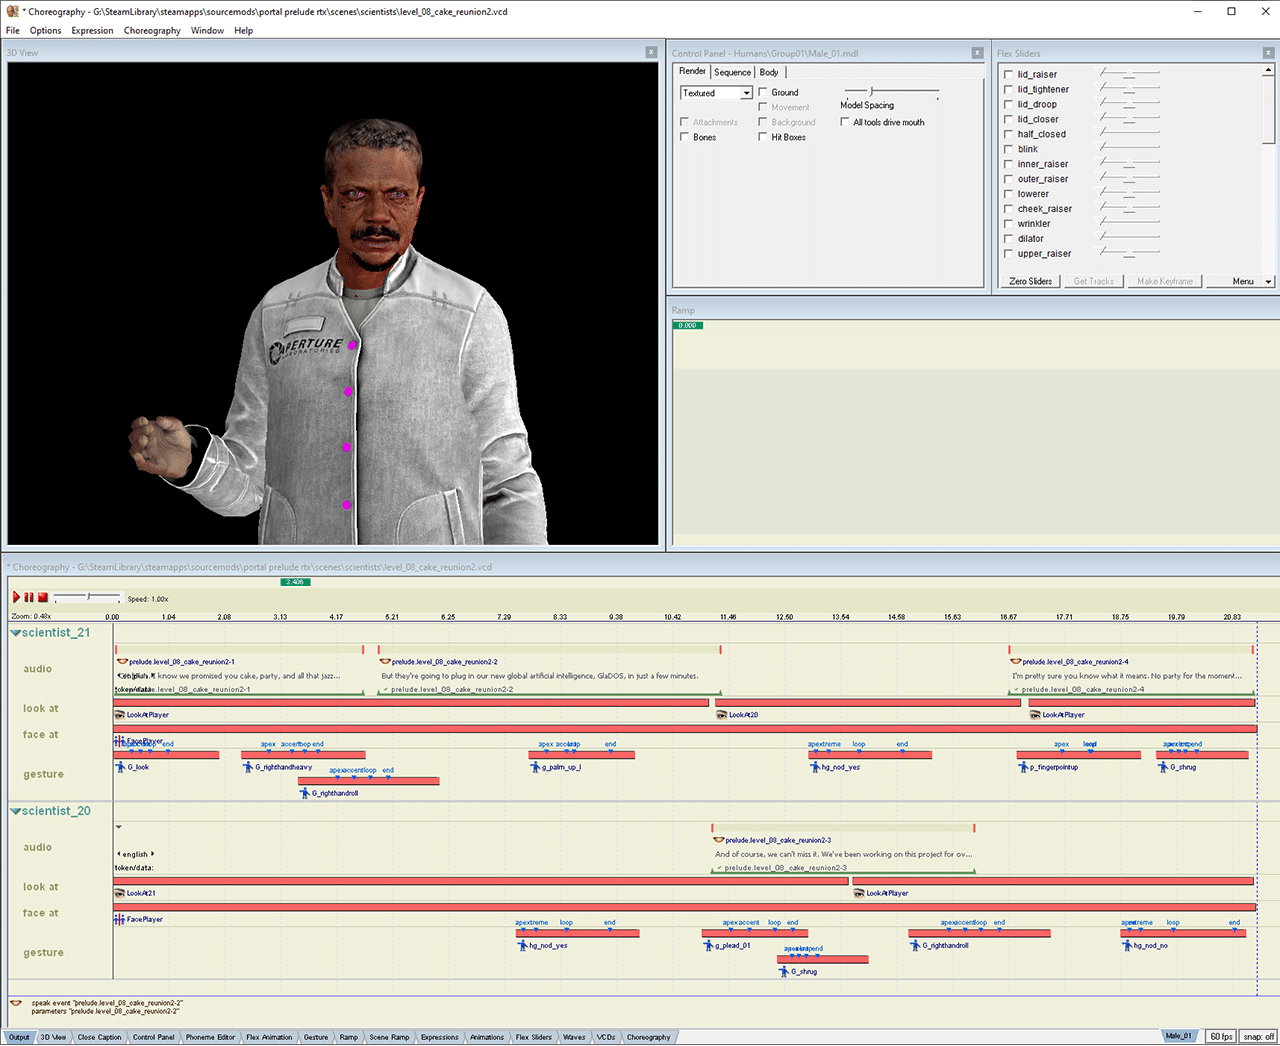
Portal: Prelude’s storyline revolves around what’s called the Genetic Lifeform and Disk Operating System, or GlaDOS, an AI created by Aperture Science, the fictional scientific research corporation key to the original game’s plot.
With extra chapters, test chambers, challenges and an extended storyline, the most popular Portal mod of all time was recognized by Mod DB with a “Mod of the Year” award. Check out the original game trailer below.
“Modders have to wear many hats — they’re simultaneously level designers, 2D artists, scripters, writers, web developers, quality-assurance analysts and so much more,” said Grevet. “This demands resilience and adaptability.”
Grevet and Driver-Gomm transformed Portal: Prelude’s older, lower-resolution assets into new, high-resolution assets using RTX Remix. Both creators used a GeForce RTX 40 Series GPU, which enabled full ray tracing and DLSS 3.
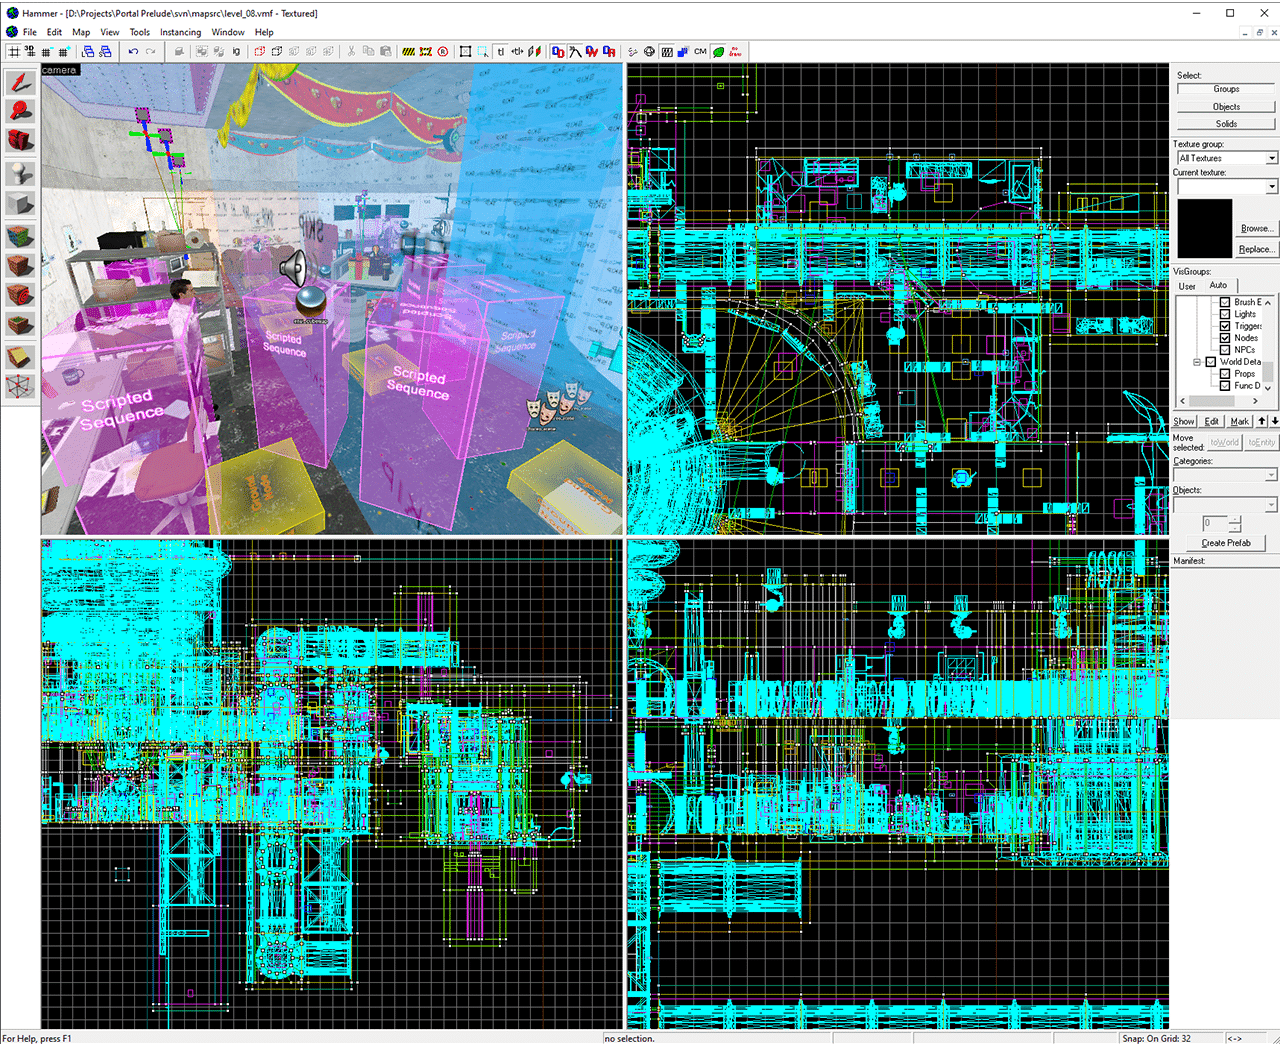
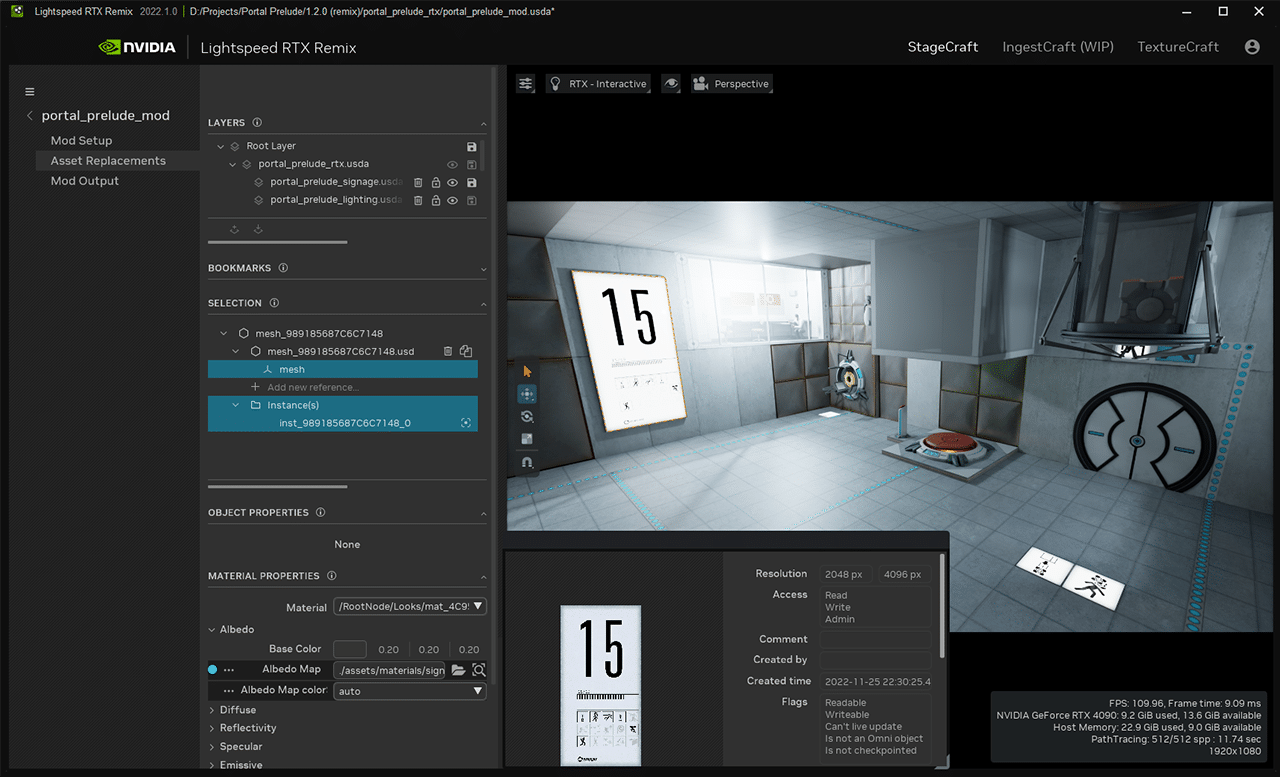
The duo first gathered 360-degree screenshots of entire scene levels with RTX Remix.
Next, they used a component of RTX Remix called RTX Remix Runtime to capture game scenes and replace assets during playback while adding RTX technology to the game, including NVIDIA Reflex for low-latency responsiveness.
“We could take virtual, in-game 3D screenshots of a level and all of its assets, load the captures in RTX Remix, and literally replace every single asset, texture, geometry and light with up to 100x higher fidelity using open-source 2D and 3D formats.” — Nicolas “NykO18” Grevet
“We played with AI upscaling a lot,” said Grevet. “It was tremendously helpful in cutting down on early work and enabled sharper focus on the hero assets that required more hands-on treatment, like characters and non-playable character models, as well as large, predominant textures.”
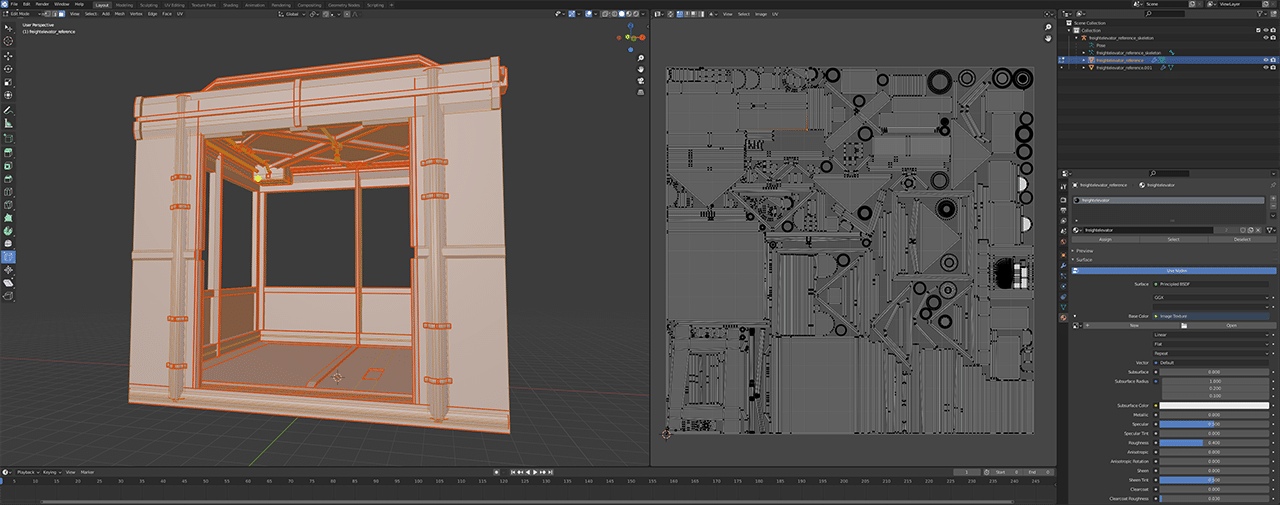
These higher-resolution assets in the OpenUSD format were uploaded to NVIDIA Omniverse, a platform for connecting and building 3D tools and applications, through the Blender Connector. This allowed the team to use their 3D app of choice for modeling new geometry and beveling out edges, all in real time, with full ray-traced fidelity for ultra-photorealistic lighting and shadows. Blender Cycles’ RTX-accelerated OptiX ray tracing enabled smooth movement in the viewport.
“Some assets were practically modeled from scratch, whereas others — like pipes — mostly just had their edges beveled out so they were higher poly and smoother,” said Driver-Gomm. “Either way, it was exponentially faster in Omniverse.” All refined assets work from captured meshes rather than by applying new meshes for individual assets, saving an incredible amount of time.
The team then UV unwrapped the assets, which is the process of opening a mesh to make a 2D texture that can blanket a 3D object for the precise application of textures and materials.
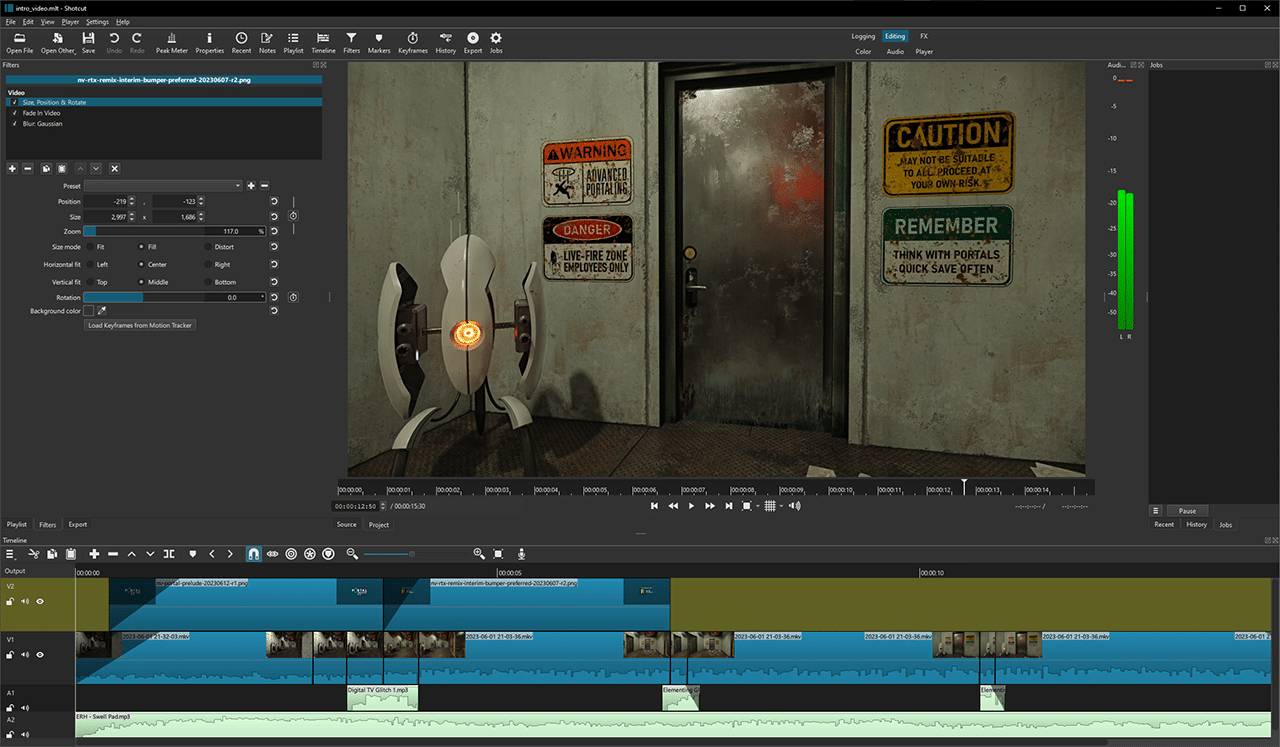
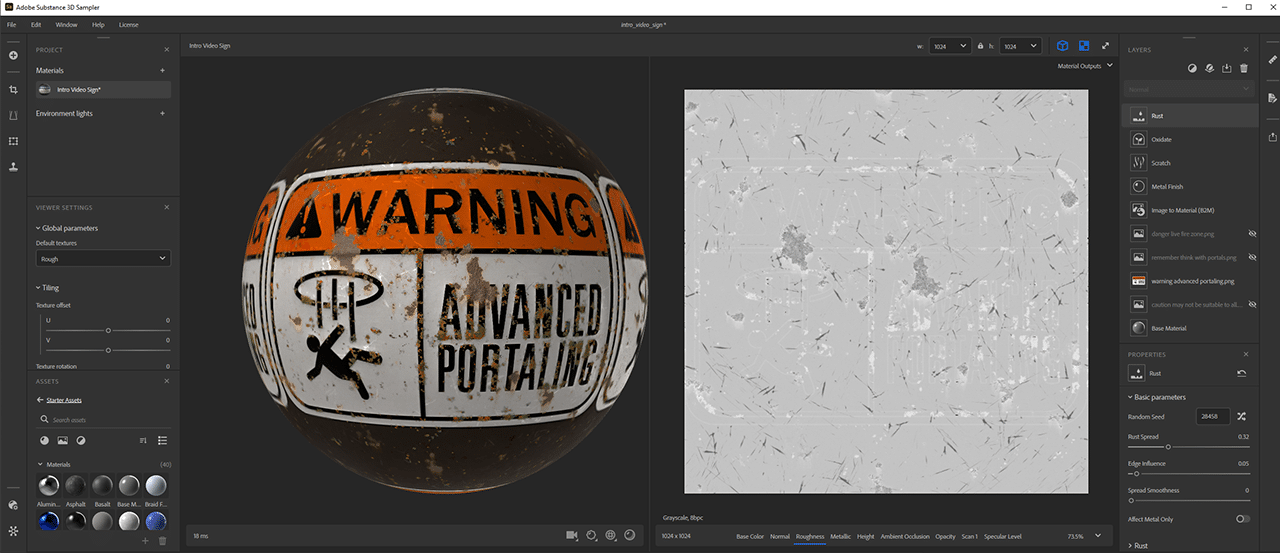
Grevet and Driver-Gomm then moved to Adobe Substance 3D Painter and Sampler to create high-quality physically based render models. This means images were rendered modeling lights and surfaces with real-world optics. GPU-accelerated filters sped up and simplified material creation, while RTX-accelerated light and ambient occlusion baked assets in seconds.
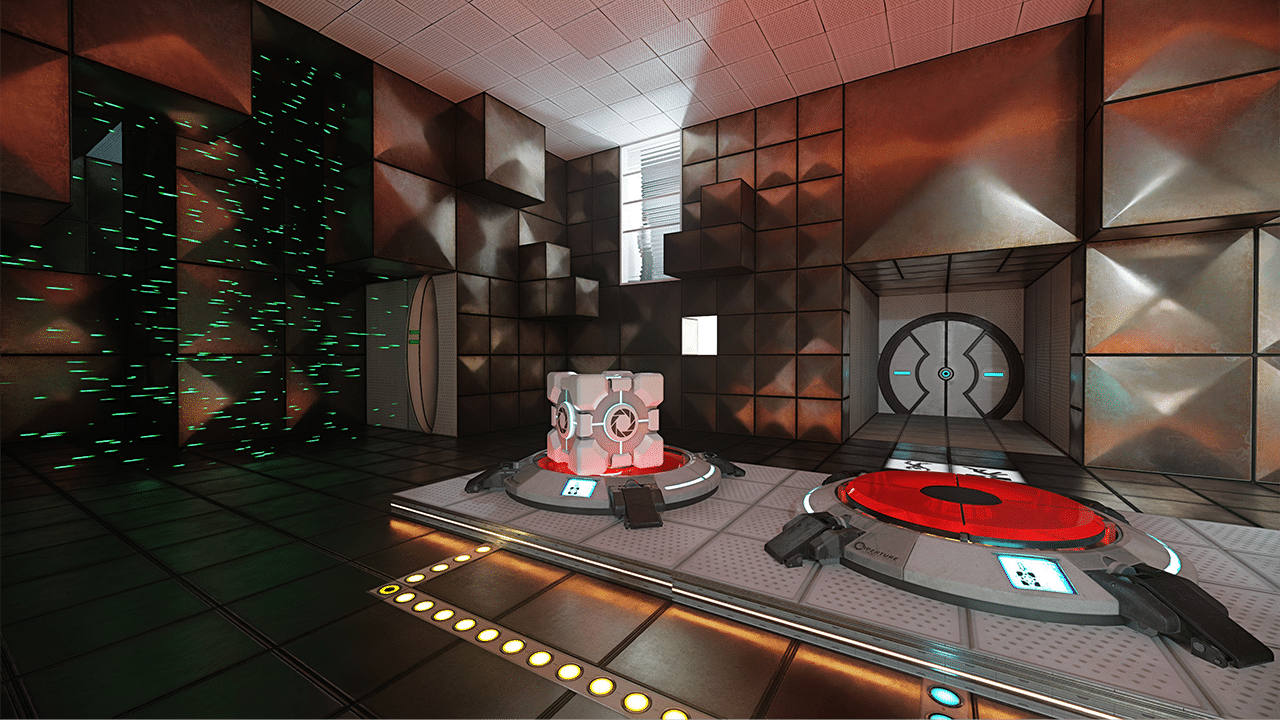
With all assets in place, the team used RTX Remix to swap older ones with these newer, higher-fidelity models. But the creators weren’t ready to rest on their laurels just yet — RTX Remix allowed them to relight every single level with realistic, path-traced lighting.
The final result of Portal: Prelude RTX is “light-years ahead of what I could do on my own,” said Grevet. “Having the opportunity to remaster these levels in the way I’d intended for them to look and behave was a nice cherry on top.”
“The RTX Remix tool is insanely powerful and almost comes across as magic to me,” said Grevet. “The ability to capture any part of a game, load it in a 3D tool and chip away at it as if this was being done using the original game’s level editor is insane.”
Pick up Portal: Prelude RTX for free for Portal owners on Steam.
Check out Grevet and Driver-Gomm on Twitter.
Follow NVIDIA Studio on Instagram, Twitter and Facebook. Access tutorials on the Studio YouTube channel and get updates directly in your inbox by subscribing to the Studio newsletter.
A new $5+ million partnership aims to explore ways the development of artificial intelligence (AI) can support a thriving, innovative local news field, and ensure local news organizations shape the future of this emerging technology.OpenAI Blog
With cloud computing, as compute power and data became more available, machine learning (ML) is now making an impact across every industry and is a core part of every business and industry.
Amazon SageMaker Studio is the first fully integrated ML development environment (IDE) with a web-based visual interface. You can perform all ML development steps and have complete access, control, and visibility into each step required to build, train, and deploy models.
Amazon Redshift is a fully managed, fast, secure, and scalable cloud data warehouse. Organizations often want to use SageMaker Studio to get predictions from data stored in a data warehouse such as Amazon Redshift.
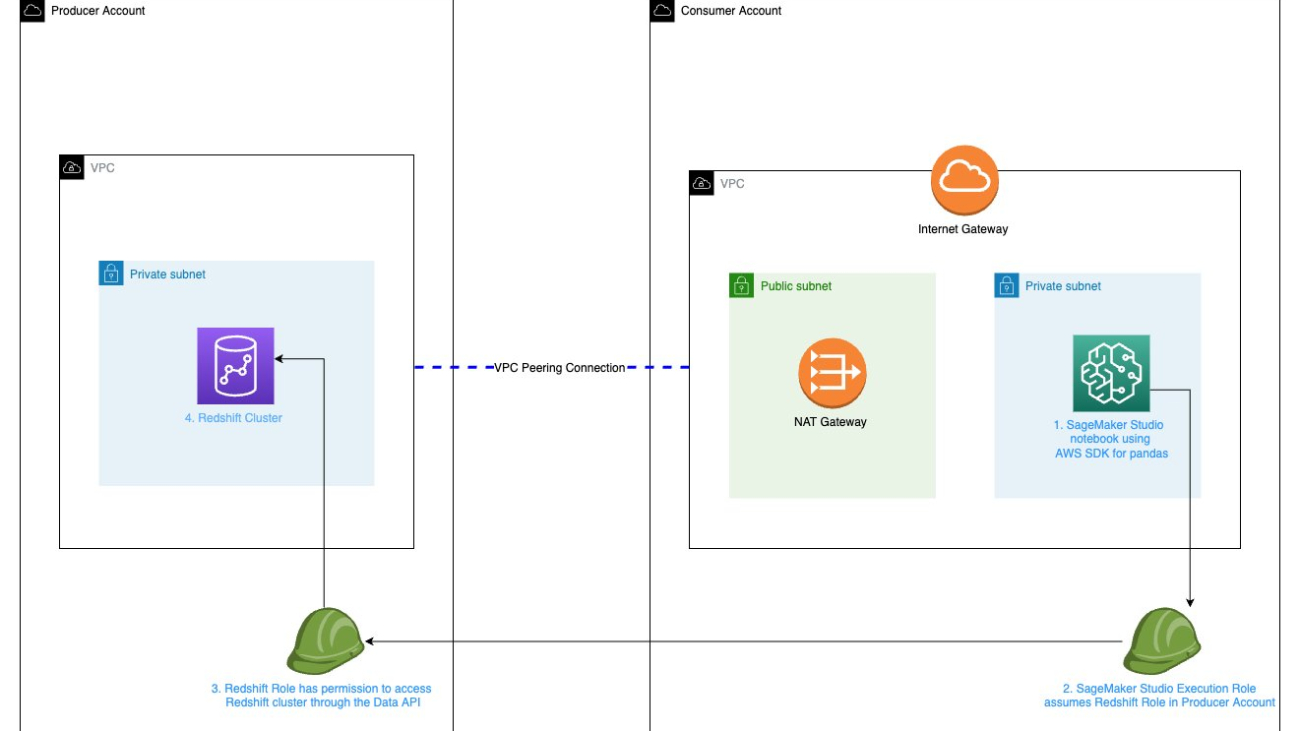
As described in the AWS Well-Architected Framework, separating workloads across accounts enables your organization to set common guardrails while isolating environments. This can be particularly useful for certain security requirements, as well as to simplify cost controls and monitoring between projects and teams. Organizations with a multi-account architecture typically have Amazon Redshift and SageMaker Studio in two separate AWS accounts. Also, Amazon Redshift and SageMaker Studio are typically configured in VPCs with private subnets to improve security and reduce the risk of unauthorized access as a best practice.
Amazon Redshift natively supports cross-account data sharing when RA3 node types are used. If you’re using any other Amazon Redshift node types, such as DS2 or DC2, you can use VPC peering to establish a cross-account connection between Amazon Redshift and SageMaker Studio.
In this post, we walk through step-by-step instructions to establish a cross-account connection to any Amazon Redshift node type (RA3, DC2, DS2) by connecting the Amazon Redshift cluster located in one AWS account to SageMaker Studio in another AWS account in the same Region using VPC peering.
We start with two AWS accounts: a producer account with the Amazon Redshift data warehouse, and a consumer account for Amazon SageMaker ML use cases that has SageMaker Studio set up. The following is a high-level overview of the workflow:
VPCOnly mode in the consumer account. This prevents SageMaker from providing internet access to your studio notebooks. All SageMaker Studio traffic is through the specified VPC and subnets.SourceIdentity to propagate the user profile name.The following diagram illustrates our solution architecture.

The steps in this post assume that Amazon Redshift is launched in a private subnet in the Amazon Redshift producer account. Launching Amazon Redshift in a private subnet provides an additional layer of security and isolation compared to launching it in a public subnet because the private subnet is not directly accessible from the internet and more secure from external attacks.
To download public libraries, you must create a VPC and a private and public subnet in the SageMaker consumer account. Then launch a NAT gateway in the public subnet and add an internet gateway for SageMaker Studio in the private subnet to access the internet. For instructions on how to establish a connection to a private subnet, refer to How do I set up a NAT gateway for a private subnet in Amazon VPC?
To create SageMaker Studio with VPCOnly mode, complete the following steps:

If you’re already using AWS IAM Identity Center (successor to AWS Single Sign-On) for accessing your AWS accounts, you can use it for authentication. Otherwise, you can use IAM for authentication and use your existing federated roles.
This creates a SageMaker execution role, such as AmazonSageMaker-ExecutionRole-00000000.


SageMaker Studio is integrated with AWS CloudTrail to enable administrators to monitor and audit user activity and API calls from SageMaker Studio notebooks. You can configure SageMaker Studio to record the user identity (specifically, the user profile name) to monitor and audit user activity and API calls from SageMaker Studio notebooks in CloudTrail events.
To log specific user activity among several user profiles, we recommended that you turn on SourceIdentity to propagate the SageMaker Studio domain with the user profile name. This allows you to persist the user information into the session so you can attribute actions to a specific user. This attribute is also persisted over when you chain roles, so you can get fine-grained visibility into their actions in the producer account. As of the time this post was written, you can only configure this using the AWS Command Line Interface (AWS CLI) or any command line tool.
To update this configuration, all apps in the domain must be in the Stopped or Deleted state.
Use the following code to enable the propagation of the user profile name as the SourceIdentity:

This requires that you add sts:SetSourceIdentity in the trust relationship for your execution role.
To create a role that SageMaker will assume to access Amazon Redshift, complete the following steps:


RedshiftROAPIUserAccess.The SourceIdentity attribute is used to tie the identity of the original SageMaker Studio user to the Amazon Redshift database user. The actions by the user in the producer account can then be monitored using CloudTrail and Amazon Redshift database audit logs.


To update the SageMaker execution role for it to assume the role that we just created, complete the following steps:
AmazonSageMaker-ExecutionRole-*).

You can get the ARN of the role created in the Amazon Redshift producer account on the IAM console, as shown in the following screenshot.


Your permission policies should look similar to the following screenshot.

To establish communication between the SageMaker Studio VPC and Amazon Redshift VPC, the two VPCs need to be peered using VPC peering. Complete the following steps to establish a connection:


After the VPC peering connection is successfully established, you create routes on both the SageMaker and Amazon Redshift VPCs to complete connectivity between them.


You can connect to SageMaker Studio from your VPC through an interface endpoint in your VPC instead of connecting over the internet. When you use a VPC interface endpoint, communication between your VPC and the SageMaker API or runtime is conducted entirely and securely within the AWS network.

After all the networking has been successfully established, follow the steps in this section to connect to the Amazon Redshift cluster in the SageMaker Studio consumer account using the AWS SDK for pandas library:
This installation is not persistent and will be lost if the KernelGateway App is deleted. Custom packages can be added as part of a Lifecycle Configuration.
RoleArn and region_name values based on your account settings:To successfully query Amazon Redshift, your database administrator needs to assign the newly created user with the required read permissions within the Amazon Redshift cluster in the producer account.
You can now start building your data transformations and analysis based on your business requirements.
To clean up any resources to avoid incurring recurring costs, delete the SageMaker VPC endpoints, Amazon Redshift cluster, and SageMaker Studio apps, users, and domain. Also delete any S3 buckets and objects you created.
In this post, we showed how to establish a cross-account connection between private Amazon Redshift and SageMaker Studio VPCs in different accounts using VPC peering and access Amazon Redshift data in SageMaker Studio using IAM role chaining, while also logging the user identity when the user accessed Amazon Redshift from SageMaker Studio. With this solution, you eliminate the need to manually move data between accounts to access data. We also walked through how to access the Amazon Redshift cluster using the AWS SDK for pandas library in SageMaker Studio and prepare the data for your ML use cases.
To learn more about Amazon Redshift and SageMaker, refer to the Amazon Redshift Database Developer Guide and Amazon SageMaker Documentation.
 Supriya Puragundla is a Senior Solutions Architect at AWS. She helps key customer accounts on their AI and ML journey. She is passionate about data-driven AI and the area of depth in machine learning.
 Marc Karp is a Machine Learning Architect with the Amazon SageMaker team. He focuses on helping customers design, deploy, and manage ML workloads at scale. In his spare time, he enjoys traveling and exploring new places.

 We’re celebrating climate science pioneer Eunice Newton Foote and six women-led Google.org grantees building a more sustainable future.Read More

Homenajeamos a Eunice Newton Foot, científica pionera de la ciencia climática, y a 6 organizaciones beneficiarias de Google.org dirigidas por mujeres que construyen un f…Read More

 A new $5 million grant aims to help Woodwell Climate Research Center track Arctic permafrost thaw in near real-time.Read More
We’ve published our joint paper with Google Research in Nature Medicine, which proposes CoDoC (Complementarity-driven Deferral-to-Clinical Workflow), an AI system that learns when to rely on predictive AI tools or defer to a clinician for the most accurate interpretation of medical images.Read More

We’ve published our joint paper with Google Research in Nature Medicine, which proposes CoDoC (Complementarity-driven Deferral-to-Clinical Workflow), an AI system that learns when to rely on predictive AI tools or defer to a clinician for the most accurate interpretation of medical images.Read More

We’ve published our joint paper with Google Research in Nature Medicine, which proposes CoDoC (Complementarity-driven Deferral-to-Clinical Workflow), an AI system that learns when to rely on predictive AI tools or defer to a clinician for the most accurate interpretation of medical images.Read More