Digitalization: A Game Changer for the Auto Industry

Digitalization: A Game Changer for the Auto Industry

The fusion of the physical and digital worlds is reshaping the automotive industry. NVIDIA’s automotive partners are using digitalization to transform every phase of the product lifecycle — evolving primarily physical, manual processes into software-driven, AI-enhanced digital systems.

Watch the video to learn more.

Digitalization: A Game Changer From End to End

Kaivan Karimi, global partner strategy lead at Microsoft, observes that companies are achieving “huge” results from “digitizing the physical entity, running simulations and rendering in 3D, whether it’s factory automation or modernizing the design and development of the car.”

Brian Ullem, vice president of engineering at Capgemini, explains that, with “the 30,000 parts that go into a car, it takes approximately five years to develop a vehicle end to end. Instead of building 50 or 100 cars, we can use digitalization to simulate without having to build prototypes. That saves a lot of time and money in the process.”

Thomas Mueller, chief technology officer of engineering at Wipro, adds that with digitalization, “we are now able to run simulations at a low cost…and improve the user experience.”

Simulation: Critical for Autonomous Driving

“Simulation is crucial to the development of autonomous systems,” says Ziv Binyamini, CEO of Foretellix. “On one hand, you need the real world, but this is highly costly. So you have to complement it with the ability to simulate a virtual world where everything is possible. And then you can, in a very cost-effective way, iterate quickly and ensure the system operates under all of these conditions.”

Simulation “gives our customers the power to validate their ADAS or autonomous systems virtually — with highly accurate sensors in the camera, lidar and radar domains — without having to rely on actual physical drives,” adds Tony Karam, global sales director at Ansys.

Austin Russell, founder and CEO of Luminar, agrees that “simulation is absolutely critical for autonomous driving. It’s great to see the work that NVIDIA has been doing in that domain, with not just the hardware but also the software.”

NVIDIA Omniverse: The Digital-Physical Convergence

“Software is a new component in the value proposition,” notes Walid Negm, chief technology officer of product engineering at Deloitte. The companies that will “survive and thrive are going to have to become much more efficient using the digital-physical convergence. The Omniverse experience is going to be important for the automotive sector.”

Shiv Tasker, global vice president of engineering at Capgemini, adds that the “visualization and production of digital twins relies on an efficient, high-performance infrastructure as well as the platforms that make it easy for customers to adopt the technology.”

Omniverse “will allow your worldwide team to simultaneously collaborate,” says Karimi of Microsoft. “Design engineers, migration engineers, test engineers — everybody collaborates simultaneously. That’s the power of NVIDIA Omniverse.”

Learn more about the NVIDIA DRIVE platform and how it’s helping industry leaders redefine transportation.

Join NVIDIA at GTC from March 18-21 in San Jose, Calif., to learn more about digitalization in the automotive industry.

Read More

Learning the importance of training data under concept drift

Learning the importance of training data under concept drift

The constantly changing nature of the world around us poses a significant challenge for the development of AI models. Often, models are trained on longitudinal data with the hope that the training data used will accurately represent inputs the model may receive in the future. More generally, the default assumption that all training data are equally relevant often breaks in practice. For example, the figure below shows images from the CLEAR nonstationary learning benchmark, and it illustrates how visual features of objects evolve significantly over a 10 year span (a phenomenon we refer to as slow concept drift), posing a challenge for object categorization models.

Sample images from the CLEAR benchmark. (Adapted from Lin et al.)

Alternative approaches, such as online and continual learning, repeatedly update a model with small amounts of recent data in order to keep it current. This implicitly prioritizes recent data, as the learnings from past data are gradually erased by subsequent updates. However in the real world, different kinds of information lose relevance at different rates, so there are two key issues: 1) By design they focus exclusively on the most recent data and lose any signal from older data that is erased. 2) Contributions from data instances decay uniformly over time irrespective of the contents of the data.

In our recent work, “Instance-Conditional Timescales of Decay for Non-Stationary Learning”, we propose to assign each instance an importance score during training in order to maximize model performance on future data. To accomplish this, we employ an auxiliary model that produces these scores using the training instance as well as its age. This model is jointly learned with the primary model. We address both the above challenges and achieve significant gains over other robust learning methods on a range of benchmark datasets for nonstationary learning. For instance, on a recent large-scale benchmark for nonstationary learning (~39M photos over a 10 year period), we show up to 15% relative accuracy gains through learned reweighting of training data.

The challenge of concept drift for supervised learning

To gain quantitative insight into slow concept drift, we built classifiers on a recent photo categorization task, comprising roughly 39M photographs sourced from social media websites over a 10 year period. We compared offline training, which iterated over all the training data multiple times in random order, and continual training, which iterated multiple times over each month of data in sequential (temporal) order. We measured model accuracy both during the training period and during a subsequent period where both models were frozen, i.e., not updated further on new data (shown below). At the end of the training period (left panel, x-axis = 0), both approaches have seen the same amount of data, but show a large performance gap. This is due to catastrophic forgetting, a problem in continual learning where a model’s knowledge of data from early on in the training sequence is diminished in an uncontrolled manner. On the other hand, forgetting has its advantages — over the test period (shown on the right), the continual trained model degrades much less rapidly than the offline model because it is less dependent on older data. The decay of both models’ accuracy in the test period is confirmation that the data is indeed evolving over time, and both models become increasingly less relevant.

Comparing offline and continually trained models on the photo classification task.

Time-sensitive reweighting of training data

We design a method combining the benefits of offline learning (the flexibility of effectively reusing all available data) and continual learning (the ability to downplay older data) to address slow concept drift. We build upon offline learning, then add careful control over the influence of past data and an optimization objective, both designed to reduce model decay in the future.

Suppose we wish to train a model, M, given some training data collected over time. We propose to also train a helper model that assigns a weight to each point based on its contents and age. This weight scales the contribution from that data point in the training objective for M. The objective of the weights is to improve the performance of M on future data.

In our work, we describe how the helper model can be meta-learned, i.e., learned alongside M in a manner that helps the learning of the model M itself. A key design choice of the helper model is that we separated out instance- and age-related contributions in a factored manner. Specifically, we set the weight by combining contributions from multiple different fixed timescales of decay, and learn an approximate “assignment” of a given instance to its most suited timescales. We find in our experiments that this form of the helper model outperforms many other alternatives we considered, ranging from unconstrained joint functions to a single timescale of decay (exponential or linear), due to its combination of simplicity and expressivity. Full details may be found in the paper.

Instance weight scoring

The top figure below shows that our learned helper model indeed up-weights more modern-looking objects in the CLEAR object recognition challenge; older-looking objects are correspondingly down-weighted. On closer examination (bottom figure below, gradient-based feature importance assessment), we see that the helper model focuses on the primary object within the image, as opposed to, e.g., background features that may spuriously be correlated with instance age.

Sample images from the CLEAR benchmark (camera & computer categories) assigned the highest and lowest weights respectively by our helper model.

Feature importance analysis of our helper model on sample images from the CLEAR benchmark.

Results

Gains on large-scale data

We first study the large-scale photo categorization task (PCAT) on the YFCC100M dataset discussed earlier, using the first five years of data for training and the next five years as test data. Our method (shown in red below) improves substantially over the no-reweighting baseline (black) as well as many other robust learning techniques. Interestingly, our method deliberately trades off accuracy on the distant past (training data unlikely to reoccur in the future) in exchange for marked improvements in the test period. Also, as desired, our method degrades less than other baselines in the test period.

Comparison of our method and relevant baselines on the PCAT dataset.

Broad applicability

We validated our findings on a wide range of nonstationary learning challenge datasets sourced from the academic literature (see 1, 2, 3, 4 for details) that spans data sources and modalities (photos, satellite images, social media text, medical records, sensor readings, tabular data) and sizes (ranging from 10k to 39M instances). We report significant gains in the test period when compared to the nearest published benchmark method for each dataset (shown below). Note that the previous best-known method may be different for each dataset. These results showcase the broad applicability of our approach.

Performance gain of our method on a variety of tasks studying natural concept drift. Our reported gains are over the previous best-known method for each dataset.

Extensions to continual learning

Finally, we consider an interesting extension of our work. The work above described how offline learning can be extended to handle concept drift using ideas inspired by continual learning. However, sometimes offline learning is infeasible — for example, if the amount of training data available is too large to maintain or process. We adapted our approach to continual learning in a straightforward manner by applying temporal reweighting within the context of each bucket of data being used to sequentially update the model. This proposal still retains some limitations of continual learning, e.g., model updates are performed only on most-recent data, and all optimization decisions (including our reweighting) are only made over that data. Nevertheless, our approach consistently beats regular continual learning as well as a wide range of other continual learning algorithms on the photo categorization benchmark (see below). Since our approach is complementary to the ideas in many baselines compared here, we anticipate even larger gains when combined with them.

Results of our method adapted to continual learning, compared to the latest baselines.

Conclusion

We addressed the challenge of data drift in learning by combining the strengths of previous approaches — offline learning with its effective reuse of data, and continual learning with its emphasis on more recent data. We hope that our work helps improve model robustness to concept drift in practice, and generates increased interest and new ideas in addressing the ubiquitous problem of slow concept drift.

Acknowledgements

We thank Mike Mozer for many interesting discussions in the early phase of this work, as well as very helpful advice and feedback during its development.

Read More

Enhance Amazon Connect and Lex with generative AI capabilities

Enhance Amazon Connect and Lex with generative AI capabilities

Effective self-service options are becoming increasingly critical for contact centers, but implementing them well presents unique challenges.

Amazon Lex provides your Amazon Connect contact center with chatbot functionalities such as automatic speech recognition (ASR) and natural language understanding (NLU) capabilities through voice and text channels. The bot takes natural language speech or text input, recognizes the intent behind the input, and fulfills the user’s intent by invoking the appropriate response.

Callers can have diverse accents, pronunciation, and grammar. Combined with background noise, this can make it challenging for speech recognition to accurately understand statements. For example, “I want to track my order” may be misrecognized as “I want to truck my holder.” Failed intents like these frustrate customers who have to repeat themselves, get routed incorrectly, or are escalated to live agents—costing businesses more.

Amazon Bedrock democratizes foundational model (FM) access for developers to effortlessly build and scale generative AI-based applications for the modern contact center. FMs delivered by Amazon Bedrock, such as Amazon Titan and Anthropic Claude, are pretrained on internet-scale datasets that gives them strong NLU capabilities such as sentence classification, question and answer, and enhanced semantic understanding despite speech recognition errors.

In this post, we explore a solution that uses FMs delivered by Amazon Bedrock to enhance intent recognition of Amazon Lex integrated with Amazon Connect, ultimately delivering an improved self-service experience for your customers.

Overview of solution

The solution uses Amazon Connect, Amazon Lex , AWS Lambda, and Amazon Bedrock in the following steps:

  1. An Amazon Connect contact flow integrates with an Amazon Lex bot via the GetCustomerInput block.
  2. When the bot fails to recognize the caller’s intent and defaults to the fallback intent, a Lambda function is triggered.
  3. The Lambda function takes the transcript of the customer utterance and passes it to a foundation model in Amazon Bedrock
  4. Using its advanced natural language capabilities, the model determines the caller’s intent.
  5. The Lambda function then directs the bot to route the call to the correct intent for fulfillment.

By using Amazon Bedrock foundation models, the solution enables the Amazon Lex bot to understand intents despite speech recognition errors. This results in smooth routing and fulfillment, preventing escalations to agents and frustrating repetitions for callers.

The following diagram illustrates the solution architecture and workflow.

In the following sections, we look at the key components of the solution in more detail.

Lambda functions and the LangChain Framework

When the Amazon Lex bot invokes the Lambda function, it sends an event message that contains bot information and the transcription of the utterance from the caller. Using this event message, the Lambda function dynamically retrieves the bot’s configured intents, intent description, and intent utterances and builds a prompt using LangChain, which is an open source machine learning (ML) framework that enables developers to integrate large language models (LLMs), data sources, and applications.

An Amazon Bedrock foundation model is then invoked using the prompt and a response is received with the predicted intent and confidence level. If the confidence level is greater than a set threshold, for example 80%, the function returns the identified intent to Amazon Lex with an action to delegate. If the confidence level is below the threshold, it defaults back to the default FallbackIntent and an action to close it.

In-context learning, prompt engineering, and model invocation

We use in-context learning to be able to use a foundation model to accomplish this task. In-context learning is the ability for LLMs to learn the task using just what’s in the prompt without being pre-trained or fine-tuned for the particular task.

In the prompt, we first provide the instruction detailing what needs to be done. Then, the Lambda function dynamically retrieves and injects the Amazon Lex bot’s configured intents, intent descriptions, and intent utterances into the prompt. Finally, we provide it instructions on how to output its thinking and final result.

The following prompt template was tested on text generation models Anthropic Claude Instant v1.2 and Anthropic Claude v2. We use XML tags to better improve the performance of the model. We also add room for the model to think before identifying the final intent to better improve its reasoning for choosing the right intent. The {intent_block} contains the intent IDs, intent descriptions, and intent utterances. The {input} block contains the transcribed utterance from the caller. Three backticks (“`) are added at the end to help the model output a code block more consistently. A <STOP> sequence is added to stop it from generating further.

"""
Human: You are a call center agent. You try to understand the intent given an utterance from the caller.

The available intents are as follows, the intent of the caller is highly likely to be one of these.
<intents>
{intents_block} </intents>
The output format is:
<thinking>
</thinking>

<output>
{{
     "intent_id": intent_id,
     "confidence": confidence
}}
</output><STOP>

For the given utterance, you try to categorize the intent of the caller to be one of the intents in <intents></intents> tags.
If it does not match any intents or the utterance is blank, respond with FALLBCKINT and confidence of 1.0.
Respond with the intent name and confidence between 0.0 and 1.0.
Put your thinking in <thinking></thinking> tags before deciding on the intent.

Utterance: {input}

Assistant: ```"""

After the model has been invoked, we receive the following response from the foundation model:

<thinking>
The given utterance is asking for checking where their shipment is. It matches the intent order status.
</thinking>

{
    "intent": "ORDERSTATUSID",
    "confidence": 1.0
}
```

Filter available intents based on contact flow session attributes

When using the solution as part of an Amazon Connect contact flow, you can further enhance the ability of the LLM to identify the correct intent by specifying the session attribute available_intents in the “Get customer input” block with a comma-separated list of intents, as shown in the following screenshot. By doing so, the Lambda function will only include these specified intents as part of the prompt to the LLM, reducing the number of intents that the LLM has to reason through. If the available_intents session attribute is not specified, all intents in the Amazon Lex bot will be used by default.

Lambda function response to Amazon Lex

After the LLM has determined the intent, the Lambda function responds in the specific format required by Amazon Lex to process the response.

If a matching intent is found above the confidence threshold, it returns a dialog action type Delegate to instruct Amazon Lex to use the selected intent and subsequently return the completed intent back to Amazon Connect. The response output is as follows:

{
    "sessionState": {
        "dialogAction": {
        "type": "Delegate"
        },
        "intent": {
        "name": intent,
        "state": "InProgress",
        }
    }
}

If the confidence level is below the threshold or an intent was not recognized, a dialog action type Close is returned to instruct Amazon Lex to close the FallbackIntent, and return the control back to Amazon Connect. The response output is as follows:

{
    "sessionState": {
        "dialogAction": {
        "type": "Close"
        },
        "intent": {
        "name": intent,
        "state": "Fulfilled",
        }
    }
}

The complete source code for this sample is available in GitHub.

Prerequisites

Before you get started, make sure you have the following prerequisites:

Implement the solution

To implement the solution, complete the following steps:

  1. Clone the repository
    git clone https://github.com/aws-samples/amazon-connect-with-amazon-lex-genai-capabilities
    cd amazon-connect-with-amazon-lex-genai-capabilities

  2. Run the following command to initialize the environment and create an Amazon Elastic Container Registry (Amazon ECR) repository for our Lambda function’s image. Provide the AWS Region and ECR repository name that you would like to create.
    bash ./scripts/build.sh region-name repository-name

  3. Update the ParameterValue fields in the scripts/parameters.json file:
    • ParameterKey ("AmazonECRImageUri") – Enter the repository URL from the previous step.
    • ParameterKey ("AmazonConnectName") – Enter a unique name.
    • ParameterKey ("AmazonLexBotName") – Enter a unique name.
    • ParameterKey ("AmazonLexBotAliasName") – The default is “prodversion”; you can change it if needed.
    • ParameterKey ("LoggingLevel") – The default is “INFO”; you can change it if required. Valid values are DEBUG, WARN, and ERROR.
    • ParameterKey ("ModelID") – The default is “anthropic.claude-instant-v1”; you can change it if you need to use a different model.
    • ParameterKey ("AmazonConnectName") – The default is “0.75”; you can change it if you need to update the confidence score.
  4. Run the command to generate the CloudFormation stack and deploy the resources:
    bash ./scripts/deploy.sh region cfn-stack-name

If you don’t want to build the contact flow from scratch in Amazon Connect, you can import the sample flow provided with this repository filelocation: /contactflowsample/samplecontactflow.json.

  1. Log in to your Amazon Connect instance. The account must be assigned a security profile that includes edit permissions for flows.
  2. On the Amazon Connect console, in the navigation pane, under Routing, choose Contact flows.
  3. Create a new flow of the same type as the one you are importing.
  4. Choose Save and Import flow.
  5. Select the file to import and choose Import.

When the flow is imported into an existing flow, the name of the existing flow is updated, too.

  1. Review and update any resolved or unresolved references as necessary.
  2. To save the imported flow, choose Save. To publish, choose Save and Publish.
  3. After you upload the contact flow, update the following configurations:
    • Update the GetCustomerInput blocks with the correct Amazon Lex bot name and version.
    • Under Manage Phone Number, update the number with the contact flow or IVR imported earlier.

Verify the configuration

Verify that the Lambda function created with the CloudFormation stack has an IAM role with permissions to retrieve bots and intent information from Amazon Lex (list and read permissions), and appropriate Amazon Bedrock permissions (list and read permissions).

In your Amazon Lex bot, for your configured alias and language, verify that the Lambda function was set up correctly. For the FallBackIntent, confirm that Fulfillmentis set to Active to be able to run the function whenever the FallBackIntent is triggered.

At this point, your Amazon Lex bot will automatically run the Lambda function and the solution should work seamlessly.

Test the solution

Let’s look at a sample intent, description, and utterance configuration in Amazon Lex and see how well the LLM performs with sample inputs that contains typos, grammar mistakes, and even a different language.

The following figure shows screenshots of our example. The left side shows the intent name, its description, and a single-word sample utterance. Without much configuration on Amazon Lex, the LLM is able to predict the correct intent (right side). In this test, we have a simple fulfillment message from the correct intent.

Clean up

To clean up your resources, run the following command to delete the ECR repository and CloudFormation stack:

bash ./scripts/cleanup.sh region repository-name cfn-stack-name

Conclusion

By using Amazon Lex enhanced with LLMs delivered by Amazon Bedrock, you can improve the intent recognition performance of your bots. This provides a seamless self-service experience for a diverse set of customers, bridging the gap between accents and unique speech characteristics, and ultimately enhancing customer satisfaction.

To dive deeper and learn more about generative AI, check out these additional resources:

For more information on how you can experiment with the generative AI-powered self-service solution, see Deploy self-service question answering with the QnABot on AWS solution powered by Amazon Lex with Amazon Kendra and large language models.


About the Authors

Hamza Nadeem is an Amazon Connect Specialist Solutions Architect at AWS, based in Toronto. He works with customers throughout Canada to modernize their Contact Centers and provide solutions to their unique customer engagement challenges and business requirements. In his spare time, Hamza enjoys traveling, soccer and trying new recipes with his wife.

Parag Srivastava is a Solutions Architect at Amazon Web Services (AWS), helping enterprise customers with successful cloud adoption and migration. During his professional career, he has been extensively involved in complex digital transformation projects. He is also passionate about building innovative solutions around geospatial aspects of addresses.

Ross Alas is a Solutions Architect at AWS based in Toronto, Canada. He helps customers innovate with AI/ML and Generative AI solutions that leads to real business outcomes. He has worked with a variety of customers from retail, financial services, technology, pharmaceutical, and others. In his spare time, he loves the outdoors and enjoying nature with his family.

Sangeetha Kamatkar is a Solutions Architect at Amazon Web Services (AWS), helping customers with successful cloud adoption and migration. She works with customers to craft highly scalable, flexible, and resilient cloud architectures that address customer business problems. In her spare time, she listens to music, watch movies and enjoy gardening during summer time.

Read More

Skeleton-based pose annotation labeling using Amazon SageMaker Ground Truth

Skeleton-based pose annotation labeling using Amazon SageMaker Ground Truth

Pose estimation is a computer vision technique that detects a set of points on objects (such as people or vehicles) within images or videos. Pose estimation has real-world applications in sports, robotics, security, augmented reality, media and entertainment, medical applications, and more. Pose estimation models are trained on images or videos that are annotated with a consistent set of points (coordinates) defined by a rig. To train accurate pose estimation models, you first need to acquire a large dataset of annotated images; many datasets have tens or hundreds of thousands of annotated images and take significant resources to build. Labeling mistakes are important to identify and prevent because model performance for pose estimation models is heavily influenced by labeled data quality and data volume.

In this post, we show how you can use a custom labeling workflow in Amazon SageMaker Ground Truth specifically designed for keypoint labeling. This custom workflow helps streamline the labeling process and minimize labeling errors, thereby reducing the cost of obtaining high-quality pose labels.

Importance of high-quality data and reducing labeling errors

High-quality data is fundamental for training robust and reliable pose estimation models. The accuracy of these models is directly tied to the correctness and precision of the labels assigned to each pose keypoint, which, in turn, depends on the effectiveness of the annotation process. Additionally, having a substantial volume of diverse and well-annotated data ensures that the model can learn a broad range of poses, variations, and scenarios, leading to improved generalization and performance across different real-world applications. The acquisition of these large, annotated datasets involves human annotators who carefully label images with pose information. While labeling points of interest within the image, it’s useful to see the skeletal structure of the object while labeling in order to provide visual guidance to the annotator. This is helpful for identifying labeling errors before they are incorporated into the dataset like left-right swaps or mislabels (such as marking a foot as a shoulder). For example, a labeling error like the left-right swap made in the following example can easily be identified by the crossing of the skeleton rig lines and the mismatching of the colors. These visual cues help labelers recognize mistakes and will result in a cleaner set of labels.

Due to the manual nature of labeling, obtaining large and accurate labeled datasets can be cost-prohibitive and even more so with an inefficient labeling system. Therefore, labeling efficiency and accuracy are critical when designing your labeling workflow. In this post, we demonstrate how to use a custom SageMaker Ground Truth labeling workflow to quickly and accurately annotate images, reducing the burden of developing large datasets for pose estimation workflows.

Overview of solution

This solution provides an online web portal where the labeling workforce can use a web browser to log in, access labeling jobs, and annotate images using the crowd-2d-skeleton user interface (UI), a custom UI designed for keypoint and pose labeling using SageMaker Ground Truth. The annotations or labels created by the labeling workforce are then exported to an Amazon Simple Storage Service (Amazon S3) bucket, where they can be used for downstream processes like training deep learning computer vision models. This solution walks you through how to set up and deploy the necessary components to create a web portal as well as how to create labeling jobs for this labeling workflow.

The following is a diagram of the overall architecture.

This architecture is comprised of several key components, each of which we explain in more detail in the following sections. This architecture provides the labeling workforce with an online web portal hosted by SageMaker Ground Truth. This portal allows each labeler to log in and see their labeling jobs. After they’ve logged in, the labeler can select a labeling job and begin annotating images using the custom UI hosted by Amazon CloudFront. We use AWS Lambda functions for pre-annotation and post-annotation data processing.

The following screenshot is an example of the UI.

The labeler can mark specific keypoints on the image using the UI. The lines between keypoints will be automatically drawn for the user based on a skeleton rig definition that the UI uses. The UI allows many customizations, such as the following:

  • Custom keypoint names
  • Configurable keypoint colors
  • Configurable rig line colors
  • Configurable skeleton and rig structures

Each of these are targeted features to improve the ease and flexibility of labeling. Specific UI customization details can be found in the GitHub repo and are summarized later in this post. Note that in this post, we use human pose estimation as a baseline task, but you can expand it to labeling object pose with a pre-defined rig for other objects as well, such as animals or vehicles. In the following example, we show how this can be applied to label the points of a box truck.

SageMaker Ground Truth

In this solution, we use SageMaker Ground Truth to provide the labeling workforce with an online portal and a way to manage labeling jobs. This post assumes that you’re familiar with SageMaker Ground Truth. For more information, refer to Amazon SageMaker Ground Truth.

CloudFront distribution

For this solution, the labeling UI requires a custom-built JavaScript component called the crowd-2d-skeleton component. This component can be found on GitHub as part of Amazon’s open source initiatives. The CloudFront distribution will be used to host the crowd-2d-skeleton.js, which is needed by the SageMaker Ground Truth UI. The CloudFront distribution will be assigned an origin access identity, which will allow the CloudFront distribution to access the crowd-2d-skeleton.js residing in the S3 bucket. The S3 bucket will remain private and no other objects in this bucket will be available via the CloudFront distribution due to restrictions we place on the origin access identity through a bucket policy. This is a recommended practice for following the least-privilege principle.

Amazon S3 bucket

We use the S3 bucket to store the SageMaker Ground Truth input and output manifest files, the custom UI template, images for the labeling jobs, and the JavaScript code needed for the custom UI. This bucket will be private and not accessible to the public. The bucket will also have a bucket policy that restricts the CloudFront distribution to only being able to access the JavaScript code needed for the UI. This prevents the CloudFront distribution from hosting any other object in the S3 bucket.

Pre-annotation Lambda function

SageMaker Ground Truth labeling jobs typically use an input manifest file, which is in JSON Lines format. This input manifest file contains metadata for a labeling job, acts as a reference to the data that needs to be labeled, and helps configure how the data should be presented to the annotators. The pre-annotation Lambda function processes items from the input manifest file before the manifest data is input to the custom UI template. This is where any formatting or special modifications to the items can be done before presenting the data to the annotators in the UI. For more information on pre-annotation Lambda functions, see Pre-annotation Lambda.

Post-annotation Lambda function

Similar to the pre-annotation Lambda function, the post-annotation function handles additional data processing you may want to do after all the labelers have finished labeling but before writing the final annotation output results. This processing is done by a Lambda function, which is responsible for formatting the data for the labeling job output results. In this solution, we are simply using it to return the data in our desired output format. For more information on post-annotation Lambda functions, see Post-annotation Lambda.

Post-annotation Lambda function role

We use an AWS Identity and Access Management (IAM) role to give the post-annotation Lambda function access to the S3 bucket. This is needed to read the annotation results and make any modifications before writing out the final results to the output manifest file.

SageMaker Ground Truth role

We use this IAM role to give the SageMaker Ground Truth labeling job the ability to invoke the Lambda functions and to read the images, manifest files, and custom UI template in the S3 bucket.

Prerequisites

For this walkthrough, you should have the following prerequisites:

For this solution, we use the AWS CDK to deploy the architecture. Then we create a sample labeling job, use the annotation portal to label the images in the labeling job, and examine the labeling results.

Create the AWS CDK stack

After you complete all the prerequisites, you’re ready to deploy the solution.

Set up your resources

Complete the following steps to set up your resources:

  1. Download the example stack from the GitHub repo.
  2. Use the cd command to change into the repository.
  3. Create your Python environment and install required packages (see the repository README.md for more details).
  4. With your Python environment activated, run the following command:
    cdk synth

  5. Run the following command to deploy the AWS CDK:
    cdk deploy

  6. Run the following command to run the post-deployment script:
    python scripts/post_deployment_script.py

Create a labeling job

After you have set up your resources, you’re ready to create a labeling job. For the purposes of this post, we create a labeling job using the example scripts and images provided in the repository.

  1. CD into the scripts directory in the repository.
  2. Download the example images from the internet by running the following code:
    python scripts/download_example_images.py

This script downloads a set of 10 images, which we use in our example labeling job. We review how to use your own custom input data later in this post.

  1. Create a labeling job by running to following code:
    python scripts/create_example_labeling_job.py <Labeling Workforce ARN>

This script takes a SageMaker Ground Truth private workforce ARN as an argument, which should be the ARN for a workforce you have in the same account you deployed this architecture into. The script will create the input manifest file for our labeling job, upload it to Amazon S3, and create a SageMaker Ground Truth custom labeling job. We take a deeper dive into the details of this script later in this post.

Label the dataset

After you have launched the example labeling job, it will appear on the SageMaker console as well as the workforce portal.

In the workforce portal, select the labeling job and choose Start working.

You’ll be presented with an image from the example dataset. At this point, you can use the custom crowd-2d-skeleton UI to annotate the images. You can familiarize yourself with the crowd-2d-skeleton UI by referring to User Interface Overview. We use the rig definition from the COCO keypoint detection dataset challenge as the human pose rig. To reiterate, you can customize this without our custom UI component to remove or add points based on your requirements.

When you’re finished annotating an image, choose Submit. This will take you to the next image in the dataset until all images are labeled.

Access the labeling results

When you have finished labeling all the images in the labeling job, SageMaker Ground Truth will invoke the post-annotation Lambda function and produce an output.manifest file containing all of the annotations. This output.manifest will be stored in the S3 bucket. In our case, the location of the output manifest should follow the S3 URI path s3://<bucket name> /labeling_jobs/output/<labeling job name>/manifests/output/output.manifest. The output.manifest file is a JSON Lines file, where each line corresponds to a single image and its annotations from the labeling workforce. Each JSON Lines item is a JSON object with many fields. The field we are interested in is called label-results. The value of this field is an object containing the following fields:

  • dataset_object_id – The ID or index of the input manifest item
  • data_object_s3_uri – The image’s Amazon S3 URI
  • image_file_name – The image’s file name
  • image_s3_location – The image’s Amazon S3 URL
  • original_annotations – The original annotations (only set and used if you are using a pre-annotation workflow)
  • updated_annotations – The annotations for the image
  • worker_id – The workforce worker who made the annotations
  • no_changes_needed – Whether the no changes needed check box was selected
  • was_modified – Whether the annotation data differs from the original input data
  • total_time_in_seconds – The time it took the workforce worker to annotation the image

With these fields, you can access your annotation results for each image and do calculations like average time to label an image.

Create your own labeling jobs

Now that we have created an example labeling job and you understand the overall process, we walk you through the code responsible for creating the manifest file and launching the labeling job. We focus on the key parts of the script that you may want to modify to launch your own labeling jobs.

We cover snippets of code from the create_example_labeling_job.py script located in the GitHub repository. The script starts by setting up variables that are used later in the script. Some of the variables are hard-coded for simplicity, whereas others, which are stack dependent, will be imported dynamically at runtime by fetching the values created from our AWS CDK stack.

# Setup/get variables values from our CDK stack
s3_upload_prefix = "labeling_jobs"
image_dir = 'scripts/images'
manifest_file_name = "example_manifest.txt"
s3_bucket_name = read_ssm_parameter('/crowd_2d_skeleton_example_stack/bucket_name')
pre_annotation_lambda_arn = read_ssm_parameter('/crowd_2d_skeleton_example_stack/pre_annotation_lambda_arn')
post_annotation_lambda_arn = read_ssm_parameter('/crowd_2d_skeleton_example_stack/post_annotation_lambda_arn')
ground_truth_role_arn = read_ssm_parameter('/crowd_2d_skeleton_example_stack/sagemaker_ground_truth_role')
ui_template_s3_uri = f"s3://{s3_bucket_name}/infrastructure/ground_truth_templates/crowd_2d_skeleton_template.html"
s3_image_upload_prefix = f'{s3_upload_prefix}/images'
s3_manifest_upload_prefix = f'{s3_upload_prefix}/manifests'
s3_output_prefix = f'{s3_upload_prefix}/output'

The first key section in this script is the creation of the manifest file. Recall that the manifest file is a JSON lines file that contains the details for a SageMaker Ground Truth labeling job. Each JSON Lines object represents one item (for example, an image) that needs to be labeled. For this workflow, the object should contain the following fields:

  • source-ref – The Amazon S3 URI to the image you wish to label.
  • annotations – A list of annotation objects, which is used for pre-annotating workflows. See the crowd-2d-skeleton documentation for more details on the expected values.

The script creates a manifest line for each image in the image directory using the following section of code:

# For each image in the image directory lets create a manifest line
manifest_items = []
for filename in os.listdir(image_dir):
    if filename.endswith('.jpg') or filename.endswith('.png'):
        img_path = os.path.join(
            image_dir,
            filename
        )
        object_name = os.path.join(
            s3_image_upload_prefix,
            filename
        ).replace("\", "/")

        # upload to s3_bucket
        s3_client.upload_file(img_path, s3_bucket_name, object_name)
f
        # add it to manifest file
        manifest_items.append({
            "source-ref": f's3://{s3_bucket_name}/{object_name}',
            "annotations": [],
        })

If you want to use different images or point to a different image directory, you can modify that section of the code. Additionally, if you’re using a pre-annotation workflow, you can update the annotations array with a JSON string consisting of the array and all its annotation objects. The details of the format of this array are documented in the crowd-2d-skeleton documentation.

With the manifest line items now created, you can create and upload the manifest file to the S3 bucket you created earlier:

# Create Manifest file
manifest_file_contents = "n".join([json.dumps(mi) for mi in manifest_items])
with open(manifest_file_name, "w") as file_handle:
    file_handle.write(manifest_file_contents)

# Upload manifest file
object_name = os.path.join(
    s3_manifest_upload_prefix,
    manifest_file_name
).replace("\", "/")
s3_client.upload_file(manifest_file_name, s3_bucket_name, object_name)

Now that you have created a manifest file containing the images you want to label, you can create a labeling job. You can create the labeling job programmatically using the AWS SDK for Python (Boto3). The code to create a labeling job is as follows:

# Create labeling job
client = boto3.client("sagemaker")
now = int(round(datetime.now().timestamp()))
response = client.create_labeling_job(
    LabelingJobName=f"crowd-2d-skeleton-example-{now}",
    LabelAttributeName="label-results",
    InputConfig={
        "DataSource": {
            "S3DataSource": {"ManifestS3Uri": f's3://{s3_bucket_name}/{object_name}'},
        },
        "DataAttributes": {},
    },
    OutputConfig={
        "S3OutputPath": f"s3://{s3_bucket_name}/{s3_output_prefix}/",
    },
    RoleArn=ground_truth_role_arn,
    HumanTaskConfig={
        "WorkteamArn": workteam_arn,
        "UiConfig": {"UiTemplateS3Uri": ui_template_s3_uri},
        "PreHumanTaskLambdaArn": pre_annotation_lambda_arn,
        "TaskKeywords": ["example"],
        "TaskTitle": f"Crowd 2D Component Example {now}",
        "TaskDescription": "Crowd 2D Component Example",
        "NumberOfHumanWorkersPerDataObject": 1,
        "TaskTimeLimitInSeconds": 28800,
        "TaskAvailabilityLifetimeInSeconds": 2592000,
        "MaxConcurrentTaskCount": 123,
        "AnnotationConsolidationConfig": {
            "AnnotationConsolidationLambdaArn": post_annotation_lambda_arn
        },
    },
)
print(response)

The aspects of this code you may want to modify are LabelingJobName, TaskTitle, and TaskDescription. The LabelingJobName is the unique name of the labeling job that SageMaker will use to reference your job. This is also the name that will appear on the SageMaker console. TaskTitle serves a similar purpose, but doesn’t need to be unique and will be the name of the job that appears in the workforce portal. You may want to make these more specific to what you are labeling or what the labeling job is for. Lastly, we have the TaskDescription field. This field appears in the workforce portal to provide extra context to the labelers as to what the task is, such as instructions and guidance for the task. For more information on these fields as well as the others, refer to the create_labeling_job documentation.

Make adjustments to the UI

In this section, we go over some of the ways you can customize the UI. The following is a list of the most common potential customizations to the UI in order to adjust it to your modeling task:

  • You can define which keypoints can be labeled. This includes the name of the keypoint and its color.
  • You can change the structure of the skeleton (which keypoints are connected).
  • You can change the line colors for specific lines between specific keypoints.

All of these UI customizations are configurable through arguments passed into the crowd-2d-skeleton component, which is the JavaScript component used in this custom workflow template. In this template, you will find the usage of the crowd-2d-skeleton component. A simplified version is shown in the following code:

<crowd-2d-skeleton
        imgSrc="{{ task.input.image_s3_uri | grant_read_access }}"
        keypointClasses='<keypoint classes>'
        skeletonRig='<skeleton rig definition>'
        skeletonBoundingBox='<skeleton bounding box size>'
        initialValues="{{ task.input.initial_values }}"
>

In the preceding code example, you can see the following attributes on the component: imgSrc, keypointClasses, skeletonRig, skeletonBoundingBox, and intialValues. We describe each attribute’s purpose in the following sections, but customizing the UI is as straightforward as changing the values for these attributes, saving the template, and rerunning the post_deployment_script.py we used previously.

imgSrc attribute

The imgSrc attribute controls which image to show in the UI when labeling. Usually, a different image is used for each manifest line item, so this attribute is often populated dynamically using the built-in Liquid templating language. You can see in the previous code example that the attribute value is set to {{ task.input.image_s3_uri | grant_read_access }}, which is Liquid template variable that will be replaced with the actual image_s3_uri value when the template is being rendered. The rendering process starts when the user opens an image for annotation. This process grabs a line item from the input manifest file and sends it to the pre-annotation Lambda function as an event.dataObject. The pre-annotation function takes take the information it needs from the line item and returns a taskInput dictionary, which is then passed to the Liquid rendering engine, which will replace any Liquid variables in your template. For example, let’s say you have a manifest file with the following line:

{"source-ref": "s3://my-bucket/exmaple.jpg", "annotations": []}

This data would be passed to the pre-annotation function. The following code shows how the function extracts the values from the event object:

def lambda_handler(event, context):
    print("Pre-Annotation Lambda Triggered")
    data_object = event["dataObject"]  # this comes directly from the manifest file
    annotations = data_object["annotations"]

    taskInput = {
        "image_s3_uri": data_object["source-ref"],
        "initial_values": json.dumps(annotations)
    }
    return {"taskInput": taskInput, "humanAnnotationRequired": "true"}

The object returned from the function in this case would look like the following code:

{
  "taskInput": {
    "image_s3_uri": "s3://my-bucket/exmaple.jpg",
    "annotations": "[]"
  },
  "humanAnnotationRequired": "true"
}

The returned data from the function is then available to the Liquid template engine, which replaces the template values in the template with the data values returned by the function. The result would be something like the following code:

<crowd-2d-skeleton
        imgSrc="s3://my-bucket/exmaple.jpg" <-- This was “injected” into template
        keypointClasses='<keypoint classes>'
        skeletonRig='<skeleton rig definition>'
        skeletonBoundingBox='<skeleton bounding box size>'
        initialValues="[]"
>

keypointClasses attribute

The keypointClasses attribute defines which keypoints will appear in the UI and be used by the annotators. This attribute takes a JSON string containing a list of objects. Each object represents a keypoint. Each keypoint object should contain the following fields:

  • id – A unique value to identify that keypoint.
  • color – The color of the keypoint represented as an HTML hex color.
  • label – The name or keypoint class.
  • x – This optional attribute is only needed if you want to use the draw skeleton functionality in the UI. The value for this attribute is the x position of the keypoint relative to the skeleton’s bounding box. This value is usually obtained by the Skeleton Rig Creator tool. If you are doing keypoint annotations and don’t need to draw an entire skeleton at once, you can set this value to 0.
  • y – This optional attribute is similar to x, but for the vertical dimension.

For more information on the keypointClasses attribute, see the keypointClasses documentation.

skeletonRig attribute

The skeletonRig attribute controls which keypoints should have lines drawn between them. This attribute takes a JSON string containing a list of keypoint label pairs. Each pair informs the UI which keypoints to draw lines between. For example, '[["left_ankle","left_knee"],["left_knee","left_hip"]]' informs the UI to draw lines between "left_ankle" and "left_knee" and draw lines between "left_knee" and "left_hip". This can be generated by the Skeleton Rig Creator tool.

skeletonBoundingBox attribute

The skeletonBoundingBox attribute is optional and only needed if you want to use the draw skeleton functionality in the UI. The draw skeleton functionality is the ability to annotate entire skeletons with a single annotation action. We don’t cover this feature in this post. The value for this attribute is the skeleton’s bounding box dimensions. This value is usually obtained by the Skeleton Rig Creator tool. If you are doing keypoint annotations and don’t need to draw an entire skeleton at once, you can set this value to null. It is recommended to use the Skeleton Rig Creator tool to get this value.

intialValues attribute

The initialValues attribute is used to pre-populate the UI with annotations obtained from another process (such as another labeling job or machine learning model). This is useful when doing adjustment or review jobs. The data for this field is usually populated dynamically in the same description for the imgSrc attribute. More details can be found in the crowd-2d-skeleton documentation.

Clean up

To avoid incurring future charges, you should delete the objects in your S3 bucket and delete your AWS CDK stack. You can delete your S3 objects via the Amazon SageMaker console or the AWS Command Line Interface (AWS CLI). After you have deleted all of the S3 objects in the bucket, you can destroy the AWS CDK by running the following code:

cdk destroy

This will remove the resources you created earlier.

Considerations

Additional steps maybe needed to productionize your workflow. Here are some considerations depending on your organizations risk profile:

  • Adding access and application logging
  • Adding a web application firewall (WAF)
  • Adjusting IAM permissions to follow least privilege

Conclusion

In this post, we shared the importance of labeling efficiency and accuracy in building pose estimation datasets. To help with both items, we showed how you can use SageMaker Ground Truth to build custom labeling workflows to support skeleton-based pose labeling tasks, aiming to enhance efficiency and precision during the labeling process. We showed how you can further extend the code and examples to various custom pose estimation labeling requirements.

We encourage you to use this solution for your labeling tasks and to engage with AWS for assistance or inquiries related to custom labeling workflows.


About the Authors

Arthur Putnam is a Full-Stack Data Scientist in AWS Professional Services. Arthur’s expertise is centered around developing and integrating front-end and back-end technologies into AI systems. Outside of work, Arthur enjoys exploring the latest advancements in technology, spending time with his family, and enjoying the outdoors.

Ben Fenker is a Senior Data Scientist in AWS Professional Services and has helped customers build and deploy ML solutions in industries ranging from sports to healthcare to manufacturing. He has a Ph.D. in physics from Texas A&M University and 6 years of industry experience. Ben enjoys baseball, reading, and raising his kids.

Jarvis Lee is a Senior Data Scientist with AWS Professional Services. He has been with AWS for over six years, working with customers on machine learning and computer vision problems. Outside of work, he enjoys riding bicycles.

Read More

Build generative AI chatbots using prompt engineering with Amazon Redshift and Amazon Bedrock

Build generative AI chatbots using prompt engineering with Amazon Redshift and Amazon Bedrock

With the advent of generative AI solutions, organizations are finding different ways to apply these technologies to gain edge over their competitors. Intelligent applications, powered by advanced foundation models (FMs) trained on huge datasets, can now understand natural language, interpret meaning and intent, and generate contextually relevant and human-like responses. This is fueling innovation across industries, with generative AI demonstrating immense potential to enhance countless business processes, including the following:

  • Accelerate research and development through automated hypothesis generation and experiment design
  • Uncover hidden insights by identifying subtle trends and patterns in data
  • Automate time-consuming documentation processes
  • Provide better customer experience with personalization
  • Summarize data from various knowledge sources
  • Boost employee productivity by providing software code recommendations

Amazon Bedrock is a fully managed service that makes it straightforward to build and scale generative AI applications. Amazon Bedrock offers a choice of high-performing foundation models from leading AI companies, including AI21 Labs, Anthropic, Cohere, Meta, Stability AI, and Amazon, via a single API. It enables you to privately customize the FMs with your data using techniques such as fine-tuning, prompt engineering, and Retrieval Augmented Generation (RAG), and build agents that run tasks using your enterprise systems and data sources while complying with security and privacy requirements.

In this post, we discuss how to use the comprehensive capabilities of Amazon Bedrock to perform complex business tasks and improve the customer experience by providing personalization using the data stored in a database like Amazon Redshift. We use prompt engineering techniques to develop and optimize the prompts with the data that is stored in a Redshift database to efficiently use the foundation models. We build a personalized generative AI travel itinerary planner as part of this example and demonstrate how we can personalize a travel itinerary for a user based on their booking and user profile data stored in Amazon Redshift.

Prompt engineering

Prompt engineering is the process where you can create and design user inputs that can guide generative AI solutions to generate desired outputs. You can choose the most appropriate phrases, formats, words, and symbols that guide the foundation models and in turn the generative AI applications to interact with the users more meaningfully. You can use creativity and trial-and-error methods to create a collection on input prompts, so the application works as expected. Prompt engineering makes generative AI applications more efficient and effective. You can encapsulate open-ended user input inside a prompt before passing it to the FMs. For example, a user may enter an incomplete problem statement like, “Where to purchase a shirt.” Internally, the application’s code uses an engineered prompt that says, “You are a sales assistant for a clothing company. A user, based in Alabama, United States, is asking you where to purchase a shirt. Respond with the three nearest store locations that currently stock a shirt.” The foundation model then generates more relevant and accurate information.

The prompt engineering field is evolving constantly and needs creative expression and natural language skills to tune the prompts and obtain the desired output from FMs. A prompt can contain any of the following elements:

  • Instruction – A specific task or instruction you want the model to perform
  • Context – External information or additional context that can steer the model to better responses
  • Input data – The input or question that you want to find a response for
  • Output indicator – The type or format of the output

You can use prompt engineering for various enterprise use cases across different industry segments, such as the following:

  • Banking and finance – Prompt engineering empowers language models to generate forecasts, conduct sentiment analysis, assess risks, formulate investment strategies, generate financial reports, and ensure regulatory compliance. For example, you can use large language models (LLMs) for a financial forecast by providing data and market indicators as prompts.
  • Healthcare and life sciences – Prompt engineering can help medical professionals optimize AI systems to aid in decision-making processes, such as diagnosis, treatment selection, or risk assessment. You can also engineer prompts to facilitate administrative tasks, such as patient scheduling, record keeping, or billing, thereby increasing efficiency.
  • Retail – Prompt engineering can help retailers implement chatbots to address common customer requests like queries about order status, returns, payments, and more, using natural language interactions. This can increase customer satisfaction and also allow human customer service teams to dedicate their expertise to intricate and sensitive customer issues.

In the following example, we implement a use case from the travel and hospitality industry to implement a personalized travel itinerary planner for customers who have upcoming travel plans. We demonstrate how we can build a generative AI chatbot that interacts with users by enriching the prompts from the user profile data that is stored in the Redshift database. We then send this enriched prompt to an LLM, specifically, Anthropic’s Claude on Amazon Bedrock, to obtain a customized travel plan.

Amazon Redshift has announced a feature called Amazon Redshift ML that makes it straightforward for data analysts and database developers to create, train, and apply machine learning (ML) models using familiar SQL commands in Redshift data warehouses. However, this post uses LLMs hosted on Amazon Bedrock to demonstrate general prompt engineering techniques and its benefits.

Solution overview

We all have searched the internet for things to do in a certain place during or before we go on a vacation. In this solution, we demonstrate how we can generate a custom, personalized travel itinerary that users can reference, which will be generated based on their hobbies, interests, favorite foods, and more. The solution uses their booking data to look up the cities they are going to, along with the travel dates, and comes up with a precise, personalized list of things to do. This solution can be used by the travel and hospitality industry to embed a personalized travel itinerary planner within their travel booking portal.

This solution contains two major components. First, we extract the user’s information like name, location, hobbies, interests, and favorite food, along with their upcoming travel booking details. With this information, we stitch a user prompt together and pass it to Anthropic’s Claude on Amazon Bedrock to obtain a personalized travel itinerary. The following diagram provides a high-level overview of the workflow and the components involved in this architecture.

First, the user logs in to the chatbot application, which is hosted behind an Application Load Balancer and authenticated using Amazon Cognito. We obtain the user ID from the user using the chatbot interface, which is sent to the prompt engineering module. The user’s information like name, location, hobbies, interests, and favorite food is extracted from the Redshift database along with their upcoming travel booking details like travel city, check-in date, and check-out date.

Prerequisites

Before you deploy this solution, make sure you have the following prerequisites set up:

Deploy this solution

Use the following steps to deploy this solution in your environment. The code used in this solution is available in the GitHub repo.

The first step is to make sure the account and the AWS Region where the solution is being deployed have access to Amazon Bedrock base models.

  1. On the Amazon Bedrock console, choose Model access in the navigation pane.
  2. Choose Manage model access.
  3. Select the Anthropic Claude model, then choose Save changes.

It may take a few minutes for the access status to change to Access granted.

Next, we use the following AWS CloudFormation template to deploy an Amazon Redshift Serverless cluster along with all the related components, including the Amazon Elastic Compute Cloud (Amazon EC2) instance to host the webapp.

  1. Choose Launch Stack to launch the CloudFormation stack:
  2. Provide a stack name and SSH keypair, then create the stack.
  3. On the stack’s Outputs tab, save the values for the Redshift database workgroup name, secret ARN, URL, and Amazon Redshift service role ARN.

Now you’re ready to connect to the EC2 instance using SSH.

  1. Open an SSH client.
  2. Locate your private key file that was entered while launching the CloudFormation stack.
  3. Change the permissions of the private key file to 400 (chmod 400 id_rsa).
  4. Connect to the instance using its public DNS or IP address. For example:
    ssh -i “id_rsa” ec2-user@ ec2-54-xxx-xxx-187.compute-1.amazonaws.com

  5. Update the configuration file personalized-travel-itinerary-planner/core/data_feed_config.ini with the Region, workgroup name, and secret ARN that you saved earlier.
  6. Run the following command to create the database objects that contain the user information and travel booking data:
    python3 ~/personalized-travel-itinerary-planner/core/redshift_ddl.py

This command creates the travel schema along with the tables named user_profile and hotel_booking.

  1. Run the following command to launch the web service:
    streamlit run ~/personalized-travel-itinerary-planner/core/chatbot_app.py --server.port=8080 &

In the next steps, you create a user account to log in to the app.

  1. On the Amazon Cognito console, choose User pools in the navigation pane.
  2. Select the user pool that was created as part of the CloudFormation stack (travelplanner-user-pool).
  3. Choose Create user.
  4. Enter a user name, email, and password, then choose Create user.

Now you can update the callback URL in Amazon Cognito.

  1. On the travelplanner-user-pool user pool details page, navigate to the App integration tab.
  2. In the App client list section, choose the client that you created (travelplanner-client).
  3. In the Hosted UI section, choose Edit.
  4. For URL, enter the URL that you copied from the CloudFormation stack output (make sure to use lowercase).
  5. Choose Save changes.

Test the solution

Now we can test the bot by asking it questions.

  1. In a new browser window, enter the URL you copied from the CloudFormation stack output and log in using the user name and password that you created. Change the password if prompted.
  2. Enter the user ID whose information you want to use (for this post, we use user ID 1028169).
  3. Ask any question to the bot.

The following are some example questions:

  • Can you plan a detailed itinerary for my July trip?
  • Should I carry a jacket for my upcoming trip?
  • Can you recommend some places to travel in March?

Using the user ID you provided, the prompt engineering module will extract the user details and design a prompt, along with the question asked by the user, as shown in the following screenshot.

The highlighted text in the preceding screenshot is the user-specific information that was extracted from the Redshift database and stitched together with some additional instructions. The elements of a good prompt such as instruction, context, input data, and output indicator are also called out.

After you pass this prompt to the LLM, we get the following output. In this example, the LLM created a custom travel itinerary for the specific dates of the user’s upcoming booking. It also took into account the user’s hobbies, interests, and favorite food while planning this itinerary.

Clean up

To avoid incurring ongoing charges, clean up your infrastructure.

  1. On the AWS CloudFormation console, choose Stacks in the navigation pane.
  2. Select the stack that you created and choose Delete.

Conclusion

In this post, we demonstrated how we can engineer prompts using data that is stored in Amazon Redshift and can be passed on to Amazon Bedrock to obtain an optimized response. This solution provides a simplified approach for building a generative AI application using proprietary data residing in your own database. By engineering tailored prompts based on the data in Amazon Redshift and having Amazon Bedrock generate responses, you can take advantage of generative AI in a customized way using your own datasets. This allows for more specific, relevant, and optimized output than would be possible with more generalized prompts. The post shows how you can integrate AWS services to create a generative AI solution that unleashes the full potential of these technologies with your data.

Stay up to date with the latest advancements in generative AI and start building on AWS. If you’re seeking assistance on how to begin, check out the Generative AI Innovation Center.


About the Authors

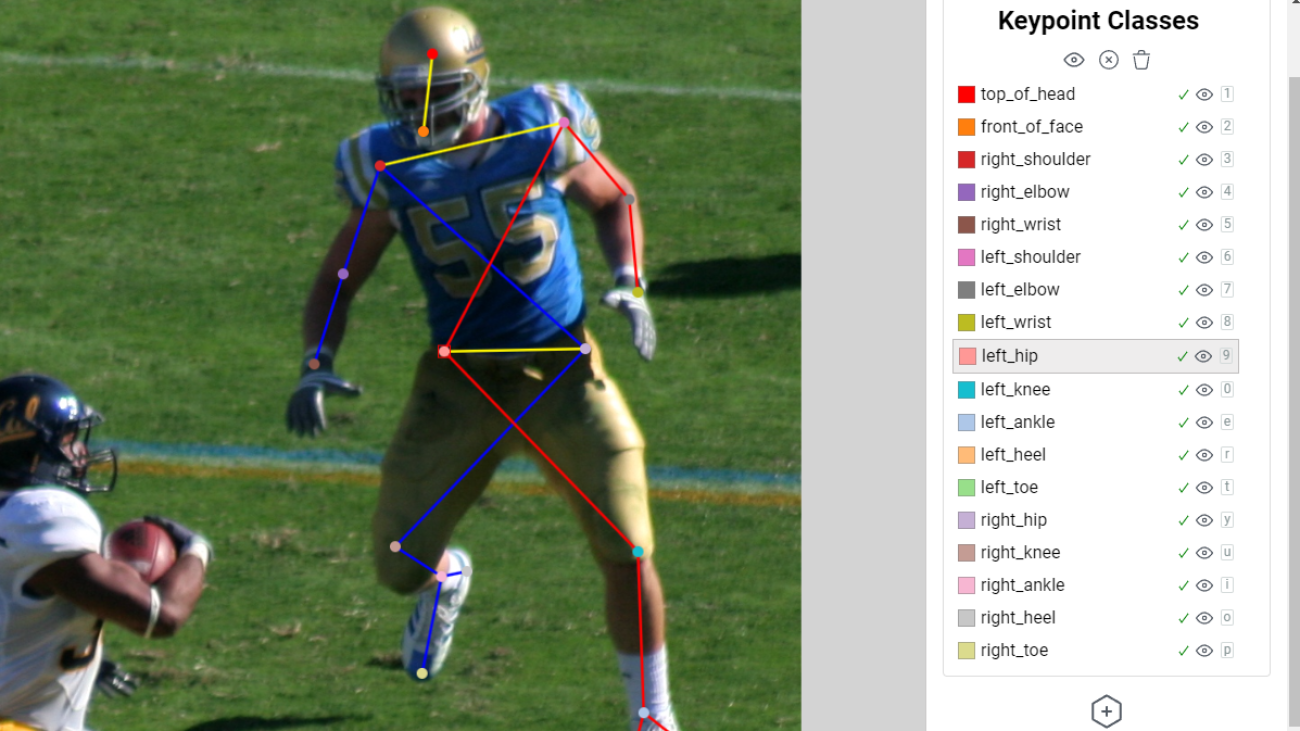
Ravikiran Rao is a Data Architect at AWS and is passionate about solving complex data challenges for various customers. Outside of work, he is a theatre enthusiast and an amateur tennis player.

Jigna Gandhi is a Sr. Solutions Architect at Amazon Web Services, based in the Greater New York City area. She has over 15 years of strong experience in leading several complex, highly robust, and massively scalable software solutions for large-scale enterprise applications.

Jason Pedreza is a Senior Redshift Specialist Solutions Architect at AWS with data warehousing experience handling petabytes of data. Prior to AWS, he built data warehouse solutions at Amazon.com and Amazon Devices. He specializes in Amazon Redshift and helps customers build scalable analytic solutions.

Roopali Mahajan is a Senior Solutions Architect with AWS based out of New York. She thrives on serving as a trusted advisor for her customers, helping them navigate their journey on cloud. Her day is spent solving complex business problems by designing effective solutions using AWS services. During off-hours, she loves to spend time with her family and travel.

Read More

Speak Like a Native: NVIDIA Parlays Win in Voice Challenge

Speak Like a Native: NVIDIA Parlays Win in Voice Challenge

Thanks to their work driving AI forward, Akshit Arora and Rafael Valle could someday speak to their spouses’ families in their native languages.

Arora and Valle — along with colleagues Sungwon Kim and Rohan Badlani — won the LIMMITS ’24 challenge which asks contestants to recreate in real time a speaker’s voice in English or any of six languages spoken in India with the appropriate accent. Their novel AI model only required a three-second speech sample.

The NVIDIA team advanced the state of the art in an emerging field of personalized voice interfaces for more than a billion native speakers of Bengali, Chhattisgarhi, Hindi, Kannada, Marathi and Telugu.

Making Voice Interfaces Realistic

The technology for personalized text-to-speech translation is a work in progress. Existing services sometimes fail to accurately reflect the accents of the target language or nuances of the speaker’s voice.

The challenge judged entries by listening for the naturalness of models’ resulting speech and its similarity to the original speaker’s voice.

The latest improvements promise personalized, realistic conversations and experiences that break language barriers. Broadcasters, telcos, universities, as well as e-commerce and online gaming services are eager to deploy such technology to create multilingual movies, lectures and virtual agents.

“We demonstrated we can do this at a scale not previously seen,” said Arora, who has two uses close to his heart.

Breaking Down Linguistic Barriers

A senior data scientist who supports one of NVIDIA’s biggest customers, Arora speaks Punjabi, while his wife and her family are native Tamil speakers.

It’s a gulf he’s long wanted to bridge for himself and others. “I had classmates who knew their native languages much better than the Hindi and English used in school, so they struggled to understand class material,” he said.

The gulf crosses continents for Valle, a native of Brazil whose wife and family speak Gujarati, a language popular in west India.

“It’s a problem I face every day,” said Valle, an AI researcher with degrees in computer music and machine listening and improvisation. “We’ve tried many products to help us have clearer conversations.”

Badlani, an AI researcher, said living in seven different Indian states, each with its own popular language, inspired him to work in the field.

A Race to the Finish Line

The initiative started nearly two years ago when Arora and Badlani formed the four-person team to work on the very different version of the challenge that would be held in 2023.

Their efforts generated a working code base for the so-called Indic languages. But getting to the win announced in January required a full-on sprint because the 2024 challenge didn’t get on the team’s radar until 15 days before the deadline.

Luckily, Kim, a deep learning researcher in NVIDIA’s Seoul office, had been working for some time on an AI model well suited to the challenge.

A specialist in text-to-speech voice synthesis, Kim was designing a so-called P-Flow model prior to starting his second internship at NVIDIA in 2023. P-Flow models borrow the technique large language models employ of using short voice samples as prompts so they can respond to new inputs without retraining.

“I created the model for English, but we were able to generalize it for any language,” he said.

“We were talking and texting about this model even before he started at NVIDIA,” said Valle, who mentored Kim in two internships before he joined full time in January.

Giving Others a Voice

P-Flow will soon be part of NVIDIA Riva, a framework for building multilingual speech and translation AI software, included in the NVIDIA AI Enterprise software platform.

The new capability will let users deploy the technology inside their data centers, on personal systems or in public or private cloud services. Today, voice translation services typically run on public cloud services.

“I hope our customers are inspired to try this technology,” Arora said. “I enjoy being able to showcase in challenges like this one the work we do every day.”

The contest is part of an initiative to develop open-source datasets and AI models for nine languages most widely spoken in India.

Hear Arora and Badlani share their experiences in a session at GTC next month.

And listen to the results of the team’s model below, starting with a three-second sample of a native Kannada speaker:


Here’s a similar-sounding synthesized voice reading the first sentence of this blog in Hindi:


And then in English:

See notice regarding software product information.

Read More

How the Ohio Supercomputer Center Drives the Future of Computing

How the Ohio Supercomputer Center Drives the Future of Computing

NASCAR races are all about speed, but even the fastest cars need to factor in safety, especially as rules and tracks change. The Ohio Supercomputer Center is ready to help. In this episode of NVIDIA’s AI Podcast, host Noah Kravitz speaks with Alan Chalker, the director of strategic programs at the OSC, about all things supercomputing. The center’s Open OnDemand program, which takes the form of a web-based interface, empowers Ohio higher education institutions and industries with accessible, reliable and secure computational services and training and educational programs. Chalker dives into the history and evolution of the OSC, and explains how it’s working with client companies like NASCAR, which is simulating race car designs virtually. Tune in to learn more about Chalker’s outlook on the future of supercomputing and OSC’s role in realizing it.

Time Stamps:

1:39: History of the Ohio Supercomputer Center
3:18: What are supercomputers?
5:08: How the Open OnDemand program came to be
11:50 How is Open OnDemand being used across higher education, industries?
22:45: OSC’s work with NASCAR
26:57: What’s on the horizon for Open OnDemand?

You Might Also Like…

MIT’s Anant Agarwal on AI in Education – Ep. 197

AI could help students work smarter, not harder. Anant Agarwal, founder of edX and Chief Platform Officer at 2U, shares his vision for the future of online education and the impact of AI in revolutionizing the learning experience.

UF Provost Joe Glover on Building a Leading AI University – Ep. 186

Joe Glover, provost and senior vice president of academic affairs at the University of Florida, discusses the university’s efforts to implement AI across all aspects of higher education, including a public-private partnership with NVIDIA that has helped transform UF into one of the leading AI universities in the country.

NVIDIA’s Marc Hamilton on Building the Cambridge-1 Supercomputer During a Pandemic – Ep. 137

Cambridge-1, U.K.’s most powerful supercomputer, ranks among the world’s top 3 most energy-efficient supercomputers and was built to help healthcare researchers make new discoveries. Marc Hamilton, vice president of solutions architecture and engineering at NVIDIA, speaks on how he remotely oversaw its construction.

Subscribe to the AI Podcast

Get the AI Podcast through iTunes, Google Podcasts, Google Play, Amazon Music, Castbox, DoggCatcher, Overcast, PlayerFM, Pocket Casts, Podbay, PodBean, PodCruncher, PodKicker, Soundcloud, Spotify, Stitcher and TuneIn.

Make the AI Podcast better: Have a few minutes to spare? Fill out this listener survey.

Read More