Reducing Model Checkpointing Times by Over 10x with PyTorch Distributed Asynchronous Checkpointing

Reducing Model Checkpointing Times by Over 10x with PyTorch Distributed Asynchronous Checkpointing

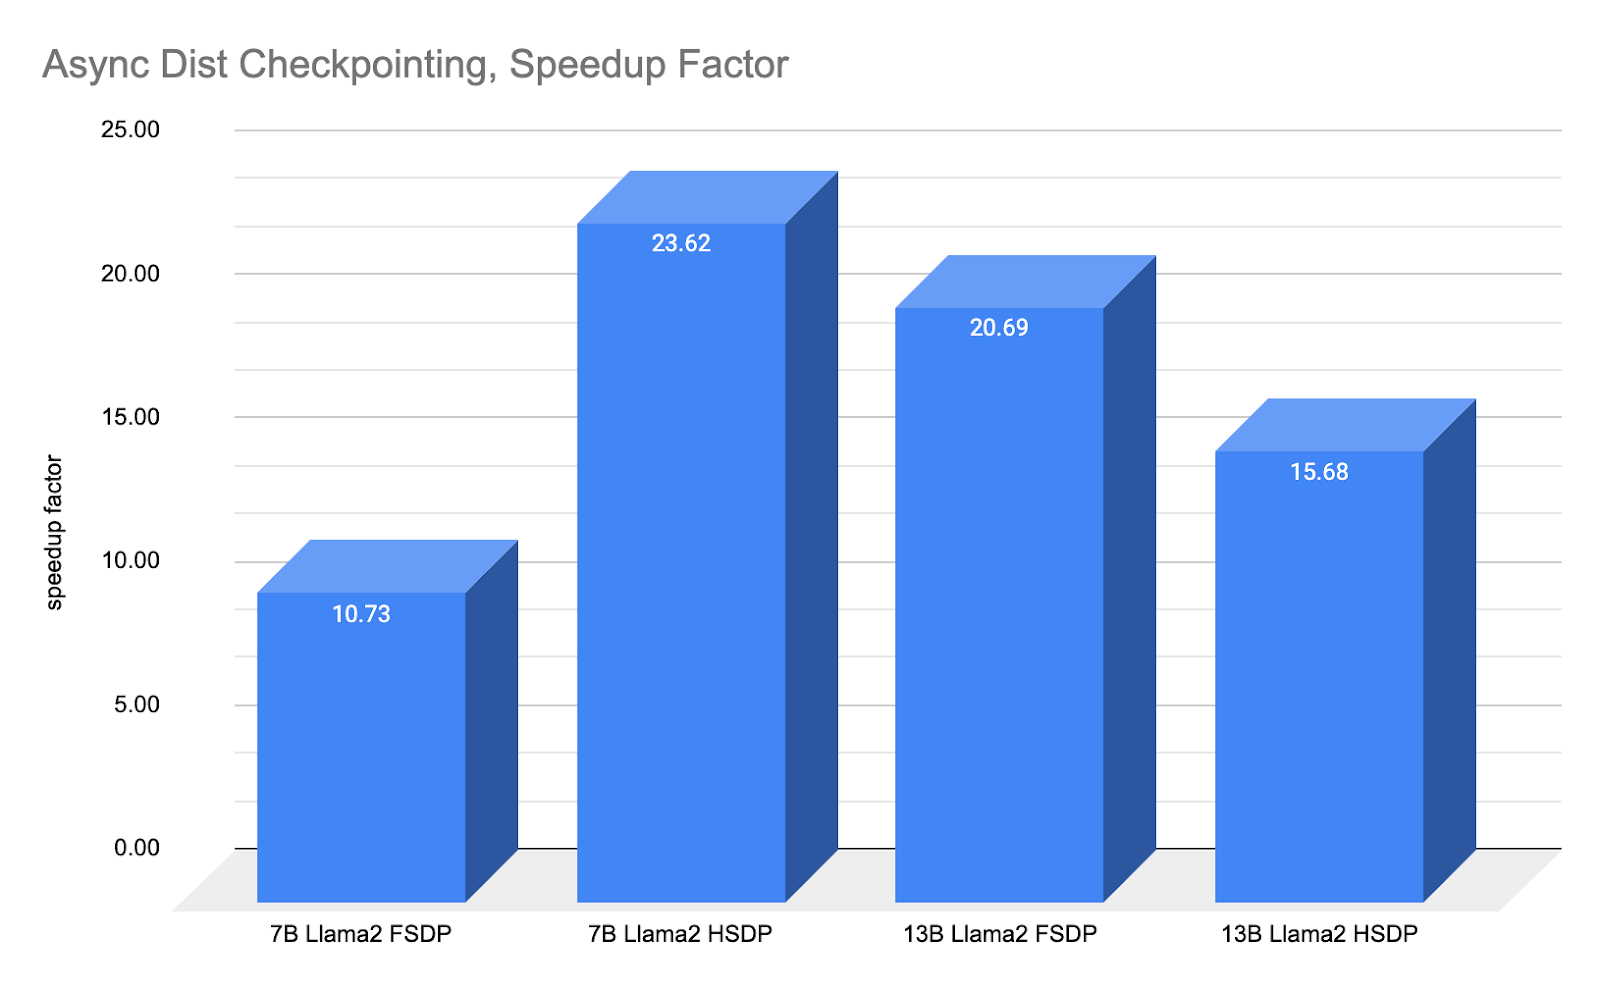
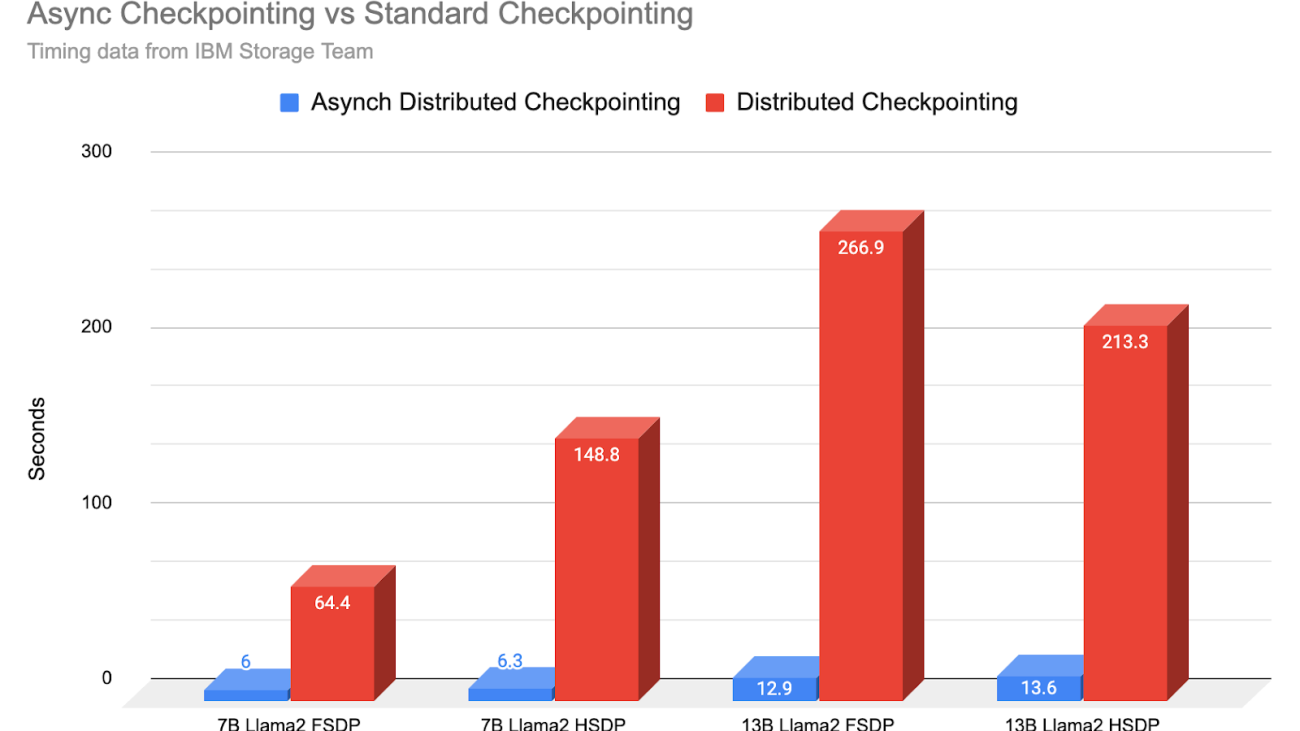
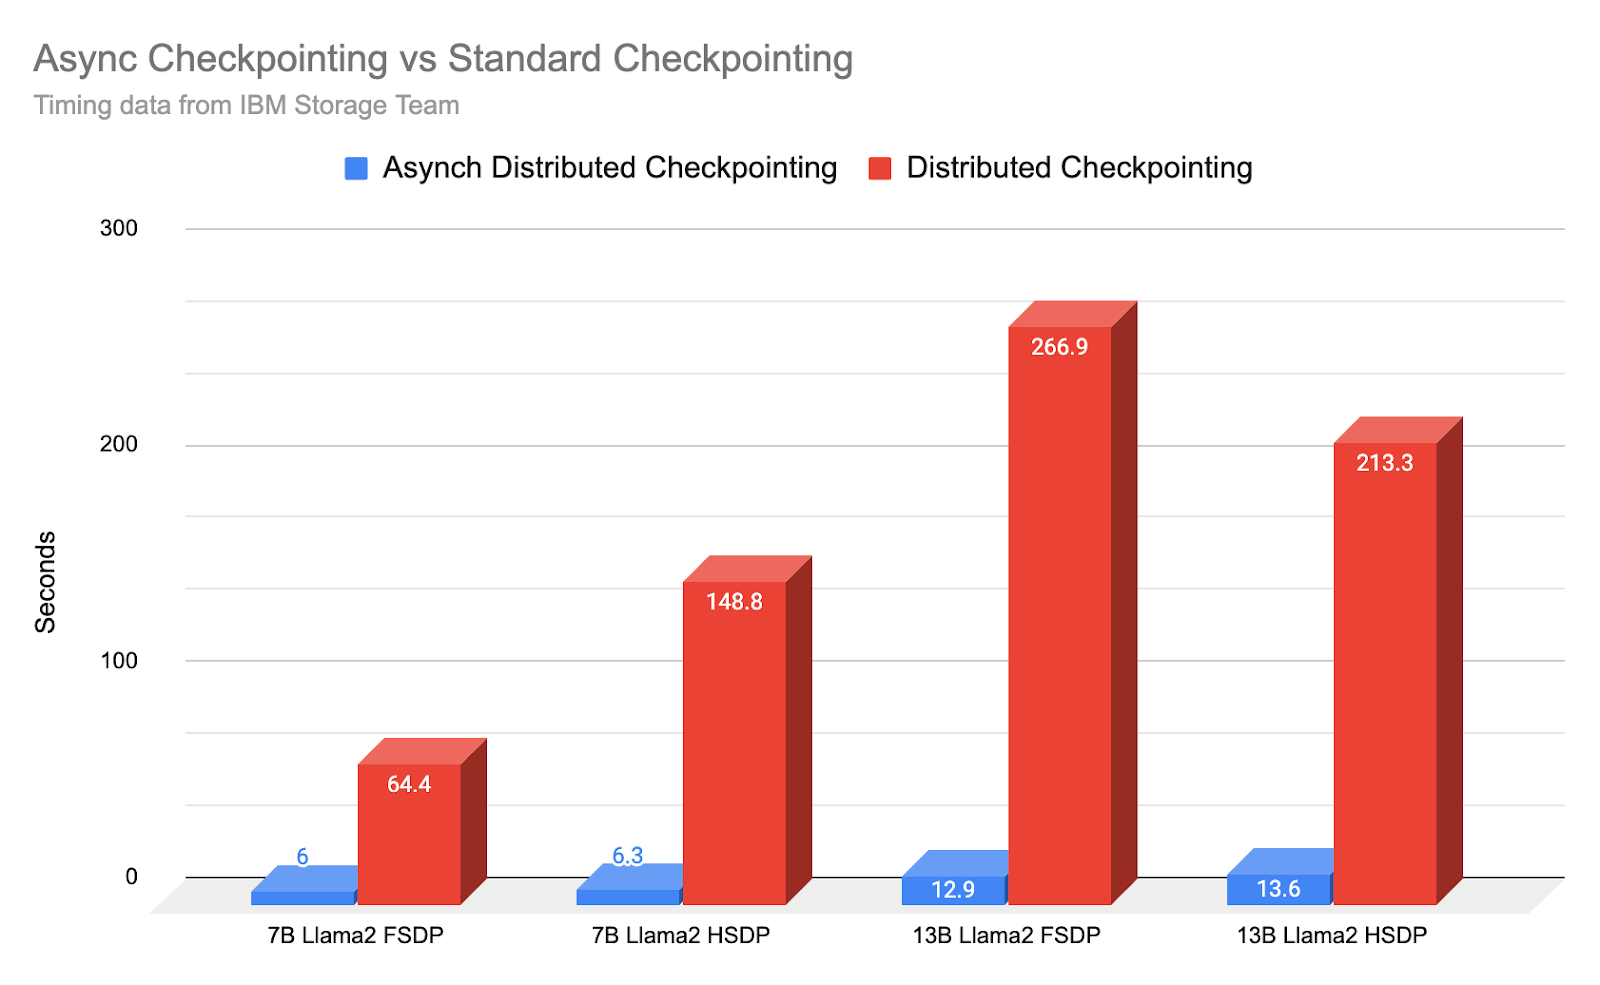
Summary: With PyTorch distributed’s new asynchronous checkpointing feature, developed with feedback from IBM, we show how IBM Research Team is able to implement and reduce effective checkpointing time by a factor of 10-20x. Example: 7B model ‘down time’ for a checkpoint goes from an average of 148.8 seconds to 6.3 seconds, or 23.62x faster.

This directly translates into either more net training progress for every given 24 hour period while continuing to robustly checkpoint or more frequent checkpoints to shorten recovery window/time.

In this note, we showcase the usage code and architecture that makes asynchronous checkpointing possible, along with timing results verified by IBM’s Research team.

Async Checkpointing vs Standard Checkpointing

Model checkpointing is a vital part of large model training, but checkpointing is an expensive process as each checkpoint process involves blocking training progress in order to save out the latest model weights. However, not checkpointing or reducing checkpointing frequency can result in a significant loss in training progress. For example, failures such as a deadlock, straggler, and gpu errors require the training process to be restarted. In order to restart from a failure, all (training) workers must stop their training process and be restarted from the last saved checkpoint.

Thus, the inherent tension between robustness to failures vs training progress plays out as a tradeoff, but now with asynchronous checkpointing, PyTorch Distributed is able to significantly reduce this tension and enable frequent checkpoint with minimal impact to the overall training time.

For background, it was almost exactly a year ago that we showcased how distributed checkpointing had massively sped up checkpointing times from the original torch.save() functionality. As IBM Research had noted, torch.save could take up to 30 minutes to checkpoint a single 11B model (PyTorch 1.13).

With advancements in distributed checkpointing, checkpoints could be done in under 4 minutes for up to 30B model sizes.

With asynchronous checkpointing, the training time lost due to checkpointing now moves to under 30 seconds, and often as short as 6 seconds.

To be clear, asynchronous checkpointing does not compress the actual serialization checkpointing time as the previous update showcased. Rather it moves the final checkpointing process off the critical path (to cpu threads) to allow GPU training to continue while finalizing the checkpoint under separate threads.

However, to the user, the effect is nearly the same in that down time for training due to checkpointing is substantially reduced, in many cases by 10x or even 20x.

Async Dist Checkpointing

As the above speedup chart shows, asynchronous checkpointing produces a 10x to 23x further improvement over the previous large improvements from a year ago.

How does Asynchronous Checkpointing work?

Asynchronous checkpointing modularizes the checkpointing process into two parts rather than one monolithic process. The first phase copies the data from each gpu/rank from GPU to CPU. This is the visible downtime to the user and can take from 6 – 14 seconds for 7B-13B model sizes. The second phase asynchronously copies the data from CPU memory to disk to persist the checkpoint.

Once data is copied to CPU in the first phase, the GPU is free to immediately resume training. Hence with asynchronous checkpointing the downtime for checkpointing is simply the time needed to copy over the latest model states to CPU.

At the same time that training resumes, non-blocking CPU threads work with the freshly arrived data in memory to complete the full checkpointing/serialization process to disk (i.e. persistent save).

flow diagram

Note that PyTorch’s Distributed Checkpointer relies on collective communication calls to per-rank metadata necessary to optimize saves, as well as a final synchronization which marks checkpointing as complete and makes the action atomic. This can interfere with distributed training (as distributed training also relies upon similar calls to synchronize training across multiple GPUs) if the Checkpointing thread utilizes the same process group used for training.

Specifically, a race condition between the calls could potentially cause training and asynch checkpointing save threads to wait on collective calls at the same time, resulting in a true collective hang.

We avoided this scenario by initializing a separate process group for async checkpointing. This separates the checkpointing collectives into their own logical process group, which thus ensures it will not interfere with collective calls in the main training threads.

How do I use Asynchronous Checkpointing in my training?

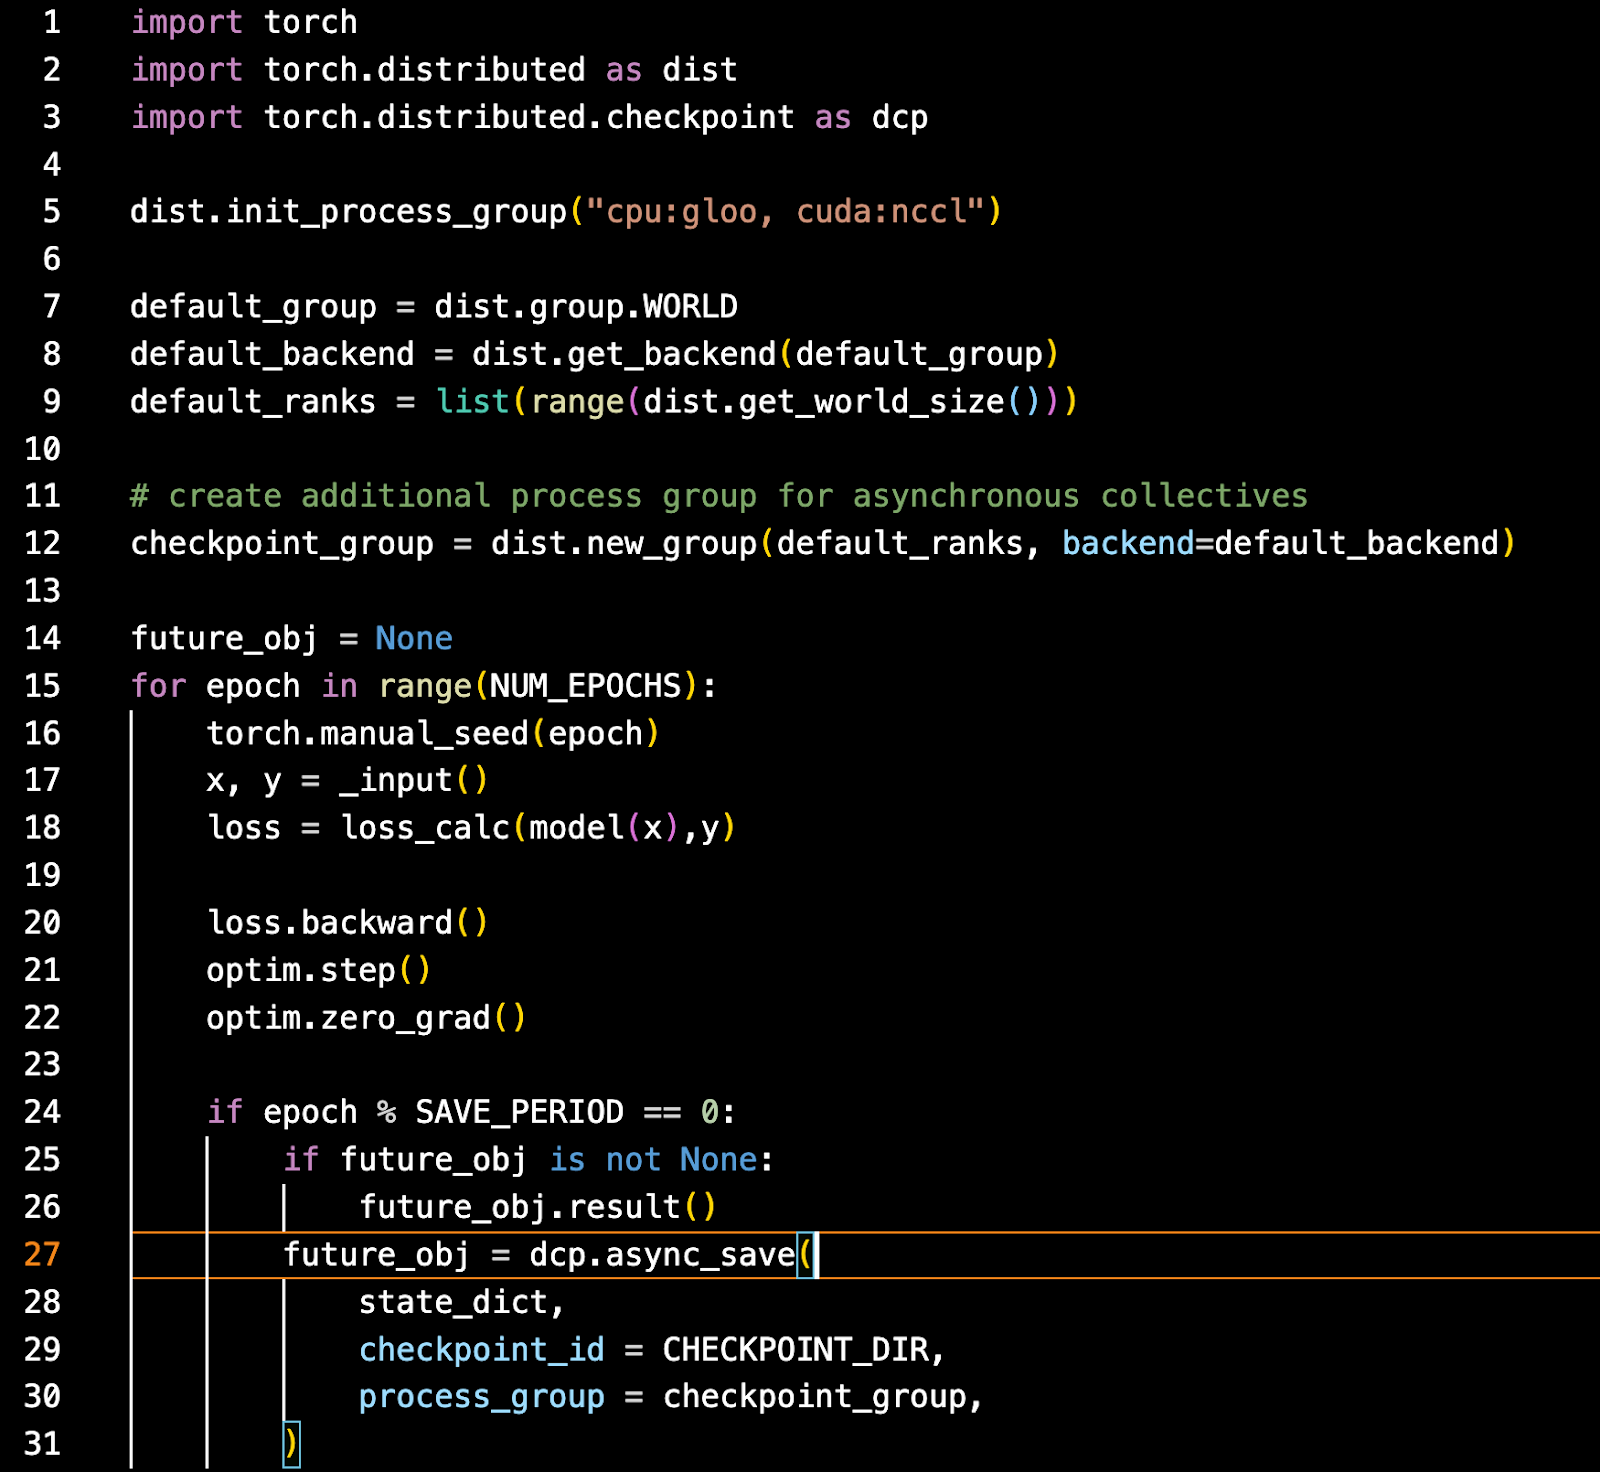
Usage of Asynchronous checkpointing is relatively straightforward. Using the latest nightly version of PyTorch, you will want to initialize your process group with both nccl and gloo. Gloo is required for the cpu threads portion.

From there, create a duplicate process group which the asynchronous checkpointing will utilize.
Then train as usual but at the point when you want to checkpoint, use the asynchronous save api, passing in the states to save, the checkpoint id and the checkpoint process group.

Code snippet

Asynchronous checkpointing is also fully implemented in torchtitan. Here, it is implemented for use with pre-training your own Llama2 or Lllama3 model. Using it is as simple as updating the toml config file:

Code snippet

Future work

Checkpointing has made huge strides over the past year. Moving from almost half an hour checkpoints to under 5 minutes with distributed checkpointing and now to under 30 seconds with asynchronous checkpointing.

The last frontier – zero overhead checkpointing where even the < 30 seconds is eliminated by streaming the updated weights during the backward pass such that checkpoint data is already on cpu at the point asynchronous checkpointing would kick in.

This would effectively move large model training to where checkpointing has no disruption or downtime enabling both more robustness (as checkpoints could be taken more frequently) and faster training progress due to no downtime for checkpointing.

Source code link: https://github.com/pytorch/pytorch/blob/main/torch/distributed/checkpoint/state_dict_saver.py

Read More

Evaluating the IWSLT2023 Speech Translation Tasks: Human Annotations, Automatic Metrics, and Segmentation

Human evaluation is a critical component in machine translation system development and has received much attention in text translation research. However, little prior work exists on the topic of human evaluation for speech translation, which adds additional challenges such as noisy data and segmentation mismatches. We take first steps to fill this gap by conducting a comprehensive human evaluation of the results of several shared tasks from the last International Workshop on Spoken Language Translation (IWSLT 2023). We propose an effective evaluation strategy based on automatic resegmentation…Apple Machine Learning Research

Improved Modelling of Federated Datasets using Mixtures-of-Dirichlet-Multinomials

In practice, training using federated learning can be orders of magnitude slower than standard centralized training. This severely limits the amount of experimentation and tuning that can be done, making it challenging to obtain good performance on a given task. Server-side proxy data can be used to run training simulations, for instance for hyperparameter tuning. This can greatly speed up the training pipeline by reducing the number of tuning runs to be performed overall on the true clients. However, it is challenging to ensure that these simulations accurately reflect the dynamics of the…Apple Machine Learning Research

Reimagining software development with the Amazon Q Developer Agent

Reimagining software development with the Amazon Q Developer Agent

Amazon Q Developer is an AI-powered assistant for software development that reimagines the experience across the entire software development lifecycle, making it faster to build, secure, manage, and optimize applications on or off of AWS. The Amazon Q Developer Agent includes an agent for feature development that automatically implements multi-file features, bug fixes, and unit tests in your integrated development environment (IDE) workspace using natural language input. After you enter your query, the software development agent analyzes your code base and formulates a plan to fulfill the request. You can accept the plan or ask the agent to iterate on it. After the plan is validated, the agent generates the code changes needed to implement the feature you requested. You can then review and accept the code changes or request a revision.

Amazon Q Developer uses generative artificial intelligence (AI) to deliver state-of-the-art accuracy for all developers, taking first place on the leaderboard for SWE-bench, a dataset that tests a system’s ability to automatically resolve GitHub issues. This post describes how to get started with the software development agent, gives an overview of how the agent works, and discusses its performance on public benchmarks. We also delve into the process of getting started with the Amazon Q Developer Agent and give an overview of the underlying mechanisms that make it a state-of-the-art feature development agent.

Getting started

To get started, you need to have an AWS Builder ID or be part of an organization with an AWS IAM Identity Center instance set up that allows you to use Amazon Q. To use Amazon Q Developer Agent for feature development in Visual Studio Code, start by installing the Amazon Q extension. The extension is also available for JetBrains, Visual Studio (in preview), and in the Command Line on macOS. Find the latest version on the Amazon Q Developer page.

Amazon Q App card in VS Code

After authenticating, you can invoke the feature development agent by entering /dev in the chat field.

Invoking /dev in Amazon Q

The feature development agent is now ready for your requests. Let’s use the repository of Amazon’s Chronos forecasting model to demonstrate how the agent works. The code for Chronos is already of high quality, but unit test coverage could be improved in places. Let’s ask the software development agent to improve the unit test coverage of the file chronos.py. Stating your request as clearly and precisely as you can will help the agent deliver the best possible solution.

/dev initial prompt

The agent returns a detailed plan to add missing tests in the existing test suite test/test_chronos.py. To generate the plan (and later the code change), the agent has explored your code base to understand how to satisfy your request. The agent will work best if the names of files and functions are descriptive of their intent.

Plan generated by the agent

You are asked to review the plan. If the plan looks good and you want to proceed, choose Generate code. If you find that it can be improved in places, you can provide feedback and request an improved plan.

The agent asking for plan validation

After the code is generated, the software development agent will list the files for which it has created a diff (for this post, test/test_chronos.py). You can review the code changes and decide to either insert them in your code base or provide feedback on possible improvements and regenerate the code.

List of files changed by the agent.

Choosing a modified file opens a diff view in the IDE showing which lines have been added or modified. The agent has added multiple unit tests for parts of chronos.py that were not previously covered.

the diff generated by the agent.

After you review the code changes, you can decide to insert them, provide feedback to generate the code again, or discard it altogether. That’s it; there is nothing else for you to do. If you want to request another feature, invoke dev again in Amazon Q Developer.

System overview

Now that we have shown you how to use Amazon Q Developer Agent for software development, let’s explore how it works. This is an overview of the system as of May 2024. The agent is continuously being improved. The logic described in this section will evolve and change.

When you submit a query, the agent generates a structured representation of the repository’s file system in XML. The following is an example output, truncated for brevity:

<tree>
  <directory name="requests">
    <file name="README.rst"/>
    <directory name="requests">
      <file name="adapters.py"/>
      <file name="api.py"/>
      <file name="models.py"/>
      <directory name="packages">
        <directory name="chardet">
          <file name="charsetprober.py"/>
          <file name="codingstatemachine.py"/>
        </directory>
        <file name="__init__.py"/>
        <file name="README.rst"/>
        <directory name="urllib3">
          <file name="connectionpool.py"/>
          <file name="connection.py"/>
          <file name="exceptions.py"/>
          <file name="fields.py"/>
          <file name="filepost.py"/>
          <file name="__init__.py"/>
        </directory>
      </directory>
    </directory>
    <file name="setup.cfg"/>
    <file name="setup.py"/>
  </directory>
</tree>

An LLM then uses this representation with your query to determine which files are relevant and should be retrieved. We use automated systems to check that the files identified by the LLM are all valid. The agent uses the retrieved files with your query to generate a plan for how it will resolve the task you have assigned to it. This plan is returned to you for validation or iteration. After you validate the plan, the agent moves to the next step, which ultimately ends with a proposed code change to resolve the issue.

The content of each retrieved code file is parsed with a syntax parser to obtain an XML syntax tree representation of the code, which the LLM is capable of using more efficiently than the source code itself while using far fewer tokens. The following is an example of that representation. Non-code files are encoded and chunked using a logic commonly used in Retrieval Augmented Generation (RAG) systems to allow for the efficient retrieval of chunks of documentation.

The following screenshot shows a chunk of Python code.

A snippet of Python code

The following is its syntax tree representation.

A syntax tree representation of python code

The LLM is prompted again with the problem statement, the plan, and the XML tree structure of each of the retrieved files to identify the line ranges that need updating in order to resolve the issue. This approach allows you to be more frugal with your usage of LLM bandwidth.

The software development agent is now ready to generate the code that will resolve your issue. The LLM directly rewrites sections of code, rather than attempting to generate a patch. This task is much closer to those that the LLM was optimized to perform compared to attempting to directly generate a patch. The agent proceeds to some syntactic validation of the generated code and attempts to fix issues before moving to the final step. The original and rewritten code are passed to a diff library to generate a patch programmatically. This creates the final output that is then shared with you to review and accept.

System accuracy

In the press release announcing the launch of Amazon Q Developer Agent for feature development, we shared that the model scored 13.82% on SWE-bench and 20.33% on SWE-bench lite, putting it at the top of the SWE-bench leaderboard as of May 2024. SWE-bench is a public dataset of over 2,000 tasks from 12 popular Python open source repositories. The key metric reported in the leaderboard of SWE-bench is the pass rate: how often we see all the unit tests associated to a specific issue passing after an AI-generated code changes are applied. This is an important metric because our customers want to use the agent to solve real-world problems and we are proud to report a state-of-the-art pass rate.

A single metric never tells the whole story. We look at the performance of our agent as a point on the Pareto front over multiple metrics. The Amazon Q Developer Agent for software development is not specifically optimized for SWE-bench. Our approach focuses on optimizing for a range of metrics and datasets. For instance, we aim to strike a balance between accuracy and resource efficiency, such as the number of LLMs calls and input/output tokens used, because this directly impacts runtime and cost. In this regard, we take pride in our solution’s ability to consistently deliver results within minutes.

Limitations of public benchmarks

Public benchmarks such as SWE-bench are an incredibly useful contribution to the AI code generation community and present an interesting scientific challenge. We are grateful to the team releasing and maintaining this benchmark. We are proud to be able to share our state-of-the-art results on this benchmark. Nonetheless, we would like to call out a few limitations, which are not exclusive to SWE-bench.

The success metric for SWE-bench is binary. Either a code change passes all tests or it does not. We believe that this doesn’t capture the full value feature development agents can generate for developers. Agents save developers a lot of time even when they don’t implement the entirety of a feature at once. Latency, cost, number of LLM calls, and number of tokens are all highly correlated metrics that represent the computational complexity of a solution. This dimension is as important as accuracy for our customers.

The test cases included in the SWE-bench benchmark are publicly available on GitHub. As such, it’s possible that these test cases may have been used in the training data of various large language models. Although LLMs have the capability to memorize portions of their training data, it’s challenging to quantify the extent to which this memorization occurs and whether the models are inadvertently leaking this information during testing.

To investigate this potential concern, we have conducted multiple experiments to evaluate the possibility of data leakage across different popular models. One approach to testing memorization involves asking the models to predict the next line of an issue description given a very short context. This is a task that they should theoretically struggle with in the absence of memorization. Our findings indicate that recent models exhibit signs of having been trained on the SWE-bench dataset.

The following figure shows the distribution of rougeL scores when asking each model to complete the next sentence of an SWE-bench issue description given the preceding sentences.

RougeL scores to measure information leakage of SWE-bench on different models.

We have shared measurements of the performance of our software development agent on SWE-bench to offer a reference point. We recommend testing the agents on private code repositories that haven’t been used in the training of any LLMs and compare these results with the ones of publicly available baselines. We will continue benchmarking our system on SWE-bench while focusing our testing on private benchmarking datasets that haven’t been used to train models and that better represent the tasks submitted by our customers.

Conclusion

This post discussed how to get started with Amazon Q Developer Agent for software development. The agent automatically implements features that you describe with natural language in your IDE. We gave you an overview of how the agent works behind the scenes and discussed its state-of-the-art accuracy and position at the top of the SWE-bench leaderboard.

You are now ready to explore the capabilities of Amazon Q Developer Agent for software development and make it your personal AI coding assistant! Install the Amazon Q plugin in your IDE of choice and start using Amazon Q (including the software development agent) for free using your AWS Builder ID or subscribe to Amazon Q to unlock higher limits.


About the authors

Christian Bock is an applied scientist at Amazon Web Services working on AI for code.

Laurent Callot is a Principal Applied Scientist at Amazon Web Services leading teams creating AI solutions for developers.

Tim Esler is a Senior Applied Scientist at Amazon Web Services working on Generative AI and Coding Agents for building developer tools and foundational tooling for Amazon Q products.

Prabhu Teja is an Applied Scientist at Amazon Web Services. Prabhu works on LLM assisted code generation with a focus on natural language interaction.

Martin Wistuba is a senior applied scientist at Amazon Web Services. As part of Amazon Q Developer, he is helping developers to write more code in less time.

Giovanni Zappella is a Principal Applied Scientist working on the creations of intelligent agents for code generation. While at Amazon he also contributed to the creation of new algorithms for Continual Learning, AutoML and recommendations systems.

Read More

SIBYL: A machine learning-based framework for forecasting dynamic workloads

SIBYL: A machine learning-based framework for forecasting dynamic workloads

This paper was presented at the ACM SIGMOD/Principles of Database Systems Conference (opens in new tab) (SIGMOD/PODS 2024), the premier forum on large-scale data management and databases.

SIGMOD/PODS 2024 logo to the left of the first page of accepted paper,

In today’s fast-paced digital landscape, data analysts are increasingly dependent on analytics dashboards to monitor customer engagement and app performance. However, as data volumes increase, these dashboards can slow down, leading to delays and inefficiencies. One solution is to use software designed to optimize how data is physically stored and retrieved, but the challenge remains in anticipating the specific queries analysts will run, a task complicated by the dynamic nature of modern workloads.

In our paper, “SIBYL: Forecasting Time-Evolving Query Workloads,” presented at SIGMOD/PODS 2024, we introduce a machine learning-based framework designed to accurately predict queries in dynamic environments. This innovation allows traditional optimization tools, typically meant for static settings, to seamlessly adapt to changing workloads, ensuring consistent high performance as query demands evolve.

Spotlight: On-demand video

AI Explainer: Foundation models ​and the next era of AI

Explore how the transformer architecture, larger models and more data, and in-context learning have helped advance AI from perception to creation.


SIBYL’s design and features

SIBYL’s framework is informed by studies of real-world workloads, which show that most are dynamic but follow predicable patterns. We identified the following recurring patterns in how parameters change over time:

  • Trending: Queries that increase, decrease, or remain steady over time.
  • Periodic: Queries that occur at regular intervals, such as hourly or daily.
  • Combination: A mix of trending and periodic patterns.
  • Random: Queries with unpredictable patterns.

These insights, illustrated in Figure 1, form the basis of SIBYL’s ability to forecast query workloads, enabling databases to maintain peak efficiency even as usage patterns shift.

A figure illustrating the analysis of how parameter changes with query arrival times, identifying four common patterns. The Y-axis represents the query arrival time and the X-axis shows the parameter values. Section (a) shows the trending pattern, which includes increasing, decreasing trends. Section (b) displays the periodic pattern, characterized by a regular pattern with fixed intervals such as hourly, daily, or weekly. Section (c) combines the trending and periodic patterns, while section (d) represents the random pattern, indicating no regular or predictable pattern.
Figure 1. We studied the changing patterns and predictability of database queries by analyzing two weeks’ worth of anonymized data from Microsoft’s telemetry system, which guides decision-making for Microsoft products and services.

SIBYL uses machine learning to analyze historical data and parameters to predict queries and arrival times. SIBYL’s architecture, illustrated in Figure 2, operates in three phases:

  • Training: It uses historical query logs and arrival times to build machine learning models.
  • Forecasting: It employs pretrained models to predict future queries and their timing.
  • Incremental fine-tuning: It continuously adapts to new workload patterns through an efficient feedback loop.
The figure shows SIBYL’s three phases. The first phase is a training phase: it featurizes the past queries and their arrival time, and trains ML models from scratch. The second phase is forecasting phase: it continuously receives recent queries from the workload traces and employs the pre-trained ML models from the training phase to predict the queries within the next time interval along with their expected arrival time. The last phase is the Incremental fine-tuning, it monitors model accuracy and detects workload shifts (e.g., new types of queries emerging in the workload) via a feedback loop. It adjusts its models efficiently by fine-tuning incrementally on the shifted workload, without retraining from scratch.
Figure 2. An overview of SIBYL’s architecture.

Challenges and innovations in designing a forecasting framework

Designing an effective forecasting framework is challenging, particularly in managing the varying number of queries and the complexity of creating separate models for each type of query. SIBYL addresses these by grouping high-volume queries and clustering low-volume ones, supporting scalability and efficiency. As demonstrated in Figure 3, SIBYL consistently outperforms other forecasting models, maintaining accuracy over different time intervals and proving its effectiveness in dynamic workloads.

The figure presents a comprehensive comparison of four forecasting models across three different workloads: Telemetry, SCOPE, and BusTracker, and Sales dataset. The models compared are History-Based, Random Forest, Vanilla LSTM, and Sibyl-LSTMs. These models are evaluated based on three metrics: Recall, Precision, and F-1 Score. Each metric is represented in a separate column, while the workloads are organized in rows. The evaluation is done over different forecast intervals: 1 Hour, 6 Hours, 12 Hours, and 1 Day. 

Sibyl-LSTMs surpasses other forecasting models and maintains stable accuracy across various time intervals settings. Vanilla LSTM and Random Forecast perform poorly on the Sales workload, which has more outliers and more unstable patterns. For Telemetry workload, the history-based method performs well with the 12-hour interval due to the workload’s recurrent queries that have the same parameter values within a day (between the past 12-hour window and the future 12-hour window). But this method is ineffective with the one-day interval, as many query parameter values change when crossing the day boundary. The history-based method yields unsatisfactory results for the other three workloads that exhibit more rapid and intricate evolution and involve time-related parameters that operate on a finer time scale. Therefore, it is imperative to use an ML-based forecasting model to handle the evolving workload.
Figure 3. SIBYL-LSTM’s accuracy compared with other models in forecasting queries for the next time interval.

SIBYL adapts to changes in workload patterns by continuously learning, retaining high accuracy with minimal adjustments. As shown in Figure 4, the model reaches 95% accuracy after fine-tuning in just 6.4 seconds, nearly matching its initial accuracy of 95.4%.

The figure consists of two parts a and b.  (a) depicts a pattern change of a parameter in the Telemetry workload. The Y-axis represents the query arrival time and the X-axis shows the parameter values. The shift in the patten starts from May 13 (highlighted in light blue), which Sibyl detects by observing the decline in accuracy. The model accuracy on the shifted pattern is 51.9%, which falls below the threshold 𝛼 = 75%, triggering model fine-tuning.  Figure 11 (b) shows that Sibyl fine-tunes the Sibyl-LSTMs by incrementally training on newly observed data, rather than training from scratch. The Y-axis represents recall, and the X-axis shows the number of epochs. Th figure demonstrates that the model converges in just two epochs, taking 6.4 seconds of overhead, and improves accuracy to 95.0%, which is close to the pre-trained accuracy of 95.4%.
Figure 4. Fine-tuning results on telemetry workload changes.

To address slow dashboard performance, we tested SIBYL by using it to create materialized views—special data structures that make queries run faster. These views identify common tasks and recommend which ones to store in advance, expediting future queries.

We trained SIBYL using 2,237 queries from anonymized Microsoft sales data over 20 days, enabling us to create materialized views for the following day. Using historical data improved query performance 1.06 times, while SIBYL’s predictions achieved a 1.83-time increase. This demonstrates that SIBYL’s ability to forecast future workloads can significantly improve database performance.

Implications and looking ahead

SIBYL’s ability to predict dynamic workloads has numerous applications beyond improving materialized views. It can help organizations efficiently scale resources, leading to reduced costs. It can also improve query performance by automatically organizing data, ensuring that the most frequently accessed data is always available. Moving forward, we plan to integrate more machine learning techniques, making SIBYL even more efficient, reducing the effort needed for setup, and improving how databases handle dynamic workloads, making them faster and more reliable.

Acknowledgments

We would like to thank our paper co-authors for their valuable contributions and efforts: Jyoti Leeka, Alekh Jindal, and Jishen Zhao.

The post SIBYL: A machine learning-based framework for forecasting dynamic workloads appeared first on Microsoft Research.

Read More

Get started quickly with AWS Trainium and AWS Inferentia using AWS Neuron DLAMI and AWS Neuron DLC

Get started quickly with AWS Trainium and AWS Inferentia using AWS Neuron DLAMI and AWS Neuron DLC

Starting with the AWS Neuron 2.18 release, you can now launch Neuron DLAMIs (AWS Deep Learning AMIs) and Neuron DLCs (AWS Deep Learning Containers) with the latest released Neuron packages on the same day as the Neuron SDK release. When a Neuron SDK is released, you’ll now be notified of the support for Neuron DLAMIs and Neuron DLCs in the Neuron SDK release notes, with a link to the AWS documentation containing the DLAMI and DLC release notes. In addition, this release introduces a number of features that help improve user experience for Neuron DLAMIs and DLCs. In this post, we walk through some of the support highlights with Neuron 2.18.

Neuron DLC and DLAMI overview and announcements

The DLAMI is a pre-configured AMI that comes with popular deep learning frameworks like TensorFlow, PyTorch, Apache MXNet, and others pre-installed. This allows machine learning (ML) practitioners to rapidly launch an Amazon Elastic Compute Cloud (Amazon EC2) instance with a ready-to-use deep learning environment, without having to spend time manually installing and configuring the required packages. The DLAMI supports various instance types, including Neuron Trainium and Inferentia powered instances, for accelerated training and inference.

AWS DLCs provide a set of Docker images that are pre-installed with deep learning frameworks. The containers are optimized for performance and available in Amazon Elastic Container Registry (Amazon ECR). DLCs make it straightforward to deploy custom ML environments in a containerized manner, while taking advantage of the portability and reproducibility benefits of containers.

Multi-Framework DLAMIs

The Neuron Multi-Framework DLAMI for Ubuntu 22 provides separate virtual environments for multiple ML frameworks: PyTorch 2.1, PyTorch 1.13, Transformers NeuronX, and TensorFlow 2.10. DLAMI offers you the convenience of having all these popular frameworks readily available in a single AMI, simplifying their setup and reducing the need for multiple installations.

This new Neuron Multi-Framework DLAMI is now the default choice when launching Neuron instances for Ubuntu through the AWS Management Console, making it even faster for you to get started with the latest Neuron capabilities right from the Quick Start AMI list.

Existing Neuron DLAMI support

The existing Neuron DLAMIs for PyTorch 1.13 and TensorFlow 2.10 have been updated with the latest 2.18 Neuron SDK, making sure you have access to the latest performance optimizations and features for both Ubuntu 20 and Amazon Linux 2 distributions.

AWS Systems Manager Parameter Store support

Neuron 2.18 also introduces support in Parameter Store, a capability of AWS Systems Manager, for Neuron DLAMIs, allowing you to effortlessly find and query the DLAMI ID with the latest Neuron SDK release. This feature streamlines the process of launching new instances with the most up-to-date Neuron SDK, enabling you to automate your deployment workflows and make sure you’re always using the latest optimizations.

Availability of Neuron DLC Images in Amazon ECR

To provide customers with more deployment options, Neuron DLCs are now hosted both in the public Neuron ECR repository and as private images. Public images provide seamless integration with AWS ML deployment services such as Amazon EC2, Amazon Elastic Container Service (Amazon ECS), and Amazon Elastic Kubernetes Service (Amazon EKS); private images are required when using Neuron DLCs with Amazon SageMaker.

Updated Dockerfile locations

Prior to this release, Dockerfiles for Neuron DLCs were located within the AWS/Deep Learning Containers repository. Moving forward, Neuron containers can be found in the AWS-Neuron/ Deep Learning Containers repository.

Improved documentation

The Neuron SDK documentation and AWS documentation sections for DLAMI and DLC now have up-to-date user guides about Neuron. The Neuron SDK documentation also includes a dedicated DLAMI section with guides on discovering, installing, and upgrading Neuron DLAMIs, along with links to release notes in AWS documentation.

Using the Neuron DLC and DLAMI with Trn and Inf instances

AWS Trainium and AWS Inferentia are custom ML chips designed by AWS to accelerate deep learning workloads in the cloud.

You can choose your desired Neuron DLAMI when launching Trn and Inf instances through the console or infrastructure automation tools like AWS Command Line Interface (AWS CLI). After a Trn or Inf instance is launched with the selected DLAMI, you can activate the virtual environment corresponding to your chosen framework and begin using the Neuron SDK. If you’re interested in using DLCs, refer to the DLC documentation section in the Neuron SDK documentation or the DLC release notes section in the AWS documentation to find the list of Neuron DLCs with the latest Neuron SDK release. Each DLC in the list includes a link to the corresponding container image in the Neuron container registry. After choosing a specific DLC, please refer to the DLC walkthrough in the next section to learn how to launch scalable training and inference workloads using AWS services like Kubernetes (Amazon EKS), Amazon ECS, Amazon EC2, and SageMaker. The following sections contain walkthroughs for both the Neuron DLC and DLAMI.

DLC walkthrough

In this section, we provide resources to help you use containers for your accelerated deep learning model acceleration on top of AWS Inferentia and Trainium enabled instances.

The section is organized based on the target deployment environment and use case. In most cases, it is recommended to use a preconfigured DLC from AWS. Each DLC is preconfigured to have all the Neuron components installed and is specific to the chosen ML framework.

Locate the Neuron DLC image

The PyTorch Neuron DLC images are published to ECR Public Gallery, which is the recommended URL to use for most cases. If you’re working within SageMaker, use the Amazon ECR URL instead of the Amazon ECR Public Gallery. TensorFlow DLCs are not updated with the latest release. For earlier releases, refer to Neuron Containers. In the following sections, we provide the recommended steps for running an inference or training job in Neuron DLCs.

Prerequisites

Prepare your infrastructure (Amazon EKS, Amazon ECS, Amazon EC2, and SageMaker) with AWS Inferentia or Trainium instances as worker nodes, making sure they have the necessary roles attached for Amazon ECR read access to retrieve container images from Amazon ECR: arn:aws:iam::aws:policy/AmazonEC2ContainerRegistryReadOnly.

When setting up hosts for Amazon EC2 and Amazon ECS, using Deep Learning AMI (DLAMI) is recommended. An Amazon EKS optimized GPU AMI is recommended to use in Amazon EKS.

You also need the ML job scripts ready with a command to invoke them. In the following steps, we use a single file, train.py, as the ML job script. The command to invoke it is torchrun —nproc_per_node=2 —nnodes=1 train.py.

Extend the Neuron DLC

Extend the Neuron DLC to include your ML job scripts and other necessary logic. As the simplest example, you can have the following Dockerfile:

FROM public.ecr.aws/neuron/pytorch-training-neuronx:2.1.2-neuronx-py310-sdk2.18.2-ubuntu20.04

COPY train.py /train.py

This Dockerfile uses the Neuron PyTorch training container as a base and adds your training script, train.py, to the container.

Build and push to Amazon ECR

Complete the following steps:

  1. Build your Docker image:
    docker build -t <your-repo-name>:<your-image-tag> 

  2. Authenticate your Docker client to your ECR registry:
    aws ecr get-login-password --region <your-region> | docker login --username AWS --password-stdin <your-aws-account-id>.dkr.ecr.<your-region>.amazonaws.com

  3. Tag your image to match your repository:
    docker tag <your-repo-name>:<your-image-tag> <your-aws-account-id>.dkr.ecr.<your-region>.amazonaws.com/<your-repo-name>:<your-image-tag>

  4. Push this image to Amazon ECR:
    docker push <your-aws-account-id>.dkr.ecr.<your-region>.amazonaws.com/<your-repo-name>:<your-image-tag>

You can now run the extended Neuron DLC in different AWS services.

Amazon EKS configuration

For Amazon EKS, create a simple pod YAML file to use the extended Neuron DLC. For example:

apiVersion: v1
kind: Pod
metadata:
  name: training-pod
spec:
  containers:
  - name: training-container
    image: <your-aws-account-id>.dkr.ecr.<your-region>.amazonaws.com/<your-repo-name>:<your-image-tag>
    command: ["torchrun"]
    args: ["--nproc_per_node=2", "--nnodes=1", "/train.py"]
    resources:
      limits:
        aws.amazon.com/neuron: 1
      requests:
        aws.amazon.com/neuron: 1

Use kubectl apply -f <pod-file-name>.yaml to deploy this pod in your Kubernetes cluster.

Amazon ECS configuration

For Amazon ECS, create a task definition that references your custom Docker image. The following is an example JSON task definition:

{
    "family": "training-task",
    "requiresCompatibilities": ["EC2"],
    "containerDefinitions": [
        {
            "command": [
                "torchrun --nproc_per_node=2 --nnodes=1 /train.py"
            ],
            "linuxParameters": {
                "devices": [
                    {
                        "containerPath": "/dev/neuron0",
                        "hostPath": "/dev/neuron0",
                        "permissions": [
                            "read",
                            "write"
                        ]
                    }
                ],
                "capabilities": {
                    "add": [
                        "IPC_LOCK"
                    ]
                }
            },
            "cpu": 0,
            "memoryReservation": 1000,
            "image": "<your-aws-account-id>.dkr.ecr.<your-region>.amazonaws.com/<your-repo-name>:<your-image-tag>",
            "essential": true,
            "name": "training-container",
        }
    ]
}

This definition sets up a task with the necessary configuration to run your containerized application in Amazon ECS.

Amazon EC2 configuration

For Amazon EC2, you can directly run your Docker container:

docker run --name training-job --device=/dev/neuron0 <your-aws-account-id>.dkr.ecr.<your-region>.amazonaws.com/<your-repo-name>:<your-image-tag> "torchrun --nproc_per_node=2 --nnodes=1 /train.py"

SageMaker configuration

For SageMaker, create a model with your container and specify the training job command in the SageMaker SDK:

import sagemaker
from sagemaker.pytorch import PyTorch
role = sagemaker.get_execution_role()
pytorch_estimator = PyTorch(entry_point='train.py',
                            role=role,
                            image_uri='<your-aws-account-id>.dkr.ecr.<your-region>.amazonaws.com/<your-repo-name>:<your-image-tag>',
                            instance_count=1,
                            instance_type='ml.trn1.2xlarge',
                            framework_version='2.1.2',
                            py_version='py3',
                            hyperparameters={"nproc-per-node": 2, "nnodes": 1},
                            script_mode=True)
pytorch_estimator.fit()

DLAMI walkthrough

This section walks through launching an Inf1, Inf2, or Trn1 instance using the Multi-Framework DLAMI in the Quick Start AMI list and getting the latest DLAMI that supports the newest Neuron SDK release easily.

The Neuron DLAMI is a multi-framework DLAMI that supports multiple Neuron frameworks and libraries. Each DLAMI is pre-installed with Neuron drivers and support all Neuron instance types. Each virtual environment that corresponds to a specific Neuron framework or library comes pre-installed with all the Neuron libraries, including the Neuron compiler and Neuron runtime needed for you to get started.

This release introduces a new Multi-Framework DLAMI for Ubuntu 22 that you can use to quickly get started with the latest Neuron SDK on multiple frameworks that Neuron supports as well as Systems Manager (SSM) parameter support for DLAMIs to automate the retrieval of the latest DLAMI ID in cloud automation flows.

For instructions on getting started with the multi-framework DLAMI through the console, refer to Get Started with Neuron on Ubuntu 22 with Neuron Multi-Framework DLAMI. If you want to use the Neuron DLAMI in your cloud automation flows, Neuron also supports SSM parameters to retrieve the latest DLAMI ID.

Launch the instance using Neuron DLAMI

Complete the following steps:

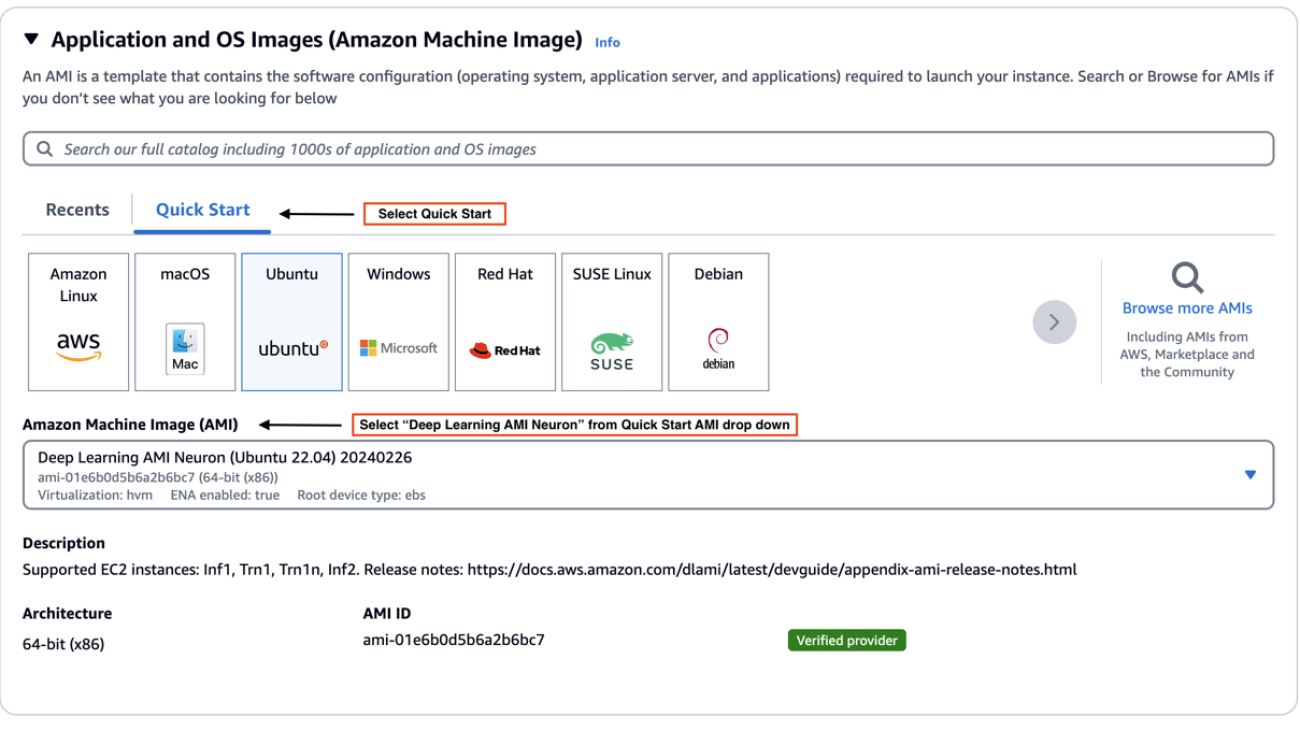
  1. On the Amazon EC2 console, choose your desired AWS Region and choose Launch Instance.
  2. On the Quick Start tab, choose Ubuntu.
  3. For Amazon Machine Image, choose Deep Learning AMI Neuron (Ubuntu 22.04).
  4. Specify your desired Neuron instance.
  5. Configure disk size and other criteria.
  6. Launch the instance.

Activate the virtual environment

Activate your desired virtual environment, as shown in the following screenshot.

After you have activated the virtual environment, you can try out one of the tutorials listed in the corresponding framework or library training and inference section.

Use SSM parameters to find specific Neuron DLAMIs

Neuron DLAMIs support SSM parameters to quickly find Neuron DLAMI IDs. As of this writing, we only support finding the latest DLAMI ID that corresponds to the latest Neuron SDK release with SSM parameter support. In the future releases, we will add support for finding the DLAMI ID using SSM parameters for a specific Neuron release.

You can find the DLAMI that supports the latest Neuron SDK by using the get-parameter command:

aws ssm get-parameter 
--region us-east-1 
--name <dlami-ssm-parameter-prefix>/latest/image_id 
--query "Parameter.Value" 
--output text

For example, to find the latest DLAMI ID for the Multi-Framework DLAMI (Ubuntu 22), you can use the following code:

aws ssm get-parameter 
--region us-east-1 
--name /aws/service/neuron/dlami/multi-framework/ubuntu-22.04/latest/image_id 
--query "Parameter.Value" 
--output text

You can find all available parameters supported in Neuron DLAMIs using the AWS CLI:

aws ssm get-parameters-by-path 
--region us-east-1 
--path /aws/service/neuron 
--recursive

You can also view the SSM parameters supported in Neuron through Parameter Store by selecting the neuron service.

Use SSM parameters to launch an instance directly using the AWS CLI

You can use the AWS CLI to find the latest DLAMI ID and launch the instance simultaneously. The following code snippet shows an example of launching an Inf2 instance using a multi-framework DLAMI:

aws ec2 run-instances 
--region us-east-1 
--image-id resolve:ssm:/aws/service/neuron/dlami/pytorch-1.13/amazon-linux-2/latest/image_id 
--count 1 
--instance-type inf2.48xlarge 
--key-name <my-key-pair> 
--security-groups <my-security-group>

Use SSM parameters in EC2 launch templates

You can also use SSM parameters directly in launch templates. You can update your Auto Scaling groups to use new AMI IDs without needing to create new launch templates or new versions of launch templates each time an AMI ID changes.

Clean up

When you’re done running the resources that you deployed as part of this post, make sure to delete or stop them from running and accruing charges:

  1. Stop your EC2 instance.
  2. Delete your ECS cluster.
  3. Delete your EKS cluster.
  4. Clean up your SageMaker resources.

Conclusion

In this post, we introduced several enhancements incorporated into Neuron 2.18 that improve the user experience and time-to-value for customers working with AWS Inferentia and Trainium instances. Neuron DLAMIs and DLCs with the latest Neuron SDK on the same day as the release means you can immediately benefit from the latest performance optimizations, features, and documentation for installing and upgrading Neuron DLAMIs and DLCs.

Additionally, you can now use the Multi-Framework DLAMI, which simplifies the setup process by providing isolated virtual environments for multiple popular ML frameworks. Finally, we discussed Parameter Store support for Neuron DLAMIs that streamlines the process of launching new instances with the most up-to-date Neuron SDK, enabling you to automate your deployment workflows with ease.

Neuron DLCs are available both private and public ECR repositories to help you deploy Neuron in your preferred AWS service. Refer to the following resources to get started:


About the Authors

Niithiyn Vijeaswaran is a Solutions Architect at AWS. His area of focus is generative AI and AWS AI Accelerators. He holds a Bachelor’s degree in Computer Science and Bioinformatics. Niithiyn works closely with the Generative AI GTM team to enable AWS customers on multiple fronts and accelerate their adoption of generative AI. He’s an avid fan of the Dallas Mavericks and enjoys collecting sneakers.

Armando Diaz is a Solutions Architect at AWS. He focuses on generative AI, AI/ML, and data analytics. At AWS, Armando helps customers integrate cutting-edge generative AI capabilities into their systems, fostering innovation and competitive advantage. When he’s not at work, he enjoys spending time with his wife and family, hiking, and traveling the world.

Sebastian Bustillo is an Enterprise Solutions Architect at AWS. He focuses on AI/ML technologies and has a profound passion for generative AI and compute accelerators. At AWS, he helps customers unlock business value through generative AI, assisting with the overall process from ideation to production. When he’s not at work, he enjoys brewing a perfect cup of specialty coffee and exploring the outdoors with his wife.

Ziwen Ning is a software development engineer at AWS. He currently focuses on enhancing the AI/ML experience through the integration of AWS Neuron with containerized environments and Kubernetes. In his free time, he enjoys challenging himself with badminton, swimming and other various sports, and immersing himself in music.

Anant Sharma is a software engineer at AWS Annapurna Labs specializing in DevOps. His primary focus revolves around building, automating and refining the process of delivering software to AWS Trainium and Inferentia customers. Beyond work, he’s passionate about gaming, exploring new destinations and following latest tech developments.

Roopnath Grandhi is a Sr. Product Manager at AWS. He leads large-scale model inference and developer experiences for AWS Trainium and Inferentia AI accelerators. With over 15 years of experience in architecting and building AI based products and platforms, he holds multiple patents and publications in AI and eCommerce.

Marco Punio is a Solutions Architect focused on generative AI strategy, applied AI solutions and conducting research to help customers hyperscale on AWS. He is a qualified technologist with a passion for machine learning, artificial intelligence, and mergers & acquisitions. Marco is based in Seattle, WA and enjoys writing, reading, exercising, and building applications in his free time.

Rohit Talluri is a Generative AI GTM Specialist (Tech BD) at Amazon Web Services (AWS). He is partnering with top generative AI model builders, strategic customers, key AI/ML partners, and AWS Service Teams to enable the next generation of artificial intelligence, machine learning, and accelerated computing on AWS. He was previously an Enterprise Solutions Architect, and the Global Solutions Lead for AWS Mergers & Acquisitions Advisory.

Read More
Sprinklr improves performance by 20% and reduces cost by 25% for machine learning inference on AWS Graviton3

Sprinklr improves performance by 20% and reduces cost by 25% for machine learning inference on AWS Graviton3

This is a guest post co-written with Ratnesh Jamidar and Vinayak Trivedi from Sprinklr.

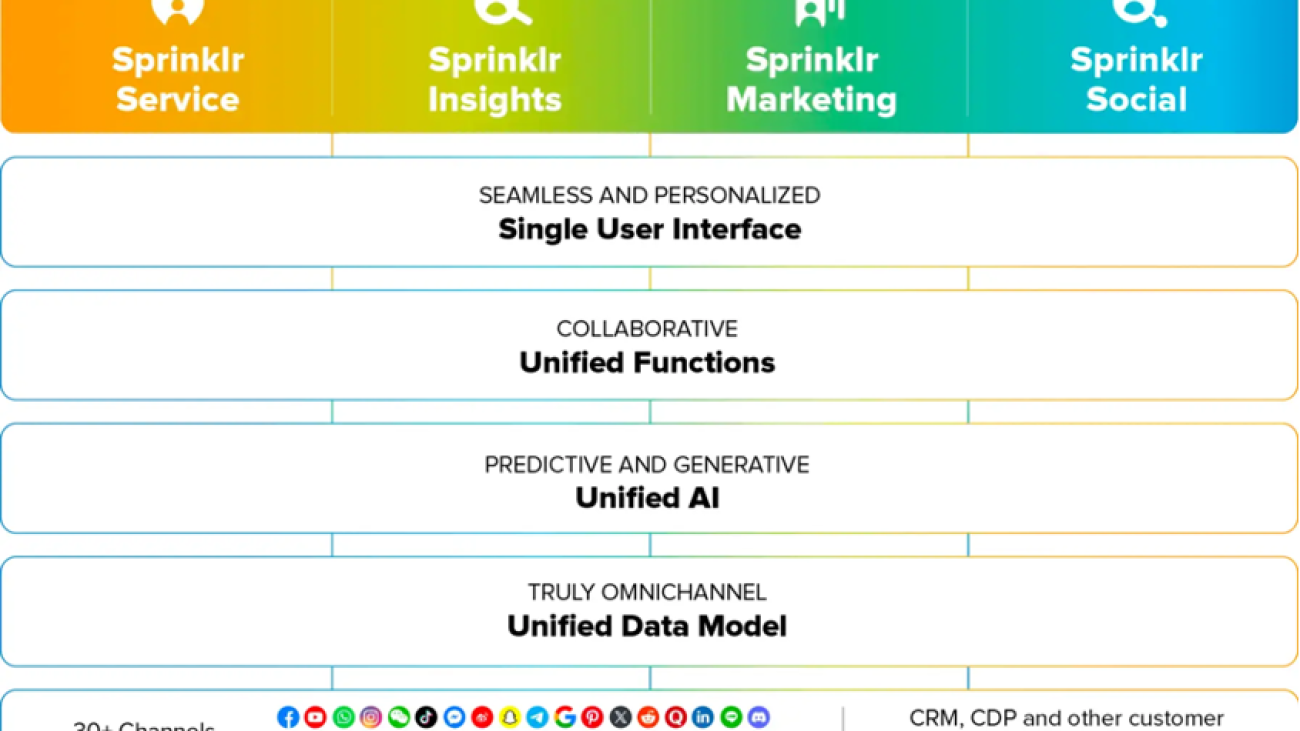
Sprinklr’s mission is to unify silos, technology, and teams across large, complex companies. To achieve this, we provide four product suites, Sprinklr Service, Sprinklr Insights, Sprinklr Marketing, and Sprinklr Social, as well as several self-serve offerings.

Each of these products are infused with artificial intelligence (AI) capabilities to deliver exceptional customer experience. Sprinklr’s specialized AI models streamline data processing, gather valuable insights, and enable workflows and analytics at scale to drive better decision-making and productivity.

In this post, we describe the scale of our AI offerings, the challenges with diverse AI workloads, and how we optimized mixed AI workload inference performance with AWS Graviton3 based c7g instances and achieved 20% throughput improvement, 30% latency reduction, and reduced our cost by 25–30%.

Sprinklr’s AI scale and challenges with diverse AI workloads

Our purpose-built AI processes unstructured customer experience data from millions of sources, providing actionable insights and improving productivity for customer-facing teams to deliver exceptional experiences at scale. To understand our scaling and cost challenges, let’s look at some representative numbers. Sprinklr’s platform uses thousands of servers that fine-tune and serve over 750 pre-built AI models across over 60 verticals, and run more than 10 billion predictions per day.

To deliver a tailored user experience across these verticals, we deploy patented AI models fine-tuned for specific business applications and use nine layers of machine learning (ML) to extract meaning from data across formats: automatic speech recognition, natural language processing, computer vision, network graph analysis, anomaly detection, trends, predictive analysis, natural language generation, and similarity engine.

The diverse and rich database of models brings unique challenges for choosing the most efficient deployment infrastructure that gives the best latency and performance.

For example, for mixed AI workloads, the AI inference is part of the search engine service with real-time latency requirements. In these cases, the model sizes are smaller, which means the communication overhead with GPUs or ML accelerator instances outweighs their compute performance benefits. Also, inference requests are infrequent, which means accelerators are more often idle and not cost-effective. Therefore, the production instances were not cost-effective for these mixed AI workloads, causing us to look for new instances that offer the right balance of scale and cost-effectiveness.

Cost-effective ML inference using AWS Graviton3

Graviton3 processors are optimized for ML workloads, including support for bfloat16, Scalable Vector Extension (SVE), twice the Single Instruction Multiple Data (SIMD) bandwidth, and 50% more memory bandwidth compared to AWS Graviton2 processors, making them an ideal choice for our mixed workloads. Our goal is to use the latest technologies for efficiency and cost savings, so when AWS released Graviton3-based Amazon Elastic Compute Cloud (Amazon EC2) instances, we were excited to try them in our mixed workloads, especially given our previous Graviton experience. For over 3 years, we have run our search infrastructure on Graviton2-based EC2 instances and our real-time and batched inference workloads on AWS Inferentia ML-accelerated instances, and in both cases we improved latency by 30% and achieved up to 40% price-performance benefits over comparable x86 instances.

To migrate our mixed AI workloads from x86-based instances to Graviton3-based c7g instances, we took a two-step approach. First, we had to experiment and benchmark in order to determine that Graviton3 was indeed the right solution for us. After that was confirmed, we had to perform the actual migration.

First, we started by benchmarking our workloads using the readily available Graviton Deep Learning Containers (DLCs) in a standalone environment. As early adopters of Graviton for ML workloads, it was initially challenging to identify the right software versions and the runtime tunings. During this journey, we collaborated with our AWS technical account manager and the Graviton software engineering teams. We collaborated closely and frequently for the optimized software packages and detailed instructions on how to tune them to achieve optimum performance. In our test environment, we observed 20% throughput improvement and 30% latency reduction across multiple natural language processing models.

After we had validated that Graviton3 met our needs, we integrated the optimizations into our production software stack. The AWS account team assisted us promptly, helping us ramp up quickly to meet our deployment timelines. Overall, migration to Graviton3-based instances was smooth, and it took less than 2 months to achieve the performance improvements in our production workloads.

Results

By migrating our mixed inference/search workloads to Graviton3-based c7g instances from the comparable x86-based instances, we achieved the following:

  • Higher performance – We realized 20% throughput improvement and 30% latency reduction.
  • Reduced cost – We achieved 25–30% cost savings.
  • Improved customer experience – By reducing the latency and increasing throughput, we significantly improved the performance of our products and services, providing the best user experience for our customers.
  • Sustainable AI – Because we saw a higher throughput on the same number of instances, we were able to lower our overall carbon footprint, and we made our products appealing to environmentally conscious customers.
  • Better software quality and maintenance – The AWS engineering team upstreamed all the software optimizations into PyTorch and TensorFlow open source repositories. As a result, our current software upgrade process on Graviton3-based instances is seamless. For example, PyTorch (v2.0+), TensorFlow (v2.9+), and Graviton DLCs come with Graviton3 optimizations and the user guides provide best practices for runtime tuning.

So far, we have migrated PyTorch and TensorFlow based Distil RoBerta-base, spaCy clustering, prophet, and xlmr models to Graviton3-based c7g instances. These models are serving intent detection, text clustering, creative insights, text classification, smart budget allocation, and image download services. These services power our unified customer experience (unified-cxm) platform and conversional AI to allow brands to build more self-serve use cases for their customers. Next, we are migrating ONNX and other larger models to Graviton3-based m7g general purpose and Graviton2-based g5g GPU instances to achieve similar performance improvements and cost savings.

Conclusion

Switching to Graviton3-based instances was quick in terms of engineering time, and resulted in 20% throughput improvement, 30% latency reduction, 25–30% cost savings, improved customer experience, and a lower carbon footprint for our workloads. Based on our experience, we will continue to seek new compute from AWS that will reduce our costs and improve the customer experience.

For further reading, refer to the following:


About the Authors

Sunita Nadampalli is a Software Development Manager at AWS. She leads Graviton software performance optimizations for Machine Learning and HPC workloads. She is passionate about open source software development and delivering high-performance and sustainable software solutions with Arm SoCs.

Gaurav Garg is a Sr. Technical Account Manager at AWS with 15 years of experience. He has a strong operations background. In his role he works with Independent Software Vendors to build scalable and cost-effective solutions with AWS that meet the business requirements. He is passionate about Security and Databases.

Ratnesh Jamidar is a AVP Engineering at Sprinklr with 8 years of experience. He is a seasoned Machine Learning professional with expertise in designing, implementing large-scale, distributed, and highly available AI products and infrastructure.

Vinayak Trivedi is an Associate Director of Engineering at Sprinklr with 4 years of experience in Backend & AI. He is proficient in Applied Machine Learning & Data Science, with a history of building large-scale, scalable and resilient systems.
Read More

How Wiz is empowering organizations to remediate security risks faster with Amazon Bedrock

How Wiz is empowering organizations to remediate security risks faster with Amazon Bedrock

Wiz is a cloud security platform that enables organizations to secure everything they build and run in the cloud by rapidly identifying and removing critical risks. Over 40% of the Fortune 100 trust Wiz’s purpose-built cloud security platform to gain full-stack visibility, accurate risk prioritization, and enhanced business agility. Organizations can connect Wiz in minutes to scan the entire cloud environment without agents and identify the issues representing real risk. Security and cloud teams can then proactively remove risks and harden cloud environments with remediation workflows.

Artificial intelligence (AI) has revolutionized the way organizations function, paving the way for automation and improved efficiency in various tasks that were traditionally manual. One of these use cases is using AI in security organizations to improve security processes and increase your overall security posture. One of the major challenges in cloud security is discerning the best ways to resolve an identified issue in the most effective way to allow you to respond quickly.

Wiz has harnessed the power of generative AI to help organizations remove risks in their cloud environment faster. With Wiz’s new integration with Amazon Bedrock, Wiz customers can now generate guided remediation steps backed by foundation models (FMs) running on Amazon Bedrock to reduce their mean time to remediation (MTTR). Amazon Bedrock is a fully managed service that offers a choice of high-performing foundation models (FMs) from leading AI companies like AI21 labs, Anthropic, Cohere, Meta, Mistral AI, Stability AI and Amazon through a single API, along with a broad set of capabilities to build generative AI applications with security, privacy, and responsible AI.

“The Wiz and Amazon Bedrock integration enables organizations to further enhance security and improve remediation time by leveraging a choice of powerful foundation models to generate GenAI-powered remediation steps.”

– Vivek Singh, Senior Manager, Product Management-Tech, AWS AI

In this post, we share how Wiz uses Amazon Bedrock to generate remediation guidance for customers that allow them to quickly address security risks in their cloud environment.

Detecting security risks in the cloud with the Wiz Security Graph

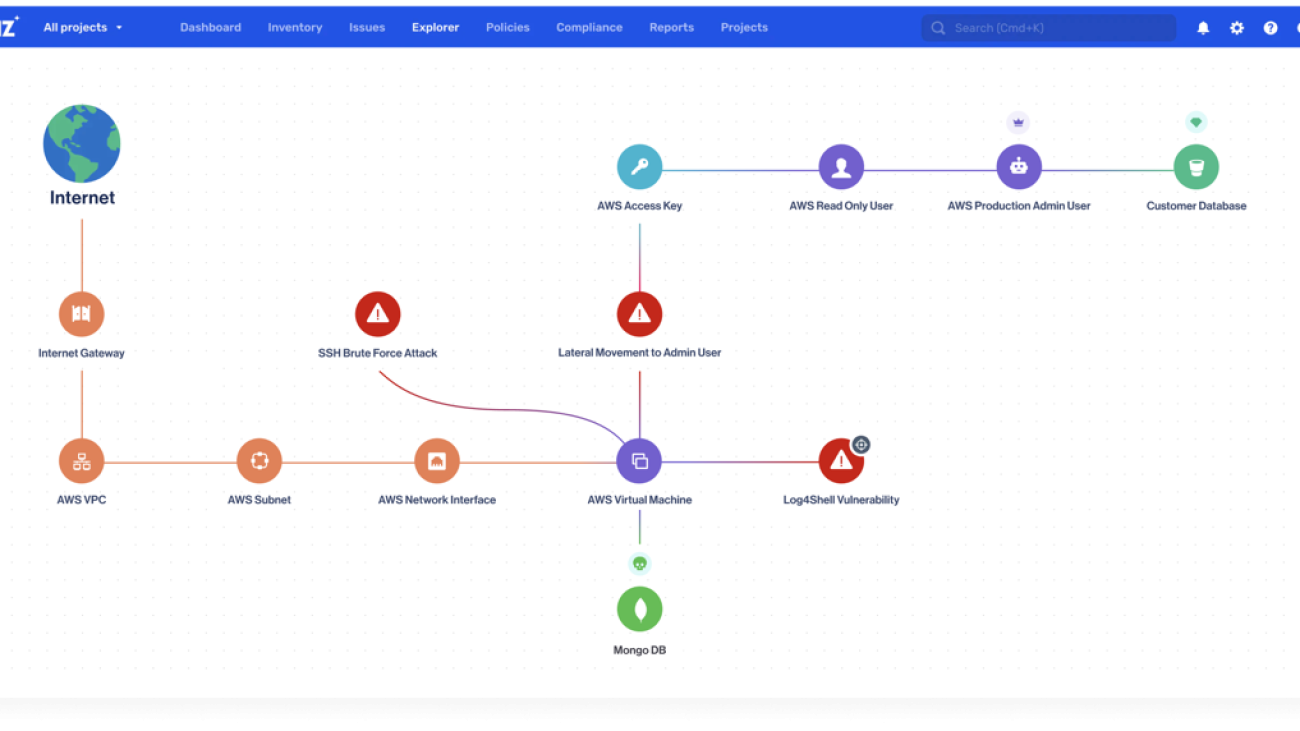
Wiz scans cloud environments without agents and runs deep risk assessment across network exposures, vulnerabilities, misconfigurations, identities, data, secrets, and malware. Wiz stores the entire technology stack as well as any risks detected on the Wiz Security Graph, which is backed by Amazon Neptune. Neptune enables Wiz to quickly traverse the graph and understand interconnected risk factors in seconds and how they create an attack path. The Security Graph allows Wiz to surface these critical attack paths in the form of Wiz Issues. For example, a Wiz Issue can alert of a publicly exposed Amazon Elastic Compute Cloud (Amazon EC2) instance that is vulnerable, has admin permissions, and can access sensitive data. The following graph illustrates this attack path.

Attack path

With its Security Graph, Wiz provides customers with pinpoint-accurate alerts on security risks in their environment, reduces the noise faced with traditional security tools, and enables organizations to focus on the most critical risks in their environment.

Remediating cloud risks with guided remediation provided by Amazon Bedrock

To help customers remediate security risks even faster, Wiz uses Amazon Bedrock to analyze metadata from Wiz Issues to generate effective remediation recommendations for customers. With Amazon Bedrock, Wiz combines its deep risk context with cutting-edge FMs to offer enhanced remediation guidance to customers. Customers can scale their remediation workflow and minimize their MTTR by generating straightforward-to-use copy-paste remediation steps that can be directly implemented into the tool of their choice, such as the AWS Command Line Interface (AWS CLI), Terraform, AWS CloudFormation, Pulumi, Go, and Python, or directly using the cloud environment console. The following screenshot showcases an example of the remediation steps generated by Amazon Bedrock for a Wiz Issue.

An example of the remediation steps generated by Amazon Bedrock for a Wiz Issue

Wiz sends a prompt with all the relevant context around a security risk to Amazon Bedrock with instructions on how to present the results based on the target platform. Amazon Bedrock native APIs allow Wiz to select the best model for the use case to answer the request, so when it’s received, it’s parsed and presented in a straightforward manner in the Wiz portal.

To fully operationalize this functionality in production, the Wiz backend has a service running on Amazon Elastic Kubernetes Service (Amazon EKS) that receives the customer request to generate remediation steps, collects the context of the alert the customer wants to remediate, and runs personally identifiable information (PII) redaction on the data to remove any sensitive data. Then, another service running on Amazon EKS pulls the resulting data and sends it to Amazon Bedrock. Such a flow can run in each needed AWS Region supported by Amazon Bedrock to address any compliance needs of their customers. In addition, to secure the usage of Amazon Bedrock with least privilege, Wiz uses AWS permission sets and follows AWS best practices. The Wiz service sending the prompt to Amazon Bedrock has a dedicated AWS Identity and Access Management (IAM) role that allows it to communicate only with the specific Amazon Bedrock service and to only generate those requests. Amazon Bedrock also has restrictions to block any data coming from a non-authorized service. Using these AWS services and the Wiz Security Graph, Wiz helps its customers adopt the most advanced LLMs to speed up the process of addressing complex security issues in a straightforward and secure manner. The following diagram illustrates this architecture.

System architecture

Wiz customers are already experiencing the advantages of our new AI-driven remediation:

“The faster we can remediate security risks, the more we can focus on driving broader strategic initiatives. With Wiz’s AI-powered remediation, we can quickly generate remediation steps that our security team and developers can simply copy-paste to remediate the issue.”

– Rohit Kohli, Deputy CISO, Genpact

By using Amazon Bedrock for generating AI-powered remediation steps, we learnt that security teams are able to minimize the time spent investigating complex risks by 40%, allowing them to focus on mitigating more risks. Furthermore, they are able to empower developers to remediate risks by removing the need for security expertise and providing them with exact steps to take. Not only does Wiz use AI to enhance security processes for customers, but it also makes it effortless for customers to securely adopt AI in their organization with its AI Security Posture Management capabilities, empowering them to protect their AI models while increasing innovation.

Conclusion

Using generative AI for generating enhanced remediation steps marks a significant advancement in the realm of problem-solving and automation. By harnessing the power of AI models powered by Amazon Bedrock, Wiz users can quickly remediate risks with straightforward remediation guidance, reducing manual efforts and improving MTTR. Learn more about Wiz and check out a live demo.


About the Authors

Shaked RotleviShaked Rotlevi is a Technical Product Marketing Manager at Wiz focusing on AI security. Prior to Wiz she was a Solutions Architect at AWS working with public sector customers as well as a Technical Program Manager for a security service team. In her spare time she enjoys playing beach volleyball and hiking.

Itay ArbelItay Arbel is a Lead Product Manager at Wiz. Before joining Wiz, Itay was a product manager at Microsoft and did an MBA in Oxford University, majoring in high tech and emerging technologies. Itay is Wiz’s product lead for the effort of helping organizations securing their AI pipeline and usage of this new emerging technology.

Eitan SelaEitan Sela is a Generative AI and Machine Learning Specialist Solutions Architect at AWS. He works with AWS customers to provide guidance and technical assistance, helping them build and operate Generative AI and Machine Learning solutions on AWS. In his spare time, Eitan enjoys jogging and reading the latest machine learning articles.

Adi AvniAdi Avni is a Senior Solutions Architect at AWS based in Israel. Adi works with AWS ISV customers, helping them to build innovative, scalable and cost-effective solutions on AWS. In his spare time, he enjoys sports and traveling with family and friends.

Read More

PyTorch Foundation Welcomes New Executive Director

PyTorch Foundation Welcomes New Executive Director

Matt White
The PyTorch Foundation is excited to welcome Matt White, our new executive director. The PyTorch Foundation formed in 2022 with the goal to drive adoption of AI tooling by fostering and sustaining an ecosystem of open source, vendor-neutral projects with PyTorch. Over the past 2 years, we’ve seen excellent growth across the project – with both contributor and member growth.

“I am honored to be a part of the PyTorch Foundation, working with such a passionate and skilled community,” said Matt White. “I am looking forward to working with our contributors and members to advance the PyTorch ecosystem through research, cutting edge technologies and open source best practices.”

Matt is a career technologist, researcher and innovator and has over 25 years of experience in AI, data, autonomous systems and simulations. He is the Co-founder and Chair of the Open Metaverse Foundation, a part of the Linux Foundation. Previously, Matt was the Director of the Generative AI Commons at the Linux Foundation, leading the advancement of open science and open-source artificial intelligence projects. He is also the GM of AI at the Linux Foundation.

Learn more about the PyTorch Foundation:

Read More