 Here’s one Googler’s experience of experimenting our newest AI products and updates at Google I/O 2024.Read More

Here’s one Googler’s experience of experimenting our newest AI products and updates at Google I/O 2024.Read More
Phishing is the process of attempting to acquire sensitive information such as usernames, passwords and credit card details by masquerading as a trustworthy entity using email, telephone or text messages. There are many types of phishing based on the mode of communication and targeted victims. In an Email phishing attempt, an email is sent as a mode of communication to group of people. There are traditional rule-based approaches to detect email phishing. However, new trends are emerging that are hard to handle with a rule-based approach. There is need to use machine learning (ML) techniques to augment rule-based approaches for email phishing detection.
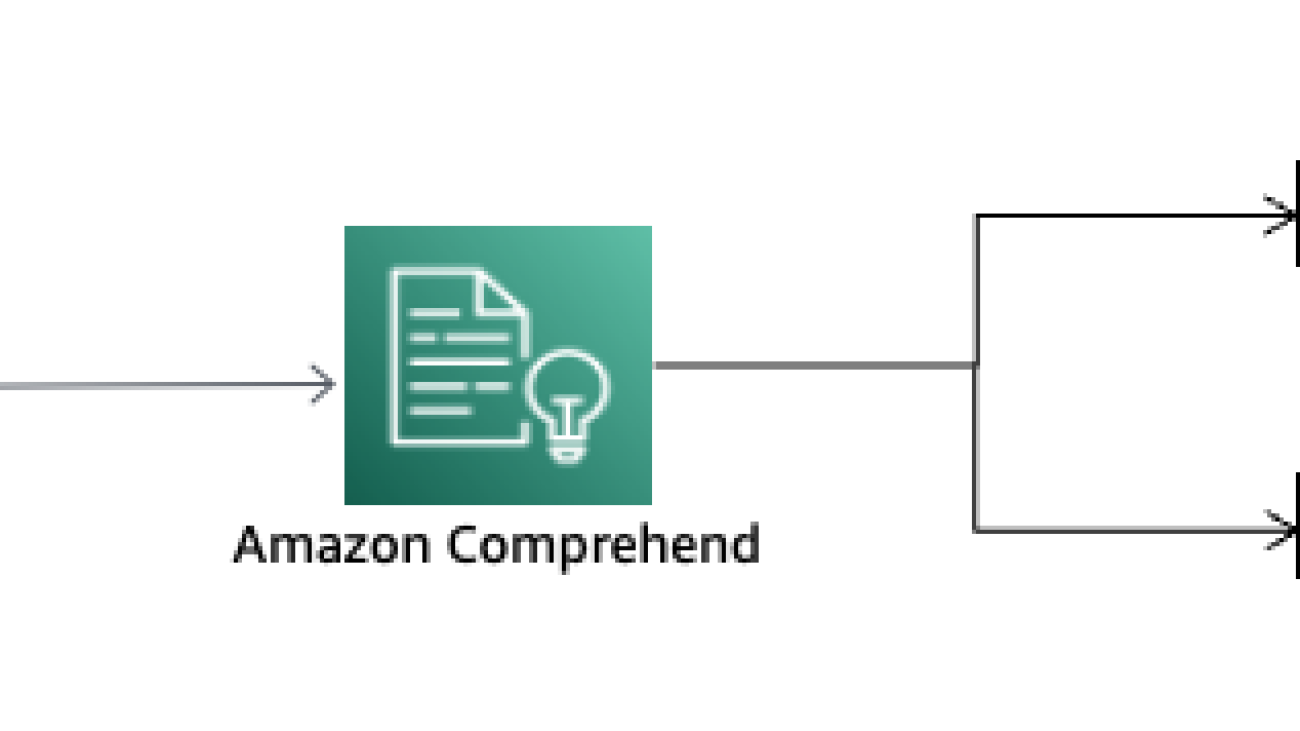
In this post, we show how to use Amazon Comprehend Custom to train and host an ML model to classify if the input email is an phishing attempt or not. Amazon Comprehend is a natural-language processing (NLP) service that uses ML to uncover valuable insights and connections in text. You can use Amazon Comprehend to identify the language of the text; extract key phrases, places, people, brands, or events; understand sentiment about products or services; and identify the main topics from a library of documents. You can customize Amazon Comprehend for your specific requirements without the skillset required to build ML-based NLP solutions. Comprehend Custom builds customized NLP models on your behalf, using training data that you provide. Comprehend Custom supports custom classification and custom entity recognition.
This post explains how you can use Amazon Comprehend to easily train and host an ML based model to detect phishing attempt. The following diagram shows how the phishing detection works.

You can use this solution with your email servers in which emails are passed through this phishing detector. When an email is flagged as a phishing attempt, the email recipient still gets the email in their mailbox, but they can be shown an additional banner highlighting a warning to the user.
You can use this solution for experimentation with the use case, but AWS recommends building a training pipeline for your environments. For details on how to build a classification pipeline with Amazon Comprehend, see Build a classification pipeline with Amazon Comprehend custom classification.
We walk through the following steps to build the phishing detection model:
Before diving into this use case, complete the following prerequisites:
Your training data should have both phishing and non-phishing emails. Email users with in the organization are asked to report phishing through their email clients. Gather all these phishing reports and examples of non-phishing emails to prepare the training data. You should have a minimum 10 examples per class. Label phishing emails as phishing and non-phishing emails as nonphishing. For minimum training requirements, see General quotas for document classification. Although minimum labels per class is a starting point, it’s recommended to provide hundreds of labels per class for performance on classification tasks across new inputs.
For custom classification, you train the model in either single-label mode or multi-label mode. Single-label mode associates a single class with each document. Multi-label mode associates one or more classes with each document. For this case, we will use single-label mode – phishing or nonphishing. The individual classes are mutually exclusive. For example, you can classify an email as phishing or not-phishing, but not both.
Custom classification supports models that you train with plain-text documents and models that you train with native documents (such as PDF, Word, or images). For more information about classifier models and their supported document types, see Training classification models. For a plain-text model, you can provide classifier training data as a CSV file or as an augmented manifest file that you create using Amazon SageMaker Ground Truth. The CSV file or augmented manifest file includes the text for each training document, and its associated labels.For a native document model, you provide classifier training data as a CSV file. The CSV file includes the file name for each training document and its associated labels. You include the training documents in the S3 input folder for the training job.
For this case, we will train a plain-text model using CSV file format. For each row, the first column contains the class label value. The second column contains an example text document for that class. Each row must end with n or rn characters.
The following example shows a CSV file containing two documents.
CLASS,Text of document 1
CLASS,Text of document 2
The following example shows two rows of a CSV file that trains a custom classifier to detect whether an email message is phishing:
phishing, “Hi, we need account details and SSN information to complete the payment. Please furnish your credit card details in the attached form.”
nonphishing,” Dear Sir / Madam, your latest statement was mailed to your communication address. After your payment is received, you will receive a confirmation text message at your mobile number. Thanks, customer support”
For information about preparing your training documents, see Preparing classifier training data.
Load the training data in CSV format to the S3 bucket you created in the prerequisite steps. For instructions, refer to Uploading objects.

Custom classification supports two types of classifier models: plain-text models and native document models. A plain-text model classifies documents based on their text content. You can train the plain-text model using documents in one of following languages: English, Spanish, German, Italian, French, or Portuguese. The training documents for a given classifier must all use the same language. A native document model has the ability to process both scanned or digital semi-structured documents like PDFs, Microsoft Word documents, and images in their native format. A native document model also classifies documents based on text content. A native document model can also use additional signals, such as from the layout of the document. You train a native document model with native documents for the model to learn the layout information. You train the model using semi-structured documents, which includes the following document types such as digital and scanned PDF documents and Word documents; Images sunch as JPG files, PNG files, and single-page TIFF files and Amazon Textract API output JSON files. AWS recommends using a plain-text model to classify plain-text documents and a native document model to classify semi-structured documents.
Data specification for the custom classification model can be represented as follows.

You can train a custom classifier using either the Amazon Comprehend console or API. Allow several minutes to a few hours for the classification model creation to complete. The length of time varies based on the size of your input documents.
For training a customer classifier on the Amazon Comprehend console, set the following data specification options.


On the Classifiers page of the Amazon Comprehend console, the new classifier appears in the table, showing Submitted as its status. When the classifier starts processing the training documents, the status changes to Training. When a classifier is ready to use, the status changes to Trained or Trained with warnings. If the status is Trained with Warnings, review the skipped files folder in the classifier training output.

If Amazon Comprehend encountered errors during creation or training, the status changes to In error. You can choose a classifier job in the table to get more information about the classifier, including any error messages.
After training the model, Amazon Comprehend tests the custom classifier model. If you don’t provide a test dataset, Amazon Comprehend trains the model with 90% of the training data. It reserves 10% of the training data to use for testing. If you do provide a test dataset, the test data must include at least one example for each unique label in the training dataset.
After Amazon Comprehend completes the custom classifier model training, it creates output files in the Amazon S3 output location that you specified in the CreateDocumentClassifier API request or the equivalent Amazon Comprehend console request. These output files are a confusion matrix and additional outputs for native document models. The format of the confusion matrix varies, depending on whether you trained your classifier using multi-class mode or multi-label mode.
After Amazon Comprehend creates the classifier model, the confusion matrix is available in the confusion_matrix.json file in the Amazon S3 output location. This confusion matrix provides metrics on how well the model performed in training. This matrix shows a matrix of labels that the model predicted, compared to the actual document labels. Amazon Comprehend uses a portion of the training data to create the confusion matrix. The following JSON file represents the matrix in confusion_matrix.json as an example.

Amazon Comprehend provides metrics to help you estimate how well a custom classifier performs. Amazon Comprehend calculates the metrics using the test data from the classifier training job. The metrics accurately represent the performance of the model during training, so they approximate the model performance for classification of similar data.
Use the Amazon Comprehend console or API operations such as DescribeDocumentClassifier to retrieve the metrics for a custom classifier.

The actual output of many binary classification algorithms is a prediction score. The score indicates the system’s certainty that the given observation belongs to the positive class. To make the decision about whether the observation should be classified as positive or negative, as a consumer of this score, you interpret the score by picking a classification threshold and comparing the score against it. Any observations with scores higher than the threshold are predicted as the positive class, and scores lower than the threshold are predicted as the negative class.

After you train a custom classifier, you can classify documents using Real-time analysis or an analysis job. Real-time analysis takes a single document as input and returns the results synchronously. An analysis job is an asynchronous job to analyze large documents or multiple documents in one batch. The following are the different options for using the custom classifier model.

Create an endpoint for the trained model. For instructions, refer to Real-tome analysis for customer classification (console). Amazon Comprehend assigns throughput to an endpoint using Inference Units (IU). An IU represents data throughput of 100 characters per second. You can provision the endpoint with up to 10 IU. You can scale the endpoint throughput either up or down by updating the endpoint. Endpoints are billed on 1-second increments, with a minimum of 60 seconds. Charges will continue to incur from the time you start the endpoint until it is deleted even if no documents are analyzed.

After the endpoint is ready, you can run the real-time analysis from the Amazon Comprehend console.

The sample input represents the email text, which is used for real-time analysis to detect if the email text is a phishing attempt or not.

Amazon Comprehend analyzes the input data using the custom model. Amazon Comprehend displays the discovered classes, along with a confidence assessment for each class. The insights section shows the inference results with confidence levels of the nonphishing and phishing classes. You can decide the threshold to decide the class of the inference. In this case, nonphishing is the inference results because this has more confidence than the phishing class. The model detects the input email text is a non-phishing email.

To integrate this capability of phishing detection in your real-world applications, you can use the Amazon API Gateway REST API with an AWS Lambda integration. Refer to the serverless pattern in Amazon API Gateway to AWS Lambda to Amazon Comprehend to know more.
When you no longer need your endpoint, you should delete it so that you stop incurring costs from it. Also, delete the data file from S3 bucket. For more information on costs, see Amazon Comprehend Pricing.

In this post, we walked you through the steps to create a phishing attempt detector using Amazon Comprehend custom classification. You can customize Amazon Comprehend for your specific requirements without the skillset required to build ML-based NLP solutions.
You can also visit the Amazon Comprehend Developer Guide, GitHub repository and Amazon Comprehend developer resources for videos, tutorials, blogs, and more.
![]() Ajeet Tewari is a Solutions Architect for Amazon Web Services. He works with enterprise customers to help them navigate their journey to AWS. His specialties include architecting and implementing highly scalable OLTP systems and leading strategic AWS initiatives.
Ajeet Tewari is a Solutions Architect for Amazon Web Services. He works with enterprise customers to help them navigate their journey to AWS. His specialties include architecting and implementing highly scalable OLTP systems and leading strategic AWS initiatives.

In the latest episode of Microsoft Research Forum, researchers explored the importance of globally inclusive and equitable AI, shared updates on AutoGen and MatterGen, presented novel use cases for AI, including industrial applications and the potential of multimodal models to improve assistive technologies.
Below is a brief recap of the event, including select quotes from the presentations. Full replays of each session and presentation will be available soon.

Jacki O’Neill, Lab Director, Microsoft Research Africa, Nairobi
Jacki O’Neill discussed the importance of creating globally equitable generative AI. She addressed the technical and sociotechnical challenges that must be tackled to positively transform the future of work worldwide.
“We’re at the very early stage of generative AI and the impacts it will have on work. This is a fast-moving field, and there’s an immense opportunity to take control of the agenda and build truly globally equitable AI systems. This requires ensuring that diverse contexts and applications, with their diverse datasets, drive the development of generative AI.”

Jacki O’Neill, Lab Director, Microsoft Research Africa, Nairobi (host)
Sunayana Sitaram, Principal Researcher, Microsoft Research India
Daniela Massiceti, Senior Researcher, Microsoft Research Cambridge
Tanuja Ganu, Principal Research SDE Manager, Microsoft Research India
Microsoft researchers discussed the challenges and opportunities of making AI more inclusive and impactful for everyone—from data that represents a broader range of communities and cultures to novel use cases for AI that are globally relevant.
“How can we take this power of generative AI and empower every individual, every individual across the globe—the people who are coming from different nationalities, different ethnicities, cultures, as well as with varied technology access and financial affordability?”
—Tanuja Ganu, Principal Research SDE Manager, Microsoft Research India
“One of the solutions that we’ve been using is to actually design with ‘human in the loop’ in mind because we know that these technologies are not perfect. And so, we really want to figure out ways in which humans and AI systems can work together in order to create the most effective outcome.”
—Sunayana Sitaram, Principal Researcher, Microsoft Research India
“We really need multidisciplinary research that goes beyond anything that we’ve done before, involving researchers and practitioners and community members. And it’s important to remember that machine learning engineers and researchers on their own can’t solve the problem of building globally equitable generative AI. This is something that we really need to do in a large scale.”
—Jacki O’Neill, Lab Director, Microsoft Research Africa, Nairobi
“An estimated 1.3 billion people—around 16 percent of the global population—live with some level of disability today. So, I think it’s really exciting to see these generative AI applications coming online for these communities.”
“As we look to this next decade of generative AI solutions, I really hope to see that we’re going to see more personalized AI models and solutions come through much more strongly, solutions where you as the user have much more control, much more agency, around how your model works for you.”
—Daniela Massiceti, Senior Researcher, Microsoft Research Cambridge

Daniela Massiceti, Senior Researcher, Microsoft Research Cambridge
Daniela Massiceti explored the transformative potential of multimodal models such as CLIP for assistive technologies. Specifically focusing on the blind/low-vision community, the talk explored the current distance from realizing this potential and the advancements needed to bridge this gap.
“Today’s AI models hold incredible potential for assisting the Blind community—from text recognition to object identification to question answering. Apps like Seeing AI are already deploying some of these AI features. But there is potential for much more.”

Jiang Bian, Senior Principal Research Manager, Microsoft Research Asia
Jiang Bian discussed how generative AI transforms industries by bridging gaps between AI capabilities and industrial needs.
“In our dialogues with strategic partners, we have identified crucial gaps in current generative AI capabilities versus the specific needs of industry applications. These include a too-narrow focus on human-like AI but not critical industry applications, limitations in processing complex and noisy data, and concerns about reliability in complex decision-making scenarios. Our research is crucial in addressing these limitations and amplifying the underappreciated potential of generative AI in high-value sectors.”

Tian Xie, Principal Research Manager, Microsoft Research
Tian Xie described MatterGen, a generative model that enables the design of new inorganic materials based on a broad range of property conditions required by the application, aiming to shift the traditional paradigm of materials design with generative AI.
“Traditionally, materials design is conducted by search-based methods. We search through a list of candidates and gradually filter them using a list of design criteria for the application. Like for batteries, we need the materials to contain lithium, to be stable, to have a high lithium-ion conductivity, and each filtering step can be conducted using simulation-based methods or AI emulators. At the end, we get five to 10 candidates that we’re sending to the lab for experimental synthesis.”
“In MatterGen, we hope to rethink this process with generative AI. We’re aiming to directly generate materials given the design requirements for the target application, bypassing the process of searching through candidates. You can think of it as using text-to-image generative models like DALL-E to generate the images given a prompt rather than needing to search through the entire internet for images via a search engine.”

Adam Fourney, Principal Researcher, Microsoft Research AI Frontiers
Adam Fourney discussed the effectiveness of using multiple agents, working together, to complete complex multi-step tasks. He showcased their capability to outperform previous single-agent solutions on benchmarks like GAIA, utilizing customizable arrangements of agents that collaborate, reason, and utilize tools to achieve complex outcomes.
“We’re starting to tackle increasingly more complex benchmarks and real-world scenarios with this configuration. And we’re really excited about opportunities to introduce new agents that, for example, learn and self-improve with experience; that understand images and screenshots a little better for maybe more effective web surfing or use of interfaces; and that are maybe a bit more systematic about exploring that solution space. So rather than just updating that ledger and then restarting when they get stuck, they can be a bit more pragmatic about the strategies that they’re employing.”
The post Microsoft Research Forum Episode 3: Globally inclusive and equitable AI, new use cases for AI, and more appeared first on Microsoft Research.

The integration of AI and other computational technologies is becoming increasingly common in high-stakes sectors such as finance, healthcare, and government, where their capacity to influence critical decisions is growing. While these systems offer numerous benefits, they also introduce risks, such as entrenching systemic biases and reducing accountability. The ACM Conference on Fairness, Accountability, and Transparency (ACM FaccT 2024) tackles these issues, bringing together experts from a wide range of disciplines who are committed to the responsible development of computational systems.
Microsoft is proud to return as a sponsor of ACM FAccT 2024, underscoring our commitment to supporting research on responsible AI. We’re pleased to share that members of our team have taken on key roles in organizing the event, contributing to the program committee and serving as a program co-chair. Additionally, seven papers by Microsoft researchers and their collaborators have been accepted to the program, with “Akal badi ya bias: An exploratory study of gender bias in Hindi language technology,” receiving an award for Best Paper.
Collectively, these research projects emphasize the need for AI technologies that reflect the Microsoft Responsible AI principles of accountability, inclusiveness, reliability and safety, fairness, transparency, and privacy and security. They underscore the importance of addressing potential risks and harms associated with deployment and usage. This post highlights these advances.
Microsoft Research Podcast

Peter Lee, head of Microsoft Research, and Ashley Llorens, AI scientist and engineer, discuss the future of AI research and the potential for GPT-4 as a medical copilot.
Anna Gausen, Bhaskar Mitra, Siân Lindley
Recent AI developments, especially LLMs, are significantly impacting organizational knowledge access and reshaping workplaces. These AI systems pose risks due to their interaction with organizational power dynamics. This paper introduces the Consequence-Mechanism-Risk framework to help identify worker risks, categorizing them into issues related to value, power, and wellbeing. The framework aims to help practitioners mitigate these risks and apply it to other technologies, enabling better protection for workers.
Christine Herlihy, Kimberly Truong, Alex Chouldechova, Miro Dudík
Disaggregated evaluation is a process used in AI fairness assessment that measures AI system performance across different subgroups. These subgroups are defined by a mix of demographic or other sensitive attributes. However, the sample size for intersectional subgroups is often very small, leading to their exclusion from analysis. This work introduces a structured regression approach for more reliable system performance estimates in these subgroups. Tested on two publicly available datasets and several variants of semi-synthetic data, this method not only yielded more accurate results but also helped to identify key factors driving performance differences.
Best Paper Award
Rishav Hada, Safiya Husain, Varun Gumma, Harshita Diddee, Aditya Yadavalli, Agrima Seth, Nidhi Kulkarni, Ujwal Gadiraju, Aditya Vashistha, Vivek Seshadri, Kalika Bali
Existing research on gender bias in language technologies primarily focuses on English, often overlooking non-English languages. This paper introduces the first comprehensive study on gender bias in Hindi, the third most spoken language globally. Employing diverse techniques and field studies, the authors expose the limitations in current methodologies and emphasize the need for more context-specific and community-centered research. The findings deepen the understanding of gender bias in language technologies in Hindi and lay the groundwork for expanded research into other Indic languages.
Sunnie S. Y. Kim, Q. Vera Liao, Mihaela Vorvoreanu, Stephanie Ballard, Jennifer Wortman Vaughan
LLMs can produce convincing yet incorrect responses, potentially misleading users who rely on them for accuracy. To mitigate this issue, there have been recommendations for LLMs to communicate uncertainty in their responses. In a large-scale study on how users perceive and act on LLMs’ expressions of uncertainty, participants were asked medical questions. The authors found that first-person uncertainty expressions (e.g., “I’m not sure, but…”) decreased participants’ confidence in the system and their tendency to agree with the system’s answers, while increasing the accuracy of their own answers. In contrast, more general uncertainty expressions (e.g., “It’s unclear, but…”) were less effective. The findings stress the importance of more thorough user testing before deploying LLMs.
Ruotong Wang, Ruijia Cheng, Denae Ford, Tom Zimmermann
As tools like GitHub Copilot gain popularity, understanding the trust software developers place in these applications becomes crucial for their adoption and responsible use. In a two-stage qualitative study, the authors interviewed 17 developers to understand the challenges they face in building trust in AI code-generation tools. Challenges identified include setting expectations, configuring tools, and validating suggestions. The authors also explore several design concepts to help developers establish appropriate trust and provide design recommendations for AI-powered code-generation tools.
Emily Black, Logan Koepke, Pauline Kim, Solon Barocas, Mingwei Hsu
In fields such as housing, employment, and credit, organizations using algorithmic systems should seek to use less discriminatory alternatives. Research in computer science has shown that for any prediction problem, multiple algorithms can deliver the same level of accuracy but differ in their impacts across demographic groups. This phenomenon, known as model multiplicity, suggests that developers might be able to find an equally performant yet potentially less discriminatory alternative.
Harini Suresh, Emily Tseng, Meg Young, Mary Gray, Emma Pierson, Karen Levy
The rise of foundation models in public services brings both potential benefits and risks, including reinforcing power imbalances and harming marginalized groups. This paper explores how participatory AI/ML methods, typically context-specific, can be adapted to these context-agnostic models to empower those most affected.
Steph Ballard
Solon Barocas
Su Lin Blodgett*
Kate Crawford
Shipi Dhanorkar
Amy Heger
Jake Hofman*
Emre Kiciman*
Vera Liao*
Daniela Massiceti
Bhaskar Mitra
Besmira Nushi*
Alexandra Olteanu
Amifa Raj
Emily Sheng
Jennifer Wortman Vaughan*
Mihaela Vorvoreanu*
Daricia Wilkinson
*Area Chairs
Microsoft welcomes talented individuals across various roles at Microsoft Research, Azure Research, and other departments. We are always pushing the boundaries of computer systems to improve the scale, efficiency, and security of all our offerings. You can review our open research-related positions here.
The post Microsoft at FAccT 2024: Advancing responsible AI research and practice appeared first on Microsoft Research.
This guest post is co-written with Manny Silva, Head of Documentation at Skyflow, Inc.
Startups move quickly, and engineering is often prioritized over documentation. Unfortunately, this prioritization leads to release cycles that don’t match, where features release but documentation lags behind. This leads to increased support calls and unhappy customers.
Skyflow is a data privacy vault provider that makes it effortless to secure sensitive data and enforce privacy policies. Skyflow experienced this growth and documentation challenge in early 2023 as it expanded globally from 8 to 22 AWS Regions, including China and other areas of the world such as Saudi Arabia, Uzbekistan, and Kazakhstan. The documentation team, consisting of only two people, found itself overwhelmed as the engineering team, with over 60 people, updated the product to support the scale and rapid feature release cycles.
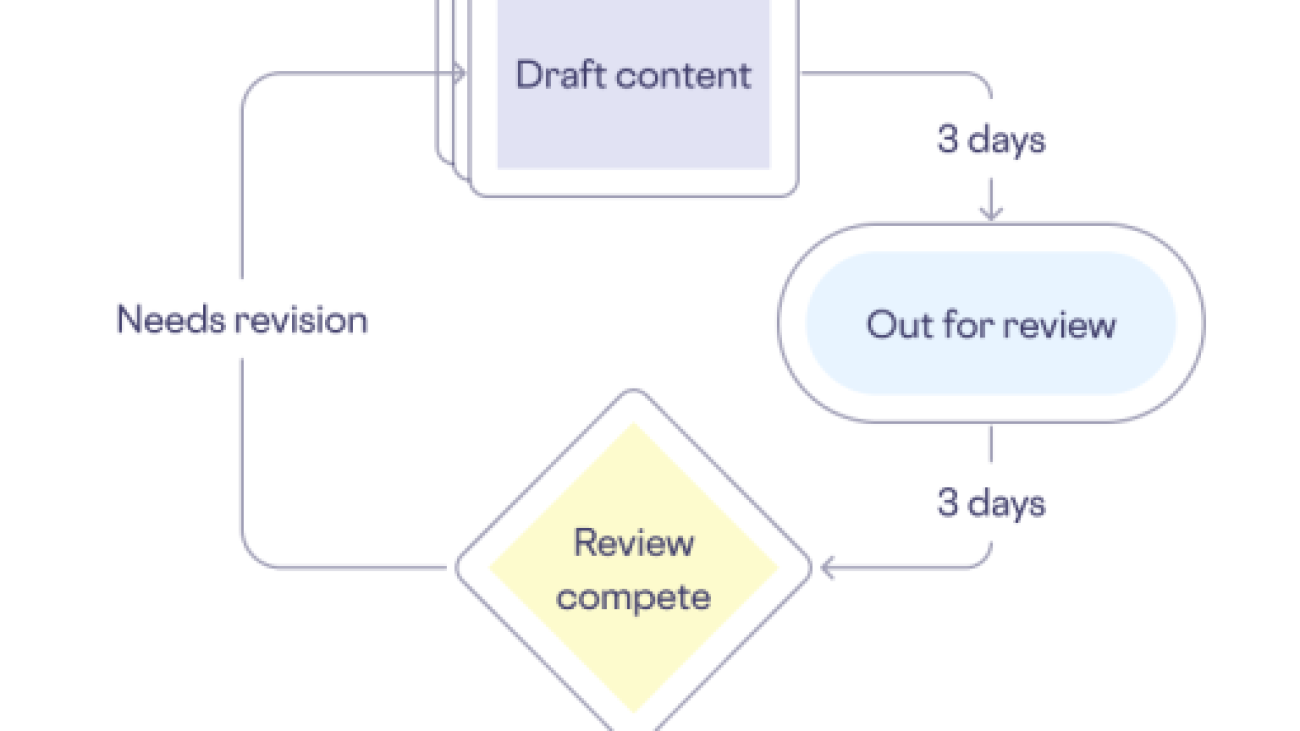
Given the critical nature of Skyflow’s role as a data privacy company, the stakes were particularly high. Customers entrust Skyflow with their data and expect Skyflow to manage it both securely and accurately. The accuracy of Skyflow’s technical content is paramount to earning and keeping customer trust. Although new features were released every other week, documentation for the features took an average of 3 weeks to complete, including drafting, review, and publication. The following diagram illustrates their content creation workflow.

Looking at our documentation workflows, we at Skyflow discovered areas where generative artificial intelligence (AI) could improve our efficiency. Specifically, creating the first draft—often referred to as overcoming the “blank page problem”—is typically the most time-consuming step. The review process could also be long depending on the number of inaccuracies found, leading to additional revisions, additional reviews, and additional delays. Both drafting and reviewing needed to be shorter to make doc target timelines match those of engineering.
To do this, Skyflow built VerbaGPT, a generative AI tool based on Amazon Bedrock. Amazon Bedrock is a fully managed service that makes foundation models (FMs) from leading AI startups and Amazon available through an API, so you can choose from a wide range of FMs to find the model that is best suited for your use case. With the Amazon Bedrock serverless experience, you can get started quickly, privately customize FMs with your own data, and integrate and deploy them into your applications using the AWS tools without having to manage any infrastructure. With Amazon Bedrock, VerbaGPT is able to prompt large language models (LLMs), regardless of model provider, and uses Retrieval Augmented Generation (RAG) to provide accurate first drafts that make for quick reviews.
In this post, we share how Skyflow improved their workflow to create documentation in days instead of weeks using Amazon Bedrock.
VerbaGPT uses Contextual Composition (CC), a technique that incorporates a base instruction, a template, relevant context to inform the execution of the instruction, and a working draft, as shown in the following figure. For the instruction, VerbaGPT tells the LLM to create content based on the specified template, evaluate the context to see if it’s applicable, and revise the draft accordingly. The template includes the structure of the desired output, expectations for what sort of information should exist in a section, and one or more examples of content for each section to guide the LLM on how to process context and draft content appropriately. With the instruction and template in place, VerbaGPT includes as much available context from RAG results as it can, then sends that off for inference. The LLM returns the revised working draft, which VerbaGPT then passes back into a new prompt that includes the same instruction, the same template, and as much context as it can fit, starting from where the previous iteration left off. This repeats until all context is considered and the LLM outputs a draft matching the included template.

The following figure illustrates how Skyflow deployed VerbaGPT on AWS. The application is used by the documentation team and internal users. The solution involves deploying containers on Amazon Elastic Kubernetes Service (Amazon EKS) that host a Streamlit user interface and a backend LLM gateway that is able to invoke Amazon Bedrock or local LLMs, as needed. Users upload documents and prompt VerbaGPT to generate new content. In the LLM gateway, prompts are processed in Python using LangChain and Amazon Bedrock.

When building this solution on AWS, Skyflow followed these steps:
Let’s dive into each step, including the goals and requirements and how they were addressed.
The inference toolkit you choose, if any, dictates your interface with your LLMs and what other tooling is available to you. VerbaGPT uses LangChain instead of directly invoking LLMs. LangChain has broad adoption in the LLM community, so there was a present and likely future ability to take advantage of the latest advancements and community support.
When building a generative AI application, there are many factors to consider. For instance, Skyflow wanted the flexibility to interact with different LLMs depending on the use case. We also needed to keep context and prompt inputs private and secure, which meant not using LLM providers who would log that information or fine-tune their models on our data. We needed to have a variety of models with unique strengths at our disposal (such as long context windows or text labeling) and to have inference redundancy and fallback options in case of outages.
Skyflow chose Amazon Bedrock for its robust support of multiple FMs and its focus on privacy and security. With Amazon Bedrock, all traffic remains inside AWS. VerbaGPT’s primary foundation model is Anthropic Claude 3 Sonnet on Amazon Bedrock, chosen for its substantial context length, though it also uses Anthropic Claude Instant on Amazon Bedrock for chat-based interactions.
To deliver accurate and grounded responses from LLMs without the need for fine-tuning, VerbaGPT uses RAG to fetch data related to the user’s prompt. By using RAG, VerbaGPT became familiar with the nuances of Skyflow’s features and procedures, enabling it to generate informed and complimentary content.
To build your own content creation solution, you collect your corpus into a knowledge base, vectorize it, and store it in a vector database. VerbaGPT includes all of Skyflow’s documentation, blog posts, and whitepapers in a vector database that it can query during inference. Skyflow uses a pipeline to embed content and store the embedding in a vector database. This embedding pipeline is a multi-step process, and everyone’s pipeline is going to look a little different. Skyflow’s pipeline starts by moving artifacts to a common data store, where they are de-identified. If your documents have personally identifiable information (PII), payment card information (PCI), personal health information (PHI), or other sensitive data, you might use a solution like Skyflow LLM Privacy Vault to make de-identifying your documentation straightforward. Next, the pipeline chunks the documents into pieces, then finally calculates vectors for the text chunks and stores them in FAISS, an open source vector store. VerbaGPT uses FAISS because it is fast and straightforward to use from Python and LangChain. AWS also has numerous vector stores to choose from for a more enterprise-level content creation solution, including Amazon Neptune, Amazon Relational Database Service (Amazon RDS) for PostgreSQL, Amazon Aurora PostgreSQL-Compatible Edition, Amazon Kendra, Amazon OpenSearch Service, and Amazon DocumentDB (with MongoDB compatibility). The following diagram illustrates the embedding generation pipeline.

When chunking your documents, keep in mind that LangChain’s default splitting strategy can be aggressive. This can result in chunks of content that are so small that they lack meaningful context and result in worse output, because the LLM has to make (largely inaccurate) assumptions about the context, producing hallucinations. This issue is particularly noticeable in Markdown files, where procedures were fragmented, code blocks were divided, and chunks were often only single sentences. Skyflow created its own Markdown splitter to work more accurately with VerbaGPT’s RAG output content.
After you deploy your embedding pipeline and vector database, you can start intelligently prompting your LLM with a prompt template. VerbaGPT uses a system prompt that instructs the LLM how to behave and includes a directive to use content in the Context section to inform the LLM’s response.
The inference process queries the vector database with the user’s prompt, fetches the results above a certain similarity threshold, and includes the results in the system prompt. The solution then sends the system prompt and the user’s prompt to the LLM for inference.
The following is a sample prompt for drafting with Contextual Composition that includes all the necessary components, system prompt, template, context, a working draft, and additional instructions:
To round out the prompt template, you need to define content templates that match your desired output, such as a blog post, how-to guide, or press release. You can jumpstart this step by sourcing high-quality templates. Skyflow sourced documentation templates from The Good Docs Project. Then, we adapted the how-to and concept templates to align with internal styles and specific needs. We also adapted the templates for use in prompt templates by providing instructions and examples per section. By clearly and consistently defining the expected structure and intended content of each section, the LLM was able to output content in the formats needed, while being both informative and stylistically consistent with Skyflow’s brand.
Amazon Bedrock provides a single API to invoke a variety of FMs. Skyflow also wanted to have inference redundancy and fallback options in case VerbaGPT experienced Amazon Bedrock service limit exceeded errors. To that end, VerbaGPT has an LLM gateway that acts as an abstraction layer that is invoked.
The main component of the gateway is the model catalog, which can return a LangChain llm model object for the specified model, updated to include any parameters. You can create this with a simple if/else statement like that shown in the following code:
By mapping standard input formats into the function and handling all custom LLM object construction within the function, the rest of the code stays clean by using LangChain’s llm object.
The final step was to add a UI on top of the application to hide the inner workings of LLM calls and context. A simple UI is key for generative AI applications, so users can efficiently prompt the LLMs without worrying about the details unnecessary to their workflow. As shown in the solution architecture, VerbaGPT uses Streamlit to quickly build useful, interactive UIs that allow users to upload documents for additional context and draft new documents rapidly using Contextual Composition. Streamlit is Python based, which makes it straightforward for data scientists to be efficient at building UIs.
By using the power of Amazon Bedrock for inferencing and Skyflow for data privacy and sensitive data de-identification, your organization can significantly speed up the production of accurate, secure technical documents, just like the solution shown in this post. Skyflow was able to use existing technical content and best-in-class templates to reliably produce drafts of different content types in minutes instead of days. For example, given a product requirements document (PRD) and an engineering design document, VerbaGPT can produce drafts for a how-to guide, conceptual overview, summary, release notes line item, press release, and blog post within 10 minutes. Normally, this would take multiple individuals from different departments multiple days each to produce.
The new content flow shown in the following figure moves generative AI to the front of all technical content Skyflow creates. During the “Create AI draft” step, VerbaGPT generates content in the approved style and format in just 5 minutes. Not only does this solve the blank page problem, first drafts are created with less interviewing or asking engineers to draft content, freeing them to add value through feature development instead.

The security measures Amazon Bedrock provides around prompts and inference aligned with Skyflow’s commitment to data privacy, and allowed Skyflow to use additional kinds of context, such as system logs, without the concern of compromising sensitive information in third-party systems.
As more people at Skyflow used the tool, they wanted additional content types available: VerbaGPT now has templates for internal reports from system logs, email templates from common conversation types, and more. Additionally, although Skyflow’s RAG context is clean, VerbaGPT is integrated with Skyflow LLM Privacy Vault to de-identify sensitive data in user inference inputs, maintaining Skyflow’s stringent standards of data privacy and security even while using the power of AI for content creation.
Skyflow’s journey in building VerbaGPT has drastically shifted content creation, and the toolkit wouldn’t be as robust, accurate, or flexible without Amazon Bedrock. The significant reduction in content creation time—from an average of around 3 weeks to as little as 5 days, and sometimes even a remarkable 3.5 days—marks a substantial leap in efficiency and productivity, and highlights the power of AI in enhancing technical content creation.
Don’t let your documentation lag behind your product development. Start creating your technical content in days instead of weeks, while maintaining the highest standards of data privacy and security. Learn more about Amazon Bedrock and discover how Skyflow can transform your approach to data privacy.
If you’re scaling globally and have privacy or data residency needs for your PII, PCI, PHI, or other sensitive data, reach out to your AWS representative to see if Skyflow is available in your region.
 Manny Silva is Head of Documentation at Skyflow and the creator of Doc Detective. Technical writer by day and engineer by night, he’s passionate about intuitive and scalable developer experiences and likes diving into the deep end as the 0th developer.
 Jason Westra is a Senior Solutions Architect for AWS AI/ML startups. He provides guidance and technical assistance that enables customers to build scalable, highly available, secure AI and ML workloads in AWS Cloud.

NVIDIA launched NVIDIA Studio at COMPUTEX in 2019. Five years and more than 500 NVIDIA RTX-accelerated apps and games later, it’s bringing AI to even more creators with an array of new RTX technology integrations announced this week at COMPUTEX 2024.
Newly announced NVIDIA GeForce RTX AI laptops — including the ASUS ProArt PX13 and P16 and MSI Stealth 16 AI+ laptops — will feature dedicated RTX Tensor Cores to accelerate AI performance and power-efficient systems-on-a-chip with Windows 11 AI PC features. They join over 200 laptops already accelerated with RTX AI technology.
NVIDIA RTX Video, a collection of technologies including RTX Video Super Resolution and RTX Video HDR that enhance video content streamed in browsers like Google Chrome, Microsoft Edge and Mozilla Firefox, is coming to the free VLC Media Player. And for the first time in June, creators can enjoy these AI-enhanced video effects in popular creative apps like DaVinci Resolve and Wondershare Filmora.
DaVinci Resolve and Cyberlink PowerDirector are adding NVIDIA’s new H.265 Ultra-High-Quality (UHQ) mode, which uses the NVIDIA NVENC to increase high-efficiency video coding (HEVC) and encoding efficiency by 10%.
NVIDIA RTX Remix, a modding platform for remastering classic games with RTX, will soon be made open source, allowing more modders to streamline how assets are replaced and scenes are relit. RTX Remix will also be made accessible via a new REST application programming interface (API) to connect the platform to other modding tools like Blender and Hammer.
Creative apps are continuing to adopt AI-powered NVIDIA DLSS for higher-quality ray-traced visuals in the viewport, with 3D modeling platform Womp being the latest to integrate DLSS 3.5 with Ray Reconstruction.
NVIDIA unveiled Project G-Assist, an RTX-powered AI-assistant technology demo that provides context-aware help for PC games and apps.
The new NVIDIA app beta update adds 120 frames per second AV1 video capture and one-click performance-tuning.
And the latest Game Ready Driver and NVIDIA Studio Driver are available for installation today.
RTX Video is a collection of real-time, AI-based video enhancements — powered by RTX GPUs equipped with AI Tensor Cores — to dramatically improve video quality.
It includes RTX Video Super Resolution — an upscaling technology that removes compression artifacts and generates additional pixels to improve video sharpness and clarity up to 4K — and RTX Video HDR, which transforms standard dynamic range videos into stunning high-dynamic range on HDR10 displays.
NVIDIA has released the RTX Video software development kit, which allows app developers to add RTX Video effects to creator workflows.
Blackmagic Design’s DaVinci Resolve, a powerful video editing app with color correction, visual effects, graphics and audio post-production capabilities, will be one of the first to integrate RTX Video. The integration is being demoed on the COMPUTEX show floor.
Wondershare Filmora, a video editing app with AI tools and pro-level social media video editing features, will support RTX Video HDR, coming soon.

VLC Media Player — an open-source, cross-platform media player, has added RTX Video HDR in its latest beta release, following its recently added support for Mozilla Firefox.
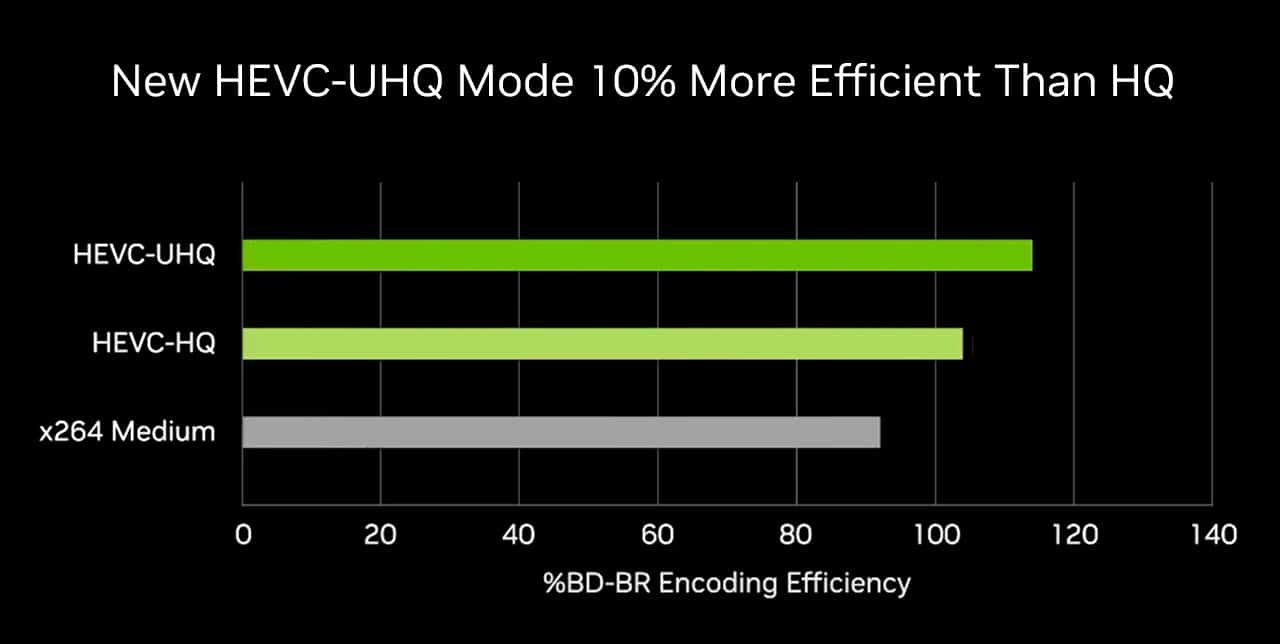
NVIDIA also released a new UHQ mode in NVENC, a dedicated hardware encoder on RTX GPUs, for the HEVC video compression standard (also known as H.265). The new mode increases compression by 10% without diminishing quality, making NVENC HEVC 34% more efficient than the typically used x264 Medium compression standard.
DaVinci Resolve and Cyberlink PowerDirector video editing software will be adding support for the new UHQ mode in their next updates. Stay tuned for official launch dates.
NVIDIA RTX Remix allows modders to easily capture game assets, automatically enhance materials with generative AI tools and create stunning RTX remasters with full ray tracing.
RTX Remix open beta recently added DLSS 3.5 support featuring Ray Reconstruction, an AI model that creates higher-quality images for intensive ray-traced games and apps.
Later this month, NVIDIA will make the RTX Remix Toolkit open source, allowing more modders to streamline how assets are replaced and scenes are relit. The company is also increasing the supported file formats for RTX Remix’s asset ingestor and bolstering RTX Remix’s AI Texture Tools with new models.
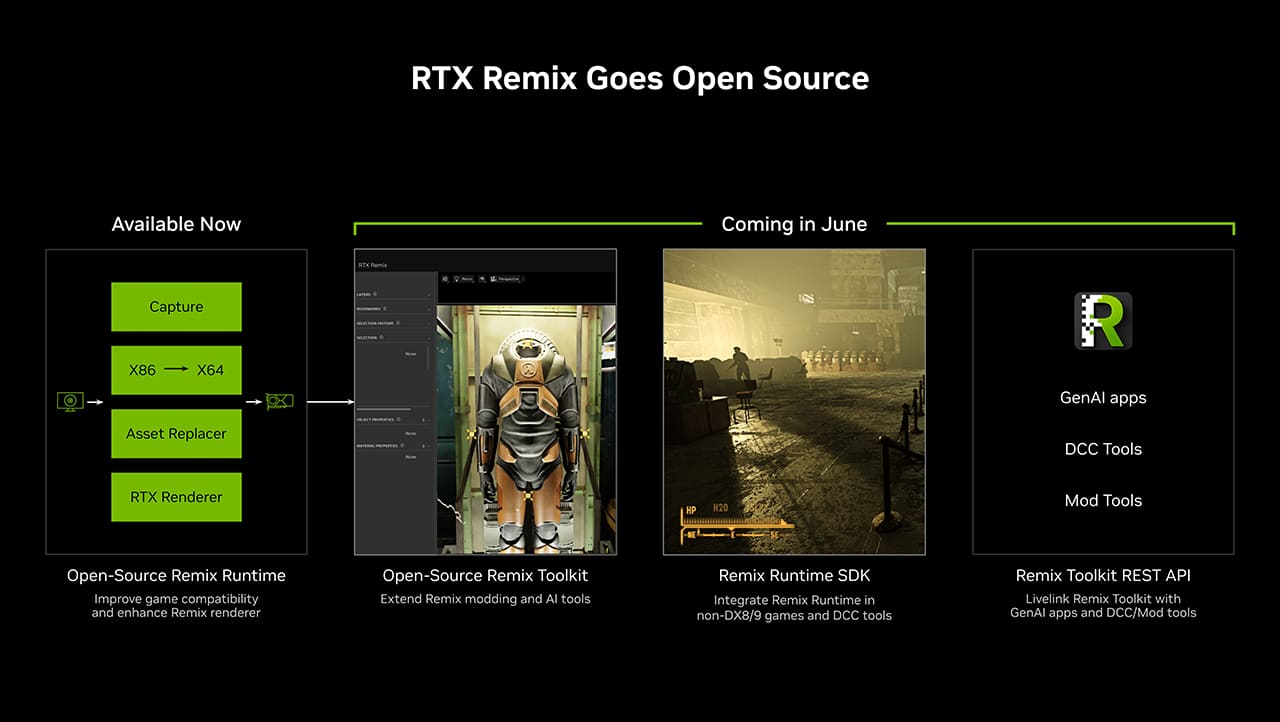
NVIDIA is also making the capabilities of RTX Remix accessible via a new powerful REST API, allowing modders to livelink RTX Remix to other DCC tools such as Blender and modding tools such as Hammer. NVIDIA is also providing an SDK for the RTX Remix runtime to allow modders to deploy RTX Remix’s renderer into other applications and games beyond DirectX 8 and 9 classics.
NVIDIA DLSS 3.5 with Ray Reconstruction enhances ray-traced image quality on NVIDIA RTX and GeForce RTX GPUs by replacing hand-tuned denoisers with an NVIDIA supercomputer-trained AI network that generates higher-quality pixels in between sampled rays.
Previewing content in the viewport, even with high-end hardware, can sometimes offer less-than-ideal image quality, as traditional denoisers require hand-tuning for every scene. With DLSS 3.5, the AI neural network recognizes a wide variety of scenes, producing high-quality preview images and drastically reducing time spent rendering.
The free browser-based 3D modeling platform Womp has added DLSS 3.5 to enhance interactive, photorealistic modeling in the viewport.

Chaos Vantage and D5 Render, two popular professional-grade 3D apps that feature real-time preview modes with ray tracing, have also seen drastic performance increases with DLSS 3.5 — up to a 60% boost from Ray Reconstruction and 4x from all DLSS technologies.
The vast ecosystem of open-source AI models currently available are usually pretrained for general purposes and run in data centers.
To create more effective app-specific AI tools that run on local PCs, NVIDIA has introduced the RTX AI Toolkit — an end-to-end workflow for the customization, optimization and deployment of AI models on RTX AI PCs.
Partners such as Adobe, Topaz and Blackmagic Design are integrating RTX AI Toolkit within their popular creative apps to accelerate AI performance on RTX PCs.
Developers can learn more on the NVIDIA Technical Blog.

India’s AI market is expected to be massive. Yotta Data Services is setting its sights on supercharging it. In this episode of NVIDIA’s AI Podcast, Sunil Gupta, cofounder, managing director and CEO of Yotta Data Services, speaks with host Noah Kravitz about the company’s Shakti Cloud offering, which provides scalable GPU services for enterprises of all sizes. Yotta is the first Indian cloud services provider in the NVIDIA Partner Network, and its Shakti Cloud is India’s fastest AI supercomputing infrastructure, with 16 exaflops of compute capacity supported by over 16,000 NVIDIA H100 Tensor Core GPUs. Tune in to hear Gupta’s insights on India’s potential as a major AI market and how to balance data center growth with sustainability and energy efficiency.
Stay tuned for more AI Podcast episodes recorded live from GTC.
1:18: Background on Yotta
2:58: What is Shakti Cloud?
6:44: What does Shakti Cloud mean for India’s tech sector?
10:36: The self-service, scalable capabilities of Shakti Cloud
19:48: Balancing data center growth with sustainability
24:35: Yotta’s work with NVIDIA
27:48: What’s next for Yotta?
Performance AI: Insights From Arthur’s Adam Wenchel – Ep. 221
In this episode of the NVIDIA AI Podcast, recorded live at the GTC 2024, host Noah Kravitz sits down with Adam Wenchel, co-founder and CEO of Arthur, about the company’s technology, which enhances the performance of AI systems across various metrics like accuracy, explainability and fairness.
How the Ohio Supercomputing Center Drives the Future of Computing – Ep. 213
NASCAR races are all about speed, but even the fastest cars need to factor in safety, especially as rules and tracks change. The Ohio Supercomputer Center is ready to help. In this episode of NVIDIA’s AI Podcast, host Noah Kravitz speaks with Alan Chalker, the director of strategic programs at the OSC, about all things supercomputing.
Replit CEO Amjad Masad on Empowering the Next Billion Software Creators – Ep. 201
Replit aims to empower the next billion software creators. In this week’s episode of NVIDIA’s AI Podcast, host Noah Kraviz dives into a conversation with Replit CEO Amjad Masad about bridging the gap between ideas and software, a task simplified by advances in generative AI.
Rendered.ai CEO Nathan Kundtz on Using AI to Build Better AI – Ep. 177
Data is the fuel that makes artificial intelligence run. Training machine learning and AI systems requires data, but compiling quality real-world data for AI and ML can be difficult and expensive. That’s where synthetic data comes in. In this episode of NVIDIA’s AI Podcast, Nathan Kundtz, founder and CEO of Rendered.ai, speaks with host Noah Kravtiz about a platform as a service for creating synthetic data to train AI models.
Get the AI Podcast through iTunes, Google Play, Amazon Music, Castbox, DoggCatcher, Overcast, PlayerFM, Pocket Casts, Podbay, PodBean, PodCruncher, PodKicker, Soundcloud, Spotify, Stitcher and TuneIn.
Make the AI Podcast better: Have a few minutes to spare? Fill out this listener survey.

 Technology companies based in the U.S. can now apply for the new Google for Startups AI Academy: American Infrastructure program.Read More
As customers seek to incorporate their corpus of knowledge into their generative artificial intelligence (AI) applications, or to build domain-specific models, their data science teams often want to conduct A/B testing and have repeatable experiments. In this post, we discuss a solution that uses infrastructure as code (IaC) to define the process of retrieving and formatting data for model customization and initiating the model customization. This enables you to version and iterate as needed.
With Amazon Bedrock, you can privately and securely customize foundation models (FMs) with your own data to build applications that are specific to your domain, organization, and use case. With custom models, you can create unique user experiences that reflect your company’s style, voice, and services.
Amazon Bedrock supports two methods of model customization:
In this post, we provide guidance on how to create an Amazon Bedrock custom model using HashiCorp Terraform that allows you to automate the process, including preparing datasets used for customization.
Terraform is an IaC tool that allows you to manage AWS resources, software as a service (SaaS) resources, datasets, and more, using declarative configuration. Terraform provides the benefits of automation, versioning, and repeatability.
We use Terraform to download a public dataset from the Hugging Face Hub, convert it to JSONL format, and upload it to an Amazon Simple Storage Service (Amazon S3) bucket with a versioned prefix. We then create an Amazon Bedrock custom model using fine-tuning, and create a second model using continued pre-training. Lastly, we configure Provisioned Throughput for our new models so we can test and deploy the custom models for wider usage.
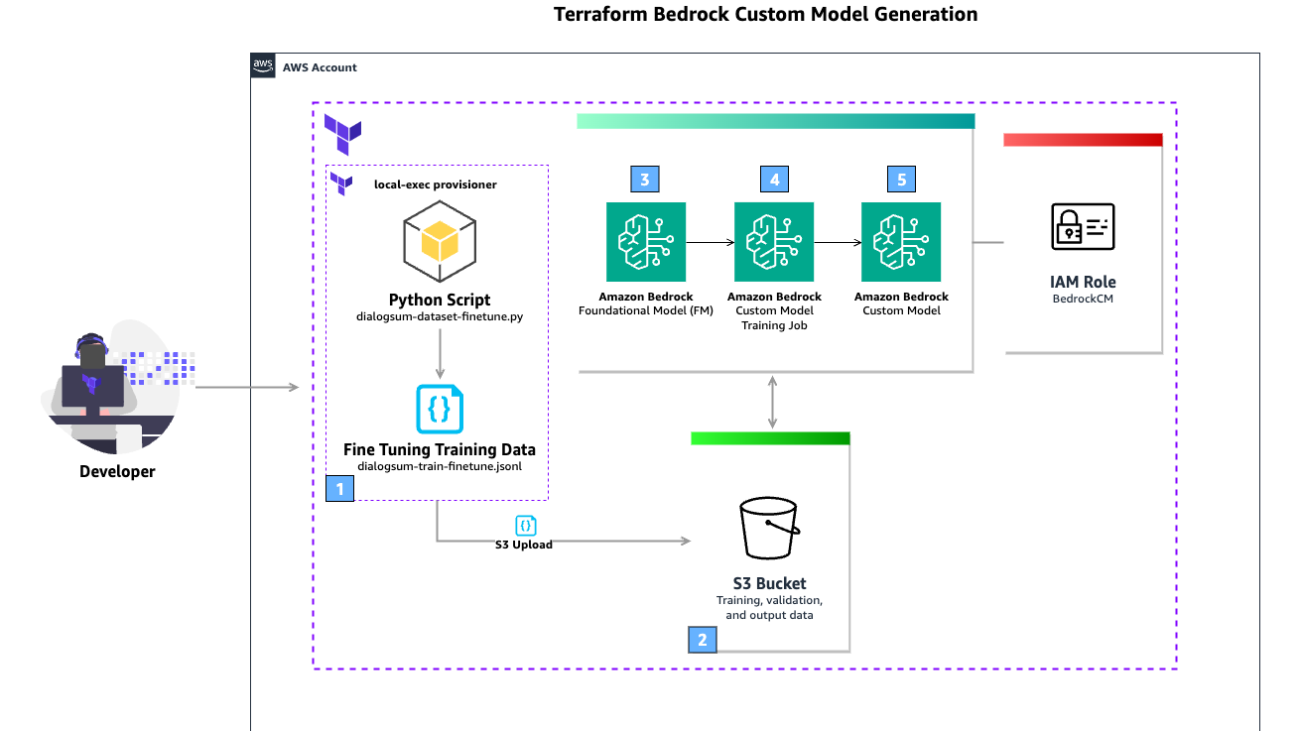
The following diagram illustrates the solution architecture.

The workflow includes the following steps:
terraform apply The Terraform local-exec provisioner is used to run a Python script that downloads the public dataset DialogSum from the Hugging Face Hub. This is then used to create a fine-tuning training JSONL file.The high-level steps to implement this solution are as follows:
This solution requires the following prerequisites:
Complete the following steps to create a new Terraform project and initialize it. You can work in a local folder of your choosing.
bedrockcm and change to that folder:
Now you can work in a text editor and enter in code.
bedrockcm folder and name it main.tf.The output will contain a successful message like the following:
“Terraform has been successfully initialized”
The next step is to add configurations that define data sources that look up information about the context Terraform is currently operating in. These data sources are used when defining the IAM role and policies and when creating the S3 bucket. More information can be found in the Terraform documentation for aws_caller_identity, aws_partition, and aws_region.
main.tf file:In this step, you use Terraform to create an S3 bucket to use during model customization and associated outputs. S3 bucket names are globally unique, so you use the Terraform data source aws_caller_identity, which allows you to look up the current AWS account ID, and use string interpolation to include the account ID in the bucket name. Complete the following steps:
main.tf file:Now you create the service role that Amazon Bedrock will assume to operate the model customization jobs.
You first create a policy document, assume_role_policy, which defines the trust relationship for the IAM role. The policy allows the bedrock.amazonaws.com service to assume this role. You use global condition context keys for cross-service confused deputy prevention. There are also two conditions you specify: the source account must match the current account, and the source ARN must be an Amazon Bedrock model customization job operating from the current partition, AWS Region, and current account.
Complete the following steps:
main.tf file:The second policy document, bedrock_custom_policy, defines permissions for accessing the S3 bucket you created for model training, validation, and output. The policy allows the actions GetObject, PutObject, and ListBucket on the resources specified, which are the ARN of the model_training S3 bucket and all of the buckets contents. You will then create an aws_iam_policy resource, which creates the policy in AWS.
main.tf file:Finally, the aws_iam_role resource, bedrock_custom_role, creates an IAM role with a name prefix of BedrockCM- and a description. The role uses assume_role_policy as its trust policy and bedrock_custom_policy as a managed policy to allow the actions specified.
main.tf file:Python supports creating lightweight virtual environments, each with their own independent set of Python packages installed. You create and activate a virtual environment, and then install the datasets package.
bedrockcm folder, run the following command to create a virtual environment:Now you install the datasets package via pip.
You now use Terraform’s local-exec provisioner to invoke a local Python script that will download the public dataset DialogSum from the Hugging Face Hub. The dataset is already divided into training, validation, and testing splits. This example uses just the training split.
You prepare the data for training by removing the id and topic columns, renaming the dialogue and summary columns, and truncating the dataset to 10,000 records. You then save the dataset in JSONL format. You could also use your own internal private datasets; we use a public dataset for example purposes.
You first create the local Python script named dialogsum-dataset-finetune.py, which is used to download the dataset and save it to disk.
bedrockcm folder and name it dialogsum-dataset-finetune.py.Next, you edit the main.tf file you have been working in and add the terraform_data resource type, uses a local provisioner to invoke your Python script.
main.tf file and add the following Terraform code:Terraform provides the aws_s3_object resource type, which allows you to create and manage objects in S3 buckets. In this step, you reference the S3 bucket you created earlier and the terraform_data resource’s output attribute. This output attribute is how you instruct the Terraform resource graph that these resources need to be created with a dependency order.
main.tf file and add the following Terraform code:Amazon Bedrock has multiple FMs that support customization with fine-tuning. To see a list of the models available, use the following AWS Command Line Interface (AWS CLI) command:
You use the Cohere Command-Light FM for this model customization. You add a Terraform data source to query the foundation model ARN using the model name. You then create the Terraform resource definition for aws_bedrock_custom_model, which creates a model customization job, and immediately returns.
The time it takes for model customization is non-deterministic, and is based on the input parameters, model used, and other factors.
main.tf file and add the following Terraform code:Now you use Terraform to create the data sources and resources defined in your main.tf file, which will start a model customization job.
Terraform will generate a plan and ask you to approve the actions, which will look similar to the following code:
yes to approve the changes.Terraform will now apply your configuration. This process runs for a few minutes. At this time, your custom model is not yet ready for use; it will be in a Training state. Wait for training to finish before continuing. You can review the status on the Amazon Bedrock console on the Custom models page.

When the process is complete, you receive a message like the following:
You can also view the status on the Amazon Bedrock console.

You have now created an Amazon Bedrock custom model using fine-tuning.
Amazon Bedrock allows you to run inference on custom models by purchasing Provisioned Throughput. This guarantees a consistent level of throughput in exchange for a term commitment. You specify the number of model units needed to meet your application’s performance needs. For evaluating custom models initially, you can purchase Provisioned Throughput hourly (on-demand) with no long-term commitment. With no commitment, a quota of one model unit is available per Provisioned Throughput.
You create a new resource for Provisioned Throughput, associate one of your custom models, and provide a name. You omit the commitment_duration attribute to use on-demand.
main.tf file and add the following Terraform code:Now you use Terraform to create the resources defined in your main.tf file.
The output will contain a successful message like the following:
Note the following best practices when using this solution:
When you no longer need the resources created as part of this post, clean up those resources to save associated costs. You can clean up the AWS resources created in this post using Terraform with the terraform destroy command.
First, you need to modify the configuration of the S3 bucket in the main.tf file to enable force destroy so the contents of the bucket will be deleted, so the bucket itself can be deleted. This will remove all of the sample data contained in the S3 bucket as well as the bucket itself. Make sure there is no data you want to retain in the bucket before proceeding.
force_destroy attribute of the S3 bucket:In this post, we demonstrated how to create Amazon Bedrock custom models using Terraform. We introduced GitOps to manage model configuration and data associated with your custom models.
We recommend testing the code and examples in your development environment, and making appropriate changes as required to use them in production. Consider your model consumption requirements when defining your Provisioned Throughput.
We welcome your feedback! If you have questions or suggestions, leave them in the comments section.
 Josh Famestad is a Solutions Architect at AWS helping public sector customers accelerate growth, add agility, and reduce risk with cloud-based solutions.
 Kevon Mayers is a Solutions Architect at AWS. Kevon is a Core Contributor for Terraform and has led multiple Terraform initiatives within AWS. Prior to joining AWS, he was working as a DevOps engineer and developer, and before that was working with the GRAMMYs/The Recording Academy as a studio manager, music producer, and audio engineer.
 Tyler Lynch is a Principal Solution Architect at AWS. Tyler leads Terraform provider engineering at AWS and is a Core Contributor for Terraform.
Businesses today heavily rely on video conferencing platforms for effective communication, collaboration, and decision-making. However, despite the convenience these platforms offer, there are persistent challenges in seamlessly integrating them into existing workflows. One of the major pain points is the lack of comprehensive tools to automate the process of joining meetings, recording discussions, and extracting actionable insights from them. This gap results in inefficiencies, missed opportunities, and limited productivity, hindering the seamless flow of information and decision-making processes within organizations.
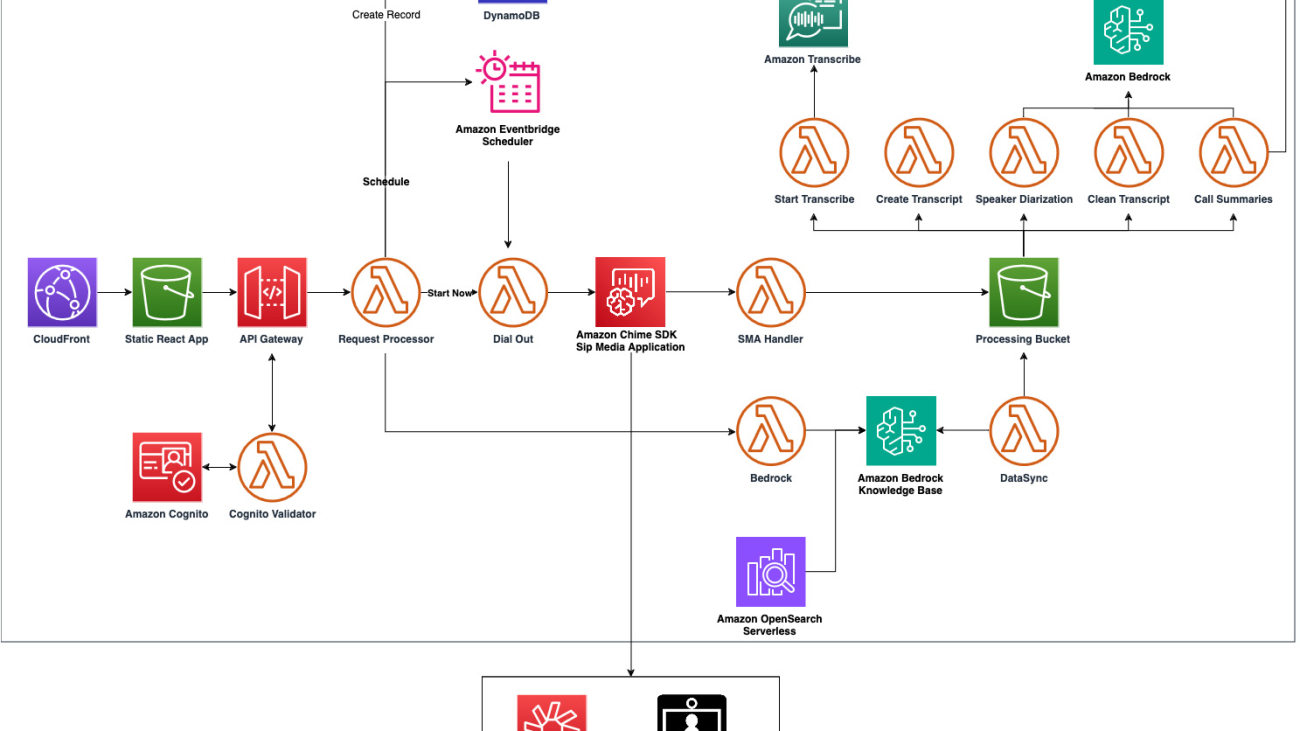
To address this challenge, we’ve developed the Amazon Chime SDK Meeting Summarizer application deployed with the Amazon Cloud Development Kit (AWS CDK). This application uses an Amazon Chime SDK SIP media application, Amazon Transcribe, and Amazon Bedrock to seamlessly join meetings, record meeting audio, and process recordings for transcription and summarization. By integrating these services programmatically through the AWS CDK, we aim to streamline the meeting workflow, empower users with actionable insights, and drive better decision-making outcomes. Our solution currently integrates with popular platforms such as Amazon Chime, Zoom, Cisco Webex, Microsoft Teams, and Google Meet.
In addition to deploying the solution, we’ll also teach you the intricacies of prompt engineering in this post. We guide you through addressing parsing and information extraction challenges, including speaker diarization, call scheduling, summarization, and transcript cleaning. Through detailed instructions and structured approaches tailored to each use case, we illustrate the effectiveness of Amazon Bedrock, powered by Anthropic Claude models.
The following infrastructure diagram provides an overview of the AWS services that are used to create this meeting summarization bot. The core services used in this solution are:
For a detailed explanation of the solution, refer to the Amazon Chime Meeting Summarizer documentation.

Before diving into the project setup, make sure you have the following requirements in place:
Refer to our GitHub repository for a step-by-step guide on deploying this solution.
To capture the audio of a meeting, an Amazon Chime SDK SIP media application will dial into the meeting using the meeting provider’s dial-in number. The Amazon Chime SDK SIP media application (SMA) is a programable telephony service that will make a phone call over the public switched telephone network (PSTN) and capture the audio. SMA uses a request/response model with an AWS Lambda function to process actions. In this demo, an outbound call is made using the CreateSipMediaApplicationCall API. This will cause the Lambda function to be invoked with a NEW_OUTBOUND_CALL event.
Because most dial-in mechanisms for meetings require a PIN or other identification to be made, the SMA will use the SendDigits action to send these dual tone multi-frequency (DTMF) digits to the meeting provider. When the application has joined the meeting, it will introduce itself using the Speak action and then record the audio using the RecordAudio action. This audio will be saved in MP3 format and saved to an Amazon Simple Storage Service (Amazon S3) bucket.
Because the SMA is joined to the meeting as a participant, the audio will be a single channel of all the participants. To process this audio file, Amazon Transcribe will be used with the ShowSpeakerLabels setting:
With speaker diarization, Amazon Transcribe will distinguish different speakers in the transcription output. The JSON file that is produced will include the transcripts and items along with speaker labels grouped by speaker with start and end timestamps. With this information provided by Amazon Transcribe, a turn-by-turn transcription can be generated by parsing through the JSON. The result will be a more readable transcription. See the following example:
spk_0: Hey Court , how’s it going ?
spk_1: Hey Adam, it’s going good . How are you
spk_0: doing ? Well , uh hey , thanks for uh joining me today on this call . I’m excited to talk to you about uh architecting on Aws .
spk_1: Awesome . Yeah , thank you for inviting me . So ,
spk_0: uh can you tell me a little bit about uh the servers you’re currently using on premises ?
spk_1: Yeah . So for our servers , we currently have four web servers running with four gigabyte of RA M and two CP US and we’re currently running Linux as our operating system .
spk_0: Ok . And what are you using for your database ?
spk_1: Oh , yeah , for a database , we currently have a 200 gigabyte database running my as to will and I can’t remember the version . But um the thing about our database is sometimes it lags . So we’re really looking for a faster option for
spk_0: that . So , um when you’re , you’re noticing lags with reads or with rights to the database
spk_1: with , with reads .
spk_0: Yeah . Ok . Have you heard of uh read replicas ?
spk_1: I have not .
spk_0: Ok . That could be a potential uh solution to your problem . Um If you don’t mind , I’ll go ahead and just uh send you some information on that later for you and your team to review .
spk_1: Oh , yeah , thank you , Adam . Yeah . Anything that could help . Yeah , be really helpful .
spk_0: Ok , last question before I let you go . Um what are you doing uh to improve the security of your on premises ? Uh data ?
spk_1: Yeah , so , so number one , we have been experiencing some esto injection attacks . We do have a Palo Alto firewall , but we’re not able to fully achieve layer server protection . So we do need a better option for that .
spk_0: Have you ex have you experienced uh my sequel attacks in the past or sequel injections ?
spk_1: Yes.
spk_0: Ok , great . Uh All right . And then are you guys bound by any compliance standards like PC I DS S or um you know GDR ? Uh what’s another one ? Any of those C just uh
spk_1: we are bound by fate , moderate complaints . So .
spk_0: Ok . Well , you have to transition to fed ramp high at any time .
spk_1: Uh Not in the near future . No .
spk_0: Ok . All right , Court . Well , thanks for that uh context . I will be reaching out to you again here soon with a follow up email and uh yeah , I’m looking forward to talking to you again uh next week .
spk_1: Ok . Sounds good . Thank you , Adam for your help .
spk_0: All right . Ok , bye .
spk_1: All right . Take care .
Here, speakers have been identified based on the order they spoke. Next, we show you how to further enhance this transcription by identifying speakers using their names, rather than spk_0, spk_1, and so on.
This application uses a large language model (LLM) to complete the following tasks:
The first task is to enhance the transcription by assigning names to speaker labels. These names are extracted from the transcript itself when a person introduces themselves and then are returned as output in JSON format by the LLM.
Special instructions are provided for cases where only one speaker is identified to provide consistency in the response structure. By following these instructions, the LLM will process the meeting transcripts and accurately extract the names of the speakers without additional words or spacing in the response. If no names are identified by the LLM, we prompted the model to return an Unknown tag.
In this demo, the prompts are designed using Anthropic Claude Sonnet as the LLM. You may need to tune the prompts to modify the solution to use another available model on Amazon Bedrock.
Human: You are a meeting transcript names extractor. Go over the transcript and extract the names from it. Use the following instructions in the <instructions></instructions> xml tags
<transcript> ${transcript} </transcript>
<instructions>
– Extract the names like this example – spk_0: “name1”, spk_1: “name2”.
– Only extract the names like the example above and do not add any other words to your response
– Your response should only have a list of “speakers” and their associated name separated by a “:” surrounded by {}
– if there is only one speaker identified then surround your answer with {}
– the format should look like this {“spk_0” : “Name”, “spk_1: “Name2”, etc.}, no unnecessary spacing should be added
</instructions>Assistant: Should I add anything else in my answer?
Human: Only return a JSON formatted response with the Name and the speaker label associated to it. Do not add any other words to your answer. Do NOT EVER add any introductory sentences in your answer. Only give the names of the speakers actively speaking in the meeting. Only give the names of the speakers actively speaking in the meeting in the format shown above.
Assistant:
After the speakers are identified and returned in JSON format, we can replace the generic speaker labels with the name attributed speaker labels in the transcript. The result will be a more enhanced transcription:
Adam: Hey Court , how’s it going ?
Court: Hey Adam , it’s going good . How are you
Adam: doing ? Well , uh hey , thanks for uh joining me today on this call . I’m excited to talk to you about uh architecting on Aws .
Court: Awesome . Yeah , thank you for inviting me . So ,
Adam: uh can you tell me a little bit about uh the servers you’re currently using on premises ?
Court: Yeah . So for our servers , we currently have four web servers running with four gigabyte of RA M and two CP US and we’re currently running Linux as our operating system .… transcript continues….
But what if a speaker can’t be identified because they never introduced themselves. In that case, we want to let the LLM leave them as unknown, rather than try to force or a hallucinate a label.
We can add the following to the instructions:
If no name is found for a speaker, use UNKNOWN_X where X is the speaker label number
The following transcript has three speakers, but only two identified speakers. The LLM must label a speaker as UNKNOWN rather than forcing a name or other response on the speaker.
spk_0: Yeah .
spk_1: Uh Thank you for joining us Court . I am your account executive here at Aws . Uh Joining us on the call is Adam , one of our solutions architect at Aws . Adam would like to introduce yourself .
spk_2: Hey , everybody . High Court . Good to meet you . Uh As your dedicated solutions architect here at Aws . Uh my job is to help uh you at every step of your cloud journey . Uh My , my role involves helping you understand architecting on Aws , including best practices for the cloud . Uh So with that , I’d love it if you could just take a minute to introduce yourself and maybe tell me a little about what you’re currently running on premises .
spk_0: Yeah , great . It’s uh great to meet you , Adam . Um My name is Court . I am the V P of engineering here at any company . And uh yeah , really excited to hear what you can do for us .
spk_1: Thanks , work . Well , we , we talked a little bit of last time about your goals for migrating to Aws . I invited Adam to , to join us today to get a better understanding of your current infrastructure and other technical requirements .
spk_2: Yeah . So co could you tell me a little bit about what you’re currently running on premises ?
spk_1: Sure . Yeah , we’re , uh ,
spk_0: we’re running a three tier web app on premise .
When we give Claude Sonnet the option to not force a name , we see results like this:
{“spk_0”: “Court”, “spk_1”: “UNKNOWN_1”, “spk_2”: “Adam”}
Now that the transcript has been diarized with speaker attributed names, we can use Amazon Bedrock to clean the transcript. Cleaning tasks include eliminating distracting filler words, identifying and rectifying misattributed homophones, and addressing any diarization errors stemming from subpar audio quality. For guidance on accomplishing these tasks using Anthropic Claude Sonnet models, see the provided prompt:
Human: You are a transcript editor, please follow the <instructions> tags.
<transcript> ${transcript} </transcript>
<instructions>
– The <transcript> contains a speaker diarized transcript
– Go over the transcript and remove all filler words. For example “um, uh, er, well, like, you know, okay, so, actually, basically, honestly, anyway, literally, right, I mean.”
– Fix any errors in transcription that may be caused by homophones based on the context of the sentence. For example, “one instead of won” or “high instead of hi”
– In addition, please fix the transcript in cases where diarization is improperly performed. For example, in some cases you will see that sentences are split between two speakers. In this case infer who the actual speaker is and attribute it to them.– Please review the following example of this,
Input Example
Court: Adam you are saying the wrong thing. What
Adam: um do you mean, Court?Output:
Court: Adam you are saying the wrong thing.
Adam: What do you mean, Court?– In your response, return the entire cleaned transcript, including all of the filler word removal and the improved diarization. Only return the transcript, do not include any leading or trailing sentences. You are not summarizing. You are cleaning the transcript. Do not include any xml tags <>
</instructions>
Assistant:
After the initial transcript is passed into the LLM, it returns a polished transcript, free from errors. The following are excerpts from the transcript:
Input:
spk_0: Hey Court , how’s it going ?
spk_1: Hey Adam, it’s going good . How are you
spk_0: doing ? Well , uh hey , thanks for uh joining me today on this call . I’m excited to talk to you about uh architecting on Aws .
Output:
Adam: Hey Court, how’s it going?
Court: Hey Adam, it’s going good. How are you?
Adam: Thanks for joining me today. I’m excited to talk to you about architecting on AWS
Input:
Adam: Have you ex have you experienced uh my sequel attacks in the past or sequel injections ?
Court: Yes .
Output:
Adam: Have you experienced SQL injections in the past?
Court: Yes.
Input:
Adam: Ok , great . Uh All right . And then are you guys bound by any compliance standards like PC I DS S or um you know GDR ? Uh what’s another one ? Any of those C just uh
Court: we are bound by fate , moderate complaints . So .
Adam: Ok . Well , you have to transition to fed ramp high at any time
Output:
Adam: Ok, great. And then are you guys bound by any compliance standards like PCI DSS or GDPR? What’s another one? Any of those? CJIS?
Court: We are bound by FedRAMP moderate compliance.
Adam: Ok. Will you have to transition to FedRAMP high at any time?
Now that the transcript has been created by Amazon Transcribe, diarized, and enhanced with Amazon Bedrock, the transcript can be summarized with Amazon Bedrock and an LLM. A simple version might look like the following:
Human:
You are a transcript summarizing bot. You will go over the transcript below and provide a summary of the transcript.
Transcript: ${transcript}Assistant:
Although this will work, it can be improved with additional instructions. You can use XML tags to provide structure and clarity to the task requirements:
Human: You are a transcript summarizing bot. You will go over the transcript below and provide a summary of the content within the <instructions> tags.
<transcript> ${transcript} </transcript><instructions>
– Go over the conversation that was had in the transcript.
– Create a summary based on what occurred in the meeting.
– Highlight specific action items that came up in the meeting, including follow-up tasks for each person.
</instructions>Assistant:
Because meetings often involve action items and date/time information, instructions are added to explicitly request the LLM to include this information. Because the LLM knows the speaker names, each person is assigned specific action items for them if any are found. To prevent hallucinations, an instruction is included that allows the LLM to fail gracefully.
Human: You are a transcript summarizing bot. You will go over the transcript below and provide a summary of the content within the <instructions> tags.
<transcript> ${transcript} </transcript>
<instructions>
– Go over the conversation that was had in the transcript.
– Create a summary based on what occurred in the meeting.
– Highlight specific action items that came up in the meeting, including follow-up tasks for each person.
– If relevant, focus on what specific AWS services were mentioned during the conversation.
– If there’s sufficient context, infer the speaker’s role and mention it in the summary. For instance, “Bob, the customer/designer/sales rep/…”
– Include important date/time, and indicate urgency if necessary (e.g., deadline/ETAs for outcomes and next steps)
</instructions>Assistant: Should I add anything else in my answer?
Human: If there is not enough context to generate a proper summary, then just return a string that says “Meeting not long enough to generate a transcript.
Assistant:
Alternatively, we invite you to explore Amazon Transcribe Call Analytics generative call summarization for an out-of-the-box solution that integrates directly with Amazon Transcribe.
Included in this demo is a React-based UI that will start the process of the SMA joining the meeting. Because this demo supports multiple meeting types, the invitation must be parsed. Rather than parse this with a complex regular expression (regex), it will be processed with an LLM. This prompt will first identify the meeting type: Amazon Chime, Zoom, Google Meet, Microsoft Teams, or Cisco Webex. Based on the meeting type, the LLM will extract the meeting ID and dial-in information. Simply copy/paste the meeting invitation to the UI, and the invitation will be processed by the LLM to determine how to call the meeting provider. This can be done for a meeting that is currently happening or scheduled for a future meeting. See the following example:
Human: You are an information extracting bot. Go over the meeting invitation below and determine what the meeting id and meeting type are <instructions></instructions> xml tags
<meeting_invitation>
${meetingInvitation}
</meeting_invitation><instructions>
1. Identify Meeting Type:
Determine if the meeting invitation is for Chime, Zoom, Google, Microsoft Teams, or Webex meetings.2. Chime, Zoom, and Webex
– Find the meetingID
– Remove all spaces from the meeting ID (e.g., #### ## #### -> ##########).3. If Google – Instructions Extract Meeting ID and Dial in
– For Google only, the meeting invitation will call a meetingID a ‘pin’, so treat it as a meetingID
– Remove all spaces from the meeting ID (e.g., #### ## #### -> ##########).
– Extract Google and Microsoft Dial-In Number (if applicable):
– If the meeting is a Google meeting, extract the unique dial-in number.
– Locate the dial-in number following the text “to join by phone dial.”
– Format the extracted Google dial-in number as (+1 ###-###-####), removing dashes and spaces. For example +1 111-111-1111 would become +11111111111)4. If Microsoft Teams – Instructions if meeting type is Microsoft Teams.
– Pay attention to these instructions carefully
– The meetingId we want to store in the generated response is the ‘Phone Conference ID’ : ### ### ###
– in the meeting invitation, there are two IDs a ‘Meeting ID’ (### ### ### ##) and a ‘Phone Conference ID’ (### ### ###), ignore the ‘Meeting ID’ use the ‘Phone Conference ID’
– The meetingId we want to store in the generated response is the ‘Phone Conference ID’ : ### ### ###
– The meetingID that we want is referenced as the ‘Phone Conference ID’ store that one as the meeting ID.
– Find the phone number, extract it and store it as the dialIn number (format (+1 ###-###-####), removing dashes and spaces. For example +1 111-111-1111 would become +11111111111)5. meetingType rules
– The only valid responses for meetingType are ‘Chime’, ‘Webex’, ‘Zoom’, ‘Google’, ‘Teams’6. Generate Response:
– Create a response object with the following format:
{
meetingId: “meeting id goes here with spaces removed”,
meetingType: “meeting type goes here (options: ‘Chime’, ‘Webex’, ‘Zoom’, ‘Google’, ‘Teams’)”,
dialIn: “Insert Google/Microsoft Teams Dial-In number with no dashes or spaces, or N/A if not a Google/Microsoft Teams Meeting”
}Meeting ID Formats:
Zoom: ### #### ####
Webex: #### ### ####
Chime: #### ## ####
Google: ### ### ####
Teams: ### ### ###Ensure that the program does not create fake phone numbers and only includes the Microsoft or Google dial-in number if the meeting type is Google or Teams.
</instructions>
Assistant: Should I add anything else in my answer?
Human: Only return a JSON formatted response with the meetingid and meeting type associated to it. Do not add any other words to your answer. Do not add any introductory sentences in your answer.
Assistant:
With this information extracted from the invitation, a call is placed to the meeting provider so that the SMA can join the meeting as a participant.
If you deployed this sample solution, clean up your resources by destroying the AWS CDK application from the AWS Command Line Interface (AWS CLI). This can be done using the following command:
In this post, we showed how to enhance Amazon Transcribe with an LLM using Amazon Bedrock by extracting information that would otherwise be difficult for a regex to extract. We also used this method to extract information from a meeting invitation sent from an unknown source. Finally, we showed how to use an LLM to provide a summarization of the meeting using detailed instructions to produce action items and include date/time information in the response.
We invite you to deploy this demo into your own account. We’d love to hear from you. Let us know what you think in the issues forum of the Amazon Chime SDK Meeting Summarizer GitHub repository. Alternatively, we invite you to explore other methods for meeting transcription and summarization, such as Amazon Live Meeting Assistant, which uses a browser extension to collect call audio.
 Adam Neumiller is a Solutions Architect for AWS. He is focused on helping public sector customers drive cloud adoption through the use of infrastructure as code. Outside of work, he enjoys spending time with his family and exploring the great outdoors.
 Court Schuett is a Principal Specialist SA – GenAI focused on third party models and how they can be used to help solve customer problems. When he’s not coding, he spends his time exploring parks, traveling with his family, and listening to music.
 Christopher Lott is a Principal Solutions Architect in the AWS AI Language Services team. He has 20 years of enterprise software development experience. Chris lives in Sacramento, California, and enjoys gardening, cooking, aerospace/general aviation, and traveling the world.
 Hang Su is a Senior Applied Scientist at AWS AI. He has been leading AWS Transcribe Contact Lens Science team. His interest lies in call-center analytics, LLM-based abstractive summarization, and general conversational AI.
 Jason Cai is an Applied Scientist at AWS AI. He has made contributions to AWS Bedrock, Contact Lens, Lex and Transcribe. His interests include LLM agents, dialogue summarization, LLM prediction refinement, and knowledge graph.
 Edgar Costa Filho is a Senior Cloud Infrastructure Architect with a focus on Foundations and Containers, including expertise in integrating Amazon EKS with open-source tooling like Crossplane, Terraform, and GitOps. In his role, Edgar is dedicated to assisting customers in achieving their business objectives by implementing best practices in cloud infrastructure design and management.