Announcing Hacker Cup AI Track at NeurIPS 2024

The PyTorch team in partnership with Meta Hacker Cup, and Microsoft Research, are excited to announce the Hacker Cup AI Track at NeurIPS 2024. This will be the first AI track for the popular Meta Hacker Cup programming competition designed to assess the capabilities of Generative AI in performing autonomous code generation tasks. We aim to test the limits of AI in complex coding challenges and measure the performance gap between AI systems and human programmers. We will provide access to all Hacker Cup problems since 2011 alongside their respective solutions in a multimodal (image and text) format, and utilize the existing Hacker Cup infrastructure for competitor evaluation. Featuring both open evaluation, open model and open evaluation, closed model tracks, this competition invites diverse participation from research institutions of varied interests and resource constraints, including academic labs, AI startups, large technology companies, and AI enthusiasts. Our goal is to develop and democratize meaningful advancements in code automation with the very first open evaluation process for competitive AI programmers. Registration will begin in Early August, with our first qualification round on September 20th.

For more information please visit our website at https://www.facebook.com/codingcompetitions/hacker-cup/ and join our Discord at discord.gg/wWeN9hTH32

Read More

Improve productivity when processing scanned PDFs using Amazon Q Business

Improve productivity when processing scanned PDFs using Amazon Q Business

Amazon Q Business is a generative AI-powered assistant that can answer questions, provide summaries, generate content, and extract insights directly from the content in digital as well as scanned PDF documents in your enterprise data sources without needing to extract the text first.

Customers across industries such as finance, insurance, healthcare life sciences, and more need to derive insights from various document types, such as receipts, healthcare plans, or tax statements, which are frequently in scanned PDF format. These document types often have a semi-structured or unstructured format, which requires processing to extract text before indexing with Amazon Q Business.

The launch of scanned PDF document support with Amazon Q Business can help you seamlessly process a variety of multi-modal document types through the AWS Management Console and APIs, across all supported Amazon Q Business AWS Regions. You can ingest documents, including scanned PDFs, from your data sources using supported connectors, index them, and then use the documents to answer questions, provide summaries, and generate content securely and accurately from your enterprise systems. This feature eliminates the development effort required to extract text from scanned PDF documents outside of Amazon Q Business, and improves the document processing pipeline for building your generative artificial intelligence (AI) assistant with Amazon Q Business.

In this post, we show how to asynchronously index and run real-time queries with scanned PDF documents using Amazon Q Business.

Solution overview

You can use Amazon Q Business for scanned PDF documents from the console, AWS SDKs, or AWS Command Line Interface (AWS CLI).

Amazon Q Business provides a versatile suite of data connectors that can integrate with a wide range of enterprise data sources, empowering you to develop generative AI solutions with minimal setup and configuration. To learn more, visit Amazon Q Business, now generally available, helps boost workforce productivity with generative AI.

After your Amazon Q Business application is ready to use, you can directly upload the scanned PDFs into an Amazon Q Business index using either the console or the APIs. Amazon Q Business offers multiple data source connectors that can integrate and synchronize data from multiple data repositories into single index. For this post, we demonstrate two scenarios to use documents: one with the direct document upload option, and another using the Amazon Simple Storage Service (Amazon S3) connector. If you need to ingest documents from other data sources, refer to Supported connectors for details on connecting additional data sources.

Index the documents

In this post, we use three scanned PDF documents as examples: an invoice, a health plan summary, and an employment verification form, along with some text documents.

The first step is to index these documents. Complete the following steps to index documents using the direct upload feature of Amazon Q Business. For this example, we upload the scanned PDFs.

  1. On the Amazon Q Business console, choose Applications in the navigation pane and open your application.
  2. Choose Add data source.
  3. Choose Upload Files.
  4. Upload the scanned PDF files.

You can monitor the uploaded files on the Data sources tab. The Upload status changes from Received to Processing to Indexed or Updated, as which point the file has been successfully indexed into the Amazon Q Business data store. The following screenshot shows the successfully indexed PDFs.

Indexed documents in uploaded files section.

The following steps demonstrate how to integrate and synchronize documents using an Amazon S3 connector with Amazon Q Business. For this example, we index the text documents.

  1. On the Amazon Q Business console, choose Applications in the navigation pane and open your application.
  2. Choose Add data source.
  3. Choose Amazon S3 for the connector.
  4. Enter the information for Name, VPC and security group settings, IAM role, and Sync mode.
  5. To finish connecting your data source to Amazon Q Business, choose Add data source.
  6. In the Data source details section of your connector details page, choose Sync now to allow Amazon Q Business to begin syncing (crawling and ingesting) data from your data source.

When the sync job is complete, your data source is ready to use. The following screenshot shows all five documents (scanned and digital PDFs, and text files) are successfully indexed.

Amazon S3 connector

The following screenshot shows a comprehensive view of the two data sources: the directly uploaded documents and the documents ingested through the Amazon S3 connector.

Amazon Q Business data sources.

Now let’s run some queries with Amazon Q Business on our data sources.

Queries on dense, unstructured, scanned PDF documents

Your documents might be dense, unstructured, scanned PDF document types. Amazon Q Business can identify and extract the most salient information-dense text from it. In this example, we use the multi-page health plan summary PDF we indexed earlier. The following screenshot shows an example page.

Health plan summary document.

This is an example of a health plan summary document.

In the Amazon Q Business web UI, we ask “What is the annual total out-of-pocket maximum, mentioned in the health plan summary?”

Amazon Q Business searches the indexed document, retrieves the relevant information, and generates an answer while citing the source for its information. The following screenshot shows the sample output.

Amazon Q Business output

Queries on structured, tabular, scanned PDF documents

Documents might also contain structured data elements in tabular format. Amazon Q Business can automatically identify, extract, and linearize structured data from scanned PDFs to accurately resolve any user queries. In the following example, we use the invoice PDF we indexed earlier. The following screenshot shows an example.

Invoice

This is an example of an invoice.

In the Amazon Q Business web UI, we ask “How much were the headphones charged in the invoice?”

Amazon Q Business searches the indexed document and retrieves the answer with reference to the source document. The following screenshot shows that Amazon Q Business is able to extract bill information from the invoice.

Amazon Q Business output

Queries on semi-structured forms

Your documents might also contain semi-structured data elements in a form, such as key-value pairs. Amazon Q Business can accurately satisfy queries related to these data elements by extracting specific fields or attributes that are meaningful for the queries. In this example, we use the employment verification PDF. The following screenshot shows an example.

Employment verification sample

This is an example of an employment verification form.

In the Amazon Q Business web UI, we ask “What is the applicant’s date of employment in the employment verification form?” Amazon Q Business searches the indexed employment verification document and retrieves the answer with reference to the source document.

Amazon Q Business output

Index documents using the AWS CLI

In this section, we show you how to use the AWS CLI to ingest structured and unstructured documents stored in an S3 bucket into an Amazon Q Business index. You can quickly retrieve detailed information about your documents, including their statuses and any errors occurred during indexing. If you’re an existing Amazon Q Business user and have indexed documents in various formats, such as scanned PDFs and other supported types, and you now want to reindex the scanned documents, complete the following steps:

  1.  Check the status of each document to filter failed documents according to the status "DOCUMENT_FAILED_TO_INDEX". You can filter the documents based on this error message:

"errorMessage": "Document cannot be indexed since it contains no text to index and search on. Document must contain some text."

If you’re a new user and haven’t indexed any documents, you can skip this step.

The following is an example of using the ListDocuments API to filter documents with a specific status and their error messages:

aws qbusiness list-documents --region <region> 
--application-id <application-id> 
--index-id <index-id> 
--query "documentDetailList[?status=='DOCUMENT_FAILED_TO_INDEX'].{DocumentId:documentId, ErrorMessage:error.errorMessage}"
--output json

The following screenshot shows the AWS CLI output with a list of failed documents with error messages.

List of failed documents

Now you batch-process the documents. Amazon Q Business supports adding one or more documents to an Amazon Q Business index.

  1. Use the BatchPutDocument API to ingest multiple scanned documents stored in an S3 bucket into the index:
    aws qbusiness batch-put-document —region <region> 
    --documents '[{ "id":"s3://<your-bucket-path>/<scanned-pdf-document1>","content":{"s3":{"bucket":"<your-bucket> ","key":"<scanned-pdf-document1>"}}}, { "id":"s3://<your-bucket-path>/<scanned-pdf-document2>","content":{"s3":{"bucket":" <your-bucket>","key":"<scanned-pdf-document2>"}}}]' 
    --application-id <application-id> 
    --index-id <index-id> 
    --endpoint-url <application-endpoint-url> 
    --role-arn <role-arn> 
    --no-verify-ssl

The following screenshot shows the AWS CLI output. You should see failed documents as an empty list.

List of failed documents

  1. Finally, use the ListDocuments API again to review if all documents were indexed properly:
    aws qbusiness list-documents --region <region> 
    --application-id <application-id> 
    --index-id <index-id> 
    --endpoint-url <application-endpoint-url> 
    --no-verify-ssl

The following screenshot shows that the documents are indexed in the data source.

List of indexed documents

Clean up

If you created a new Amazon Q Business application and don’t plan to use it further, unsubscribe and remove assigned users from the application and delete it so that your AWS account doesn’t accumulate costs. Moreover, if you don’t need to use the indexed data sources further, refer to Managing Amazon Q Business data sources for instructions to delete your indexed data sources.

Conclusion

This post demonstrated the support for scanned PDF document types with Amazon Q Business. We highlighted the steps to sync, index, and query supported document types—now including scanned PDF documents—using generative AI with Amazon Q Business. We also showed examples of queries on structured, unstructured, or semi-structured multi-modal scanned documents using the Amazon Q Business web UI and AWS CLI.

To learn more about this feature, refer to Supported document formats in Amazon Q Business. Give it a try on the Amazon Q Business console today! For more information, visit Amazon Q Business and the Amazon Q Business User Guide. You can send feedback to AWS re:Post for Amazon Q or through your usual AWS support contacts.


About the Authors

Sonali Sahu is leading the Generative AI Specialist Solutions Architecture team in AWS. She is an author, thought leader, and passionate technologist. Her core area of focus is AI and ML, and she frequently speaks at AI and ML conferences and meetups around the world. She has both breadth and depth of experience in technology and the technology industry, with industry expertise in healthcare, the financial sector, and insurance.

Chinmayee Rane is a Generative AI Specialist Solutions Architect at AWS. She is passionate about applied mathematics and machine learning. She focuses on designing intelligent document processing and generative AI solutions for AWS customers. Outside of work, she enjoys salsa and bachata dancing.

Himesh Kumar is a seasoned Senior Software Engineer, currently working at Amazon Q Business in AWS. He is passionate about building distributed systems in the generative AI/ML space. His expertise extends to develop scalable and efficient systems, ensuring high availability, performance, and reliability. Beyond the technical skills, he is dedicated to continuous learning and staying at the forefront of technological advancements in AI and machine learning.

Qing Wei is a Senior Software Developer for Amazon Q Business team in AWS, and passionate about building modern applications using AWS technologies. He loves community-driven learning and sharing of technology especially for machine learning hosting and inference related topics. His main focus right now is on building serverless and event-driven architectures for RAG data ingestion.

Read More

Accelerated PyTorch inference with torch.compile on AWS Graviton processors

Accelerated PyTorch inference with torch.compile on AWS Graviton processors

Originally PyTorch used an eager mode where each PyTorch operation that forms the model is run independently as soon as it’s reached. PyTorch 2.0 introduced torch.compile to speed up PyTorch code over the default eager mode. In contrast to eager mode, the torch.compile pre-compiles the entire model into a single graph in a manner that’s optimal for running on a given hardware platform. AWS optimized the PyTorch torch.compile feature for AWS Graviton3 processors. This optimization results in up to 2x better performance for Hugging Face model inference (based on geomean of performance improvement for 33 models) and up to 1.35x better performance for TorchBench model inference (geomean of performance improvement for 45 models) compared to the default eager mode inference across several natural language processing (NLP), computer vision (CV), and recommendation models on AWS Graviton3-based Amazon EC2 instances. Starting with PyTorch 2.3.1, the optimizations are available in torch Python wheels and AWS Graviton PyTorch deep learning container (DLC).

In this blog post, we show how we optimized torch.compile performance on AWS Graviton3-based EC2 instances, how to use the optimizations to improve inference performance, and the resulting speedups.

Why torch.compile and what’s the goal?

In eager mode, operators in a model are run immediately as they are encountered. It’s easier to use, more suitable for machine learning (ML) researchers, and hence is the default mode. However, eager mode incurs runtime overhead because of redundant kernel launch and memory read overhead. Whereas in torch compile mode, operators are first synthesized into a graph, wherein one operator is merged with another to reduce and localize memory reads and total kernel launch overhead.

The goal for the AWS Graviton team was to optimize torch.compile backend for Graviton3 processors. PyTorch eager mode was already optimized for Graviton3 processors with Arm Compute Library (ACL) kernels using oneDNN (also known as MKLDNN). So, the question was, how to reuse those kernels in torch.compile mode to get the best of graph compilation and the optimized kernel performance together?

Results

The AWS Graviton team extended the torch inductor and oneDNN primitives that reused the ACL kernels and optimized compile mode performance on Graviton3 processors. Starting with PyTorch 2.3.1, the optimizations are available in the torch Python wheels and AWS Graviton DLC. Please see the Running an inference section that follows for the instructions on installation, runtime configuration, and how to run the tests.

To demonstrate the performance improvements, we used NLP, CV, and recommendation models from TorchBench and the most downloaded NLP models from Hugging Face across Question Answering, Text Classification, Token Classification, Translation, Zero-Shot Classification, Translation, Summarization, Feature Extraction, Text Generation, Text2Text Generation, Fill-Mask, and Sentence Similarity tasks to cover a wide variety of customer use cases.

We started with measuring TorchBench model inference latency, in milliseconds (msec), for the eager mode, which is marked 1.0 with a red dotted line in the following graph. Then we compared the improvements from torch.compile for the same model inference, the normalized results are plotted in the graph. You can see that for the 45 models we benchmarked, there is a 1.35x latency improvement (geomean for the 45 models).

Image 1: PyTorch model inference performance improvement with torch.compile on AWS Graviton3-based c7g instance using TorchBench framework. The reference eager mode performance is marked as 1.0. (higher is better)

Similar to the preceding TorchBench inference performance graph, we started with measuring the Hugging Face NLP model inference latency, in msec, for the eager mode, which is marked 1.0 with a red dotted line in the following graph. Then we compared the improvements from torch.compile for the same model inference, the normalized results are plotted in the graph. You can see that for the 33 models we benchmarked, there is around 2x performance improvement (geomean for the 33 models).

Image 2: Hugging Face NLP model inference performance improvement with torch.compile on AWS Graviton3-based c7g instance using Hugging Face example scripts. The reference eager mode performance is marked as 1.0. (higher is better)

Running an inference

Starting with PyTorch 2.3.1, the optimizations are available in the torch Python wheel and in AWS Graviton PyTorch DLC. This section shows how to run inference in eager and torch.compile modes using torch Python wheels and benchmarking scripts from Hugging Face and TorchBench repos.

To successfully run the scripts and reproduce the speedup numbers mentioned in this post, you need an instance from the Graviton3 family (c7g/r7g/m7g/hpc7g) of hardware. For this post, we used the c7g.4xl (16 vcpu) instance. The instance, the AMI details, and the required torch library versions are mentioned in the following snippet.

Instance: c7g.4xl instance
Region: us-west-2
AMI: ami-05cc25bfa725a144a (Ubuntu 22.04/Jammy with 6.5.0-1017-aws kernel)

# Install Python
sudo apt-get update
sudo apt-get install -y python3 python3-pip

# Upgrade pip3 to the latest version
python3 -m pip install --upgrade pip

# Install PyTorch and extensions
python3 -m pip install torch==2.3.1 torchvision==0.18.1 torchaudio==2.3.1

The generic runtime tunings implemented for eager mode inference are equally applicable for the torch.compile mode, so, we set the following environment variables to further improve the torch.compile performance on AWS Graviton3 processors.

# Enable the fast math GEMM kernels, to accelerate fp32 inference with bfloat16 gemm
export DNNL_DEFAULT_FPMATH_MODE=BF16

# Enable Linux Transparent Huge Page (THP) allocations,
# to reduce the tensor memory allocation latency
export THP_MEM_ALLOC_ENABLE=1

# Set LRU Cache capacity to cache the primitives and avoid redundant
# memory allocations
export LRU_CACHE_CAPACITY=1024

TorchBench benchmarking scripts

TorchBench is a collection of open source benchmarks used to evaluate PyTorch performance. We benchmarked 45 models using the scripts from the TorchBench repo. Following code shows how to run the scripts for the eager mode and the compile mode with inductor backend.

# Set OMP_NUM_THREADS to number of vcpus, 16 for c7g.4xl instance
export OMP_NUM_THREADS=16

# Install the dependencies
sudo apt-get install -y libgl1-mesa-glx
sudo apt-get install -y libpangocairo-1.0-0
python3 -m pip install psutil numpy transformers pynvml numba onnx onnxruntime scikit-learn timm effdet gym doctr opencv-python h5py==3.10.0 python-doctr

# Clone pytorch benchmark repo
git clone https://github.com/pytorch/benchmark.git
cd benchmark
# PyTorch benchmark repo doesn't have any release tags. So,
# listing the commit we used for collecting the performance numbers
git checkout 9a5e4137299741e1b6fb7aa7f5a6a853e5dd2295

# Setup the models
python3 install.py

# Colect eager mode performance using the following command. The results will be
# stored at .userbenchmark/cpu/metric-<timestamp>.json.
python3 run_benchmark.py cpu --model BERT_pytorch,hf_Bert,hf_Bert_large,hf_GPT2,hf_Albert,hf_Bart,hf_BigBird,hf_DistilBert,hf_GPT2_large,dlrm,hf_T5,mnasnet1_0,mobilenet_v2,mobilenet_v3_large,squeezenet1_1,timm_efficientnet,shufflenet_v2_x1_0,timm_regnet,resnet50,soft_actor_critic,phlippe_densenet,resnet152,resnet18,resnext50_32x4d,densenet121,phlippe_resnet,doctr_det_predictor,timm_vovnet,alexnet,doctr_reco_predictor,vgg16,dcgan,yolov3,pytorch_stargan,hf_Longformer,timm_nfnet,timm_vision_transformer,timm_vision_transformer_large,nvidia_deeprecommender,demucs,tts_angular,hf_Reformer,pytorch_CycleGAN_and_pix2pix,functorch_dp_cifar10,pytorch_unet --test eval --metrics="latencies,cpu_peak_mem"

# Collect torch.compile mode performance with inductor backend
# and weights pre-packing enabled. The results will be stored at
# .userbenchmark/cpu/metric-<timestamp>.json
python3 run_benchmark.py cpu --model BERT_pytorch,hf_Bert,hf_Bert_large,hf_GPT2,hf_Albert,hf_Bart,hf_BigBird,hf_DistilBert,hf_GPT2_large,dlrm,hf_T5,mnasnet1_0,mobilenet_v2,mobilenet_v3_large,squeezenet1_1,timm_efficientnet,shufflenet_v2_x1_0,timm_regnet,resnet50,soft_actor_critic,phlippe_densenet,resnet152,resnet18,resnext50_32x4d,densenet121,phlippe_resnet,doctr_det_predictor,timm_vovnet,alexnet,doctr_reco_predictor,vgg16,dcgan,yolov3,pytorch_stargan,hf_Longformer,timm_nfnet,timm_vision_transformer,timm_vision_transformer_large,nvidia_deeprecommender,demucs,tts_angular,hf_Reformer,pytorch_CycleGAN_and_pix2pix,functorch_dp_cifar10,pytorch_unet --test eval --torchdynamo inductor --freeze_prepack_weights --metrics="latencies,cpu_peak_mem"

On successful completion of the inference runs, the script stores the results in JSON format. The following is the sample output:

{
"name": "cpu"
"environ": {
"pytorch_git_version": "d44533f9d073df13895333e70b66f81c513c1889"
},

"metrics": {
"BERT_pytorch-eval_latency": 56.3769865,
"BERT_pytorch-eval_cmem": 0.4169921875
}
}

Hugging Face benchmarking scripts

Google T5 Small Text Translation model is one of the around 30 Hugging Face models we benchmarked. We’re using it as a sample model to demonstrate how to run inference in eager and compile modes. The additional configurations and APIs required to run it in compile mode are highlighted in BOLD. Save the following script as google_t5_small_text_translation.py .

import argparse
from transformers import T5Tokenizer, T5Model
import torch
from torch.profiler import profile, record_function, ProfilerActivity
import torch._inductor.config as config config.cpp.weight_prepack=True config.freezing=True

def test_inference(mode, num_iter):
tokenizer = T5Tokenizer.from_pretrained("t5-small")
model = T5Model.from_pretrained("t5-small")

input_ids = tokenizer(
"Studies have been shown that owning a dog is good for you", return_tensors="pt"
).input_ids  # Batch size 1
decoder_input_ids = tokenizer("Studies show that", return_tensors="pt").input_ids  # Batch size 1

    if (mode == 'compile'):         model = torch.compile(model)

with torch.no_grad():
for _ in range(50):
outputs = model(input_ids=input_ids, decoder_input_ids=decoder_input_ids)

with profile(activities=[ProfilerActivity.CPU]) as prof:
with record_function("model_inference"):
for _ in range(num_iter):
outputs = model(input_ids=input_ids, decoder_input_ids=decoder_input_ids)

print(prof.key_averages().table(sort_by="self_cpu_time_total"))

def main() -> None:
global m, args
parser = argparse.ArgumentParser(__doc__)
parser.add_argument(
"-m",
"--mode",
choices=["eager", "compile"],
default="eager",
help="Which test to run.",
)
parser.add_argument(
"-n",
"--number",
type=int,
default=100,
help="how many iterations to run.",
)
args = parser.parse_args()
test_inference(args.mode, args.number)

if __name__ == "__main__":
main()

Run the script with the following steps.

# Set OMP_NUM_THREADS to number of vcpus to 4 because
# the scripts are running inference in sequence, and
# they don't need large number of vcpus
export OMP_NUM_THREADS=4

# Install the dependencies
python3 -m pip install transformers

# Run the inference script in Eager mode
# using number of iterations as 1 just to show the torch profiler output
# but for the benchmarking, we used 1000 iterations.
python3 google_t5_small_text_translation.py -n 1 -m eager

# Run the inference script in torch compile mode
python3 google_t5_small_text_translation.py -n 1 -m compile

On successful completion of the inference runs, the script prints the torch profiler output with the latency breakdown for the torch operators. The following is the sample output from torch profiler:


# Torch profiler output for the eager mode run on c7g.xl (4vcpu)
---------------    ------------  -----------  ------------  -----------  ------------  ------------
Name                 Self CPU %   Self CPU     CPU total %   CPU total   CPU time avg    # of Calls
---------------    ------------  -----------  ------------  -----------  ------------  ------------
aten::mm            40.71%         12.502ms       40.71%      12.502ms     130.229us            96
model_inference     26.44%         8.118ms       100.00%      30.708ms      30.708ms             1
aten::bmm            6.85%         2.102ms         9.47%       2.908ms      80.778us            36
aten::matmul         3.73%         1.146ms        57.26%      17.583ms     133.205us           132
aten::select         1.88%       576.000us         1.90%     583.000us       0.998us           584
aten::transpose      1.51%       464.000us         1.83%     563.000us       3.027us           186
---------------    ------------  -----------  ------------  -----------  ------------  -------------
Self CPU time total: 30.708ms

# Torch profiler output for the compile mode run for the same model on the same instance
------------------------- ----------  -----------  ------------  ------------  ------------  ------------
Name                      Self CPU %    Self CPU    CPU total %    CPU total   CPU time avg   # of Calls
------------------------- ----------  -----------  ------------  ------------  ------------  ------------
mkldnn::_linear_pointwise   37.98%       5.461ms        45.91%       6.602ms      68.771us            96
Torch-Compiled Region       29.56%       4.251ms        98.53%      14.168ms      14.168ms             1
aten::bmm                   14.90%       2.143ms        21.73%       3.124ms      86.778us            36
aten::select                 4.51%     648.000us         4.62%     665.000us       1.155us           576
aten::view                   3.29%     473.000us         3.29%     473.000us       1.642us           288
aten::empty                  2.53%     364.000us         2.53%     364.000us       3.165us           115
-------------------------  ---------  -----------  ------------  ------------  ------------ -------------
Self CPU time total: 14.379ms

What’s next

Next, we’re extending the torch inductor CPU backend support to compile Llama model, and adding support for fused GEMM kernels to enable torch inductor operator fusion optimization on AWS Graviton3 processors.

Conclusion

In this tutorial, we covered how we optimized torch.compile performance on AWS Graviton3-based EC2 instances, how to use the optimizations to improve PyTorch model inference performance, and demonstrated the resulting speedups. We hope that you will give it a try! If you need any support with ML software on Graviton, please open an issue on the AWS Graviton Technical Guide GitHub.


About the Author

Sunita Nadampalli is a Software Development Manager and AI/ML expert at AWS. She leads AWS Graviton software performance optimizations for AI/ML and HPC workloads. She is passionate about open source software development and delivering high-performance and sustainable software solutions for SoCs based on the Arm ISA.

Read More

Access control for vector stores using metadata filtering with Knowledge Bases for Amazon Bedrock

Access control for vector stores using metadata filtering with Knowledge Bases for Amazon Bedrock

In November 2023, we announced Knowledge Bases for Amazon Bedrock as generally available.

Knowledge bases allow Amazon Bedrock users to unlock the full potential of Retrieval Augmented Generation (RAG) by seamlessly integrating their company data into the language model’s generation process. This feature allows organizations to harness the power of large language models (LLMs) while making sure that the generated responses are tailored to their specific domain knowledge, regulations, and business requirements. By incorporating their unique data sources, such as internal documentation, product catalogs, or transcribed media, organizations can enhance the relevance, accuracy, and contextual awareness of the language model’s outputs.

Knowledge bases effectively bridge the gap between the broad knowledge encapsulated within foundation models and the specialized, domain-specific information that businesses possess, enabling a truly customized and valuable generative artificial intelligence (AI) experience.

With metadata filtering now available in Knowledge Bases for Amazon Bedrock, you can define and use metadata fields to filter the source data used for retrieving relevant context during RAG. For example, if your data contains documents from different products, departments, or time periods, you can use metadata filtering to limit retrieval to only the most relevant subset of data for a given query or conversation. This helps improve the relevance and quality of retrieved context while reducing potential hallucinations or noise from irrelevant data. Metadata filtering gives you more control over the RAG process for better results tailored to your specific use case needs.

In this post, we discuss how to implement metadata filtering within Knowledge Bases for Amazon Bedrock by implementing access control and ensuring data privacy and security in RAG applications.

Access control with metadata filters

Metadata filtering in knowledge bases enables access control for your data. By defining metadata fields based on attributes such as user roles, departments, or data sensitivity levels, you can ensure that the retrieval only fetches and uses information that a particular user or application is authorized to access. This helps maintain data privacy and security, preventing sensitive or restricted information from being inadvertently surfaced or used in generated responses. With this access control capability, you can safely use retrieval across different user groups or scenarios while complying with company specific data governance policies and regulations.

During retrieval of contextually relevant chunks, metadata filters add an additional layer of selection to those vectors that are returned to the LLM for response generation. In addition, metadata filtering requires fewer computation resources, thereby improving the overall performance and reducing costs associated with the search.

Let’s explore some practical applications of metadata filtering in Knowledge Bases for Amazon Bedrock. Here are a few examples and use cases across different domains:

  • A company uses a chatbot to help HR personnel navigate employee files. There is sensitive information present in the documents and only certain employees should be able to have access and converse with them. With metadata filters on access IDs, a user can only chat with documents that have metadata associated with their access ID. The access ID associated with their authentication when the chat is initiated can be passed as a filter.
  • A business-to-business (B2B) platform is developed for companies to allow their end-users to access all their uploaded documents, search over them conversationally, and complete various tasks using those documents. To ensure that end-users can only chat with their data, metadata filters on user access tokens—such as those obtained through an authentication service—can enable secure access to their information. This provides customers with peace of mind while maintaining compliance with various data security standards.
  • A work organization application has a conversational search feature. Documents, kanbans, meeting recording transcripts, and other assets can be searched more intently and with more granular control. The app uses a single sign-on (SSO) functionality that allows them to access company-wide resources and other services and follows a company’s data level access protocol. With metadata filters on work groups and a privilege level (for example Limited, Standard, or Admin) derived from their SSO authentication, you can enforce data security while personalizing the chat experience to streamline a user’s work and collaboration with others.

Access control with metadata filtering in the healthcare domain

To demonstrate the access-control capabilities enabled by metadata filtering in knowledge bases, let’s consider a use case where a healthcare provider has a knowledge base that contains transcripts of conversations between doctors and patients. In this scenario, it is crucial that each doctor can only access transcripts from their own patient interactions during the search, and not have access to transcripts from other doctors’ patient interactions.

By defining a metadata field for patient_id and associating each transcript with the corresponding patient’s identifier, the healthcare provider can implement access control within their search application. When a doctor initiates a conversation, the knowledge base can filter the vector store to retrieve context only from transcripts where the patient_id metadata matches either a specific patient ID or the list of patient IDs associated with the authenticated doctor. This way, the generated responses will be augmented solely with information from that doctor’s past patient interactions, maintaining patient privacy and confidentiality.

This access control approach can be extended to other relevant metadata fields, such as year or department, further refining the subset of data accessible to each user or application. By using metadata filtering in knowledge bases, the healthcare provider can achieve compliance with data governance policies and regulations while enabling doctors to have personalized, contextually relevant conversations tailored to their specific patient histories and needs.

Solution overview

Let’s walk through the high-level steps to implement access control with Knowledge Bases for Amazon Bedrock. The following GitHub repository provides a guided notebook that you can follow to deploy this example in your own account.

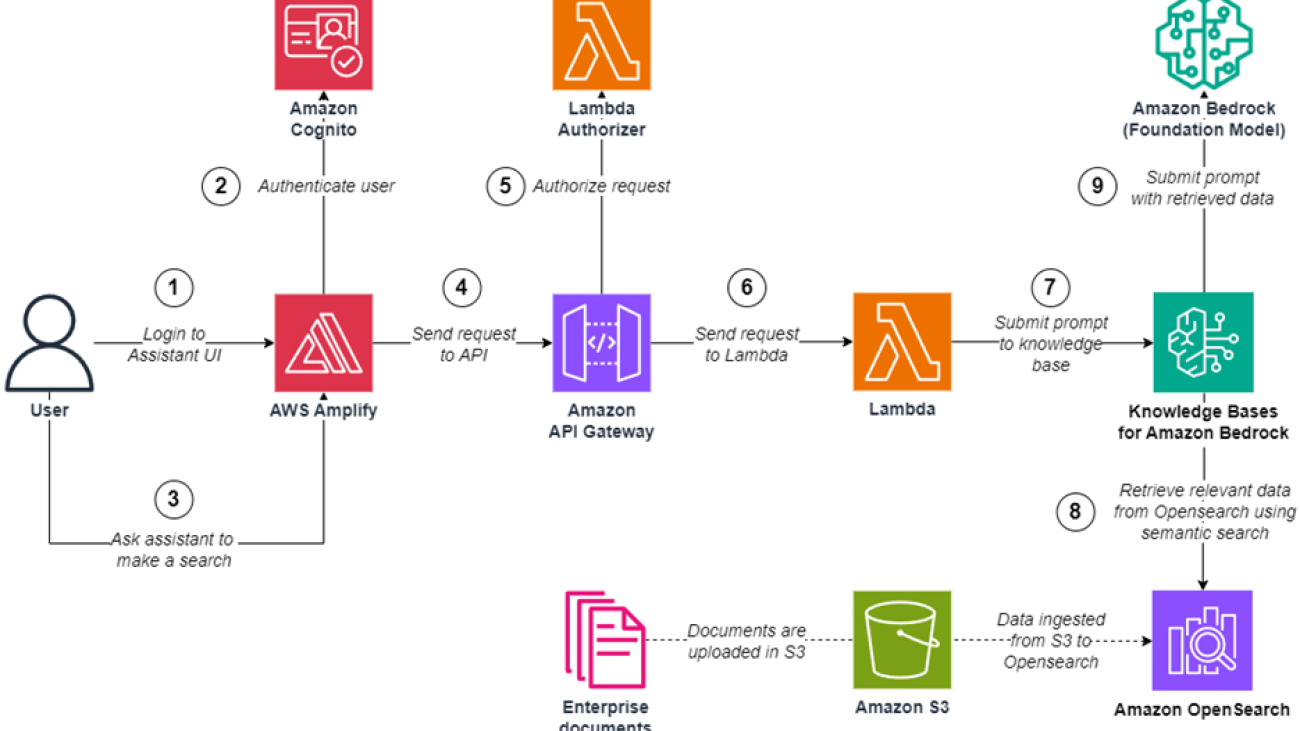
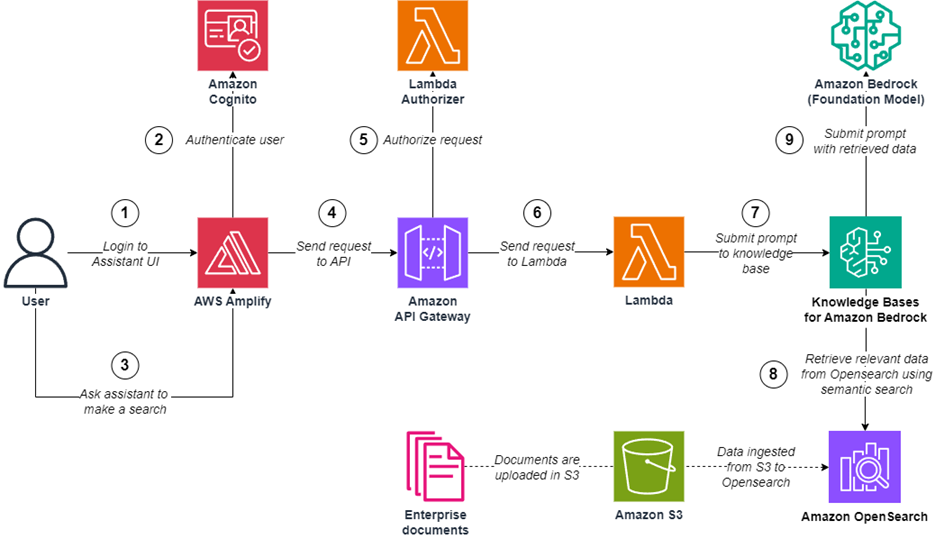
The following diagram illustrates the solution architecture.

Figure 1: Solution architecture

The workflow for the solution is as follows:

  1. The doctor interacts with the Streamlit frontend, which serves as the application interface. Amazon Cognito handles user authentication and access control, ensuring only authorized doctors can access the application. For production use, it is recommended to use a more robust frontend framework such as AWS Amplify, which provides a comprehensive set of tools and services for building scalable and secure web applications.
  2. After the doctor has successfully signed in, the application retrieves the list of patients associated with the doctor’s ID from the Amazon DynamoDB database. The doctor is then presented with this list of patients, from which they can select one or more patients to filter their search.
  3. When the doctor interacts with the Streamlit frontend, it sends a request to an AWS Lambda function, which acts as the application backend. The request includes the doctor’s ID, a list of patient IDs to filter by, and the text query.
  4. Before querying the knowledge base, the Lambda function retrieves data from the DynamoDB database, which stores doctor-patient associations. This step validates that the doctor is authorized to access the requested patient or list of patient’s information.
  5. If the validation is successful, the Lambda function queries the knowledge base using the provided patient or list of patient’s IDs. The knowledge base is pre-populated with transcript and metadata files stored in Amazon Simple Storage Service (Amazon S3).
  6. The knowledge base returns the relevant results, which are then sent back to the Streamlit application and displayed to the doctor.

User authentication with Amazon Cognito

To implement the access control solution for the healthcare provider use case, you can use Amazon Cognito user pools to manage the authentication and user identities of the doctors.

To start, you will create an Amazon Cognito user pool that will store the doctor user accounts. During the user pool setup, you define the necessary attributes for each doctor, including their name and a unique identifier (sub or custom attribute). For patients, their identifier will be used as the patient_id metadata field. This unique identifier will be associated with each patient’s account and used for metadata filtering in the knowledge base retrieval process.

Figure 2: User information

Doctor and patient association in DynamoDB

To facilitate the access control mechanism based on the doctor-patient relationship, the healthcare provider can create a DynamoDB table to store these associations. This table will act as a centralized repository, allowing efficient retrieval of the patient IDs associated with each authenticated doctor during the knowledge base search process. When a doctor authenticates through Amazon Cognito, their unique identifier can be used to query the doctor_patient_list_associations table and retrieve the list of patient_id values associated with that doctor.

Figure 3: Items retrieved based on the doctor_ID and patient relationships

This approach offers flexibility in managing doctor-patient associations. If a doctor changes over time, only the corresponding entries in the DynamoDB table need to be updated. This update does not require modifying the metadata files of the transcripts themselves.

Now that you have your doctor and patients set up with their relationships defined, let’s examine the dataset format required for effective metadata filtering.

Dataset format

When working with Knowledge Bases for Amazon Bedrock, the dataset format plays a crucial role in providing seamless integration and effective metadata filtering. This example uses a series of PDF files containing transcripts of doctor-patient conversations.

These files need to be uploaded to an S3 bucket for processing. To use metadata filtering, you need to create a separate metadata JSON file for each transcript file. The metadata file should share the same name as the corresponding PDF file (including the extension). For instance, if the transcript file is named transcript_001.pdf, the metadata file should be named transcript_001.pdf.metadata.json. This nomenclature is crucial for the knowledge base to identify the metadata for specific files during the ingestion process.

The metadata JSON file will contain key-value pairs representing the relevant metadata fields associated with the transcript. In the healthcare provider use case, the most important metadata field is patient_id, which will be used to implement access control. You assign each transcript to a specific patient by including their unique identifier from the Amazon Cognito user pool in the patient_id field of the metadata file, as in the following example:

{"metadataAttributes": {"patient_id": 669}}

By structuring the dataset with transcript PDF files accompanied by their corresponding metadata JSON files, you can effectively use the metadata filtering capabilities of Knowledge Bases for Amazon Bedrock. This approach enables you to implement access control, so each doctor can only retrieve and use content from their own patient transcripts during the retrieval process. For customers processing thousands of files, automating the generation of the metadata files using Lambda functions or a similar solution could be a more efficient approach to scale.

Knowledge base creation

With the dataset properly structured and organized, you can now create the knowledge base in Amazon Bedrock. The process is straightforward, thanks to the user-friendly interface and step-by-step guidance provided by the AWS Management Console. See Knowledge Bases now delivers fully managed RAG experience in Amazon Bedrock for instructions to create a new knowledge base, upload your dataset, and configure the necessary settings to achieve optimal performance. Alternatively, you can create a knowledge base using the AWS SDK, API, or AWS CloudFormation template, which provides programmatic and automated ways to set up and manage your knowledge bases.

Figure 4: Using the console to create a knowledge base

After you create the knowledge base and sync it with your dataset, you can immediately experience the power of metadata filtering.

In the test pane, navigate to the settings section and locate the filters option. Here, you can define specific filter conditions by specifying the patient_id field along with the unique IDs or list of identifiers of the patients you wish to test. By applying this filter, the retrieval process will fetch and incorporate only the relevant context from transcripts associated with the specified patient or patients. This filter-based retrieval approach means that the generated responses are tailored to the doctor’s individual patient interactions, maintaining data privacy and confidentiality.

Figure 5:Knowledge Bases console test configuration Panel

Figure 6: Knowledge Bases console test panel

Querying the knowledge base programmatically

You have seen how to implement access control with metadata filtering through the console, but what if you want to integrate knowledge bases directly into your applications? AWS provides SDKs that allow you to programmatically interact with Amazon Bedrock features, including knowledge bases.

The following code snippet demonstrates how to call the retrieve_and_generate API using the Boto3 library in Python. It includes metadata filtering capabilities within the vectorSearchConfiguration, where you can now add filter conditions. For this specific use case, you first need to retrieve the list of patient_ids associated with a doctor from the DynamoDB table. This allows you to filter the search results based on the authenticated user’s identity.

import boto3
import json

bedrock_agent = boto3.client('bedrock-agent-runtime')

# Retrieve and generate API

response = bedrock_agent.retrieve_and_generate(
    input={
        "text": "Who is Kelly?"
    },
    retrieveAndGenerateConfiguration={
        "type": "KNOWLEDGE_BASE",
        "knowledgeBaseConfiguration": {
             'knowledgeBaseId': <<KnowledgeBase id>>,
            "modelArn": "arn:aws:bedrock:us-west-2::foundation-model/anthropic.claude-v2:1",
            "retrievalConfiguration": {
                "vectorSearchConfiguration": {
                    "numberOfResults":5,
                    "filter": {
                        "in": {
                            "key": "patient_id",
                            "value": <<patient_ids>> # Amazon Cognito Id once the doctor is authenticated.
                        }
                    }
                } 
            }
        }
    }
)

print(response['output']['text'],end='n'*2) 

You can create a Lambda function that serves as the backend for the application. This Lambda function uses the Boto3 library to interact with Amazon Bedrock, specifically to retrieve relevant information from the knowledge base using the retrieve_and_generate API.

Now that the architectural components are in place, you can create a visual interface to display the results.

Streamlit sample app

To showcase the interaction between doctors and the knowledge base, we developed a user-friendly web application using Streamlit, a popular open source Python library for building interactive data apps. Streamlit provides a simple and intuitive way to create custom interfaces that can seamlessly integrate with the various AWS services involved in this solution.

The Streamlit application acts as the frontend for doctors to initiate conversations and interact with the knowledge base. It uses Amazon Cognito for user authentication, so only authorized doctors can access the application and the corresponding patient data. Upon successful authentication, the application interacts with Lambda to handle the RAG workflow using the Amazon Cognito user ID.

Figure 7: Demo

Clean up

It’s important to clean up and delete the resources created during this solution deployment to avoid unnecessary costs. In the provided GitHub repository, you’ll find a section at the end of the notebook dedicated to deleting all the resources created as part of this solution to ensure that you don’t incur any ongoing charges for resources that are no longer needed.

Conclusion

This post has demonstrated the powerful capabilities of metadata filtering within Knowledge Bases for Amazon Bedrock by implementing access control and ensuring data privacy and security in RAG applications. By using metadata fields, organizations can precisely control the subset of data accessible to different users or applications during the RAG process while also improving the relevancy and performance of the search.

Get started with Knowledge Bases for Amazon Bedrock, and let us know your thoughts in the comments section.


About the Authors

Dani Mitchell is an Generative AI Specialist Solutions Architect at Amazon Web Services. He is focused on computer vision use cases and helping customers across EMEA accelerate their ML journey.

Chris Pecora is a Generative AI Data Scientist at Amazon Web Services. He is passionate about building innovative products and solutions while also focused on customer-obsessed science. When not running experiments and keeping up with the latest developments in generative AI, he loves spending time with his kids.

Kshitiz Agarwal is an Engineering Leader at Amazon Web Services (AWS), where he leads the development of Knowledge Bases for Amazon Bedrock. With a decade of experience at Amazon, having joined in 2012, Kshitiz has gained deep insights into the cloud computing landscape. His passion lies in engaging with customers and understanding the innovative ways they leverage AWS to drive their business success. Through his work, Kshitiz aims to contribute to the continuous improvement of AWS services, enabling customers to unlock the full potential of the cloud.

Read More

Accenture creates a custom memory-persistent conversational user experience using Amazon Q Business

Accenture creates a custom memory-persistent conversational user experience using Amazon Q Business

Traditionally, finding relevant information from documents has been a time-consuming and often frustrating process. Manually sifting through pages upon pages of text, searching for specific details, and synthesizing the information into coherent summaries can be a daunting task. This inefficiency not only hinders productivity but also increases the risk of overlooking critical insights buried within the document’s depths.

Imagine a scenario where a call center agent needs to quickly analyze multiple documents to provide summaries for clients. Previously, this process would involve painstakingly navigating through each document, a task that is both time-consuming and prone to human error.

With the advent of chatbots in the conversational artificial intelligence (AI) domain, you can now upload your documents through an intuitive interface and initiate a conversation by asking specific questions related to your inquiries. The chatbot then analyzes the uploaded documents, using advanced natural language processing (NLP) and machine learning (ML) technologies to provide comprehensive summaries tailored to your questions.

However, the true power lies in the chatbot’s ability to preserve context throughout the conversation. As you navigate through the discussion, the chatbot should maintain a memory of previous interactions, allowing you to review past discussions and retrieve specific details as needed. This seamless experience makes sure you can effortlessly explore the depths of your documents without losing track of the conversation’s flow.

Amazon Q Business is a generative AI-powered assistant that can answer questions, provide summaries, generate content, and securely complete tasks based on data and information in your enterprise systems. It empowers employees to be more creative, data-driven, efficient, prepared, and productive.

This post demonstrates how Accenture used Amazon Q Business to implement a chatbot application that offers straightforward attachment and conversation ID management. This solution can speed up your development workflow, and you can use it without crowding your application code.

“Amazon Q Business distinguishes itself by delivering personalized AI assistance through seamless integration with diverse data sources. It offers accurate, context-specific responses, contrasting with foundation models that typically require complex setup for similar levels of personalization. Amazon Q Business real-time, tailored solutions drive enhanced decision-making and operational efficiency in enterprise settings, making it superior for immediate, actionable insights”

– Dominik Juran, Cloud Architect, Accenture

Solution overview

In this use case, an insurance provider uses a Retrieval Augmented Generation (RAG) based large language model (LLM) implementation to upload and compare policy documents efficiently. Policy documents are preprocessed and stored, allowing the system to retrieve relevant sections based on input queries. This enhances the accuracy, transparency, and speed of policy comparison, making sure clients receive the best coverage options.

This solution augments an Amazon Q Business application with persistent memory and context tracking throughout conversations. As users pose follow-up questions, Amazon Q Business can continually refine responses while recalling previous interactions. This preserves conversational flow when navigating in-depth inquiries.

At the core of this use case lies the creation of a custom Python class for Amazon Q Business, which streamlines the development workflow for this solution. This class offers robust document management capabilities, keeping track of attachments already shared within a conversation as well as new uploads to the Streamlit application. Additionally, it maintains an internal state to persist conversation IDs for future interactions, providing a seamless user experience.

The solution involves developing a web application using Streamlit, Python, and AWS services, featuring a chat interface where users can interact with an AI assistant to ask questions or upload PDF documents for analysis. Behind the scenes, the application uses Amazon Q Business for conversation history management, vectorizing the knowledge base, context creation, and NLP. The integration of these technologies allows for seamless communication between the user and the AI assistant, enabling tasks such as document summarization, question answering, and comparison of multiple documents based on the documents attached in real time.

The code uses Amazon Q Business APIs to interact with Amazon Q Business and send and receive messages within a conversation, specifically the qbusiness client from the boto3 library.

In this use case, we used the German language to test our RAG LLM implementation on 10 different documents and 10 different use cases. Policy documents were preprocessed and stored, enabling accurate retrieval of relevant sections based on input queries. This testing demonstrated the system’s accuracy and effectiveness in handling German language policy comparisons.

The following is a code snippet:

import boto3
import json
from botocore.exceptions import ClientError
from os import environ

class AmazonQHandler:
    def __init__(self, application_id, user_id, conversation_id, system_message_id):
        self.application_id = application_id
        self.user_id = user_id
        self.qbusiness = boto3.client('qbusiness')
        self.prompt_engineering_instruction = "Ansage: Auf Deutsch, und nur mit den nötigsten Wörter ohne ganze Sätze antworten, bitte"
        self.parent_message_id = system_message_id
        self.conversation_id = conversation_id

    def process_message(self, initial_message, input_text):
        print('Please ask as many questions as you want. At the end of the session write exitn')
        
        message = f'{self.prompt_engineering_instruction}: {input_text}'
            
        return message


def send_message(self, input_text, uploaded_file_names=[]):
        attachments = []
        message = f'{self.prompt_engineering_instruction}: {input_text}'
        if len(uploaded_file_names) > 0:
            for file_name in uploaded_file_names:
                in_file = open(file_name, "rb")
                data = in_file.read()
                attachments.append({
                    'data': data,
                    'name': file_name
                })

        if self.conversation_id:
            print("we are in if part of send_message")
            if len(attachments) > 0:
                resp = self.qbusiness.chat_sync(
                    applicationId=self.application_id,
                    userId=self.user_id,
                    userMessage=message,
                    conversationId=self.conversation_id,
                    parentMessageId=self.parent_message_id,
                    attachments=attachments,
                )
            else:
                resp = self.qbusiness.chat_sync(
                    applicationId=self.application_id,
                    userId=self.user_id,
                    userMessage=message,
                    conversationId=self.conversation_id,
                    parentMessageId=self.parent_message_id,
                )
        else:
            if len(attachments) > 0:
                resp = self.qbusiness.chat_sync(
                    applicationId=self.application_id,
                    userId=self.user_id,
                    userMessage=message,
                    attachments=attachments,
                )
            else: 
                resp = self.qbusiness.chat_sync(
                    applicationId=self.application_id,
                    userId=self.user_id,
                    userMessage=message,
                )
            self.conversation_id = resp.get("conversationId")

        print(f'Amazon Q: "{resp.get("systemMessage")}"n')
        print(json.dumps(resp))
        self.parent_message_id = resp.get("systemMessageId")
        return resp.get("systemMessage")

if __name__ == '__main__':
    application_id = environ.get("APPLICATION_ID", "a392f5e9-50ed-4f93-bcad-6f8a26a8212d")
    user_id = environ.get("USER_ID", "AmazonQ-Administrator")

    amazon_q_handler = AmazonQHandler(application_id, user_id)
    amazon_q_handler.process_message(None)

The architectural flow of this solution is shown in the following diagram.

Q business

The workflow consists of the following steps:

  1. The LLM wrapper application code is containerized using AWS CodePipeline, a fully managed continuous delivery service that automates the build, test, and deploy phases of the software release process.
  2. The application is deployed to Amazon Elastic Container Service (Amazon ECS), a highly scalable and reliable container orchestration service that provides optimal resource utilization and high availability. Because we were making the calls from a Flask-based ECS task running Streamlit to Amazon Q Business, we used Amazon Cognito user pools rather than AWS IAM Identity Center to authenticate users for simplicity, and we hadn’t experimented with IAM Identity Center on Amazon Q Business at the time. For instructions to set up IAM Identity Center integration with Amazon Q Business, refer to Setting up Amazon Q Business with IAM Identity Center as identity provider.
  3. Users authenticate through an Amazon Cognito UI, a secure user directory that scales to millions of users and integrates with various identity providers.
  4. A Streamlit application running on Amazon ECS receives the authenticated user’s request.
  5. An instance of the custom AmazonQ class is initiated. If an ongoing Amazon Q Business conversation is present, the correct conversation ID is persisted, providing continuity. If no existing conversation is found, a new conversation is initiated.
  6. Documents attached to the Streamlit state are passed to the instance of the AmazonQ class, which keeps track of the delta between the documents already attached to the conversation ID and the documents yet to be shared. This approach respects and optimizes the five-attachment limit imposed by Amazon Q Business. To simplify and avoid repetitions in the middleware library code we are maintaining on the Streamlit application, we decided to write a custom wrapper class for the Amazon Q Business calls, which keeps the attachment and conversation history management in itself as class variables (as opposed to state-based management on the Streamlit level).
  7. Our wrapper Python class encapsulating the Amazon Q Business instance parses and returns the answers based on the conversation ID and the dynamically provided context derived from the user’s question.
  8. Amazon ECS serves the answer to the authenticated user, providing a secure and scalable delivery of the response.

Prerequisites

This solution has the following prerequisites:

  • You must have an AWS account where you will be able to create access keys and configure services like Amazon Simple Storage Service (Amazon S3) and Amazon Q Business
  • Python must be installed on the environment, as well as all the necessary libraries such as boto3
  • It is assumed that you have Streamlit library installed for Python, along with all the necessary settings

Deploy the solution

The deployment process entails provisioning the required AWS infrastructure, configuring environment variables, and deploying the application code. This is accomplished by using AWS services such as CodePipeline and Amazon ECS for container orchestration and Amazon Q Business for NLP.

Additionally, Amazon Cognito is integrated with Amazon ECS using the AWS Cloud Development Kit (AWS CDK) and user pools are used for user authentication and management. After deployment, you can access the application through a web browser. Amazon Q Business is called from the ECS task. It is crucial to establish proper access permissions and security measures to safeguard user data and uphold the application’s integrity.

We use AWS CDK to deploy a web application using Amazon ECS with AWS Fargate, Amazon Cognito for user authentication, and AWS Certificate Manager for SSL/TLS certificates.

To deploy the infrastructure, run the following commands:

  • npm install to install dependencies
  • npm run build to build the TypeScript code
  • npx cdk synth to synthesize the AWS CloudFormation template
  • npx cdk deploy to deploy the infrastructure

The following screenshot shows our deployed CloudFormation stack.

UI demonstration

The following screenshot shows the home page when a user opens the application in a web browser.

The following screenshot shows an example response from Amazon Q Business when no file was uploaded and no relevant answer to the question was found.

The following screenshot illustrates the entire application flow, where the user asked a question before a file was uploaded, then uploaded a file, and asked the same question again. The response from Amazon Q Business after uploading the file is different from the first query (for testing purposes, we used a very simple file with randomly generated text in PDF format).

Solution benefits

This solution offers the following benefits:

  • Efficiency – Automation enhances productivity by streamlining document analysis, saving time, and optimizing resources
  • Accuracy – Advanced techniques provide precise data extraction and interpretation, reducing errors and improving reliability
  • User-friendly experience – The intuitive interface and conversational design make it accessible to all users, encouraging adoption and straightforward integration into workflows

This containerized architecture allows the solution to scale seamlessly while optimizing request throughput. Persisting the conversation state enhances precision by continuously expanding dialog context. Overall, this solution can help you balance performance with the fidelity of a persistent, context-aware AI assistant through Amazon Q Business.

Clean up

After deployment, you should implement a thorough cleanup plan to maintain efficient resource management and mitigate unnecessary costs, particularly concerning the AWS services used in the deployment process. This plan should include the following key steps:

  • Delete AWS resources – Identify and delete any unused AWS resources, such as EC2 instances, ECS clusters, and other infrastructure provisioned for the application deployment. This can be achieved through the AWS Management Console or AWS Command Line Interface (AWS CLI).
  • Delete CodeCommit repositories – Remove any CodeCommit repositories created for storing the application’s source code. This helps declutter the repository list and prevents additional charges for unused repositories.
  • Review and adjust CodePipeline configuration – Review the configuration of CodePipeline and make sure there are no active pipelines associated with the deployed application. If pipelines are no longer required, consider deleting them to prevent unnecessary runs and associated costs.
  • Evaluate Amazon Cognito user pools – Evaluate the user pools configured in Amazon Cognito and remove any unnecessary pools or configurations. Adjust the settings to optimize costs and adhere to the application’s user management requirements.

By diligently implementing these cleanup procedures, you can effectively minimize expenses, optimize resource usage, and maintain a tidy environment for future development iterations or deployments. Additionally, regular review and adjustment of AWS services and configurations is recommended to provide ongoing cost-effectiveness and operational efficiency.

If the solution runs in AWS Amplify or is provisioned by the AWS CDK, you don’t need to take care of removing everything described in this section; deleting the Amplify application or AWS CDK stack is enough to get rid all of the resources associated with the application.

Conclusion

In this post, we showcased how Accenture created a custom memory-persistent conversational assistant using AWS generative AI services. The solution can cater to clients developing end-to-end conversational persistent chatbot applications at a large scale following the provided architectural practices and guidelines.

The joint effort between Accenture and AWS builds on the 15-year strategic relationship between the companies and uses the same proven mechanisms and accelerators built by the Accenture AWS Business Group (AABG). Connect with the AABG team at accentureaws@amazon.com to drive business outcomes by transforming to an intelligent data enterprise on AWS.

For further information about generative AI on AWS using Amazon Bedrock or Amazon Q Business, we recommend the following resources:

You can also sign up for the AWS generative AI newsletter, which includes educational resources, post posts, and service updates.


About the Authors

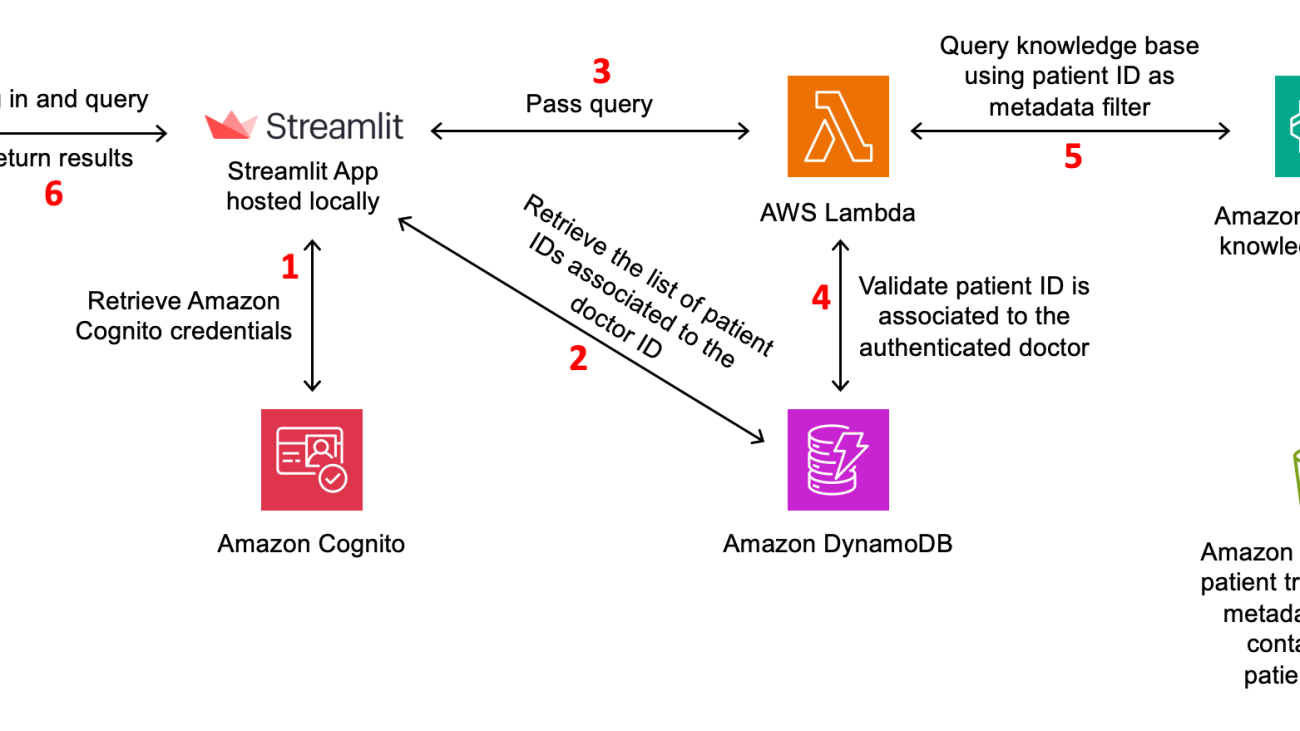
Dominik Juran works as a full stack developer at Accenture with a focus on AWS technologies and AI. He also has a passion for ice hockey.

Milica Bozic works as Cloud Engineer at Accenture, specializing in AWS Cloud solutions for the specific needs of clients with background in telecommunications, particularly 4G and 5G technologies. Mili is passionate about art, books, and movement training, finding inspiration in creative expression and physical activity.

Zdenko Estok works as a cloud architect and DevOps engineer at Accenture. He works with AABG to develop and implement innovative cloud solutions, and specializes in infrastructure as code and cloud security. Zdenko likes to bike to the office and enjoys pleasant walks in nature.

Selimcan “Can” Sakar is a cloud first developer and solution architect at Accenture with a focus on artificial intelligence and a passion for watching models converge.

Shikhar Kwatra is a Sr. AI/ML Specialist Solutions Architect at Amazon Web Services, working with leading Global System Integrators. He has earned the title of one of the Youngest Indian Master Inventors with over 500 patents in the AI/ML and IoT domains. Shikhar aids in architecting, building, and maintaining cost-efficient, scalable cloud environments for the organization, and supports the GSI partner in building strategic industry solutions on AWS. Shikhar enjoys playing guitar, composing music, and practicing mindfulness in his spare time.

Read More

Create an end-to-end serverless digital assistant for semantic search with Amazon Bedrock

Create an end-to-end serverless digital assistant for semantic search with Amazon Bedrock

With the rise of generative artificial intelligence (AI), an increasing number of organizations use digital assistants to have their end-users ask domain-specific questions, using Retrieval Augmented Generation (RAG) over their enterprise data sources.

As organizations transition from proofs of concept to production workloads, they establish objectives to run and scale their workloads with minimal operational overhead, while optimizing on costs. Organizations also require the implementation of common security practices such as identity and access management, to make sure that only authorized and authenticated users are allowed to perform specific actions or access specific resources.

This post covers a solution to create an end-to-end digital assistant as a web application using a serverless architecture to address these requirements. Because the solution components primarily use serverless technologies, it provides several benefits, such as automatic scaling, built-in high availability, and a pay-per-use billing model to optimize on costs. The solution also includes an authentication layer and an authorization layer to manage identities and permissions.

This solution also uses the hybrid search feature of Knowledge Bases for Amazon Bedrock to increase the relevancy of retrieved results using RAG. When receiving a query from an end-user, hybrid search performs both a semantic search and a keyword search:

  • A semantic search provides results based on the meaning and intent within the query
  • A keyword search provides results based on specific entities in a query such as product codes or acronyms

For example, if a user submits a prompt that includes keywords, a text-based search may provide better results than a semantic search. This is why hybrid search combines the two approaches: the precision of semantic search and coverage of keywords. For more information about hybrid search, see Knowledge Bases for Amazon Bedrock now supports hybrid search.

In this post, we provide an operational overview of the solution, and then describe how to set it up with the following services:

  • Amazon Bedrock and a knowledge base to generate responses from user questions based on enterprise data sources. Amazon Bedrock is a fully managed service that makes a wide range of foundation models (FMs) available though an API without having to manage any infrastructure. Refer to the Amazon Bedrock FAQs for further details.
  • An Amazon OpenSearch Serverless vector engine to store enterprise data as vectors to perform semantic search.
  • AWS Amplify to create and deploy the web application.
  • Amazon API Gateway and AWS Lambda to create an API with an authentication layer and integrate with Amazon Bedrock.
  • Amazon Cognito to implement an identity platform (user directory and authorization management) for the web application.
  • Amazon Simple Storage Service (Amazon S3) to store the enterprise data used by the solution and web application-related assets.

Solution overview

The solution architecture involves the following steps:

  1. The user authenticates to the web application (the digital assistant UI).
  2. Amazon Cognito validates the authentication details.
  3. The user submits a request using the web application.
  4. The request is sent by the web application to the API.
  5. The API calls a Lambda authorizer to confirm that the user is authorized to perform the operation.
  6. The request is sent from the API to a Lambda function.
  7. The Lambda function submits the request as a prompt to a knowledge base (Knowledge Bases for Amazon Bedrock), and explicitly requests a hybrid search to be performed using the Amazon Bedrock API.
  8. Amazon Bedrock retrieves relevant data from the vector store (using the vector engine for OpenSearch Serverless) using hybrid search.
  9. Amazon Bedrock submits a prompt to a foundation model.

After Step 9, the foundation model generates a response back that will be returned to the user in the web application’s digital assistant.

The following diagram illustrates this workflow.

Prerequisites

To follow along and set up this solution, you must have the following:

  • An AWS account
  • A device with access to your AWS account with the following:
  • Model access to the following models in Amazon Bedrock: Titan Embeddings G1 – Text and Claude Instant

Upload documents and create a knowledge base

In this section, we create a knowledge base in Amazon Bedrock. The knowledge base will enrich the prompt submitted to an Amazon Bedrock foundation model with contextual information derived from our data source (in our case, documents uploaded in a S3 bucket).

During the creation of the knowledge base, a vector store will also be created to ingest documents encoded as vectors, using an embeddings model. An embeddings model encodes data as vectors in order to capture the meaning and context of our sample documents. This allows us to find data relevant to our end-user prompts.

For our use case, we use the vector engine for OpenSearch Serverless as a vector store and Titan Text Embeddings G1 model as the embeddings model.

Complete the following steps to create an S3 bucket to upload documents, and synchronize them with a knowledge base in Amazon Bedrock:

  1. Create an S3 bucket in your account.
  2. Upload the following documents in the S3 bucket:
  3. Create a knowledge base with the following configuration:
    • For Knowledge base name, enter assistant-knowledgebase.
    • For Knowledge base description, enter Knowledge base for digital assistant.
    • For IAM permissions, select Create and use a new service role.
    • For Data source name, enter assistant-knowledgebase-datasource.
    • For S3 URI, enter the URI of the previously created S3 bucket (for example, s3://#s3-bucket-name#).
    • For Embeddings model, choose Titan G1 Embeddings – Text.
    • For Vector database, select Quick create a new vector store.
  4. Ingest and synchronize the documents in the knowledge base.

Create the API and backend

In this section, we create the following resources:

  • A user directory for web authentication and authorization, created with an Amazon Cognito user pool.
  • An API created with Amazon API Gateway. This will expose a single-entry door interface to our digital assistant’s web application.
  • An authorization layer in our API, to protect our backend from unauthorized users. This will be implemented with a Lambda authorizer function to validate that incoming requests include valid authorization details.
  • A Lambda function behind the API, which will submit prompts to a knowledge base and return responses back to the API.

Complete the following steps to create the API and the backend of the digital assistant’s web application, using AWS CloudFormation templates:

  1. Clone the GitHub repository.
  2. Navigate to the api folder, which includes the following content:
    • A template named webapp-userpool-stack.yml for the Amazon Cognito user pool
    • A template named webapp-lambda-stack.yml for the Lambda function calling a knowledge base
    • A template named webapp-api-stack.yml for the API and the Lambda authorizer function
    • A subfolder named lambda-auth for the Lambda authorizer function code
    • A subfolder named lambda-knowledgebase for the Lambda function calling a knowledge base
    • A script named cognito-create-testuser.sh to create a test user in the Amazon Cognito user pool
  3.  Create the Amazon Cognito user pool of the web application using the following AWS Command Line Interface (AWS CLI) command:
    aws cloudformation create-stack --stack-name webapp-userpool-stack --template-body file://webapp-userpool-stack.yml

  4. Go to the lambda-knowledgebase folder and download the dependencies with the following command:
    pip install -r requirements.txt -t .

  5. Create a .zip file named lambda-knowledgebase.zip with the Lambda code and its dependencies (the .zip file’s root directory must include the Lambda code and its dependencies).
  6. From the api folder, go to the lambda-auth folder and download the dependencies with the following command:
    pip install -r requirements.txt -t .

  7. Create .a zip file named lambda-auth.zip with the Lambda code and its dependencies (the .zip file’s root directory must include the Lambda code and its dependencies).
  8. Create an S3 bucket in your account.
  9. Upload both .zip files (lambda-auth.zip and lambda-knowledgebase.zip) to the S3 bucket.
  10. Go back to the api folder and create the Lambda function of the web application using the following AWS CLI command (provide your S3 bucket and knowledge base ID):
aws cloudformation create-stack 
--stack-name webapp-lambda-knowledgebase-stack 
--capabilities "CAPABILITY_IAM" 
--template-body file://webapp-lambda-knowledgebase-stack.yml 
--parameters ParameterKey=BedrockKnowledgeBaseId,ParameterValue=#bedrock-knowledgebase-id# 
ParameterKey=BedrockLambdaS3Bucket,ParameterValue=#lambdacode-s3-bucket-name# 
ParameterKey=BedrockLambdaS3Key,ParameterValue=lambda-knowledgebase.zip

You can retrieve the knowledge base ID by running the following AWS CLI command:

aws bedrock-agent list-knowledge-bases 
--output text 
--query 'knowledgeBaseSummaries[?name==`assistant-knowledgebase`].knowledgeBaseId'

  1. Create the API of the web application using the following AWS CLI command (provide your bucket name):
aws cloudformation create-stack 
--stack-name webapp-api-stack 
--capabilities "CAPABILITY_IAM" 
--template-body file://webapp-api-stack.yml 
--parameters ParameterKey=LambdaAuthorizerS3Bucket,ParameterValue=#lambdacode-s3-bucket-name# 
ParameterKey=LambdaAuthorizerS3Key,ParameterValue=lambda-auth.zip

Configure the Amazon Cognito user pool

In this section, we create a user in our Amazon Cognito user pool. This user will be used to log in to our web application.

Complete the following steps to configure the Amazon Cognito user pool created in the previous section:

  1. On the Amazon Cognito console, access the user pool named webapp-userpool.
  2. On the Users tab, choose Create a user.
  3. For Invitation message, select Send an email invitation.
  4. For Email address section, enter your email address and select Mark email address as verified.
  5. For Temporary password, select Generate a password.
  6. Choose Create user.


You can also complete these steps by running the script cognito-create-testuser.sh available in the api folder as follows (provide your email address):

./cognito-create-testuser.sh #your-email-address#

After you create the user, you should receive an email with a temporary password in this format: “Your username is #your-email-address# and temporary password is #temporary-password#.

Keep note of these login details (email address and temporary password) to use later when testing the web application.

Create the web application

In this section, we build a web application using Amplify and publish it to make it accessible through an endpoint URL. To complete this section, you must first install and set up the Amplify CLI, as discussed in the prerequisites.

Complete the following steps to create the web application of the digital assistant:

  1. Go back to the root folder of the repository and open the frontend folder.
  2. Run the script amplify-setup.sh to create the Amplify application:
    ./amplify-setup.sh

The amplify-setup.sh script creates an Amplify application and configures it to integrate with resources you created in the previous modules:

    • The Amazon Cognito user pool to authenticate our user through the web application’s login page
    • The Amazon API Gateway to process prompts submitted using the web application’s chat interface
  1. Configure the hosting of the Amplify application using the following command:
    amplify add hosting

  2. Choose the following options:
    • For Select the plugin module to execute, choose Hosting with Amplify Console (Managed hosting with custom domains, Continuous deployment).
    • For Choose a type, choose Manual deployment.

In this step, we configure how the web application will be deployed and hosted:

    • The web application will be hosted using the Amplify console, which offers fully managed hosting
    • The web application will be deployed using manual deployment, which allows us to publish our web application to the Amplify console without connecting a Git provider
  1. Publish the Amplify application using the following command:
    amplify publish --yes

The web application is now available for testing and a URL should be displayed, as shown in the following screenshot. Take note of the URL to use in the following section.

Test the digital assistant

In this section, you test the web application of the digital assistant:

  1. Open the URL of the Amplify application in your navigator.
  2. Enter your login information (your email and the temporary password you received earlier while configuring the user pool in Amazon Cognito) and choose Sign in.
  3. When prompted, enter a new password and choose Change Password.
  4. You should now be able to see a chat interface.
  5. Ask a question to test the assistant. For example, “What is the OPS number related to health of operations in the Well Architected framework?

You should receive a response along with sources, as shown in the following screenshot

Clean up

To make sure that no additional cost is incurred, remove the resources provisioned in your account. Make sure you’re in the correct AWS account before deleting the following resources.

  1. Delete the knowledge base.
  2. Delete the CloudFormation stacks (provide the AWS Region where you created your resources):
    aws cloudformation delete-stack --stack-name webapp-api-stack --region #region#
    aws cloudformation delete-stack --stack-name webapp-lambda-knowledgebase-stack --region #region#
    aws cloudformation delete-stack --stack-name webapp-userpool-stack --region #region#

  3. Delete the Amplify application with the following AWS CLI command (provide your application ID and the Region where it was created):
    aws amplify delete-app --app-id #app-id# --region #region#

  4. You can retrieve the app id by running the following AWS CLI command:
    aws amplify list-apps --query 'apps[?name==`frontend`].appId'

  5. Delete the S3 buckets.

You should exercise caution when performing the preceding steps. Make sure you are deleting the resources in the correct AWS account.

Conclusion

In this post, we walked through a solution to create a digital assistant using serverless services. First, we created a knowledge base and ingested documents into it from an S3 bucket. Then we created an API and a Lambda function to submit prompts to the knowledge base. We also configured a user pool to grant a user access to the digital assistant’s web application. Finally, we created the frontend of the web application in Amplify.

For further information on the services used, consult the Amazon Bedrock, Security in Amazon Bedrock, Amazon OpenSearch Serverless, AWS Amplify, Amazon API Gateway, AWS Lambda, Amazon Cognito, and Amazon S3 product pages.

To dive deeper into this solution, a self-paced workshop is available in AWS Workshop Studio, at this location.


About the author

Mehdi Amrane is a Senior Solutions Architect at Amazon Web Services. He supports customers on their initiatives and provides them prescriptive guidance to achieve their goals, and accelerate their cloud journey. He is passionate about creating content on application architecture, DevOps and Serverless technologies.

Read More

Build a self-service digital assistant using Amazon Lex and Knowledge Bases for Amazon Bedrock

Build a self-service digital assistant using Amazon Lex and Knowledge Bases for Amazon Bedrock

Organizations strive to implement efficient, scalable, cost-effective, and automated customer support solutions without compromising the customer experience. Generative artificial intelligence (AI)-powered chatbots play a crucial role in delivering human-like interactions by providing responses from a knowledge base without the involvement of live agents. These chatbots can be efficiently utilized for handling generic inquiries, freeing up live agents to focus on more complex tasks.

Amazon Lex provides advanced conversational interfaces using voice and text channels. It features natural language understanding capabilities to recognize more accurate identification of user intent and fulfills the user intent faster.

Amazon Bedrock simplifies the process of developing and scaling generative AI applications powered by large language models (LLMs) and other foundation models (FMs). It offers access to a diverse range of FMs from leading providers such as Anthropic Claude, AI21 Labs, Cohere, and Stability AI, as well as Amazon’s proprietary Amazon Titan models. Additionally, Knowledge Bases for Amazon Bedrock empowers you to develop applications that harness the power of Retrieval Augmented Generation (RAG), an approach where retrieving relevant information from data sources enhances the model’s ability to generate contextually appropriate and informed responses.

The generative AI capability of QnAIntent in Amazon Lex lets you securely connect FMs to company data for RAG. QnAIntent provides an interface to use enterprise data and FMs on Amazon Bedrock to generate relevant, accurate, and contextual responses. You can use QnAIntent with new or existing Amazon Lex bots to automate FAQs through text and voice channels, such as Amazon Connect.

With this capability, you no longer need to create variations of intents, sample utterances, slots, and prompts to predict and handle a wide range of FAQs. You can simply connect QnAIntent to company knowledge sources and the bot can immediately handle questions using the allowed content.

In this post, we demonstrate how you can build chatbots with QnAIntent that connects to a knowledge base in Amazon Bedrock (powered by Amazon OpenSearch Serverless as a vector database) and build rich, self-service, conversational experiences for your customers.

Solution overview

The solution uses Amazon Lex, Amazon Simple Storage Service (Amazon S3), and Amazon Bedrock in the following steps:

  1. Users interact with the chatbot through a prebuilt Amazon Lex web UI.
  2. Each user request is processed by Amazon Lex to determine user intent through a process called intent recognition.
  3. Amazon Lex provides the built-in generative AI feature QnAIntent, which can be directly attached to a knowledge base to fulfill user requests.
  4. Knowledge Bases for Amazon Bedrock uses the Amazon Titan embeddings model to convert the user query to a vector and queries the knowledge base to find the chunks that are semantically similar to the user query. The user prompt is augmented along with the results returned from the knowledge base as an additional context and sent to the LLM to generate a response.
  5. The generated response is returned through QnAIntent and sent back to the user in the chat application through Amazon Lex.

The following diagram illustrates the solution architecture and workflow.

In the following sections, we look at the key components of the solution in more detail and the high-level steps to implement the solution:

  1. Create a knowledge base in Amazon Bedrock for OpenSearch Serverless.
  2. Create an Amazon Lex bot.
  3. Create new generative AI-powered intent in Amazon Lex using the built-in QnAIntent and point the knowledge base.
  4. Deploy the sample Amazon Lex web UI available in the GitHub repo. Use the provided AWS CloudFormation template in your preferred AWS Region and configure the bot.

Prerequisites

To implement this solution, you need the following:

  1. An AWS account with privileges to create AWS Identity and Access Management (IAM) roles and policies. For more information, see Overview of access management: Permissions and policies.
  2. Familiarity with AWS services such as Amazon S3, Amazon Lex, Amazon OpenSearch Service, and Amazon Bedrock.
  3. Access enabled for the Amazon Titan Embeddings G1 – Text model and Anthropic Claude 3 Haiku on Amazon Bedrock. For instructions, see Model access.
  4. A data source in Amazon S3. For this post, we use Amazon shareholder docs (Amazon Shareholder letters – 2023 & 2022) as a data source to hydrate the knowledge base.

Create a knowledge base

To create a new knowledge base in Amazon Bedrock, complete the following steps. For more information, refer to Create a knowledge base.

  1. On the Amazon Bedrock console, choose Knowledge bases in the navigation pane.
  2. Choose Create knowledge base.
  3. On the Provide knowledge base details page, enter a knowledge base name, IAM permissions, and tags.
  4. Choose Next.
  5. For Data source name, Amazon Bedrock prepopulates the auto-generated data source name; however, you can change it to your requirements.
  6. Keep the data source location as the same AWS account and choose Browse S3.
  7. Select the S3 bucket where you uploaded the Amazon shareholder documents and choose Choose.
    This will populate the S3 URI, as shown in the following screenshot.
  8. Choose Next.
  9. Select the embedding model to vectorize the documents. For this post, we select Titan embedding G1 – Text v1.2.
  10. Select Quick create a new vector store to create a default vector store with OpenSearch Serverless.
  11. Choose Next.
  12. Review the configurations and create your knowledge base.
    After the knowledge base is successfully created, you should see a knowledge base ID, which you need when creating the Amazon Lex bot.
  13. Choose Sync to index the documents.

Create an Amazon Lex bot

Complete the following steps to create your bot:

  1. On the Amazon Lex console, choose Bots in the navigation pane.
  2. Choose Create bot.
  3. For Creation method, select Create a blank bot.
  4. For Bot name, enter a name (for example, FAQBot).
  5. For Runtime role, select Create a new IAM role with basic Amazon Lex permissions to access other services on your behalf.
  6. Configure the remaining settings based on your requirements and choose Next.
  7. On the Add language to bot page, you can choose from different languages supported.
    For this post, we choose English (US).
  8. Choose Done.

    After the bot is successfully created, you’re redirected to create a new intent.
  9. Add utterances for the new intent and choose Save intent.

Add QnAIntent to your intent

Complete the following steps to add QnAIntent:

  1. On the Amazon Lex console, navigate to the intent you created.
  2. On the Add intent dropdown menu, choose Use built-in intent.
  3. For Built-in intent, choose AMAZON.QnAIntent – GenAI feature.
  4. For Intent name, enter a name (for example, QnABotIntent).
  5. Choose Add.

    After you add the QnAIntent, you’re redirected to configure the knowledge base.
  6. For Select model, choose Anthropic and Claude3 Haiku.
  7. For Choose a knowledge store, select Knowledge base for Amazon Bedrock and enter your knowledge base ID.
  8. Choose Save intent.
  9. After you save the intent, choose Build to build the bot.
    You should see a Successfully built message when the build is complete.
    You can now test the bot on the Amazon Lex console.
  10. Choose Test to launch a draft version of your bot in a chat window within the console.
  11. Enter questions to get responses.

Deploy the Amazon Lex web UI

The Amazon Lex web UI is a prebuilt fully featured web client for Amazon Lex chatbots. It eliminates the heavy lifting of recreating a chat UI from scratch. You can quickly deploy its features and minimize time to value for your chatbot-powered applications. Complete the following steps to deploy the UI:

  1. Follow the instructions in the GitHub repo.
  2. Before you deploy the CloudFormation template, update the LexV2BotId and LexV2BotAliasId values in the template based on the chatbot you created in your account.
  3. After the CloudFormation stack is deployed successfully, copy the WebAppUrl value from the stack Outputs tab.
  4. Navigate to the web UI to test the solution in your browser.

Clean up

To avoid incurring unnecessary future charges, clean up the resources you created as part of this solution:

  1. Delete the Amazon Bedrock knowledge base and the data in the S3 bucket if you created one specifically for this solution.
  2. Delete the Amazon Lex bot you created.
  3. Delete the CloudFormation stack.

Conclusion

In this post, we discussed the significance of generative AI-powered chatbots in customer support systems. We then provided an overview of the new Amazon Lex feature, QnAIntent, designed to connect FMs to your company data. Finally, we demonstrated a practical use case of setting up a Q&A chatbot to analyze Amazon shareholder documents. This implementation not only provides prompt and consistent customer service, but also empowers live agents to dedicate their expertise to resolving more complex issues.

Stay up to date with the latest advancements in generative AI and start building on AWS. If you’re seeking assistance on how to begin, check out the Generative AI Innovation Center.


About the Authors

Supriya Puragundla is a Senior Solutions Architect at AWS. She has over 15 years of IT experience in software development, design and architecture. She helps key customer accounts on their data, generative AI and AI/ML journeys. She is passionate about data-driven AI and the area of depth in ML and generative AI.

Manjula Nagineni is a Senior Solutions Architect with AWS based in New York. She works with major financial service institutions, architecting and modernizing their large-scale applications while adopting AWS Cloud services. She is passionate about designing cloud-centered big data workloads. She has over 20 years of IT experience in software development, analytics, and architecture across multiple domains such as finance, retail, and telecom.

Mani Khanuja is a Tech Lead – Generative AI Specialists, author of the book Applied Machine Learning and High Performance Computing on AWS, and a member of the Board of Directors for Women in Manufacturing Education Foundation Board. She leads machine learning projects in various domains such as computer vision, natural language processing, and generative AI. She speaks at internal and external conferences such AWS re:Invent, Women in Manufacturing West, YouTube webinars, and GHC 23. In her free time, she likes to go for long runs along the beach.

Read More