Effective customer support and project management are critical aspects of providing effective customer relationship management. Atlassian Jira, a platform for issue tracking and project management functions for software projects, has become an indispensable part of many organizations’ workflows to ensure success of the customer and the product. However, extracting valuable insights from the vast amount of data stored in Jira often requires manual efforts and building specialized tooling. Users such as support engineers, project managers, and product managers need to be able to ask questions about a project, issue, or customer in order to provide excellence in their support for customers’ needs. Generative AI provides the ability to take relevant information from a data source and provide well-constructed answers back to the user.
Building a generative AI-based conversational application that is integrated with the data sources that contain the relevant content an enterprise requires time, money, and people. You first need to build connectors to the data sources. Next, you need to index this data to make it available for a Retrieval Augmented Generation (RAG) approach, where relevant passages are delivered with high accuracy to a large language model (LLM). To do this, you need to select an index that provides the capabilities to index the content for semantic and vector search, build the infrastructure to retrieve and rank the answers, and build a feature-rich web application. You also need to hire and staff a large team to build, maintain, and manage such a system.
Amazon Q Business is a fully managed generative AI-powered assistant that can answer questions, provide summaries, generate content, and securely complete tasks based on data and information in your enterprise systems. Amazon Q Business can help you get fast, relevant answers to pressing questions, solve problems, generate content, and take action using the data and expertise found in your company’s information repositories, code, and enterprise systems (such as Jira, among others). Amazon Q provides out-of-the-box native data source connectors that can index content into a built-in retriever and uses an LLM to provide accurate, well-written answers. A data source connector is a component of Amazon Q that helps integrate and synchronize data from multiple repositories into one index.
Amazon Q Business offers multiple prebuilt connectors to a large number of data sources, including Atlassian Jira, Atlassian Confluence, Amazon Simple Storage Service (Amazon S3), Microsoft SharePoint, Salesforce, and many more, and helps you create your generative AI solution with minimal configuration. For a full list of Amazon Q Business supported data source connectors, see Amazon Q Business connectors.
In this post, we walk you through configuring and integrating Amazon Q for Business with Jira to enable your support, project management, product management, leadership, and other teams to quickly get accurate answers to their questions related to the content in Jira projects, issues, and more.
Find accurate answers from content in Jira using Amazon Q Business
After you integrate Amazon Q Business with Jira, users can ask questions from the description of the document. This enables the following use cases:
- Natural language search – Users can search for tasks, issues, or other project-related information using conversational language, making it straightforward to find the desired data without having to remember specific keywords or filters
- Summarization – Users can request a concise summary of all issues, tasks, or other entities matching their search query, allowing them to quickly grasp the key points without having to sift through individual document descriptions manually
- Query clarification – If a user’s query is ambiguous or lacks sufficient context, Amazon Q Business can engage in a dialogue to clarify the intent, so the user receives the most relevant and accurate results
Overview of Jira connector for Amazon Q Business
To crawl and index contents in Jira, you can configure the Amazon Q Business Jira connector as a data source in your Amazon Q business application. When you connect Amazon Q Business to a data source and initiate the sync process, Amazon Q Business crawls and indexes documents from the data source into its index.
Types of documents
In Amazon Q Business, a document is a unit of data. Let’s look at what are considered as documents in the context of Amazon Q Business Jira connector. A document is a collection of information that consists of a title, the content (or the body), metadata (data about the document) and access control list (ACL) information to make sure answers are provided from documents that the user has access to.
The Amazon Q Business Jira connector supports crawling of the following entities in Jira:
- Projects – Each project is considered a single document
- Issues – Each issue is considered a single document
- Comments – Each comment is considered a single document
- Attachments – Each attachment is considered a single document
- Worklogs – Each worklog is considered a single document
Additionally, Jira users can create custom objects and custom metadata fields. Amazon Q supports the crawling and indexing of these custom objects and custom metadata.
Amazon Q Business Jira connector also supports the indexing of a rich set of metadata from the various entities in Jira. It further provides the ability to map these source metadata fields to Amazon Q index fields for indexing this metadata. These field mappings allow you to map Jira field names to Amazon Q index field names. There are three types of metadata fields that Amazon Q connectors support:
- Default fields – These are required with each document, such as the title, creation date, author, and so on.
- Optional fields – These are provided by the data source. The administrator can optionally choose one or more of these fields if they contain important and relevant information to obtain accurate answers.
- Custom metadata fields – These are fields created in the data source in addition to what the data source already provides.
Refer to Jira data source connector field mappings for more information.
Authentication
Before you index the content from Jira, you need to establish a secure connection between the Amazon Q Business connector for Jira with your Jira cloud instance. To establish a secure connection, you need to authenticate with the data source. You can authenticate Amazon Q Business to Jira using basic authentication with a Jira ID and Jira API token.
To authenticate using basic authentication, you create a secret using AWS Secrets Manager with your Jira ID and Jira API token. If you use the AWS Management Console, you can choose to create a new secret or use an existing one. If you use the API, you must provide the Amazon Resource Name (ARN) of an existing secret when you use the CreateDataSource operation.
Refer to Manage API tokens for your Atlassian account for more information on creating and managing API tokens in Jira.
Secure querying with ACL crawling, identity crawling, and user store
Secure querying is a critical feature that makes sure users receive answers only from documents they’re authorized to access. Amazon Q Business implements this security measure through a two-step process. First, it indexes ACLs associated with each document. This indexing is vital for data security, because any document without an ACL is treated as public. Second, when a query is made, the system considers both the user’s credentials (typically their email address) and the query content. This dual-check mechanism means that the results are not only relevant to the query but also confined to documents the user has permission to view. By using ACLs and user authentication, Amazon Q Business maintains a robust barrier against unauthorized data access while delivering pertinent information to users.
If you need to index documents without ACLs, you must make sure they’re explicitly marked as public in your data source. Refer to Allow anonymous access to projects to enable public access to documents. Refer to How Amazon Q business connector crawls Jira ACLs for more information about crawling Jira ACLs.
Solution overview
In this post, we walk through the steps to configure a Jira connector for Amazon Q Business application. We use an existing Amazon Q application and configure the Jira connector to sync data from specific Jira projects and issue types, map relevant Jira fields to the Amazon Q index, initiate the data sync, and then query the ingested Jira data using Amazon Q’s web experience.
As part of querying Jira documents using Amazon Q Business application, we demonstrate how to ask natural language questions on your Jira issues, projects, and other issue types and get back relevant results and insights using Amazon Q Business.
Prerequisites
You should have the following:
Configure the Jira connector for an Amazon Q Business application
Complete the following steps to configure the connector:
- On the Amazon Q Business console, choose Applications in the navigation pane.
- Select the application that you want to add the Jira connector to.
- On the Actions menu, choose Edit.

- On the Update application page, leave all values as default and choose Update.
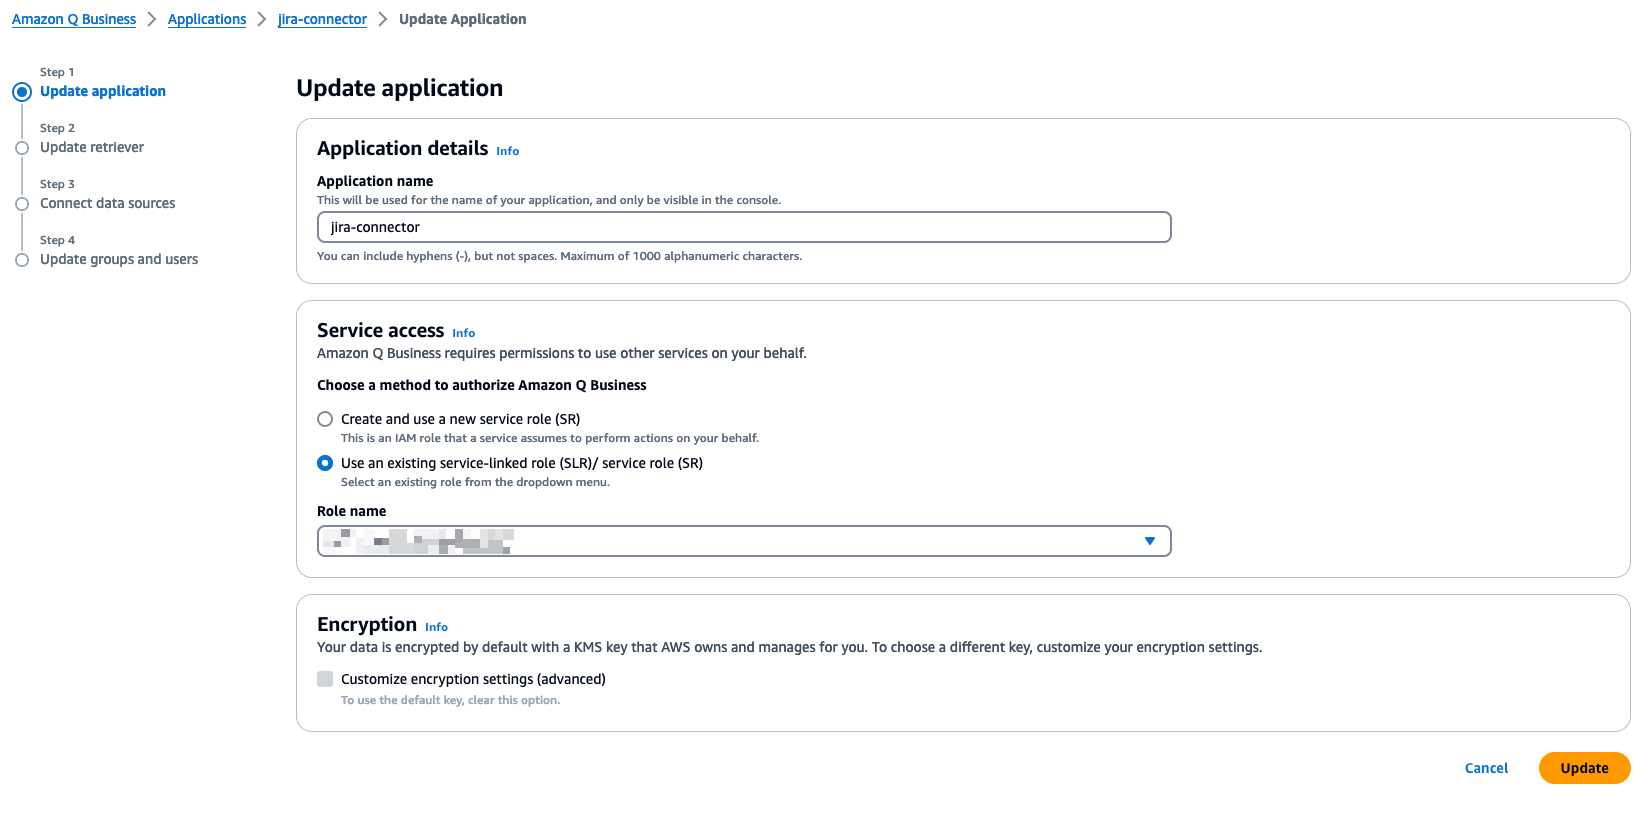
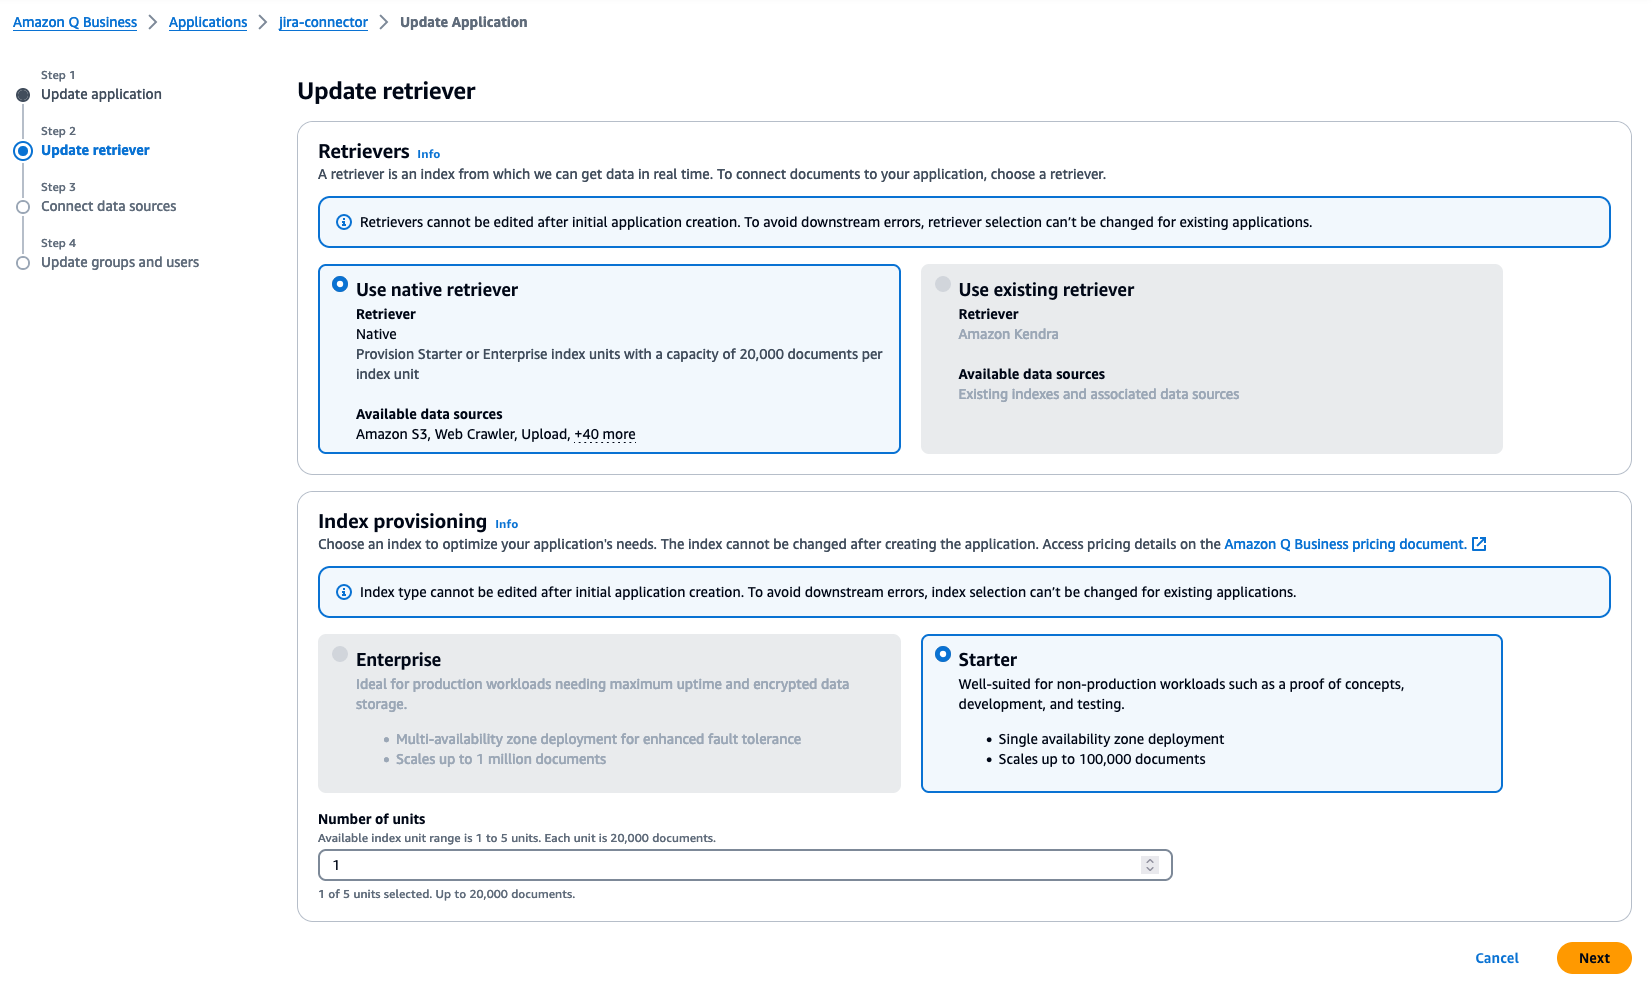
- On the Update retriever page, leave all values as default and choose Next.
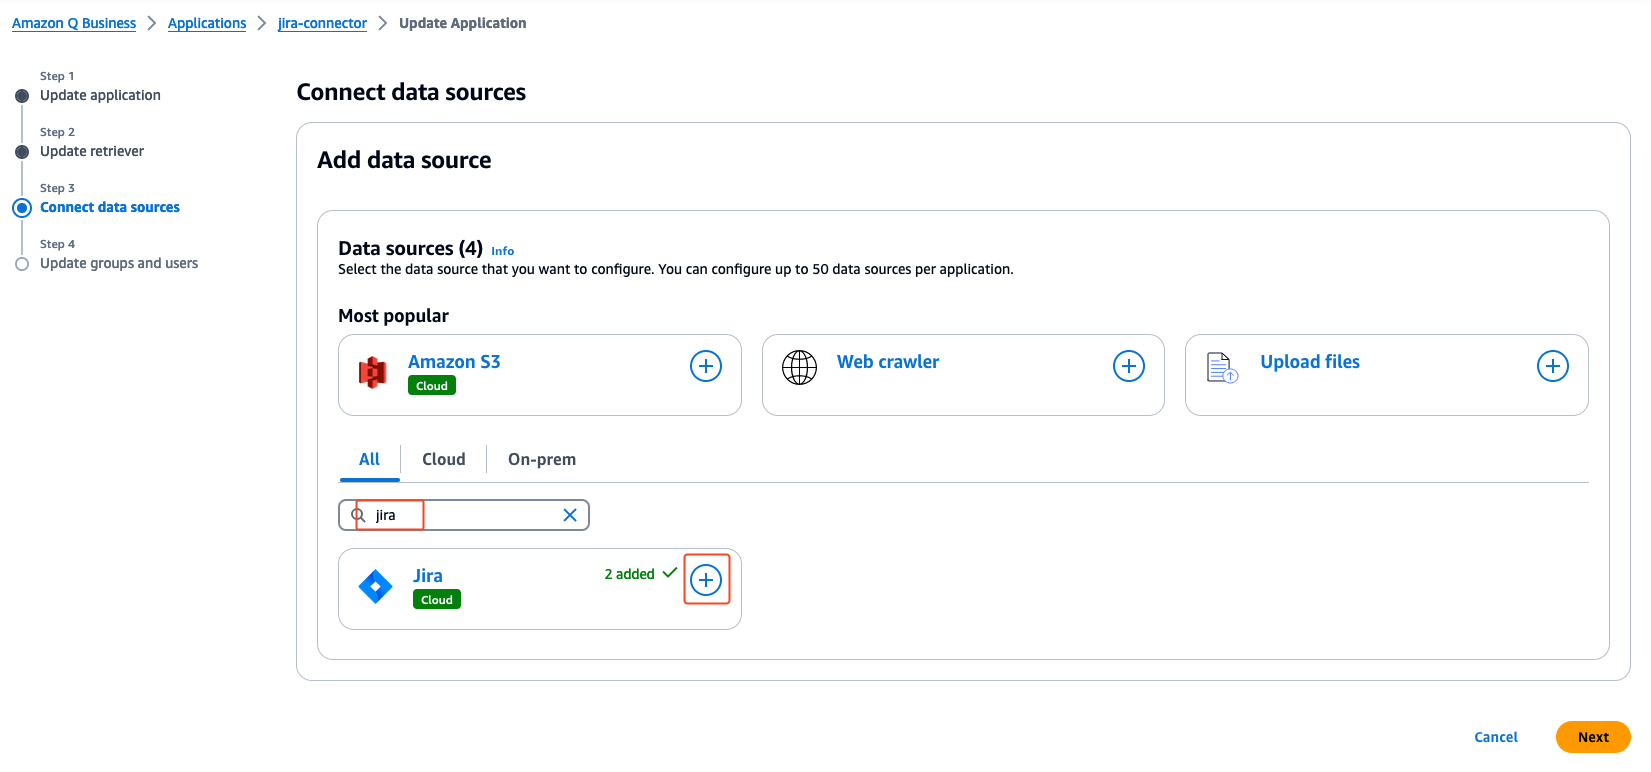
- On the Connect data sources page, on the All tab, search for Jira in the search field.
- Choose the plus sign on the Jira connector.
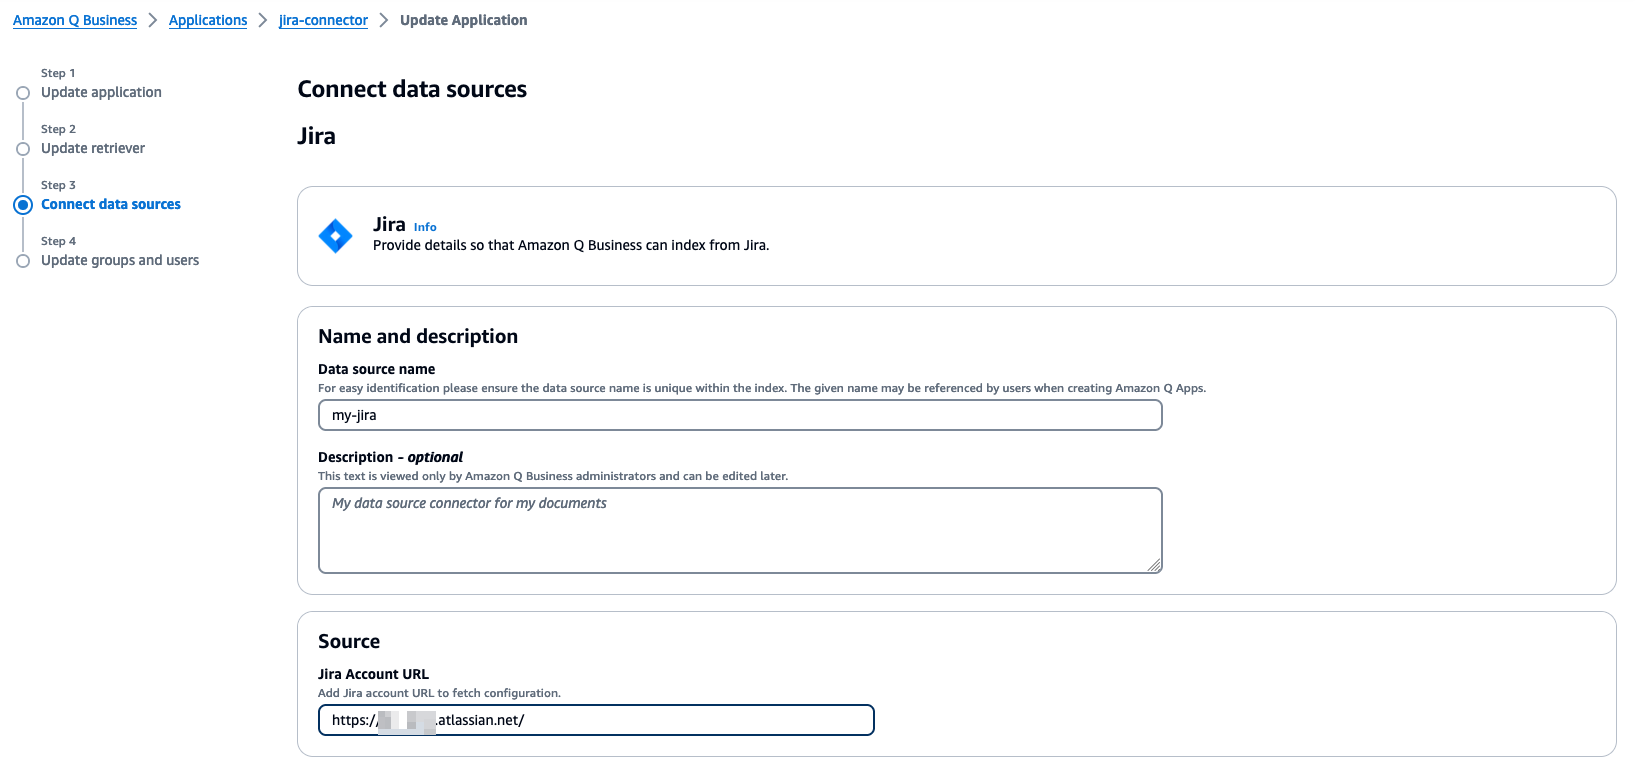
- In the Name and description section, enter a name and description.
- In the Source section, enter your company’s Jira account URL in
https://yourcompany.atlassian.net/
- In the Authentication section, choose Create and add new secret.
- Enter a name for your Secrets Manager secret.
- For Jira ID, enter the user name for the API token.
- For Password/Token, enter the API token details.
- Choose Save.
See Manage API tokens for your Atlassian account for details on how to create an API token.

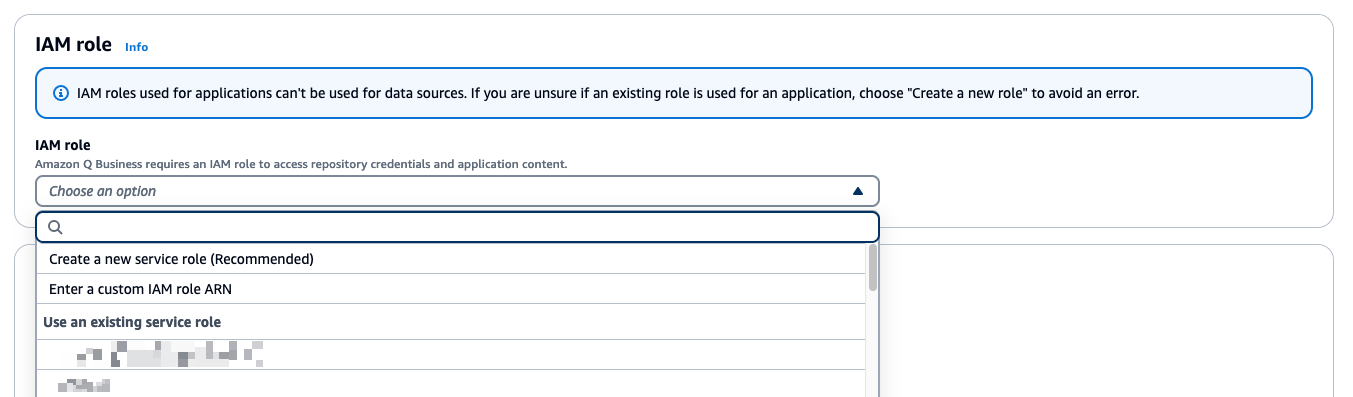
- In the IAM role section, for IAM role, choose Create a new service role (recommended).
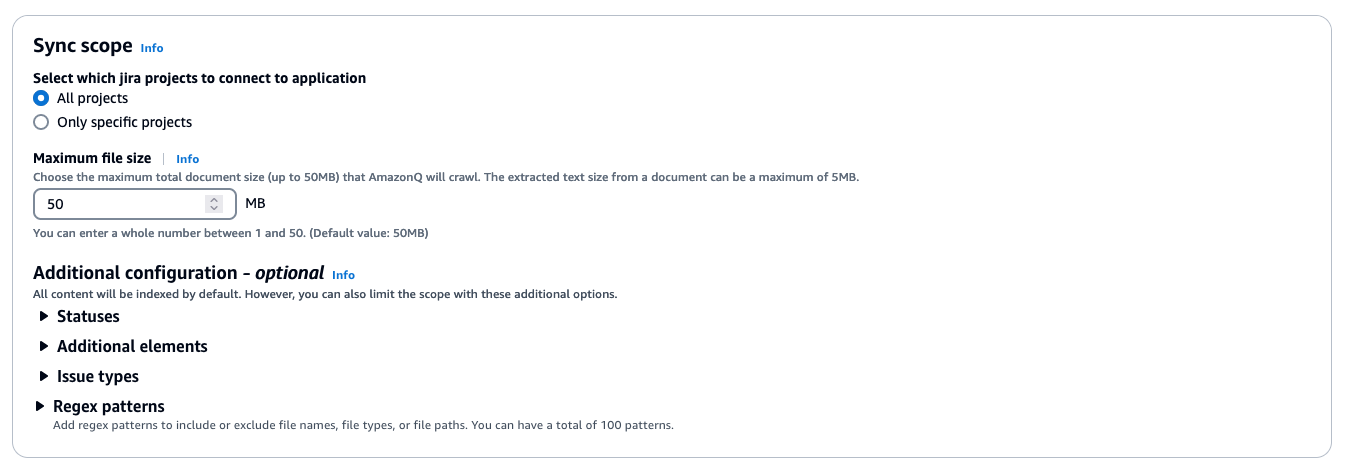
- In the Sync Scope section, you can select All projects or Only specific projects.
- By default, the Jira connector indexes all content from the projects. Optionally, you can choose to sync only specific Jira entities by selecting the appropriate options under Additional configuration.
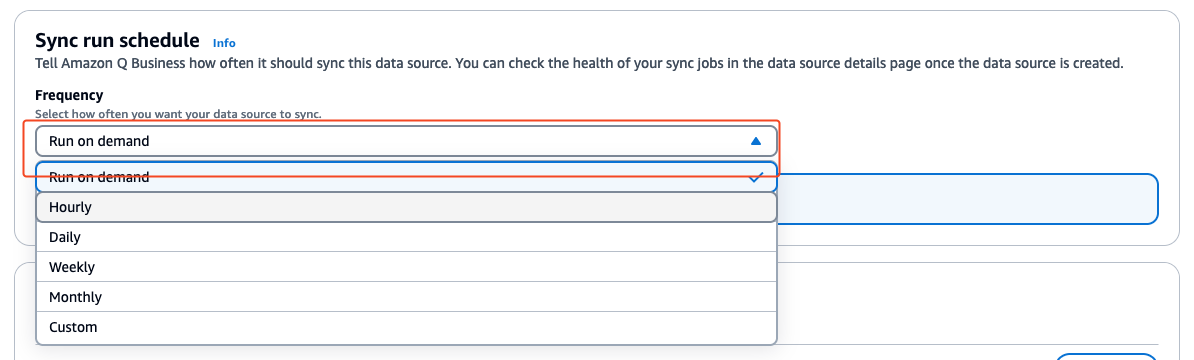
- In the Sync mode section, choose New, modified, or deleted content sync.

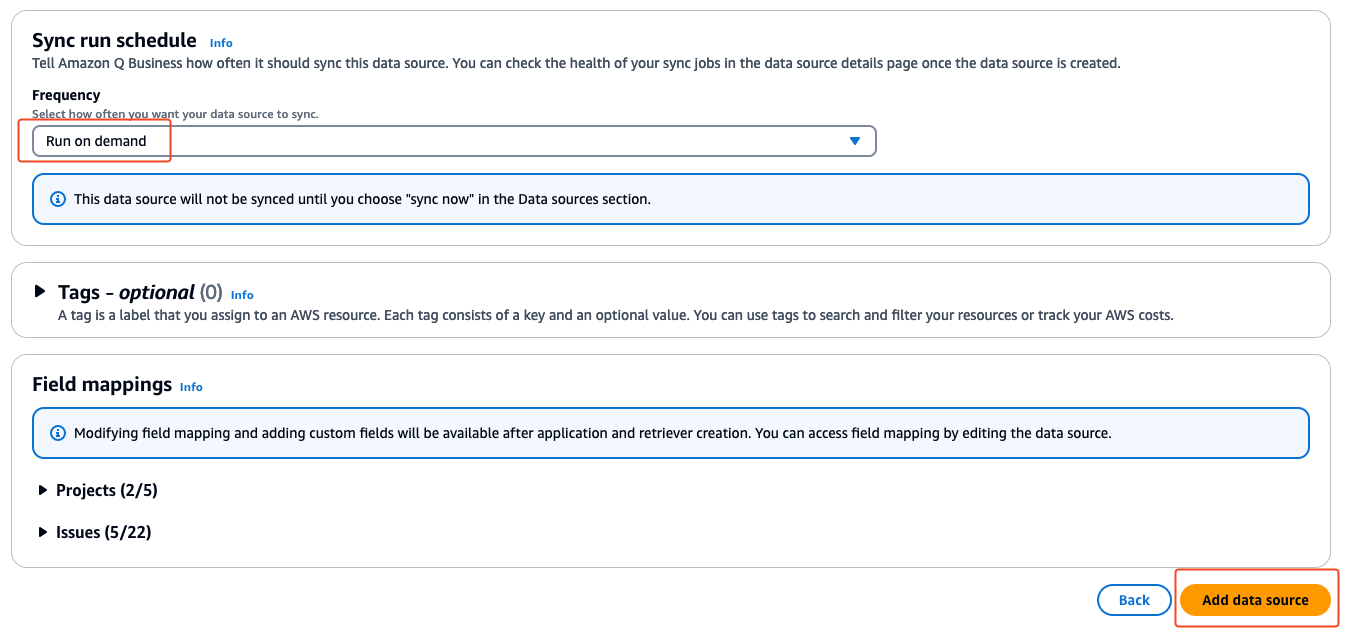
- In the Sync run schedule section, choose your desired frequency. For this post, we choose Run on demand.
- Choose Add data source wait for the retriever to be created.
After the data source is created, you’re redirected to the Connect data sources page to add more data sources as needed.
- For this walkthrough, choose Next.
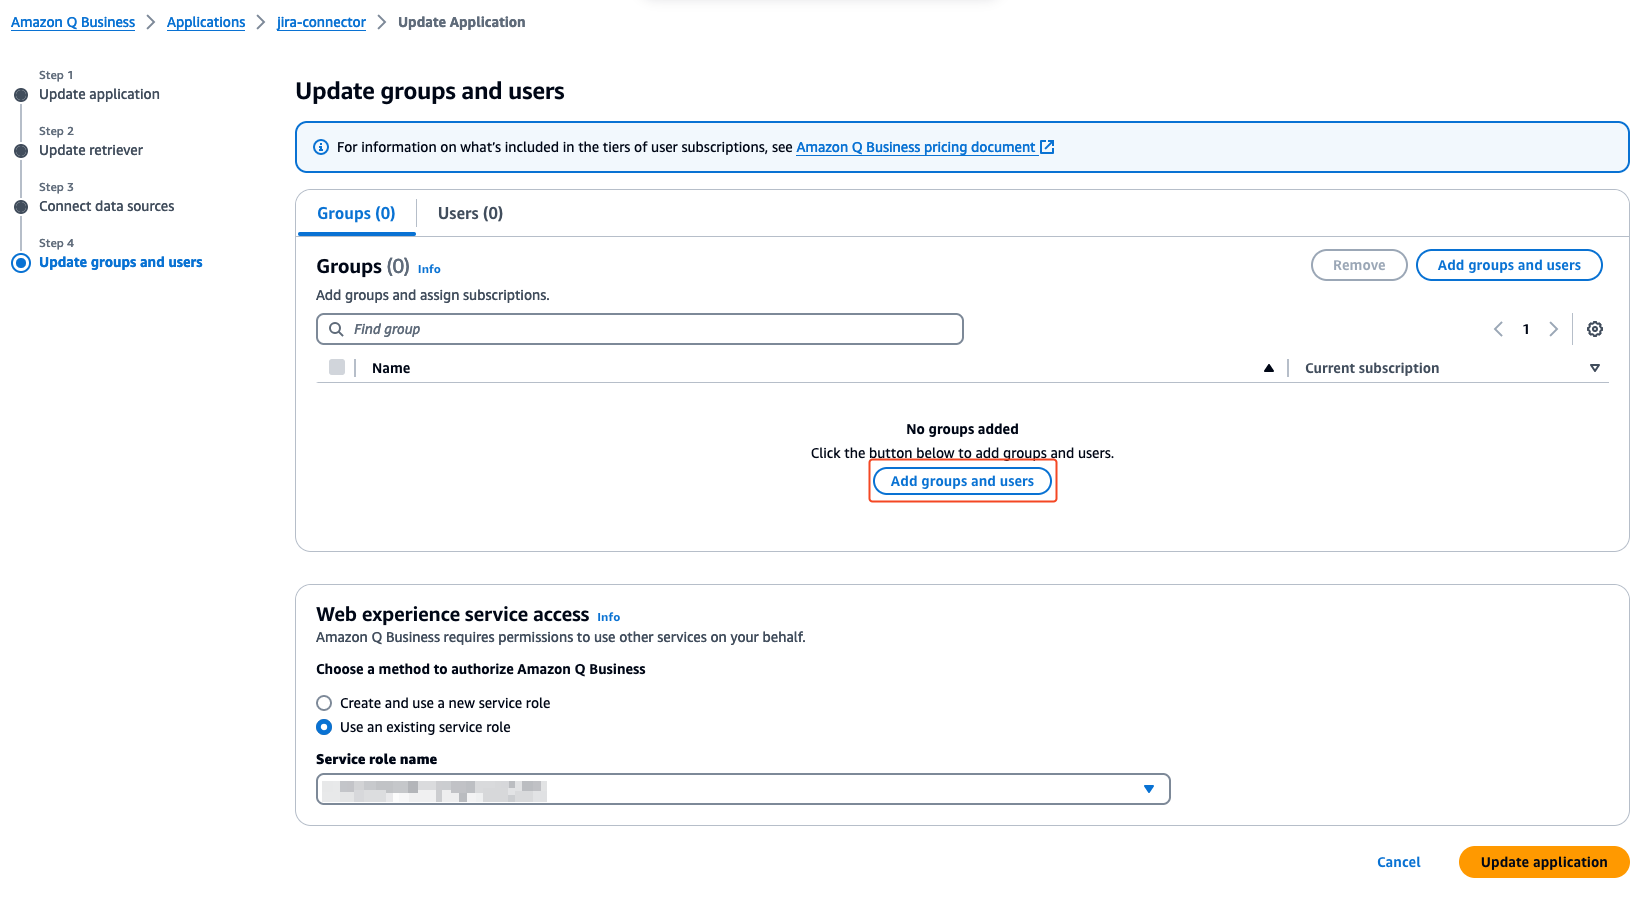
- On the Update groups and users page, choose Add groups and users.
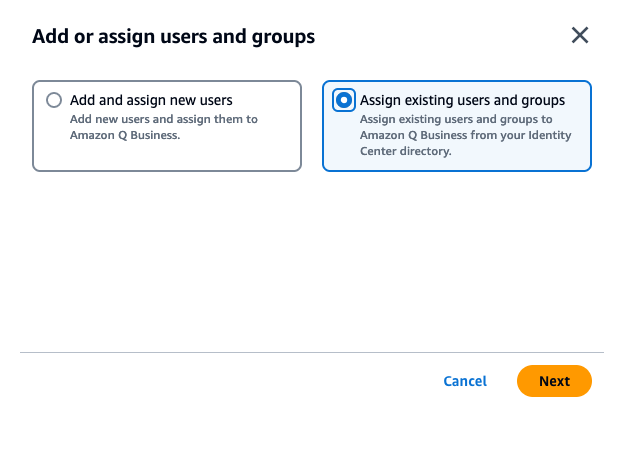
The users and groups that you add in this section are from the AWS IAM Identity Center users and groups set up by your administrator.
- In the Add or assign users and groups pop-up, select Assign existing users and groups to add existing users configured in your connected IAM Identity Center. Optionally, if you have permissions to add users, you can select Add new users.
- Choose Next.
- In the Assign users and groups pop-up, search for users by user display name or groups by group name.
- Choose the users or groups you want you add and choose Assign.
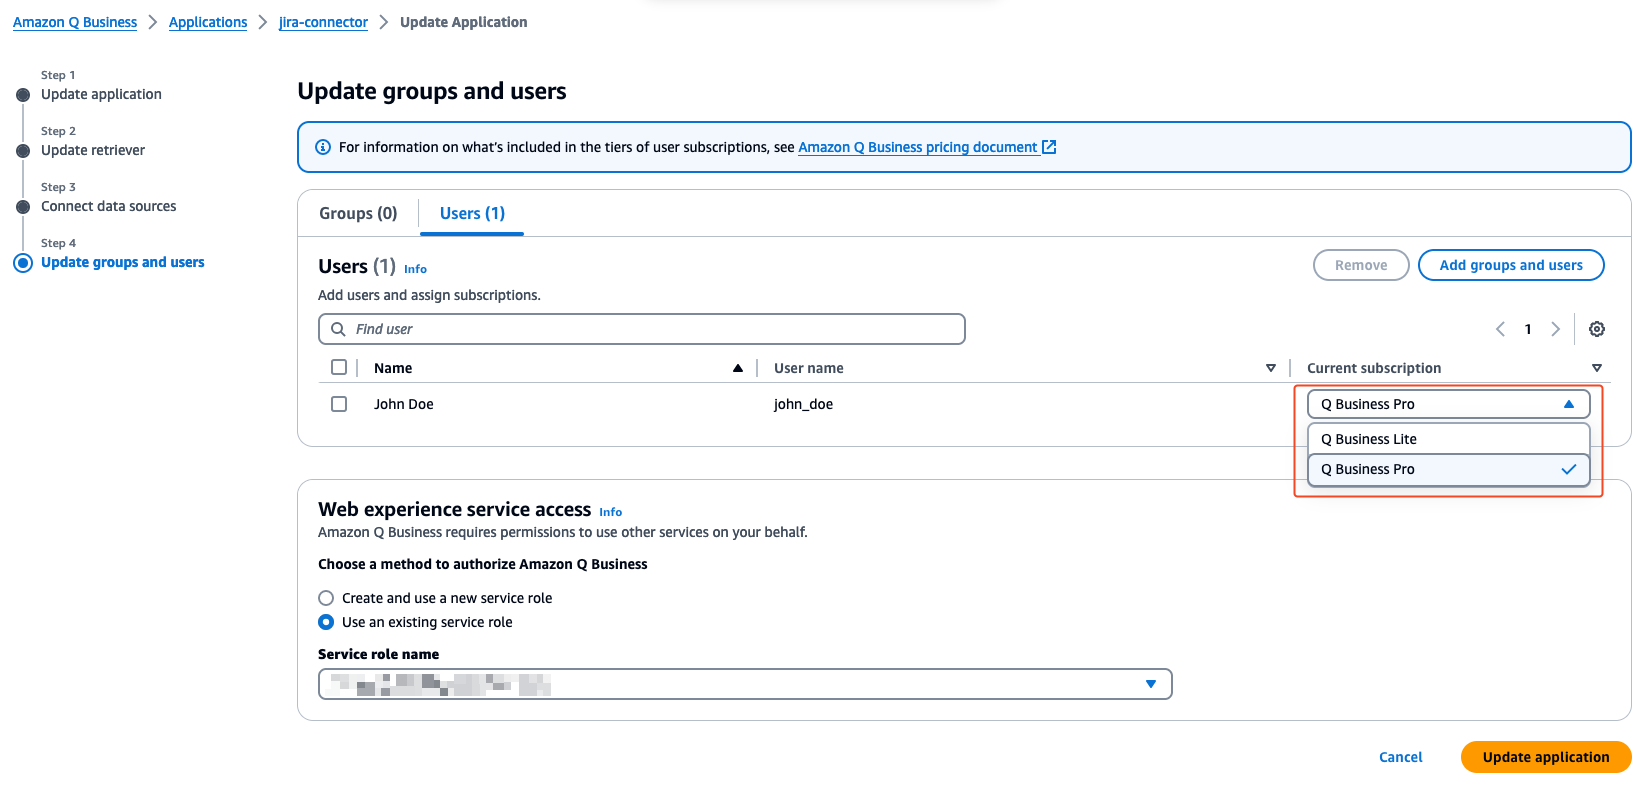
This closes the pop-up. The groups and users that you added should now be available on the Groups or Users tabs.

For each group or user entry, an Amazon Q Business subscription tier needs to be assigned.
- To enable subscription for a group, on the Update groups and users page, choose the Groups (If individual users need to be assigned a subscription, choose the Users tab).
- Under the Current subscription column, choose Choose subscription and choose a subscription (Q Business Lite or Q Business Pro).
- Choose Update application to complete adding and setting up the Jira data connector for Amazon Q Business.
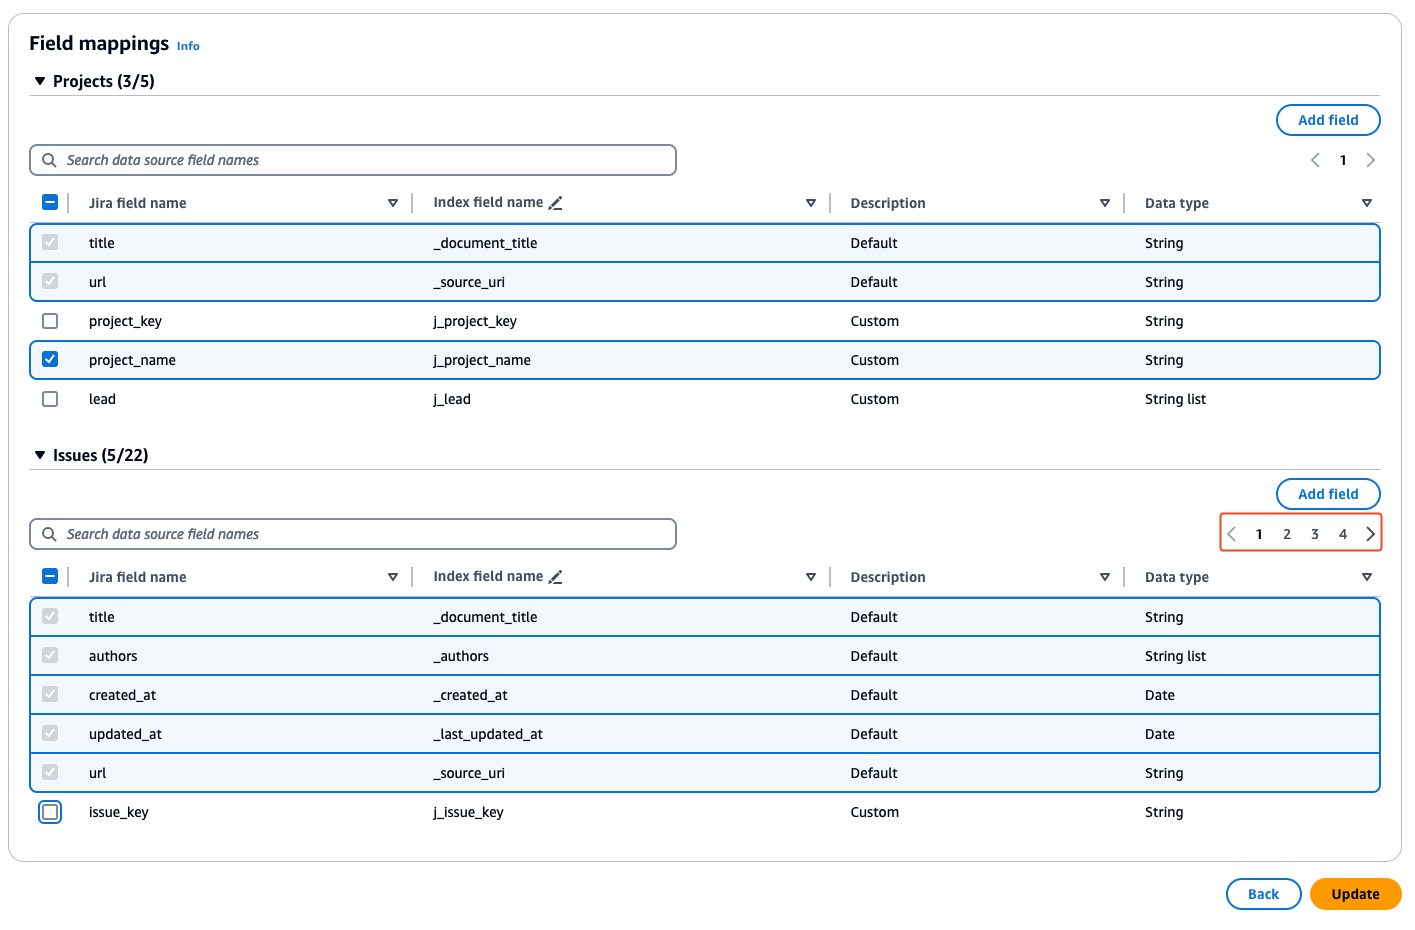
Configure Jira field mappings
To help you structure data for retrieval and chat filtering, Amazon Q Business crawls data source document attributes or metadata and maps them to fields in your Amazon Q index. Amazon Q has reserved fields that it uses when querying your application. When possible, Amazon Q automatically maps these built-in fields to attributes in your data source.
If a built-in field doesn’t have a default mapping, or if you want to map additional index fields, use the custom field mappings to specify how a data source attribute maps to your Amazon Q application.
- On the Amazon Q Business console, choose your application.
- Under Data sources, select your data source.
- On the Actions menu, choose Edit.

- In the Field mappings section, select the required fields to crawl under Projects, Issues, and any other issue types that are available and choose
When selecting all items, make sure you navigate through each page by choosing the page numbers and selecting Select All on every page to include all mapped items.
The Jira connector setup for Amazon Q is now complete. To test the connectivity to Jira and initiate the data synchronization, choose Sync now. The initial sync process may take several minutes to complete.
When the sync is complete, on the Sync history tab, you can see the sync status along with a summary of how may total items were added, deleted, modified, and failed during the sync process.

Query Jira data using the Amazon Q web experience
Now that the data synchronization is complete, you can start exploring insights from Amazon Q. In the newly created Amazon Q application, choose Customize web experience to open a new tab with a preview of the UI and options to customize as per your needs.
You can customize the Title, Subtitle, and Welcome message fields according to your needs, which will be reflected in the UI.
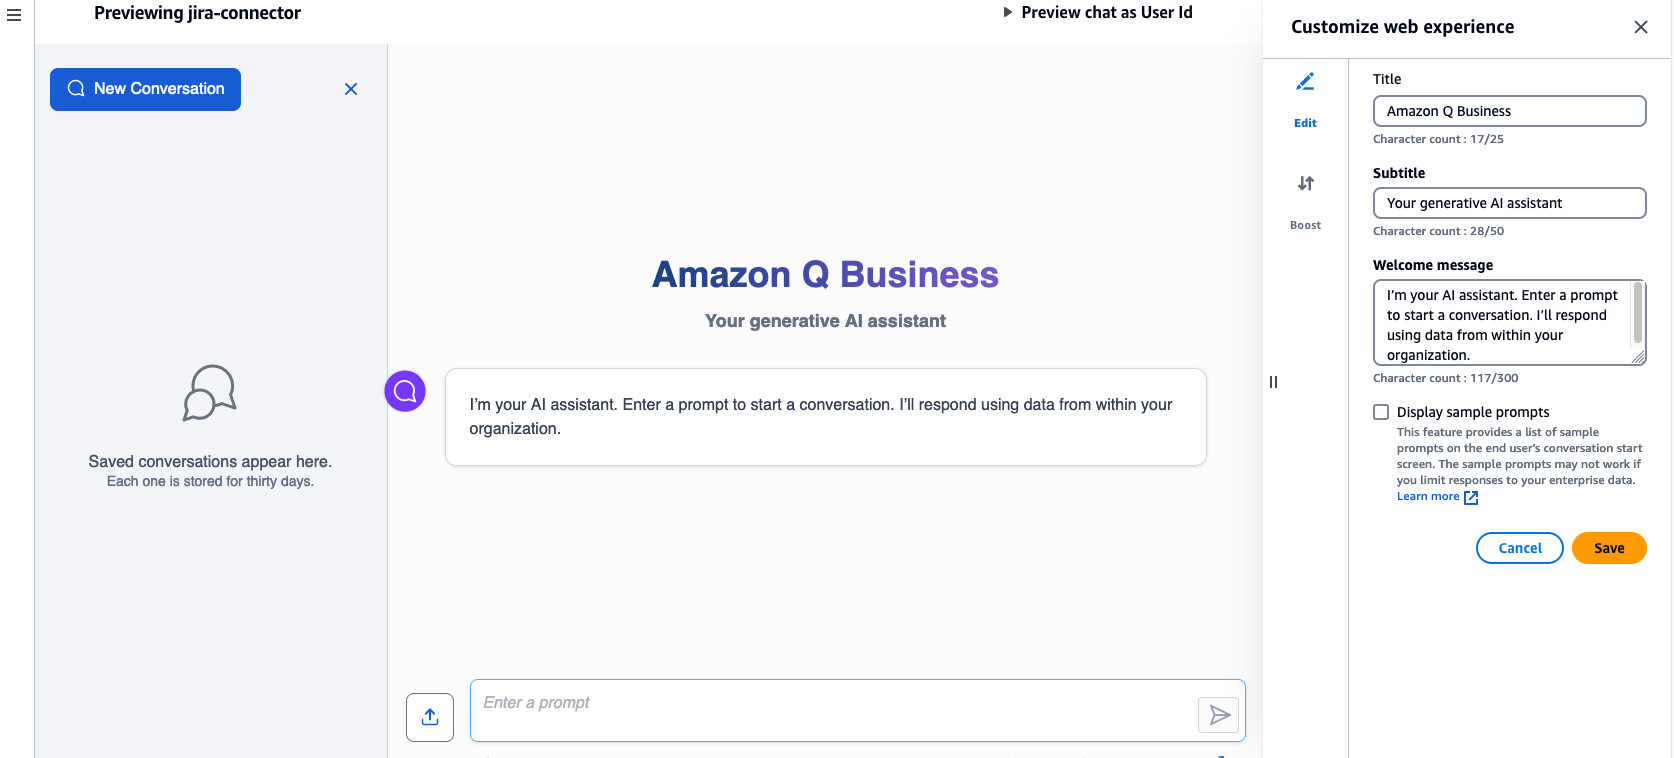
For this walkthrough, we use the defaults and choose View web experience to be redirected to the login page for the Amazon Q application.
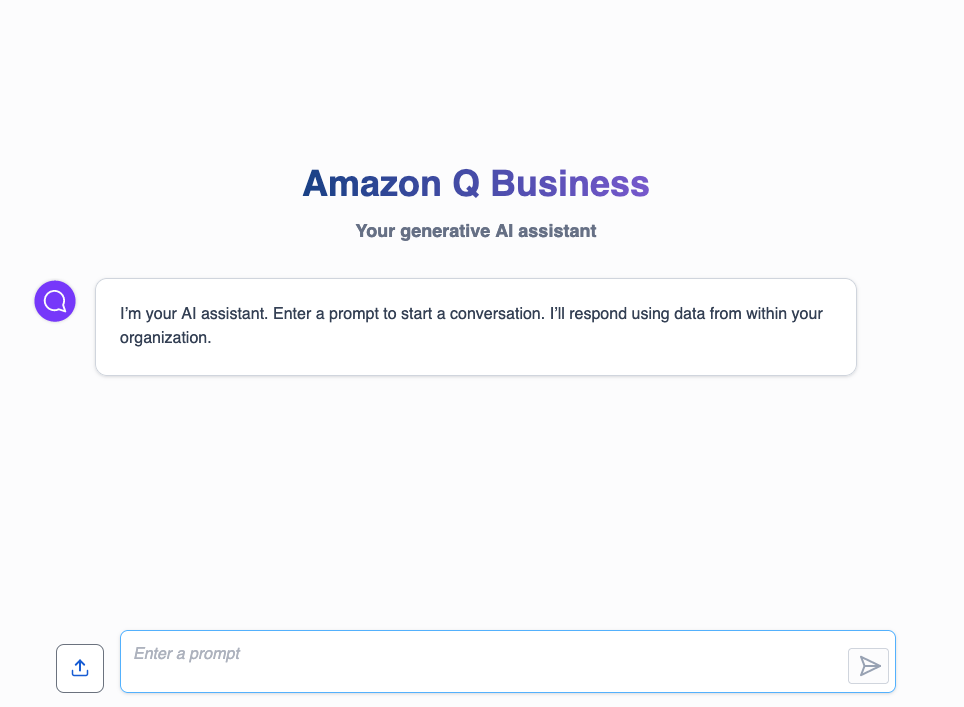
Log in to the application using the credentials for the user that were added to the Amazon Q application. After the login is successful, you’re redirected to the Amazon Q assistant UI, where you can ask questions using natural language and get insights from your Jira index.
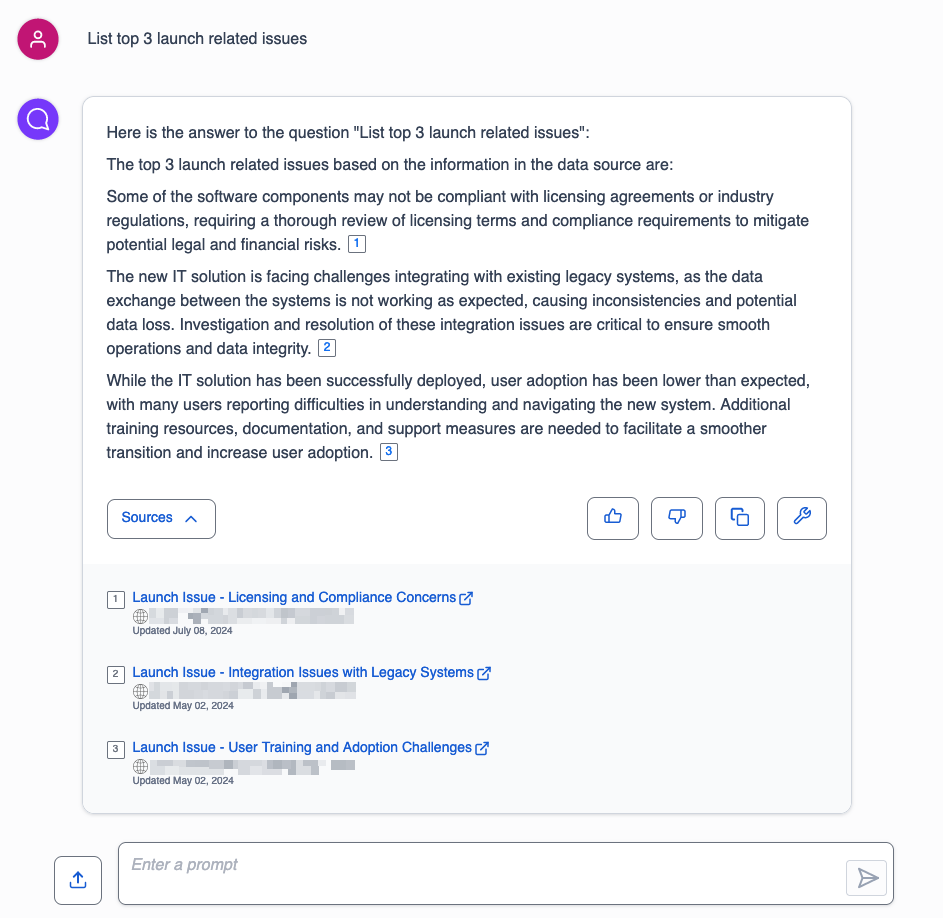
The Jira data source connected to this Amazon Q application has a sample IT software management project with tasks related to the project launch and related issues. We demonstrate how the Amazon Q application lets you ask questions on issues within this project using natural language and receive responses and insights for those queries.
Let’s begin by asking Amazon Q to provide a list of the top three challenges encountered during the project launch. The following screenshot displays the response, listing the top three documents associated with launch issues. The response also includes Sources, which contain links to all the matching documents. Choosing any of those links will redirect you to the corresponding Jira page with the relevant issue or task.
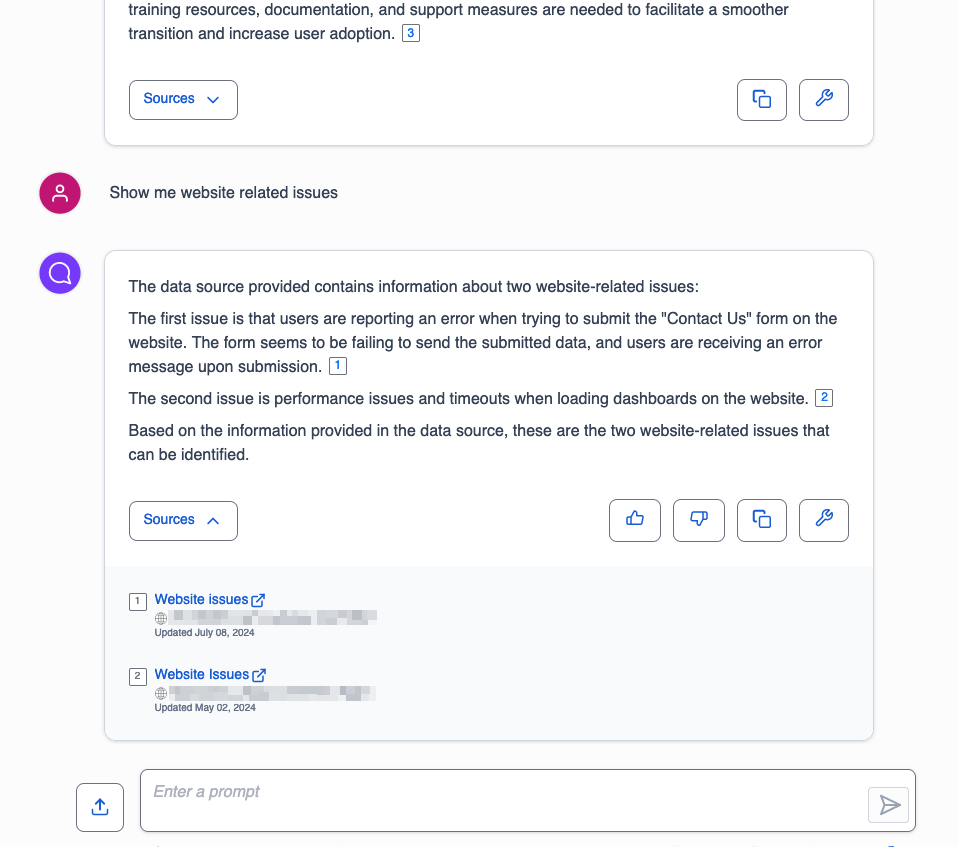
For the second query, we ask Amazon Q if there were any website-related issues. The following screenshot displays the response, which includes a summary of website-related issues along with corresponding Jira ticket links.
Frequently asked questions
In this section, we provide guidance to frequently asked questions.
Amazon Q Business is unable to answer your questions
If you get the response “Sorry, I could not find relevant information to complete your request,” this may be due to a few reasons:
- No permissions – ACLs applied to your account don’t allow you to query certain data sources. If this is the case, reach out to your application administrator to make sure your ACLs are configured to access the data sources.
- Data connector sync failed – Your data connector may have failed to sync information from the source to the Amazon Q Business application. Verify the data connector’s sync run schedule and sync history to confirm the sync is successful.
- Empty or private Jira projects – Private or empty projects aren’t crawled during the sync run.
If none of these reasons apply to your use case, open a support case and work with your technical account manager to get this resolved.
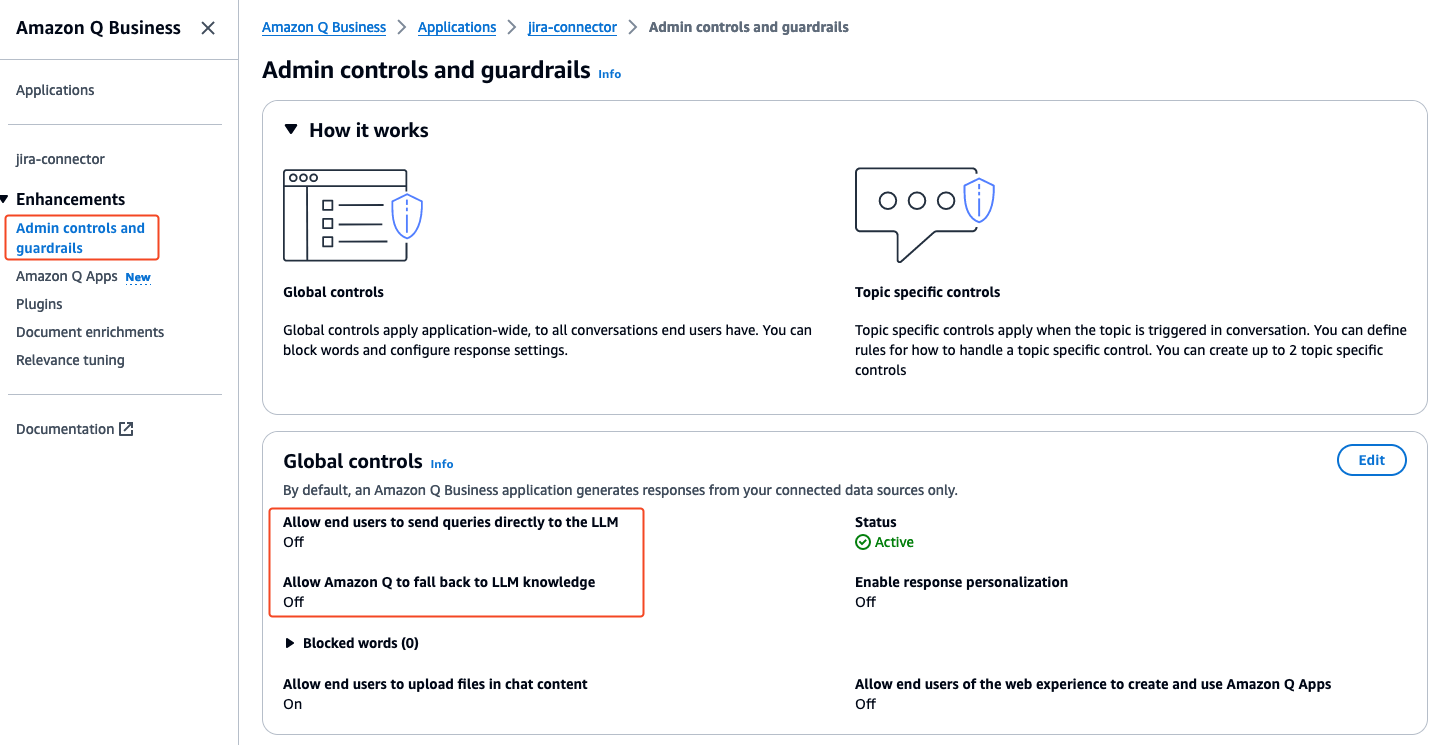
How to generate responses from authoritative data sources
If you want Amazon Q Business to only generate responses from authoritative data sources, you can configure this using the Amazon Q Business application global controls under Admin controls and guardrails.
- Log in to the Amazon Q Business console as an Amazon Q Business application administrator.
- Navigate to the application and choose Admin controls and guardrails in the navigation pane.
- Choose Edit in the Global controls section to set these options.
For more information, refer to Admin controls and guardrails in Amazon Q Business.
Amazon Q Business responds using old (stale) data even though your data source is updated
Each Amazon Q Business data connector can be configured with a unique sync run schedule frequency. Verifying the sync status and sync schedule frequency for your data connector reveals when the last sync ran successfully. It could be that your data connector’s sync run schedule is either set to sync at a scheduled time of day, week, or month. If it’s set to run on demand, the sync has to be manually invoked. When the sync run is complete, verify the sync history to make sure the run has successfully synced all new issues. Refer to Sync run schedule for more information about each option.

Clean up
To prevent incurring additional costs, it’s essential to clean up and remove any resources created during the implementation of this solution. Specifically, you should delete the Amazon Q application, which will consequently remove the associated index and data connectors. However, any IAM roles and secrets created during the Amazon Q application setup process need to be removed separately. Failing to clean up these resources may result in ongoing charges, so it’s crucial to take the necessary steps to completely remove all components related to this solution.
Complete the following steps to delete the Amazon Q application, secret, and IAM role:
- On the Amazon Q Business console, select the application that you created.
- On the Actions menu, choose Delete and confirm the deletion.

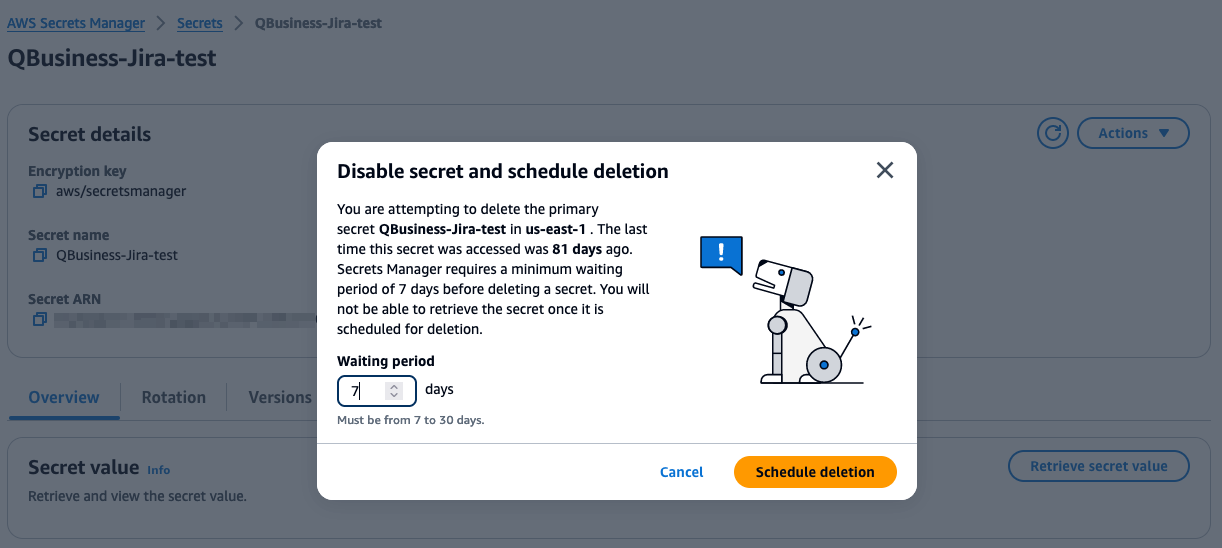
- On the Secrets Manager console, select the secret that was created for the Jira connector.
- On the Actions menu, choose Delete.
- Select the waiting period as 7 days and choose Schedule deletion.
- On the IAM console, select the role that was created during the Amazon Q application creation.
- Choose Delete and confirm the deletion.
Conclusion
The Amazon Q Jira connector allows organizations to seamlessly integrate their Jira projects, issues, and data into the powerful generative AI capabilities of Amazon Q. By following the steps outlined in this post, you can quickly configure the Jira connector as a data source for Amazon Q and initiate synchronization of your Jira information. The native field mapping options enable you to customize exactly which Jira data to include in the Amazon Q index.
Amazon Q can serve as a powerful assistant capable of providing rich insights and summaries about your Jira projects and issues from natural language queries. The Jira plugin further extends this functionality by allowing users to create new Jira issues from within the AI assistant interface.
The Amazon Q Jira integration represents a valuable tool for software teams to gain AI-driven visibility into their development workflows and pain points. By bridging Jira’s industry-leading project management with Amazon’s cutting-edge generative AI, teams can drive productivity, make better informed decisions, and unlock deeper insights into their software operations. As generative AI continues advancing, integrations like this will become critical for organizations aiming to deliver streamlined, data-driven software development lifecycles.
To learn more about the Amazon Q connector for Jira, refer to Connecting Jira to Amazon Q Business.
About the Authors
 Praveen Chamarthi is a Senior AI/ML Specialist with Amazon Web Services. He is passionate about AI/ML and all things AWS. He helps customers across the Americas scale, innovate, and operate ML workloads efficiently on AWS. In his spare time, Praveen loves to read and enjoys sci-fi movies.
 Srikanth Reddy is a Senior AI/ML Specialist with Amazon Web Services. He is responsible for providing deep, domain specific expertise to enterprise customers, helping them leverage AWS’s AI and ML capabilities to their fullest potential.
 Ge Jiang is a Software Development Engineer Manager in the Amazon Q and Amazon Kendra organization of Amazon Web Services. She is responsible for the design and development of features for the Amazon Q and Amazon Kendra connectors.
 Vijai Gandikota is a Principal Product Manager in the Amazon Q and Amazon Kendra organization of Amazon Web Services. He is responsible for the Amazon Q and Amazon Kendra connectors, ingestion, security, and other aspects of the Amazon Q and Amazon Kendra services.
Read More


 Nirmal Kumar is Sr. Product Manager for the Amazon SageMaker service. Committed to broadening access to AI/ML, he steers the development of no-code and low-code ML solutions. Outside work, he enjoys travelling and reading non-fiction.
 Dan Sinnreich is a Sr. Product Manager for Amazon SageMaker, focused on expanding no-code / low-code services. He is dedicated to making ML and generative AI more accessible and applying them to solve challenging problems. Outside of work, he can be found playing hockey, scuba diving, and reading science fiction.
 Davide Gallitelli is a Specialist Solutions Architect for AI/ML in the EMEA region. He is based in Brussels and works closely with customer throughout Benelux. He has been a developer since very young, starting to code at the age of 7. He started learning AI/ML in his later years of university, and has fallen in love with it since then.
 Biswanath Hore is a Solutions Architect at Amazon Web Services. He works with customers early in their AWS journey, helping them adopt cloud solutions to address their business needs. He is passionate about Machine Learning and, outside of work, loves spending time with his family.


 Surendar Gajavelli is a Sr. Solutions Architect based out of Nashville, TN. He is a passionate technology enthusiast who enjoys working with customers and helping them build innovative solutions.
 Abhi Patlolla is a Sr. Solutions Architect based out of the NYC region, helping customers in their cloud transformation, AI/ML, and data initiatives. He is a strategic and technical leader, advising executives and engineers on cloud strategies to foster innovation and positive impact.
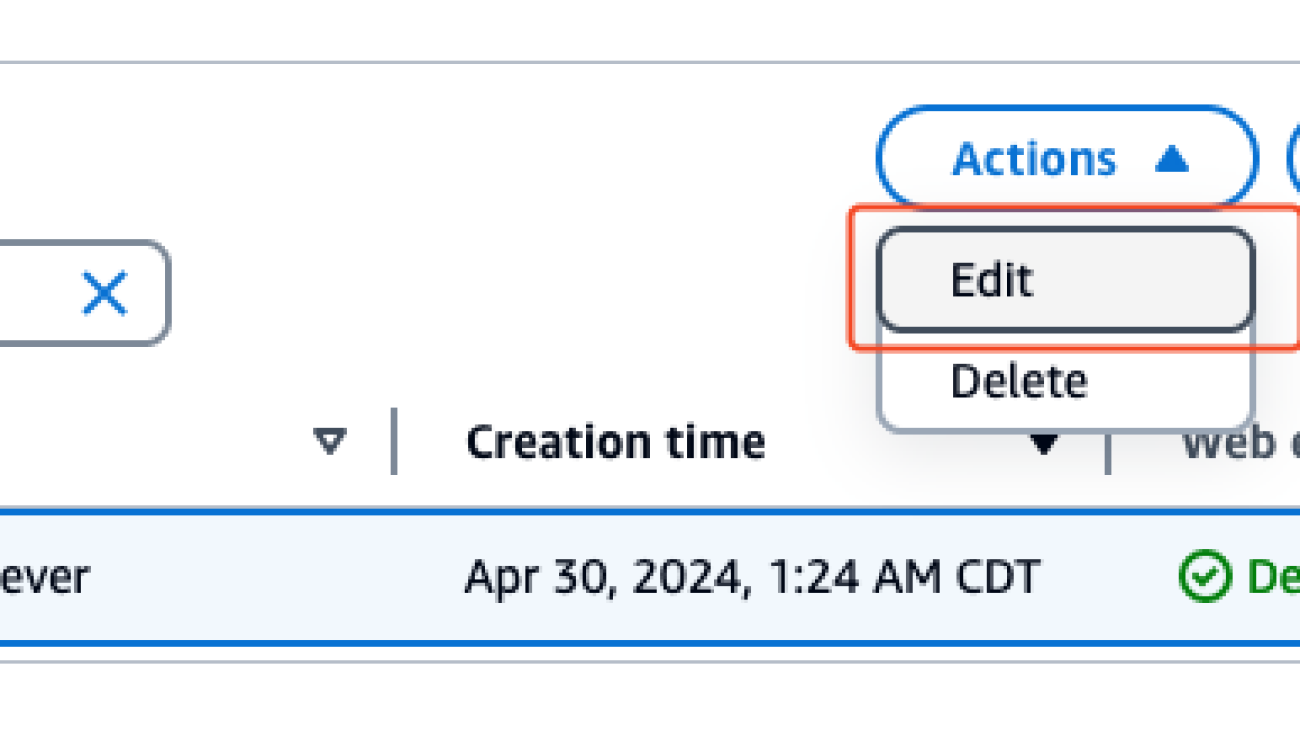

 Learn more about Project Green Light, Google’s initiative to cut down on stop-and-go emissions.