Build custom generative AI applications powered by Amazon Bedrock

Build custom generative AI applications powered by Amazon Bedrock

With last month’s blog, I started a series of posts that highlight the key factors that are driving customers to choose Amazon Bedrock. I explored how Bedrock enables customers to build a secure, compliant foundation for generative AI applications. Now I’d like to turn to a slightly more technical, but equally important differentiator for Bedrock—the multiple techniques that you can use to customize models and meet your specific business needs.

As we’ve all heard, large language models (LLMs) are transforming the way we leverage artificial intelligence (AI) and enabling businesses to rethink core processes. Trained on massive datasets, these models can rapidly comprehend data and generate relevant responses across diverse domains, from summarizing content to answering questions. The wide applicability of LLMs explains why customers across healthcare, financial services, and media and entertainment are moving quickly to adopt them. However, our customers tell us that while pre-trained LLMs excel at analyzing vast amounts of data, they often lack the specialized knowledge necessary to tackle specific business challenges.

Customization unlocks the transformative potential of large language models. Amazon Bedrock equips you with a powerful and comprehensive toolset to transform your generative AI from a one-size-fits-all solution into one that is finely tailored to your unique needs. Customization includes varied techniques such as Prompt Engineering, Retrieval Augmented Generation (RAG), and fine-tuning and continued pre-training. Prompt Engineering involves carefully crafting prompts to get a desired response from LLMs. RAG combines knowledge retrieved from external sources with language generation to provide more contextual and accurate responses. Model Customization techniques—including fine-tuning and continued pre-training involve further training a pre-trained language model on specific tasks or domains for improved performance. These techniques can be used in combination with each other to train base models in Amazon Bedrock with your data to deliver contextual and accurate outputs. Read the below examples to understand how customers are using customization in Amazon Bedrock to deliver on their use cases.

Thomson Reuters, a global content and technology company, has seen positive results with Claude 3 Haiku, but anticipates even better results with customization. The company—which serves professionals in legal, tax, accounting, compliance, government, and media—expects that it will see even faster and more relevant AI results by fine-tuning Claude with their industry expertise.

“We’re excited to fine-tune Anthropic’s Claude 3 Haiku model in Amazon Bedrock to further enhance our Claude-powered solutions. Thomson Reuters aims to provide accurate, fast, and consistent user experiences. By optimizing Claude around our industry expertise and specific requirements, we anticipate measurable improvements that deliver high-quality results at even faster speeds. We’ve already seen positive results with Claude 3 Haiku, and fine-tuning will enable us to tailor our AI assistance more precisely.”

– Joel Hron, Chief Technology Officer at Thomson Reuters.

At Amazon, we see Buy with Prime using Amazon Bedrock’s cutting-edge RAG-based customization capabilities to drive greater efficiency. Their order on merchants’ sites are covered by Buy with Prime Assist, 24/7 live chat customer service. They recently launched a chatbot solution in beta capable of handling product support queries. The solution is powered by Amazon Bedrock and customized with data to go beyond traditional email-based systems. My colleague Amit Nandy, Product Manager at Buy with Prime, says,

“By indexing merchant websites, including subdomains and PDF manuals, we constructed tailored knowledge bases that provided relevant and comprehensive support for each merchant’s unique offerings. Combined with Claude’s state-of-the-art foundation models and Guardrails for Amazon Bedrock, our chatbot solution delivers a highly capable, secure, and trustworthy customer experience. Shoppers can now receive accurate, timely, and personalized assistance for their queries, fostering increased satisfaction and strengthening the reputation of Buy with Prime and its participating merchants.”

Stories like these are the reason why we continue to double down on our customization capabilities for generative AI applications powered by Amazon Bedrock.

In this blog, we’ll explore the three major techniques for customizing LLMs in Amazon Bedrock. And, we’ll cover related announcements from the recent AWS New York Summit.

Prompt Engineering: Guiding your application toward desired answers

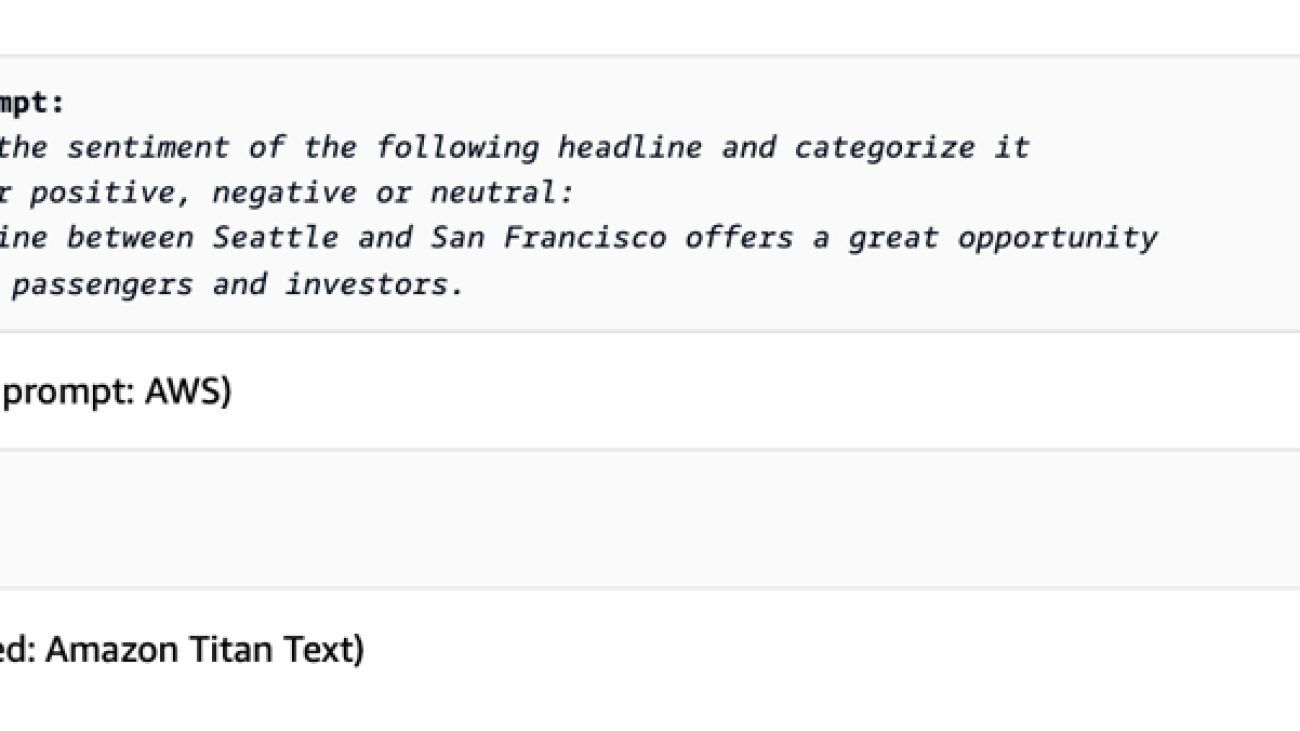
Prompts are the primary inputs that drive LLMs to generate answers. Prompt engineering is the practice of carefully crafting these prompts to guide LLMs effectively. Learn more here. Well-designed prompts can significantly boost a model’s performance by providing clear instructions, context, and examples tailored to the task at hand. Amazon Bedrock supports multiple prompt engineering techniques. For example, few-shot prompting provides examples with desired outputs to help models better understand tasks, such as sentiment analysis samples labeled “positive” or “negative.” Zero-shot prompting provides task descriptions without examples. And chain-of-thought prompting enhances multi-step reasoning by asking models to break down complex problems, which is useful for arithmetic, logic, and deductive tasks.

Our Prompt Engineering Guidelines outline various prompting strategies and best practices for optimizing LLM performance across applications. Leveraging these techniques can help practitioners achieve their desired outcomes more effectively. However, developing optimal prompts that elicit the best responses from foundational models is a challenging and iterative process, often requiring weeks of refinement by developers.

Zero-shot prompting Few-shot prompting
Zero-shot prompting Zero-shot prompting
Chain-of-thought prompting with Prompt Flows Visual Builder
Prompt Flow Visual Builder

Retrieval-Augmented Generation: Augmenting results with retrieved data

LLMs generally lack specialized knowledge, jargon, context, or up-to-date information needed for specific tasks. For instance, legal professionals seeking reliable, current, and accurate information within their domain may find interactions with generalist LLMs inadequate. Retrieval-Augmented Generation (RAG) is the process of allowing a language model to consult an authoritative knowledge base outside of its training data sources—before generating a response.

The RAG process involves three main steps:

  • Retrieval: Given an input prompt, a retrieval system identifies and fetches relevant passages or documents from a knowledge base or corpus.
  • Augmentation: The retrieved information is combined with the original prompt to create an augmented input.
  • Generation: The LLM generates a response based on the augmented input, leveraging the retrieved information to produce more accurate and informed outputs.

Amazon Bedrock’s Knowledge Bases is a fully managed RAG feature that allows you to connect LLMs to internal company data sources—delivering relevant, accurate, and customized responses. To offer greater flexibility and accuracy in building RAG-based applications, we announced multiple new capabilities at the AWS New York Summit. For example, now you can securely access data from new sources like the web (in preview), allowing you to index public web pages, or access enterprise data from Confluence, SharePoint, and Salesforce (all in preview). Advanced chunking options are another exciting new feature, enabling you to create custom chunking algorithms tailored to your specific needs, as well as leverage built-in semantic and hierarchical chunking options. You now have the capability to extract information with precision from complex data formats (e.g., complex tables within PDFs), thanks to advanced parsing techniques. Plus, the query reformulation feature allows you to deconstruct complex queries into simpler sub-queries, enhancing retrieval accuracy. All these new features help you reduce the time and cost associated with data access and construct highly accurate and relevant knowledge resources—all tailored to your specific enterprise use cases.

Model Customization: Enhancing performance for specific tasks or domains

Model customization in Amazon Bedrock is a process to customize pre-trained language models for specific tasks or domains. It involves taking a large, pre-trained model and further training it on a smaller, specialized dataset related to your use case. This approach leverages the knowledge acquired during the initial pre-training phase while adapting the model to your requirements, without losing the original capabilities. The fine-tuning process in Amazon Bedrock is designed to be efficient, scalable, and cost-effective, enabling you to tailor language models to your unique needs, without the need for extensive computational resources or data. In Amazon Bedrock, model fine-tuning can be combined with prompt engineering or the Retrieval-Augmented Generation (RAG) approach to further enhance the performance and capabilities of language models. Model customization can be implemented both for labeled and unlabeled data.

Fine-Tuning with labeled data involves providing labeled training data to improve the model’s performance on specific tasks. The model learns to associate appropriate outputs with certain inputs, adjusting its parameters for better task accuracy. For instance, if you have a dataset of customer reviews labeled as positive or negative, you can fine-tune a pre-trained model within Bedrock on this data to create a sentiment analysis model tailored to your domain. At the AWS New York Summit, we announced Fine-tuning for Anthropic’s Claude 3 Haiku. By providing task-specific training datasets, users can fine-tune and customize Claude 3 Haiku, boosting its accuracy, quality, and consistency for their business applications.

Continued Pre-training with unlabeled data, also known as domain adaptation, allows you to further train the LLMs on your company’s proprietary, unlabeled data. It exposes the model to your domain-specific knowledge and language patterns, enhancing its understanding and performance for specific tasks.

Customization holds the key to unlocking the true power of generative AI

Large language models are revolutionizing AI applications across industries, but tailoring these general models with specialized knowledge is key to unlocking their full business impact. Amazon Bedrock empowers organizations to customize LLMs through Prompt Engineering techniques, such as Prompt Management and Prompt Flows, that help craft effective prompts. Retrieval-Augmented Generation—powered by Amazon Bedrock’s Knowledge Bases—lets you integrate LLMs with proprietary data sources to generate accurate, domain-specific responses. And Model Customization techniques, including fine-tuning with labeled data and continued pre-training with unlabeled data, help optimize LLM behavior for your unique needs. After taking a close look at these three main customization methods, it’s clear that while they may take different approaches, they all share a common goal—to help you address your specific business problems..

Resources       

For more information on customization with Amazon Bedrock, check the below resources:

  1. Learn more about Amazon Bedrock
  2. Learn more about Amazon Bedrock Knowledge Bases
  3. Read announcement blog on additional data connectors in Knowledge Bases for Amazon Bedrock
  4. Read blog on advanced chunking and parsing options in Knowledge Bases for Amazon Bedrock
  5. Learn more about Prompt Engineering
  6. Learn more about Prompt Engineering techniques and best practices
  7. Read announcement blog on Prompt Management and Prompt Flows
  8. Learn more about fine-tuning and continued pre-training
  9. Read the announcement blog on fine-tuning Anthropic’s Claude 3 Haiku

About the author

Vasi Philomin is VP of Generative AI at AWS. He leads generative AI efforts, including Amazon Bedrock and Amazon Titan.

Read More

Meet the Maker: High School Student Develops Robot Guide Dogs With NVIDIA Jetson

Meet the Maker: High School Student Develops Robot Guide Dogs With NVIDIA Jetson

High school student Selin Alara Ornek is looking ahead — using machine learning and the NVIDIA Jetson platform for edge AI and robotics to create robot guide dogs for the visually impaired.

The project, called IC4U, is one of seven robots Ornek has created to date, including a school aid robot, named BB4All, that can help prevent bullying with real-time notification and health-monitoring capabilities.

About the Maker

A high school senior from Istanbul, Turkey, Ornek has always had a passion for the intersection of AI, social good and robotics. She’s a self-taught robotics developer — in building IC4U, she used the Jetson Developer Kit as a sandbox to explore and experiment.

She is a member of AI4ALL, a nonprofit program with the mission to make AI more diverse and inclusive, and the New York Academy of Science. A global presence in the robotics scene, she’s been recognized at the European Youth Awards and Women in Tech Global Awards events. She placed first in the 2021 Istanbul Bosphorus Robot Cup and third at the 2023 OpenCV AI Competition.

Her Inspiration

Ornek’s inspiration for creating IC4U came from a trip to France, where she saw a guide dog assisting its owner. Her late dog, Korsan, was also a key source of inspiration.

“I started to think about if a visually impaired person lost their dog, not only would they lose their best friend, but their eyes,” Ornek said.

The project was built to offer the visually impaired a companion not limited by aging and health.

Her Jetson Project

Ornek initially used ultrasonic sensors located in IC4U’s eyes to detect obstacles. But after attending the 2021 World Summit AI as a panelist, she decided to develop new AI applications for the robot dog that’d enable it to mimic a real one.

The ultrasonic sensors only offered object detection from directly in front of IC4U, and Ornek wanted to expand detection to the robot’s entire surroundings.

The solution was using sound sensors located in the robot’s ears. IC4U can turn toward a sound and process visual information gathered by an integrated ZED 2i Wide-Angle 3D AI camera, which captures a wider range of visual data and helps detect information such as the size and speed of an object.

“To power the ZED 2i camera and for high-quality image processing, I used an NVIDIA Jetson Nano developer kit,” Ornek said. “I was so impressed with the ZED 2i camera’s performance that I didn’t want to limit its use to a simple object-recognition task.”

She began to think of other ways that IC4U could assist a visually impaired person. IC4U’s improved data processing from high-resolution sensors, powered by Jetson, enables it to detect city objects such as stop signs, traffic light colors and the denomination of paper money.

In addition, Ornek used the Jetson Nano to add a shopping feature to IC4U via web scraping from publicly available resources, aiming to one day expand it by partnering with online retail stores.

Back to School

In the long run, Ornek hopes to deploy IC4U for use in smart cities and spaces — continuing her exploration of AI applications with next-generation platforms like Jetson Orin.

This fall, she’ll begin studying computer science at the University of British Columbia on a full scholarship, as a recipient of the Karen McKellin International Leader of Tomorrow Award. She strives to encourage other youth, especially girls, that technology is fun.

Students and educators with a valid accredited university or education-related email address can sign up to purchase the Jetson Orin Nano or Jetson AGX Orin Developer Kit at a discounted rate. U.S.-based students and educators can visit Sparkfun to sign up for their discount — residents of other countries should check their eligibility (login required).

Learn more about the NVIDIA Jetson platform and NVIDIA Deep Learning Institute Jetson AI courses and certifications.

Read More

Use Amazon Bedrock to generate, evaluate, and understand code in your software development pipeline

Use Amazon Bedrock to generate, evaluate, and understand code in your software development pipeline

Generative artificial intelligence (AI) models have opened up new possibilities for automating and enhancing software development workflows. Specifically, the emergent capability for generative models to produce code based on natural language prompts has opened many doors to how developers and DevOps professionals approach their work and improve their efficiency. In this post, we provide an overview of how to take advantage of the advancements of large language models (LLMs) using Amazon Bedrock to assist developers at various stages of the software development lifecycle (SDLC).

Amazon Bedrock is a fully managed service that offers a choice of high-performing foundation models (FMs) from leading AI companies like AI21 Labs, Anthropic, Cohere, Meta, Mistral AI, Stability AI, and Amazon through a single API, along with a broad set of capabilities to build generative AI applications with security, privacy, and responsible AI.

The following process architecture proposes an example SDLC flow that incorporates generative AI in key areas to improve the efficiency and speed of development.

The intent of this post is to focus on how developers can create their own systems to augment, write, and audit code by using models within Amazon Bedrock instead of relying on out-of-the-box coding assistants. We discuss the following topics:

  • A coding assistant use case to help developers write code faster by providing suggestions
  • How to use the code understanding capabilities of LLMs to surface insights and recommendations
  • An automated application generation use case to generate functioning code and automatically deploy changes into a working environment

Considerations

It’s important to consider some technical options when choosing your model and approach to implementing this functionality at each step. One such option is the base model to use for the task. With each model having been trained on a different corpus of data, there will inherently be different task performance per model. Anthropic’s Claude 3 on Amazon Bedrock models write code effectively out of the box in many common coding languages, for example, whereas others may not be able to reach that performance without further customization. Customization, however, is another technical choice to make. For instance, if your use case includes a less common language or framework, customizing the model through fine-tuning or using Retrieval Augmented Generation (RAG) may be necessary to achieve production-quality performance, but involves more complexity and engineering effort to implement effectively.

There is an abundance of literature breaking down these trade-offs; for this post, we are just describing what should be explored in its own right. We are simply laying the context that goes into the builder’s initial steps in implementing their generative AI-powered SDLC journey.

Coding assistant

Coding assistants are a very popular use case, with an abundance of examples from which to choose. AWS offers several services that can be applied to assist developers, either through in-line completion from tools like Amazon CodeWhisperer, or to be interacted with via natural language using Amazon Q. Amazon Q for builders has several implementations of this functionality, such as:

In nearly all the use cases described, there can be an integration with the chat interface and assistants. The use cases here are focused on more direct code generation use cases using natural language prompts. This is not to be confused with in-line generation tools that focus on autocompleting a coding task.

The key benefit of an assistant over in-line generation is that you can start new projects based on simple descriptions. For instance, you can describe that you want a serverless website that will allow users to post in blog fashion, and Amazon Q can start building the project by providing sample code and making recommendations on which frameworks to use to do this. This natural language entry point can give you a template and framework to operate within so you can spend more time on the differentiating logic of your application rather than the setup of repeatable and commoditized components.

Code understanding

It’s common for a company that begins to experiment with generative AI to augment the productivity of their individual developers to then use LLMs to infer meaning and functionality of code to improve the reliability, efficiency, security, and speed of the development process. Code understanding by humans is a central part of the SDLC: creating documentation, performing code reviews, and applying best practices. Onboarding new developers can be a challenge even for mature teams. Instead of a more senior developer taking time to respond to questions, an LLM with awareness of the code base and the team’s coding standards could be used to explain sections of code and design decisions to the new team member. The onboarding developer has everything they need with a rapid response time and the senior developer can focus on building. In addition to user-facing behaviors, this same mechanism can be repurposed to work completely behind the scenes to augment existing continuous integration and continuous delivery (CI/CD) processes as an additional reviewer.

For instance, you can use prompt engineering techniques to guide and automate the application of coding standards, or include the existing code base as referential material to use custom APIs. You can also take proactive measures by prefixing each prompt with a reminder to follow the coding standards and make a call to get them from document storage, passing them to the model as context with the prompt. As a retroactive measure, you can add a step during the review process to check the written code against the standards to enforce adherence, similar to how a team code review would work. For example, let’s say that one of the team’s standards is to reuse components. During the review step, the model can read over a new code submission, note that the component already exists in the code base, and suggest to the reviewer to reuse the existing component instead of recreating it.

The following diagram illustrates this type of workflow.

Application generation

You can extend the concepts from the use cases described in this post to create a full application generation implementation. In the traditional SDLC, a human creates a set of requirements, makes a design for the application, writes some code to implement that design, builds tests, and receives feedback on the system from external sources or people, and then the process repeats. The bottleneck in this cycle typically comes at the implementation and testing phases. An application builder needs to have substantive technical skills to write code effectively, and there are typically numerous iterations required to debug and perfect code—even for the most skilled builders. In addition, a foundational knowledge of a company’s existing code base, APIs, and IP are fundamental to implementing an effective solution, which can take humans a long time to learn. This can slow down the time to innovation for new teammates or teams with technical skills gaps. As mentioned earlier, if models can be used with the capability to both create and interpret code, pipelines can be created that perform the developer iterations of the SDLC by feeding outputs of the model back in as input.

The following diagram illustrates this type of workflow.

For example, you can use natural language to ask a model to write an application that prints all the prime numbers between 1–100. It returns a block of code that can be run with applicable tests defined. If the program doesn’t run or some tests fail, the error and failing code can be fed back into the model, asking it to diagnose the problem and suggest a solution. The next step in the pipeline would be to take the original code, along with the diagnosis and suggested solution, and stitch the code snippets together to form a new program. The SDLC restarts in the testing phase to get new results, and either iterates again or a working application is produced. With this basic framework, an increasing number of components can be added in the same manner as in a traditional human-based workflow. This modular approach can be continuously improved until there is a robust and powerful application generation pipeline that simply takes in a natural language prompt and outputs a functioning application, handling all of the error correction and best practice adherence behind the scenes.

The following diagram illustrates this advanced workflow.

Conclusion

We are at the point in the adoption curve of generative AI that teams are able to get real productivity gains from using the variety of techniques and tools available. In the near future, it will be imperative to take advantage of these productivity gains to stay competitive. One thing we do know is that the landscape will continue to rapidly progress and change, so building a system tolerant of change and flexibility is key. Developing your components in a modular fashion allows for stability in the face of an ever-changing technical landscape while being ready to adopt the latest technology at each step of the way.

For more information about how to get started building with LLMs, see these resources:


About the Authors

Ian Lenora is an experienced software development leader who focuses on building high-quality cloud native software, and exploring the potential of artificial intelligence. He has successfully led teams in delivering complex projects across various industries, optimizing efficiency and scalability. With a strong understanding of the software development lifecycle and a passion for innovation, Ian seeks to leverage AI technologies to solve complex problems and create intelligent, adaptive software solutions that drive business value.

Cody Collins is a New York-based Solutions Architect at Amazon Web Services, where he collaborates with ISV customers to build cutting-edge solutions in the cloud. He has extensive experience in delivering complex projects across diverse industries, optimizing for efficiency and scalability. Cody specializes in AI/ML technologies, enabling customers to develop ML capabilities and integrate AI into their cloud applications.

Samit KumbhaniSamit Kumbhani is an AWS Senior Solutions Architect in the New York City area with over 18 years of experience. He currently collaborates with Independent Software Vendors (ISVs) to build highly scalable, innovative, and secure cloud solutions. Outside of work, Samit enjoys playing cricket, traveling, and biking.

Read More

Editor’s Paradise: NVIDIA RTX-Powered Video Software CyberLink PowerDirector Gains High-Efficiency Video Coding Upgrades

Editor’s Paradise: NVIDIA RTX-Powered Video Software CyberLink PowerDirector Gains High-Efficiency Video Coding Upgrades

Editor’s note: This post is part of our In the NVIDIA Studio series, which celebrates featured artists, offers creative tips and tricks, and demonstrates how NVIDIA Studio technology improves creative workflows. We’re also deep diving on new GeForce RTX GPU features, technologies and resources, and how they dramatically accelerate content creation.

Every month brings new creative app updates and optimizations powered by the NVIDIA Studio platform — supercharging creative processes with NVIDIA RTX and AI.

RTX-powered video editing app CyberLink PowerDirector now has a setting for high-efficiency video encoding (HEVC). 3D artists can access new features and faster workflows in Adobe Substance 3D Modeler and SideFX: Houdini. And content creators using Topaz Video AI Pro can now scale their photo and video touchups faster with NVIDIA TensorRT acceleration.

The August Studio Driver is ready to install via the NVIDIA app beta — the essential companion for creators and gamers — to keep GeForce RTX PCs up to date with the latest NVIDIA drivers and technology.

And this week’s featured In the NVIDIA Studio artist Stavros Liaskos is creating physically accurate 3D digital replicas of Greek Orthodox churches, holy temples, monasteries and other buildings using the NVIDIA Omniverse platform for building and connecting Universal Scene Description (OpenUSD) apps.

Discover the latest breakthroughs in graphics and generative AI by watching the replay of NVIDIA founder and CEO Jensen Huang’s firechat chats with Lauren Goode, senior writer at WIRED, and Meta founder and CEO Mark Zuckerberg at SIGGRAPH. 

There’s a Creative App for That

The NVIDIA NVENC video encoder is built into every RTX graphics card, offloading the compute-intensive task of video encoding from the CPU to a dedicated part of the GPU.

CyberLink PowerDirector, a popular video editing program that recently added support for RTX Video HDR, now has a setting to increase HEVC with NVIDIA NVENC HEVC Ultra-High-Quality mode.

The new functionality reduces bit rates and improves encoding efficiency by 55%, significantly boosting video quality. Using the custom setting, content creators can offer audiences superior viewing experiences.

Encoding efficiency jumps by 55% with just a few clicks.

Alpha exporting allows users to add overlay effects to videos by exporting HEVC video with an alpha channel. This technique can be used to create transparent backgrounds and rapidly process animated overlays, making it ideal for creating social media content.

With an alpha channel, users can export HEVC videos up to 8x faster compared with run-length encoding supported by other processors, and with a 100x reduction in file size.

Adobe Substance 3D Modeler, a multisurface 3D sculpting tool for artists, virtual effects specialists and designers, released Block to Stock, an AI-powered, geometry-based feature for accelerating the prototyping of complex shapes.

It allows rough 3D shapes to be quickly replaced with pre-existing, similarly shaped 3D models that have greater detail. The result is a highly detailed shape crafted in no time.

The recently released version 20.5 of SideFX: Houdini, a 3D procedural software for modeling, animation and lighting, introduced NVIDIA OptiX 8 and NVIDIA’s Shader Execution Reordering feature to its Karma XPU renderer — exclusively on NVIDIA RTX GPUs.

With these additions, computationally intensive tasks can now be executed up to 4x faster on RTX GPUs.

Topaz Video AI Pro, a photo and video enhancement software for noise reduction, sharpening and upscaling, added TensorRT acceleration for multi-GPU configurations, enabling parallelization across multiple GPUs for supercharged rendering speeds — up to 2x faster with two GPUs over a single GPU system, with further acceleration in systems with additional GPUs.

Virtual Cultural Sites to G(r)eek Out About

Anyone can now explore over 30 Greek cultural sites in virtual reality, thanks to the immersive work of Stavros Liaskos, managing director of visual communications company Reyelise.

“Many historical and religious sites are at risk due to environmental conditions, neglect and socio-political issues,” he said. “By creating detailed 3D replicas, we’re helping to ensure their architectural splendor is preserved digitally for future generations.”

Liaskos dedicated the project to his father, who passed away last year.

“He taught me the value of patience and instilled in me the belief that nothing is unattainable,” he said. “His wisdom and guidance continue to inspire me every day.”

Churches are architecturally complex structures. To create physically accurate 3D models of them, Liaskos used the advanced real-time rendering capabilities of Omniverse, connected with a slew of content-creation apps.

The OpenUSD framework enabled a seamless workflow across the various apps Liaskos used. For example, after using Trimble X7 for highly accurate 3D scanning of structures, Liaskos easily moved to Autodesk 3ds Max and Blender for modeling and animation.

Then, with ZBrush, he sculpted intricate architectural details on the models and refined textures with Adobe Photoshop and Substance 3D. It was all brought together in Omniverse for real-time lighting and rendering.

Interior rendering of the Panagia Xrysospiliotissa Church in Nicosia, Cyprus.

For post-production work, like adding visual effects and compiling rendered scenes, Liaskos used OpenUSD to transfer his projects to Adobe After Effects, where he finalized the video output. Nearly every element of his creative workflow was accelerated by his NVIDIA RTX A4500 GPU. 

Interior scene of the Church of Saint Basil on Metsovou Street in Athens.

Liaskos also explored developing extended reality (XR) applications that allow users to navigate his 3D projects in real time in virtual reality (VR).


First, he used laser scanning and photogrammetry to capture the detailed geometries and textures of the churches.


Then, he tapped Autodesk 3ds Max and Maxon ZBrush for retopology, ensuring the models were optimized for real-time rendering without compromising detail.

After importing them into NVIDIA Omniverse with OpenUSD, Liaskos packaged the XR scenes so they could be streamed to VR headsets  using either the NVIDIA Omniverse Create XR spatial computing app or Unity Engine, enabling immersive viewing experiences.

“This approach will even more strikingly showcase the architectural beauty and cultural significance of these sites,” Liaskos said. “The simulation must be as good as possible to recreate the overwhelming, impactful feeling of calm and safety that comes with visiting a deeply spiritual space.”

Creator Stavros Liaskos.

Follow NVIDIA Studio on Instagram, X and Facebook. Access tutorials on the Studio YouTube channel and get updates directly in your inbox by subscribing to the Studio newsletter

Stay up to date on NVIDIA Omniverse with Instagram, Medium and X. For more, join the Omniverse community and check out the Omniverse forums, Discord server, Twitch and YouTube channels. 

Read More

Inference AudioCraft MusicGen models using Amazon SageMaker

Inference AudioCraft MusicGen models using Amazon SageMaker

Music generation models have emerged as powerful tools that transform natural language text into musical compositions. Originating from advancements in artificial intelligence (AI) and deep learning, these models are designed to understand and translate descriptive text into coherent, aesthetically pleasing music. Their ability to democratize music production allows individuals without formal training to create high-quality music by simply describing their desired outcomes.

Generative AI models are revolutionizing music creation and consumption. Companies can take advantage of this technology to develop new products, streamline processes, and explore untapped potential, yielding significant business impact. Such music generation models enable diverse applications, from personalized soundtracks for multimedia and gaming to educational resources for students exploring musical styles and structures. It assists artists and composers by providing new ideas and compositions, fostering creativity and collaboration.

One prominent example of a music generation model is AudioCraft MusicGen by Meta. MusicGen code is released under MIT, model weights are released under CC-BY-NC 4.0. MusicGen can create music based on text or melody inputs, giving you better control over the output. The following diagram shows how MusicGen, a single stage auto-regressive Transformer model, can generate high-quality music based on text descriptions or audio prompts.

Music Generation Models - MusicGen Input Output flow

MusicGen uses cutting-edge AI technology to generate diverse musical styles and genres, catering to various creative needs. Unlike traditional methods that include cascading several models, such as hierarchically or upsampling, MusicGen operates as a single language model, which operates over several streams of compressed discrete music representation (tokens). This streamlined approach empowers users with precise control over generating high-quality mono and stereo samples tailored to their preferences, revolutionizing AI-driven music composition.

MusicGen models can be used across education, content creation, and music composition. They can enable students to experiment with diverse musical styles, generate custom soundtracks for multimedia projects, and create personalized music compositions. Additionally, MusicGen can assist musicians and composers, fostering creativity and innovation.

This post demonstrates how to deploy MusicGen, a music generation model on Amazon SageMaker using asynchronous inference. We specifically focus on text conditioned generation of music samples using MusicGen models.

Solution overview

With the ability to generate audio, music, or video, generative AI models can be computationally intensive and time-consuming. Generative AI models with audio, music, and video output can use asynchronous inference that queues incoming requests and process them asynchronously. Our solution involves deploying the AudioCraft MusicGen model on SageMaker using SageMaker endpoints for asynchronous inference. This entails deploying AudioCraft MusicGen models sourced from the Hugging Face Model Hub onto a SageMaker infrastructure.

The following solution architecture diagram shows how a user can generate music using natural language text as an input prompt by using AudioCraft MusicGen models deployed on SageMaker.

MusicGen on Amazon SageMaker Asynchronous Inference

The following steps detail the sequence happening in the workflow from the moment the user enters the input to the point where music is generated as output:

  1. The user invokes the SageMaker asynchronous endpoint using an Amazon SageMaker Studio notebook.
  2. The input payload is uploaded to an Amazon Simple Storage Service (Amazon S3) bucket for inference. The payload consists of both the prompt and the music generation parameters. The generated music will be downloaded from the S3 bucket.
  3. The facebook/musicgen-large model is deployed to a SageMaker asynchronous endpoint. This endpoint is used to infer for music generation.
  4. The HuggingFace Inference Containers image is used as a base image. We use an image that supports PyTorch 2.1.0 with a Hugging Face Transformers framework.
  5. The SageMaker HuggingFaceModel is deployed to a SageMaker asynchronous endpoint.
  6. The Hugging Face model (facebook/musicgen-large) is uploaded to Amazon S3 during deployment. Also, during inference, the generated outputs are uploaded to Amazon S3.
  7. We use Amazon Simple Notification Service (Amazon SNS) topics to notify the success and failure as defined as a part of SageMaker asynchronous inference configuration.

Prerequisites

Make sure you have the following prerequisites in place :

  1. Confirm you have access to the AWS Management Console to create and manage resources in SageMaker, AWS Identity and Access Management (IAM), and other AWS services.
  2. If you’re using SageMaker Studio for the first time, create a SageMaker domain. Refer to Quick setup to Amazon SageMaker to create a SageMaker domain with default settings.
  3. Obtain the AWS Deep Learning Containers for Large Model Inference from pre-built HuggingFace Inference Containers.

Deploy the solution

To deploy the AudioCraft MusicGen model to a SageMaker asynchronous inference endpoint, complete the following steps:

  1. Create a model serving package for MusicGen.
  2. Create a Hugging Face model.
  3. Define asynchronous inference configuration.
  4. Deploy the model on SageMaker.

We detail each of the steps and show how we can deploy the MusicGen model onto SageMaker. For sake of brevity, only significant code snippets are included. The full source code for deploying the MusicGen model is available in the GitHub repo.

Create a model serving package for MusicGen

To deploy MusicGen, we first create a model serving package. The model package contains a requirements.txt file that lists the necessary Python packages to be installed to serve the MusicGen model. The model package also contains an inference.py script that holds the logic for serving the MusicGen model.

Let’s look at the key functions used in serving the MusicGen model for inference on SageMaker:

def model_fn(model_dir):
    '''loads model'''
    model = MusicgenForConditionalGeneration.from_pretrained("facebook/musicgen-large")
    return model

The model_fn function loads the MusicGen model facebook/musicgen-large from the Hugging Face Model Hub. We rely on the MusicgenForConditionalGeneration Transformers module to load the pre-trained MusicGen model.

You can also refer to musicgen-large-load-from-s3/deploy-musicgen-large-from-s3.ipynb, which demonstrates the best practice of downloading the model from the Hugging Face Hub to Amazon S3 and reusing the model artifacts for future deployments. Instead of downloading the model every time from Hugging Face when we deploy or when scaling happens, we download the model to Amazon S3 and reuse it for deployment and during scaling activities. Doing so can improve the download speed, especially for large models, thereby helping prevent the download from happening over the internet from a website outside of AWS. This best practice also maintains consistency, which means the same model from Amazon S3 can be deployed across various staging and production environments.

The predict_fn function uses the data provided during the inference request and the model loaded through model_fn:

texts, generation_params = _process_input(data)
processor = AutoProcessor.from_pretrained("facebook/musicgen-large")
inputs = processor (
    text = texts,
    padding=True,
    return_tensors="pt",
)

Using the information available in the data dictionary, we process the input data to obtain the prompt and generation parameters used to generate the music. We discuss the generation parameters in more detail later in this post.

device = torch.device('cuda' if torch.cuda.is_available() else 'cpu')
model.to(device)
audio_values = model.generate(**inputs.to(device),
                                **generation_params)

We load the model to the device and then send the inputs and generation parameters as inputs to the model. This process generates the music in the form of a three-dimensional Torch tensor of shape (batch_size, num_channels, sequence_length).

sampling_rate = model.config.audio_encoder.sampling_rate
disk_wav_locations = _write_wavs_to_disk(sampling_rate, audio_values)
# Upload wavs to S3
result_dict["generated_outputs_s3"] = _upload_wav_files(disk_wav_locations, bucket_name)
# Clean up disk
for wav_on_disk in disk_wav_locations:
    _delete_file_on_disk(wav_on_disk)

We then use the tensor to generate .wav music and upload these files to Amazon S3 and clean up the .wav files saved on disk. We then obtain the S3 URI of the .wav files and send them locations in the response.

We now create the archive of the inference scripts and upload those to the S3 bucket:

musicgen_prefix = 'musicgen_large'
s3_model_key = f'{musicgen_prefix}/model/model.tar.gz'
s3_model_location = f"s3://{sagemaker_session_bucket}/{s3_model_key}"
s3 = boto3.resource("s3")
s3.Bucket(sagemaker_session_bucket).upload_file("model.tar.gz", s3_model_key)

The uploaded URI of this object on Amazon S3 will later be used to create the Hugging Face model.

Create the Hugging Face model

Now we initialize HuggingFaceModel with the necessary arguments. During deployment, the model serving artifacts, stored in s3_model_location, will be deployed. Before the model serving, the MusicGen model will be downloaded from Hugging Face as per the logic in model_fn.

huggingface_model = HuggingFaceModel(
    name=async_endpoint_name,
    model_data=s3_model_location,  # path to your model artifacts 
    role=role,
    env= {
           'TS_MAX_REQUEST_SIZE': '100000000',
           'TS_MAX_RESPONSE_SIZE': '100000000',
           'TS_DEFAULT_RESPONSE_TIMEOUT': '3600'
       },# iam role with permissions to create an Endpoint
    transformers_version="4.37",  # transformers version used
    pytorch_version="2.1",  # pytorch version used
    py_version="py310",  # python version used
)

The env argument accepts a dictionary of parameters such as TS_MAX_REQUEST_SIZE and TS_MAX_RESPONSE_SIZE, which define the byte size values for request and response payloads to the asynchronous inference endpoint. The TS_DEFAULT_RESPONSE_TIMEOUT key in the env dictionary represents the timeout in seconds after which the asynchronous inference endpoint stops responding.

You can run MusicGen with the Hugging Face Transformers library from version 4.31.0 onwards. Here we set transformers_version to 4.37. MusicGen requires at least PyTorch version 2.1 or latest, and we have set pytorch_version to 2.1.

Define asynchronous inference configuration

Music generation using a text prompt as input can be both computationally intensive and time-consuming. Asynchronous inference in SageMaker is designed to address these demands. When working with music generation models, it’s important to note that the process can often take more than 60 seconds to complete.

SageMaker asynchronous inference queues incoming requests and processes them asynchronously, making it ideal for requests with large payload sizes (up to 1 GB), long processing times (up to 1 hour), and near real-time latency requirements. By queuing incoming requests and processing them asynchronously, this capability efficiently handles the extended processing times inherent in music generation tasks. Moreover, asynchronous inference enables seamless auto scaling, making sure that resources are allocated only when needed, leading to cost savings.

Before we proceed with asynchronous inference configuration , we create SNS topics for success and failure that can be used to perform downstream tasks:

from utils.sns_client import SnsClient
import time
sns_client = SnsClient(boto3.client("sns"))
timestamp = time.time_ns()
topic_names = [f"musicgen-large-topic-SuccessTopic-{timestamp}", f"musicgen-large-topic-ErrorTopic-{timestamp}"]

topic_arns = []
for topic_name in topic_names:
    print(f"Creating topic {topic_name}.")
    response = sns_client.create_topic(topic_name)
    topic_arns.append(response.get('TopicArn'))

We now create an asynchronous inference endpoint configuration by specifying the AsyncInferenceConfig object:

# create async endpoint configuration
async_config = AsyncInferenceConfig(
    output_path=s3_path_join(
        "s3://", sagemaker_session_bucket, "musicgen_large/async_inference/output"
    ),  # Where our results will be stored
    # Add nofitication SNS if needed
    notification_config={
        "SuccessTopic": topic_arns[0],
        "ErrorTopic": topic_arns[1],
    },  #  Notification configuration
)

The arguments to the AsyncInferenceConfig are detailed as follows:

  • output_path – The location where the output of the asynchronous inference endpoint will be stored. The files in this location will have an .out extension and will contain the details of the asynchronous inference performed by the MusicGen model.
  • notification_config – Optionally, you can associate success and error SNS topics. Dependent workflows can poll these topics to make informed decisions based on the inference outcomes.

Deploy the model on SageMaker

With the asynchronous inference configuration defined, we can deploy the Hugging Face model, setting initial_instance_count to 1:

# deploy the endpoint
async_predictor = huggingface_model.deploy(
    initial_instance_count=1,
    instance_type=instance_type,
    async_inference_config=async_config,
    endpoint_name=async_endpoint_name,
)

After successfully deploying, you can optionally configure automatic scaling to the asynchronous endpoint. With asynchronous inference, you can also scale down your asynchronous endpoint’s instances to zero.

We now dive into inferencing the asynchronous endpoint for music generation.

Inference

In this section, we show how to perform inference using an asynchronous inference endpoint with the MusicGen model. For the sake of brevity, only significant code snippets are included. The full source code for inferencing the MusicGen model is available in the GitHub repo. The following diagram explains the sequence of steps to invoke the asynchronous inference endpoint.

MusicGen - Amazon SageMaker Async Inference Sequence Diagram

We detail the steps to invoke the SageMaker asynchronous inference endpoint for MusicGen by prompting a desired mood in natural language using English. We then demonstrate how to download and play the .wav files generated from the user prompt. Finally, we cover the process of cleaning up the resources created as part of this deployment.

Prepare prompt and instructions

For controlled music generation using MusicGen models, it’s important to understand various generation parameters:

generation_params = { 
    'guidance_scale': 3,
    'max_new_tokens': 1200, 
    'do_sample': True, 
    'temperature': 1 
}

From the preceding code, let’s understand the generation parameters:

  • guidance_scale – The guidance_scale is used in classifier-free guidance (CFG), setting the weighting between the conditional logits (predicted from the text prompts) and the unconditional logits (predicted from an unconditional or ‘null’ prompt). A higher guidance scale encourages the model to generate samples that are more closely linked to the input prompt, usually at the expense of poorer audio quality. CFG is enabled by setting guidance_scale > 1. For best results, use guidance_scale = 3. Our deployment defaults to 3.
  • max_new_tokens – The max_new_tokens parameter specifies the number of new tokens to generate. Generation is limited by the sinusoidal positional embeddings to 30-second inputs, meaning MusicGen can’t generate more than 30 seconds of audio (1,503 tokens). Our deployment defaults to 256.
  • do_sample – The model can generate an audio sample conditioned on a text prompt through use of the MusicgenProcessor to preprocess the inputs. The preprocessed inputs can then be passed to the .generate method to generate text-conditional audio samples. Our deployment defaults to True.
  • temperature – This is the softmax temperature parameter. A higher temperature increases the randomness of the output, making it more diverse. Our deployment defaults to 1.

Let’s look at how to build a prompt to infer the MusicGen model:

data = {
    "texts": [
        "Warm and vibrant weather on a sunny day, feeling the vibes of hip hop and synth",
    ],
    "bucket_name": sagemaker_session_bucket,
    "generation_params": generation_params
}

The preceding code is the payload, which will be saved as a JSON file and uploaded to an S3 bucket. We then provide the URI of the input payload during the asynchronous inference endpoint invocation along with other arguments as follows.

The texts key accepts an array of texts, which may contain the mood you want to reflect in your generated music. You can include musical instruments in the text prompt to the MusicGen model to generate music featuring those instruments.

The response from the invoke_endpoint_async is a dictionary of various parameters:

response = sagemaker_runtime.invoke_endpoint_async(
    EndpointName=endpoint_name,
    InputLocation=input_s3_location,
    ContentType="application/json",
    InvocationTimeoutSeconds=3600
)

OutputLocation in the response metadata represents Amazon S3 URI where the inference response payload is stored.

Asynchronous music generation

As soon as the response metadata is sent to the client, the asynchronous inference begins the music generation. The music generation happens on the instance chosen during the deployment of the MusicGen model on the SageMaker asynchronous Inference endpoint , as detailed in the deployment section.

Continuous polling and obtaining music files

While the music generation is in progress, we continuously poll for the response metadata parameter OutputLocation:

from utils.inference_utils import get_output
output = get_output(sm_session, response.get('OutputLocation'))

The get_output function keeps polling for the presence of OutputLocation and returns the S3 URI of the .wav music file.

Audio output

Lastly, we download the files from Amazon S3 and play the output using the following logic:

from utils.inference_utils import play_output_audios
music_files = []
for s3_url in output.get('generated_outputs_s3'):
    if s3_url is not None:
        music_files.append(download_from_s3(s3_url))
play_output_audios(music_files, data.get('texts'))

You now have access to the .wav files and can try changing the generation parameters to experiment with various text prompts.

The following is another music sample based on the following generation parameters:

generation_params = { 'guidance_scale': 5, 'max_new_tokens': 1503, 'do_sample': True, 'temperature': 0.9 }
data = {
    "texts": [
        "Catchy funky beats with drums and bass, synthesized pop for an upbeat pop game",
    ],
    "bucket_name": sagemaker_session_bucket,
    "generation_params": generation_params
}

Clean up

To avoid incurring unnecessary charges, you can clean up using the following code:

import boto3
sagemaker_runtime = boto3.client('sagemaker-runtime')

cleanup = False # < - Set this to True to clean up resources.
endpoint_name = <Endpoint_Name>

sm_client = boto3.client('sagemaker')
endpoint = sm_client.describe_endpoint(EndpointName=endpoint_name)
endpoint_config_name = endpoint['EndpointConfigName']
endpoint_config = sm_client.describe_endpoint_config(EndpointConfigName=endpoint_config_name)
model_name = endpoint_config['ProductionVariants'][0]['ModelName']
notification_config = endpoint_config['AsyncInferenceConfig']['OutputConfig'].get('NotificationConfig', None)
print(f"""
About to delete the following sagemaker resources:
Endpoint: {endpoint_name}
Endpoint Config: {endpoint_config_name}
Model: {model_name}
""")
for k,v in notification_config.items():
    print(f'About to delete SNS topics for {k} with ARN: {v}')

if cleanup:
    # delete endpoint
    sm_client.delete_endpoint(EndpointName=endpoint_name)
    # delete endpoint config
    sm_client.delete_endpoint_config(EndpointConfigName=endpoint_config_name)
    # delete model
    sm_client.delete_model(ModelName=model_name)
    print('deleted model, config and endpoint')

The aforementioned cleanup routine will delete the SageMaker endpoint, endpoint configurations, and models associated with MusicGen model, so that you avoid incurring unnecessary charges. Make sure to set cleanup variable to True, and replace <Endpoint_Name> with the actual endpoint name of the MusicGen model deployed on SageMaker. Alternatively, you can use the console to delete the endpoints and its associated resources that were created while running the code mentioned in the post.

Conclusion

In this post, we learned how to use SageMaker asynchronous inference to deploy the AudioCraft MusicGen model. We started by exploring how the MusicGen models work and covered various use cases for deploying MusicGen models. We also explored how you can benefit from capabilities such as auto scaling and the integration of asynchronous endpoints with Amazon SNS to power downstream tasks. We then took a deep dive into the deployment and inference workflow of MusicGen models on SageMaker, using the AWS Deep Learning Containers for HuggingFace inference and the MusicGen model sourced from the Hugging Face Hub.

Get started with generating music using your creative prompts by signing up for AWS. The full source code is available on the official GitHub repository.

References


About the Authors

Pavan Kumar Rao NavulePavan Kumar Rao Navule is a Solutions Architect at Amazon Web Services, where he works with ISVs in India to help them innovate on the AWS platform. He is specialized in architecting AI/ML and generative AI services at AWS. Pavan is a published author for the book “Getting Started with V Programming.” In his free time, Pavan enjoys listening to the great magical voices of Sia and Rihanna.

David John ChakramDavid John Chakram is a Principal Solutions Architect at AWS. He specializes in building data platforms and architecting seamless data ecosystems. With a profound passion for databases, data analytics, and machine learning, he excels at transforming complex data challenges into innovative solutions and driving businesses forward with data-driven insights.

Sudhanshu HateSudhanshu Hate is a principal AI/ML specialist with AWS and works with clients to advise them on their MLOps and generative AI journey. In his previous role before Amazon, he conceptualized, created, and led teams to build ground-up open source-based AI and gamification platforms, and successfully commercialized it with over 100 clients. Sudhanshu has to his credit a couple of patents, has written two books and several papers and blogs, and has presented his points of view in various technical forums. He has been a thought leader and speaker, and has been in the industry for nearly 25 years. He has worked with Fortune 1000 clients across the globe and most recently with digital native clients in India.

Rupesh BajajRupesh Bajaj is a Solutions Architect at Amazon Web Services, where he collaborates with ISVs in India to help them leverage AWS for innovation. He specializes in providing guidance on cloud adoption through well-architected solutions and holds seven AWS certifications. With 5 years of AWS experience, Rupesh is also a Gen AI Ambassador. In his free time, he enjoys playing chess.

Read More

KGLens: Towards Efficient and Effective Knowledge Probing of Large Language Models with Knowledge Graphs

This paper was accepted at the Workshop Towards Knowledgeable Language Models 2024.
Large Language Models (LLMs) might hallucinate facts, while curated Knowledge Graph (KGs) are typically factually reliable especially with domain-specific knowledge. Measuring the alignment between KGs and LLMs can effectively probe the factualness and identify the knowledge blind spots of LLMs. However, verifying the LLMs over extensive KGs can be expensive. In this paper, we present KGLens, a Thompson-sampling-inspired framework aimed at effectively and efficiently measuring the alignment between KGs and…Apple Machine Learning Research

Rephrasing the Web: A Recipe for Compute and Data-Efficient Language Modeling

Large language models are trained on massive scrapes of the web, which are often unstructured, noisy, and poorly phrased. Current scaling laws show that learning from such data requires an abundance of both compute and data, which grows with the size of the model being trained. This is infeasible both because of the large compute costs and duration associated with pre-training, and the impending scarcity of high-quality data on the web. In this work, we propose Web Rephrase Augmented Pre-training (WRAP) that uses an off-the-shelf instruction-tuned model prompted to paraphrase documents on the…Apple Machine Learning Research

Build an end-to-end RAG solution using Knowledge Bases for Amazon Bedrock and AWS CloudFormation

Build an end-to-end RAG solution using Knowledge Bases for Amazon Bedrock and AWS CloudFormation

Retrieval Augmented Generation (RAG) is a state-of-the-art approach to building question answering systems that combines the strengths of retrieval and foundation models (FMs). RAG models first retrieve relevant information from a large corpus of text and then use a FM to synthesize an answer based on the retrieved information.

An end-to-end RAG solution involves several components, including a knowledge base, a retrieval system, and a generation system. Building and deploying these components can be complex and error-prone, especially when dealing with large-scale data and models.

This post demonstrates how to seamlessly automate the deployment of an end-to-end RAG solution using Knowledge Bases for Amazon Bedrock and AWS CloudFormation, enabling organizations to quickly and effortlessly set up a powerful RAG system.

Solution overview

The solution provides an automated end-to-end deployment of a RAG workflow using Knowledge Bases for Amazon Bedrock. We use AWS CloudFormation to set up the necessary resources, including :

  1. An AWS Identity and Access Management (IAM) role
  2. An Amazon OpenSearch Serverless collection and index
  3. A knowledge base with its associated data source

The RAG workflow enables you to use your document data stored in an Amazon Simple Storage Service (Amazon S3) bucket and integrate it with the powerful natural language processing capabilities of FMs provided in Amazon Bedrock. The solution simplifies the setup process, allowing you to quickly deploy and start querying your data using the selected FM.

Prerequisites

To implement the solution provided in this post, you should have the following:

  • An active AWS account and familiarity with FMs, Amazon Bedrock, and OpenSearch Serverless.
  • An S3 bucket where your documents are stored in a supported format (.txt, .md, .html, .doc/docx, .csv, .xls/.xlsx, .pdf).
  • The Amazon Titan Embeddings G1-Text model enabled in Amazon Bedrock. You can confirm it’s enabled on the Model access page of the Amazon Bedrock console. If the Amazon Titan Embeddings G1-Text model is enabled, the access status will show as Access granted, as shown in the following screenshot.

Set up the solution

When the prerequisite steps are complete, you’re ready to set up the solution:

  1. Clone the GitHub repository containing the solution files:
git clone https://github.com/aws-samples/amazon-bedrock-samples.git
  1. Navigate to the solution directory:
cd knowledge-bases/features-examples/04-infrastructure/e2e-rag-deployment-using-bedrock-kb-cfn
  1. Run the sh script, which will create the deployment bucket, prepare the CloudFormation templates, and upload the ready CloudFormation templates and required artifacts to the deployment bucket:
bash deploy.sh

While running deploy.sh, if you provide a bucket name as an argument to the script, it will create a deployment bucket with the specified name. Otherwise, it will use the default name format: e2e-rag-deployment-${ACCOUNT_ID}-${AWS_REGION}

As shown in the following screenshot, if you complete the preceding steps in an Amazon SageMaker notebook instance, you can run the bash deploy.sh at the terminal, which creates the deployment bucket in your account (account number has been redacted).

  1. After the script is complete, note the S3 URL of the main-template-out.yml.

  1. On the AWS CloudFormation console, create a new stack.
  2. For Template source, select Amazon S3 URL and enter the URL you copied earlier.
  3. Choose Next.

  1. Provide a stack name and specify the RAG workflow details according to your use case and then choose Next.

  1. Leave everything else as default and choose Next on the following pages.
  1. Review the stack details and select the acknowledgement check boxes.

  1. Choose Submit to start the deployment process.

You can monitor the stack deployment progress on the AWS CloudFormation console.

Test the solution

When the deployment is successful (which may take 7–10 minutes to complete), you can start testing the solution.

  1. On the Amazon Bedrock console, navigate to the created knowledge base.
  2. Choose Sync to initiate the data ingestion job.

  1. After data synchronization is complete, select the desired FM to use for retrieval and generation (it requires model access to be granted to this FM in Amazon Bedrock before using).

  1. Start querying your data using natural language queries.

That’s it! You can now interact with your documents using the RAG workflow powered by Amazon Bedrock.

Clean up

To avoid incurring future charges, delete the resources used in this solution:

  1. On the Amazon S3 console, manually delete the contents inside the bucket you created for template deployment, then delete the bucket.
  2. On the AWS CloudFormation console, choose Stacks in the navigation pane, select the main stack, and choose Delete.

Your created knowledge base will be deleted when you delete the stack.

Conclusion

In this post, we introduced an automated solution for deploying an end-to-end RAG workflow using Knowledge Bases for Amazon Bedrock and AWS CloudFormation. By using the power of AWS services and the preconfigured CloudFormation templates, you can quickly set up a powerful question answering system without the complexities of building and deploying individual components for RAG applications. This automated deployment approach not only saves time and effort, but also provides a consistent and reproducible setup, enabling you to focus on utilizing the RAG workflow to extract valuable insights from your data.

Try it out and see firsthand how it can streamline your RAG workflow deployment and enhance efficiency. Please share your feedback to us!


About the Authors

Sandeep Singh is a Senior Generative AI Data Scientist at Amazon Web Services, helping businesses innovate with generative AI. He specializes in generative AI, machine learning, and system design. He has successfully delivered state-of-the-art AI/ML-powered solutions to solve complex business problems for diverse industries, optimizing efficiency and scalability.

Yanyan Zhang is a Senior Generative AI Data Scientist at Amazon Web Services, where she has been working on cutting-edge AI/ML technologies as a Generative AI Specialist, helping customers use generative AI to achieve their desired outcomes. With a keen interest in exploring new frontiers in the field, she continuously strives to push boundaries. Outside of work, she loves traveling, working out, and exploring new things.

Mani Khanuja is a Tech Lead – Generative AI Specialists, author of the book Applied Machine Learning and High Performance Computing on AWS, and a member of the Board of Directors for Women in Manufacturing Education Foundation Board. She leads machine learning projects in various domains such as computer vision, natural language processing, and generative AI. She speaks at internal and external conferences such AWS re:Invent, Women in Manufacturing West, YouTube webinars, and GHC 23. In her free time, she likes to go for long runs along the beach.

Read More

Faster LLMs with speculative decoding and AWS Inferentia2

Faster LLMs with speculative decoding and AWS Inferentia2

In recent years, we have seen a big increase in the size of large language models (LLMs) used to solve natural language processing (NLP) tasks such as question answering and text summarization. Larger models with more parameters, which are in the order of hundreds of billions at the time of writing, tend to produce better results. For example, Llama-3-70B, scores better than its smaller 8B parameters version on metrics like reading comprehension (SQuAD 85.6 compared to 76.4). Thus, customers often experiment with larger and newer models to build ML-based products that bring value.

However, the larger the model, the more computationally demanding it is, and the higher the cost to deploy. For example, on AWS Trainium, Llama-3-70B has a median per-token latency of 21.4 ms, while Llama-3-8B takes 4.7 ms. Similarly, Llama-2-70B has a median per-token latency of 20.6 ms, while Llama-2-7B takes 3.7 ms. Customers have to consider performance to ensure they meet their users’ needs. In this blog post, we will explore how speculative sampling can help make large language model inference more compute efficient and cost-effective on AWS Inferentia and Trainium. This technique improves LLM inference throughput and output token latency (TPOT).

Introduction

Modern language models are based on the transformer architecture. The input prompts are processed first using a technique called context encoding, which runs fast because it is parallelizable. Next, we perform auto-regressive token generation where the output tokens are generated sequentially. Note that we cannot generate the next token until we know the previous one, as depicted in Figure 1. Therefore, to generate N output tokens we need N serial runs through the decoder. A run takes longer through a larger model, like Llama-3-70B, than through a smaller model, like Llama-3-8B.

AWS Neuron speculative decoding - Sequential token generation in LLMs

Figure 1: Sequential token generation in LLMs

From a computational perspective, token generation in LLMs is a memory bandwidth-bound process. The larger the model, the more likely it is that we will wait on memory transfers. This results in underutilizing the compute units and not fully benefiting from the floating-point operations (FLOPS) available.

Speculative sampling

Speculative sampling is a technique that improves the computational efficiency for running inference with LLMs, while maintaining accuracy. It works by using a smaller, faster draft model to generate multiple tokens, which are then verified by a larger, slower target model. This verification step processes multiple tokens in a single pass rather than sequentially and is more compute efficient than processing tokens sequentially. Increasing the number of tokens processed in parallel increases the compute intensity because a larger number of tokens can be multiplied with the same weight tensor. This provides better performance compared with the non-speculative run, which is usually memory bandwidth-bound, and thus leads to better hardware resource utilization.

The speculative process involves an adjustable window k, where the target model provides one guaranteed correct token, and the draft model speculates on the next k-1 tokens. If the draft model’s tokens are accepted, the process speeds up. If not, the target model takes over, ensuring accuracy.

AWS Neuron speculative decoding - Case when all speculated tokens are accepted

Figure 2: Case when all speculated tokens are accepted

Figure 2 illustrates a case where all speculated tokens are accepted, resulting in faster processing. The target model provides a guaranteed output token, and the draft model runs multiple times to produce a sequence of possible output tokens. These are verified by the target model and subsequently accepted by a probabilistic method.

AWS Neuron speculative decoding - Case when some speculated tokens are rejected

Figure 3: Case when some speculated tokens are rejected

On the other hand, Figure 3 shows a case where some of the tokens are rejected. The time it takes to run this speculative sampling loop is the same as in Figure 2, but we obtain fewer output tokens. This means we will be repeating this process more times to complete the response, resulting in slower overall processing.

By adjusting the window size k and understanding when the draft and target models are likely to produce similar results, we can maximize the benefits of speculative sampling.

A Llama-2-70B/7B demonstration

We will show how speculative sampling works on Inferentia2-powered Amazon EC2 Inf2 instances and Trainium-powered EC2 Trn1 instances. We will be using a sample where we generate text faster with Llama-2-70B by using a Llama-2-7B model as a draft model. The example walk-through is based on Llama-2 models, but you can follow a similar process for Llama-3 models as well.

Loading models

You can load the Llama-2 models using data type bfloat16. The draft model needs to be loaded in a standard way like in the example below. The parameter n_positions is adjustable and represents the maximum sequence length you want to allow for generation. The only batch_size we support for speculative sampling at the time of writing is 1. We will explain tp_degree later in this section.

draft_model = LlamaForSampling.from_pretrained('Llama-2-7b', n_positions=128, batch_size=1, tp_degree=32, amp='bf16')

The target model should be loaded in a similar way, but with speculative sampling functionality enabled. The value k was described previously.

target_model = LlamaForSampling.from_pretrained('Llama-2-70b', n_positions=128, batch_size=1, tp_degree=32, amp='bf16')
target_model.enable_speculative_decoder(k)

Combined, the two models need almost 200 GB of device memory for the weights with additional memory in the order of GBs needed for key-value (KV) caches. If you prefer to use the models with float32 parameters, they will need around 360 GB of device memory. Note that the KV caches grow linearly with sequence length (input tokens + tokens yet to be generated). Use neuron-top to see the memory utilization live. To accommodate for these memory requirements, we’ll need either the largest Inf2 instance (inf2.48xlarge) or largest Trn1 instance (trn1.32xlarge).

Because of the size of the models, their weights need to be distributed amongst the NeuronCores using a technique called tensor parallelism. Notice that in the sample provided, tp_degree is used per model to specify how many NeuronCores that model should use. This, in turn, affects the memory bandwidth utilization, which is critical for token generation performance. A higher tp_degree can lead to better bandwidth utilization and improved throughput. The topology for Trn1 requires that tp_degree is set to 1, 2, 8, 16 or a multiple of 32. For Inf2, it needs to be 1 or multiples of 2.

The order in which you load the models also matters. After a set of NeuronCores has been initialized and allocated for one model, you cannot use the same NeuronCores for another model unless it’s the exact same set. If you try to use only some of the NeuronCores that were previously initialized, you will get an nrt_load_collectives - global nec_comm is already init'd error.

Let’s go through two examples on trn1.32xlarge (32 NeuronCores) to understand this better. We will calculate how many NeuronCores we need per model. The formula used is the observed model size in memory, using neuron-top, divided by 16GB which is the device memory per NeuronCore.

  1. If we run the models using bfloat16, we need more than 10 NeuronCores for Llama-2-70B and more than 2 NeuronCores for Llama-2-7B. Because of topology constraints, it means we need at least tp_degree=16 for Llama-2-70B. We can use the remaining 16 NeuronCores for Llama-2-7B. However, because both models fit in memory across 32 NeuronCores, we should set tp_degree=32 for both, to speed-up the model inference for each.
  2. If we run the models using float32, we need more than 18 NeuronCores for Llama-2-70B and more than 3 NeuronCores for Llama-2-7B. Because of topology constraints, we have to set tp_degree=32 for Llama-2-70B. That means Llama-2-7B needs to re-use the same set of NeuronCores, so you need to set tp_degree=32 for Llama-2-7B too.

Walkthrough

The decoder we’ll use from transformers-neuronx is LlamaForSampling, which is suitable for loading and running Llama models. You can also use NeuronAutoModelForCausalLM which will attempt to auto-detect which decoder to use. To perform speculative sampling, we need to create a speculative generator first which takes two models and the value k described previously.

spec_gen = SpeculativeGenerator(draft_model, target_model, k)

We invoke the inferencing process by calling the following function:

spec_gen.sample(input_ids=input_token_ids, sequence_length=total_output_length)

During sampling, there are several hyper-parameters (for example: temperature, top_p, and top_k) that affect if the output is deterministic across multiple runs. At the time of writing, the speculative sampling implementation sets default values for these hyper-parameters. With these values, expect randomness in results when you run a model multiple times, even if it’s with the same prompt. This is normal intended behavior for LLMs because it improves their qualitative responses.

When you run the sample, you will use the default token acceptor, based on the DeepMind paper which introduced speculative sampling, which uses a probabilistic method to accept tokens. However, you can also implement a custom token acceptor, which you can pass as part of the acceptor parameter when you initialize the SpeculativeGenerator. You would do this if you wanted more deterministic responses, for example. See the implementation of the DefaultTokenAcceptor class in transformers-neuronx to understand how to write your own.

Conclusion

As more developers look to incorporate LLMs into their applications, they’re faced with a choice of using larger, more costly, and slower models that will deliver higher quality results. Or they can use smaller, less expensive and faster models that might reduce quality of answers. Now, with AWS artificial intelligence (AI) chips and speculative sampling, developers don’t have to make that choice. They can take advantage of the high-quality outputs of larger models and the speed and responsiveness of smaller models.

In this blog post, we have shown that we can accelerate the inference of large models, such as Llama-2-70B, by using a new feature called speculative sampling.

To try it yourself, check out the speculative sampling example, and tweak the input prompt and k parameter to see the results you get. For more advanced use cases, you can develop your own token acceptor implementation. To learn more about running your models on Inferentia and Trainium instances, see the AWS Neuron documentation. You can also visit repost.aws AWS Neuron channel to discuss your experimentations with the AWS Neuron community and share ideas.


About the Authors

Syl Taylor AWS
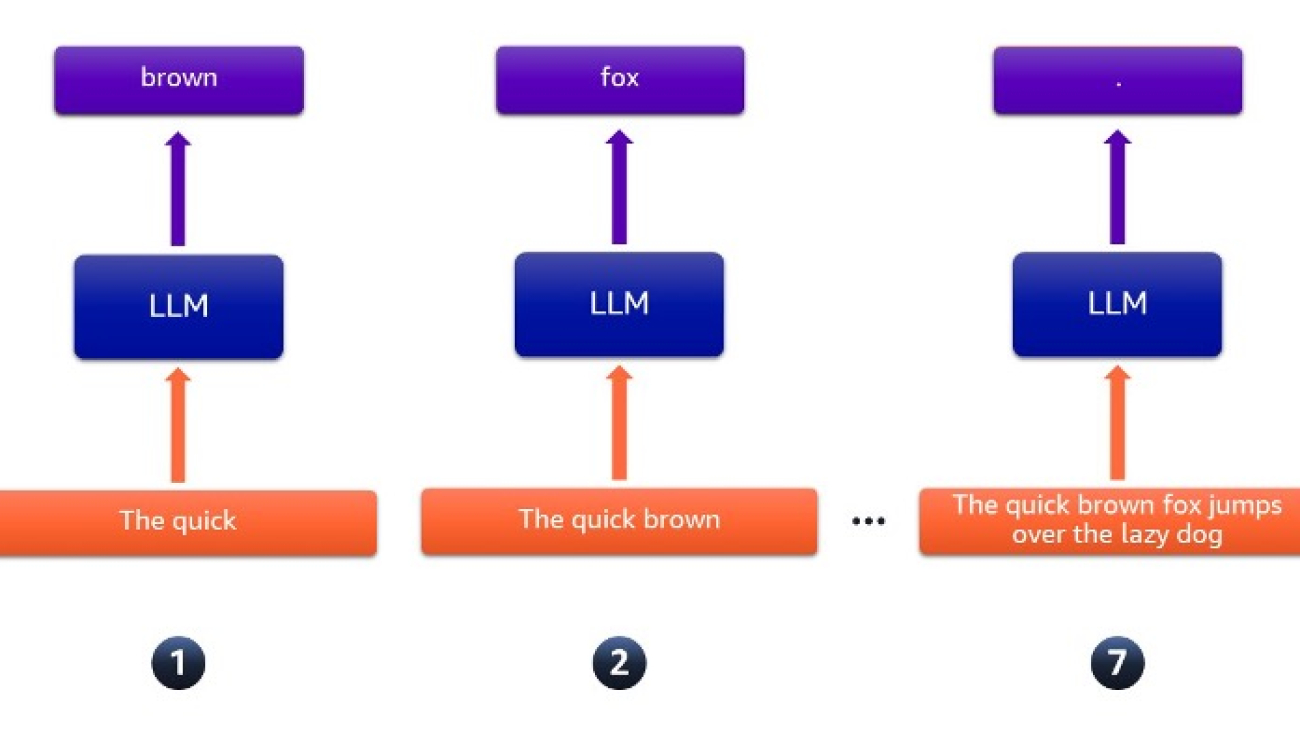
Syl Taylor is a Specialist Solutions Architect for Efficient Compute. She advises customers across EMEA on Amazon EC2 cost optimization and improving application performance using AWS-designed chips. Syl previously worked in software development and AI/ML for AWS Professional Services, designing and implementing cloud native solutions. She’s based in the UK and loves spending time in nature.

Emir Ayar AWSEmir Ayar is a Senior Tech Lead Solutions Architect with the AWS Prototyping team. He specializes in assisting customers with building ML and generative AI solutions, and implementing architectural best practices. He supports customers in experimenting with solution architectures to achieve their business objectives, emphasizing agile innovation and prototyping. He lives in Luxembourg and enjoys playing synthesizers.

Read More