*Equal Contributors
To deploy machine learning models on-device, practitioners use compression algorithms to shrink and speed up models while maintaining their high-quality output. A critical aspect of compression in practice is model comparison, including tracking many compression experiments, identifying subtle changes in model behavior, and negotiating complex accuracy-efficiency trade-offs. However, existing compression tools poorly support comparison, leading to tedious and, sometimes, incomplete analyses spread across disjoint tools. To support real-world comparative workflows, we…Apple Machine Learning Research
GenAI for Aerospace: Empowering the workforce with expert knowledge on Amazon Q and Amazon Bedrock
Aerospace companies face a generational workforce challenge today. With the strong post-COVID recovery, manufacturers are committing to record production rates, requiring the sharing of highly specialized domain knowledge across more workers. At the same time, maintaining the headcount and experience level of the workforce is increasingly challenging, as a generation of subject matter experts (SMEs) retires and increased fluidity characterizes the post-COVID labor market. This domain knowledge is traditionally captured in reference manuals, service bulletins, quality ticketing systems, engineering drawings, and more, but the quantity and complexity of documents is growing and takes time to learn. You simply can’t train new SMEs overnight. Without a mechanism to manage this knowledge transfer gap, productivity across all phases of the lifecycle might suffer from losing expert knowledge and repeating past mistakes.
Generative AI is a modern form of machine learning (ML) that has recently shown significant gains in reasoning, content comprehension, and human interaction. It can be a significant force multiplier to help the human workforce quickly digest, summarize, and answer complex questions from large technical document libraries, accelerating your workforce development. AWS is uniquely positioned to help you address these challenges through generative AI, with a broad and deep range of AI/ML services and over 20 years of experience in developing AI/ML technologies.
This post shows how aerospace customers can use AWS generative AI and ML-based services to address this document-based knowledge use case, using a Q&A chatbot to provide expert-level guidance to technical staff based on large libraries of technical documents. We focus on the use of two AWS services:
- Amazon Q can help you get fast, relevant answers to pressing questions, solve problems, generate content, and take actions using the data and expertise found in your company’s information repositories, code, and enterprise systems.
- Amazon Bedrock is a fully managed service that offers a choice of high-performing foundation models (FMs) from leading AI companies like AI21 Labs, Anthropic, Cohere, Meta, Stability AI, and Amazon through a single API, along with a broad set of capabilities to build generative AI applications with security, privacy, and responsible AI.
Although Amazon Q is a great way to get started with no code for business users, Amazon Bedrock Knowledge Bases offers more flexibility at the API level for generative AI developers; we explore both these solutions in the following sections. But first, let’s revisit some basic concepts around Retrieval Augmented Generation (RAG) applications.
Generative AI constraints and RAG
Although generative AI holds great promise for automating complex tasks, our aerospace customers often express concerns about the use of the technology in such a safety- and security-sensitive industry. They ask questions such as:
- “How do I keep my generative AI applications secure?”
- “How do I make sure my business-critical data isn’t used to train proprietary models?”
- “How do I know that answers are accurate and only drawn from authoritative sources?” (Avoiding the well-known problem of hallucination.)
- “How can I trace the reasoning of my model back to source documents to build user trust?”
- “How do I keep my generative AI applications up to date with an ever-evolving knowledge base?”
In many generative AI applications built on proprietary technical document libraries, these concerns can be addressed by using the RAG architecture. RAG helps maintain the accuracy of responses, keeps up with the rapid pace of document updates, and provides traceable reasoning while keeping your proprietary data private and secure.
This architecture combines a general-purpose large language model (LLM) with a customer-specific document database, which is accessed through a semantic search engine. Rather than fine-tuning the LLM to the specific application, the document library is loaded with the relevant reference material for that application. In RAG, these knowledge sources are often referred to as a knowledge base.
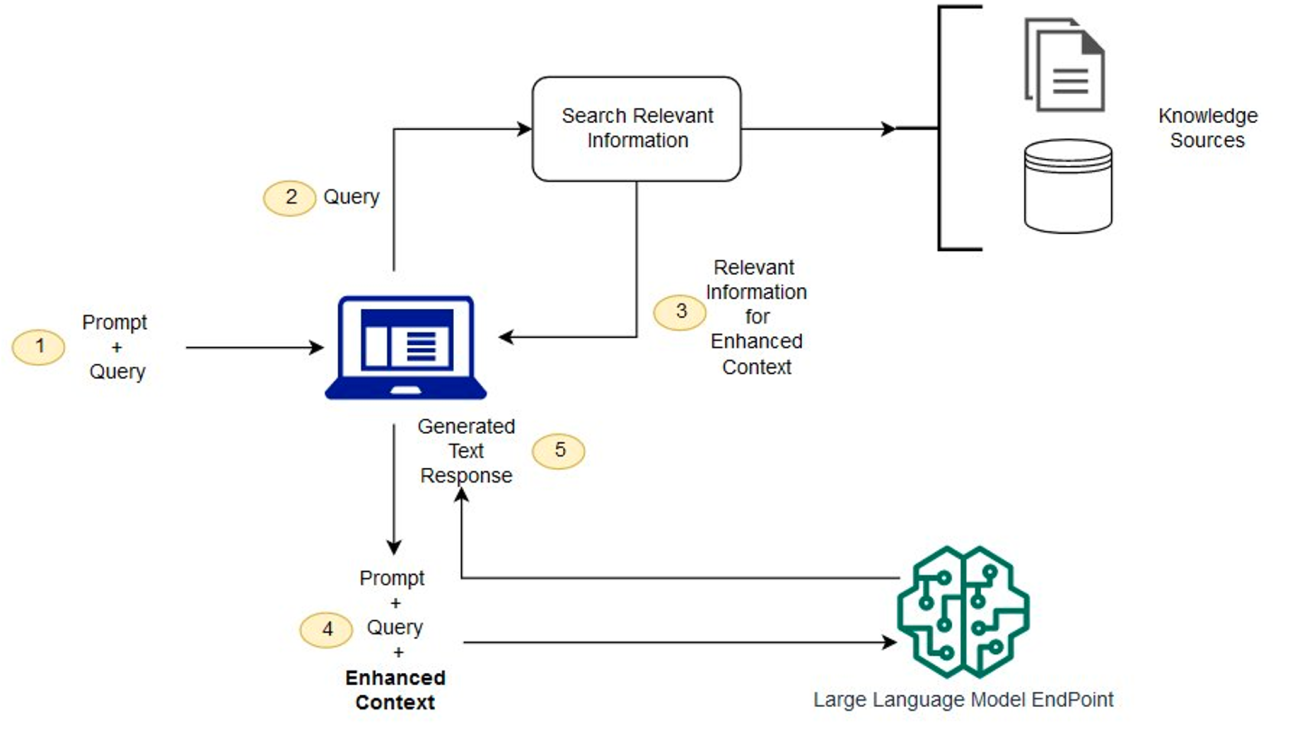
A high-level RAG architecture is shown in the following figure. The workflow includes the following steps:
- When the technician has a question, they enter it at the chat prompt.
- The technician’s question is used to search the knowledge base.
- The search results include a ranked list of most relevant source documentation.
- Those documentation snippets are added to the original query as context, and sent to the LLM as a combined prompt.
- The LLM returns the answer to the question, as synthesized from the source material in the prompt.
Because RAG uses a semantic search, it can find more relevant material in the database than just a keyword match alone. For more details on the operation of RAG systems, refer to Question answering using Retrieval Augmented Generation with foundation models in Amazon SageMaker JumpStart.

This architecture addresses the concerns listed earlier in few key ways:
- The underlying LLM doesn’t require custom training because the domain-specialized knowledge is contained in a separate knowledge base. As a result, the RAG-based system can be kept up to date, or retrained to completely new domains, simply by changing the documents in the knowledge base. This mitigates the significant cost typically associated with training custom LLMs.
- Because of the document-based prompting, generative AI answers can be constrained to only come from trusted document sources, and provide direct attribution back to those source documents to verify.
- RAG-based systems can securely manage access to different knowledge bases by role-based access control. Proprietary knowledge in generative AI remains private and protected in those knowledge bases.
AWS provides customers in aerospace and other high-tech domains the tools they need to rapidly build and securely deploy generative AI solutions at scale, with world-class security. Let’s look at how you can use Amazon Q and Amazon Bedrock to build RAG-based solutions in two different use cases.
Use case 1: Create a chatbot “expert” for technicians with Amazon Q
Aerospace is a high-touch industry, and technicians are the front line of that workforce. Technician work appears at every lifecycle stage for the aircraft (and its components), engineering prototype, qualification testing, manufacture, quality inspection, maintenance, and repair. Technician work is demanding and highly specialized; it requires detailed knowledge of highly technical documentation to make sure products meet safety, functional, and cost requirements. Knowledge management is a high priority for many companies, seeking to spread domain knowledge from experts to junior employees to offset attrition, scale production capacity, and improve quality.
Our customers frequently ask us how they can use customized chatbots built on customized generative AI models to automate access to this information and help technicians make better-informed decisions and accelerate their development. The RAG architecture shown in this post is an excellent solution to this use case because it allows companies to quickly deploy domain-specialized generative AI chatbots built securely on their own proprietary documentation. Amazon Q can deploy fully managed, scalable RAG systems tailored to address a wide range of business problems. It provides immediate, relevant information and advice to help streamline tasks, accelerate decision-making, and help spark creativity and innovation at work. It can automatically connect to over 40 different data sources, including Amazon Simple Storage Service (Amazon S3), Microsoft SharePoint, Salesforce, Atlassian Confluence, Slack, and Jira Cloud.
Let’s look at an example of how you can quickly deploy a generative AI-based chatbot “expert” using Amazon Q.
- Sign in to the Amazon Q console.
If you haven’t used Amazon Q before, you might be greeted with a request for initial configuration.
- Under Connect Amazon Q to IAM Identity Center, choose Create account instance to create a custom credential set for this demo.
- Under Select a bundle to get started, under Amazon Q Business Lite, choose Subscribe in Q Business to create a test subscription.
If you have previously used Amazon Q in this account, you can simply reuse an existing user or subscription for this walkthrough.

- After you create your AWS IAM Identity Center and Amazon Q subscription, choose Get started on the Amazon Q landing page.

- Choose Create application.
- For Application name, enter a name (for example,
my-tech-assistant). - Under Service access, select Create and use a new service-linked role (SLR).
- Choose Create.
This creates the application framework.

- Under Retrievers, select Use native retriever.
- Under Index provisioning, select Starter for a basic, low-cost retriever.
- Choose Next.

Next, we need to configure a data source. For this example, we use Amazon S3 and assume that you have already created a bucket and uploaded documents to it (for more information, see Step 1: Create your first S3 bucket). For this example, we have uploaded some public domain documents from the Federal Aviation Administration (FAA) technical library relating to software, system standards, instrument flight rating, aircraft construction and maintenance, and more.
- For Data sources, choose Amazon S3 to point our RAG assistant to this S3 bucket.

- For Data source name, enter a name for your data source (independent of the S3 bucket name, such as my-faa-docs).
- Under IAM role, choose Create new service role (Recommended).
- Under Sync scope, choose the S3 bucket where you uploaded your documents.
- Under Sync run schedule, choose Run on demand (or another option, if you want your documents to be re-indexed on a set schedule).
- Choose Add data source.
- Leave the remaining settings as default and choose Next to finish adding your Amazon S3 data source.

Finally, we need to create user access permissions to our chatbot.
- Under Add groups and users, choose Add groups and users.
- In the popup that appears, you can choose to either create new users or select existing ones. If you want to use an existing user, you can skip the following steps:
- Select Add new users, then choose Next.
- Enter the new user information, including a valid email address.
An email will be sent to that address with a link to validate that user.
- Now that you have a user, select Assign existing users and groups and choose Next.
- Choose your user, then choose Assign.

You should now have a user assigned to your new chatbot application.
- Under Web experience service access, select Create and use a new service role.
- Choose Create application.

You now have a new generative AI application! Before the chatbot can answer your questions, you have to run the indexer on your documents at least one time.
- On the Applications page, choose your application.

- Select your data source and choose Sync now.
The synchronization process takes a few minutes to complete.
- When the sync is complete, on the Web experience settings tab, choose the link under Deployed URL.

If you haven’t yet, you will be prompted to log in using the user credentials you created; use the email address as the user name.
Your chatbot is now ready to answer technical questions on the large library of documents you provided. Try it out! You’ll notice that for each answer, the chatbot provides a Sources option that indicates the authoritative reference from which it drew its answer.

Our fully customized chatbot required no coding, no custom data schemas, and no managing of underlying infrastructure to scale! Amazon Q fully manages the infrastructure required to securely deploy your technician’s assistant at scale.
Use case 2: Use Amazon Bedrock Knowledge Bases
As we demonstrated in the previous use case, Amazon Q fully manages the end-to-end RAG workflow and allows business users to get started quickly. But what if you need more granular control of parameters related to the vector database, chunking, retrieval, and models used to generate final answers? Amazon Bedrock Knowledge Bases allows generative AI developers to build and interact with proprietary document libraries for accurate and efficient Q&A over documents. In this example, we use the same FAA documents as before, but this time we set up the RAG solution using Amazon Bedrock Knowledge Bases. We demonstrate how to do this using both APIs and the Amazon Bedrock console. The full notebook for following the API-based approach can be downloaded from the GitHub repo.
The following diagram illustrates the architecture of this solution.

Create your knowledge base using the API
To implement the solution using the API, complete the following steps:
- Create a role with the necessary policies to access data from Amazon S3 and write embeddings to Amazon OpenSearch Serverless. This role will be used by the knowledge base to retrieve relevant chunks for OpenSearch based on the input query.
- Create an empty OpenSearch Serverless index to store the document embeddings and metadata. OpenSearch Serverless is a fully managed option that allows you to run petabyte-scale workloads without managing clusters.
- With the OpenSearch Serverless index set up, you can now create the knowledge base and associate it with a data source containing our documents. For brevity, we haven’t included the full code; to run this example end-to-end, refer to the GitHub repo.
The ingestion job will fetch documents from the Amazon S3 data source, preprocess and chunk the text, create embeddings for each chunk, and store them in the OpenSearch Serverless index.
- With the knowledge base populated, you can now query it using the
RetrieveAndGenerateAPI and get responses generated by LLMs like Anthropic’s Claude on Amazon Bedrock:
The RetrieveAndGenerate API converts the query into an embedding, searches the knowledge base for relevant document chunks, and generates a response by providing the retrieved context to the specified language model. We asked the question “How are namespaces registered with the FAA for service providers?” Anthropic’s Claude 3 Sonnet uses the chunks retrieved from our OpenSearch vector index to answer as follows:
To register a namespace with the FAA as a service provider, you need to follow these steps:
- Develop the namespaces metadata according to FAA-STD-063 and submit it for registration in the FAA Data Registry (FDR).
- The FDR registrar will perform the namespace registration function. The specific process for
developing and registering a namespace in the FDR involves: - Searching the FDR for an existing namespace that matches your business domain. If none exists, work
with the FDR registrar to create a new one. - Create and document the new namespace according to FAA-STD-063, following the guidelines for
organization, web service, or taxonomy namespaces. - Register the namespace in the FDR by either filling out a registration form and submitting it to the FDR
registrar, or requesting access to enter the metadata directly into the FDR.
Create your knowledge base on the Amazon Bedrock console
If you prefer, you can build the same solution in Amazon Bedrock Knowledge Bases using the Amazon Bedrock console instead of the API-based implementation shown in the previous section. Complete the following steps:
- Sign in to your AWS account.
- On the Amazon Bedrock console, choose Get started.

As a first step, you need to set up your permissions to use the various LLMs in Amazon Bedrock.
- Choose Model access in the navigation pane.
- Choose Modify model access.

- Select the LLMs to enable.
- Choose Next¸ then choose Submit to complete your access request.
You should now have access to the models you requested.

Now you can set up your knowledge base.
- Choose Knowledge bases under Builder tools in the navigation pane.
- Choose Create knowledge base.

- On the Provide knowledge base details page, keep the default settings and choose Next.
- For Data source name, enter a name for your data source or keep the default.
- For S3 URI, choose the S3 bucket where you uploaded your documents.
- Choose Next.

- Under Embeddings model, choose the embeddings LLM to use (for this post, we choose Titan Text Embeddings).
- Under Vector database, select Quick create a new vector store.
This option uses OpenSearch Serverless as the vector store.
- Choose Next.

- Choose Create knowledge base to finish the process.
Your knowledge base is now set up! Before interacting with the chatbot, you need to index your documents. Make sure you have already loaded the desired source documents into your S3 bucket; for this walkthrough, we use the same public-domain FAA library referenced in the previous section.
- Under Data source, select the data source you created, then choose Sync.
- When the sync is complete, choose Select model in the Test knowledge base pane, and choose the model you want to try (for this post, we use Anthropic Claude 3 Sonnet, but Amazon Bedrock gives you the flexibility to experiment with many other models).

Your technician’s assistant is now set up! You can experiment with it using the chat window in the Test knowledge base pane. Experiment with different LLMs and see how they perform. Amazon Bedrock provides a simple API-based framework to experiment with different models and RAG components so you can tune them to help meet your requirements in production workloads.

Clean up
When you’re done experimenting with the assistant, complete the following steps to clean up your created resources to avoid ongoing charges to your account:
- On the Amazon Q Business console, choose Applications in the navigation pane.
- Select the application you created, and on the Actions menu, choose Delete.
- On the Amazon Bedrock console, choose Knowledge bases in the navigation pane.
- Select the knowledge base you created, then choose Delete.
Conclusion
This post showed how quickly you can launch generative AI-enabled expert chatbots, trained on your proprietary document sets, to empower your workforce across specific aerospace roles with Amazon Q and Amazon Bedrock. After you have taken these basic steps, more work will be needed to solidify these solutions for production. Future editions in this “GenAI for Aerospace” series will explore follow-up topics, such as creating additional security controls and tuning performance for different content.
Generative AI is changing the way companies address some of their largest challenges. For our aerospace customers, generative AI can help with many of the scaling challenges that come from ramping production rates and the skills of their workforce to match. This post showed how you can apply this technology to expert knowledge challenges in various functions of aerospace development today. The RAG architecture shown can help meet key requirements for aerospace customers: maintaining privacy of data and custom models, minimizing hallucinations, customizing models with private and authoritative reference documents, and direct attribution of answers back to those reference documents. There are many other aerospace applications where generative AI can be applied: non-conformance tracking, business forecasting, bid and proposal management, engineering design and simulation, and more. We examine some of these use cases in future posts.
AWS provides a broad range of AI/ML services to help you develop generative AI solutions for these use cases and more. This includes newly announced services like Amazon Q, which provides fast, relevant answers to pressing business questions drawn from enterprise data sources, with no coding required, and Amazon Bedrock, which provides quick API-level access to a wide range of LLMs, with knowledge base management for your proprietary document libraries and direct integration to external workflows through agents. AWS also offers competitive price-performance for AI workloads, running on purpose-built silicon—the AWS Trainium and AWS Inferentia processors—to run your generative AI services in the most cost-effective, scalable, simple-to-manage way. Get started on addressing your toughest business challenges with generative AI on AWS today!
For more information on working with generative AI and RAG on AWS, refer to Generative AI. For more details on building an aerospace technician’s assistant with AWS generative AI services, refer to Guidance for Aerospace Technician’s Assistant on AWS.
About the authors
 Peter Bellows is a Principal Solutions Architect and Head of Technology for Commercial Aviation in the Worldwide Specialist Organization (WWSO) at Amazon Web Services (AWS). He leads technical development for solutions across aerospace domains, including manufacturing, engineering, operations, and security. Prior to AWS, he worked in aerospace engineering for 20+ years.
 Shreyas Subramanian is a Principal Data Scientist and helps customers by using Machine Learning to solve their business challenges using the AWS platform. Shreyas has a background in large scale optimization and Machine Learning, and in use of Machine Learning and Reinforcement Learning for accelerating optimization tasks.
 Priyanka Mahankali is a Senior Specialist Solutions Architect for Aerospace at AWS, bringing over 7 years of experience across the cloud and aerospace sectors. She is dedicated to streamlining the journey from innovative industry ideas to cloud-based implementations.
Scalable training platform with Amazon SageMaker HyperPod for innovation: a video generation case study
Video generation has become the latest frontier in AI research, following the success of text-to-image models. Luma AI’s recently launched Dream Machine represents a significant advancement in this field. This text-to-video API generates high-quality, realistic videos quickly from text and images. Trained on the Amazon SageMaker HyperPod, Dream Machine excels in creating consistent characters, smooth motion, and dynamic camera movements.
To accelerate iteration and innovation in this field, sufficient computing resources and a scalable platform are essential. During the iterative research and development phase, data scientists and researchers need to run multiple experiments with different versions of algorithms and scale to larger models. Model parallel training becomes necessary when the total model footprint (model weights, gradients, and optimizer states) exceeds the memory of a single GPU. However, building large distributed training clusters is a complex and time-intensive process that requires in-depth expertise. Furthermore, as clusters scale to larger sizes (for example, more than 32 nodes), they require built-in resiliency mechanisms such as automated faulty node detection and replacement to improve cluster goodput and maintain efficient operations. These challenges underscore the importance of robust infrastructure and management systems in supporting advanced AI research and development.
Amazon SageMaker HyperPod, introduced during re:Invent 2023, is a purpose-built infrastructure designed to address the challenges of large-scale training. It removes the undifferentiated heavy lifting involved in building and optimizing machine learning (ML) infrastructure for training foundation models (FMs). SageMaker HyperPod offers a highly customizable user interface using Slurm, allowing users to select and install any required frameworks or tools. Clusters are provisioned with the instance type and count of your choice and can be retained across workloads. With these capabilities, customers are adopting SageMaker HyperPod as their innovation platform for more resilient and performant model training, enabling them to build state-of-the-art models faster.
In this post, we share an ML infrastructure architecture that uses SageMaker HyperPod to support research team innovation in video generation. We will discuss the advantages and pain points addressed by SageMaker HyperPod, provide a step-by-step setup guide, and demonstrate how to run a video generation algorithm on the cluster.
Training video generation algorithms on Amazon SageMaker HyperPod: background and architecture
Video generation is an exciting and rapidly evolving field that has seen significant advancements in recent years. While generative modeling has made tremendous progress in the domain of image generation, video generation still faces several challenges that require further improvement.
Algorithms architecture complexity with diffusion model family
Diffusion models have recently made significant strides in generating high-quality images, prompting researchers to explore their potential in video generation. By leveraging the architecture and pre-trained generative capabilities of diffusion models, scientists aim to create visually impressive videos. The process extends image generation techniques to the temporal domain. Starting with noisy frames, the model iteratively refines them, removing random elements while adding meaningful details guided by text or image prompts. This approach progressively transforms abstract patterns into coherent video sequences, effectively translating diffusion models’ success in static image creation to dynamic video synthesis.
However, the compute requirements for video generation using diffusion models increase substantially compared to image generation for several reasons:
- Temporal dimension – Unlike image generation, video generation requires processing multiple frames simultaneously. This adds a temporal dimension to the original 2D UNet, significantly increasing the amount of data that needs to be processed in parallel.
- Iterative denoising process – The diffusion process involves multiple iterations of denoising for each frame. When extended to videos, this iterative process must be applied to multiple frames, multiplying the computational load.
- Increased parameter count – To handle the additional complexity of video data, models often require more parameters, leading to larger memory footprints and increased computational demands.
- Higher resolution and longer sequences – Video generation often aims for higher resolution outputs and longer sequences compared to single image generation, further amplifying the computational requirements.
Due to these factors, the operational efficiency of diffusion models for video generation is lower and significantly more compute-intensive compared to image generation. This increased computational demand underscores the need for advanced hardware solutions and optimized model architectures to make video generation more practical and accessible.
Handling the increased computational requirements
The improvement in video generation quality necessitates a significant increase in the size of the models and training data. Researchers have concluded that scaling up the base model size leads to substantial enhancements in video generation performance. However, this growth comes with considerable challenges in terms of computing power and memory resources. Training larger models requires more computational power and memory space, which can limit the accessibility and practical use of these models. As the model size increases, the computational requirements grow exponentially, making it difficult to train these models on single GPU, or even single node multi-GPUs environment. Moreover, storing and manipulating the large datasets required for training also pose significant challenges in terms of infrastructure and costs. High-quality video datasets tend to be massive, requiring substantial storage capacity and efficient data management systems. Transferring and processing these datasets can be time-consuming and resource-intensive, adding to the overall computational burden.
Maintaining temporal consistency and continuity
Maintaining temporal consistency and continuity becomes increasingly challenging as the length of the generated video increases. Temporal consistency refers to the continuity of visual elements, such as objects, characters, and scenes, across subsequent frames. Inconsistencies in appearance, movement, or lighting can lead to jarring visual artifacts and disrupt the overall viewing experience. To address this challenge, researchers have explored the use of multiframe inputs, which provide the model with information from multiple consecutive frames to better understand and model the relationships and dependencies across time. These techniques preserve high-resolution details in visual quality while simulating a continuous and smooth temporal motion process. However, they require more sophisticated modeling techniques and increased computational resources.
Algorithm overview
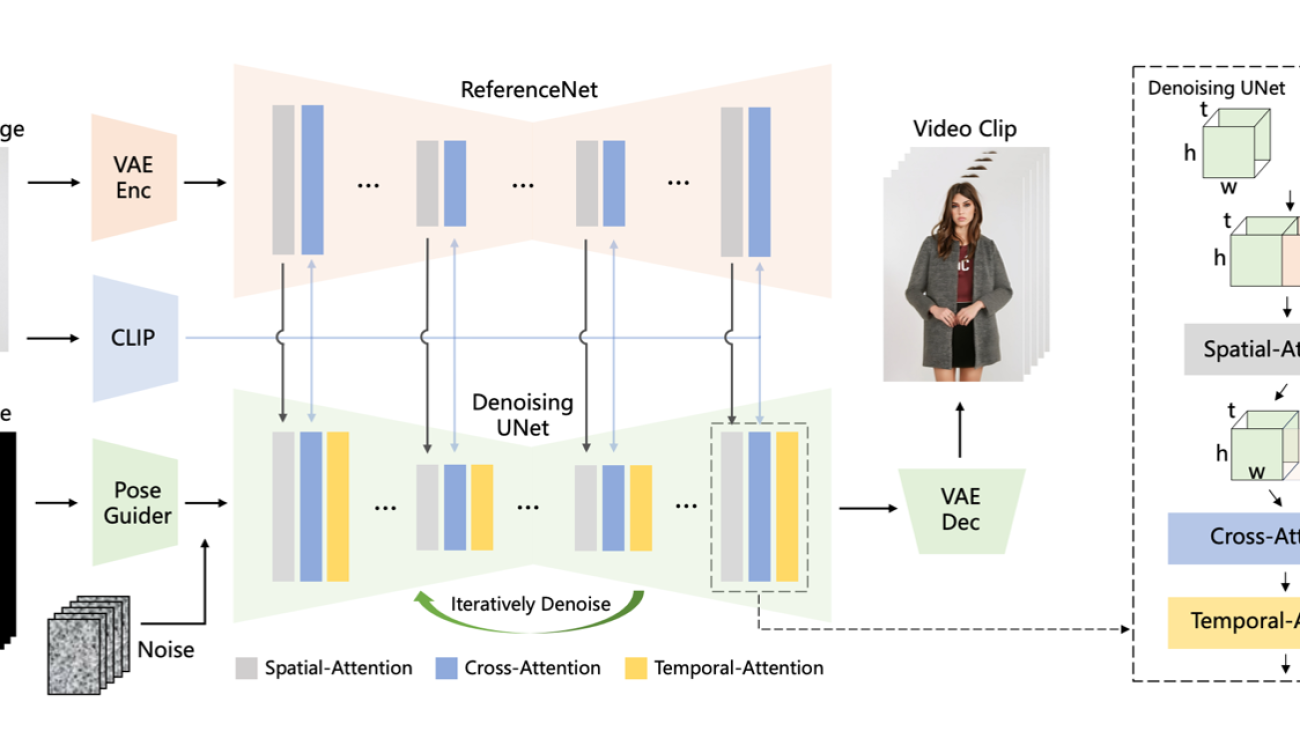
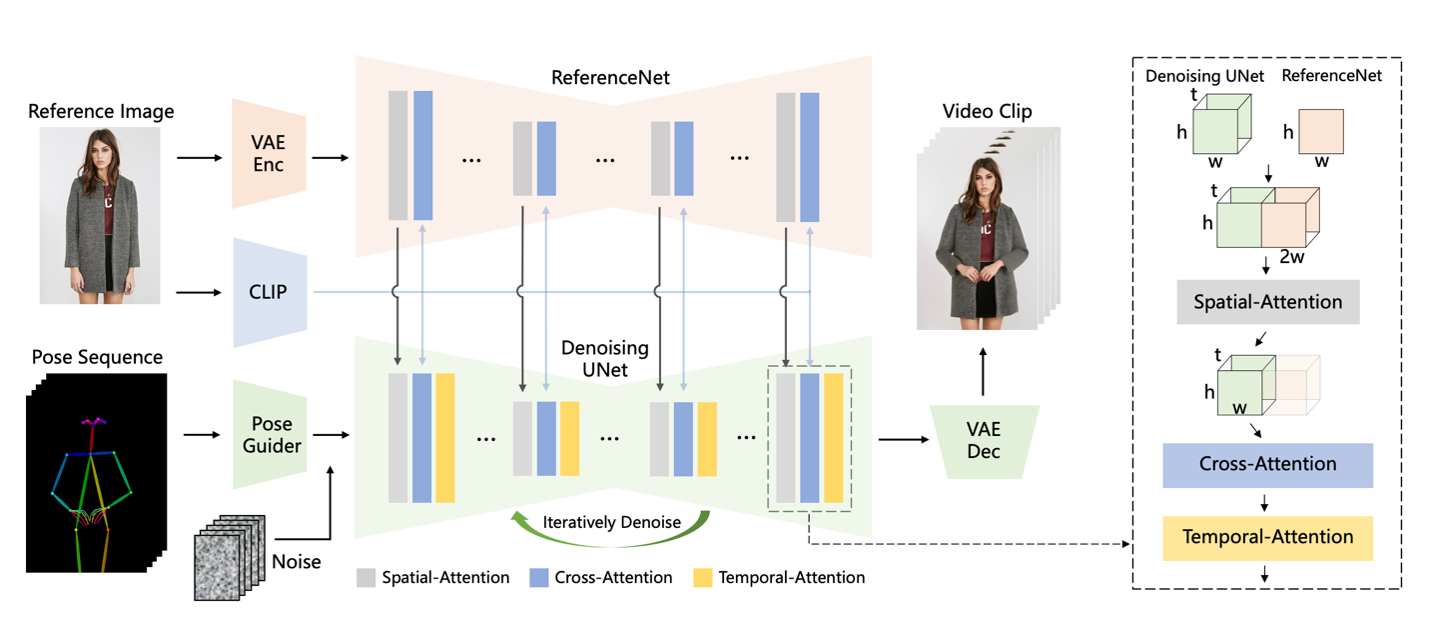
In the following sections, we illustrate how to run the Animate Anyone: Consistent and Controllable Image-to-Video Synthesis for Character Animation algorithm on Amazon SageMaker HyperPod for video generation. Animate Anyone is one of the methods for transforming character images into animated videos controlled by desired pose sequences. The key components of the architecture include:
- ReferenceNet – A symmetrical UNet structure that captures spatial details of the reference image and integrates them into the denoising UNet using spatial-attention to preserve appearance consistency
- Pose guider – A lightweight module that efficiently integrates pose control signals into the denoising process to ensure pose controllability
- Temporal layer – Added to the denoising UNet to model relationships across multiple frames, preserving high-resolution details and ensuring temporal stability and continuity of the character’s motion
The model architecture is illustrated in the following image from its original research paper. The method is trained on a dataset of video clips and achieves state-of-the-art results on fashion video and human dance synthesis benchmarks, demonstrating its ability to animate arbitrary characters while maintaining appearance consistency and temporal stability. The implementation of AnimateAnyone can be found in this repository.
To address the challenges of large-scale training infrastructure required in video generation training process, we can use the power of Amazon SageMaker HyperPod. While many customers have adopted SageMaker HyperPod for large-scale training, such as Luma’s launch of Dream Machine and Stability AI’s work on FMs for image or video generation, we believe that the capabilities of SageMaker HyperPod can also benefit lighter ML workloads, including full fine-tuning.
Amazon SageMaker HyperPod concept and advantage
SageMaker HyperPod offers a comprehensive set of features that significantly enhance the efficiency and effectiveness of ML workflows. From purpose-built infrastructure for distributed training to customizable environments and seamless integration with tools like Slurm, SageMaker HyperPod empowers ML practitioners to focus on their core tasks while taking advantage of the power of distributed computing. With SageMaker HyperPod, you can accelerate your ML projects, handle larger datasets and models, and drive innovation in your organization. SageMaker HyperPod provides several key features and advantages in the scalable training architecture.
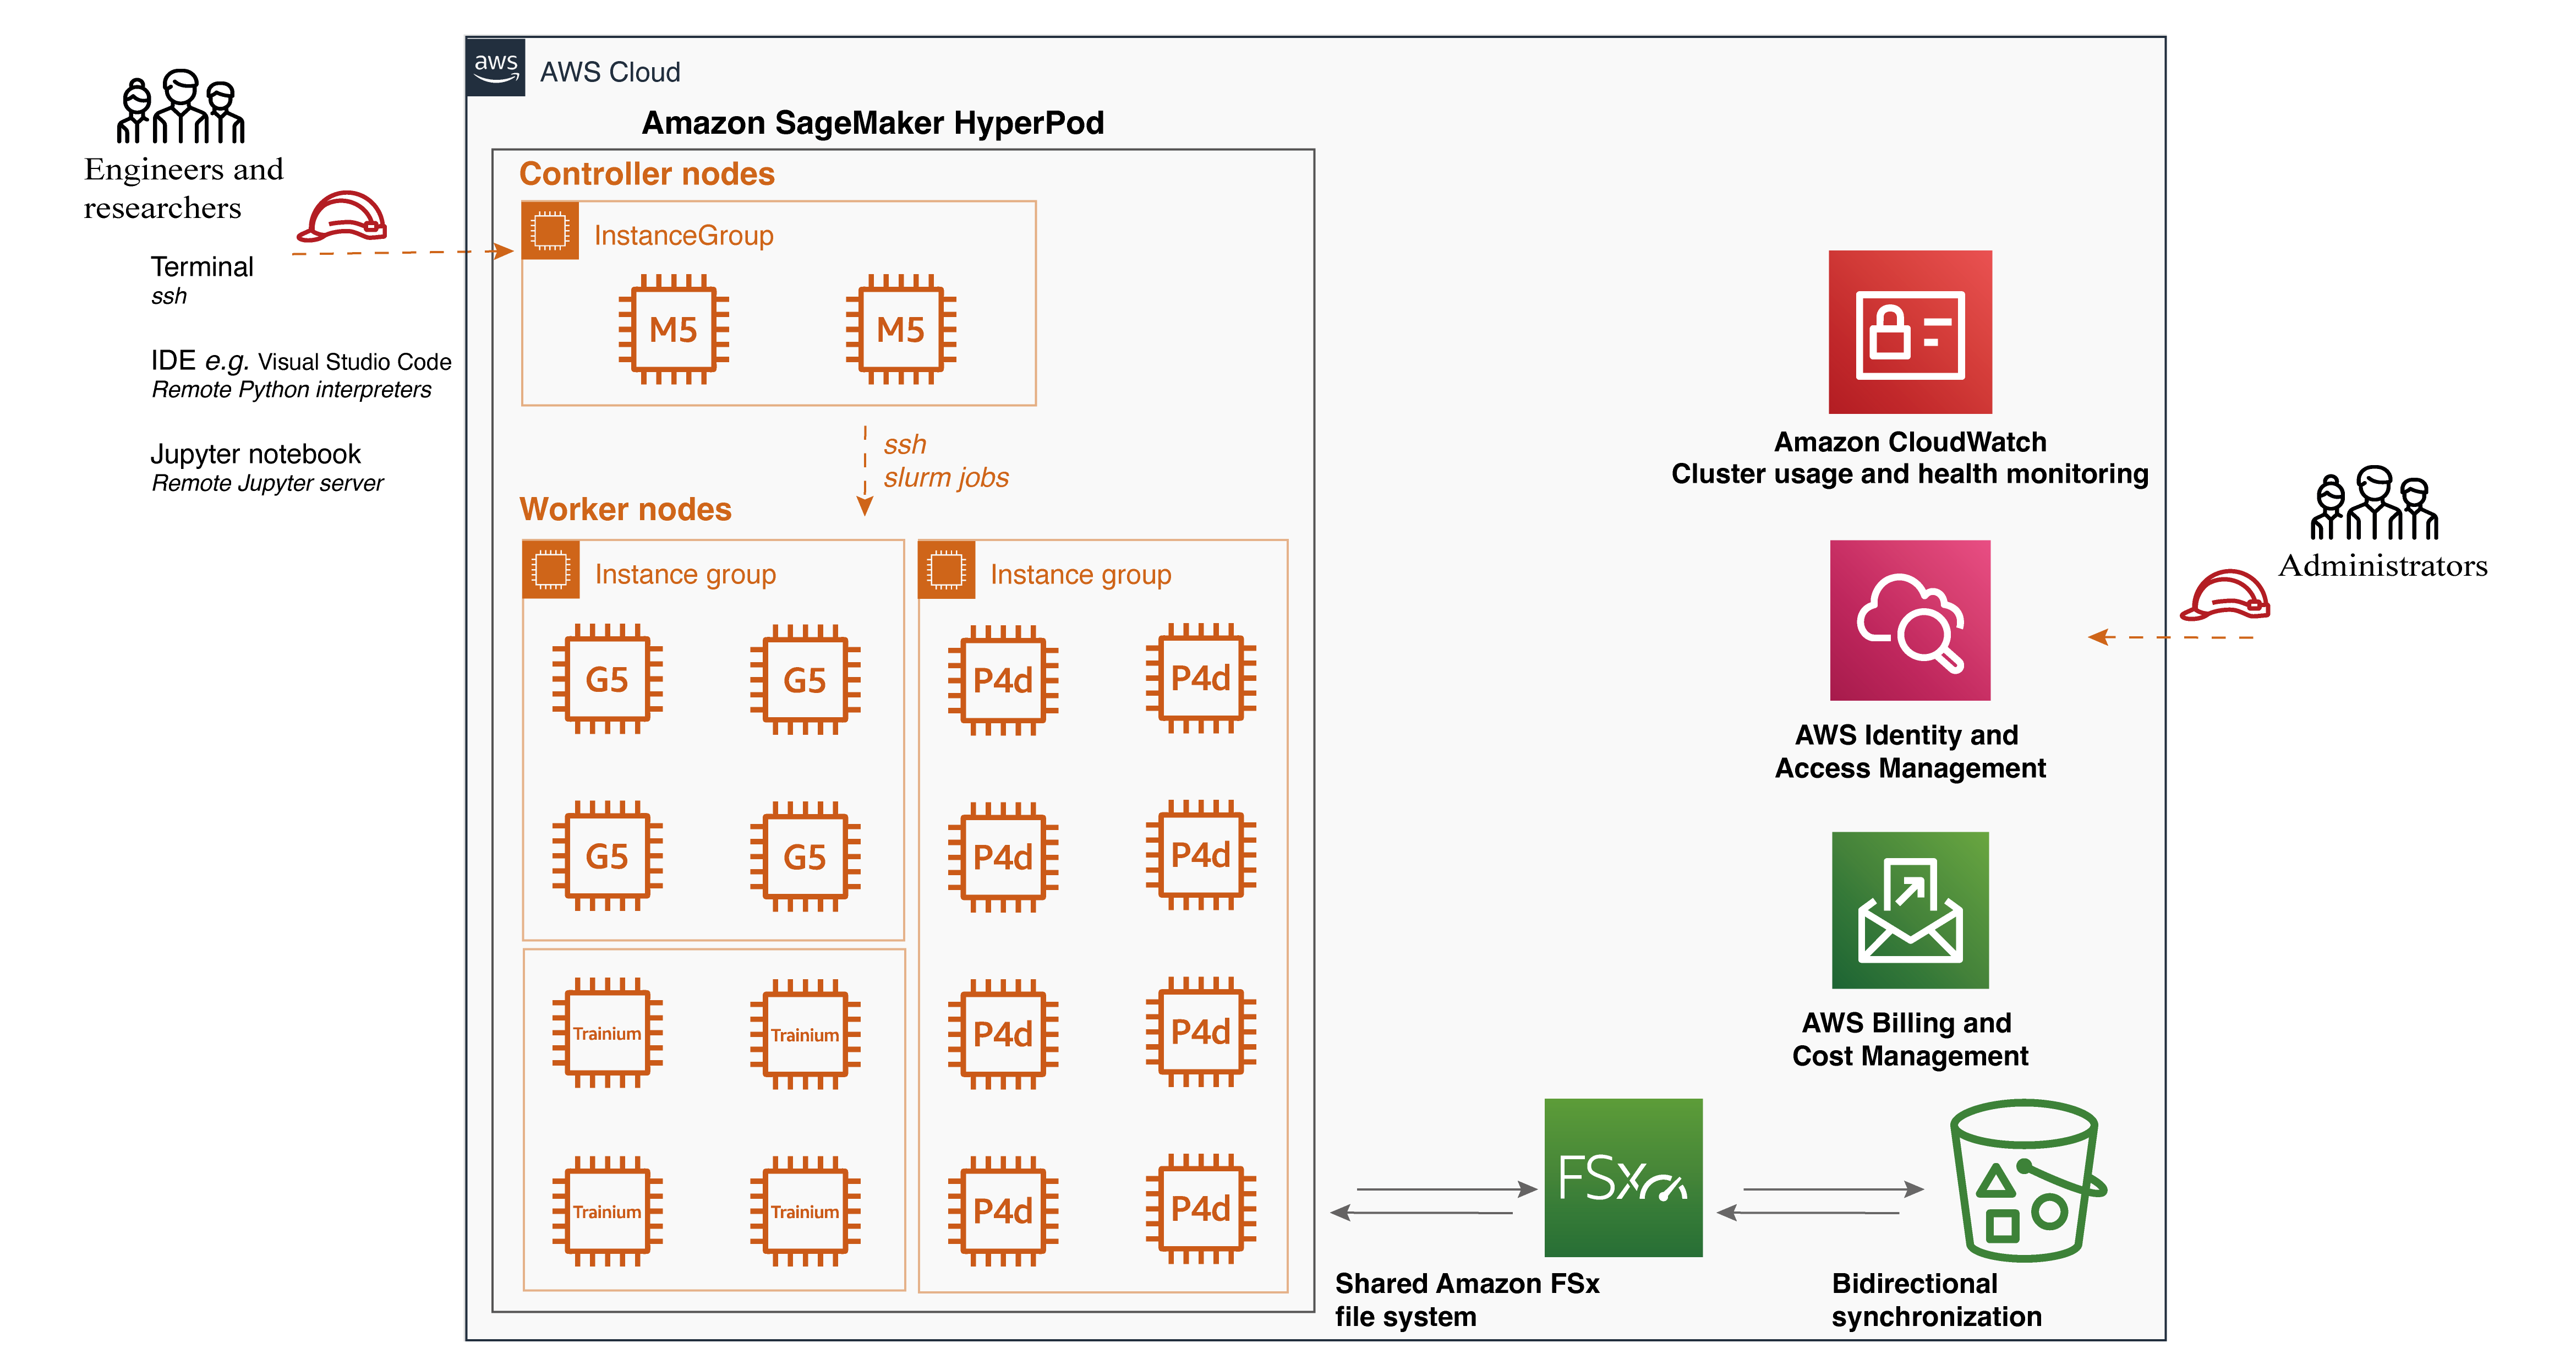
Purpose-built infrastructure – One of the primary advantages of SageMaker HyperPod is its purpose-built infrastructure for distributed training. It simplifies the setup and management of clusters, allowing you to easily configure the desired instance types and counts, which can be retained across workloads. As a result of this flexibility, you can adapt to various scenarios. For example, when working with a smaller backbone model like Stable Diffusion 1.5, you can run multiple experiments simultaneously on a single GPU to accelerate the iterative development process. As your dataset grows, you can seamlessly switch to data parallelism and distribute the workload across multiple GPUs, such as eight GPUs, to reduce compute time. Furthermore, when dealing with larger backbone models like Stable Diffusion XL, SageMaker HyperPod offers the flexibility to scale and use model parallelism.
Shared file system – SageMaker HyperPod supports the attachment of a shared file system, such as Amazon FSx for Lustre. This integration brings several benefits to your ML workflow. FSx for Lustre enables full bidirectional synchronization with Amazon Simple Storage Service (Amazon S3), including the synchronization of deleted files and objects. It also allows you to synchronize file systems with multiple S3 buckets or prefixes, providing a unified view across multiple datasets. In our case, this means that the installed libraries within the conda virtual environment will be synchronized across different worker nodes, even if the cluster is torn down and recreated. Additionally, input video data for training and inference results can be seamlessly synchronized with S3 buckets, enhancing the experience of validating inference results.
Customizable environment – SageMaker HyperPod offers the flexibility to customize your cluster environment using lifecycle scripts. These scripts allow you to install additional frameworks, debugging tools, and optimization libraries tailored to your specific needs. You can also split your training data and model across all nodes for parallel processing, fully using the cluster’s compute and network infrastructure. Moreover, you have full control over the execution environment, including the ability to easily install and customize virtual Python environments for each project. In our case, all the required libraries for running the training script are installed within a conda virtual environment, which is shared across all worker nodes, simplifying the process of distributed training on multi-node setups. We also installed MLflow Tracking on the controller node to monitor the training progress.
Job distribution with Slurm integration – SageMaker HyperPod seamlessly integrates with Slurm, a popular open source cluster management and job scheduling system. Slurm can be installed and set up through lifecycle scripts as part of the cluster creation process, providing a highly customizable user interface. With Slurm, you can efficiently schedule jobs across different GPU resources so you can run multiple experiments in parallel or use distributed training to train large models for improved performance. With Slurm, customers can customize the job queues, prioritization algorithms, and job preemption policies, ensuring optimal resource use and streamlining your ML workflows. If you are searching a Kubernetes-based administrator experience, recently, Amazon SageMaker HyperPod introduces Amazon EKS support to manage their clusters using a Kubernetes-based interface.
Enhanced productivity – To further enhance productivity, SageMaker HyperPod supports connecting to the cluster using Visual Studio Code (VS Code) through a Secure Shell (SSH) connection. You can easily browse and modify code within an integrated development environment (IDE), execute Python scripts seamlessly as if in a local environment, and launch Jupyter notebooks for quick development and debugging. The Jupyter notebook application experience within VS Code provides a familiar and intuitive interface for iterative experimentation and analysis.
Set up SageMaker HyperPod and run video generation algorithms
In this walkthrough, we use the AnimateAnyone algorithm as an illustration for video generation. AnimateAnyone is a state-of-the-art algorithm that generates high-quality videos from input images or videos. Our walkthrough guidance code is available on GitHub.
Set up the cluster
To create the SageMaker HyperPod infrastructure, follow the detailed intuitive and step-by-step guidance for cluster setup from the Amazon SageMaker HyperPod workshop studio.
The two things you need to prepare are a provisioning_parameters.json file required by HyperPod for setting up Slurm and a cluster-config.json file as the configuration file for creating the HyperPod cluster. Inside these configuration files, you need to specify the InstanceGroupName, InstanceType, and InstanceCount for the controller group and worker group, as well as the execution role attached to the group.
One practical setup is to set up bidirectional synchronization with Amazon FSx and Amazon S3. This can be done with the Amazon S3 integration for Amazon FSx for Lustre. It helps to establish a full bidirectional synchronization of your file systems with Amazon S3. In addition, it can synchronize your file systems with multiple S3 buckets or prefixes.
In addition, if you prefer a local IDE such as VSCode, you can set up an SSH connection to the controller node within your IDE. In this way, the worker nodes can be used for running scripts within a conda environment and a Jupyter notebook server.
Run the AnimateAnyone algorithm
When the cluster is in service, you can connect using SSH into the controller node, then go into the worker nodes, where the GPU compute resources are available. You can follow the SSH Access to compute guide. We suggest installing the libraries on the worker nodes directly.
To create the conda environment, follow the instructions at Miniconda’s Quick command line install. You can then use the conda environment to install all required libraries.
To run AnimateAnyone, clone the GitHub repo and follow the instructions.
To train AnimateAnyone, launch stage 1 for training the denoising UNet and ReferenceNet, which enables the model to generate high-quality animated images under the condition of a given reference image and target pose. The denoising UNet and ReferenceNet are initialized based on the pre-trained weights from Stable Diffusion.
In stage 2, the objective is to train the temporal layer to capture the temporal dependencies among video frames.
Once the training script executes as expected, use a Slurm scheduled job to run on a single node. We provide a batch file to simulate the single-node training job. It can be a single GPU or a single node with multiple GPUs. If you want to know more, the documentation provides detailed instructions on running jobs on SageMaker HyperPod clusters.
#!/bin/bash
#SBATCH --job-name=video-gen
#SBATCH -N 1
#SBATCH --exclusive
#SBATCH -o video-gen-stage-1.out
export OMP_NUM_THREADS=1
# Activate the conda environment
source ~/miniconda3/bin/activate
conda activate videogen
srun accelerate launch train_stage_1.py --config configs/train/stage1.yaml
Check the job status using the following code snippet.
By using a small batch size and setting use_8bit_adam=True, you can achieve efficient training on a single GPU. When using a single GPU, use a multi-GPU cluster for running multiple experiments.
The following code block is one example of running four jobs in parallel to test different hyperparameters. We provide the batch file here as well.
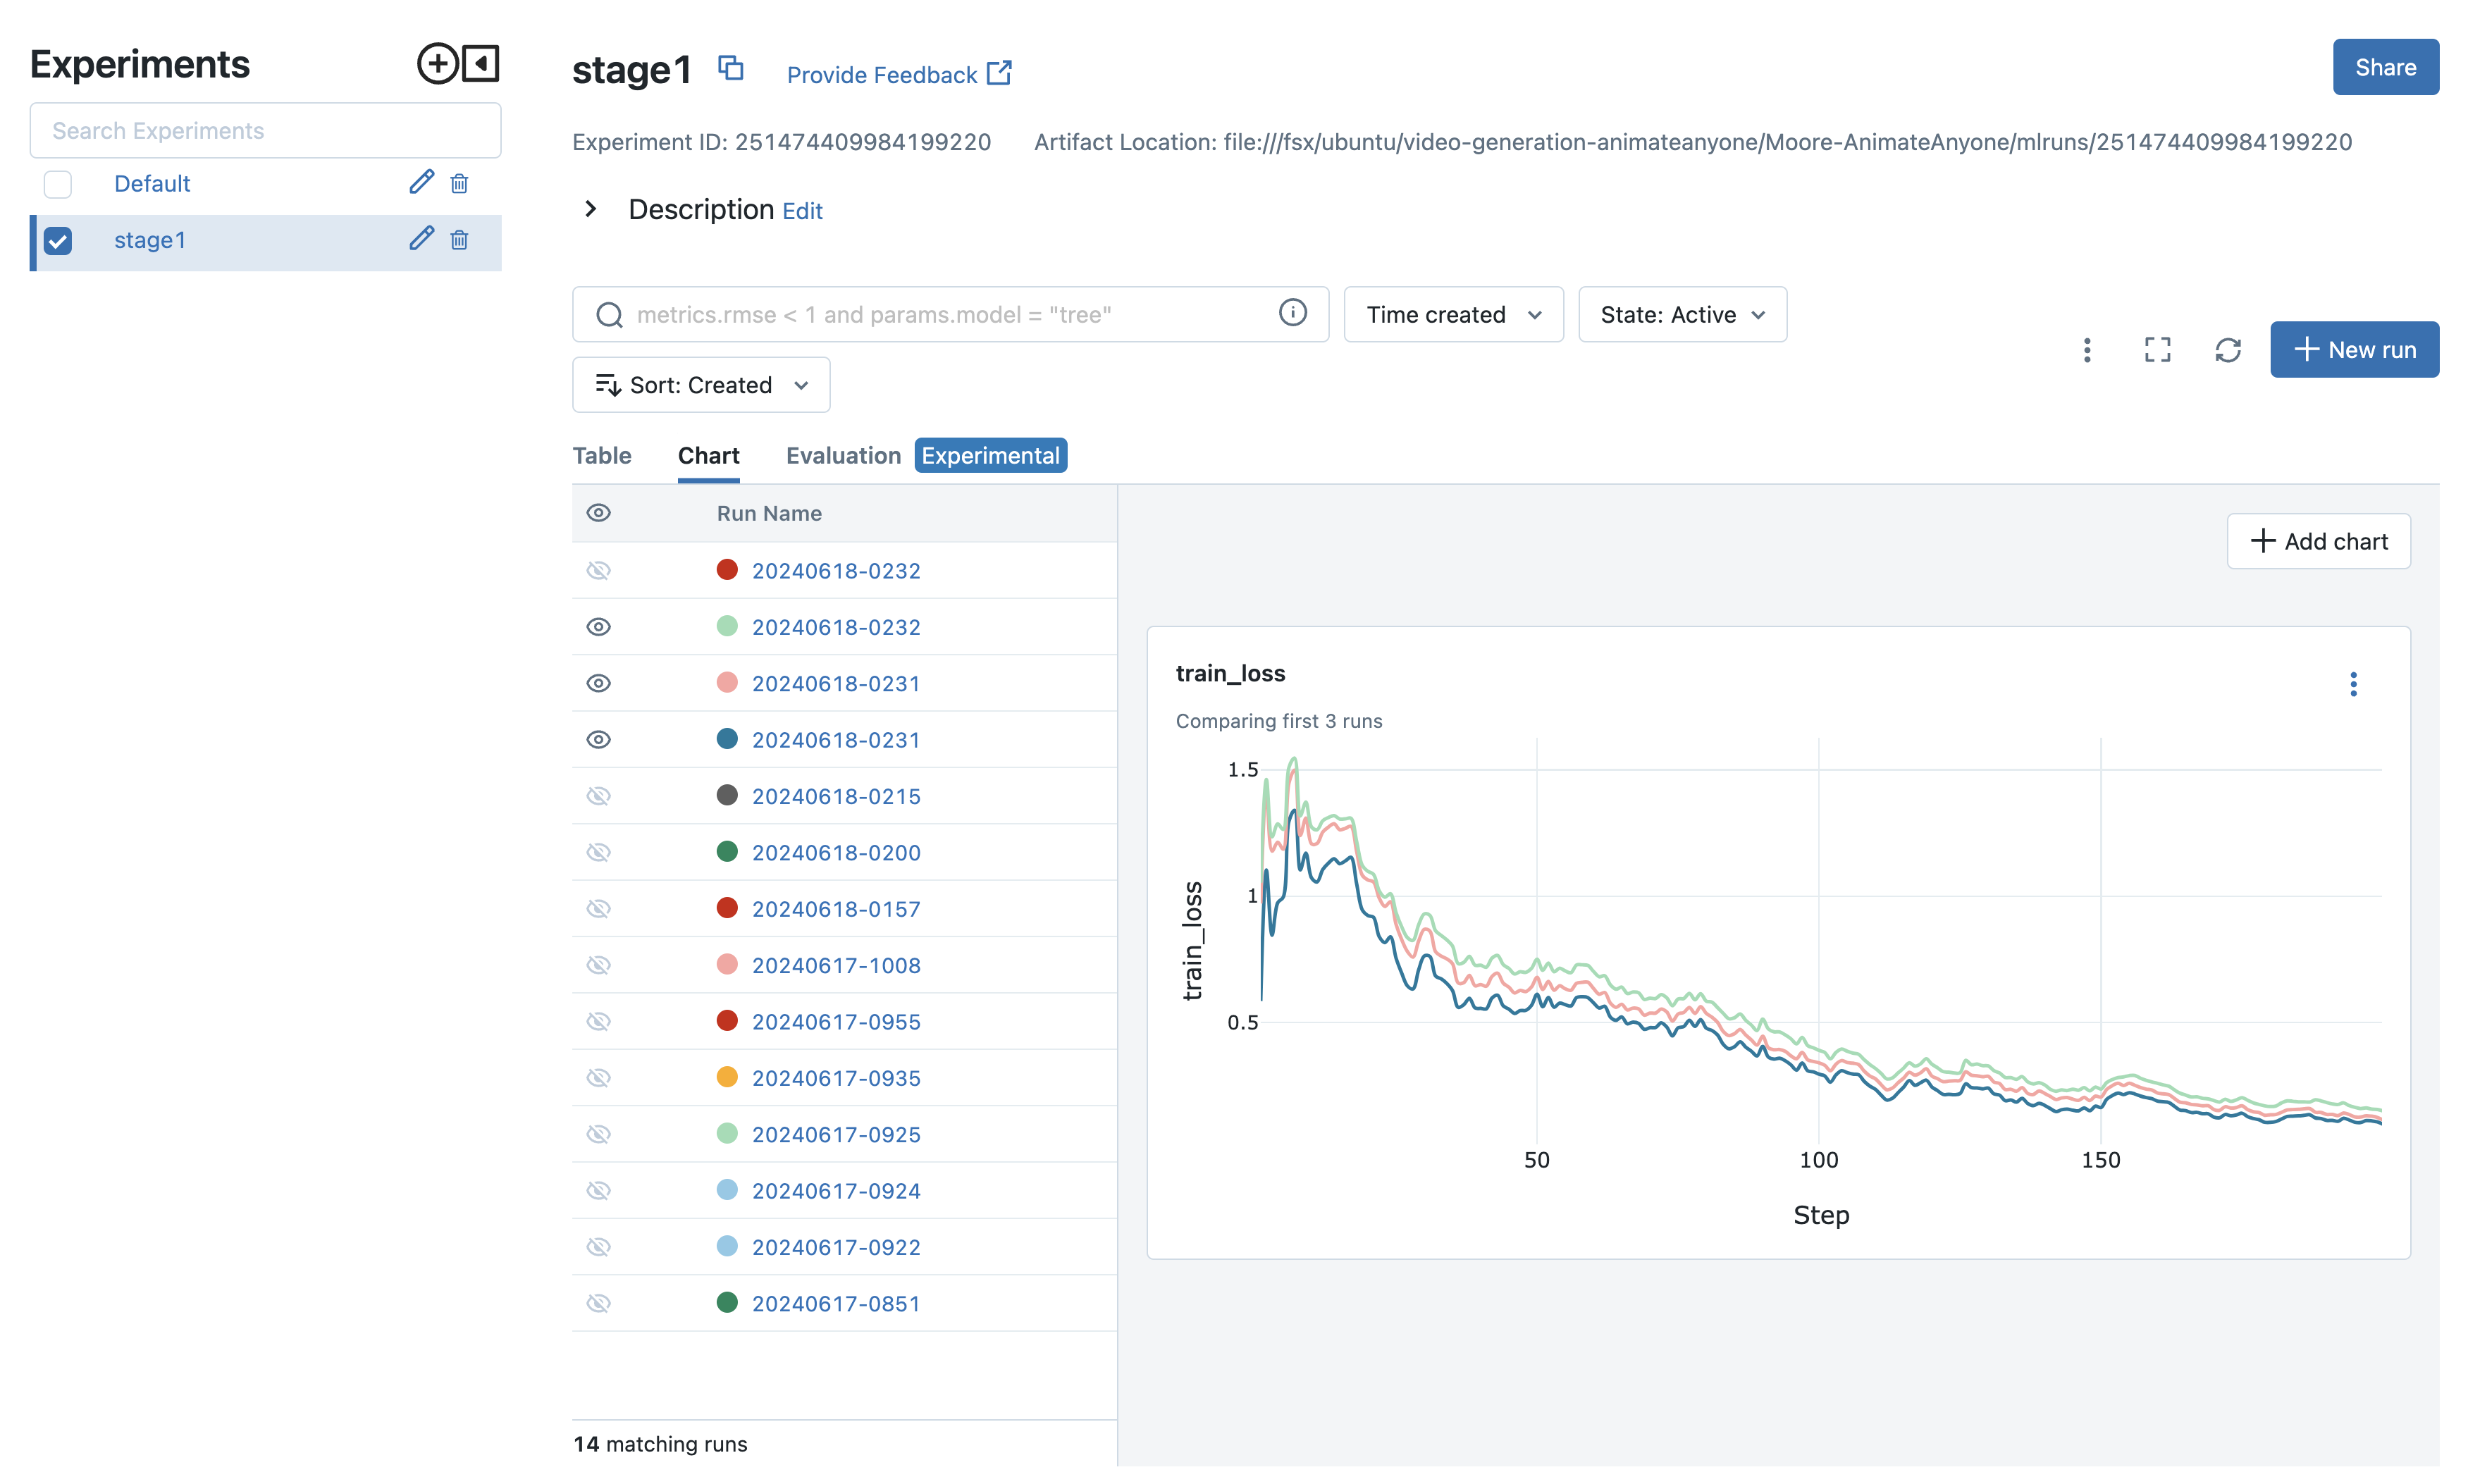
The experiments can then be compared, and you can move forward with the best configuration. In our scenario, shown in the following screenshot, we use different datasets and video preprocessing strategies to validate the stage 1 training. Then, we quickly draw conclusions about the impact on video quality with respect to stage 1 training results. For experiment tracking, besides installing MLflow on the controller node to monitor the training progress, you can also leverage the fully managed MLflow capability on Amazon SageMaker. This makes it easy for data scientists to use MLflow on SageMaker for model training, registration, and deployment.
Scale to multi-node GPU setup
As model sizes grow, single GPU memory quickly becomes a bottleneck. Large models easily exhaust memory with pure data parallelism, and implementing model parallelism can be challenging. DeepSpeed addresses these issues, accelerating model development and training.
ZeRO
DeepSpeed is a deep learning optimization library that aims to make distributed training easy, efficient, and effective. DeepSpeed’s ZeRO removes memory redundancies across data-parallel processes by partitioning three model states (optimizer states, gradients, and parameters) across data-parallel processes instead of replicating them. This approach significantly boosts memory efficiency compared to classic data-parallelism while maintaining computational granularity and communication efficiency.
ZeRO offers three stages of optimization:
- ZeRO Stage 1 – Partitions optimizer states across processes, with each process updating only its partition
- ZeRO Stage 2 – Additionally partitions gradients, with each process retaining only the gradients corresponding to its optimizer state portion
- ZeRO Stage 3 – Partitions model parameters across processes, automatically collecting and partitioning them during forward and backward passes
Each stage offers progressively higher memory efficiency at the cost of increased communication overhead. These techniques enable training of extremely large models that would otherwise be impossible. This is particularly useful when working with limited GPU memory or training very large models.
Accelerate
Accelerate is a library that enables running the same PyTorch code across any distributed configuration with minimal code changes. It handles the complexities of distributed setups, allowing developers to focus on their models rather than infrastructure. To put it briefly, Accelerate makes training and inference at scale straightforward, efficient, and adaptable.
Accelerate allows easy integration of DeepSpeed features through a configuration file. Users can supply a custom configuration file or use provided templates. The following is an example of how to use DeepSpeed with Accelerate.
Single node with multiple GPUs job
To run a job on a single node with multiple GPUs, we have tested this configuration on four GPU instances (for example, g5.24xlarge). For these instances, adjust train_width: 768 and train_height: 768, and set use_8bit_adam: False in your configuration file. You’ll likely notice that the model can handle much larger images for generation with these settings.
This Slurm job will:
- Allocate a single node
- Activate the training environment
- Run
accelerate launch train_stage_1.py --config configs/train/stage1.yaml
Multi-node with multiple GPUs job
To run a job across multiple nodes, each with multiple GPUs, we have tested this distribution with two ml.g5.24xlarge instances.
This Slurm job will:
- Allocate the specified number of nodes
- Activate the training environment on each node
- Run
accelerate launch --multi_gpu --num_processes <num_processes> --num_machines <num_machines> train_stage_1.py --config configs/train/stage1.yaml
When running a multi-node job, make sure that the num_processes and num_machines arguments are set correctly based on your cluster configuration.
For optimal performance, adjust the batch size and learning rate according to the number of GPUs and nodes being used. Consider using a learning rate scheduler to adapt the learning rate during training.
Additionally, monitor the GPU memory usage and adjust the model’s architecture or batch size if necessary to prevent out-of-memory issues.
By following these steps and configurations, you can efficiently train your models on single-node and multi-node setups with multiple GPUs, taking advantage of the power of distributed training.
Monitor cluster usage
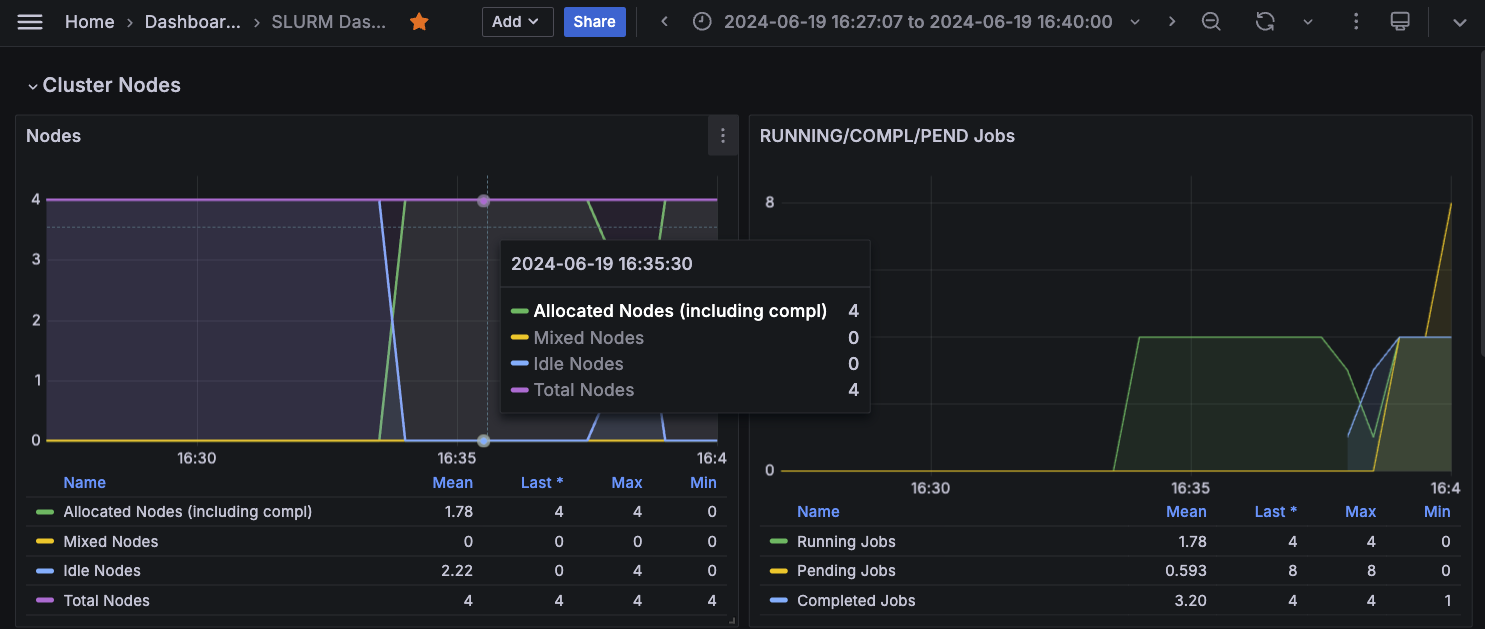
To achieve comprehensive observability into your SageMaker HyperPod cluster resources and software components, integrate the cluster with Amazon Managed Service for Prometheus and Amazon Managed Grafana. The integration with Amazon Managed Service for Prometheus makes it possible to export of metrics related to your HyperPod cluster resources, providing insights into their performance, utilization, and health. The integration with Amazon Managed Grafana makes it possible to visualize these metrics through various Grafana dashboards that offer intuitive interfaces for monitoring and analyzing the cluster’s behavior. You can follow the SageMaker documentation on Monitor SageMaker HyperPod cluster resources and Workshop Studio Observability section to bootstrap your cluster monitoring with the metric exporter services. The following screenshot shows a Grafana dashboard.
Inference and results discussion
When the fine-tuned model is ready, you have two primary deployment options: using popular image and video generation GUIs like ComfyUI or deploying an inference endpoint with Amazon SageMaker. The SageMaker option offers several advantages, including easy integration of image generation APIs with video generation endpoints to create end-to-end pipelines. As a managed service with auto scaling, SageMaker makes parallel generation of multiple videos possible using either the same reference image with different reference videos or the reverse. Furthermore, you can deploy various video generation model endpoints such as MimicMotion and UniAnimate, allowing for quality comparisons by generating videos in parallel with the same reference image and video. This approach not only provides flexibility and scalability but also accelerates the production process by making possible the generation of a large number of videos quickly, ultimately streamlining the process of obtaining content that meets business requirements. The SageMaker option thus offers a powerful, efficient, and scalable solution for video generation workflows. The following diagram shows a basic version of video generation pipeline. You can modify it based on your own specific business requirements.

Recent advancements in video generation have rapidly overcome limitations of earlier models like AnimateAnyone. Two notable research papers showcase significant progress in this domain.
Champ: Controllable and Consistent Human Image Animation with 3D Parametric Guidance enhances shape alignment and motion guidance. It demonstrates superior ability in generating high-quality human animations that accurately capture both pose and shape variations, with improved generalization on in-the-wild datasets.
UniAnimate: Taming Unified Video Diffusion Models for Consistent Human Image Animation makes it possible to generate longer videos, up to one minute, compared to earlier models’ limited frame outputs. It introduces a unified noise input supporting both random noise input and first frame conditioned input, enhancing long-term video generation capabilities.
Cleanup
To avoid incurring future charges, delete the resources created as part of this post:
- Delete the SageMaker HyperPod cluster using either the CLI or the console.
- Once the SageMaker HyperPod cluster deletion is complete, delete the CloudFormation stack. For more details on cleanup, refer to the cleanup section in the Amazon SageMaker HyperPod workshop.
- To delete the endpoints created during deployment, refer to the endpoint deletion section we provided in the Jupyter notebook. Then manually delete the SageMaker notebook.
Conclusion
In this post, we explored the exciting field of video generation and showcased how SageMaker HyperPod can be used to efficiently train video generation algorithms at scale. By using the AnimateAnyone algorithm as an example, we demonstrated the step-by-step process of setting up a SageMaker HyperPod cluster, running the algorithm, scaling it to multiple GPU nodes, and monitoring GPU usage during the training process.
SageMaker HyperPod offers several key advantages that make it an ideal platform for training large-scale ML models, particularly in the domain of video generation. Its purpose-built infrastructure allows for distributed training at scale so you can manage clusters with desired instance types and counts. The ability to attach a shared file system such as Amazon FSx for Lustre provides efficient data storage and retrieval, with full bidirectional synchronization with Amazon S3. Moreover, the SageMaker HyperPod customizable environment, integration with Slurm, and seamless connectivity with Visual Studio Code enhance productivity and simplify the management of distributed training jobs.
We encourage you to use SageMaker HyperPod for your ML training workloads, especially those involved in video generation or other computationally intensive tasks. By harnessing the power of SageMaker HyperPod, you can accelerate your research and development efforts, iterate faster, and build state-of-the-art models more efficiently. Embrace the future of video generation and unlock new possibilities with SageMaker HyperPod. Start your journey today and experience the benefits of distributed training at scale.
About the author
 Yanwei Cui, PhD, is a Senior Machine Learning Specialist Solutions Architect at AWS. He started machine learning research at IRISA (Research Institute of Computer Science and Random Systems), and has several years of experience building AI-powered industrial applications in computer vision, natural language processing, and online user behavior prediction. At AWS, he shares his domain expertise and helps customers unlock business potentials and drive actionable outcomes with machine learning at scale. Outside of work, he enjoys reading and traveling.
 Gordon Wang is a Senior Data Scientist at AWS. He helps customers imagine and scope the use cases that will create the greatest value for their businesses, define paths to navigate technical or business challenges. He is passionate about computer vision, NLP, generative AI, and MLOps. In his spare time, he loves running and hiking.
 Gary LO is a Solutions Architect at AWS based in Hong Kong. He is a highly passionate IT professional with over 10 years of experience in designing and implementing critical and complex solutions for distributed systems, web applications, and mobile platforms for startups and enterprise companies. Outside of the office, he enjoys cooking and sharing the latest technology trends and insights on his social media platforms with thousands of followers.
Control data access to Amazon S3 from Amazon SageMaker Studio with Amazon S3 Access Grants
Amazon SageMaker Studio provides a single web-based visual interface where different personas like data scientists, machine learning (ML) engineers, and developers can build, train, debug, deploy, and monitor their ML models. These personas rely on access to data in Amazon Simple Storage Service (Amazon S3) for tasks such as extracting data for model training, logging model training metrics, and storing model artifacts after training. For example, data scientists need access to datasets stored in Amazon S3 for tasks like data exploration and model training. ML engineers require access to intermediate model artifacts stored in Amazon S3 from past training jobs.
Traditionally, access to data in Amazon S3 from SageMaker Studio for these personas is provided through roles configured in SageMaker Studio—either at the domain level or user profile level. The SageMaker Studio domain role grants permissions for the SageMaker Studio domain to interact with other AWS services, providing access to data in Amazon S3 for all users of that domain. If no specific user profile roles are created, this role will apply to all user profiles, granting uniform access privileges across the domain. However, if different users of the domain have different access restrictions, then configuring individual user roles allows for more granular control. These roles define the specific actions and access each user profile can have within the environment, providing granular permissions.
Although this approach offers a degree of flexibility, it also entails frequent updates to the policies attached to these roles whenever access requirements change, which can add maintenance overhead. This is where Amazon S3 Access Grants can significantly streamline the process. S3 Access Grants enables you to manage access to Amazon S3 data more dynamically, without the need to constantly update AWS Identity and Access Management (IAM) roles. S3 Access Grants allows data owners or permission administrators to set permissions, such as read-only, write-only, or read/write access, at various levels of Amazon S3, such as at the bucket, prefix, or object level. The permissions can be granted to IAM principals or to users and groups from their corporate directory through integration with AWS IAM Identity Center.
In this post, we demonstrate how to simplify data access to Amazon S3 from SageMaker Studio using S3 Access Grants, specifically for different user personas using IAM principals.
Solution overview
Now that we’ve discussed the benefits of S3 Access Grants, let’s look at how grants can be applied with SageMaker Studio user roles and domain roles for granular access control.
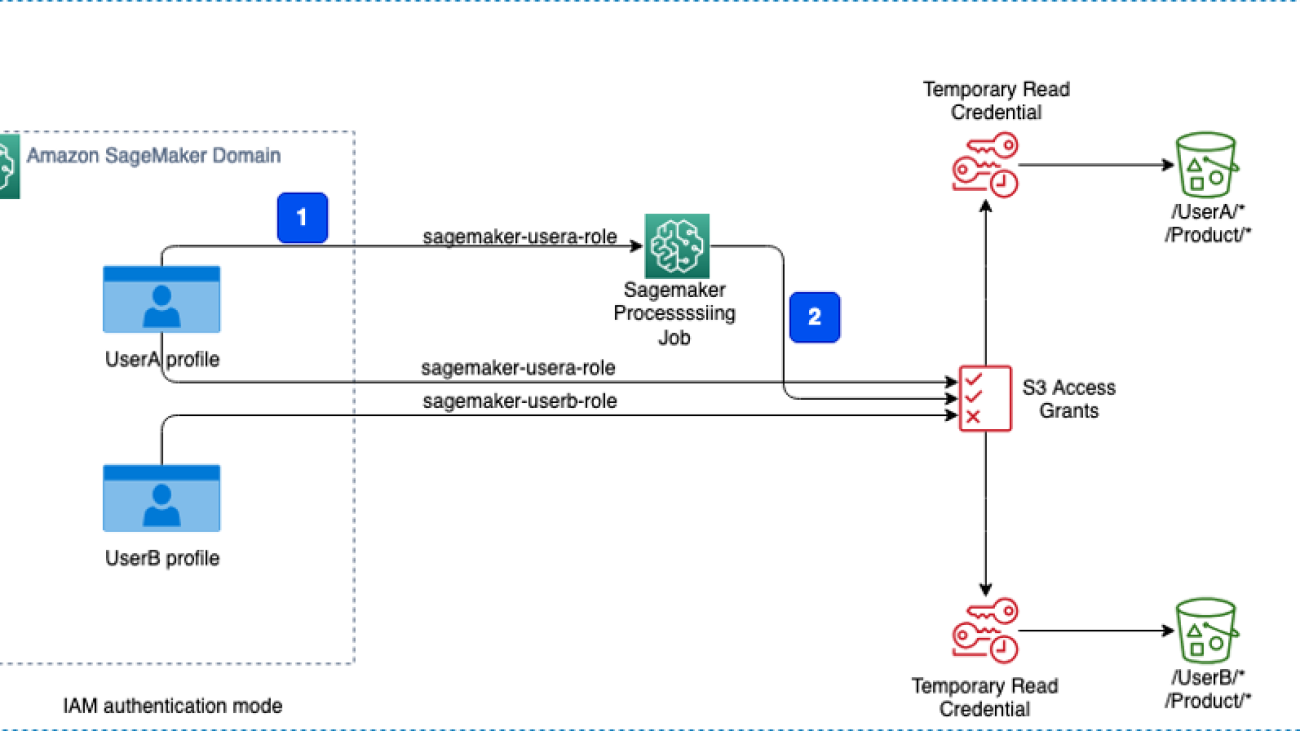
Consider a scenario involving a product team with two members: User A and User B. They use an S3 bucket where the following access requirements are implemented:
- All members of the team should have access to the folder named Product within the S3 bucket.
- The folder named
UserAshould be accessible only by User A. - The folder named
UserBshould be accessible only by User B. - User A will be running an Amazon SageMaker Processing job that uses S3 Access Grants to get data from the S3 bucket. The processing job will access the required data from the S3 bucket using the temporary credentials provided by the access grants.
The following diagram illustrates the solution architecture and workflow.

Let’s start by creating a SageMaker Studio environment as needed for our scenario. This includes establishing a SageMaker Studio domain, setting up user profiles for User A and User B, configuring an S3 bucket with the necessary folders, configuring S3 Access Grants.
Prerequisites
To set up the SageMaker Studio environment and configure S3 Access Grants as described in this post, you need administrative privileges for the AWS account you’ll be working with. If you don’t have administrative access, request assistance from someone who does. Throughout this post, we assume that you have the necessary permissions to create SageMaker Studio domains, create S3 buckets, and configure S3 Access Grants. If you don’t have these permissions, consult with your AWS administrator or account owner for guidance.
Deploy the solution resources using AWS CloudFormation
To provision the necessary resources and streamline the deployment process, we’ve provided an AWS CloudFormation template that automates the provisioning of required services. Deploying the CloudFormation stack in your account incurs AWS usage charges.
The CloudFormation stack creates the following resources:
Virtual private cloud (VPC) with private subnets with relevant route tables, NAT gateway, internet gateway, and security groups
- IAM execution roles
- S3 Access Grants instance
- AWS Lambda function to load the Abalone dataset into Amazon S3
- SageMaker domain
- SageMaker Studio user profiles
Complete the following steps to deploy the stack:
- Choose Launch Stack to launch the CloudFormation stack.

- On the Create stack page, leave the default options and choose Next.
- On the Specify stack details page, for Stack name, enter a name (for example,
blog-sagemaker-s3-access-grants). - Under Parameters, provide the following information:
- For PrivateSubnetCIDR, enter the IP address range in CIDR notation that should be allocated for the private subnet.
- For ProjectName, enter
sagemaker-blog. - For VpcCIDR, enter the desired IP address range in CIDR notation for the VPC being created.
- Choose Next.

- On the Configure stack options page, leave the default options and choose Next.
- On the Review and create page, select I acknowledge that AWS CloudFormation might create IAM resources with custom names.
- Review the template and choose Create stack.
After the successful deployment of stack, you can view the resources created on the stack’s Outputs tab on the AWS CloudFormation console.

Validate data in the S3 bucket
To validate access to the S3 bucket, we use the Abalone dataset. As part of the CloudFormation stack deployment process, a Lambda function is invoked to load the data into Amazon S3. After the Lambda function is complete, you should find the abalone.csv file in all three folders (Product, UserA, and UserB) within the S3 bucket.

Validate the SageMaker domain and associated user profiles
Complete the following steps to validate the SageMaker resources:
- On the SageMaker console, choose Domains in the navigation pane.
- Choose
Product-Domainto be directed to the domain details page.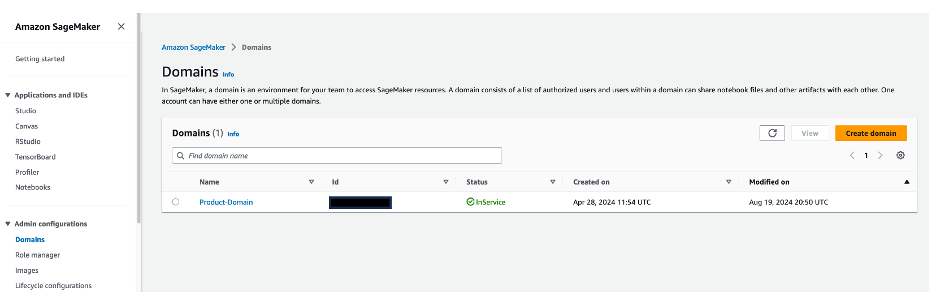
- In the User profiles section, verify that the
userAanduserBprofiles are present.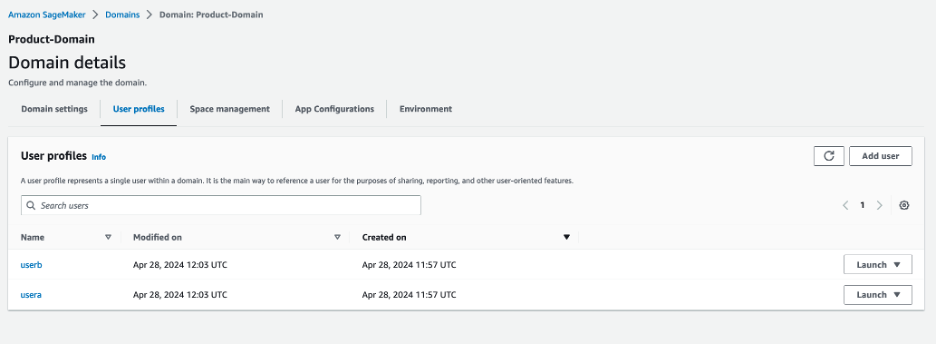
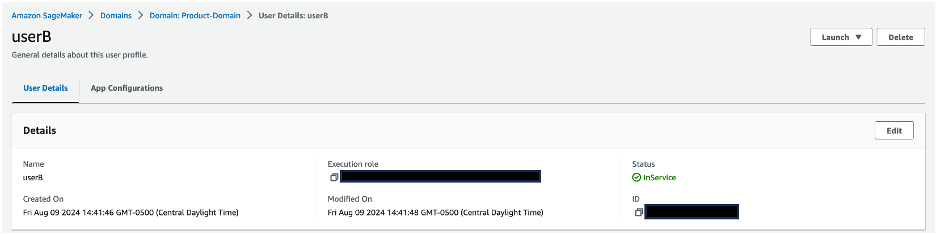
- Choose a user profile name to be directed to the user profile details.
- Validate that each user profile is associated with its corresponding IAM role:
userAis associated withsagemaker-usera-role, anduserBis associated withsagemaker-userb-role.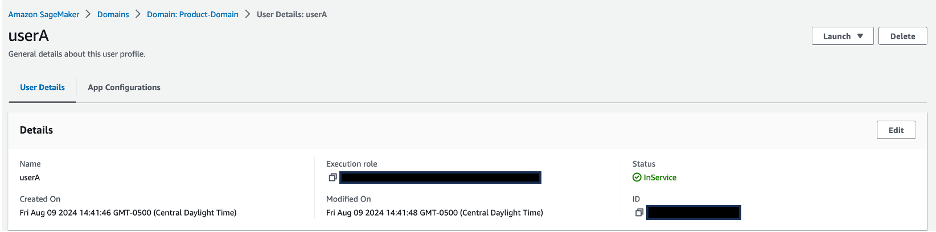
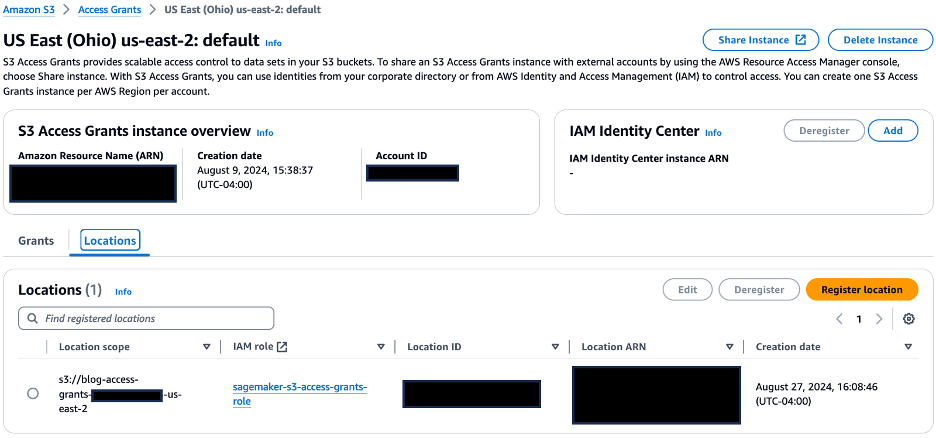
Validate S3 Access Grants setup
Complete the following steps to validate your configuration of S3 Access Grants:
- On the Amazon S3 console, choose Access Grants in the navigation pane.
- Choose View details to be directed to the details page of S3 Access Grants.
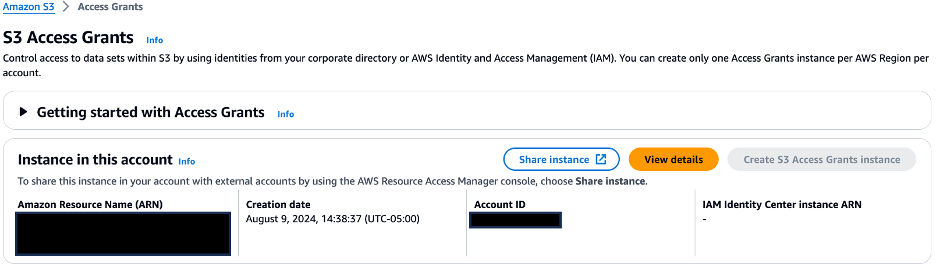
- On the Locations tab, confirm that the URI of S3 bucket created is registered with the S3 Access Grants instance for the location scope.
- On the Grants tab, confirm the following:
sagemaker-usera-rolehas been given read/write permissions on the S3 prefixProduct/*andUserA/*sagemaker-userb-rolehas been given read/write permissions on the S3 prefixProduct/*andUserB/*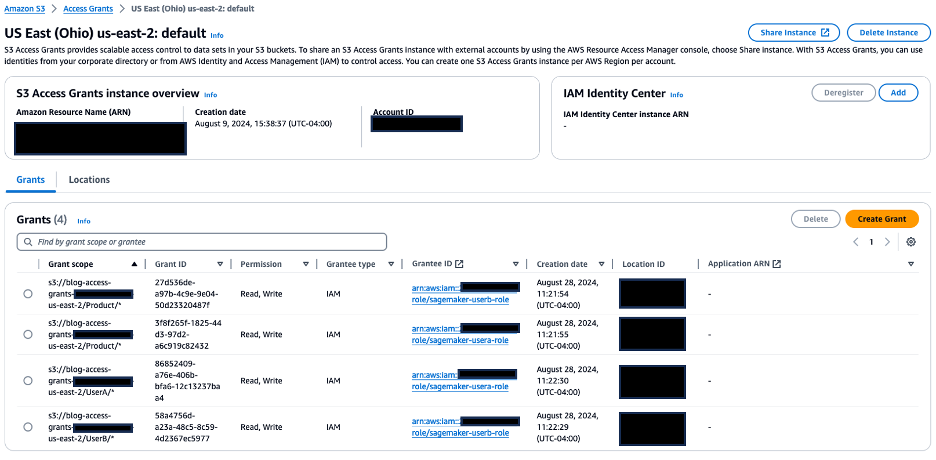
Validate access from your SageMaker Studio environment
To validate the access grants we set up, we run a distributed data processing job on the Abalone dataset using SageMaker Processing jobs and PySpark.
To get started, complete the following steps:
- On the SageMaker console, choose Domains in the navigation pane.
- Choose the domain
Product-Domainto be directed to the domain details page. - Choose
userAunder User profiles. - On the User Details page, choose Launch and choose Studio.

- On the SageMaker Studio console, choose JupyterLab in the navigation pane.
- Choose Create JupyterLab space.

-
For Name, enter usera-space.
-
For Sharing, select Private.
-
Choose Create space.

- After the space is created, choose Run space.
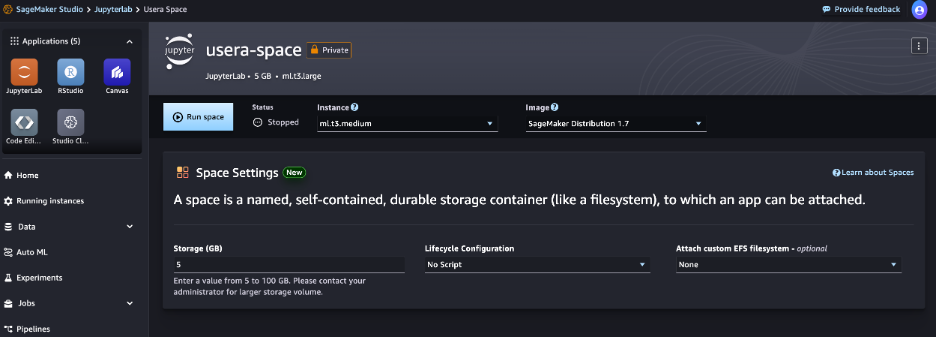
- When the status shows as Running, choose Open JupyterLab, which will redirect you to the SageMaker JupyterLab experience.

- On the Launcher page, choose Python 3 under Notebook.
This will open a new Python notebook, which we use to run the PySpark script.
Let’s validate the access grants by running a distributed job using SageMaker Processing jobs to process data, because we often need to process data before it can be used for training ML models. SageMaker Processing jobs allow you to run distributed data processing workloads while using the access grants you set up earlier. - Copy the following PySpark script into a cell in your SageMaker Studio notebook.
The%%writefiledirective is used to save the script locally. The script is used to generate temporary credentials using the access grant and configures Spark to use these credentials for accessing data in Amazon S3. It performs some basic feature engineering on the Abalone dataset, including string indexing, one-hot encoding, and vector assembly, and combines them into a pipeline. It then does an 80/20 split to produce training and validation datasets as outputs, and saves these datasets in Amazon S3.
Make sure to replaceregion_namewith the AWS Region you’re using in the script.%%writefile ./preprocess.py from pyspark.sql import SparkSession from pyspark.sql.types import StructType, StructField, StringType, DoubleType from pyspark.ml import Pipeline from pyspark.ml.feature import StringIndexer, OneHotEncoder, VectorAssembler import argparse import subprocess import sys def install_packages(): subprocess.check_call([sys.executable, "-m", "pip", "install", "boto3==1.35.1", "botocore>=1.35.0"]) install_packages() import boto3 print(f"logs: boto3 version in the processing job: {boto3.__version__}") import botocore print(f"logs: botocore version in the processing job: {botocore.__version__}") def get_temporary_credentials(account_id, bucket_name, object_key_prefix): region_name = '<region>' s3control_client = boto3.client('s3control', region_name=region_name) response = s3control_client.get_data_access( AccountId=account_id, Target=f's3://{bucket_name}/{object_key_prefix}/', Permission='READWRITE' ) return response['Credentials'] def configure_spark_with_s3a(credentials): spark = SparkSession.builder .appName("PySparkApp") .config("spark.hadoop.fs.s3a.access.key", credentials['AccessKeyId']) .config("spark.hadoop.fs.s3a.secret.key", credentials['SecretAccessKey']) .config("spark.hadoop.fs.s3a.session.token", credentials['SessionToken']) .config("spark.hadoop.fs.s3a.impl", "org.apache.hadoop.fs.s3a.S3AFileSystem") .config("spark.hadoop.fs.s3a.aws.credentials.provider", "org.apache.hadoop.fs.s3a.TemporaryAWSCredentialsProvider") .getOrCreate() spark.sparkContext._jsc.hadoopConfiguration().set( "mapred.output.committer.class", "org.apache.hadoop.mapred.FileOutputCommitter" ) return spark def csv_line(data): r = ",".join(str(d) for d in data[1]) return str(data[0]) + "," + r def main(): parser = argparse.ArgumentParser(description="app inputs and outputs") parser.add_argument("--account_id", type=str, help="AWS account ID") parser.add_argument("--s3_input_bucket", type=str, help="s3 input bucket") parser.add_argument("--s3_input_key_prefix", type=str, help="s3 input key prefix") parser.add_argument("--s3_output_bucket", type=str, help="s3 output bucket") parser.add_argument("--s3_output_key_prefix", type=str, help="s3 output key prefix") args = parser.parse_args() # Get temporary credentials for both reading and writing credentials = get_temporary_credentials(args.account_id, args.s3_input_bucket, args.s3_input_key_prefix) spark = configure_spark_with_s3a(credentials) # Defining the schema corresponding to the input data schema = StructType([ StructField("sex", StringType(), True), StructField("length", DoubleType(), True), StructField("diameter", DoubleType(), True), StructField("height", DoubleType(), True), StructField("whole_weight", DoubleType(), True), StructField("shucked_weight", DoubleType(), True), StructField("viscera_weight", DoubleType(), True), StructField("shell_weight", DoubleType(), True), StructField("rings", DoubleType(), True), ]) # Reading data directly from S3 using s3a protocol total_df = spark.read.csv( f"s3a://{args.s3_input_bucket}/{args.s3_input_key_prefix}/abalone.csv", header=False, schema=schema ) # Transformations and data processing sex_indexer = StringIndexer(inputCol="sex", outputCol="indexed_sex") sex_encoder = OneHotEncoder(inputCol="indexed_sex", outputCol="sex_vec") assembler = VectorAssembler( inputCols=[ "sex_vec", "length", "diameter", "height", "whole_weight", "shucked_weight", "viscera_weight", "shell_weight", ], outputCol="features" ) pipeline = Pipeline(stages=[sex_indexer, sex_encoder, assembler]) model = pipeline.fit(total_df) transformed_total_df = model.transform(total_df) (train_df, validation_df) = transformed_total_df.randomSplit([0.8, 0.2]) # Saving transformed datasets to S3 using RDDs and s3a protocol train_rdd = train_df.rdd.map(lambda x: (x.rings, x.features)) train_lines = train_rdd.map(csv_line) train_lines.saveAsTextFile( f"s3a://{args.s3_output_bucket}/{args.s3_output_key_prefix}/train" ) validation_rdd = validation_df.rdd.map(lambda x: (x.rings, x.features)) validation_lines = validation_rdd.map(csv_line) validation_lines.saveAsTextFile( f"s3a://{args.s3_output_bucket}/{args.s3_output_key_prefix}/validation" ) if __name__ == "__main__": main() - Run the cell to create the
preprocess.pyfile locally. - Next, you use the
PySparkProcessorclass to define a Spark job and run it using SageMaker Processing. Copy the following code into a new cell in your SageMaker Studio notebook, and run the cell to invoke the SageMaker Processing job:from sagemaker.spark.processing import PySparkProcessor from time import gmtime, strftime import boto3 import sagemaker import logging # Get region region = boto3.Session().region_name # Initialize Boto3 and SageMaker sessions boto_session = boto3.Session(region_name=region) sagemaker_session = sagemaker.Session(boto_session=boto_session) # Get account id def get_account_id(): client = boto3.client("sts") return client.get_caller_identity()["Account"] account_id = get_account_id() bucket = sagemaker_session.default_bucket() role = sagemaker.get_execution_role() sagemaker_logger = logging.getLogger("sagemaker") sagemaker_logger.setLevel(logging.INFO) sagemaker_logger.addHandler(logging.StreamHandler()) # Set up S3 bucket and paths timestamp_prefix = strftime("%Y-%m-%d-%H-%M-%S", gmtime()) prefix = "Product/sagemaker/spark-preprocess-demo/{}".format(timestamp_prefix) # Define the account ID and S3 bucket details input_bucket = f'blog-access-grants-{account_id}-{region}' input_key_prefix = 'UserA' output_bucket = f'blog-access-grants-{account_id}-{region}' output_key_prefix = 'UserA/output' # Define the Spark processor using the custom Docker image spark_processor = PySparkProcessor( framework_version="3.3", role=role, instance_count=2, instance_type="ml.m5.2xlarge", base_job_name="spark-preprocess-job", sagemaker_session=sagemaker_session ) # Run the Spark processing job spark_processor.run( submit_app="./preprocess.py", arguments=[ "--account_id", account_id, "--s3_input_bucket", input_bucket, "--s3_input_key_prefix", input_key_prefix, "--s3_output_bucket", output_bucket, "--s3_output_key_prefix", output_key_prefix, ], spark_event_logs_s3_uri=f"s3://{output_bucket}/{prefix}/spark_event_logs", logs=False )A few things to note in the definition of the
PySparkProcessor:- This is a multi-node job with two ml.m5.2xlarge instances (specified in the
instance_countandinstance_typeparameters) - The Spark framework version is set to 3.3 using the
framework_versionparameter - The PySpark script is passed using the
submit_appparameter - Command line arguments to the PySpark script (such as the account ID, input/output bucket names, and input/output key prefixes) are passed through the
argumentsparameter - Spark event logs will be offloaded to the Amazon S3 location specified in
spark_event_logs_s3_uriand can be used to view the Spark UI while the job is in progress or after it’s complete.
- This is a multi-node job with two ml.m5.2xlarge instances (specified in the
- After the job is complete, validate the output of the preprocessing job by looking at the first five rows of the output dataset using the following validation script:
import boto3
import pandas as pd
import io

# Initialize S3 client
s3 = boto3.client('s3')

# Get region
region = boto3.Session().region_name

# Get account id
def get_account_id():
    client = boto3.client("sts")
    return client.get_caller_identity()["Account"]
account_id = get_account_id()

# Replace with your bucket name and output key prefix
bucket_name = f'blog-access-grants-{account_id}-{region}'
output_key_prefix = 'UserA/output/train'

# Get temporary credentials for accessing S3 data using user profile role
s3control_client = boto3.client('s3control')
response = s3control_client.get_data_access(
    AccountId=account_id,
    Target=f's3://{bucket_name}/{output_key_prefix}',
    Permission='READ'
)
credentials = response['Credentials']

# Create an S3 client with the temporary credentials
s3_client = boto3.client(
    's3',
    aws_access_key_id=credentials['AccessKeyId'],
    aws_secret_access_key=credentials['SecretAccessKey'],
    aws_session_token=credentials['SessionToken']
)

objects = s3_client.list_objects(Bucket=bucket_name, Prefix=output_key_prefix)

# Read the first part file into a pandas DataFrame
first_part_key = f"{output_key_prefix}/part-00000"
obj = s3_client.get_object(Bucket=bucket_name, Key=first_part_key)
data = obj['Body'].read().decode('utf-8')
df = pd.read_csv(io.StringIO(data), header=None)

# Print the top 5 rows
print(f"Top 5 rows from s3://{bucket_name}/{first_part_key}")
print(df.head())
This script uses the access grants to obtain temporary credentials, reads the first part file (
part-00000) from the output location into a pandas DataFrame, and prints the top five rows of the DataFrame.
Because the User A role has access to theuserAfolder, the user can read the contents of the filepart-00000, as shown in the following screenshot.
Now, let’s validate access to the
userAfolder from the User B profile. -
Repeat the earlier steps to launch a Python notebook under the User B profile.
-
Use the validation script to read the contents of the file part-00000, which is in the
userAfolder.
If User B tries to read the contents of the file part-00000, which is in the userA folder, their access will be denied, as shown in the following screenshot, because User B doesn’t have access to the userA folder.

Clean up
To avoid incurring future charges, delete the CloudFormation stack. This will delete resources such as the SageMaker Studio domain, S3 Access Grants instance, and S3 bucket you created.
Conclusion
In this post, you learned how to control data access to Amazon S3 from SageMaker Studio with S3 Access Grants. S3 Access Grants provides a more flexible and scalable mechanism to define access patterns at scale than IAM based techniques. These grants not only support IAM principals but also allow direct granting of access to users and groups from a corporate directory that is synchronized with IAM Identity Center.
Take the next step in optimizing your data management workflow by integrating S3 Access Grants into your AWS environment alongside SageMaker Studio, a web-based visual interface for building, training, debugging, deploying, and monitoring ML models. Take advantage of the granular access control and scalability offered by S3 Access Grants to enable efficient collaboration, secure data access, and simplified access management for your team working in the SageMaker Studio environment. For more details, refer to Managing access with S3 Access Grants and Amazon SageMaker Studio.
About the authors
 Koushik Konjeti is a Senior Solutions Architect at Amazon Web Services. He has a passion for aligning architectural guidance with customer goals, ensuring solutions are tailored to their unique requirements. Outside of work, he enjoys playing cricket and tennis.
 Vijay Velpula is a Data Architect with AWS Professional Services. He helps customers implement Big Data and Analytics Solutions. Outside of work, he enjoys spending time with family, traveling, hiking and biking.
 Ram Vittal is a Principal ML Solutions Architect at AWS. He has over 3 decades of experience architecting and building distributed, hybrid, and cloud applications. He is passionate about building secure, scalable, reliable AI/ML and big data solutions to help enterprise customers with their cloud adoption and optimization journey. In his spare time, he rides motorcycle and enjoys the nature with his family.
NotebookLM adds audio and YouTube support, plus easier sharing of Audio Overviews
 Today, we’re expanding the types of sources you can use with NotebookLM and giving you an easier way to share an Audio Overview.Read More

How AlphaChip transformed computer chip design
Our AI method has accelerated and optimized chip design, and its superhuman chip layouts are used in hardware around the world.Read More

How AlphaChip transformed computer chip design
Our AI method has accelerated and optimized chip design, and its superhuman chip layouts are used in hardware around the world.Read More

How AlphaChip transformed computer chip design
Our AI method has accelerated and optimized chip design, and its superhuman chip layouts are used in hardware around the world.Read More

How AlphaChip transformed computer chip design
Our AI method has accelerated and optimized chip design, and its superhuman chip layouts are used in hardware around the world.Read More

How AlphaChip transformed computer chip design
Our AI method has accelerated and optimized chip design, and its superhuman chip layouts are used in hardware around the world.Read More