Vision use cases with Llama 3.2 11B and 90B models from Meta

Vision use cases with Llama 3.2 11B and 90B models from Meta

Today, we are excited to announce the availability of Llama 3.2 in Amazon SageMaker JumpStart and Amazon Bedrock. The Llama 3.2 models are a collection of state-of-the-art pre-trained and instruct fine-tuned generative AI models that come in various sizes—in lightweight text-only 1B and 3B parameter models suitable for edge devices, to small and medium-sized 11B and 90B parameter models capable of sophisticated reasoning tasks, including multimodal support for high-resolution images. SageMaker JumpStart is a machine learning (ML) hub that provides access to algorithms, models, and ML solutions so you can quickly get started with ML. Amazon Bedrock is a fully managed service that offers a choice of high-performing foundation models (FMs) from leading AI companies, like Meta, through a single API, along with a broad set of capabilities you need to build generative AI applications with security, privacy, and responsible AI.

In this post, we demonstrate how you can use Llama 3.2 11B and 90B models for a variety of vision-based use cases. This is the first time Meta’s Llama models have been released with vision capabilities. These new capabilities expand the usability of Llama models from their traditional text-only applications. The vision-based use cases that we discuss in this post include document visual question answering, extracting structured entity information from images, and image captioning.

Overview of Llama 3.2 11B and 90B Vision models

The Llama 3.2 collection of multimodal and multilingual large language models (LLMs) is a collection of pre-trained and instruction-tuned generative models in a variety of sizes. The 11B and 90B models are multimodal—they support text in/text out, and text+image in/text out.

Llama 3.2 11B and 90B are the first Llama models to support vision tasks, with a new model architecture that integrates image encoder representations into the language model. The new models are designed to be more efficient for AI workloads, with reduced latency and improved performance, making them suitable for a wide range of applications. All Llama 3.2 models support a 128,000 context length, maintaining the expanded token capacity introduced in Llama 3.1. Additionally, the models offer improved multilingual support for eight languages, including English, German, French, Italian, Portuguese, Hindi, Spanish, and Thai.

Llama 3.2 models are available today for inferencing in SageMaker JumpStart and Amazon Bedrock. With SageMaker JumpStart, you can access Llama 3.2 models initially in the US East (Ohio) AWS region and support the required instance types. Meta’s Llama 3.2 90B and 11B models are also available in Amazon Bedrock in the US West (Oregon) Region, and in the US East (Ohio, N. Virginia) Regions via cross-region inference. Llama 3.2 1B and 3B models are available in the US West (Oregon) and Europe (Frankfurt) Regions, and in the US East (Ohio, N. Virginia) and Europe (Ireland, Paris) Regions via cross-region inference with planned expanded regional availability in the future.

Solution overview

In the following sections, we walk through how to configure Llama 3.2 vision models in Amazon Bedrock and Amazon SageMaker JumpStart for vision-based reasoning. We also demonstrate use cases for document question answering, entity extraction, and caption generation.

For the examples shown in this post, we use the Llama 3.2 90B model unless otherwise noted. The fashion images are from the Fashion Product Images Dataset. Caption generation images are from Human Preference Synthetic Dataset. The interior design and real estate images are from the Interior design dataset.

Prerequisites

The following prerequisites are needed to implement the steps outlined in this post:

For information about how to set up Llama 3.2 model access for Amazon Bedrock, see launch post. For details on creating model endpoints in SageMaker JumpStart, refer to the launch post.

Configure Llama 3.2 for vision-based reasoning in Amazon Bedrock

To set up vision-based reasoning tasks with Llama 3.2 models in Amazon Bedrock, use the following code snippet:

import boto3
import json
import base64
from botocore.config import Config

# Initialize the Bedrock client
config = Config(
            region_name = os.getenv("BEDROCK_REGION", "us-west-2"),
            )
bedrock_runtime = boto3.client('bedrock-runtime', config=config)
MODEL_ID = " us.meta.llama3-2-90b-instruct-v1:0"

Amazon Bedrock supports the messages object as part of the Converse API. With the Converse API, you don’t have to convert the image into base64 (compared to SageMaker JumpStart).

You can read the image with the following code:

# Read and encode the image
image_path = "<your_file_path>"  # Replace with the actual path to your image
try:
    # Open the image file and read its contents
    with open(image_path, "rb") as image_file:
        image_bytes = image_file.read()
    # Encode the image bytes to base64
    image_data = image_bytes
except FileNotFoundError:
    print(f"Image file not found at {image_path}")
    image_data = None 

Use the following code to create a messages object:

# Construct the messages for the model input

# Construct the messages for the model input
messages = [    
    {
        "role": "user",
        "content": [
            {                
                "text": prompt
            },
            {                
                "image": {
                    "format": "<your_file_format>",
                    "source": {
                        "bytes":image_data
                }
            }
        ]
    }
]

Invoke the Amazon Bedrock Converse API as follows:

try:
    # Invoke the SageMaker endpoint
    response = bedrock_runtime.converse(
        modelId=MODEL_ID, # MODEL_ID defined at the beginning
        messages=[
            messages
        ],
        inferenceConfig={
        "maxTokens": 4096,
        "temperature": 0,
        "topP": .1
        },        
    )
    
    # Read the response 
    print(response['output']['message']['content'][0]['text'])

except Exception as e:
    print(f"An error occurred while invoking the endpoint: {str(e)}")

Configure Llama 3.2 for vision-based reasoning in SageMaker

You can set up vision-based reasoning tasks with Llama 3.2 vision models with a SageMaker endpoint with the following code snippet (please refer to Llama 3.2 in SageMaker JumpStart blog to setup the inference endpoint):

import boto3
import json
import base64

# Initialize the SageMaker runtime client
sagemaker_runtime = boto3.client('sagemaker-runtime')
endpoint_name = '<model-endpoint>'  # Replace with your actual endpoint name

SageMaker JumpStart deployment can also take in a Messages API style messages object as the input (similar to the Amazon Bedrock Converse API). First, the image needs to be read into a base64 format before sending it through the messages object.

Read the image with the following code:

# Read and encode the image
image_path = "<your_file_path>"  # Replace with the actual path to your image
try:
    # Open the image file and read its contents
    with open(image_path, "rb") as image_file:
        image_bytes = image_file.read()
    # Encode the image bytes to base64
    image_data = base64.b64encode(image_bytes).decode('utf-8')
    image_media_type = 'image/jpeg'  # Adjust if using a different image format
except FileNotFoundError:
    print(f"Image file not found at {image_path}")
    image_data = None
    image_media_type = None

Create a messages object with the following code:

# Create a data URL for the image
my_url = f"""data:image/jpeg;base64,{image_data}"""

# Construct the messages for the model input
messages = [    
    {
        "role": "user",
        "content": [
            {
                "type": "text",
                "text": prompt
            },
            {
                "type": "image_url",
                "image_url": {
                    "url": my_url
                }
            }
        ]
    }
]

In the preceding code, prompt is the question we ask about the reasoning of the model with the image.

After you create the messages object, you can send that as payload to the SageMaker endpoint:

try:
    # Invoke the SageMaker endpoint
    response = sagemaker_runtime.invoke_endpoint(
        EndpointName=endpoint_name,
        ContentType='application/json',
        Body=json.dumps(payload)
    )
    
    # Read the response body
    response_body = response['Body'].read()
    
    if response_body:
        try:
            # Parse the JSON response
            result = json.loads(response_body.decode('utf-8'))
            # Print the model's response
            print(result['choices'][0]['message']['content'])
        except json.JSONDecodeError as json_err:
            print(f"Failed to parse JSON: {json_err}")
            print(f"Raw response: {response_body['choices'][0]['message']['content']}")
    else:
        print("The response body is empty")

except Exception as e:
    print(f"An error occurred while invoking the endpoint: {str(e)}")

Document question answering

In this section, we present example use cases for document question answering. We focus on two use cases: first on answering questions based on financial results slides that contain complex graphical information, and secondly solving math-based problems by looking at an image.

Financial results slides Q&A

Llama 3.2 vision models can reason and answer questions based on images with complicated information in the image such as plots, graphs, and tables. Let’s use the model for a financial analyst assistant to analyze slides with different types of financial information to answer our questions. We use the Amazon Q2 2024 Financial Results Conference Calls Slides document to ask Llama 3.2 some questions based on this slide deck.

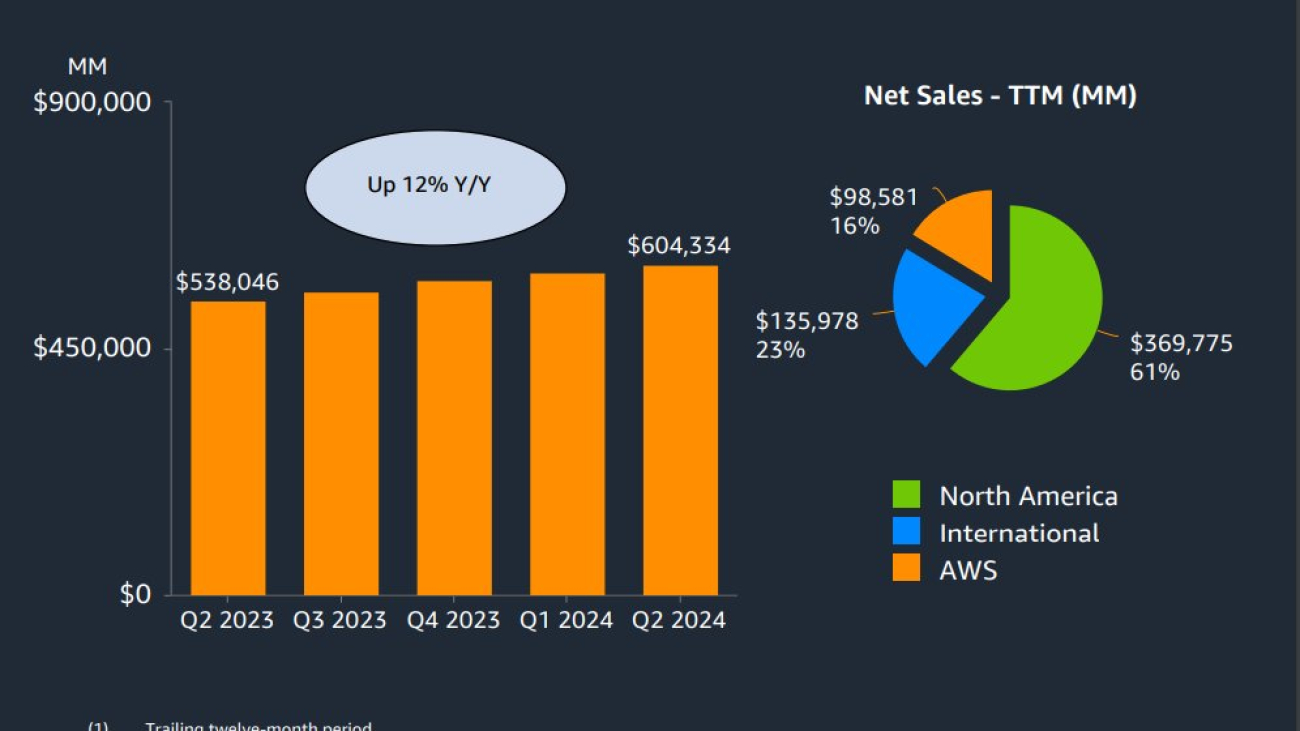
For our first prompt, we ask “How is the sales trending over the last twelve months?” with the following slide.
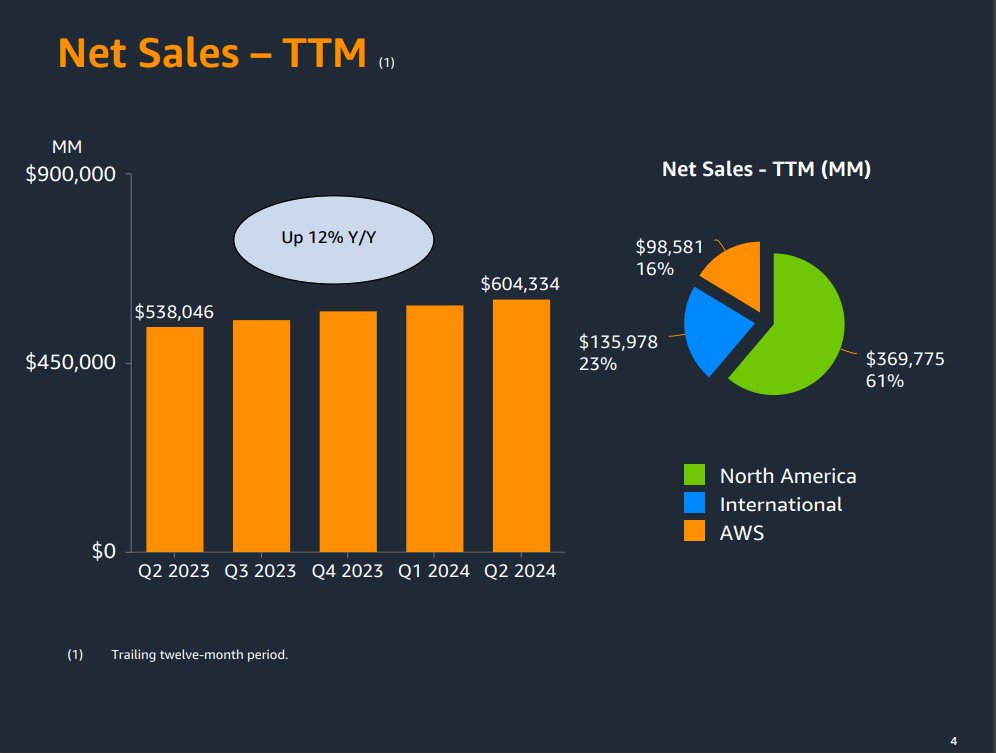
We get the following response:
The sales are trending up 12% year over year. The bar graph shows that the sales have increased from $538,046 in Q2 2023 to $604,334 in Q1 2024, and further to $604,334 in Q2 2024. This indicates a steady growth in sales over the last twelve months.

Next, we ask “Can you please help me understand this slide? How are the operating and free cash flow trending the last 12 month period? What is the significant contributor to the free cash flow trend?” We use the following slide.
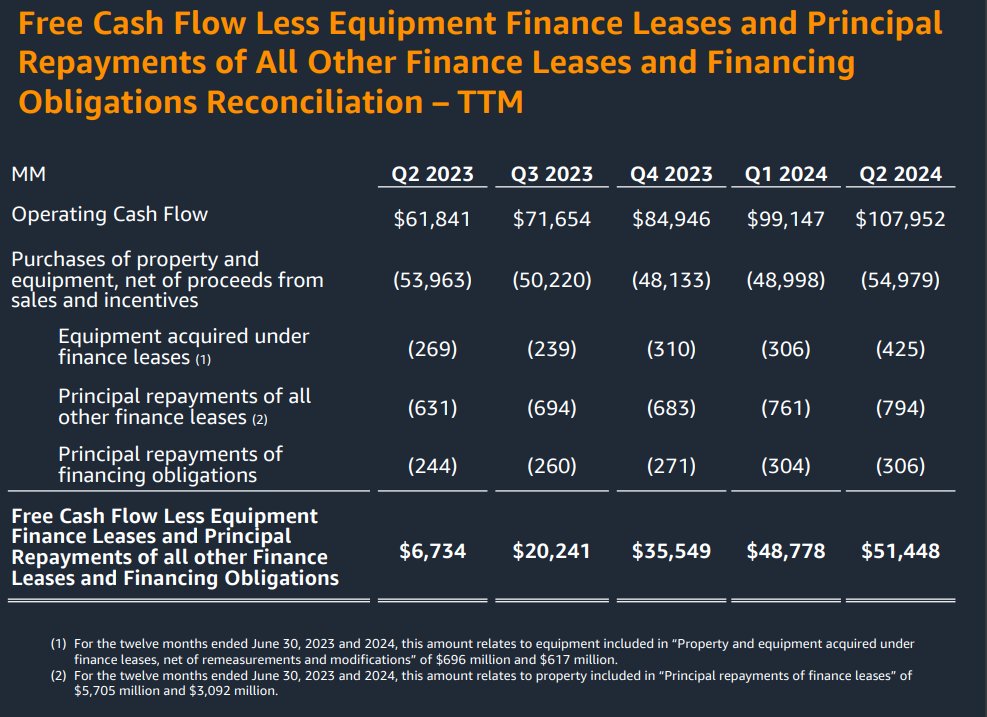
We get the following response:
The slide presents a table with two main sections: "Operating Cash Flow" and "Free Cash Flow Less Equipment Finance Leases and Principal Repayments of All Other Finance Leases and Financing Obligations." The table is divided into five columns, each representing a quarter from Q2 2023 to Q2 2024.

**Operating Cash Flow Trend:**

*   Q2 2023: $61,841

*   Q3 2023: $71,654

*   Q4 2023: $84,946

*   Q1 2024: $99,147

*   Q2 2024: $107,952

The operating cash flow has consistently increased over the five quarters, indicating a positive trend.

**Free Cash Flow Trend:**

*   Q2 2023: $6,734

*   Q3 2023: $20,241

*   Q4 2023: $35,549

*   Q1 2024: $48,778

*   Q2 2024: $51,448

The free cash flow has also shown an upward trend, with a significant increase from Q2 2023 to Q2 2024.

**Significant Contributor to Free Cash Flow Trend:**

The significant contributor to the free cash flow trend is the "Principal repayments of all other finance leases" and "Principal repayments of financing obligations." These two items have consistently increased over the five quarters, contributing to the overall growth in free cash flow.

In summary, both operating cash flow and free cash flow have demonstrated a positive trend over the last 12-month period. The significant contributor to the free cash flow trend is the increase in principal repayments of all other finance leases and financing obligations.

Visual math question answering

Another interesting problem for visual question answering is answering visual math and logic puzzles. Llama 3.2 vision models are highly capable in solving and answering visual math questions. We show a few examples here.

For our first prompt, we use the following image and ask “The kangaroo is inside how many circles?”

We get the following response:
The kangaroo is inside 3 circles.

Next, we use the following image and ask “Which of these figures differ from the other four?”
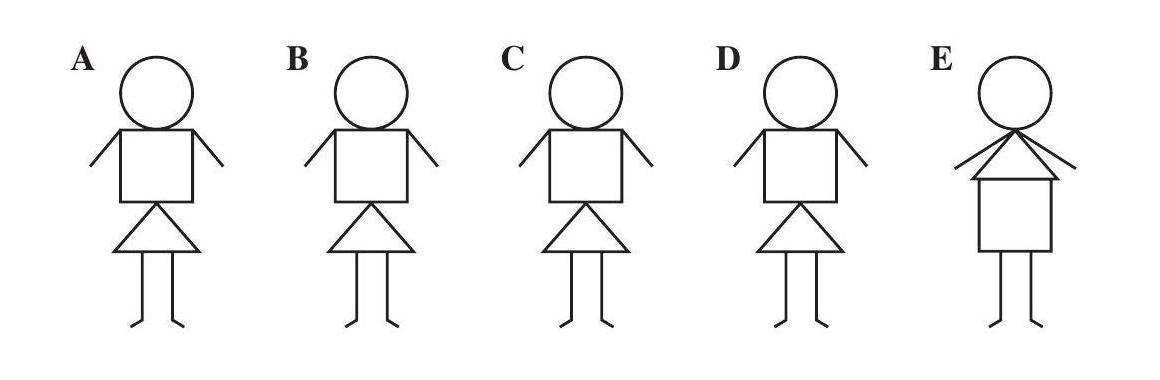
We get the following response:
The figure labeled E is the only one with a different shape for the skirt. The other figures have triangular skirts, while figure E has a rectangular skirt.

Entity extraction

Extracting information about products is an important use case for the retail industry. On platforms supporting third-party sellers, product images are the most available resources to gather information about the product. Therefore, accurately extracting relevant information about the product is essential for the success of the product. In this section, we show a couple of examples of clothing product images, and how you can use Llama 3.2 to extract relevant information about the product that can support it on an ecommerce application.

We first use the following images and the prompt “Can you please extract all information about the product in the image? Think very carefully in a step-by-step manner to construct a json file to organize all the information about the product. Please consider formulating the json file so that the extracted information can be stored in a database for further use in a retail ecommerce application. Return the json file as the output.”

For the pink dress, we get the following output:
Based on the image, here is a JSON representation of the product information:

```
{
"product_id": "unknown",
"name": "Pink Floral Dress",
"description": "A sleeveless dress with a pink floral pattern and a pink trim at the bottom",
"category": "Dresses",
"sub_category": "Casual Dresses",
"color": "Pink",
"size": "unknown",
"price": "unknown",
"brand": "unknown",
"material": "unknown",
"features": [
"Sleeveless",
"Floral pattern",
"Pink trim at the bottom"
],
"images": [
{
"url": "image_url",
"alt_text": "Pink Floral Dress"
}
]
}
```

Please note that some information such as product_id, size, price, brand, and material are unknown as they are not visible in the image. Also, the image_url is a placeholder and should be replaced with the actual URL of the image.

For the blue cap, we get the following output:

Based on the image, here is a JSON representation of the product information:

```json
{
"product_id": "NIKE-CAP-001",
"name": "Nike Cap",
"description": "A blue baseball cap with a white Nike logo",
"category": "Accessories",
"subcategory": "Hats",
"brand": "Nike",
"color": "Blue",
"size": "One Size",
"material": "Cotton",
"price": 29.99,
"image_url": "https://example.com/nike-cap.jpg",
"features": [
"Adjustable strap in the back",
"Embroidered Nike logo on the front"
]
}
```

This JSON object includes the following fields:

* `product_id`: a unique identifier for the product
* `name`: the name of the product
* `description`: a brief description of the product
* `category` and `subcategory`: the categories and subcategories that the product belongs to
* `brand`: the brand of the product
* `color`: the color of the product
* `size`: the size of the product
* `material`: the material that the product is made of
* `price`: the price of the product
* `image_url`: the URL of the product image
* `features`: an array of features that describe the product

Note that this is just one possible way to represent the product information in JSON. Depending on the specific requirements of your application, you may need to add or remove fields, or use different data types for certain fields.

Caption generation

Another important and useful capability of vision models is to generate captions automatically for images. In this section, we showcase caption generation with a simple caption, a more creative and funnier caption, and a marketing style caption.

Simple captioning

For simple captioning, we use the following image and the prompt “Please provide a caption for this image. Be creative but respectful.”

We get the following response:

The image shows a young woman sitting in a dentist's chair, with a female dentist examining her teeth. The woman is wearing a bib to protect her clothes from any water or other substances that may be used during the examination. The dentist is wearing a white lab coat and a mask, and she is holding a dental mirror and a probe. The background of the image is a dental office, with various dental tools and equipment visible.

The overall atmosphere of the image is one of professionalism and care. The dentist appears to be focused on her work, and the woman seems to be relaxed and comfortable. The image suggests that the woman is receiving a routine dental checkup or cleaning, and that the dentist is taking good care of her.

Creative captioning

For our second example, we want a more creative and funny tone. We use the same image and the prompt “Please provide a short caption for this image. Be creative and funny but respectful. This is meant to be shared on a social network application.”

We get the following response:

"Brace yourself for a sparkling smile, because this dentist is about to make your teeth shine brighter than a disco ball!"

Listing generation

To generate a real estate listing, we use the following image and the prompt “You are a real estate marketing expert. Please create a listing description with the attached image of a property.”

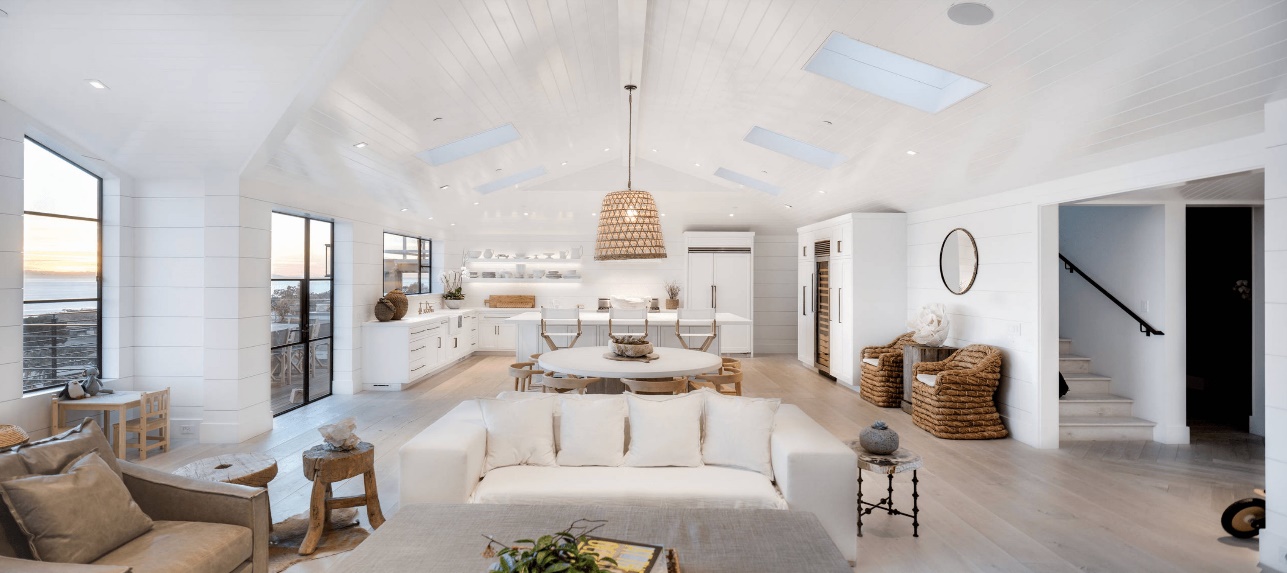
We get the following output:

**Welcome to Your Dream Home**

This stunning property boasts an open-plan living area that seamlessly blends style and functionality. The spacious living room, dining area, and kitchen are perfect for entertaining, with plenty of natural light pouring in through the large windows. The sleek, modern kitchen features high-end appliances and ample counter space, making meal prep a breeze.

The living room is a cozy retreat, with a comfortable sofa and chairs arranged around a stylish coffee table. The adjacent dining area is perfect for hosting dinner parties, with a large table that seats eight.

But the real showstopper is the stunning view of the water, which can be enjoyed from the comfort of your own home. Imagine sipping your morning coffee or enjoying a glass of wine in the evening while taking in the breathtaking scenery.

This property is the perfect blend of form and function, offering the ultimate in comfort and style. Don't miss out on this incredible opportunity to make it your own.

**Key Features:**

* Open-plan living area with kitchen, dining area, and living room
* Modern kitchen with high-end appliances and ample counter space
* Comfortable living room with sofa and chairs
* Large dining table that seats eight
* Stunning view of the water
* Perfect for entertaining

**Don't miss out on this incredible opportunity. Contact us today to schedule a viewing.**

Conclusion

In this post, we demonstrated the diverse vision capabilities of the Llama 3.2 11B and 90B models from Meta. Llama 3.2 vision models enable you to solve multiple use cases, including document understanding, math and logic puzzle solving, entity extraction, and caption generation. These capabilities can drive productivity in a number of enterprise use cases, including ecommerce (retail), marketing, and much more.

To learn more about Llama 3.2 features and capabilities in Amazon Bedrock, refer to the launch post, product page, and documentation. To learn more about using Llama 3.2 in SageMaker JumpStart, see the launch post, and for more information about using foundation models in SageMaker JumpStart, check out product page and documentation.

We can’t wait to see what you build with the Llama 3.2 models on AWS!


About the Authors

Dr. Natarajan Chennimalai Kumar is a Principal Solutions Architect in the 3rd Party Model Provider team at AWS, working closely with the Llama partner engineering team at Meta to enable AWS customers use Llama models. He holds a PhD from University of Illinois at Urbana-Champaign. He is based in the Bay Area in California. Outside of work, he enjoys watching shows with his kids, playing tennis, and traveling with his family.

Sebastian Bustillo is a Solutions Architect at AWS. He focuses on AI/ML technologies with a profound passion for generative AI and compute accelerators. At AWS, he helps customers unlock business value through generative AI. When he’s not at work, he enjoys brewing a perfect cup of specialty coffee and exploring the outdoors with his wife.

Marco Punio is a Sr. Specialist Solutions Architect focused on generative AI strategy, applied AI solutions, and conducting research to help customers hyperscale on AWS. As a member of the 3rd Party Model Provider Applied Sciences Solutions Architecture team at AWS, he is a Global Lead for the Meta – AWS Partnership and technical strategy. Based in Seattle, WA, Marco enjoys writing, reading, exercising, and building applications in his free time.

Armando Diaz is a Solutions Architect at AWS. He focuses on generative AI, AI/ML, and data analytics. At AWS, Armando helps customers integrating cutting-edge generative AI capabilities into their systems, fostering innovation and competitive advantage. When he’s not at work, he enjoys spending time with his wife and family, hiking, and traveling the world.

Read More

Research Focus: Week of September 23, 2024

Research Focus: Week of September 23, 2024

Welcome to Research Focus, a series of blog posts that highlights notable publications, events, code/datasets, new hires and other milestones from across the research community at Microsoft.

Research Focus | September 23, 2024

ProbTS: Benchmarking Point and Distributional Forecasting across Diverse Prediction Horizons

Time-series forecasting is a technique used to predict future values based on previously observed data points over time. It has extensive applications for traffic flow, renewable energy, retail, finance, and climate, among other uses. For these applications, it is crucial to provide forecasts across different prediction horizons, addressing both short- and long-term planning needs. Many decision-making processes also require not only point forecasts to quantify planning efficiency but also robust distributional estimations to manage uncertainty effectively. 

Delivering precise point and distributional forecasts across a spectrum of prediction horizons is a significant challenge. Prior research on developing deep learning models for time-series forecasting has often concentrated on isolated aspects, such as long-term point forecasting or short-term probabilistic estimations. This may result in skewed methodological choices and hinder the adaptability of these models to uncharted scenarios. While there is a rising trend in developing universal forecasting models, a thorough understanding of their advantages and drawbacks is still lacking.  

In a recent paper: ProbTS: Benchmarking Point and Distributional Forecasting across Diverse Prediction Horizons, researchers from Microsoft and external collaborators present a platform to evaluate these fundamental forecasting needs and to conduct a rigorous comparative analysis of related recent studies. They examine the latest models for universal time-series forecasting and discover that their analyses of methodological strengths and weaknesses are also applicable to these universal models. They then outline the limitations inherent in current research and underscore several avenues for future exploration. 


SynDL: A Large-Scale Synthetic Test Collection for Passage Retrieval

Information retrieval (IR) involves identifying and retrieving recorded data that is relevant to an information need. Large-scale test collections play a crucial role in IR research. However, existing IR research studies are commonly developed on small-scale datasets that rely on human assessors for relevance judgments – a time-intensive and expensive process. Recent studies have shown the strong capability of large language models (LLMs) in producing reliable relevance judgments with human accuracy but at a greatly reduced cost.

In a recent paper: SynDL: A Large-Scale Synthetic Test Collection for Passage Retrieval (opens in new tab), researchers from Microsoft and external colleagues address the missing large-scale ad-hoc document retrieval dataset. They extend the TREC Deep Learning Track (opens in new tab) test collection via additional language model synthetic labels to enable researchers to test and evaluate their search systems at a large scale. Such a test collection includes more than 1,900 test queries from previous tracks. The researchers compare system evaluation with past human labels and show that their synthetically created large-scale test collection can lead to highly correlated system rankings. 

Spotlight: Blog post

Research Focus: Week of September 9, 2024

Investigating vulnerabilities in LLMs; A novel total-duration-aware (TDA) duration model for text-to-speech (TTS); Generative expert metric system through iterative prompt priming; Integrity protection in 5G fronthaul networks.


Intelligent Router for LLM Workloads: Improving Performance Through Workload-Aware Scheduling

LLMs are used for a wide variety of tasks and scenarios, such as chat, question answering, code generation, summarization and reasoning. These tasks exhibit variations in their input and output characteristics. Requests for different tasks with distinct input and output characteristics are often served concurrently at a single model instance, which can lead to spikes in end-to-end latency, time to generate the first token, and time between tokens (in the case of a streaming request). Understanding the interplay between requests of different characteristics is important for optimizing the end-to-end performance during LLM inference.

In a recent preprint, Intelligent Router for LLM Workloads: Improving Performance Through Workload-Aware Scheduling, researchers from Microsoft propose a heuristic-guided reinforcement learning-based intelligent router for data-driven and workload-aware scheduling. This router leverages a trainable response-length predictor, and a novel formulation for estimating the impact of mixing different workloads to schedule queries across LLM instances and achieve over 11% lower end-to-end latency than existing approaches.


INTERNSHIP OPPORTUNITY

Apply now: Microsoft Research Undergrad Internship Program – Summer 2025

The Microsoft Research Undergrad Internship Program offers 12-week internships in Redmond, Washington; New York City; or Cambridge, Massachusetts, for rising college juniors and seniors who are passionate about technology and champion diversity and inclusion.

Come work alongside world-class researchers on state-of-the-art projects. Participants will collaborate with an extended network of visiting faculty, postdoctoral researchers, data and applied scientists, engineers, designers, and doctoral students to make important contributions to new and ongoing research. On-the-job learning will be augmented with mentoring, community building, and networking opportunities. Candidates from groups currently underrepresented in engineering and computer science are strongly encouraged to apply.

Applications (opens in new tab) will be accepted until October 21, 2024. Apply now!

The post Research Focus: Week of September 23, 2024 appeared first on Microsoft Research.

Read More

Decoding How AI Can Accelerate Data Science Workflows

Decoding How AI Can Accelerate Data Science Workflows

Editor’s note: This post is part of the AI Decoded series, which demystifies AI by making the technology more accessible, and showcases new hardware, software, tools and accelerations for RTX workstation and PC users.

Across industries, AI is driving innovation and enabling efficiencies — but to unlock its full potential, the technology must be trained on vast amounts of high-quality data.

Data scientists play a key role in preparing this data, especially in domain-specific fields where specialized, often proprietary data is essential to enhancing AI capabilities.

To help data scientists with increasing workload demands, NVIDIA announced that RAPIDS cuDF, a library that allows users to more easily work with data, accelerates the pandas software library with zero code changes. Pandas is a flexible, powerful and popular data analysis and manipulation library for the Python programming language. With cuDF, data scientists can now use their preferred code base without compromising on data processing speed.

NVIDIA RTX AI hardware and technologies can also deliver data processing speedups. They include powerful GPUs that deliver the computational performance necessary to quickly and efficiently accelerate AI at every level — from data science workflows to model training and customization on PCs and workstations.

The Data Science Bottleneck

The most common data format is tabular data, which is organized in rows and columns. Smaller datasets can be managed with spreadsheet tools like Excel, however, datasets and modeling pipelines with tens of millions of rows typically rely on dataframe libraries in programming languages like Python.

Python is a popular choice for data analysis, primarily because of the pandas library, which features an easy-to-use application programming interface (API). However, as dataset sizes grow, pandas struggles with processing speed and efficiency in CPU-only systems. The library also notoriously struggles with text-heavy datasets, which is an important data type for large language models.

When data requirements outgrow pandas’ capabilities, data scientists are faced with a dilemma: endure slow processing timelines or take the complex and costly step of switching to more efficient but less user-friendly tools.

Accelerating Preprocessing Pipelines With RAPIDS cuDF 

RAPIDS cuDF speeds the popular pandas library up to 100x on RTX-powered AI PCs and workstations.

With RAPIDS cuDF, data scientists can use their preferred code base without sacrificing processing speed.

RAPIDS is an open-source suite of GPU-accelerated Python libraries designed to improve data science and analytics pipelines. cuDF is a GPU DataFrame library that provides a pandas-like API for loading, filtering and manipulating data.

Using cuDF’s “pandas accelerator mode,” data scientists can run their existing pandas code on GPUs to take advantage of powerful parallel processing, with the assurance that the code will switch to CPUs when necessary. This interoperability delivers advanced, reliable performance.

The latest release of cuDF supports larger datasets and billions of rows of tabular text data. This allows data scientists to use pandas code to preprocess data for generative AI use cases.

Accelerating Data Science on NVIDIA RTX-Powered AI Workstations and PCs

According to a recent study, 57% of data scientists use local resources such as PCs, desktops or workstations for data science.

Data scientists can achieve significant speedups starting with the NVIDIA GeForce RTX 4090 GPU. As datasets grow and processing becomes more memory-intensive, they can use cuDF to deliver up to 100x better performance with NVIDIA RTX 6000 Ada Generation GPUs in workstations, compared with traditional CPU-based solutions.

A chart show cuDF.pandas takes single-digit seconds, compared to multiple minutes on traditional pandas, to run the same operation.
Two common data science operations — “join” and “groupby” — are on the y-axis, while the x-axis shows the time it took to run each operation.

Data scientists can easily get started with RAPIDS cuDF on NVIDIA AI Workbench. This free developer environment manager powered by containers enables data scientists and developers to create, collaborate and migrate AI and data science workloads across GPU systems. Users can get started with several example projects available on the NVIDIA GitHub repository, such as the cuDF AI Workbench project.

cuDF is also available by default on HP AI Studio, a centralized data science platform designed to help AI developers seamlessly replicate their development environment from workstations to the cloud. This allows them to set up, develop and collaborate on projects without managing multiple environments.

The benefits of cuDF on RTX-powered AI PCs and workstations extend beyond raw performance speedups. It also:

  • Saves time and money with fixed-cost local development on powerful GPUs that replicates seamlessly to on-premises servers or cloud instances.
  • Enables faster data processing for quicker iterations, allowing data scientists to experiment, refine and derive insights from datasets at interactive speeds.
  • Delivers more impactful data processing for better model outcomes further down the pipeline.

Learn more about RAPIDS cuDF.

A New Era of Data Science

As AI and data science continue to evolve, the ability to rapidly process and analyze massive datasets will become a key differentiator to enable breakthroughs across industries. Whether for developing sophisticated machine learning models, conducting complex statistical analyses or exploring generative AI, RAPIDS cuDF provides the foundation for next-generation data processing.

NVIDIA is expanding that foundation by adding support for the most popular dataframe tools, including Polars, one of the fastest-growing Python libraries, which significantly accelerates data processing compared with other CPU-only tools out of the box.

Polars announced this month the open beta of the Polars GPU Engine, powered by RAPIDS cuDF. Polars users can now boost the performance of the already lightning-fast dataframe library by up to 13x.

Endless Possibilities for Tomorrow’s Engineers With RTX AI

NVIDIA GPUs — whether running in university data centers, GeForce RTX laptops or NVIDIA RTX workstations — are accelerating studies. Students in data science fields and beyond are enhancing their learning experience and gaining hands-on experience with hardware used widely in real-world applications.

Learn more about how NVIDIA RTX PCs and workstations help students level up their studies with AI-powered tools.

Generative AI is transforming gaming, videoconferencing and interactive experiences of all kinds. Make sense of what’s new and what’s next by subscribing to the AI Decoded newsletter.

Read More

CUDA-Free Inference for LLMs

CUDA-Free Inference for LLMs

PyTorch Native Architecture Optimization: torchao

By Team PyTorch

We’re happy to officially launch torchao, a PyTorch native library that makes models faster and smaller by leveraging low bit dtypes, quantization and sparsity. torchao is an accessible toolkit of techniques written (mostly) in easy to read PyTorch code spanning both inference and training. This blog will help you pick which techniques matter for your workloads.

We benchmarked our techniques on popular GenAI models like LLama 3 and Diffusion models and saw minimal drops in accuracy. Unless otherwise noted the baselines are bf16 run on A100 80GB GPU.

Our topline metrics for llama 3 are

For inference

  • 97% speedup for Llama 3 8B using autoquant with int4 weight only quantization and hqq
  • 73% peak VRAM reduction for Llama 3.1 8B at 128K context length with a quantized KV cache

For training

  • 50% speedup for Llama 3 70B pretraining using float8 training on H100
  • 30% peak VRAM reduction for Llama 3 8B using 4 bit quantized optimizers.

Our topline metrics for diffusion model inference

  • 53% speedup using float8 dynamic quantization inference with float8 row-wise scaling on flux1.dev onH100
  • 50% reduction in model VRAM for CogVideoX using int8 dynamic quantization

Below we’ll walk through some of the techniques available in torchao you can apply to your models for inference and training.

Inference

Our inference quantization algorithms work over arbitrary PyTorch models that contain nn.Linear layers. Weight only and dynamic activation quantization for various dtypes and sparse layouts can be chosen using our top level quantize_ api

from torchao.quantization import (
quantize_,
int4_weight_only,
)
quantize_(model, int4_weight_only())

Sometimes quantizing a layer can make it slower because of overhead so if you’d rather we just pick how to quantize each layer in a model for you then you can instead run

model = torchao.autoquant(torch.compile(model, mode=’max-autotune’))

quantize_ API has a few different options depending on whether your model is compute bound or memory bound.

from torchao.quantization import (
# Memory bound models
int4_weight_only,
int8_weight_only,

# Compute bound models  
int8_dynamic_activation_int8_semi_sparse_weight,  
int8_dynamic_activation_int8_weight,  
  
# Device capability 8.9+  
float8_weight_only,  
float8_dynamic_activation_float8_weight,   )

«««< HEAD:_posts/2024-09-25-pytorch-native-architecture-optimization.md
We also have extensive benchmarks on diffusion models in collaboration with the HuggingFace diffusers team in diffusers-torchao where we demonstrated 53.88% speedup on Flux.1-Dev and 27.33% speedup on CogVideoX-5b
=======

We also have extensive benchmarks on diffusion models in collaboration with the HuggingFace diffusers team in diffusers-torchao where we demonstrated 53.88% speedup on Flux.1-Dev and 27.33% speedup on CogVideoX-5b

97898699f7101b847da377106274783ced03bb3d:_posts/2024-09-25-pytorch-native-architecture-optimizaion.md

Our APIs are composable so we’ve for example composed sparsity and quantization to bring 5% speedup for ViT-H inference

But also can do things like quantize weights to int4 and the kv cache to int8 to support Llama 3.1 8B at the full 128K context length running in under 18.9GB of VRAM.

QAT

Post training quantization, especially at less than 4 bit can suffer from serious accuracy degradations. Using Quantization Aware Training (QAT) we’ve managed to recover up to 96% of the accuracy degradation on hellaswag. We’ve integrated this as an end to end recipe in torchtune with a minimal tutorial

Training

Low precision compute and communications

torchao provides easy to use e2e workflows for reducing the precision of training compute and distributed communications, starting with float8 for `torch.nn.Linear` layers.Here is a one-liner to convert the compute gemms of your training run to float8:

from torchao.float8 import convert_to_float8_training
convert_to_float8_training(model)

For an e2e example of how to speed up LLaMa 3 70B pretraining by up to 1.5x with float8, see our README, and torchtitan’s blog and float8 recipe.

Performance and accuracy of float8 pretraining of LLaMa 3 70B, vs bfloat16


(source: https://dev-discuss.pytorch.org/t/enabling-float8-all-gather-in-fsdp2/2359)

We are expanding our training workflows to more dtypes and layouts

  1. NF4 QLoRA in torchtune
  2. Prototype int8 training support
  3. Accelerated sparse 2:4 training

Low bit Optimizers

Inspired by Bits and Bytes we’ve also added prototype support for 8 and 4 bit optimizers as a drop in replacement for AdamW.

from torchao.prototype.low_bit_optim import AdamW8bit, AdamW4bit
optim = AdamW8bit(model.parameters())

Integrations

We’ve been actively working on making sure torchao works well in some of the most important projects in open source.

  1. Huggingface transformers as an inference backend
  2. In diffusers-torchao as a reference implementation for accelerating diffusion models
  3. In HQQ for fast 4 bit inference
  4. In torchtune for PyTorch native QLoRA and QAT recipes
  5. In torchchat for post training quantization
  6. In SGLang for for int4 and int8 post training quantization

#

Conclusion

If you’re interested in making your models faster and smaller for training or inference, we hope you’ll find torchao useful and easy to integrate.

pip install torchao

There are a lot of things we’re excited about next ranging from going lower than 4 bit, performant kernels for high-throughput inference, expanding to more layers, scaling types or granularities, MX hardware support and supporting more hardware backends. If any of the above sounds exciting you can follow our progress at: https://github.com/pytorch/ao

If you’re interested in working on torchao, we’ve created a contributors guide, and if you have any questions we hang out on the #torchao channel on discord.gg/cudamode

Acknowledgements

We are fortunate to stand on the shoulders of giants and collaborate with some of the best people in open source. Thank you!

  1. Bits and Bytes for pioneering work in low bit optimizers and QLoRA
  2. Answer.ai for their engineering work to get FSDP and QLoRA composing
  3. Mobius Labs for the lovely back and forths on quantization algorithms and low bit kernels
  4. HuggingFace transformers for their help in battle testing and integrating our work
  5. HuggingFace diffusers for our collaboration on extensive benchmarks and best practices
  6. torch.compile so we could write our algorithms in pure PyTorch
  7. CUDA MODE for most of our early contributors

Read More

CUDA-Free Inference for LLMs

PyTorch Native Architecture Optimization: torchao

By Team PyTorch

We’re happy to officially launch torchao, a PyTorch native library that makes models faster and smaller by leveraging low bit dtypes, quantization and sparsity. torchao is an accessible toolkit of techniques written (mostly) in easy to read PyTorch code spanning both inference and training. This blog will help you pick which techniques matter for your workloads.

We benchmarked our techniques on popular GenAI models like LLama 3 and Diffusion models and saw minimal drops in accuracy. Unless otherwise noted the baselines are bf16 run on A100 80GB GPU.

Our topline metrics for llama 3 are

For inference

  • 97% speedup for Llama 3 8B using autoquant with int4 weight only quantization and hqq
  • 73% peak VRAM reduction for Llama 3.1 8B at 128K context length with a quantized KV cache

For training

  • 50% speedup for Llama 3 70B pretraining using float8 training on H100
  • 30% peak VRAM reduction for Llama 3 8B using 4 bit quantized optimizers.

Our topline metrics for diffusion model inference

  • 53% speedup using float8 dynamic quantization inference with float8 row-wise scaling on flux1.dev onH100
  • 50% reduction in model VRAM for CogVideoX using int8 dynamic quantization

Below we’ll walk through some of the techniques available in torchao you can apply to your models for inference and training.

Inference

Our inference quantization algorithms work over arbitrary PyTorch models that contain nn.Linear layers. Weight only and dynamic activation quantization for various dtypes and sparse layouts can be chosen using our top level quantize_ api

from torchao.quantization import (
quantize_,
int4_weight_only,
)
quantize_(model, int4_weight_only())

Sometimes quantizing a layer can make it slower because of overhead so if you’d rather we just pick how to quantize each layer in a model for you then you can instead run

model = torchao.autoquant(torch.compile(model, mode=’max-autotune’))

quantize_ API has a few different options depending on whether your model is compute bound or memory bound.

from torchao.quantization import (
# Memory bound models
int4_weight_only,
int8_weight_only,

# Compute bound models  
int8_dynamic_activation_int8_semi_sparse_weight,  
int8_dynamic_activation_int8_weight,  
  
# Device capability 8.9+  
float8_weight_only,  
float8_dynamic_activation_float8_weight,   )

We also have extensive benchmarks on diffusion models in collaboration with the HuggingFace diffusers team in diffusers-torchao where we demonstrated 53.88% speedup on Flux.1-Dev and 27.33% speedup on CogVideoX-5b

Our APIs are composable so we’ve for example composed sparsity and quantization to bring 5% speedup for ViT-H inference

But also can do things like quantize weights to int4 and the kv cache to int8 to support Llama 3.1 8B at the full 128K context length running in under 18.9GB of VRAM.

QAT

Post training quantization, especially at less than 4 bit can suffer from serious accuracy degradations. Using Quantization Aware Training (QAT) we’ve managed to recover up to 96% of the accuracy degradation on hellaswag. We’ve integrated this as an end to end recipe in torchtune with a minimal tutorial

Training

Low precision compute and communications

torchao provides easy to use e2e workflows for reducing the precision of training compute and distributed communications, starting with float8 for `torch.nn.Linear` layers.Here is a one-liner to convert the compute gemms of your training run to float8:

from torchao.float8 import convert_to_float8_training
convert_to_float8_training(model)

For an e2e example of how to speed up LLaMa 3 70B pretraining by up to 1.5x with float8, see our README, and torchtitan’s blog and float8 recipe.

Performance and accuracy of float8 pretraining of LLaMa 3 70B, vs bfloat16


(source: https://dev-discuss.pytorch.org/t/enabling-float8-all-gather-in-fsdp2/2359)

We are expanding our training workflows to more dtypes and layouts

  1. NF4 QLoRA in torchtune
  2. Prototype int8 training support
  3. Accelerated sparse 2:4 training

Low bit Optimizers

Inspired by Bits and Bytes we’ve also added prototype support for 8 and 4 bit optimizers as a drop in replacement for AdamW.

from torchao.prototype.low_bit_optim import AdamW8bit, AdamW4bit
optim = AdamW8bit(model.parameters())

Integrations

We’ve been actively working on making sure torchao works well in some of the most important projects in open source.

  1. Huggingface transformers as an inference backend
  2. In diffusers-torchao as a reference implementation for accelerating diffusion models
  3. In HQQ for fast 4 bit inference
  4. In torchtune for PyTorch native QLoRA and QAT recipes
  5. In torchchat for post training quantization
  6. In SGLang for for int4 and int8 post training quantization

#

Conclusion

If you’re interested in making your models faster and smaller for training or inference, we hope you’ll find torchao useful and easy to integrate.

pip install torchao

There are a lot of things we’re excited about next ranging from going lower than 4 bit, performant kernels for high-throughput inference, expanding to more layers, scaling types or granularities, MX hardware support and supporting more hardware backends. If any of the above sounds exciting you can follow our progress at: https://github.com/pytorch/ao

If you’re interested in working on torchao, we’ve created a contributors guide, and if you have any questions we hang out on the #torchao channel on discord.gg/cudamode

Acknowledgements

We are fortunate to stand on the shoulders of giants and collaborate with some of the best people in open source. Thank you!

  1. Bits and Bytes for pioneering work in low bit optimizers and QLoRA
  2. Answer.ai for their engineering work to get FSDP and QLoRA composing
  3. Mobius Labs for the lovely back and forths on quantization algorithms and low bit kernels
  4. HuggingFace transformers for their help in battle testing and integrating our work
  5. HuggingFace diffusers for our collaboration on extensive benchmarks and best practices
  6. torch.compile so we could write our algorithms in pure PyTorch
  7. CUDA MODE for most of our early contributors

Read More

How generative AI is transforming legal tech with AWS

How generative AI is transforming legal tech with AWS

Legal professionals often spend a significant portion of their work searching through and analyzing large documents to draw insights, prepare arguments, create drafts, and compare documents. The rise of generative artificial intelligence (AI) has brought an inflection of foundation models (FMs). These FMs, with simple instructions (prompts), can perform various tasks such as drafting emails, extracting key terms from contracts or briefs, summarizing documents, searching through multiple documents, and more. As a result, these models are fit for legal tech. Goldman Sachs estimated that generative AI could automate 44% of legal tasks in the US. A special report published by Thompson Reuters reported that generative AI awareness is significantly higher among legal professionals, with 91% of respondents saying they have heard of or read about these tools.

However, such models alone are not sufficient due to legal and ethical concerns around data privacy. Security and confidentiality are of paramount importance in the legal field. Legal tech professionals, like any other business handling sensitive customer information, require robust security and confidentiality practices. Advancements in AI and natural language processing (NLP) show promise to help lawyers with their work, but the legal industry also has valid questions around the accuracy and costs of these new techniques, as well as how customer data will be kept private and secure. AWS AI and machine learning (ML) services help address these concerns within the industry.

In this post, we share how legal tech professionals can build solutions for different use cases with generative AI on AWS.

AI/ML on AWS

AI and ML have been a focus for Amazon for over 25 years, and many of the capabilities customers use with Amazon are driven by ML. Ecommerce recommendation engines, Just Walk Out technology, Alexa devices, and route optimizations are some examples. These capabilities are built using the AWS Cloud. At AWS, we have played a key role in and making ML accessible to anyone who wants to use it, including more than 100,000 customers of all sizes and industries. Thomson Reuters, Booking.com, and Merck are some of the customers who are using the generative AI capabilities of AWS services to deliver innovative solutions.

AWS makes it straightforward to build and scale generative AI customized for your data, your use cases, and your customers. AWS gives you the flexibility to choose different FMs that work best for your needs. Your organization can use generative AI for various purposes like chatbots, intelligent document processing, media creation, and product development and design. You can now apply that same technology to the legal field.

When you’re building generative AI applications, FMs are part of the architecture and not the entire solution. There are other components involved, such as knowledge bases, data stores, and document repositories. It’s important to understand how your enterprise data is integrating with different components and the controls that can be put in place.

Security and your data on AWS

Robust security and confidentiality are foundations to the legal tech domain. At AWS, security is our top priority. AWS is architected to be the most secure global cloud infrastructure on which to build, migrate, and manage applications and workloads. This is backed by our deep set of over 300 cloud security tools and the trust of our millions of customers, including the most security sensitive organizations like government, healthcare, and financial services.

Security is a shared responsibility model. Core security disciplines, like identity and access management, data protection, privacy and compliance, application security, and threat modeling, are still critically important for generative AI workloads, just as they are for any other workload. For example, if your generative AI applications is accessing a database, you’ll need to know what the data classification of the database is, how to protect that data, how to monitor for threats, and how to manage access. But beyond emphasizing long-standing security practices, it’s crucial to understand the unique risks and additional security considerations that generative AI workloads bring. To learn more, refer to Securing generative AI: An introduction to the Generative AI Security Scoping Matrix.

Sovereignty has been a priority for AWS since the very beginning, when we were the only major cloud provider to allow you to control the location and movement of your customer data and address stricter data residency requirements. The AWS Digital Sovereignty Pledge is our commitment to offering AWS customers the most advanced set of sovereignty controls and features available in the cloud. We are committed to expanding our capabilities to allow you to meet your digital sovereignty needs, without compromising on the performance, innovation, security, or scale of the AWS Cloud.

AWS generative AI approach for legal tech

AWS solutions enable legal professionals to refocus their expertise on high-value tasks. On AWS, generative AI solutions are now within reach for legal teams of all sizes. With virtually unlimited cloud computing capacity, the ability to fine-tune models for specific legal tasks, and services tailored for confidential client data, AWS provides the ideal environment for applying generative AI in legal tech.

In the following sections, we share how we’re working with several legal customers on different use cases that are focused on improving the productivity of various tasks in legal firms.

Boost productivity to allow a search based on context and conversational Q&A

Legal professionals store their information in different ways, such as on premises, in the cloud, or a combination of the two. It can take hours or days to consolidate the documents prior to reviewing them if they are scattered across different locations. The industry relies on tools where searching is limited to each domain, and may not flexible enough for users to search for information.

To address this issue, AWS used AI/ML and search engines to provide a managed service where users can ask a human-like, open-ended generative AI-powered assistant to answer questions based on data and information. Users can prompt the assistant to extract key attributes that serve as metadata, find relevant documents, and answer legal questions and terms inquiries. What used to take hours can now be done in a matter of minutes, and based on what we have learned with our customers, AWS generative AI has been able to improve productivity of resources by up to a 15% increase compared to manual processes during its initial phases.

Boost productivity with legal document summarization

Legal tech workers can realize a benefit from the generation of first draft that can then be reviewed and revised by the process owner. Multiple use cases are being implemented under this category:

  • Contract summarization for tax approval
  • Approval attachment summarization
  • Case summarization

The summarization of documents can either use existing documents and videos from your document management system or allow users to upload a document and ask questions in real time. Instead of writing the summary, generative AI uses FMs to create the content so the lawyer can review the final content. This approach reduces these laborious tasks to 5–10 minutes instead of 20–60 minutes.

Boost attorney productivity by drafting and reviewing legal documents using generative AI

Generative AI can help boost attorney productivity by automating the creation of legal documents. Tasks like drafting contracts, briefs, and memos can be time-consuming for attorneys. With generative AI, attorneys can describe the key aspects of a document in plain language and instantly generate an initial draft. This new approach uses generative AI to use templates and chatbot interactions to add allowed text to an initial validation prior to legal review.

Another use case is to improve reviewing contracts using generative AI. Attorneys spend valuable time negotiating contracts. Generative AI can streamline this process by reviewing and redlining contracts, and identify potential discrepancies and conflicting provisions. Given a set of documents, this functionality allows attorneys to ask open-ended questions based on the documents along with follow-up questions, enabling human-like conversational experiences with enterprise data.

Start your AWS generative AI journey today

We are at the beginning of a new and exciting foray into generative AI, and we have just scratched the surface of some potential applications in the legal field—from text summarization, drafting legal documents, or searching based on context. The AWS generative AI stack offers you the infrastructure to build and train your own FMs, services to build with existing FMs, or applications that use other FMs. You can start with the following services:

  • Amazon Q Business is a new type of generative AI-powered assistant. It can be tailored to your business to have conversations, solve problems, generate content, and take actions using the data and expertise found in your company’s information repositories, code bases, and enterprise systems. Amazon Q Business provides quick, relevant, and actionable information and advice to help streamline tasks, speed up decision-making and problem-solving, and help spark creativity and innovation.
  • Amazon Bedrock is a fully managed service that offers a choice of high-performing FMs from leading AI companies like AI21 Labs, Anthropic, Cohere, Meta, Mistral AI, Stability AI, and Amazon through a single API, along with a broad set of capabilities to build generative AI applications with security, privacy, and responsible AI. With Amazon Bedrock, you can experiment with and evaluate top FMs for your use case, privately customize them with your data using techniques such as fine-tuning and Retrieval Augmented Generation (RAG), and build agents that perform tasks using your enterprise systems and data sources.

In upcoming posts, we will dive deeper into different architectural patterns that describe how to use AWS generative AI services to solve for these different use cases.

Conclusion

Generative AI solutions are empowering legal professionals to reduce the difficulty in finding documents and performing summarization, and allow your business to standardize and modernize contract generation and revisions. These solutions do not envision to replace law experts, but instead increase their productivity and time working on practicing law.

We are excited about how legal professionals can build with generative AI on AWS. Start exploring our services and find out where generative AI could benefit your organization. Our mission is to make it possible for developers of all skill levels and for organizations of all sizes to innovate using generative AI in a secure and scalable manner. This just the beginning of what we believe will be the next wave of generative AI, powering new possibilities in legal tech.

Resources


About the Authors

Victor FissVictor Fiss a Sr. Solution Architect Leader at AWS, helping customers in their cloud journey from infrastructure to generative AI solutions at scale. In his free time, he enjoys hiking and playing with his family.

Vineet KachhawahaVineet Kachhawaha is a Sr. Solutions Architect at AWS focusing on AI/ML and generative AI. He co-leads the AWS for Legal Tech team within AWS. He is passionate about working with enterprise customers and partners to design, deploy, and scale AI/ML applications to derive business value.

Pallavi NargundPallavi Nargund is a Principal Solutions Architect at AWS. She is a generative AI lead for East – Greenfield. She leads the AWS for Legal Tech team. She is passionate about women in technology and is a core member of Women in AI/ML at Amazon. She speaks at internal and external conferences such as AWS re:Invent, AWS Summits, and webinars. Pallavi holds a Bachelor’s of Engineering from the University of Pune, India. She lives in Edison, New Jersey, with her husband, two girls, and a Labrador pup.

Read More

Deploy generative AI agents in your contact center for voice and chat using Amazon Connect, Amazon Lex, and Amazon Bedrock Knowledge Bases

Deploy generative AI agents in your contact center for voice and chat using Amazon Connect, Amazon Lex, and Amazon Bedrock Knowledge Bases

This post is co-written with Vraj Shah and Chaitanya Hari from DoorDash.

DoorDash connects consumers with their favorite local businesses in more than 30 countries across the globe. Recently, they faced a significant challenge in handling the high volume of calls from its contractor delivery workers, known as Dashers. With a user base of over 37 million active consumers and 2 million monthly active Dashers at the end of 2023, the company recognized the need to reduce the burden on its live agents by providing a more efficient self-service experience for Dashers.

To address this challenge, the contact center team at DoorDash wanted to harness the power of generative AI to deploy a solution quickly, and at scale, while maintaining their high standards for issue resolution and customer satisfaction. Dashers, who generally prefer calling into support rather than texting while they’re on the road, require fast and reliable assistance, with minimal response latency. This low latency requirement became a critical factor in DoorDash’s quest for an effective, voice-enabled self-service solution.

Working with the AWS Generative AI Innovation Center, DoorDash built a solution to provide Dashers with a low-latency self-service voice experience to answer frequently asked questions, reducing the need for live agent assistance, in just 2 months.

The solution uses Amazon Lex, a voice-enabled conversational AI service; Amazon Bedrock, a fully managed service that makes foundation models (FMs) from leading AI startups and Amazon available through an API, so you can choose from a wide range of FMs to find the model that is best suited for your use case; and Amazon Bedrock Knowledge Bases, a fully managed service that connects large language models (LLMs) to your data sources. It’s a fully serverless architecture that uses Amazon OpenSearch Serverless, which can run petabyte-scale workloads, without you having to manage the underlying infrastructure.

The solution fields hundreds of thousands of calls per day, responding to Dashers with answers to their questions in 2.5 seconds or less. It also enables operational capabilities including automated testing, conversation analytics, monitoring and observability, and LLM hallucination prevention and detection.

“We wanted to empower Dashers to get help with their most common questions and issues as quickly and efficiently as possible, saving them time, effort, and increasing their trust in DoorDash’s self-service capabilities,”

– Chaitanya Hari, Contact Center Product Lead at DoorDash.

In this post, we show how you can deploy generative AI agents in your contact center using AWS services.

Solution overview

For this post, we use a fictional hotel chain example called Example Corp Hospitality Group. The following is a sample interaction between a customer and the LLM-powered automated agent:

Customer: Hi, we’re looking for a great place for a family vacation

Agent: Example Corp Family Getaways offers family-friendly hotels and resorts located near top attractions like theme parks, national parks, and historic sites. The resorts feature spacious accommodations, activities for all ages, and diverse dining options to create unforgettable family memories.

Customer: Where are they located?

Agent: Example Corp Family Getaways offers family-friendly resorts in a variety of popular vacation destinations, including Orlando, Florida; Anaheim, California; Williamsburg, Virginia; Pigeon Forge, Tennessee; San Antonio, Texas; Scottsdale, Arizona; Branson, Missouri; Wisconsin Dells, Wisconsin; and Hershey, Pennsylvania.

Customer: Pigeon Forge sounds interesting.

Agent: Our Pigeon Forge resort offers families a chance to experience the great outdoors while enjoying the excitement of Dollywood and other nearby attractions. Guests can enjoy our indoor water park, mini-golf course, and nightly s’mores roasts around the fire pit.

Customer: Do they have kids’ menus?

Agent: Example Corp Family Getaways resorts in Pigeon Forge, Tennessee feature family-friendly dining options, including dedicated kids’ menus with favorites like pizza, chicken nuggets, and mac and cheese.

You can deploy the solution in your own AWS account and try the example solution. The following diagram illustrates the solution architecture.

Solution architecture diagram

We will walk you through deploying and testing these major components of the solution:

  1. An AWS CloudFormation stack to set up an Amazon Bedrock knowledge base, where you store the content used by the solution to answer questions.
  2. A CloudFormation stack to create an Amazon Lex bot and an AWS Lambda fulfillment function, which implement the core Retrieval Augmented Generation (RAG) question answering capability.
  3. An optional CloudFormation stack to deploy a data pipeline to enable a conversation analytics dashboard.
  4. An optional CloudFormation stack to enable an asynchronous LLM hallucination detection feature.
  5. Optional Jupyter notebooks in Amazon SageMaker that provide an automated testing capability that compares generated answers to ground truth answers, providing pass/fail grades with explanations.

Everything you need is also provided as open source in our GitHub repo.

Prerequisites

You need to have an AWS account and an AWS Identity and Access Management (IAM) role and user with permissions to create and manage the necessary resources and components for this application. If you don’t have an AWS account, see How do I create and activate a new Amazon Web Services account?

This solution uses Amazon Bedrock LLMs to find answers to questions from your knowledge base. Before proceeding, if you have not previously done so, request access to at least the following Amazon Bedrock models:

  • Amazon Titan Embeddings G1 – Text
  • Cohere Embed English v3 and Cohere Embed Multilingual v3
  • Anthropic’s Claude 3 Haiku and Anthropic’s Claude 3 Sonnet

If you’ll be integrating with Amazon Connect, make sure you have an instance available in your account. If you don’t already have one, you can create one. If you plan to deploy the conversation analytics stack, you need Amazon QuickSight, so make sure you have enabled it in your AWS account. 

At the time of writing, this solution is available in the following AWS Regions: Asia Pacific (Singapore, Sydney, Tokyo), Canada (Central), Europe (Frankfurt, London), US East (N. Virginia), and US West (Oregon).

Deploy the Amazon Bedrock knowledge base

You can use the provided CloudFormation stack for the Amazon Bedrock knowledge base instances you may need using Amazon Simple Storage Service (Amazon S3) as a data source. Complete the following steps to set up your knowledge base:

  1. Sign in to your AWS account, then choose Launch Stack to deploy the CloudFormation template:

Launch Knowledge Base stack

  1. Provide a stack name, for example contact-center-kb.
  2. Provide the name for an existing S3 bucket, for example contact-center-kb-(your-account-number). This is where the content for the demo solution will be stored. Create this S3 bucket if you don’t already have one.
  3. Do not specify an S3 prefix.
  4. Choose an embedding model, such as amazon.titan-embed-text-v2:0.
  5. Choose the Fixed-sized chunking chunking strategy.
  6. For the maximum tokens per chunk entry, use 600 for the Amazon Titan embeddings model. (If you are using the Cohere embeddings model, use 512). This represents about a full page of text.
  7. For the percentage overlap, use 10%.
  8. Leave the four entries for Index Details at their default values (index name, vector field name, metadata field name, and text field name).
  9. Choose Next.
  10. On the Configure stack options page, choose Next
  11. On the Review and create page, acknowledge the IAM capabilities message and choose Submit.

The stack will take about 10 minutes to deploy.

Upload the sample content and test your knowledge base

The demonstration sample for the solution includes an LLM-based hotel-bot that can answer questions about the fictional hotel chain Example Corp Hospitality Group. You need to load the content for this hotel chain into the S3 bucket that you specified for the knowledge base stack. You can find the S3 bucket used by the CloudFormation stack on the Outputs tab for the stack.

  1. Either using the AWS Command Line Interface (AWS CLI) or the AWS Management Console, upload the following folders from the content section of the GitHub repo:
    • corporate
    • family-getaways
    • luxury-suites
    • party-times
    • seaside-resorts
    • waypoint-inns

You can choose either the PDF versions or the Word document versions (Word versions recommended). When you’re done, the top level of your S3 bucket should contain six folders, each containing a single Word or PDF document.

  1. On the Amazon Bedrock console, choose Knowledge bases in the navigation pane.
  2. Choose your new knowledge base to open it.

A message appears that says “One or more data sources have not been synced.”

  1. Select the data source and choose Sync.

The sync process should only take a minute or two.

After your data source has been synced, you can try some question answering on the Amazon Bedrock console. Make sure you have enabled all the models approved by your organization on the Amazon Bedrock Model access page.

Select an LLM model, such as Anthropic’s Claude 3 Haiku on Amazon Bedrock, and start asking questions! You might want to peruse the sample documents you uploaded for some ideas about questions to ask.

Knowledge base test example

Deploy the hallucination detection stack (optional)

If you want to use the optional asynchronous hallucination detection feature, deploy this stack. Otherwise, move on to the next section. You can use this CloudFormation stack for any RAG-based solution requiring asynchronous hallucination detection.

  1. Choose Launch Stack:

Launch Hallucination Detection stack

  1. Provide a stack name, for example contact-center-hallucination-detection.
  2. Specify an LLM to perform the hallucination detection. At the time of writing, there are seven LLMs that are recommended for hallucination detection. For the demo solution, choose the default (Claude V3 Sonnet).
  3. Optionally, create an Amazon Key Management Service (AWS KMS) customer managed key (CMK) to encrypt the Amazon Simple Queue Service (Amazon SQS) queue and the Amazon CloudWatch Logs log group for the Lambda function (recommended for production).

There are two types of Amazon CloudWatch alarms in this stack:

  • ERROR alarms – For code issues with the Lambda function that does the hallucination detection work
  • WARNING alarms – For when the Lambda function actually detects a hallucination

Both alarm types are optional, but recommended.

  1. Choose yes to enable or no to disable the alarms.
  2. For the alarms that you enable, you can specify an optional email address or distribution list to receive email notifications about the alarms.
  3. Choose Next.
  4. On the Configure stack options page, choose Next
  5. On the Review and create page, acknowledge the IAM capabilities message and choose Submit.

The stack will take about a minute or two to deploy.

When the stack is complete, you can review the resources it creates on the Resources tab for the CloudFormation stack. In particular, review the Lambda function code.

If you entered email addresses for the alarm notifications, you should receive email requests asking you to confirm the subscriptions. Confirm them to receive email notifications about alarms that may occur.

Deploy the RAG solution stack

If you’re integrating with Amazon Connect, make sure you have an instance available in your account. If you don’t already have one, you can create one. Then complete the following steps to deploy the Amazon Lex bot and Lambda fulfillment function:

  1. Choose Launch Stack:

  1. Provide a stack name, for example contact-center-rag-solution.
  2. Provide a name for the Amazon Lex bot, for example hotel-bot.
  3. Specify the number of conversation turns to retain for context. This can be optimized for different use cases and datasets. For the hotel-bot demo, try the default of 4.
  4. Optionally, specify an existing CloudWatch Logs log group ARN for the Amazon Lex conversation logs. You’ll need this if you’re planning to deploy the conversation analytics stack. Create a log group if you don’t already have one.
  5. Optionally, enter a value for Lambda provisioned concurrency units for the Amazon Lex bot handler function. If set to a non-zero number, this will prevent Lambda cold starts and is recommended for production and for internal testing. For development, 0 or 1 is recommended.
  6. Optionally, select the option to create a KMS CMK to encrypt the CloudWatch Logs log groups for the Lambda functions (recommended for production).
  7. If you’re integrating with Amazon Connect, provide the Amazon Connect instance ARN, as well as the name for a new contact flow that the stack will create for you.
  8. Provide the knowledge base ID from the knowledge base stack you just created. You can find this on the Outputs tab of the knowledge base stack.
  9. Provide the S3 bucket used by the knowledge base stack (also referenced on the Outputs tab).
  10. If you created the hallucination detection stack, enter the SQS queue name. You can find this on the Outputs tab of the hallucination detection stack.
  11. If you opted for a KMS key for your hallucination detection stack, enter the KMS key ARN.
  12. Choose Next.
  13. On the Configure stack options page, choose Next
  14. On the Review and create page, acknowledge the IAM capabilities message and choose Submit.

The stack will take a few minutes to complete.

To try the RAG solution, navigate to the Amazon Lex console and open the hotel-bot bot. The bot has a single language section for the English language. Choose Intents in the navigation pane to check out the intents for this sample bot. They include the following:

  • Intents related to questions about the hotel chain and its various hotel brands – This includes Accommodations, Amenities, CorporateOverview, Locations, Parking, and more. These intents are routed to the RAG solution by Amazon Lex. Technically, intents like these could be omitted, allowing the FallbackIntent to handle requests of this nature. However, including these intents (and their sample utterances) provides Amazon Lex with information about the “language” of your solution domain, allowing it to better optimize its speech-to-text engine and improve speech transcription accuracy. In addition, including these intents is useful for conversation analytics.
  • SwitchBrand – This intent is designed to improve conversation flow by allowing the user to say things like “What about at your other hotels?” in the middle of a conversation.
  • Booking – This demonstrates an example of routing the caller to a live agent queue.
  • SpeakToAgent – This intent is for when a caller specifically requests a live agent.
  • Welcome, Goodbye, and Help – These conversation support intents are for starting and ending the conversation, or asking what the bot can do.
  • FallbackIntent – This is the standard intent for questions or requests that don’t match other intents. In this example solution, such requests are also routed to the RAG solution to allow the LLM to answer based on the content in the knowledge base.
  • SelectKnowledgeBase and SelectLLM – These allow the user to direct the RAG solution to use a different knowledge base instance (if more than one is available) or a different LLM. These intents are designed for testing purposes, and should normally be included only in non-production deployments. You can test the RAG solution with any of the LLMs available on Amazon Bedrock. You can also switch to a different knowledge base or LLM mid-conversation, if desired.
  • ToggleLLMGuardrails and ToggleLLMContext – These allow the user to turn the prompt-based LLM guardrails off or on, and to disable or enable the retrieval of information from the knowledge base. These intents are designed for testing purposes, and should normally be included only in non-production environments. You can turn these settings off and on mid-conversation, if desired.

You can choose Test on the Amazon Lex console to try the solution.

Amazon Lex test example

Try some sample conversations, for example:

  • Ask “We’re looking for a nice place for a family vacation” and the bot will respond “Example Corp Family Getaways offers family-friendly accommodations…”
  • Ask “Where are they located?” and the bot will respond “Example Corp Family Getaways has locations in…”
  • Ask “Tell me more about the one in Pigeon Forge” and the bot will respond “The Example Corp Family Getaways resort in Pigeon Forge, Tennessee is…”

You can refer to the sample documents you uploaded for some ideas about questions to ask.

If you deployed the hallucination detection stack, you can look at its assessment of the answers you got when you tested. From the hallucination detection stack details page, on the Resources tab, choose the HallucinationDetectionFunctionLogGroup entry. This opens the CloudWatch Logs log group for the Lambda hallucination detection function. You can inspect the log statements to observe the hallucination detection process in action, as shown in the following screenshot.

Hallucination detection example

If you’re integrating with Amazon Connect, there will be a new contact flow in the Amazon Connect instance you specified, as shown in the following screenshot.

Amazon Connect contact flow example

To test using voice, just claim a phone number, associate it with this contact flow, and give it a call!

Deploy the conversation analytics stack (optional)

This stack uses QuickSight for analytics, so make sure you have already enabled it in your AWS account before deploying this stack.

  1. Choose Launch Stack:

  1. Provide a stack name, for example contact-center-analytics.
  2. Provide the name (not the ARN) of the Amazon Lex conversation logs log group. This is the same CloudWatch Logs log group you used for the the RAG solution CloudFormation stack.
  3. Choose an option for purging source log streams from the log group. For testing, choose no.
  4. Choose an option for redacting sensitive data using from the conversation logs. For testing, choose no.
  5. Leave the personally identifiable information (PII) entity types and confidence score thresholds at their default values.
  6. Choose an option for allowing unredacted logs for the Lambda function in the data pipeline. For testing, choose yes.
  7. Select an option for creating a KMS CMK.

If you create a CMK, it will be used to encrypt the data in the S3 bucket that this stack creates, where the normalized conversation data is housed. This allows you to control which IAM principals are allowed to decrypt the data and view it. This setting is recommended for production.

  1. Select the options for enabling CloudWatch alarms for ERRORS and WARNINGS in the Amazon Lex data pipeline. It is recommended to enable these alarms.
  2. For the alarms that you enable, you can specify an optional email address or distribution list to receive email notifications about the alarms.
  3. Choose Next.
  4. On the Configure stack options page, choose Next
  5. On the Review and create page, acknowledge the IAM capabilities message and choose Submit.

The stack should about 5 minutes to complete.

The following diagram illustrates the architecture of the stack.

As Amazon Lex writes conversation log entries to CloudWatch Logs (1), they are picked up by Amazon Data Firehose and streamed to an S3 bucket (2). Along the way, a Lambda transformation function (3) simplifies the JSON structure of the data to make it more user-friendly for querying purposes. The Lambda function can also redact sensitive data using Amazon Comprehend (4), and optionally purge the entries from the CloudWatch Logs log group as it consumes them.

On a scheduled basis (every 5 minutes), an AWS Glue crawler (5) inspects new data in the S3 bucket, and updates a data schema that is used by Amazon Athena (6) to provide a SQL interface to the data. This allows tools like QuickSight (7) to create near real-time dashboards, analytics, and visualizations of the data.

Set up the QuickSight dashboard (optional)

Before you create the QuickSight dashboard, make sure to return to the Amazon Lex console and ask a few questions, in order to generate some data for the dashboard. It will take about 5 minutes for the pipeline to process this new conversation data and make it available to QuickSight.

To set up dashboards and visualizations in QuickSight, complete the following steps:

  1. On the QuickSight console, choose the user profile icon and choose Manage QuickSight.
  2. Under Security & permissions, choose Manage in the QuickSight access to AWS services
  3. Under Amazon S3, choose Select S3 buckets.
  4. Enable access to the S3 bucket created by the conversation analytics stack (it will have a name with a 12-character unique identifier prepended to lex-conversation-logs). You don’t need to enable write permissions.
  5. Choose Finish, then choose Save.
  6. Choose the QuickSight menu icon to return to the main page in QuickSight.
  7. In the navigation pane, choose Datasets.
  8. Choose New dataset.
  9. From the list of dataset sources, choose Athena.
  10. Enter a data source name (for example contact-center-analytics).
  11. Choose Create data source.
  12. In the Choose your table window, choose your database, select your lex_conversation_logs table, and choose Edit/Preview data.

Quicksight select database table example

This opens your new QuickSight dataset. You can review the various attributes available, and see some results from your testing.

Quicksight dataset example

For improved speed in displaying the data, you can select the SPICE option for Query mode, but that will mean you need to refresh SPICE (or set up an hourly auto-update schedule) when you want to see data updates based on additional testing.

  1. For now, leave the setting as Direct query.
  2. When you’re ready, choose PUBLISH & VISUALIZE.
  3. In the New sheet window, keep the defaults and choose CREATE.

This opens the analysis page, where you can start creating visualizations.

Quicksight analysis example

Automated testing notebooks (optional)

To try the automated testing capability, you need a SageMaker Jupyter notebook. Alternatively, you can run the notebooks locally in your integrated development environment (IDE) or other environment that supports Jupyter notebooks.

  1. On the SageMaker console, under Notebook in the navigation pane, choose Notebook instances.
  2. Choose Create notebook instance.
  3. Give your notebook a name, such as contact-center-rag-testing.
  4. To enable multi-threaded testing, it’s recommended to select a larger instance, such as ml.m5.2xlarge (which has 8 vCPUs) or ml.m5.4xlarge (which has 16 vCPUs). Don’t forget to stop them when they’re not in use.
  5. Keep the default setting for Platform identifier (Amazon Linux 2, Jupyter Lab 3).
  6. Under Additional configuration, increase the Volume size in GB setting to 50 GB.
  7. In the Permissions and encryption section, under IAM role, choose Create a new role in the drop down list (don’t use the role creation wizard).
  8. In the Create an IAM role window, you can specify any S3 buckets you want to provide access to (none are needed for this solution).
  9. Choose Create role.

Amazon Sagemaker create role example

  1. Choose Create notebook instance.

It will take several minutes for your notebook instance to become available. While it’s being created, you can update the IAM role to add some inline policies you’ll need for accessing Amazon Bedrock and Amazon Lex.

  1. On the Notebook instances page, open your notebook instance (for example, contact-center-rag-testing) and then choose the entry under IAM role ARN to open the role.
  2. Add the following inline policies (available in the notebooks/iam-roles folder in the GitHub repository):

You can revise these roles to limit resource access as needed.

  1. After your notebook instance has started, choose Open Jupyter to open the notebook.
  2. Upload the following to your notebook instance (if desired, you can zip the files locally, upload the zip archive, and then unzip it in SageMaker):
    1. bedrock_helpers.py – This script configures LLM instances for the notebooks.
    2. bedrock_utils – You should make sure to upload all subfolders and files, and confirm that the folder structure is correct.
    3. run_tests.ipynb – This notebook runs a set of test cases.
    4. generate_ground_truths.ipynb – Given a set of questions, this notebook generates potential ground truth answers.
    5. test-runs – This folder should contain Excel workbooks.
  3. Open the run_tests.ipynb notebook.
  4. In the second cell, replace the bot_id and bot_alias_id values with the values for your Amazon Lex bot (you can find these on the Outputs tab of the RAG solution stack).
  5. After you updated these values, choose Restart & Run All on the Kernel

If you’re using a ml.m5.2xlarge instance type, it should take about a minute to run the 50 test cases in the test-runs/test-cases-claude-haiku-2024-09-02.xlsx workbook. When it’s complete, you should find a corresponding test-results workbook in the test-runs folder in your notebook.

Sample test results

After a few minutes, you can also see the test results in your conversation analytics dashboard.

Quicksight test run example

Adapt the solution to your use case

You can adapt this solution to your specific use cases with minimal work:

  • Replace the Amazon Bedrock Knowledge Bases sample content with your content – Replace the content in the S3 bucket and organize it into a folder structure that makes sense for your use case. You can create a new knowledge base for your content.
  • Replace the intents in the Amazon Lex bot with intents for your use case – Modify the Amazon Lex bot definition to reflect the interactions you want to enable for your use case.
  • Modify the LLM prompts in the bedrock_utils code – In the Amazon Lex bot fulfillment Lambda function, review the LLM prompt definitions in the bedrock_utils folder. For example, provide a use case-specific definition for the role of the LLM-based agent.
  • Modify the bot handler code if necessary – In the Amazon Lex bot fulfillment Lambda function, review the code in the TopicIntentHandler.py function. For the knowledge base search, this code provides an example that uses the sample hotel brands as topics. You can replace this metadata search query with one appropriate for your use cases.

Clean up

Congratulations! You have completed all the steps for setting up your voice-enabled contact center generative AI agent solution using AWS services.

When you no longer need the solution deployed in your AWS account, you can delete the CloudFormation stacks that you deployed, as well as the SageMaker notebook instance if you created one.

Conclusion

The contact center generative AI agent solution offers a scalable, cost-effective approach to automate Q&A conversations in your contact center, using AWS services like Amazon Bedrock, Amazon Bedrock Knowledge Bases, OpenSearch Serverless, and Amazon Lex.

The solution code is provided as open source—use it as a starting point for your own solution, and help us make it better by contributing back fixes and features through GitHub pull requests. Browse to the GitHub repository to explore the code, and check the CHANGELOG for the latest changes and the README for the latest documentation updates.

For expert assistance, the AWS Generative AI Innovation Center, AWS Professional Services, and our AWS Partners are here to help.


About the Authors

Vraj Shah is a Connect Developer at DoorDash.

Chaitanya Hari is a Voice/Contact Center Product Lead at DoorDash.

Marcelo Silva PhotoMarcelo Silva is a Principal Product Manager at Amazon Web Services, leading strategy and growth for Amazon Bedrock Knowledge Bases and Amazon Lex.

Adam Diesterhaft is a Sr. Pursuit Solutions Architect on the Amazon Connect team.

Brian Yost is a Principal Deep Learning Architect in the AWS Generative AI Innovation Center.

Read More