Achieve multi-Region resiliency for your conversational AI chatbots with Amazon Lex

Achieve multi-Region resiliency for your conversational AI chatbots with Amazon Lex

Global Resiliency is a new Amazon Lex capability that enables near real-time replication of your Amazon Lex V2 bots in a second AWS Region. When you activate this feature, all resources, versions, and aliases associated after activation will be synchronized across the chosen Regions. With Global Resiliency, the replicated bot resources and aliases in the second Region will have the same identifiers as those in the source Region. This consistency allows you to seamlessly route traffic to any Region by simply changing the Region identifier, providing uninterrupted service availability. In the event of a Regional outage or disruption, you can swiftly redirect your bot traffic to a different Region. Applications now have the ability to use replicated Amazon Lex bots across Regions in an active-active or active-passive manner for improved availability and resiliency. With Global Resiliency, you no longer need to manually manage separate bots across Regions, because the feature automatically replicates and keeps Regional configurations in sync. With just a few clicks or commands, you gain robust Amazon Lex bot replication capabilities. Applications that are using Amazon Lex bots can now fail over from an impaired Region seamlessly, minimizing the risk of costly downtime and maintaining business continuity. This feature streamlines the process of maintaining robust and highly available conversational applications. These include interactive voice response (IVR) systems, chatbots for digital channels, and messaging platforms, providing a seamless and resilient customer experience.

In this post, we walk you through enabling Global Resiliency for a sample Amazon Lex V2 bot. We showcase the replication process of bot versions and aliases across multiple Regions. Additionally, we discuss how to handle integrations with AWS Lambda and Amazon CloudWatch after enabling Global Resiliency.

Solution overview

For this exercise, we create a BookHotel bot as our sample bot. We use an AWS CloudFormation template to build this bot, including defining intents, slots, and other required components such as a version and alias. Throughout our demonstration, we use the us-east-1 Region as the source Region, and we replicate the bot in the us-west-2 Region, which serves as the replica Region. We then replicate this bot, enable logging, and integrate it with a Lambda function.

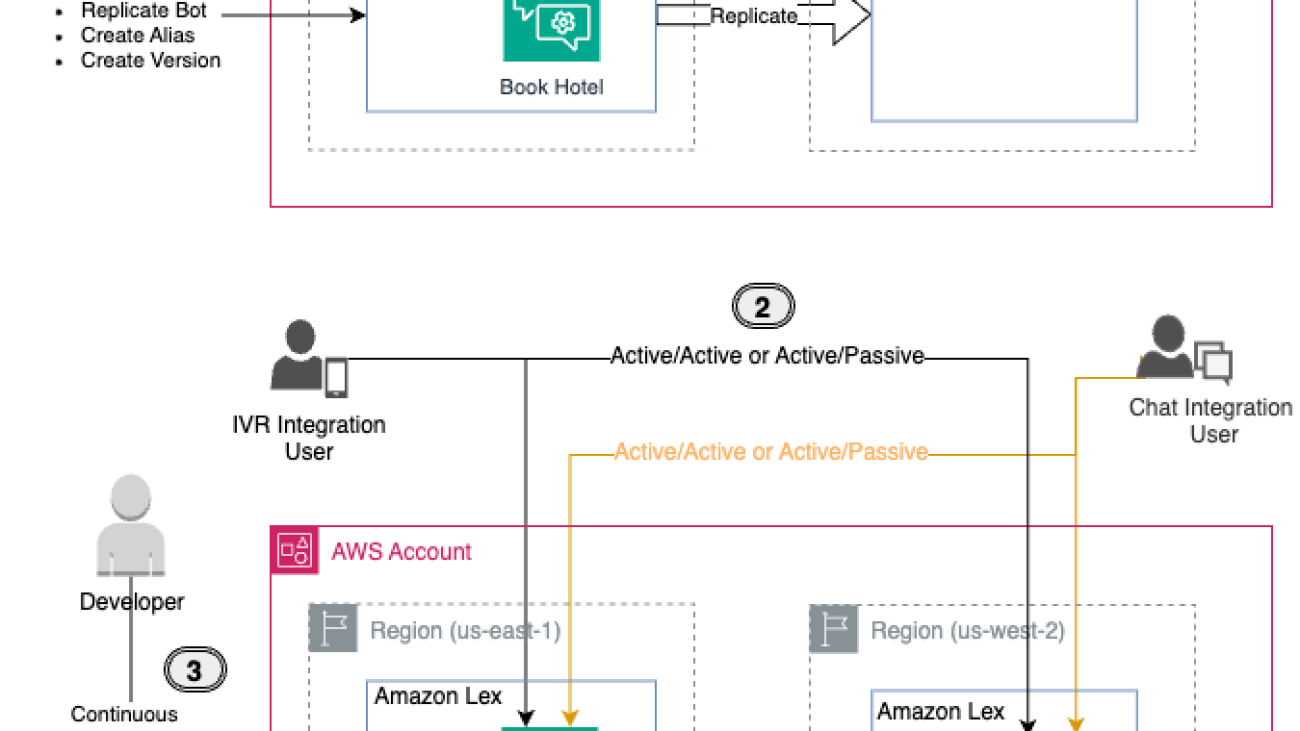
To better understand the solution, refer to the following architecture diagram.

Solution overview

  1. Enabling Global Resiliency for an Amazon Lex bot is straightforward using the AWS Management Console, AWS Command Line Interface (AWS CLI), or APIs. We walk through the instructions to replicate the bot later in this post.
  2. After replication is successfully enabled, the bot will be replicated across Regions, providing a unified experience. This allows you to distribute IVR or chat application requests between Regions in either an active-active or active-passive setup, depending on your use case.
  3. A key benefit of Global Resiliency is that developers can continuously work on bot improvements in the source Region, and changes are automatically synchronized to the replica Region. This streamlines the development workflow without compromising resiliency.

At the time of writing, Global Resiliency only works with predetermined pairs of Regions. For more information, see Use Global Resiliency to deploy bots to other Regions.

Prerequisites

You should have the following prerequisites:

  • An AWS account with administrator access
  • Access to Amazon Lex Global Resiliency (contact your Amazon Connect Solutions Architect or Technical Account Manager)
  • Working knowledge of the following services:
    • AWS CloudFormation
    • Amazon CloudWatch
    • AWS Lambda
    • Amazon Lex

Create a sample Amazon Lex bot

To set up a sample bot for our use case, refer to Manage your Amazon Lex bot via AWS CloudFormation templates. For this example, we create a bot named BookHotel in the source Region (us-east-1). Complete the following steps:

  1. Download the CloudFormation template and deploy it in the source Region (us-east-1). For instructions, see Create a stack from the CloudFormation console.

Upon successful deployment, the BookHotel bot will be created in the source Region.

  1. On the Amazon Lex console, choose Bots in the navigation pane and locate the BookHotel.

Verify that the Global Resiliency option is available under Deployment in the navigation pane. If this option isn’t visible, the Global Resiliency feature may not be enabled for your account. In this case, refer to the prerequisites section for enabling the Global Resiliency feature.

Verify Global Resiliency

Our sample BookHotel bot has one version (Version 1, in addition to the draft version) and an alias named BookHotelDemoAlias (in addition to the TestBotAlias).

Enable Global Resiliency

To activate Global Resiliency and set up bot replication in a replica Region, complete the following steps:

  1. On the Amazon Lex console, choose us-east-1 as your Region.
  2. Choose Bots in the navigation pane and locate the BookHotel.
  3. Under Deployment in the navigation pane, choose Global Resiliency.

You can see the replication details here. Because you haven’t enabled Global Resiliency yet, all the details are blank.

  1. Choose Create replica to create a draft version of your bot.Create Replica

In your source Region (us-east-1), after the bot replication is complete, you will see Replication status as Enabled.Replica Confirmation

  1. Switch to the replica Region (us-west-2).

You can see that the BookHotel bot is replicated. This is a read-only replica and the bot ID in the replica Region matches the bot ID in the source Region.Replica bot ID match

  1. Under Deployment in the navigation pane, choose Global Resiliency.

You can see the replication details here, which are the same as that in the source Region BookHotel bot.Replica Region Details

You have verified that the bot is replicated successfully after Global Resiliency is enabled. Only new versions and aliases created from this point onward will be replicated. As a next step, we create a bot version and alias to demonstrate the replication.

Create a new bot version and alias

Complete the following steps to create a new bot version and alias:

  1. On the Amazon Lex console in your source Region (us-east-1), navigate to the BookHotel.
  2. Choose Bot versions in the navigation pane, and choose Create new version to create Version 2.

Version 2 now has Global Resiliency enabled, whereas Version 1 and the draft version do not, because they were created prior to enabling Global Resiliency.

  1. Choose Aliases in the navigation pane, then choose Create new alias.
  2. Create a new alias for the BookHotel bot called BookHotelDemoAlias_GR and point that to the new version.

Similarly, the BookHotelDemoAlias_GR now has Global Resiliency enabled, whereas aliases created before enabling Global Resiliency, such as BookHotelDemoAlias and TestBotAlias, don’t have Global Resiliency enabled.

  1. Choose Global Resiliency in the navigation pane to view the source and replication details.

The details for Last replicated version are now updated to Version 2.Verify Replicated Version

  1. Switch to the replica Region (us-west-2) and choose Global Resiliency in the navigation pane.

You can see that the new Global Resiliency enabled version (Version 2) is replicated and the new alias BookHotelDemoAlias_GR is also present.

You have verified that the new version and alias were created after Global Resiliency is replicated to the replica Region. You can now make Amazon Lex runtime calls to both Regions.

Handling integrations with Lambda and CloudWatch after enabling Global Resiliency

Amazon Lex has integrations with other AWS services such as enabling custom logic with Lambda functions and logging with conversation logs using CloudWatch and Amazon Simple Storage Service (Amazon S3). In this section, we associate a Lambda function and CloudWatch group for the BookHotel bot in the source Region (us-east-1) and validate its association in the replica Region (us-west-2).

  1. Download the CloudFormation template to deploy a sample Lambda and CloudWatch log group.
  2. Deploy the CloudFormation stack to the source Region (us-east-1). For instructions, see Create a stack from the CloudFormation console.

This will deploy a Lambda function (book-hotel-lambda) and a CloudWatch log group (/lex/book-hotel-bot) in the us-east-1 Region.

  1. Deploy the CloudFormation stack to the replica Region (us-west-2).

This will deploy a Lambda function (book-hotel-lambda) and a CloudWatch log group (/lex/book-hotel-bot) in the us-west-2 Region. The Lambda function name and CloudWatch log group name must be the same in both Regions.

  1. On the Amazon Lex console in the source Region (us-east-1), navigate to the BookHotel.
  2. Choose Aliases in the navigation pane, and choose the BookHotelDemoAlias_GR.
  3. In the Languages section, choose English (US).
  4. Select the book-hotel-lambda function and associate it with the BookHotel bot by choosing Save.
  5. Navigate back to the BookHotelDemoAlias_GR alias, and in the Conversation logs section, choose Manage conversation logs.
  6. Enable Text logs and select the /lex/book-hotel-bot log group, then choose Save.

Conversation text logs are now enabled for the BookHotel bot in us-east-1.Enable Conversation logs source region

  1. Switch to the replica Region (us-west-2) and navigate to the BookHotel.
  2. Choose Aliases in the navigation pane, and choose the BookHotelDemoAlias_GR.

You can see that the conversation logs are already associated with the /lex/book-hotel-bot CloudWatch group the us-west-2 Region.Verify Conversational logs in replica

  1. In the Languages section, choose English (US).

You can see that the book-hotel-lambda function is associated with the BookHotel alias.Lambda Association in Replica

Through this process, we have demonstrated how Lambda functions and CloudWatch log groups are automatically associated with the corresponding bot resources in the replica Region for the replicated bots, providing a seamless and consistent integration across both Regions.

Disabling Global Resiliency

You have the flexibility to disable Global Resiliency at any time. By disabling Global Resiliency, your source bot, along with its associated aliases and versions, will no longer be replicated across other Regions. In this section, we demonstrate the process to disable Global Resiliency.

  1. On the Amazon Lex console in your source Region (us-east-1), choose Bots in the navigation pane and locate the BookHotel.
  2. Under Deployment in the navigation pane, choose Global Resiliency.
  3. Choose Disable Global Resiliency.

Disable Global Resiliency

  1. Enter confirm in the confirmation box and choose Delete.

This action initiates the deletion of the replicated BookHotel bot in the replica Region.Confirm Disable Global Resiliency

The replication status will change to Deleting, and after a few minutes, the deletion process will be complete. You will then see the Create replica option available again. If you don’t see it, try refreshing the page.

Verify Global Resiliency Disable

  1. Check the Bot versions page of the BookHotel bot to confirm that Version 2 is still the latest version.
  2. Check the Aliases page to confirm that the BookHotelDemoAlias_GR alias is still present on the source bot.

Applications referring to this alias can continue to function as normal in the source Region.

  1. Switch to the replica Region (us-west-2) to confirm that the BookHotel bot has been deleted from this Region.

You can reenable Global Resiliency on the source Region (us-east-1) by going through the process described earlier in this post.

Clean up

To prevent incurring charges, complete the following steps to clean up the resources created during this demonstration:

  1. Disable Global Resiliency for the bot by following the instructions detailed earlier in this post.
  2. Delete the book-hotel-lambda-cw-stack CloudFormation stack from the us-west-2. For instructions, see Delete a stack on the CloudFormation console.
  3. Delete the book-hotel-lambda-cw-stack CloudFormation stack from the us-east-1.
  4. Delete the book-hotel-stack CloudFormation stack from the us-east-1.

Integrations with Amazon Connect

Amazon Lex Global Resiliency seamlessly complements Amazon Connect Global Resiliency, providing you with a comprehensive solution for maintaining business continuity and resilience across your conversational AI and contact center infrastructure. Amazon Connect Global Resiliency enables you to automatically maintain your instances synchronized across two Regions, making sure that all configuration resources, such as contact flows, queues, and agents, are true replicas of each other.

With the addition of Amazon Lex Global Resiliency, Amazon Connect customers gain the added benefit of automated synchronization of their Amazon Lex V2 bots associated with their contact flows. This integration provides a consistent and uninterrupted experience during failover scenarios, because your Amazon Lex interactions seamlessly transition between Regions without any disruption. By combining these complementary features, you can achieve end-to-end resilience. This minimizes the risk of downtime and makes sure your conversational AI and contact center operations remain highly available and responsive, even in the case of Regional failures or capacity constraints.

Global Resiliency APIs

Global Resiliency provides API support to create and manage replicas. These are supported in the AWS CLI and AWS SDKs. In this section, we demonstrate usage with the AWS CLI.

  1. Create a bot replica in the replica Region using the CreateBotReplica.
  2. Monitor the bot replication status using the DescribeBotReplica.
  3. List the replicated bots using the ListBotReplicas.
  4. List all the version replication statuses applicable for Global Resiliency using the ListBotVersionReplicas.

This list includes only the replicated bot versions, which were created after Global Resiliency was enabled. In the API response, a botVersionReplicationStatus of Available indicates that the bot version was replicated successfully.

  1. List all the alias replication statuses applicable for Global Resiliency using the ListBotAliasReplicas.

This list includes only the replicated bot aliases, which were created after Global Resiliency was enabled. In the API response, a botAliasReplicationStatus of Available indicates that the bot alias was replicated successfully.

Conclusion

In this post, we introduced the Global Resiliency feature for Amazon Lex V2 bots. We discussed the process to enable Global Resiliency using the console and reviewed some of the new APIs released as part of this feature.

As the next step, you can explore Global Resiliency and apply the techniques discussed in this post to replicate bots and bot versions across Regions. This hands-on practice will solidify your understanding of managing and replicating Amazon Lex V2 bots in your solution architecture.


About the Authors

Priti AryamanePriti Aryamane is a Specialty Consultant at AWS Professional Services. With over 15 years of experience in contact centers and telecommunications, Priti specializes in helping customers achieve their desired business outcomes with customer experience on AWS using Amazon Lex, Amazon Connect, and generative AI features.

Sanjeet SandaSanjeet Sanda is a Specialty Consultant at AWS Professional Services with over 20 years of experience in telecommunications, contact center technology, and customer experience. He specializes in designing and delivering customer-centric solutions with a focus on integrating and adapting existing enterprise call centers into Amazon Connect and Amazon Lex environments. Sanjeet is passionate about streamlining adoption processes by using automation wherever possible. Outside of work, Sanjeet enjoys hanging out with his family, having barbecues, and going to the beach.

Yogesh KhemkaYogesh Khemka is a Senior Software Development Engineer at AWS, where he works on large language models and natural language processing. He focuses on building systems and tooling for scalable distributed deep learning training and real-time inference.

Read More

Create and fine-tune sentence transformers for enhanced classification accuracy

Create and fine-tune sentence transformers for enhanced classification accuracy

Sentence transformers are powerful deep learning models that convert sentences into high-quality, fixed-length embeddings, capturing their semantic meaning. These embeddings are useful for various natural language processing (NLP) tasks such as text classification, clustering, semantic search, and information retrieval.

In this post, we showcase how to fine-tune a sentence transformer specifically for classifying an Amazon product into its product category (such as toys or sporting goods). We showcase two different sentence transformers, paraphrase-MiniLM-L6-v2 and a proprietary Amazon large language model (LLM) called M5_ASIN_SMALL_V2.0, and compare their results. M5 LLMS are BERT-based LLMs fine-tuned on internal Amazon product catalog data using product title, bullet points, description, and more. They are currently being used for use cases such as automated product classification and similar product recommendations. Our hypothesis is that M5_ASIN_SMALL_V2.0 will perform better for the use case of Amazon product category classification due to it being fine-tuned with Amazon product data. We prove this hypothesis in the following experiment illustrated in this post.

Solution overview

In this post, we demonstrate how to fine-tune a sentence transformer with Amazon product data and how to use the resulting sentence transformer to improve classification accuracy of product categories using an XGBoost decision tree. For this demonstration, we use a public Amazon product dataset called Amazon Product Dataset 2020 from a kaggle competition. This dataset contains the following attributes and fields:

  • Domain name – amazon.com
  • Date range – January 1, 2020, through January 31, 2020
  • File extension – CSV
  • Available fields – Uniq Id, Product Name, Brand Name, Asin, Category, Upc Ean Code, List Price, Selling Price, Quantity, Model Number, About Product, Product Specification, Technical Details, Shipping Weight, Product Dimensions, Image, Variants, SKU, Product Url, Stock, Product Details, Dimensions, Color, Ingredients, Direction To Use, Is Amazon Seller, Size Quantity Variant, and Product Description
  • Label field – Category

Prerequisites

Before you begin, install the following packages. You can do this in either an Amazon SageMaker notebook or your local Jupyter notebook by running the following commands:

!pip install sentencepiece --quiet
!pip install sentence_transformers --quiet
!pip install xgboost –-quiet
!pip install scikit-learn –-quiet/

Preprocess the data

The first step needed for fine-tuning a sentence transformer is to preprocess the Amazon product data for the sentence transformer to be able to consume the data and fine-tune effectively. It involves normalizing the text data, defining the product’s main category by extracting the first category from the Category field, and selecting the most important fields from the dataset that contribute to classifying the product’s main category accurately. We use the following code for preprocessing:

import pandas as pd
from sklearn.preprocessing import LabelEncoder

data = pd.read_csv('marketing_sample_for_amazon_com-ecommerce__20200101_20200131__10k_data.csv')
data.columns = data.columns.str.lower().str.replace(' ', '_')
data['main_category'] = data['category'].str.split("|").str[0]
data["all_text"] = data.apply(
    lambda r: " ".join(
        [
            str(r["product_name"]) if pd.notnull(r["product_name"]) else "",
            str(r["about_product"]) if pd.notnull(r["about_product"]) else "",
            str(r["product_specification"]) if pd.notnull(r["product_specification"]) else "",
            str(r["technical_details"]) if pd.notnull(r["technical_details"]) else ""
        ]
    ),
    axis=1
)
label_encoder = LabelEncoder()
labels_transform = label_encoder.fit_transform(data['main_category'])
data['label']=labels_transform
data[['all_text','label']]

The following screenshot shows an example of what our dataset looks like after it has been preprocessed.

Fine-tune the sentence transformer paraphrase-MiniLM-L6-v2

The first sentence transformer we fine-tune is called paraphrase-MiniLM-L6-v2. It uses the popular BERT model as its underlying architecture to transform product description text into a 384-dimensional dense vector embedding that will be consumed by our XGBoost classifier for product category classification. We use the following code to fine-tune paraphrase-MiniLM-L6-v2 using the preprocessed Amazon product data:

from sentence_transformers import SentenceTransformer
model_name='paraphrase-MiniLM-L6-v2'
model = SentenceTransformer(model_name)

The first step is to define a classification head that represents the 24 product categories that an Amazon product can be classified into. This classification head will be used to train the sentence transformer specifically to be more effective at transforming product descriptions according to the 24 product categories. The idea is that all product descriptions that are within the same category should be transformed into a vector embedding that is closer in distance compared to product descriptions that belong in different categories.

 The following code is for fine-tuning sentence transformer 1:

import torch.nn as nn

# Define classification head
class ClassificationHead(nn.Module):
    def __init__(self, embedding_dim, num_classes):
        super(ClassificationHead, self).__init__()
        self.linear = nn.Linear(embedding_dim, num_classes)

    def forward(self, features):
        x = features['sentence_embedding']
        x = self.linear(x)
        return x

# Define the number of classes for a classification task.
num_classes = 24
print('class number:', num_classes)
classification_head = ClassificationHead(model.get_sentence_embedding_dimension(), num_classes)

# Combine SentenceTransformer model and classification head."
class SentenceTransformerWithHead(nn.Module):
    def __init__(self, transformer, head):
        super(SentenceTransformerWithHead, self).__init__()
        self.transformer = transformer
        self.head = head

    def forward(self, input):
        features = self.transformer(input)
        logits = self.head(features)
        return logits

model_with_head = SentenceTransformerWithHead(model, classification_head)

We then set the fine-tuning parameters. For this post, we train on five epochs, optimize for cross-entropy loss, and use the AdamW optimization method. We chose epoch 5 because, after testing various epoch values, we observed that the loss minimized at epoch 5. This made it the optimal number of training iterations for achieving the best classification results.

The following code is for fine-tuning sentence transformer 2:

import os
os.environ["TORCH_USE_CUDA_DSA"] = "1"
os.environ["CUDA_LAUNCH_BLOCKING"] = "1"

from sentence_transformers import SentenceTransformer, InputExample, LoggingHandler
import torch
from torch.utils.data import DataLoader
from transformers import AdamW, get_linear_schedule_with_warmup

train_sentences = data['all_text']
train_labels = data['label']
# training parameters
num_epochs = 5
batch_size = 2
learning_rate = 2e-5

# Convert the dataset to PyTorch tensors.
train_examples = [InputExample(texts=[s], label=l) for s, l in zip(train_sentences, train_labels)]

# Customize collate_fn to convert InputExample objects into tensors.
def collate_fn(batch):
    texts = [example.texts[0] for example in batch]
    labels = torch.tensor([example.label for example in batch])
    return texts, labels

train_dataloader = DataLoader(train_examples, shuffle=True, batch_size=batch_size, collate_fn=collate_fn)

# Define the loss function, optimizer, and learning rate scheduler.
criterion = nn.CrossEntropyLoss()
optimizer = AdamW(model_with_head.parameters(), lr=learning_rate)
total_steps = len(train_dataloader) * num_epochs
scheduler = get_linear_schedule_with_warmup(optimizer, num_warmup_steps=0, num_training_steps=total_steps)

# Training loop
loss_list=[]
for epoch in range(num_epochs):
    model_with_head.train()
    for step, (texts, labels) in enumerate(train_dataloader):
        labels = labels.to(model.device)
        optimizer.zero_grad()

        # Encode text and pass through classification head.
        inputs = model.tokenize(texts)
        input_ids = inputs['input_ids'].to(model.device)
        input_attention_mask = inputs['attention_mask'].to(model.device)
        inputs_final = {'input_ids': input_ids, 'attention_mask': input_attention_mask}
        
        # move model_with_head to the same device
        model_with_head = model_with_head.to(model.device)
        logits = model_with_head(inputs_final)
        
        loss = criterion(logits, labels)
        loss.backward()
        optimizer.step()
        scheduler.step()
        if step % 100 == 0:
            print(f"Epoch {epoch}, Step {step}, Loss: {loss.item()}")

    print(f'Epoch {epoch+1}/{num_epochs}, Loss: {loss.item()}')
    model_save_path = f'./intermediate-output/epoch-{epoch}'
    model.save(model_save_path)
    loss_list.append(loss.item())
# Save the final model
model_final_save_path='st_ft_epoch_5'
model.save(model_final_save_path)

To observe whether our resulting fine-tuned sentence transformer improves our product category classification accuracy, we use it as our text embedder in the XGBoost classifier in the next step.

XGBoost classification

XGBoost (Extreme Gradient Boosting) classification is a machine learning technique used for classification tasks. It’s an implementation of the gradient boosting framework designed to be efficient, flexible, and portable. For this post, we have XGBoost consume the product description text embedding output of our sentence transformers and observe product category classification accuracy. We use the following code to use the standard paraphrase-MiniLM-L6-v2 sentence transformer before it was fine-tuned to classify Amazon products to their respective categories:

from sklearn.model_selection import train_test_split
import xgboost as xgb
from sklearn.metrics import accuracy_score

model = SentenceTransformer('paraphrase-MiniLM-L6-v2')  
data['text_embedding'] = data['all_text'].apply(lambda x: model.encode(str(x)))
text_embeddings = pd.DataFrame(data['text_embedding'].tolist(), index=data.index, dtype=float)

# Convert numeric columns stored as strings to floats
numeric_columns = ['selling_price', 'shipping_weight', 'product_dimensions']  # Add more columns as needed
for col in numeric_columns:
    data[col] = pd.to_numeric(data[col], errors='coerce')

# Convert categorical columns to category type
categorical_columns = ['model_number', 'is_amazon_seller']  # Add more columns as needed
for col in categorical_columns:
    data[col] = data[col].astype('category')
    
X_0 = data[['selling_price','model_number','is_amazon_seller']]
X = pd.concat([X_0, text_embeddings], axis=1)
label_encoder = LabelEncoder()
data['main_category_encoded'] = label_encoder.fit_transform(data['main_category'])
y = data['main_category_encoded']
X_train, X_test, y_train, y_test = train_test_split(X, y, test_size=0.2, random_state=42)

# Re-encode the labels to ensure they are consecutive integers starting from 0
unique_labels = sorted(set(y_train) | set(y_test))
label_mapping = {label: idx for idx, label in enumerate(unique_labels)}

y_train = y_train.map(label_mapping)
y_test = y_test.map(label_mapping)

# Enable categorical support for XGBoost
dtrain = xgb.DMatrix(X_train, label=y_train, enable_categorical=True)
dtest = xgb.DMatrix(X_test, label=y_test, enable_categorical=True)

param = {
    'max_depth': 6,
    'eta': 0.3,
    'objective': 'multi:softmax',
    'num_class': len(label_mapping),
    'eval_metric': 'mlogloss'
}

num_round = 100
bst = xgb.train(param, dtrain, num_round)

# Evaluate the model
y_pred = bst.predict(dtest)
accuracy = accuracy_score(y_test, y_pred)
print(f'Accuracy: {accuracy:.2f}')

Accuracy: 0.78

We observe a 78% accuracy using the stock paraphrase-MiniLM-L6-v2 sentence transformer. To observe the results of the fine-tuned paraphrase-MiniLM-L6-v2 sentence transformer, we need to update the beginning of the code as follows. All other code remains the same.

model = SentenceTransformer('st_ft_epoch_5')  
data['text_embedding_miniLM_ft10'] = data['all_text'].apply(lambda x: model.encode(str(x)))
text_embeddings = pd.DataFrame(data['text_embedding_finetuned'].tolist(), index=data.index, dtype=float)
X_pa_finetuned = pd.concat([X_0, text_embeddings], axis=1)
X_train, X_test, y_train, y_test = train_test_split(X_pa_finetuned, y, test_size=0.2, random_state=42)

# Re-encode the labels to ensure they are consecutive integers starting from 0
unique_labels = sorted(set(y_train) | set(y_test))
label_mapping = {label: idx for idx, label in enumerate(unique_labels)}

y_train = y_train.map(label_mapping)
y_test = y_test.map(label_mapping)

# Build and train the XGBoost model
# Enable categorical support for XGBoost
dtrain = xgb.DMatrix(X_train, label=y_train, enable_categorical=True)
dtest = xgb.DMatrix(X_test, label=y_test, enable_categorical=True)

param = {
    'max_depth': 6,
    'eta': 0.3,
    'objective': 'multi:softmax',
    'num_class': len(label_mapping),
    'eval_metric': 'mlogloss'
}

num_round = 100
bst = xgb.train(param, dtrain, num_round)

y_pred = bst.predict(dtest)
accuracy = accuracy_score(y_test, y_pred)
print(f'Accuracy: {accuracy:.2f}')

# Optionally, convert the predicted labels back to the original category labels
inverse_label_mapping = {idx: label for label, idx in label_mapping.items()}
y_pred_labels = pd.Series(y_pred).map(inverse_label_mapping)

Accuracy: 0.94

With the fine-tuned paraphrase-MiniLM-L6-v2 sentence transformer, we observe a 94% accuracy, a 16% increase from the baseline of 78% accuracy. From this observation, we conclude that fine-tuning paraphrase-MiniLM-L6-v2 is effective for classifying Amazon product data into product categories.

Fine-tune the sentence transformer M5_ASIN_SMALL_V20

Now we create a sentence transformer from a BERT-based model called M5_ASIN_SMALL_V2.0. It’s a 40-million-parameter BERT-based model trained at M5, an internal team at Amazon specializing in fine-tuning LLMs using Amazon product data. It was distilled from a larger teacher model (approximately 5 billion parameters), which was pre-trained on a large amount of unlabeled ASIN data and pre-fine-tuned on a set of Amazon supervised learning tasks (multi-task pre-fine-tuning). It is a multi-task, multi-lingual, multi-locale, and multi-modal BERT-based encoder-only model trained on text and structured data input. Its neural network architectural details are as follows:

Model backbone:
 Hidden size: 384
 Number of hidden layers: 24
 Number of attention heads: 16
 Intermediate size: 1536
 Vocabulary size: 256,035
Number of backbone parameters: 42,587,904
Number of word embedding parameters (bert.embedding.*): 98,517,504
Total number of parameters: 141,259,023

Because M5_ASIN_SMALL_V20 was pre-trained on Amazon product data specifically, we hypothesize that building a sentence transformer from it will increase the accuracy of product category classification. We complete the following steps to build a sentence transformer from M5_ASIN_SMALL_V20, fine-tune it, and input it into an XGBoost classifier to observe accuracy impact:

  1. Load a pre-trained M5 model that you want to use as the base encoder.
  2. Use the M5 model within the SentenceTransformer framework to create a sentence transformer.
  3. Add a pooling layer to create fixed-size sentence embeddings from the variable-length output of the BERT model.
  4. Combine the M5 model and pooling layer into a single model.
  5. Fine-tune the model on a relevant dataset.

See the following code for Steps 1–3:

from sentence_transformers import models 
from transformers import AutoTokenizer

# Step 1: Load Pre-trained M5 Model
model_path = 'M5_ASIN_SMALL_V20'  # or your custom model path
transformer_model = models.Transformer(model_path)
tokenizer = AutoTokenizer.from_pretrained(model_path)

# Step 2: Define Pooling Layer
pooling_model = models.Pooling(transformer_model.get_word_embedding_dimension(),
                               pooling_mode_mean_tokens=True)

# Step 3: Create SentenceTransformer Model
model_mean_m5_base = SentenceTransformer(modules=[transformer_model, pooling_model])

The rest of the code remains the same as fine-tuning for the paraphrase-MiniLM-L6-v2 sentence transformer, except that we use the fine-tuned M5 sentence transformer instead to create embeddings for the texts in the dataset:

loaded_model = SentenceTransformer('m5_ft_epoch_5_mean')
data['text_embedding_m5'] = data['all_text'].apply(lambda x: loaded_model.encode(str(x)))

Result

We observe similar results to paraphrase-MiniLM-L6-v2 when looking at accuracy before fine-tuning, observing a 78% accuracy for M5_ASIN_SMALL_V20. However, we observe that the fine-tuned M5_ASIN_SMALL_V20 sentence transformer performs better than the fine-tuned paraphrase-MiniLM-L6-v2. Its accuracy is 98%, compared to 94% for the fine-tuned paraphrase-MiniLM-L6-v2. We fine-tuned the sentence transformers for 5 epochs, because experiments showed this was the optimal number to minimize loss. The following graph summarizes our observations of accuracy improvement with fine-tuning for 5 epochs in a single comparison chart.

Clean up

We recommend using GPUs to fine-tune the sentence transformers, for example, ml.g5.4xlarge or ml.g4dn.16xlarge. Be sure to clean up resources to avoid incurring additional costs.

If you’re using a SageMaker notebook instance, refer to Clean up Amazon SageMaker notebook instance resources. If you’re using Amazon SageMaker Studio, refer to Delete or stop your Studio running instances, applications, and spaces.

Conclusion

In this post, we explored sentence transformers and how to use them effectively for text classification tasks. We dived deep into the sentence transformer paraphrase-MiniLM-L6-v2, demonstrated how to use a BERT-based model like M5_ASIN_SMALL_V20 to create a sentence transformer, showed how to fine-tune sentence transformers, and showed the accuracy effects of fine-tuning sentence transformers.

Fine-tuning sentence transformers has proven to be highly effective for classifying product descriptions into categories, significantly enhancing prediction accuracy. As a next step, we encourage you to explore different sentence transformers from Hugging Face.

Lastly, if you want to explore M5, note that it is proprietary to Amazon and you can only access it as an Amazon partner or customer as of the time of this publication. Connect with your Amazon point of contact if you’re an Amazon partner or customer wanting to use M5, and they will guide you through M5’s offerings and how it can be used for your use case.


About the Authors

Kara Yang is a Data Scientist at AWS Professional Services in the San Francisco Bay Area, with extensive experience in AI/ML. She specializes in leveraging cloud computing, machine learning, and Generative AI to help customers address complex business challenges across various industries. Kara is passionate about innovation and continuous learning.

Farshad Harirchi is a Principal Data Scientist at AWS Professional Services. He helps customers across industries, from retail to industrial and financial services, with the design and development of generative AI and machine learning solutions. Farshad brings extensive experience in the entire machine learning and MLOps stack. Outside of work, he enjoys traveling, playing outdoor sports, and exploring board games.

James Poquiz is a Data Scientist with AWS Professional Services based in Orange County, California. He has a BS in Computer Science from the University of California, Irvine and has several years of experience working in the data domain having played many different roles. Today he works on implementing and deploying scalable ML solutions to achieve business outcomes for AWS clients.



Read More

Spooks Await at the ‘Haunted Sanctuary,’ Built With RTX and AI

Spooks Await at the ‘Haunted Sanctuary,’ Built With RTX and AI

Among the artists using AI to enhance and accelerate their creative endeavors is Sabour Amirazodi, a creator and tech marketing and workflow specialist at NVIDIA.

Using his over 20 years of multi-platform experience in location-based entertainment and media production, he decorates his home every year with an incredible Halloween installation — dubbed the Haunted Sanctuary.

The project is a massive undertaking requiring projection mapping, the creation and assembly of 3D scenes, compositing and editing in Adobe After Effects and Premiere Pro, and more. The creation process was accelerated using the NVIDIA Studio content creation platform and Amirazodi’s NVIDIA RTX 6000 GPU.

This year, Amirazodi deployed new AI workflows in ComfyUI, Adobe Firefly and Photoshop to create digital portraits — inspired by his family — as part of the installation.

Give ’em Pumpkin to Talk About

ComfyUI is a node-based interface that generates images and videos from text. It’s designed to be highly customizable, allowing users to design workflows, adjust settings and see results immediately. It can combine various AI models and third-party extensions to achieve a higher degree of control.

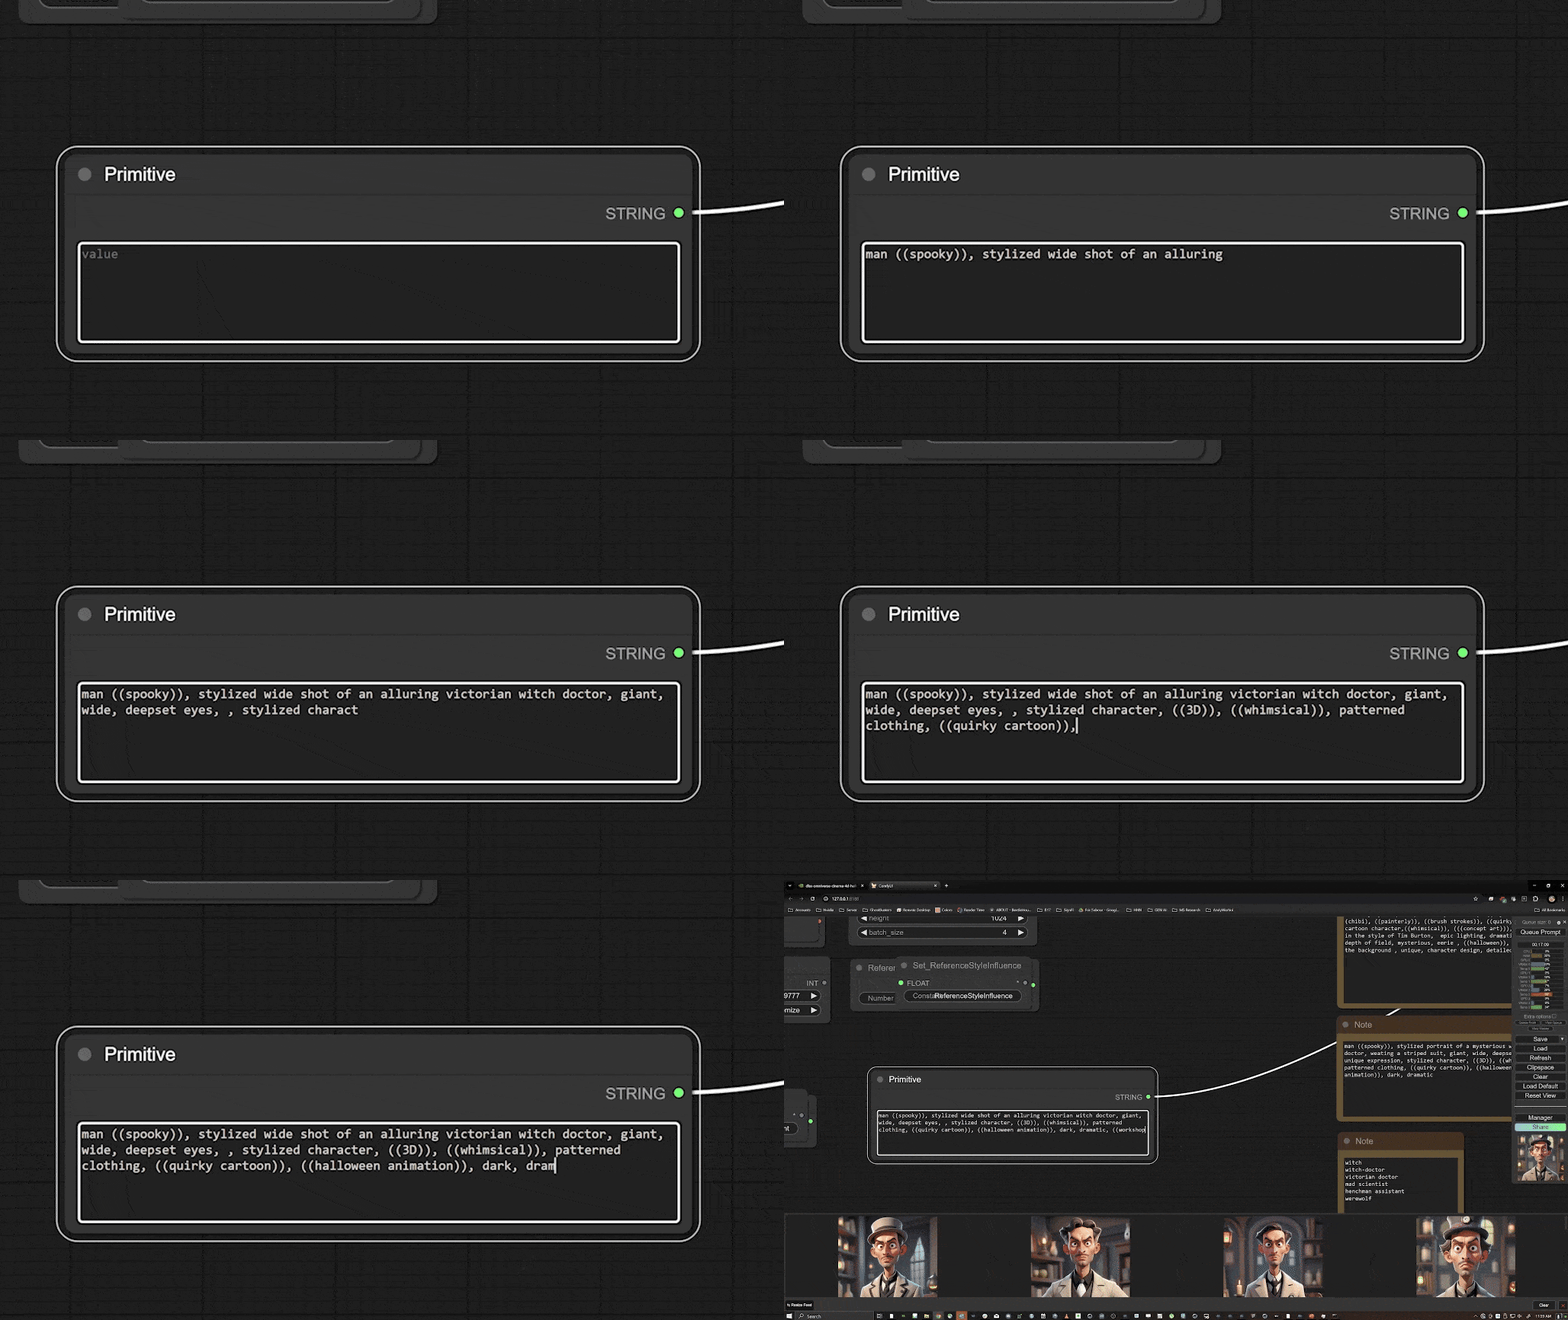
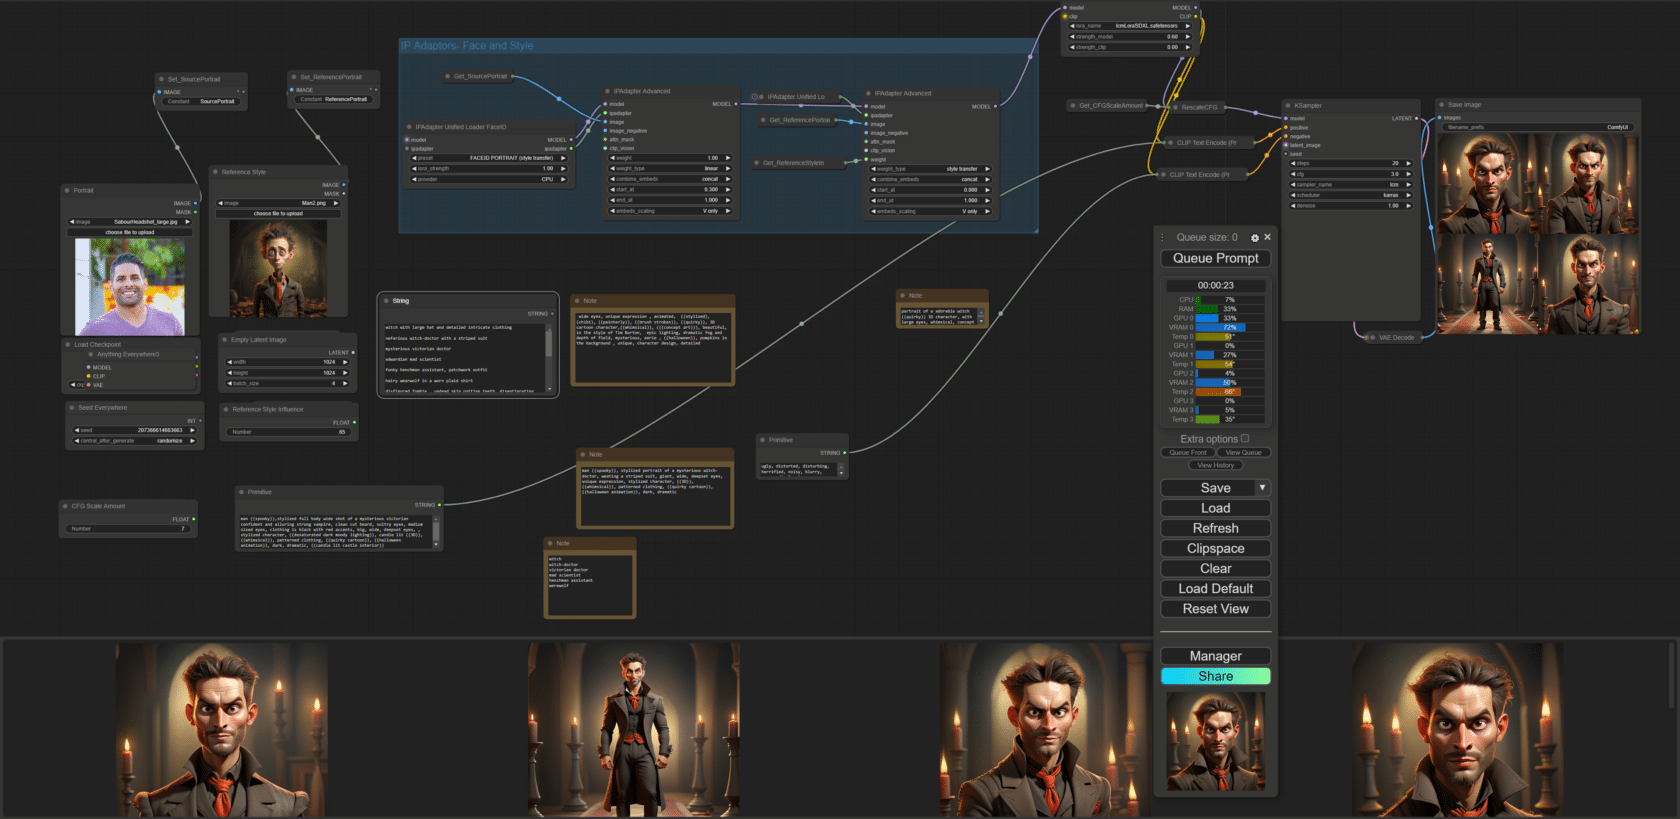
For example, this workflow below requires entering a prompt, the details and characteristics of the desired image, and a negative prompt to help omit any undesired visual effects.

Since Amirazodi wanted his digital creations to closely resemble his family, he started by applying Run IP Adapters, which use reference images to inform generated content.

ComfyUI nodes and reference material in the viewer.

From there, he tinkered with the settings to achieve the desired look and feel of each character.

The Amirazodis digitized for the ‘Halloween Sanctuary’ installation.

ComfyUI has NVIDIA TensorRT acceleration, so RTX users can generate images from prompts up to 60% faster.

Get started with ComfyUI.

In Darkness, Let There Be Light

Adobe Firefly is a family of creative generative AI models that offer new ways to ideate and create while assisting creative workflows. They’re designed to be safe for commercial use and were trained, using NVIDIA GPUs, on licensed content like Adobe Stock Images and public domain content where copyright has expired.

To make the digital portraits fit as desired, Amirazodi needed to expand the background.

Adobe Photoshop features a Generative Fill tool called Generative Expand that allows artists to extend the border of their image with the Crop tool and automatically fill the space with content that matches the existing image.

Photoshop also features “Neural Filters that allow artists to explore creative ideas and make complex adjustments to images in just seconds, saving them hours of tedious, manual work.

With Smart Portrait Neural Filters, artists can easily experiment with facial characteristics such as gaze direction and lighting angles simply by dragging a slider. Amirazodi used the feature to apply the final touches to his portraits, adjusting colors, textures, depth blur and facial expressions.

NVIDIA RTX GPUs help power AI-based tasks, accelerating the Neural Filters in Photoshop.

Learn more about the latest Adobe features and tools in this blog.

AI is already helping accelerate and automate tasks across content creation, gaming and everyday life — and the speedups are only multiplied with an NVIDIA RTX- or GeForce RTX GPU-equipped system.

Check out and share Halloween- and fall-themed art as a part of the NVIDIA Studio #HarvestofCreativity challenge on Instagram, X, Facebook and Threads for a chance to be featured on the social media channels.

Read More