The rapid evolution of Large Language Models (LLMs) and conversational assistants necessitates dynamic, scalable, and configurable conversational datasets for training and evaluation. These datasets must accommodate diverse user interaction modes, including text and voice, each presenting unique modeling challenges. Knowledge Graphs (KGs), with their structured and evolving nature, offer an ideal foundation for current and precise knowledge. Although human-curated KG-based conversational datasets exist, they struggle to keep pace with the rapidly changing user information needs. We present…Apple Machine Learning Research

What’s new in TensorFlow 2.18
 Posted by the TensorFlow team

TensorFlow 2.18 has been released! Highlights of this release (and 2.17) include NumPy 2.0, LiteRT repository, CUDA Update, Hermetic CUDA and more. For the full release notes, please click here.
Note: Release updates on the new multi-backend Keras will be published on keras.io, starting with Keras 3.0. For more information, please see https://keras.io/keras_3/.
TensorFlow Core
NumPy 2.0
The upcoming TensorFlow 2.18 release will include support for NumPy 2.0. While the majority of TensorFlow APIs will function seamlessly with NumPy 2.0, this may break some edge cases of usage, e.g., out-of-boundary conversion errors and numpy scalar representation errors. You can consult the following common solutions.
Note that NumPy’s type promotion rules have been changed (See NEP 50 for details). This may change the precision at which computations happen, leading either to type errors or to numerical changes to results. Please see the NumPy 2 migration guide.
We’ve updated some TensorFlow tensor APIs to maintain compatibility with NumPy 2.0 while preserving the out-of-boundary conversion behavior in NumPy 1.x.
LiteRT Repository
We’re making some changes to how LiteRT (formerly known as TFLite) is developed. Over the coming months, we’ll be gradually transitioning TFLite’s codebase to LiteRT. Once the migration is complete, we’ll start accepting contributions directly through the LiteRT repository. There will no longer be any binary TFLite releases and developers should switch to LiteRT for the latest updates.
Hermetic CUDA
If you build TensorFlow from source, Bazel will now download specific versions of CUDA, CUDNN and NCCL distributions, and then use those tools as dependencies in various Bazel targets. This enables more reproducible builds for Google ML projects and supported CUDA versions because the build no longer relies on the locally installed versions. More details are provided here.
CUDA Update
TensorFlow binary distributions now ship with dedicated CUDA kernels for GPUs with a compute capability of 8.9. This improves the performance on the popular Ada-Generation GPUs like NVIDIA RTX 40**, L4 and L40.
To keep Python wheel sizes in check, we made the decision to no longer ship CUDA kernels for compute capability 5.0. That means the oldest NVIDIA GPU generation supported by the precompiled Python packages is now the Pascal generation (compute capability 6.0). For Maxwell support, we either recommend sticking with TensorFlow version 2.16, or compiling TensorFlow from source. The latter will be possible as long as the used CUDA version still supports Maxwell GPUs.
Import data from Google Cloud Platform BigQuery for no-code machine learning with Amazon SageMaker Canvas
In the modern, cloud-centric business landscape, data is often scattered across numerous clouds and on-site systems. This fragmentation can complicate efforts by organizations to consolidate and analyze data for their machine learning (ML) initiatives.
This post presents an architectural approach to extract data from different cloud environments, such as Google Cloud Platform (GCP) BigQuery, without the need for data movement. This minimizes the complexity and overhead associated with moving data between cloud environments, enabling organizations to access and utilize their disparate data assets for ML projects.
We highlight the process of using Amazon Athena Federated Query to extract data from GCP BigQuery, using Amazon SageMaker Data Wrangler to perform data preparation, and then using the prepared data to build ML models within Amazon SageMaker Canvas, a no-code ML interface.
SageMaker Canvas allows business analysts to access and import data from over 50 sources, prepare data using natural language and over 300 built-in transforms, build and train highly accurate models, generate predictions, and deploy models to production without requiring coding or extensive ML experience.
Solution overview
The solution outlines two main steps:
- Set up Amazon Athena for federated queries from GCP BigQuery, which enables running live queries in GCP BigQuery directly from Athena
- Import the data into SageMaker Canvas from BigQuery using Athena as an intermediate
After the data is imported into SageMaker Canvas, you can use the no-code interface to build ML models and generate predictions based on the imported data.
You can use SageMaker Canvas to build the initial data preparation routine and generate accurate predictions without writing code. However, as your ML needs evolve or require more advanced customization, you may want to transition from a no-code environment to a code-first approach. The integration between SageMaker Canvas and Amazon SageMaker Studio allows you to operationalize the data preparation routine for production-scale deployments. For more details, refer to Seamlessly transition between no-code and code-first machine learning with Amazon SageMaker Canvas and Amazon SageMaker Studio
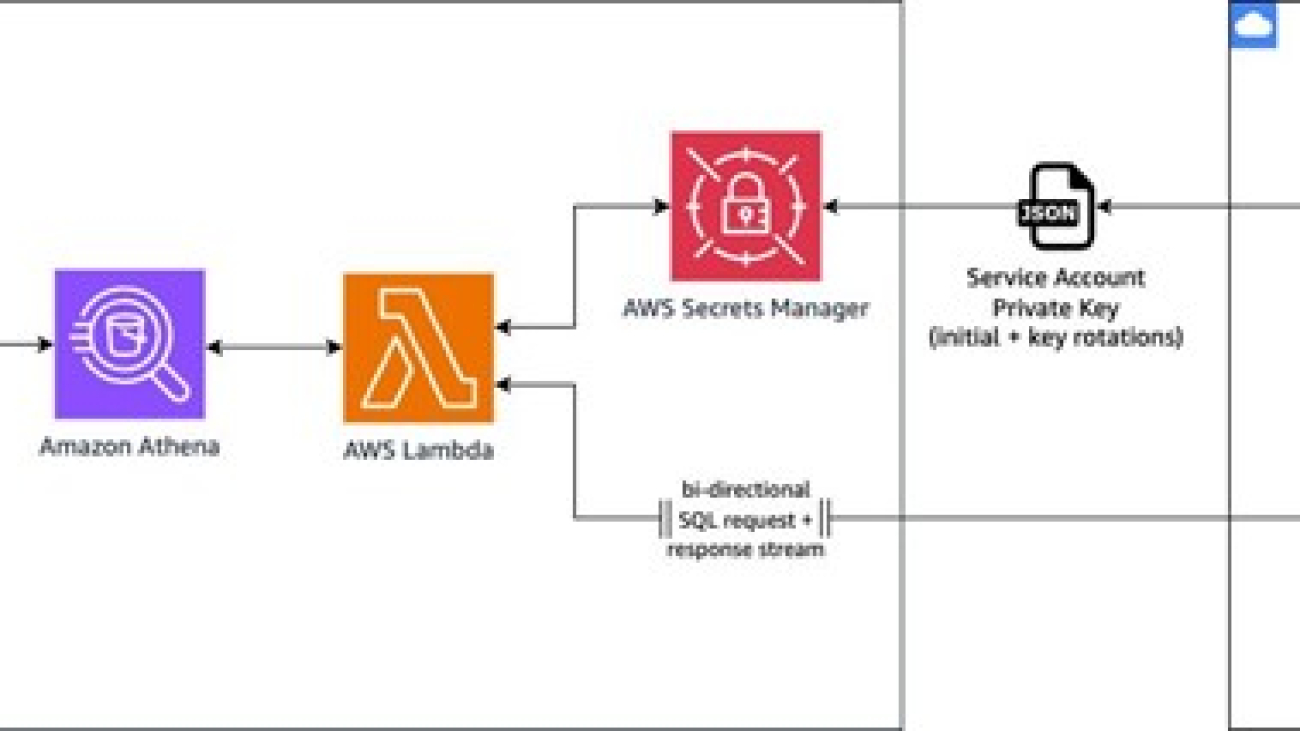
The overall architecture, as seen below, demonstrates how to use AWS services to seamlessly access and integrate data from a GCP BigQuery data warehouse into SageMaker Canvas for building and deploying ML models.

The workflow includes the following steps:
- Within the SageMaker Canvas interface, the user composes a SQL query to run against the GCP BigQuery data warehouse. SageMaker Canvas relays this query to Athena, which acts as an intermediary service, facilitating the communication between SageMaker Canvas and BigQuery.
- Athena uses the Athena Google BigQuery connector, which uses a pre-built AWS Lambda function to enable Athena federated query capabilities. This Lambda function retrieves the necessary BigQuery credentials (service account private key) from AWS Secrets Manager for authentication purposes.
- After authentication, the Lambda function uses the retrieved credentials to query BigQuery and obtain the desired result set. It parses this result set and sends it back to Athena.
- Athena returns the queried data from BigQuery to SageMaker Canvas, where you can use it for ML model training and development purposes within the no-code interface.
This solution offers the following benefits:
- Seamless integration – SageMaker Canvas empowers you to integrate and use data from various sources, including cloud data warehouses like BigQuery, directly within its no-code ML environment. This integration eliminates the need for additional data movement or complex integrations, enabling you to focus on building and deploying ML models without the overhead of data engineering tasks.
- Secure access – The use of Secrets Manager makes sure BigQuery credentials are securely stored and accessed, enhancing the overall security of the solution.
- Scalability – The serverless nature of the Lambda function and the ability in Athena to handle large datasets make this solution scalable and able to accommodate growing data volumes. Additionally, you can use multiple queries to partition the data to source in parallel.
In the next sections, we dive deeper into the technical implementation details and walk through a step-by-step demonstration of this solution.
Dataset
The steps outlined in this post provide an example of how to import data into SageMaker Canvas for no-code ML. In this example, we demonstrate how to import data through Athena from GCP BigQuery.
For our dataset, we use a synthetic dataset from a telecommunications mobile phone carrier. This sample dataset contains 5,000 records, where each record uses 21 attributes to describe the customer profile. The Churn column in the dataset indicates whether the customer left service (true/false). This Churn attribute is the target variable that the ML model should aim to predict.
The following screenshot shows an example of the dataset on the BigQuery console.

Prerequisites
Complete the following prerequisite steps:
- Create a service account in GCP and a service account key.
- Download the private key JSON file.
- Store the JSON file in Secrets Manager:
- On the Secrets Manager console, choose Secrets in the navigation pane, then choose Store a new secret.
- For Secret type¸ select Other type of secret.
- Copy the contents of the JSON file and enter it under Key/value pairs on the Plaintext tab.

- If you don’t have a SageMaker domain already created, create it along with the user profile. For instructions, see Quick setup to Amazon SageMaker.
- Make sure the user profile has permission to invoke Athena by confirming that the AWS Identity and Access Management (IAM) role has
glue:GetDatabaseandathena:GetDataCatalogpermission on the resource. See the following example:
Register the Athena data source connector
Complete the following steps to set up the Athena data source connector:
- On the Athena console, choose Data sources in the navigation pane.
- Choose Create data source.
- On the Choose a data source page, search for and select Google BigQuery, then choose Next.

- On the Enter data source details page, provide the following information:
- For Data source name¸ enter a name.
- For Description, enter an optional description.
- For Lambda function, choose Create Lambda function to configure the connection.

- Under Application settings¸ enter the following details:
- For SpillBucket, enter the name of the bucket where the function can spill data.
- For GCPProjectID, enter the project ID within GCP.
- For LambdaFunctionName, enter the name of the Lambda function that you’re creating.
- For SecretNamePrefix, enter the secret name stored in Secrets Manager that contains GCP credentials.


- Choose Deploy.
You’re returned to the Enter data source details page.
- In the Connection details section, choose the refresh icon under Lambda function.
- Choose the Lambda function you just created. The ARN of the Lambda function is displayed.
- Optionally, for Tags, add key-value pairs to associate with this data source.
For more information about tags, see Tagging Athena resources.

- Choose Next.
- On the Review and create page, review the data source details, then choose Create data source.
The Data source details section of the page for your data source shows information about your new connector. You can now use the connector in your Athena queries. For information about using data connectors in queries, see Running federated queries.
To query from Athena, launch the Athena SQL editor and choose the data source you created. You should be able to run live queries against the BigQuery database.

Connect to SageMaker Canvas with Athena as a data source
To import data from Athena, complete the following steps:
- On the SageMaker Canvas console, choose Data Wrangler in the navigation pane.
- Choose Import data and prepare.
- Select the Tabular
- Choose Athena as the data source.
SageMaker Data Wrangler in SageMaker Canvas allows you to prepare, featurize, and analyze your data. You can integrate a SageMaker Data Wrangler data preparation flow into your ML workflows to simplify and streamline data preprocessing and feature engineering using little to no coding.
- Choose an Athena table in the left pane from AwsDataCatalog and drag and drop the table into the right pane.

- Choose Edit in SQL and enter the following SQL query:
In the preceding query, bigquery is the data source name created in Athena, athenabigquery is the database name, and customer_churn is the table name.
- Choose Run SQL to preview the dataset and when you’re satisfied with the data, choose Import.

When working with ML, it’s crucial to randomize or shuffle the dataset. This step is essential because you may have access to millions or billions of data points, but you don’t necessarily need to use the entire dataset for training the model. Instead, you can limit the data to a smaller subset specifically for training purposes. After you’ve shuffled and prepared the data, you can begin the iterative process of data preparation, feature evaluation, model training, and ultimately hosting the trained model.
- You can process or export your data to a location that is suitable for your ML workflows. For example, you can export the transformed data as a SageMaker Canvas dataset and create an ML model from it.
- After you export your data, choose Create model to create an ML model from your data.

The data is imported into SageMaker Canvas as a dataset from the specific table in Athena. You can now use this dataset to create a model.
Train a model
After your data is imported, it shows up on the Datasets page in SageMaker Canvas. At this stage, you can build a model. To do so, complete the following steps:
- Select your dataset and choose Create a model.

- For Model name, enter your model name (for this post,
my_first_model).
SageMaker Canvas enables you to create models for predictive analysis, image analysis, and text analysis.
- Because we want to categorize customers, select Predictive analysis for Problem type.
- Choose Create.

On the Build page, you can see statistics about your dataset, such as the percentage of missing values and mode of the data.
- For Target column, choose a column that you want to predict (for this post,
churn).
SageMaker Canvas offers two types of models that can generate predictions. Quick build prioritizes speed over accuracy, providing a model in 2–15 minutes. Standard build prioritizes accuracy over speed, providing a model in 30 minutes–2 hours.
- For this example, choose Quick build.

After the model is trained, you can analyze the model accuracy.
The Overview tab shows us the column impact, or the estimated importance of each column in predicting the target column. In this example, the Night_calls column has the most significant impact in predicting if a customer will churn. This information can help the marketing team gain insights that lead to taking actions to reduce customer churn. For example, we can see that both low and high CustServ_Calls increase the likelihood of churn. The marketing team can take actions to help prevent customer churn based on these learnings. Examples include creating a detailed FAQ on websites to reduce customer service calls, and running education campaigns with customers on the FAQ that can keep engagement up.

Generate predictions
On the Predict tab, you can generate both batch predictions and single predictions. Complete the following steps to generate a batch prediction:
- Download the following sample inference dataset for generating predictions.
- To test batch predictions, choose Batch prediction.
SageMaker Canvas allows you to generate batch predictions either manually or automatically on a schedule. To learn how to automate batch predictions on a schedule, refer to Manage automations.
- For this post, choose Manual.
- Upload the file you downloaded.
- Choose Generate predictions.
After a few seconds, the prediction is complete, and you can choose View to see the prediction.

Optionally, choose Download to download a CSV file containing the full output. SageMaker Canvas will return a prediction for each row of data and the probability of the prediction being correct.

Optionally, you can deploy your models to an endpoint to make predictions. For more information, refer to Deploy your models to an endpoint.
Clean up
To avoid future charges, log out of SageMaker Canvas.
Conclusion
In this post, we showcased a solution to extract the data from BigQuery using Athena federated queries and a sample dataset. We then used the extracted data to build an ML model using SageMaker Canvas to predict customers at risk of churning—without writing code. SageMaker Canvas enables business analysts to build and deploy ML models effortlessly through its no-code interface, democratizing ML across the organization. This enables you to harness the power of advanced analytics and ML to drive business insights and innovation, without the need for specialized technical skills.
For more information, see Query any data source with Amazon Athena’s new federated query and Import data from over 40 data sources for no-code machine learning with Amazon SageMaker Canvas. If you’re new to SageMaker Canvas, refer to Build, Share, Deploy: how business analysts and data scientists achieve faster time-to-market using no-code ML and Amazon SageMaker Canvas.
About the authors
 Amit Gautam is an AWS senior solutions architect supporting enterprise customers in the UK on their cloud journeys, providing them with architectural advice and guidance that helps them achieve their business outcomes.
 Sujata Singh is an AWS senior solutions architect supporting enterprise customers in the UK on their cloud journeys, providing them with architectural advice and guidance that helps them achieve their business outcomes.
Customized model monitoring for near real-time batch inference with Amazon SageMaker
Real-world applications vary in inference requirements for their artificial intelligence and machine learning (AI/ML) solutions to optimize performance and reduce costs. Examples include financial systems processing transaction data streams, recommendation engines processing user activity data, and computer vision models processing video frames. In these scenarios, customized model monitoring for near real-time batch inference with Amazon SageMaker is essential, making sure the quality of predictions is continuously monitored and any deviations are promptly detected.
In this post, we present a framework to customize the use of Amazon SageMaker Model Monitor for handling multi-payload inference requests for near real-time inference scenarios. SageMaker Model Monitor monitors the quality of SageMaker ML models in production. Early and proactive detection of deviations in model quality enables you to take corrective actions, such as retraining models, auditing upstream systems, or fixing quality issues without having to monitor models manually or build additional tooling. SageMaker Model Monitor provides monitoring capabilities for data quality, model quality, bias drift in a model’s predictions, and drift in feature attribution. SageMaker Model Monitor adapts well to common AI/ML use cases and provides advanced capabilities given edge case requirements such as monitoring custom metrics, handling ground truth data, or processing inference data capture.
You can deploy your ML model to SageMaker hosting services and get a SageMaker endpoint for real-time inference. Your client applications invoke this endpoint to get inferences from the model. To reduce the number of invocations and meet custom business objectives, AI/ML developers can customize inference code to send multiple inference records in one payload to the endpoint for near real-time model predictions. Rather than using a SageMaker Model Monitoring schedule with native configurations, a SageMaker Model Monitor Bring Your Own Container (BYOC) approach meets these custom requirements. Although this advanced BYOC topic can appear overwhelming to AI/ML developers, with the right framework, there is opportunity to accelerate SageMaker Model Monitor BYOC development for customized model monitoring requirements.
In this post, we provide a BYOC framework with SageMaker Model Monitor to enable customized payload handling (such as multi-payload requests) from SageMaker endpoint data capture, use ground truth data, and output custom business metrics for model quality.
Overview of solution
SageMaker Model Monitor uses a SageMaker pre-built image using Spark Deequ, which accelerates the usage of model monitoring. Using this pre-built image occasionally becomes problematic when customization is required. For example, the pre-built image requires one inference payload per inference invocation (request to a SageMaker endpoint). However, if you’re sending multiple payloads in one invocation to reduce the number of invocations and setting up model monitoring with SageMaker Model Monitor, then you will need to explore additional capabilities within SageMaker Model Monitor.
A preprocessor script is a capability of SageMaker Model Monitor to preprocess SageMaker endpoint data capture before creating metrics for model quality. However, even with a preprocessor script, you still face a mismatch in the designed behavior of SageMaker Model Monitor, which expects one inference payload per request.
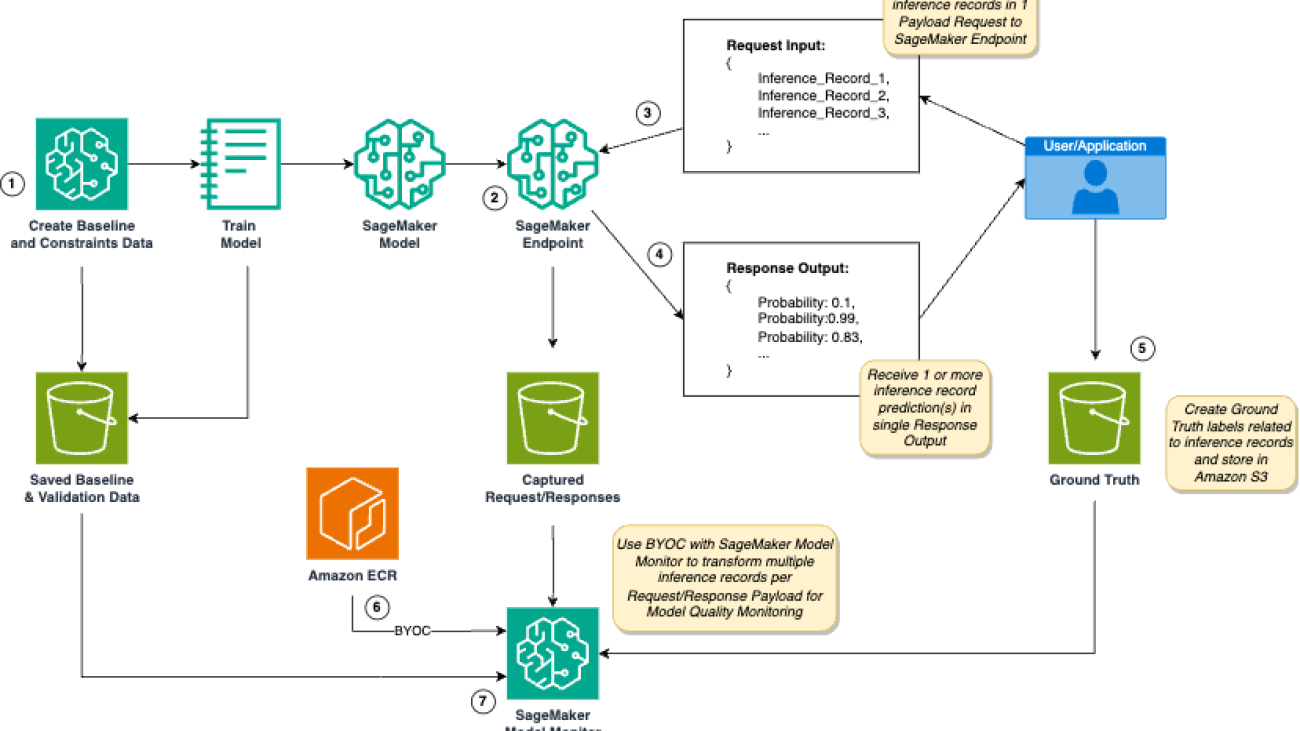
Given these requirements, we create the BYOC framework shown in the following diagram. In this example, we demonstrate setting up a SageMaker Model Monitor job for monitoring model quality.

The workflow includes the following steps:
- Before and after training an AI/ML model, an AI/ML developer creates baseline and validation data that is used downstream for monitoring model quality. For example, users can save the accuracy score of a model, or create custom metrics, to validate model quality.
- An AI/ML developer creates a SageMaker endpoint including custom inference scripts. Data capture must be enabled for the SageMaker endpoint to save real-time inference data to Amazon Simple Storage Service (Amazon S3) and support downstream SageMaker Model Monitor.
- A user or application sends a request including multiple inference payloads. If you have a large volume of inference records, SageMaker batch transform may be a suitable option for your use case.
- The SageMaker endpoint (which includes the custom inference code to preprocesses the multi-payload request) passes the inference data to the ML model, postprocesses the predictions, and sends a response to the user or application. The information pertaining to the request and response is stored in Amazon S3.
- Independent of calling the SageMaker endpoint, the user or application generates ground truth for the predictions returned by the SageMaker endpoint.
- A customer image (BYOC) is pushed to Amazon Elastic Container Registry (Amazon ECR) that contains code to perform the following actions:
- Read input and output contracts required for SageMaker Model Monitor.
- Read ground truth data.
- Optionally, read any baseline constraint or validation data (such as accuracy score threshold).
- Process data capture stored in Amazon S3 from the SageMaker endpoint.
- Compare real-time data with ground truth and create model quality metrics.
- Publish metrics to Amazon CloudWatch Logs and output a model quality report.
- The AI/ML developer creates a SageMaker Model Monitor schedule and sets the custom image (BYOC) as the referable image URI.
This post uses code provided in the following GitHub repo to demonstrate the solution. The process includes the following steps:
- Train a multi-classification XGBoost model using the public forest coverage dataset.
- Create an inference script for the SageMaker endpoint for custom inference logic.
- Create a SageMaker endpoint with data capture enabled.
- Create a constraint file that contains metrics used to determine if model quality alerts should be generated.
- Create a custom Docker image for SageMaker Model Monitor by using the SageMaker Docker Build CLI and push it to Amazon ECR.
- Create a SageMaker Model Monitor schedule with the BYOC image.
- View the custom model quality report generated by the SageMaker Model Monitor job.
Prerequisites
To follow along with this walkthrough, make sure you have the following prerequisites:
- An AWS account
- Access to Amazon SageMaker Studio
- Applicable AWS Identity and Access Management (IAM) roles for SageMaker, Amazon S3, and Amazon ECR
- Familiarity with model deployment and model monitoring concepts
- The GitHub repository cloned to an environment within SageMaker Studio
Train the model
In the SageMaker Studio environment, launch a SageMaker training job to train a multi-classification model and output model artifacts to Amazon S3:
from sagemaker.xgboost.estimator import XGBoost
from sagemaker.estimator import Estimator

hyperparameters = {
    "max_depth": 5,
    "eta": 0.36,
    "gamma": 2.88,
    "min_child_weight": 9.89,
    "subsample": 0.77,
    "objective": "multi:softprob",
    "num_class": 7,
    "num_round": 50
}

xgb_estimator = XGBoost(
    entry_point="./src/train.py",
    hyperparameters=hyperparameters,
    role=role,
    instance_count=1,
    instance_type="ml.m5.2xlarge",
    framework_version="1.5-1",
    output_path=f's3://{bucket}/{prefix_name}/models'
)

xgb_estimator.fit(
    {
        "train": train_data_path,
        "validation": validation_data_path
    },
    wait=True,
    logs=True
)
Create Inference Code
Before you deploy the SageMaker endpoint, create an inference script (inference.py) that contains a function to preprocess the request with multiple payloads, invoke the model, and postprocess results.
For output_fn, a payload index is created for each inference record found in the request. This enables you to merge ground truth records with data capture within the SageMaker Model Monitor job.
See the following code:
def input_fn(input_data, content_type):
    """Take request data and de-serializes the data into an object for prediction.
        When an InvokeEndpoint operation is made against an Endpoint running SageMaker model server,
        the model server receives two pieces of information:
            - The request Content-Type, for example "application/json"
            - The request data, which is at most 5 MB (5 * 1024 * 1024 bytes) in size.
    Args:
        input_data (obj): the request data.
        content_type (str): the request Content-Type.
    Returns:
        (obj): data ready for prediction. For XGBoost, this defaults to DMatrix.
    """

    if content_type == "application/json":
        request_json = json.loads(input_data)
        prediction_df = pd.DataFrame.from_dict(request_json)
        return xgb.DMatrix(prediction_df)
    else:
        raise ValueError


def predict_fn(input_data, model):
    """A predict_fn for XGBooost Framework. Calls a model on data deserialized in input_fn.
    Args:
        input_data: input data (DMatrix) for prediction deserialized by input_fn
        model: XGBoost model loaded in memory by model_fn
    Returns: a prediction
    """
    output = model.predict(input_data, validate_features=True)
    return output


def output_fn(prediction, accept):
    """Function responsible to serialize the prediction for the response.
    Args:
        prediction (obj): prediction returned by predict_fn .
        accept (str): accept content-type expected by the client.
    Returns: JSON output
    """

    if accept == "application/json":
        prediction_labels = np.argmax(prediction, axis=1)
        prediction_scores = np.max(prediction, axis=1)
        output_returns = [
            {
                "payload_index": int(index),
                "label": int(label),
                "score": float(score)} for label, score, index in zip(
                prediction_labels, prediction_scores, range(len(prediction_labels))
            )
        ]
        return worker.Response(encoders.encode(output_returns, accept), mimetype=accept)

    else:
        raise ValueError
Deploy the SageMaker endpoint
Now that you have created the inference script, you can create the SageMaker endpoint:
from sagemaker.model_monitor import DataCaptureConfig

predictor = xgb_estimator.deploy(
    instance_type="ml.m5.large",
    initial_instance_count=1,
    wait=True,
    data_capture_config=DataCaptureConfig(
        enable_capture=True,
        sampling_percentage=100,
        destination_s3_uri=f"s3://{bucket}/{prefix_name}/model-monitor/data-capture"
    ),
    source_dir="./src",
    entry_point="inference.py"
)
Create constraints for model quality monitoring
In model quality monitoring, you need to compare your metric generated from ground truth and data capture with a pre-specified threshold. In this example, we use the accuracy value of the trained model on the test set as a threshold. If the newly computed accuracy metric (generated using ground truth and data capture) is lower than this threshold, a violation report will be generated and the metrics will be published to CloudWatch.
See the following code:
constraints_dict = {
    "accuracy":{
        "threshold": accuracy_value
    }
}


# Serializing json
json_object = json.dumps(constraints_dict, indent=4)

# Writing to sample.json
with open("constraints.json", "w") as outfile:
    outfile.write(json_object)
This contraints.json file is written to Amazon S3 and will be the input for the processing job for the SageMaker Model Monitor job downstream.
Publish the BYOC image to Amazon ECR
Create a script named model_quality_monitoring.py to perform the following functions:
- Read environment variables and any arguments passed to the SageMaker Model Monitor job
- Read SageMaker endpoint data capture and constraint metadata configured with the SageMaker Model Monitor job
- Read ground truth data from Amazon S3 using the AWS SDK for pandas
- Create accuracy metrics with data capture and ground truth
- Create metrics and violation reports given constraint violations
- Publish metrics to CloudWatch if violations are present
This script serves as the entry point for the SageMaker Model Monitor job. With a custom image, the entry point script needs to be specified in the Docker image, as shown in the following code. This way, when the SageMaker Model Monitor job initiates, the specified script is run. The sm-mm-mqm-byoc:1.0 image URI is passed to the image_uri argument when you define the SageMaker Model Monitor job downstream.
The custom BYOC image is pushed to Amazon ECR using the SageMaker Docker Build CLI:
sm-docker build . --file ./docker/Dockerfile --repository sm-mm-mqm-byoc:1.0
Create a SageMaker Model Monitor schedule
Next, you use the Amazon SageMaker Python SDK to create a model monitoring schedule. You can define the BYOC ECR image created in the previous section as the image_uri parameter.
You can customize the environment variables and arguments passed to the SageMaker Processing job when SageMaker Model Monitor runs the model quality monitoring job. In this example, the ground truth Amazon S3 URI path is passed as an environment variable and is used within the SageMaker Processing job:
sm_mm_mqm = ModelMonitor(
    role=role,
    image_uri=f"{account_id}.dkr.ecr.us-east-1.amazonaws.com/sm-mm-mqm-byoc:1.0",
    instance_count=1,
    instance_type='ml.m5.xlarge',
    base_job_name="sm-mm-mqm-byoc",
    sagemaker_session=sess,
    env={
        "ground_truth_s3_uri_path": f"s3://{bucket}/{prefix_name}/model-monitor/mqm/ground_truth/{predictor.endpoint_name}"
    }
)
Before you create the schedule, specify the endpoint name, the Amazon S3 URI output location you want to send violation reports to, the statistics and constraints metadata files (if applicable), and any custom arguments you want to pass to your entry script within your BYOC SageMaker Processing job. In this example, the argument –-create-violation-tests is passed, which creates a mock violation for demonstration purposes. SageMaker Model Monitor accepts the rest of the parameters and translates them into environment variables, which you can use within your custom monitoring job.
sm_mm_mqm.create_monitoring_schedule(
    endpoint_input=predictor.endpoint_name,
    output=MonitoringOutput(
        source="/opt/ml/processing/output",
        destination=f"s3://{bucket}/{prefix_name}/model-monitor/mqm/reports"
    ),
    statistics=f"s3://{bucket}/{prefix_name}/model-monitor/mqm/baseline-data/statistics.json",
    constraints=f"s3://{bucket}/{prefix_name}/model-monitor/mqm/baseline-data/constraints.json",
    monitor_schedule_name="sm-mm-byoc-batch-inf-schedule",
    schedule_cron_expression=CronExpressionGenerator().hourly(),
    arguments=[
        "--create-violation-tests"
    ]
)
Review the entry point script model_quallity_monitoring.py to better understand how to use custom arguments and environment variables provided by the SageMaker Model Monitor job.
Observe the SageMaker Model Monitor job output
Now that the SageMaker Model Monitor resource is created, the SageMaker endpoint is invoked.
In this example, a request is provided that includes a list of two payloads in which we want to collect predictions:
sm_runtime = boto3.client("sagemaker-runtime")

response = sm_runtime.invoke_endpoint(
    EndpointName=predictor.endpoint_name,
    ContentType="application/json",
    Accept="application/json",
    Body=test_records,
    InferenceId="0"
)
InferenceId is passed as an argument to the invoke_endpoint method. This ID is used downstream when merging the ground truth data to the real-time SageMaker endpoint data capture. In this example, we want to collect ground truth with the following structure.
| InferenceI | payload_index | groundTruthLabel |
|---|---|---|
| 0 | 0 | 1 |
| 0 | 1 | 0 |
This makes it simpler when merging the ground truth data with real-time data within the SageMaker Model Monitor custom job.
Because we set the CRON schedule for the SageMaker Model Monitor job to an hourly schedule, we can view the results at the end of the hour. In SageMaker Studio Classic, by navigating the SageMaker endpoint details page, you can choose the Monitoring job history tab to view status reports of the SageMaker Model Monitor job.

If an issue is found, you can choose the monitoring job name to review the report.
In this example, the custom model monitoring metric created in the BYOC flagged an accuracy score violation of -1 (this was done purposely for demonstration with the argument --create-violation-tests).

This gives you the ability to monitor model quality violations for your custom SageMaker Model Monitor job within the SageMaker Studio console. If you want to invoke CloudWatch alarms based on published CloudWatch metrics, you must create these CloudWatch metrics with your BYOC job. You can review how this is done within the monitor_quality_monitoring.py script. For automated alerts for model monitoring, creating an Amazon Simple Notification Service (Amazon SNS) topic is recommended, which email user groups will subscribe to for alerts on a given CloudWatch metric alarm.
Clean up
To avoid incurring future charges, delete all resources related to the SageMaker Model Monitor schedule by completing the following steps:
- Delete data capture and any ground truth data:
- Delete the monitoring schedule:
- Delete the SageMaker model and SageMaker endpoint:
Conclusion
Custom business or technical requirements for a SageMaker endpoint frequently have an impact on downstream efforts in model monitoring. In this post, we provided a framework that enables you to customize SageMaker Model Monitor jobs (in this case, for monitoring model quality) to handle the use case of passing multiple inference payloads to a SageMaker endpoint.
Explore the provided GitHub repository to implement this customized model monitoring framework with SageMaker Model Monitor. You can use this framework as a starting point to monitor your custom metrics or handle other unique requirements for model quality monitoring in your AI/ML applications.
About the Authors
 Joe King is a Sr. Data Scientist at AWS, bringing a breadth of data science, ML engineering, MLOps, and AI/ML architecting to help businesses create scalable solutions on AWS.
 Ajay Raghunathan is a Machine Learning Engineer at AWS. His current work focuses on architecting and implementing ML solutions at scale. He is a technology enthusiast and a builder with a core area of interest in AI/ML, data analytics, serverless, and DevOps. Outside of work, he enjoys spending time with family, traveling, and playing football.
 Raju Patil is a Sr. Data Scientist with AWS Professional Services. He architects, builds, and deploys AI/ML solutions to help AWS customers across different verticals overcome business challenges in a variety of AI/ML use cases.

Fintech Leaders Tap Generative AI for Safer, Faster, More Accurate Financial Services
An overwhelming 91% of financial services industry (FSI) companies are either assessing artificial intelligence or already have it in the bag as a tool that’s driving innovation, improving operational efficiency and enhancing customer experiences.
Generative AI — powered by NVIDIA NIM microservices and accelerated computing — can help organizations improve portfolio optimization, fraud detection, customer service and risk management.
Among the companies harnessing these technologies to boost financial services applications are Ntropy, Contextual AI and NayaOne — all members of the NVIDIA Inception program for cutting-edge startups.
And Silicon Valley-based startup Securiti, which offers a centralized, intelligent platform for the safe use of data and generative AI, is using NVIDIA NIM to build an AI-powered copilot for financial services.
At Money20/20, a leading fintech conference running this week in Las Vegas, the companies will demonstrate how their technologies can turn disparate, often complex FSI data into actionable insights and advanced innovation opportunities for banks, fintechs, payment providers and other organizations.
Ntropy Brings Order to Unstructured Financial Data
New York-based Ntropy is helping remove various states of entropy — disorder, randomness or uncertainty — from financial services workflows.
“Whenever money is moved from point A to point B, text is left in bank statements, PDF receipts and other forms of transaction history,” said Naré Vardanyan, cofounder and CEO of Ntropy. “Traditionally, that unstructured data has been very hard to clean up and use for financial applications.”
The company’s transaction enrichment application programming interface (API) standardizes financial data from across different sources and geographies, acting as a common language that can help financial services applications understand any transaction with humanlike accuracy in just milliseconds, at 10,000x lower cost than traditional methods.
It’s built on the Llama 3 NVIDIA NIM microservice and NVIDIA Triton Inference Server running on NVIDIA H100 Tensor Core GPUs. Using the Llama 3 NIM microservice, Ntropy achieved up to 20x better utilization and throughput for its large language models (LLMs) compared with running the native models.
Airbase, a leading procure-to-pay software platform provider, boosts transaction authorization processes using LLMs and the Ntropy data enricher.
At Money20/20, Ntropy will discuss how its API can be used to clean up customers’ merchant data, which boosts fraud detection by improving the accuracy of risk-detection models. This in turn reduces both false transaction declines and revenue loss.
Another demo will highlight how an automated loan agent taps into the Ntropy API to analyze information on a bank’s website and generate a relevant investment report to speed loan dispersal and decision-making processes for users.
Contextual AI Advances Retrieval-Augmented Generation for FSI
Contextual AI — based in Mountain View, California — offers a production-grade AI platform, powered by retrieval-augmented generation (RAG) and ideal for building enterprise AI applications in knowledge-intensive FSI use cases.
“RAG is the answer to delivering enterprise AI into production,” said Douwe Kiela, CEO and cofounder of Contextual AI. “Tapping into NVIDIA technologies and large language models, the Contextual AI RAG 2.0 platform can bring accurate, auditable AI to FSI enterprises looking to optimize operations and offer new generative AI-powered products.”
The Contextual AI platform integrates the entire RAG pipeline — including extraction, retrieval, reranking and generation — into a single optimized system that can be deployed in minutes, and further tuned and specialized based on customer needs, delivering much greater accuracy in context-dependent tasks.
HSBC plans to use Contextual AI to provide research insights and process guidance support through retrieving and synthesizing relevant market outlooks, financial news and operational documents. Other financial organizations are also harnessing Contextual AI’s pre-built applications, including for financial analysis, policy-compliance report generation, financial advice query resolution and more.
For example, a user could ask, “What’s our forecast for central bank rates by Q4 2025?” The Contextual AI platform would provide a brief explanation and an accurate answer grounded in factual documents, including citations to specific sections in the source.
Contextual AI uses NVIDIA Triton Inference Server and the open-source NVIDIA TensorRT-LLM library for accelerating and optimizing LLM inference performance.
NayaOne Provides Digital Sandbox for Financial Services Innovation
London-based NayaOne offers an AI sandbox that allows customers to securely test and validate AI applications prior to commercial deployment. Its technology platform allows financial institutions the ability to create synthetic data and gives them access to a marketplace of hundreds of fintechs.
Customers can use the digital sandbox to benchmark applications for fairness, transparency, accuracy and other compliance measures and to better ensure top performance and successful integration.
“The demand for AI-driven solutions in financial services is accelerating, and our collaboration with NVIDIA allows institutions to harness the power of generative AI in a controlled, secure environment,” said Karan Jain, CEO of NayaOne. “We’re creating an ecosystem where financial institutions can prototype faster and more effectively, leading to real business transformation and growth initiatives.”
Using NVIDIA NIM microservices, NayaOne’s AI Sandbox lets customers explore and experiment with optimized AI models, and take them to deployment more easily. With NVIDIA accelerated computing, NayaOne achieves up to 10x faster processing for the large datasets used in its fraud detection models, at up to 40% lower infrastructure costs compared with running extensive CPU-based models.
The digital sandbox also uses the open-source NVIDIA RAPIDS set of data science and AI libraries to accelerate fraud detection and prevention capabilities in money movement applications. The company will demonstrate its digital sandbox at the NVIDIA AI Pavilion at Money20/20.
Securiti Improves Financial Planning With AI Copilot
Powering a broad range of generative AI applications — including safe enterprise AI copilots and LLM training and tuning — Securiti’s highly flexible Data+AI platform lets users build safe, end-to-end enterprise AI systems.
The company is now building an NVIDIA NIM-powered financial planning assistant. The copilot chatbot accesses diverse financial data while adhering to privacy and entitlement policies to provide context-aware responses to users’ finance-related questions.
“Banks struggle to provide personalized financial advice at scale while maintaining data security, privacy and compliance with regulations,” said Jack Berkowitz, chief data officer at Securiti. “With robust data protection and role-based access for secure, scalable support, Securiti helps build safe AI copilots that offer personalized financial advice tailored to individual goals.”
The chatbot retrieves data from a variety of sources, such as earnings transcripts, client profiles and account balances, and investment research documents. Securiti’s solution safely ingests and prepares it for use with high-performance, NVIDIA-powered LLMs, preserving controls such as access entitlements. Finally, it provides users with customized responses through a simple consumer interface.
Using the Llama 3 70B-Instruct NIM microservice, Securiti optimized the performance of the LLM, while ensuring the safe use of data. The company will demonstrate its generative AI solution at Money20/20.
NIM microservices and Triton Inference Server are available through the NVIDIA AI Enterprise software platform.
Learn more about AI for financial services by joining NVIDIA at Money20/20, running through Wednesday, Oct. 30.
Explore a new NVIDIA AI workflow for fraud detection.

Bring Receipts: New NVIDIA AI Workflow Detects Fraudulent Credit Card Transactions
Financial losses from worldwide credit card transaction fraud are expected to reach $43 billion by 2026.
A new NVIDIA AI workflow for fraud detection running on Amazon Web Services (AWS) can help combat this burgeoning epidemic — using accelerated data processing and advanced algorithms to improve AI’s ability to detect and prevent credit card transaction fraud.
Launched this week at the Money20/20 fintech conference, the workflow enables financial institutions to identify subtle patterns and anomalies in transaction data based on user behavior to improve accuracy and reduce false positives compared with traditional methods.
Users can streamline the migration of their fraud detection workflows from traditional compute to accelerated compute using the NVIDIA AI Enterprise software platform and NVIDIA GPU instances.
Businesses embracing comprehensive machine learning tools and strategies can observe up to an estimated 40% improvement in fraud detection accuracy, boosting their ability to identify and stop fraudsters faster and mitigate harm.
As such, leading financial organizations like American Express and Capital One have been using AI to build proprietary solutions that mitigate fraud and enhance customer protection.
The new NVIDIA workflow accelerates data processing, model training and inference, and demonstrates how these components can be wrapped into a single, easy-to-use software offering, powered by NVIDIA AI.
Currently optimized for credit card transaction fraud, the workflow could be adapted for use cases such as new account fraud, account takeover and money laundering.
Accelerated Computing for Fraud Detection
As AI models expand in size, intricacy and diversity, it’s more important than ever for organizations across industries — including financial services — to harness cost- and energy-efficient computing power.
Traditional data science pipelines lack the necessary compute acceleration to handle the massive volumes of data required to effectively fight fraud amid rapidly growing losses across the industry. Leveraging NVIDIA RAPIDS Accelerator for Apache Spark could help payment companies reduce data processing times and save on their data processing costs.
To efficiently manage large-scale datasets and deliver real-time AI performance with complex AI models, financial institutions are turning to NVIDIA’s AI and accelerated computing platforms.
The use of gradient-boosted decision trees — a type of machine learning algorithm — tapping into libraries such as XGBoost, has long been the standard for fraud detection.
The new NVIDIA AI workflow for fraud detection enhances XGBoost using the NVIDIA RAPIDS suite of AI libraries with graph neural network (GNN) embeddings as additional features to help reduce false positives.
The GNN embeddings are fed into XGBoost to create and train a model that can then be orchestrated with the NVIDIA Morpheus Runtime Core library and NVIDIA Triton Inference Server for real-time inferencing.
The NVIDIA Morpheus framework securely inspects and classifies all incoming data, tagging it with patterns and flagging potentially suspicious activity. NVIDIA Triton Inference Server simplifies inference of all types of AI model deployments in production, while optimizing throughput, latency and utilization.
NVIDIA Morpheus, RAPIDS and Triton Inference Server are available through NVIDIA AI Enterprise.
Leading Financial Services Organizations Adopt AI
During a time when many large North American financial institutions are reporting online or mobile fraud losses continue to increase, AI is helping to combat this trend.
American Express, which began using AI to fight fraud in 2010, leverages fraud detection algorithms to monitor all customer transactions globally in real time, generating fraud decisions in just milliseconds. Using a combination of advanced algorithms, one of which tapped into the NVIDIA AI platform, American Express enhanced model accuracy, advancing the company’s ability to better fight fraud.
European digital bank bunq uses generative AI and large language models to help detect fraud and money laundering. Its AI-powered transaction-monitoring system achieved nearly 100x faster model training speeds with NVIDIA accelerated computing.
BNY announced in March that it became the first major bank to deploy an NVIDIA DGX SuperPOD with DGX H100 systems, which will help build solutions that support fraud detection and other use cases.
And now, systems integrators, software vendors and cloud service providers can integrate the new NVIDIA AI workflow for fraud detection to boost their financial services applications and help keep customers’ money, identities and digital accounts safe.
Explore the fraud detection NVIDIA AI workflow and read this NVIDIA Technical Blog on supercharging fraud detection with GNNs.
Learn more about AI for fraud detection by visiting the NVIDIA AI Pavilion featuring AWS at Money 20/20, running this week in Las Vegas.
Getting started with PyTorch, ExecuTorch, and Ethos-U85 in three easy steps
ExecuTorch support for Ethos-U85
In the rapidly evolving landscape of machine learning, PyTorch has emerged as a leading framework for model development, given its flexibility and comprehensive ecosystem. Arm has worked with Meta to introduce support for Arm platforms in ExecuTorch, that further simplifies this process, making it seamless to deploy PyTorch models on edge devices.
The Arm Ethos-U85 NPU is the highest performing Ethos NPU addressing the growing demand for running advanced AI inference workloads at the edge, including transformer-based networks like LLMs. Arm offers reference designs, including the Corstone-320 IoT reference design platform, around the Ethos-U to accelerate and simplify the chip development cycle. The reference design platform includes, among many items, a Fixed Virtual Platform (FVP) that simulates an entire system, enabling cutting edge embedded software development and neural network deployment for the Ethos-U85.
Today, Arm is extending the support for developers building IoT edge applications, by supporting ExecuTorch beta on Ethos-U85. Leveraging ExecuTorch, developers can now efficiently land their natively developed PyTorch models to enable intelligent and responsive IoT solutions built on Arm.
With this package now available, thousands of developers looking to create Edge AI applications, can start their model and application development months before the platforms arrive on the market.
Getting started with ExecuTorch on Ethos-U85
A full development environment has been provided in the public ExecuTorch GitHub repository. This provides an integrated and tested development flow with all necessary components.
The three simple steps are:
- Set up ExecuTorch
- Set up the Arm Build environment
- Compile and Run models on the arm_executor_runner
You can then build on this flow for compiling and running models, to capture runtime behavior from the Ethos-U85 driver, such as cycle count information.
To make the process easier for end users, we have also added scripts to the ExecuTorch repository:
- Set up ExecuTorch
- setup.sh: Download the necessary software.
- run.sh: to compile and run the model on the Corstone-320 FVP
To build other models, you can use the ahead of time compiler script aot_arm_compiler.py, which takes a PyTorch program (nn.module) to an ExecuTorch program (.pte flatbuffer file). To write custom applications which use ExecuTorch you can follow the application flow in the example executor_runner application.
We support approximately 40 core ATen operators and already support end-to-end deployment of models such as Mobilenetv2. Ongoing efforts to support further operators will enable more PyTorch models every week .
As more functionality is added, it will be demonstrated through the tutorial materials for Ethos-U on pytorch.org
How this deployment flow works in more detail
Leveraging the extensibility of ExecuTorch and the expressiveness of Arm’s Tensor Operator Set Architecture (TOSA), we have enabled Ethos-U support in ExecuTorch. The Ethos-U compiler, Vela, has been enhanced with a TOSA front-end, making it possible to compile models for all products in the Ethos-U family. Combining these components into a cohesive workflow involves the following steps.
- Converting a PyTorch model into a deployable ExecuTorch program (AOT flow)
- Compile the ExecuTorch program into an executable, which can be deployed on Corstone-320 (runtime flow)
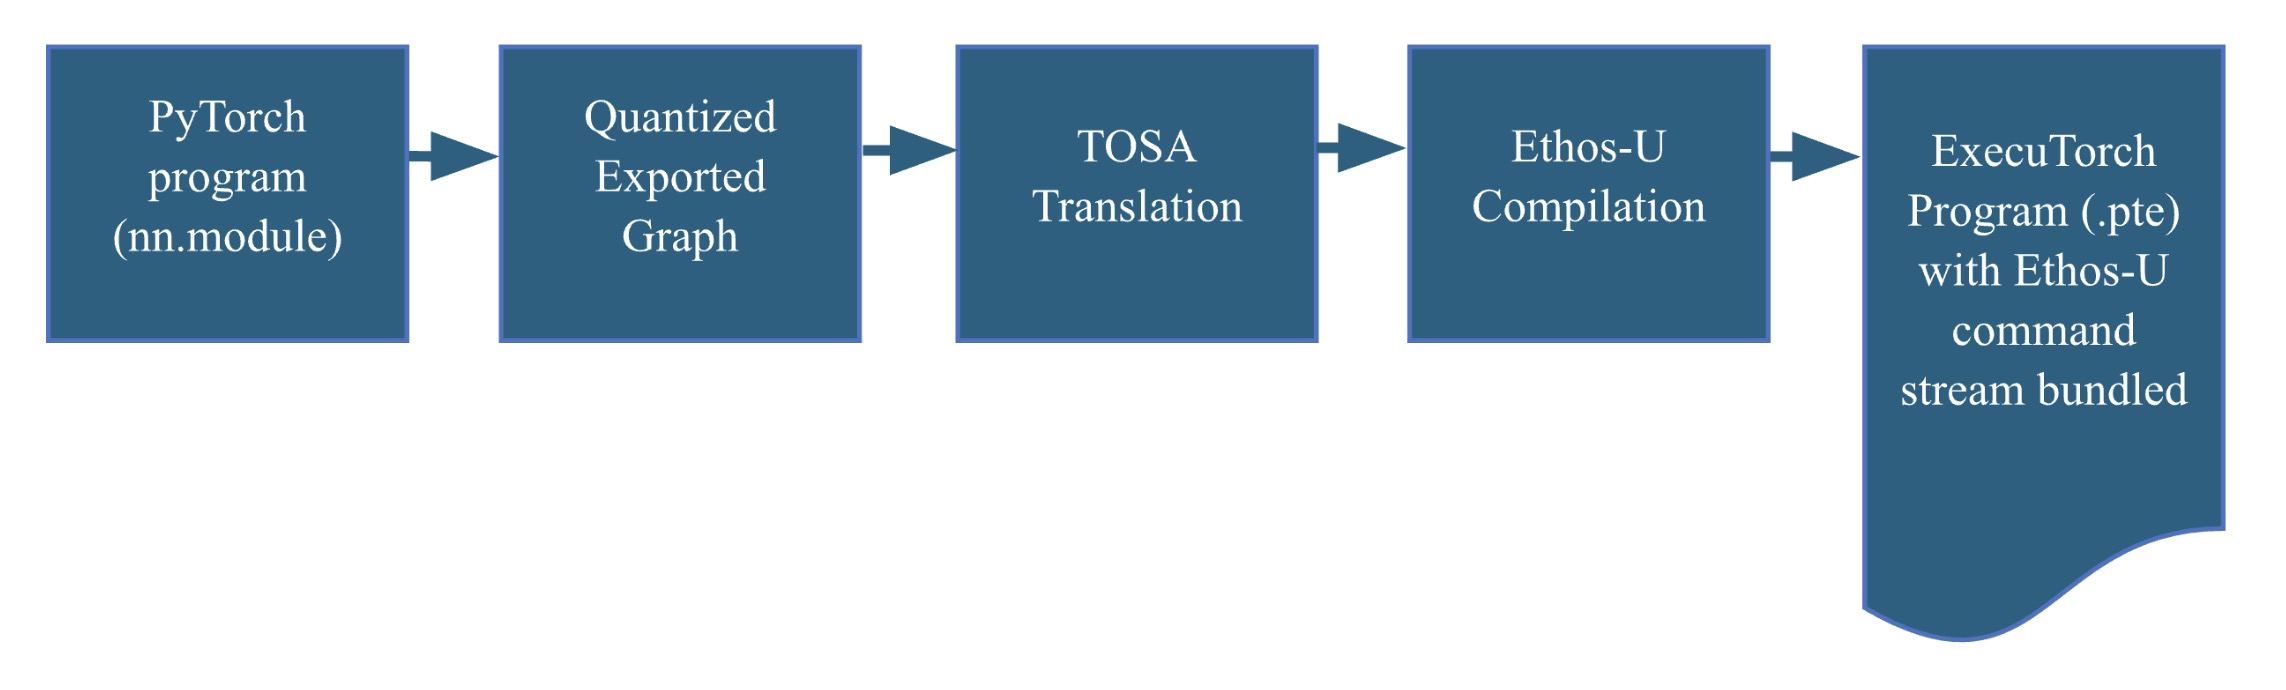
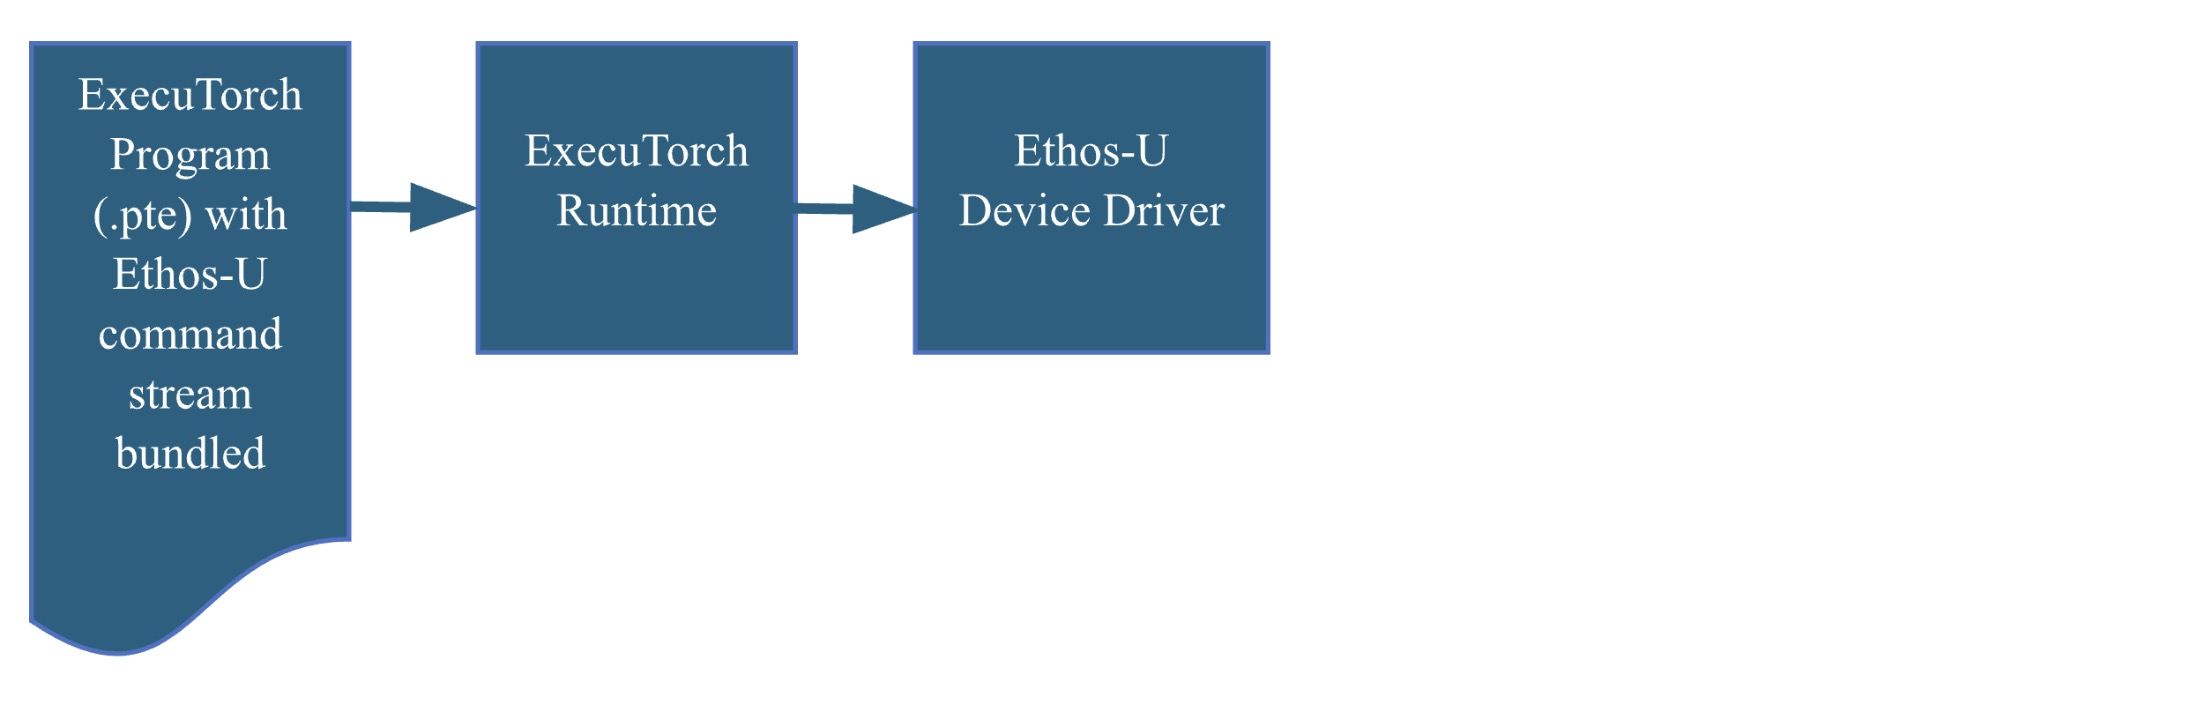
The ExecuTorch Ahead of time (AOT) flow
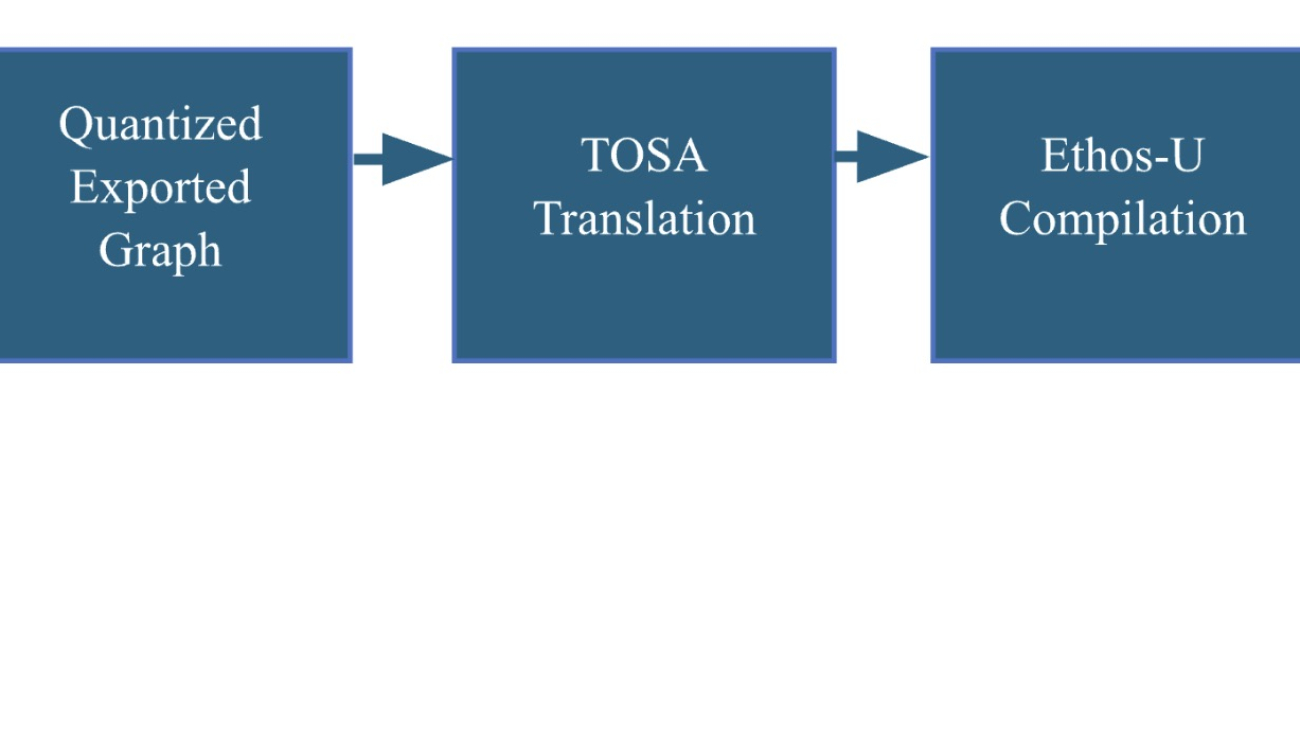
The process begins by converting a PyTorch model into a quantized TOSA representation using the PyTorch dynamo export flow. This allows us to generate an Ethos-U set of machine instructions, known as a command stream, utilizing the Vela compiler TOSA frontend. The command stream is bundled into an ExecuTorch program, represented by a flatbuffer file (.pte). This file contains everything the ExecuTorch runtime needs to perform inference using Ethos-U hardware.
The ExecuTorch Runtime flow
The ExecuTorch runtime, written in C/C++, is designed to support multiple backends. We have extended it to include support for the Ethos-U device driver. Following this flow will produce a self-contained compiled executable. Deploying the executable on the Corstone-320 FVP is straightforward and requires only the appropriate flags when calling the FVP.
Ethos-U85 and Corstone-320
The Ethos-U family of NPUs offers high performance and energy-efficient solutions for edge AI. The Ethos-U55 (also supported by ExecuTorch) is widely deployed in many Cortex-M heterogeneous systems, while the Ethos-U65 extends the applicability of the Ethos-U family to Cortex-A-based systems and increases the performance.
Ethos-U85 further extends the Ethos-U product line, supporting current and future workloads on the edge using transformer-based networks. Ethos-U85 delivers a 4x performance uplift and 20% higher energy efficiency compared to its predecessor, with up to 85% utilization on popular networks. Notable feature of Ethos-U85 includes;
- configurations from 128 to 2048 MACs/cycle, delivering up 4 TOP/s at 1GHz
- Compatible with Cortex-A and Cortex-M based systems
- Native support for major neural networks though support for TOSA
- Full hardware acceleration of all major neural networks
- For a full list of features, see the Ethos-U85 Technical Overview
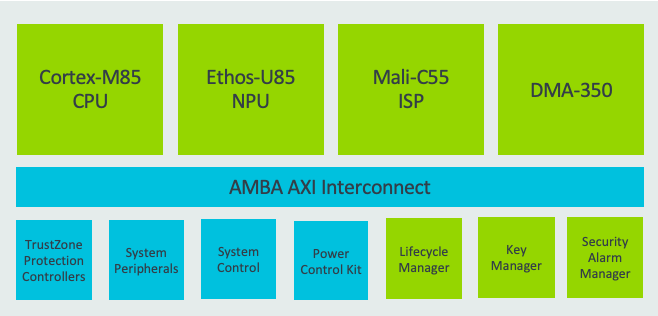
A typical compute subsystem design with Ethos-U85
What’s next
We are adding new operator support every week, extending ExecuTorch core ATen operator coverage, and enabling a wider range of models to run on Ethos-U. Our ongoing efforts focus on improving performance to ensure models run as optimally as possible on Ethos-U.
The ExecuTorch delegate framework supports fallback to running operators not supported by Ethos-U on the CPU using reference kernel implementations. We will work towards optimal performance on Cortex-M CPUs using CMSIS-NN, providing the best possible support for fallback operators and ensuring optimal performance for devices without Ethos-U capability.
The package above with the Corstone-320 FVP are more steps to simplify application development, so please, go ahead, check out the code and build process and send us feedback. Meanwhile we will be busy making weekly releases to enable more features, models and to extract the maximum performance out of the hardware.
Unleashing the Power of AI on Mobile: LLM Inference for Llama 3.2 Quantized Models with ExecuTorch and KleidiAI
Introduction
At the recent PyTorch Conference, Arm highlighted the widespread impact of its technology, spanning from cloud to edge, emphasizing its commitment to delivering its advanced AI computing capabilities seamlessly to millions of developers worldwide.
During the presentation, it was emphasized that Arm bears the immense responsibility of equipping 20+ million developers and billions of users with advanced AI computing features without friction. Achieving this requires crucial software collaborations across a vast ecosystem of software and hardware partners.
Just a few months ago, Arm launched Arm Kleidi, developer enablement technologies and resources to drive technical collaboration and innovation across the ML stack. This includes the KleidiAI software library providing optimized software routines, which when integrated into key frameworks such as XNNPACK enable automatic AI acceleration for developers on Arm Cortex-A CPUs.
Today, we’re excited to announce a new milestone for the AI open-source community that brings Arm even closer to realizing this vision: the integration of KleidiAI into ExecuTorch via XNNPACK, boosting AI workload performance on Arm mobile CPUs!
Thanks to the collaborative efforts of the engineering teams at Arm and Meta, AI developers can now deploy quantized Llama models which run up to 20% faster on Arm Cortex-A v9 CPUs with the i8mm ISA extension.
And there’s more exciting news – the ExecuTorch team has officially launched the Beta release!
This marks an important milestone in our partnership. In this blog, we are eager to share more details about ExecuTorch capabilities, the new Meta Llama 3.2 models, the integer 4-bit with per-block quantization, and the impressive performance recorded on certain Arm CPUs. Notably, we have achieved speeds of over 350 tokens per second on the prefill stage with the quantized Llama 3.2 1B model on Samsung S24+ device, as shown in the following screenshots.

Now, let’s dive into the key components that enabled the demo creation presented in the preceding images. First up: new Llama 3.2 models!
Meta Llama 3.2
Meta recently announced the first lightweight quantized Llama models, which are designed to run on popular mobile devices. Meta used two techniques for quantizing Llama 3.2 1B and 3B models: Quantization-Aware Training (QAT) with LoRA adaptors (QLoRA), and SpinQuant, a state-of-the-art post-training quantization method. The quantized models were evaluated using PyTorch’s ExecuTorch framework as the inference engine, with the Arm CPU as a backend.
These instruction-tuned models retain the quality and safety of the original 1B and 3B models while achieving a 2-4x speedup and reducing model size by 56% on average and memory footprint by 41% on average compared to the original BF16 format.
In this blog post, we will demonstrate the performance improvements we observed in our experiments.
ExecuTorch
ExecuTorch is a PyTorch-native framework specifically designed for deploying AI models on-device, enhancing privacy and reducing latency. It supports the deployment of cutting-edge open-source AI models, including the Llama family of models and vision and speech models like Segment Anything and Seamless.
This unlocks new possibilities for edge devices such as mobile phones, smart glasses, VR headsets, and smart home cameras. Traditionally, deploying PyTorch-trained AI models to resource-limited edge devices has been challenging and time-consuming, often requiring conversion to other formats which could lead to errors and suboptimal performance. The varied toolchains across the hardware and edge ecosystem have also degraded the developer experience, making a universal solution impractical.
ExecuTorch addresses these issues by providing composable components that include core runtime, operator library, and delegation interface that allows for portability as well extensibility. Models can be exported using torch.export(), producing a graph that is natively compatible with the ExecuTorch runtime, capable of running on most edge devices with CPUs, and extendable to specialized hardware like GPUs and NPUs for enhanced performance.
Working with Arm, ExecuTorch now leverages the optimized low-bit matrix multiplication kernels from the Arm KleidiAI library to improve on-device Large Language Model (LLM) inference performance via XNNPACK. We also thank the XNNPACK team at Google for supporting this effort.
In this post, we will focus on this integration available in ExecuTorch
Evolving the architecture for AI workloads
At Arm, we have been deeply committed to investing in open-source projects and advancing new technologies in our processors since the early days of the deep learning wave, focusing on making AI workloads high-performing and more power-efficient.
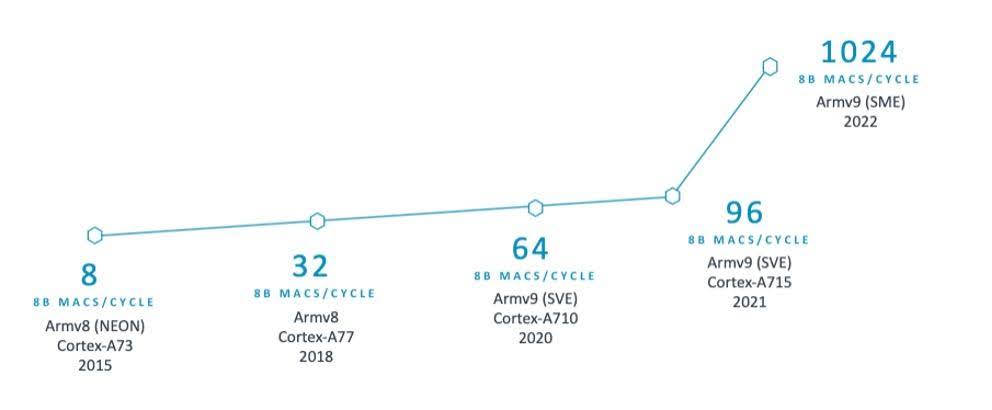
For instance, Arm introduced the SDOT instruction, starting with the Armv8.2-A architecture, to accelerate dot product arithmetic between 8-bit integer vectors. This feature, now widely available in mobile devices, significantly speeds up the computation of quantized 8-bit models. After the SDOT instruction, Arm introduced the BF16 data type and the MMLA instruction to further enhance the floating-point and integer matrix multiplication performance on CPUs and, most recently, announced the Scalable Matrix Extension (SME), marking a significant leap forward in machine learning capabilities.
The following image shows a few examples of Arm CPU’s continuous innovations in the AI space over the last decade:
Given the widespread use of Arm CPUs, AI frameworks need to take full advantage of these technologies in key operators to maximize performance. Recognizing this, we saw the need for an open-source library to share these optimized software routines. However, we were mindful of the challenges in integrating a new library into AI frameworks, such as concerns about library size, dependencies, and documentation and the need to avoid adding extra burdens for developers. So, we took extra steps to gather feedback from our partners and ensure a smooth integration process that does not require additional dependencies for AI developers. This effort led to KleidiAI, an open-source library that provides optimized performance-critical routines for artificial intelligence (AI) workloads tailored for Arm CPUs. You can learn more about KleidiAI here.
Working with the ExecuTorch team at Meta, Arm provided the software optimizations for their novel 4-bit with per-block quantization schema, which is used to accelerate the matrix multiplication kernel in the Transformer layer’s torch.nn.linear operator for Llama 3.2 quantized models. This flexible 4-bit quantization schema from ExecuTorch strikes a balance between model accuracy and low-bit matrix multiplication performance targeting on-device LLMs.
The integer 4-bit with per-block quantization
In KleidiAI, we introduced micro-kernels optimized for this new 4-bit integer quantization scheme (matmul_clamp_f32_qai8dxp_qsi4c32p)
As shown in the following image, this 4-bit quantization uses a per-block strategy for weight (RHS matrix) quantization and an 8-bit per-row quantization for activations (LHS matrix):
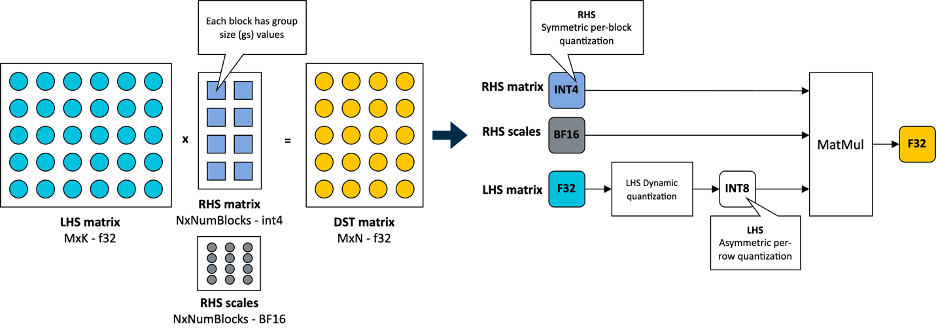
As you can see in the preceding image, each output feature map (OFM) in the weight matrix is divided into equally sized blocks (group size), with each block having a scale factor stored in BF16 format. BF16 is advantageous because it maintains the dynamic range of 32-bit floating-point (FP32) format with half the bit size, and it’s easy to convert to and from FP32 using a simple shift operation. This makes BF16 ideal for saving model space, preserving accuracy, and ensuring backward compatibility with devices that lack BF16 hardware acceleration. You can learn more about the BF16 format in this Arm Community blog post.
For completeness, this 4-bit quantization scheme and our implementation in KleidiAI allow users to configure group size for the linear weights (RHS), allowing them to trade-off between model size, model accuracy, and model performance if the model is quantized by the user.
At this point, we are ready to unveil the incredible performance recorded on Arm CPUs with ExecuTorch when running Llama 3.2 1B and Llama 3.2 3B. Let’s first go over metrics we will use to evaluate the performance of LLM inference.
Metrics for LLM Inference
Typically, performance metrics used to evaluate LLM performance during inference include:
- Time To First Token (TTFT): This measures the time it takes to produce the first output token after a prompt is provided by the user. This latency or response time is important for a good user experience, especially on a phone. TTFT is also a function of the length of the prompt or prompt tokens. To make this metric independent of the prompt length, we use Prefill tokens/second as a proxy here. The relationship between these is inverse: lower TTFT corresponds to higher Prefill tokens/second.
- Decode Performance: This is the average number of output tokens generated per second, thus reported in Tokens/Second. It is independent of the total number of tokens generated. For on-device inference, it is important to keep this higher than a user’s average reading speed.
- Peak Runtime Memory: This metric reflects the amount of RAM, typically reported in MegaBytes (MiB), needed to run the model with expected performance measured using the metrics above. Given the limited amount of RAM available on Android and iOS devices, this is one of the key metrics for on-device LLM deployment. It dictates the type of models that can be deployed on a device.
Results
The quantized Llama 3.2 1B models, both SpinQuant and QLoRA, are designed to run efficiently on a wide range of phones with limited RAM. In this section, we demonstrate that the quantized Llama 3.2 1B models can achieve over 350 tokens per second in the prefill phase and over 40 tokens per second in the decode stage. This level of performance is sufficient to enable on-device text summarization with a reasonable user experience using only Arm CPUs. To put this into perspective, on average, 50 unread messages contain about 600 tokens. With this performance, the response time (the time it takes for the first generated word to appear on the screen) is approximately two seconds.
We present measurements from a Samsung S24+ running vanilla Android. We used Llama 3.2 1B parameter models for these experiments. Although we only demonstrate using 1B models, similar performance gains can be expected for the 3B parameter models. The experiment setup involves doing a single warmup run, sequence length of 128, prompt length of 64, and using 6 out of 8 available CPUs, and measuring results over adb.
Using the ExecuTorch main branch from GitHub, we first generated the ExecuTorch PTE binary files for each model using the published checkpoints. Then, using the same repository, we generated the ExecuTorch runtime binary for Armv8. In the rest of the section, we will compare the performance of different quantized 1B models against the BF16 model using the binary built with KleidiAI. We will also compare the performance gains for quantized models between the binary with KleidiAI and the one without KleidiAI to distill the impact from KleidiAI.
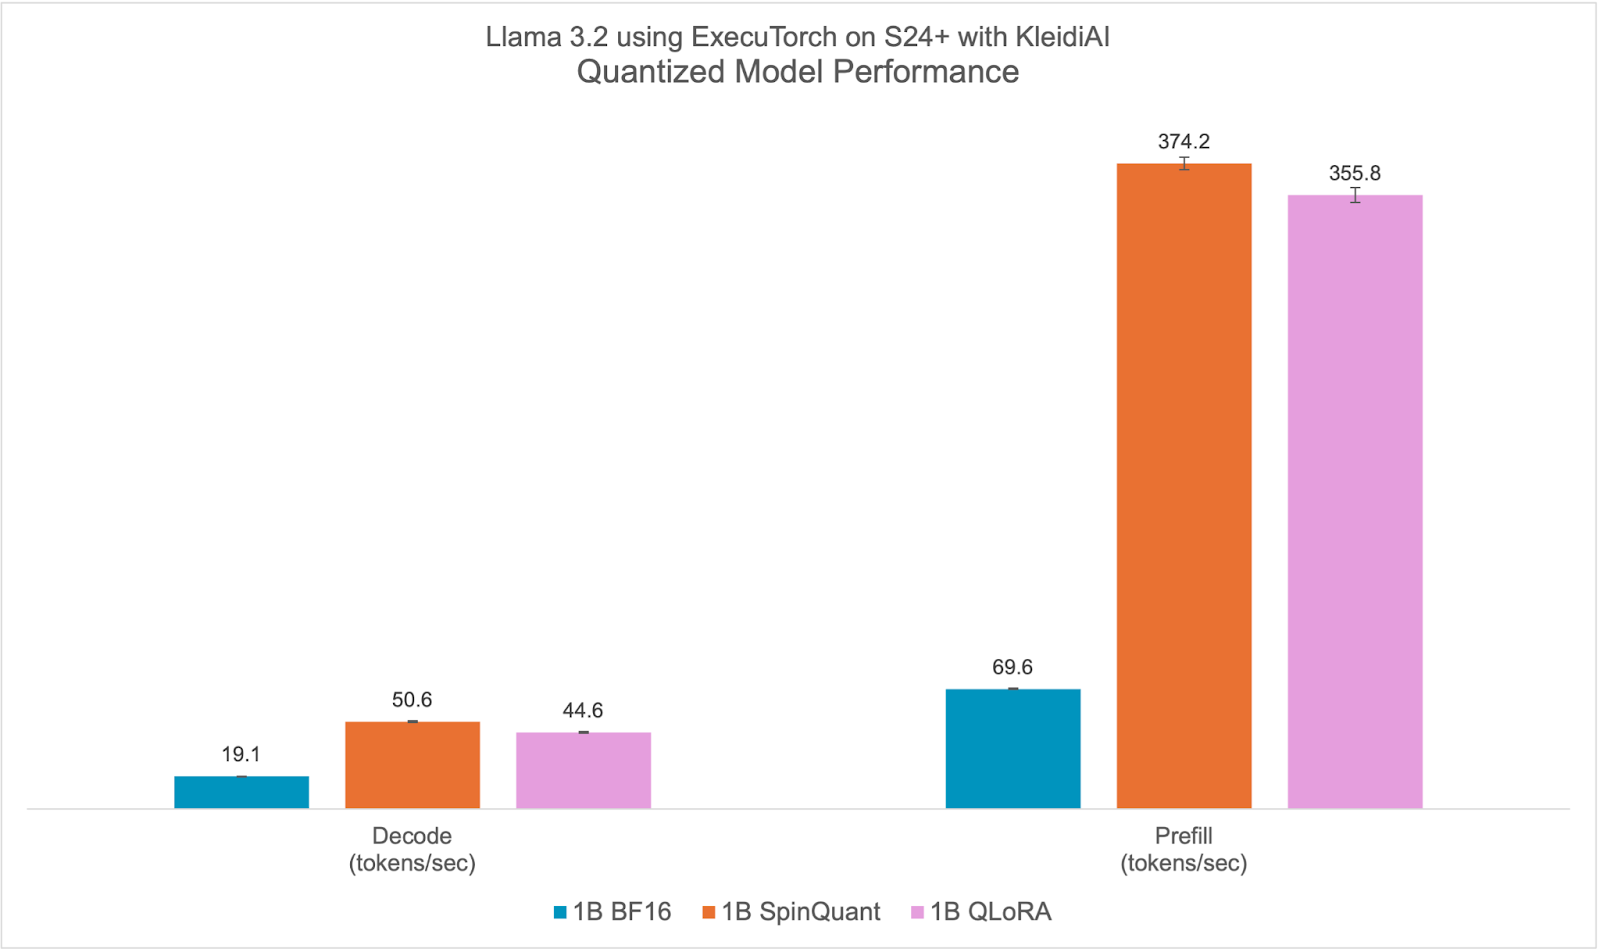
Quantized Model Performance
Llama 3.2 quantized models both SpinQuant and QLoRA perform significantly better on prompt prefill and text generation (decode) compared to the baseline BF16. We observed a >2x improvement in decode and a >5x improvement in prefill performance.
Furthermore, the quantized model size, PTE file size in bytes, is less than half that of the BF16 model, 2.3 GiB vs. 1.1 GiB. Although the size of int4 is a quarter of BF16, some layers in the model are quantized with int8, making the PTE file size ratio larger. We observed runtime peak memory footprint reduction of almost 40% from 3.1 GiB for the BF16 model to 1.9 GiB for the SpinQuant model, measured in Resident Set Size (RSS) for a maximum sequence length of 2048.
With all-around improvements, the new quantized Llama 3.2 models are ideal for on-device deployment targeting Arm CPUs. For more information on accuracy, check out the Meta Llama 3.2 blog.
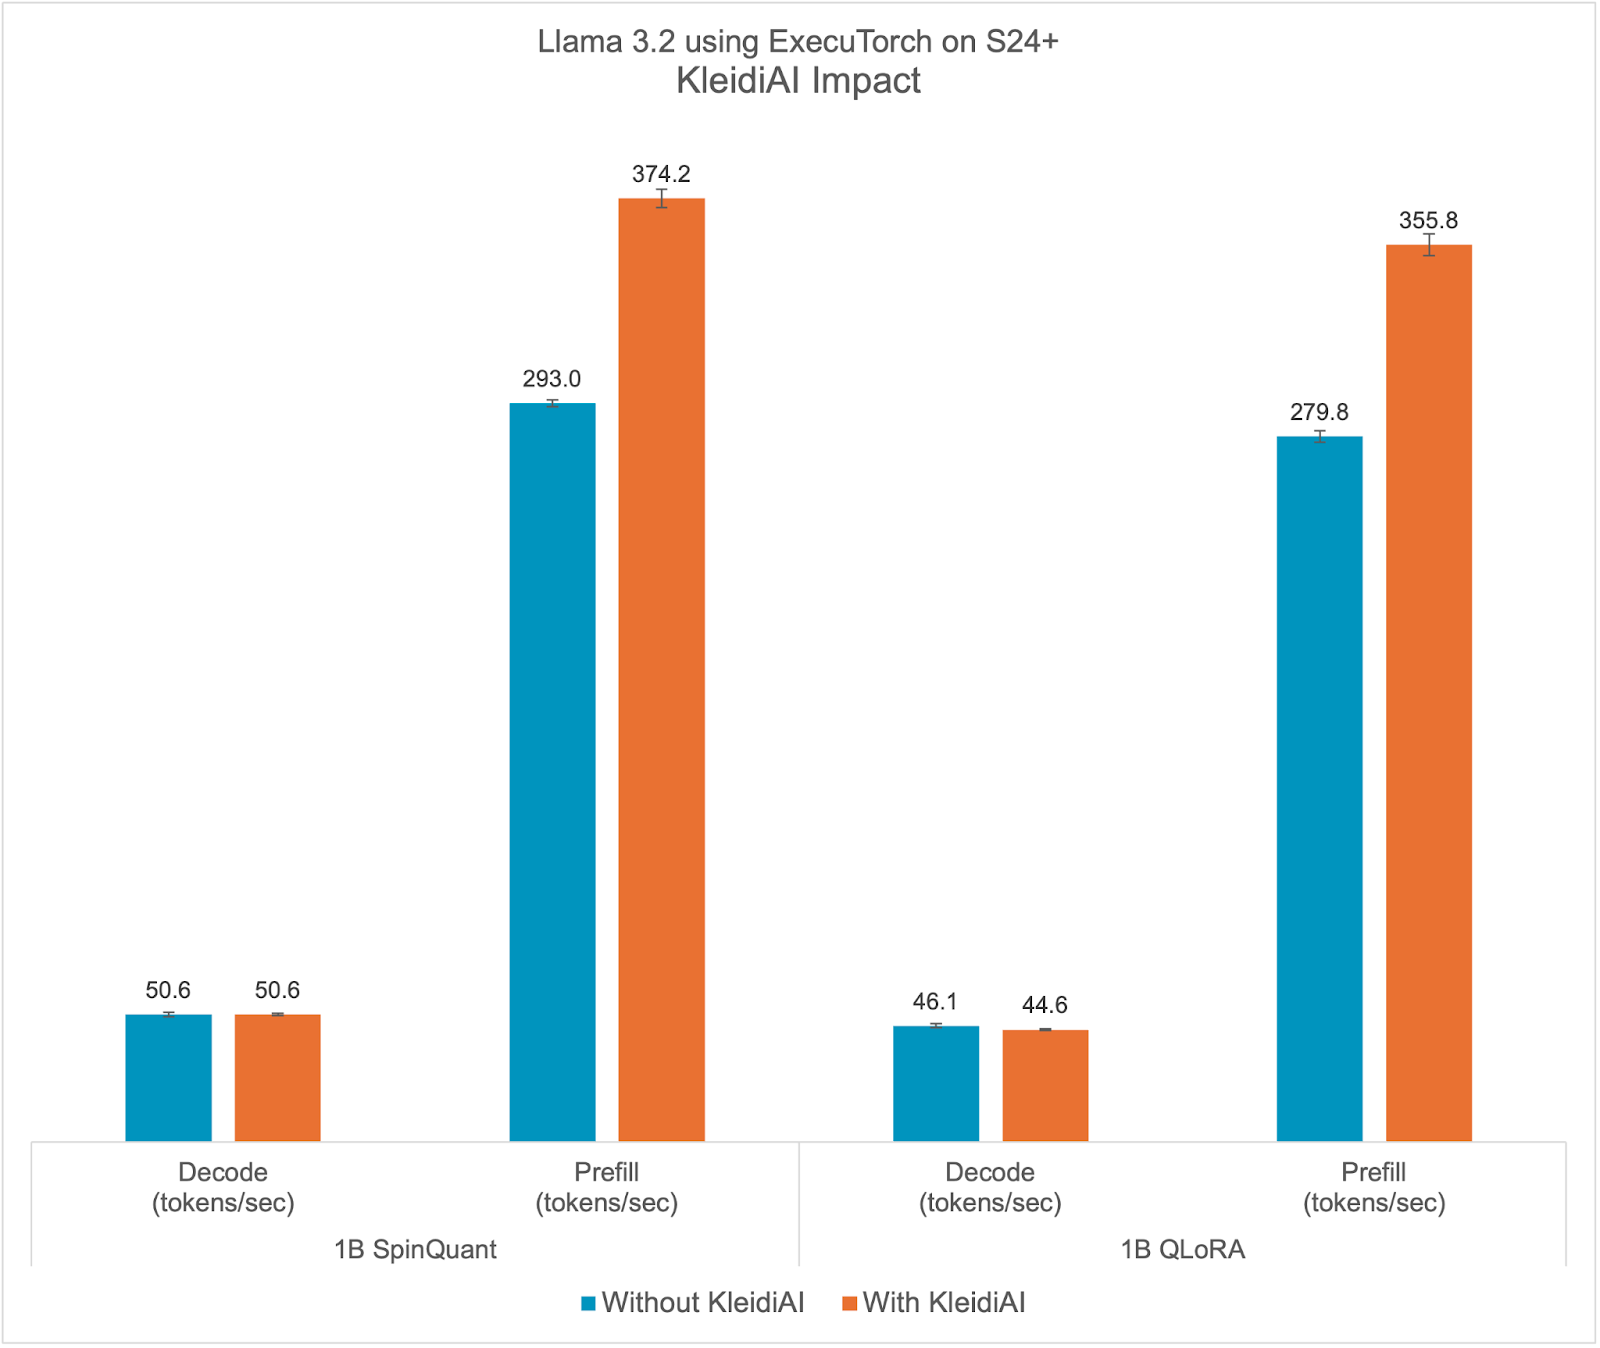
KleidiAI Impact
ExecuTorch relies on the Arm KleidiAI library to provide low-bit performant matrix multiplication kernels for the latest Arm CPUs with advanced Armv8/9 ISA features. These kernels are utilized for on-device quantized Llama 3.2 model inference in ExecuTorch. As depicted in the graph below, ExecuTorch achieves an average of >20% better prefill performance on S24+ with KleidiAI compared to non-KleidiAI kernels, while maintaining the same accuracy. This performance advantage is not limited to specific models or devices, and is expected to benefit all ExecuTorch models using low-bit quantized matrix multiplication on Arm CPUs.
To assess the impact of Kleidi, we generated two ExecuTorch runtime binaries targeting Arm Cortex-A CPUs and compared their performance.
- The first ExecuTorch runtime binary built with the Arm KleidiAI library through the XNNPACK library.
- The second binary was built without the Arm KleidiAI repository, using native kernels from the XNNPACK library.
Try it yourself!
Ready to experience the performance improvements firsthand? Here’s how you can try out ExecuTorch with the optimizations provided by KleidiAI on your projects: Here is a link to the learning path from Arm to start developing your own application using LLMs using ExecuTorch and KleidiAI.
We look forward to hearing your feedback!

Africa’s digital decade: AI upskilling and expanding speech technology
 As Sub-Saharan Africa looks to its ‘digital decade’, President of Google EMEA Matt Brittin discusses the big opportunities and some new announcements from Google.Read More
Promoting Cross-Modal Representations to Improve Multimodal Foundation Models for Physiological Signals
Many healthcare applications are inherently multimodal, involving several physiological signals. As sensors for these signals become more common, improving machine learning methods for multimodal healthcare data is crucial. Pretraining foundation models is a promising avenue for success. However, methods for developing foundation models in healthcare are still in early exploration and it is unclear which pretraining strategies are most effective given the diversity of physiological signals. This is partly due to challenges in multimodal health data: obtaining data across many patients is…Apple Machine Learning Research