Have you ever faced the challenge of obtaining high-quality data for fine-tuning your machine learning (ML) models? Generating synthetic data can provide a robust solution, especially when real-world data is scarce or sensitive. For instance, when developing a medical search engine, obtaining a large dataset of real user queries and relevant documents is often infeasible due to privacy concerns surrounding personal health information. However, synthetic data generation techniques can be employed to create realistic query-document pairs that resemble authentic user searches and relevant medical content, enabling the training of accurate retrieval models while preserving user privacy.
In this post, we demonstrate how to use Amazon Bedrock to create synthetic data, fine-tune a BAAI General Embeddings (BGE) model, and deploy it using Amazon SageMaker.
Amazon Bedrock is a fully managed service that offers a choice of high-performing foundation models (FMs) from leading artificial intelligence (AI) companies like AI21 Labs, Anthropic, Cohere, Meta, Stability AI, and Amazon through a single API, along with a broad set of capabilities to build generative AI applications with security, privacy, and responsible AI.
You can find the full code associated with this post at the accompanying GitHub repository.
Solution overview
BGE stands for Beijing Academy of Artificial Intelligence (BAAI) General Embeddings. It is a family of embedding models with a BERT-like architecture, designed to produce high-quality embeddings from text data. The BGE models come in three sizes:
- bge-large-en-v1.5: 1.34 GB, 1,024 embedding dimensions
- bge-base-en-v1.5: 0.44 GB, 768 embedding dimensions
- bge-small-en-v1.5: 0.13 GB, 384 embedding dimensions
For comparing two pieces of text, the BGE model functions as a bi-encoder architecture, processing each piece of text through the same model in parallel to obtain their embeddings.
Generating synthetic data can significantly enhance the performance of your models by providing ample, high-quality training data without the constraints of traditional data collection methods. This post guides you through generating synthetic data using Amazon Bedrock, fine-tuning a BGE model, evaluating its performance, and deploying it with SageMaker.
The high-level steps are as follows:
- Set up an Amazon SageMaker Studio environment with the necessary AWS Identity and Access Management (IAM) policies.
- Open SageMaker Studio.
- Create a Conda environment for dependencies.
- Generate synthetic data using Meta Llama 3 on Amazon Bedrock.
- Fine-tune the BGE embedding model with the generated data.
- Merge the model weights.
- Test the model locally.
- Evaluate and compare the fine-tuned model.
- Deploy the model using SageMaker and Hugging Face Text Embeddings Inference (TEI).
- Test the deployed model.
Prerequisites
First-time users need an AWS account and an IAM user role with the following permission policies attached:
AmazonSageMakerFullAccessIAMFullAccess(or a custom IAM policy that grantsiam:GetRoleandiam:AttachRolePolicypermissions for the specific SageMaker execution role and the required policies:AmazonBedrockFullAccess,AmazonS3FullAccess, andAmazonEC2ContainerRegistryFullAccess)
Create a SageMaker Studio domain and user
Complete the following steps to create a SageMaker Studio domain and user:
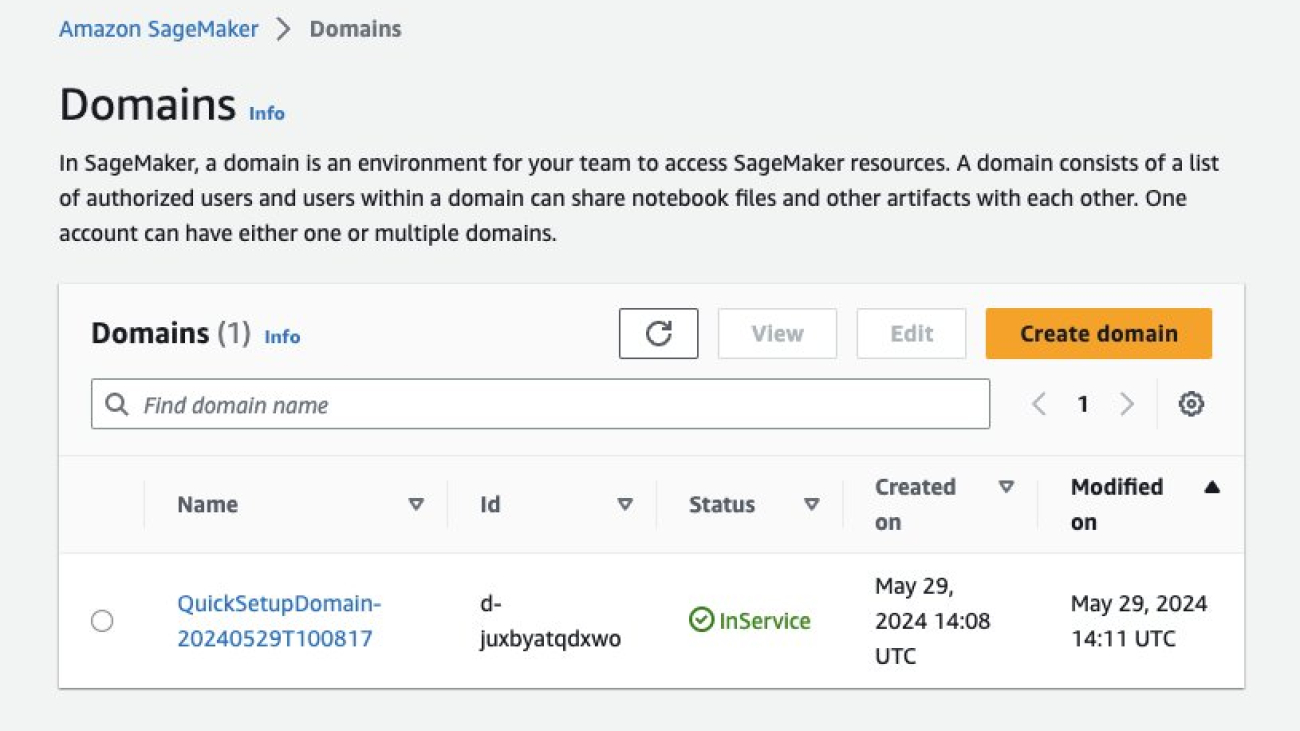
- On the SageMaker console, under Admin configurations in the navigation pane, choose Domains.
- Choose Create domain.

- Choose Set up for single user (Quick setup). Your domain, along with an IAM role with the
AmazonSageMakerFullAccesspolicy, will be automatically created. - After the domain is prepared, choose Add user.
- Provide a name for the new user profile and choose the IAM role (use the default role you created in step 4).
- Choose Next on the next three screens, then choose Submit.
After you add the user profile, update the IAM role.
- On the IAM console, choose Roles in the navigation pane.
- Navigate to the Domain settings page of your newly created domain and locate the IAM role created earlier (it should have a name similar to
AmazonSageMaker-ExecutionRole-YYYYMMDDTHHMMSS). - On the role details page, on the Add permissions drop down menu, choose Attach policies.
- Select the following policies and Add permissions to add them to the role.
AmazonBedrockFullAccessAmazonS3FullAccessAmazonEC2ContainerRegistryFullAccess
Open SageMaker Studio
To open SageMaker studio, complete the following steps:
- On the SageMaker console, choose Studio in the navigation pane.
- On the SageMaker Studio landing page, select the newly created user profile and choose Open Studio.
- After you launch SageMaker Studio, choose JupyterLab.
- In the top-right corner, choose Create JupyterLab Space.
- Give the space a name, such as embedding-finetuning, and choose Create space.
- Change the instance type to ml.g5.2xlarge and the Storage (GB) value to 100.
You may need to request a service quota increase before being able to select the ml.g5.2xlarge instance type.
- Choose Run space and wait a few minutes for the space to start.
- Choose Open JupyterLab.
Set up a Conda environment in SageMaker Studio
Next, you create a Conda environment with the necessary dependencies for running the code in this post. You can use the environment.yml file provided in the code repository to create this.
- Open the previous terminal, or choose Terminal in Launcher to open a new one.
- Clone the code repository, and enter the directory:
- Create the Conda environment by running the following command (this step will take several minutes to complete):
- Activate the environment by running the following commands one by one:
- Add the newly created Conda environment to Jupyter:
- From the Launcher, open the repository folder named embedding-finetuning-blog and open the file
Embedding Blog.ipynb. - On the Kernel drop down menu in the notebook, choose Change Kernel, then choose
ft-embedding-blog.
You may need to refresh your browser if it doesn’t show up as available.
Now you have a Jupyter notebook that includes the necessary dependencies required to run the code in this post.
Generate synthetic data using Amazon Bedrock
We start by adapting LlamaIndex’s embedding model fine-tuning guide to use Amazon Bedrock to generate synthetic data for fine-tuning. We use the sample data and evaluation procedures outlined in this guide.
To generate synthetic data, we use the Meta Llama3-70B-Instruct model on Amazon Bedrock, which offers great a price and performance. The process involves the following steps:
- Download the training and validation data, which consists of PDFs from Uber and Lyft 10K documents. These PDFs will serve as the source for generating document chunks.
- Parse the PDFs into plain text chunks using LlamaIndex functionality. The Lyft corpus will be used as the training dataset, and the Uber corpus will be used as the evaluation dataset.
- Clean the parsed data by removing samples that are too short or contain special characters that could cause errors during training.
- Set up the large language model (LLM) Meta Llama3-70B-Instruct and define a prompt template for generating questions based on the context provided by the document chunks.
- Use the LLM to generate synthetic question answer pairs for each document chunk. The document chunks serve as the context, and the generated questions are designed to be answerable using the information within the corresponding chunk.
- Save the generated synthetic data in JSONL format, where each line is a dictionary containing the query (generated question), positive passages (the document chunk used as context), and negative passages (if available). This format is compatible with the FlagEmbedding library, which will be used for fine-tuning the BGE model.
By generating synthetic question-answer pairs using the Meta Llama3-70B-Instruct model and the document chunks from the Uber and Lyft datasets, you create a high-quality dataset that can be used to fine-tune the BGE embedding model for improved performance in retrieval tasks.
Fine-Tune the BGE embedding model
For fine-tuning, you can use the bge-base-en-v1.5 model, which offers a good balance between performance and resource requirements. You define retrieval instructions for the query to enhance the model’s performance during fine-tuning and inference.
Before fine-tuning, generate hard negatives using a predefined script available from the FlagEmbedding library. Hard negative mining is an essential step that helps improve the model’s ability to distinguish between similar but not identical text pairs. By including hard negatives in the training data, you encourage the model to learn more discriminative embeddings.
You then initiate the fine-tuning process using the FlagEmbedding library, which trains the model with InfoNCE contrastive loss. The library provides a convenient way to fine-tune the BGE model using the synthetic data you generated earlier. During fine-tuning, the model learns to produce embeddings that bring similar query-document pairs closer together in the embedding space while pushing dissimilar pairs further apart.
Merge the model weights
After fine-tuning, you can use the LM-Cocktail library to merge the fine-tuned weights with the original weights of the BGE model. LM-Cocktail creates new model parameters by calculating a weighted average of the parameters from two or more models. This process helps mitigate the problem of catastrophic forgetting, where the model might lose its previously learned knowledge during fine-tuning.
By merging the fine-tuned weights with the original weights, you obtain a model that benefits from the specialized knowledge acquired during fine-tuning while retaining the general language understanding capabilities of the original model. This approach often leads to improved performance compared to using either the fine-tuned or the original model alone.
Test the model locally
Before you evaluate the fine-tuned BGE model on the validation set, it’s a good idea to perform a quick local test to make sure the model behaves as expected. You can do this by comparing the cosine similarity scores for pairs of queries and documents that you expect to have high similarity and those that you expect to have low similarity.
To test the model, prepare two small sets of document-query pairs:
- Similar document-query pairs – These are pairs where the document and query are closely related and should have a high cosine similarity score
- Different document-query pairs – These are pairs where the document and query are not closely related and should have a lower cosine similarity score
Then use the fine-tuned BGE model to generate embeddings for each document and query in both sets of pairs. By calculating the cosine similarity between the document and query embeddings for each pair, you can assess how well the model captures the semantic similarity between them.
When comparing the cosine similarity scores, we expect to see higher scores for the similar document-query pairs compared to the different document-query pairs. This would indicate that the fine-tuned model is able to effectively distinguish between similar and dissimilar pairs, assigning higher similarity scores to the pairs that are more closely related.
If the local testing results align with your expectations, it provides a quick confirmation that the fine-tuned model is performing as intended. You can then move on to a more comprehensive evaluation of the model’s performance using the validation set.
However, if the local testing results are not satisfactory, it may be necessary to investigate further and identify potential issues with the fine-tuning process or the model architecture before proceeding to the evaluation step.
This local testing step serves as a quick sanity check to make sure the fine-tuned model is behaving reasonably before investing time and resources in a full evaluation on the validation set. It can help catch obvious issues early on and provide confidence in the model’s performance before moving forward with more extensive testing.
Evaluate the model
We evaluate the performance of the fine-tuned BGE model using two procedures:
- Hit rate – This straightforward metric assesses the model’s performance by checking if the retrieved results for a given query include the relevant document. You calculate the hit rate by taking each query-document pair from the validation set, retrieving the top-K documents using the fine-tuned model, and verifying if the relevant document is present in the retrieved results.
- InformationRetrievalEvaluator – This procedure, provided by the sentence-transformers library, offers a more comprehensive suite of metrics for detailed performance analysis. It evaluates the model on various information retrieval tasks and provides metrics such as Mean Average Precision (MAP), Normalized Discounted Cumulative Gain (NDCG), and more. However,
InformationRetrievalEvaluatoris only compatible with sentence-transformers
To get a better understanding of the fine-tuned model’s performance, you can compare it against the base (non-fine-tuned) BGE model and the Amazon Titan Text Embeddings V2 model on Amazon Bedrock. This comparison helps you assess the effectiveness of the fine-tuning process and determine if the fine-tuned model outperforms the baseline models.
By evaluating the model using both the hit rate and InformationRetrievalEvaluator (when applicable), you gain insights into its performance on different aspects of retrieval tasks and can make informed decisions about its suitability for your specific use case.
Deploy the model
To deploy the fine-tuned BGE model, you can deploy the Hugging Face Text Embedding Inference (TEI) container to SageMaker. TEI is a high-performance toolkit for deploying and serving popular text embeddings and sequence classification models, including support for FlagEmbedding models. It provides a fast and efficient serving framework for your fine-tuned model on SageMaker.
The deployment process involves the following steps:
- Upload the fine-tuned model to the Hugging Face Hub or Amazon Simple Storage Service (Amazon S3).
- Retrieve the new Hugging Face Embedding Container image URI.
- Deploy the model to SageMaker.
- Optionally, set up auto scaling for the endpoint to automatically adjust the number of instances based on the incoming request traffic. Auto scaling helps make sure the endpoint can handle varying workloads efficiently.
By deploying the fine-tuned BGE model using TEI on SageMaker, you can integrate it into your applications and use it for efficient text embedding and retrieval tasks. The deployment process outlined in this post provides a scalable and manageable solution for serving the model in production environments.
Test the deployed model
After you deploy the fine-tuned BGE model using TEI on SageMaker, you can test the model by sending requests to the SageMaker endpoint and evaluating the model’s responses.
To test the deployed model, you can run the model and optionally add instructions. If the model was fine-tuned with instructions for queries or passages, it’s important to match the instructions used during fine-tuning when performing inference. In this case, you used instructions for queries but not for passages, so you can follow the same approach during testing.
To test the deployed model, you send queries to the SageMaker endpoint using the tei_endpoint.predict() method provided by the SageMaker SDK. You prepare a batch of queries, optionally prepending any instructions used during fine-tuning, and pass them to the predict() method. The model generates embeddings for each query, which are returned in the response.
By examining the generated embeddings, you can assess the quality and relevance of the model’s output. You can compare the embeddings of similar queries and verify that they have high cosine similarity scores, indicating that the model accurately captures the semantic meaning of the queries.
Additionally, you can measure the average response time of the deployed model to evaluate its performance and make sure it adheres to the required latency constraints for your application.
Integrate the model with LangChain
Additionally, you can integrate the deployed BGE model with LangChain, a library for building applications with language models. To do this, you create a custom content handler that inherits from LangChain’s EmbeddingsContentHandler. This handler implements methods to convert input data into a format compatible with the SageMaker endpoint and converts the endpoint’s output into embeddings.
You then create a SagemakerEndpointEmbeddings instance, specifying the endpoint name, SageMaker runtime client, and custom content handler. This instance wraps the deployed BGE model and integrates it with LangChain workflows.
Using the embed_documents method of the SagemakerEndpointEmbeddings instance, you generate embeddings for documents or queries, which can be used for downstream tasks like similarity search, clustering, or classification.
Integrating the deployed BGE model with LangChain allows you to take advantage of LangChain’s features and abstractions to build sophisticated language model applications that utilize the fine-tuned BGE embeddings. Testing the integration makes sure the model performs as expected and can be seamlessly incorporated into real-world workflows and applications.
Clean up
After you’re finished with the deployed endpoint, don’t forget to delete it to prevent unexpected SageMaker costs.
Conclusion
In this post, we walked through the process of fine-tuning a BGE embedding model using synthetic data generated from Amazon Bedrock. We covered key steps, including generating high-quality synthetic data, fine-tuning the model, evaluating performance, and deploying the optimized model using Amazon SageMaker.
By using synthetic data and advanced fine-tuning techniques like hard negative mining and model merging, you can significantly enhance the performance of embedding models for your specific use cases. This approach is especially valuable when real-world data is limited or difficult to obtain.
To get started, we encourage you to experiment with the code and techniques demonstrated in this post. Adapt them to your own datasets and models to unlock performance improvements in your applications. You can find all the code used in this post in our GitHub repository.
Resources
- GitHub repository
- LlamaIndex fine-tune embeddings example
- BAAI/bge-base-en-v1.5
- FlagEmbedding
- LM-Cocktail
- Introducing the Hugging Face Embedding Container for Amazon SageMaker
- AWS Machine Learning Blog
About the Authors
 Austin Welch is a Senior Applied Scientist at Amazon Web Services Generative AI Innovation Center.
 Bryan Yost is a Principle Deep Learning Architect at Amazon Web Services Generative AI Innovation Center.
 Mehdi Noori is a Senior Applied Scientist at Amazon Web Services Generative AI Innovation Center.


 Daniel Martinez is a Solutions Architect in Iberia Enterprise, part of the worldwide commercial sales organization (WWCS) at AWS.


 Mani Khanuja is a Tech Lead – Generative AI Specialist, author of the book Applied Machine Learning and High Performance Computing on AWS, and a member of the Board of Directors for Women in Manufacturing Education Foundation Board. She leads machine learning projects in various domains such as computer vision, natural language processing, and generative AI. She speaks at internal and external conferences such as AWS re:Invent, Women in Manufacturing West, YouTube webinars, and GHC 23. In her free time, she likes to go for long runs along the beach.
 Erick Friis, Founding Engineer at LangChain, currently spends most of his time on the open source side of the company. He’s an ex-founder with a passion for language-based applications. He spends his free time outdoors on skis or training for triathlons.
 Harrison Chase is the CEO and cofounder of LangChain, an open source framework and toolkit that helps developers build context-aware reasoning applications. Prior to starting LangChain, he led the ML team at Robus Intelligence, led the entity linking team at Kensho, and studied statistics and computer science at Harvard.