Improve governance of models with Amazon SageMaker unified Model Cards and Model Registry

Improve governance of models with Amazon SageMaker unified Model Cards and Model Registry

You can now register machine learning (ML) models in Amazon SageMaker Model Registry with Amazon SageMaker Model Cards, making it straightforward to manage governance information for specific model versions directly in SageMaker Model Registry in just a few clicks.

Model cards are an essential component for registered ML models, providing a standardized way to document and communicate key model metadata, including intended use, performance, risks, and business information. This transparency is particularly important for registered models, which are often deployed in high-stakes or regulated industries, such as financial services and healthcare. By including detailed model cards, organizations can establish the responsible development of their ML systems, enabling better-informed decisions by the governance team.

When solving a business problem with an ML model, customers want to refine their approach and register multiple versions of the model in SageMaker Model Registry to find the best candidate model. To effectively operationalize and govern these various model versions, customers want the ability to clearly associate model cards with a particular model version. This lack of a unified user experience posed challenges for customers, who needed a more streamlined way to register and govern their models.

Because SageMaker Model Cards and SageMaker Model Registry were built on separate APIs, it was challenging to associate the model information and gain a comprehensive view of the model development lifecycle. Integrating model information and then sharing it across different stages became increasingly difficult. This required custom integration efforts, along with complex AWS Identity and Access Management (IAM) policy management, further complicating the model governance process.

With the unification of SageMaker Model Cards and SageMaker Model Registry, architects, data scientists, ML engineers, or platform engineers (depending on the organization’s hierarchy) can now seamlessly register ML model versions early in the development lifecycle, including essential business details and technical metadata. This unification allows you to review and govern models across your lifecycle from a single place in SageMaker Model Registry. By consolidating model governance workflows in SageMaker Model Registry, you can improve transparency and streamline the deployment of models to production environments upon governance officers’ approval.

In this post, we discuss a new feature that supports the integration of model cards with the model registry. We discuss the solution architecture and best practices for managing model cards with a registered model version, and walk through how to set up, operationalize, and govern your models using the integration in the model registry.

Solution overview

In this section, we discuss the solution to address the aforementioned challenges with model governance. First, we introduce the unified model governance solution architecture for addressing the model governance challenges for an end-to-end ML lifecycle in a scalable, well-architected environment. Then we dive deep into the details of the unified model registry and discuss how it helps with governance and deployment workflows.

Unified model governance architecture

ML governance enforces the ethical, legal, and efficient use of ML systems by addressing concerns like bias, transparency, explainability, and accountability. It helps organizations comply with regulations, manage risks, and maintain operational efficiency through robust model lifecycles and data quality management. Ultimately, ML governance builds stakeholder trust and aligns ML initiatives with strategic business goals, maximizing their value and impact. ML governance starts when you want to solve a business use case or problem with ML and is part of every step of your ML lifecycle, from use case inception, model building, training, evaluation, deployment, and monitoring of your production ML system.

Let’s delve into the architecture details of how you can use a unified model registry along with other AWS services to govern your ML use case and models throughout the entire ML lifecycle.

SageMaker Model Registry catalogs your models along with their versions and associated metadata and metrics for training and evaluation. It also maintains audit and inference metadata to help drive governance and deployment workflows.

The following are key concepts used in the model registry:

  • Model package group – A model package group or model group solves a business problem with an ML model (for this example, we use the model CustomerChurn). This model group contains all the model versions associated with that ML model.
  • Model package version – A model package version or model version is a registered model version that includes the model artifacts and inference code for the model.
  • Registered model – This is the model group that is registered in SageMaker Model Registry.
  • Deployable model – This is the model version that is deployable to an inference endpoint.

Additionally, this solution uses Amazon DataZone. With the integration of SageMaker and Amazon DataZone, it enables collaboration between ML builders and data engineers for building ML use cases. ML builders can request access to data published by data engineers. Upon receiving approval, ML builders can then consume the accessed data to engineer features, create models, and publish features and models to the Amazon DataZone catalog for sharing across the enterprise. As part of the SageMaker Model Cards and SageMaker Model Registry unification, ML builders can now share technical and business information about their models, including training and evaluation details, as well as business metadata such as model risk, for ML use cases.

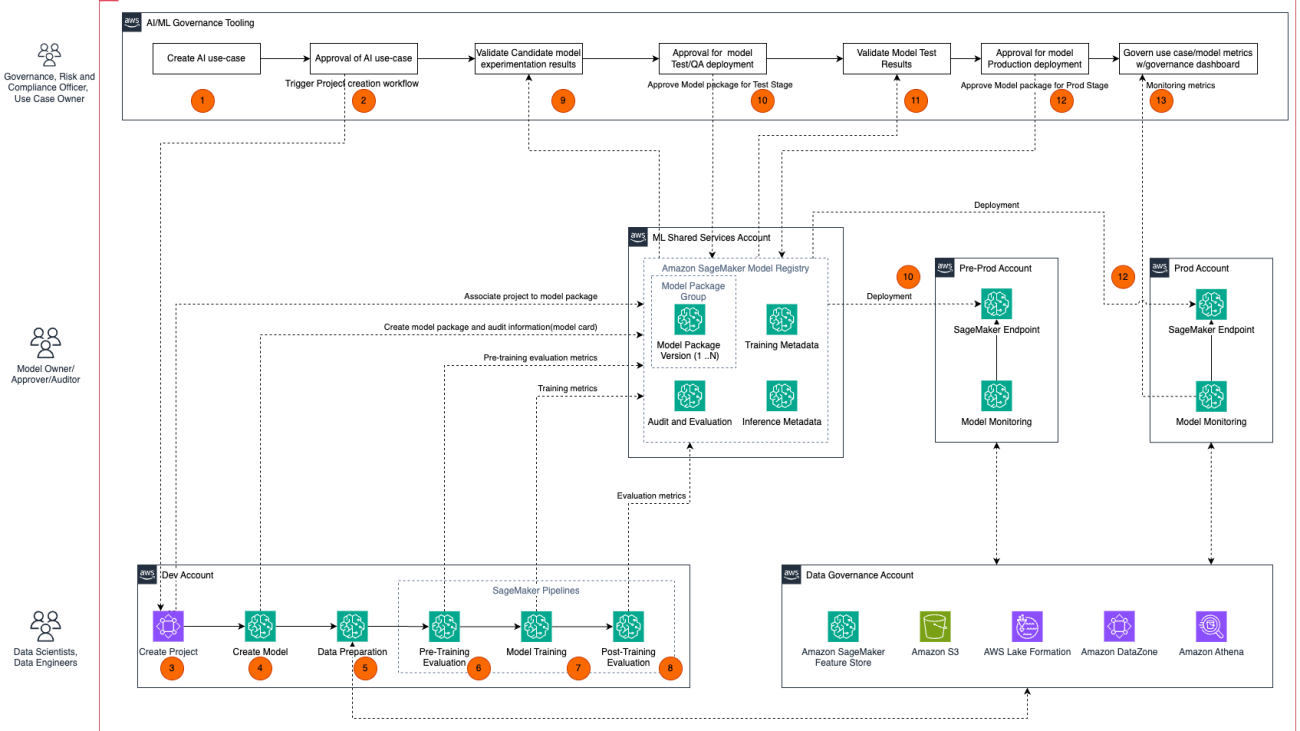
The following diagram depicts the architecture for unified governance across your ML lifecycle.

There are several for implementing secure and scalable end-to-end governance for your ML lifecycle:

  1. Define your ML use case metadata (name, description, risk, and so on) for the business problem you’re trying to solve (for example, automate a loan application process).
  2. Set up and invoke your use case approval workflow for building the ML model (for example, fraud detection) for the use case.
  3. Create an ML project to create a model for the ML use case.
  4. Create a SageMaker model package group to start building the model. Associate the model to the ML project and record qualitative information about the model, such as purpose, assumptions, and owner.
  5. Prepare the data to build your model training pipeline.
  6. Evaluate your training data for data quality, including feature importance and bias, and update the model package version with relevant evaluation metrics.
  7. Train your ML model with the prepared data and register the candidate model package version with training metrics.
  8. Evaluate your trained model for model bias and model drift, and update the model package version with relevant evaluation metrics.
  9. Validate that the candidate model experimentation results meet your model governance criteria based on your use case risk profile and compliance requirements.
  10. After you receive the governance team’s approval on the candidate model, record the approval on the model package version and invoke an automated test deployment pipeline to deploy the model to a test environment.
  11. Run model validation tests in a test environment and make sure the model integrates and works with upstream and downstream dependencies similar to a production environment.
  12. After you validate the model in the test environment and make sure the model complies with use case requirements, approve the model for production deployment.
  13. After you deploy the model to the production environment, continuously monitor model performance metrics (such as quality and bias) to make sure the model stays in compliance and meets your business use case key performance indicators (KPIs).

Architecture tools, components, and environments

You need to set up several components and environments for orchestrating the solution workflow:

  • AI governance tooling – This tooling should be hosted in an isolated environment (a separate AWS account) where your key AI/ML governance stakeholders can set up and operate approval workflows for governing AI/ML use cases across your organization, lines of business, and teams.
  • Data governance – This tooling should be hosted in an isolated environment to centralize data governance functions such as setting up data access policies and governing data access for AI/ML use cases across your organization, lines of business, and teams.
  • ML shared services – ML shared services components should be hosted in an isolated environment to centralize model governance functions such as accountability through workflows and approvals, transparency through centralized model metadata, and reproducibility through centralized model lineage for AI/ML use cases across your organization, lines of business, and teams.
  • ML development – This phase of the ML lifecycle should be hosted in an isolated environment for model experimentation and building the candidate model. Several activities are performed in this phase, such as creating the model, data preparation, model training, evaluation, and model registration.
  • ML pre-production – This phase of ML lifecycle should be hosted in an isolated environment for integrating the testing the candidate model with the ML system and validating that the results comply with the model and use case requirements. The candidate model that was built in the ML development phase is deployed to an endpoint for integration testing and validation.
  • ML production – This phase of the ML lifecycle should be hosted in an isolated environment for deploying the model to a production endpoint for shadow testing and A/B testing, and for gradually rolling out the model for operations in a production environment.

Integrate a model version in the model registry with model cards

In this section, we provide API implementation details for testing this in your own environment. We walk through an example notebook to demonstrate how you can use this unification during the model development data science lifecycle.

We have two example notebooks in GitHub repository: AbaloneExample and DirectMarketing.

Complete the following steps in the above Abalone example notebook:

  1. Install or update the necessary packages and library.
  2. Import the necessary library and instantiate the necessary variables like SageMaker client and Amazon Simple Storage Service (Amazon S3) buckets.
  3. Create an Amazon DataZone domain and a project within the domain.

You can use an existing project if you already have one. This is an optional step and we will be referencing the Amazon DataZone project ID while creating the SageMaker model package. For overall governance between your data and the model lifecycle, this can help create the correlation between business unit/domain, data and corresponding model.

The following screenshot shows the Amazon DataZone welcome page for a test domain.

In Amazon DataZone, projects enable a group of users to collaborate on various business use cases that involve creating assets in project inventories and thereby making them discoverable by all project members, and then publishing, discovering, subscribing to, and consuming assets in the Amazon DataZone catalog. Project members consume assets from the Amazon DataZone catalog and produce new assets using one or more analytical workflows. Project members can be owners or contributors.

You can gather the project ID on the project details page, as shown in the following screenshot.

In the notebook, we refer to the project ID as follows:

project_id = "5rn1teh0tv85rb"
  1. Prepare a SageMaker model package group.

A model group contains a group of versioned models. We refer to the Amazon DataZone project ID when we create the model package group, as shown in the following screenshot. It’s mapped to the custom_details field.

  1. Update the details for the model card, including the intended use and owner:
model_overview = ModelOverview(
    #model_description="This is an example model used for a Python SDK demo of unified Amazon SageMaker Model Registry and Model Cards.",
    #problem_type="Binary Classification",
    #algorithm_type="Logistic Regression",
    model_creator="DEMO-Model-Registry-ModelCard-Unification",
    #model_owner="datascienceteam",
)
intended_uses = IntendedUses(
    purpose_of_model="Test model card.",
    intended_uses="Not used except this test.",
    factors_affecting_model_efficiency="No.",
    risk_rating=RiskRatingEnum.LOW,
    explanations_for_risk_rating="Just an example.",
)
business_details = BusinessDetails(
    business_problem="The business problem that your model is used to solve.",
    business_stakeholders="The stakeholders who have the interest in the business that your model is used for.",
    line_of_business="Services that the business is offering.",
)
additional_information = AdditionalInformation(
    ethical_considerations="Your model ethical consideration.",
    caveats_and_recommendations="Your model's caveats and recommendations.",
    custom_details={"custom details1": "details value"},
)
my_card = ModelCard(
    name="mr-mc-unification",
    status=ModelCardStatusEnum.DRAFT,
    model_overview=model_overview,
    intended_uses=intended_uses,
    business_details=business_details,
    additional_information=additional_information,
    sagemaker_session=sagemaker_session,
)

This data is used to update the created model package. The SageMaker model package helps create a deployable model that you can use to get real-time inferences by creating a hosted endpoint or to run batch transform jobs.

The model card information shown as model_card=my_card in the following code snippet can be passed to the pipeline during the model register step:

register_args = model.register(
    content_types=["text/csv"],
    response_types=["text/csv"],
    inference_instances=["ml.t2.medium", "ml.m5.large"],
    transform_instances=["ml.m5.large"],
    model_package_group_name=model_package_group_name,
    approval_status=model_approval_status,
    model_metrics=model_metrics,
    drift_check_baselines=drift_check_baselines,
    model_card=my_card
)

step_register = ModelStep(name="RegisterAbaloneModel", step_args=register_args)

Alternatively, you can pass it as follows:

step_register = RegisterModel(
    name="MarketingRegisterModel",
    estimator=xgb_train,
    model_data=step_train.properties.ModelArtifacts.S3ModelArtifacts,
    content_types=["text/csv"],
    response_types=["text/csv"],
    inference_instances=["ml.t2.medium", "ml.m5.xlarge"],
    transform_instances=["ml.m5.xlarge"],
    model_package_group_name=model_package_group_name,
    approval_status=model_approval_status,
    model_metrics=model_metrics,
    model_card=my_card
)

The notebook will invoke a run of the SageMaker pipeline (which can also be invoked from an event or from the pipelines UI), which includes preprocessing, training, and evaluation.

After the pipeline is complete, you can navigate to Amazon SageMaker Studio, where you can see a model package on the Models page.

You can view the details like business details, intended use, and more on the Overview tab under Audit, as shown in the following screenshots.

The Amazon DataZone project ID is captured in the Documentation section.

You can view performance metrics under Train as well.

Evaluation details like model quality, bias pre-training, bias post-training, and explainability can be reviewed on the Evaluate tab.

Optionally, you can view the model card details from the model package itself.

Additionally, you can update the audit details of the model by choosing Edit in the top right corner. Once you are done with your changes, choose Save to keep the changes in the model card.

Also, you can update the model’s deploy status.

You can track the different statuses and activity as well.

Lineage

ML lineage is crucial for tracking the origin, evolution, and dependencies of data, models, and code used in ML workflows, providing transparency and traceability. It helps with reproducibility and debugging, making it straightforward to understand and address issues.

Model lineage tracking captures and retains information about the stages of an ML workflow, from data preparation and training to model registration and deployment. You can view the lineage details of a registered model version in SageMaker Model Registry using SageMaker ML lineage tracking, as shown in the following screenshot. ML model lineage tracks the metadata associated with your model training and deployment workflows, including training jobs, datasets used, pipelines, endpoints, and the actual models. You can also use the graph node to view more details, such as dataset and images used in that step.

Clean up

If you created resources while using the notebook in this post, follow the instructions in the notebook to clean up those resources.

Conclusion

In this post, we discussed a solution to use a unified model registry with other AWS services to govern your ML use case and models throughout the entire ML lifecycle in your organization. We walked through an end-to-end architecture for developing an AI use case embedding governance controls, from use case inception to model building, model validation, and model deployment in production. We demonstrated through code how to register a model and update it with governance, technical, and business metadata in SageMaker Model Registry.

We encourage you to try out this solution and share your feedback in the comments section.


About the authors

Ram Vittal is a Principal ML Solutions Architect at AWS. He has over 3 decades of experience architecting and building distributed, hybrid, and cloud applications. He is passionate about building secure and scalable AI/ML and big data solutions to help enterprise customers with their cloud adoption and optimization journey to improve their business outcomes. In his spare time, he rides his motorcycle and walks with his 3-year-old Sheepadoodle.

Neelam Koshiya is principal solutions architect (GenAI specialist) at AWS. With a background in software engineering, she moved organically into an architecture role. Her current focus is to help enterprise customers with their ML/ GenAI journeys for strategic business outcomes. Her area of depth is machine learning. In her spare time, she enjoys reading and being outdoors.

Siamak Nariman is a Senior Product Manager at AWS. He is focused on AI/ML technology, ML model management, and ML governance to improve overall organizational efficiency and productivity. He has extensive experience automating processes and deploying various technologies.

Saumitra Vikaram is a Senior Software Engineer at AWS. He is focused on AI/ML technology, ML model management, ML governance, and MLOps to improve overall organizational efficiency and productivity.

Read More

Transcribe, translate, and summarize live streams in your browser with AWS AI and generative AI services

Transcribe, translate, and summarize live streams in your browser with AWS AI and generative AI services

Live streaming has been gaining immense popularity in recent years, attracting an ever-growing number of viewers and content creators across various platforms. From gaming and entertainment to education and corporate events, live streams have become a powerful medium for real-time engagement and content consumption. However, as the reach of live streams expands globally, language barriers and accessibility challenges have emerged, limiting the ability of viewers to fully comprehend and participate in these immersive experiences.

Recognizing this need, we have developed a Chrome extension that harnesses the power of AWS AI and generative AI services, including Amazon Bedrock, an AWS managed service to build and scale generative AI applications with foundation models (FMs). This extension aims to revolutionize the live streaming experience by providing real-time transcription, translation, and summarization capabilities directly within your browser.

With this extension, viewers can seamlessly transcribe live streams into text, enabling them to follow along with the content even in noisy environments or when listening to audio is not feasible. Moreover, the extension’s translation capabilities open up live streams to a global audience, breaking down language barriers and fostering more inclusive participation. By offering real-time translations into multiple languages, viewers from around the world can engage with live content as if it were delivered in their first language.

In addition, the extension’s capabilities extend beyond mere transcription and translation. Using the advanced natural language processing and summarization capabilities of FMs available through Amazon Bedrock, the extension can generate concise summaries of the content being transcribed in real time. This innovative feature empowers viewers to catch up with what is being presented, making it simpler to grasp key points and highlights, even if they have missed portions of the live stream or find it challenging to follow complex discussions.

In this post, we explore the approach behind building this powerful extension and provide step-by-step instructions to deploy and use it in your browser.

Solution overview

The solution is powered by two AWS AI services, Amazon Transcribe and Amazon Translate, along with Amazon Bedrock, a fully managed service that allows you to build generative AI applications. The solution also uses Amazon Cognito user pools and identity pools for managing authentication and authorization of users, Amazon API Gateway REST APIs, AWS Lambda functions, and an Amazon Simple Storage Service (Amazon S3) bucket.

After deploying the solution, you can access the following features:

  • Live transcription and translation – The Chrome extension transcribes and translates audio streams for you in real time using Amazon Transcribe, an automatic speech recognition service. This feature also integrates with Amazon Transcribe automatic language identification for streaming transcriptions—with a minimum of 3 seconds of audio, the service can automatically detect the dominant language and generate a transcript without you having to specify the spoken language.
  • Summarization – The Chrome extension uses FMs such as Anthropic’s Claude 3 models on Amazon Bedrock to summarize content being transcribed, so you can grasp key ideas of your live stream by reading the summary.

Live transcription is currently available in the over 50 languages currently supported by Amazon Transcribe streaming (Chinese, English, French, German, Hindi, Italian, Japanese, Korean, Brazilian Portuguese, Spanish, and Thai), while translation is available in the over 75 languages currently supported by Amazon Translate.

The following diagram illustrates the architecture of the application.

Architecture diagram showing services' interactions

The solution workflow includes the following steps:

  1. A Chrome browser is used to access the desired live streamed content, and the extension is activated and displayed as a side panel. The extension delivers a web application implemented using the AWS SDK for JavaScript and the AWS Amplify JavaScript library.
  2. The user signs in by entering a user name and a password. Authentication is performed against the Amazon Cognito user pool. After a successful login, the Amazon Cognito identity pool is used to provide the user with the temporary AWS credentials required to access application features. For more details about the authentication and authorization flows, refer to Accessing AWS services using an identity pool after sign-in.
  3. The extension interacts with Amazon Transcribe (StartStreamTranscription operation), Amazon Translate (TranslateText operation), and Amazon Bedrock (InvokeModel operation). Interactions with Amazon Bedrock are handled by a Lambda function, which implements the application logic underlying an API made available using API Gateway.
  4. The user is provided with the transcription, translation, and summary of the content playing inside the browser tab. The summary is stored inside an S3 bucket, which can be emptied using the extension’s Clean Up feature.

In the following sections, we walk through how to deploy the Chrome extension and the underlying backend resources and set up the extension, then we demonstrate using the extension in a sample use case.

Prerequisites

For this walkthrough, you should have the following prerequisites:

Deploy the backend

The first step consists of deploying an AWS Cloud Development Kit (AWS CDK) application that automatically provisions and configures the required AWS resources, including:

  • An Amazon Cognito user pool and identity pool that allow user authentication
  • An S3 bucket, where transcription summaries are stored
  • Lambda functions that interact with Amazon Bedrock to perform content summarization
  • IAM roles that are associated with the identity pool and have permissions required to access AWS services

Complete the following steps to deploy the AWS CDK application:

  1. Using a command line interface (Linux shell, macOS Terminal, Windows command prompt or PowerShell), clone the GitHub repository to a local directory, then open the directory:
git clone https://github.com/aws-samples/aws-transcribe-translate-summarize-live-streams-in-browser.git
cd aws-transcribe-translate-summarize-live-streams-in-browser

  1. Open the cdk/bin/config.json file and populate the following configuration variables:
{
    "prefix": "aaa123",
    "aws_region": "us-west-2",
    "bedrock_region": "us-west-2",
    "bucket_name": "summarization-test",
    "bedrock_model_id": "anthropic.claude-3-sonnet-20240229-v1:0"
}

The template launches in the us-east-2 AWS Region by default. To launch the solution in a different Region, change the aws_region parameter accordingly. Make sure to select a Region in which all the AWS services in scope (Amazon Transcribe, Amazon Translate, Amazon Bedrock, Amazon Cognito, API Gateway, Lambda, Amazon S3) are available.

The Region used for bedrock_region can be different from aws_region because you might have access to Amazon Bedrock models in a Region different from the Region where you want to deploy the project.

By default, the project uses Anthropic’s Claude 3 Sonnet as a summarization model; however, you can use a different model by changing the bedrock_model_id in the configuration file. For the complete list of model IDs, see Amazon Bedrock model IDs. When selecting a model for your deployment, don’t forget to check that the desired model is available in your preferred Region; for more details about model availability, see Model support by AWS Region.

  1. If you have never used the AWS CDK on this account and Region combination, you will need to run the following command to bootstrap the AWS CDK on the target account and Region (otherwise, you can skip this step):
npx cdk bootstrap aws://{targetAccountId}/{targetRegion}
  1. Navigate to the cdk sub-directory, install dependencies, and deploy the stack by running the following commands:
cd cdk
npm i
npx cdk deploy
  1. Confirm the deployment of the listed resources by entering y.

Wait for AWS CloudFormation to finish the stack creation.

You need to use the CloudFormation stack outputs to connect the frontend to the backend. After the deployment is complete, you have two options.

The preferred option is to use the provided postdeploy.sh script to automatically copy the cdk configuration parameters to a configuration file by running the following command, still in the /cdk folder:

./scripts/postdeploy.sh

Alternatively, you can copy the configuration manually:

  1. Open the AWS CloudFormation console in the same Region where you deployed the resources.
  2. Find the stack named AwsStreamAnalysisStack.
  3. On the Outputs tab, note of the output values to complete the next steps.

Set up the extension

Complete the following steps to get the extension ready for transcribing, translating, and summarizing live streams:

  1. Open the src/config.js Based on how you chose to collect the CloudFormation stack outputs, follow the appropriate step:
    1. If you used the provided automation, check whether the values inside the src/config.js file have been automatically updated with the corresponding values.
    2. If you copied the configuration manually, populate the src/config.js file with the values you noted. Use the following format:
const config = {
    "aws_project_region": "{aws_region}", // The same you have used as aws_region in cdk/bin/config.json
    "aws_cognito_identity_pool_id": "{CognitoIdentityPoolId}", // From CloudFormation outputs
    "aws_user_pools_id": "{CognitoUserPoolId}", // From CloudFormation outputs
    "aws_user_pools_web_client_id": "{CognitoUserPoolClientId}", // From CloudFormation outputs
    "bucket_s3": "{BucketS3Name}", // From CloudFormation outputs
    "bedrock_region": "{bedrock_region}", // The same you have used as bedrock_region in cdk/bin/config.json
    "api_gateway_id": "{APIGatewayId}" // From CloudFormation outputs
};

Take note of the CognitoUserPoolId, which will be needed in a later step to create a new user.

  1. In the command line interface, move back to the aws-transcribe-translate-summarize-live-streams-in-browser directory with a command similar to following:
cd ~/aws-transcribe-translate-summarize-live-streams-in-browser
  1. Install dependencies and build the package by running the following commands:
npm i
npm run build
  1. Open your Chrome browser and navigate to chrome://extensions/.

Make sure that developer mode is enabled by toggling the icon on the top right corner of the page.

  1. Choose Load unpacked and upload the build directory, which can be found inside the local project folder aws-transcribe-translate-summarize-live-streams-in-browser.
  2. Grant permissions to your browser to record your screen and audio:
    1. Identify the newly added Transcribe, translate and summarize live streams (powered by AWS)
    2. Choose Details and then Site Settings.
    3. In the Microphone section, choose Allow.
  3. Create a new Amazon Cognito user:
    1. On the Amazon Cognito console, choose User pools in the navigation pane.
    2. Choose the user pool with the CognitoUserPoolId value noted from the CloudFormation stack outputs.
    3. On the Users tab, choose Create user and configure this user’s verification and sign-in options.

See a walkthrough of Steps 4-6 in the animated image below. For additional details, refer to Creating a new user in the AWS Management Console.

Gif showcasing steps previously desccribed to setup the extension

Use the extension

Now that the extension in set up, you can interact with it by completing these steps:

  1. On the browser tab, choose the Extensions.
  2. Choose (right-click) on the Transcribe, translate and summarize live streams (powered by AWS) extension and choose Open side panel.
  3. Log in using the credentials created in the Amazon Cognito user pool from the previous step.
  4. Close the side panel.

You’re now ready to experiment with the extension.

  1. Open a new tab in the browser, navigate to a website featuring an audio/video stream, and open the extension (choose the Extensions icon, then choose the option menu (three dots) next to AWS transcribe, translate, and summarize, and choose Open side panel).
  2. Use the Settings pane to update the settings of the application:
    • Mic in use – The Mic not in use setting is used to record only the audio of the browser tab for a live video streaming. Mic in use is used for a real-time meeting where your microphone is recorded as well.
    • Transcription language – This is the language of the live stream to be recorded (set to auto to allow automatic identification of the language).
    • Translation language – This is the language in which the live stream will be translated and the summary will be printed. After you choose the translation language and start the recording, you can’t change your choice for the ongoing live stream. To change the translation language for the transcript and summary, you will have to record it from scratch.
  3. Choose Start recording to start recording, and start exploring the Transcription and Translation

Content on the Translation tab will appear with a few seconds of delay compared to what you see on the Transcription tab. When transcribing speech in real time, Amazon Transcribe incrementally returns a stream of partial results until it generates the final transcription for a speech segment. This Chrome extension has been implemented to translate text only after a final transcription result is returned.

  1. Expand the Summary section and choose Get summary to generate a summary. The operation will take a few seconds.
  2. Choose Stop recording to stop recording.
  3. Choose Clear all conversations in the Clean Up section to delete the summary of the live stream from the S3 bucket.

See the extension in action in the video below.

Troubleshooting

If you receive the error “Extension has not been invoked for the current page (see activeTab permission). Chrome pages cannot be captured.”, check the following:

  • Make sure you’re using the extension on the tab where you first opened the side pane. If you want to use it on a different tab, stop the extension, close the side pane, and choose the extension icon again to run it
  • Make sure you have given permissions for audio recording in the web browser.

If you can’t get the summary of the live stream, make sure you have stopped the recording and then request the summary. You can’t change the language of the transcript and summary after the recording has started, so remember to choose it appropriately before you start the recording.

Clean up

When you’re done with your tests, to avoid incurring future charges, delete the resources created during this walkthrough by deleting the CloudFormation stack:

  1. On the AWS CloudFormation console, choose Stacks in the navigation pane.
  2. Choose the stack AwsStreamAnalysisStack.
  3. Take note of the CognitoUserPoolId and CognitoIdentityPoolId values among the CloudFormation stack outputs, which will be needed in the following step.
  4. Choose Delete stack and confirm deletion when prompted.

Because the Amazon Cognito resources won’t be automatically deleted, delete them manually:

  1. On the Amazon Cognito console, locate the CognitoUserPoolId and CognitoIdentityPoolId values previously retrieved in the CloudFormation stack outputs.
  2. Select both resources and choose Delete.

Conclusion

In this post, we showed you how to deploy a code sample that uses AWS AI and generative AI services to access features such as live transcription, translation and summarization. You can follow the steps we provided to start experimenting with the browser extension.

To learn more about how to build and scale generative AI applications, refer to Transform your business with generative AI.


About the Authors

Luca Guida is a Senior Solutions Architect at AWS; he is based in Milan and he supports independent software vendors in their cloud journey. With an academic background in computer science and engineering, he started developing his AI/ML passion at university; as a member of the natural language processing and generative AI community within AWS, Luca helps customers be successful while adopting AI/ML services.

Chiara Relandini is an Associate Solutions Architect at AWS. She collaborates with customers from diverse sectors, including digital native businesses and independent software vendors. After focusing on ML during her studies, Chiara supports customers in using generative AI and ML technologies effectively, helping them extract maximum value from these powerful tools.

Arian Rezai Tabrizi is an Associate Solutions Architect based in Milan. She supports enterprises across various industries, including retail, fashion, and manufacturing, on their cloud journey. Drawing from her background in data science, Arian assists customers in effectively using generative AI and other AI technologies.

Read More

Accelerate your financial statement analysis with Amazon Bedrock and generative AI

Accelerate your financial statement analysis with Amazon Bedrock and generative AI

The financial and banking industry can significantly enhance investment research by integrating generative AI into daily tasks like financial statement analysis. By taking advantage of advanced natural language processing (NLP) capabilities and data analysis techniques, you can streamline common tasks like these in the financial industry:

  • Automating data extraction – The manual data extraction process to analyze financial statements can be time-consuming and prone to human errors. Generative AI models can automate finding and extracting financial data from documents like 10-Ks, balance sheets, and income statements. Foundation model (FMs) are trained to identify and extract relevant information like expenses, revenue, and liabilities.
  • Trend analysis and forecasting – Identifying trends and forecasting requires domain expertise and advanced mathematics. This limits the ability for individuals to run one-time reporting, while creating dependencies within an organization on a small subset of employees. Generative AI applications can analyze financial data and identify trends and patterns while forecasting future financial performance, all without manual intervention from an analyst. Removing the manual analysis step and allowing the generative AI model to build a report analyzing trends in the financial statement can increase the organization’s agility to make quick market decisions.
  • Financial reporting statements – Writing detailed financial analysis reports manually can be time-consuming and resource intensive. Dedicated resources to generate financial statements can create bottlenecks within the organization, requiring specialized roles to handle the translation of financial data into a consumable narrative. FMs can summarize financial statements, highlighting key metrics found through trend analysis and providing insights. An automated report writing process not only provides consistency and speed, but minimizes resource constraints in the financial reporting process.

Amazon Bedrock is a fully managed service that makes FMs from leading AI startups and Amazon available through an API, so you can choose from a wide range of FMs to find the model that is best suited for your use case. Amazon Bedrock offers a serverless experience, so you can get started quickly, privately customize FMs with your own data, and quickly integrate and deploy them into your applications using AWS tools without having to manage infrastructure.

In this post, we demonstrate how to deploy a generative AI application that can accelerate your financial statement analysis on AWS.

Solution overview

Building a generative AI application with Amazon Bedrock to analyze financial statements involves a series of steps, from setting up the environment to deploying the model and integrating it into your application.

The following diagram illustrates an example solution architecture using AWS services.


The workflow consists of the following steps:

  1. The user interfaces with a web or mobile application, where they upload financial documents.
  2. Amazon API Gateway manages and routes the incoming request from the UI.
  3. An AWS Lambda function is invoked when new documents are added to the Amazon Simple Storage Service (Amazon S3) bucket.
  4. Amazon Bedrock analyzes the documents stored in Amazon S3. The analysis results are returned to the S3 bucket through a Lambda function and stored there.
  5. Amazon DynamoDB provides a fast, scalable way to store and retrieve metadata and analysis results to display to users.
  6. Amazon Simple Notification Service (Amazon SNS) sends notifications about the status of document processing to the application user.

In the following sections, we discuss the key considerations in each step to build and deploy a generative AI application.

Prepare the data

Gather the financial statements you want to analyze. These can be balance sheets, income statements, cash flow statements, and so on. Make sure the data is clean and in a consistent format. You might need to preprocess the data to remove noise and standardize the format. Preprocessing the data will transform the raw data into a state that can be efficiently used for model training. This is often necessary due to messiness and inconsistencies in real-world data. The outcome is to have consistent data for the model to ingest. The two most common types of data preprocessing are normalization and standardization.

Normalization modifies the numerical columns within a dataset to standardize the scale. By rearranging the data within a dataset, the scaling method reduces duplication in which the numbers are scaled from 0–1. Because outliers are removed, undesirable characteristics from the dataset are also removed. When dealing with a significant amount of data, normalizing the dataset enhances the performance of a machine learning model in environments where feature distribution is unclear.

Standardization is a method designed to rescale the values of a dataset to meet the characteristics of a standard normal distribution. By using this methodology, the data can transmit more reliably across systems, making it simpler to process, analyze, and store data in a database. Standardization is beneficial when feature distribution is consistent and values on a scale aren’t constrained within a particular range.

Choose your model

Amazon Bedrock gives you the power of choice by providing a flexible and scalable environment that allows you to access and use multiple FMs from leading AI model providers. This flexibility enables you to select the most appropriate models for your specific use cases, whether you’re working on tasks like NLP, text generation, image generation, or other AI-driven applications.

Deploy the model

If you don’t already have access to Amazon Bedrock FMs, you’ll need to request access through the Amazon Bedrock console. Then you can use the Amazon Bedrock console to deploy the chosen model. Configure the deployment settings according to your application’s requirements.

Develop the backend application

Create a backend service to interact with the deployed model. This service will handle requests from the frontend, send data to the model, and process the model’s responses. You can use Lambda, API Gateway, or other preferred REST API endpoints.

Use the Amazon Bedrock API to send financial statements to the model and receive the analysis results.

The following is an example of the backend code.

Develop the frontend UI

Create a frontend interface for users to upload financial statements and view analysis results. This can be a web or mobile application. Make sure the frontend can send financial statement data to the backend service and display the analysis results.

Conclusion

In this post, we discussed the benefits to building a generative AI application powered by Amazon Bedrock to accelerate the analysis of financial documents. Stakeholders will be able to use AWS services to deploy and manage LLMs that help improve the efficiency of pulling insights from common documents like 10-Ks, balance sheets, and income statements.

For more information on working with generative AI on AWS, visit the AWS Skill Builder generative AI training modules.

For instructions on building frontend applications and full-stack applications powered by Amazon Bedrock, refer to Front-End Web & Mobile on AWS and Create a Fullstack, Sample Web App powered by Amazon Bedrock.


About the Author

Jason D’Alba is an AWS Solutions Architect leader focused on enterprise applications, helping customers architect highly available and scalable data & ai solutions.

Read More

Multilingual content processing using Amazon Bedrock and Amazon A2I

Multilingual content processing using Amazon Bedrock and Amazon A2I

The market size for multilingual content extraction and the gathering of relevant insights from unstructured documents (such as images, forms, and receipts) for information processing is rapidly increasing. The global intelligent document processing (IDP) market size was valued at $1,285 million in 2022 and is projected to reach $7,874 million by 2028 (source).

Let’s consider that you’re a multinational company that receives invoices, contracts, or other documents from various regions worldwide, in languages such as Arabic, Chinese, Russian, or Hindi. These languages might not be supported out of the box by existing document extraction software.

Anthropic’s Claude models, deployed on Amazon Bedrock, can help overcome these language limitations. These large language models (LLMs) are trained on a vast amount of data from various domains and languages. They possess remarkable capabilities in understanding and generating human-like text in multiple languages. Handling complex and sensitive documents requires accuracy, consistency, and compliance, often necessitating human oversight. Amazon Augmented AI (Amazon A2I) simplifies the creation of workflows for human review, managing the heavy lifting associated with developing these systems or overseeing a large reviewer workforce. By combining Amazon A2I and Anthropic’s Claude on Amazon Bedrock, you can build a robust multilingual document processing pipeline with improved accuracy and quality of extracted information.

To demonstrate this multilingual and validated content extraction solution, we will use Amazon Bedrock generative AI, serverless orchestration managed by Amazon Step Functions, and augmented human intelligence powered by Amazon A2I.

Solution overview

This post outlines a custom multilingual document extraction and content assessment framework using a combination of Anthropic’s Claude 3 on Amazon Bedrock and Amazon A2I to incorporate human-in-the-loop capabilities. The key steps of the framework are as follows:

  • Store documents of different languages
  • Invoke a processing flow that extracts data from the document according to given schema
  • Pass extracted content to human reviewers to validate the information
  • Convert validated content into an Excel format and store in a storage layer for use

This framework can be further expanded by parsing the content to a knowledge base, indexing the information extracted from the documents, and creating a knowledge discovery tool (Q&A assistant) to allow users to query information and extract relevant insights.

Document processing stages

Our reference solution uses a highly resilient pipeline, as shown in the following diagram, to coordinate the various document processing stages.

The document processing stages are:

  1. Acquisition – The first stage of the pipeline acquires input documents from Amazon Simple Storage Service (Amazon S3). In this stage, we store initial document information in an Amazon DynamoDB table after receiving an Amazon S3 event notification. We use this table to track the progression of this document across the entire pipeline.
  2. Extraction – A document schema definition is used to formulate the prompt and documents are embedded into the prompt and sent to Amazon Bedrock for extraction. Results are stored as JSON in a folder in Amazon S3.
  3. Custom business rules – Custom business rules are applied to the reshaped output containing information about tables in the document. Custom rules might include table format detection (such as detecting that a table contains invoice transactions) or column validation (such as verifying that a product code column only contains valid codes).
  4. Reshaping – JSON extracted in the previous step is reshaped in the format supported by Amazon A2I and prepared for augmentation.
  5. Augmentation – Human annotators use Amazon A2I to review the document and augment it with any information that was missed.
  6. Cataloging – Documents that pass human review are cataloged into an Excel workbook so your business teams can consume them.

A custom UI built with ReactJS is provided to human reviewers to intuitively and efficiently review and correct issues in the documents.

Extraction with a multi-modal language model

The architecture uses a multi-modal LLM to perform extraction of data from various multi-lingual documents. We specifically used the Rhubarb Python framework to extract JSON schema-based data from the documents. Rhubarb is a lightweight Python framework built from the ground up to enable document understanding tasks using multi-modal LLMs. It uses Amazon Bedrock through the Boto3 API to use Anthropic’s Claude V3 multi-modal language models, but makes it straightforward to use file formats that are otherwise not supported by Anthropic’s Claude models. As of writing, Anthropic’s Claude V3 models can only support image formats (JPEG, PNG, and GIF). This means that when dealing with documents in PDF or TIF format, the document must be converted to a compatible image format. This process is taken care by the Rhubarb framework internally, making our code simpler.

Additionally, Rhubarb comes with built-in system prompts that ground the model responses to be in a defined format using the JSON schema. A predefined JSON schema can be provided to the Rhubarb API, which makes sure the LLM generates data in that specific format. Internally, Rhubarb also does re-prompting and introspection to rephrase the user prompt in order to increase the chances of successful data extraction by the model. We used the following JSON schema for the purposes of extracting data from our documents:

{
    "type": "object",
    "properties": {
        "invoice_number": {
            "type": "string",
            "description": "The unique identifier for the invoice"
        },
        "issue_date": {
            "type": "string",
            "description": "The date the invoice was issued"
        },
        "due_date": {
            "type": "string",
            "description": "The date the payment for the invoice is due"
        },
        "issuer": {
            "type": "object",
            "properties": {
                "name": {
                    "type": "string",
                    "description": "The name of the company or entity issuing the invoice"
                },
                "address": {
                    "type": "string",
                    "description": "The address of the issuing company or entity"
                },
                "identifier": {
                    "type": "string",
                    "description": "The identifier of the issuing company or entity"
                }
            },
            "required": [
                "name",
                "address",
                "identifier"
            ]
        },
        "recipient": {
            "type": "object",
            "properties": {
                "name": {
                    "type": "string",
                    "description": "The name of the company or entity receiving the invoice"
                },
                "address": {
                    "type": "string",
                    "description": "The address of the receiving company or entity"
                },
                "identifier": {
                    "type": "string",
                    "description": "The identifier of the receiving company or entity"
                }
            },
            "required": [
                "name",
                "address",
                "identifier"
            ]
        },
        "line_items": {
            "type": "array",
            "items": {
                "type": "object",
                "properties": {
                    "product_id": {
                        "type": "string",
                        "description": "The identifier for the product or service"
                    },
                    "description": {
                        "type": "string",
                        "description": "A description of the product or service"
                    },
                    "quantity": {
                        "type": "number",
                        "description": "The quantity of the product or service"
                    },
                    "unit_price": {
                        "type": "number",
                        "description": "The price per unit of the product or service"
                    },
                    "discount": {
                        "type": "number",
                        "description": "The discount applied to the unit price"
                    },
                    "discounted_price": {
                        "type": "number",
                        "description": "The price per unit after discount"
                    },
                    "tax_rate": {
                        "type": "number",
                        "description": "The tax rate applied to the unit price"
                    },
                    "total_price": {
                        "type": "number",
                        "description": "The total price for the line item (quantity * unit_price)"
                    }
                },
                "required": [
                    "product_id",
                    "description",
                    "quantity",
                    "unit_price",
                    "discount",
                    "discounted_price",
                    "tax_rate",
                    "total_price"
                ]
            }
        },
        "totals": {
            "type": "object",
            "properties": {
                "subtotal": {
                    "type": "number",
                    "description": "The total of all line item prices before taxes and fees"
                },
                "discount": {
                    "type": "number",
                    "description": "The total discount applied"
                },
                "tax": {
                    "type": "number",
                    "description": "The amount of tax applied to the subtotal"
                },
                "total": {
                    "type": "number",
                    "description": "The total amount due for the invoice after taxes and fees"
                }
            },
            "required": [
                "subtotal",
                "discount",
                "tax",
                "total"
            ]
        }
    },
    "required": [
        "invoice_number",
        "issue_date",
        "due_date",
        "issuer",
        "recipient",
        "line_items",
        "totals"
    ]
}

There are a number of other features supported by Rhubarb; for example, it supports document classification, summary, page wise extractions, Q&A, streaming chat and summaries, named entity recognition, and more. Visit the Rhubarb documentation to learn more about using it for various document understanding tasks.

Prerequisites

This solution uses Amazon SageMaker labeling workforces to manage workers and distribute tasks. As a prerequisite, create a private workforce. For instructions, see Create an Amazon Cognito Workforce Using the Labeling Workforces Page. Create two worker teams, called primary and quality, and assign yourself to both teams.

After you add yourself to the teams and confirm your email, note the worker portal URL. To find the URL, open the AWS Management Console for SageMaker and choose Ground Truth and then Labeling workforces in the navigation pane. On the Private tab, you can find the URL for the labeling portal. This URL is also automatically emailed to the work team members as they are onboarded.

Next, install the AWS Cloud Development Kit (AWS CDK) toolkit with the following code:

npm install -g aws-cdk

Disclaimer: When installing global packages like the AWS CDK using npm, some systems, especially macOS and Linux, might require elevated permissions. If you encounter a permissions error when running npm install -g aws-cdk, you can adjust the global npm directory to avoid using sudo by following the instructions in this documentation.

Lastly, install Docker based on your operating system:

Deploy the application to the AWS Cloud

This reference solution is available on GitHub, and you can deploy it with the AWS CDK. For instructions on deploying the cloud application, see the README file in the GitHub repo.

Deploying this application to your AWS account will create various S3 buckets for document storage, AWS Lambda functions for integration with AWS machine learning (ML) services and business logic, AWS Identity and Access Management (IAM) policies, an Amazon Simple Queue Service (Amazon SQS) queue, a data processing pipeline using a Step Functions state machine, and an Amazon A2I based human review workflow.

Complete the following steps:

  1. Clone the GitHub repo.

To clone the repository, you can use either the HTTPS or SSH method depending on your environment and authentication setup:

Using HTTPS:

git clone https://github.com/aws-samples/multilingual-content-processing-with-amazon-bedrock.git

This option is generally accessible for most users who have their Git configuration set up for HTTPS

Using SSH:

git clone git@github.com:aws-samples/multilingual-content-processing-with-amazon-bedrock.git

Make sure you have your SSH keys properly configured and added to your GitHub account to use this method.

  1. Navigate to the root directory of the repository.
cd  multilingual-content-processing-with-amazon-bedrock
  1. Create a virtual environment.
python3 -m venv .venv
  1. Enter the virtual environment.
source .venv/bin/activate
  1. Install dependencies in the virtual environment.
pip install -r requirements.txt
  1. Bootstrap the AWS CDK (you only need to do this one time per account setup).
cdk bootstrap
  1. Edit the json file to add the name of the work team you created earlier. Make sure to match the work team name in the same AWS Region and account.
edit cdk.json
  1. Deploy the application.
cdk deploy --all

After you run cdk deploy --all, the AWS CloudFormation template provisions the necessary AWS resources.

Test the document processing pipeline

When the application is up and running, you’re ready to upload documents for processing and review. For this post, we use the following sample document for testing the pipeline. You can use the AWS Command Line Interface (AWS CLI) to upload the document, which will automatically invoke the pipeline.

  1. Upload the document schema.
aws s3 cp ./data/invoice_schema.json s3://mcp-store-document-<ACCOUNT-ID>/schema/
  1. Upload the documents.
aws s3 cp ./data/croatianinvoice.pdf s3://mcp-store-document-<ACCOUNT-ID>/acquire/
  1. The status of the document processing is tracked in a DynamoDB table. You can check the status on the DynamoDB console or by using the following query.
aws dynamodb query 
    --table-name mcp-table-pipeline 
    --key-condition-expression "DocumentID = :documentID" 
    --expression-attribute-values '{":documentID":{"S":"croatianinvoice.pdf"}}' 
    --output text

When the document reaches the Augment#Running stage, the extraction and business rule applications are complete, indicating that the document is ready for human review.

  1. Navigate to the portal URL that you retrieved earlier and log in to view all tasks pending human review.
  2. Choose Start working to examine the submitted document.

The interface will display the original document on the left and the extracted content on the right.

  1. When you complete your review and annotations, choose Submit.

The results will be stored as an Excel file in the mcp-store-document-<ACCOUNT-ID> S3 bucket in the /catalog folder.

The /catalog folder in your S3 bucket might take a few minutes to be created after you submit the job. If you don’t see the folder immediately, wait a few minutes and refresh your S3 bucket. This delay is normal because the folder is generated when the job is complete and the results are saved.

By following these steps, you can efficiently process, review, and store documents using a fully automated AWS Cloud-based pipeline.

Clean up

To avoid ongoing charges, clean up the entire AWS CDK environment by using the cdk destroy command. Additionally, it’s recommended to manually inspect the Lambda functions, Amazon S3 resources, and Step Functions workflow to confirm that they are properly stopped and deleted. This step is essential to avoid incurring any additional costs associated with running the AWS CDK application.

Furthermore, delete the output data created in the S3 buckets while running the orchestration workflow through the Step Functions and the S3 buckets themselves. You must delete the data in the S3 buckets before you can delete the buckets themselves.

Conclusion

In this post, we demonstrated an end-to-end approach for multilingual document ingestion and content extraction, using Amazon Bedrock and Amazon A2I to incorporate human-in-the-loop capabilities. This comprehensive solution enables organizations to efficiently process documents in multiple languages and extract relevant insights, while benefiting from the combined power of AWS AI/ML services and human validation.

Don’t let language barriers or validation challenges hold you back. Try this solution to take your content and insights to the next level to unlock the full potential of your data, and reach out to your AWS contact if you need further assistance. We encourage you to experiment editing the prompts and model versions to generate outputs that may get more closely aligned with your requirements.

For further information about Amazon Bedrock, check out the Amazon Bedrock workshop. To learn more about Step Functions, see Building machine learning workflows with Amazon SageMaker Processing jobs and AWS Step Functions.


About the Authors

Marin Mestrovic is a Partner Solutions Architect at Amazon Web Services, specializing in supporting partner solutions. In his role, he collaborates with leading Global System Integrators (GSIs) and independent software vendors (ISVs) to help design and build cost-efficient, scalable, industry-specific solutions. With his expertise in AWS capabilities, Marin empowers partners to develop innovative solutions that drive business growth for their clients.

Shikhar Kwatra is a Sr. Partner Solutions Architect at Amazon Web Services, working with leading Global System Integrators. He has earned the title of one of the Youngest Indian Master Inventors with over 500 patents in the AI/ML and IoT domains. Shikhar aids in architecting, building, and maintaining cost-efficient, scalable cloud environments for the organization, and support the GSI partners in building strategic industry solutions on AWS.

Dilin Joy is a Senior Partner Solutions Architect at Amazon Web Services. In his role, he works with leading independent software vendors (ISVs) and Global System Integrators (GSIs) to provide architectural guidance and support in building strategic industry solutions on the AWS platform. His expertise and collaborative approach help these partners develop innovative cloud-based solutions that drive business success for their clients.

Anjan Biswas is a Senior AI Services Solutions Architect who focuses on computer vision, NLP, and generative AI. Anjan is part of the worldwide AI services specialist team and works with customers to help them understand and develop solutions to business problems with AWS AI Services and generative AI.

Read More

Build a reverse image search engine with Amazon Titan Multimodal Embeddings in Amazon Bedrock and AWS managed services

Build a reverse image search engine with Amazon Titan Multimodal Embeddings in Amazon Bedrock and AWS managed services

In ecommerce, visual search technology revolutionizes how customers find products by enabling them to search for products using images instead of text. Shoppers often have a clear visual idea of what they want but struggle to describe it in words, leading to inefficient and broad text-based search results. For example, searching for a specific red leather handbag with a gold chain using text alone can be cumbersome and imprecise, often yielding results that don’t directly match the user’s intent. By using images, visual search can directly match physical attributes, providing better results quickly and enhancing the overall shopping experience.

A reverse image search engine enables users to upload an image to find related information instead of using text-based queries. It works by analyzing the visual content to find similar images in its database. Companies such as Amazon use this technology to allow users to use a photo or other image to search for similar products on their ecommerce websites. Other companies use it to identify objects, faces, and landmarks to discover the original source of an image. Beyond ecommerce, reverse image search engines are invaluable to law enforcement for identifying illegal items for sale and identifying suspects, to publishers for validating visual content authenticity, for healthcare professionals by assisting in medical image analysis, and tackling challenges such as misinformation, copyright infringement, and counterfeit products.

In the context of generative AI, significant progress has been made in developing multimodal embedding models that can embed various data modalities—such as text, image, video, and audio data—into a shared vector space. By mapping image pixels to vector embeddings, these models can analyze and compare visual attributes such as color, shape, and size, enabling users to find similar images with specific attributes, leading to more precise and relevant search results.

Amazon Bedrock is a fully managed service that offers a choice of high-performing foundation models (FMs) from leading AI companies like AI21 Labs, Anthropic, Cohere, Meta, Mistral AI, Stability AI, and Amazon through a single API, along with a broad set of capabilities you need to build generative AI applications with security, privacy, and responsible AI. The Amazon Bedrock single API access, regardless of the models you choose, gives you the flexibility to use different FMs and upgrade to the latest model versions with minimal code changes.

Exclusive to Amazon Bedrock, the Amazon Titan family of models incorporates 25 years of experience innovating with AI and machine learning at Amazon. Amazon Titan FMs provide customers with a breadth of high-performing image, multimodal, and text model choices, through a fully managed API. With Amazon Titan Multimodal Embeddings, you can power more accurate and contextually relevant multimodal search, recommendation, and personalization experiences for users.

In this post, you will learn how to extract key objects from image queries using Amazon Rekognition and build a reverse image search engine using Amazon Titan Multimodal Embeddings from Amazon Bedrock in combination with Amazon OpenSearch Serverless Service.

Solution overview

The solution outlines how to build a reverse image search engine to retrieve similar images based on input image queries. This post demonstrates a guide for using Amazon Titan Multimodal Embeddings to embed images, store these embeddings in an OpenSearch Serverless vector index, and use Amazon Rekognition to extract key objects from images for querying the index.

The following diagram illustrates the solution architecture:

Architecture of solutionThe steps of the solution include:

  1. Upload data to Amazon S3: Store the product images in Amazon Simple Storage Service (Amazon S3).
  2. Generate embeddings: Use Amazon Titan Multimodal Embeddings to generate embeddings for the stored images.
  3. Store embeddings: Ingest the generated embeddings into an OpenSearch Serverless vector index, which serves as the vector database for the solution.
  4. Image analysis: Use Amazon Rekognition to analyze the product images and extract labels and bounding boxes for these images. These extracted objects will then be saved as separate images, which can be used for the query.
  5. Convert search query to an embedding: Convert the user’s image search query into an embedding using Amazon Titan Multimodal Embeddings.
  6. Run similarity search: Perform a similarity search on the vector database to find product images that closely match the search query embedding.
  7. Display results: Display the top K similar results to the user.

Prerequisites

To implement the proposed solution, make sure that you have the following:

Request model access

  • An Amazon SageMaker Studio domain. If you haven’t set up a SageMaker Studio domain, see this Amazon SageMaker blog post for instructions on setting up SageMaker Studio for individual users.
  • An Amazon OpenSearch Serverless collection. You can create a vector search collection by following the steps in Create a collection with public network access and data access granted to the Amazon SageMaker Notebook execution role principal.
  • The GitHub repo cloned to the Amazon SageMaker Studio instance. To clone the repo onto your SageMaker Studio instance, choose the Git icon on the left sidebar and enter https://github.com/aws-samples/reverse-image-search-engine.git
  • After it has cloned, you can navigate to the reverse-image-search-engine.ipynb notebook file to and run the cells. This post highlights the important code segments; however, the full code can be found in the notebook.
  • The necessary permissions attached to the Amazon SageMaker notebook execution role to grant read and write access to the Amazon OpenSearch Serverless collection. For more information on managing credentials securely, see the AWS Boto3 documentation. Make sure that full access is granted to the SageMaker execution role by applying the following IAM policy:
{
    "Version": "2012-10-17",
    "Statement": [
        {
            "Effect": "Allow",
            "Action": "aoss:*",
            "Resource": "*"
        }
    ]
}

Upload the dataset to Amazon S3

In this solution, we will use the Shoe Dataset from Kaggle.com, which contains a collection of approximately 1,800 shoe images. The dataset is primarily used for image classification use cases and contains images of shoes from six main categories—boots, sneakers, flip flops, loafers, sandals, and soccer shoes—with 249 JPEG images for each shoe type. For this tutorial, you will concentrate on the loafers folder found in the training category folder.

To upload the dataset

  1. Download the dataset: Go to the Shoe Dataset page on Kaggle.com and download the dataset file (350.79MB) that contains the images.
  2. Extract the specific folder: Extract the downloaded file and navigate to the loafers category within the training 
  3. Create an Amazon S3 bucket: Sign in to the Amazon S3 console, choose Create bucket, and follow the prompts to create a new S3 bucket.
  4. Upload images to the Amazon S3 bucket using the AWS CLI: Open your terminal or command prompt and run the following command to upload the images from the loafers folder to the S3 bucket:
    aws s3 cp </path/to/local/folder> s3://<your-bucket-name>/ --recursive

Replace </path/to/local/folder> with the path to the loafers category folder from the training folder on your local machine. Replace <your-bucket-name> with the name of your S3 bucket. For example:
aws s3 cp /Users/username/Documents/training/loafers s3://footwear-dataset/ --recursive

  1. Confirm the upload: Go back to the S3 console, open your bucket, and verify that the images have been successfully uploaded to the bucket.

Create image embeddings

Vector embeddings represent information—such as text or images—as a list of numbers, with each number capturing specific features. For example, in a sentence, some numbers might represent the presence of certain words or topics, while in an image or video, they might represent colors, shapes, or patterns. This numerical representation, or vector, is placed in a multidimensional space called the embedding space, where distances between vectors indicate similarities between the represented information. The closer vectors are to one another in this space, the more similar the information they represent is. The following figure is an example of an image and part of its associated vector.

Example of image embedding

To convert images to vectors, you can use Amazon Titan Multimodal Embeddings to generate image embeddings, which can be accessed through Amazon Bedrock. The model will generate vectors embeddings with 1,024 dimensions; however, you can choose a smaller dimension size to optimize for speed and performance.

To create image embeddings:

  1. The following code segment shows how to create a function that will be used to generate embeddings for the dataset of shoe images stored in the S3 bucket.
    # Import required libraries
    import boto3
    import pandas as pd
    import base64
    import json
    
    # Constants, change to your S3 bucket name and selected AWS region
    BUCKET_NAME = "<YOUR_AMAZON_S3_BUCKET_NAME>"
    BEDROCK_MODEL_ID = "amazon.titan-embed-image-v1"
    REGION = "<YOUR_SELECTED_AWS_REGION>"
    # Define max width and height for resizing to accommodate Bedrock limits
    MAX_WIDTH = 1024  
    MAX_HEIGHT = 1024  
    
    # Initialize AWS clients
    s3 = boto3.client('s3')
    bedrock_client = boto3.client(
        "bedrock-runtime", 
        REGION, 
        endpoint_url=f"https://bedrock-runtime.{REGION}.amazonaws.com"
    )
    
    # Function to resize image
    def resize_image(image_data):
        image = Image.open(io.BytesIO(image_data))
    
        # Resize image while maintaining aspect ratio
        image.thumbnail((MAX_WIDTH, MAX_HEIGHT))
    
        # Save resized image to bytes buffer
        buffer = io.BytesIO()
        image.save(buffer, format="JPEG")
        buffer.seek(0)
    
        return buffer.read()
    
    # Function to create embedding from input image
    def create_image_embedding(image):
        image_input = {}
    
        if image is not None:
            image_input["inputImage"] = image
        else:
            raise ValueError("Image input is required")
    
        image_body = json.dumps(image_input)
    
        # Invoke Amazon Bedrock with encoded image body
        bedrock_response = bedrock_client.invoke_model(
            body=image_body,
            modelId=BEDROCK_MODEL_ID,
            accept="application/json",
            contentType="application/json"
        )
    
        # Retrieve body in JSON response
        final_response = json.loads(bedrock_response.get("body").read())
    
        embedding_error = final_response.get("message")
    
        if embedding_error is not None:
            print (f"Error creating embeddings: {embedding_error}")
    
        # Return embedding value
        return final_response.get("embedding")

  2. Because you will be performing a search for similar images stored in the S3 bucket, you will also have to store the image file name as metadata for its embedding. Also, because the model expects a base64 encoded image as input, you will have to create an encoded version of the image for the embedding function. You can use the following code to fulfill both requirements.
    # Retrieve images stored in S3 bucket 
    response = s3.list_objects_v2(Bucket=BUCKET_NAME)
    contents = response.get('Contents', [])
    
    # Define arrays to hold embeddings and image file key names
    image_embeddings = []
    image_file_names = []
    
    # Loop through S3 bucket to encode each image, generate its embedding, and append to array
    for obj in contents:
        image_data = s3.get_object(Bucket=BUCKET_NAME, Key=obj['Key'])['Body'].read()
    
        # Resize the image to meet model requirements
        resized_image = resize_image(image_data)
    
        # Create base64 encoded image for Titan Multimodal Embeddings model input
        base64_encoded_image = base64.b64encode(resized_image).decode('utf-8')
    
        # Generate the embedding for the resized image
        image_embedding = create_image_embedding(image=base64_encoded_image)
        image_embeddings.append(image_embedding)
        image_file_names.append(obj["Key"])

  3. After generating embeddings for each image stored in the S3 bucket, the resulting embedding list can be obtained by running the following code
    # Add and list embeddings with associated image file key to dataframe object
    final_embeddings_dataset = pd.DataFrame({'image_key': image_file_names, 'image_embedding': image_embeddings})
    final_embeddings_dataset.head()

image_key image_embedding
image1.jpeg [0.00961759, 0.0016261627, -0.0024508594, -0.0…
image10.jpeg [0.008917685, -0.0013863152, -0.014576114, 0.0…
image100.jpeg [0.006402869, 0.012893448, -0.0053941975, -0.0…
image101.jpg [0.06542923, 0.021960363, -0.030726435, -0.000…
image102.jpeg [0.0134112835, -0.010299515, -0.0044046864, -0…

Upload embeddings to Amazon OpenSearch Serverless

Now that you have created embeddings for your images, you need to store these vectors so they can be searched and retrieved efficiently. To do so, you can use a vector database.

A vector database is a type of database designed to store and retrieve vector embeddings. Each data point in the database is associated with a vector that encapsulates its attributes or features. This makes it particularly useful for tasks such as similarity search, where the goal is to find objects that are the most similar to a given query object. To search against the database, you can use a vector search, which is performed using the k-nearest neighbors (k-NN) algorithm. When you perform a search, the algorithm computes a similarity score between the query vector and the vectors of stored objects using methods such as cosine similarity or Euclidean distance. This enables the database to retrieve the closest objects that are most similar to the query object in terms of their features or attributes. Vector databases often use specialized vector search engines, such as nmslib or faiss, which are optimized for efficient storage, retrieval, and similarity calculation of vectors.

In this post, you will use OpenSearch Serverless as the vector database for the image embeddings. OpenSearch Serverless is a serverless option for OpenSearch Service, a powerful storage option built for distributed search and analytics use cases. With Amazon OpenSearch Serverless, you don’t need to provision, configure, and tune the instance clusters that store and index your data.

To upload embeddings:

  1. If you have set up your Amazon OpenSearch Serverless collection, the next step is to create a vector index. In the Amazon OpenSearch Service console, choose Serverless Collections, then select your collection.
  2. Choose Create vector index.

Create vector index in OpenSearch Collection

  1. Next, create a vector field by entering a name, defining an engine, and adding the dimensions, and search configurations.
    1. Vector field name: Enter a name, such as vector.
    2. Engine: Select nmslib.
    3. Dimensions: Enter 1024.
    4. Distance metric: Select Euclidean.
    5. Choose Confirm.

  1. To tag each embedding with the image file name, you must also add a mapping field under Metadata management.
    1. Mapping field: Enter image_file.
    2. Data type: Select String.
    3. Filterable: Select True.
    4. Choose Create to create the index.

Review and confirm vector index creation

  1. Now that the vector index has been created, you can ingest the embeddings. To do so, run the following code segment to connect to your Amazon OpenSearch Serverless collection.
# Import required libraries to connect to Amazon OpenSearch Serverless connection
from opensearchpy import OpenSearch, RequestsHttpConnection
from requests_aws4auth import AWS4Auth

# Initialize endpoint name constant
HOST = "<YOUR_HOST_ENDPOINT_NAME>" # For example, abcdefghi.us-east-1.aoss.amazonaws.com (without https://)

# Initialize and authenticate with the OpenSearch client
credentials = boto3.Session().get_credentials()
auth = AWS4Auth(credentials.access_key, credentials.secret_key, REGION, 'aoss', session_token=credentials.token)
client = OpenSearch(
    hosts=[{'host': HOST, 'port': 443}],
    http_auth=auth,
    use_ssl=True,
    verify_certs=True,
    connection_class=RequestsHttpConnection,
    pool_maxsize=300
)

  1. After connecting, you can ingest your embeddings and the associated image key for each vector as shown in the following code.
# Import required library to iterate through dataset
import tqdm.notebook as tq

INDEX_NAME = "<YOUR_VECTOR_INDEX_NAME>"
VECTOR_NAME = "<YOUR_VECTOR_FIELD_NAME>"
VECTOR_MAPPING = "<YOUR_MAPPING_FIELD_NAME>"

# Ingest embeddings into vector index with associate vector and text mapping fields
for idx, record in tq.tqdm(final_embeddings_dataset.iterrows(), total=len(final_embeddings_dataset)):
    body = {
        VECTOR_NAME: record['image_embedding'],
        VECTOR_MAPPING: record['image_key']
    }
    response = client.index(index=INDEX_NAME, body=body)

Use Amazon Rekognition to extract key objects

Now that the embeddings have been created, use Amazon Rekognition to extract objects of interest from your search query. Amazon Rekognition analyzes images to identify objects, people, text, and scenes by detecting labels and generating bounding boxes. In this use case, Amazon Rekognition will be used to detect shoe labels in query images.

To view the bounding boxes around your respective images, run the following code. If you want to apply this to your own sample images, make sure to specify the labels you want to identify. Upon completion of the bounding box and label generation, the extracted objects will be saved in your local directory in the SageMaker Notebook environment.

# Import required libraries to draw bounding box on image
from PIL import Image, ImageDraw, ImageFont

# Function to draw bounding boxes and extract labeled objects
def process_image(image_path, boxes, labels):
    # Load the image
    image = Image.open(image_path)
    
    # Convert RGBA to RGB if necessary
    if image.mode == 'RGBA':
        image = image.convert('RGB')
    
    draw = ImageDraw.Draw(image)
    
    # Font for the label
    try:
        font = ImageFont.truetype("arial.ttf", 15)
    except IOError:
        font = ImageFont.load_default()

    # Counter for unique filenames
    crop_count = 1 
    
    # Draw bounding boxes around specific label of interest (ex. shoe) and extract labeled objects
    for box, label in zip(boxes, labels):
    
        # Change to specific label you are looking to extract
        if label not in "Shoe":
            continue
        
        # Box coordinates
        left = int(image.width * box['Left'])
        top = int(image.height * box['Top'])
        right = left + int(image.width * box['Width'])
        bottom = top + int(image.height * box['Height'])
            
        # Crop the image to the bounding box
        cropped_image = image.crop((left, top, right, bottom))
    
        # Draw label on the cropped image
        cropped_draw = ImageDraw.Draw(cropped_image)
    
        # File name for the output
        file_name = f"extract_{crop_count}.jpg"
        # Save extracted object image locally
        cropped_image.save(file_name)
        print(f"Saved extracted object image: {file_name}")
        crop_count += 1
    
    # Save or display the image with bounding boxes
    image.show()

The following image shows the outputted image with the respective labels within the bounding boxes:

Embed object image

Now that the object of interest within the image has been extracted, you need to generate an embedding for it so that it can be searched against the stored vectors in the Amazon OpenSearch Serverless index. To do so, find the best extracted image in the local directory created when the images were downloaded. Ensure the image is unobstructed, high-quality, and effectively encapsulates the features that you’re searching for. After you have identified the best image, paste its file name as shown in the following code.

# Open the extracted object image file in binary mode
# Paste your extracted image from the local download directory in the notebook below
with open("<YOUR_LOCAL_EXTRACTED_IMAGE (ex. extract_1.jpg)>", "rb") as image_file:
    base64_encoded_image = base64.b64encode(image_file.read()).decode('utf-8')

# Embed the extracted object image
object_embedding = create_image_embedding(image=base64_encoded_image)

# Print the first few numbers of the embedding followed by ...
print(f"Image embedding: {object_embedding[:5]} ...")

Perform a reverse image search

With the embedding of the extracted object, you can now perform a search against the Amazon OpenSearch Serverless vector index to retrieve the closest matching images, which is performed using the k-NN algorithm. When you created your vector index earlier, you defined the similarity between vector distances to be calculated using the Euclidian metric with the nmslib engine. With this configuration, you can define the number of results to retrieve from the index and invoke the Amazon OpenSearch Service client with a search request as shown in the following code.

# Define number of images to search and retrieve
K_SEARCHES = 3

# Define search configuration body for K-NN 
body = {
        "size": K_SEARCHES,
        "_source": {
            "exclude": [VECTOR_NAME],
        },
        "query": {
            "knn": {
                "vectors": {
                    "vector": object_embedding,
                    "k": K_SEARCHES,
                }
            }
        },
        "_source": True,
        "fields": [VECTOR_MAPPING],
    }

# Invoke OpenSearch to search through index with K-NN configurations
knn_response = client.search(index=INDEX_NAME, body=body)
result = []
scores_tracked = set()  # Set to keep track of already retrieved images and their scores

# Loop through response to print the closest matching results
for hit in knn_response["hits"]["hits"]:
    id_ = hit["_id"]
    score = hit["_score"]
    item_id_ = hit["_source"][VECTOR_MAPPING]

    # Check if score has already been tracked, if not, add it to final result
    if score not in scores_tracked:
        final_item = [item_id_, score]
        result.append(final_item)
        scores_tracked.add(score)  # Log score as tracked already

# Print Top K closest matches
print(f"Top {K_SEARCHES} closest embeddings and associated scores: {result}")

Because the preceding search retrieves the file names that are associated with the closest matching vectors, the next step is to fetch each specific image to display the results. This can be accomplished by downloading the specific image from the S3 bucket to a local directory in the notebook, then displaying each one sequentially. Note that if your images are stored within a subdirectory in the bucket, you might need to add the appropriate prefix to the bucket path as shown in the following code.

import os

# Function to display image
def display_image(image_path):
    image = Image.open(image_path)
    image.show()
    
# List of image file names from the K-NN search
image_files = result

# Create a local directory to store downloaded images
download_dir = 'RESULTS'

# Create directory if not exists
os.makedirs(download_dir, exist_ok=True)

# Download and display each image that matches image query
for file_name in image_files:
    print("File Name: " + file_name[0])
    print("Score: " + str(file_name[1]))
    local_path = os.path.join(download_dir, file_name[0])
    # Ensure to add in the necessary prefix before the file name if files are in subdirectories in the bucket
    # ex. s3.download_file(BUCKET_NAME, "training/loafers/"+file_name[0], local_path)
    s3.download_file(BUCKET_NAME, file_name[0], local_path)
    # Open downloaded image and display it
    display_image(local_path)
    print()

The following images show the results for the closest matching products in the S3 bucket related to the extracted object image query:

First match:
File Name: image17.jpeg
Score: 0.64478767
Image of first match from search

Second match:
File Name: image209.jpeg
Score: 0.64304984
Image of second match from search

Third match:
File Name: image175.jpeg
Score: 0.63810235
Image of third match from search

Clean up

To avoid incurring future charges, delete the resources used in this solution.

  1. Delete the Amazon OpenSearch Collection vector index.
  2. Delete the Amazon OpenSearch Serverless collection.
  3. Delete the Amazon SageMaker resources.
  4. Empty and delete the Amazon S3 bucket.

Conclusion

By combining the power of Amazon Rekognition for object detection and extraction, Amazon Titan Multimodal Embeddings for generating vector representations, and Amazon OpenSearch Serverless for efficient vector indexing and search capabilities, you successfully created a robust reverse image search engine. This solution enhances product recommendations by providing precise and relevant results based on visual queries, thereby significantly improving the user experience for ecommerce solutions.

For more information, see the following resources:


About the Authors

Nathan Pogue is a Solutions Architect on the Canadian Public Sector Healthcare and Life Sciences team at AWS. Based in Toronto, he focuses on empowering his customers to expand their understanding of AWS and utilize the cloud for innovative use cases. He is particularly passionate about AI/ML and enjoys building proof-of-concept solutions for his customers.

Waleed Malik is a Solutions Architect with the Canadian Public Sector EdTech team at AWS. He holds six AWS certifications, including the Machine Learning Specialty Certification. Waleed is passionate about helping customers deepen their knowledge of AWS by translating their business challenges into technical solutions.

Read More

Toward modular models: Collaborative AI development enables model accountability and continuous learning

Toward modular models: Collaborative AI development enables model accountability and continuous learning

Modular Models blog hero

Today, development of generalizable AI models requires access to sufficient data and compute resources, which may create challenges for some researchers. Democratizing access to technology across the research community can advance the development of generalizable AI models. By applying the core software development concept of modularity to AI, we can build models that are powerful, efficient, adaptable, and transparent. 

Until recently, AI models were primarily built using monolithic architecture. Though powerful, these models can be challenging to customize and edit compared to modular models with easily interpretable functional components. Today, developers employ modularity to make services more reliable, faster to refine, and easier for multiple users to contribute to simultaneously. One promising research direction that supports this involves shifting AI development towards a modular approach (opens in new tab), which could enhance flexibility and improve scalability. 

One such approach is to use numerous fine-tuned models designed for specific tasks, known as expert models, and coordinate them to solve broader tasks (see Towards Modular LLMs by Building and Reusing a Library of LoRAs – Microsoft Research (opens in new tab)Learning to Route Among Specialized Experts for Zero-Shot Generalization (opens in new tab)). These expert models can be developed in a decentralized way. Similar to the benefits of using a microservice architecture, this modular AI approach can be more flexible, cheaper to develop, and more compliant with relevant privacy and legal policies. However, while substantial research has been done on training optimization, coordination methods remain largely unexplored.

Our team is exploring the potential of modular models by focusing on two themes: i) optimizing the training of expert models and ii) refining how expert models coordinate to form a collaborative model. One method for coordinating expert models is to adaptively select the most relevant independently developed expert models for specific tasks or queries. This approach, called MoErging, is similar to Mixture-of-Experts (MoE) approaches but differs in that the routing mechanism is learned after the individual experts are trained. As an initial step, we contributed to creating a taxonomy for organizing recent MoErging methods with the goal of helping establish a shared language for the research community and facilitating easier and fairer comparisons between different methods. 

Assessing existing MoErging methods

Most MoErging methods were developed within the past year, so they don’t reference each and are difficult to compare. To enable comparison of MoErging methods, we recently collaborated on a survey that establishes a taxonomy for comparing methods and organizes MoErging design choices into three steps: 

  • Expert design: Identifies and uses expert models trained asynchronously by distributed contributors. 
  • Routing design: Routes tasks to the appropriate expert models. 
  • Application design: Applies the merged models to specific tasks or domains. 

Each step is broken down into more detailed choices. For example, in expert design, expert training can be custom or standard, and training data can be private or shared. Custom training requires MoErging to have specific training procedures, while the standard training does not. Similarly, shared data means that the training data must be accessible for routing. Otherwise, the training data is considered private. 

The benefits of modular models discussed below assume that training data doesn’t need to be shared. However, a review of current MoErging methods finds that some approaches do require sharing training data, making certain benefits no longer applicable. 

Spotlight: Blog post

Research Focus: Week of September 9, 2024

Investigating vulnerabilities in LLMs; A novel total-duration-aware (TDA) duration model for text-to-speech (TTS); Generative expert metric system through iterative prompt priming; Integrity protection in 5G fronthaul networks.


The survey evaluates 29 different MoErging methods using its taxonomy, which categorizes the design choices into two expert design choices, five routing design choices, and two application design options, shown in Figure 1.

Taxonomy of model MoErging design choices. References in the leaf noes link to sections for specific papers that make some particular design choice. We omit references to methods for which a given choice is not applicable.
Figure 1: Taxonomy of model MoErging design choices. References in the leaf nodes link to sections of specific papers that implement each choice. We omit references to methods where a particular choice is not applicable. 

One takeaway from the survey is that most MoErging methods can be grouped into four categories based on their routing design choices:

  1. Classifier-based routing: Methods that train the router as a classifier using expert datasets or unseen data. 
  2. Embedding-based routing: Methods that compute embeddings of expert training sets and compare them to a query embedding for routing. 
  3. Nonrouter methods: Methods that do not explicitly train a router but instead initialize the router in an unsupervised manner.  
  4. Task-specific routing: Methods that learn a task-specific routing distribution over the target dataset to improve performance on a specific task. 

While the differences within each category are minor, the differences across categories are significant because they determine the level of data access required for implementation. As a result, data access is a primary factor in determining which methods are applicable and feasible in various settings. 

Our taxonomy also covers recent approaches to building agentic systems, which could be viewed as specific types of MoErging methods where experts are full language models and routing decisions are made on a step-by-step or example-by-example basis. The optimal level for MoErging may vary depending on the task and the computational resources available to each stakeholder. 

Potential benefits and use cases of modular models 

Modular models can unlock new benefits and use cases for AI, offering a promising approach to addressing challenges in current AI development. Moving forward, further substantial research is needed to validate this potential and assess feasibility.  

Modular AI may: 

  • Allow privacy-conscious contributions.  Teams with sensitive or proprietary data, such as personally identifiable information (PII) and copyrighted content, can contribute expert models and benefit from larger projects without sharing their data. This capacity can make it easier to comply with data privacy and legal standards, which could be valuable for healthcare teams that would benefit from general model capabilities without combining their sensitive data with other training data. 
  • Drive model transparency and accountability.  Modular models allow specific expert models to be identified and, if necessary, removed or retrained. For example, if a module trained on PII, copyrighted, or biased data is identified, it can be removed more easily, eliminating the need for retraining and helping ensure compliance with privacy and ethical standards. 
  • Facilitate model extensibility and continual improvement. Modularity supports continual improvements, allowing new capabilities from expert models to be integrated as they are available. This approach is akin to making localized edits, allowing for continuous, cost-effective improvement. 
  • Lower the barrier to AI development for those with limited compute and data resources. Modular AI can reduce the need for extensive data and compute by creating a system where pretrained experts can be reused, benefiting academics, startups, and teams focused on niche use cases. For example, an AI agent tasked with booking flights on a specific website with limited training data could leverage general navigation and booking skills from other trained AI experts, enabling generalizable and broadly applicable skills without requiring domain-specific training data. We explore this process of transferring skills across tasks in our paper “Multi-Head Routing For Cross-Task Generalization.” 
  • Support personalization.  Modular models make it possible to equip AI agents with experts tailored to individual users or systems. For instance, AI designed to emulate five-time World Chess Champion Magnus Carlsen could enhance a player’s preparation to play a match against him. Experiments suggest that storing knowledge or user profiles in on-demand modules can match or surpass the performance of retrieval-augmented generation (RAG), potentially reducing latency and improving the user’s experience in custom AI applications. 

Current limitations and looking forward 

In this blog, we focused on a type of modular approach that involves training foundation models, which requires substantial compute power and large amounts of data. Despite the advantages of modularity, such as increased flexibility, efficiency, and adaptability, the development of foundation models remains resource-intensive, necessitating high-performance computing and robust datasets to support fine-tuning.  

Recent work has begun to address these challenges by distributing the pretraining process of foundation models (opens in new tab). Looking ahead, a promising research direction focuses on exploring how to create a minimal dataset for training “empty foundation models” while shifting most of their capabilities to external pluggable modules. 

Modular methods are evolving rapidly, and we’re excited by their potential. Modularity has the capacity to democratize AI development, improve model accountability, and support efficient continuous learning. With the MoErging taxonomy, we aim to establish a shared language that fosters engagement within the research community. This research is in the early stages, and we welcome community collaboration. If you’re interested in working with us, please reach out to ModularModels@microsoft.com

Acknowledgements

We would like to thank paper collaborators: Prateek Yadav, Colin Raffel, Mohammed Muqeeth, Haokun Liu, Tianlong Chen, Mohit Bansal, Leshem Choshen, Edoardo Ponti, Zhan Su, Matheus Pereira, Nicolas Le Roux, Nabil Omi, Siddhartha Sen, Anurag Sarkar, Jordan T. Ash, Oleksiy Ostapenko, and Laurent Charlin.

The post Toward modular models: Collaborative AI development enables model accountability and continuous learning appeared first on Microsoft Research.

Read More

Research Focus: Week of November 11, 2024

Research Focus: Week of November 11, 2024

Welcome to Research Focus, a series of blog posts that highlights notable publications, events, code/datasets, new hires and other milestones from across the research community at Microsoft.

Research Focus: Week of November 11, 2024

Look Ma, no markers: holistic performance capture without the hassle

Motion-capture technologies used in film and game production typically focus solely on face, body, or hand capture, requiring complex and expensive hardware and lots of manual intervention from skilled operators. While machine-learning-based approaches can overcome these challenges, they usually only support a single camera, often operate on a single part of the body, do not produce precise world-space results, and rarely generalize outside specific contexts.

In a recent paper: Look Ma, no markers: holistic performance capture without the hassle, researchers from Microsoft introduce a technique for marker-free, high-quality reconstruction of the complete human body, including eyes and tongue, without requiring any calibration, manual intervention or custom hardware. This approach produces stable world-space results from arbitrary camera rigs while also supporting varied capture environments and clothing. The researchers achieve this through a hybrid approach that leverages machine learning models trained exclusively on synthetic data and powerful parametric models of human shape and motion. They evaluate their method on a number of body, face, and hand reconstruction benchmarks and demonstrate state-of-the-art results that generalize on diverse datasets. 


Building AI Agents for Autonomous Clouds: Challenges and Design Principles

Using AI agents for operational resilience of cloud services, which currently require significant human effort and domain knowledge, is a high-impact application. Interest is growing in AI for IT Operations (AIOps), which aims to automate complex operational tasks like fault localization and root cause analysis, thereby reducing human intervention and customer impact. However, achieving the vision of autonomous and self-healing clouds though AIOps is hampered by the lack of standardized frameworks for building, evaluating, and improving AIOps agents.  

In a recent paper: Building AI Agents for Autonomous Clouds: Challenges and Design Principles, researchers from Microsoft lay the groundwork for such a framework by first framing the requirements and then discussing design decisions that satisfy them. The researchers also propose AIOpsLab, a prototype implementation leveraging agent-cloud-interface that orchestrates an application, injects real-time faults using chaos engineering, and interfaces with an agent to localize and resolve the faults. The paper sets the stage for building a modular and robust framework for building, evaluating, and improving agents for autonomous clouds. 

Spotlight: AI-POWERED EXPERIENCE

Microsoft research copilot experience

Discover more about research at Microsoft through our AI-powered experience


Towards Neural Synthesis for SMT-Assisted Proof-Oriented Programming

AI-assisted programming offers great promise, but also raises concerns around the trustworthiness of AI-generated code. Proof-oriented languages like F* (opens in new tab) enable authoring programs backed by machine-checked proofs of correctness. Using AI to generate code and proofs in proof-oriented languages helps mitigate these concerns, while also making proof-oriented programming more accessible to people. 

In a recent preprint: Towards Neural Synthesis for SMT-Assisted Proof-Oriented Programming, researchers from Microsoft and external colleagues explore using AI to automate the construction of proof-oriented programs. The researchers curate a dataset of 940,000 lines of open-source F* programs and proofs, including software used in production systems ranging from Windows and Linux to Python and Firefox. The dataset includes around 54,000 top-level F* definitions, each representing a type-directed program and proof synthesis problem. A program fragment checker queries F* to check the correctness of candidate solutions. With this dataset, the researchers explore using AI to synthesize programs and their proofs in F*, finding the performance of fine-tuned smaller language models to compare favorably with LLMs, at much lower computational cost.


One-to-many testing for code generation from (just) natural language

The mostly basic Python programs (MBPP) dataset is commonly used for evaluating natural language models on the task of code generation. Despite its popularity, the original MBPP has two major problems: it relies on providing test cases to generate the right signature and there is poor alignment between “what is asked” and “what is evaluated” using the test cases. 

To address these challenges, in their recent “One-to-many testing for code generation from (just) natural language” paper, researchers from Microsoft introduce the “mostly basic underspecified Python programs” or MBUPP dataset. This dataset adapts MBPP to emphasize the natural language aspect by allowing for some syntactic ambiguity (like not specifying the return type of a function) and evaluating generated code on multiple sets of assertions (like each set covering a different return type). Besides iteratively inspecting LLM results to extend the assertions sets, the researchers carefully remove poor alignment from the instructions (like a specific algorithm to use) and perform a majority vote over slightly paraphrased instructions to improve the quality of the dataset. The researchers compare popular open and closed weight models on the original MBPP and adapted MBUPP datasets to highlight the effect of paraphrasing and new test cases on code generation evaluation.  The MBUPP dataset is publicly available to encourage its use in evaluation code generation models.


The post Research Focus: Week of November 11, 2024 appeared first on Microsoft Research.

Read More

2025 Predictions: AI Finds a Reason to Tap Industry Data Lakes

2025 Predictions: AI Finds a Reason to Tap Industry Data Lakes

Since the advent of the computer age, industries have been so awash in stored data that most of it never gets put to use.

This data is estimated to be in the neighborhood of 120 zettabytes — the equivalent of trillions of terabytes, or more than 120x the amount of every grain of sand on every beach around the globe. Now, the world’s industries are putting that untamed data to work by building and customizing large language models (LLMs).

As 2025 approaches, industries such as healthcare, telecommunications, entertainment, energy, robotics, automotive and retail are using those models, combining it with their proprietary data and gearing up to create AI that can reason.

The NVIDIA experts below focus on some of the industries that deliver $88 trillion worth of goods and services globally each year. They predict that AI that can harness data at the edge and deliver near-instantaneous insights is coming to hospitals, factories, customer service centers, cars and mobile devices near you.

But first, let’s hear AI’s predictions for AI. When asked, “What will be the top trends in AI in 2025 for industries?” both Perplexity and ChatGPT 4.0 responded that agentic AI sits atop the list alongside edge AI, AI cybersecurity and AI-driven robots.

Agentic AI is a new category of generative AI that operates virtually autonomously. It can make complex decisions and take actions based on continuous learning and analysis of vast datasets. Agentic AI is adaptable, has defined goals and can correct itself, and can chat with other AI agents or reach out to a human for help.

Now, hear from NVIDIA experts on what to expect in the year ahead:

Kimberly Powell
Vice President of Healthcare

Human-robotic interaction: Robots will assist human clinicians in a variety of ways, from understanding and responding to human commands, to performing and assisting in complex surgeries.

It’s being made possible by digital twins, simulation and AI that train and test robotic systems in virtual environments to reduce risks associated with real-world trials. It also can train robots to react in virtually any scenario, enhancing their adaptability and performance across different clinical situations.

New virtual worlds for training robots to perform complex tasks will make autonomous surgical robots a reality. These surgical robots will perform complex surgical tasks with precision, reducing patient recovery times and decreasing the cognitive workload for surgeons.

Digital health agents: The dawn of agentic AI and multi-agent systems will address the existential challenges of workforce shortages and the rising cost of care.

Administrative health services will become digital humans taking notes for you or making your next appointment — introducing an era of services delivered by software and birthing a service-as-a-software industry.

Patient experience will be transformed with always-on, personalized care services while healthcare staff will collaborate with agents that help them reduce clerical work, retrieve and summarize patient histories, and recommend clinical trials and state-of-the-art treatments for their patients.

Drug discovery and design AI factories: Just as ChatGPT can generate an email or a poem without putting a pen to paper for trial and error, generative AI models in drug discovery can liberate scientific thinking and exploration.

Techbio and biopharma companies have begun combining models that generate, predict and optimize molecules to explore the near-infinite possible target drug combinations before going into time-consuming and expensive wet lab experiments.

The drug discovery and design AI factories will consume all wet lab data, refine AI models and redeploy those models — improving each experiment by learning from the previous one. These AI factories will shift the industry from a discovery process to a design and engineering one.

Rev Lebaredian
Vice President of Omniverse and Simulation Technology

Let’s get physical (AI, that is): Getting ready for AI models that can perceive, understand and interact with the physical world is one challenge enterprises will race to tackle.

While LLMs require reinforcement learning largely in the form of human feedback, physical AI needs to learn in a “world model” that mimics the laws of physics. Large-scale physically based simulations are allowing the world to realize the value of physical AI through robots by accelerating the training of physical AI models and enabling continuous training in robotic systems across every industry.

Cheaper by the dozen: In addition to their smarts (or lack thereof), one big factor that has slowed adoption of humanoid robots has been affordability. As agentic AI brings new intelligence to robots, though, volume will pick up and costs will come down sharply. The average cost of industrial robots is expected to drop to $10,800 in 2025, down sharply from $46K in 2010 to $27K in 2017. As these devices become significantly cheaper, they’ll become as commonplace across industries as mobile devices are.

Deepu Talla
Vice President of Robotics and Edge Computing

Redefining robots: When people think of robots today, they’re usually images or content showing autonomous mobile robots (AMRs), manipulator arms or humanoids. But tomorrow’s robots are set to be an autonomous system that perceives, reasons, plans and acts — then learns.

Soon we’ll be thinking of robots embodied everywhere from surgical rooms and data centers to warehouses and factories. Even traffic control systems or entire cities will be transformed from static, manually operated systems to autonomous, interactive systems embodied by physical AI.

The rise of small language models: To improve the functionality of robots operating at the edge, expect to see the rise of small language models that are energy-efficient and avoid latency issues associated with sending data to data centers. The shift to small language models in edge computing will improve inference in a range of industries, including automotive, retail and advanced robotics.

Kevin Levitt
Global Director of Financial Services

AI agents boost firm operations: AI-powered agents will be deeply integrated into the financial services ecosystem, improving customer experiences, driving productivity and reducing operational costs.

AI agents will take every form based on each financial services firm’s needs. Human-like 3D avatars will take requests and interact directly with clients, while text-based chatbots will summarize thousands of pages of data and documents in seconds to deliver accurate, tailored insights to employees across all business functions.

AI factories become table stakes: AI use cases in the industry are exploding. This includes improving identity verification for anti-money laundering and know-your-customer regulations, reducing false positives for transaction fraud and generating new trading strategies to improve market returns. AI also is automating document management, reducing funding cycles to help consumers and businesses on their financial journeys.

To capitalize on opportunities like these, financial institutions will build AI factories that use full-stack accelerated computing to maximize performance and utilization to build AI-enabled applications that serve hundreds, if not thousands, of use cases — helping set themselves apart from the competition.

AI-assisted data governance: Due to the sensitive nature of financial data and stringent regulatory requirements, governance will be a priority for firms as they use data to create reliable and legal AI applications, including for fraud detection, predictions and forecasting, real-time calculations and customer service.

Firms will use AI models to assist in the structure, control, orchestration, processing and utilization of financial data, making the process of complying with regulations and safeguarding customer privacy smoother and less labor intensive. AI will be the key to making sense of and deriving actionable insights from the industry’s stockpile of underutilized, unstructured data.

Richard Kerris
Vice President of Media and Entertainment

Let AI entertain you: AI will continue to revolutionize entertainment with hyperpersonalized content on every screen, from TV shows to live sports. Using generative AI and advanced vision-language models, platforms will offer immersive experiences tailored to individual tastes, interests and moods. Imagine teaser images and sizzle reels crafted to capture the essence of a new show or live event and create an instant personal connection.

In live sports, AI will enhance accessibility and cultural relevance, providing language dubbing, tailored commentary and local adaptations. AI will also elevate binge-watching by adjusting pacing, quality and engagement options in real time to keep fans captivated. This new level of interaction will transform streaming from a passive experience into an engaging journey that brings people closer to the action and each other.

AI-driven platforms will also foster meaningful connections with audiences by tailoring recommendations, trailers and content to individual preferences. AI’s hyperpersonalization will allow viewers to discover hidden gems, reconnect with old favorites and feel seen. For the industry, AI will drive growth and innovation, introducing new business models and enabling global content strategies that celebrate unique viewer preferences, making entertainment feel boundless, engaging and personally crafted.

Ronnie Vasishta
Senior Vice President of Telecoms

The AI connection: Telecommunications providers will begin to deliver generative AI applications and 5G connectivity over the same network. AI radio access network (AI-RAN) will enable telecom operators to transform traditional single-purpose base stations from cost centers into revenue-producing assets capable of providing AI inference services to devices, while more efficiently delivering the best network performance.

AI agents to the rescue: The telecommunications industry will be among the first to dial into agentic AI to perform key business functions. Telco operators will use AI agents for a wide variety of tasks, from suggesting money-saving plans to customers and troubleshooting network connectivity, to answering billing questions and processing payments.

More efficient, higher-performing networks: AI also will be used at the wireless network layer to enhance efficiency, deliver site-specific learning and reduce power consumption. Using AI as an intelligent performance improvement tool, operators will be able to continuously observe network traffic, predict congestion patterns and make adjustments before failures happen, allowing for optimal network performance.

Answering the call on sovereign AI: Nations will increasingly turn to telcos — which have proven experience managing complex, distributed technology networks — to achieve their sovereign AI objectives. The trend will spread quickly across Europe and Asia, where telcos in Switzerland, Japan, Indonesia and Norway are already partnering with national leaders to build AI factories that can use proprietary, local data to help researchers, startups, businesses and government agencies create AI applications and services.

Xinzhou Wu
Vice President of Automotive

Pedal to generative AI metal: Autonomous vehicles will become more performant as developers tap into advancements in generative AI. For example, harnessing foundation models, such as vision language models, provides an opportunity to use internet-scale knowledge to solve one of the hardest problems in the autonomous vehicle (AV) field, namely that of efficiently and safely reasoning through rare corner cases.

Simulation unlocks success: More broadly, new AI-based tools will enable breakthroughs in how AV development is carried out. For example, advances in generative simulation will enable the scalable creation of complex scenarios aimed at stress-testing vehicles for safety purposes. Aside from allowing for testing unusual or dangerous conditions, simulation is also essential for generating synthetic data to enable end-to-end model training.

Three-computer approach: Effectively, new advances in AI will catalyze AV software development across the three key computers underpinning AV development — one for training the AI-based stack in the data center, another for simulation and validation, and a third in-vehicle computer to process real-time sensor data for safe driving. Together, these systems will enable continuous improvement of AV software for enhanced safety and performance of cars, trucks, robotaxis and beyond.

Marc Spieler
Senior Managing Director of Global Energy Industry

Welcoming the smart grid: Do you know when your daily peak home electricity is? You will soon as utilities around the world embrace smart meters that use AI to broadly manage their grid networks, from big power plants and substations and, now, into the home.

As the smart grid takes shape, smart meters — once deemed too expensive to be installed in millions of homes — that combine software, sensors and accelerated computing will alert utilities when trees in a backyard brush up against power lines or when to offer big rebates to buy back the excess power stored through rooftop solar installations.

Powering up: Delivering the optimal power stack has always been mission-critical for the energy industry. In the era of generative AI, utilities will address this issue in ways that reduce environmental impact.

Expect in 2025 to see a broader embrace of nuclear power as one clean-energy path the industry will take. Demand for natural gas also will grow as it replaces coal and other forms of energy. These resurgent forms of energy are being helped by the increased use of accelerated computing, simulation technology and AI and 3D visualization, which helps optimize design, pipeline flows and storage. We’ll see the same happening at oil and gas companies, which are looking to reduce the impact of energy exploration and production.

Azita Martin
Vice President of Retail, Consumer-Packaged Goods and Quick-Service Restaurants 

Software-defined retail: Supercenters and grocery stores will become software-defined, each running computer vision and sophisticated AI algorithms at the edge. The transition will accelerate checkout, optimize merchandising and reduce shrink — the industry term for a product being lost or stolen.

Each store will be connected to a headquarters AI network, using collective data to become a perpetual learning machine. Software-defined stores that continually learn from their own data will transform the shopping experience.

Intelligent supply chain: Intelligent supply chains created using digital twins, generative AI, machine learning and AI-based solvers will drive billions of dollars in labor productivity and operational efficiencies. Digital twin simulations of stores and distribution centers will optimize layouts to increase in-store sales and accelerate throughput in distribution centers.

Agentic robots working alongside associates will load and unload trucks, stock shelves and pack customer orders. Also, last-mile delivery will be enhanced with AI-based routing optimization solvers, allowing products to reach customers faster while reducing vehicle fuel costs.

Read More

Peak Training: Blackwell Delivers Next-Level MLPerf Training Performance

Peak Training: Blackwell Delivers Next-Level MLPerf Training Performance

Generative AI applications that use text, computer code, protein chains, summaries, video and even 3D graphics require data-center-scale accelerated computing to efficiently train the large language models (LLMs) that power them.

In MLPerf Training 4.1 industry benchmarks, the NVIDIA Blackwell platform delivered impressive results on workloads across all tests — and up to 2.2x more performance per GPU on LLM benchmarks, including Llama 2 70B fine-tuning and GPT-3 175B pretraining.

In addition, NVIDIA’s submissions on the NVIDIA Hopper platform continued to hold at-scale records on all benchmarks, including a submission with 11,616 Hopper GPUs on the GPT-3 175B benchmark.

Leaps and Bounds With Blackwell

The first Blackwell training submission to the MLCommons Consortium — which creates standardized, unbiased and rigorously peer-reviewed testing for industry participants — highlights how the architecture is advancing generative AI training performance.

For instance, the architecture includes new kernels that make more efficient use of Tensor Cores. Kernels are optimized, purpose-built math operations like matrix-multiplies that are at the heart of many deep learning algorithms.

Blackwell’s higher per-GPU compute throughput and significantly larger and faster high-bandwidth memory allows it to run the GPT-3 175B benchmark on fewer GPUs while achieving excellent per-GPU performance.

Taking advantage of larger, higher-bandwidth HBM3e memory, just 64 Blackwell GPUs were able to run in the GPT-3 LLM benchmark without compromising per-GPU performance. The same benchmark run using Hopper needed 256 GPUs.

The Blackwell training results follow an earlier submission to MLPerf Inference 4.1, where Blackwell delivered up to 4x more LLM inference performance versus the Hopper generation. Taking advantage of the Blackwell architecture’s FP4 precision, along with the NVIDIA QUASAR Quantization System, the submission revealed powerful performance while meeting the benchmark’s accuracy requirements.

Relentless Optimization

NVIDIA platforms undergo continuous software development, racking up performance and feature improvements in training and inference for a wide variety of frameworks, models and applications.

In this round of MLPerf training submissions, Hopper delivered a 1.3x improvement on GPT-3 175B per-GPU training performance since the introduction of the benchmark.

NVIDIA also submitted large-scale results on the GPT-3 175B benchmark using 11,616 Hopper GPUs connected with NVIDIA NVLink and NVSwitch high-bandwidth GPU-to-GPU communication and NVIDIA Quantum-2 InfiniBand networking.

NVIDIA Hopper GPUs have more than tripled scale and performance on the GPT-3 175B benchmark since last year. In addition, on the Llama 2 70B LoRA fine-tuning benchmark, NVIDIA increased performance by 26% using the same number of Hopper GPUs, reflecting continued software enhancements.

NVIDIA’s ongoing work on optimizing its accelerated computing platforms enables continued improvements in MLPerf test results — driving performance up in containerized software, bringing more powerful computing to partners and customers on existing platforms and delivering more return on their platform investment.

Partnering Up

NVIDIA partners, including system makers and cloud service providers like ASUSTek, Azure, Cisco, Dell, Fujitsu, Giga Computing, Lambda Labs, Lenovo, Oracle Cloud, Quanta Cloud Technology and Supermicro also submitted impressive results to MLPerf in this latest round.

A founding member of MLCommons, NVIDIA sees the role of industry-standard benchmarks and benchmarking best practices in AI computing as vital. With access to peer-reviewed, streamlined comparisons of AI and HPC platforms, companies can keep pace with the latest AI computing innovations and access crucial data that can help guide important platform investment decisions.

Learn more about the latest MLPerf results on the NVIDIA Technical Blog

Read More

‘Every Industry, Every Company, Every Country Must Produce a New Industrial Revolution,’ Says NVIDIA CEO Jensen Huang at AI Summit Japan

‘Every Industry, Every Company, Every Country Must Produce a New Industrial Revolution,’ Says NVIDIA CEO Jensen Huang at AI Summit Japan

The next technology revolution is here, and Japan is poised to be a major part of it.

At NVIDIA’s AI Summit Japan on Wednesday, NVIDIA founder and CEO Jensen Huang and SoftBank Chairman and CEO Masayoshi Son shared a sweeping vision for Japan’s role in the AI revolution.

Speaking in Tokyo, Huang underscored that AI infrastructure is essential to drive global transformation.

In his talk, he emphasized two types of AI: digital and physical. Digital is represented by AI agents, while physical AI is represented by robotics.

He said Japan is poised to create both types, leveraging its unique language, culture and data.

“Every industry, every company, every country must produce a new industrial revolution,” Huang said, pointing to AI as the catalyst for this shift.

Huang emphasized Japan’s unique position to lead in this AI-driven economy, praising the country’s history of innovation and engineering excellence as well as its technological and cultural panache.

“I can’t imagine a better country to lead the robotics AI revolution than Japan,” Huang said. “You have created some of the world’s best robots. These are the robots we grew up with, the robots we’ve loved our whole lives.”

Huang highlighted the potential of agentic AI—advanced digital agents capable of understanding, reasoning, planning, and taking action—to transform productivity across industries.

He noted that these agents can tackle complex, multi-step tasks, effectively doing “50% of the work for 100% of the people,” turbocharging human productivity.

By turning data into actionable insights, agentic AI offers companies powerful tools to enhance operations without replacing human roles.

SoftBank and NVIDIA to Build Japan’s Largest AI Supercomputer

Among the summit’s major announcements was NVIDIA’s collaboration with SoftBank to build Japan’s most powerful AI supercomputer.

NVIDIA CEO Jensen Huang showcases Blackwell, the company’s advanced AI supercomputing platform, at the AI Summit Japan in Tokyo.

Using the NVIDIA Blackwell platform, SoftBank’s DGX SuperPOD will deliver extensive computing power to drive sovereign AI initiatives, including large language models (LLMs) specifically designed for Japan.

“With your support, we are creating the largest AI data center here in Japan,” said Son, a visionary who, as Huang noted, has been a part of every major technology revolution of the past half-century.

“We should provide this platform to many of those researchers, the students, the startups, so that we can encourage … so that they have a better access [to] much more compute.”

Huang noted that the AI supercomputer project is just one part of the collaboration.

SoftBank also successfully piloted the world’s first combined AI and 5G network, known as AI-RAN (radio access network). The network enables AI and 5G workloads to run simultaneously, opening new revenue possibilities for telecom providers.

“Now with this intelligence network that we densely connect each other, [it will] become one big neural brain for the infrastructure intelligence to Japan,” Son said. “That will be amazing.”

Accelerated Computing and Japan’s AI Infrastructure

Huang emphasized the profound synergy between AI and robotics, highlighting how advancements in artificial intelligence have created new possibilities for robotics across industries.

He noted that as AI enables machines to learn, adapt and perform complex tasks autonomously, robotics is evolving beyond traditional programming.

Huang spoke to developers, researchers and AI industry leaders at this week’s NVIDIA AI Summit Japan.

“I hope that Japan will take advantage of the latest breakthroughs in artificial intelligence and combine that with your world-class expertise in mechatronics,” Huang said. “No country in the world has greater skills in mechatronics than Japan, and this is an extraordinary opportunity to seize.”

NVIDIA aims to develop a national AI infrastructure network through partnerships with Japanese cloud leaders such as GMO Internet Group and SAKURA internet.

Supported by the Japan Ministry of Economy, Trade and Industry, this infrastructure will support sectors like healthcare, automotive and robotics by providing advanced AI resources to companies and research institutions across Japan.

“This is the beginning of a new era… we can’t miss this time,” Huang added.

Read more about all of today’s announcements in the NVIDIA AI Summit Japan online press kit

Read More