Our new AI system accurately identifies errors inside quantum computers, helping to make this new technology more reliable.Read More

Our new AI system accurately identifies errors inside quantum computers, helping to make this new technology more reliable.Read More

Our new AI system accurately identifies errors inside quantum computers, helping to make this new technology more reliable.Read More

Our new AI system accurately identifies errors inside quantum computers, helping to make this new technology more reliable.Read More

Our new AI system accurately identifies errors inside quantum computers, helping to make this new technology more reliable.Read More

Our new AI system accurately identifies errors inside quantum computers, helping to make this new technology more reliable.Read More

Our new AI system accurately identifies errors inside quantum computers, helping to make this new technology more reliable.Read More
In today’s data-intensive business landscape, organizations face the challenge of extracting valuable insights from diverse data sources scattered across their infrastructure. Whether it’s structured data in databases or unstructured content in document repositories, enterprises often struggle to efficiently query and use this wealth of information.
In this post, we explore how you can use Amazon Q Business, the AWS generative AI-powered assistant, to build a centralized knowledge base for your organization, unifying structured and unstructured datasets from different sources to accelerate decision-making and drive productivity. The solution combines data from an Amazon Aurora MySQL-Compatible Edition database and data stored in an Amazon Simple Storage Service (Amazon S3) bucket.
Amazon Q Business is a fully managed, generative AI-powered assistant that helps enterprises unlock the value of their data and knowledge. The key to using the full potential of Amazon Q lies in its ability to seamlessly integrate and query multiple data sources, from structured databases to unstructured content stores. In this solution, we use Amazon Q to build a comprehensive knowledge base that combines sales-related data from an Aurora MySQL database and sales documents stored in an S3 bucket. Aurora MySQL-Compatible is a fully managed, MySQL-compatible, relational database engine that combines the speed and reliability of high-end commercial databases with the simplicity and cost-effectiveness of open-source databases. Amazon S3 is an object storage service that offers industry-leading scalability, data availability, security, and performance.
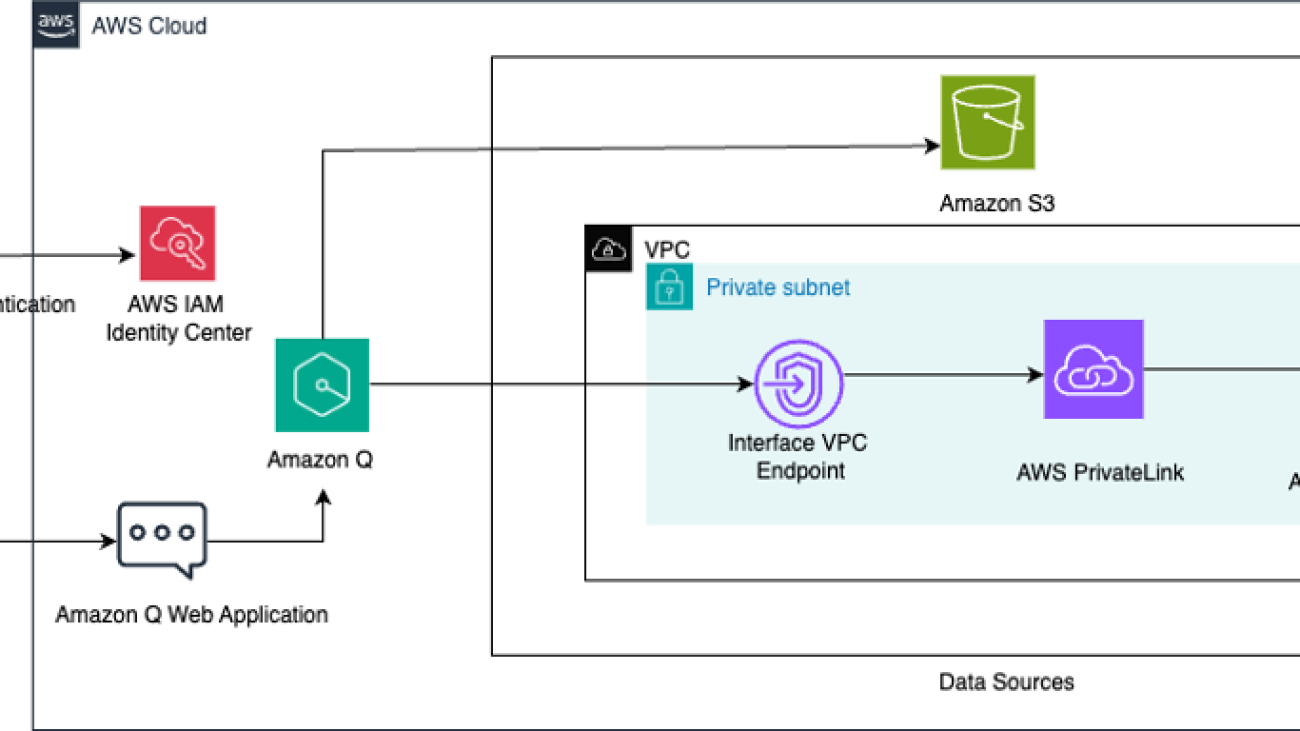
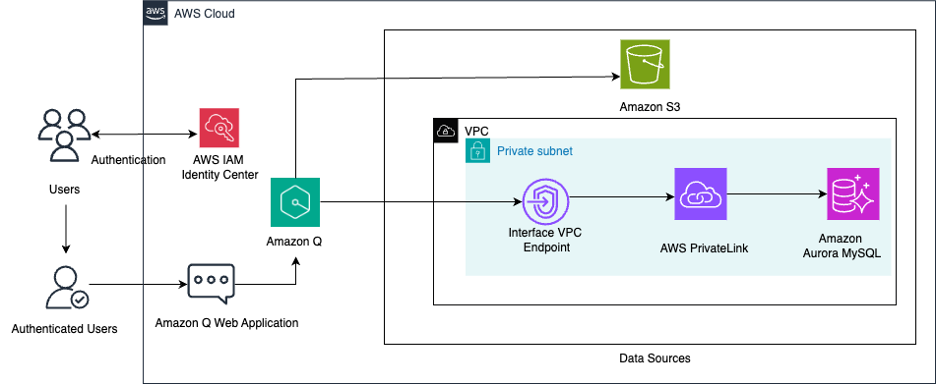
This custom knowledge base that connects these diverse data sources enables Amazon Q to seamlessly respond to a wide range of sales-related questions using the chat interface. The following diagram illustrates the solution architecture.
For this walkthrough, you should have the following prerequisites:
Establishing a VPC provides a secure, isolated network environment for hosting the data sources that Amazon Q Business will access to index. In this post, we use an Aurora MySQL database in a private subnet, and Amazon Q Business accesses the private DB instance in a secure manner using an interface VPC endpoint.
Complete the following steps:
Each interface endpoint is represented by one or more elastic network interfaces in your subnets, which is then used by Amazon Q Business to connect to the private database.
Complete the following steps to create an Aurora MySQL database to host the structured sales data:
In this post, you connect to the private DB instance from the MySQL Workbench client on your local machine through an EC2 bastion host. Launch the EC2 instance in the public subnet of the VPC you configured. The security group attached to this EC2 bastion host instance should be configured to allow SSH traffic (port 22) from your local machine’s IP address. To facilitate the connection between the EC2 bastion host and the Aurora MySQL database, the security group for the Aurora MySQL database should have an inbound rule to allow MySQL traffic (port 3306) from the security group of the EC2 bastion host. Conversely, the security group for the EC2 bastion host should have an outbound rule to allow traffic to the security group of the Aurora MySQL database on port 3306. Refer to Controlling access with security groups for more details.
An Amazon Q Business application requires you to use IAM Identity Center to manage user access. IAM Identity Center is a single place where you can assign your workforce users, also known as workforce identities, to provide consistent access to multiple AWS accounts and applications. In this post, we use IAM Identity Center as the SAML 2.0-aligned identity provider (IdP). Make sure you have enabled an IAM Identity Center instance, provisioned at least one user, and provided each user with a valid email address. The Amazon Q Business application needs to be in the same Region as the IAM Identity Center instance. For more information on enabling users in IAM Identity Center, see Add users to your Identity Center directory.
Create a S3 bucket in the us-east-1 Region with the default settings and create a folder with a name of your choice inside the bucket.
In this post, we use two sample datasets: a total sales dataset CSV file and a sales target document in PDF format. The total sales dataset contains information about orders placed by customers located in various geographical locations, through different sales channels. The sales document contains information about sales targets for the year for each of the sales channel. Complete the steps in the section below to load both datasets.
In the Amazon Q Business application, you create two indexes for the same Aurora MySQL table: one on the total sales dataset and another on an aggregated view of the total sales data, to cater to the different type of queries. Complete the following steps:
This enables you to manage and interact with your database resources directly from your local MySQL Workbench client.
If you encounter the error LOAD DATA LOCAL INFILE file request rejected due to restrictions on access when running the statements in MySQL Workbench 8.0, you might need to edit the connection. On the Connection tab, go to the Advanced sub-tab, and in the Others field, add the line OPT_LOCAL_INFILE=1 and start a new query tab after testing the connection.
This should return 7,991 rows.
The following screenshot shows the database table schema and the sample data in the table.

Download the sample file 2020_Sales_Target.pdf in your local environment and upload it to the S3 bucket you created. This sales target document contains information about the sales target for four sales channels and looks like the following screenshot.

Complete the following steps to create an Amazon Q application:
sales_analyzer).

Complete the following steps to configure Amazon Q to connect to Aurora MySQL-Compatible:

aurora_mysql_sales).<databasename>.<ID>.<region>.rds.amazonaws.com).You can obtain the endpoint on the Amazon RDS console for the instance on the Connectivity & security tab.
3306.sales).

This select statement returns a primary key column, a document title column, and a text column that serves your document body for Amazon Q to answer questions. Make sure you don’t put ; at the end of the query.
order_number.sales_channel.sales_details.

This process may take a few minutes to complete. After the aurora_mysql_sales data source is added, you will be redirected to the Connect data sources page.
aggregated_sales, for the same database but with the following details in the Sync scope This data source will be used by Amazon Q for answering questions on aggregated sales.
scoy_id.sales_channel.sales_aggregates.
After adding the aggregated_sales data source, you will be redirected to the Connect data sources page again.
Complete the following steps to configure Amazon Q to connect to Amazon S3:
s3_sales_targets) and a description.


After few minutes, the application will be created and you will be taken to the Applications page on the Amazon Q Business console.

Choose the name of your application and navigate to the Data sources section. For each of the three data sources, select the data source and choose Sync now. It will take several minutes to complete. After the sources have synced, you should see the Last sync status show as Completed.

At this point, you have created an Amazon Q application, synced the data source, and deployed the web experience. You can customize your web experience to make it more intuitive to your application users.


You can now test the application by asking different questions, as shown in the following screenshot. You can observe in the following question that the channel names were fetched from the Amazon S3 sales target PDF.

The following screenshots show more example interactions.


The answer in the preceding example was derived from the two sources: the S3 bucket and the Aurora database. You can verify the output by cross-referencing the PDF, which has a target as $12 million for the in-store sales channel in 2020. The following SQL shows the actual sales achieved in 2020 for the same channel:

As seen from the sales target PDF data, the 2020 sales target for the distributor sales channel was $7 million.

The following SQL in the Aurora MySQL database shows the actual sales achieved in 2020 for the same channel:

The following screenshots show additional questions.


You can verify the preceding answers with the following SQL:

To avoid incurring future charges, clean up any resources you created as part of this solution, including the Amazon Q Business application:
In this post, we demonstrated how organizations can use Amazon Q to build a unified knowledge base that integrates structured data from an Aurora MySQL database and unstructured data from an S3 bucket. By connecting these disparate data sources, Amazon Q enables you to seamlessly query information from two data sources and gain valuable insights that drive better decision-making.
We encourage you to try this solution and share your experience in the comments. Additionally, you can explore the many other data sources that Amazon Q for Business can seamlessly integrate with, empowering you to build robust and insightful applications.
 Monjumi Sarma is a Technical Account Manager at Amazon Web Services. She helps customers architect modern, scalable, and cost-effective solutions on AWS, which gives them an accelerated path towards modernization initiatives. She has experience across analytics, big data, ETL, cloud operations, and cloud infrastructure management.
 Akchhaya Sharma is a Sr. Data Engineer at Amazon Ads. He builds and manages data-driven solutions for recommendation systems, working together with a diverse and talented team of scientists, engineers, and product managers. He has experience across analytics, big data, and ETL.
Email remains a vital communication channel for business customers, especially in HR, where responding to inquiries can use up staff resources and cause delays. The extensive knowledge required can make it overwhelming to respond to email inquiries manually. In the future, high automation will play a crucial role in this domain.
Using generative AI allows businesses to improve accuracy and efficiency in email management and automation. This technology allows for automated responses, with only complex cases requiring manual review by a human, streamlining operations and enhancing overall productivity.
The combination of retrieval augmented generation (RAG) and knowledge bases enhances automated response accuracy. The combination of retrieval-based and generation-based models in RAG allows for accessing databases and generating accurate and contextually relevant responses. Access to reliable information from a comprehensive knowledge base helps the system provide better responses. This hybrid approach makes sure automated replies are not only contextually relevant but also factually correct, enhancing the reliability and trustworthiness of the communication.
In this post, we illustrate automating the responses to email inquiries by using Amazon Bedrock Knowledge Bases and Amazon Simple Email Service (Amazon SES), both fully managed services. By linking user queries to relevant company domain information, Amazon Bedrock Knowledge Bases offers personalized responses. Amazon Bedrock Knowledge Bases can achieve greater response accuracy and relevance by integrating foundation models (FMs) with internal company data sources for RAG. Amazon SES is an email service that provides a straightforward way to send and receive email using your own email addresses and domains.
RAG is an approach that integrates information retrieval into the natural language generation process. It involves two key workflows: data ingestion and text generation. The data ingestion workflow creates semantic embeddings for documents and questions, storing document embeddings in a vector database. By comparing vector similarity to the question embedding, the text generation workflow selects the most relevant document chunks to enhance the prompt. The obtained information empowers the model to generate more knowledgeable and precise responses.
For RAG workflows, Amazon Bedrock offers managed knowledge bases, which are vector databases that store unstructured data semantically. This managed service simplifies deployment and scaling, allowing developers to focus on building RAG applications without worrying about infrastructure management. For more information on RAG and Amazon Bedrock Knowledge Bases, see Connect Foundation Models to Your Company Data Sources with Agents for Amazon Bedrock.
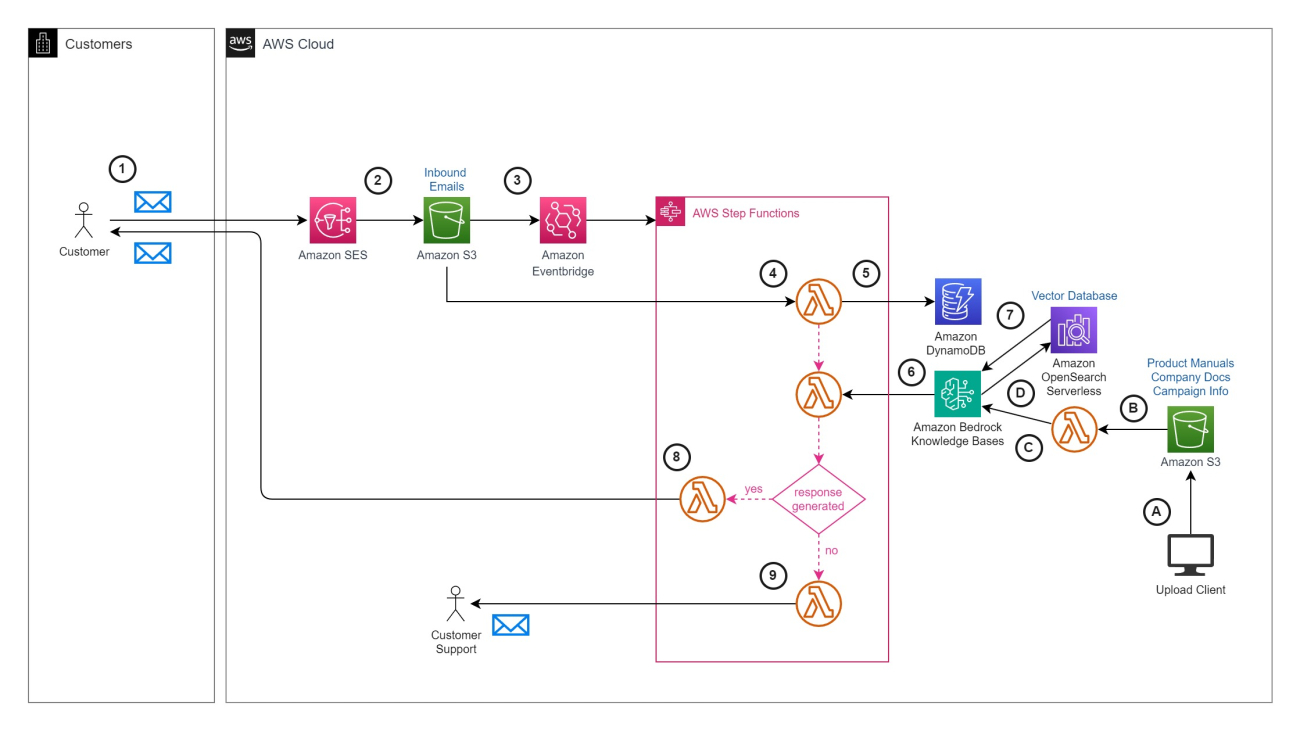
The solution presented in this post responds automatically to email inquiries using the following solution architecture. The primary functions are to enhance the RAG support knowledge base with domain-specific documents and automate email responses.

The workflow to populate the knowledge base consists of the following steps, as noted in the architecture diagram:
StartIngestionJob API function. The knowledge base splits the documents in the data source into manageable chunks for efficient retrieval. The knowledge base is set up to use Amazon OpenSearch Serverless as its vector store and an Amazon Titan embeddings text model on Amazon Bedrock to create the embeddings. During this step, the chunks are converted to embeddings and stored in a vector index in the OpenSearch Serverless vector store for Knowledge Bases of Amazon Bedrock, while also keeping track of the original document.The workflow for automating email responses using generative AI with the knowledge base includes the following steps:
info@example.com.RetrieveAndGenerate API function to generate a response.To set up this solution, you should have the following prerequisites:
cdk bootstrap aws://{ACCOUNT_NUMBER}/{REGION}.To deploy the solution, complete the following steps:
ROUTE53_HOSTED_ZONE context variable. If you manage your domain in a different account or in a registrar besides Route 53, refer to Creating and verifying identities in Amazon SES to manually verify your domain identity and Publishing an MX record for Amazon SES email receiving to manually add the MX record required for Amazon SES to receive email for your domain.npm install{EMAIL_SOURCE} with the email address that will receive inquiries, {EMAIL_REVIEW_DEST} with the email address for internal review for messages that fail auto response, and {HOSTED_ZONE_NAME} with your domain name:
At this point, you have configured Amazon SES with a verified domain identity in sandbox mode. You can now send email to an address in that domain. If you need to send email to users with a different domain name, you need to request production access.
Now that you have a running knowledge base, you need to populate your vector store with the raw data you want to query. To do so, upload your raw text data to the S3 bucket serving as the knowledge base data source:
KnowledgeBaseSourceBucketArn/Name).If you’re testing this solution out, we recommend using the documents in the following open source HR manual. Upload the files in either the markdown or PDF folders. Your knowledge base will then automatically sync those files to the vector database.
To test the solution, send an email to the address defined in the “sourceEmail” context parameter. If you opted to upload the sample HR documents, you could use the following example questions:
Deploying the solution will incur charges. To clean up resources, run the following command from the project’s folder:
In this post, we discussed the essential role of email as a communication channel for business users and the challenges of manual email responses. Our description outlined the use of a RAG architecture and Amazon Bedrock Knowledge Bases to automate email responses, resulting in improved HR prioritization and enhanced user experiences. Lastly, we created a solution architecture and sample code in a GitHub repository for automatically generating and sending contextual email responses using a knowledge base.
For more information, see the Amazon Bedrock User Guide and Amazon SES Developer Guide.
 Darrin Weber is a Senior Solutions Architect at AWS, helping customers realize their cloud journey with secure, scalable, and innovative AWS solutions. He brings over 25 years of experience in architecture, application design and development, digital transformation, and the Internet of Things. When Darrin isn’t transforming and optimizing businesses with innovative cloud solutions, he’s hiking or playing pickleball.
 Marc Luescher is a Senior Solutions Architect at AWS, helping enterprise customers be successful, focusing strongly on threat detection, incident response, and data protection. His background is in networking, security, and observability. Previously, he worked in technical architecture and security hands-on positions within the healthcare sector as an AWS customer. Outside of work, Marc enjoys his 3 dogs, 4 cats, and over 20 chickens, and practices his skills in cabinet making and woodworking.
 Matt Richards is a Senior Solutions Architect at AWS, assisting customers in the retail industry. Having formerly been an AWS customer himself with a background in software engineering and solutions architecture, he now focuses on helping other customers in their application modernization and digital transformation journeys. Outside of work, Matt has a passion for music, singing, and drumming in several groups.
Retrieval Augmented Generation (RAG) has become a crucial technique for improving the accuracy and relevance of AI-generated responses. The effectiveness of RAG heavily depends on the quality of context provided to the large language model (LLM), which is typically retrieved from vector stores based on user queries. The relevance of this context directly impacts the model’s ability to generate accurate and contextually appropriate responses.
One effective way to improve context relevance is through metadata filtering, which allows you to refine search results by pre-filtering the vector store based on custom metadata attributes. By narrowing down the search space to the most relevant documents or chunks, metadata filtering reduces noise and irrelevant information, enabling the LLM to focus on the most relevant content.
In some use cases, particularly those involving complex user queries or a large number of metadata attributes, manually constructing metadata filters can become challenging and potentially error-prone. To address these challenges, you can use LLMs to create a robust solution. This approach, which we call intelligent metadata filtering, uses tool use (also known as function calling) to dynamically extract metadata filters from natural language queries. Function calling allows LLMs to interact with external tools or functions, enhancing their ability to process and respond to complex queries.
Amazon Bedrock is a fully managed service that offers a choice of high-performing foundation models (FMs) from leading AI companies like AI21 Labs, Anthropic, Cohere, Meta, Mistral AI, Stability AI, and Amazon through a single API, along with a broad set of capabilities to build generative AI applications with security, privacy, and responsible AI. One of its key features, Amazon Bedrock Knowledge Bases, allows you to securely connect FMs to your proprietary data using a fully managed RAG capability and supports powerful metadata filtering capabilities.
In this post, we explore an innovative approach that uses LLMs on Amazon Bedrock to intelligently extract metadata filters from natural language queries. By combining the capabilities of LLM function calling and Pydantic data models, you can dynamically extract metadata from user queries. This approach can also enhance the quality of retrieved information and responses generated by the RAG applications.
This approach not only addresses the challenges of manual metadata filter construction, but also demonstrates how you can use Amazon Bedrock to create more effective and user-friendly RAG applications.
Metadata filtering is a powerful feature that allows you to refine search results by pre-filtering the vector store based on custom metadata attributes. This approach narrows down the search space to the most relevant documents or passages, reducing noise and irrelevant information. For a comprehensive overview of metadata filtering and its benefits, refer to Amazon Bedrock Knowledge Bases now supports metadata filtering to improve retrieval accuracy.
In RAG applications, the accuracy and relevance of generated responses heavily depend on the quality of the context provided to the LLM. This context, typically retrieved from the knowledge base based on user queries, directly impacts the model’s ability to generate accurate and contextually appropriate outputs.
To evaluate the effectiveness of a RAG system, we focus on three key metrics:
By implementing dynamic metadata filtering, you can significantly improve these metrics, leading to more accurate and relevant RAG responses. Let’s explore how to implement this approach using Amazon Bedrock and Pydantic.
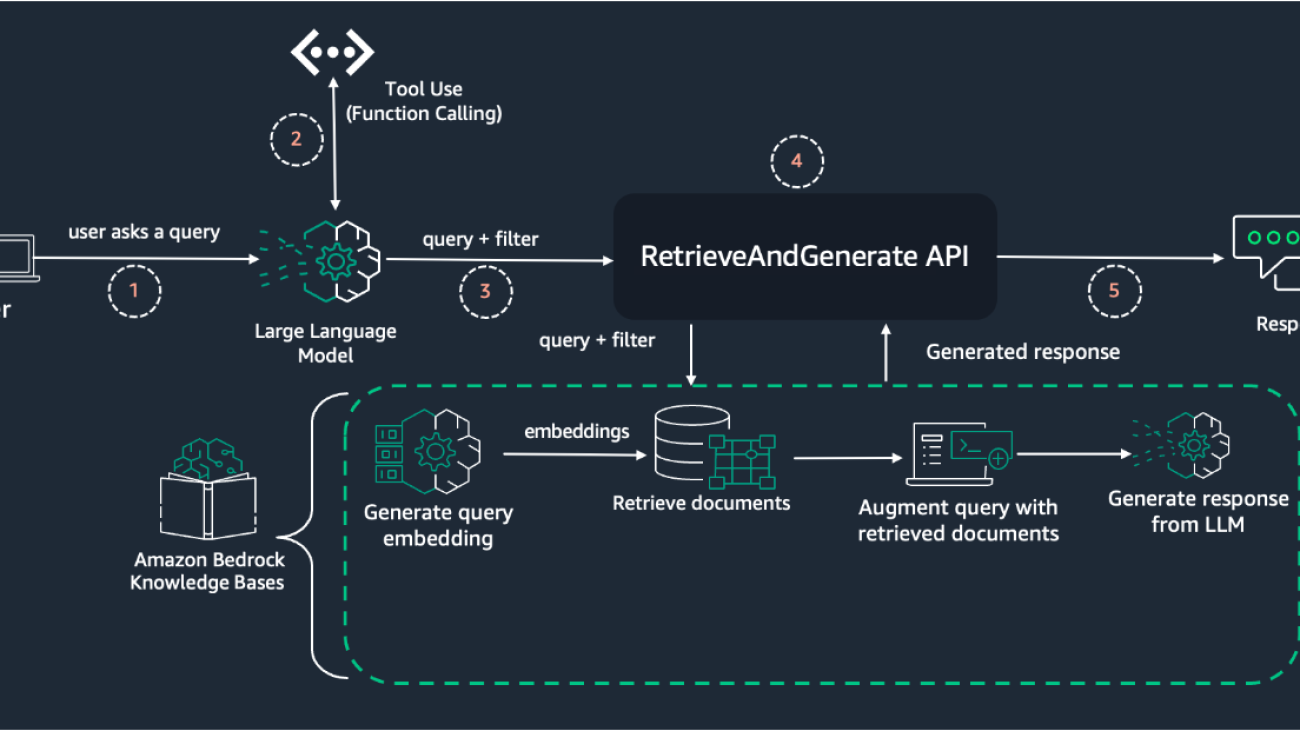
In this section, we illustrate the flow of the dynamic metadata filtering solution using the tool use (function calling) capability. The following diagram illustrates high level RAG architecture with dynamic metadata filtering.

The process consists of the following steps:
RetrieveAndGenerateThis architecture uses the power of tool use for intelligent metadata extraction from a user’s query, combined with the robust RAG capabilities of Amazon Bedrock Knowledge Bases. The key innovation lies in Step 2, where the LLM is used to dynamically interpret the user’s query and extract relevant metadata for filtering. This approach allows for more flexible and intuitive querying, because users can express their information needs in natural language without having to manually specify metadata filters.
The subsequent steps (3–4) follow a more standard RAG workflow, but with the added benefit of using the dynamically generated metadata filter to improve the relevance of retrieved documents. This combination of intelligent metadata extraction and traditional RAG techniques results in more accurate and contextually appropriate responses to user queries.
Before proceeding with this tutorial, make sure you have the following in place:
In the following sections, we explore how to implement dynamic metadata filtering using the tool use feature in Amazon Bedrock and Pydantic for data validation.
Tool use is a powerful feature in Amazon Bedrock that allows models to access external tools or functions to enhance their response generation capabilities. When you send a message to a model, you can provide definitions for one or more tools that could potentially help the model generate a response. If the model determines it needs a tool, it responds with a request for you to call the tool, including the necessary input parameters.
In our example, we use Amazon Bedrock to extract entities like genre and year from natural language queries about video games. For a query like “A strategy game with cool graphics released after 2023?”” it will extract “strategy” (genre) and “2023” (year). These extracted entities will then dynamically construct metadata filters to retrieve only relevant games from the knowledge base. This allows flexible, natural language querying with precise metadata filtering.
First, set up your environment with the necessary imports and Boto3 clients:
For this solution, you use Pydantic models to validate and structure our extracted entities:
You now define a tool for entity extraction with basic instructions and use it with Amazon Bedrock. You should use a proper description for this to work for your use case:
Create a function to construct the metadata filter based on the extracted entities:
Finally, create a main function to process the query and retrieve results:
This implementation uses the tool use feature in Amazon Bedrock to dynamically extract entities from user queries. It then uses these entities to construct metadata filters, which are applied when retrieving results from the knowledge base.
The key advantages of this approach include:
When implementing dynamic metadata filtering, it’s important to consider and handle edge cases. In this section, we discuss some ways you can address them.
If the tool use process fails to extract metadata from the user query due to an absence of filters or errors, you have several options:
This approach makes sure that only queries with clear, extractable metadata are processed, potentially reducing errors and improving overall response quality.
The dynamic approach introduces an additional FM call to extract metadata, which will increase both cost and latency. To mitigate this, consider the following:
After you’ve finished experimenting with this solution, it’s crucial to clean up your resources to avoid unnecessary charges. For detailed cleanup instructions, see Amazon Bedrock Knowledge Bases now supports metadata filtering to improve retrieval accuracy. These steps will guide you through deleting your knowledge base, vector database, AWS Identity and Access Management (IAM) roles, and sample datasets, making sure that you don’t incur unexpected costs.
By implementing dynamic metadata filtering using Amazon Bedrock and Pydantic, you can significantly enhance the flexibility and power of RAG applications. This approach allows for more intuitive querying of knowledge bases, leading to improved context recall and more relevant AI-generated responses.
As you explore this technique, remember to balance the benefits of dynamic filtering against the additional computational costs. We encourage you to try this method in your own RAG applications and share your experiences with the community.
For additional resources, refer to the following:
Happy building with Amazon Bedrock!
 Mani Khanuja is a Tech Lead – Generative AI Specialists, author of the book Applied Machine Learning and High-Performance Computing on AWS, and a member of the Board of Directors for Women in Manufacturing Education Foundation Board. She leads machine learning projects in various domains such as computer vision, natural language processing, and generative AI. She speaks at internal and external conferences such AWS re:Invent, Women in Manufacturing West, YouTube webinars, and GHC 23. In her free time, she likes to go for long runs along the beach.
 Ishan Singh is a Generative AI Data Scientist at Amazon Web Services, where he helps customers build innovative and responsible generative AI solutions and products. With a strong background in machine learning and natural language processing, Ishan specializes in developing safe and responsible AI systems that drive business value. Outside of work, he enjoys playing competitive volleyball, exploring local bike trails, and spending time with his wife and dog, Beau.

This post is co-written with Lawrence Zorio III from Mark43.
Public safety organizations face the challenge of accessing and analyzing vast amounts of data quickly while maintaining strict security protocols. First responders need immediate access to relevant data across multiple systems, while command staff require rapid insights for operational decisions. Mission-critical public safety applications require the highest levels of security and reliability when implementing technology capabilities. Mark43, a public safety technology company, recognized this challenge and embedded generative artificial intelligence (AI) capabilities into their application using Amazon Q Business to transform how law enforcement agencies interact with their mission-critical applications. By embedding advanced AI into their cloud-native platform, Mark43 enables officers to receive instant answers to natural language queries and automated case report summaries, reducing administrative time from minutes to seconds. This solution demonstrates how generative AI can enhance public safety operations while allowing officers to focus more time on serving their communities.
This post shows how Mark43 uses Amazon Q Business to create a secure, generative AI-powered assistant that drives operational efficiency and improves community service. We explain how they embedded Amazon Q Business web experience in their web application with low code, so they could focus on creating a rich AI experience for their customers.
Mark43 offers a cloud-native Public Safety Platform with powerful computer-aided dispatch (CAD), records management system (RMS), and analytics solutions, positioning agencies at the forefront of public safety technology. These solutions make sure public safety agencies have access to the essential tools and data they need to protect and serve their communities effectively. By using purpose-built Amazon Web Services (AWS) cloud services and modern software architecture, Mark43 delivers an intuitive, user-friendly experience that empowers both frontline personnel and command staff. The solution’s advanced analytical capabilities provide real-time insights to support data-driven decision making and enhance operational efficiency. Mark43 has built a robust and resilient microservices architecture using a combination of serverless technologies, such as AWS Lambda, AWS Fargate, and Amazon Elastic Compute Cloud (Amazon EC2). They use event-driven architectures, real-time processing, and purpose-built AWS services for hosting data and running analytics. This, combined with integrated AI capabilities, positions Mark43 to drive innovation in the industry. With its Open API architecture built on AWS and 100+ integrations, Mark43 connects to the applications and data sources agencies rely on for unmatched insights, situational awareness and decision support. This modern data foundation built on AWS allows agencies to leverage the latest technologies and AI models, keeping pace with the evolving technology landscape.
Agency stakeholders have mission-critical roles that demand significant time and administrative interactions with core solutions. With a cloud native Computer Aided Dispatch (CAD) and Records Management System (RMS), Mark43 was able to bring the same modern solutions that have long infiltrated other industries to make police forces more efficient, replacing legacy systems. Now, Mark43 values the opportunity to leverage AI to support the next evolution of innovative technology to drive efficiencies, enhance situational awareness, and support better public safety outcomes.
Leading agencies are embracing AI by setting high standards for data integrity and security, implementing a central strategy to prevent unauthorized use of consumer AI tools, and ensuring a human-in-the-loop approach. Meanwhile, value-add AI tools should seamlessly integrate with existing workflows and applications to prevent sprawl to yet more tools adding unwanted complexity. Mark43 and AWS worked backwards from these requirements to bring secure, easy-to-use, and valuable AI to public safety.
AWS collaborated with Mark43 to embed a frictionless AI assistant directly into their core products, CAD and RMS, for first responders and command staff. Together, we harnessed the power of AI into a secure, familiar, existing workflow with a low barrier to entry for adoption across the user base. The assistant enables first responders to search information, receive summaries, and complete tasks based on their authorized data access within Mark43’s systems, reducing the time needed to capture high value insights.
In just a few weeks, Mark43 deployed an Amazon Q Business application, integrated their data sources using Amazon Q Business built-in data connectors, embedded the Amazon Q Business application into their native app, tested and tuned responses to prompts, and completed a successful beta version of the assistant with their to end users. Figure 1 depicts the overall architecture of Mark43’s application using Amazon Q Business.

Mark43’s solution uses the Amazon Q Business built-in data connectors to unite information from various enterprise applications, document repositories, chat applications, and knowledge management systems. The implementation draws data from objects stored in Amazon Simple Storage Service (Amazon S3) in addition to structured records stored in Amazon Relational Database Service (Amazon RDS). Amazon Q Business automatically uses the data from these sources as context to answer prompts from users of the AI assistant without requiring Mark43 to build and maintain a retrieval augmented generation (RAG) pipeline.
Amazon Q Business provides a chat interface web experience with a web address hosted by AWS. To embed the Amazon Q Business web experience in Mark43’s web application, Mark43 first allowlisted their web application domain using the Amazon Q Business console. Then, Mark43 added an inline frame (iframe) HTML component to their web application with the src attribute set to the web address of the Amazon Q Business web experience. For example, <iframe src=”Amazon Q Business web experience URL”/>. This integration requires a small amount of development effort to create a seamless experience for Mark43 end users.
Security remains paramount in the implementation. Amazon Q Business integrates with Mark43’s existing identity and access management protocols, making sure that users can only access information to which they’re authorized. If a user doesn’t have access to the data outside of Amazon Q Business, then they cannot access the data within Amazon Q Business. The AI assistant respects the same data access restrictions that apply to users in their normal workflow. With Amazon Q Business administrative controls and guardrails, Mark43 administrators can block specific topics and filter both questions and answers using keywords, verifying that responses align with public safety agency guidelines and protocols.
Mark43 is committed to the responsible use of AI. We believe in transparency, informing our users that they’re interacting with an AI solution. We strongly recommend human-in-the-loop review for critical decisions. Importantly, our AI assistant’s responses are limited to authorized data sources only, not drawing from general Large Language Model (LLM) knowledge. Additionally, we’ve implemented Amazon Q’s guardrails to filter undesirable topics, further enhancing the safety and reliability of our AI-driven solutions.
“Mark43 is committed to empowering communities and governments with a modern public safety solution that elevates both safety and quality of life. When we sought a seamless way to integrate AI-powered search and summarization, Amazon Q Business proved the ideal solution.
We added Amazon Q Business into our solution, reaffirming our dedication to equipping agencies with resilient, dependable and powerful technology. Amazon Q’s precision in extracting insights from complex data sources provides law enforcement with immediate access to information, reducing administrative burden from minutes to seconds. By adding Amazon Q into our portfolio of AWS services, we continue to deliver an efficient, intuitive user experience which enables officers to stay focused on serving their communities but also empowers command staff to quickly interpret data and share insights with stakeholders, supporting real-time situational awareness and operational efficiency,”
– Bob Hughes, CEO Mark43, GovTech Provider of Public Safety Solutions.
Public Safety agencies are excited about the potential for AI-powered search to enhance investigations, drive real-time decision support, and increase situational awareness. At International Association of Chiefs of Police (IACP) conference in Boston in Oct 2024, one agency who viewed a demo described it as a “game-changer,” while another agency recognized the value of AI capabilities to make officer training programs more efficient. Agency stakeholders noted that AI-powered search will democratize insights across the agency, allowing them to spend more time on higher-value work, instead of answering basic questions.
In this post, we showed you how Mark43 embedded Amazon Q Business web experience into their public safety solution to transform how law enforcement agencies interact with mission-critical applications. Through this integration, Mark43 demonstrated how AI can reduce administrative tasks from minutes to seconds while maintaining the high levels of security required for law enforcement operations.
Looking ahead, Mark43 plans to expand their Amazon Q Business integration with a focus on continuous improvements to the user experience. Mark43 will continue to empower law enforcement with the most advanced, resilient, and user-friendly public safety technology powered by Amazon Q Business and other AWS AI services.
Visit the Amazon Q Business User Guide to learn more about how to embed generative AI into your applications. Request a demo with Mark43 and learn how your agency can benefit from Amazon Q Business in public safety software.
 Lawrence Zorio III serves as the Chief Information Security Officer at Mark43, where he leads a team of cybersecurity professionals dedicated to safeguarding the confidentiality, integrity, and availability (CIA) of enterprise and customer data, assets, networks, and products. His leadership ensures Mark43’s security strategy aligns with the unique requirements of public safety agencies worldwide. With over 20 years of global cybersecurity experience across the Public Safety, Finance, Healthcare, and Technology sectors, Zorio is a recognized leader in the field. He chairs the Integrated Justice Information System (IJIS) Cybersecurity Working Group, where he helps develop standards, best practices, and recommendations aimed at strengthening cybersecurity defenses against rising cyber threats. Zorio also serves as an advisor to universities and emerging technology firms. Zorio holds a Bachelor of Science in Business Information Systems from the University of Massachusetts Dartmouth and a Master of Science in Innovation from Northeastern University’s D’Amore-McKim School of Business. He has been featured in various news publications, authored multiple security-focused white papers, and is a frequent speaker at industry events.
 Ritesh Shah is a Senior Generative AI Specialist at AWS. He partners with customers like Mark43 to drive AI adoption, resulting in millions of dollars in top and bottom line impact for these customers. Outside work, Ritesh tries to be a dad to his AWSome daughter. Connect with him on LinkedIn.
 Prajwal Shetty is a GovTech Solutions Architect at AWS and collaborates with Justice and Public Safety (JPS) customers like Mark43. He designs purpose-driven solutions that foster an efficient and secure society, enabling organizations to better serve their communities through innovative technology. Connect with him on LinkedIn.
 Garrett Kopeski is an Enterprise GovTech Senior Account Manager at AWS responsible for the business relationship with Justice and Public Safety partners such as Mark43. Garrett collaborates with his customers’ Executive Leadership Teams to connect their business objectives with AWS powered initiatives and projects. Outside work, Garrett pursues physical fitness challenges when he’s not chasing his energetic 2-year-old son. Connect with him on LinkedIn.
 Bobby Williams is a Senior Solutions Architect at AWS. He has decades of experience designing, building, and supporting enterprise software solutions that scale globally. He works on solutions across industry verticals and horizontals and is driven to create a delightful experience for every customer.