Apple researchers are advancing the field of ML through fundamental research that improves the world’s understanding of this technology and helps to redefine what is possible with it. This work may lead to advancements in Apple’s products and services, and the benefits of the research extend beyond the Apple ecosystem as it is shared with the broader research community through publication, open source resources, and engagement at industry and research community events.
Next week, the 38th annual Conference on Neural Information Processing Systems (NeurIPS), will be held in Vancouver, Canada…Apple Machine Learning Research
Neural Information Processing Systems (NeurIPS) 2024
Apple Machine Learning Research
Advancing AI trust with new responsible AI tools, capabilities, and resources
As generative AI continues to drive innovation across industries and our daily lives, the need for responsible AI has become increasingly important. At AWS, we believe the long-term success of AI depends on the ability to inspire trust among users, customers, and society. This belief is at the heart of our long-standing commitment to building and using AI responsibly. Responsible AI goes beyond mitigating risks and aligning to relevant standards and regulations. It’s about proactively building trust and unlocking AI’s potential to drive business value. A comprehensive approach to responsible AI empowers organizations to innovate boldly and achieve transformative business outcomes. New joint research conducted by Accenture and AWS underscores this, highlighting responsible AI as a key driver of business value — boosting product quality, operational efficiency, customer loyalty, brand perception, and more. Nearly half of the surveyed companies acknowledge responsible AI as pivotal in driving AI-related revenue growth. Why? Responsible AI builds trust, and trust accelerates adoption and innovation.
With trust as a cornerstone of AI adoption, we are excited to announce at AWS re:Invent 2024 new responsible AI tools, capabilities, and resources that enhance the safety, security, and transparency of our AI services and models and help support customers’ own responsible AI journeys.

Taking proactive steps to manage AI risks and foster trust and interoperability
AWS is the first major cloud service provider to announce ISO/IEC 42001 accredited certification for AI services, covering Amazon Bedrock, Amazon Q Business, Amazon Textract, and Amazon Transcribe. ISO/IEC 42001 is an international management system standard that outlines the requirements for organizations to manage AI systems responsibly throughout their lifecycle. Technical standards, such as ISO/IEC 42001, are significant because they provide a common framework for responsible AI development and deployment, fostering trust and interoperability in an increasingly global and AI-driven technological landscape. Achieving ISO/IEC 42001 certification means that an independent third party has validated that AWS is taking proactive steps to manage risks and opportunities associated with AI development, deployment, and operation. With this certification, we reinforce our commitments to providing AI services that help you innovate responsibly with AI.
Expanding safeguards in Amazon Bedrock Guardrails to improve transparency and safety
In April 2024, we announced the general availability of Amazon Bedrock Guardrails, which makes it easier to apply safety and responsible AI checks for your gen AI applications. Amazon Bedrock Guardrails delivers industry-leading safety protections by blocking up to 85% more harmful content on top of native protections provided by foundation models (FMs) and filtering over 75% of hallucinated responses from models using contextual grounding checks for Retrieval Augmented Generation (RAG) and summarization use cases. The ability to implement these safeguards was a big step forward in building trust in AI systems. Despite the advancements in FMs, models can still produce hallucinations—a challenge many of our customers face. For use cases where accuracy is critical, customers need the use of mathematically sound techniques and explainable reasoning to help generate accurate FM responses.
To address this need, we are adding new safeguards to Amazon Bedrock Guardrails to help prevent factual errors due to FM hallucinations and offer verifiable proofs. With the launch of the Automated Reasoning checks in Amazon Bedrock Guardrails (preview), AWS becomes the first and only major cloud provider to integrate automated reasoning in our generative AI offerings. Automated Reasoning checks help prevent factual errors from hallucinations using sound mathematical, logic-based algorithmic verification and reasoning processes to verify the information generated by a model, so outputs align with provided facts and aren’t based on hallucinated or inconsistent data. Used alongside other techniques such as prompt engineering, RAG, and contextual grounding checks, Automated Reasoning checks add a more rigorous and verifiable approach to enhancing the accuracy of LLM-generated outputs. Encoding your domain knowledge into structured policies helps your conversational AI applications provide reliable and trustworthy information to your users.
Click on the image below to see a demo of Automated Reasoning checks in Amazon Bedrock Guardrails.

As organizations increasingly use applications with multimodal data to drive business value, improve decision-making, and enhance customer experiences, the need for content filters extends beyond text. Amazon Bedrock Guardrails now supports multimodal toxicity detection (in preview) with support for image content, helping organizations to detect and filter undesirable and potentially harmful image content while retaining safe and relevant visuals. Multimodal toxicity detection helps remove the heavy lifting required to build your own safeguards for image data or invest time in manual evaluation that can be error-prone and tedious. Amazon Bedrock Guardrails helps you to responsibly create AI applications, helping build trust with your users.
Improving generative AI application responses and quality with new Amazon Bedrock evaluation capabilities
With more general-purpose FMs to choose from, organizations now have a wide range of options to power their generative AI applications. However, selecting the optimal model for a specific use case requires efficiently comparing models based on an organization’s preferred quality and responsible AI metrics. While evaluation is an important part of building trust and transparency, it demands substantial time, expertise, and resources for every new use case, making it challenging to choose the model that delivers the most accurate and safe customer experience. Amazon Bedrock Evaluations addresses this by helping you evaluate, compare, and select the best FMs for your use case. You can now use an LLM-as-a-judge (in preview) for model evaluations to perform tests and evaluate other models with human-like quality on your dataset. You can choose from LLMs hosted on Amazon Bedrock to be the judge, with a variety of quality and responsible AI metrics such as correctness, completeness, and harmfulness. You can also bring your own prompt dataset to customize the evaluation with your data, and compare results across evaluation jobs to make decisions faster. Previously, you had a choice between human-based model evaluation and automatic evaluation with exact string matching and other traditional natural language processing (NLP) metrics. These methods, though fast, didn’t provide a strong correlation with human evaluators. Now, with LLM-as-a-judge, you can get human-like evaluation quality at a much lower cost than full human-based evaluations while saving up to weeks of time. Many organizations still want the final assessment to be from expert human annotators. For this, Amazon Bedrock still offers full human-based evaluations with an option to bring your own workforce or have AWS manage your custom evaluation.
To equip FMs with up-to-date and proprietary information, organizations use RAG, a technique that fetches data from company data sources and enriches the prompt to provide more relevant and accurate responses. However, evaluating and optimizing RAG applications can be challenging due to the complexity of optimizing retrieval and generation components. To address this, we’ve introduced RAG evaluation support in Amazon Bedrock Knowledge Bases (in preview). This new evaluation capability now allows you to assess and optimize RAG applications conveniently and quickly, right where your data and LLMs already reside. Powered by LLM-as-a-judge technology, RAG evaluations offer a choice of several judge models and metrics, such as context relevance, context coverage, correctness, and faithfulness (hallucination detection). This seamless integration promotes regular assessments, fostering a culture of continuous improvement and transparency in AI application development. By saving both cost and time compared to human-based evaluations, these tools empower organizations to enhance their AI applications, building trust through consistent improvement.
The model and RAG evaluation capabilities both provide natural language explanations for each score in the output file and on the AWS Management Console. The scores are normalized from 0 to 1 for ease of interpretability. Rubrics are published in full with the judge prompts in the documentation so non-scientists can understand how scores are derived. To learn more about model and RAG evaluation capabilities, see News blog.
Introducing Amazon Nova, built with responsible AI at the core
Amazon Nova is a new generation of state-of-the-art FMs that deliver frontier intelligence and industry leading price-performance. Amazon Nova FMs incorporate built-in safeguards to detect and remove harmful content from data, rejecting inappropriate user inputs, and filtering model outputs. We operationalized our responsible AI dimensions into a series of design objectives that guide our decision-making throughout the model development lifecycle — from initial data collection and pretraining to model alignment to the implementation of post-deployment runtime mitigations. Amazon Nova Canvas and Amazon Nova Reel come with controls to support safety, security, and IP needs with responsible AI. This includes watermarking, content moderation, and C2PA support (available in Amazon Nova Canvas) to add metadata by default to generated images. Amazon’s safety measures to combat the spread of misinformation, child sexual abuse material (CSAM), and chemical, biological, radiological, or nuclear (CBRN) risks also extend to Amazon Nova models. For more information on how Amazon Nova was built responsibly, read the Amazon Science blog.

Enhancing transparency with new resources to advance responsible generative AI
At re:Invent 2024, we announced the availability of new AWS AI Service Cards for Amazon Nova Reel, Amazon Canvas, Amazon Nova Micro, Lite, and Pro, Amazon Titan Image Generator, and Amazon Titan Text Embeddings to increase transparency of Amazon FMs. These cards provide comprehensive information on the intended use cases, limitations, responsible AI design choices, and best practices for deployment and performance optimization. A key component of Amazon’s responsible AI documentation, AI Service Cards offer customers and the broader AI community a centralized resource to understand the development process we undertake to build our services in a responsible way that addresses fairness, explainability, privacy and security, safety, controllability, veracity and robustness, governance, and transparency. As generative AI continues to grow and evolve, transparency on how technology is developed, tested, and used will be a vital component to earn the trust of organizations and their customers alike. You can explore all 16 AI Service Cards on Responsible AI Tools and Resources.
We also updated the AWS Responsible Use of AI Guide. This document offers considerations for designing, developing, deploying, and operating AI systems responsibly, based on our extensive learnings and experience in AI. It was written with a set of diverse AI stakeholders and perspectives in mind—including, but not limited to, builders, decision-makers, and end-users. At AWS, we are committed to continuing to bring transparency resources like these to the broader community—and to iterate and gather feedback on the best ways forward.
Delivering breakthrough innovation with trust at the forefront
At AWS, we’re dedicated to fostering trust in AI, empowering organizations of all sizes to build and use AI effectively and responsibly. We are excited about the responsible AI innovations announced at re:Invent this week. From new safeguards and evaluation techniques in Amazon Bedrock to state-of-the-art Amazon Nova FMs to fostering trust and transparency with ISO/IEC 42001 certification and new AWS AI Service Cards, you have more tools, resources and built-in protections to help you innovate responsibly and unlock value with generative AI.
We encourage you to explore these new tools and resources:
- AWS achieves ISO/IEC 42001 AI Management System accredited certification
- Prevent factual errors from LLM hallucinations with mathematically sound Automated Reasoning checks (preview)
- Amazon Bedrock Guardrails supports multimodal toxicity detection with image support
- New RAG evaluation and LLM-as-a-judge capabilities in Amazon Bedrock
- Amazon Nova and our commitment to responsible AI
- Responsible AI at AWS website
- AWS AI Service Cards
- AWS Responsible Use of AI Guide
About the author
 Dr. Baskar Sridharan is the Vice President for AI/ML and Data Services & Infrastructure, where he oversees the strategic direction and development of key services, including Bedrock, SageMaker, and essential data platforms like EMR, Athena, and Glue.
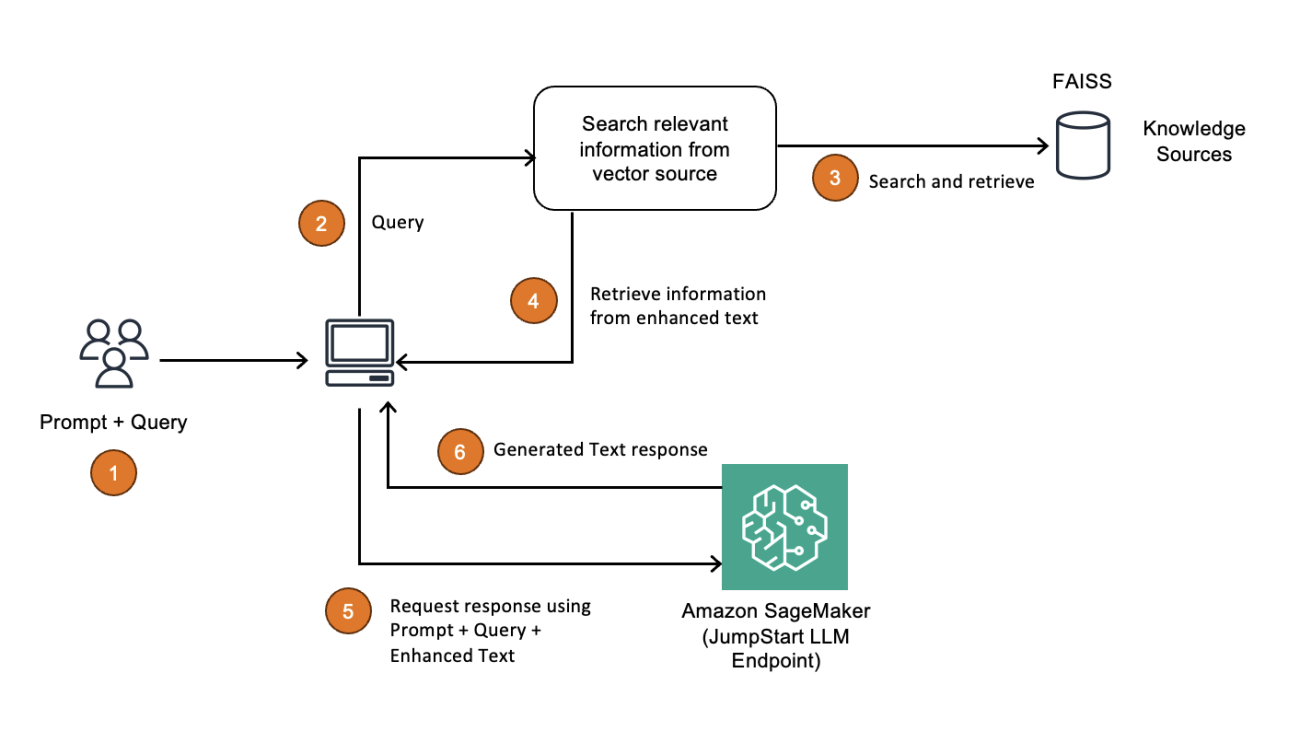
Deploy RAG applications on Amazon SageMaker JumpStart using FAISS
Generative AI has empowered customers with their own information in unprecedented ways, reshaping interactions across various industries by enabling intuitive and personalized experiences. This transformation is significantly enhanced by Retrieval Augmented Generation (RAG), which is a generative AI pattern where the large language model (LLM) being used references a knowledge corpus outside of its training data to generate a response. RAG has become a popular choice to improve performance of generative AI applications by taking advantage of additional information in the knowledge corpus to augment an LLM. Customers often prefer RAG for optimizing generative AI output over other techniques like fine-tuning due to cost benefits and quicker iteration.
In this post, we show how to build a RAG application on Amazon SageMaker JumpStart using Facebook AI Similarity Search (FAISS).
RAG applications on AWS
RAG models have proven useful for grounding language generation in external knowledge sources. By retrieving relevant information from a knowledge base or document collection, RAG models can produce responses that are more factual, coherent, and relevant to the user’s query. This can be particularly valuable in applications like question answering, dialogue systems, and content generation, where incorporating external knowledge is crucial for providing accurate and informative outputs.
Additionally, RAG has shown promise for improving understanding of internal company documents and reports. By retrieving relevant context from a corporate knowledge base, RAG models can assist with tasks like summarization, information extraction, and question answering on complex, domain-specific documents. This can help employees quickly find important information and insights buried within large volumes of internal materials.
A RAG workflow typically has four components: the input prompt, document retrieval, contextual generation, and output. A workflow begins with a user providing an input prompt, which is searched in a large knowledge corpus, and the most relevant documents are returned. These returned documents along with the original query are then fed into the LLM, which uses the additional conditional context to produce a more accurate output to users. RAG has become a popular technique to optimize generative AI applications because it uses external data that can be frequently modified to dynamically retrieve user output without the need retrain a model, which is both costly and compute intensive.
The next component in this pattern that we have chosen is SageMaker JumpStart. It provides significant advantages for building and deploying generative AI applications, including access to a wide range of pre-trained models with prepackaged artifacts, ease of use through a user-friendly interface, and scalability with seamless integration to the broader AWS ecosystem. By using pre-trained models and optimized hardware, SageMaker JumpStart allows you to quickly deploy both LLMs and embeddings models without spending too much time on configurations for scalability.
Solution overview
To implement our RAG workflow on SageMaker JumpStart, we use a popular open source Python library known as LangChain. Using LangChain, the RAG components are simplified into independent blocks that you can bring together using a chain object that will encapsulate the entire workflow. Let’s review these different components and how we bring them together:
- LLM (inference) – We need an LLM that will do the actual inference and answer our end-user’s initial prompt. For our use case, we use Meta Llama 3 for this component. LangChain comes with a default wrapper class for SageMaker endpoints that allows you to simply pass in the endpoint name to define an LLM object in the library.
- Embeddings model – We need an embeddings model to convert our document corpus into textual embeddings. This is necessary for when we are doing a similarity search on the input text to see what documents share similarities and possess the knowledge to help augment our response. For this example, we use the BGE Hugging Face embeddings model available through SageMaker JumpStart.
- Vector store and retriever – To house the different embeddings we have generated, we use a vector store. In this case, we use FAISS, which allows for similarity search as well. Within our chain object, we define the vector store as the retriever. You can tune this depending on how many documents you want to retrieve. Other vector store options include Amazon OpenSearch Service as you scale your experiments.
The following architecture diagram illustrates how you can use a vector index such as FAISS as a knowledge base and embeddings store.

Standalone vector indexes like FAISS can significantly improve the search and retrieval of vector embeddings, but they lack capabilities that exist in any database. The following is an overview of the primary benefits to using a vector index for RAG workflows:
- Efficiency and speed – Vector indexes are highly optimized for fast, memory-efficient similarity search. Because vector databases are built on top of vector indexes, there are additional features that typically contribute additional latency. To build a highly efficient and low-latency RAG workflow, you can use a vector index (such as FAISS) deployed on a single machine with GPU acceleration.
- Simplified deployment and maintenance – Because vector indexes don’t require the effort of spinning up and maintaining a database instance, they’re a great option to quickly deploy a RAG workflow if continuous updates, high concurrency, or distributed storage aren’t a requirement.
- Control and customization – Vector indexes offer granular control over parameters, the index type, and performance trade-offs, letting you optimize for exact or approximate searches based on the RAG use case.
- Memory efficiency – You can tune a vector index to minimize memory usage, especially when using data compression techniques such as quantization. This is advantageous in scenarios where memory is limited and high scalability is required so that more data can be stored in memory on a single machine.
In short, a vector index like FAISS is advantageous when trying to maximize speed, control, and efficiency with minimal infrastructure components and stable data.
In the following sections, we walk through the following notebook, which implements FAISS as the vector store in the RAG solution. In this notebook, we use several years of Amazon’s Letter to Shareholders as a text corpus and perform Q&A on the letters. We use this notebook to demonstrate advanced RAG techniques with Meta Llama 3 8B on SageMaker JumpStart using the FAISS embedding store.
We explore the code using the simple LangChain vector store wrapper, RetrievalQA and ParentDocumentRetriever. RetreivalQA is more advanced than a LangChain vector store wrapper and offers more customizations. ParentDocumentRetriever helps with advanced RAG options like invocation of parent documents for response generation, which enriches the LLM’s outputs with a layered and thorough context. We will see how the responses progressively get better as we move from simple to advanced RAG techniques.
Prerequisites
To run this notebook, you need access to an ml.t3.medium instance.
To deploy the endpoints for Meta Llama 3 8B model inference, you need the following:
- At least one ml.g5.12xlarge instance for Meta Llama 3 endpoint usage
- At least one ml.g5.2xlarge instance for embedding endpoint usage
Additionally, you may need to request a Service Quota increase.
Set up the notebook
Complete the following steps to create a SageMaker notebook instance (you can also use Amazon SageMaker Studio with JupyterLab):
- On the SageMaker console, choose Notebooks in the navigation pane.
- Choose Create notebook instance.

- For Notebook instance type, choose t3.medium.
- Under Additional configuration, for Volume size in GB, enter 50 GB.
This configuration might need to change depending on the RAG solution you are working with and the amount of data you will have on the file system itself.

- For IAM role, choose Create a new role.

- Create an AWS Identity and Access Management (IAM) role with SageMaker full access and any other service-related policies that are necessary for your operations.

- Expand the Git repositories section and for Git repository URL, enter
https://github.com/aws-samples/sagemaker-genai-hosting-examples.git.

- Accept defaults for the rest of the configurations and choose Create notebook instance.
- Wait for the notebook to be InService and then choose the Open JupyterLab link to launch JupyterLab.

- Open
genai-recipes/RAG-recipes/llama3-rag-langchain-smjs.ipynbto work through the notebook.

Deploy the model
Before you start building the end-to-end RAG workflow, it’s necessary to deploy the LLM and embeddings model of your choice. SageMaker JumpStart simplifies this process because the model artifacts, data, and container specifications are all pre-packaged for optimal inference. These are then exposed using SageMaker Python SDK high-level API calls, which let you specify the model ID for deployment to a SageMaker real-time endpoint:
LangChain comes with built-in support for SageMaker JumpStart and endpoint-based models, so you can encapsulate the endpoints with these constructs so they can later be fit into the encompassing RAG chain:
After you have set up the models, you can focus on the data preparation and setup of the FAISS vector store.
Data preparation and vector store setup
For this RAG use case, we take public documents of Amazon’s Letter to Shareholders as the text corpus and document source that we will be working with:
LangChain comes with built-in processing for PDF documents, and you can use this to load the data from the text corpus. You can also tune or iterate over parameters such as chunk size depending on the documents that you’re working with for your use case.
You can then combine the documents and embeddings models and point towards FAISS as your vector store. LangChain has widespread support for different LLMs such as SageMaker JumpStart, and also has built-in API calls for integrating with FAISS, which we use in this case:
You can then make sure the vector store is performing as expected by sending a few sample queries and reviewing the output that is returned:
LangChain inference
Now that you have set up the vector store and models, you can encapsulate this into a singular chain object. In this case, we use a RetrievalQA Chain tailored for RAG applications provided by LangChain. With this chain, you can customize the document fetching process and control parameters such as number of documents to retrieve. We define a prompt template and pass in our retriever as well as these tertiary parameters:
You can then test some sample inference and trace the relevant source documents that helped answer the query:
Optionally, if you want to further augment or enhance your RAG applications for more advanced use cases with larger documents, you can also explore using options such as a parent document retriever chain. Depending on your use case, it’s crucial to identify the different RAG processes and architectures that can optimize your generative AI application.
Clean up
After you have built the RAG application with FAISS as a vector index, make sure to clean up the resources that were used. You can delete the LLM endpoint using the delete_endpoint Boto3 API call. In addition, make sure to stop your SageMaker notebook instance to not incur any further charges.
Conclusion
RAG can revolutionize customer interactions across industries by providing personalized and intuitive experiences. RAG’s four-component workflow—input prompt, document retrieval, contextual generation, and output—allows for dynamic, up-to-date responses without the need for costly model retraining. This approach has gained popularity due to its cost-effectiveness and ability to quickly iterate.
In this post, we saw how SageMaker JumpStart has simplified the process of building and deploying generative AI applications, offering pre-trained models, user-friendly interfaces, and seamless scalability within the AWS ecosystem. We also saw how using FAISS as a vector index can enable quick retrieval from a large corpus of information, while keeping costs and operational overhead low.
To learn more about RAG on SageMaker, see Retrieval Augmented Generation, or contact your AWS account team to discuss your use cases.
About the Authors
 Raghu Ramesha is an ML Solutions Architect with the Amazon SageMaker Service team. He focuses on helping customers build, deploy, and migrate ML production workloads to SageMaker at scale. He specializes in machine learning, AI, and computer vision domains, and holds a master’s degree in Computer Science from UT Dallas. In his free time, he enjoys traveling and photography.
 Ram Vegiraju is an ML Architect with the Amazon SageMaker Service team. He focuses on helping customers build and optimize their AI/ML solutions on SageMaker. In his spare time, he loves traveling and writing.
 Vivek Gangasani is a Senior GenAI Specialist Solutions Architect at AWS. He helps emerging generative AI companies build innovative solutions using AWS services and accelerated compute. Currently, he is focused on developing strategies for fine-tuning and optimizing the inference performance of large language models. In his free time, Vivek enjoys hiking, watching movies, and trying different cuisines.
 Harish Rao is a Senior Solutions Architect at AWS, specializing in large-scale distributed AI training and inference. He empowers customers to harness the power of AI to drive innovation and solve complex challenges. Outside of work, Harish embraces an active lifestyle, enjoying the tranquility of hiking, the intensity of racquetball, and the mental clarity of mindfulness practices.
 Ankith Ede is a Solutions Architect at Amazon Web Services based in New York City. He specializes in helping customers build cutting-edge generative AI, machine learning, and data analytics-based solutions for AWS startups. He is passionate about helping customers build scalable and secure cloud-based solutions.
 Sid Rampally is a Customer Solutions Manager at AWS, driving generative AI acceleration for life sciences customers. He writes about topics relevant to his customers, focusing on data engineering and machine learning. In his spare time, Sid enjoys walking his dog in Central Park and playing hockey.
Speed up your cluster procurement time with Amazon SageMaker HyperPod training plans
Today, organizations are constantly seeking ways to use advanced large language models (LLMs) for their specific needs. These organizations are engaging in both pre-training and fine-tuning massive LLMs, with parameter counts in the billions. This process aims to enhance model efficacy for a wide array of applications across diverse sectors, including healthcare, financial services, and marketing. However, customizing these larger models requires access to the latest and accelerated compute resources.
In this post, we demonstrate how you can address this requirement by using Amazon SageMaker HyperPod training plans, which can bring down your training cluster procurement wait time. A training plan provides simple and predictable access to accelerated compute resources (supporting P4d, P5, P5e, P5en, and trn2 as of the time of writing), allowing you to use this compute capacity to run model training on either Amazon SageMaker training jobs or SageMaker HyperPod.
We guide you through a step-by-step implementation on how you can use the (AWS CLI) or the AWS Management Console to find, review, and create optimal training plans for your specific compute and timeline needs. We further guide you through using the training plan to submit SageMaker training jobs or create SageMaker HyperPod clusters.
You can check out the launch of this new feature in Meet your training timelines and budget with new Amazon SageMaker HyperPod flexible training plans.
Business challenges
As organizations strive to harness the power of LLMs for competitive advantage, they face a significant hurdle: securing sufficient and reliable compute capacity for model training. The scale of these models demands cutting-edge accelerated compute hardware. However, the high cost and limited availability of such resources create a bottleneck for many businesses. This scarcity not only impacts timelines, but also stretches budgets, potentially delaying critical AI initiatives. As a result, organizations are seeking solutions that can provide consistent, scalable, and cost-effective access to high-performance computing resources, enabling them to train and fine-tune LLMs without compromising on speed or quality.
Solution overview
SageMaker HyperPod training plans, a new SageMaker capability, address this challenge by offering you a simple-to-use console UI or AWS CLI experience to search, review, create, and manage training plans.
Capacity provisioned through SageMaker training plans can be used with either SageMaker training jobs or SageMaker HyperPod. If you want to focus on model development rather than infrastructure management and prefer ease of use with a managed experience, SageMaker training jobs are an excellent choice. For organizations requiring granular control over training infrastructure and extensive customization options, SageMaker HyperPod is the ideal solution. To better understand these services and choose the one most appropriate for your use case, refer to Generative AI foundation model training on Amazon SageMaker, which provides detailed information about both options.
The following diagram provides an overview of the main steps involved in requesting capacity using SageMaker training plans for SageMaker training jobs.
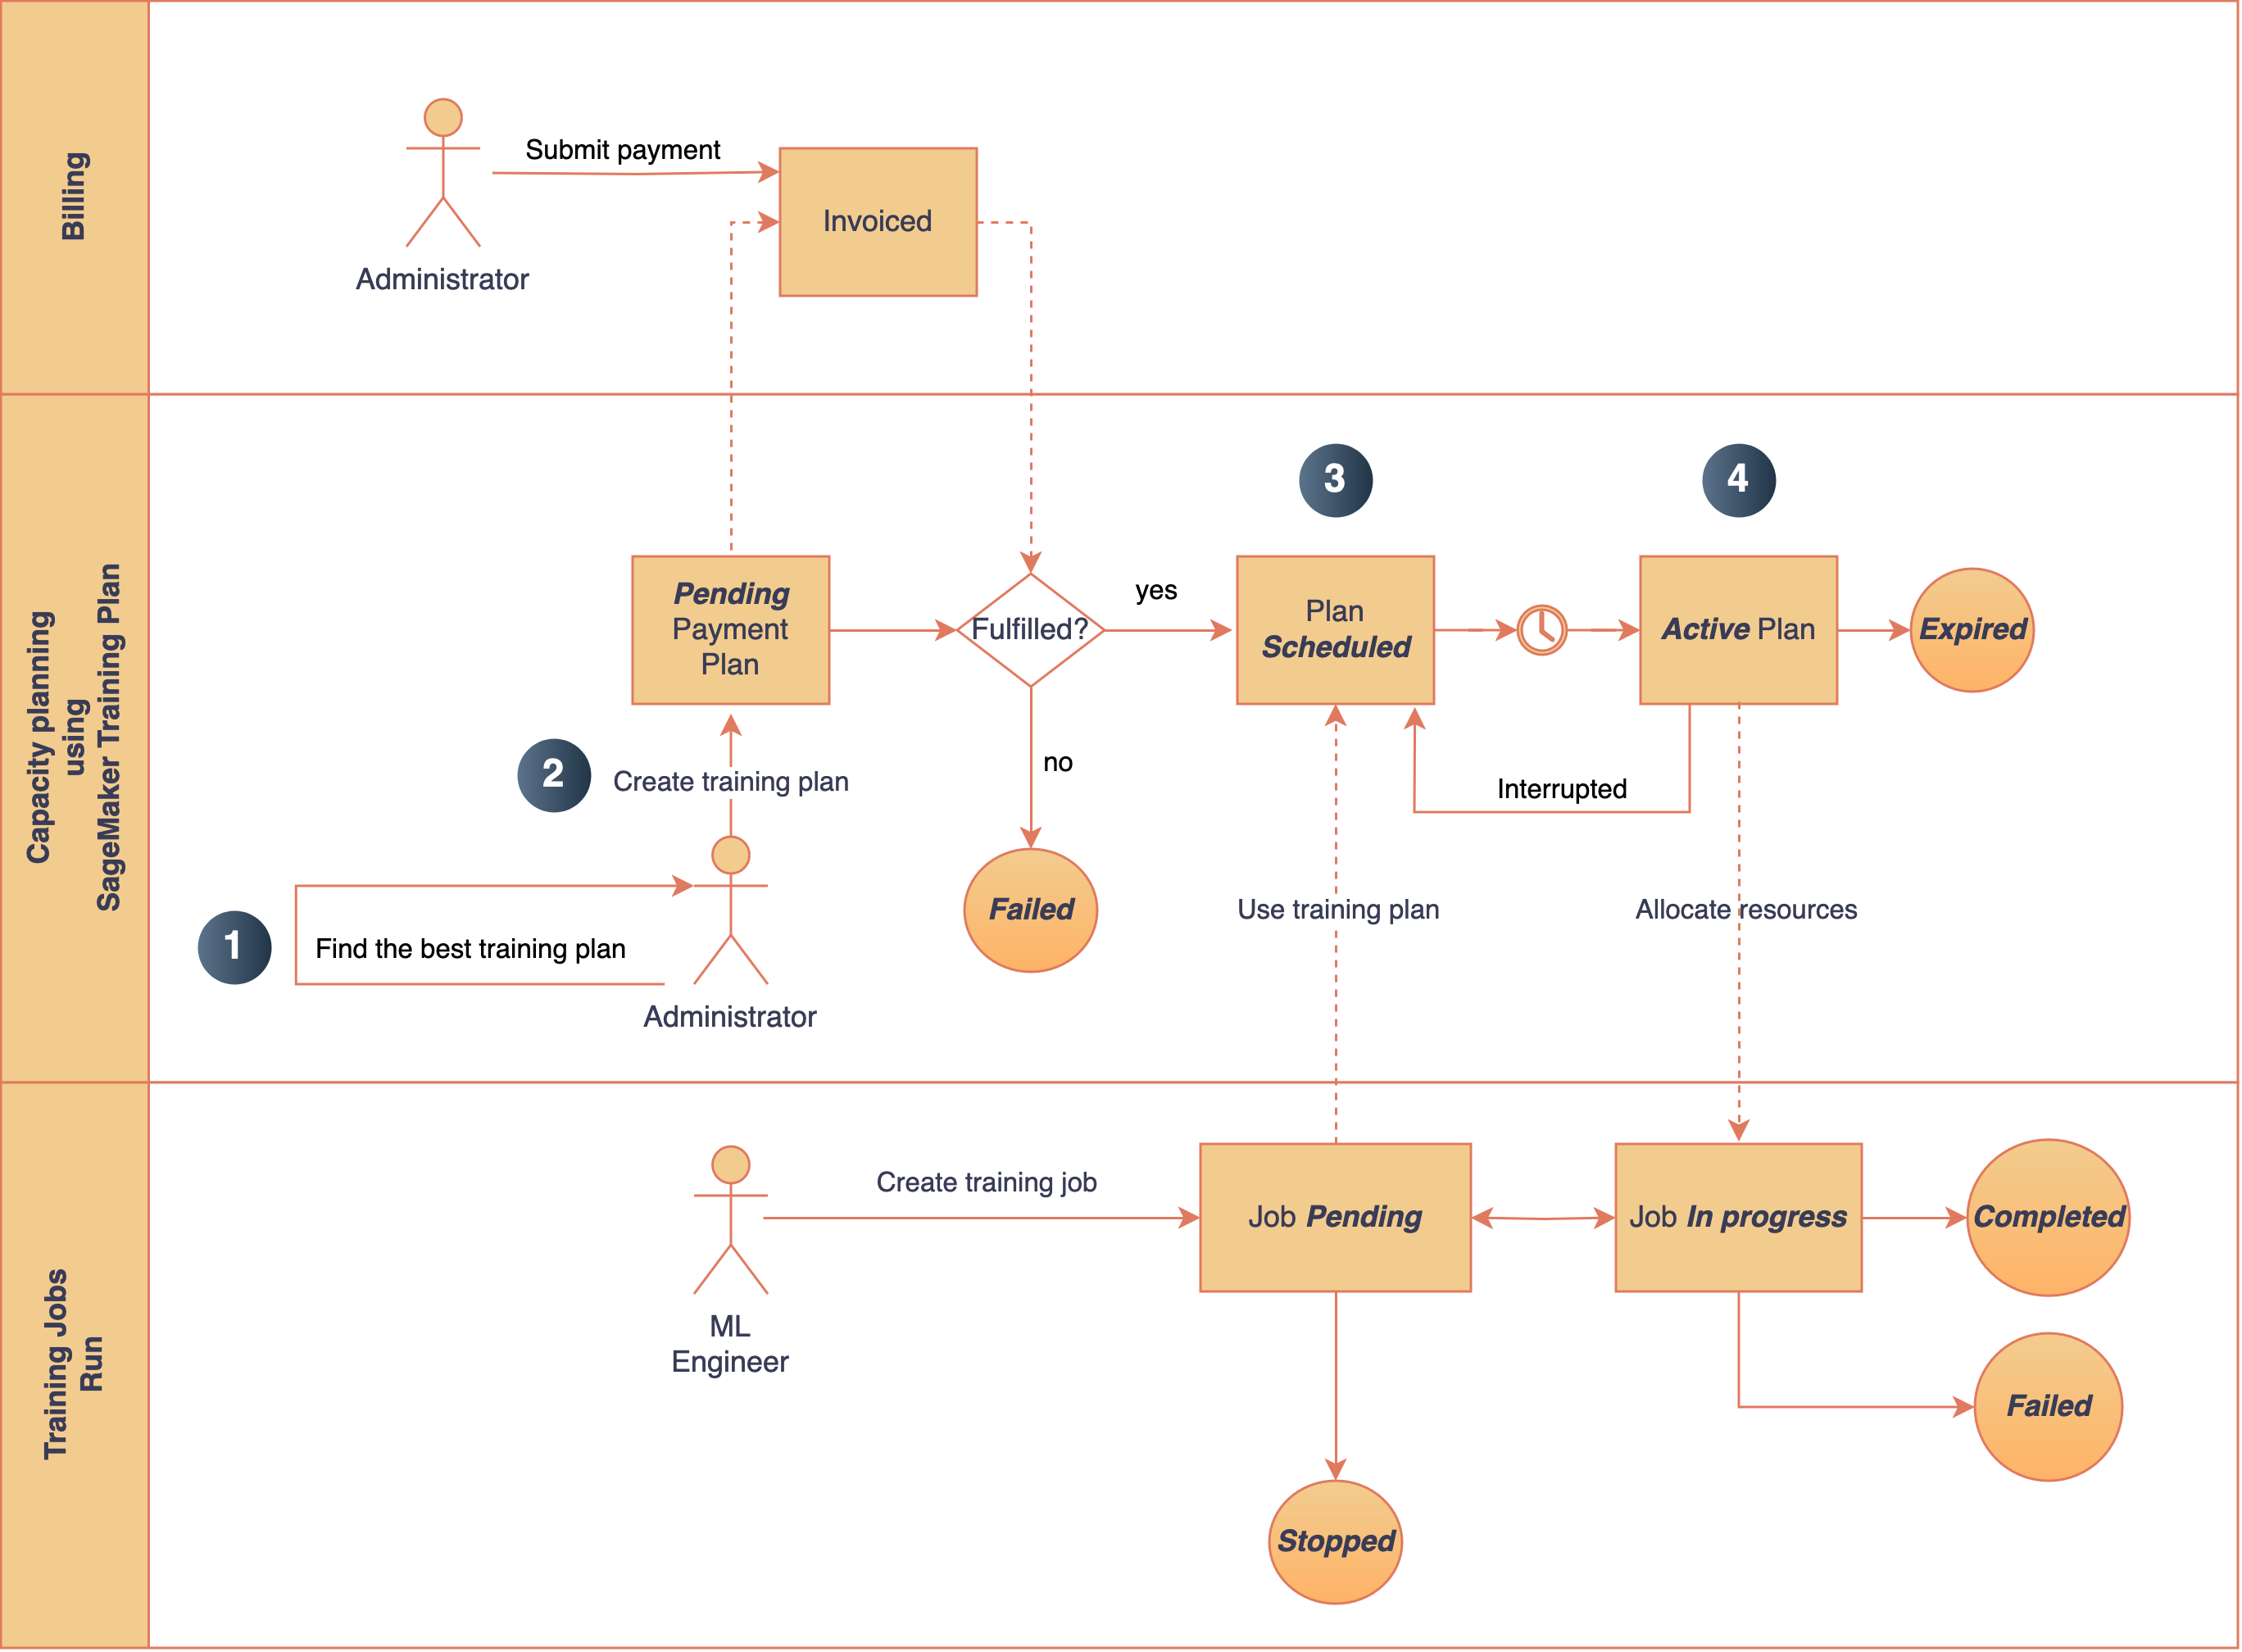
Figure 1: The main steps involved in procuring capacity via SageMaker HyperPod training plans. Note: This workflow arbitrarily uses SageMaker training jobs as the target; you may choose to use SageMaker HyperPod too.
At a high level, the steps to create a training plan are as follows:
- Search the training plans that best match your capacity requirements, such as instance type, instance count, start time, and duration. SageMaker finds the optimal plans across one or more segments.
- After reviewing the available training plan offerings, you can reserve the plan that meets your requirements.
- Schedule your SageMaker training jobs by using a training plan with a
training-jobtarget resource. Note, we are only usingtraining-jobfor illustration purposes. You may also usehyperpod-clusteras your target resource. - Describe and list your existing training plans. When the capacity is available, it will be allocated to the scheduled training job.
In the following sections, we shift our focus to the solution walkthrough associated with training plans.
Prerequisites
Complete the following prerequisite steps:
- If you’re using an AWS Identity and Access Management (IAM) user for this solution, make sure that your user has the
AmazonSageMakerFullAccesspolicy attached to it. To learn more about how to attach a policy to an IAM user, see Adding IAM identity permissions (console). - If you’re setting up the AWS CLI for the first time, follow the instructions at Getting started with the AWS CLI.
- If you choose to use the AWS CLI, make sure you are on the most up-to-date AWS CLI version.
Create a training plan
In this post, we discuss two ways to create a training plan: using the SageMaker console or the AWS CLI.
Create a SageMaker training plan using the SageMaker console
The SageMaker console user experience for creating a training plan is similar for both training jobs and SageMaker HyperPod. In this post, for demonstration purposes, we show how to create a training plan for a SageMaker HyperPod cluster.
- On the SageMaker console, choose Training plans in the navigation pane.
- Create a new training plan.
- For Target, select HyperPod cluster.
- Under Instance attributes, specify your instance type (ml.p5.48xlarge) and instance count (16).
- Under Date settings to search for an available plan, choose your preferred training date and duration (for example, 10 days).
- Choose Find training plan.
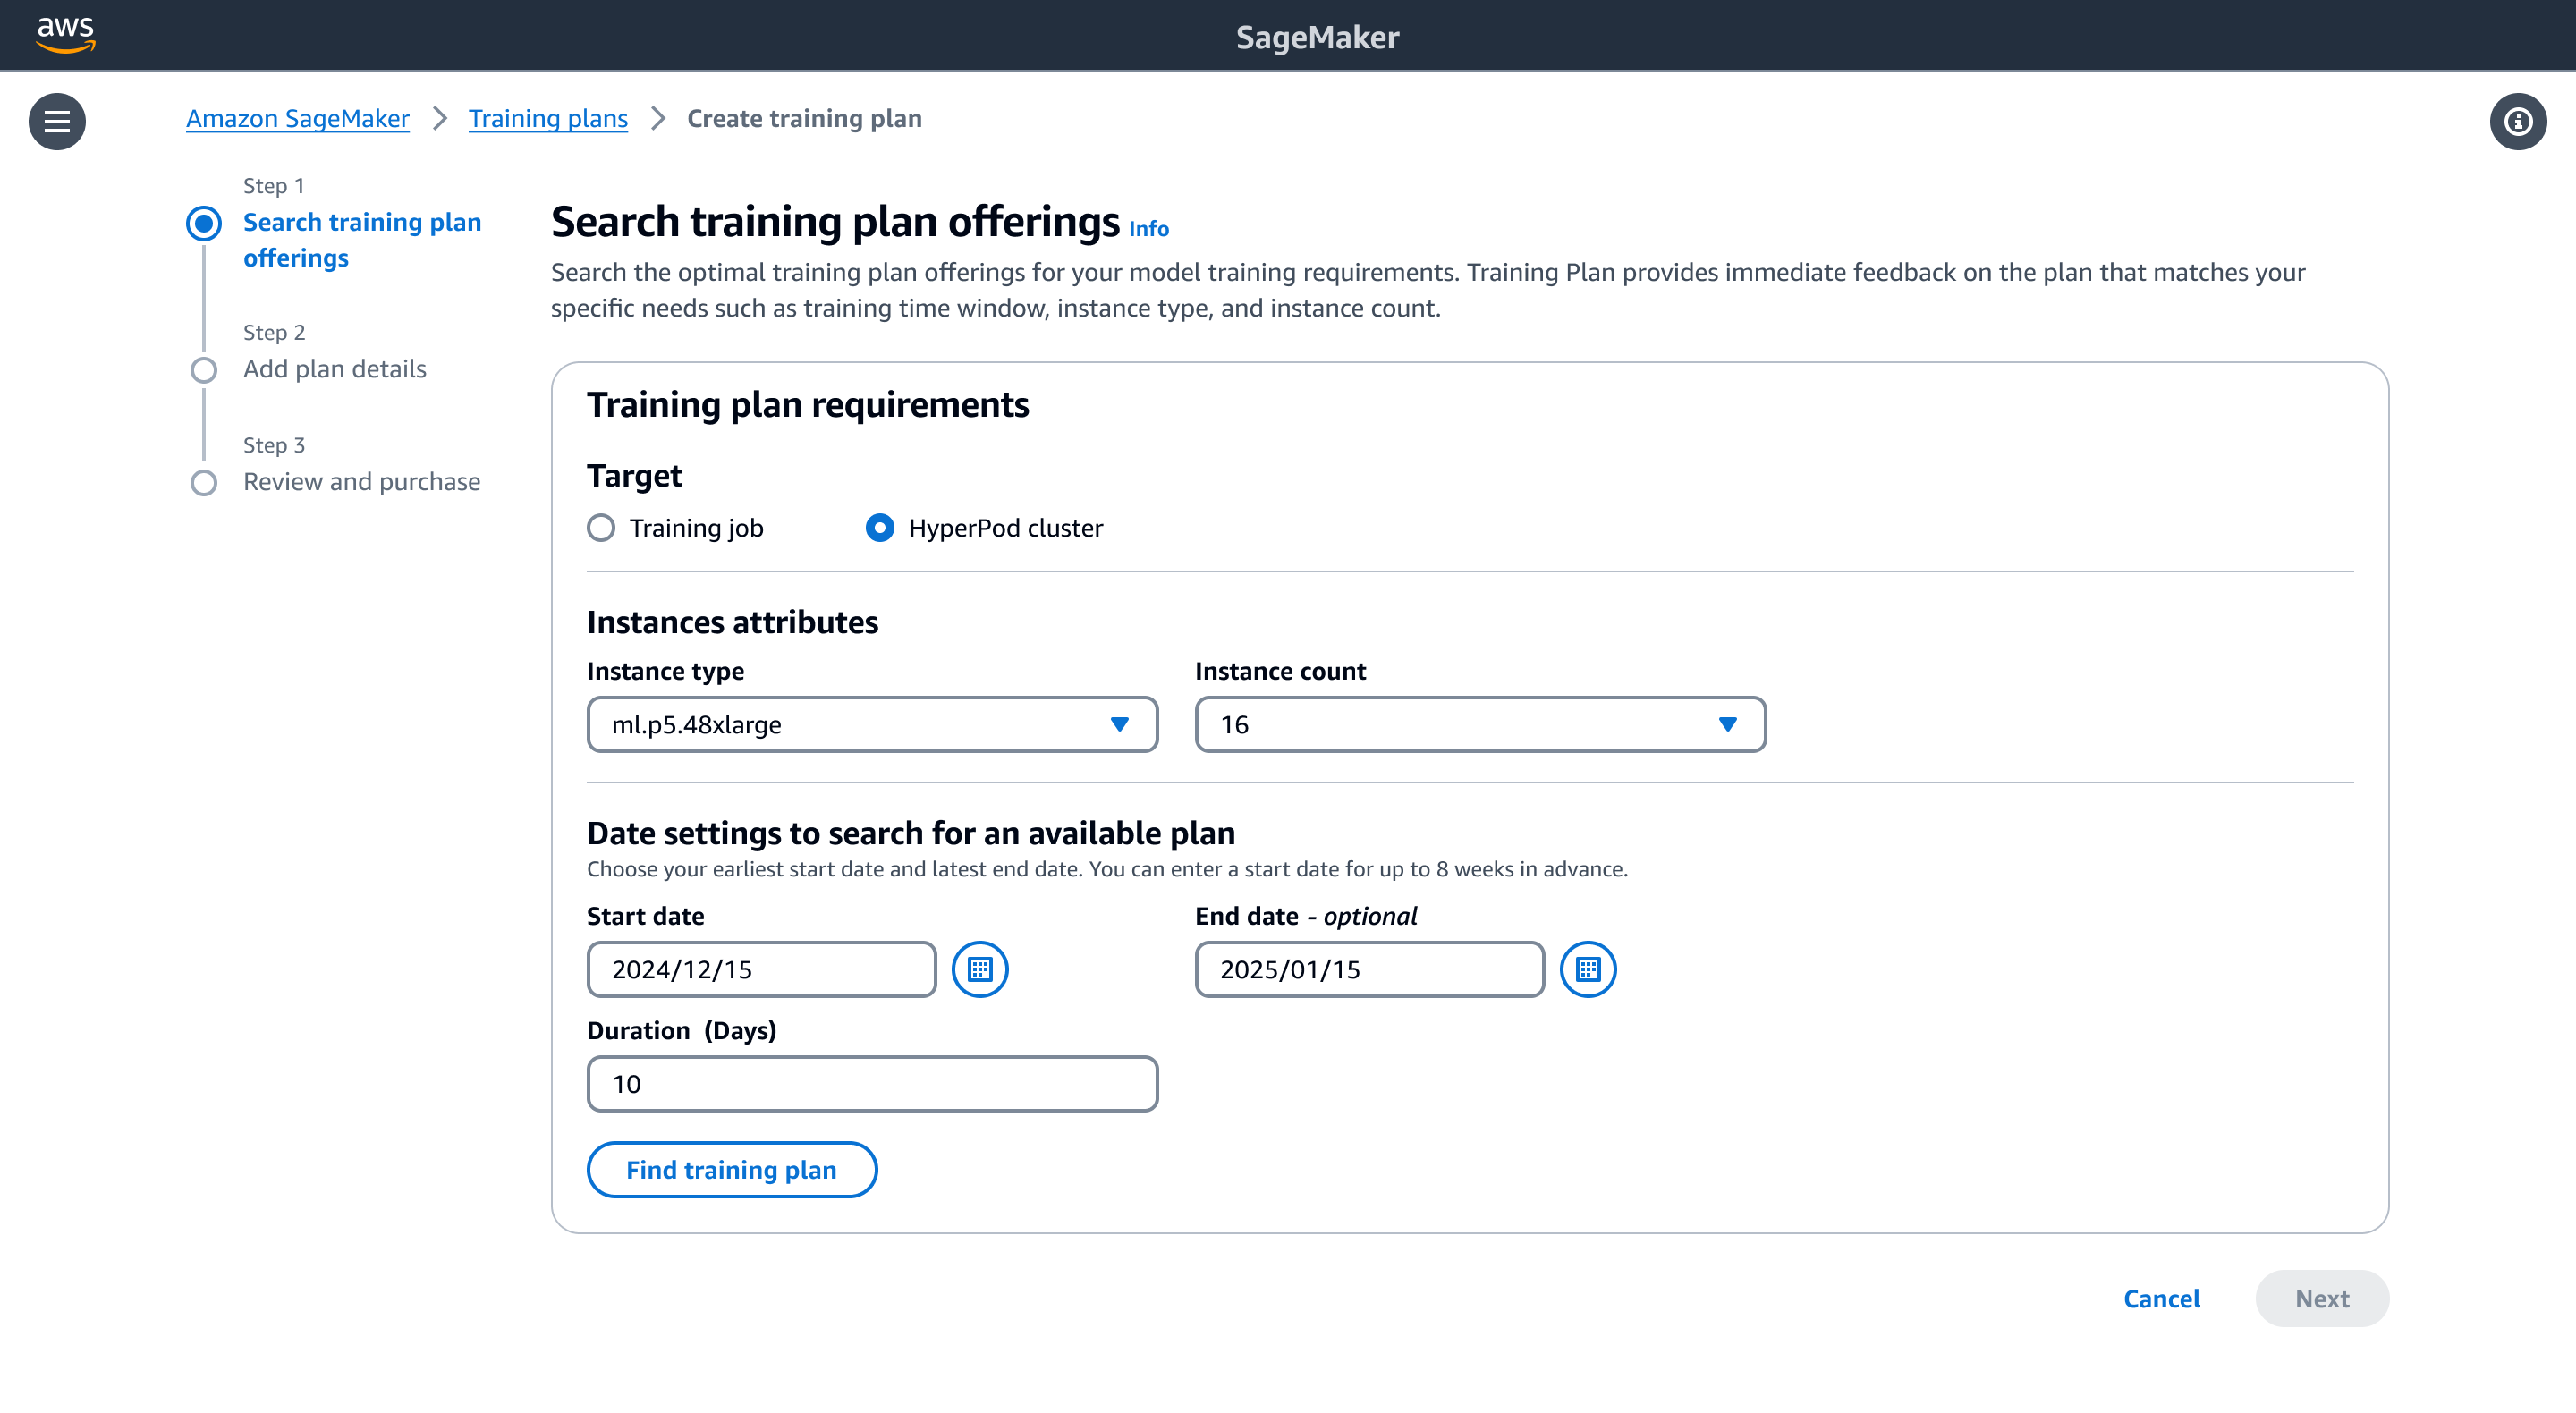
Figure 2: You can search for available training plan offerings via the SageMaker console! Choose your target, select your instance type and count, and specify duration.
SageMaker suggests a training plan that is split into two 5-day segments. This includes the total upfront price for the plan as well as the estimated data transfer cost based on the data location you provided.
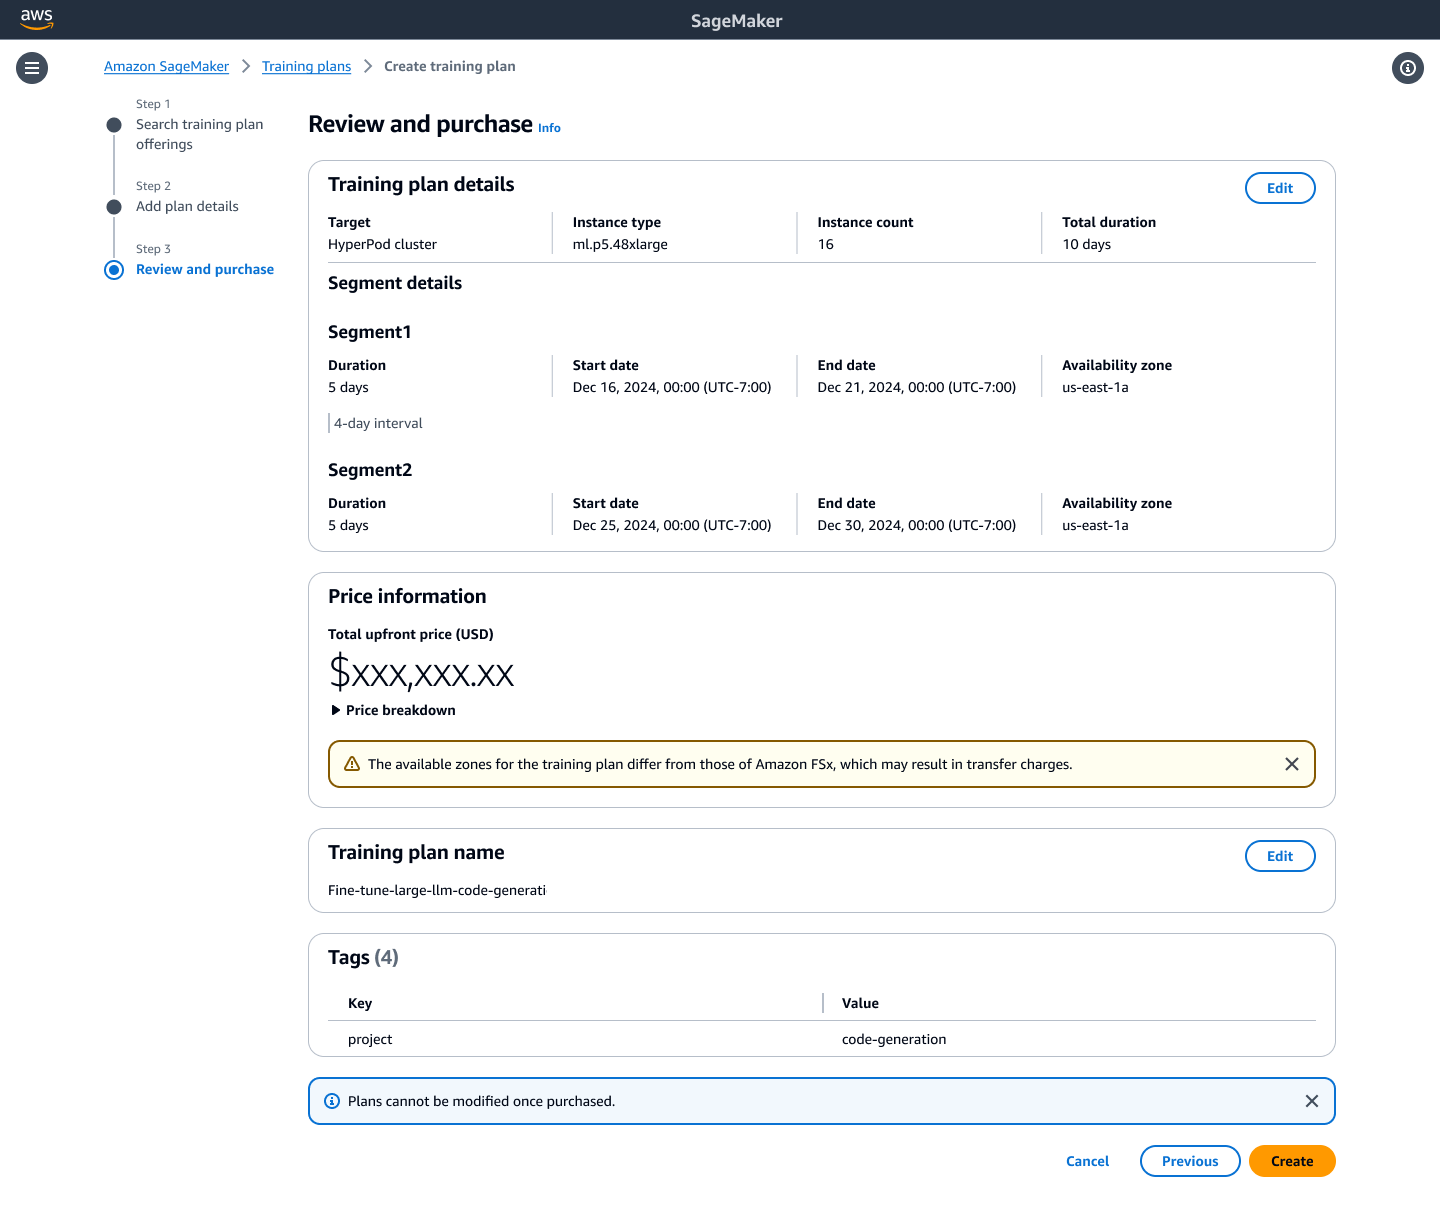
Figure 3: SageMaker suggests a training plan based on your inputs. In this example, SageMaker suggests a training plan split across two 5-day segments. You will also see the total upfront price.
- Review and purchase your plan.
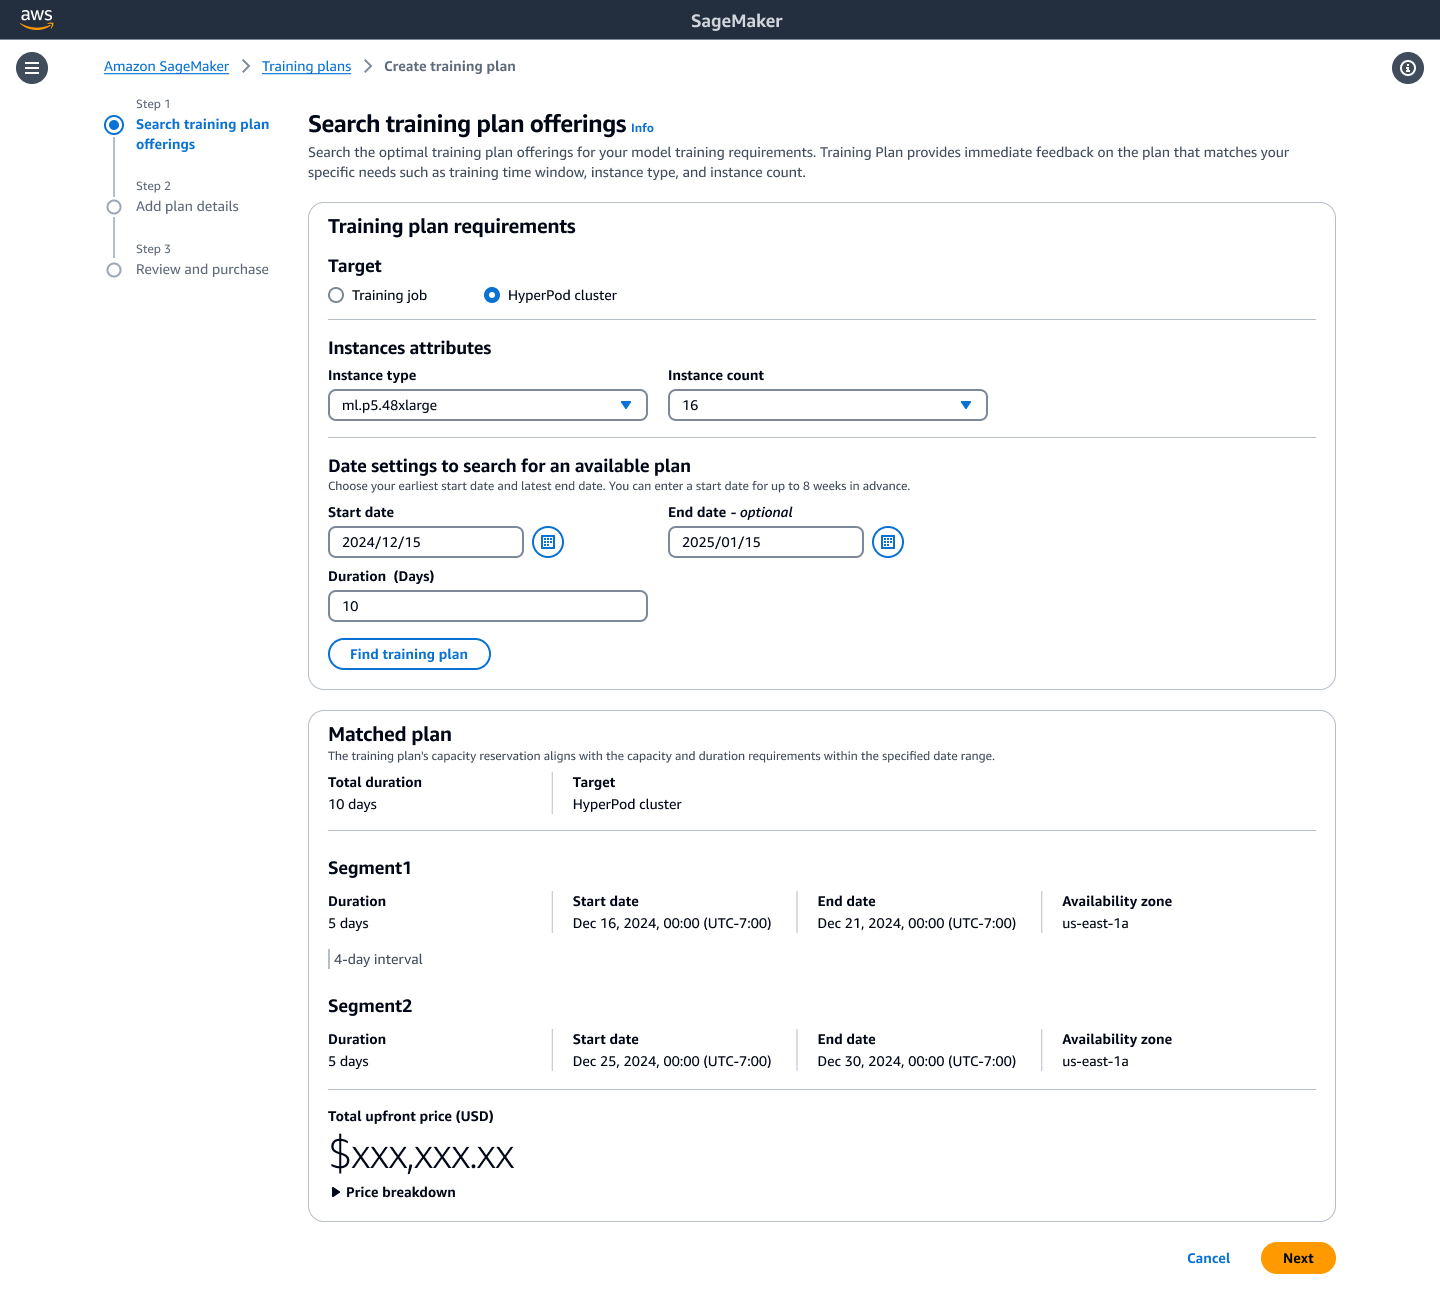
Figure 4: Once you’re happy with your selection, you can review and purchase your training plan!
After you create the training plan, you can see the list of training plans created. The plan initially enters a Pending state, awaiting payment. Once the payment is processed (unless the payment cycle has changed), the plan will transition to the Scheduled state. At this point, you can begin queuing jobs or creating clusters using the plan. On the plan’s start date, it becomes Active, and resources are allocated. Your training tasks can then start running (pending resource availability).
Make sure you pay for the training plan using the AWS Billing and Cost Management console for your plan to show up on your SageMaker console. You will receive an invoice to resolve before being able to proceed.
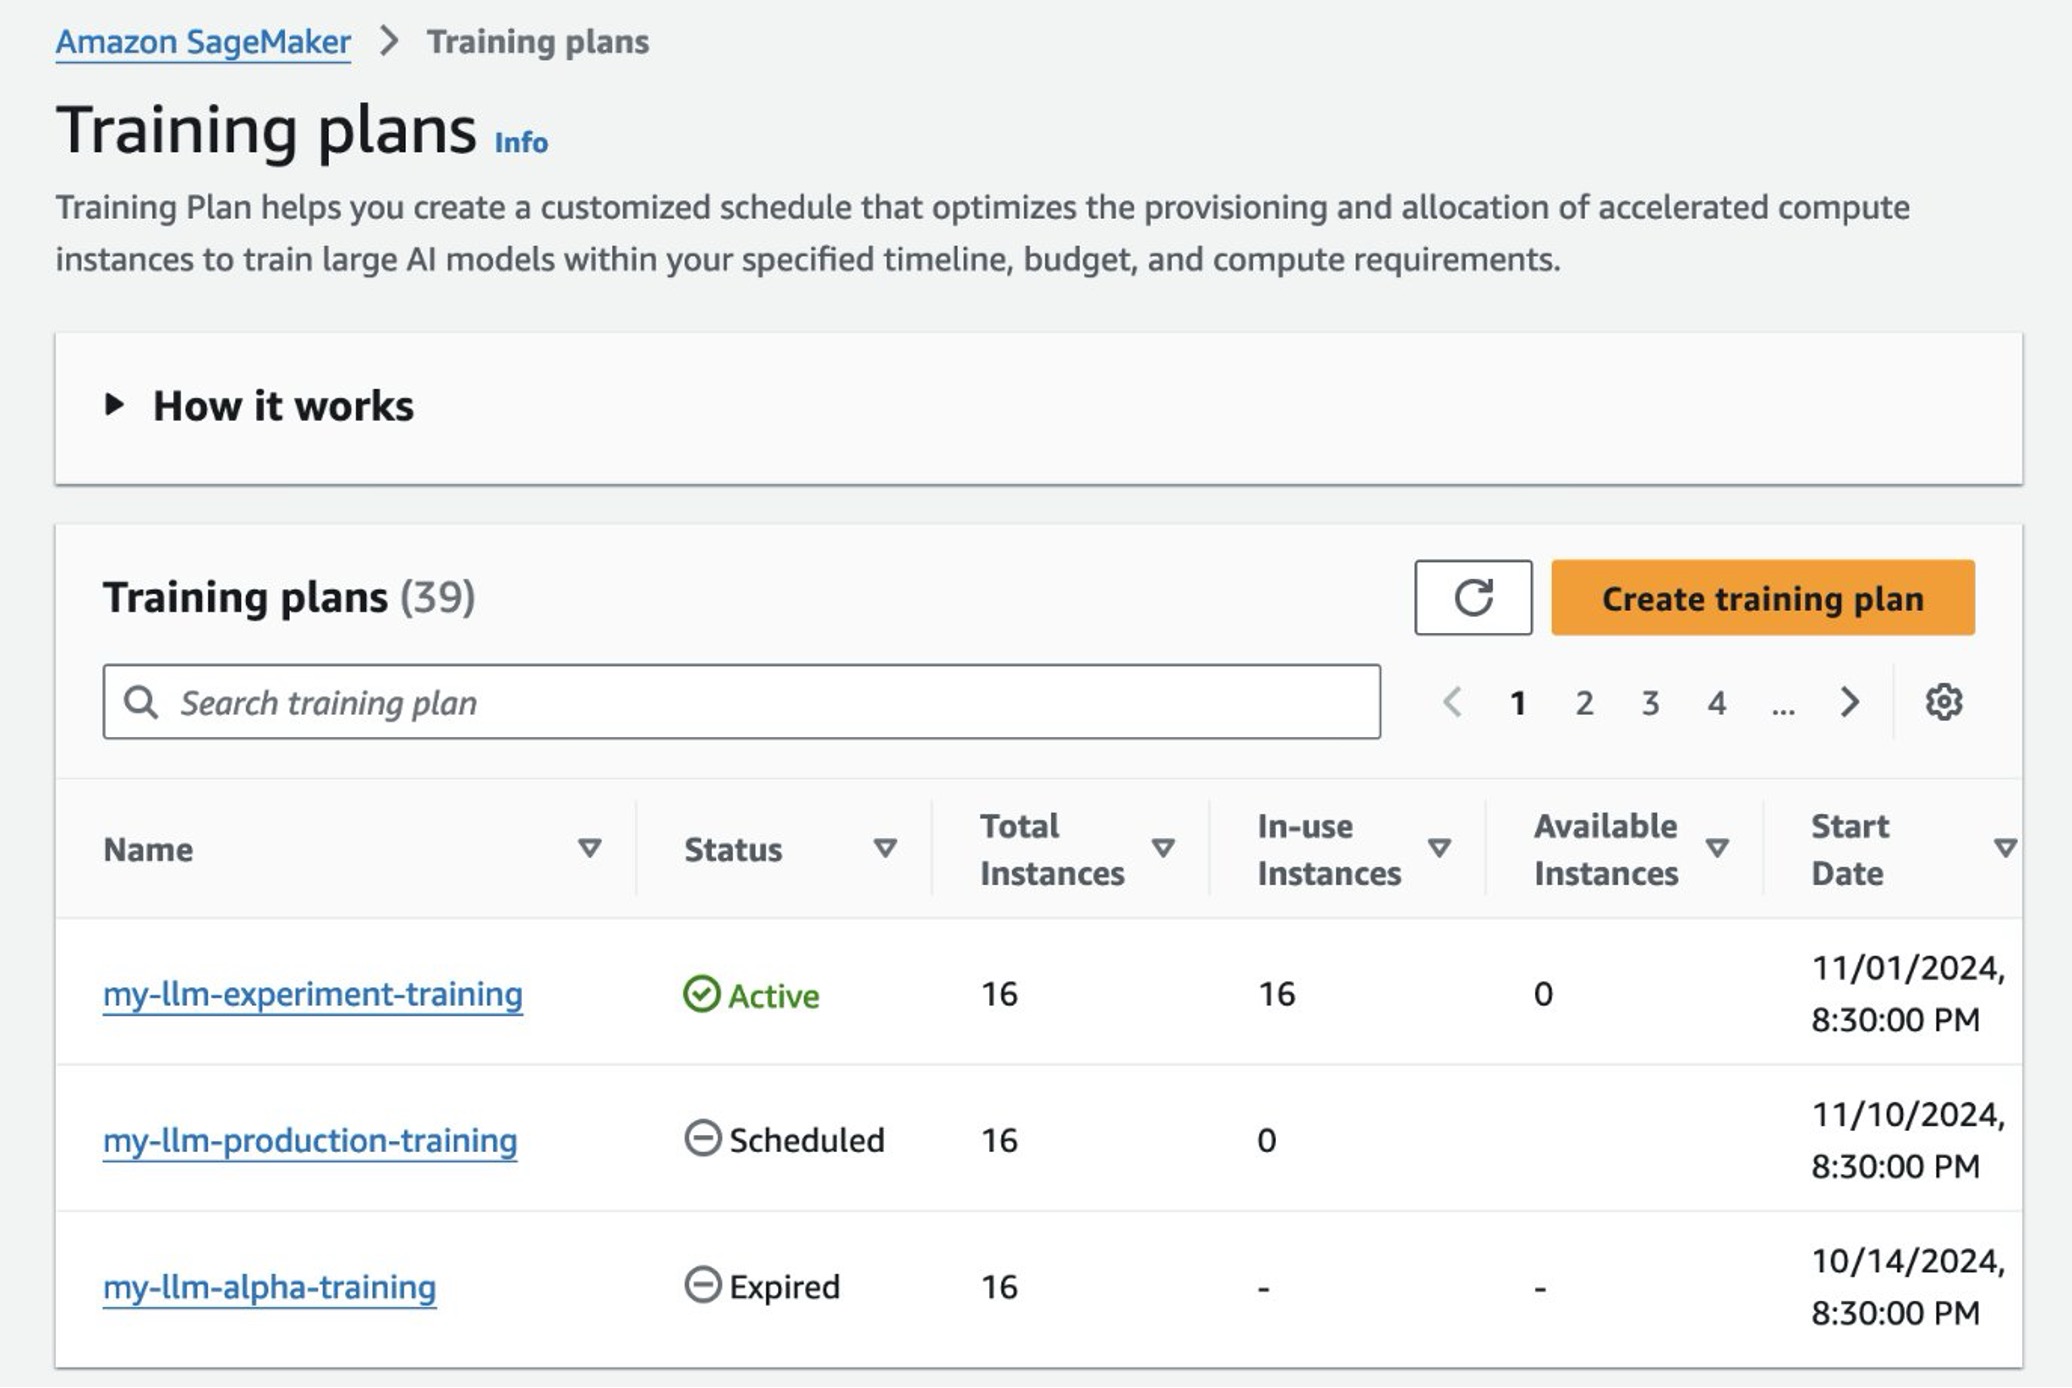
Figure 5: You can list out your training plans on the SageMaker console. You can start using your plan once it transitions to the Active state.
Create a SageMaker training plan using the AWS CLI
Complete the following steps to create a training plan using the AWS CLI:
- Start by calling the API, passing your capacity requirements as input parameters, to search for all matching training plan offerings.
The following example searches for training plan offerings suitable for two ml.p5.48xlarge instances for 96 hours in the us-west-2 region. In this example, we also have filters for what time frame we want to use the training plan, and we also filter for training plans that can be used for SageMaker HyperPod cluster workloads using the target-resources parameter:
Each TrainingPlanOffering returned in the response is identified by a unique TrainingPlanOfferingId. The first offering in the list represents the best match for your requirements. In this case, the SageMaker SearchTrainingPlanOfferings API returns a single available TrainingPlanOffering that matches the specified capacity requirements:
Make sure that your SageMaker HyperPod training job subnets are in the same Availability Zone as your training plan.
- After you choose the training plan that best suits your schedule and requirements, you can reserve it by calling the
CreateTrainingPlanAPI as follows:
You will see an output that looks like the following:
After you create the training plan, you will have to pay. Be on the lookout for an invoice. You can also find this on the AWS Billing and Cost Management console.
- You can list all the training plans that are created in your AWS account (and Region) by calling the
ListTrainingPlansAPI:
This will give you a summary of the training plans in your account. After you have your training plan (the newly created p5-training-plan), you can check its details using either the console or the DescribeTrainingPlan API as follows:
Use a training plan with SageMaker HyperPod
When your training plan status transitions to Scheduled, you can use it for new instance groups in either a new or existing SageMaker HyperPod cluster. You can use both the CreateCluster and UpdateCluster APIs to create a new SageMaker HyperPod cluster with your training plan, or update an existing cluster respectively. You can also choose to directly use the SageMaker console.
For a given SageMaker HyperPod cluster, training plans are attached at the instance group level, separately per each instance group. If desired, one SageMaker HyperPod cluster can have one or more training plans attached to multiple instance groups. You always have the option to omit a training plan and instead continue using On-Demand capacity as previously for other combinations of instance groups. However, you can’t mix training plan capacity with On-Demand capacity within the same instance group. You can also choose to have a partial cluster launch for every instance group. This means that even if all the requested capacity isn’t available, you can still spin up a cluster with capacity already available to you.
When a training plan is active, this is the time window when the TrainingPlanOfferings within it are scheduled to start and stop. Each time a TrainingPlanOffering starts, instance groups will automatically scale up to the specified count, and the instance group TrainingPlanStatus will reflect as Active. When a TrainingPlanOffering is scheduled to stop, your cluster’s instance groups will automatically scale down to zero, and the instance group TrainingPlanStatus will reflect as Expired.
Use a training plan with SageMaker HyperPod on the console
You can choose to either create a new cluster and create an instance group, or edit an existing cluster and edit an existing instance group. In the configuration, choose the same instance type that was chosen for a training plan and specify the desired instance count. The Instance capacity option will appear only when you choose an instance type that is supported for training plans. Choose the dropdown menu to scroll through valid training plans. The available training plan selections are listed by name and are filtered for only those that match the chosen instance type, that have at least the specified instance count, that were created with hyperpod-cluster as the target resource, and currently have a status of Scheduled or Active. Double-check these conditions if you don’t see an expected training plan name, and make sure that the expected training plan was created in the same account and in the same Region. The default selection is to use no training plan. Repeat the process for each instance group that should have a training plan.
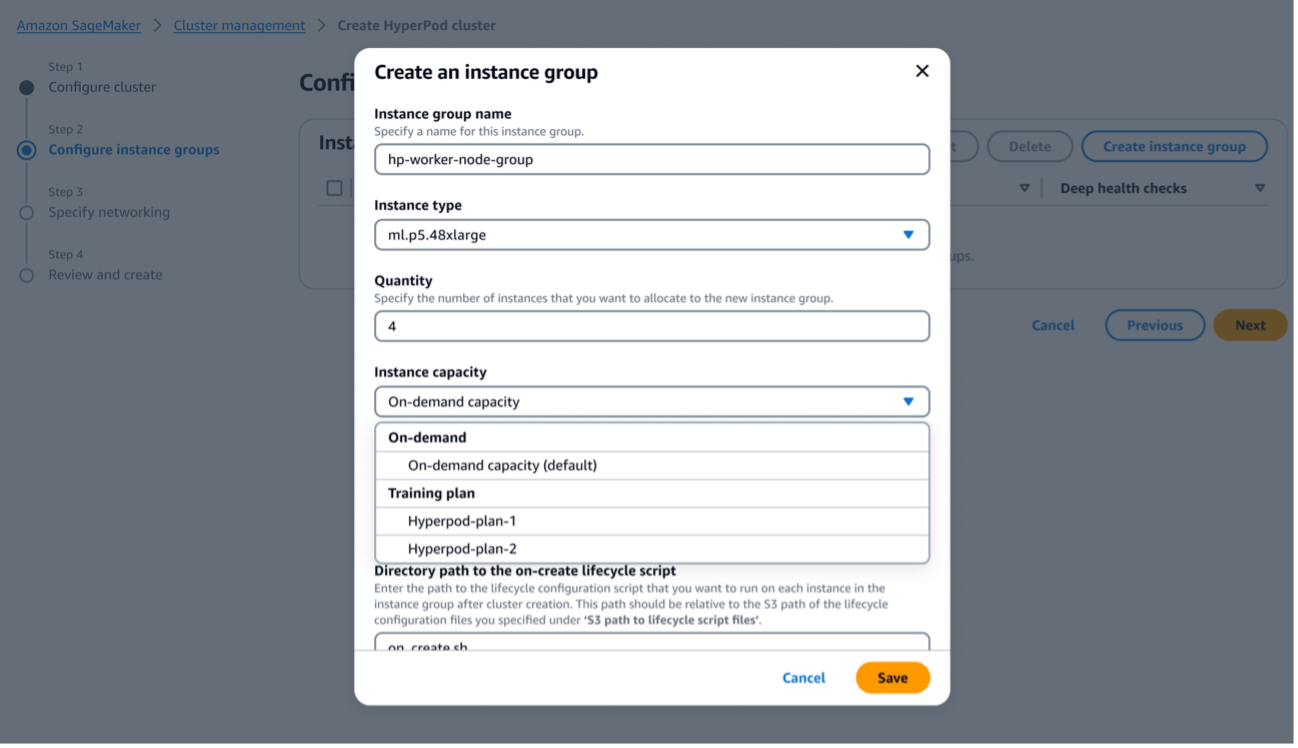
Figure 6: You can create an instance group for a SageMaker HyperPod cluster with the instances in your training plan. Make sure to choose the right training plan listed under “Instance capacity”
Use a training plan with SageMaker HyperPod with the AWS CLI
Complete the following steps to use your training plan with the AWS CLI:
- Create a SageMaker HyperPod cluster from scratch. For instructions, refer to the Amazon SageMaker HyperPod workshop or the Amazon EKS Support in Amazon SageMaker HyperPod workshop.
The following cluster configuration file defines a SageMaker HyperPod SLURM cluster named ml-cluster. The steps for using training plans will be the same, regardless of if you choose SLURM or Amazon Elastic Kubernetes Service (Amazon EKS) as the orchestrator. This cluster contains an instance group named controller-machine with 1 ml.m5.12xlarge instance as the head node of a SLURM cluster, and it will not use a training plan for the controller-machine instance group. We also define a worker instance group named worker-group-1 that specifies 2 ml.p5.48xlarge instances, which will be sourced from your training plan. Note the line "TrainingPlanArn"—this is where you specify your training plan by the full Amazon Resource Name (ARN). If you followed the steps in the prior sections, this should be the value of the environment variable TRAINING_PLAN_ARN. The following cluster configuration also skips some configuration parameters, such as VPCConfig and InstanceStorageConfig. Refer to the workshop or the following script for a complete SageMaker HyperPod cluster configuration file.
You can then create the cluster using the following code:
These next steps assume that you already have a SageMaker HyperPod cluster created. This section is relevant if you’d like to add an instance group that uses your training plan reserved instances to your existing cluster.
- To update an existing cluster, you can define another file called
update-cluster-config.jsonas follows. If you followed the instructions in the workshop to provision the cluster, you can use the providedcreate_config.shto get the values for yourenv_varsbefore sourcing them.
In this file, we define an additional worker group named worker-group-2 consisting of 2 ml.p5.48xlarge instances. Again, notice the line “TrainingPlanArn”—this is where you specify your training plan by the full ARN.
Make sure that you also update provisioning_parameters.json, and upload the updated file to your S3 bucket for SageMaker to use while provisioning the new worker group:
- Because this file is uploaded to Amazon Simple Storage Service (Amazon S3) for SageMaker to use while provisioning your cluster, you need to first copy that file over from Amazon S3:
aws s3 cp s3://${BUCKET}/src/provisioning_parameters.json provisioning_parameters.json
- Assuming your existing cluster has a controller machine group and a worker group with an ml.g5.48xlarge, you can add the lines in bold to your existing yaml file:
This step adds in the new worker group that you just created, which consists of your 2 ml.p5.48xlarge nodes from your training plan.
- Now you can re-upload the updated
provisioning-parameters.jsonfile to Amazon S3:
- Now, with both
cluster-config.json(nowupdate-cluster-config.json) andprovisioning-parameters.jsonupdated, you can add the training plan nodes to the cluster:
Use a training plan with a SageMaker training job
SageMaker training jobs offer two primary methods for execution: an AWS CLI command and the Python SDK. The AWS CLI approach provides direct control and is ideal for scripting, allowing you to create training jobs with a single command. The Python SDK offers a more programmatic interface, enabling seamless integration with existing Python workflows and using the high-level features in SageMaker. In this section, we look at how you can use a training plan with both options.
Run a training job on a training plan using the AWS CLI
The following example demonstrates how to create a SageMaker training job and associate it with a provided training plan using the CapacityScheduleConfig attribute in the create-training-job AWS CLI command:
After creating the training job, you can verify that it was properly assigned to the training plan by calling the DescribeTrainingJob API:
Run a training job on a training plan using the SageMaker Python SDK
The following example demonstrates how to create a SageMaker training job using the SageMaker Python SDK’s Training estimator. It also shows how to associate the job with a provided training plan by using the capacity_schedules attribute in the estimator object when using the SageMaker Python SDK.
For more information on the SageMaker estimator, see Use a SageMaker estimator to run a training job.
Make sure the SageMaker Python SDK version is updated to the latest version.
After creating the training job, you can verify that it was properly assigned to the training plan by calling the DescribeTrainingJob API:
Clean up
To clean up your resources to avoid incurring more charges, complete the following steps:
- Delete the SageMaker HyperPod cluster and associated resources such as storage, VPC, and IAM roles.
- Delete any S3 buckets created.
- Make sure that the training plan created is used and completes the fulfillment lifecycle.
Conclusion
SageMaker training plans represent a significant leap forward in addressing the compute capacity challenges faced by organizations working with LLMs. By providing quick access to high-performance GPU resources, it streamlines the process of model training and fine-tuning. This solution not only reduces wait times for cluster provisioning, but also offers flexibility in choosing between SageMaker training jobs and SageMaker HyperPod, catering to diverse organizational needs. Ultimately, SageMaker training plans empower businesses to overcome resource constraints and accelerate their AI initiatives, leading to more efficient and effective usage of advanced language models across various industries.
To get started with a SageMaker training plan and explore its capabilities for your specific LLM training needs, refer to Reserve capacity with training plans and try out the step-by-step implementation guide provided in this post.
Special thanks to Fei Ge, Oscar Hsu, Takuma Yoshitani, and Yiting Li for their support in the launch of this post.
About the Authors
 Aman Shanbhag is an Associate Specialist Solutions Architect on the ML Frameworks team at Amazon Web Services, where he helps customers and partners with deploying ML Training and Inference solutions at scale. Before joining AWS, Aman graduated from Rice University with degrees in Computer Science, Mathematics, and Entrepreneurship.
 Kanwaljit Khurmi is an AI/ML Principal Solutions Architect at Amazon Web Services. He works with AWS product teams, engineering, and customers to provide guidance and technical assistance for improving the value of their hybrid ML solutions when using AWS. Kanwaljit specializes in helping customers with containerized and machine learning applications.
 Sean Smith is a Sr Specialist Solution Architect at AWS for HPC and generative AI. Prior to that, Sean worked as a Software Engineer on AWS Batch and CfnCluster, becoming the first engineer on the team that created AWS ParallelCluster.
 Ty Bergstrom is a Software Engineer at Amazon Web Services. He works on the Hyperpod Clusters platform for Amazon SageMaker.

Google DeepMind at NeurIPS 2024
Advancing adaptive AI agents, empowering 3D scene creation, and innovating LLM training for a smarter, safer futureRead More

Google DeepMind at NeurIPS 2024
Advancing adaptive AI agents, empowering 3D scene creation, and innovating LLM training for a smarter, safer futureRead More

Google DeepMind at NeurIPS 2024
Advancing adaptive AI agents, empowering 3D scene creation, and innovating LLM training for a smarter, safer futureRead More

Google DeepMind at NeurIPS 2024
Advancing adaptive AI agents, empowering 3D scene creation, and innovating LLM training for a smarter, safer futureRead More

Google DeepMind at NeurIPS 2024
Advancing adaptive AI agents, empowering 3D scene creation, and innovating LLM training for a smarter, safer futureRead More