Real value, real time: Production AI with Amazon SageMaker and Tecton

Real value, real time: Production AI with Amazon SageMaker and Tecton

This post is cowritten with Isaac Cameron and Alex Gnibus from Tecton.

Businesses are under pressure to show return on investment (ROI) from AI use cases, whether predictive machine learning (ML) or generative AI. Only 54% of ML prototypes make it to production, and only 5% of generative AI use cases make it to production.

ROI isn’t just about getting to production—it’s about model accuracy and performance. You need a scalable, reliable system with high accuracy and low latency for the real-time use cases that directly impact the bottom line every millisecond.

Fraud detection, for example, requires extremely low latency because decisions need to be made in the time it takes to swipe a credit card. With fraud on the rise, more organizations are pushing to implement successful fraud detection systems. The US nationwide fraud losses topped $10 billion in 2023, a 14% increase from 2022. Global ecommerce fraud is predicted to exceed $343 billion by 2027.

But building and managing an accurate, reliable AI application that can make a dent in that $343 billion problem is overwhelmingly complex.

ML teams often start by manually stitching together different infrastructure components. It seems straightforward at first for batch data, but the engineering gets even more complicated when you need to go from batch data to incorporating real-time and streaming data sources, and from batch inference to real-time serving.

Engineers need to build and orchestrate the data pipelines, juggle the different processing needs for each data source, manage the compute infrastructure, build reliable serving infrastructure for inference, and more. Without the capabilities of Tecton, the architecture might look like the following diagram.

Figure 1: Diagram depicting the different aspects of a typical AI Systems Architecture

Accelerate your AI development and deployment with Amazon SageMaker and Tecton

All that manual complexity gets simplified with Tecton and Amazon SageMaker. Together, Tecton and SageMaker abstract away the engineering needed for production, real-time AI applications. This enables faster time to value, and engineering teams can focus on building new features and use cases instead of struggling to manage the existing infrastructure.

Using SageMaker, you can build, train and deploy ML models. Meanwhile, Tecton makes it straightforward to compute, manage, and retrieve features to power models in SageMaker, both for offline training and online serving. This streamlines the end-to-end feature lifecycle for production-scale use cases, resulting in a simpler architecture, as shown in the following diagram.

Figure 2: Depicting high level architecture of Tecton & SageMaker showing end-to-end feature lifecycle

How does it work? With Tecton’s simple-to-use declarative framework, you define the transformations for your features in a few lines of code, and Tecton builds the pipelines needed to compute, manage, and serve the features. Tecton takes care of the full deployment into production and online serving.

It doesn’t matter if it’s batch, streaming, or real-time data or whether it’s offline or online serving. It’s one common framework for every data processing need in end-to-end feature production.

This framework creates a central hub for feature management and governance with enterprise feature store capabilities, making it straightforward to observe the data lineage for each feature pipeline, monitor data quality, and reuse features across multiple models and teams.

The following diagram shows the Tecton declarative framework.

Figure 3: Depicting Tecton’s Declarative framework to do feature engineering and serving

The next section examines a fraud detection example to show how Tecton and SageMaker accelerate both training and real-time serving for a production AI system.

Streamline feature development and model training

First, you need to develop the features and train the model. Tecton’s declarative framework makes it simple to define features and generate accurate training data for SageMaker models:

  • Experiment and iterate on features in SageMaker notebooks – You can use Tecton’s software development kit (SDK) to interact with Tecton directly through SageMaker notebook instances, enabling flexible experimentation and iteration without leaving the SageMaker environment.
  • Orchestrate with Tecton-managed EMR clusters – After features are deployed, Tecton automatically creates the scheduling, provisioning, and orchestration needed for pipelines that can run on Amazon EMR compute engines. You can view and create EMR clusters directly through the SageMaker notebook.
  • Generate accurate training data for SageMaker models – For model training, data scientists can use Tecton’s SDK within their SageMaker notebooks to retrieve historical features. The same code is used to backfill the offline store and continually update the online store, reducing training/serving skew.

Next, the features need to be served online for the final model to consume in production.

Serve features with robust, real-time online inference

Tecton’s declarative framework extends to online serving. Tecton’s real-time infrastructure is designed to help meet the demands of extensive applications and can reliably run 100,000 requests per second.

For critical ML apps, it’s hard to meet demanding service level agreements (SLAs) in a scalable and cost-efficient manner. Real-time use cases such as fraud detection typically have a p99 latency budget between 100 to 200 milliseconds. That means 99% of requests need to be faster than 200ms for the end-to-end process from feature retrieval to model scoring and post-processing.

Feature serving only gets a fraction of that end-to-end latency budget, which means you need your solution to be especially quick. Tecton accommodates these latency requirements by integrating with both disk-based and in-memory data stores, supporting in-memory caching, and serving features for inference through a low-latency REST API, which integrates with SageMaker endpoints.

Now we can complete our fraud detection use case. In a fraud detection system, when someone makes a transaction (such as buying something online), your app might follow these steps:

  1. It checks with other services to get more information (for example, “Is this merchant known to be risky?”) from third-party APIs
  2. It pulls important historical data about the user and their behavior (for example, “How often does this person usually spend this much?” or “Have they made purchases from this location before?”), requesting the ML features from Tecton
  3. It will likely use streaming features to compare the current transaction with recent spending activity over the last few hours or minutes
  4. It sends all this information to the model hosted on Amazon SageMaker that predicts whether the transaction looks fraudulent.

This process is shown in the following diagram.

Figure 4: Steps performed in a Fraud Detection System when someone makes a transaction

Expand to generative AI use cases with your existing AWS and Tecton architecture

After you’ve developed ML features using the Tecton and AWS architecture, you can extend your ML work to generative AI use cases.

For instance, in the fraud detection example, you might want to add an LLM-powered customer support chat that helps a user answer questions about their account. To generate a useful response, the chat would need to reference different data sources, including the unstructured documents in your knowledge base (such as policy documentation about what causes an account suspension) and structured data such as transaction history and real-time account activity.

If you’re using a Retrieval Augmented Generation (RAG) system to provide context to your LLM, you can use your existing ML feature pipelines as context. With Tecton, you can either enrich your prompts with contextual data or provide features as tools to your LLM—all using the same declarative framework.

To choose and customize the model that will best suit your use case, Amazon Bedrock provides a range of pre-trained foundation models (FMs) for inference, or you can use SageMaker for more extensive model building and training.

The following graphic shows how Amazon Bedrock is incorporated to support generative AI capabilities in the fraud detection system architecture.

Figure 5: Incorporating Bedrock to support Gen-AI capabilities to the fraud detection system architecture

Build valuable AI apps faster with AWS and Tecton

In this post, we walked through how SageMaker and Tecton enable AI teams to train and deploy a high-performing, real-time AI application—without the complex data engineering work. Tecton combines production ML capabilities with the convenience of doing everything from within SageMaker, whether that’s at the development stage for training models or doing real-time inference in production.

To get started, refer to Getting Started with Amazon SageMaker & Tecton’s Feature Platform, a more detailed guide on how to use Tecton with Amazon SageMaker. And if you can’t wait to try it yourself, check out the Tecton interactive demo and observe a fraud detection use case in action.

You can also find Tecton at AWS re:Invent. Reach out to set up a meeting with experts onsite about your AI engineering needs.


About the Authors

Isaac Camerson - Tecton Solutions ArchitectIsaac Cameron is Lead Solutions Architect at Tecton, guiding customers in designing and deploying real-time machine learning applications. Having previously built a custom ML platform from scratch at a major U.S. airline, he brings firsthand experience of the challenges and complexities involved—making him a strong advocate for leveraging modern, managed ML/AI infrastructure.

Alex Gnibus - Product MarketingAlex Gnibus is a technical evangelist at Tecton, making technical concepts accessible and actionable for engineering teams. Through her work educating practitioners, Alex has developed deep expertise in identifying and addressing the practical challenges teams face when productionizing AI systems.

Arnab Sinha SAArnab Sinha is a Senior Solutions Architect at AWS, specializing in designing scalable solutions that drive business outcomes in AI, machine learning, big data, digital transformation, and application modernization. With expertise across industries like energy, healthcare, retail and manufacturing, Arnab holds all AWS Certifications, including the ML Specialty, and has led technology and engineering teams before joining AWS.

Read More

Use Amazon Bedrock tooling with Amazon SageMaker JumpStart models

Use Amazon Bedrock tooling with Amazon SageMaker JumpStart models

Today, we’re excited to announce a new capability that allows you to deploy over 100 open-weight and proprietary models from Amazon SageMaker JumpStart and register them with Amazon Bedrock, allowing you to seamlessly access them through the powerful Amazon Bedrock APIs. You can now use Amazon Bedrock features such as Amazon Bedrock Knowledge Bases and Amazon Bedrock Guardrails with models deployed through SageMaker JumpStart.

SageMaker JumpStart helps you get started with machine learning (ML) by providing fully customizable solutions and one-click deployment and fine-tuning of more than 400 popular open-weight and proprietary generative AI models. Amazon Bedrock is a fully managed service that provides a single API to access and use various high-performing foundation models (FMs). It also offers a broad set of capabilities to build generative AI applications. The Amazon Bedrock Converse API is a runtime API that provides a consistent interface that works with different models. It allows you to use advanced features in Amazon Bedrock such as the playground, guardrails, and tool use (function calling).

SageMaker JumpStart has long been the go-to service for developers and data scientists seeking to deploy state-of-the-art generative AI models. Through this integration, you can now combine the flexibility of hosting models on SageMaker JumpStart with the fully managed experience of Amazon Bedrock, including advanced security controls, scalable infrastructure, and comprehensive monitoring capabilities.

In this post, we show you how to deploy FMs through SageMaker JumpStart, register them with Amazon Bedrock, and invoke them using Amazon Bedrock APIs.

Solution overview

The Converse API standardizes interaction with Amazon Bedrock FMs, enabling developers to write code one time and use it across various models without needing to adjust for model-specific differences. It supports multi-turn conversations through conversational history as part of the API request, and developers can perform tasks that require access to external APIs through the usage of tools (function calling). Additionally, the Converse API allows you to block inappropriate inputs or generated content by including a guardrail in your API calls. To review the complete list of supported models and model features, refer to Supported models and model features.

This new feature extends the capabilities of the Converse API into a single interface that developers can use to call FMs deployed in SageMaker JumpStart. This allows developers to use the same API to invoke models from Amazon Bedrock and SageMaker JumpStart, streamlining the process to integrate models into their generative AI applications. Now you can build on top of an even larger library of world-class open source and proprietary models through a single API. To view the full list of Bedrock Ready models available from SageMaker JumpStart, refer to the Bedrock Marketplace documentation. You can also use Amazon Bedrock Marketplace to discover and deploy these models to SageMaker endpoints.

In this post, we walk through the following steps:

  1. Deploy the Gemma 2 9B Instruct model using SageMaker JumpStart.
  2. Register the model with Amazon Bedrock.
  3. Test the model with sample prompts using the Amazon Bedrock playground.
  4. Use the Amazon Bedrock RetrieveAndGenerate API to query the Amazon Bedrock knowledge base.
  5. Set up Amazon Bedrock Guardrails to help block harmful content and personally identifiable information (PII) data.
  6. Invoke models with Converse APIs to show an end-to-end Retrieval Augmented Generation (RAG) pipeline.

Prerequisites

You can access and deploy pretrained models from SageMaker JumpStart in the Amazon SageMaker Studio UI. To access SageMaker Studio on the AWS Management Console, you need to set up an Amazon SageMaker domain. SageMaker uses domains to organize user profiles, applications, and their associated resources. To create a domain and set up a user profile, refer to Guide to getting set up with Amazon SageMaker.

You also need an AWS Identity and Access Management (IAM) role with appropriate permissions. To get started with this example, you can use the AmazonSageMakerFullAccess, AmazonBedrockFullAccess, AmazonOpenSearchAccess managed policies to provide the required permissions to SageMaker JumpStart and Amazon Bedrock. For a more scoped down set of permissions, refer to the following:

{
  "Version": "2012-10-17",
  "Statement": [
    {
      "Sid": "BedrockEndpointManagementMutatingOperations",
      "Action": [
        "sagemaker:AddTags",
        "sagemaker:CreateEndpoint",
        "sagemaker:CreateEndpointConfig",
        "sagemaker:CreateModel",
        "sagemaker:DeleteEndpoint",
        "sagemaker:UpdateEndpoint",
        "sagemaker:DeleteTags"
      ],
      "Effect": "Allow",
      "Resource": "arn:aws:sagemaker:*",
      "Condition": {
        "StringEquals": {
            "aws:ViaAWSService": "bedrock.amazonaws.com"
        }
       }
    },
    {
      "Sid": "BedrockEndpointManagementNonMutatingOperations",
      "Action": [
        "sagemaker:DescribeEndpoint",
        "sagemaker:DescribeEndpointConfig",
        "sagemaker:DescribeModel",
        "sagemaker:ListEndpoints",
        "sagemaker:ListTags"
      ],
      "Effect": "Allow",
      "Resource": "arn:aws:sagemaker:*",
      "Condition": {
        "StringEquals": {
            "aws:ViaAWSService": "bedrock.amazonaws.com"
        }
       }
    },
    {
      "Sid": "BedrockEndpointInvokingOperations",
      "Action": [
        "sagemaker:InvokeEndpoint",
        "sagemaker:InvokeEndpointWithResponseStream"      
      ],
      "Effect": "Allow",
      "Resource": "arn:aws:sagemaker:*",
      "Condition": {
        "StringEquals": {
            "aws:ViaAWSService": "bedrock.amazonaws.com"
         }
       }
    },
    {
      "Sid": "AllowDiscoveringPublicModelDetails",
      "Action": [
        "sagemaker:DescribeHubContent"
      ],
      "Effect": "Allow",
      "Resource": "arn:aws:sagemaker:*:aws:hub-content/SageMakerPublicHub/Model/*"
    },
    {
      "Sid": "AllowListingPublicModels",
      "Action": [
        "sagemaker:ListHubContents"
      ],
      "Effect": "Allow",
      "Resource": "arn:aws:sagemaker:*:aws:hub/SageMakerPublicHub"
    },
    {
      "Sid": "RetrieveSubscribedMarketplaceLicenses",
      "Action": [
        "license-manager:ListReceivedLicenses"
      ],
      "Effect": "Allow",
      "Resource": "arn:aws:license-manager:*"
    },
    {
      "Sid" : "PassRoleToSagemaker",
      "Effect" : "Allow",
      "Action" : [
        "iam:PassRole"
      ],
      "Resource" : "arn:aws:iam::*:role/*AmazonSageMaker*",
      "Condition" : {
        "StringEquals" : {
        "iam:PassedToService" : [
            "sagemaker.amazonaws.com"
          ]
        }
      }
    },
    {
      "Sid" : "BedrockAll",
      "Effect" : "Allow",
      "Action" : [ "bedrock:*" ],
      "Resource" : "*" 
    },
    {
      "Sid" : "AmazonOpenSearchAccess",
      "Effect" : "Allow",
      "Action" : [ "aoss:*" ],
      "Resource" : "*",
      "Condition": {
                "StringEquals": {
                    "aws:ResourceAccount": "${aws:PrincipalAccount}"
                }
      }
    },
  ]
}

After applying the relevant permissions, setting up a SageMaker domain, and creating user profiles, you are ready to deploy your SageMaker JumpStart model and register it with Amazon Bedrock.

Deploy a model with SageMaker JumpStart and register it with Amazon Bedrock

This section provides a walkthrough of deploying a model using SageMaker JumpStart and registering it with Amazon Bedrock. In this walkthrough, you will deploy and register the Gemma 2 9B Instruct model offered through Hugging Face in SageMaker JumpStart. Complete the following steps:

  1. On the SageMaker console, choose Studio in the navigation pane.
  2. Choose the relevant user profile on the dropdown menu and choose Open Studio.

  1. In SageMaker Studio, choose JumpStart in the navigation pane.

Here, you will see a list of the available SageMaker JumpStart models. Models that can be registered to Amazon Bedrock after they’ve been deployed through SageMaker JumpStart have a Bedrock ready tag.

  1. The Gemma 2 9B Instruct model for this example is provided by Hugging Face, so choose the Hugging Face model card.

  1. To filter the list of models to view which models are supported by Amazon Bedrock, select Bedrock Ready under Action.
  2. Search for Gemma 2 9B Instruct and choose the model card for Gemma 2 9B Instruct.

You can review the model card for Gemma 2 9B Instruct to learn more about the model.

  1. To deploy the model, choose Deploy.
  2. Review the End User License Agreement for Gemma 2 9B Instruct and select I accept the End User License Agreement (EULA) and read the terms and conditions.
  3. Leave the endpoint settings with their default values and choose Deploy.

The endpoint deployment process will take a few minutes.

  1. Under Deployments in the navigation pane, choose Endpoints to view your available endpoints.

After a few minutes, the model will be deployed to the endpoint and its status will change to In service, indicating that the endpoint is ready to serve traffic. You can use the Refresh icon at the bottom of the endpoint screen to get the latest information.

  1. When your endpoint is in service, choose it to go to the endpoint details page.

  1. Choose Use with Bedrock to start the registration process.

You will be redirected to the Amazon Bedrock console.

  1. On the Register endpoint page, the SageMaker endpoint Amazon Resource Name (ARN) and model ARN have already been prepopulated. Review these values and choose Register.

Your SageMaker endpoint will be registered with Amazon Bedrock in a few minutes.

After your SageMaker endpoint is registered with Amazon Bedrock, you can invoke it using the Converse API. Then you can test your endpoint in the Amazon Bedrock playground.

  1. In the navigation pane on the Amazon Bedrock console, choose Marketplace deployments under Foundation models.
  2. From the list of managed deployments, select your registered model, then choose Open in playground.

You will now be in the Amazon Bedrock playground for Chat/text. The Chat/text playground allows to you test your model with a single prompt, or provides chat capability for conversational use cases. Because this example will be an interactive chat session, leave the Mode as the default Chat. The chat capability in the playground should be set to test your Gemma 2 9B Instruct model.

Now you can test your SageMaker endpoint through Amazon Bedrock! Use the following prompt to test summarizing a meeting transcript, and review the results:

Meeting transcript:
Miguel: Hi Brant, I want to discuss the workstream for our new product launch
Brant: Sure Miguel, is there anything in particular you want to discuss?
Miguel: Yes, I want to talk about how users enter into the product.
Brant: Ok, in that case let me add in Namita.
Namita: Hey everyone
Brant: Hi Namita, Miguel wants to discuss how users enter into the product.
Miguel: its too complicated and we should remove friction.  for example, why do I need to fill out additional forms?  I also find it difficult to find where to access the product when I first land on the landing page.
Brant: I would also add that I think there are too many steps.
Namita: Ok, I can work on the landing page to make the product more discoverable but brant can you work on the additonal forms?
Brant: Yes but I would need to work with James from another team as he needs to unblock the sign up workflow.  Miguel can you document any other concerns so that I can discuss with James only once?
Miguel: Sure.

From the meeting transcript above, Create a list of action items for each person.
  1. Enter the prompt into the playground, then choose Run.

You can view the response in the chat generated by your deployed SageMaker JumpStart model through Amazon Bedrock:

Here's a breakdown of action items from the meeting transcript:

**Miguel:**

* **Document:** List out any additional concerns regarding user entry into the product. Share these with Brant for his discussion with James.

**Brant:**

* **Collaborate with James:**  Work with James from another team to simplify the additional forms involved in the user sign-up workflow.
* **Review Documentation:** Review Miguel's documented concerns about user entry to prepare for the discussion with James.

**Namita:**

* **Landing Page Redesign:**  Improve the landing page to make the product more discoverable for new users.

Let me know if you'd like me to elaborate on any of these action items!

You can also test the model with your own prompts and use cases.

Use Amazon Bedrock APIs with the deployed model

This section demonstrates using the AWS SDK for Python (Boto3) and Converse APIs to invoke the Gemma 2 9B Instruct model you deployed earlier through SageMaker and registered with Amazon Bedrock. The full source code associated with this post is available in the accompanying GitHub repo. For additional Converse API examples, refer to Converse API examples.

In this code sample, we also implement a RAG architecture in conjunction with the deployed model. RAG is the process of optimizing the output of a large language model (LLM) so it references an authoritative knowledge base outside of its training data sources before generating a response.

Use the deployed SageMaker model with the RetrieveAndGenerate API offered by Amazon Bedrock to query a knowledge base and generate responses based on the retrieved results. The response only cites sources that are relevant to the query. For information on creating a Knowledge Base, refer to Creating a Knowledge Base. For additional code samples, refer to RetrieveAndGenerate.

The following diagram illustrates the RAG workflow.

Complete the following steps:

  1. To invoke the deployed model, you need to pass the endpoint ARN of the deployed model in the modelId parameter of the Converse API.

To obtain the ARN of the deployed model, navigate to the Amazon Bedrock console. In the navigation pane, choose Marketplace deployments under Foundation models. From the list of managed deployments, choose your registered model to view more details.

You will be directed to the model summary on the Model catalog page under Foundation models. Here, you will find the details associated with your deployed model. Copy the model ARN to use in the following code sample.

import boto3

bedrock_runtime = boto3.client("bedrock-runtime")

# Add your bedrock endpoint arn here.
endpoint_arn = "arn:aws:sagemaker:<AWS::REGION>:<AWS::AccountId>:endpoint/<Endpoint_Name>"

# Base inference parameters to use.
inference_config = {
        "maxTokens": 256,
        "temperature": 0.1,
        "topP": 0.999,
}

# Additional inference parameters to use.
additional_model_fields = {"parameters": {"repetition_penalty": 0.9, "top_k": 250, "do_sample": True}}


response = bedrock_runtime.converse(
    modelId=endpoint_arn,
    messages=[
        {
            "role": "user",
            "content": [
                {
                    "text": "What is Amazon doing in the field of generative AI?",
                },
            ]
        },
    ],
    inferenceConfig=inference_config,
    additionalModelRequestFields=additional_model_fields,
)
  1. Invoke the SageMaker JumpStart model with the RetrieveAndGenerate API. The generation_template and orchestration_template parameters in the retrieve_and_generate API are model specific. These templates define the prompts and instructions for the language model, guiding the generation process and the integration with the knowledge retrieval component.
import boto3

bedrock_agent_runtime_client = boto3.client("bedrock-agent-runtime")

# Provide your Knowledge Base Id 
kb_id = "" 

response = bedrock_agent_runtime_client.retrieve_and_generate(
    input={
        "text": "What is Amazon doing in the field of generative AI?"
    },
    retrieveAndGenerateConfiguration={
        "type": "KNOWLEDGE_BASE",
        "knowledgeBaseConfiguration": {
            "generationConfiguration": {
                "inferenceConfig": {
                    "textInferenceConfig": {
                        "maxTokens": 512,
                        "temperature": 0.1,
                        "topP": 0.9
                    }
                },
                "promptTemplate": {
                    "textPromptTemplate": generation_template
                }
            },
            "knowledgeBaseId": kb_id,
            "orchestrationConfiguration": {
                "inferenceConfig": {
                    "textInferenceConfig": {
                        "maxTokens": 512,
                        "temperature": 0.1,
                        "topP": 0.9
                    }
                },
                "promptTemplate": {
                    "textPromptTemplate": orchestration_template
                },
            },
            "modelArn": endpoint_arn,
            "retrievalConfiguration": {
                "vectorSearchConfiguration": {
                    "numberOfResults":5
                } 
            }
        }
    }
)

Now you can implement guardrails with the Converse API for your SageMaker JumpStart model. Amazon Bedrock Guardrails enables you to implement safeguards for your generative AI applications based on your use cases and responsible AI policies. For information on creating guardrails, refer to Create a Guardrail. For additional code samples to implement guardrails, refer to Include a guardrail with Converse API.

  1. In the following code sample, you include a guardrail in a Converse API request invoking a SageMaker JumpStart model:
import boto3

bedrock_agent_runtime_client = boto3.client("bedrock-agent-runtime")

# Provide your Knowledge Base Id
kb_id = "" 

relevant_documents = bedrock_agent_runtime_client.retrieve(
    retrievalQuery= {
        "text": "What is Amazon doing in the field of generative AI?"
    },
    knowledgeBaseId=kb_id,
    retrievalConfiguration= {
        "vectorSearchConfiguration": {
            "numberOfResults": 1
        }
    }
)

def invoke_model(prompt, source, inference_config=None, additional_model_field=None):
    messages = [
        {
            "role": "user",
            "content": [
                {
                    "guardContent": {
                        "text": {
                            "text": source,
                            "qualifiers": ["grounding_source"],
                        }
                    }
                },
                {
                    "guardContent": {
                        "text": {
                            "text": prompt,
                            "qualifiers": ["query"],
                        }
                    }
                },
            ],
        }
    ]
    if not inference_config:
        # Base inference parameters to use.
        inference_config = {
                "maxTokens": 256,
                "temperature": 0.1,
                "topP": 0.999,
        }
    
    if not additional_model_field:
        # Additional inference parameters to use.
        additional_model_fields = {"parameters": {"repetition_penalty": 0.9, "top_k": 250, "do_sample": True}}


    response = bedrock_runtime.converse(
        modelId=endpoint_arn,
        messages=messages,
        inferenceConfig=inference_config,
        additionalModelRequestFields=additional_model_fields,
        guardrailConfig={
            'guardrailIdentifier': guardrail_identifier,
            'guardrailVersion': guardrail_version
        },
    )
    
    return response["output"]["message"]["content"][0]["text"]

invoke_model(prompt="What is Amazon doing in the field of generative AI?", source=relevant_documents["retrievalResults"][0]["content"]["text"]) 
# Content is Blocked 
invoke_model(prompt="Should I buy bitcoin?", source=relevant_documents["retrievalResults"][0]["content"]["text"])

Clean up

To clean up your resources, use the following code:

import boto3

from knowledge_base import KnowledgeBasesForAmazonBedrock

kb = KnowledgeBasesForAmazonBedrock()
kb.delete_kb(knowledge_base_name, delete_s3_bucket=True, delete_iam_roles_and_policies=True)

bedrock.delete_guardrail(guardrailIdentifier=guardrail_identifier)

The SageMaker JumpStart model you deployed will incur cost if you leave it running. Delete the endpoint if you want to stop incurring charges. Deleting the endpoint will also de-register the model from Amazon Bedrock. For more details, see Delete Endpoints and Resources.

Conclusion

In this post, you learned how to deploy FMs through SageMaker JumpStart, register them with Amazon Bedrock, and invoke them using Amazon Bedrock APIs. With this new capability, organizations can access leading proprietary and open-weight models using a single API, reducing the complexity of building generative AI applications with a variety of models. This integration between SageMaker JumpStart and Amazon Bedrock is generally available in all AWS Regions where Amazon Bedrock is available. Try this code to use ConverseAPIs, Knowledge bases and Guardrails with SageMaker.


About the Author

Vivek Gangasani is a Senior GenAI Specialist Solutions Architect at AWS. He helps emerging GenAI companies build innovative solutions using AWS services and accelerated compute. Currently, he is focused on developing strategies for fine-tuning and optimizing the inference performance of Large Language Models. In his free time, Vivek enjoys hiking, watching movies and trying different cuisines.

Abhishek Doppalapudi is a Solutions Architect at Amazon Web Services (AWS), where he assists startups in building and scaling their products using AWS services. Currently, he is focused on helping AWS customers adopt Generative AI solutions. In his free time, Abhishek enjoys playing soccer, watching Premier League matches, and reading.

June Won  is a product manager with Amazon SageMaker JumpStart. He focuses on making foundation models easily discoverable and usable to help customers build generative AI applications. His experience at Amazon also includes mobile shopping applications and last mile delivery.

Eashan Kaushik is an Associate Solutions Architect at Amazon Web Services. He is driven by creating cutting-edge generative AI solutions while prioritizing a customer-centric approach to his work. Before this role, he obtained an MS in Computer Science from NYU Tandon School of Engineering. Outside of work, he enjoys sports, lifting, and running marathons.

Giuseppe Zappia is a Principal AI/ML Specialist Solutions Architect at AWS, focused on helping large enterprises design and deploy ML solutions on AWS. He has over 20 years of experience as a full stack software engineer, and has spent the past 5 years at AWS focused on the field of machine learning.

Bhaskar Pratap is a Senior Software Engineer with the Amazon SageMaker team. He is passionate about designing and building elegant systems that bring machine learning to people’s fingertips. Additionally, he has extensive experience with building scalable cloud storage services.

Read More

A guide to Amazon Bedrock Model Distillation (preview)

A guide to Amazon Bedrock Model Distillation (preview)

When using generative AI, achieving high performance with low latency models that are cost-efficient is often a challenge, because these goals can clash with each other. With the newly launched Amazon Bedrock Model Distillation feature, you can use smaller, faster, and cost-efficient models that deliver use-case specific accuracy that is comparable to the largest and most capable models in Amazon Bedrock for those specific use cases.

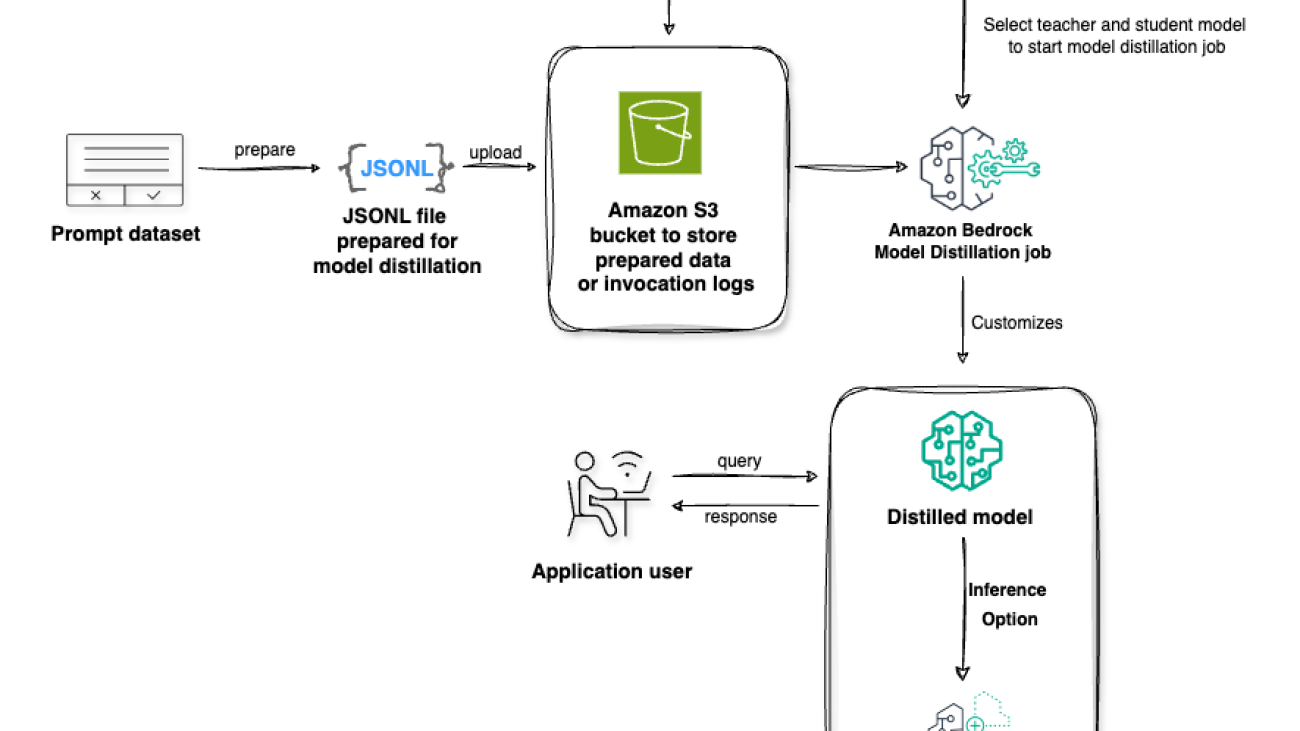
Model distillation is the process of transferring knowledge from a more capable advanced model (teacher) to a smaller model (student), which is faster and more cost efficient to make the student model as performant as the teacher for a specific use-case. To transfer knowledge, your use-case specific prompts are used to first generate responses from the teacher model, and then the teacher responses are used to fine-tune the student model.

Amazon Bedrock is a fully managed service that offers a choice of high-performing foundation models (FMs) along with a broad set of capabilities to build generative AI applications, simplifying development with security, privacy, and responsible AI. With Amazon Bedrock Model Distillation, you can now customize models for your use case using synthetic data generated by highly capable models. At preview, Amazon Bedrock Model Distillation offers support for three model providers: Amazon, Anthropic, and Meta. The teacher and student models should be from the same model provider.

This post introduces the workflow of Amazon Bedrock Model Distillation. We first introduce the general concept of model distillation in Amazon Bedrock, and then focus on the important steps in model distillation, including setting up permissions, selecting the models, providing input dataset, commencing the model distillation jobs, and conducting evaluation and deployment of the student models after model distillation.

Key benefits of Amazon Bedrock Model Distillation

  • Efficiency: Distilled models provide high use-case specific accuracy comparable to the most capable models while being as fast as some of the smallest models.
  • Cost optimization: Inference from distilled models is less expensive compared to larger advanced models.
  • Advanced customization: Amazon Bedrock Model Distillation removes the need to create a labeled dataset for fine-tuning. Amazon Bedrock automates the complex process of generating high-quality teacher responses to create a diverse and high-volume training dataset to use for fine-tuning the student model, by adding data synthesis (up to 15 thousand prompt-response pairs) and augmentation techniques behind the scenes that automatically adapt to your use case, optimizing the distilled model’s performance.
  • Ease of use: Amazon Bedrock Model Distillation offers a single workflow that automates the generation of teacher responses, adds data synthesis to improve teacher responses, and fine-tunes the student model with optimized hyperparameter tuning.

Use cases for Amazon Bedrock Model Distillation

By distilling knowledge from larger models into smaller, more agile ones, organizations are empowered to develop optimized AI solutions to achieve a higher return on their investments. Here are some applications where a distilled model can make a significant impact:

  • Retrieval Augmented Generation (RAG): Enable enterprise wide search and knowledge retrieval systems that can handle thousands of concurrent queries at a fraction of the cost of larger models, making widespread deployment more feasible.
  • Document summarization: Process vast amounts of business content in real time, such as summarizing thousands of customer call transcripts daily, enabling insights at a scale previously limited by latency constraints.
  • Chatbot deployments: Power customer service chatbots that can handle thousands of concurrent real-time conversations with consistently low latency, delivering the quality of a larger model but at significantly lower operational costs.
  • Text classification: Build faster models for categorizing high volumes of concurrent support tickets, emails, or customer feedback at scale; or for efficiently routing requests to larger models when necessary. This approach can significantly reduce processing costs while maintaining classification accuracy, enabling real-time responsiveness to customer needs.

Amazon Bedrock Model Distillation workflow

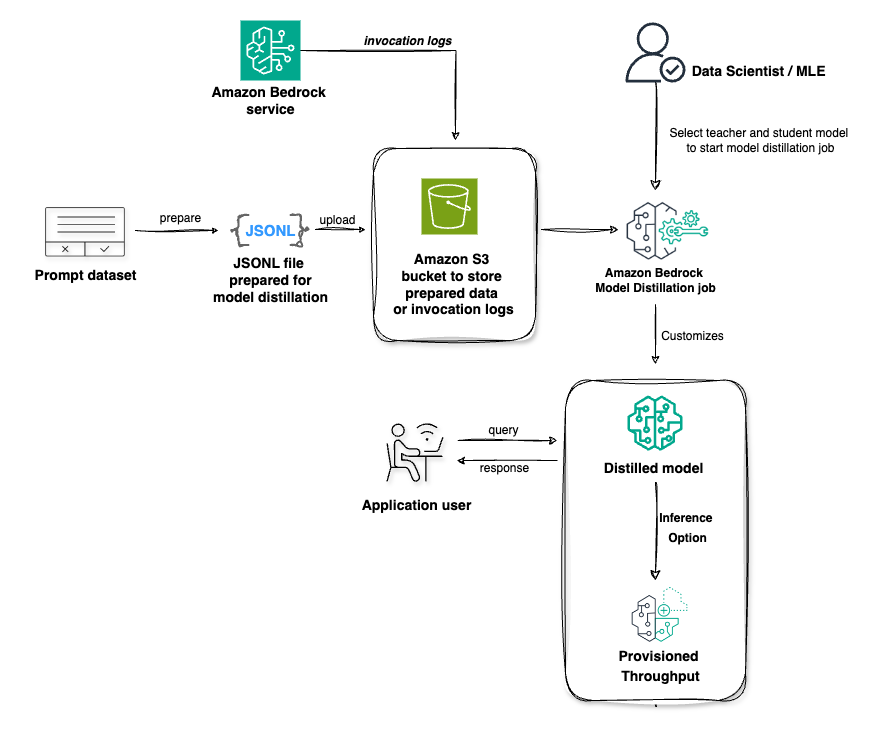
Amazon Bedrock offers two options for using Amazon Bedrock Model Distillation. In the first option, you can create a distilled model by providing your production data using historical invocation logs from your previous interactions within Amazon Bedrock. In a production environment, you continue to use the existing Amazon Bedrock Inference APIs, such as the InvokeModel or Converse API, and turn on invocation logs that store model input data (prompts) and model output data (responses). You can optionally add request metadata to these inference requests to filter your invocation logs for specific use cases. By default, Amazon Bedrock reads only the prompts from the invocation logs and will generate responses from the teacher model selected in your distillation job. In this scenario, Amazon Bedrock might apply proprietary data synthesis techniques to generate diverse and high-quality responses from the teacher model to augment the fine-tuning dataset, potentially improving the performance of the distilled student model. The student model is then fine-tuned using the prompt and teacher response pairs. Optionally, you can configure Amazon Bedrock to extract both the prompt and response from the invocation logs. In this scenario, the teacher model selected in the distillation job must match the teacher model in the invocation log. No data synthesis techniques are applied. The prompt-response pairs are taken as is from the invocation logs and the student model is fine-tuned.

In the second option, you can upload your use-case specific prompts by directly uploading a JSONL file to Amazon Simple Storage Service (Amazon S3) containing your use-case specific prompts or labelled prompt-completion pairs. Amazon Bedrock generates responses from the teacher model for the provided prompts. If you provide a human-generated labeled dataset representing the ground truth, Amazon Bedrock can use these prompt-response pairs as golden examples to generate better teacher responses. The student model is then fine-tuned using the prompt-response pairs generated by the teacher model.

Prerequisites

To use the model distillation feature, make sure that you have satisfied the following requirements:

  • An active AWS account.
  • Selected teacher and student models enabled in Amazon Bedrock. You can confirm that the models are enabled on the Model access page of the Amazon Bedrock console.
  • Confirm the AWS Regions where the model is available and quotas.
  • To create a model distillation job using Amazon Bedrock, you need to create an AWS Identity and Access Management (IAM) role with the following permissions:
    • A trust relationship that allows Amazon Bedrock to assume the role
    • Permissions to access input data and historical invocation logs in Amazon S3
    • Permissions to write output data to Amazon S3
    • Optionally, permissions to decrypt an AWS Key Management Service (AWS KMS) key if you have encrypted resources with a KMS key
  • An S3 bucket where your distillation job output metrics are stored.
  • If you provide an input dataset for distillation, use Amazon S3 to store your input data
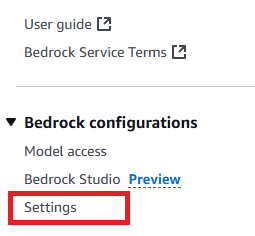
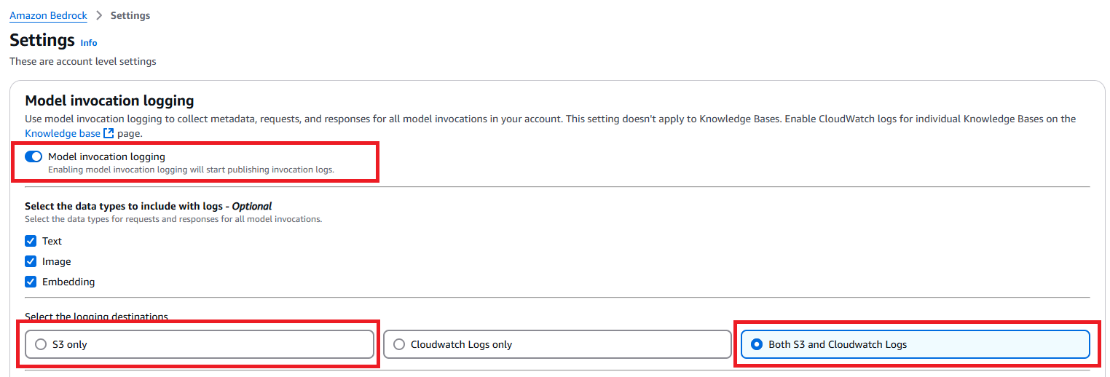
    • Alternatively, if you use a historical invocation log for model distillation, make sure to enable the invocation log in the AWS Management Console and that the historical invocation logging is stored in an S3 location. To do so, go to the Amazon Bedrock console and choose Settings at the bottom of left corner, as shown in the screenshot:
    • On the next page, make sure that Model invocation logging is enabled and select S3 only as the logging destination. (Optionally, you can select Both S3 and CloudWatch Logs as the destination.)
  • Ensure that you have sufficient quota for running a Provisioned Throughput during inference. Go to the AWS Service Quotas console, and check the following quotas:
    • Model units no-commitment Provisioned Throughputs across custom models
    • Model units per provisioned model for [student model name]

Both of these fields need to have enough quota to support your Provisioned Throughput model unit. Request a quota increase if necessary to accommodate your expected inference workload.

Model selection

Currently, Amazon Bedrock Model Distillation supports student-teacher combinations within the same model providers (for example, Amazon, Anthropic, or Meta).

Selecting the right models for distillation is crucial. The process involves choosing a teacher model for synthetic data generation and a student model to learn from the teacher’s output. The teacher model is typically larger and more capable, while the student model is smaller, faster, and more cost-efficient.

When selecting models, consider three key dimensions: performance, latency and cost. These factors are interconnected and adjusting one can affect the others.

  • Performance: Establish clear performance targets for your use case, such as accuracy, consistency, or harmlessness. Select a teacher model that meets or exceeds your desired performance level. The expectation from distillation is to increase the student model’s performance to approach that of the teacher model.
  • Latency: Choose a student model that meets your latency requirements. The final distilled model will have the same latency profile as the student model that you select.
  • Cost: Consider the total cost of ownership (TCO) across the model’s lifecycle, including teacher model inference for synthetic data generation, student model fine-tuning, inference cost for the distilled model, and custom model storage.

Distillation input dataset

There are two main ways to prepare use-case specific input data for distillation in Amazon Bedrock:

  • Uploading a JSONL file to Amazon S3
  • Using historical invocation logs

Uploading a JSONL file to S3

If you have a dataset in the JSON Lines (JSONL) format, you can upload it to an S3 bucket. Each record in this JSONL file use the following structure:

{
    "schemaVersion": "bedrock-conversation-2024",
    "system": [
        {
            "text": string
        }
    ],
    "messages": [
        {
            "role": "user",
            "content": [
                {
                    "text": string
                }
            ]
        },
        {
            "role": "assistant"
            "content": [
               {
                   "text": string
               }
            ]
        }
    ]
}

Specifically, each record has a mandatory field, schemaVersion, that must have the value bedrock-conversation-2024 at this launch. The record can optionally include a system prompt that indicates the role assigned to the model. In the messages field, the user role is required, containing the input prompt provided to the model, while the assistant role, containing the desired response, is optional.

At preview, Anthropic and Meta models only accept single-turn conversation prompts, meaning you can only have one user prompt. The Amazon (Nova) models support multi-turn conversations, allowing you to provide multiple user and assistant exchanges within one record.

Using historical invocation logs

Alternatively, you can use your historical invocation logs stored in Amazon S3 for model distillation. These logs capture the prompts, responses, and metadata from your previous model interactions, making them a valuable source of data. To use this method:

  1. Enable invocation logging: Make sure that you’ve enabled invocation logging for your account. If you haven’t done this yet, see to the prerequisites section for instructions.
  2. Add metadata to model invocations: When invoking models using the InvokeModel or Converse API, include a requestMetadata field with key value paris. This allows you to categorize and filter your interactions later. An example for using the Converse API would be:
{
    "additionalModelRequestFields": JSON value,
    "additionalModelResponseFieldPaths": ["string"],
    "guardrailConfig": {
        "guardrailIdentifier": "string",
        "guardrailVersion": "string",
        "trace": "string"
    },
    "inferenceConfig": {
        "maxTokens": number,
        "stopSequences": ["string"],
        "temperature": number,
        "topP": number
    },
    "messages": [{
        "content": [{
            ...
        }],
        "role": "string"
    }],
    "system": [{
        ...
    }],
    "toolConfig": {
        "toolChoice": {
            ...
        },
        "tools": [{
            ...
        }]
    },
    "requestMetadata": {
        "string": "string", // {"key": "value"}
        "string": "string", // {"key": "value"}
        "string": "string"  // {"key": "value"}
    }
}

A specific example for the requestMetadata field for a sample use case could be:

 "requestMetadata":{ 
    "project": "CustomerService", 
    "intent": "BestPractices", 
    "priority": "Medium" }
  1. Select logs for distillation: When creating a model customization job, you can specify filters to select which invocation logs to use. The API supports various filtering options:
    • Include specific logs:
       "requestMetadataFilters": { 
          "equals": {"project": "CustomerService"} }

    • Exclude specific logs:
       "requestMetadataFilters": { 
          "notEquals": {"priority": "Low"} }

    • Combine multiple conditions:
      "requestMetadataFilters": {
          "andAll": [
          {"equals": {"project": "CustomerService"}},
          {"notEquals": {"priority": "Low"}}
          ]
      }

    • Use OR logic:
      "requestMetadataFilters": {
          "orAll": [
          {"equals": {"intent": "ComplaintResolution"}},
          {"equals": {"intent": "ProductInquiry"}}
          ]
      }

By following these steps, you can precisely control which data from your invocation logs should be used for distillation, enabling you to target specific use cases, projects, or workflows.

Selecting the right data

When selecting data for distillation, whether through a new training JSONL file or historical invocation logs, it’s crucial to choose prompts and responses that are relevant to your use case. The quality and diversity of the data will directly impact the performance of the distilled model.

In general, you should aim to include prompts that cover a wide range of topics and scenarios relevant to your use case, more importantly, a good approach also includes optimizing prompts for the teacher model to get better responses so distillation can perform high quality knowledge transfer from teacher to student. Specifically, for use cases like RAG, make sure to include prompts that contain relevant context to be used by the model. For tasks that require a specific response style or format, it’s important to include examples that adhere to the desired style or format.

Be mindful when curating the data used for distillation to help ensure that the distilled model learns the most relevant and valuable knowledge from the teacher model, optimizing its performance for your specific use case.

Run the model distillation

You can start a distillation job either through the Amazon Bedrock console or programmatically using the Amazon Bedrock API. The distillation process requires training data, either by uploading training data in JSONL format to Amazon S3, or by using historical model invocation logs, as we prepared in the prior section.

Before starting a model distillation job, make sure that you’re operating within the boundaries of Amazon Bedrock distillation service quotas.

Let’s explore how to start distillation jobs using different approaches. In the following example, we use Llama 3.1 70B as the teacher model and Llama 3.1 8B as student model.

Start a distillation job using the console

Amazon Bedrock Model Distillation provides you with an option to run a distillation job through a guided user interface in the console. To start a distillation job through the console, follow these steps:

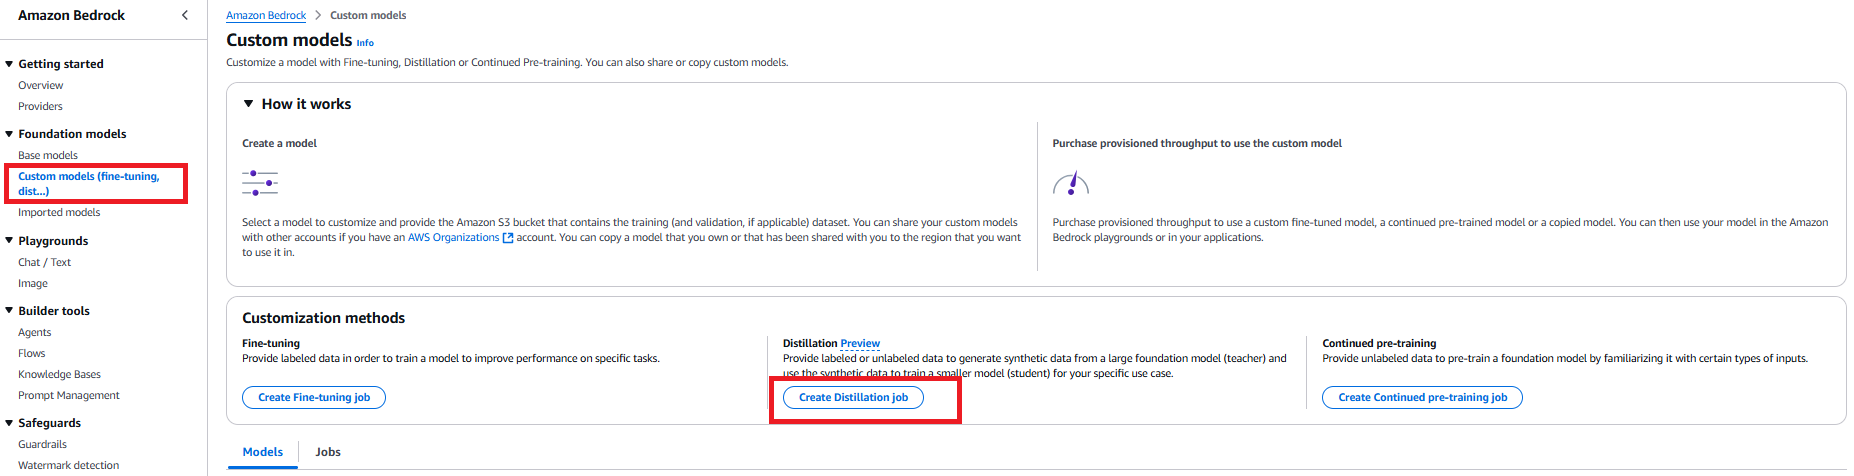
  1. Go to the Amazon Bedrock console. Choose Foundation models in the navigation pane, then choose Custom models. In the Customization methods section, choose Create Distillation job.
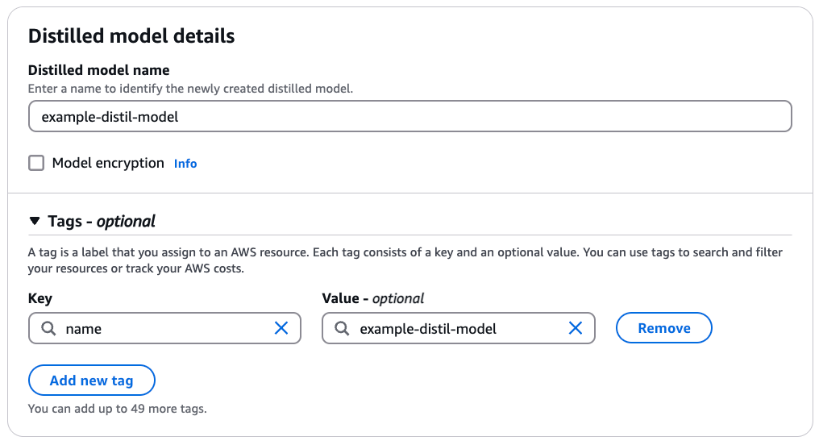
  1. For Distilled model name, enter a name for the model. Select Model encryption to add a KMS key. Optionally, expand the Tags section to add tags for tracking.
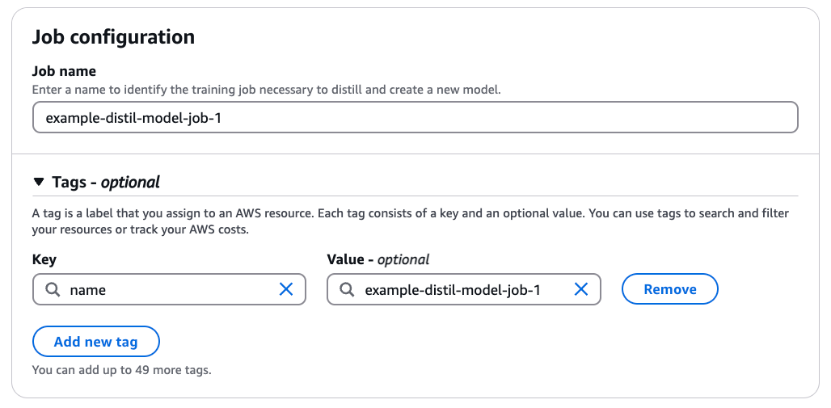
  2. For Job name, enter a name for the training job. Optionally, expand the Tags section to add tags for tracking.
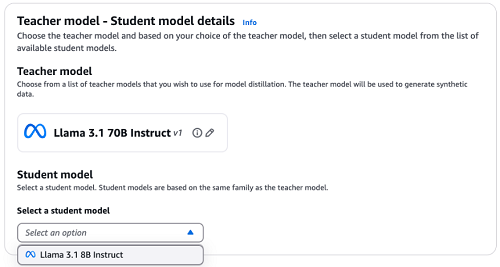
  3. Choose Select model to pick the teacher model of your choice.
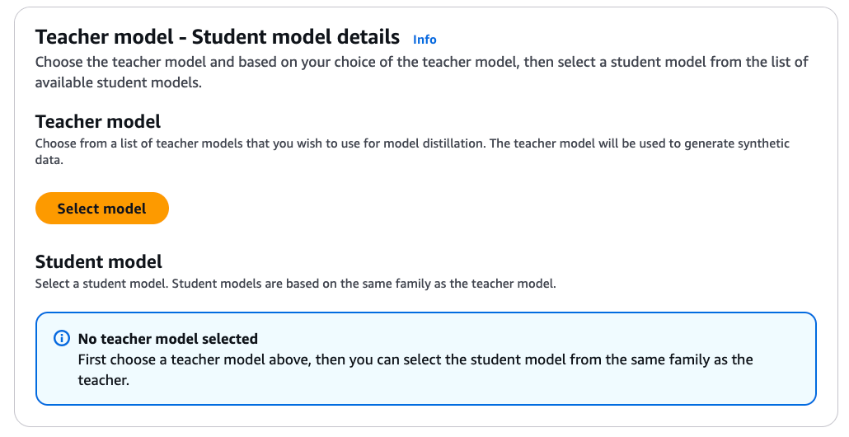
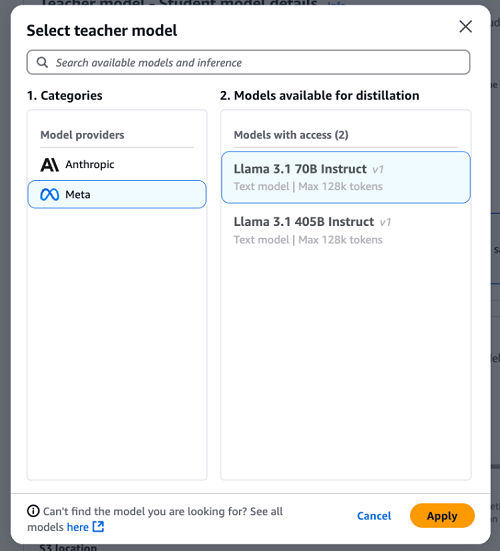
  4. For Categories, choose Meta model family. For Models available for distillation, select Llama 3.1 70B Instruct. Choose Apply.
  5. Open the drop down under Select a student model. For this example, select Llama 3.1 8B Instruct.
  6. Specify the Max response length through the slider or directly in the input field. This configuration will be used as an inference parameter for the synthetic data generation by the teacher model.
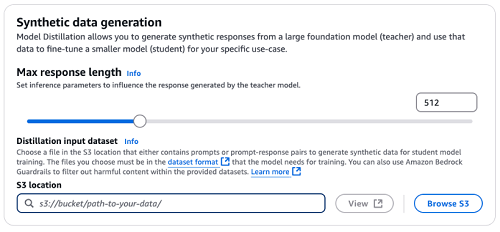
  7. As discussed in the prior section, there are two approaches to provide a distillation input dataset.

    • If you plan to directly upload JSONL file to S3, upload your training dataset to the S3 bucket you prepared in prerequisite section. Under Distillation input dataset, specify the Amazon S3 location for your training dataset.
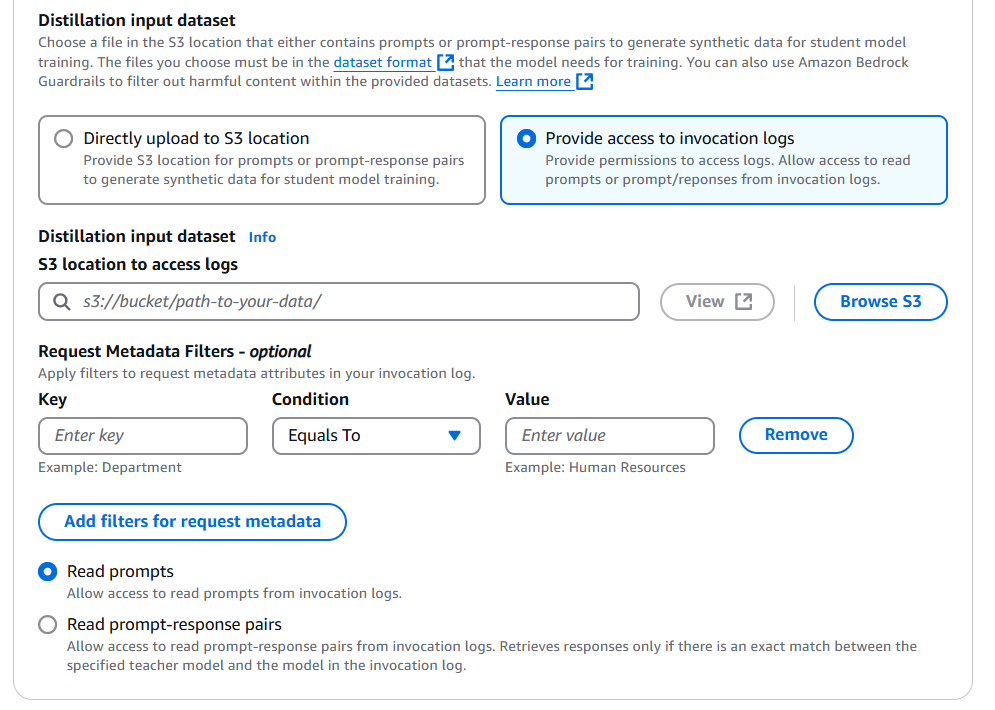
    • If you plan to use historical invocation logs, select Provide access to invocation logs first, then specify the S3 location for your stored invocation logs. You can add different types of metadata filters to select only the invocation logs relevant to the use case.

You can also configure Amazon Bedrock to only read your prompts or use the prompt-response pairs. If you chose to only read the prompts, Amazon Bedrock will regenerate responses from the teacher model; or if you choose to use prompt-response pairs, Amazon Bedrock will use the available response in logs without regenerating it.

Make sure that the teacher model selected for distillation and the model used in the invocation logs is the same if you want Amazon Bedrock to re-use the responses from invocation logs.

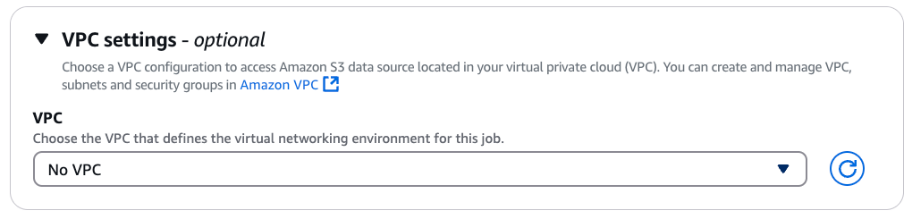
  1. Optionally, expand the VPC settings section to specify a VPC that defines the virtual networking environment for this distillation job.
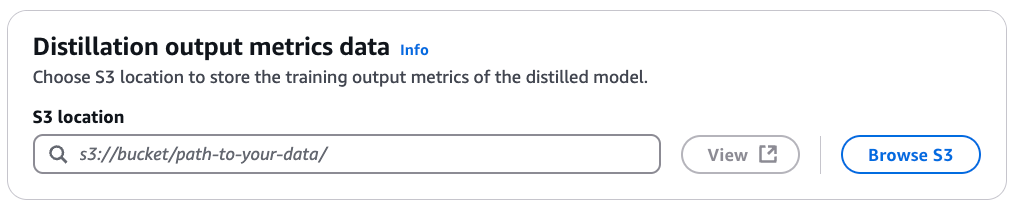
  2. Under Distillation output metrics data, for S3 location, enter the S3 path for the bucket where you want the training output metrics of the distilled model to be stored.
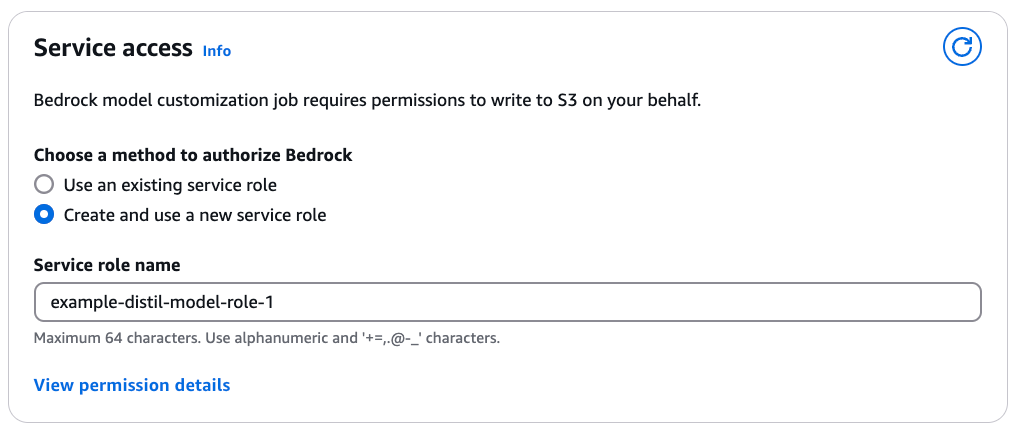
  3. Under Service access, select a method to provide Amazon Bedrock with the required IAM permissions to perform the distillation. This happens through assignment of a service role. You can select Use an existing service role if you have already defined a role with fine-grained IAM policies. If you want a new role to be created, select Create and use a new service role and specify a Service role name. View permission details provides you with a comprehensive overview of IAM permissions required.
  4. After you have added all the required configurations for the Amazon Bedrock Model Distillation job, choose Create Distillation job.
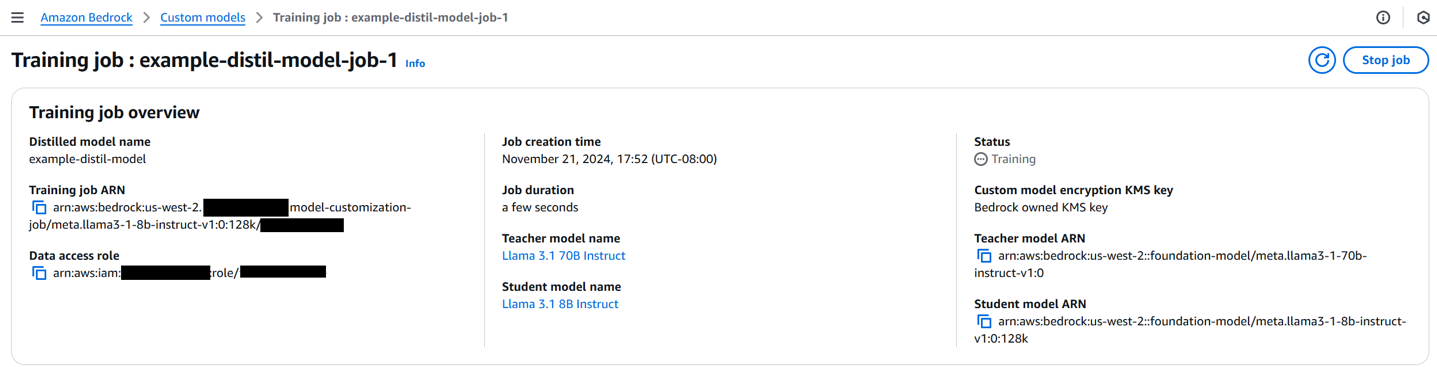
  5. When the distillation job starts, you can see the status of the job (Training, Complete, or e) under Jobs.
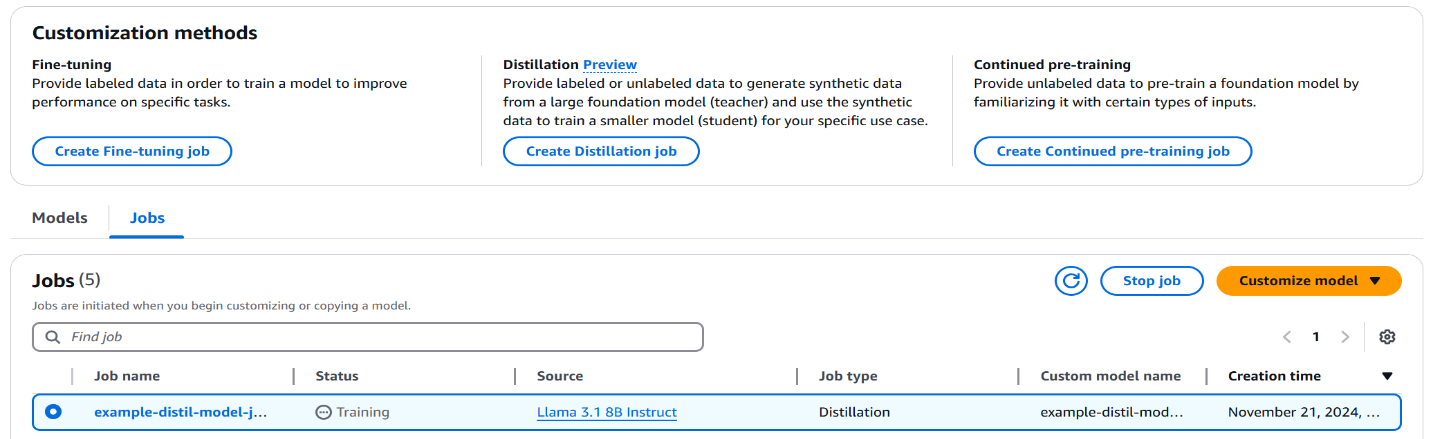
  6. Now select your distillation job. As the distillation job progresses, you can find more information about the job, including job creation time, status, job duration, teacher-student configuration and the distillation input dataset.

Start a distillation job with S3 JSONL data using an API

To use an API to start a distillation job using training data stored in an S3 bucket, follow these steps:

  1. First, create and configure an Amazon Bedrock client:
    import boto3
    from datetime import datetime
     
    bedrock_client = boto3.client(service_name="bedrock")
     
    # Generate unique names for the job and model
    job_name = f"distillation-job-{datetime.now().strftime('%Y-%m-%d-%H-%M-%S')}"
    model_name = f"distilled-model-{datetime.now().strftime('%Y-%m-%d-%H-%M-%S')}"
     
    # Configure your models and IAM role
    teacher_model = "arn:aws:bedrock:us-west-2::foundation-model/meta.llama3-1-70b-instruct-v1:0"
    student_model = "arn:aws:bedrock:us-west-2::foundation-model/meta.llama3-1-8b-instruct-v1:0:128k"
    role_arn = "arn:aws:iam::<YOUR_ACCOUNT_ID>:role/<YOUR_IAM_ROLE>"
    # Specify S3 locations for training data and output
    training_data = "s3://<YOUR_BUCKET>/training-data.jsonl" # Replace by your training file
    output_path = "s3://<YOUR_BUCKET>/output/" 
    # Specify MaxResponseLengthForInference parameter
    max_response_length = 1000

  2. Create the distillation job using create_model_customization_job:
    distillation_job_response = bedrock_client.create_model_customization_job(
        jobName=job_name,
        customModelName=model_name,
        roleArn=role_arn,
        baseModelIdentifier=student_model,
        customizationType="DISTILLATION",
        trainingDataConfig={
            "s3Uri": training_data
        },
        outputDataConfig={
            "s3Uri": output_path
        },
        customizationConfig={
            "distillationConfig": {
                "teacherModelConfig": {
                    "teacherModelIdentifier": teacher_model,
                    "maxResponseLengthForInference": max_response_length 
                }
            }
        }
    )

  3. You can monitor the progress of distillation job by providing the job_arn of your model distillation job:
    response = bedrock_client.get_model_customization_job(
        jobIdentifier=job_arn # Replace by your distillation job_arn
    )

Start a distillation job with an invocation log using an API

To use model invocation logs as training data, make sure that you have collected enough invocation logs in your S3 bucket. First, define the log filter based on the supporting logic referred to in the data preparation section:

# Configure the training data using invocation logs
training_data_config = {
    'invocationLogsConfig': {
        'usePromptResponse': False,
        'invocationLogSource': {
            's3Uri': 's3://<YOUR_BUCKET>/<BUCKET_PREFIX>/AWSLogs' # Replace by your S3 location
        },
        'requestMetadataFilters': {
            'equals': {
                'project': 'CustomerService'  # Filter logs based on metadata
            }
        }
    }
}

The invocationLogsConfig allows you to specify the Amazon S3 location where your invocation logs are stored, whether to use prompt-response pairs from the logs or generate new responses from the teacher model, and filters to select specific logs based on request metadata.

Then, create the distillation job using the same create_model_customization_job API (configuration parameters are defined as was done in the prior section):

distillation_job_response = bedrock_client.create_model_customization_job(
    jobName=job_name,
    customModelName=model_name,
    roleArn=role_arn,
    baseModelIdentifier=student_model,
    customizationType="DISTILLATION",
    trainingDataConfig=training_data_config,
    outputDataConfig={
        "s3Uri": output_path
    },
    customizationConfig={
        "distillationConfig": {
            "teacherModelConfig": {
                "teacherModelIdentifier": teacher_model,
                "maxResponseLengthForInference": max_response_length
            }
        }
    }
)

Deploy and evaluate the model distillation

After distilling the model, you can evaluate the distillation metrics recorded during the process. These metrics are stored in the specified S3 bucket for evaluation purposes, which includes step-wise training metrics with columns step_number, epoch_number and training_loss.

When you’re satisfied with the distillation metrics, you can purchase a Provisioned Throughput to deploy your fine-tuned model, allowing you to take advantage of the improved performance and specialized capabilities of the distilled model in your applications. Provisioned throughput refers to the number and rate of inputs and outputs that a model processes and returns. To use a distilled model, you must purchase a Provisioned Throughput, which is billed hourly. The pricing for a Provisioned Throughput depends on the following factors:

  • The selected student model.
  • The number of model units (MUs) specified for the Provisioned Throughput. An MU is a unit that specifies the throughput capacity for a given model; each MU defines the number of input tokens it can process and output tokens it can generate across all requests within 1 minute.
  • The commitment duration, which can be no commitment, 1 month, or 6 months. Longer commitments offer more discounted hourly rates.

After the Provisioned Throughput is set up, you can use the InvokeModel or Converse API to invoke the distilled model, similar to how the base model is invoked. This provides a seamless transition and maintains compatibility with existing applications or workflows.

It’s crucial to evaluate the performance of the distilled model to make sure that it meets the desired criteria and outperforms in specific tasks. You can conduct various evaluations, including comparing the distilled model with the teacher model to validate its performance.

Deploy the distilled model using the Amazon Bedrock console

To deploy the distilled model using the Amazon Bedrock console, complete the following steps:

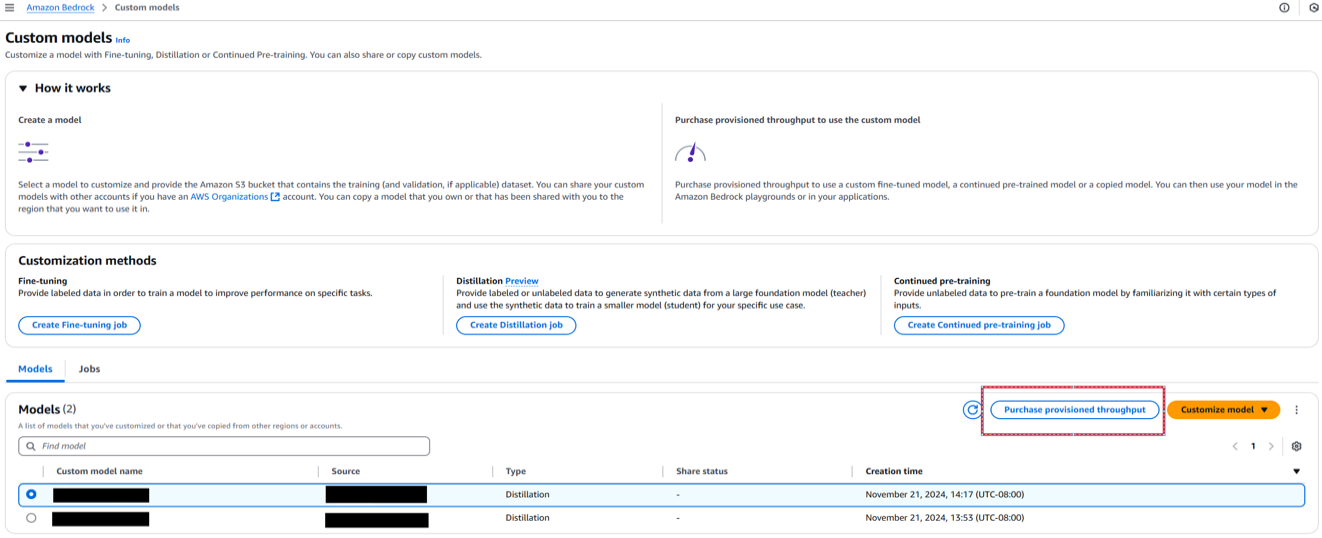
  1. On the Amazon Bedrock console, choose Custom models in the navigation pane.
  2. Select the distilled model and choose Purchase provisioned throughput.
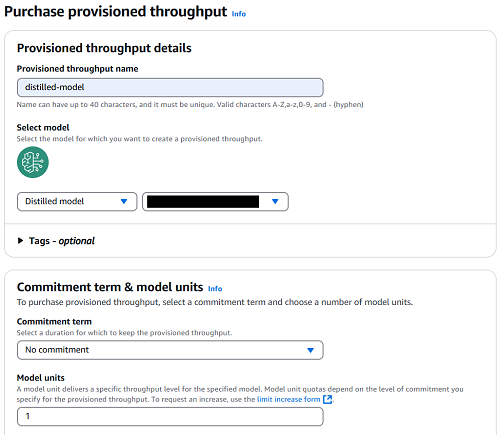
  3. For Provisioned throughput name, enter a name.
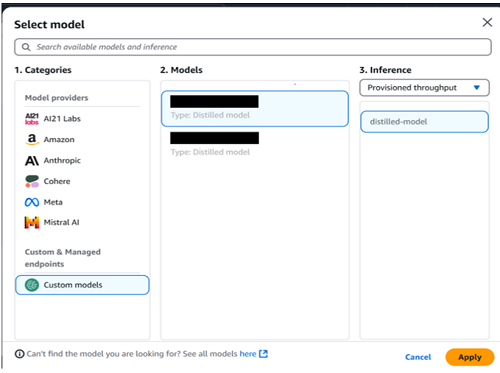
  4. Choose the model that you want to deploy.
  5. For Commitment term, select your level of commitment (for this post, we choose No commitment).
  6. Choose Purchase provisioned throughput.

After the distilled model has been deployed using a Provisioned Throughput, you can see the model status as In Service when you go to the Provisioned throughput page on the Amazon Bedrock console.

You can interact with this distilled model in Amazon Bedrock playground, select Chat/text, then select the distilled model in Custom & Managed endpoints.

Deploy the distilled model using the Amazon Bedrock API

To deploy the distilled model using the Amazon Bedrock API, complete the following steps:

  1. Retrieve the distilled model ID from the job’s output, and create a Provisioned Throughput model instance with the desired model units:
    import boto3
    bedrock_client = boto3.client(service_name="bedrock")
    job_arn = distillation_job_response['jobArn']
    custom_model_id = bedrock_client.get_model_customization_job(jobIdentifier=job_arn)['outputModelArn']
    
    provisioned_model_id = bedrock_client.create_provisioned_model_throughput(
    modelUnits=1, # Update model unites with desired number
    provisionedModelName='distilled-model',
    modelId=custom_model_id 
    )['provisionedModelArn']

  2. Check the status of your Provisioned Throughput model by running:
    bedrock_client.get_provisioned_model_throughput(provisionedModelId=provisioned_model_id)['status']

  3. When the Provisioned Throughput model is ready, you can call the model by using the InvokeModel or Converse API to generate text using the distilled model:
    bedrock_runtime = boto3.client(service_name='bedrock-runtime')
    conversation = [ 
            {
            "role": "user", 
            "content": [{"text": <YOUR_INPUT_TEXT_PROMPT>}], 
            } 
    ]
    inferenceConfig = {"maxTokens": 2048, "temperature": 0.1, "topP": 0.9}
    response = bedrock_runtime.converse(modelId=provisioned_model_id,
                                                  messages=conversation,
                                                  inferenceConfig=inferenceConfig,
                                                )
    response_text = response["output"]["message"]["content"][0]["text"]

By following these steps, you can deploy and use your distilled model through Amazon Bedrock API, allowing you to generate an efficient and high-performing student model tailored to your use cases. After deploying the distilled model, you can use it for inference in various Amazon Bedrock services, including Knowledge Base inference, Playground, and any other service where custom models can be used for inference.

Conclusion

Amazon Bedrock Model Distillation enables you to create efficient, cost-optimized student models that closely match the performance of larger teacher models for specific use cases. By automating the complex process of knowledge transfer from advanced models to smaller models, Amazon Bedrock simplifies the deployment of faster and less expensive AI solutions without sacrificing accuracy. Customers can benefit from efficiency gains, ease of use, science innovation, and exclusive access to distill models across providers such as Anthropic and Amazon. With Amazon Bedrock Model Distillation, enterprises can use the power of foundation models while optimizing for latency, cost, and resource constraints to drive AI innovation across industries such as financial services, content moderation, healthcare, and customer service.

We encourage you to start your journey towards cost-effective AI innovation by visiting the Amazon Bedrock console and discovering how model distillation can transform your business.

For additional resources, see the following:


About the authors

Yanyan Zhang is a Senior Generative AI Data Scientist at Amazon Web Services, where she has been working on cutting-edge AI/ML technologies as a Generative AI Specialist, helping customers use generative AI to achieve their desired outcomes. Yanyan graduated from Texas A&M University with a PhD in Electrical Engineering. Outside of work, she loves traveling, working out, and exploring new things.

Ishan Singh is a Generative AI Data Scientist at Amazon Web Services, where he helps customers build innovative and responsible generative AI solutions and products. With a strong background in AI/ML, Ishan specializes in building Generative AI solutions that drive business value. Outside of work, he enjoys playing volleyball, exploring local bike trails, and spending time with his wife and dog, Beau.

Aris Tsakpinis is a Specialist Solutions Architect for AI & Machine Learning with a special focus on natural language processing (NLP), large language models (LLMs), and generative AI. In his free time he is pursuing a PhD in ML Engineering at University of Regensburg, focussing on applied NLP in the science domain.

Shreeya Sharma  is a Senior Technical Product Manager at AWS, where she has been working on leveraging the power of Generative AI to deliver innovative and customer-centric products. Shreeya holds a master’s degree from Duke University. Outside of work, she loves traveling, dancing, and singing.

Sovik Kumar Nath is an AI/ML and Generative AI Senior Solutions Architect with AWS. He has extensive experience designing end-to-end machine learning and business analytics solutions in finance, operations, marketing, healthcare, supply chain management, and IoT. He has double master’s degrees from the University of South Florida and University of Fribourg, Switzerland, and a bachelor’s degree from the Indian Institute of Technology, Kharagpur. Outside of work, Sovik enjoys traveling, and adventures.

Read More

Build generative AI applications quickly with Amazon Bedrock IDE in Amazon SageMaker Unified Studio

Build generative AI applications quickly with Amazon Bedrock IDE in Amazon SageMaker Unified Studio

Building generative AI applications presents significant challenges for organizations: they require specialized ML expertise, complex infrastructure management, and careful orchestration of multiple services. To address these challenges, we introduce Amazon Bedrock IDE, an integrated environment for developing and customizing generative AI applications. Formerly known as Amazon Bedrock Studio, Amazon Bedrock IDE is now incorporated into the Amazon SageMaker Unified Studio (currently in preview). SageMaker Unified Studio combines various AWS services, including Amazon Bedrock, Amazon SageMaker, Amazon Redshift, Amazon Glue, Amazon Athena, and Amazon Managed Workflows for Apache Airflow (MWAA), into a comprehensive data and AI development platform. In this blog post, we’ll focus on Amazon Bedrock IDE and its generative AI capabilities within the Amazon SageMaker Unified Studio environment.

Consider a global retail site operating across multiple regions and countries. Its sales analysts face a daily challenge: they need to make data-driven decisions but are overwhelmed by the volume of available information. They have structured data such as sales transactions and revenue metrics stored in databases, alongside unstructured data such as customer reviews and marketing reports collected from various channels. Without specialized structured query language (SQL) knowledge or Retrieval Augmented Generation (RAG) expertise, these analysts struggle to combine insights effectively from both sources.

In this post, we’ll show how anyone in your company can use Amazon Bedrock IDE to quickly create a generative AI chat agent application that analyzes sales performance data. Through simple conversations, business teams can use the chat agent to extract valuable insights from both structured and unstructured data sources without writing code or managing complex data pipelines. The following diagram illustrates the conceptual architecture of an AI assistant with Amazon Bedrock IDE.

SageMaker Unified Studio simple architecture diagram

Solution overview

The AI chat agent application combines structured and unstructured data analysis through Amazon Bedrock IDE:

  • For structured data: connects to sales records in Amazon Athena, translating natural language into SQL queries
  • For unstructured data: uses Amazon Titan Text Embeddings and Amazon OpenSearch to enable semantic search across customer reviews and marketing reports

The Amazon Bedrock IDE interface seamlessly combines results from both sources, delivering comprehensive insights without requiring users to understand the underlying data structures or query languages. The following figure illustrates the workflow from initial user interaction to final response. For more details on the user interaction flow, check out our associated GitHub repository.

Solution architecture

Bedrock IDE architecture diagram

The architecture in the preceding figure shows how Amazon Bedrock IDE orchestrates the data flow. When users pose questions through the natural language interface, the chat agent determines whether to query the structured data in Amazon Athena through the Amazon Bedrock IDE function, search the Amazon Bedrock knowledge base, or combine both sources for comprehensive insights. This approach enables sales, marketing, product, and supply chain teams to make data-driven decisions efficiently, regardless of their technical expertise. For example, by the end of this tutorial, you will be able to query the data with prompts such as “Can you return our five top selling products this quarter and the principal customer complaints for each?” or “Were there any supply chain issues that could have affected our North American market for clothing sales?”

In the following sections, we’ll guide you through setting up your SageMaker Unified Studio project, creating your knowledge base, building the natural language query interface, and testing the solution.

SageMaker Unified Studio setup

SageMaker Unified Studio is a browser-based web application where you can use all your data and tools for analytics and AI. SageMaker Unified Studio can authenticate you with your AWS Identity and Access Management (IAM) credentials, credentials from your identity provider through the AWS IAM Identity Center, or with your SAML credentials.

You can obtain the SageMaker Unified Studio URL for your domains by accessing the AWS Management Console for Amazon DataZone. Follow the steps in the Administrator Guide to set up your SageMaker Unified Studio.

Building a generative AI application

SageMaker Unified Studio offers tools to discover and build with generative AI. To get started, you need to build a project.

  1. Open SageMaker Unified Studio and choose Generative AI playground at the top of the page.

SageMaker Unified Studio simple landing page

  1. Here, you can explore, experiment and compare various foundation models (FMs) through a chat interface.

Bedrock IDE - Generative AI playground

Similarly, you can explore image and video models with the Image & video playground.

  1. To begin creating your chat agent, choose Build chat agent in the chat playground window. You will now create a new project before building your app. Choose Create project.

Build chat agent

  1. Enter a project name. Next, select Generative AI application development from the available profiles. This profile includes all the necessary elements for working with Amazon Bedrock components in your generative AI application development. Choose Continue.

Bedrock IDE - Create project view

  1. On the next screen, leave all settings at their default values. Choose Continue to move to the next screen and choose the Create Project button to initiate the project creation process. The system will take a few minutes to set up your project.

Bedrock IDE - Create project view confirmation

After you’ve created your project, you can begin building your generative AI application.

Prerequisites

Before creating your application in Amazon Bedrock IDE, you’ll need to set up a few resources in your AWS account. This will provision the backend infrastructure and services that the sales analytics application will rely on. This includes setting up Amazon API Gateway, AWS Lambda functions, and Amazon Athena to enable querying the structured sales data.

  1. Deploy the required AWS resources:
    1. Launch the AWS CloudFormation stack in your preferred AWS Region:
    2. After the stack is deployed, note down the API Gateway URL value from the CloudFormation outputs tab: TextToSqlEngineAPIGatewayURL.
    3. Navigate to the AWS Secrets Manager console and find the secret <StackName>-api-keys. Choose Retrieve secret and copy the apiKey value from the plaintext string {"clientId":"default","allowedOperations":["query"],"apiKey":"xxxxxxxx"}.

You’ll need these values when setting up your Amazon Bedrock IDE function later.

  1. Download all three sample data files. These files contain synthetic data generated by a generative AI model, including customer reviews, customer survey responses, and world news that you’ll use to build your knowledge base:
  2. Download the API configuration: openapi_schema.json. You’ll use this file when setting up your function to query sales data.

That’s it! With these resources ready, you can create your sales analytics application. Each subsequent section will guide you through exactly when and how to use these files.

Instructions configuration for the chat agent

Go to Amazon Bedrock IDE chat agent application. Select model from dropdown (this can be changed later – ensure it supports data and functions). In chat agent instructions field, enter:

You are a Sales Analytics agent with access to sales data in the "sales" database, table "sales_records". Your tasks include analyzing metrics, providing sales insights, and answering data questions.
Table Schema:
- region, country: Location data
- item_type: Product category
- sales_channel: Online/Offline
- order_priority: H/M/L/C
- order_date, ship_date: Timing
- order_id: Unique identifier
- units_sold: Quantity
- unit_price, unit_cost: Price metrics
- total_revenue, total_cost, total_profit: Financial metrics.
Use Amazon Athena SQL queries to provide insights. Format responses with:
	1	SQL query used
	2	Business interpretation
	3	Key insights/recommendations
You can also access sales-repo which contains details on products categories, customer reviews, etc.
Error Handling:
- If the user's query cannot be translated into a valid SQL query, or the SQL is invalid or fails to execute, provide a clear and informative error message.

This instruction will guide the AI application to act as a sales analytics agent, providing structured responses based on the given sales data schema in addition to accessing the product reviews and other sales-related data.

Chat agent application building view

For this application, you will create two main components: a knowledge base to handle unstructured data, and a function that uses Amazon Athena to query the structured data. These components will work together to process and retrieve information for your generative AI application.

Creating a knowledge base

Knowledge bases enable your application to analyze unstructured data like customer reviews and news stories.

  1. Select the Data section on the current chat agent screen.
  2. Choose Create new Knowledge Base and enter a name for your new knowledge base. You also need to enter a brief description for the chat agent to understand the purpose of this Knowledge Base:

This contains product-specific reviews from users, user feedback gathered via survey, and recent industry and economic news

  1. You have two options for configuring your knowledge base data sources, you can either use local files or you can configure a web crawler. Web scraping automatically extracts content from public web pages that you have permission to access. By adding website URLs to the tool, it will crawl these sites and create a knowledge base from all the defined URLs. This process allows you to efficiently gather and structure information from multiple web sources, building a comprehensive dataset for your needs.

For this post, you’ll upload the files containing unstructured data that we mentioned previously (product-reviews.txt, survey-response.txt, and world-news.txt).

  1. Choose Click to upload, and upload the three files. Keep the default parsing settings.
  2. For the embeddings model, select Amazon Titan Text Embeddings V2 or any other embeddings model.
  3. Select OpenSearch Serverless as your vector store.
  4. After you’ve made these selections, choose Create to create your knowledge base.
  5. After the knowledge base creation is finished, select it for your application under the Select Knowledge Base dropdown.

This unstructured data will be used to enhance the knowledge base of your generative AI application, allowing it to process and provide insights based on customer reviews, survey responses, and current news relevant to your business sector.

Create Knowledge Base

To verify that the unstructured data connection is working properly, submit this example prompt into the application. Note that generative AI systems are nondeterministic, so responses will not be the same every time.

Prompt:

What is the customer sentiment surrounding our Office Supplies products?

Expected response:

Based on the customer reviews and feedback, the sentiment surrounding our Office Supplies products is mixed. While there are many positive reviews praising the product selection, store environment, and helpful staff, there are also a significant number of negative reviews citing issues like:

Poor product quality (e.g. flimsy materials, inconsistent paper quality, adhesive issues)

Frustrating in-store experiences (e.g. long wait times, rude staff, messy/disorganized stores)

Problems with online ordering and apps (e.g. filters not working properly, payment issues, logging out repeatedly)

To improve customer sentiment, we should focus on addressing these common pain points through better quality control, more efficient inventory management and staffing, and improving the online/app user experience.

Creating a function

In this section, you will create a function that will interact with Amazon API Gateway to query the database, which then forwards requests to the Lambda function that retrieves data from Amazon Simple Storage Service (Amazon S3) and processes SQL queries using Amazon Athena. The AWS infrastructure has already been deployed as part of the CloudFormation template. The structured dataset includes order information for products spanning from 2010 to 2017. This historical data will allow the function to analyze sales trends, product performance, and other relevant metrics over this seven-year period. The application will use this function to integrate structured data analysis capabilities, enabling it to provide insights based on concrete sales data alongside the unstructured data from reviews and news that are already incorporated.

  1. In your Amazon Bedrock IDE Chat agent application, expand the Functions section on the screen. Choose Create New Function.
  2. Enter a name for the function and provide a description.
  3. For the function schema, select Import JSON/YAML. Import the API schema from the openapi_schema.json file that you downloaded earlier.
  4. Important: After importing, you need to modify the API endpoint URL in the schema. Replace it with the actual value from the CloudFormation stack output TextToSqlEngineAPIGatewayURL. This step makes sure that your function is correctly linked to the appropriate API endpoint for your application.

Create a function

  1. For the Authentication method, select API Keys (Max. 2 Keys) and enter the following details:
    • Key sent in: Header
    • Key name: x-api-key
    • Key value: enter the Amazon Secrets Manager apiKey value.
  2. Choose Create and wait until the function creation is complete.
  3. After the function creation is finished, select it for your application under Functions dropdown.

Create a function confirmation

To verify that the structured data connection is working properly, submit the following example query into the application. Note that generative AI systems are nondeterministic, so responses will not be the same every time.

Prompt:

List all the regions that we do business in.

Expected response:

Based on the query to get distinct region values from the sales_records table, the regions where we do business are:
Europe
Australia and Oceania
North America
Central America and the Caribbean
Sub-Saharan Africa
Middle East and North Africa
Asia

Sharing your application

After you’ve built your application, you can share it with other users in your organization through SageMaker Unified Studio.

  1. In the application interface, locate and choose Share in the top right corner.
  2. In the sharing dialog, search for users by their alias and choose Invite to include them in the sharing list.
  1. After adding all desired users, copy the application URL from the sharing dialog and send the URL to the added users through your preferred communication channel.

Note: if you turn link sharing on, anyone with the link will be able to subscribe and use the app. If you add their names specifically, only those users can see the app, and it will appear under the “Shared generative AI assets” section for them.

Users must have valid SageMaker Unified Studio access credentials to use the shared application. Contact your AWS administrator if users encounter access issues.

Application sharing view

Examples

The following examples demonstrate how a global retail site uses this solution to transform their sales analytics process and extract valuable insights. Let’s explore three types of queries that demonstrate the power of this approach:

  • Analyzing structured data to understand sales performance
  • Analyzing unstructured customer feedback to extract insights
  • Combining both data sources for comprehensive business intelligence

In the following examples, we’ll show how sales analysts can extract valuable insights through basic conversational queries.

Keep in mind that generative AI systems are nondeterministic, so responses will not be the same every time. Generative AI systems might also hallucinate information, and care should be taken to evaluate responses for correctness. Additionally, the structured data source is randomly generated on download, so our results will not necessarily agree. You can access the CSV data source in Amazon S3 to evaluate the results manually. Our examples used the Anthropic Claude 3 Sonnet model, but feel free to experiment with others.

Structured data examples

The feature columns that can be queried are the following: Region, Country, Item Type, Sales Channel, Order Priority, Order Date, Order ID, Ship Date, Units Sold, Unit Price, Unit Cost, Total Revenue, Total Cost, and Total Profit. The data spans seven regions and over a hundred countries, with the following item types represented: Baby Food, Beverages, Cereal, Clothes, Cosmetics, Fruits, Household, Meat, Office Supplies, Personal Care, Snacks, and Vegetables.

Prompt 1:

What region accounts for our highest revenue, and how much revenue is that?

Expected Response 1:

The region that accounts for our highest revenue is "Sub-Saharan Africa" with a total revenue of $356,724,250.12.

Prompt 2:

Which 3 item types account for our most units sold?

Expected Response 2:

The 3 item types that account for our most units sold are:
Beverages with 504,905 units
Personal Care with 475,724 units
Vegetables with 471,276 units

Unstructured data examples

The following examples demonstrate a few natural language prompts that you can use to query unstructured data. The goal of these queries is to query textual data to answer questions and identify common themes.

The data that can be queried includes product-specific reviews from users, online compared to offline feedback gathered through surveys, and recent industry and economic news.

Prompt 1:

Search our customer surveys to see if customers seem to prefer our online or offline shopping experience

Expected Response 1:

Based on the customer survey results from the knowledge base, there seems to be a preference for the in-store/offline shopping experience over the online experience (website and mobile app). 
The in-store reviews frequently mention positive aspects like helpful staff, clean stores, good product selection and organization. In contrast, the online reviews cite many issues with the website and mobile app like slow loading times, crashes, poor search functionality, and difficulties during checkout. 
While there are some positive online reviews as well, the negative experiences seem more prevalent for the online channels compared to the offline in-store experience.

Prompt 2:

Were there any major world events in 2016 affecting the sale of Vegetables?

Expected Response 2:

Based on the search results from the knowledge base, there were a few major events in 2016 that may have impacted vegetable sales:
In July 2016, an extended drought in California's Central Valley resulted in reduced vegetable production, affecting supply chains for major retailers across North America.
In April 2016, Morocco's innovative desert greenhouse project began operations, introducing new competition in the Mediterranean vegetable market and affecting prices in Southern Europe.
In June 2016, India's successful implementation of cold chain infrastructure reduced vegetable spoilage by 35%, stabilizing prices across South Asian markets.
So the drought in California likely reduced vegetable supply and increased prices in North America, while the new greenhouse operations in Morocco introduced more competition in Europe. However, improved cold chain logistics in India helped stabilize vegetable prices in that region.

Combined data examples

The following are examples of a few natural language prompts that you can use to query both structured and unstructured data sources and seamlessly combine the results into valuable business insights.

Prompt 1:

Do customers seem to prefer our online or offline shopping experience?
Gather data from both customer surveys and number of units sold on different sales channels (online and offline),
and try to identify a trend to see if the data corroborates these reviews.

Expected Response 1:

Based on the customer reviews from the knowledge base, there seems to be a preference for the in-store/offline shopping experience over online shopping. Common complaints for online included slow websites, technical glitches, poor search functionality, and issues during checkout. 
In contrast, the in-store experience received more positive reviews praising helpful staff, clean stores, and good product selection.
The overall sales data shows that the Offline sales channel had higher total revenue ($698.9M) and units sold (2.69M) compared to Online ($628.4M revenue, 2.36M units). 
This data corroborates the customer review sentiments, indicating customers may prefer the offline/in-store experience for our products and services.
However, it is important to note that both channels received a mix of positive and negative reviews. To improve the overall customer experience, we should analyze the specific issues raised in the reviews and look for ways to enhance both the online and offline channels based on that feedback.

Prompt 2:

Can you identify any major events that may have affected the sales revenue of Baby Food?
What about any product reviews that may reflect the trends in revenue?
Use order dates and news article publishing dates as you look for trends.

Expected Response 2:

Based on analyzing the sales revenue data for the Baby Food item type and searching relevant unstructured data sources, here are some major events that appear to have impacted sales revenue:
In November 2015, Japan introduced stricter quality control standards for imported baby foods (source 5). This appears to have disrupted supply chains in Asia and may have driven the spike in revenue that month as companies rushed to get products into Japan before the new standards took effect.
In August 2016, Mexico reported a breakthrough in avocado cultivation that increased yields by 25% (source 3). This improved supply of a key baby food ingredient and may have contributed to the high revenue in late 2016 by lowering costs for manufacturers.
In April 2014, Australia had a wheat shortage due to drought conditions, impacting costs for grain-based baby food products (source 2). This aligns with the low revenue on 4/26/2014 as manufacturers likely passed along higher costs to consumers.
The unstructured data sources provided helpful context around supply chain disruptions, ingredient shortages and surpluses, major agricultural events, and changes in trade policies - all of which appear to have impacted baby food sales based on the timing of these events correlating with fluctuations in revenue in the structured data.

Clean-up

To clean up the resources deployed in these instructions, first delete the CloudFormation stack. You can then remove resources from your Amazon Bedrock IDE project and delete domains by following the Amazon SageMaker Unified Studio documentation.

Conclusion

In this post, we demonstrated how Amazon Bedrock IDE transforms generative AI application development from a complex technical endeavor into a straightforward point-and-click experience. While traditional approaches require specialized ML expertise and significant development time, Amazon Bedrock IDE enables users from various skill levels to create production-ready AI applications in hours instead of weeks.

The key benefits are clear: anyone can now build sophisticated generative AI applications without coding expertise, achieve faster time-to-value through pre-built components, and maintain enterprise governance through centralized management. All while having secure access to their organization’s data through a unified, simple-to-use interface. This same approach can be applied beyond sales analytics to other scenarios where teams need to quickly build AI applications that combine enterprise data with large language models – making generative AI truly accessible across your organization.

Ready to transform your organization’s AI capabilities? Start building your first generative AI application today by following our step-by-step guide or visit Amazon Bedrock IDE to explore more solutions for your business needs.


About the Authors

Ameer Hakme is an AWS Solutions Architect based in Pennsylvania. He collaborates with Independent Software Vendors (ISVs) in the Northeast region, assisting them in designing and building scalable and modern platforms on the AWS Cloud. An expert in AI/ML and generative AI, Ameer helps customers unlock the potential of these cutting-edge technologies. In his leisure time, he enjoys riding his motorcycle and spending quality time with his family.

Adam Gamba is a Solutions Architect and Aspiring Analytics & AI/ML Specialist at AWS. With his background in computer science, he is very interested in using technology to build solutions to real-world problems. Originally from New Jersey, but now based in Arlington, Virginia, Adam enjoys rock climbing, playing piano, cooking, and attending local museums and concerts.

Bhaskar Ravat is a Senior Solutions Architect at AWS based in New York, with a deep interest in the transformative potential of AI. My passion lies in exploring how AI can impact both everyday life and the broader human experience. You can find him reading 4 books at a time when not helping or building solutions for customers.

Kosti Vasilakakis is a Principal Product Manager at AWS. He is an ex-data-scientist, turned PM, now leading Amazon Bedrock IDE to help enterprises build high-quality Gen AI applications faster. Kosti remains in awe of the rapid advancements in AI, and is excited to be working on its democratization. Outside of work, you’ll find him coding personal productivity automations, playing tennis, and spending time in the wilderness with his family.

Read More

Scale ML workflows with Amazon SageMaker Studio and Amazon SageMaker HyperPod

Scale ML workflows with Amazon SageMaker Studio and Amazon SageMaker HyperPod

Scaling machine learning (ML) workflows from initial prototypes to large-scale production deployment can be daunting task, but the integration of Amazon SageMaker Studio and Amazon SageMaker HyperPod offers a streamlined solution to this challenge. As teams progress from proof of concept to production-ready models, they often struggle with efficiently managing growing infrastructure and storage needs. This integration addresses these hurdles by providing data scientists and ML engineers with a comprehensive environment that supports the entire ML lifecycle, from development to deployment at scale.

In this post, we walk you through the process of scaling your ML workloads using SageMaker Studio and SageMaker HyperPod.

Solution overview

Implementing the solution consists of the following high-level steps:

  1. Set up your environment and the permissions to access Amazon HyperPod clusters in SageMaker Studio.
  2. Create a JupyterLab space and mount an Amazon FSx for Lustre file system to your space. This eliminates the need for data migration or code changes as you scale. This also mitigates potential reproducibility issues that often arise from data discrepancies across different stages of model development.
  3. You can now use SageMaker Studio to discover the SageMaker HyperPod clusters, and view cluster details and metrics. When you have access to multiple clusters, this information can help you compare the specifications of each cluster, current utilization, and queue status of the clusters to identify the one that meets the requirements of your specific ML task.
  4. We use a sample notebook to show how to connect to the cluster and run a Meta Llama 2 training job with PyTorch FSDP on your Slurm cluster.
  5. After you submit the long-running job to the cluster, you can monitor the tasks directly through the SageMaker Studio UI. This can help you get real-time insights into your distributed workflows and allow you to quickly identify bottlenecks, optimize resource utilization, and improve overall workflow efficiency.

This integrated approach not only streamlines the transition from prototype to large-scale training but also enhances overall productivity by maintaining a familiar development experience even as you scale up to production-level workloads.

Prerequisites

Complete the following prerequisite steps:

  1. Create a SageMaker HyperPod Slurm cluster. For instructions, refer to the Amazon SageMaker HyperPod workshop or Tutorial for getting started with SageMaker HyperPod.
  2. Make sure you have the latest version of the AWS Command Line Interface (AWS CLI).
  3. Create a user in the Slurm head node or login node with an UID greater than 10000. Refer to Multi-User for instructions to create a user.
  4. Tag the SageMaker HyperPod cluster with the key hyperpod-cluster-filesystem. This is the ID for the FSx for Lustre file system associated with the SageMaker HyperPod cluster. This is needed for Amazon SageMaker Studio to mount FSx for Lustre onto Jupyter Lab and Code Editor spaces. Use the following code snippet to add a tag to an existing SageMaker HyperPod cluster:
    aws sagemaker add-tags --resource-arn <cluster_ARN> 
    --tags Key=hyperpod-cluster-filesystem,Value=<fsx_id>

Set up your permissions

In the following sections, we outline the steps to create an Amazon SageMaker domain, create a user, set up a SageMaker Studio space, and connect to the SageMaker HyperPod cluster. By the end of these steps, you should be able to connect to a SageMaker HyperPod Slurm cluster and run a sample training workload. To follow the setup instructions, you need to have admin privileges. Complete the following steps:

  1. Create a new AWS Identity and Access Management (IAM) execution role with AmazonSageMakerFullAccess attached to the role. Also attach the following JSON policy to the role, which enables SageMaker Studio to access the SageMaker HyperPod cluster. Make sure the trust relationship on the role allows the sagemaker.amazonaws.com service to assume this role.
{
    "Version": "2012-10-17",            
    "Statement": [
        {
            "Effect": "Allow",
            "Action": [
                "ssm:StartSession",
                "ssm:TerminateSession"
            ],
            "Resource": "*"    
        }
{
            "Effect": "Allow",
            "Action": [
                "sagemaker:CreateCluster",
                "sagemaker:ListClusters"
            ],
            "Resource": "*"    
        },
        {
            "Effect": "Allow",
            "Action": [
                "sagemaker:DescribeCluster",
                "sagemaker:DescribeClusterNode",
                "sagemaker:ListClusterNodes",
                "sagemaker:UpdateCluster",
                "sagemaker:UpdateClusterSoftware"
            ],
            "Resource": "arn:aws:sagemaker:region:account-id:cluster/*"    
        }
    ]
}
  1. In order to use the role you created to access the SageMaker HyperPod cluster head or login node using AWS Systems Manager, you need to add a tag to this IAM role, where Tag Key = “SSMSessionRunAs” and Tag Value = “<posix user>”. The POSIX user is the user that is set up on the Slurm head node. Systems Manager uses this user to exec into the head node.
  2. When you activate Run As support, it prevents Session Manager from starting sessions using the ssm-user account on a managed node. To enable Run As in Session Manager, complete the following steps:
    1. On the Session Manager console, choose Preferences, then choose Edit.
    2. Don’t specify any user name. The user name will be picked from the role tag SSMSessionRunAs that you created earlier.
    3. In the Linux shell profile section, enter /bin/bash.
    4. Choose Save.
  1. Create a new SageMaker Studio domain with the execution role created earlier along with other necessary parameters required to access the SageMaker HyperPod cluster. Use the following script to create the domain and replace the export variables accordingly. Here, VPC_ID and Subnet_ID are the same as the SageMaker HyperPod cluster’s VPC and subnet. The EXECUTION_ROLE_ARN is the role you created earlier.
export DOMAIN_NAME=<domain name>
export VPC_ID=vpc_id-for_hp_cluster
export SUBNET_ID=private_subnet_id
export EXECUTION_ROLE_ARN=execution_role_arn
export FILE_SYSTEM_ID=fsx id
export USER_UID=10000
export USER_GID=1001
export REGION=us-east-2

cat > user_settings.json << EOL
{
    "ExecutionRole": "$EXECUTION_ROLE_ARN",
    "CustomPosixUserConfig":
    {
        "Uid": $USER_UID,
        "Gid": $USER_GID
    },
    "CustomFileSystemConfigs":
    [
        {
            "FSxLustreFileSystemConfig":
            {
                "FileSystemId": "$FILE_SYSTEM_ID",
                "FileSystemPath": "$FILE_SYSTEM_PATH"
            }
        }
    ]
}
EOL

aws sagemaker create-domain 
--domain-name $DOMAIN_NAME 
--vpc-id $VPC_ID 
--subnet-ids $SUBNET_ID 
--auth-mode IAM 
--default-user-settings file://user_settings.json 
--region $REGION 

The UID and GID in the preceding configuration are set to 10000 and 1001 as default; this can be overridden according to the user created in Slurm, and this UID/GID is used to give permissions to the FSx for Lustre file system. Also, setting this at the domain level gives each user the same UID. In order to have a separate UID for each user, consider setting CustomPosixUserConfig while creating the user profile.

  1. After you create the domain, you need to attach SecurityGroupIdForInboundNfs created as part of domain creation to all ENIs of the FSx Lustre volume:
    1. Locate the Amazon Elastic File System (Amazon EFS) file system associated with the domain and corresponding security group attached to It. You can find the EFS file system on the Amazon EFS console; it’s tagged with the domain ID, as shown in the following screenshot.
    2. Collect the corresponding security group, which will be named inbound-nfs-<domain-id> and can be found on the Network tab.
    3. On the FSx for Lustre console, choose To see all the ENIs, see the Amazon EC2 Console. This will show all the ENIs attached to FSx for Lustre. Alternatively, you can find ENIs using the AWS CLI or by calling the fsx:describeFileSystems
    4. For each ENI, attach the SecurityGroupIdForInboundNfs of the domain to it.

Alternately, you can use the following script to automatically find and attach security groups to the ENIs associated with the FSx for Lustre volume. Replace the REGION, DOMAIN_ID, and FSX_ID attributes accordingly.

#!/bin/bash

export REGION=us-east-2
export DOMAIN_ID=d-xxxxx
export FSX_ID=fs-xxx

export EFS_ID=$(aws sagemaker describe-domain --domain-id $DOMAIN_ID --region $REGION --query 'HomeEfsFileSystemId' --output text)
export MOUNT_TARGET_ID=$(aws efs describe-mount-targets --file-system-id $EFS_ID --region $REGION --query 'MountTargets[0].MountTargetId' --output text)
export EFS_SG=$(aws efs describe-mount-target-security-groups --mount-target-id $MOUNT_TARGET_ID --query 'SecurityGroups[0]' --output text)
echo "security group associated with the Domain $EFS_SG"

echo "Adding security group to FSxL file system ENI's"
# Get the network interface IDs associated with the FSx file system
NETWORK_INTERFACE_IDS=$(aws fsx describe-file-systems --file-system-ids $FILE_SYSTEM_ID --query "FileSystems[0].NetworkInterfaceIds" --output text)
# Iterate through each network interface and attach the security group
for ENI_ID in $NETWORK_INTERFACE_IDS; do
aws ec2 modify-network-interface-attribute --network-interface-id $ENI_ID --groups $EFS_SG
echo "Attached security group $EFS_SG to network interface $ENI_ID"
done

Without this step, application creation will fail with an error.

  1. After you create the domain, you can use the domain to create a user profile. Replace the DOMAIN_ID value from the one created in the previous step.
export DOMAIN_ID=d-xxx
export USER_PROFILE_NAME=test
export REGION=us-east-2

aws sagemaker create-user-profile 
--domain-id $DOMAIN_ID 
--user-profile-name$USER_PROFILE_NAME 
--region $REGION

Create a JupyterLab space and mount the FSx for Lustre file system

Create a space using the FSx for Lustre file system with the following code:

export SPACE_NAME=hyperpod-space
export DOMAIN_ID=d-xxx
export USER_PROFILE_NAME=test
export FILE_SYSTEM_ID=fs-xxx
export REGION=us-east-2

aws sagemaker create-space --domain-id $DOMAIN_ID 
--space-name $SPACE_NAME 
--space-settings "AppType=JupyterLab,CustomFileSystems=[{FSxLustreFileSystem={FileSystemId=$FILE_SYSTEM_ID}}]" 
--ownership-settings OwnerUserProfileName=$USER_PROFILE_NAME  --space-sharing-settings SharingType=Private  
--region $REGION

Create an application using the space with the following code:

export SPACE_NAME=hyperpod-space
export DOMAIN_ID=d-xxx
export APP_NAME=test-app
export INSTANCE_TYPE=ml.t3.medium
export REGION=us-east-2
export IMAGE_ARN=arn:aws:sagemaker:us-east-2:081975978581:image/sagemaker-distribution-cpu

aws sagemaker create-app --space-name $SPACE_NAME 
--resource-spec '{"InstanceType":"$INSTANCE_TYPE","SageMakerImageArn":"$IMAGE_ARN"}' 
--domain-id  $DOMAIN_ID --app-type JupyterLab --app-name $APP_NAME --region $REGION

Discover clusters in SageMaker Studio

You should now have everything ready to access the SageMaker HyperPod cluster using SageMaker Studio. Complete the following steps:

  1. On the SageMaker console, choose Admin configurations, Domains.
  2. Locate the user profile you created and launch SageMaker Studio.
  3. Under Compute in the navigation pane, choose HyperPod clusters.

Here you can view the SageMaker HyperPod clusters available in the account.

  1. Identify the right cluster for your training workload by looking at the cluster details and the cluster hardware metrics.

You can also preview the cluster by choosing the arrow icon.

You can also go to the Settings and Details tabs to find more information about the cluster.

Work in SageMaker Studio and connect to the cluster

You can also launch either JupyterLab or Code Editor, which mounts the cluster FSx for Lustre volume for development and debugging.

  1. In SageMaker Studio, choose Get started in and choose JupyterLab.
  2. Choose a space that has the FSx for Lustre file system mounted to get a consistent, reproducible environment.

The Cluster Filesystem column identifies which space has the cluster file system mounted.

This should launch JupyterLab with the FSx for Lustre volume mounted. By default, you should see the getting started notebook in your home folder, which has step-by-step instructions to run a Meta Llama 2 training job with PyTorch FSDP on the Slurm cluster. This example notebook demonstrates how you can use SageMaker Studio notebooks to transition from prototyping your training script to scaling up your workloads across multiple instances in the cluster environment. Additionally, you should see the FSx for Lustre file system you mounted to your JupyterLab space under /home/sagemaker-user/custom-file-systems/fsx_lustre.

Monitor the tasks on SageMaker Studio

You can go to SageMaker Studio and choose the cluster to view a list of tasks currently in the Slurm queue.

You can choose a task to get additional task details such as the scheduling and job state, resource usage details, and job submission and limits.

You can also perform actions such as release, requeue, suspend, and hold on these Slurm tasks using the UI.

Clean up

Complete the following steps to clean up your resources:

  1. Delete the space:
aws —region <REGION> sagemaker delete-space 
--domain-id <DomainId> 
--space-name <SpaceName>
  1. Delete the user profile:
aws —region <REGION> sagemaker delete-user-profile 
--domain-id <DomainId> 
--user-profile-name <UserProfileName>
  1. Delete the domain. To retain the EFS volume, specify HomeEfsFileSystem=Retain.
aws —region <REGION> sagemaker delete-domain 
--domain-id <DomainId> 
--retention-policy HomeEfsFileSystem=Delete
  1. Delete the SageMaker HyperPod cluster.
  2. Delete the IAM role you created.

Conclusion

In this post, we explored an approach to streamline your ML workflows using SageMaker Studio. We demonstrated how you can seamlessly transition from prototyping your training script within SageMaker Studio to scaling up your workload across multiple instances in a cluster environment. We also explained how to mount the cluster FSx for Lustre volume to your SageMaker Studio spaces to get a consistent reproducible environment.

This approach not only streamlines your development process but also allows you to initiate long-running jobs on the clusters and conveniently monitor their progress directly from SageMaker Studio.

We encourage you to try this out and share your feedback in the comments section.

Special thanks to Durga Sury (Sr. ML SA), Monidipa Chakraborty (Sr. SDE), and Sumedha Swamy (Sr. Manager PMT) for their support to the launch of this post.


About the Authors

AKLArun Kumar Lokanatha is a Senior ML Solutions Architect with the Amazon SageMaker team. He specializes in large language model training workloads, helping customers build LLM workloads using SageMaker HyperPod, SageMaker training jobs, and SageMaker distributed training. Outside of work, he enjoys running, hiking, and cooking.

PKPooja Karadgi is a Senior Technical Product Manager at Amazon Web Services. At AWS, she is a part of the Amazon SageMaker Studio team and helps build products that cater to the needs of administrators and data scientists. She began her career as a software engineer before making the transition to product management. Outside of work, she enjoys crafting travel planners in spreadsheets, in true MBA fashion. Given the time she invests in creating these planners, it’s clear that she has a deep love for traveling, alongside a strong passion for hiking.

Read More

NVIDIA NIM on AWS Supercharges AI Inference

NVIDIA NIM on AWS Supercharges AI Inference

Generative AI is rapidly transforming industries, driving demand for secure, high-performance inference solutions to scale increasingly complex models efficiently and cost-effectively.

Expanding its collaboration with NVIDIA, Amazon Web Services (AWS) revealed today at its annual AWS re:Invent conference that it has extended NVIDIA NIM microservices across key AWS AI services to support faster AI inference and lower latency for generative AI applications.

NVIDIA NIM microservices are now available directly from the AWS Marketplace, as well as Amazon Bedrock Marketplace and Amazon SageMaker JumpStart, making it even easier for developers to deploy NVIDIA-optimized inference for commonly used models at scale.

NVIDIA NIM, part of the NVIDIA AI Enterprise software platform available in the AWS Marketplace, provides developers with a set of easy-to-use microservices designed for secure, reliable deployment of high-performance, enterprise-grade AI model inference across clouds, data centers and workstations.

These prebuilt containers are built on robust inference engines, such as NVIDIA Triton Inference Server, NVIDIA TensorRT, NVIDIA TensorRT-LLM and PyTorch, and support a broad spectrum of AI models — from open-source community ones to NVIDIA AI Foundation models and custom ones.

NIM microservices can be deployed across various AWS services, including Amazon Elastic Compute Cloud (EC2), Amazon Elastic Kubernetes Service (EKS) and Amazon SageMaker.

Developers can preview over 100 NIM microservices built from commonly used models and model families, including Meta’s Llama 3, Mistral AI’s Mistral and Mixtral, NVIDIA’s Nemotron, Stability AI’s SDXL and many more on the NVIDIA API catalog. The most commonly used ones are available for self-hosting to deploy on AWS services and are optimized to run on NVIDIA accelerated computing instances on AWS.

NIM microservices now available directly from AWS include:

  • NVIDIA Nemotron-4, available in Amazon Bedrock Marketplace, Amazon SageMaker Jumpstart and AWS Marketplace. This is a cutting-edge LLM designed to generate diverse synthetic data that closely mimics real-world data, enhancing the performance and robustness of custom LLMs across various domains.
  • Llama 3.1 8B-Instruct, available on AWS Marketplace. This 8-billion-parameter multilingual large language model is pretrained and instruction-tuned for language understanding, reasoning and text-generation use cases.
  • Llama 3.1 70B-Instruct, available on AWS Marketplace. This 70-billion-parameter pretrained, instruction-tuned model is optimized for multilingual dialogue.
  • Mixtral 8x7B Instruct v0.1, available on AWS Marketplace. This high-quality sparse mixture of experts model with open weights can follow instructions, complete requests and generate creative text formats.

NIM on AWS for Everyone

Customers and partners across industries are tapping NIM on AWS to get to market faster, maintain security and control of their generative AI applications and data, and lower costs.

SoftServe, an IT consulting and digital services provider, has developed six generative AI solutions fully deployed on AWS and accelerated by NVIDIA NIM and AWS services. The solutions, available on AWS Marketplace, include SoftServe Gen AI Drug Discovery, SoftServe Gen AI Industrial Assistant, Digital Concierge, Multimodal RAG System, Content Creator and Speech Recognition Platform.

They’re all based on NVIDIA AI Blueprints, comprehensive reference workflows that accelerate AI application development and deployment and feature NVIDIA acceleration libraries, software development kits and NIM microservices for AI agents, digital twins and more.

Start Now With NIM on AWS

Developers can deploy NVIDIA NIM microservices on AWS according to their unique needs and requirements. By doing so, developers and enterprises can achieve high-performance AI with NVIDIA-optimized inference containers across various AWS services.

Visit the NVIDIA API catalog to try out over 100 different NIM-optimized models, and request either a developer license or 90-day NVIDIA AI Enterprise trial license to get started deploying the microservices on AWS services. Developers can also explore NIM microservices in the AWS Marketplace, Amazon Bedrock Marketplace or Amazon SageMaker JumpStart.

See notice regarding software product information.

Read More

Introducing Amazon Kendra GenAI Index – Enhanced semantic search and retrieval capabilities

Introducing Amazon Kendra GenAI Index – Enhanced semantic search and retrieval capabilities

Amazon Kendra is an intelligent enterprise search service that helps you search across different content repositories with built-in connectors. AWS customers use Amazon Kendra with large language models (LLMs) to quickly create secure, generative AI–powered conversational experiences on top of your enterprise content.

As enterprises adopt generative AI, many are developing intelligent assistants powered by Retrieval Augmented Generation (RAG) to take advantage of information and knowledge from their enterprise data repositories. This approach combines a retriever with an LLM to generate responses. A retriever is responsible for finding relevant documents based on the user query. Customers seek to build comprehensive generative AI systems that use this approach with their choice of index, LLMs, and other components. The combination of retrievers and LLMs offers powerful capabilities, but organizations face significant challenges in building effective retrieval systems.

The core challenge lies in developing data pipelines that can handle diverse data sources, the multitude of data entities in each data source, their metadata and access control information, while maintaining accuracy. This requires implementing information extraction models, optimizing text processing, and balancing sparse and dense retrieval methods. These diverse data sources come with their own ways of encapsulating entities of information. These entities can be documents in Amazon Simple Storage Service (Amazon S3), HTML pages in a web server, accounts in Salesforce, or incidents in ServiceNow. Each data source can have multiple ways to authenticate such as OAuth 2.0 (for example, client credentials flow or refresh token flow), Network Level Trust Manager(), basic authentication, and others.

Entities also come with access control information for each entity, such as the user email and groups that are authorized to access the entity. The data source administrators and users also add a multitude of metadata fields to each entity that contain critical information about the entity, such as created date or author. Organizations must also fine-tune technical parameters, including embedding models, dimensionality, and nearest neighbor algorithms for optimal performance. This complexity often requires significant expertise and resources, making it difficult for many organizations to implement effective retrieval systems for their generative AI solutions.

Amazon Bedrock Knowledge Bases provides managed workflows for RAG pipelines with customizable features for chunking, parsing, and embedding. However, customers seek a more streamlined experience with pre-optimized parameters and simplified data source integration. They also want the ability to reuse indexed content across their generative AI solutions.

Amazon Q Business is a fully managed, generative AI–powered assistant that you can configure to answer questions, provide summaries, generate content, and complete tasks based on your enterprise data. It allows end users to receive immediate, permissions-aware responses from enterprise data sources with citations, for use cases such as IT, human resources (HR), and benefits help desks.

Amazon Q Business also helps streamline tasks and accelerate problem solving. You can use Amazon Q Business to create and share task automation applications or perform routine actions like submitting time-off requests and sending meeting invites. However, Amazon Q Business customers who have already made investments in Amazon Kendra for their enterprise search needs are seeking ways to get RAG-based enhanced semantic search against Amazon Kendra index and save on cost and time.

Amazon Kendra GenAI Index is a new index in Amazon Kendra designed for RAG and intelligent search to help enterprises build digital assistants and intelligent search experiences more efficiently and effectively. This index offers high retrieval accuracy, using advanced semantic models and the latest information retrieval technologies. It can be integrated with Amazon Bedrock Knowledge Bases and other Amazon Bedrock tools to create RAG-powered digital assistants, or it can be used with Amazon Q Business for a fully managed digital assistant solution.

Amazon Kendra GenAI Index addresses common challenges in building retrievers for generative AI assistants, including data ingestion, model selection, and integration with various generative AI tools. Its features include a managed retriever with high semantic accuracy, a hybrid index combining vector and keyword search, pre-optimized parameters, connectors to a variety of enterprise data sources, and metadata-based user permissions filtering.

A single Amazon Kendra GenAI Index can be used across multiple Amazon Q Business applications and Amazon Bedrock Knowledge Bases, benefiting from features such as relevance tuning, document enrichment, and metadata filtering. This new offering joins our existing Amazon Kendra Developer and Enterprise editions, providing customers with more options to meet their specific search needs. This index will support most of the popular features (with some exceptions listed later in this post) such as connectors, user context filtering, metadata support, relevance tuning, and others that customers love to use in Amazon Kendra.

Benefits

Amazon Kendra GenAI Index offers a managed retriever solution that delivers high semantic accuracy for RAG while enabling organizations to use their Amazon Web Services (AWS) generative AI investments across multiple services through built-in integration with Amazon Bedrock Knowledge Bases and Amazon Q Business without needing to rebuild indexes for different applications. Amazon Kendra Gen AI Index also supports connectors to 43 enterprise sources such as SharePoint, OneDrive, Google Drive, Salesforce, and others with integrated metadata-based user permissions filtering, reducing the burden of building custom connectors.

Because Amazon Kendra GenAI Index is a managed RAG option within Amazon Bedrock Knowledge Bases, customers can build generative AI assistants using Amazon Bedrock tooling such as agents and prompt flows. Organizations can select their preferred language models, customize prompts, and manage costs through pay-per-token pricing.

For those seeking a fully managed experience, Amazon Kendra Gen AI Index integrates seamlessly with Amazon Q Business, removing the complexity of LLM selection and prompt engineering. Customers can also use a single Amazon Kendra GenAI Index that serves multiple Amazon Q Business applications and Amazon Bedrock Knowledge Bases. As a result, they can index one time and reuse that indexed content across use cases. Additionally, features such as relevance tuning, document enrichment, and metadata filtering enable businesses to optimize content relevance for their specific needs.

Enhanced semantic understanding

Amazon Kendra GenAI Index incorporates significant upgrades to the underlying search and retrieval technologies, along with improved semantic models. These enhancements provide higher accuracy in the retrieval API, making it especially valuable for RAG applications. It offers high accuracy out-of-the-box for search and retrieval use cases, powered by the latest information retrieval technologies, semantic embedding, and reranker models tested across a variety of datasets. The high retrieval accuracy is provided through its hybrid indexing system, which combines vector and keyword search using advanced semantic relevance models with pre-optimized parameters.

Optimized resource management

The Amazon Kendra GenAI Index introduces smaller index units, leading to improved capacity utilization. This optimization enables organizations to manage their search infrastructure more efficiently while maintaining high performance levels. The streamlined architecture reduces operational overhead and allows for more flexible scaling based on actual usage patterns.

Single index seamless integration with AWS services

Amazon Kendra GenAI Index enables organizations to use a single index across the AWS generative AI stack without having to rebuild indexes. Through deep integration with both Amazon Q Business and Amazon Bedrock Knowledge Bases, organizations can choose between a fully managed experience or a customizable approach. The Amazon Q Business integration provides a streamlined path for building generative AI assistants, and Amazon Bedrock Knowledge Bases offers greater control over prompt customization, model selection, and orchestration with pay-per-token pricing. This flexibility allows organizations to adapt their implementation as needs evolve, protecting their investment in content indexing.

How to create and use the Amazon Kendra Gen AI Index

As mentioned, you have the option to use Amazon Kendra GenAI Index as a standalone index for search use cases using Amazon Kendra. You also have the option to use the new Amazon Kendra GenAI Index as a retriever for Amazon Q Business and as part of Amazon Bedrock Knowledge Bases.

Option 1: Use Amazon Kendra Gen AI Index within Amazon Kendra standalone

The steps to create an Amanzon Kendra GenAI index are similar to Creating an index as described in the Amazon Kendra Developer Guide.

To get started with Amazon Kendra GenAI Index:

  1. On the Amazon Kendra console, choose Create index.
  2. Select GenAI edition as your index type and choose Next, as shown in the following screenshot.
  1. Choose defaults under Configure user access control and choose Next, as shown in the following screenshot.
  1. Choose the defaults under Review and create and choose Create, as shown in the following screenshot.
  1. You can validate the Amazon Kendra Edition type by selecting the created index from the list of indexes created. By clicking on the Settings tab, you to validate the Edition type.

  1. Your index is now ready to add data sources. In the left navigation pane, choose Data sources, then choose Add data source, as shown in the following screenshot.
  1. Choose Select sample dataset (Amazon S3 data source).
  1. Add a Data source name and choose defaults. Choose Add data source, as shown in the following screenshot.
  1. It will take a few seconds to propagate the AWS Identity and Access Management (IAM) role. When it’s done, sync the data source by choosing Sync now explicitly, or it should also automatically start syncing.
  1. After it’s done crawling and indexing, in Sync history under Status, you should notice it has Completed. Confirm Total items scanned.
  1. Check the search results against the newly created Amazon Kendra GenAI index. Select the newly created index and choose Search indexed content, which presents a user interface to search.

The following image shows a comparison of the results for the same query to a Non GenAI index. You can observe that the semantic relevancy increased, making the result as part of Amazon Kendra suggested answers. Also, the number of output tokens increased, providing more context and relevance.

You can also visit the Amazon Kendra Developer Guide to learn how to add data sources to your index by using one of the available data sources or adding a document directly to batch upload.

Option 2: Use Amazon Kendra GenAI Index as a retriever with Amazon Q Business

One of the main benefits of the Amazon Kendra GenAI Index is the usability of the index across multiple AWS services. In Amazon Q Business, administrators can now use the same Amazon Kendra GenAI index created in the previous steps to attach to an application.

To create an Amazon Q Business application, refer to Creating an Amazon Q Business application environment in the Amazon Q User Guide.

  1. When the Amazon Q Business application is ready, in the left navigation pane, select Data sources, then choose Add an index, as shown in the following screenshot.
  1. Select Use an existing Amazon Kendra index. Under Select an index, notice the newly created GenAI

NOTE: After adding the Amazon Kendra index as a retriever in your Amazon Q Business application, you can manage the index and add documents and data sources through the Amazon Kendra GenAI Index console.

  1. After the indexed is attached, click on the web experience link. In the left navigation pane, select Amazon Q Business. Under Web experience settings, choose Deployed URL, as shown in the following screenshot to interact with Q Business AI assistant.
  1. When you’re in the Amazon Q Business web chat, pose the same question as in the previous steps. This query will use the same Amazon Kendra GenAI Index created in Amazon Kendra.

Option 3: Use Amazon Kendra GenAI Index with Amazon Bedrock Knowledge Bases

Similar to Option 2, you can seamlessly use Amazon Kendra GenAI Index as a data source with Amazon Bedrock Knowledge Bases.

To create Amazon Bedrock Knowledge bases, refer to Build a knowledge base by connecting to a data source in the Amazon Bedrock User Guide.

  1. On the Amazon Bedrock console, choose Knowledge , as shown in the following screenshot.
  1. You will be presented with Knowledge Base creation with Amazon Kendra GenAI Index screen, enter the details shown below and select Amazon Kendra GenAI index created from the options.
  1. After your knowledge base is created, you can validate that the Retrieval-Augmented Generation (RAG) type is listed as Kendra GenAI Index. To manage data sources, you can choose Add. The Amazon Kendra console will open, where you can manage all data sources for the index.
  1. After the knowledge base is created, select it to test the query.

Conclusion

Amazon Kendra GenAI Index represents a significant advancement in enterprise search and retrieval capabilities, offering organizations a streamlined path to implementing effective RAG solutions. Whether organizations choose to use it as a standalone search solution, integrate it with Amazon Q Business, or use it through Amazon Bedrock Knowledge Bases, Amazon Kendra GenAI Index provides the flexibility and efficiency needed to make enterprise content more accessible and actionable.

To know more about Amazon Kendra, visit Amazon Kendra Documentation.

Pricing and availability

For information about the AWS Regions in which Amazon Kendra GenAI Index is available, refer to the Amazon Kendra endpoints and quotas page. For detailed pricing information, visit the Amazon Kendra Pricing page.


About the Authors

Krishna Mudda is Senior Manager of Gen AI World Wide Specialist Solution Architects with in Amazon Q Business team.

Marcel Pividal is a Senior AI Services SA in the World- Wide Specialist Organization, bringing over 22 years of expertise in transforming complex business challenges into innovative technological solutions. As a thought leader in generative AI implementation, he specializes in developing secure, compliant AI architectures for enterprise- scale deployments across multiple industries.

Nikhil Shetty is Senior Product Manager of Amazon Kendra.

Aakash Upadhyay is a Senior Software Engineer at AWS, specializing in building scalable NLP and Generative AI cloud services. Over the past six years, he has contributed to the development and enhancement of products like Amazon Translate, Kendra, and Q-Business.

Vijai Gandikota is a Principal Product Manager on the Amazon Q and Amazon Kendra team of Amazon Web Services. He is responsible for Region expansion, language support, guardrails, ingestion, security, and other aspects of Amazon Q and Amazon Kendra.

Kristy Lin is a Software Development Engineer with Amazon Bedrock Knowledge Bases, helping customers build scalable RAG applications.

Read More

Research Focus: Week of December 2, 2024

Research Focus: Week of December 2, 2024

Welcome to Research Focus, a series of blog posts that highlights notable publications, events, code/datasets, new hires and other milestones from across the research community at Microsoft.

Research Focus: Week of December 2, 2024

Adaptive Security, Erasures, and Network Assumptions in Communication-Local MPC

n-party Multi-Party Computation (MPC) is a cryptographic protocol technique that allows separate parties to securely compute a function on their joint data while keeping their inputs private. To build such a protocol, most works require all pairs of participating parties to be able to securely and reliably communicate with each other. Recently, the problem of Communication-Local (CL) MPC has been explored where this assumption is modelled more realistically – e.g. by only requiring that participating parties can securely and reliably communicate with a few other participating parties (as for example in networks like blockchains). However, few solutions exist that guarantee adaptive security—resilience to dynamic corruption of parties—and most rely on strong assumptions about party actions.

In a recent paper: Adaptive Security, Erasures, and Network Assumptions in Communication-Local MPC, researchers from Microsoft and external collaborators revisit assumptions made in earlier work. The authors conclude that for secure, adaptive CL-MPC, some previously assumed capabilities (like secure erasure and multisend) can be bypassed under certain conditions; however, fully reducing all-to-all to all-to-one communication remains unachievable in CL settings without some minimal assumptions. They propose a new SOS-RMT protocol, enabling more efficient CL-MPC under specific feasibility bounds and additional cryptographic assumptions.


Cuttlefish: A Fair, Predictable Execution Environment for Cloud-hosted Financial Exchanges

Low-latency algorithmic trading is driving efficiency in modern financial markets by promoting accurate/timely pricing of securities, higher liquidity, and lower trade costs for investors. The goal is to process incoming market data and issue trades as quickly as possible to take advantage of ephemeral market-making and arbitrage opportunities. Interest in cloud-hosted financial exchanges is growing, as they promise a cost-effective platform more accessible to market participants, among other benefits.

Unfortunately, one of the major roadblocks in cloud environments is to ensure equal network and compute despite the unpredictable network latencies as well as non-deterministic computation times.

In a recent preprint: Cuttlefish: A Fair, Predictable Execution Environment for Cloud-hosted Financial Exchanges, researchers from Microsoft and external collaborators present a fair-by-design algorithmic trading platform that can run in cloud environments. Cuttlefish aims to apply efficient and robust mapping of real operations to a novel formulation of ‘virtual time’. This allows Cuttlefish to push fairness to the extreme, regardless of the underlying network communication and computation hardware. The researchers’ implementation and evaluation validate the practicality of Cuttlefish and shows its operational efficiency on public cloud platforms. This paper builds on previous work: Rethinking Cloud-hosted Financial Exchanges for Response Time Fairness and DBO: Fairness for Cloud-Hosted Financial Exchanges. 


Spotlight: Blog post

Research Focus: Week of September 9, 2024

Investigating vulnerabilities in LLMs; A novel total-duration-aware (TDA) duration model for text-to-speech (TTS); Generative expert metric system through iterative prompt priming; Integrity protection in 5G fronthaul networks.


LLM2CLIP: Powerful language model unlocks richer visual representation

CLIP is a prominent multimodal foundational model, aligning visual and textual signals into a shared feature space. It supports various tasks, including zero-shot classification, detection, segmentation, and cross-modal retrieval, significantly influencing the entire multimodal domain. As a feature extractor, it has become dominant in cross-modal representation tasks such as image understanding, video understanding, and text-to-image/video generation. However, rapid advancements in large language models (LLMs) are continually pushing the boundaries of language comprehension and generation. Can the capabilities of LLMs be harnessed to further improve multimodal representation learning?

In a recent article: LLM2CLIP: Powerful Language Model Unlock Richer Visual Representation, researchers from Microsoft and external collaborators propose LLM2CLIP, a novel approach to unlock CLIP’s potential, focusing on fundamental optimizations of promising foundation models. By fine-tuning the LLM in the caption space with contrastive learning, they extract its textual capabilities into the output embeddings, significantly improving the output layer’s textual discriminability. The researchers then design a training process where the fine-tuned LLM acts as a powerful teacher for CLIP’s visual encoder. The LLM’s presence allows them to incorporate longer and more complex captions without being restricted by CLIP’s text encoder’s context window and ability limitations. Their experiments demonstrate that this approach brings substantial improvements in cross-modal tasks.


LORASC: Expressive and Generalizable Low-rank Adaptation for Large Models via Slow Cascaded Learning

Foundation models, which are large-scale models pre-trained on extensive datasets and subsequently adapted for specific downstream tasks, have become integral to contemporary machine learning frameworks. Fine-tuning these models is essential, yet full parameter fine-tuning often encounters significant memory and computational bottlenecks. Parameter-efficient finetuning (PEFT) techniques aim to minimize the number of trainable parameters to reduce training costs and improve training stability. Among these techniques, Low-Rank Adaptation (LoRA) is highly efficient, although it has limitations in terms of expressiveness and generalization have been noted.

In a recent paper: LORASC: Expressive and Generalizable Low-rank Adaptation for Large Models via Slow Cascaded Learning, researchers from Microsoft and external collaborators present an innovative technique designed to enhance LoRA’s expressiveness and generalization capabilities while preserving its training efficiency. Their cascaded learning strategy enables a mixture-of-low-rank adaptation, thereby increasing the model’s ability to capture complex patterns. They also introduce a slow-fast update mechanism and cascading noisy tuning to bolster generalization. Their extensive experiments on various language and vision datasets, as well as robustness benchmarks, show that the proposed method significantly outperforms existing baselines, while also mitigating overfitting, enhancing model stability, and improving out-of-distribution (OOD) robustness.

Microsoft Research in the news


Can AI spot the next bomb cyclone far in advance? Microsoft hopes so 

Seattle Times | November 23, 2024

Microsoft claims that Aurora, a deep-learning model that’s constantly being trained, can produce weather forecasts much faster than — and with accuracy that meets or exceeds — traditional forecasting models.


How Microsoft’s next-gen BitNet architecture is turbocharging LLM efficiency  

VentureBeat | November 13, 2024

One-bit large language models (LLMs) have emerged as a promising approach to making generative AI more accessible and affordable. In a new paper, Microsoft researchers introduce Binet a4.8, a new technique that further improves the efficiency of one-bit LLMs without sacrificing their performance.


2024 Ellison Cliffe Lecture: AI in science and medicine with Christopher Bishop 

Royal Society of Medicine | November 13, 2024

Christopher Bishop, Technical Fellow and Director of Microsoft Research AI for Science, discusses the extraordinary advances in the deep learning technology that underpins the AI revolution, including crucial progress in the fields of scientific discovery and medicine. This recent speech at the Royal Society of Medicine includes current examples of AI’s impact in materials design, drug discovery, and healthcare.

The post Research Focus: Week of December 2, 2024 appeared first on Microsoft Research.

Read More

Building Generative AI and ML solutions faster with AI apps from AWS partners using Amazon SageMaker

Building Generative AI and ML solutions faster with AI apps from AWS partners using Amazon SageMaker

Organizations of every size and across every industry are looking to use generative AI to fundamentally transform the business landscape with reimagined customer experiences, increased employee productivity, new levels of creativity, and optimized business processes. A recent study by Telecom Advisory Services, a globally recognized research and consulting firm that specializes in economic impact studies, shows that cloud-enabled AI will add more than $1 trillion to global GDP from 2024 to 2030.

Organizations are looking to accelerate the process of building new AI solutions. They use fully managed services such as Amazon SageMaker AI to build, train and deploy generative AI models. Oftentimes, they also want to integrate their choice of purpose-built AI development tools to build their models on SageMaker AI.

However, the process of identifying appropriate applications is complex and demanding, requiring significant effort to make sure that the selected application meets an organization’s specific business needs. Deploying, upgrading, managing, and scaling the selected application also demands considerable time and effort. To adhere to rigorous security and compliance protocols, organizations also need their data to stay within the confines of their security boundaries without the need to store it in a software as a service (SaaS) provider-owned infrastructure.

This increases the time it takes for customers to go from data to insights. Our customers want a simple and secure way to find the best applications, integrate the selected applications into their machine learning (ML) and generative AI development environment, manage and scale their AI projects.

Introducing Amazon SageMaker partner AI apps

Today, we’re excited to announce that AI apps from AWS Partners are now available in SageMaker. You can now find, deploy, and use these AI apps privately and securely, all without leaving SageMaker AI, so you can develop performant AI models faster.

Industry-leading app providers

The first group of partners and applications—shown in the following figure—that we’re including are Comet and its model experiment tracking application, Deepchecks and its large language model (LLM) quality and evaluation application, Fiddler and its model observability application, and Lakera and its AI security application.

Managed and secure

These applications are fully managed by SageMaker AI, so customers don’t have to worry about provisioning, scaling, and maintaining the underlying infrastructure. SageMaker AI makes sure that sensitive data stays completely within each customer’s SageMaker environment and will never be shared with a third party.

Available in SageMaker AI and SageMaker Unified Studio (preview)

Data scientists and ML engineers can access these applications from Amazon SageMaker AI (formerly known as Amazon SageMaker) and from SageMaker Unified Studio. This capability enables data scientists and ML engineers to seamlessly access the tools they require, enhancing their productivity and accelerating the development and deployment of AI products. It also empowers data scientists and ML engineers to do more with their models by collaborating seamlessly with their colleagues in data and analytics teams.

Seamless workflow integration

Direct integration with SageMaker AI provides a smooth user experience, from model building and deployment to ongoing production monitoring, all within your SageMaker development environment. For example, a data scientist can run experiments in their SageMaker Studio or SageMaker Unified Studio Jupyter notebook and then use the Comet ML app for visualizing and comparing those experiments.

Streamlined access

Use AWS credits to use partner apps without navigating lengthy procurement or approval processes, accelerating adoption and scaling of AI observability.

Application deep dive

The integration of these AI apps within SageMaker Studio enables you to build AI models and solutions without leaving your SageMaker development environment. Let’s take a look at the initial group of apps launched at re:Invent 2024.

Comet

Comet provides an end-to-end model evaluation solution for AI developers with best-in-class tooling for experiment tracking and model production monitoring. Comet has been trusted by enterprise customers and academic teams since 2017. Within SageMaker Studio, Notebooks and Pipelines, data scientists, ML engineers, and AI researchers can use Comet’s robust tracking and monitoring capabilities to oversee model lifecycles from training through production, bringing transparency and reproducibility to ML workflows.

You can access the Comet UI directly from SageMaker Studio and SageMaker Unified Studio without the need to provide additional credentials. The app infrastructure is deployed, managed, and supported by AWS, providing a holistic experience and seamless integration. This means each Comet deployment through SageMaker AI is securely isolated and provisioned automatically. You can seamlessly integrate Comet’s advanced tools without altering their existing your SageMaker AI workflows. To learn more, visit Comet.

Deepchecks

Deepchecks specializes in LLM evaluation. Their validation capabilities include automatic scoring, version comparison, and auto-calculated metrics for properties such as relevance, coverage, and grounded-in-context. These capabilities enable organizations to rigorously test, monitor, and improve their LLM applications while maintaining complete data sovereignty.

Deepchecks’s state-of-the-art automatic scoring capabilities for LLM applications, paired with the infrastructure and purpose-built tools provided by SageMaker AI for each step of the ML and FM lifecycle, makes it possible for AI teams to improve their models’ quality and compliance.

Starting today, organizations using AWS can immediately work with Deepchecks’s LLM evaluation tools in their environment, minimizing security and privacy concerns because data remains fully contained within their AWS environments. This integration also removes the overhead of onboarding a third-party vendor, because legal and procurement aspects are streamlined by AWS. To learn more, visit Deepchecks.

Fiddler AI

The Fiddler AI Observability solution allows data science, engineering, and line-of-business teams to validate, monitor, analyze, and improve ML models deployed on SageMaker AI.

With Fiddler’s advanced capabilities, users can track model performance, monitor for data drift and integrity, and receive alerts for immediate diagnostics and root cause analysis. This proactive approach allows teams to quickly resolve issues, continuously improving model reliability and performance. To learn more, visit Fiddler.

Lakera

Lakera partners with enterprises and high-growth technology companies to unlock their generative AI transformation. Lakera’s application Lakera Guard provides real-time visibility, protection, and control for generative AI applications. By protecting sensitive data, mitigating prompt attacks, and creating guardrails, Lakera Guard makes sure that your generative AI always interacts as expected.

Starting today, you can set up a dedicated instance of Lakera Guard within SageMaker AI that ensures data privacy and delivers low-latency performance, with the flexibility to scale alongside your generative AI application’s evolving needs. To learn more, visit Lakera.

See how customers are using partner apps

“The AI/ML team at Natwest Group leverages SageMaker and Comet to rapidly develop customer solutions, from swift fraud detection to in-depth analysis of customer interactions. With Comet now a SageMaker partner app, we streamline our tech and enhance our developers’ workflow, improving experiment tracking and model monitoring. This leads to better results and experiences for our customers.”
– Greig Cowan, Head of AI and Data Science, NatWest Group.

“Amazon SageMaker plays a pivotal role in the development and operation of Ping Identity’s homegrown AI and ML infrastructure. The SageMaker partner AI apps capability will enable us to deliver faster, more effective ML-powered functionality to our customers as a private, fully managed service, supporting our strict security and privacy requirements while reducing operational overhead.”
– Ran Wasserman, Principal Architect, Ping Identity.

Start building with AI apps from AWS partners

Amazon SageMaker AI provides access to a highly curated selection of apps from industry leading providers that are designed and certified to run natively and privately on SageMaker AI. Data scientists and developers can quickly find, deploy, and use these applications within SageMaker AI and the new unified studio to accelerate their ML and generative AI model building journey.

You can access all available SageMaker partner AI apps directly from SageMaker AI and SageMaker Unified Studio. Click through to view a specific app’s functionality, licensing terms, and estimated costs for deployment. After subscribing, you can configure the infrastructure that your app will run on by selecting a deployment tier and additional configuration parameters. After the app finishes the provisioning process, you will be able to assign access to your users, who will find the app ready to use in their SageMaker Studio and SageMaker Unified Studio environments.


About the authors

Gwen Chen is a Senior Generative AI Product Marketing Manager at AWS. She started working on AI products in 2018. Gwen has launched an NLP-powered app building product, MLOps, generative AI-powered assistants for data integration and model building, and inference capabilities. Gwen graduated from a dual master degree program of science and business with Duke and UNC Kenan-Flagler. Gwen likes listening to podcasts, skiing, and dancing.

Naufal Mir is a Senior Generative AI/ML Specialist Solutions Architect at AWS. He focuses on helping customers build, train, deploy, and migrate ML workloads to SageMaker. He previously worked at financial services institutes developing and operating systems at scale. He enjoys ultra-endurance running and cycling.

Kunal Jha is a Senior Product Manager at AWS. He is focused on building Amazon SageMaker Studio as the IDE of choice for all ML development steps. In his spare time, Kunal enjoys skiing, scuba diving and exploring the Pacific Northwest. You can find him on LinkedIn.

Eric Peña is a Senior Technical Product Manager in the AWS Artificial Intelligence Platforms team, working on Amazon SageMaker Interactive Machine Learning. He currently focuses on IDE integrations on SageMaker Studio. He holds an MBA degree from MIT Sloan and outside of work enjoys playing basketball and football.

Arkaprava De is a manager leading the SageMaker Studio Apps team at AWS. He has been at Amazon for over 9 years and is currently working on improving the Amazon SageMaker Studio IDE experience. You can find him on LinkedIn.

Zuoyuan Huang is a Software Development Manager at AWS. He has been at Amazon for over 5 years, and has been focusing on building SageMaker Studio apps and IDE experience. You can find him on LinkedIn.

Read More

MarS: A unified financial market simulation engine in the era of generative foundation models

MarS: A unified financial market simulation engine in the era of generative foundation models

MarS illustration with document workflow and chatbot icons on a purple gradient background

Introduction

Generative foundation models have transformed various domains, creating new paradigms for content generation. Integrating these models with domain-specific data enables industry-specific applications. Microsoft Research has used this approach to develop the large market model (LMM) and the Financial Market Simulation Engine (MarS) for the financial domain. These innovations have the potential to empower financial researchers to customize generative models for diverse scenarios, establishing a new paradigm for applying generative models to downstream tasks in financial markets. This integration may provide enhanced efficiency, more accurate insights, and significant advancements in the financial domain. 

Applying generative models to financial markets

In recent years, generative foundation models have achieved notable success in fields like natural language processing and media generation. Their rise has sparked a new wave of research and industrial adoption, reshaping production processes across industries. These models excel due to three essential elements: a large volume of high-quality training data; effective tokenization and serialization of core information (such as semantic information in text); and an auto-regressive training approach that models data comprehensively, enabling implicit reasoning. 

Building on years of AI applications across industries, Microsoft researchers recognized that combining generative models with domain-specific data could lead to impactful solutions, particularly in finance. The financial market is a prime example, notably for its vast amount of order data, which are characterized by three key features: 

  • Fine granularity: Orders, as the atomic data in the financial market, provide a comprehensive and detailed representation of the real market. Combined with matching rules, one can reproduce the entire market operation process. 
  • Large scale: Electronic trading has resulted in the accumulation of massive trade-order data across global exchanges
  • Well-structured: The structured nature of order data makes it ideal for tokenization and sequential modeling

These characteristics position order flow data as a critical foundation for generative modeling in financial markets. To this end, Microsoft Research developed the LMM and the MarS, which financial researchers can use to customize generative models for various applications, thus fostering a new paradigm of generative solutions for all downstream tasks in finance. This has the potential to advance efficiency and insight generation in the financial industry. 

Figure 1: Illustration of Stock Market and Orders. On the left, a document icon shows order details. An arrow points to the right where multiple icons (robots and human figures) interact with charts and graphs representing market data.
Figure 1: Illustration of stock market and orders

Tokenization of order flow information

Order flow data is vital for generative models in finance, reflecting real-time interactions among market participants. It offers two types of value: 

  • Fine-grained market feedback: Each order, especially large ones, may influence others’ decisions, providing a micro-level view of pricing behavior. 
  • Macroscopic market dynamics: Collective interactions shape trading dynamics over time, capturing the evolution and resolution of conflicts between market forces. 

Researchers at Microsoft developed LMM by modeling both individual orders and entire order sets over time. This two-tiered approach captures both fine-grained feedback and macro-level dynamics of competition. Figure 2 shows the tokenization techniques for these models, enabling high-fidelity simulations of complex market dynamics. 

Figure 2: Illustration of Tokenization for Individual Orders (Top) and Batch Orders (Bottom) . At the top left, a green document labeled 'Type Price Volume Interval' is connected by dotted lines to another document icon. To the right, a bar chart with red and green bars shows volume on the y-axis and numbers on the x-axis. Below, an arrow points from an 'Order Batch' section with three documents to three grids.
Figure 2: Tokenization for individual orders (top) and batch orders (bottom) 

Expansion law of large market model: Unlocking the potential of financial data 

The effectiveness of generative models improves significantly with larger training datasets and model parameters. Researchers at Microsoft used two tokenization strategies to design models based on the Transformer architecture, testing them across varying data scales. Figure 3 illustrates the scaling behavior of both the order and order batch models, highlighting insights from historical trading data. This integration enhances the model’s ability to generate order flows with a deep understanding of market intricacies, enabling more accurate time-series modeling. 

Figure 3: Two line graphs comparing validation loss against the number of training tokens for different model sizes. The left graph, titled 'Order Model,' shows curves for model sizes ranging from 2M to 1.02B, with validation loss decreasing as the number of training tokens increases. The right graph, titled 'Order-Batch Model,' displays curves for model sizes ranging from 150M to 3B, also showing a decrease in validation loss with an increase in training tokens.
Figure 3: Scaling curves of order and batch order models under different parameter sizes 

Microsoft research podcast

Collaborators: Silica in space with Richard Black and Dexter Greene

College freshman Dexter Greene and Microsoft research manager Richard Black discuss how technology that stores data in glass is supporting students as they expand earlier efforts to communicate what it means to be human to extraterrestrials.


MarS based on LMM

A customizable generative model for financial scenarios

Generative models, once trained, can be easily adapted for a range of downstream tasks, often outperforming traditional models tailored for specific scenarios. Building on the development of LMM, researchers further analyzed the needs of various financial scenarios and designed MarS as a versatile financial market simulation engine. MarS not only serves as a general-purpose simulation tool but also introduces a novel framework for applying generative models across diverse financial tasks, from market prediction and risk assessment to trading strategy optimization. 

Figure 4: Diagram of the MarS framework showing data flow and interactions between components like the current market & environment data, order-level historical market data, large marke model, generated order sequences, simulated market trajectories, and applications.
Figure 4: Framework of MarS

Constructing a unified paradigm for prediction and detection tasks 

Traditional financial prediction solutions often require the development of specialized algorithms, which must be frequently adjusted, consuming time and resources. LMM’s capacity to model financial markets in depth allows for periodic updates based on the latest data. MarS creates a virtual exchange to match order flows generated by LMM, simulating trades and deriving simulated market trajectories (see the top right of Figure 4). This approach can effectively address common prediction and detection tasks in financial scenarios, introducing innovative solutions within the generative model framework. 

Applications in prediction tasks

Prediction tasks, vital in finance, involve estimating future market metrics. Traditional models require modifications with any change in prediction targets. MarS addresses this by continuously generating future order flows from recent data, which are matched in a virtual exchange, allowing for the simulation of potential future market trajectories. This provides a significant advancement in forecasting capabilities.

Figure 5 demonstrates the use of MarS in forecasting stock-price movements, where its performance significantly outperforms traditional benchmark algorithms. Taking the Order Model (1.02B) for instance, its performance exceeds that of DeepLOB by approximately (0.662/0.583−1=13.5%) at a 1-minute horizon and increases to (0.579/0.473−1=22.4%) at a 5-minute horizon This widening performance gap suggests that the Order Model maintains its predictive accuracy more effectively over longer horizons, highlighting its superior generalization capability compared to baseline, especially as the prediction task becomes more challenging over extended timeframes. This provides an attractive solution for prediction tasks in financial markets, while also highlighting LMM’s capability in modeling stock market dynamics. 

Figure 5: Line graph comparing prediction accuracy over time for three models: DeepLOB, Order Model (0.22B), and Order Model (1.02B). Prediction accuracy decreases as time increases from 1 to 5 minutes, with DeepLOB showing the lowest accuracy and Order Model (1.02B) showing the highest.
Figure 5: Predicting stock price trends with MarS

Applications in detection tasks

For regulators, detecting systemic risks or market abuse is critical for market stability. LMM models typical market patterns, enabling the identification of anomalies by comparing real market trajectories with those generated by MarS. Figure 6 shows the differences in the spread distribution (i.e., the difference between the best buy and sell prices, which reflects asset liquidity) between simulated and real market trajectories during a confirmed malicious market manipulation incident. This comparison can uncover subtle deviations indicative of unusual activities, offering regulators effective tools for monitoring market integrity.

Figure 6: Three bar graphs comparing the distribution similarity of data across three different periods: pre-manipulation, manipulation period, and post-manipulation. Each graph shows the probability distribution for 2 types of data: Replay and Simulation. The distribution similarity scores are 0.870 for pre-manipulation, 0.835 for the manipulation period, and 0.873 for post-manipulation.
Figure 6: Spread correlation between simulated and real market during market manipulation 

Defining new FinTech scenarios 

Generative models can create tailored content from simple descriptions. In MarS, a mechanism generates specific order flows from natural language descriptions of market conditions. To address extreme conditions, researchers developed a control signal system using a hierarchical diffusion model to generate high-fidelity signals during rare events, such as stock market crashes and circuit breakers. This capability transforms broad descriptions into precise order flow controls. 

By integrating controlled order generation with real-time feedback, MarS creates a unified framework for prediction and detection tasks, redefining financial research, applications, and market understanding. Key applications include “What If” analyses and training environments for reinforcement learning algorithms in realistic market conditions. 

“What If” analysis for financial research

The question “What would happen if different sizes of trading orders were executed under different market conditions?” is crucial for understanding market behavior. Traditional methods, relying on real orders, experience, and assumptions, are costly and slow. Generative models provide a breakthrough solution.

Figure 7 illustrates how MarS can simulate market impact: the top left shows how buy orders affect asset price trajectories, while the top right presents market impact curves of different strategies, matching traditional patterns. Researchers also used MarS to generate large-scale simulated data, constructing a market impact model using ordinary differential equations (ODE). The bottom left of Figure 7) shows the derived impact formula, and the bottom right demonstrates its interpretability. These advancements highlight MarS’s potential to enhance “What If” research through deep market modeling. 

Figure 7: Composite image of four graphs related to sample research results for market impact of orders Using MarS. The top left graph shows mid-price over time with two lines representing simulation and replay actions. The top right graph displays market impact for different agent types over time. The bottom left graph illustrates the auto-correlation of market impact decay for learned ODE, base ODE, and synthetic Seq. The bottom right heatmap shows interaction weights of the learned ODE with various features on the x-axis and log-transformed time on the y-axis.
Figure 7: Sample research results for market impact of orders using MarS 

Training environments for reinforcement learning in financial markets

Reinforcement learning (RL) algorithms require controlled environments for testing and optimization. Financial market behaviors often manifest through order flow changes, impacting the market. If the simulation cannot reflect these impacts accurately, an RL algorithm may fail in real-world scenarios.

MarS provides high-fidelity generation and real-time feedback, creating a comprehensive environment for RL in finance. Figure 8 shows the training process of trading agents, highlighting significant improvements in performance over time and demonstrating MarS’s effectiveness as an RL training ground. 

Figure 8: Line graph titled 'Price Advantage' on the y-axis and 'Step' on the x-axis. The graph shows an upward trend as the steps increase.
Figure 8: Performance of reinforcement learning trading agents trained in MarS. During training, the agent’s performance improved significantly, showcasing MarS’s ability to aid in developing robust reinforcement learning algorithms for real market conditions. 

Disclaimer: The research mentioned in this article, conducted by Microsoft Research, focuses on scientific exploration, aiming to advance knowledge and provide theoretical and technological support for research and applications in the financial field. All studies adhere to Microsoft’s responsible AI guidelines, ensuring principles such as fairness, inclusiveness, reliability and safety, transparency, privacy, and accountability are maintained. The technologies and methods discussed are still under research and development, not yet forming any commercial products or services, nor constituting any financial solutions. Readers are advised to consult certified financial professionals before making any financial decisions. 

The post MarS: A unified financial market simulation engine in the era of generative foundation models appeared first on Microsoft Research.

Read More