Current and New Activation Checkpointing Techniques in PyTorch

Current and New Activation Checkpointing Techniques in PyTorch

As models scale in depth, batch size, and sequence length, etc, activation memory becomes an increasingly significant contributor to the overall memory usage. To help address this, PyTorch provides utilities for activation checkpointing, which reduce the number of saved tensors by recomputing them when needed, trading off memory usage for additional compute.

In this post, we’ll walk through the basics of what activation memory is, the high-level ideas behind existing activation checkpointing techniques, and also introduce some newer techniques that aim to improve flexibility and provide more optimization/automation out of the box.

As we look at these techniques, we’ll compare how these methods fit into a speed vs. memory trade-off diagram and hopefully provide some insight on how to choose the right strategy for your use case.

(If you prefer to jump straight to the new APIs, please skip ahead to the “Selective Activation Checkpoint” and “Memory Budget API” sections below.)

flow diagram


Activation Memory Basics

By default, in eager mode (rather than using torch.compile), PyTorch’s autograd preserves intermediate activations for backward computation. For example, if you call sin on a tensor x during the forward pass, autograd must remember x to compute cos(x) during backward.

flow diagram

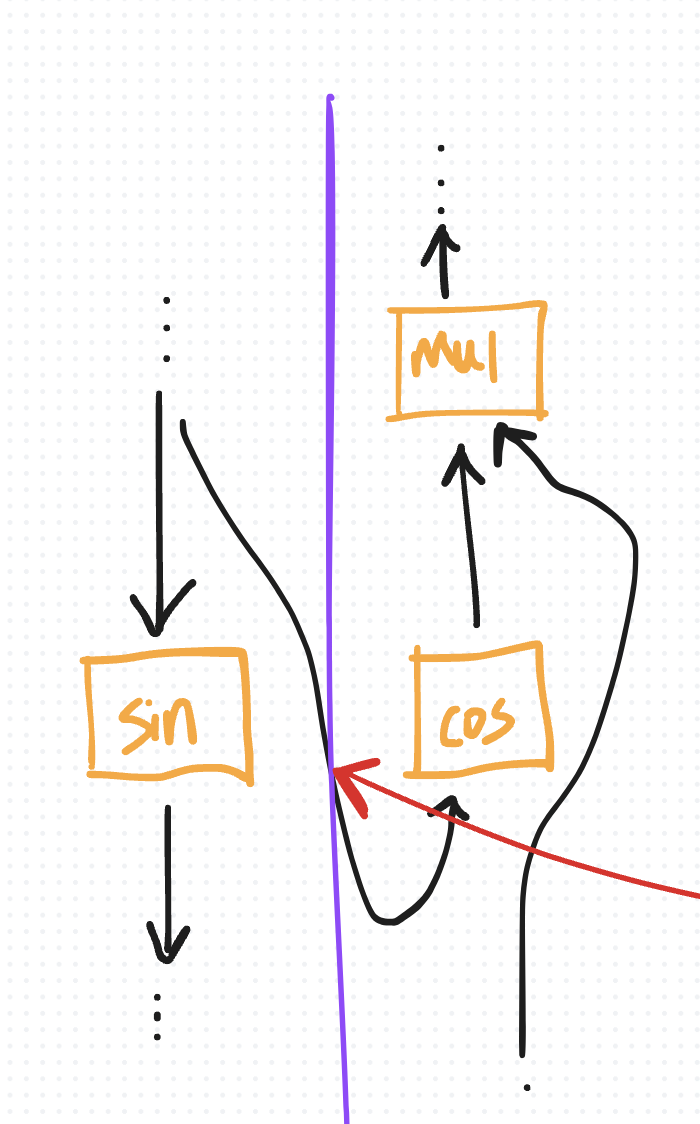
If this tensor x is saved at the beginning of the forward pass, it remains in memory throughout both the forward and backward phases. It can only be cleared after it is used to compute the gradient, which happens at the end of the backward pass (due to the reverse order of execution).

Thus, as you proceed through the forward pass and perform more and more operations, you accumulate more and more activations, resulting in more and more activation memory until it (typically) reaches its peak at the start of backward (at which point activations can start to get cleared).

flow diagram

In the diagram above, the orange boxes represent operations, black arrows represent their tensor inputs and outputs. The black arrows that cross over the right represent tensors that autograd saves for backward.

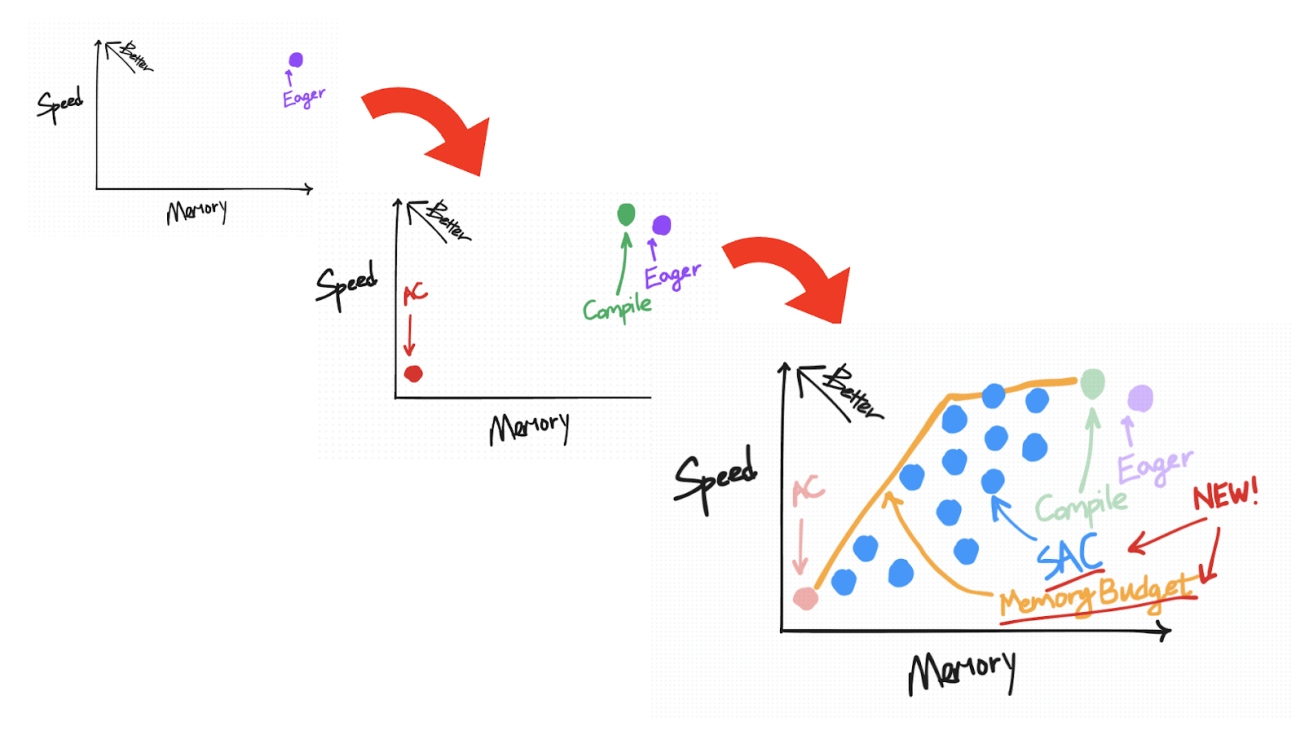
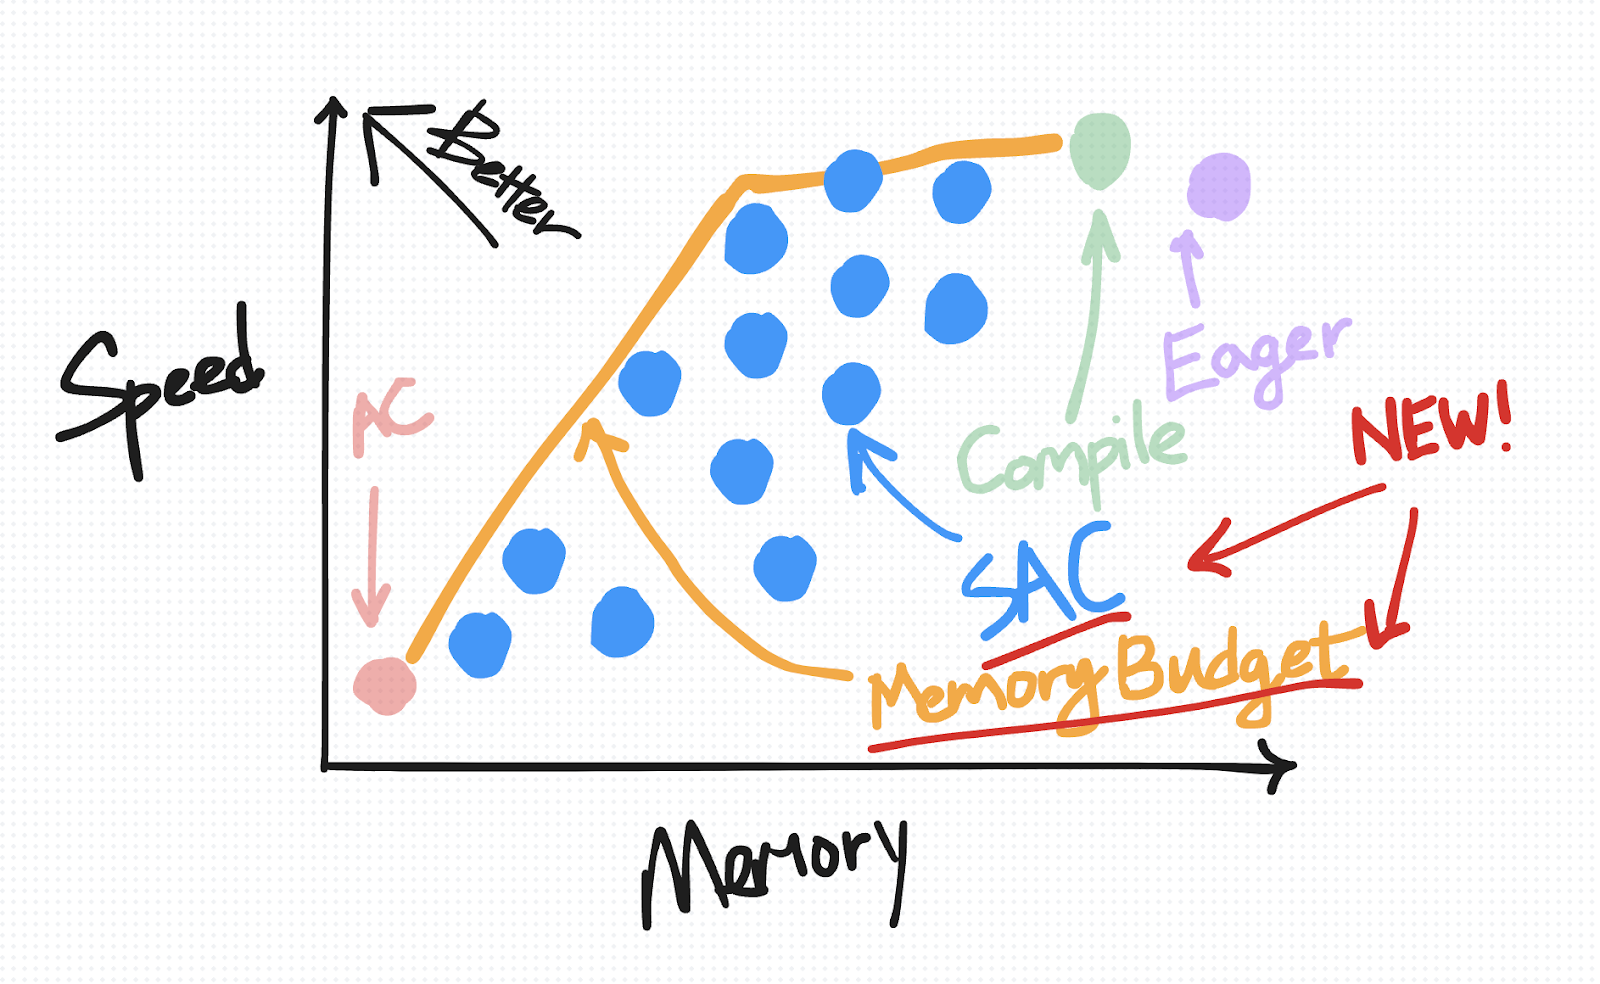
A useful way to visually organize this default saving behavior in eager as well as the techniques we’re about to introduce is based on how they trade off speed versus memory.

flow diagram

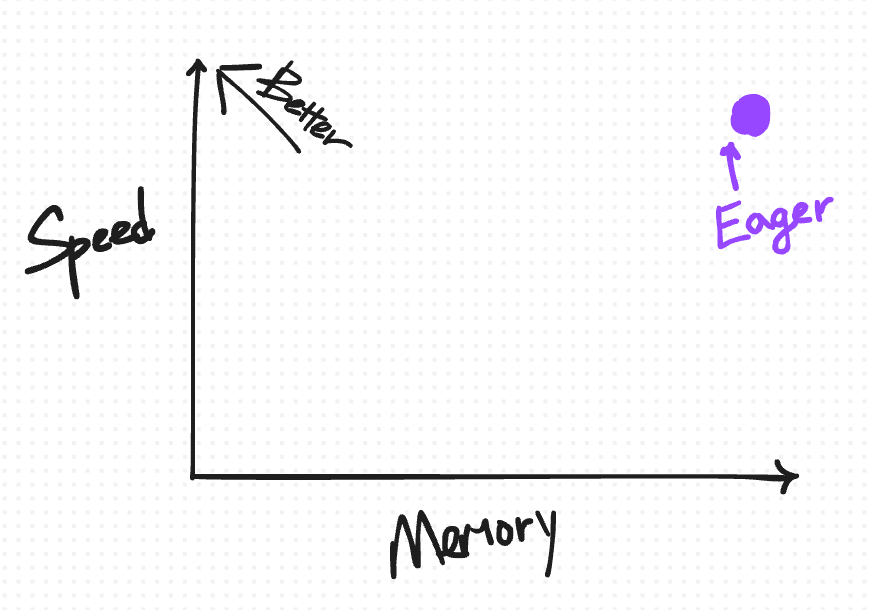
The ideal place to be on this diagram is the top-left, where you have “high” speed but also low memory usage.

We begin by putting the default saving behavior on the top-right (for reasons we’ll explain in more detail as we introduce more points for other techniques).


Activation Checkpointing (AC)

Activation checkpointing (AC) is a popular technique to reduce memory usage in PyTorch.

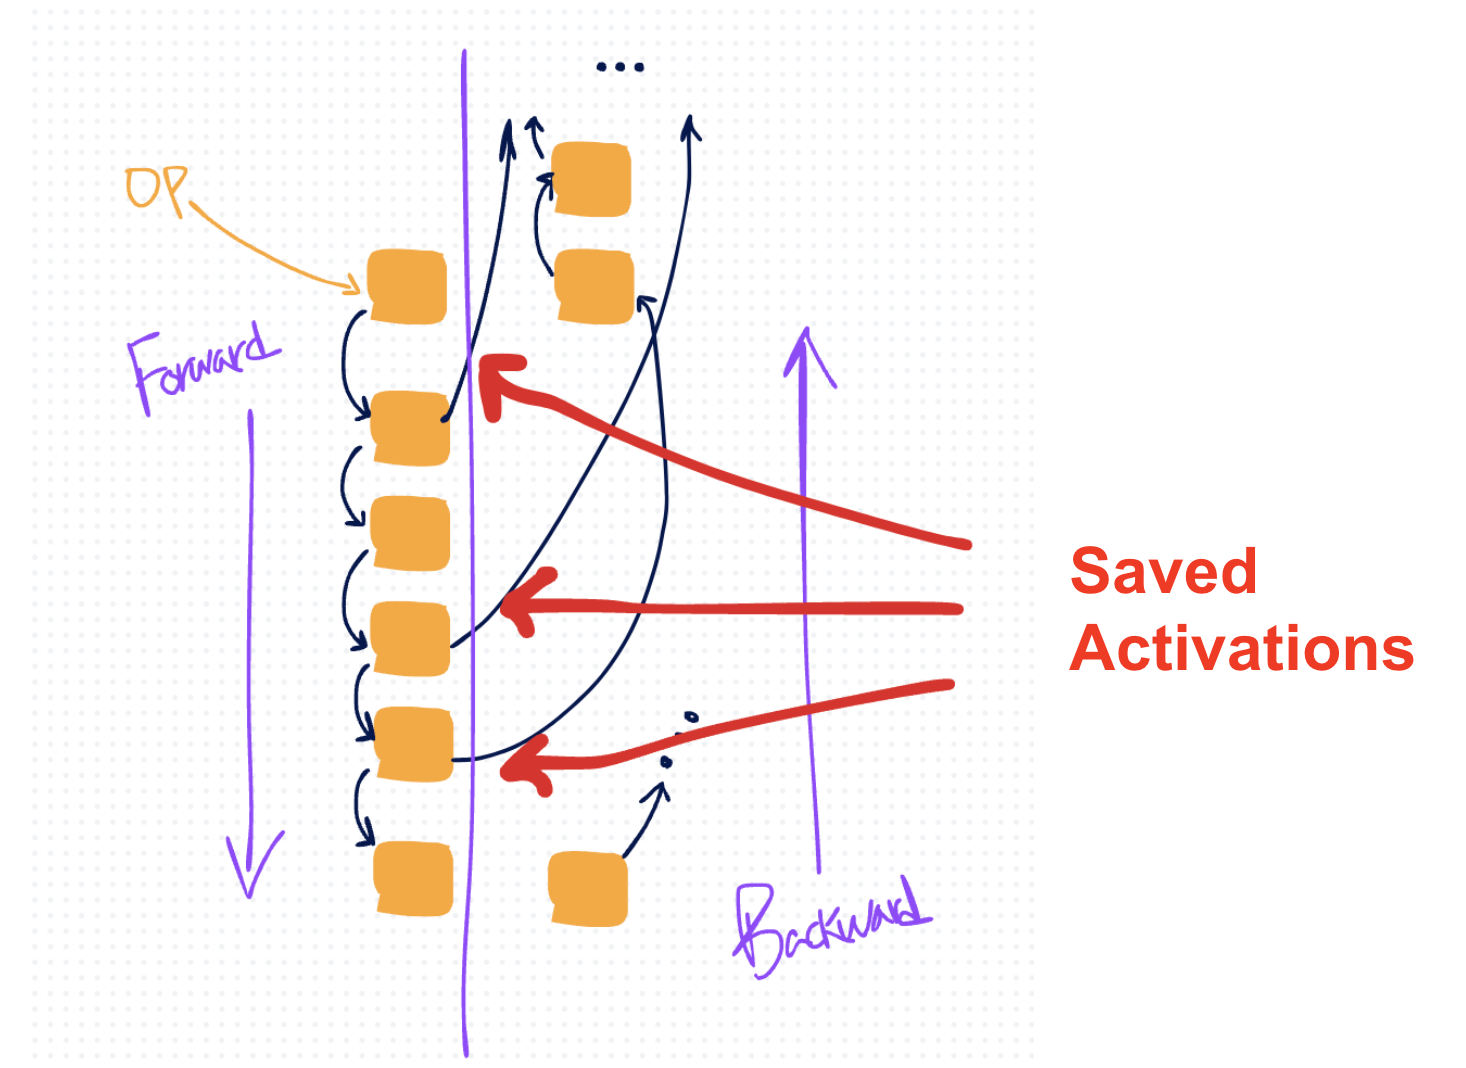
During forward, any operations performed inside the AC’d region do not save tensors for backward. (Only the inputs to the function are saved.) During backward, the intermediate activations needed for gradient computation are rematerialized by running the function a second time.

flow diagram

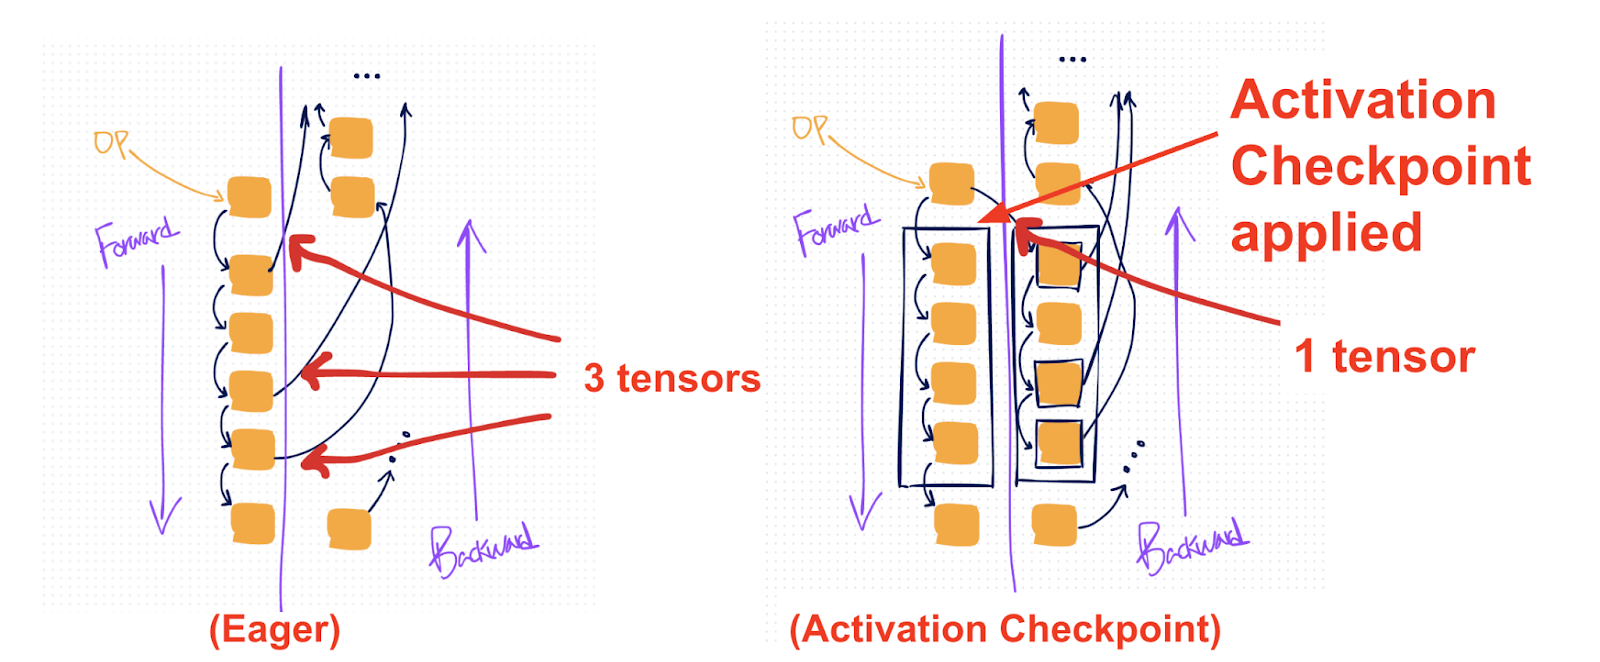
In the diagram (right), the black box shows where activation checkpointing is applied. Compared to the default eager approach (left), this setup results in fewer tensors being saved (1 versus 3).

Applying AC on the right parts of the model has the effect of reducing peak memory, because the intermediate activations are no longer materialized in memory when the memory usage typically peaks (at the beginning of backward).

On the speed-versus-memory tradeoff diagram, AC is plotted on the bottom-left. Relative to eager mode, it reduces the amount of memory saved for backward but comes with an added cost in compute due to recomputation.

flow diagram

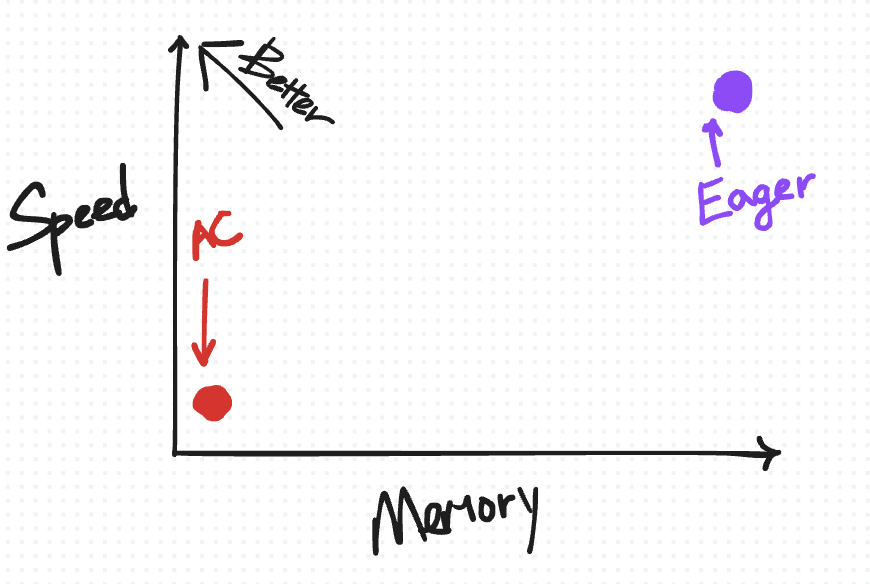
Note that AC’s speed–memory tradeoff /can/ be adjusted by selecting which parts of the forward pass to checkpoint and by defining how many checkpoint regions to use. However, implementing these changes may require modifying your model’s structure and can be cumbersome depending on how your code is organized. For the purposes of this diagram, we assume only one region is checkpointed; under this assumption, AC appears as a single point on the tradeoff diagram.

Also note that “memory” here does not refer to peak memory usage; rather, it indicates the how much memory is saved for backward for a fixed region.


torch.compile and min-cut partitioner

Another notable approach to keep in mind is torch.compile (introduced in PyTorch 2.0). Like activation checkpointing, torch.compile can also perform some level of recomputation under the hood. Specifically, it traces the forward and backward computations into a single joint graph, which is then processed by a “min-cut” partitioner. This partitioner uses a min-cut/max-flow algorithm to split the graph such that it minimizes the number of tensors that need to be saved for backward.

At first glance, this might sound a lot like what we want for activation memory reduction. However, the reality is more nuanced. By default, the partitioner’s primary goal is to reduce runtime. As a result, it only recomputes certain types of operations—primarily simpler, fusible, and non-compute-intensive ops (like pointwise ops).

Placing “compile” on the speed-versus-memory tradeoff diagram…

flow diagram

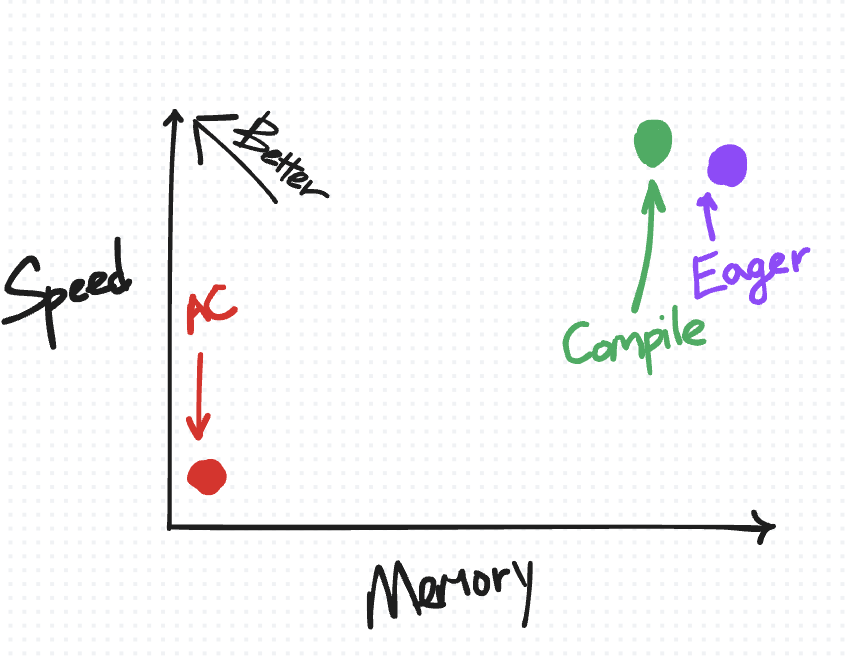
It is to the top-left of the eager non-AC point, as we expect torch.compile to improve on both speed and memory.

On the other hand, relative to activation checkpointing, torch.compile is more conservative about what it recomputes, placing it closer to the top-left on the speed-versus-memory diagram.


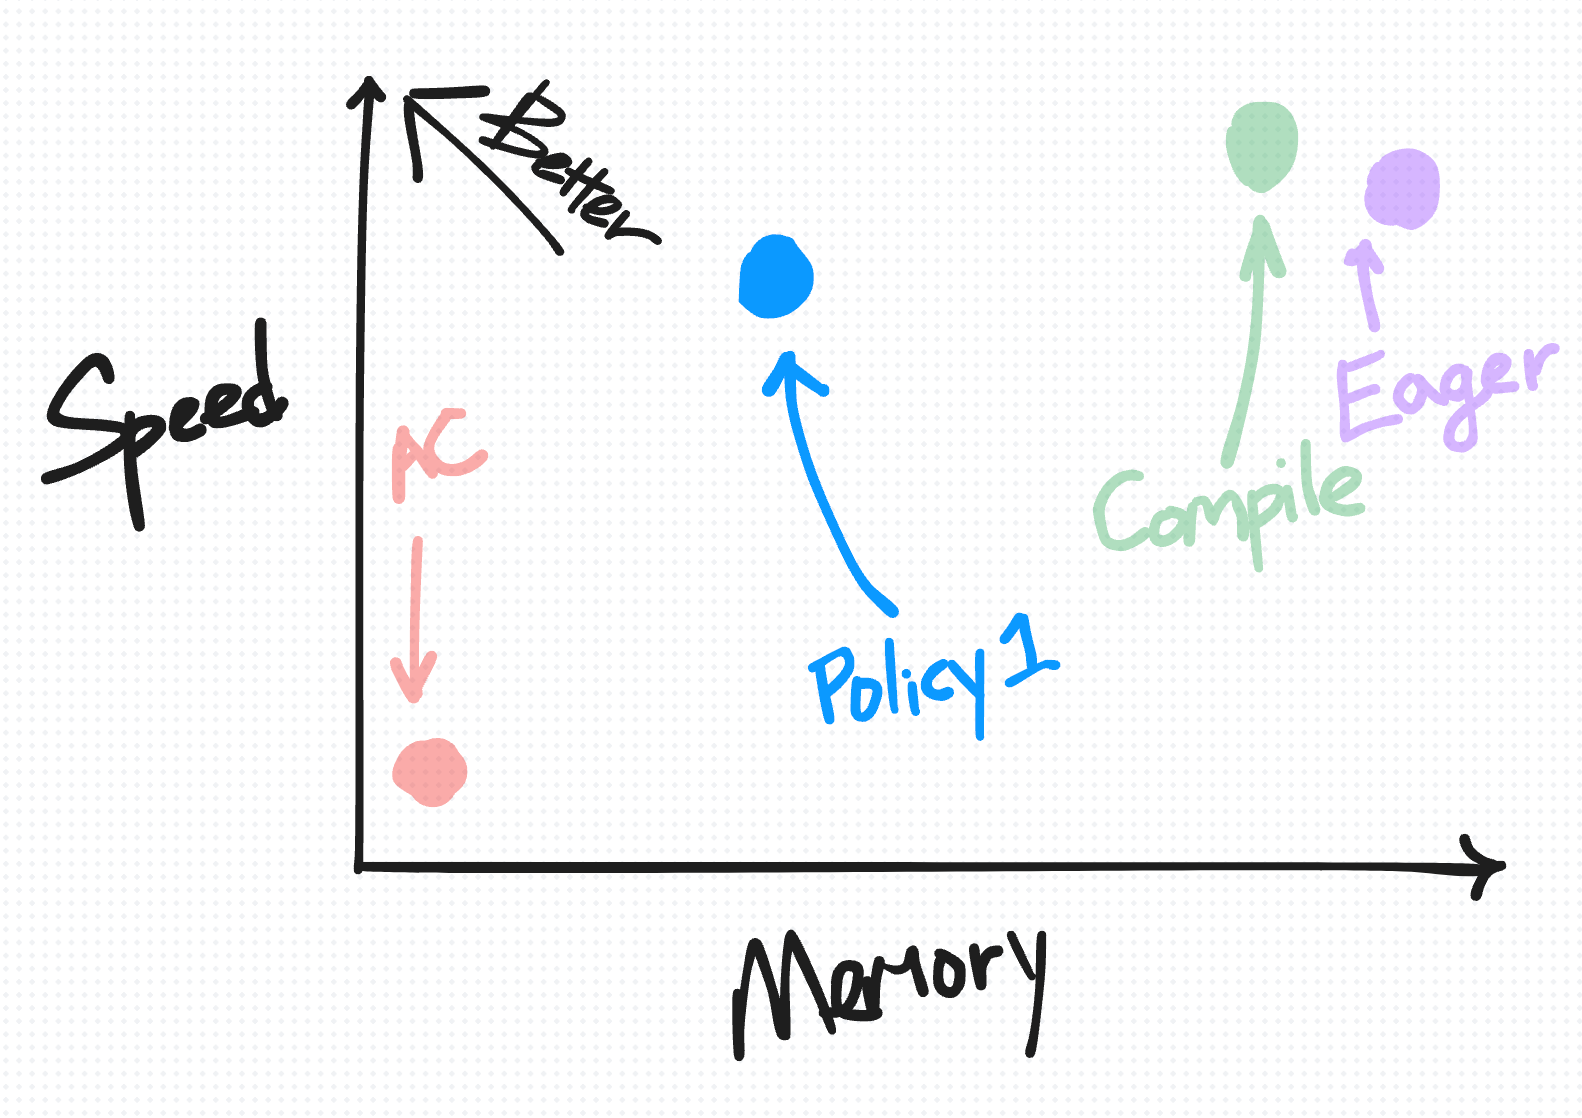
Selective Activation Checkpoint [NEW!]

While normal checkpointing recomputes every op in a chosen region, selective activation checkpointing (SAC) is an additional setting on top of activation checkpointing that you can apply to have a more granular control over which operations to recompute.

This can be useful if you have certain more expensive operations like matmuls which you prefer to avoid recomputing, but still generally want to recompute cheaper operations like pointwise.

flow diagram

Where plain AC (left) would save a single tensor and then recompute the entire AC’d region, with SAC (right) you can selectively save specific operations (marked red) in the region, so you can avoid recomputing them.

To specify what to selectively save, you can specify a policy_fn. To illustrate the additional trade offs you can make with this, we present two simple policy functions.

Policy 1: Not recomputing matmuls:

aten = torch.ops.aten
compute_intensive_ops = [  
        aten.mm,
        aten.bmm,
        aten.addmm,
] 
def policy_fn(ctx, op, *args, **kwargs):
    if op in compute_intensive_ops:
        return CheckpointPolicy.MUST_SAVE
    else:
        return CheckpointPolicy.PREFER_RECOMPUTE

flow diagram

Policy 2: More aggressively save anything compute intensive

# torch/_functorch/partitioners.py
aten = torch.ops.aten
compute_intensive_ops = [  
   aten.mm,
   aten.convolution,
   aten.convolution_backward,
   aten.bmm,
   aten.addmm,
   aten._scaled_dot_product_flash_attention,
   aten._scaled_dot_product_efficient_attention,
   aten._flash_attention_forward,
   aten._efficient_attention_forward,
   aten.upsample_bilinear2d,
   aten._scaled_mm
] 
def policy_fn(ctx, op, *args, **kwargs):
    if op in compute_intensive_ops:
        return CheckpointPolicy.MUST_SAVE
    else:
        return CheckpointPolicy.PREFER_RECOMPUTE

flow diagram

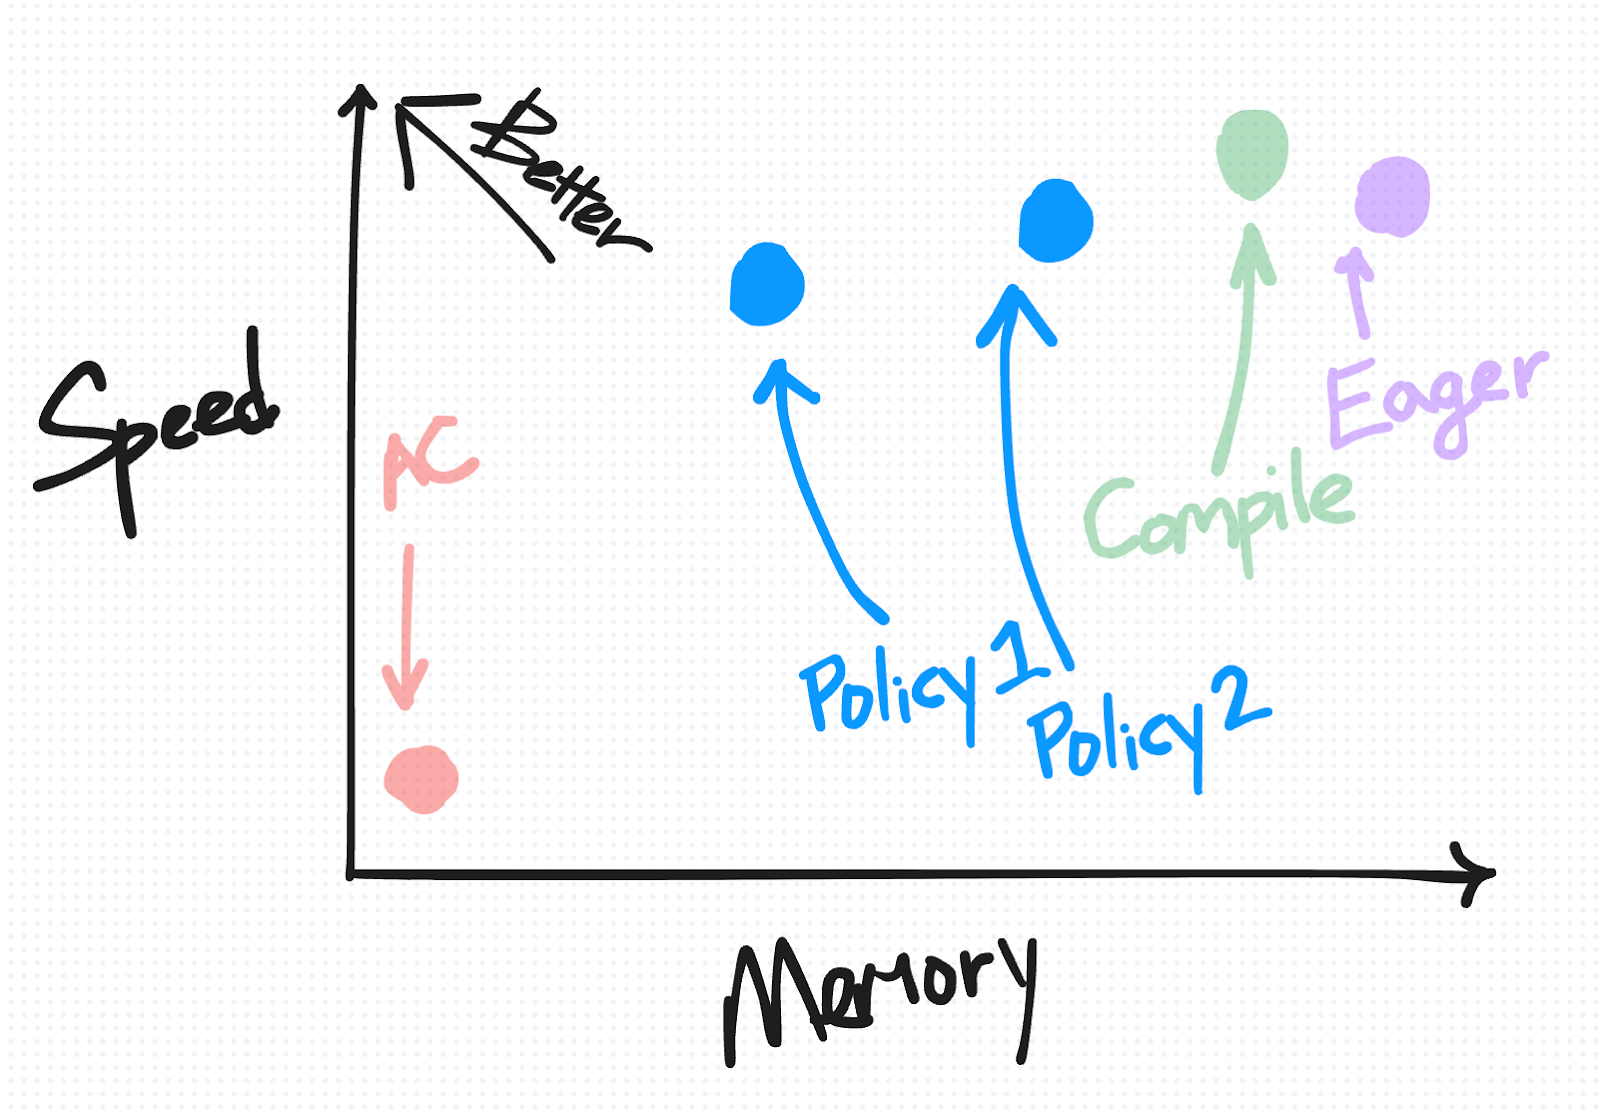
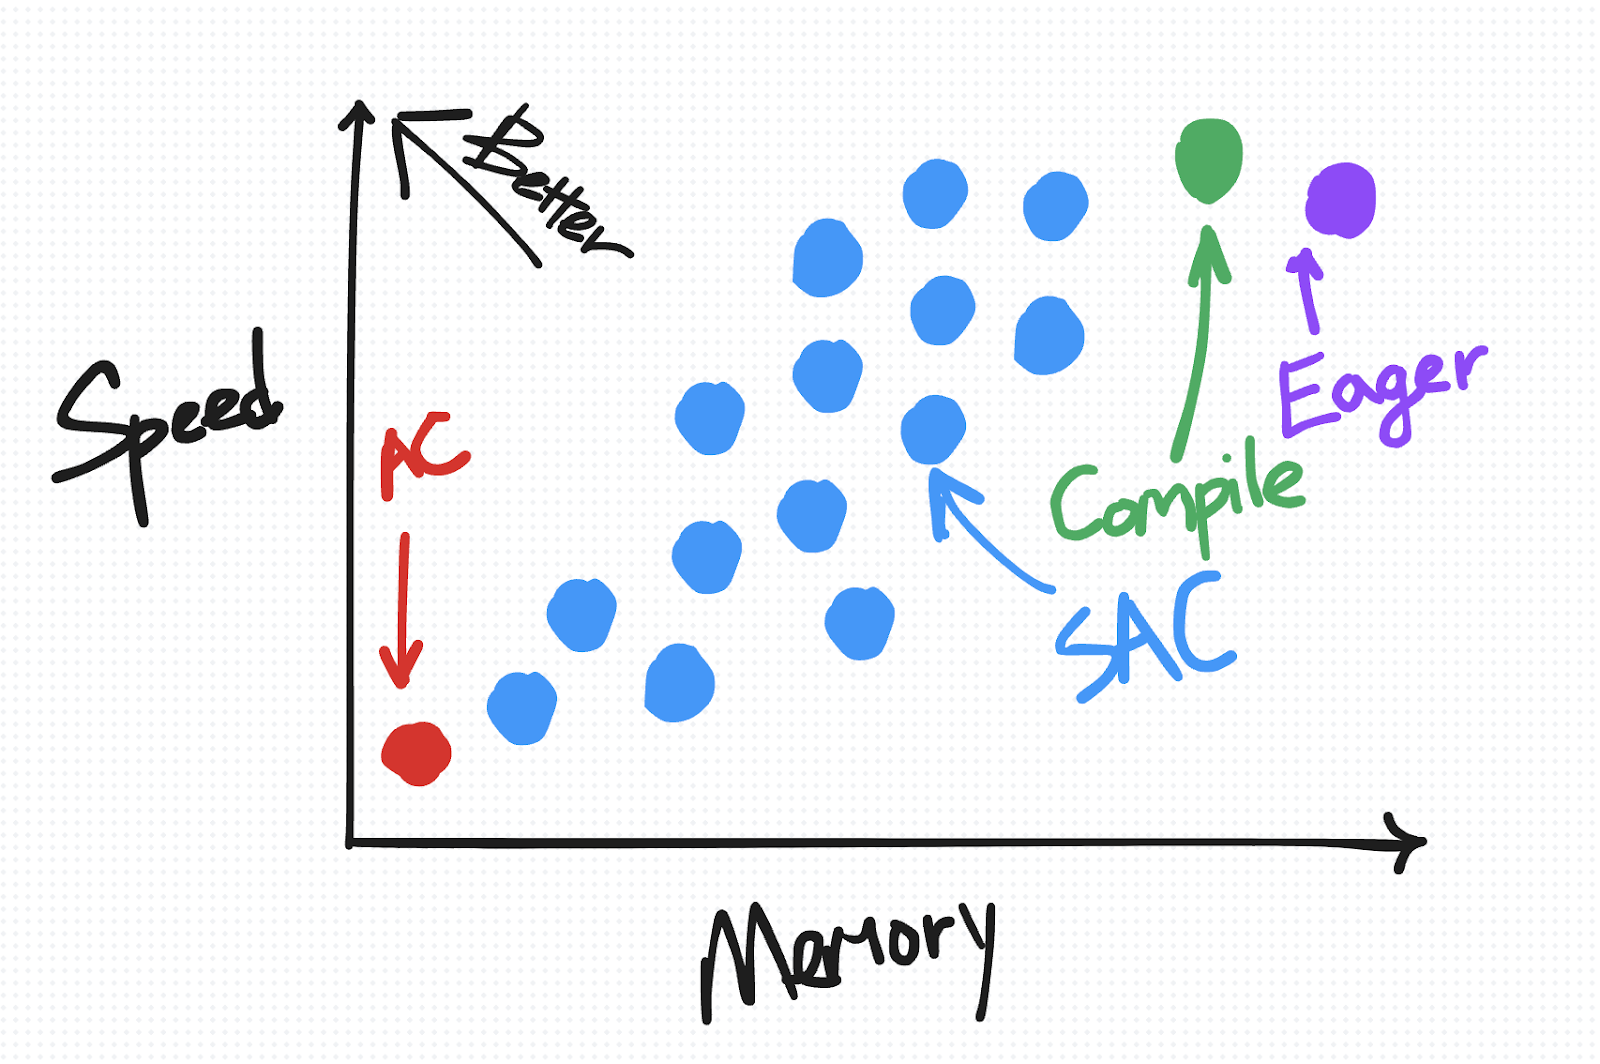
On the speed-versus-memory diagram, SAC is plotted as a range of points from closer to AC to closer to Eager, depending on your chosen policy.

flow diagram

Try it out! (Available in 2.5 as a prototype feature; see docs for more info + copy-pastable example)

from torch.utils.checkpoint import checkpoint, create_selective_checkpoint_contexts

# Create a policy function that returns a CheckpointPolicy
def policy_fn(ctx, op, *args, **kwargs):
    if op in ops_to_save:
        return CheckpointPolicy.MUST_SAVE
    else:
        return CheckpointPolicy.PREFER_RECOMPUTE

# Use the context_fn= arg of the existing checkpoint API
out = checkpoint(
    fn, *args,
    use_reentrant=False,
    # Fill in SAC context_fn's policy_fn with functools.partial
    context_fn=partial(create_selective_checkpoint_contexts, policy_fn),
)


(compile-only) Memory Budget API [NEW!]

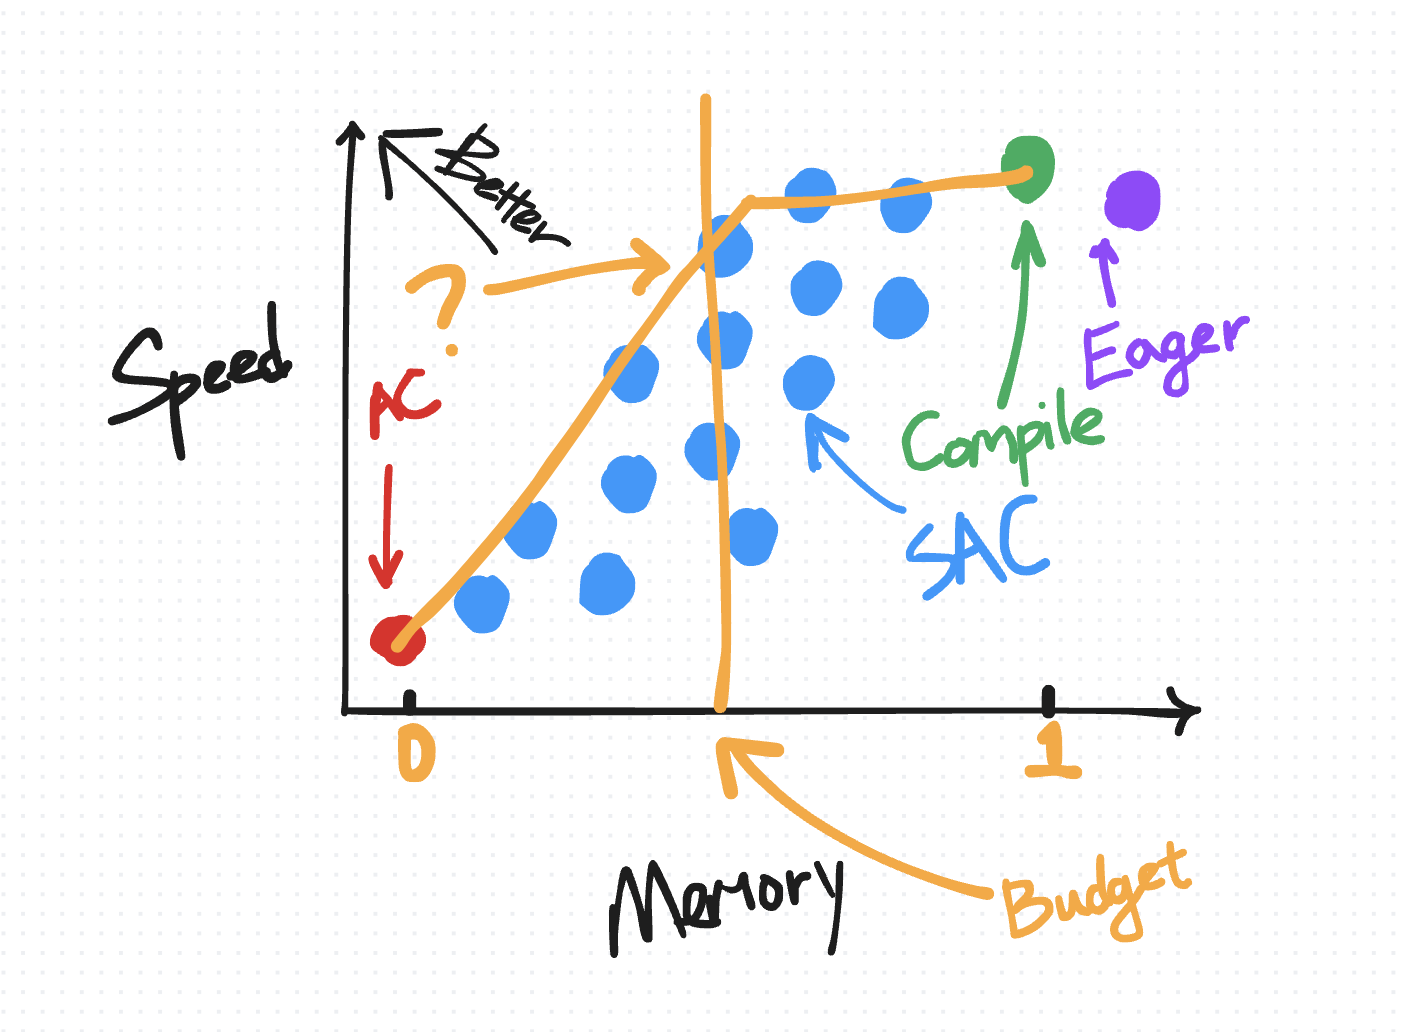
As mentioned previously, any given SAC policy can be represented as a point on a speed-memory tradeoff diagram. Not all policies are created equal, however. The “optimal” policies are the ones that fall on a pareto curve, e.g. for all policies that incur the same memory overhead, this policy is the one that minimizes the amount of required compute.

For users who are using torch.compile, we offer a memory budget API that automatically applies SAC over your compiled region with a pareto-optimal policy given a user-specified “memory budget” between 0 and 1, where a budget of 0 behaves like plain-AC and a budget of 1 behaves like default torch.compile.

flow diagram

Below are some real results on a transformer model:

flow diagram

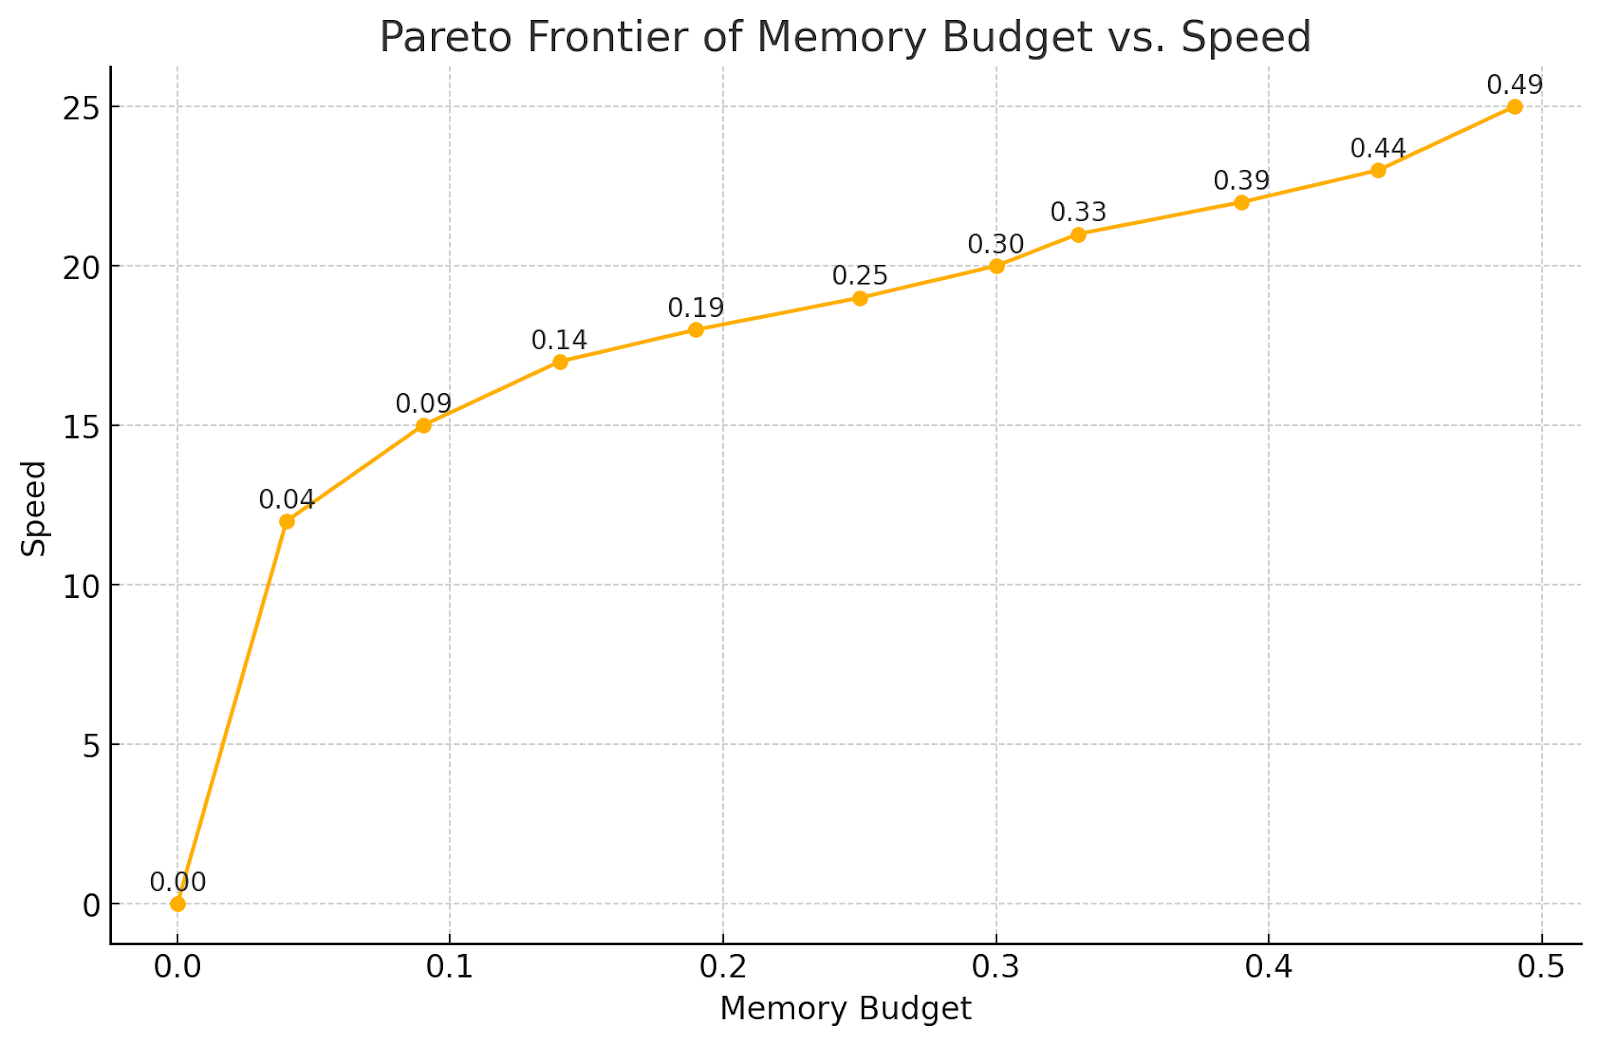
We observe a 50% memory reduction by recomputing only pointwise ops, with a steady drop-off as you recompute more and more of your matmuls. Attention is the most expensive, so you tend to want to recompute those last.

Try it out! (Available in 2.4 as an experimental feature; see this comment block for more info)

torch._dynamo.config.activation_memory_budget = 0.5

out = torch.compile(fn)(inp)

Conclusion

flow diagram

In summary, activation checkpointing techniques in PyTorch offer a variety of ways to balance memory and compute demands, from simple region-based checkpointing to more selective and automated methods. By choosing the option that best matches your model’s structure and resource constraints, you can achieve significant memory savings with an acceptable trade-off in compute.

Acknowledgements

We would like to thank Meta’s xformers team including Francisco Massa for working on the original version of Selective Activation Checkpoint.

Read More

Towards Automatic Assessment of Self-Supervised Speech Models Using Rank

This study explores using embedding rank as an unsupervised evaluation metric for general-purpose speech encoders trained via self-supervised learning (SSL). Traditionally, assessing the performance of these encoders is resource-intensive and requires labeled data from the downstream tasks. Inspired by the vision domain, where embedding rank has shown promise for evaluating image encoders without tuning on labeled downstream data, this work examines its applicability in the speech domain, considering the temporal nature of the signals. The findings indicate rank correlates with downstream…Apple Machine Learning Research

Speaker-IPL: Unsupervised Learning of Speaker Characteristics with i-Vector Based Pseudo-Labels

Iterative self-training, or iterative pseudo-labeling (IPL) — using an improved model from the current iteration to provide pseudo-labels for the next iteration — has proven to be a powerful approach to enhance the quality of speaker representations. Recent applications of IPL in unsupervised speaker recognition start with representations extracted from very elaborate self-supervised methods (e.g., DINO). However, training such strong self-supervised models is not straightforward (they require hyper-parameter tuning and may not generalize to out-of-domain data) and, moreover, may not be…Apple Machine Learning Research

M2R2: Mixture of Multi-Rate Residuals for Efficient Transformer Inference

Residual transformations enhance the representational depth and expressive power of large language models (LLMs). However, applying static residual transformations across all tokens in auto-regressive generation leads to a suboptimal trade-off between inference efficiency and generation fidelity. Existing methods, including Early Exiting, Skip Decoding, and Mixture-of-Depth address this by modulating the residual transformation based on token-level complexity. Nevertheless, these approaches predominantly consider the distance traversed by tokens through the model layers, neglecting the…Apple Machine Learning Research

Does Spatial Cognition Emerge in Frontier Models?

Not yet. We present SPACE, a benchmark that systematically evaluates spatial cognition in frontier models. Our benchmark builds on decades of research in cognitive science. It evaluates large-scale mapping abilities that are brought to bear when an organism traverses physical environments, smaller-scale reasoning about object shapes and layouts, and cognitive infrastructure such as spatial attention and memory. For many tasks, we instantiate parallel presentations via text and images, allowing us to benchmark both large language models and large multimodal models. Results suggest that…Apple Machine Learning Research

SELMA: A Speech-Enabled Language Model for Virtual Assistant Interactions

In this work, we present and evaluate SELMA, a Speech-Enabled Language Model for virtual Assistant interactions that integrates audio and text as inputs to a Large Language Model (LLM). SELMA is designed to handle three primary and two auxiliary tasks related to interactions with virtual assistants simultaneously within a single end-to-end model. We employ low-rank adaptation modules for parameter-efficient training of both the audio encoder and the LLM. Additionally, we implement a feature pooling strategy enabling the system to recognize global patterns and improve accuracy on tasks less…Apple Machine Learning Research

Accelerate AWS Well-Architected reviews with Generative AI

Accelerate AWS Well-Architected reviews with Generative AI

Building cloud infrastructure based on proven best practices promotes security, reliability and cost efficiency. To achieve these goals, the AWS Well-Architected Framework provides comprehensive guidance for building and improving cloud architectures. As systems scale, conducting thorough AWS Well-Architected Framework Reviews (WAFRs) becomes even more crucial, offering deeper insights and strategic value to help organizations optimize their growing cloud environments.

In this post, we explore a generative AI solution leveraging Amazon Bedrock to streamline the WAFR process. We demonstrate how to harness the power of LLMs to build an intelligent, scalable system that analyzes architecture documents and generates insightful recommendations based on AWS Well-Architected best practices. This solution automates portions of the WAFR report creation, helping solutions architects improve the efficiency and thoroughness of architectural assessments while supporting their decision-making process.

Scaling Well-Architected reviews using a generative AI-powered solution

As organizations expand their cloud footprint, they face several challenges in adhering to the Well-Architected Framework:

  • Time-consuming and resource-intensive manual reviews
  • Inconsistent application of Well-Architected principles across different teams
  • Difficulty in keeping pace with the latest best practices
  • Challenges in scaling reviews for large or numerous architectures

To address these challenges, we have built a WAFR Accelerator solution that uses generative AI to help streamline and expedite the WAFR process. By automating the initial assessment and documentation process, this solution significantly reduces time spent on evaluations while providing consistent architecture assessments against AWS Well-Architected principles. This allows teams to focus more on implementing improvements and optimizing AWS infrastructure. The solution incorporates the following key features:

  • Using a Retrieval Augmented Generation (RAG) architecture, the system generates a context-aware detailed assessment. The assessment includes a solution summary, an evaluation against Well-Architected pillars, an analysis of adherence to best practices, actionable improvement recommendations, and a risk assessment.
  •  An interactive chat interface allows deeper exploration of both the original document and generated content.
  • Integration with the AWS Well-Architected Tool pre-populates workload information and initial assessment responses.

This solution offers the following key benefits:

  • Rapid analysis and resource optimization – What previously took days of manual review can now be accomplished in minutes, allowing for faster iteration and improvement of architectures. This time efficiency translates to significant cost savings and optimized resource allocation in the review process.
  • Consistency and enhanced accuracy – The approach provides a consistent application of AWS Well-Architected principles across reviews, reducing human bias and oversight. This systematic approach leads to more reliable and standardized evaluations.
  • Depth of insight – Advanced analysis can identify subtle patterns and potential issues that might be missed in manual reviews, providing deeper insights into architectural strengths and weaknesses.
  • Scalability – The solution can handle multiple reviews simultaneously, making it suitable for organizations of all sizes, from startups to enterprises. This scalability allows for more frequent and comprehensive reviews.
  • Interactive exploration -The generative AI-driven chat interface allows users to dive deeper into the assessment, asking follow-up questions and gaining a better understanding of the recommendations. This interactivity enhances engagement and promotes more thorough comprehension of the results.

Solution overview

The WAFR Accelerator is designed to streamline and enhance the architecture review process by using the capabilities of generative AI through Amazon Bedrock and other AWS services. This solution automates the analysis of complex architecture documents, evaluating them against the AWS Well-Architected Framework’s pillars and providing detailed assessments and recommendations.

The solution consists of the following capabilties:

  • Generative AI-powered analysis – Uses Amazon Bedrock to rapidly analyze architecture documents against AWS Well-Architected best practices, generating detailed assessments and recommendations.
  • Knowledge base integration – Incorporates up-to-date WAFR documentation and cloud best practices using Amazon Bedrock Knowledge Bases, providing accurate and context-aware evaluations.
  • Customizable – Uses prompt engineering, which enables customization and iterative refinement of the prompts used to drive the large language model (LLM), allowing for refining and continuous enhancement of the assessment process.
  • Integration with the AWS Well-Architected Tool – Creates a Well-Architected workload milestone for the assessment and prepopulates answers for WAFR questions based on generative AI-based assessment.
  • Generative AI-assisted chat – Offers an AI-driven chat interface for in-depth exploration of assessment results, supporting multi-turn conversations with context management.
  • Scalable architecture – Uses AWS services like AWS Lambda and Amazon Simple Queue Service (Amazon SQS) for efficient processing of multiple reviews.
  • Data privacy and network security – With Amazon Bedrock, you are in control of your data, and all your inputs and customizations remain private to your AWS account. Your data, such as prompts, completions, custom models, and data used for fine-tuning or continued pre-training, is not used for service improvement and is never shared with third-party model providers. Your data remains in the AWS Region where the API call is processed. All data is encrypted in transit and at rest. You can use AWS PrivateLink to create a private connection between your VPC and Amazon Bedrock.

A human-in-the-loop review is still crucial to validate the generative AI findings, checking for accuracy and alignment with organizational requirements.

The following diagram illustrates the solution’s technical architecture.

solution-architecture

The workflow consists of the following steps:

  1. WAFR guidance documents are uploaded to a bucket in Amazon Simple Storage Service (Amazon S3). These documents form the foundation of the RAG architecture. Using Amazon Bedrock Knowledge Base, the sample solution ingests these documents and generates embeddings, which are then stored and indexed in Amazon OpenSearch Serverless. This creates a vector database that enables retrieval of relevant WAFR guidance during the review process
  2. Users access the WAFR Accelerator Streamlit application through Amazon CloudFront, which provides secure and scalable content delivery. User authentication is handled by Amazon Cognito, making sure only authenticated user have access.
  3. Users upload their solution architecture document in PDF format using the Streamlit application running on an Amazon Elastic Compute Cloud (Amazon EC2) instance that stores it in an S3 bucket. On submission, the WAFR review process is invoked by Amazon SQS, which queues the review request.
  4. The WAFR reviewer, based on Lambda and AWS Step Functions, is activated by Amazon SQS. It orchestrates the review process, including document content extraction, prompt generation, solution summary, knowledge embedding retrieval, and generation.
  5. Amazon Textract extracts the content from the uploaded documents, making it machine-readable for further processing.
  6. The WAFR reviewer uses Amazon Bedrock Knowledge Bases’ fully managed RAG workflow to query the vector database in OpenSearch Serverless, retrieving relevant WAFR guidance based on the selected WAFR pillar and questions. Metadata filtering is used to improve retrieval accuracy.
  7. Using the extracted document content and retrieved embeddings, the WAFR reviewer generates an assessment using Amazon Bedrock. A workload is created in the AWS Well-Architected Tool with answers populated with the assessment results. This allows users to download initial version of the AWS Well-Architected report from the AWS Well-Architected Tool console on completion of the assessment.
  8. The assessment is also stored in an Amazon DynamoDB table for quick retrieval and future reference.
  9. The WAFR Accelerator application retrieves the review status from the DynamoDB table to keep the user informed.
  10. Users can chat with the content using Amazon Bedrock, allowing for deeper exploration of the document, assessment, and recommendations.
  11. Once the assessment is complete, human reviewers can review it in the AWS Well-Architected Tool.

Deploy the solution

To implement the solution in your own environment, we’ve provided resources in the following GitHub repo to guide you through the process. The setup is streamlined using the AWS Cloud Development Kit (AWS CDK), which allows for infrastructure as code (IaC) deployment. For step-by-step instructions, we’ve prepared a detailed README file that walks you through the entire setup process.

To get started, complete the following steps:

  1. Clone the provided repository containing the AWS CDK code and README file.
  2. Review the README file for prerequisites and environment setup instructions.
  3. Follow the AWS CDK deployment steps outlined in the documentation.
  4. Configure necessary environment-specific parameters as described.

Deploying and running this solution in your AWS environment will incur costs for the AWS services used, including but not limited to Amazon Bedrock, Amazon EC2, Amazon S3, and DynamoDB. It is highly recommended that you use a separate AWS account and setup AWS Budget to monitor the costs.

DISCLAIMER: This is sample code for non-production usage. You should work with your security and legal teams to adhere to your organizational security, regulatory, and compliance requirements before deployment.

Test the solution

The following diagram illustrates the workflow for using the application.

workflow

To demonstrate how generative AI can accelerate AWS Well-Architected reviews, we have developed a Streamlit-based demo web application that serves as the front-end interface for initiating and managing the WAFR review process.

Complete the following steps to test the demo application:

  1. Open a new browser window and enter the CloudFront URL provided during the setup.
  2. Add a new user to the Amazon Cognito user pool deployed by the AWS CDK during the setup. Log in to the application using this user’s credentials.
  3. Choose New WAFR Review in the navigation pane.
  4. For Analysis type, choose the analysis type:
    • Quick – You can generate a quick analysis without creating a workload in the AWS Well-Architected Tool. This option is faster because it groups the questions for an individual pillar into a single prompt. It’s suitable for an initial assessment.
    • Deep with Well-Architected Tool – You can generate a comprehensive and detailed analysis that automatically creates a workload in the AWS Well-Architected tool. This thorough review process requires more time to complete as it evaluates each question individually rather than grouping them together. The deep review typically takes approximately 20 minutes, though the actual duration may vary depending on the document size and the number of Well- Architected pillars selected for evaluation.
  5. Enter the analysis name and description.
  6. Choose the AWS Well-Architected lens and desired pillars.
  7. Upload your solution architecture or technical design document
  8. Choose Create WAFR Analysis.wafr-results
  9. Choose Existing WAFR Reviews in the navigation pane.
  10. Choose your newly submitted analysis.

After the status changes to Completed, you can view the WAFR analysis at the bottom of the page. For multiple reviews, choose the relevant analysis on the dropdown menu.

You can chat with the uploaded document as well as the other generated content by using the WAFR Chat section on the Existing WAFR Reviews page.

Improving assessment quality

The solution uses prompt engineering to optimize textual input to the foundation model (FM) to obtain desired assessment responses. The quality of prompt (the system prompt, in this case) has significant impact on the model output. The solution provides a sample system prompt that is used to drive the assessment. You could enhance this prompt further to align with specific organizational needs. This becomes more crucial when defining and ingesting your own custom lenses.

Another important factor is the quality of the document that is uploaded for assessment. Detailed and architecture-rich documents can result in better inferences and therefore finer assessments. Prompts are defined in such a way that if there is inadequate information for assessment, then it’s highlighted in the output. This minimizes hallucination by the FM and provides a potential opportunity to enrich your design templates in alignment with AWS Well-Architected content.

You could further enhance this solution by using Amazon Bedrock Guardrails to further reduce hallucinations and ground responses in your own source information.

At the time of writing of this blog, only the AWS Well-Architected Framework, Financial Services Industry, and Analytics lenses have been provisioned. However, other lenses, including custom lenses, could be added with a few refinements to the UI application and underlying data store.

Clean up

After you’ve finished exploring or using the solution and no longer require these resources, be sure to clean them up to avoid ongoing charges. Follow these steps to remove all associated resources:

  1. Navigate to the directory containing your AWS CDK code.
  2. Run the following command: cdk destroy.
  3. Confirm the deletion when prompted.
  4. Manually check for and delete any resources that might not have been automatically removed, such as S3 buckets with content or custom IAM roles.
  5. Verify that all related resources have been successfully deleted.

Conclusion

In this post, we showed how generative AI and Amazon Bedrock can play a crucial role in expediting and scaling the AWS Well-Architected Framework reviews within an organization. By automating document analysis and using a WAFR-aware knowledge base, the solution offers rapid and in-depth assessments, helping organizations build secure, high-performing, resilient, and efficient infrastructure for a variety of applications and workloads.

To learn more, refer to the following:


About the Authors

Shoeb Bustani is a Senior Enterprise Solutions Architect at AWS, based in the United Kingdom. As a senior enterprise architect, innovator, and public speaker, he provides strategic architectural partnership and guidance to help customers achieve their business outcome leveraging AWS services and best practices.

Brijesh Pati is an Enterprise Solutions Architect at AWS, helping enterprise customers adopt cloud technologies. With a background in application development and enterprise architecture, he has worked with customers across sports, finance, energy, and professional services sectors. Brijesh specializes in AI/ML solutions and has experience with serverless architectures.

Rohan Ghosh is as an Enterprise Solutions Architect at Amazon Web Services (AWS), specializing in the Advertising and Marketing sector. With extensive experience in Cloud Solutions Engineering, Application Development, and Enterprise Support, he helps organizations architect and implement cutting-edge cloud solutions. His current focus areas include Data Analytics and Generative AI, where he guides customers in leveraging AWS technologies to drive innovation and business transformation.

Read More

Dynamic metadata filtering for Amazon Bedrock Knowledge Bases with LangChain

Dynamic metadata filtering for Amazon Bedrock Knowledge Bases with LangChain

Amazon Bedrock Knowledge Bases offers a fully managed Retrieval Augmented Generation (RAG) feature that connects large language models (LLMs) to internal data sources. It’s a cost-effective approach to improving LLM output so it remains relevant, accurate, and useful in various contexts. It also provides developers with greater control over the LLM’s outputs, including the ability to include citations and manage sensitive information.

Amazon Bedrock Knowledge Bases has a metadata filtering capability that allows you to refine search results based on specific attributes of the documents, improving retrieval accuracy and the relevance of responses. These metadata filters can be used in combination with the typical semantic (or hybrid) similarity search. Improving document retrieval results helps personalize the responses generated for each user. Dynamic metadata filters allow you to instantly create custom queries based on the varying user profiles or user-inputted responses so the documents retrieved only contain information relevant to the your needs.

In this post, we discuss using metadata filters with Amazon Bedrock Knowledge Bases.

Solution overview

The following code is an example metadata filter for Amazon Bedrock Knowledge Bases. Logical operators (such as AND or OR) can be nested to combine other logical operators and filter conditions. For more information, refer to the Retrieve API.

{
    "andAll": [
        {
            "equals": {
                "key": "desired_destination",
                "value": "<UNKNOWN>"  # This will be overwritten with appropriate values at runtime
            }
        },
        {
            "equals": {
                "key": "travelling_with_children",
                "value": "<UNKNOWN>"  # This will be overwritten with appropriate values at runtime
            }
        }
    ]
}

For our use case, we use an example of a travel website where the user answers a few questions about their travel preferences (including desired destination, preferred activities, and traveling companions) and then the system retrieves relevant documents.

We exclusively focus on the retrieval portion of RAG in this post. We provide the upstream components, including document ingestion and query formatting, as static data instead of code. The downstream generation component is out of scope for this post.

Prerequisites

To follow along with this post, you should understand basic retrieval techniques such as similarity search.

Additionally, you need an Amazon Bedrock knowledge base populated with documents and metadata. For instructions, see Create an Amazon Bedrock knowledge base. We have provided example documents and metadata in the accompanying GitHub repo for you to upload.

The associated notebook contains the required library imports and environment variables. Make sure you run the notebook using an AWS Identity and Access Management (IAM) role with the correct permissions for Amazon Simple Storage Service (Amazon S3) and Amazon Bedrock (AmazonS3FullAccess and AmazonBedrockFullAccess, respectively). We recommend running the notebook locally or in Amazon SageMaker. Then you can run the following code to test your AWS and knowledge base connection:

# Test AWS connection
# Create a session using your AWS credentials
session = boto3.Session()

# Create an STS client
sts_client = session.client('sts')

# Get the caller identity
response = sts_client.get_caller_identity()

# Print the response
print(response)

knowledge_base_id = 'XXXXXXXXXX'

retrieval_config = {
    "vectorSearchConfiguration": {
        "numberOfResults": 4,
        "overrideSearchType": "HYBRID"
    }
}

# Test bedrock knowledge bases connection
client = boto3.client('bedrock-agent-runtime')

response = client.retrieve(
    knowledgeBaseId=knowledge_base_id,
    retrievalConfiguration=retrieval_config,
    retrievalQuery={"text": "Hello world"}
)

print(response)

Create a dynamic filter

The "value" field within the filter needs to be updated at request time. This means overwriting the retrieval_config object, as shown in the following figure. The placeholder values in the filter get overwritten with the user data at runtime.

Visual of how the placeholder value of keys is updated with the actual values in the user data

Because the retrieval_config object is a nested hierarchy of logical conditions (a tree), you can implement a breadth first search to identify and replace all the "value" field values (where "value" is the key and "<UNKNOWN>" is the placeholder value) with the corresponding value from the user data. See the following code:

def setup_retrieval_config(inputs):

    # Make a copy because the filter is updated dynamically based on the user_data, this allows you to start from the default each time
    local_retrieval_config = copy.deepcopy(retrieval_config)

    updated_vector_search_config = replace_values(local_retrieval_config["vectorSearchConfiguration"], inputs["user_data"])
    local_retrieval_config["vectorSearchConfiguration"] = updated_vector_search_config

    return local_retrieval_config

def replace_values(vector_search_config: Dict, user_data: Dict):
    # Replace the value fields in the filter with the correct value according to the user_data
    # Uses breadth first search to find all of the value fields

    # Filter is not a required key, if you do not want any filters get rid of the key
    if "filter" in vector_search_config and not vector_search_config["filter"]:
        del vector_search_config["filter"]

    # Recursively traverse from the root
    elif 'filter' in vector_search_config:
        vector_search_config['filter'] = replace_values(vector_search_config['filter'], user_data)

    # At a node that is not the root
    else:
        for key, value in vector_search_config.items():
            if isinstance(value, dict):

                # At a leaf e.g. {"key": "age", "value": ""}}
                if 'key' in value and 'value' in value:

                    # Only overwrite value['value'] that are not unknown
                    if value['key'] in user_data and not (value["value"] == "unknown" or value["value"] == ["unknown"]):

                        # Primitive data type
                        if type(value["value"]) in [str, int, float, bool]:
                            value['value'] = user_data[value['key']]

                        # List data type
                        elif isinstance(value["value"], list):
                            value['value'] = [user_data[value['key']]]
                        else:
                            raise ValueError(f"Unsupported value['value'] type {type(value['value'])}")
                else:
                    vector_search_config[key] = replace_values(value, user_data)

            # Recurse on each item in the list
            elif isinstance(value, list):
                vector_search_config[key] = [replace_values(item, user_data) for item in value]
            else:
                raise ValueError(f"Unsupported value type {type(value)}")

    return vector_search_config

Option 1: Create a retriever each time

To define the retrieval_config parameter dynamically, you can instantiate AmazonKnowledgeBasesRetriever each time. This integrates into a larger LangChain centric code base. See the following code:

def create_retrieval_chain() -> Runnable:
        """
        Creates a retrieval chain for the retriever.

        Returns:
            Runnable: The retrieval chain.
        """

        query = create_query_for_retrieval()

        def create_retriever(inputs):
            # This wrapper is necessary because if you return a callable object LangChain will automatically call it immediately, which is not the desired behavior
            # instead we want to call the retriever on the next step of the chain
            retriever_wrapper = {"retriever": AmazonKnowledgeBasesRetriever(knowledge_base_id=knowledge_base_id, retrieval_config=inputs["retrieval_config"])}
            return retriever_wrapper

        # Retrieval chain has three steps: (1) create the filter based off of the user data, (2) create the retriever, and (3) invoke the retriever
        retrieval_chain = (
            {
                "user_data" : itemgetter("user_data"),
                "retrieval_config" : lambda inputs: setup_retrieval_config(inputs)
            } |
            {
                "query" : query,
                "retriever" : lambda inputs: create_retriever(inputs)
            } |
            RunnableLambda(lambda inputs: inputs["retriever"]["retriever"].invoke(inputs["query"]))
        )
        return retrieval_chain

Option 2: Access the underlying Boto3 API

The Boto3 API is able to directly retrieve with a dynamic retrieval_config. You can take advantage of this by accessing the object that AmazonKnowledgeBasesRetriever wraps. This is slightly faster but is less pythonic because it relies on LangChain implementation details, which may change without notice. This requires additional code to adapt the output to the proper format for a LangChain retriever. See the following code:

retriever = AmazonKnowledgeBasesRetriever(
    knowledge_base_id=knowledge_base_id,
    retrieval_config=retrieval_config
)

def create_retrieval_chain() -> Runnable:
        """
        Creates a retrieval chain for the retriever.

        Returns:
            Runnable: The retrieval chain.
        """

        query = create_query_for_retrieval()
        
        def retrieve_and_format(inputs):
            results = retriever.client.retrieve(
                retrievalQuery={"text": inputs["query"]}, 
                knowledgeBaseId=knowledge_base_id, 
                retrievalConfiguration=inputs["retrieval_config"]
            )
        
            documents = []
            for result in results["retrievalResults"]:
                metadata = {
                    "location": result["location"],
                    "source_metadata": result["metadata"],
                    "score": result["score"],
                }

                document = Document(
                    page_content=result["content"]["text"],
                    metadata=metadata
                )
                documents.append(document)
            
            return documents

        retrieval_chain = (
            {
                "query" : query,
                "retrieval_config" : lambda inputs: setup_retrieval_config(inputs)
            } |
            RunnableLambda(lambda inputs: retrieve_and_format(inputs))
            # RunnableLambda(lambda inputs: retriever.client.retrieve(retrievalQuery={"text": inputs["query"]}, knowledgeBaseId=knowledge_base_id, retrievalConfiguration=inputs["retrieval_config"]))
        )
        return retrieval_chain

retrieval_chain_2 = create_retrieval_chain()

Results

Begin by reading in the user data. This example data contains user answers to an online questionnaire about travel preferences. The user_data fields must match the metadata fields.

with open("data/user_data.json", "r") as file:
user_data = json.load(file)

print(json.dumps(user_data[:2], indent=2))

Here is a preview of the user_data.json file from which certain fields will be extracted as values for filters.

{
        "trip_id": 1,
        "desired_destination": "Bali, Indonesia",
        "stay_duration": 7,
        "age": 35,
        "gender": "male",
        "companion": "solo",
	"travelling_with_children": "no",
        "travelling_with_pets": "no"
    },
    {
        "trip_id": 2,
        "desired_destination": "Paris, France",
        "stay_duration": 5,
        "age": 28,
        "gender": "female",
        "companion": "solo",
	"travelling_with_children": "no",
        "travelling_with_pets": "yes"
    },

Test the code with filters turned on and off. Only use a few filtering criteria because restrictive filters might return zero documents.

filters_to_test: List = [
    {
        "andAll": [
            {
                "equals": {
                    "key": "desired_destination",
                    "value": "<UNKNOWN>"  # This will be overwritten with appropriate values at runtime
                }
            },
            {
                "equals": {
                    "key": "travelling_with_children",
                    "value": "<UNKNOWN>"  # This will be overwritten with appropriate values at runtime
                }
            }
        ]
    },
    None
]

Finally, run both retrieval chains through both sets of filters for each user:

retrieval_chains = [retrieval_chain_1, retrieval_chain_2]

results = []

for retrieval_chain_id, retrieval_chain in enumerate(retrieval_chains):
    logger.info(retrieval_chain_id)
    # Loop through each filter options
    for filter in filters_to_test:
        retrieval_config["vectorSearchConfiguration"]["filter"] = filter
        # Loop through each user data entry
        for user_entry in user_data:
            inputs = {
                    "user_data": user_entry,
                    "retrieval_config": retrieval_config
                }

            # Run the retrieval chain with the current user entry
            try:
                result = retrieval_chain.invoke(inputs)
                # print(f"Result for user entry {user_entry['trip_id']}: {result}")
                results.append(({'retrieval_chain_id': retrieval_chain_id, 'user': user_entry, 'documents': result}))

            except Exception as e:
                print(f"Error during retrieval for user entry {user_entry['trip_id']}: {e}")

When analyzing the results, you can see that the first half of the documents are identical to the second half. In addition, when metadata filters aren’t used, the documents retrieved are occasionally for the wrong location. For example, trip ID 2 is to Paris, but the retriever pulls documents about London.

Excerpt of output table for reference:

Retrieval Approach Filter Trip ID Destination Page Content Metadata
Option_0 TRUE 2 Paris, France As a 70-year-old retiree, I recently had the pleasure of visiting Paris for the first time. It was a trip I had been looking forward to for years, and I was not disappointed. Here are some of my favorite attractions and activities that I would recommend to other seniors visiting the city.  First on my list is the Eiffel Tower… {‘location’: {‘s3Location’: {‘uri’: ‘s3://{YOUR_S3_BUCKET}/travel_reviews_titan/Paris_6.txt‘}, ‘type’: ‘S3’}, ‘score’: 0.48863396, ‘source_metadata’: {‘x-amz-bedrock-kb-source-uri’: ‘s3://{YOUR_S3_BUCKET}/travel_reviews_titan/Paris_6.txt‘, ‘travelling_with_children’: ‘no’, ‘activities_interest’: [‘museums’, ‘palaces’, ‘strolling’, ‘boat tours’, ‘neighborhood tours’], ‘companion’: ‘unknown’, ‘x-amz-bedrock-kb-data-source-id’: {YOUR_KNOWLEDGE_BASE_ID}, ‘stay_duration’: ‘unknown’, ‘preferred_month’: [‘unknown’], ‘travelling_with_pets’: ‘unknown’, ‘age’: [’71’, ’80’], ‘x-amz-bedrock-kb-chunk-id’: ‘1%3A0%3AiNKlapMBdxcT3sYpRK-d’, ‘desired_destination’: ‘Paris, France’}}
Option_0 TRUE 2 Paris, France As a 35-year-old traveling with my two dogs, I found Paris to be a pet-friendly city with plenty of attractions and activities for pet owners. Here are some of my top recommendations for traveling with pets in Paris:  The Jardin des Tuileries is a beautiful park located between the Louvre Museum and the Place de la Concorde… {‘location’: {‘s3Location’: {‘uri’: ‘s3://{YOUR_S3_BUCKET}/travel_reviews_titan/Paris_9.txt‘}, ‘type’: ‘S3’}, ‘score’: 0.474106, ‘source_metadata’: {‘x-amz-bedrock-kb-source-uri’: ‘s3://{YOUR_S3_BUCKET}/travel_reviews_titan/Paris_9.txt‘, ‘travelling_with_children’: ‘no’, ‘activities_interest’: [‘parks’, ‘museums’, ‘river cruises’, ‘neighborhood exploration’], ‘companion’: ‘pets’, ‘x-amz-bedrock-kb-data-source-id’: {YOUR_KNOWLEDGE_BASE_ID}, ‘stay_duration’: ‘unknown’, ‘preferred_month’: [‘unknown’], ‘travelling_with_pets’: ‘yes’, ‘age’: [’30’, ’31’, ’32’, ’33’, ’34’, ’35’, ’36’, ’37’, ’38’, ’39’, ’40’], ‘x-amz-bedrock-kb-chunk-id’: ‘1%3A0%3Aj52lapMBuHB13c7-hl-4’, ‘desired_destination’: ‘Paris, France’}}
Option_0 TRUE 2 Paris, France If you are looking for something a little more active, I would suggest visiting the Bois de Boulogne. This large park is located on the western edge of Paris and is a great place to go for a walk or a bike ride with your pet. The park has several lakes and ponds, as well as several gardens and playgrounds… {‘location’: {‘s3Location’: {‘uri’: ‘s3://{YOUR_S3_BUCKET}/travel_reviews_titan/Paris_5.txt‘}, ‘type’: ‘S3’}, ‘score’: 0.45283788, ‘source_metadata’: {‘x-amz-bedrock-kb-source-uri’: ‘s3://{YOUR_S3_BUCKET}/travel_reviews_titan/Paris_5.txt‘, ‘travelling_with_children’: ‘no’, ‘activities_interest’: [‘strolling’, ‘picnic’, ‘walk or bike ride’, ‘cafes and restaurants’, ‘art galleries and shops’], ‘companion’: ‘pet’, ‘x-amz-bedrock-kb-data-source-id’: ‘{YOUR_KNOWLEDGE_BASE_ID}, ‘stay_duration’: ‘unknown’, ‘preferred_month’: [‘unknown’], ‘travelling_with_pets’: ‘yes’, ‘age’: [’40’, ’41’, ’42’, ’43’, ’44’, ’45’, ’46’, ’47’, ’48’, ’49’, ’50’], ‘x-amz-bedrock-kb-chunk-id’: ‘1%3A0%3AmtKlapMBdxcT3sYpSK_N’, ‘desired_destination’: ‘Paris, France’}}
Option_0 FALSE 2 Paris, France {   “metadataAttributes”: {     “age”: [       “30”     ],     “desired_destination”: “London, United Kingdom”,     “stay_duration”: “unknown”,     “preferred_month”: [       “unknown”     ],     “activities_interest”: [       “strolling”,       “sightseeing”,       “boating”,       “eating out”     ],     “companion”: “pets”,     “travelling_with_children”: “no”,     “travelling_with_pets”: “yes”   } } {‘location’: {‘s3Location’: {‘uri’: ‘s3://{YOUR_S3_BUCKET}/travel_reviews_titan/London_2.txt.metadata (1).json’}, ‘type’: ‘S3’}, ‘score’: 0.49567315, ‘source_metadata’: {‘x-amz-bedrock-kb-source-uri’: ‘s3://{YOUR_S3_BUCKET}/travel_reviews_titan/London_2.txt.metadata (1).json’, ‘x-amz-bedrock-kb-chunk-id’: ‘1%3A0%3A5tKlapMBdxcT3sYpYq_r’, ‘x-amz-bedrock-kb-data-source-id’: {YOUR_KNOWLEDGE_BASE_ID}}}
Option_0 FALSE 2 Paris, France As a 35-year-old traveling with my two dogs, I found Paris to be a pet-friendly city with plenty of attractions and activities for pet owners. Here are some of my top recommendations for traveling with pets in Paris:  The Jardin des Tuileries is a beautiful park located between the Louvre Museum and the Place de la Concorde… {‘location’: {‘s3Location’: {‘uri’: ‘s3://{YOUR_S3_BUCKET}/travel_reviews_titan/Paris_9.txt‘}, ‘type’: ‘S3’}, ‘score’: 0.4741059, ‘source_metadata’: {‘x-amz-bedrock-kb-source-uri’: ‘s3://{YOUR_S3_BUCKET}/travel_reviews_titan/Paris_9.txt‘, ‘travelling_with_children’: ‘no’, ‘activities_interest’: [‘parks’, ‘museums’, ‘river cruises’, ‘neighborhood exploration’], ‘companion’: ‘pets’, ‘x-amz-bedrock-kb-data-source-id’: {YOUR_KNOWLEDGE_BASE_ID}, ‘stay_duration’: ‘unknown’, ‘preferred_month’: [‘unknown’], ‘travelling_with_pets’: ‘yes’, ‘age’: [’30’, ’31’, ’32’, ’33’, ’34’, ’35’, ’36’, ’37’, ’38’, ’39’, ’40’], ‘x-amz-bedrock-kb-chunk-id’: ‘1%3A0%3Aj52lapMBuHB13c7-hl-4’, ‘desired_destination’: ‘Paris, France’}}
Option_0 FALSE 2 Paris, France If you are looking for something a little more active, I would suggest visiting the Bois de Boulogne. This large park is located on the western edge of Paris and is a great place to go for a walk or a bike ride with your pet. The park has several lakes and ponds, as well as several gardens and playgrounds… {‘location’: {‘s3Location’: {‘uri’: ‘s3://{YOUR_S3_BUCKET}/travel_reviews_titan/Paris_5.txt‘}, ‘type’: ‘S3’}, ‘score’: 0.45283788, ‘source_metadata’: {‘x-amz-bedrock-kb-source-uri’: ‘s3://{YOUR_S3_BUCKET}/travel_reviews_titan/Paris_5.txt‘, ‘travelling_with_children’: ‘no’, ‘activities_interest’: [‘strolling’, ‘picnic’, ‘walk or bike ride’, ‘cafes and restaurants’, ‘art galleries and shops’], ‘companion’: ‘pet’, ‘x-amz-bedrock-kb-data-source-id’: {YOUR_KNOWLEDGE_BASE_ID}, ‘stay_duration’: ‘unknown’, ‘preferred_month’: [‘unknown’], ‘travelling_with_pets’: ‘yes’, ‘age’: [’40’, ’41’, ’42’, ’43’, ’44’, ’45’, ’46’, ’47’, ’48’, ’49’, ’50’], ‘x-amz-bedrock-kb-chunk-id’: ‘1%3A0%3AmtKlapMBdxcT3sYpSK_N’, ‘desired_destination’: ‘Paris, France’}}

Clean up

To avoid incurring additional charges, be sure to delete your knowledge base, OSS/vector store and the underlying S3 bucket.

Conclusion

Enabling dynamic filtering through Knowledge Base’s metadata filtering enhances document retrieval in RAG systems by tailoring outputs to user-specific needs, significantly improving the relevance and accuracy of LLM-generated responses. In the travel website example, filters make sure that retrieved documents closely matched user preferences.

This approach can be applied to other use cases, such as customer support, personalized recommendations, and content curation, where context-sensitive information retrieval is essential. Properly configured filters are crucial for maintaining accuracy across different applications, making this feature a powerful tool for refining LLM outputs in diverse scenarios.

Be sure to take advantage of this powerful and flexible solution in your application. For more information on metadata in Amazon Bedrock Knowledge Bases, see Amazon Bedrock Knowledge Bases now supports metadata filtering to improve retrieval accuracy. Also, Amazon Bedrock Knowledge Bases now provides autogenerated query filters.

Security Best Practices

For AWS IAM Policies:

  • Apply least-privilege permissions by being explicit with IAM actions and listing only required permissions rather than using wildcards
  • Use temporary credentials with IAM roles for workloads
  • Avoid using wildcards (*) in the Action element as this grants access to all actions for specific AWS services
  • Remove wildcards from the Resource element and explicitly list the specific resources that IAM entities should access
  • Review AWS managed policies carefully before using them and consider using customer managed policies if AWS managed policies grant more permissions than needed

For more detailed security best practices for AWS IAM, see Security best practices in IAM.

For Amazon S3:

  • Block Public Access unless explicitly required, make sure S3 buckets are not publicly accessible by using the S3 Block Public Access feature and implementing appropriate bucket policies
  • Enable encryption for data at rest (all S3 buckets have default encryption) and enforce encryption for data in transit using HTTPS/TLS
  • Grant only the minimum permissions required using IAM policies, bucket policies, and disable ACLs (Access Control Lists) which are no longer recommended for most modern use cases
  • Enable server access logging, AWS CloudTrail, and use AWS security services like GuardDuty, Macie, and IAM Access Analyzer to monitor and detect potential security issues

For more detailed security best practices for Amazon S3, see Security best practices for Amazon S3.

For Amazon Bedrock:

  • Use IAM roles and policies to control access to Bedrock resources and APIs.
  • Implement VPC endpoints to access Bedrock securely from within your VPC.
  • Encrypt data at rest and in transit when working with Bedrock to protect sensitive information.
  • Monitor Bedrock usage and access patterns using AWS CloudTrail for auditing purposes.

For more information on security in Amazon Bedrock, see Security in Amazon Bedrock.

For Amazon SageMaker:

  • Use IAM roles to control access to SageMaker resources and limit permissions based on job functions.
  • Encrypt SageMaker notebooks, training jobs, and endpoints using AWS KMS keys for data protection.
  • Implement VPC configurations for SageMaker resources to restrict network access and enhance security.
  • Use SageMaker private endpoints to access APIs without traversing the public internet.

About the Authors

Haley Tien is a Deep Learning Architect at AWS Generative AI Innovation Center. She has a Master’s degree in Data Science and assists customers in building generative AI solutions on AWS to optimize their workloads and achieve desired outcomes.

Adam Weinberger is a Applied Scientist II at AWS Generative AI Innovation Center. He has 10 years of experience in data science and machine learning. He holds a Master’s of Information and Data Science from the University of California, Berkeley.

Dan Ford is a Applied Scientist II at AWS Generative AI Innovation Center, where he helps public sector customers build state-of-the-art GenAI solutions.

Read More