This post is co-written with Saibal Samaddar, Tanushree Halder, and Lokesh Joshi from Infosys Consulting.
Critical insights and expertise are concentrated among thought leaders and experts across the globe. Language barriers often hinder the distribution and comprehension of this knowledge during crucial encounters. Workshops, conferences, and training sessions serve as platforms for collaboration and knowledge sharing, where the attendees can understand the information being conveyed in real-time and in their preferred language.
Infosys, a leading global IT services and consulting organization, used its digital expertise to tackle this challenge by pioneering, Infosys Event AI, an innovative AI-based event assistant. Infosys Event AI is designed to make knowledge universally accessible, making sure that valuable insights are not lost and can be efficiently utilized by individuals and organizations across diverse industries both during the event and after the event has concluded. The absence of such a system hinders effective knowledge sharing and utilization, limiting the overall impact of events and workshops. By transforming ephemeral event content into a persistent and searchable knowledge asset, Infosys Event AI seeks to enhance knowledge utilization and impact.
Some of the challenges in capturing and accessing event knowledge include:
- Knowledge from events and workshops is often lost due to inadequate capture methods, with traditional note-taking being incomplete and subjective.
- Reviewing lengthy recordings to find specific information is time-consuming and inefficient, creating barriers to knowledge retention and sharing.
- People who miss events face significant obstacles accessing the knowledge shared, impacting sectors like education, media, and public sector where information recall is crucial.
To address these challenges, Infosys partnered with Amazon Web Services (AWS) to develop the Infosys Event AI to unlock the insights generated during events. In this post, we explain how Infosys built the Infosys Event AI solution using several AWS services including:
- AWS Elemental MediaLive – A video processing service to encode live video streams
- AWS Elemental MediaConnect – A video transport service to build live video workflows
- Amazon Bedrock – A fully managed service that offers a choice of industry-leading large language models (LLMs) to build generative AI applications
- Amazon Nova Pro – A highly capable multimodal model that balances accuracy, speed, and cost
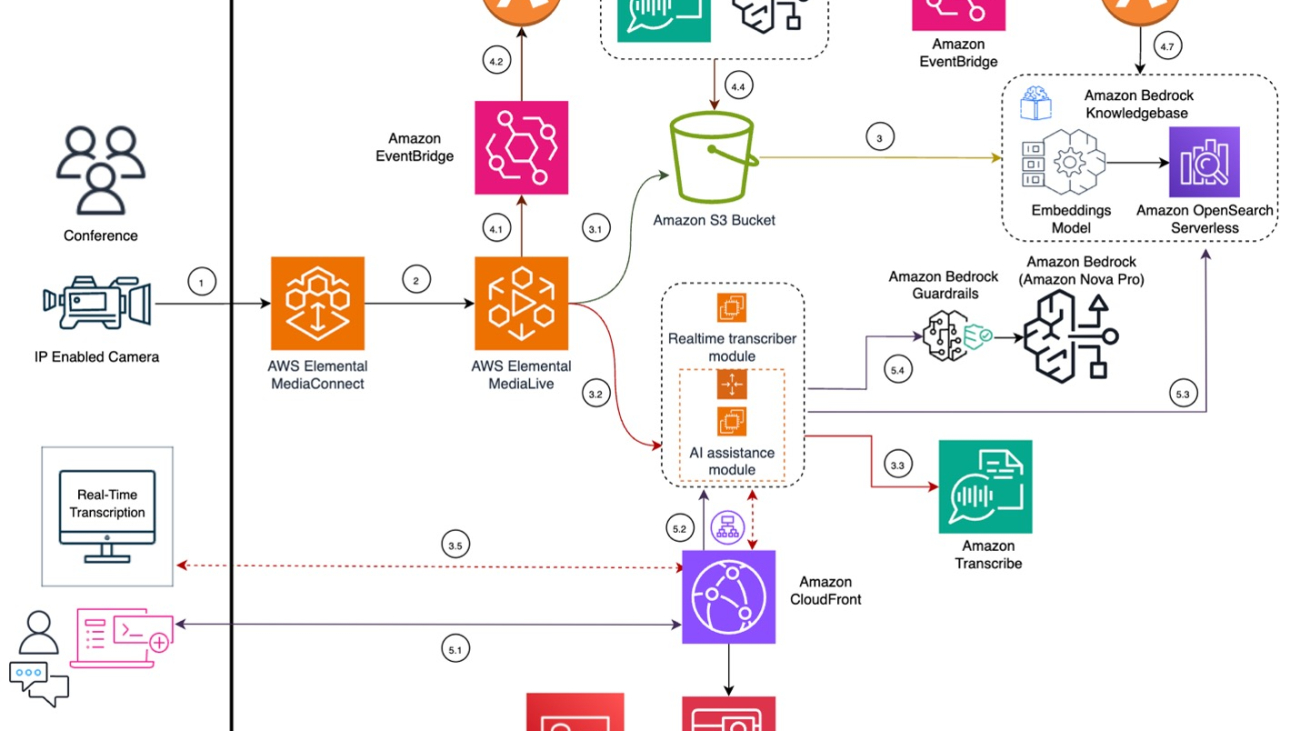
Solution Architecture
In this section, we present an overview of Event AI, highlighting its key features and workflow. Event AI delivers these core functionalities, as illustrated in the architecture diagram that follows:
- Seamless live stream acquisition from on-premises sources
- Real-time transcription processing for speech-to-text conversion
- Post-event processing and knowledge base indexing for structured information retrieval
- Automated generation of session summaries and key insights to enhance accessibility
- AI-powered chat-based assistant for interactive Q&A and efficient knowledge retrieval from the event session

Solution walkthrough
Next, we break down each functionality in detail. The services used in the solution are granted least-privilege permissions through AWS Identity and Access Management (IAM) policies for security purposes.
Seamless live stream acquisition
The solution begins with an IP-enabled camera capturing the live event feed, as shown in the following section of the architecture diagram. This stream is securely and reliably transported to the cloud using the Secure Reliable Transport (SRT) protocol through MediaConnect. The ingested stream is then received and processed by MediaLive, which encodes the video in real time and generates the necessary outputs.
The workflow follows these steps:
- Use an IP-enabled camera or ground encoder to convert non-IP streams into IP streams and transmit them through SRT protocol to MediaConnect for live event ingestion.
- MediaConnect securely transmits the stream to MediaLive for processing.
Real-time transcription processing
To facilitate real-time accessibility, the system uses MediaLive to isolate audio from the live video stream. This audio-only stream is then forwarded to a real-time transcriber module. The real-time transcriber module, hosted on an Amazon Elastic Compute Cloud (Amazon EC2) instance, uses the Amazon Transcribe stream API to generate transcriptions with minimal latency. These real-time transcriptions are subsequently delivered to an on-premises web client through secure WebSocket connections. The following screenshot shows a brief demo based on a fictitious scenario to illustrate Event AI’s real-time streaming capability.
![]()
The workflow steps for this part of the solution follows these steps:
- MediaLive extracts the audio from the live stream and creates an audio-only stream, which it then sends to the real-time transcriber module running on an EC2 instance. MediaLive also extracts the audio-only output and stores it in an Amazon Simple Storage Service (Amazon S3) bucket, facilitating a subsequent postprocessing workflow.
- The real-time transcriber module receives the audio-only stream and employs the Amazon Transcribe stream API to produce real-time transcriptions with low latency.
- The real-time transcriber module uses a secure WebSocket to transmit the transcribed text.
- The on-premises web client receives the transcribed text through a secure WebSocket connection through Amazon CloudFront and displays it on the web client’s UI.
The below diagram shows the live-stream acquisition and real-time transcription.

Post-event processing and knowledge base indexing
After the event concludes, recorded media and transcriptions are securely stored in Amazon S3 for further analysis. A serverless, event-driven workflow using Amazon EventBridge and AWS Lambda automates the post-event processing. Amazon Transcribe processes the recorded content to generate the final transcripts, which are then indexed and stored in an Amazon Bedrock knowledge base for seamless retrieval. Additionally, Amazon Nova Pro enables multilingual translation of the transcripts, providing global accessibility when needed. With its quality and speed, Amazon Nova Pro is ideally suited for this global use case.
The workflow for this part of the process follows these steps:
- After the event concludes, MediaLive sends a channel stopped notification to EventBridge
- Lambda function, subscribed to the channel stopped event, triggers post-event transcription using Amazon Transcribe
- The transcribed content is processed and stored in an S3 bucket
- (Optional) Amazon Nova Pro translates transcripts into multiple languages for broader accessibility using Amazon Bedrock
- Amazon Transcribe generates a transcription complete event and sends it to EventBridge
- A Lambda function, subscribed to the transcription complete event, triggers the synchronization process with Amazon Bedrock Knowledge Bases
- The knowledge is then indexed and stored in Amazon Bedrock knowledge base for efficient retrieval
These steps are shown in the following diagram.

Automated generation of session summaries and key insights
To enhance user experience, the solution uses Amazon Bedrock to analyze the transcriptions to generate concise session summaries and key insights. These insights help users quickly understand the essence of the event without going through lengthy transcripts. The below screenshot shows Infosys Event AI’s summarization capability.

The workflow for this part of the solution follows these steps:
- Users authenticate in to the web client portal using Amazon Cognito. Once authenticated, the user selects option in the portal UI to view the summaries and key insights.
- The user request is delegated to the AI assistant module, where it fetches the complete transcript from the S3 bucket.
- The transcript undergoes processing through Amazon Bedrock Pro, which is guided by Amazon Bedrock Guardrails. In line with responsible AI policies, this process results in the generation of secure summaries and the creation of key insights that are safeguarded for the user.
AI-powered chat-based assistant
A key feature of this architecture is an AI-powered chat assistant, which is used to interactively query the event knowledge base. The chat assistant is powered by Amazon Bedrock and retrieves information from the Amazon OpenSearch Serverless index, enabling seamless access to session insights.
The workflow for this part of the solution follows these steps:
- Authenticated users engage with the chat assistant using natural language to request specific event messaging details from the client web portal.
- The user prompt is directed to the AI assistant module for processing.
- The AI assistant module queries Amazon Bedrock Knowledge Bases for relevant answers.
- The transcript is processed by Amazon Nova Pro, guided by Amazon Bedrock Guardrails, to generate secure summaries and safeguard key insights. The integration of Amazon Bedrock Guardrails promotes professional, respectful interactions by working to block undesirable and harmful content during user interactions aligned with responsible AI policies.
The following demo demonstrates Event AI’s Q&A capability.

The steps for automated generation of insights and AI-chat assistant are shown in the following diagram.

Results and Impact
Infosys EventAI Assistant was launched on February 2025 during a responsible AI conference event in Bangalore, India, hosted by Infosys in partnership with the British High Commission.
- Infosys Event AI was used by more than 800 conference attendees
- It was used by around 230 people every minute during the event
- The intelligent chat assistant was queried an average of 57 times every minute during the event
- A total of more than 9,000 event session summaries were generated during the event
By using the solution, Infosys was able to realize the following key benefits for their internal users and for their customers:
- Enhanced knowledge retention – During the events, Infosys Event AI was accessible from both mobile and laptop devices, providing an immersive participation experience for both the online and offline event.
- Improved accessibility – Session knowledge became quickly accessible after the event through transcripts, summaries, and the intelligent chat assistant. The event information is readily available for attendees and for those who couldn’t attend. Furthermore, Infosys Event AI aggregates the session information from previous events, creating a knowledge archival system for information retrieval.
- Increased engagement – The interactive chat assistant provides deeper engagement during the event sessions, which means users can ask specific questions and receive immediate, contextually relevant answers.
- Time efficiency – Quick access to summaries and chat responses saves time compared to reviewing full session recordings or manual notes when seeking specific information.
Impacting Multiple Industries
Infosys is positioned to accelerate the adoption of Infosys Event AI across diverse industries:
- AI-powered meeting management for the enterprises – Businesses can use the system for generating meeting minutes, creating training documentation from workshops, and facilitating knowledge sharing within teams. Summaries provide quick recaps of meetings for executives, and transcripts offer detailed records for compliance and reference.
- Improved transparency and accessibility in the public sector – Parliamentary debates, public hearings, and government briefings are made accessible to the general public through transcripts and summaries, improving transparency and citizen engagement. The platform enables searchable archives of parliamentary proceedings for researchers, policymakers, and the public, creating accessible records for historical reference.
- Accelerated learnings and knowledge retention in the education sector – Students effectively review lectures, seminars, and workshops through transcripts and summaries, reinforcing learning, and improving knowledge retention. The chat assistant allows for interactive learning and clarification of doubts, acting as a virtual teaching assistant. This is particularly useful in online and hybrid learning environments.
- Improved media reporting and efficiency in the media industry – Journalists can use Infosys Event AI to rapidly transcribe press conferences, speeches, and interviews, accelerating news cycles and improving reporting accuracy. Summaries provide quick overviews of events, enabling faster news dissemination. The chat assistant facilitates quick fact-checking (with source citation) and information retrieval from event recordings.
- Improved accessibility and inclusivity across the industry – Real-time transcription provides accessibility for hearing-challenged individuals. Multilingual translation of event transcripts allows participation by attendees for whom the event sessions aren’t in their native language. This promotes inclusivity and a wider participation during events for the purposes of knowledge sharing.
Conclusion
In this post, we explored how Infosys developed Infosys Event AI to unlock the insights generated from events and conferences. Through its suite of features—including real-time transcription, intelligent summaries, and an interactive chat assistant—Infosys Event AI makes event knowledge accessible and provides an immersive engagement solution for the attendees, during and after the event.
Infosys is planning to offer the Infosys Event AI solution to their internal teams and global customers in two versions: as a multi-tenanted, software-as-a-service (SaaS) solution and as a single-deployment solution. Infosys is also adding capabilities to include an event catalogue, knowledge lake, and event archival system to make the event information accessible beyond the scope of the current event. By using AWS managed services, Infosys has made Event AI a readily available, interactive, immersive and valuable resource for students, journalists, policymakers, enterprises, and the public sector. As organizations and institutions increasingly rely on events for knowledge dissemination, collaboration, and public engagement, Event AI is well positioned to unlock the full potential of the events.
Stay updated with new Amazon AI features and releases to advance your AI journey on AWS.
About the Authors
 Aparajithan Vaidyanathan is a Principal Enterprise Solutions Architect at AWS. He supports enterprise customers migrate and modernize their workloads on AWS cloud. He is a Cloud Architect with 24+ years of experience designing and developing enterprise, large-scale and distributed software systems. He specializes in Generative AI & Machine Learning with focus on Data and Feature Engineering domain. He is an aspiring marathon runner and his hobbies include hiking, bike riding and spending time with his wife and two boys.
 Maheshwaran G is a Specialist Solution Architect working with Media and Entertainment supporting Media companies in India to accelerate growth in an innovative fashion leveraging the power of cloud technologies. He is passionate about innovation and currently holds 8 USPTO and 8 IPO granted patents in diversified domains.
 Saibal Samaddar is a senior principal consultant at Infosys Consulting and heads the AI Transformation Consulting (AIX) practice in India. He has over eighteen years of business consulting experience, including 11 years in PwC and KPMG, helping organizations drive strategic transformation by harnessing Digital and AI technologies. Known to be a visionary who can navigate complex transformations and make things happen, he has played a pivotal role in winning multiple new accounts for Infosys Consulting (IC).
 Tanushree Halder is a principal consultant with Infosys Consulting and is the Lead – CX and Gen AI capability for AI Transformation Consulting (AIX). She has 11 years of experience working with clients in their transformational journeys. She has travelled to over 10 countries to provide her advisory services in AI with clients in BFSI, retail and logistics, hospitality, healthcare and shared services.
 Lokesh Joshi is a consultant at Infosys Consulting. He has worked with multiple clients to strategize and integrate AI based solutions for workflow enhancements. He has over 4 years of experience in AI/ML, GenAI development, full Stack development, and cloud services. He specializes in Machine Learning and Data Science with a focus on Deep Learning and NLP. A fitness enthusiast, his hobbies include programming, hiking, and traveling.


 Rui Wang is a senior solutions architect at AWS with extensive experience in game operations and development. As an enthusiastic Generative AI advocate, he enjoys exploring AI infrastructure and LLM application development. In his spare time, he loves eating hot pot.
 Hao Huang is an Applied Scientist at the AWS Generative AI Innovation Center. His expertise lies in generative AI, computer vision, and trustworthy AI. Hao also contributes to the scientific community as a reviewer for leading AI conferences and journals, including CVPR, AAAI, and TMM.
 Guang Yang, Ph.D. is a senior applied scientist with the Generative AI Innovation Centre at AWS. He has been with AWS for 5 yrs, leading several customer projects in the Greater China Region spanning different industry verticals such as software, manufacturing, retail, AdTech, finance etc. He has over 10+ years of academic and industry experience in building and deploying ML and GenAI based solutions for business problems.
 Zhengyuan Shen is an Applied Scientist at Amazon Bedrock, specializing in foundational models and ML modeling for complex tasks including natural language and structured data understanding. He is passionate about leveraging innovative ML solutions to enhance products or services, thereby simplifying the lives of customers through a seamless blend of science and engineering. Outside work, he enjoys sports and cooking.
 Huong Nguyen is a Principal Product Manager at AWS. She is a product leader at Amazon Bedrock, with 18 years of experience building customer-centric and data-driven products. She is passionate about democratizing responsible machine learning and generative AI to enable customer experience and business innovation. Outside of work, she enjoys spending time with family and friends, listening to audiobooks, traveling, and gardening.
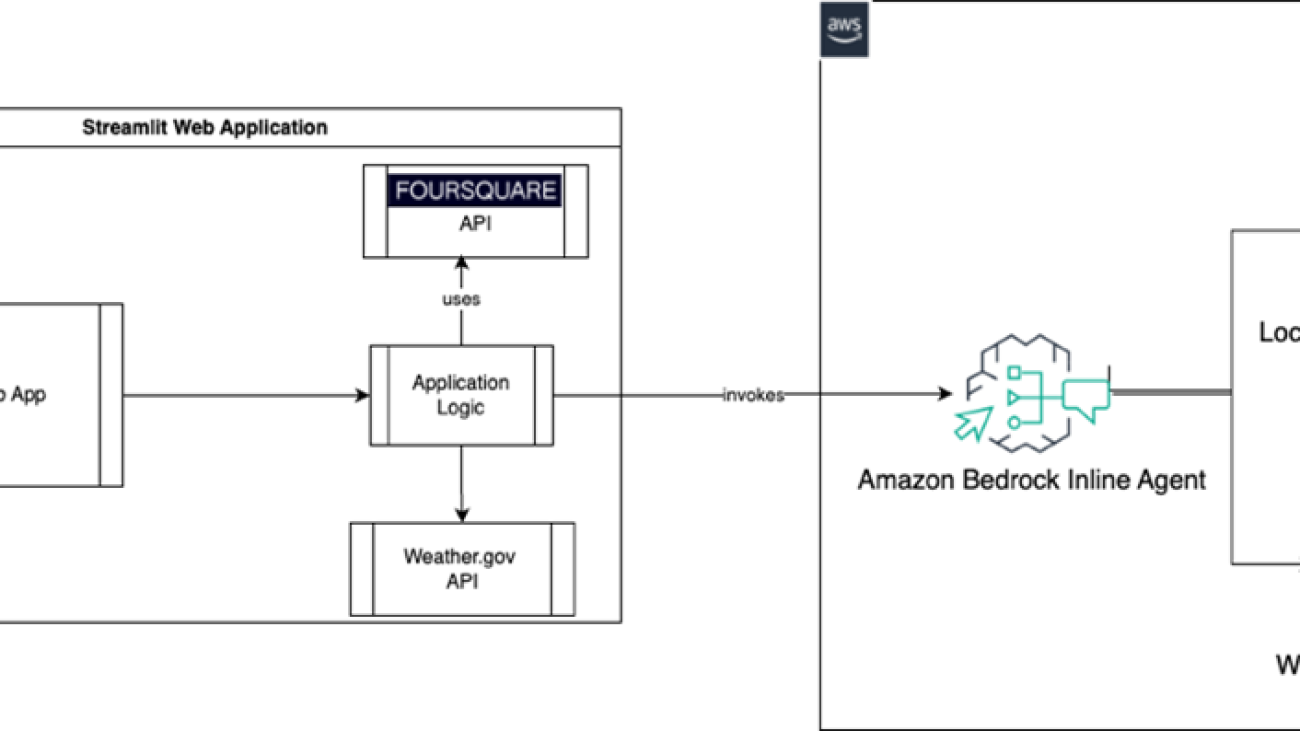


 John Baker is a Principal SDE at AWS, where he works on Amazon Bedrock and specifically Amazon Bedrock Agents. He has been with Amazon for more than 10 years and has worked across AWS, Alexa, and Amazon.com. In his spare time, John enjoys skiing and other outdoor activities throughout the Pacific Northwest.
 Mark Roy is a Principal Machine Learning Architect for AWS, helping customers design and build generative AI solutions. His focus since early 2023 has been leading solution architecture efforts for the launch of Amazon Bedrock, the flagship generative AI offering from AWS for builders. Mark’s work covers a wide range of use cases, with a primary interest in generative AI, agents, and scaling ML across the enterprise. He has helped companies in insurance, financial services, media and entertainment, healthcare, utilities, and manufacturing. Prior to joining AWS, Mark was an architect, developer, and technology leader for over 25 years, including 19 years in financial services. Mark holds six AWS Certifications, including the ML Specialty Certification.
 Vikram Gundeti currently serves as the Chief Technology Officer (CTO) of Foursquare, where he leads the technical strategy, decision making, and research for the company’s Geospatial Platform. Before joining Foursquare, Vikram held the position of Principal Engineer at Amazon, where he made his mark as a founding engineer on the Amazon Alexa team.
 Nate Folkert is a Senior Staff Engineer at Foursquare, where he’s been since spotting it trending nearby when checking in at a Soho coffee shop 14 years ago. He builds the server API for Swarm and helps out on special projects. Outside of work, he loves exploring the world (with Swarm, ofc, so is it really outside of work?) and is currently obsessed with finding all of the irl filming locations used in Apple TV’s Severance


 Today, we’re opening applications for this year’s Google for Startups AI Academy: American Infrastructure cohort.Designed for Seed to Series A startups using AI in criti…