NVIDIA Partners Showcase Cutting-Edge Robotic and Industrial AI Solutions at Automate 2025

NVIDIA Partners Showcase Cutting-Edge Robotic and Industrial AI Solutions at Automate 2025

As the manufacturing industry faces challenges — such as labor shortages, reshoring and inconsistent operational strategies — AI-powered robots present a significant opportunity to accelerate industrial automation.

At Automate, the largest robotics and automation event in North America, robotics leaders KUKA, Standard Bots, Universal Robots (UR) and Vention are showcasing hardware and robots powered by the NVIDIA accelerated computing, Omniverse and Isaac platforms — helping manufacturers everywhere automate and optimize their production lines.

Deepu Talla, vice president of robotics and edge AI at NVIDIA, delivered a keynote on physical AI and industrial autonomy.

“The manufacturing industry is experiencing a fundamental shift, with industrial automation and AI-powered robots increasingly changing how warehouses and factories operate worldwide,” said Deepu Talla, vice president of robotics and edge AI at NVIDIA. “NVIDIA’s three-computer architecture — enabling robot training, simulation and accelerated runtime — is empowering the entire robotics ecosystem to accelerate this shift toward software-defined autonomous facilities.”

Synthetic Data Generation Blueprint Speeds Up Robot Development Pipelines

Embodied AI systems, which refers to the integration of AI into physical systems, must be trained with real-world data — traditionally a complex and resource-intensive process. Each robot typically needs its own custom dataset due to differences in hardware, sensors and environments.

Synthetic data offers a powerful alternative. NVIDIA Isaac Lab 2.1 — the latest version of the open-source robot learning framework, announced at Automate — provides developers with tools to accelerate the robot training process using the NVIDIA Isaac GR00T Blueprint for synthetic motion generation. Built on NVIDIA Omniverse, a physical AI simulation platform, and NVIDIA Cosmos world foundation models, the blueprint provides a reference workflow for creating vast amounts of synthetic and robot manipulation data, making it easier and faster to train robots, like manipulators and humanoids, for a variety of tasks.

NVIDIA showcases the synthetic manipulation motion generation blueprint.

Robotics Leaders Harness NVIDIA Technologies for Industrial AI

Image courtesy of UR.

Robotics leaders are building next-generation robots, tapping into NVIDIA technologies to train, power and deploy physical AI in industrial settings.

Universal Robots, a leader in collaborative robotics, introduced UR15, its fastest collaborative robot yet, featuring improved cycle times and advanced motion control. Using UR’s AI Accelerator — developed on the NVIDIA Isaac platform’s CUDA-accelerated libraries and AI models, and NVIDIA Jetson AGX Orin — manufacturers can build AI applications to embody intelligence into cobots.

Vention, a manufacturing automation company, announced MachineMotion AI, an automation controller designed to unify motion, sensing, vision and AI. The system taps into the NVIDIA Jetson platform for embedded computing and NVIDIA Isaac’s CUDA-accelerated libraries and models, enabling compute-intensive AI tasks such as real-time vision processing, bin-picking and autonomous decision-making. This technology shows the value AI brings to the manufacturing floor for practical deployment of robotic solutions.

Standard Bots, a robotics developer, unveiled its manipulator, a 30kg-payload, 2m-reach robot that can be used for heavy-duty tooling and moving large objects in the automotive, aerospace and logistics industries. With NVIDIA Isaac Sim, a reference application built on Omniverse, robots can be taught tasks through demonstrations, eliminating the need for traditional coding or programming to free up developers for higher-value tasks. Standard Bots also announced teleoperation capabilities via a tablet device, which can efficiently collect training data.

KUKA, a leading supplier of intelligent automation solutions, unveiled its KR C5 Micro-2, a small robot controller integrated with an NVIDIA Jetson extension for AI-ready applications. It will provide future KUKA robots with better AI vision and AI-based control tasks powered by NVIDIA’s software stack.

NVIDIA Brings Software to Deploy AI Agents in Factories and Warehouses

In addition to robots, manufacturers everywhere are increasingly turning to AI agents capable of analyzing and acting upon ever-growing video data.

The NVIDIA AI Blueprint for video search and summarization (VSS), part of the NVIDIA Metropolis platform, combines generative AI, large language models, vision language models and media management services to deploy visual AI agents that can optimize processes, such as visual inspection and assembly, and enhance worker safety in factories and warehouses.

This helps eliminate manual monitoring and enables rapid processing and interpretation of vast amounts of video data, helping businesses drive industrial automation and make data-driven decisions. Developers can now use their own video data to try the AI Blueprint for VSS in the cloud with NVIDIA Launchable.

Industry leaders are using the blueprint for VSS to enable advanced video analytics and computer vision capabilities across domains.

At Automate, Siemens will be showcasing its Industrial Copilot for Operations, a generative AI-powered assistant that optimizes workflows and enhances collaboration between humans and AI. Using the tool, shop floor operators, maintenance engineers and service technicians can receive machine instructions and guidance quicker, using natural language. The copilot uses NVIDIA accelerated computing and NVIDIA NIM and NeMo Retriever microservices from the AI Blueprint for VSS to add multimodal capabilities.

Connect Tech, an edge computing company, is analyzing drone footage with the blueprint for VSS running on NVIDIA Jetson edge devices to enable real-time Q&A and zero-shot detections for hazards like fires or flooding in remote areas.

DeepHow, a generative AI-powered video training platform provider, is using the blueprint to create smart videos that capture key workflows and convert them into structured training content, improving shop floor operator efficiency.

InOrbit.AI, a software platform for robot orchestration, will showcase its latest improvements in InOrbit Space Intelligence, which harnesses physical AI, computer vision and the VSS blueprint to analyze robot operations and optimize real-world workflows.

And KoiReader Technologies, a provider of vision and generative AI-powered automation solutions, is using the blueprint to enable true real-time operational intelligence from events occurring in supply chain and manufacturing environments.

Explore the following talks to connect with NVIDIA and its partners at Automate:

Learn more about NVIDIA’s latest work in robotics and industrial AI at Automate, running through May 15.

Read More

NVIDIA Scores COMPUTEX Best Choice Awards

NVIDIA Scores COMPUTEX Best Choice Awards

NVIDIA today received multiple accolades at COMPUTEX’s Best Choice Awards, in recognition of innovation across the company.

The NVIDIA GeForce RTX 5090 GPU won the Gaming and Entertainment category award; the NVIDIA Quantum-X Photonics InfiniBand switch system won the Networking and Communication category award; NVIDIA DGX Spark won the Computer and System category award; and the NVIDIA GB200 NVL72 system and NVIDIA Cosmos world foundation model development platform won Golden Awards.

The awards recognize the outstanding functionality, innovation and market promise of technologies in each category.

Jensen Huang, founder and CEO of NVIDIA, will deliver a keynote at COMPUTEX on Monday, May 19, at 11 a.m. Taiwan time.

GB200 NVL72 and NVIDIA Cosmos Go Gold

NVIDIA GB200 NVL72 and NVIDIA Cosmos each won Golden Awards.

The NVIDIA GB200 NVL72 system connects 36 NVIDIA Grace CPUs and 72 NVIDIA Blackwell GPUs in a rack-scale design. It delivers 1.4 exaflops of AI performance and 30 terabytes of fast memory, as well as 30x faster real-time trillion-parameter large language model inference with 25x energy efficiency compared with the NVIDIA H100 GPU.

By design, the GB200 NVL72 accelerates the most compute-intensive AI and high-performance computing workloads, including AI training and data processing for engineering design and simulation.

NVIDIA Cosmos accelerates physical AI development by enabling developers to build and deploy world foundation models with unprecedented speed and scale.

Pretrained on 9,000 trillion tokens of robotics and driving data, Cosmos world foundation models can rapidly generate synthetic, physics-based data or be post-trained for downstream robotics and autonomous vehicle foundation models, significantly reducing development time and the costs of real-world data collection.

The platform’s accelerated video data processing pipeline can process and label 20 million hours of video in just two weeks, a task that would otherwise take over three years with CPU-only systems.

Spotlighting NVIDIA Technologies

All the NVIDIA technologies nominated — including the NVIDIA GeForce RTX 5090 GPU, NVIDIA Quantum-X Photonics InfiniBand switch system and NVIDIA DGX Spark — won in their respective categories.

The NVIDIA GeForce RTX 5090, built on NVIDIA Blackwell architecture and equipped with ultra-fast GDDR7 memory, delivers powerful gaming and creative performance. It features fifth-generation Tensor Cores and a 512-bit memory bus, enabling high-performance gaming and AI-accelerated workloads with next-generation ray-tracing and NVIDIA DLSS 4 technologies.

The NVIDIA Quantum-X Photonics Q3450-LD InfiniBand switch advances data center networking for the agentic AI era with co-packaged optics. By integrating silicon photonics directly with the InfiniBand switch ASIC, the Q3450-LD eliminates the need for pluggable optical transceivers — reducing electrical loss, enhancing signal integrity and improving overall power and thermal efficiency.

NVIDIA DGX Spark is a personal AI supercomputer, bringing the power of the NVIDIA Grace Blackwell architecture to desktops to enable researchers, developers and students to prototype, fine-tune and run advanced AI models locally with up to 1,000 trillion operations per second of performance.

With its compact, power-efficient design and seamless integration into the NVIDIA AI ecosystem, DGX Spark empowers users to accelerate generative and physical AI workloads — whether working at the desk, in the lab or deploying to the cloud.

Learn more about the latest agentic AI advancements at NVIDIA GTC Taipei, running May 21-22 at COMPUTEX.

Read More

MetaShuffling: Accelerating Llama 4 MoE Inference

MetaShuffling: Accelerating Llama 4 MoE Inference

Mixture-of-Experts (MoE) is a popular model architecture for large language models (LLMs). Although it reduces computation in training and inference by activating fewer parameters per token, it imposes additional challenges in achieving optimal computation efficiency with high memory and communication pressure, as well as the complexity to handle the dynamism and sparsity nature of the model. Here we introduce a new MoE inference solution, MetaShuffling, which enables us to efficiently deploy Llama 4 models for production inference.

Llama 4 Architecture

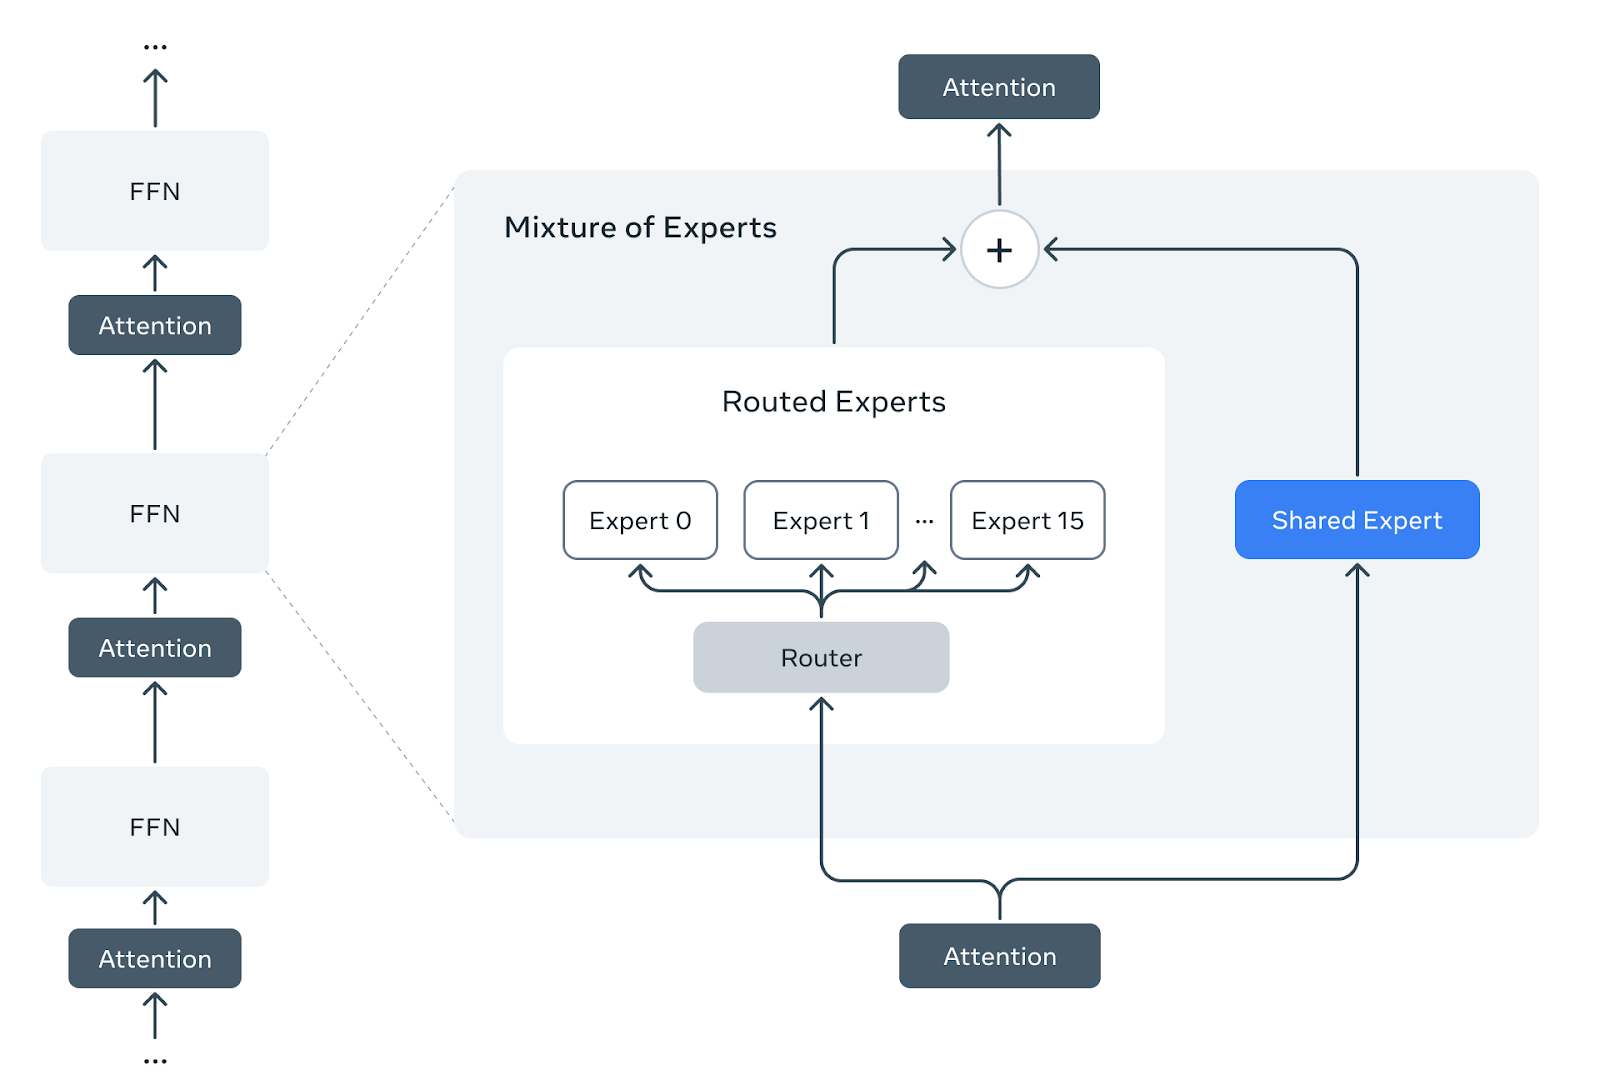
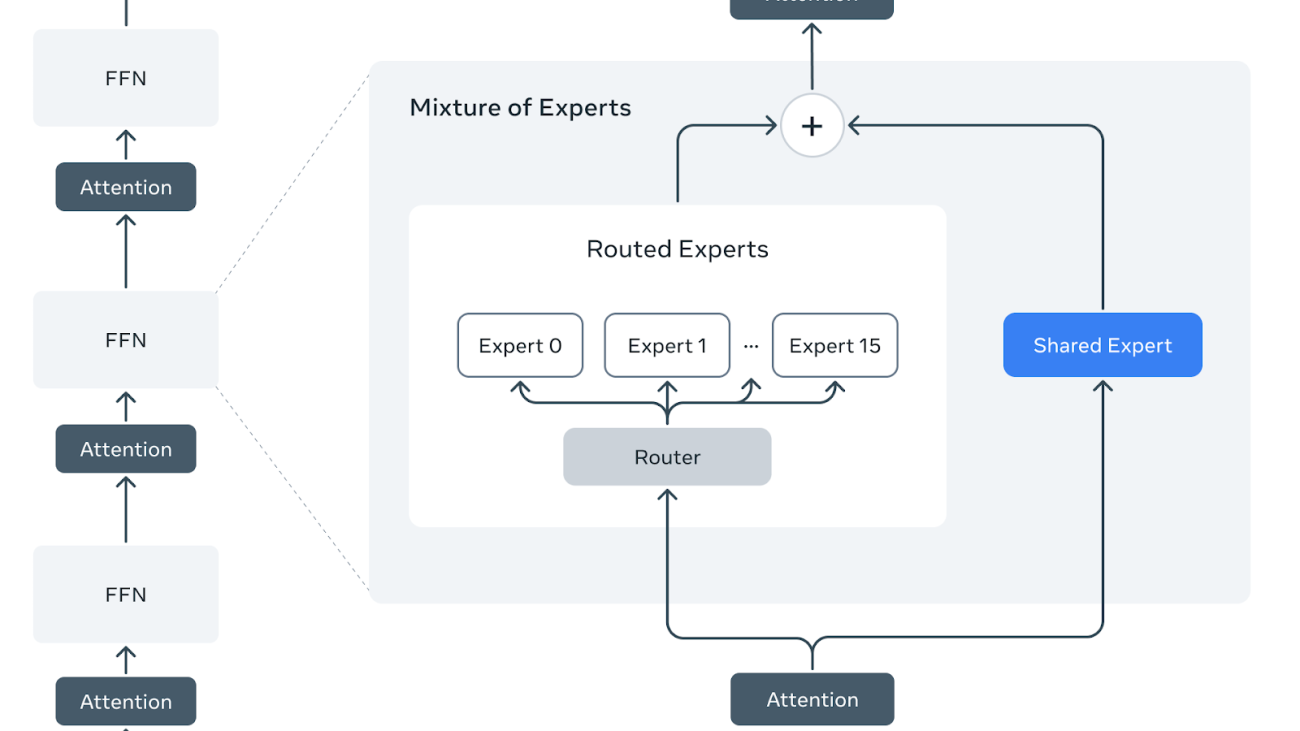
Llama 4 Scout and Maverick models are officially released.  Scout / Maverick has a shared expert and 16 / 128 routed experts with dropless token-choice routing and Top-1 selection for each MoE layer. Besides, both shared and routed experts use SwiGLU activation with 3 linear layers. Please refer to The Llama 4 herd: The beginning of a new era of natively multimodal AI innovation for more information about the model.

Key Concept

There are multiple common solutions to handle dynamism and sparsity problems introduced in MoE layers. Here we demonstrate different solutions of token-choice routing with Top-1 selection.

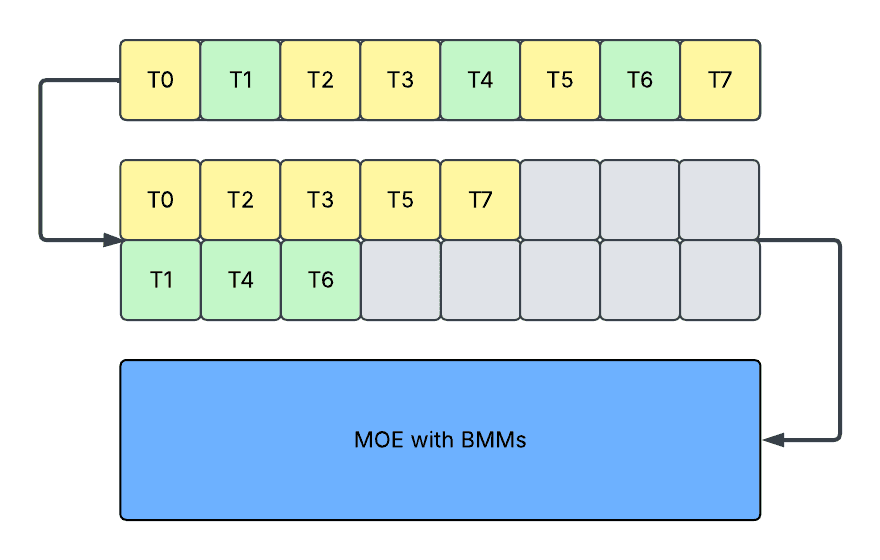
The above diagram shows the padding design.  Each box represents a token, and the yellow / green color represents valid tokens with different routed experts, and the grey color represents padded tokens. Each row of boxes in the second step represents different routed experts. Ti represents the i-th token from the current rank of the data parallel group.

  • Padding: In this approach, we pad activation to maximum sequence length for each expert and run a single batched matrix multiplication (BMM). It incurs:
    • Increased memory on holding paddings.
    • Increased latency on processing paddings. Note that it is possible to avoid processing padding through jagged kernels, but jagged kernels may also incur high overhead when the number of experts is large. 
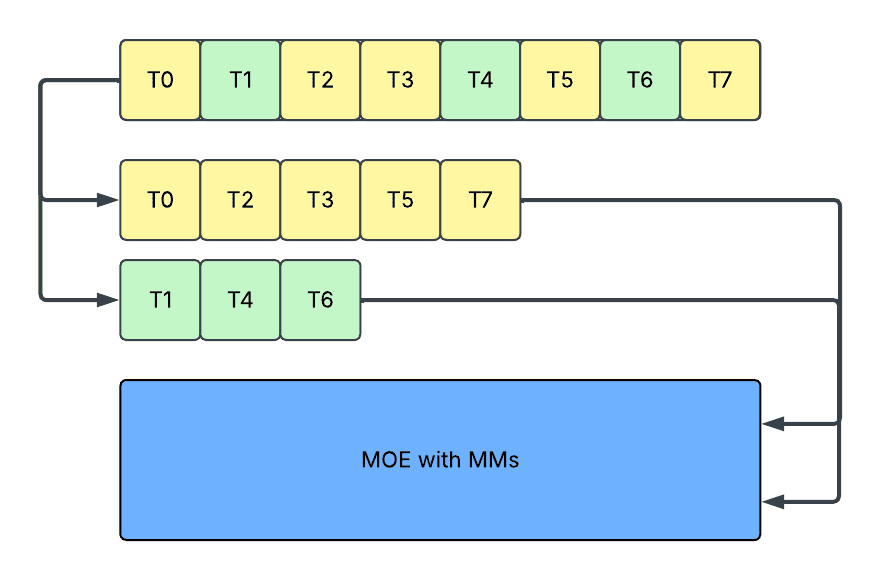
  • Slicing: In this approach, we slice activation to exact sequence length for each expert and run multiple matrix multiplications (MM). It avoids the problems in padding, but it incurs:
    • Reduced kernel efficiency, caused by repeated kernel launches on small shapes.
    • Reduced device utilization, caused by frequent host and device synchronizations on dynamic shapes, plus extra kernel launch overheads, as it is incompatible with graph capturing mechanisms (e.g. CUDAGraph and torch.compile).

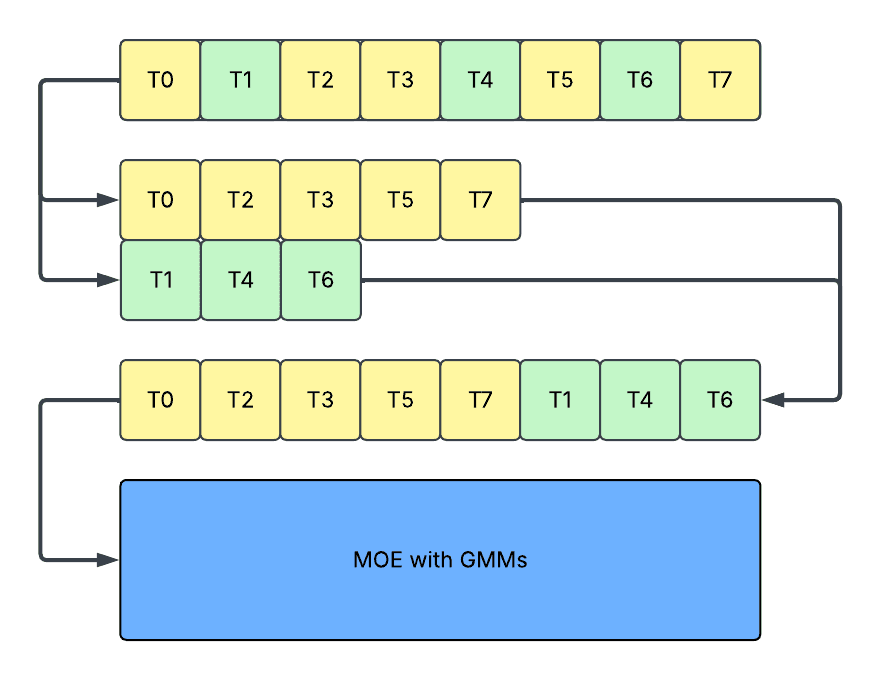
  • Concatenation: In this approach, we further concatenate the activations after slicing and run a single grouped matrix multiplication (GMM). It avoids the kernel efficiency problem in slicing, but still incurs 
    • Reduced device utilization, as it still requires host and device synchronization, and still incompatible with graph capturing mechanisms.

To further improve the solution, we propose a shuffling-based mechanism:

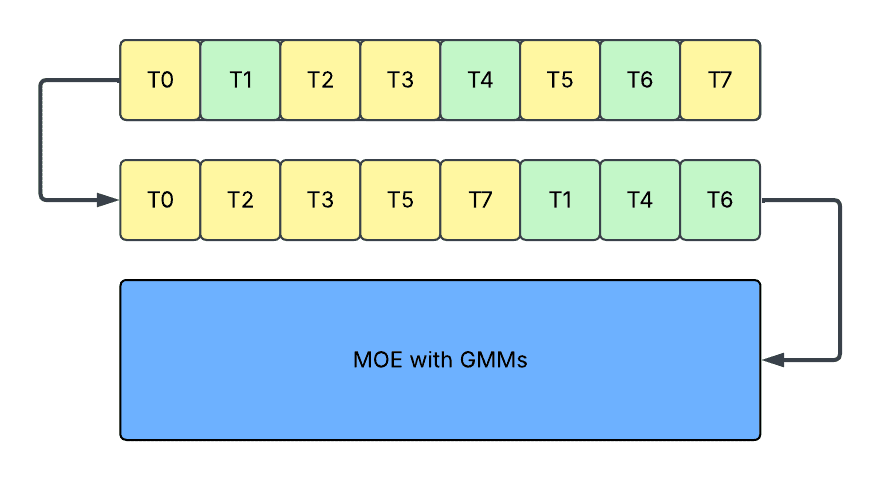
  • Shuffling: In this approach, we directly sort the tokens so that routed tokens are ordered by routed expert’s ID. By doing so, no padding or splitting is introduced, and tokens assigned to the same experts are stored together and can be processed together inside GroupedGEMM. It provides a dense model interface and avoids all the problems mentioned above.
    • No paddings as the activation remains a dense tensor.
    • No host and device synchronization, as the activation remains a static-shaped tensor.

We built an end-to-end MoE inference solution, MetaShuffling, based on this design.

Runtime Design

No Parallelism for Single-GPU Inference

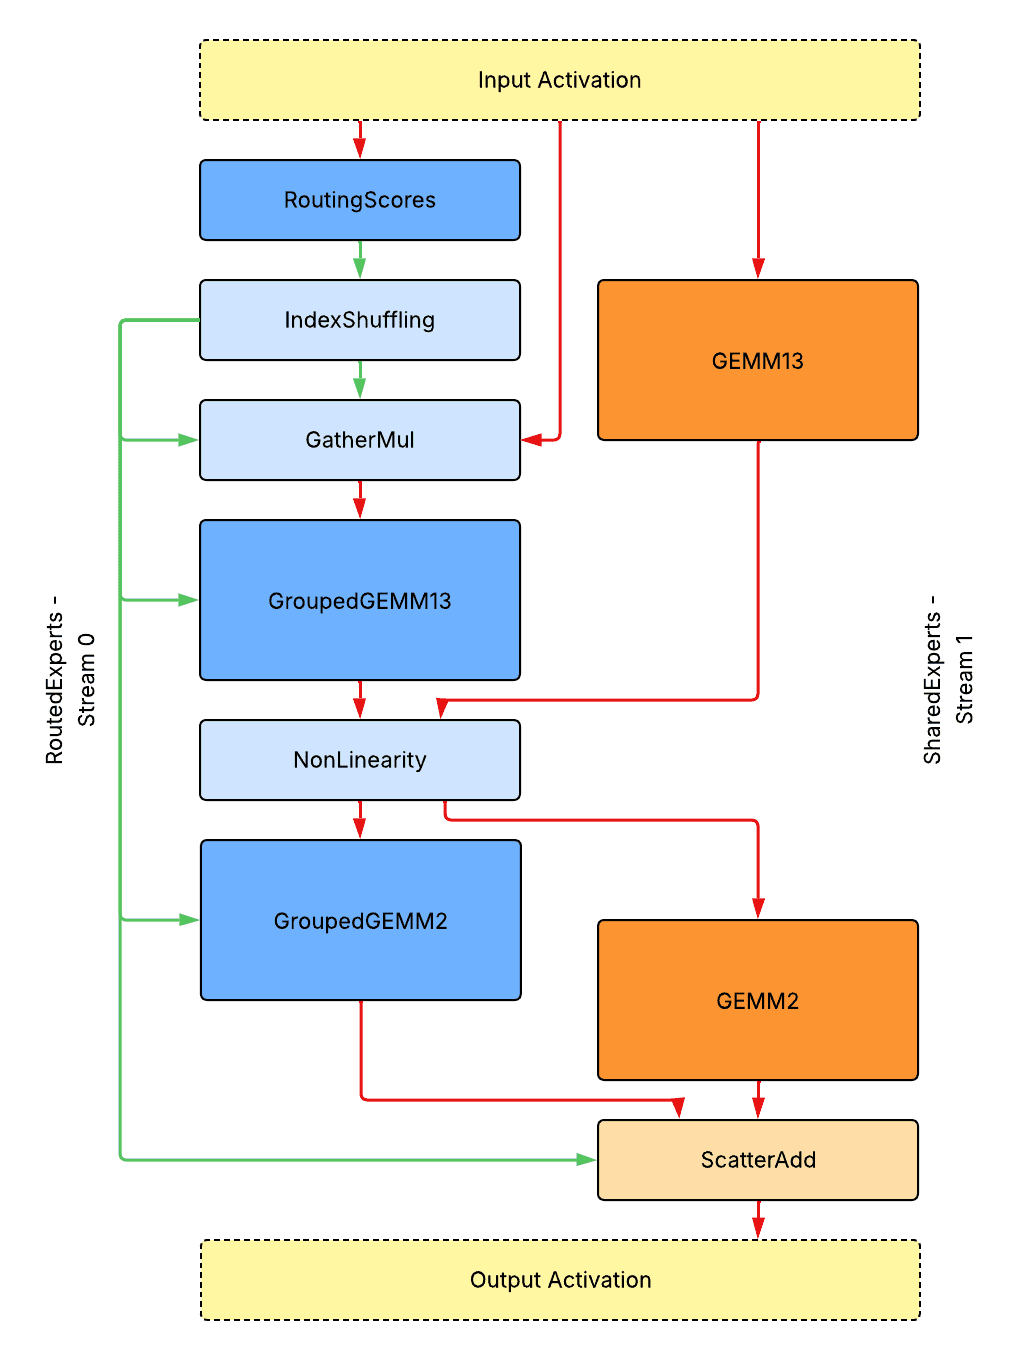
Above is the overall runtime design for single-GPU inference without model parallelism. Note that, to optimize performance, the first and third linear layers of SwiGLU activation are merged together as GroupedGEMM13 / GEMM13.

  • Solid dark blue/orange boxes represent tensor core heavy kernels on routed/shared expert streams.
  • Solid light blue/orange boxes represent CUDA core or memory traffic-heavy kernels on routed/shared expert streams.
  • Red arrows represent data flows of activation tensors.
  • Green arrows represent data flows of metadata tensors.

All metadata tensors are placed on the device. There is no blocking device to host synchronization. All kernels are launched back to back without bubbles. The diagram shows data flows only, not a demonstration of actual profiling traces.

Kernel Interfaces And Data Flows

  • RoutingScores: A function or fused kernel that handles routing scores calculation.
    • Input: input_tokens: [T, D] (T: number of tokens; D: feature dimension); router_weights: [D, E] (E: number of experts); router_biases: [E];
    • Output: routing_scores: [T, E]; scaling_factors: [T, E];
  •  IndexShuffling: A fused kernel that handles shuffling and sorting of indices. We will introduce an optimized implementation in the Kernel Design section.
    • Input: routing_scores: [T, E]; K (threshold for top-k routing);
    • Output: routed_token_indices: [K * T]; routed_expert_indices: [K * T]; routed_token_counts_per_expert: [E];
  • GatherMul: A fused kernel that shuffles tokens based on sorted indices and scales them.
    • Input: input_tokens: [T, D]; routed_token_indices: [K * T]; routed_expert_indices: [K * T]; scaling_factors: [T, E];
    • Output: scaled_routed_tokens: [K * T, D]
  • GroupedGEMM: An optimized GroupedGEMM kernel that handles on-device shape information about batches along M dimension without restrictions. We will introduce an optimized implementation in the Kernel Design section.
    • Input: tokens: [K * T, D]; weights: [E, D, HD] (HD: hidden dimension); routed_token_counts_per_expert: [E];
    • Output: tokens: [K * T, HD]
  • GEMM: An optimized GEMM kernel. Similar interface to dense model.
  • NonLinearity: A fused kernel that handles non-linearity. Similar interface to dense model.
  • ScatterAdd: An optimized kernel that reverses token shuffling based on sorted indices and directly performs scatter add to shared expert output without materializing an unshuffled tensor.
    • Input: shared_output_tokens: [T, D]; routed_output_tokens: [K * T, D]; routed_token_indices: [K * T]; 
    • Output: combined_output_tokens: [T, D]

Note that if quantization is applied, then activation quantization kernels are fused into the preceding non-GEMM kernels, which means fusing into GatherMul for GroupedGEMM13 and fusing into NonLinearity for GroupedGEMM2, etc.

Note if using a large K * T, the GatherMul and ScatterAdd operation can be further fused into following/proceeding GroupedGEMM operations, which should be complete as global memory to shared memory/registers or shared memory to global memory step in prologue/epilogue, however, it adds additional challenge on overlapping with tensor core execution at the kernel design level. Besides, fusing ScatterAdd requires shared experts to complete before routed experts, which might not be a good design choice if these kernels can be used to hide AlltoAll latency.

Tensor Parallelism for Single-Host Inference

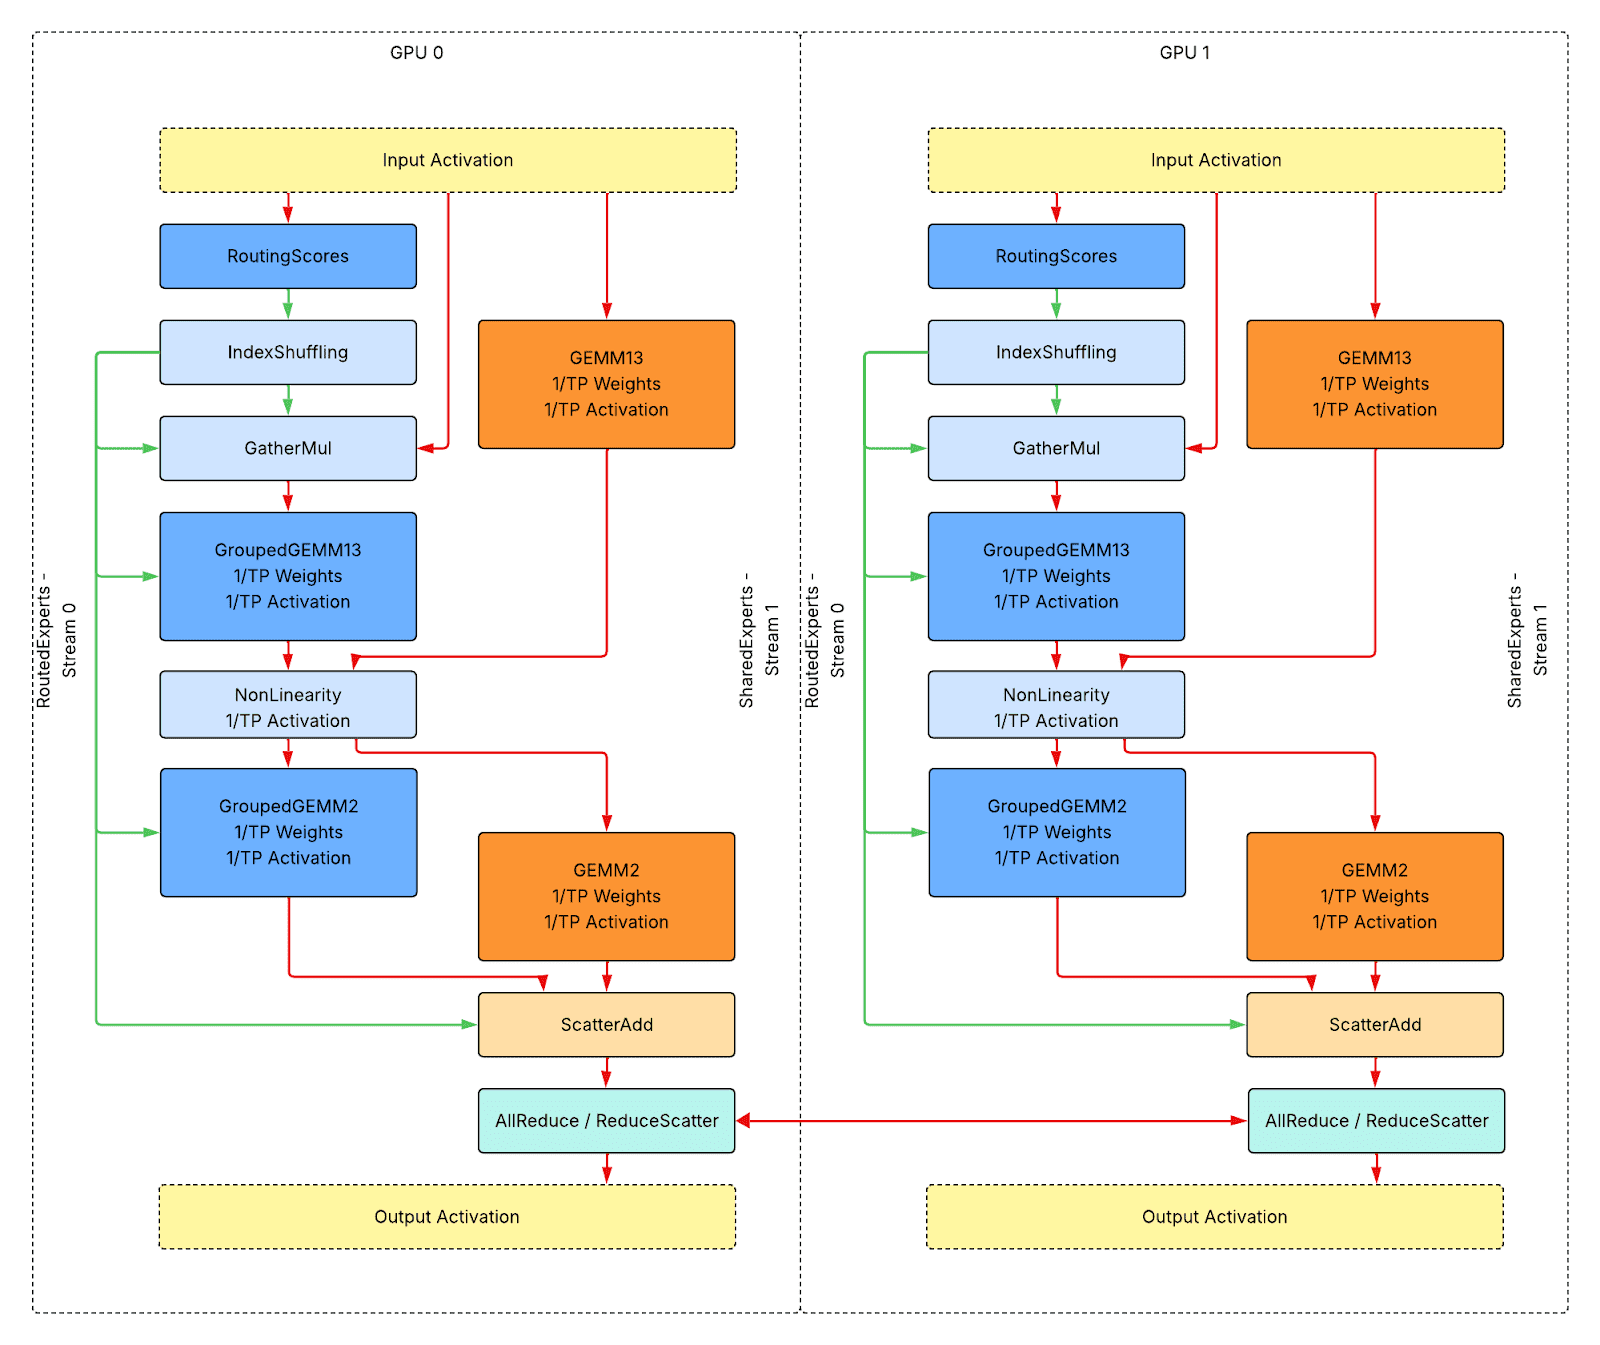
Above is the overall runtime design for single-host inference with tensor parallelism (TP). Compared to single-GPU inference, the additional step is:

  • Solid light mint boxes represent network traffic-heavy communication kernels.

Still, all metadata tensors are placed on the device, there is no device to host synchronization. All kernels are launched back to back without bubbles. The diagram shows data flows only, not a demonstration of actual profiling traces.

Workload Sharding and Additional Kernels

No additional custom kernel is introduced compared to the single GPU inference use case. For GEMM, GroupedGEMM, and non-linearity kernels, the activation and weights are both shared to 1/TP along different dimensions, and the computation/memory overhead is also shared to 1/TP.

The final step should be AllReduce if only tensor parallelism is applied. Alternatively, ReduceScatter if tensor parallelism is applied with sequence parallelism.

Expert Parallelism for Multi-Host Inference

To enable expert parallelism (EP), we swap data parallelism dimension out of the routed expert as the expert parallelism dimension inside the routed expert. Note that tensor parallelism can be further swapped with expert parallelism for better GEMM efficiency with increased routing imbalance risk, but we won’t cover this design in this blog.

If expert parallelism is enabled with token-choice routing, then we must decide between using dense tensors or using static shapes, because the number of routed tokens to different expert groups is dynamic. 

  • We use dense tensors and dynamic shapes when using eager mode is preferred to avoid waste on network traffic and memory space caused by running unpadded AlltoAll.
  • We use sparse tensors and static shapes when using graph mode is preferred to avoid generating GPU bubbles caused by CPU launch overheads and device-to-host synchronization through running with CUDAGraph.

Note that wasted network traffic with padded activations can also be avoided using a custom AlltoAll implementation, but we won’t cover any topics on custom communication or communication and computation fusion kernels in this blog.

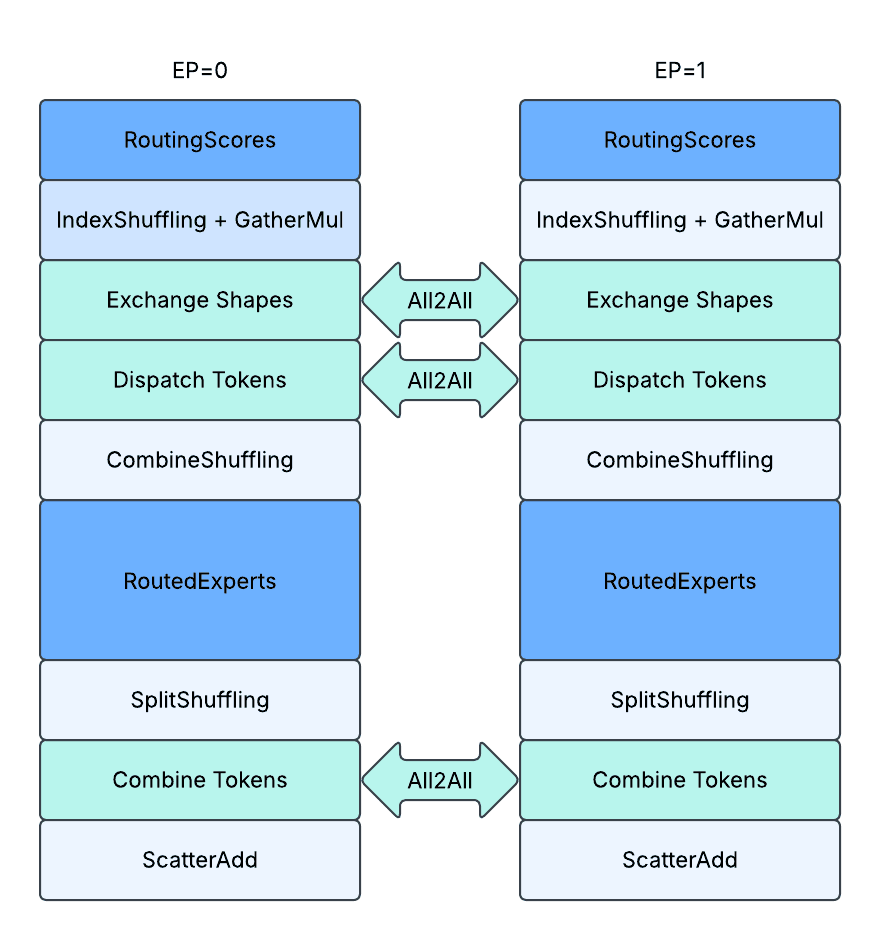
Above is the overall runtime design for multi-host inference with tensor parallelism and expert parallelism. Compared to single-host inference with tensor parallelism.

  • Solid red arrows represent intra-node communication.
  • Solid purple arrows represent inter-node communication.

Kernel Interfaces And Data Flows

For added expert parallelism-based communication, we use 3-shot All2All communication to exchange shapes and tokens:

  • 1st A2A: Exchange on-device metadata tensor about number of tokens routed to each expert, which is `routed_token_counts_per_expert: [E]`, the output generated from IndexShuffling kernel.
  • 2nd A2A: Exchange tokens from data parallelism based to expert parallelism based, dispatching to different EP ranks based on routing.  
  • 3rd A2A: Exchange tokens from expert parallelism based to data parallelism based, combining from different EP ranks based on routing.

Besides, we added 2 additional shuffling kernels and 1 special scatter kernel:

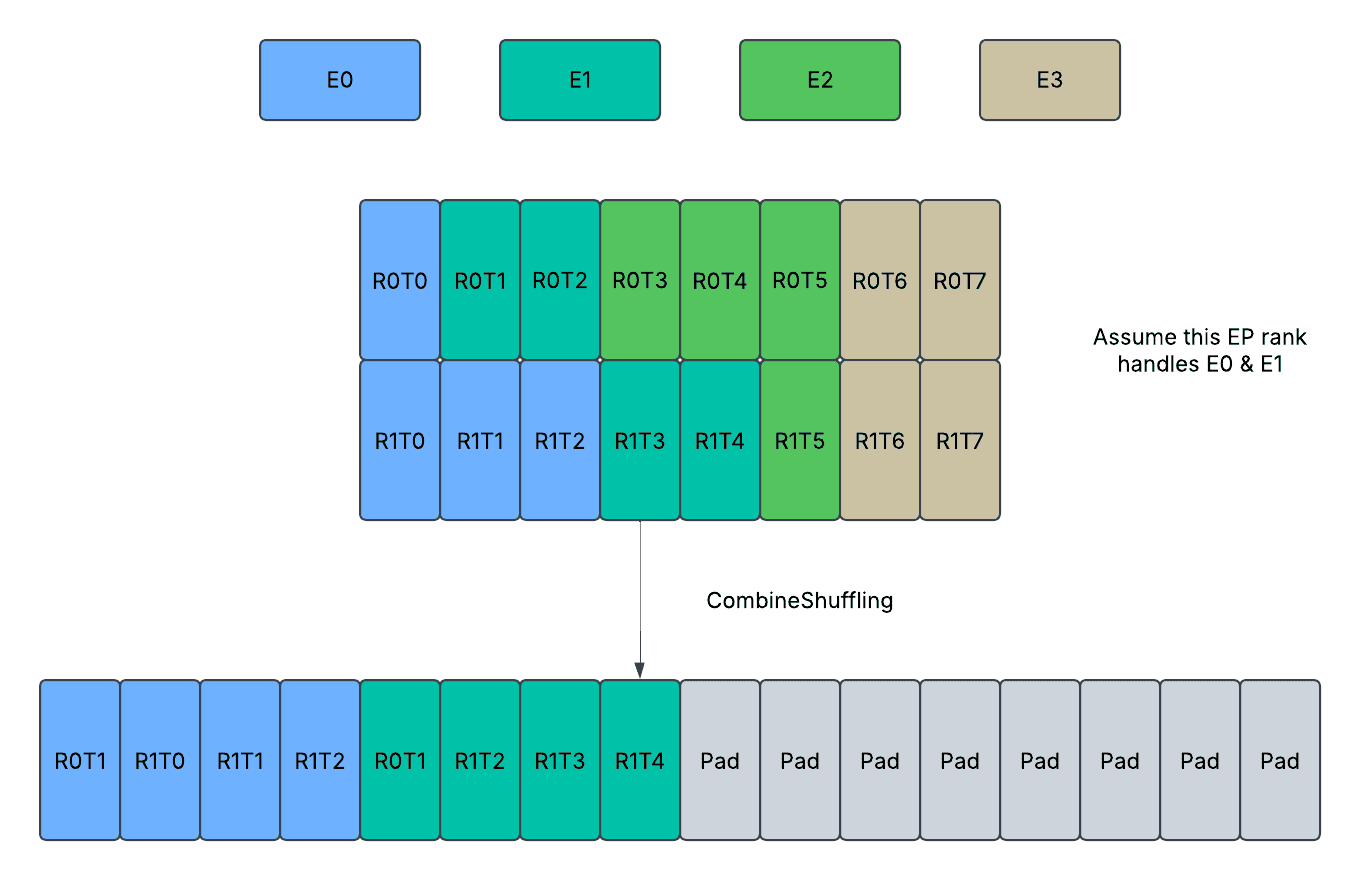
  • CombineShuffling (Dense or Padded): Reshuffles received tokens from rank first order to expert first order. Following T* indicates the number of total tokens received from all peers, which can be further interpreted as a jagged dimension with shape information from routed_token_counts_per_rank_per_expert tensor.
    • Input: received_tokens: [T*, D] (first ordered by dp ranks, then ordered by expert indices); routed_token_counts_per_rank_per_expert: [EP, E // EP];
    • Output: reshuffled_tokens: [T*, D] (first ordered by expert indices, then ordered by dp ranks); routed_token_counts_per_expert: [E // EP];
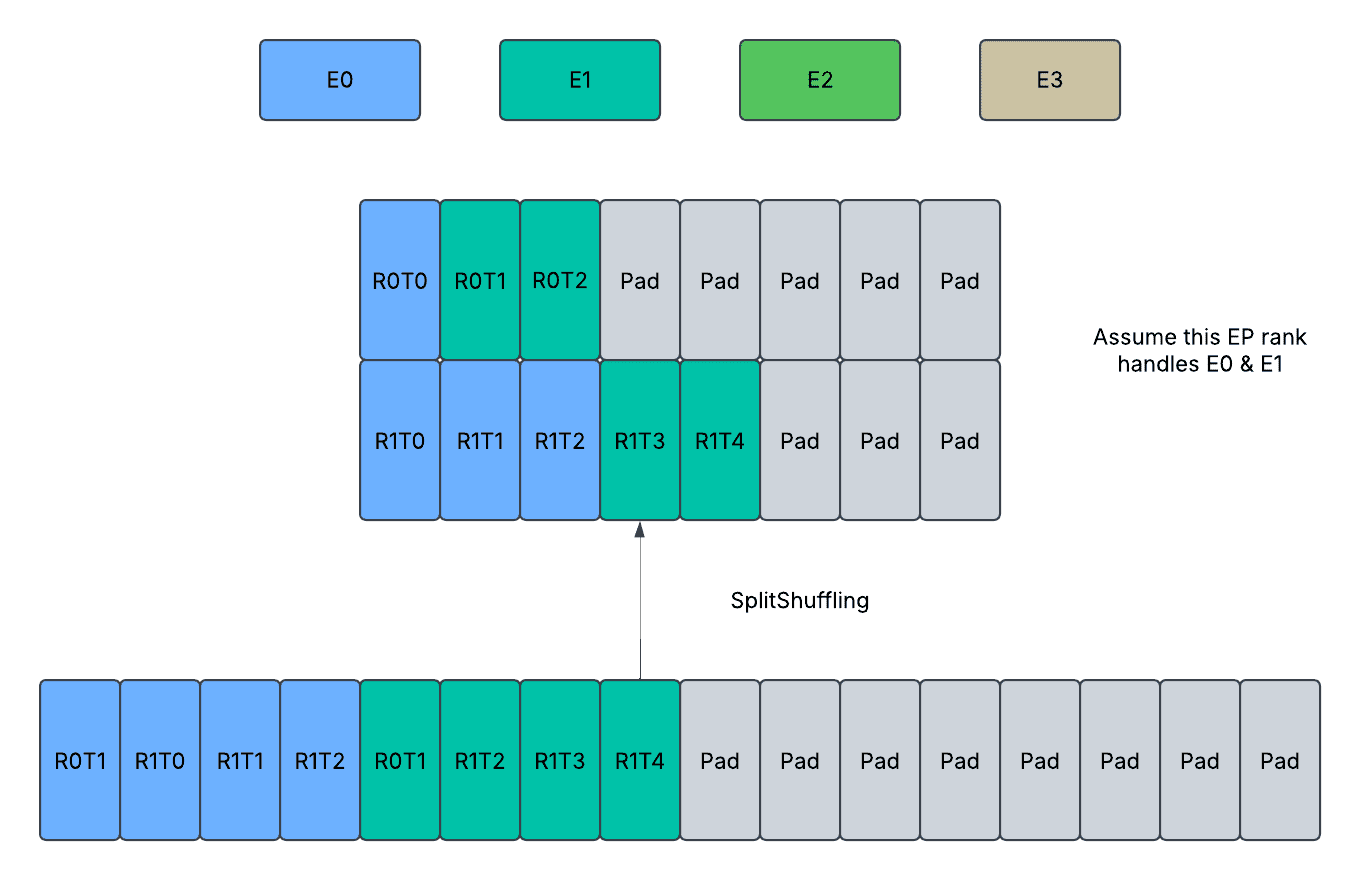
  • SplitShuffling (Dense or Padded): Reverse process of CombineShuffling. Reshuffles to-send tokens from expert first order to rank first order.
    • Input: reshuffuled_tokens: [T*, D] (first ordered by expert indices, then ordered by dp ranks); routed_token_counts_per_rank_per_expert: [EP, E // EP];
    • Output: to_send_tokens: [T*, D] (first ordered by dp ranks, then ordered by expert indices);
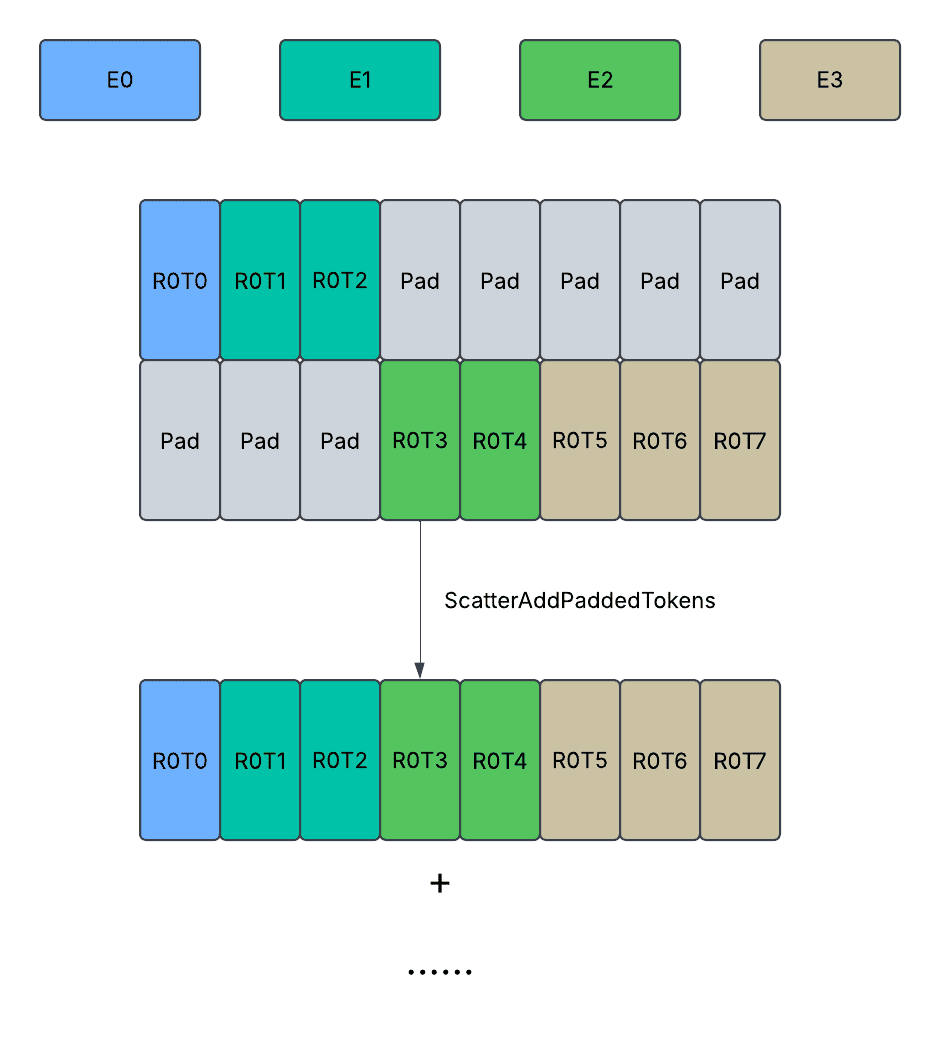
  • ScatterAdd (Padded): Scatter adds validate tokens from padded tensors.
    • Input: shared_output_tokens: [T, D]; received_padded_routed_output_tokens: [EP, K*T, D];  routed_token_indices: [K * T];  routed_token_counts_per_expert: [E]; 
    • Output: combined_output_tokens: [T, D]

We will provide a better demonstration of the above kernels in detail in the `Padded Communication with Static Shapes In Graph Mode` section.

Unpadded Communication with Dynamic Shapes In Eager Mode

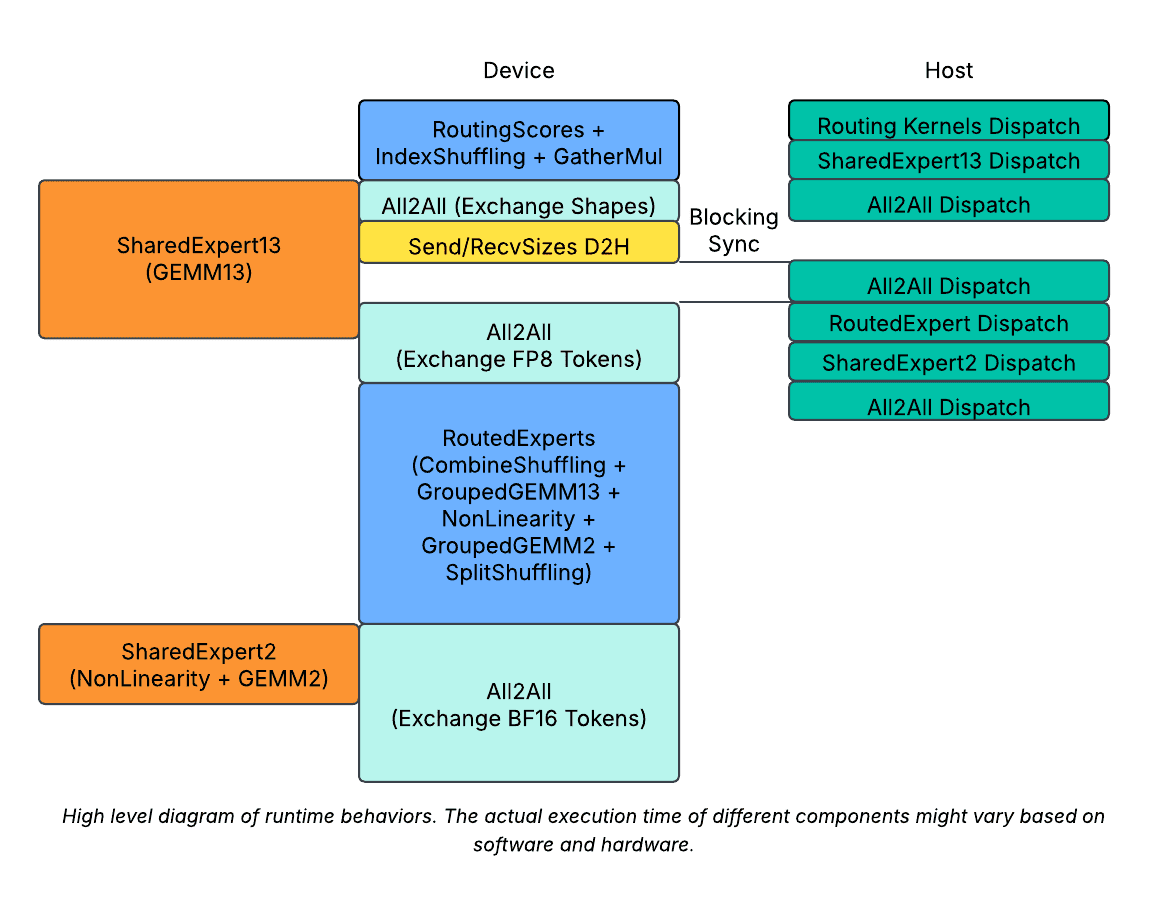
High-level diagram on runtime behavior. The actual runtime of different components might vary based on software and hardware.

Minimize Usage of Dynamic Shapes

As the routing is dynamic per MoE layer, the minimal amount of device/host synchronization required is once per layer. To achieve this, we made a delay of the D2H copy of `send_sizes`, and concatenated it with `recv_sizes` to transfer them together with a single D2H copy. It reduces the device/host synchronization to once per layer.

Minimize Negative Impact on Dynamic Shapes

To further hide the device/host synchronization overhead, we further split the shared experts into 2 parts.

  • We had the first part dispatched right after routing, but before dispatch A2As. Then, when the device/host synchronization happens, the device is still kept busy running shared experts.
  • We have the second part dispatched right after MoE but before combining A2A. This will further help overlapping the second A2A.

Padded Communication with Static Shapes In Graph Mode

Minimize Usage of Padding

With a dropless token choice design, the maximum possible number of tokens routed to any single expert is T. However, if we group multiple experts together and place them on a single GPU through expert parallelism sharding, for TopK routing,

  • The maximum number of tokens routed to 1 expert is T.
  • The maximum number of tokens routed to 2 expert is 2 * T.
  • The maximum number of tokens routed to K experts is K * T.
  • The maximum number of tokens routed to K + 1 experts is, still, K * T. 

So the maximum number of tokens routed to an expert group of N experts will be capped at min(N, K) * T tokens. 

For Top1 routing, the number of tokens routed to an expert group of any size will always be capped at T tokens, and the minimal required memory to allocate and hold for dynamic tokens is EP * T tokens, as there are EP expert groups. 

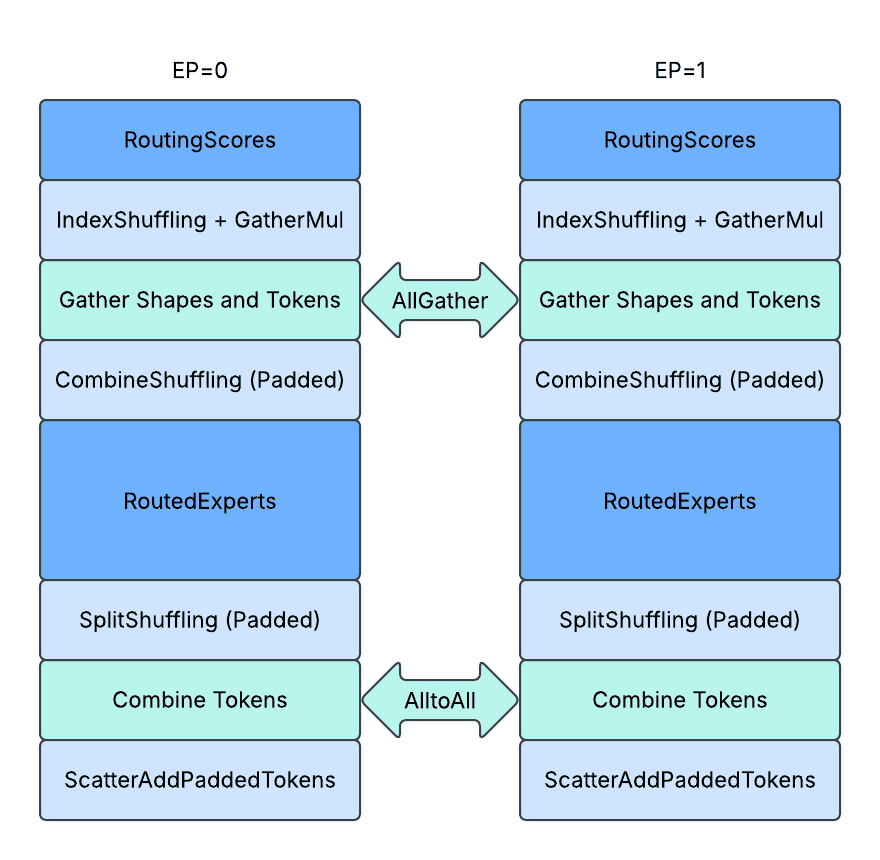
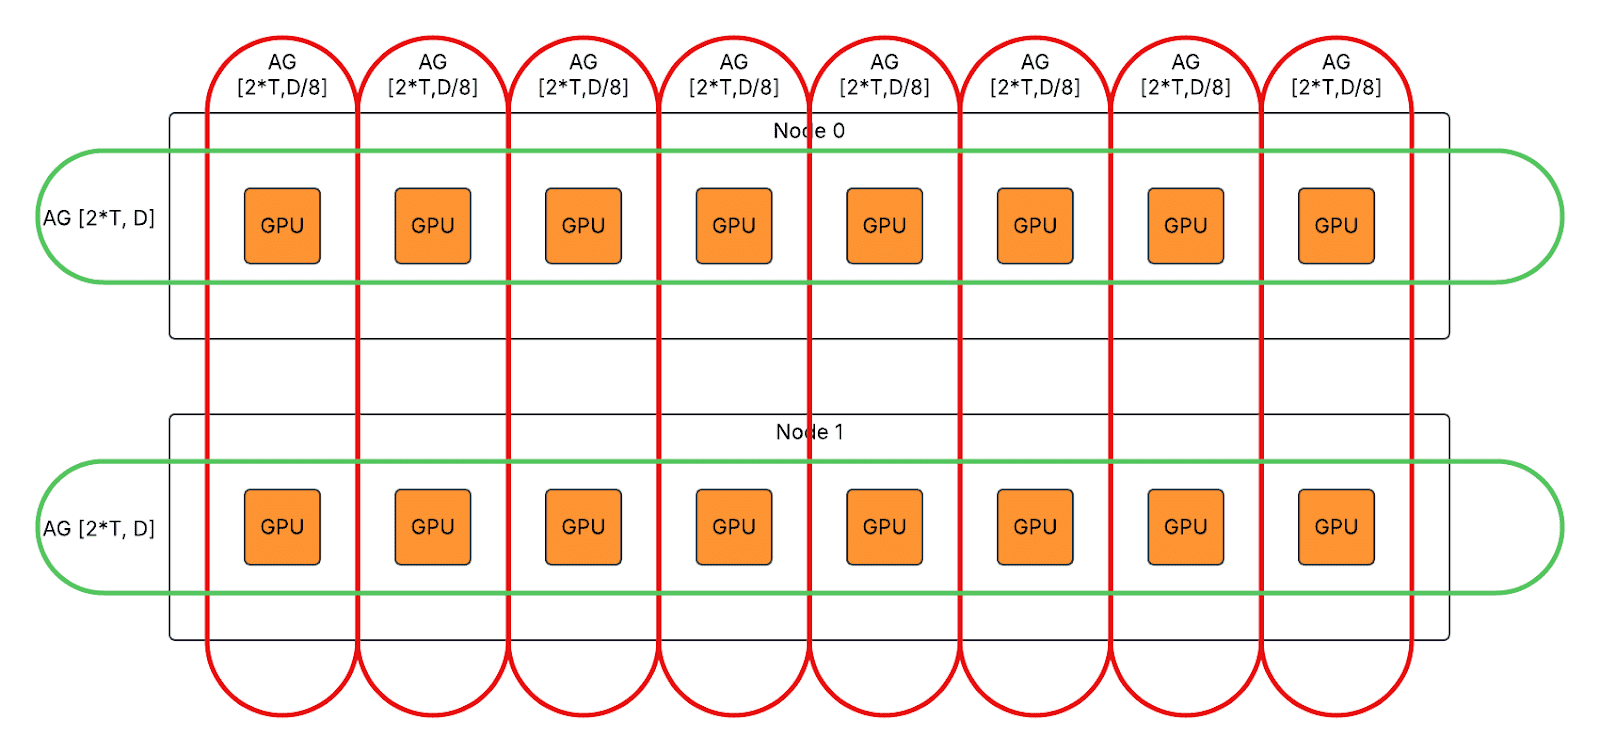
To achieve the minimal required padding, we directly use AllGather to gather all active tokens from different EP ranks and then splits and reshuffles routed tokens locally through custom kernels. The activation size is compressed to 1 / (E // EP), which corresponds to reductions in memory and network traffic.

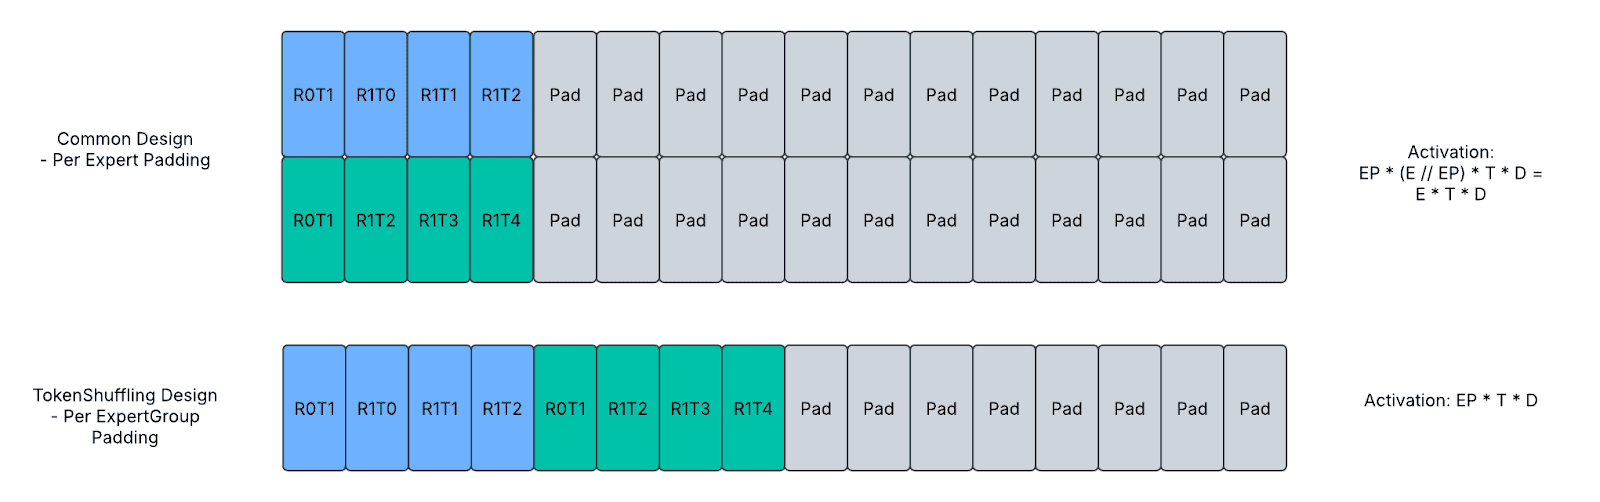
The above diagram shows the padding design. Each box represents a token, the blue / green color represents valid tokens with expert assignments and the grey color represents padded tokens. RiTj represents the j-th token from the i-th rank of expert parallelism group.

Minimize Negative Impact on Padding

Even though the paddings are reduced to minimal allowance, we also ensure that the paddings only cause memory space (allocation) and network traffic (communication), but not cause redundant computation (GroupedGEMM / NonLinear), redundant memory bandwidth (CombineShuffling / SplitShuffling / ScatterAdd) through taking on device shape information `routed_token_counts_per_expert` or `routed_token_counts_per_rank_per_expert`.

Activation Conceptional Interpretation

Most importantly,

  • When the total number of active tokens is small across all EP ranks, it is important to do so to avoid activating redundant experts in GroupedGEMM and causing extra memory traffic.
  • When the total number of active tokens is large across all EP ranks, it is also important to do so to avoid converting GroupedGEMM from memory bound to compute bound. 

CombineShuffling: The tokens assigned to the current EP rank are reshuffled from expert first order to rank first order right after AllGather. The tokens not assigned are not copied, and the remaining allocated memory space at the end of the tensor remains untouched.

SplitShuffling: The tokens assigned to the current EP rank are reshuffled from rank-first order to expert-first order right before AlltoAll. The tokens not assigned are not copied, and the reshuffled tensors have paddings stored in an interleaved fashion.

ScatterAdd (Padded): Each EP rank finally receives activations computed from all other ranks, it will understand where are the valid tokens and where are the padded tokens, and then only read the valid tokens to do scatter_add with.

Communication Deduplication

Different tensor parallelism ranks have the same activation before 1st GroupedGEMM and after 2nd GroupedGEMM, so the same tokens are exchanged across nodes repeatedly. 

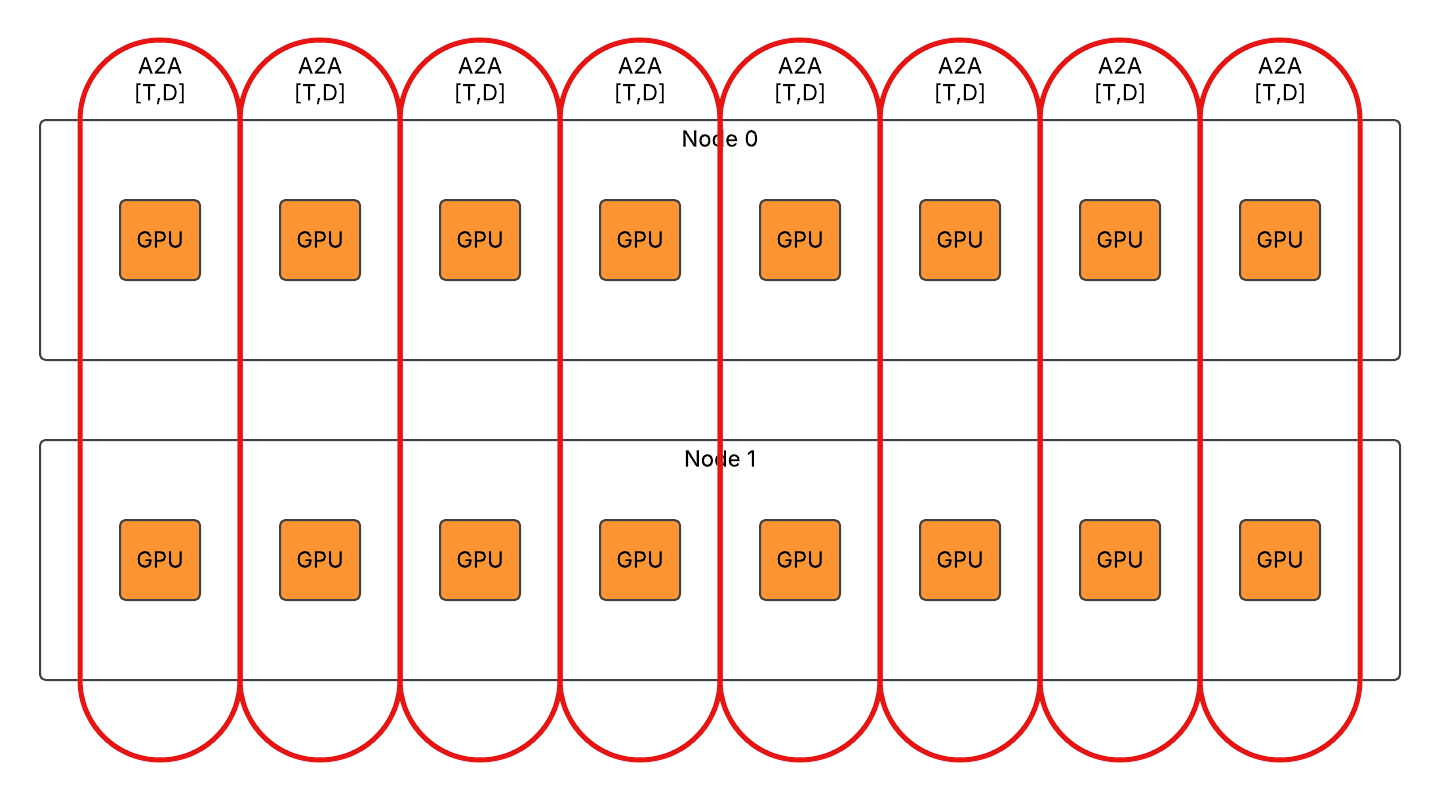
We enabled communication deduplication to evenly distribute the inter-node communication workload to different ranks with extra intra-node communication introduced. Example of DP2/TP8/EP2:

  • For first AlltoAll in eager mode, split T*D inter-node AlltoAll to T*D/8 inter-node AlltoAll and T*D intra-node AllGather.

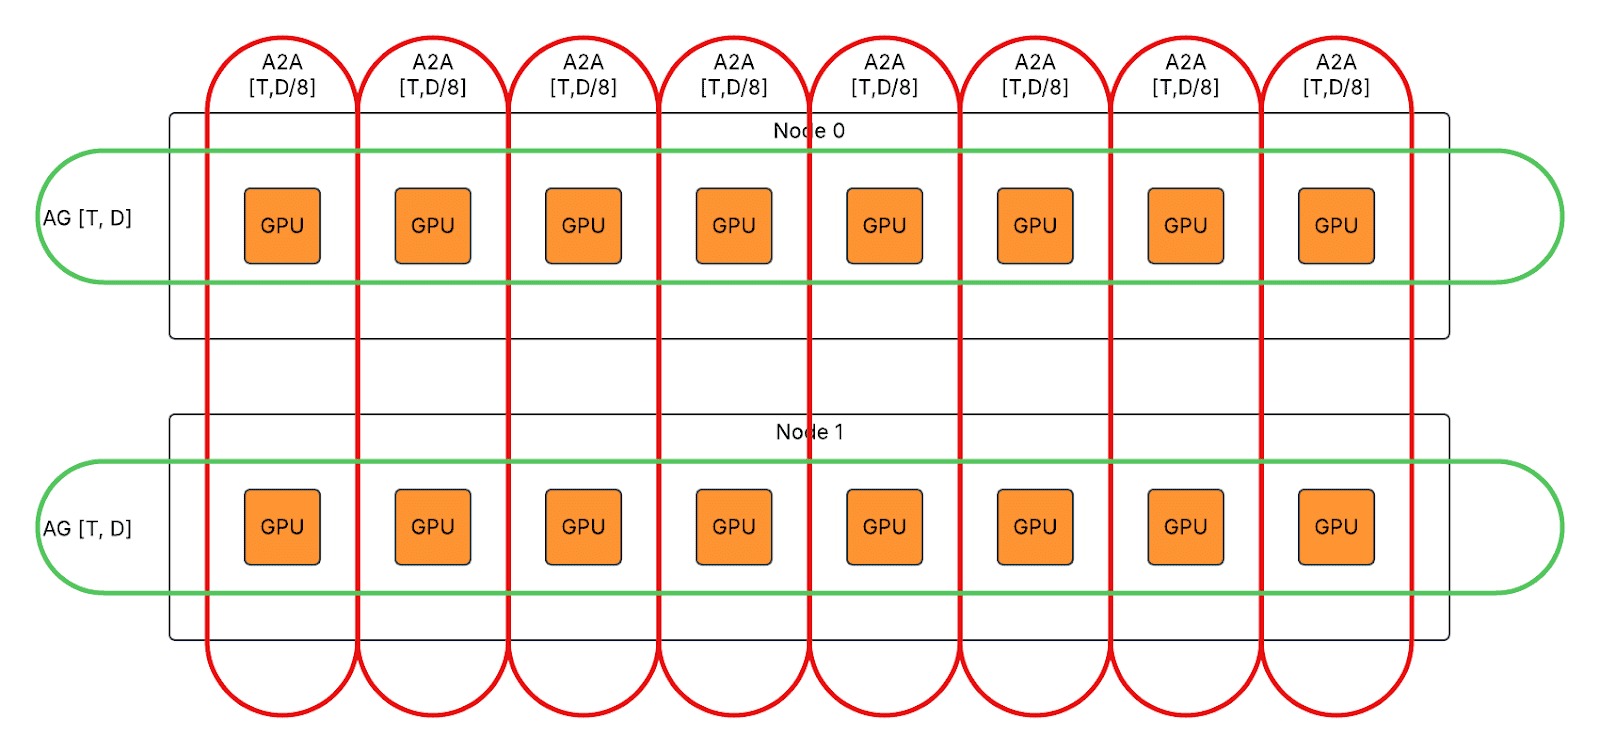
  • For second AlltoAll in eager / graph mode, split T*D inter-node AlltoAll to T*D/8 intra-node ReduceScatter and T*D/8 inter-node AlltoAll.

  • For first AllGather in graph mode, split 2*T*D inter-node AlltoAll to 2*T*D/8 inter-node AllGather and 2*T*D intra-node AllGather.

Kernel Design

We implemented more than 10 custom kernels to support MetaShuffling MoE inference design in different use cases running on both Nvidia H100 GPU and AMD MI300X GPU. We open sourced all computation kernels as PyTorch operators in FBGEMM Generative AI Kernel Library. We hope it can help users efficiently serve Llama 4 models in their preferred framework and preferred accelerators, for example, vLLM / SGLang. In this blog, we will focus on the 2 most interesting kernels designs as the key to improve inference performance, GroupedGEMM and IndexShuffling.

GroupedGEMM

We implemented Triton-based GroupedGEMM kernels for BF16 / FP16 / FP8 Rowwise.

Interface

def grouped_gemm_fp8_rowwise(
	x: torch.Tensor, 		# shape: [M, K]
	w: torch.Tensor, 		# shape: [G*N, K]
	m_sizes: torch.Tensor, 	# shape: [G]
	x_scales: torch.Tensor,	# shape: [M]
	w_scales: torch.Tensor, 	# shape: [G*N]
) -> torch.Tensor:               # shape: [M, N]
	...

The interface is quite similar to single GEMM in that it takes a single LHS, a single RHS tensor, and produces a single output. There is no dynamism or sparsity from the runtime point of view.

However, the kernel dynamically splits the M dimension of the LHS tensor using the data of `m_sizes` and statically splits the N dimension of the RHS tensor using the shape of `m_sizes`. This design has several advantages:

  • No additional padding or alignment requirement within different batches of Ms. So `m_sizes` can store any non-negative values as long as its total does not exceed `M`.
  • The `m_sizes` can be zero values to skip loading weights of unactivated experts.
  • The `m_sizes` can have a total sum less than `M` to skip computation on padded tokens at the end without extra overhead.
  • The `m_sizes`, or the splitting of the LHS activation, is known to the device but unknown to the host. So it supports dynamic routing information without incurring device-to-host synchronization. 

Workload Partition

We adopt the persistent kernel design to launch 1 CTA per SM and have all the CTAs running through all the partitioned tiles in an interleaved fashion. Conceptually, the workload partition happens as follows.


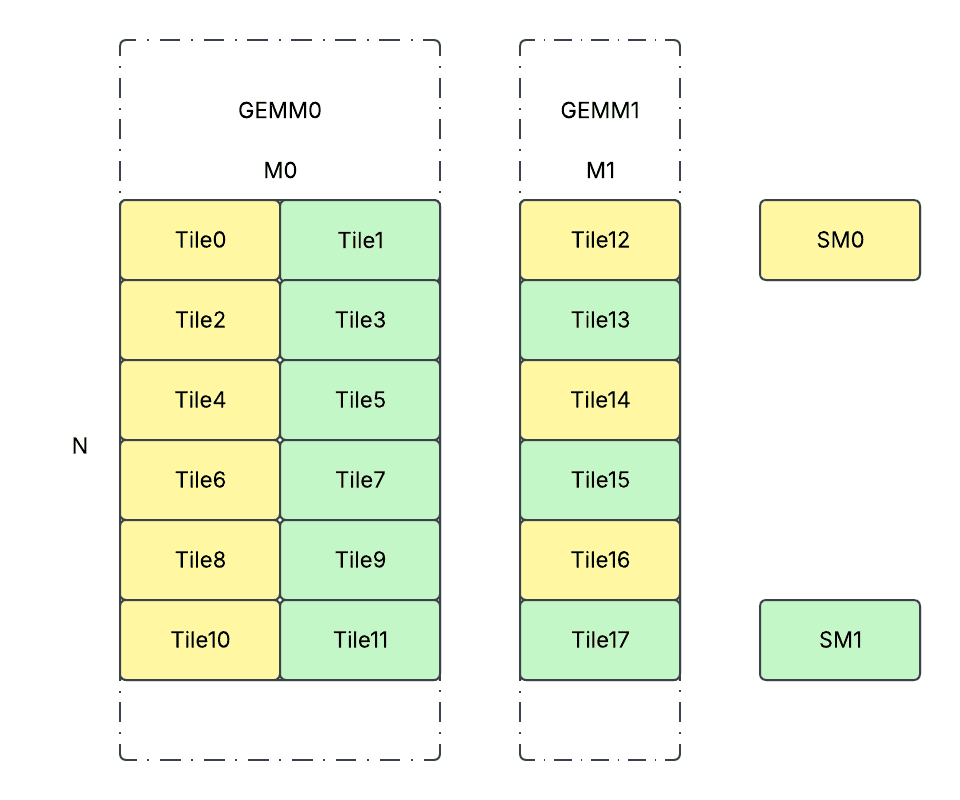
def partition_workload(G: int, Ms: List[int], N: int):
	partitions = []
	for g in range(G):
		for n in range(0, N, BLOCK_N):
			for m in range(0, Ms[g], BLOCK_M):
				partitions.append((g, m, n))
	paritions_per_cta = [[] for _ in NUM_SMS]
	for i, part in enumerate(partitions):
		paritions_per_cta[i % NUM_SMS].append(part)

The partitions are dynamically calculated on the device side at runtime with a small overhead. However, by doing so, we can achieve:

  • Balanced workload across different SMs.
  • Small launching overhead as each SM will only launch 1 CTA.
  • High L2 cache hit rate. The order of workload partition makes sure the weights/activations will most likely be loaded once from HBM and cached on L2. Because usages of the same weight/activation tile will almost always happen concurrently / consecutively from different SMs.

Persistent Kernel with Warp Specialization

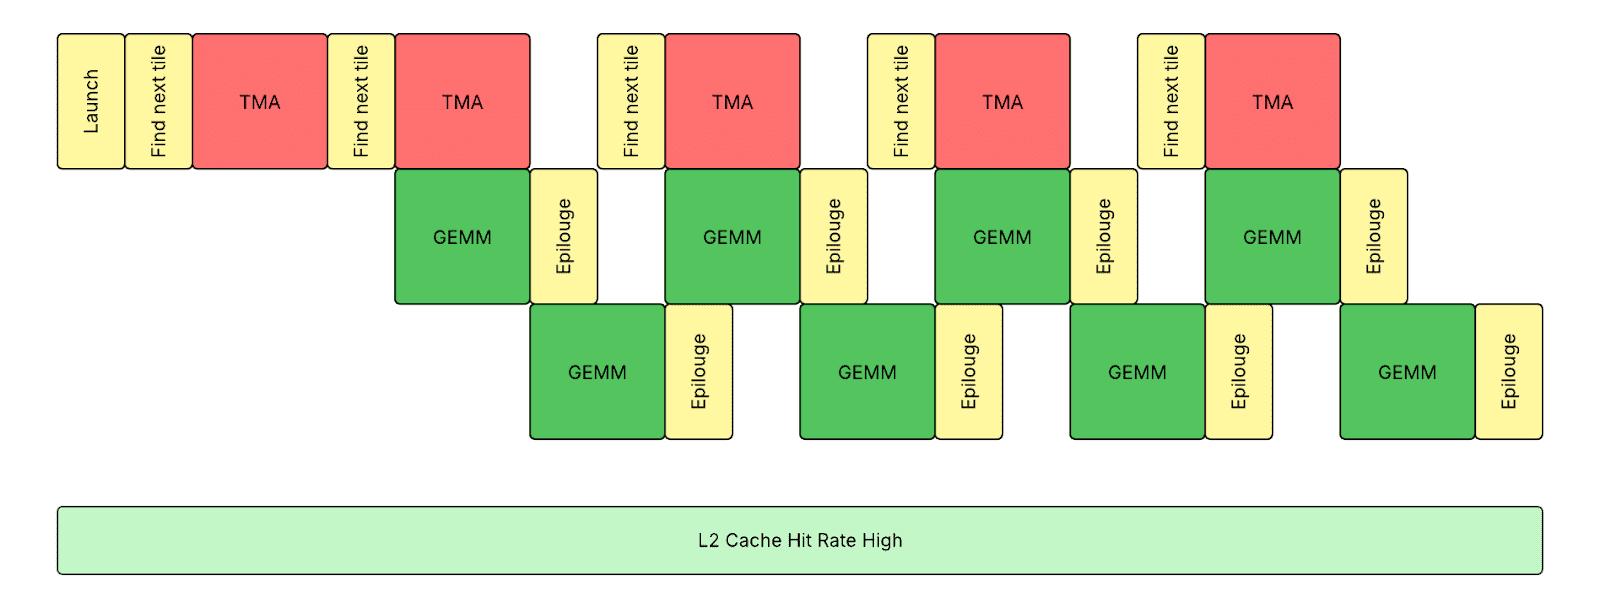
We adopted host-side tensor map-based loading of activations and weights, and optional device-side tensor map-based storing of outputs, to reduce memory transfer overhead on Hopper GPUs. With a contiguous storage format of activations, we can use a single host-side TMA (Tensor Memory Accelerator) descriptor to load activations and mask out the tokens that belong to other experts. However, we need to create multiple device-side TMA descriptors to store outputs without dynamic masking support.

We adopted a warp specialization-based kernel design to have the kernel running in a truly persistent fashion that each SM switches between 3 warp groups (1 producer and 2 consumers). This design keeps TMA engine, Tensor core, and CUDA core execution overlapping with each other, utilizing asynchronous TMA instructions and WGMMA (Asynchronous Warpgroup Level Matrix Multiply-Accumulate) instructions with memory barriers on shared memory. We received tremendous help from our Meta’s Triton compiler team to enable it. It is only possible to hide prologue and epilogue with warp specialization, as the traditional software pipeline approach cannot handle complicated control flows with pointer chasing.

IndexShuffling

We implemented CUDA / HIP-based index shuffling kernels.

Interface

def index_shuffling(
	scores: torch.Tensor,			        # shape: [T, E]
):
	token_counts: torch.Tensor = ...		# shape: [E]
	expert_indices: torch.Tensor = ...	        # shape: [T]
	token_indices: torch.Tensor = ...		# shape: [T]
	return token_counts, expert_indices, token_indices

The kernel takes routing scores of all tokens on all experts, figures out the specific expert each token is routed to, reorders the token indices such that all the tokens routed to the same expert are placed contiguously, and returns:

  • `token_counts`: As the number of tokens routed to each expert. It will be fed into the GroupedGEMM kernel discussed above.
  • `expert_indices`: As the expert index each shuffled token belongs to. It will be fed into the GatherMul kernel discussed above.
  • `token_indices`: As the original token index each shuffled token belongs to. It will be fed into the GatherMul and ScatterAdd kernel discussed above.

Cooperative Kernel

We adopted the cooperative kernel design, and split the kernel into 2 major phases, top-k reduction phase and bucket sort phase, with a global synchronization in the middle.
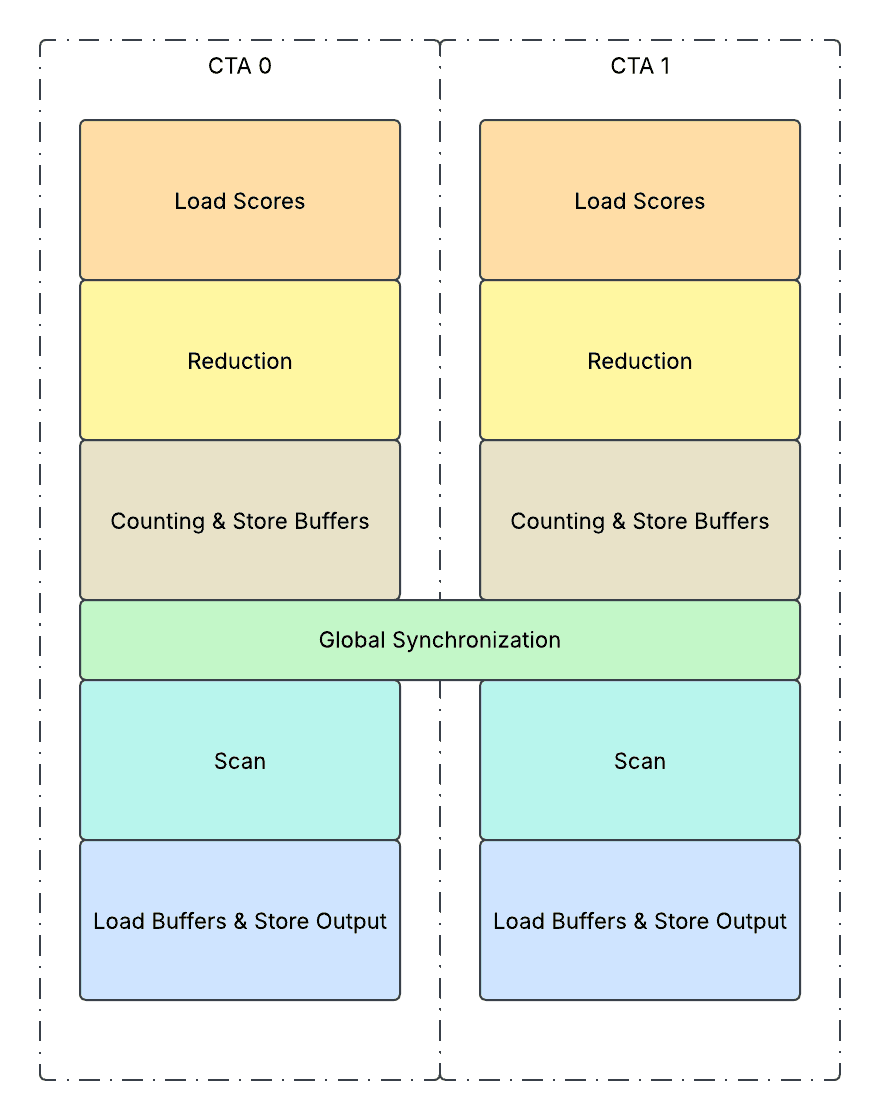
  • 1. Load scores
    • It loads a tile of routing scores from global memory (HBM) to shared memory (SMEM) and stores associated expert indices along with it on SMEM.
  • 2. Reduction
    • Performs TopK reduction on SMEM across E dimension. For Llama 4 use cases, it performs ArgMax sorting as Top1 reduction, which includes a 2D parallel tree reduction on the scores and associated expert indices on SMEM. Between different tree reduction phases,
      • All threads will concurrently work on reductions of multiple tokens on SMEM.
      • Each thread will sequentially work on reductions of multiple tokens on SMEM.
  • 3. Counting & Store Buffers:  
    • It iterates all the tokens on the tile, getting the selected expert index from SMEM, storing it to the buffer (`buf_expert_index`) on HBM, and performs an `atomicAdd` operation on the output counter (`token_counts`) on HBM. 
    • The interesting part is, the `atomicAdd` operation will return the value previously on the memory location, which indicates the place of the token within the group, and we will store this value inside a buffer (`buf_local_token_index`) and use it to determine the global order among all the tokens.
  • Repeat 1-3 iteratively until all the tokens assigned to the CTA are processed.
  • 4. Global Synchronization: 
    • It performs an `atomicAdd` operation on the global counter on HBM. Afterwards, all CTAs will wait until the global counter reaches the number of total tokens, with a `st.release` + `ld.aquire` barrier guarding preceding store operations and following load operations to ensure correctness.
  • 5. Scan
    • It performs a simple load and prefix sum of `token_counts` and transforms it into `token_counts_cumsums` on SMEM.
  • 6. Load Buffer & Store Output
    • It iterates all the tokens assigned to this CTA. For each token, it loads the expert index the token is assigned to from `buf_expert_index`, and then figure out the new token index after shuffling as a sum of 
      • The number of tokens before it that belong to previous experts, using the SMEM tensor `token_counts_cumsums`.
      • The number of tokens before it that belong to the same expert, using the HBM tensor `buf_local_token_index`.
    • Afterwards, it simply does a direct store on `expert_indices` and `token_indices` output at the new token index after shuffling.

Performance

Example Kernel Performance

Our setup used H100 80GB SMX5 HBM3 700W SKUs, Python 3.12, and CUDA 12.8. The theoretical peak HBM memory bandwidth on a single H100 is 3.35 TB/s.

GroupedGEMM

Prefill Performance

The following table shows the prefill performance of the kernel on Llama 4 Scout and Maverick single host serving. The experiment setup assumes 16,384 total number of tokens and tensor parallelism sharding. 

Precision G M N K Time

(us)

Compute

(TFlops)

Memory

(GB/s)

BF16 16 1,024 2,048 5,120 523.85 655.90 1,088.90
BF16 16 1,024 5,120 1,024 294.95 582.46 1,251.39
BF16 128 128 2,048 5,120 975.41 352.26 2,992.82
BF16 128 128 5,120 1,024 510.78 336.35 3,021.86
FP8 16 1,024 2,048 5,120 286.89 1,197.64 1,111.10
FP8 16 1,024 5,120 1,024 182.41 941.83 1,471.62
FP8 128 128 2,048 5,120 517.16 664.40 2,887.28
FP8 128 128 5,120 1,024 290.25 591.90 2,947.93

Note: G indicates the number of groups. M indicates the number of tokens per group. N indicates the output feature dimension per group. K indicates the input feature dimension per group. FP8 indicates FP8 rowwise scaling (per-token scaling on activation and per-channel scaling on weight) with fast accumulation. Quantization kernels are not included in benchmarking. Scales are not included in memory bandwidth calculation. Benchmarked with rotating buffers and CUDAGraphs.

Decode Performance

The following table shows the decode performance of the kernel on Llama 4 Scout and Maverick single host serving. The experiment setup assumes 128 total number of tokens and tensor parallelism sharding. 

Precision G M N K Time

(us)

Compute

(TFlops)

Memory

(GB/s)

BF16 16 8 2,048 5,120 112.54 23.85 2,997.82
BF16 16 8 5,120 1,024 60.00 22.37 2,822.50
BF16 128 1 2,048 5,120 861.22 3.12 3,119.07
BF16 128 1 5,120 1,024 433.15 3.10 3,102.26
FP8 16 8 2,048 5,120 59.81 44.88 2,824.60
FP8 16 8 5,120 1,024 34.86 38.50 2,447.64
FP8 128 1 2,048 5,120 440.53 6.09 3,049.44
FP8 128 1 5,120 1,024 225.14 5.96 2,987.15

IndexShuffling

The following table shows the performance of the kernel on Llama 4 Scout and Maverick single-host serving, comparing against native PyTorch implementations.

Num Tokens Num Experts IndexShuffling (us) Unfused Ops (us) Speedup
128 16 5.08 36.71 722.53%
128 128 8.95 34.36 384.05%
2048 16 7.06 57.10 808.51%
2048 128 13.53 69.84 516.18%
4096 16 7.42 68.96 929.98%
4096 128 18.89 87.46 463.09%
8192 16 9.26 123.94 1339.16%
8192 128 30.56 165.21 540.71%

Note: Benchmarked with rotating buffers and CUDAGraphs.

Example Trace Analysis

Llama 4 Scout BF16 Decode

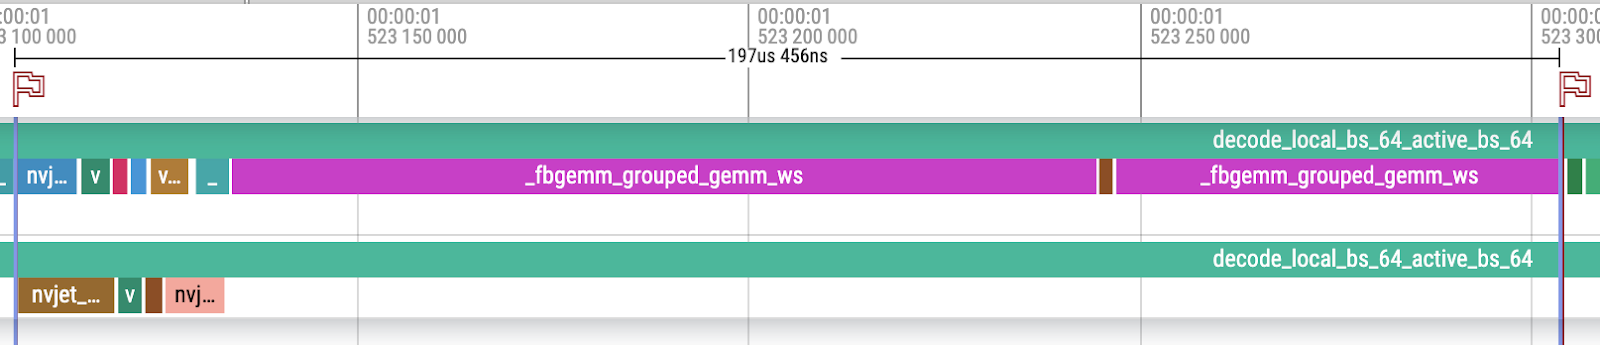
Here is an example decoding trace of Llama 4 Scout BF16 with 64 tokens using our MetaShuffling MoE inference solution. 

  • The total memory traffic of MoE is (ignoring activations):
    • Router: 5120x16x2 = 163,840 Bytes
    • Shared Experts: (2048×5120 + 5120×1024)x2=31,457,280 Bytes
    • Routed Experts: 16x(2048×5120 + 5120×1024)x2=503,316,480 Bytes
    • Total combined: 163,840 + 31,457,280 + 503,316,480=534,937,600 Bytes
    • The total execution time of MoE is 197.456usThe memory bandwidth achieved is 534,937,600 / (197.456 * 10^-6)=2,709,148,367,231 Bytes/s ~= 2.71 TB/s, which is 80.90% of the theoretical peak HBM memory bandwidth of H100 80GB SMX5 HBM3 as 3.35 TB/s.

Here is a breakdown of different components of the trace.

First is the breakdown of routing and shared experts. Both components are running concurrently on 2 different streams to achieve better resource utilization.

For the router stream (marked with red boxes):

  • 1. Router GEMM: CuBLAS-based GEMM with a split-k design. It launches 2 kernels with the second kernel being the reduction kernel.
  • 2. Sigmoid (Router Activation): PyTorch native sigmoid.
  • 3. IndexShuffling: FBGEMM-based index shuffling with a cooperative kernel design. It can be viewed as a fusion of 3 operations, topk, bincount, and sort. It launches 2 kernels with the first kernel being the setup kernel.
  • 4. GatherMul: FBGEMM-based gather scaling. It can be viewed as a fusion of 3 operations: gather (tokens), gather (scores), and mul operations.

For the shared expert stream (marked with orange boxes):

  • 5. SharedExpert GEMM13: CuBLAS-based GEMM with a split-k design. It launches 2 kernels, with the second kernel being the reduction kernel.
  • 6. SwiGLU: Fused SwiGLU. It can be viewed as a fusion of 2 operations, sigmoid and mul.
  • 7. SharedExpert GEMM2: CuBLAS based GEMM.

Second is the breakdown of routed experts. This component is running exclusively on 1 stream to let the GroupedGEMM kernels take full ownership of all SMs.

For the routed expert stream (marked with red boxes):

  • 8. RoutedExperts GroupedGEMM13: FBGEMM-based GroupedGEMM with a persistent kernel design. 
  • 9. SwiGLU: Fused SwiGLU. As mentioned in 6.
  • 10. RoutedExperts GroupedGEMM2: FBGEMM-based GroupedGEMM with a persistent kernel design, fused with scatter add in the epilogue.

The decoding step is running on dense tensors with static shapes using CUDAGraph.

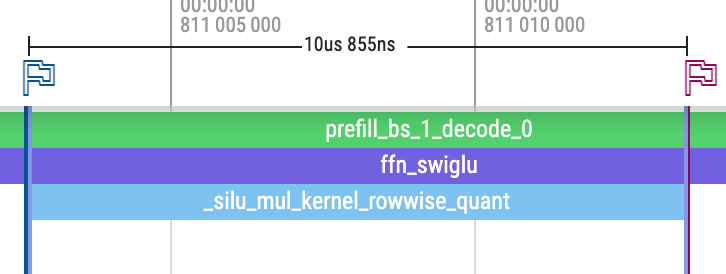
Llama 4 Maverick FP8 Prefill

Here is an example prefill trace of Llama 4 Maverick FP8 with 5000 tokens using our MetaShuffling MoE inference solution. Note FP8 rowwise scaling for routed experts, and BF16 for router and shared experts.

Compared to the decode trace:

  • It uses a single stream to avoid interactions of kernels between router and shared experts. As the kernels are working on a large enough problem size that can saturate compute resources, having additional overlapping simply causes contentions, especially on L2 cache.
  • It runs on dense tensors with static shapes, but in eager mode. As the kernel execution time is large enough and there is no device/host synchronization, the kernels can be launched back to back without bubbles.

Here we highlight the kernel difference between these two traces, except for execution time.

  • Router GEMM and SharedExpertGEMM13: CuBLAS-based GEMM without using split-k design. So it launches 1 kernel instead of 2.

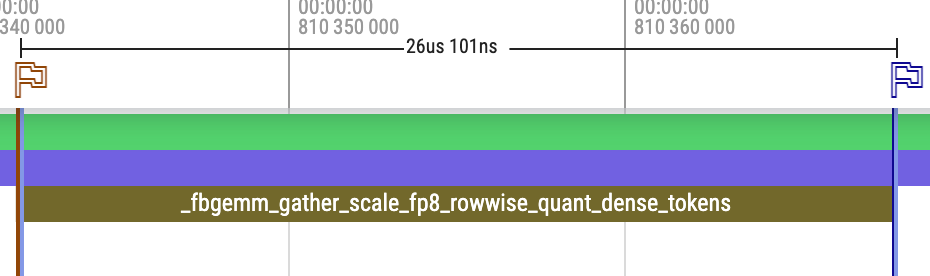
  • 4. GatherMul (FP8 Rowwise Quantize): FBGEMM-based gather scaling and quantization. It can be viewed as a fusion of 8 operations: gather (tokens), gather (scores), mul, max, divide, mul, clamp, and typecast.
  • 9. SwiGLU (FP8 Rowwise Quantize): Fused SwiGLU and quantization. It can be viewed as a fusion of 7 operations: sigmoid and mul, max, divide, mul, clamp, and typecast.

Takeaway

We take the following steps progressively to optimize the inference performance of our MoE solution:

    • Improve device-level utilization by avoiding host and device synchronization.
    • Reduce wasted resources by removing paddings or avoiding processing paddings.
    • Reduce kernel launch and I/O overhead by aggressive kernel fusion.
    • Improve computation and memory efficiency by various kernel optimizations, pushing performance towards hardware limits.
    • Improve hardware component level utilization by concurrent execution of computation, memory traffic, or network traffic heavy kernels, but avoiding undesirable contention at the same time.

Single Host Serving

We benchmarked the single-host serving performance of Llama 4 Maverick and Llama 4 Scout with our internal MetaShuffling-based MoE inference stack using 1000 requests with random prompts. To compare against openly available data from vLLM and SGLang, we adopted the same experiment setup (i.e., Maverick with FP8, Scout with BF16, on a 8xH100 host with maximum batch size 64). Our setup used H100 80GB SMX5 HBM3 700W SKUs, Python 3.12, and CUDA 12.8.  We open sourced all computation kernels used in the MetaShuffling MoE inference stack on FBGEMM and an example implementation of MetaShuffling as a reference.

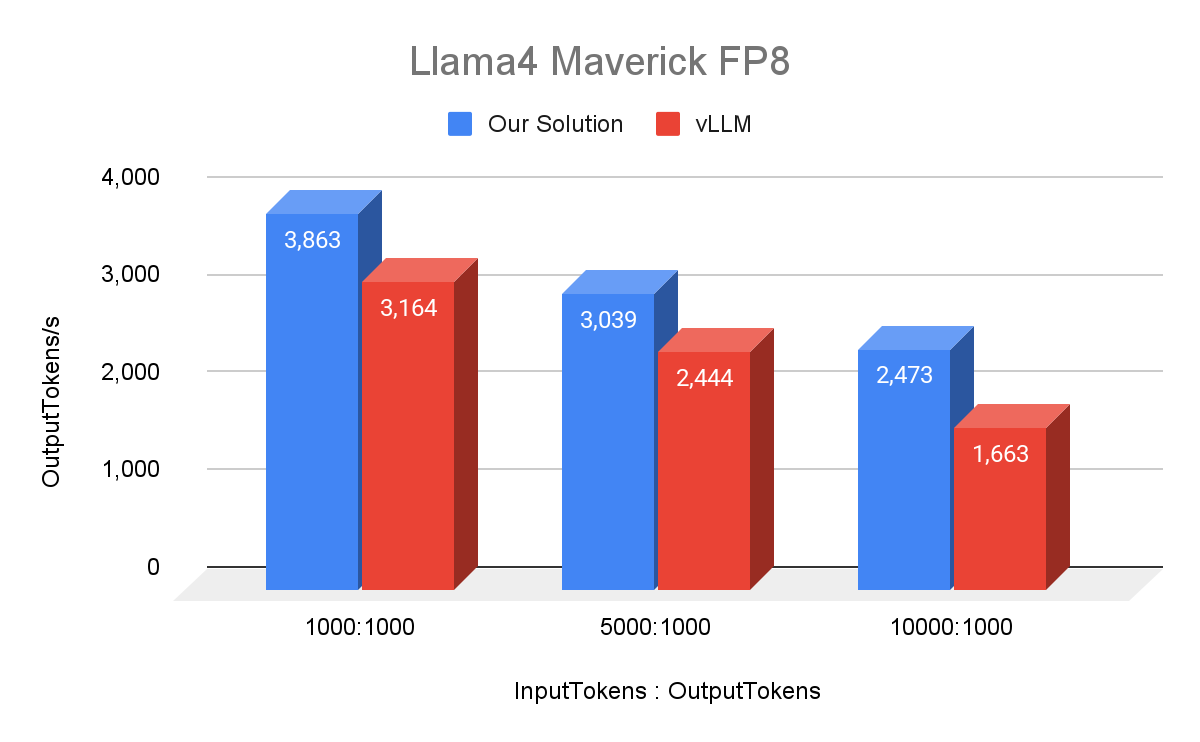
To keep the best accuracy, we benchmarked Llama 4 Maverick with FP8 precision on routed experts. BF16 precision on attention linear, attention, shared experts, router, and KV cache.

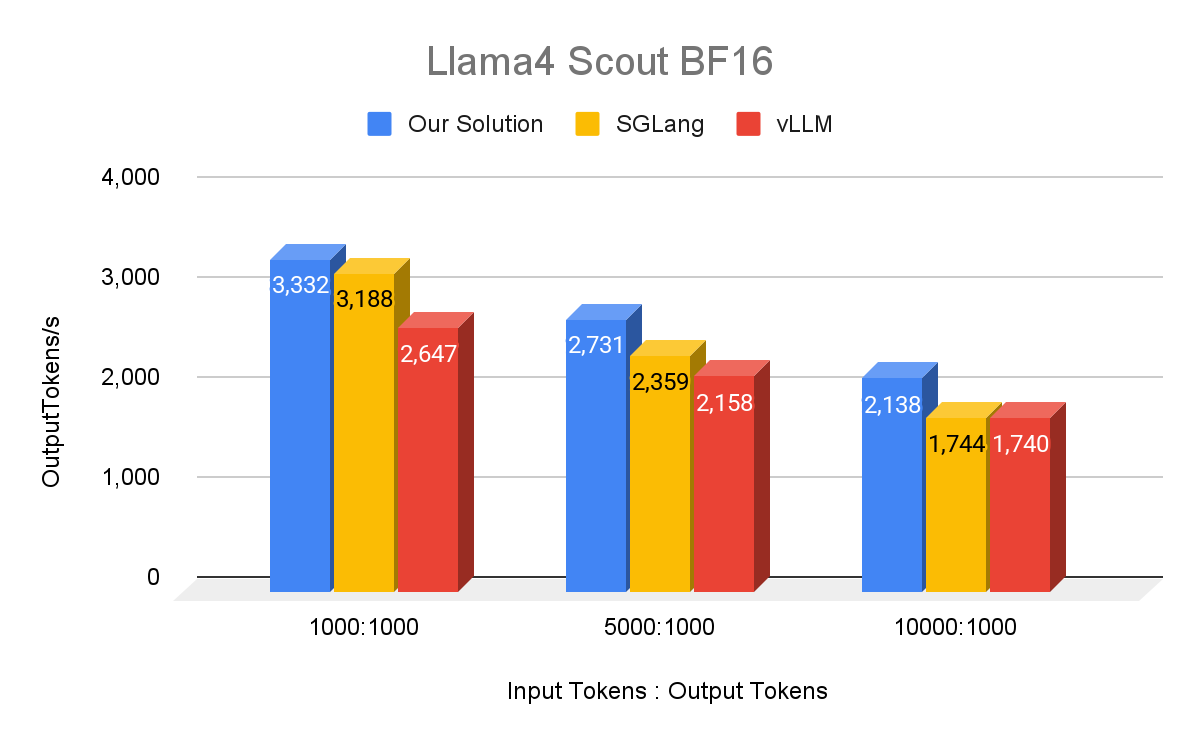
To match external benchmark numbers, we benchmarked Llama 4 Scout with BF16 precision on all linear layers (attention linear, shared experts, router, and routed experts), attention, and KV cache.

Disclaimer: Here we use datapoints released from official channels as a reference. However, as all inference frameworks are rapidly evolving, they might already be outdated at the time of publication. We hope the community can continuously break records in improving the efficiency of serving Llama 4 models.

Acknowledgement

We would like to thank Jing Zhang, Ying Zhang, and Manman Ren for providing technical review and guidance.

We would also like to thank Bradley Davis, Yan Cui, Rengan Xu, Josh Fromm, Jiawen Liu, Sarunya Pumma, Jie Wang, Xinfeng Xie, Benson Ma, Michael Shu, Bingzhe Liu, Jingyi Yang, Min Si, Pavan Balaji, Dhruva Kaushal. for contributions to this project.

Read More

PyTorch Foundation at MLSys 2025

PyTorch Foundation at MLSys 2025

PyTorch Foundation at MLSys 2025: Supporting the Future of Machine Learning Systems

The PyTorch Foundation is proud to support MLSys 2025 as a Gold Sponsor. Held May 12–15 in Santa Clara, CA, this premier conference sits at the intersection of machine learning and systems, bringing together researchers, engineers, and practitioners pushing the boundaries of scalable AI infrastructure.

📍Visit the PyTorch Booth
Stop by to connect with the PyTorch Foundation team, including Executive Director Matt White, and contributors from across the ecosystem. Learn more about PyTorch Foundation’s recent expansion into an umbrella foundation and the acceptance of two leading open source AI projects—vLLM and DeepSpeed.

🎤Featured Sessions from the PyTorch Ecosystem

Extreme PyTorch: Inside the Most Demanding ML Workloads—and the Open Challenges in Building AI Agents to Democratize Them
Speaker: Soumith Chintala
Monday, May 12 | 9:30–10:30 a.m. PT | Mission City Ballroom

In this talk, Soumith Chintala will explore how cutting-edge users are pushing PyTorch to its limits, from planetary-scale training on interactive supercomputers to ultra-efficient, real-time inference on exotic hardware. These power users offer a unique window into today’s most demanding ML systems challenges. Chintala will also examine a bold idea that’s top of mind at this conference: using AI agents to automate a large portion of the work these users currently perform. He will outline the open challenges in building such agents and share concrete opportunities for open collaboration toward making SysML AI agents a reality.

An AI Stack: From Scaling AI Workloads to Evaluating LLMs
Speaker: Ion Stoica
Tuesday, May 13 | 10:30–11:30 a.m. PT | Mission City Ballroom

Ion Stoica will discuss how large language models (LLMs) are enabling new applications, intensifying GPU shortages, and raising concerns about output accuracy. He will present several projects developed to address these challenges, focusing on: (i) Ray, a distributed framework for scaling AI workloads; (ii) vLLM and SGLang, two high-throughput inference engines for LLMs; and (iii) Chatbot Arena, a platform for accurate LLM benchmarking. The session will conclude with key lessons learned and directions for future research.

⚡Additional Highlight
PyTorch Foundation Executive Director Matt White will also deliver a lightning talk during a PhD-focused session at the conference on the value of open source AI and the mission and value of the PyTorch Foundation.

We look forward to an engaging week of learning, collaboration, and technical exchange with the systems and ML research communities.

🔗 Learn more and register at mlsys.org

Read More

Build an intelligent community agent to revolutionize IT support with Amazon Q Business

Build an intelligent community agent to revolutionize IT support with Amazon Q Business

In the era of AI and machine learning (ML), there is a growing emphasis on enhancing security— especially in IT contexts. In this post, we demonstrate how your organization can reduce the end-to-end burden of resolving regular challenges experienced by your IT support teams—from understanding errors and reviewing diagnoses, remediation steps, and relevant documentation, to opening external support tickets using common third-party services such as Jira.

We show how Amazon Q Business can streamline your end-to-end troubleshooting processes by using your preexisting documentation and ticketing systems while approaching complex IT issues in a conversational dialogue. This solution illustrates the benefits of incorporating Amazon Q as a supplemental tool in your IT stack.

Benefits of Amazon Q Business

The following are some relevant benefits of Amazon Q Business:

  • Scalability – As an AWS cloud-based service, Amazon Q is highly scalable and able to handle numerous concurrent requests from multiple employees without performance degradation. This makes it suitable for organizations with a large IT department consisting of many employees who intend to use Amazon Q as an intelligent agent assistant.
  • Increased productivity – Because Amazon Q can handle a large volume of customer inquiries simultaneously, this frees up human employees (such as IT support engineers) to focus on more complex or specialized tasks, thereby improving overall productivity.
  • Natural language understanding (NLU) – Users can interact with the Amazon Q Business application using natural language (such as English). This enables more natural and intuitive conversational experiences without requiring your agents to learn new APIs or languages.
  • Customization and personalization – Developers can customize the knowledge base and responses to cater to the specific needs of their application and users, enabling more personalized experiences. In this post, we discuss an IT support use case for Amazon Q Business and how to configure it to index and search custom audit logs.

Solution overview

Our use case focuses on the challenges around troubleshooting, specifically within systems and applications for IT support and help desk operations. We use Amazon Q Business to train on our internal documentation and runbooks to create a tailored Amazon Q application that offers personalized instructions, source links to relevant documentation, and seamless integration with ticketing services like Jira for escalation requirements. Our goal is to reduce the time and effort required for IT support teams and others to diagnose challenges, review runbooks for remediation, and automate the escalation and ticketing process.

The following diagram illustrates the solution architecture.

Image of an AWS Architecture diagram

The solution consists of the following key integrations:

  • Jira plugin – Amazon Q Business supports integration with Jira; you can use the AI assistant UI to search, read, create, and delete Jira tickets. Changes made using this plugin by Amazon Q can then be viewed within your Jira console.
  • Web crawling – Amazon Q Business uses web crawlers to index and ingest product documentation websites, making sure that the latest information is available for answering queries.
  • Amazon S3 connector – Organizations can upload product documents directly to Amazon Simple Storage Service (Amazon S3), enabling Amazon Q Business to access and incorporate this information into its knowledge base.
  • Jira data source – If your Jira environment rarely changes, or if you want to have more granular control over Amazon Q interactions with Jira, then you can use Jira as a simple data source. Here, Amazon Q will have read-only access to Jira.

Prerequisites

As a prerequisite to deploying this solution, you will need to set up Jira and Confluence using an Atlassian account. If you already have these set up, you can use your existing account. Otherwise, you can create an Atlassian account and set up Jira and Confluence using the free version.

  1. Sign up with your email or through a social identity provider. If you sign up using email, you must verify your email through a One Time Password (OTP).
    Image of a Get Started with Jira webpage
  1. Enter a name for your site and choose Continue.
    Image of a name your Jira Website Webpage
  1. Choose Other and choose Continue.
    Select the type of work you do Jira Webpage Image
  1. If asked for a starting template, you can choose the Project management template and choose Start now.
  2. Enter a name for your project and choose Get started.
    Jira Welcome Screen Image

Your UI should now look like the following screenshot.
Image of a Jira Project home screen

Now you have created an Atlassian account and Jira project.

For example purposes, we created a few tasks within the Jira console. We will come back to these later.
Jira project web page with task lists image

Create an Amazon Q application

You are now ready to create an Amazon Q application:

  1. Sign in to your AWS account on the AWS Management Console and set your preferred AWS Region.
  2. Open the Amazon Q console.
  3. If you haven’t already, complete the steps to connect to AWS IAM Identity Center, creating either an organization instance or account instance.
    Create an Amazon Q App Image

After you have completed your configuration of IAM Identity Center and connected it within Amazon Q, you should see the following success message on the Amazon Q console.
Connect to Amazon Identity Center Image

  1. On the Amazon Q Business console, choose Applications in the navigation pane, then choose Create an application.
  2. For Application name, enter a name (for example, QforITTeams).
  3. Leave the remaining options as default and choose Next.
    Connect to IAM Identity Center image
  1. You have the choice of selecting an existing Amazon Kendra retriever or using the Amazon Q native retriever. For more information on the retriever options, see Creating an index for an Amazon Q Business application. For this post, we use the native retriever.
  2. Keep the other default options and choose Next.
    Select Retriever Image

Amazon Q offers a suite of default data sources for you to choose from, including Amazon S3, Amazon Relational Database Service (Amazon RDS), Slack, Salesforce, Confluence, code repositories in GitHub, on-premises stores (such as IBM DB2), and more. For our sample set up, we are using sample AWS Well-Architected documentation, for which we can use a web crawler. We also want to use some sample runbooks (we have already generated and uploaded these to an S3 bucket).

Let’s set up our Amazon S3 data source first.

  1. For Add a data source, choose Amazon S3.
    Choose a data source image
  1. Under Name and description, enter a name and description.
    Enter name and description image
  1. Complete the steps to add your Amazon S3 data source. For our use case, we create a new AWS Identity and Access Management (IAM) service role according to the AWS recommendations for standard use cases. AWS will automatically propagate the role for us following the principle of least privilege.
  2. After you add the data source, run the sync by choosing Sync now.

Creation complete image

Wait 5–10 minutes for your data to finish syncing to Amazon Q.

Sync history image

Now let’s add our web crawler and link to some AWS Well-Architected documentation.

  1. Add a second data source and choose Web crawlers.
  2. Under Source, select Source URLs and enter the source URLs you want to crawl.

For this use case, we entered some links to public AWS documentation; you have the option to configure authentication and a web proxy in order to crawl intranet documents as well.

Data source image

  1. After you create the data source, choose Sync now to run the sync.

Add an IAM Identity Center user

While our data sources are busy syncing, let’s create an IAM Identity Center user for us to test the Amazon Q Business application web experience:

  1. On the Amazon Q Business console, navigate to your application.
  2. Under Groups and users, choose Manage access and subscriptions, and choose Add groups and users.
  3. Select Add new users and choose Next.
    Add IAM users to the app image
  4. After you create the user, you can add it by choosing Assign existing users and groups and searching for the user by first name.
  5. After you add the user, you can edit their subscription access. We upgrade our user’s access to Q Business Pro for our testing.

Deploy the web experience

After the data sources have completed their sync, you can move to the testing stage to confirm things are working so far:

  1. On the Amazon Q Business console, choose Applications in the navigation pane.
  2. Select your application and choose Deploy web experience.
  3. On the application details page, choose Customize web experience.
    Customize web experience image
  4. Customize the title, subtitle, and welcome message as needed, then choose Save.
    Customize app UI experience image
  5. Choose View web experience.

Let’s test some prompts on the data that our Amazon Q application has seen.

First, let’s ask some questions around the provided runbooks stored in our S3 bucket that we previously added as a data source to our application. In the following example, we ask about information for restarting an Amazon Elastic Compute Cloud (Amazon EC2) instance.

As shown in the following screenshot, Amazon Q has not only answered our question, but it also cited its source for us, providing a link to the .txt file that contains the runbook for Restarting an EC2 Instance.
Restart EC2 instance prompt to Q App image

Let’s ask a question about the Well-Architected webpages that we crawled. For this query, we can ask if there is a tool we can use to improve our AWS architecture. The following screenshot shows the reply.

Amazon Q prompt reply image

Set up Jira as a data source

In this section, we set up Jira as a data source for our Amazon Q application. This will allow Amazon Q to search data in Jira. For instructions, see Connecting Jira to Amazon Q Business.

After you have set up Jira as a data source, test out your Amazon Q Business application. Go to the web experience chat interface URL and ask it about one of your Jira tickets. The following screenshot shows an example.

Use Jira as a data source for Q

Set up a Jira plugin

What if you encounter a situation where your user, an IT support professional, can’t find the solution with the provided internal documents and runbooks that Amazon Q has been trained on? Your next step might be to open a ticket in Jira. Let’s add a plugin for Jira that allows you to submit a Jira ticket through the Amazon Q chat interface. For more details, see Configuring a Jira Cloud plugin for Amazon Q Business. In the previous section, we added Jira as a data source, allowing Amazon Q to search data contained in Jira. By adding Jira as a plugin, we will allow Amazon Q to perform actions within Jira.

Complete the following steps to add the Jira plugin:

  1. On the Amazon Q Business console, navigate to your application.
  2. Choose Plugins in the navigation pane.
  3. Choose Add plugin.
    Create plugin image
  1. For Plugin name, enter a name.
  2. For Domain URL, enter https://api.atlassian.com/ex/jira/yourInstanceID, where the value of yourInstanceID is the value at https://my-site-name.atlassian.net/_edge/tenant_info.
  3. For OAuth2.0, select Create a new secret, and enter your Jira client ID and client secret.

If you require assistance retrieving these values, refer to the prerequisites.

  1. Complete creating your plugin.
    Add plugin page image

After you have created the plugin, return to the application web experience to try it out. The first time you use the Jira plugin within the Amazon Q chat interface, you might be asked to authorize access. The request will look similar to the following screenshots.

Create a Jira ticket Image

Authorize Access Image

Q App requesting access to Jira image

After you provide Amazon Q authorization to access Jira, you’re ready to test out the plugin.

First, let’s ask Amazon Q to create some draft text for our ticket.

Create Jira ticket in Amazon Q image

Next, we ask Amazon Q to use this context to create a task in Jira. This is where we use the plugin. Choose the options menu (three dots) next to the chat window and choose the Jira plugin.

Search for Plugins Image

Ask it to generate a Jira task. Amazon Q will automatically recognize the conversation and input its data within the Jira ticket template for you, as shown in the following screenshot. You can customize the fields as needed and choose Submit.
Ask Amazon Q to update Jira task image

You should receive a response similar to the following screenshot.

Amazon Q response image

Amazon Q has created a new task for us in Jira. We can confirm that by viewing our Jira console. There is a task for updating the IT runbooks to meet disaster recovery objectives.
Jira task tracker image

If we open that task, we can confirm that the information provided matches the information we passed to the Jira plugin.
Jira ticket image

Now, let’s test out retrieving an existing ticket and modifying it. In the following screenshot, Amazon Q is able to search through our Jira Issues and correctly identify the exact task we were referring to.Query Q on Jira image

We can ask Amazon Q about some possible actions we can take.

Querying Q on Jira ticket actions image

Let’s ask Amazon Q to move the task to the “In Progress” stage.

Move the task stage Image

The following screenshot shows the updated view of our Jira tasks on the Jira console. The ticket for debugging the Amazon DynamoDB application has been moved to the In Progress stage.

Amazon Q created Jira task image

Now, suppose we wanted to view more information for this task. We can simply ask Amazon Q. This saves us the trouble of having to navigate our way around the Jira UI.

Get more information on Jira task image

Amazon Q is even able to extract metadata about the ticket, such as last-updated timestamps, its creator, and other components.

Jira task informational image

You can also delete tasks in Jira using the Amazon Q chat interface. The following is an example of deleting the DynamoDB ticket. You will be prompted to confirm the task ID (key). The task will be deleted after you confirm.
Delete Jira task Q request image

Now, if we view our Jira console, the corresponding task is gone.
Via Jira Console image

Clean up

To clean up the resources that you have provisioned, complete the following steps:

  1. Empty and delete any S3 buckets you created.
  2. Downgrade your IAM Identity Center user subscription to Amazon Q.
  3. Delete any Amazon Q related resources, including your Amazon Q Business application.
  4. Delete any additional services or storage provisioned during your tests.

Conclusion

In this post, we configured IAM Identity Center for Amazon Q and created an Amazon Q application with connectors to Amazon S3, web crawlers, and Jira. We then customized our Amazon Q application for a use case targeting IT specialists, and we sent some test prompts to review our runbooks for issue resolution as well as to get answers to questions regarding AWS Well-Architected practices. We also added a plugin for Jira so that IT support teams can create Jira issues and tickets automatically with Amazon Q, taking into account the full context of our conversation.

Try out Amazon Q Business for your own use case, and share your feedback in the comments. For more information about using Amazon Q Business with Jira, see Improve the productivity of your customer support and project management teams using Amazon Q Business and Atlassian Jira.


About the Authors

Dylan Martin is a Solutions Architect (SA) at Amazon Web Services based in the Seattle area. Dylan specializes in developing Generative AI solutions for new service and feature launches. Outside of work, Dylan enjoys motorcycling and studying languages.

Ankit Patel is a Solutions Developer at AWS based in the NYC area. As part of the Prototyping and Customer Engineering (PACE) team, he helps customers bring their innovative ideas to life by rapid prototyping; using the AWS platform to build, orchestrate, and manage custom applications.

Read More

Predicting and explaining AI model performance: A new approach to evaluation

Predicting and explaining AI model performance: A new approach to evaluation

The image shows a radar chart comparing the performance of different AI models across various metrics. The chart has a circular grid with labeled axes including VO, AS, CEc, CEe, CL, MCr, MCt, MCu, MS, QLI, QLqA, SNs, KNa, KNc, KNF, KNn, and AT. Different AI models are represented by various line styles: Babbage-002 (dotted line), Davinci-002 (dash-dotted line), GPT-3.5-Turbo (dashed line), GPT-4.0 (solid thin line), OpenAI ol-mini (solid thick line), and OpenAI o1 (solid bold line). There is a legend in the bottom left corner explaining the line styles for each model. The background transitions from blue on the left to green on the right.

With support from the Accelerating Foundation Models Research (AFMR) grant program, a team of researchers from Microsoft and collaborating institutions has developed an approach to evaluate AI models that predicts how they will perform on unfamiliar tasks and explain why, something current benchmarks struggle to do.

In the paper, “General Scales Unlock AI Evaluation with Explanatory and Predictive Power,” they introduce a methodology that goes beyond measuring overall accuracy. It assesses the knowledge and cognitive abilities a task requires and evaluates them against the model’s capabilities.

ADeLe: An ability-based approach to task evaluation

The framework uses ADeLe (annotated-demand-levels), a technique that assesses how demanding a task is for an AI model by applying measurement scales for 18 types of cognitive and knowledge-based abilities. This difficulty rating is based on a detailed rubric, originally developed for human tasks and shown to work reliably when applied by AI models.

By comparing what a task requires with what a model can do, ADeLe generates an ability profile that not only predicts performance but also explains why a model is likely to succeed or fail—linking outcomes to specific strengths or limitations.

The 18 scales reflect core cognitive abilities (e.g., attention, reasoning), knowledge areas (e.g., natural or social sciences), and other task-related factors (e.g., prevalence of the task on the internet). Each task is rated from 0 to 5 based on how much it draws on a given ability. For example, a simple math question might score 1 on formal knowledge, while one requiring advanced expertise could score 5. Figure 1 illustrates how the full process works—from rating task requirements to generating ability profiles.

Figure 1: This diagram presents a framework for explaining and predicting AI performance on new tasks using cognitive demand profiles. The System Process (top) evaluates an AI system on the ADeLe Battery—tasks annotated with DeLeAn rubrics—to create an ability profile with each dimension representing what level of demand the model can reach. The Task Process (bottom) applies the same rubrics to new tasks, generating demand profiles from annotated inputs. An optional assessor model can be trained to robustly predict how well the AI system will perform on these new tasks by matching system abilities to task demands.
Figure 1. Top: For each AI model, (1) run the new system on the ADeLe benchmark, and (2) extract its ability profile. Bottom: For each new task or benchmark, (A) apply 18 rubrics and (B) get demand histograms and profiles that explain what abilities the tasks require. Optionally, predict performance on the new tasks for any system based on the demand and ability profiles, or past performance data, of the systems.

To develop this system, the team analyzed 16,000 examples spanning 63 tasks drawn from 20 AI benchmarks, creating a unified measurement approach that works across a wide range of tasks. The paper details how ratings across 18 general scales explain model success or failure and predict performance on new tasks in both familiar and unfamiliar settings.

Evaluation results 

Using ADeLe, the team evaluated 20 popular AI benchmarks and uncovered three key findings: 1) Current AI benchmarks have measurement limitations; 2) AI models show distinct patterns of strengths and weaknesses across different capabilities; and 3) ADeLe provides accurate predictions of whether AI systems will succeed or fail on a new task. 

1. Revealing hidden flaws in AI testing methods 

Many popular AI tests either don’t measure what they claim or only cover a limited range of difficulty levels. For example, the Civil Service Examination benchmark is meant to test logical reasoning, but it also requires other abilities, like specialized knowledge and metacognition. Similarly, TimeQA, designed to test temporal reasoning, only includes medium-difficulty questions—missing both simple and complex challenges. 

2. Creating detailed AI ability profiles 

Using the 0–5 rating for each ability, the team created comprehensive ability profiles of 15 LLMs. For each of the 18 abilities measured, they plotted “subject characteristic curves” to show how a model’s success rate changes with task difficulty.  

They then calculated a score for each ability—the difficulty level at which a model has a 50% chance of success—and used these results to generate radial plots showing each model’s strengths and weaknesses across the different scales and levels, illustrated in Figure 2.

Figure 2: The image consists of three radar charts showing ability profiles of 15 LLMs evaluated across 18 ability scales, ranged from 0 to infinity (the higher, the more capable the model is). Each chart has multiple axes labeled with various ability scales such as VO, AS, CEc, AT, CL, MCr, etc. The left chart shows ability for Babbage-002 (light red), Davinci-002 (orange), GPT-3.5-Turbo (red), GPT-4 (dark red), OpenAI o1-mini (gray), and OpenAI o1 (dark gray). The middle chart shows ability for LLaMA models: LLaMA-3.2-1B-Instruct (light blue), LLaMA-3.2-3B-Instruct (blue), LLaMA-3.2-11B-Instruct (dark blue), LLaMA-3.2-90B-Instruct (navy blue), and LLaMA-3.1-405B Instruct (very dark blue). The right chart shows ability for DeepSeek-R1-Dist-Qwen models: DeepSeek-R1-Dist-Qwen-1.5B (light green), DeepSeek-R1-Dist-Qwen-7B (green), DeepSeek-R1-Dist-Qwen-14B (dark green), DK-R1-Dist-Qwen-32B (very dark green). Each model's ability is represented by a colored polygon within the radar charts.
Figure 2. Ability profiles for the 15 LLMs evaluated.

This analysis revealed the following: 

  • When measured against human performance, AI systems show different strengths and weaknesses across the 18 ability scales. 
  • Newer LLMs generally outperform older ones, though not consistently across all abilities. 
  • Knowledge-related performance depends heavily on model size and training methods. 
  • Reasoning models show clear gains over non-reasoning models in logical thinking, learning and abstraction, and social capabilities, such as inferring the mental states of their users. 
  • Increasing the size of general-purpose models after a given threshold only leads to small performance gains. 

3. Predicting AI success and failure 

In addition to evaluation, the team created a practical prediction system based on demand-level measurements that forecasts whether a model will succeed on specific tasks, even unfamiliar ones.  

The system achieved approximately 88% accuracy in predicting the performance of popular models like GPT-4o and LLaMA-3.1-405B, outperforming traditional methods. This makes it possible to anticipate potential failures before deployment, adding the important step of reliability assessment for AI models.

Looking ahead

ADeLe can be extended to multimodal and embodied AI systems, and it has the potential to serve as a standardized framework for AI research, policymaking, and security auditing.

This technology marks a major step toward a science of AI evaluation, one that offers both clear explanations of system behavior and reliable predictions about performance. It aligns with the vision laid out in a previous Microsoft position paper on the promise of applying psychometrics to AI evaluation and a recent Societal AI white paper emphasizing the importance of AI evaluation.

As general-purpose AI advances faster than traditional evaluation methods, this work lays a timely foundation for making AI assessments more rigorous, transparent, and ready for real-world deployment. The research team is working toward building a collaborative community to strengthen and expand this emerging field.

The post Predicting and explaining AI model performance: A new approach to evaluation appeared first on Microsoft Research.

Read More

The path to better plastics: Our progress and partnerships

The path to better plastics: Our progress and partnerships


The path to better plastics: Our progress and partnerships

How Amazon is helping transform plastics through innovation in materials, recycling technology, sortation, and more.

Sustainability

May 12, 11:47 AMMay 12, 11:47 AM

In 2022, we shared our vision for transforming plastics through an innovative collaboration with the U.S. Department of Energy’s BOTTLE Consortium. Today, that vision is advancing from laboratory concept to commercial trials. Through work with our partners from material scientists to recycling facilities to Amazon Fresh stores we’re demonstrating the steps to prove out a new value chain for plastics that are derived from renewable resources and easily recyclable, while also being naturally biodegradable.

When we first started this work, we knew we needed to develop a new recycling technology that could efficiently process biodegradable plastics, as that is not something that exists at scale today. Our specific focus was on polyester-based biodegradable plastics. The molecular backbones of these plastics contain carbon-oxygen ester linkages, which are much easier to break down than the carbon-carbon bonds found in more common plastics, such as polyethylene or polypropylene.

Amazon scientists test biopolyester materials in the Sustainable Materials Innovation Lab.

The ester linkages that make these types of plastics more susceptible to biodegradation also make them easier to break down in controlled environments where the remaining molecules can be recycled back into new materials. Solvolysis techniques, such as methanolysis and glycolysis, are being developed for polyethylene terephthalate (PET), but they could be extended to other polyesters, such as polylactic acid (PLA) or polyhydroxyalkanoates (PHAs), that are more readily biodegradable.

While focusing on recycling polyester-based biodegradable plastics or biopolyesters, for short we also aimed to make this new recycling technology work for a mixed-waste stream of materials. There is no single biodegradable plastic that can meet the diverse needs of different packaging applications, and applications will often require blends or different materials layered together.

Having a separate recycling stream for each new type of biopolyester plastic would be impractical and likely uneconomical. It also would not solve the problem of recycling blends and multilayered materials. Working backward from this insight, we partnered with scientists at the National Renewable-Energy Laboratory (NREL) to conduct a comprehensive analysis comparing different chemical recycling approaches for recycling a mixed-waste stream of polyester-based plastics.

Our initial analysis, which was recently published in One Earth, provided the scientific foundation for what would become EsterCycle, a new startup founded by one of our collaborators at NREL, Julia Curley. EsterCycles technology uses low-energy methanolysis processes with an amine catalyst to selectively break the ester bonds that hold these polymers together.

Julia Curley, founder of EsterCycle.

Importantly, the recycling technology was developed to handle a mixed-waste stream of polyesters without requiring extensive sorting of different materials beforehand. This is a crucial advantage because it means we can start recycling biopolyesters even while they represent a small portion of the waste stream, processing them alongside more common materials like PET.

The development of the EsterCycle technology represents a key step toward our vision of a more sustainable circular value chain for plastics, but for EsterCycle to succeed at scale, there needs to be a reliable supply of materials to recycle. This is where our partnership with Glacier Technologies comes in.

Glacier, which Amazons Climate Pledge Fund recently invested in, uses AI-powered robots to automate the sorting of recyclables and collect real-time data on recycling streams. In real time, Glaciers proprietary AI model can identify a range of different material and package types, from rigid PET containers, such as thermoformed clam shells, to multi-material flexible packaging, such as snack bags.

Glaciers AI vision and robotic systems are used at a materials recovery facility to sort new materials in mixed-waste streams.

We launched a sortation trial with Glacier and a recycling facility in San Francisco to test how effectively Glaciers AI vision and robotic systems could identify and sort biopolyester packaging. A key insight from these trials was that packaging design significantly influences AI detection. Packaging with consistent, visible features was identified correctly by Glacier’s AI models 99% of the time. However, lookalike materials and inconsistent designs led to higher rates of misidentification. These results will help us and our partners design packaging that’s easier to recycle as we design and test emerging biopolyesters for new applications.

Our next step in helping build out this new value chain for plastics was to test and trial emerging biopolyesters in real-world applications. Our first priority is to minimize packaging and even eliminate it, where possible. But there are some applications where packaging is necessary, and paper is not a viable option particularly, applications with specific and stringent requirements, such as moisture barrier properties. To understand how biopolyesters perform in these critical applications, we launched several commercial trials across our operations.

In Seattle, we tested biopolyester produce bags made with Novamont’s Mater-Bi material in Amazon Fresh stores. Customer feedback was overwhelmingly positive, with 83% of Amazon Fresh customers reporting they “really liked” the new compostable bags. Our shelf-life testing showed that the bags performed similarly to conventional plastic bags in keeping produce fresh for the first week after purchase, though different types of produce showed varying results in longer-term storage, which is an area where we are working with materials developers to improve.

Examples of biopolyester-material product applications.

In Europe, we successfully trialed biopolyester prep bags at three Amazon fulfillment centers near Milan, Italy. The majority of associates reported that the biopolyester bags were just as easy to use as conventional plastic bags, with no impact on operational efficiency. Similarly, in Valencia, Spain, we tested biopolyester bags for grocery delivery through Amazon Fresh. This trial actually showed improvements in quality metrics, including reduced rates of damaged and missing items compared to conventional packaging.

These trials demonstrate that biopolyester materials can effectively replace conventional plastics in many applications while delighting customers and enabling continued operational excellence. The data and findings from these trials are helping build confidence across the industry around these new materials, which is crucial for driving broader adoption to replace conventional plastics.

Today, we cannot yet recycle these materials at scale, so composting is the interim end-of-life option. However, as EsterCycle scales, and as Glacier enables more materials recovery facilities to sort a range of different polyesters, from PET to PLA to new PHAs, we envision a future where these materials are widely accepted in household recycling programs, making it easy for our customers to recycle these materials.

Building a new, circular value chain for plastics is a complex challenge that requires innovation at multiple levels from developing new materials and recycling technologies to creating the infrastructure that will enable these materials to be collected and processed at scale. Through our work with partners like NREL, Glacier, and Novamont, we’re demonstrating that this transformation is possible.

While there is still much work to be done, we are encouraged by the progress we’ve made with our partners. We are excited that by continuing to invest in research, support innovative startups, and collaborate across the value chain, we are at the forefront of a more sustainable future for plastics.

Research areas: Sustainability

Tags: Packaging

Read More

StreamBridge: Turning Your Offline Video Large Language Model into a Proactive Streaming Assistant

We present StreamBridge, a simple yet effective framework that seamlessly transforms offline Video-LLMs into streaming-capable models. It addresses two fundamental challenges in adapting existing models into online scenarios: (1) limited capability for multi-turn real-time understanding, and (2) lack of proactive response mechanisms. Specifically, StreamBridge incorporates (1) a memory buffer combined with a round-decayed compression strategy, supporting long-context multi-turn interactions, and (2) a decoupled, lightweight activation model that can be effortlessly integrated into existing…Apple Machine Learning Research

Elevate marketing intelligence with Amazon Bedrock and LLMs for content creation, sentiment analysis, and campaign performance evaluation

Elevate marketing intelligence with Amazon Bedrock and LLMs for content creation, sentiment analysis, and campaign performance evaluation

In the media and entertainment industry, understanding and predicting the effectiveness of marketing campaigns is crucial for success. Marketing campaigns are the driving force behind successful businesses, playing a pivotal role in attracting new customers, retaining existing ones, and ultimately boosting revenue. However, launching a campaign isn’t enough; to maximize their impact and help achieve a favorable return on investment, it’s important to understand how these initiatives perform.

This post explores an innovative end-to-end solution and approach that uses the power of generative AI and large language models (LLMs) to transform marketing intelligence. We use Amazon Bedrock, a fully managed service that provides access to leading foundation models (FMs) through a unified API, to demonstrate how to build and deploy this marketing intelligence solution. By combining sentiment analysis from social media data with AI-driven content generation and campaign effectiveness prediction, businesses can make data-driven decisions that optimize their marketing efforts and drive better results.

The challenge

Marketing teams in the media and entertainment sector face several challenges:

  • Accurately gauging public sentiment towards their brand, products, or campaigns
  • Creating compelling, targeted content for various marketing channels
  • Predicting the effectiveness of marketing campaigns before execution
  • Reducing marketing costs while maximizing impact

To address these challenges, we explore a solution that harnesses the power of generative AI and LLMs. Our solution integrates sentiment analysis, content generation, and campaign effectiveness prediction into a unified architecture, allowing for more informed marketing decisions.

Solution overview

The following diagram illustrates the logical data flow for our solution by using sentiment analysis and content generation to enhance marketing strategies.

Solution process overview, from social media data ingestion to social media end users

In this pattern, social media data flows through a streamlined data ingestion and processing pipeline for real-time handling. At its core, the system uses Amazon Bedrock LLMs to perform three key AI functions:

  • Analyzing the sentiment of social media content
  • Generating tailored content based on the insights obtained
  • Evaluating campaign effectiveness

The processed data is stored in databases or data warehouses, then made available for reporting through interactive dashboards and generated detailed performance reports, enabling businesses to visualize trends and extract meaningful insights about their social media performance using customizable metrics and KPIs. This pattern creates a comprehensive solution that transforms raw social media data into actionable business intelligence (BI) through advanced AI capabilities. By integrating LLMs such as Anthropic’s Claude 3.5 Sonnet, Amazon Nova Pro, and Meta Llama 3.2 3B Instruct Amazon Bedrock, the system provides tailored marketing content that adds business value.

The following is a breakdown of each step in this solution.

Prerequisites

This solution requires you to have an AWS account with the appropriate permissions.

Ingest social media data

The first step involves collecting social media data that is relevant to your marketing campaign, for example from platforms such as Bluesky:

  1. Define hashtags and keywords to track hashtags related to your brand, product, or campaign.
  2. Connect to social media platform APIs.
  3. Set up your data storage system.
  4. Configure real-time data streaming.

Conduct sentiment analysis with social media data

The next step involves conducting sentiment analysis on social media data. Here’s how it works:

  1. Collect posts using relevant hashtags related to your brand, product, or campaign.
  2. Feed the collected posts into an LLM using a prompt for sentiment analysis.
  3. The LLM processes the textual content and outputs classifications (for example, positive, negative, or neutral) and explanations.

The following code is an example using the AWS SDK for Python (Boto3) that prompts the LLM for sentiment analysis:

import boto3
import json

# Initialize Bedrock Runtime client
bedrock = boto3.client('bedrock-runtime')

def analyze_sentiment(text, model_id= {selected_model}):
    # Construct the prompt
    prompt = f"""You are an expert AI sentiment analyst with advanced natural language processing capabilities. Your task is to perform a sentiment analysis on a given social media post, providing a classification of positive, negative, or neutral, and detailed rationale.
    
    Inputs:
    Post: "{text}"
    
    Instructions:
    1. Carefully read and analyze the provided post content.
    2. Consider the following aspects in your analysis:
        - Overall tone of the message
        - Choice of words and phrases
        - Presence of emotional indicators (such as emojis, punctuation)
        - Context and potential sarcasm or irony
        - Balance of positive and negative elements, if any
    3. Classify the sentiment as one of the following:
        - Positive: The post expresses predominantly favorable or optimistic views
        - Negative: The post expresses predominantly unfavorable or pessimistic views
        - Neutral: The post lacks strong emotion or balances positive and negative elements.
    4. Explain your classification with specific references to the post
    
    Provide your response in the following format:
    Sentiment: [Positive/Negative/Neutral]
    Explanation: [Detailed explanation of your classification, including:
        - Key words or phrases that influenced your decision
        - Analysis of any emotional indicators
        - Discussion of context and tone
        - Explanation of any ambiguities or mixed signals]
        
    Remember to be objective and base your analysis solely on the content of the post. If the sentiment is ambiguous or context-dependent, acknowledge this in your explanation.
    """
    
    # Create the request body
    body = json.dumps({
        "prompt": prompt,
        "max_tokens_to_sample": 500,
        "temperature": 0.5,
        "top_p": 1
    })

    # Invoke the model
    response = bedrock.invoke_model(
        modelId=model_id,
        body=body
    )
    
    return json.loads(response['body'].read())

This analysis provides valuable insights into public perception, providing marketers the information they need to understand how their brand or campaign is resonating with the audience in real time.

The following output examples were obtained using Amazon Bedrock:

Sentiment analysis for Large Language Models:
=================================================

EXAMPLE PROMPT:
-------------------------------------------------
Analyze the sentiment of the following post. Classify it as positive, negative, or neutral, and provide a brief explanation for your classification.

Post: "Avoid [AnyCompany] printer ink refills at all costs! Leaked everywhere, and barely lasted a week. Overpriced. #PrinterInkNightmare #AnyCompanyFail"

Sentiment:
Explanation:
-------------------------------------------------

Using Amazon Nova Pro:
=====================================
Sentiment: Negative

Explanation: The post expresses strong dissatisfaction with [AnyCompany] printer ink refills. The author uses phrases like "avoid at all costs," "leaked everywhere," "barely lasted a week," and "overpriced," all of which convey a highly negative experience. Additionally, the hashtags "#PrinterInkNightmare" and "#AnyCompanyFail" further emphasize the negative sentiment by highlighting the frustration and failure associated with the product.

Using Meta Llama 3.2 3B Instruct:
================================
Classification: Negative

Explanation: The post expresses strong dissatisfaction and warning to others about purchasing printer ink refills from "AnyCompany". The language used is emphatic, with words like "Avoid", "Leaked everywhere", and "Overpriced", which convey a sense of frustration and disappointment. The hashtags "#PrinterInkNightmare" and "#AnyCompanyFail" further emphasize the negative sentiment, suggesting that the author has had a terrible experience with the product.

Using Anthropic Claude 3.5 Sonnet:
==================================
Sentiment: Negative

Explanation: This post expresses a strongly negative sentiment towards [AnyCompany]'s printer ink refills. Several factors contribute to this classification:

The use of the phrase "Avoid... at all costs" indicates a strong recommendation against the product.

Multiple negative aspects of the product are mentioned: leaking, short lifespan, and high price.

The use of the hashtag "#PrinterInkNightmare" emphasizes the user's frustration and negative experience.

The hashtag "#AnyCompanyFail" directly criticizes the company, associating it with failure.

The overall tone is one of warning and disappointment, with no positive aspects mentioned.

The language used is emphatic and critical, clearly conveying the user's dissatisfaction with the product and the company. This post is likely intended to warn others away from the product, further reinforcing its negative sentiment.
===============================

Analyze campaign effectiveness and generate content

The next step focuses on using AI for content creation and campaign effectiveness prediction:

  1. Input campaign data points (target audience, messaging, channels, and so on) into an LLM tailored for generating marketing content.
  2. The LLM generates relevant content such as ad copy, social media posts, or email campaigns based on the provided data.
  3. Another LLM, designed for campaign effectiveness analysis, evaluates the generated content.
  4. This analysis model outputs a score or measure of the content’s potential effectiveness, considering the campaign objectives and insights from the social media sentiment analysis.

Content generation

The following is an example that prompts a selected LLM for content generation:

import boto3
import json

# Initialize Bedrock Runtime client
bedrock = boto3.client('bedrock-runtime')

def generate_marketing_content(
    product,
    target_audience,
    key_message,
    tone,
    platform,
    char_limit,
    model_id= {selected_model}
):
    prompt = f"""You are an expert AI social media copywriter with extensive experience in creating engaging, platform-specific content for marketing campaigns. Your task is to craft a compelling social media post based on the provided campaign details.
    
    Inputs:
    Product: {product}
    Target Audience: {target_audience}
    Key Message: {key_message}
    Tone: {tone}
    Platform: {platform}
    Character Limit: {char_limit}
    
    Instructions:
    1. Carefully review all provided information.
    2. Craft a social media post that:
        - Accurately represents the product
        - Resonates with the target audience
        - Clearly conveys the key message
        - Matches the specified tone
        - Is optimized for the given platform
        - Adheres to the character limit
    3. Incorporate platform-specific best practices (i.e. hashtags for Twitter/Instagram, emojis if appropriate)
    4. Make sure the post is attention-grabbing and encourage engagement (likes, shares, comments)
    5. Include a call-to-action if appropriate for the campaign
    
    Provide your response in the following format:
    Generated Post: [Your social media post here, ensuring it's within the character limit]
    
    Remember to be creative, concise, and impactful. Ensure your post aligns perfectly with the provided campaign details and platform requirements.
    """

    body = json.dumps({
        "prompt": prompt,
        "max_tokens_to_sample": 300,
        "temperature": 0.7,
        "top_p": 0.9
    })

    response = bedrock.invoke_model(
        modelId=model_id,
        body=body
    )
    
    return json.loads(response['body'].read())

The following output examples were obtained using Amazon Bedrock:

Text generation Prompt for Large Language Models:
=================================================
Create a social media post for the following marketing campaign:

Product: [AnyCompany printer ink cartridge refills]
Target Audience: [Home Office or small business users]
Key Message: [lower cost with same or similar results as original branded ink cartridges]
Tone: [Desired tone, e.g., friendly, professional, humorous]
Platform: [Social media platform, e.g., Bluesky]
Character Limit: [75]

Using Amazon Nova Pro:
=====================================
🖨 Save big on printing! Try [AnyCompany] ink cartridge refills for your home office or small biz. Enjoy lower costs with quality that matches the originals. Print smart, print affordable. 💼💰 
#PrintSmart #CostSaving #AnyCompanyInk


Using Meta Llama 3.2 3B Instruct:
================================
"Ditch the expensive original ink cartridges! Our refill cartridges are made to match your printer's original quality, at a fraction of the cost. Save up to 50% on your ink needs!" 
#InkSavers #PrintOnABudget


Using Anthropic Claude 3.5 Sonnet:
===============================
"Print more, pay less! AnyCompany refills: OEM quality, half the price." 
#SmartOffice

Campaign effectiveness analysis

The following is an example of code that prompts the selected LLM for campaign effectiveness analysis:

import boto3
import json

# Initialize Bedrock Runtime client
bedrock = boto3.client('bedrock-runtime')

def analyze_campaign_effectiveness(
    campaign_objectives,
    sentiment_summary,
    marketing_content,
    model_id= {selected_model}
):
    prompt = f"""You are an expert AI marketing analyst with extensive experience in evaluating marketing campaigns. Your task is to assess a marketing campaign based on its content and alignment with objectives. Provide a thorough, impartial analysis using the information given.
    
    Inputs:
    Campaign Objectives: {campaign_objectives}
    Positive Sentiments: {sentiment_summary['praises']}
    Negative Sentiments: {sentiment_summary['flaws']}
    Marketing Content: {marketing_content}
    
    Instructions:
    1. Carefully review all provided information.
    2. Analyze how well the marketing content aligns with the campaign objectives.
    3. Consider the positive and negative sentiments in your evaluation.
    4. Provide an Effectiveness Score on a scale of 1-10, where 1 is completely ineffective and 10 is extremely effective.
    5. Give a detailed explanation of your evaluation, including:
        - Strengths of the campaign
        - Areas for improvement
        - How well the content addresses the objectives
        - Impact of positive and negative sentiments
        - Suggestions for enhancing campaign effectiveness
    
    Provide your response in the following format:
    1. Effectiveness Score: [Score]/10
    2. Detailed explanation of the evaluation: [Your detailed explanation here, structured in clear paragraphs or bullet points]
    
    Remember to be objective, specific, and constructive in your analysis. Base your evaluation solely on the provided information.
    """
    
    body = json.dumps({
        "prompt": prompt,
        "max_tokens_to_sample": 800,
        "temperature": 0.3,
        "top_p": 1
    })

    response = bedrock.invoke_model(
        modelId=model_id,
        body=body
    )
    
    return json.loads(response['body'].read())

Let’s examine a step-by-step process for evaluating how effectively the generated marketing content aligns with campaign goals using audience feedback to enhance impact and drive better results.

The following diagram shows the logical flow of the application, which is executed in multiple steps, both within the application itself and through services like Amazon Bedrock.

Campaign effectiveness analysis process

The LLM takes several key inputs (shown in the preceding figure):

  • Campaign objectives – A textual description of the goals and objectives for the marketing campaign.
  • Positive sentiments (praises) – A summary of positive sentiments and themes extracted from the social media sentiment analysis.
  • Negative sentiments (flaws) – A summary of negative sentiments and critiques extracted from the social media sentiment analysis.
  • Generated marketing content – The content generated by the content generation LLM, such as ad copy, social media posts, and email campaigns.

The process involves the following underlying key steps (shown in the preceding figure):

  • Text vectorization – The campaign objectives, sentiment analysis results (positive and negative sentiments), and generated marketing content are converted into numerical vector representations using techniques such as word embeddings or Term Frequency-Inverse Document Frequency (TF-IDF).
  • Similarity calculation – The system calculates the similarity between the vector representations of the generated content and the campaign objectives, positive sentiments, and negative sentiments. Common similarity measures include cosine similarity or advanced transformer-based models.
  • Component scoring – Individual scores are computed to measure the alignment between the generated content and the campaign objectives (objective alignment score), the incorporation of positive sentiments (positive sentiment score), and the avoidance of negative sentiments (negative sentiment score).
  • Weighted scoring – The individual component scores are combined using a weighted average or scoring function to produce an overall effectiveness score. The weights are adjustable based on campaign priorities.
  • Interpretation and explanation – In addition to the numerical score, the system provides a textual explanation highlighting the content’s alignment with objectives and sentiments, along with recommendations for improvements.

The following is example output for the marketing campaign evaluation:

1. Effectiveness Score: 8/10
2. Detailed explanation of the evaluation:

Campaign Objectives:
•	Increase brand awareness by 20%.
•	Drive a 15% increase in website traffic.
•	Boost social media engagement by 25%.
•	Successfully launch the ink refill product.

Positive Sentiments:
•	Creative and resonant content.
•	Clear messaging on cost savings and quality.
•	Effective use of hashtags and emojis.
•	Generated positive buzz.

Negative Sentiments:
•	Tone too casual for brand image.
•	Weak call to action.
•	Overly focused on cost savings.

Marketing Content:
•	Social media posts, email campaigns, and a website landing page.

Strengths:
•	Engaging and shareable content.
•	Clear communication of benefits.
•	Strong initial market interest.

Areas for Improvement:
•	Align tone with brand image.
•	Strengthen call to action.
•	Balance cost focus with value proposition.

The campaign effectiveness analysis uses advanced natural language processing (NLP) and machine learning (ML) models to evaluate how well the generated marketing content aligns with the campaign objectives while incorporating positive sentiments and avoiding negative ones. By combining these steps, marketers can create data-driven content that is more likely to resonate with their audience and achieve campaign goals.

Impact and benefits

This AI-powered approach to marketing intelligence provides several key advantages:

  • Cost-efficiency – By predicting campaign effectiveness upfront, companies can optimize resource allocation and minimize spending on underperforming campaigns.
  • Monetizable insights – The data-driven insights gained from this analysis can be valuable not only internally but also as a potential offering for other businesses in the industry.
  • Precision marketing – A deeper understanding of audience sentiment and content alignment allows for more targeted campaigns tailored to audience preferences.
  • Competitive edge – AI-driven insights enable companies to make faster, more informed decisions, staying ahead of market trends.
  • Enhanced ROI – Ultimately, better campaign targeting and optimization lead to higher ROI, increased revenue, and improved financial outcomes.

Additional considerations

Though the potential of this approach is significant, there are several challenges to consider:

  • Data quality – High-quality, diverse input data is key to effective model performance.
  • Model customization – Adapting pre-trained models to specific industry needs and company voice requires careful adjustment. This might involve iterative prompt engineering and model adjustments.
  • Ethical use of AIResponsible AI use involves addressing issues such as privacy, bias, and transparency when analyzing public data.
  • System integration – Seamlessly incorporating AI insights into existing workflows can be complex and might require changes to current processes.
  • Prompt engineering – Crafting effective prompts for LLMs requires continuous experimentation and refinement for best results. Learn more about prompt engineering techniques.

Clean up

To avoid incurring ongoing charges, clean up your resources when you’re done with this solution.

Conclusion

The integration of generative AI and large LLMs into marketing intelligence marks a transformative advancement for the media and entertainment industry. By combining real-time sentiment analysis with AI-driven content creation and campaign effectiveness prediction, companies can make data-driven decisions, reduce costs, and enhance the impact of their marketing efforts.

Looking ahead, the evolution of generative AI—including image generation models like Stability AI’s offerings on Amazon Bedrock and Amazon Nova’s creative content generation capabilities—will further expand possibilities for personalized and visually compelling campaigns. These advancements empower marketers to generate high-quality images, videos, and text that align closely with campaign objectives, offering more engaging experiences for target audiences.

Success in this new landscape requires not only adoption of AI tools but also developing the ability to craft effective prompts, analyze AI-driven insights, and continuously optimize both content and strategy. Those who use these cutting-edge technologies will be well-positioned to thrive in the rapidly evolving digital marketing environment.


About the Authors

Arghya Banerjee is a Sr. Solutions Architect at AWS in the San Francisco Bay Area, focused on helping customers adopt and use the AWS Cloud. He is focused on big data, data lakes, streaming and batch analytics services, and generative AI technologies.

Dhara Vaishnav is Solution Architecture leader at AWS and provides technical advisory to enterprise customers to use cutting-edge technologies in generative AI, data, and analytics. She provides mentorship to solution architects to design scalable, secure, and cost-effective architectures that align with industry best practices and customers’ long-term goals.

Mayank Agrawal is a Senior Customer Solutions Manager at AWS in San Francisco, dedicated to maximizing enterprise cloud success through strategic transformation. With over 20 years in tech and a computer science background, he transforms businesses through strategic cloud adoption. His expertise in HR systems, digital transformation, and previous leadership at Accenture helps organizations across healthcare and professional services modernize their technology landscape.

Namita Mathew is a Solutions Architect at AWS, where she works with enterprise ISV customers to build and innovate in the cloud. She is passionate about generative AI and IoT technologies and how to solve emerging business challenges.

Wesley Petry is a Solutions Architect based in the NYC area, specialized in serverless and edge computing. He is passionate about building and collaborating with customers to create innovative AWS-powered solutions that showcase the art of the possible. He frequently shares his expertise at trade shows and conferences, demonstrating solutions and inspiring others across industries.

Read More