Modern generative AI model providers require unprecedented computational scale, with pre-training often involving thousands of accelerators running continuously for days, and sometimes months. Foundation Models (FMs) demand distributed training clusters — coordinated groups of accelerated compute instances, using frameworks like PyTorch — to parallelize workloads across hundreds of accelerators (like AWS Trainium and AWS Inferentia chips or NVIDIA GPUs).
Orchestrators like SLURM and Kubernetes manage these complex workloads, scheduling jobs across nodes, managing cluster resources, and processing requests. Paired with AWS infrastructure like Amazon Elastic Compute Cloud (Amazon EC2) accelerated computing instances, Elastic Fabric Adapter (EFA), and distributed file systems like Amazon Elastic File System (Amazon EFS) and Amazon FSx, these ultra clusters can run large-scale machine learning (ML) training and inference, handling parallelism, gradient synchronization and collective communications, and even routing and load balancing. However, at scale, even robust orchestrators face challenges around cluster resilience. Distributed training workloads specifically run synchronously, because each training step requires participating instances to complete their calculations before proceeding to the next step. This means that if a single instance fails, the entire job fails. The likelihood of these failures increases with the size of the cluster.
Although resilience and infrastructure reliability can be a challenge, developer experience remains equally pivotal. Traditional ML workflows create silos, where data and research scientists prototype on local Jupyter notebooks or Visual Studio Code instances, lacking access to cluster-scale storage, and engineers manage production jobs through separate SLURM or Kubernetes (kubectl or helm, for example) interfaces. This fragmentation has consequences, including mismatches between notebook and production environments, lack of local access to cluster storage, and most importantly, sub-optimal use of ultra clusters.
In this post, we explore these challenges. In particular, we propose a solution to enhance the data scientist experience on Amazon SageMaker HyperPod—a resilient ultra cluster solution.
Amazon SageMaker HyperPod
SageMaker HyperPod is a compute environment purpose built for large-scale frontier model training. You can build resilient clusters for ML workloads and develop state-of-the-art frontier models. SageMaker HyperPod runs health monitoring agents in the background for each instance. When it detects a hardware failure, SageMaker HyperPod automatically repairs or replaces the faulty instance and resumes training from the last saved checkpoint. This automation alleviates the need for manual intervention, which means you can train in distributed settings for weeks or months with minimal disruption.
To learn more about the resilience and Total Cost of Ownership (TCO) benefits of SageMaker HyperPod, check out Reduce ML training costs with Amazon SageMaker HyperPod. As of writing this post, SageMaker HyperPod supports both SLURM and Amazon Elastic Kubernetes Service (Amazon EKS) as orchestrators.
To deploy a SageMaker HyperPod cluster, refer to the SageMaker HyperPod workshops (SLURM, Amazon EKS). To learn more about what’s being deployed, check out the architecture diagrams later in this post. You can choose to use either of the two orchestrators based on your preference.
Amazon SageMaker Studio
Amazon SageMaker Studio is a fully integrated development environment (IDE) designed to streamline the end-to-end ML lifecycle. It provides a unified, web-based interface where data scientists and developers can perform ML tasks, including data preparation, model building, training, tuning, evaluation, deployment, and monitoring.
By centralizing these capabilities, SageMaker Studio alleviates the need to switch between multiple tools, significantly enhancing productivity and collaboration. SageMaker Studio supports a variety of IDEs, such as JupyterLab Notebooks, Code Editor based on Code-OSS, Visual Studio Code Open Source, and RStudio, offering flexibility for diverse development preferences. SageMaker Studio supports private and shared spaces, so teams can collaborate effectively while optimizing resource allocation. Shared spaces allow multiple users to access the same compute resources across profiles, and private spaces provide dedicated environments for individual users. This flexibility empowers data scientists and developers to seamlessly scale their compute resources and enhance collaboration within SageMaker Studio. Additionally, it integrates with advanced tooling like managed MLflow and Partner AI Apps to streamline experiment tracking and accelerate AI-driven innovation.
Distributed file systems: Amazon FSx
Amazon FSx for Lustre is a fully managed file storage service designed to provide high-performance, scalable, and cost-effective storage for compute-intensive workloads. Powered by the Lustre architecture, it’s optimized for applications requiring access to fast storage, such as ML, high-performance computing, video processing, financial modeling, and big data analytics.
FSx for Lustre delivers sub-millisecond latencies, scaling up to 1 GBps per TiB of throughput, and millions of IOPS. This makes it ideal for workloads demanding rapid data access and processing. The service integrates with Amazon Simple Storage Service (Amazon S3), enabling seamless access to S3 objects as files and facilitating fast data transfers between Amazon FSx and Amazon S3. Updates in S3 buckets are automatically reflected in FSx file systems and vice versa. For more information on this integration, check out Exporting files using HSM commands and Linking your file system to an Amazon S3 bucket.
Theory behind mounting an FSx for Lustre file system to SageMaker Studio spaces
You can use FSx for Lustre as a shared high-performance file system to connect SageMaker Studio domains with SageMaker HyperPod clusters, streamlining ML workflows for data scientists and researchers. By using FSx for Lustre as a shared volume, you can build and refine your training or fine-tuning code using IDEs like JupyterLab and Code Editor in SageMaker Studio, prepare datasets, and save your work directly in the FSx for Lustre volume.This same volume is mounted by SageMaker HyperPod during the execution of training workloads, enabling direct access to prepared data and code without the need for repetitive data transfers or custom image creation. Data scientists can iteratively make changes, prepare data, and submit training workloads directly from SageMaker Studio, providing consistency across development and execution environments while enhancing productivity. This integration alleviates the overhead of moving data between environments and provides a seamless workflow for large-scale ML projects requiring high throughput and low-latency storage. You can configure FSx for Lustre volumes to provide file system access to SageMaker Studio user profiles in two distinct ways, each tailored to different collaboration and data management needs.
Option 1: Shared file system partition across every user profile
Infrastructure administrators can set up a single FSx for Lustre file system partition shared across user profiles within a SageMaker Studio domain, as illustrated in the following diagram.

Figure 1: A FSx for Lustre file system partition shared across multiple user profiles within a single SageMaker Studio Domain
- Shared project directories – Teams working on large-scale projects can collaborate seamlessly by accessing a shared partition. This makes it possible for multiple users to work on the same files, datasets, and FMs without duplicating resources.
- Simplified file management – You don’t need to manage private storage; instead, you can rely on the shared directory for your file-related needs, reducing complexity.
- Improved data governance and security – The shared FSx for Lustre partition is centrally managed by the infrastructure admin, enabling robust access controls and data policies to maintain security and integrity of shared resources.
Option 2: Shared file system partition across each user profile
Alternatively, administrators can configure dedicated FSx for Lustre file system partitions for each individual user profile in SageMaker Studio, as illustrated in the following diagram.

Figure 2: A FSx for Lustre file system with a dedicated partition per user
This setup provides personalized storage and facilitates data isolation. Key benefits include:
- Individual data storage and analysis – Each user gets a private partition to store personal datasets, models, and files. This facilitates independent work on projects with clear segregation by user profile.
- Centralized data management – Administrators retain centralized control over the FSx for Lustre file system, facilitating secure backups and direct access while maintaining data security for users.
- Cross-instance file sharing – You can access your private files across multiple SageMaker Studio spaces and IDEs, because the FSx for Lustre partition provides persistent storage at the user profile level.
Solution overview
The following diagram illustrates the architecture of SageMaker HyperPod with SLURM integration.

Figure 3: Architecture Diagram for SageMaker HyperPod with Slurm as the orchestrator
The following diagram illustrates the architecture of SageMaker HyperPod with Amazon EKS integration.

Figure 4: Architecture Diagram for SageMaker HyperPod with EKS as the orchestrator
These diagrams illustrate what you would provision as part of this solution. In addition to the SageMaker HyperPod cluster you already have, you provision a SageMaker Studio domain, and attach the cluster’s FSx for Lustre file system to the SageMaker Studio domain. Depending on whether or not you choose a SharedFSx, you can either attach the file system to be mounted with a single partition shared across user profiles (that you configure) within your SageMaker domain, or attach it to be mounted with multiple partitions for multiple isolated users. To learn more about this distinction, refer to the section earlier in this post discussing the theory behind mounting an FSx for Lustre file system to SageMaker Studio spaces.
In the following sections, we present a walkthrough of this integration by demonstrating on a SageMaker HyperPod with Amazon EKS cluster how you can:
- Attach a SageMaker Studio domain.
- Use that domain to fine-tune the DeepSeek-R1-Distill-Qwen-14B using the FreedomIntelligence/medical-o1-reasoning-SFT dataset.
Prerequisites
This post assumes that you have a SageMaker HyperPod cluster.
Deploy resources using AWS CloudFormation
As part of this integration, we provide an AWS CloudFormation stack template (SLURM, Amazon EKS). Before deploying the stack, make sure you have a SageMaker HyperPod cluster set up.
In the stack for SageMaker HyperPod with SLURM, you create the following resources:
- A SageMaker Studio domain.
- Lifecycle configurations for installing necessary packages for the SageMaker Studio IDE, including SLURM. Lifecycle configurations will be created for both JupyterLab and Code Editor. We set it up so that your Code Editor or JupyterLab instance will essentially be configured as a login node for your SageMaker HyperPod cluster.
- An AWS Lambda function that:
- Associates the created
security-group-for-inbound-nfs security group to the SageMaker Studio domain.
- Associates the
security-group-for-inbound-nfs security group to the FSx for Lustre ENIs.
- Optional:
- If
SharedFSx is set to True, the created partition is shared in the FSx for Lustre volume and associated to the SageMaker Studio domain.
- If
SharedFSx is set to False, a Lambda function creates the partition /{user_profile_name} and associates it to the SageMaker Studio user profile.
In the stack for SageMaker HyperPod with Amazon EKS, you create the following resources:
- A SageMaker Studio domain.
- Lifecycle configurations for installing necessary packages for SageMaker Studio IDE, such as
kubectl and jq. Lifecycle configurations will be created for both JupyterLab and Code Editor.
- A Lambda function that:
- Associates the created
security-group-for-inbound-nfs security group to the SageMaker Studio domain.
- Associates the
security-group-for-inbound-nfs security group to the FSx for Lustre ENIs.
- Optional:
- If
SharedFSx is set to True, the created partition is shared in the FSx for Lustre volume and associated to the SageMaker Studio domain.
- If
SharedFSx is set to False, a Lambda function creates the partition /{user_profile_name} and associates it to the SageMaker Studio user profile.
The main difference in the implementation of the two is in the lifecycle configurations for the JupyterLab or Code Editor servers running on the two implementations of SageMaker HyperPod—this is because of the difference in how you interact with the cluster using the different orchestrators (kubectl or helm for Amazon EKS, and ssm or ssh for SLURM). In addition to mounting your cluster’s FSx for Lustre file system, for SageMaker HyperPod with Amazon EKS, the lifecycle scripts configure your JupyterLab or Code Editor server to be able to run known Kubernetes-based command line interfaces, including kubectl, eksctl, and helm. Additionally, it preconfigures your context, so that your cluster is ready to use as soon as your JupyterLab or Code Editor instance is up.
You can find the lifecycle configuration for SageMaker HyperPod with Amazon EKS on the deployed CloudFormation stack template. SLURM works a bit differently. We designed the lifecycle configuration so that your JupyterLab or Code Editor instance would serve as a login node to your SageMaker HyperPod with SLURM cluster. Login nodes allow you to log in to the cluster, submit jobs, and view and manipulate data without running on the critical slurmctld scheduler node. This also makes it possible to run monitoring servers like aim, TensorBoard, or Grafana or Prometheus. Therefore, the lifecycle configuration here automatically installs SLURM and configures it so that you can interface with your cluster using your JupyterLab or Code Editor instance. You can find the script used to configure SLURM on these instances on GitHub.
Both these configurations use the same logic to mount the file systems. The instructions found in Adding a custom file system to a domain were achieved in a custom resource (Lambda function) defined in the CloudFormation stack template.
For more details on deploying these provided stacks, check out the respective workshop pages for SageMaker HyperPod with SLURM and SageMaker HyperPod with Amazon EKS.
Data science journey on SageMaker HyperPod with SageMaker Studio
As a data scientist, after you set up the SageMaker HyperPod and SageMaker Studio integration, you can log in to the SageMaker Studio environment through your user profile.

Figure 5: You can log in to your SageMaker Studio environment through your created user profile.
In SageMaker Studio, you can select your preferred IDE to start prototyping your fine-tuning workload, and create the MLFlow tracking server to track training and system metrics during the execution of the workload.

Figure 6: Select your preferred IDE to connect to your HyperPod cluster
The SageMaker HyperPod clusters page provides information about the available clusters and details on the nodes.
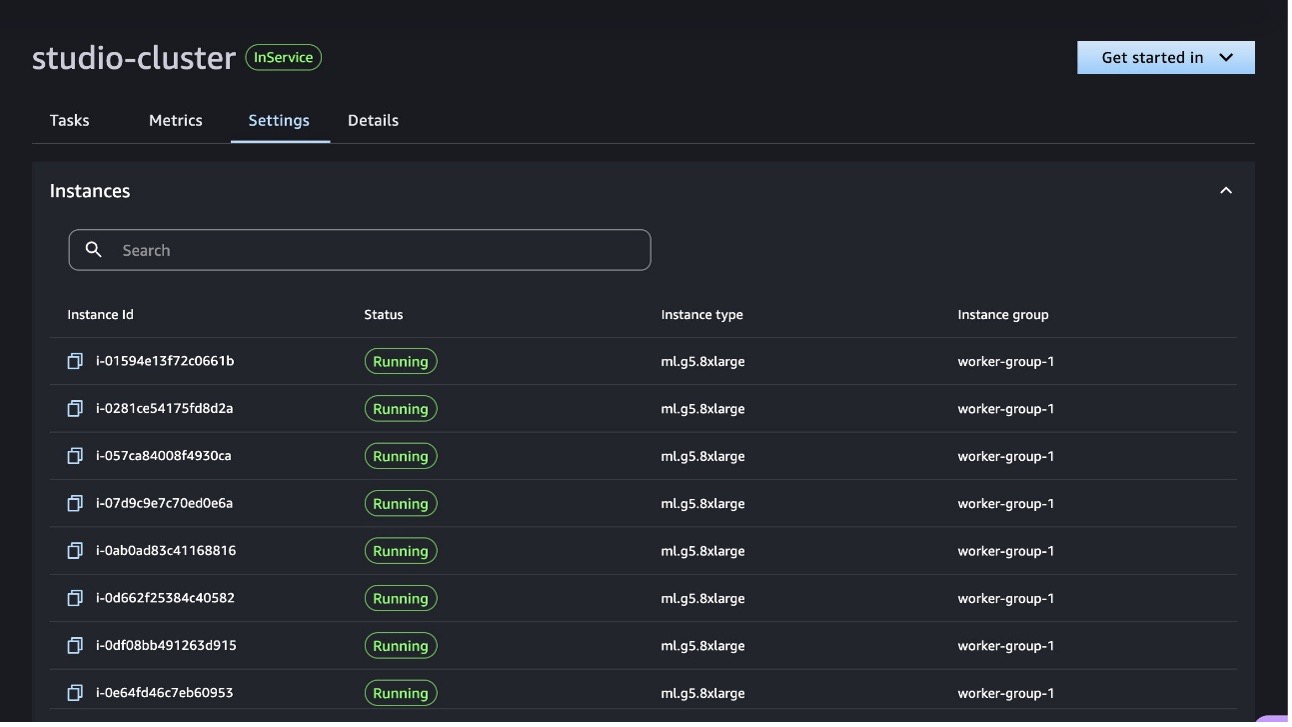
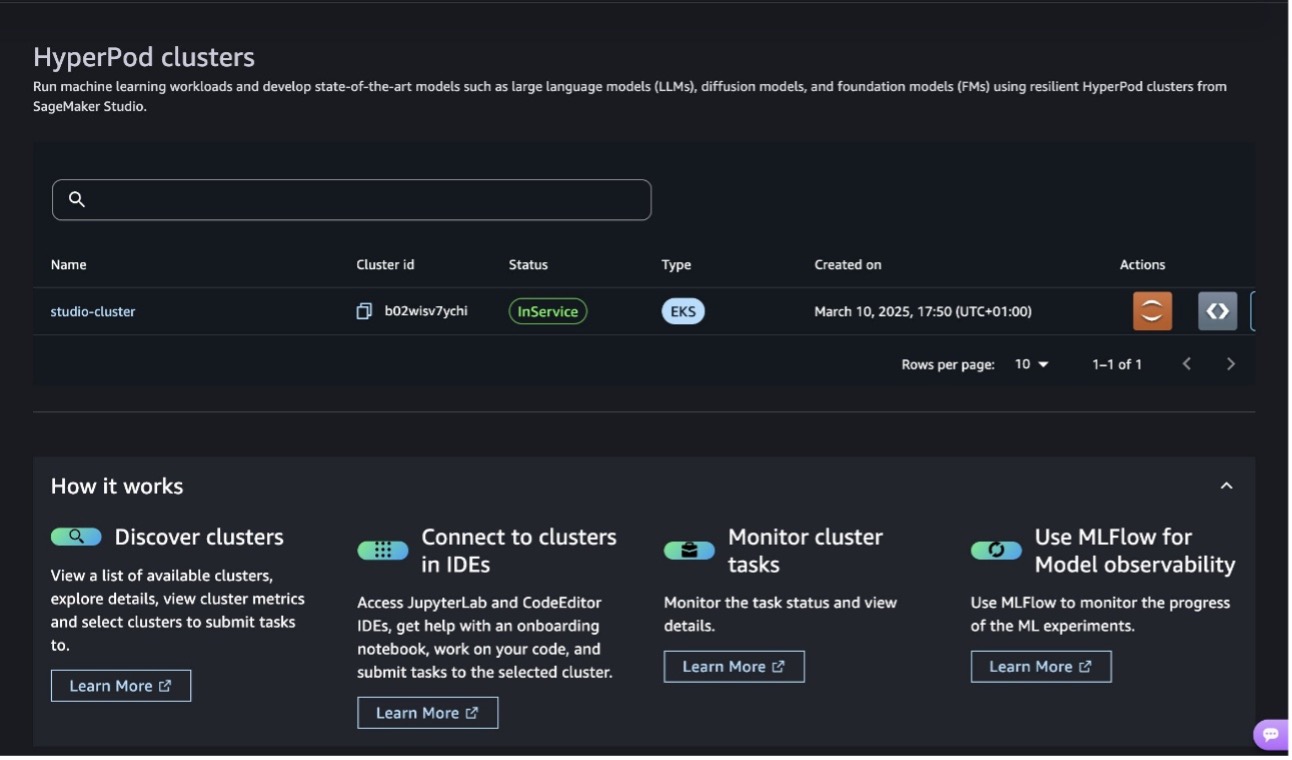
Figures 7,8: You can also see information about your SageMaker HyperPod cluster on SageMaker Studio
For this post, we selected Code Editor as our preferred IDE. The automation provided by this solution preconfigured the FSx for Lustre file system and the lifecycle configuration to install the necessary modules for submitting workloads on the cluster by using the hyperpod-cli or kubectl. For the instance type, you can choose a wide range of available instances. In our case, we opted for the default ml.t3.medium.

Figure 9: CodeEditor configuration
The development environment already presents the partition mounted as a file system, where you can start prototyping your code for data preparation of model fine-tuning. For the purpose of this example, we fine-tune DeepSeek-R1-Distill-Qwen-14B using the FreedomIntelligence/medical-o1-reasoning-SFT dataset.

Figure 10: Your cluster’s files are accessible directly on your CodeEditor space, as a result of your file system being mounted directly to your CodeEditor space! This means you can develop locally, and deploy onto your ultra-cluster.
The repository is organized as follows:
- download_model.py – The script to download the open source model directly in the FSx for Lustre volume. This way, we provide a faster and consistent execution of the training workload on SageMaker HyperPod.
- scripts/dataprep.py – The script to download and prepare the dataset for the fine-tuning workload. In the script, we format the dataset by using the prompt style defined for the DeepSeek R1 models and save the dataset in the FSx for Lustre volume. This way, we provide a faster execution of the training workload by avoiding asset copy from other data repositories.
- scripts/train.py – The script containing the fine-tuning logic, using open source modules like Hugging Face transformers and optimization and distribution techniques using FSDP and QLoRA.
- scripts/evaluation.py – The script to run ROUGE evaluation on the fine-tuned model.
- pod-finetuning.yaml – The manifest file containing the definition of the container used to execute the fine-tuning workload on the SageMaker HyperPod cluster.
- pod-evaluation.yaml – The manifest file containing the definition of the container used to execute the evaluation workload on the SageMaker HyperPod cluster.
After downloading the model and preparing the dataset for the fine-tuning, you can start prototyping the fine-tuning script directly in the IDE.

Figure 11: You can start developing locally!
The updates done in the script will be automatically reflected in the container for the execution of the workload. When you’re ready, you can define the manifest file for the execution of the workload on SageMaker HyperPod. In the following code, we highlight the key components of the manifest. For a complete example of a Kubernetes manifest file, refer to the awsome-distributed-training GitHub repository.
...

apiVersion: "kubeflow.org/v1"
kind: PyTorchJob
metadata:
  name: deepseek-r1-qwen-14b-fine-tuning
spec:
  ...
  pytorchReplicaSpecs:
    Worker:
      replicas: 8
      restartPolicy: OnFailure
      template:
        metadata:
          labels:
            app: deepseek-r1-distill-qwen-14b-fine-tuning
        spec:
          volumes:
            - name: shmem
              hostPath:
                path: /dev/shm
            - name: local
              hostPath:
                path: /mnt/k8s-disks/0
            - name: fsx-volume
              persistentVolumeClaim:
                claimName: fsx-claim
          serviceAccountName: eks-hyperpod-sa
          containers:
            - name: pytorch
              image: 123456789012.dkr.ecr.us-east-1.amazonaws.com/pytorch-training:2.6.0-gpu-py312-cu126-ubuntu22.04-ec2
              imagePullPolicy: Always
              resources:
                requests:
                  nvidia.com/gpu: 1
                  vpc.amazonaws.com/efa: 1
                limits:
                  nvidia.com/gpu: 1
                  vpc.amazonaws.com/efa: 1
              ...
              command:
                - /bin/bash
                - -c
                - |
                  pip install -r /data/Data-Scientist/deepseek-r1-distill-qwen-14b/requirements.txt &&
                  torchrun
                  --nnodes=8
                  --nproc_per_node=1
                  /data/Data-Scientist/deepseek-r1-distill-qwen-14b/scripts/train.py
                  --config /data/Data-Scientist/deepseek-r1-distill-qwen-14b/args-fine-tuning.yaml
              volumeMounts:
                - name: shmem
                  mountPath: /dev/shm
                - name: local
                  mountPath: /local
                - name: fsx-volume
                  mountPath: /data
The key components are as follows:
- replicas: 8 – This specifies that eight worker pods will be created for this PyTorchJob. This is particularly important for distributed training because it determines the scale of your training job. Having eight replicas means your PyTorch training will be distributed across eight separate pods, allowing for parallel processing and faster training times.
- Persistent volume configuration – This includes the following:
- name: fsx-volume – Defines a named volume that will be used for storage.
- persistentVolumeClaim – Indicates this is using Kubernetes’s persistent storage mechanism.
- claimName: fsx-claim – References a pre-created
PersistentVolumeClaim, pointing to an FSx for Lustre file system used in the SageMaker Studio environment.
- Container image – This includes the following:
- Training command – The highlighted command shows the execution instructions for the training workload:
- pip install -r /data/Data-Scientist/deepseek-r1-distill-qwen-14b/requirements.txt – Installs dependencies at runtime, to customize the container with packages and modules required for the fine-tuning workload.
- torchrun … /data/Data-Scientist/deepseek-r1-distill-qwen-14b/scripts/train.py – The actual training script, by pointing to the shared FSx for Lustre file system, in the partition created for the SageMaker Studio user profile
Data-Scientist.
- –config /data/Data-Scientist/deepseek-r1-distill-qwen-14b/args-fine-tuning.yaml – Arguments provided to the training script, which contains definition of the training parameters, and additional variables used during the execution of the workload.
The args-fine-tuning.yaml file contains the definition of the training parameters to provide to the script. In addition, the training script was defined to save training and system metrics on the managed MLflow server in SageMaker Studio, in case the Amazon Resource Name (ARN) and experiment name are provided:
# Location in the FSx for Lustre file system where the base model was saved
model_id: "/data/Data-Scientist/deepseek-r1-distill-qwen-14b/DeepSeek-R1-Distill-Qwen-14B"
mlflow_uri: "${MLFLOW_ARN}"
mlflow_experiment_name: "deepseek-r1-distill-llama-8b-agent"
# sagemaker specific parameters
# File system path where the workload will store the model
output_dir: "/data/Data-Scientist/deepseek-r1-distill-qwen-14b/model/"
# File system path where the workload can access the dataset train dataset
train_dataset_path: "/data/Data-Scientist/deepseek-r1-distill-qwen-14b/data/train/"
# File system path where the workload can access the dataset test dataset
test_dataset_path: "/data/Data-Scientist/deepseek-r1-distill-qwen-14b/data/test/"
# training parameters
lora_r: 8
lora_alpha: 16
lora_dropout: 0.1
learning_rate: 2e-4                    # learning rate scheduler
num_train_epochs: 1                    # number of training epochs
per_device_train_batch_size: 2         # batch size per device during training
per_device_eval_batch_size: 2          # batch size for evaluation
gradient_accumulation_steps: 2         # number of steps before performing a backward/update pass
gradient_checkpointing: true           # use gradient checkpointing
bf16: true                             # use bfloat16 precision
tf32: false                            # use tf32 precision
fsdp: "full_shard auto_wrap offload"
fsdp_config:
    backward_prefetch: "backward_pre"
    cpu_ram_efficient_loading: true
    offload_params: true
    forward_prefetch: false
    use_orig_params: true
merge_weights: true
The parameters model_id, output_dir, train_dataset_path, and test_dataset_path follow the same logic described for the manifest file and refer to the location where the FSx for Lustre volume is mounted in the container, under the partition Data-Scientist created for the SageMaker Studio user profile.
When you have finished the development of the fine-tuning script and defined the training parameters for the workload, you can deploy the workload with the following commands:
$ kubectl apply -f pod-finetuning.yaml
service/etcd unchanged
deployment.apps/etcd unchanged
pytorchjob.kubeflow.org/deepseek-r1-qwen-14b-fine-tuning created
$ kubectl get pods
NAME READY STATUS RESTARTS AGE
deepseek-r1-qwen-14b-fine-tuning-worker-0 1/1 Running 0 2m7s
deepseek-r1-qwen-14b-fine-tuning-worker-1 1/1 Running 0 2m7s
deepseek-r1-qwen-14b-fine-tuning-worker-2 1/1 Running 0 2m7s
deepseek-r1-qwen-14b-fine-tuning-worker-3 1/1 Running 0 2m7s
deepseek-r1-qwen-14b-fine-tuning-worker-4 1/1 Running 0 2m7s
deepseek-r1-qwen-14b-fine-tuning-worker-5 1/1 Running 0 2m7s
deepseek-r1-qwen-14b-fine-tuning-worker-6 1/1 Running 0 2m7s
deepseek-r1-qwen-14b-fine-tuning-worker-7 1/1 Running 0 2m7s
...
You can explore the logs of the workload execution directly from the SageMaker Studio IDE.

Figure 12: View the logs of the submitted training run directly in your CodeEditor terminal
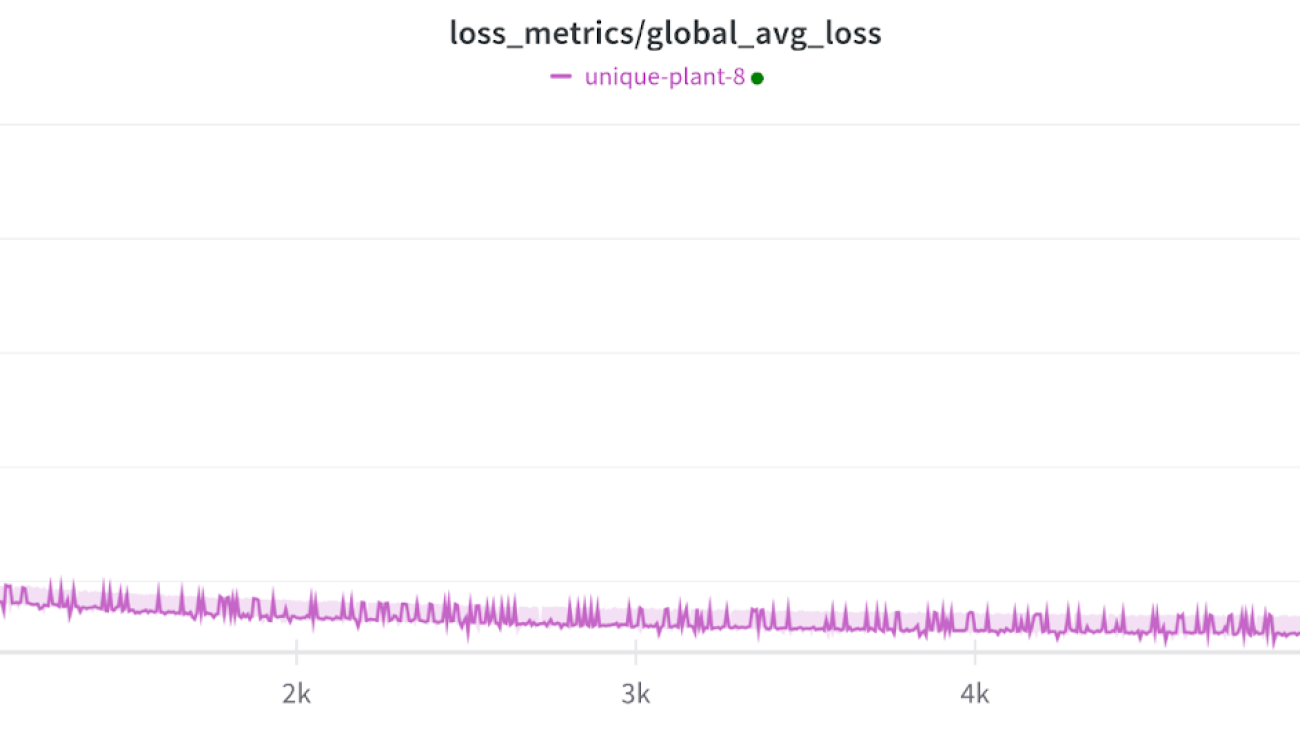
You can track training and system metrics from the managed MLflow server in SageMaker Studio.

Figure 13: SageMaker Studio directly integrates with a managed MLFlow server. You can use it to track training and system metrics directly from your Studio Domain
In the SageMaker HyperPod cluster sections, you can explore cluster metrics thanks to the integration of SageMaker Studio with SageMaker HyperPod observability.

Figure 14: You can view additional cluster level/infrastructure metrics in the “Compute” -> “SageMaker HyperPod clusters” section, including GPU utilization.
At the conclusion of the fine-tuning workload, you can use the same cluster to run batch evaluation workloads on the model by deploying the manifest pod-evaluation.yaml file to run an evaluation on the fine-tuned model by using ROUGE metrics (ROUGE-1, ROUGE-2, ROUGE-L, and ROUGE-L-Sum), which measure the similarity between machine-generated text and human-written reference text.
The evaluation script uses the same SageMaker HyperPod cluster and compares results with the previously downloaded base model.
Clean up
To clean up your resources to avoid incurring more charges, follow these steps:
- Delete unused SageMaker Studio resources.
- Optionally, delete the SageMaker Studio domain.
- If you created a SageMaker HyperPod cluster, delete the cluster to stop incurring costs.
- If you created the networking stack from the SageMaker HyperPod workshop, delete the stack as well to clean up the virtual private cloud (VPC) resources and the FSx for Lustre volume.
Conclusion
In this post, we discussed how SageMaker HyperPod and SageMaker Studio can improve and speed up the development experience of data scientists by using IDEs and tooling of SageMaker Studio and the scalability and resiliency of SageMaker HyperPod with Amazon EKS. The solution simplifies the setup for the system administrator of the centralized system by using the governance and security capabilities offered by the AWS services.
We recommend starting your journey by exploring the workshops Amazon EKS Support in Amazon SageMaker HyperPod and Amazon SageMaker HyperPod, and prototyping your customized large language model by using the resources available in the awsome-distributed-training GitHub repository.
A special thanks to our colleagues Nisha Nadkarni (Sr. WW Specialist SA GenAI), Anoop Saha (Sr. Specialist WW Foundation Models), and Mair Hasco (Sr. WW GenAI/ML Specialist) in the AWS ML Frameworks team, for their support in the publication of this post.
About the authors
 Bruno Pistone is a Senior Generative AI and ML Specialist Solutions Architect for AWS based in Milan. He works with large customers helping them to deeply understand their technical needs and design AI and Machine Learning solutions that make the best use of the AWS Cloud and the Amazon Machine Learning stack. His expertise include: Machine Learning end to end, Machine Learning Industrialization, and Generative AI. He enjoys spending time with his friends and exploring new places, as well as travelling to new destinations
 Aman Shanbhag is a Specialist Solutions Architect on the ML Frameworks team at Amazon Web Services (AWS), where he helps customers and partners with deploying ML training and inference solutions at scale. Before joining AWS, Aman graduated from Rice University with degrees in computer science, mathematics, and entrepreneurship.
Read More


 Nick Biso is a Machine Learning Engineer at AWS Professional Services. He solves complex organizational and technical challenges using data science and engineering. In addition, he builds and deploys AI/ML models on the AWS Cloud. His passion extends to his proclivity for travel and diverse cultural experiences.
 Natasha Tchir is a Cloud Consultant at the Generative AI Innovation Center, specializing in machine learning. With a strong background in ML, she now focuses on the development of generative AI proof-of-concept solutions, driving innovation and applied research within the GenAIIC.
 Katherine Feng is a Cloud Consultant at AWS Professional Services within the Data and ML team. She has extensive experience building full-stack applications for AI/ML use cases and LLM-driven solutions.
 Jinzhao Feng is a Machine Learning Engineer at AWS Professional Services. He focuses on architecting and implementing large-scale generative AI and classic ML pipeline solutions. He is specialized in FMOps, LLMOps, and distributed training.
 Jayadev Kalla is a Product Manager with the AWS Social Responsibility and Impact team, focusing on AI & ML education. His goal is to expand access to AI education through hands-on learning experiences. Outside of work, Jayadev is a sports enthusiast and loves to cook.
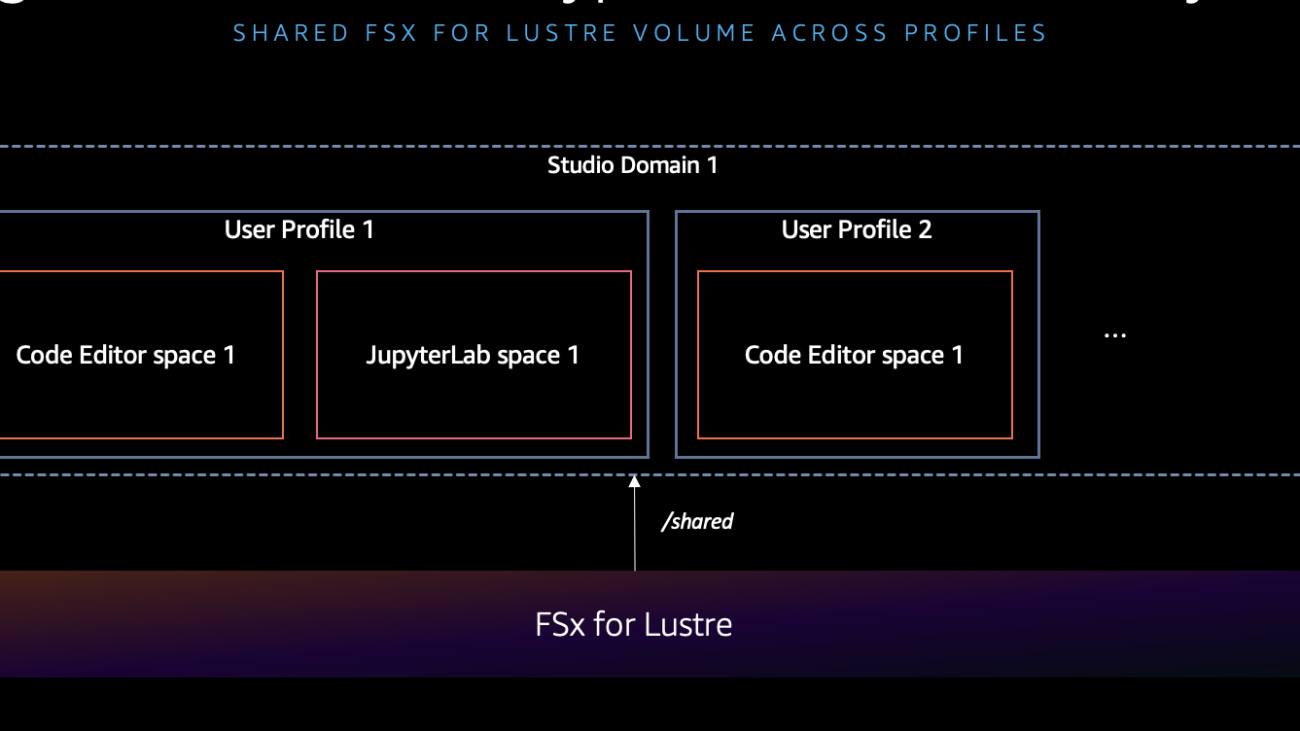


 NVIDIA GeForce NOW (@NVIDIAGFN)


 Baishali Chaudhury is an Applied Scientist at the Generative AI Innovation Center at AWS, where she focuses on advancing Generative AI solutions for real-world applications. She has a strong background in computer vision, machine learning, and AI for healthcare. Baishali holds a PhD in Computer Science from University of South Florida and PostDoc from Moffitt Cancer Centre.
 Sungmin Hong is a Senior Applied Scientist at Amazon Generative AI Innovation Center where he helps expedite the variety of use cases of AWS customers. Before joining Amazon, Sungmin was a postdoctoral research fellow at Harvard Medical School. He holds Ph.D. in Computer Science from New York University. Outside of work, he prides himself on keeping his indoor plants alive for 3+ years.
 Mengdie (Flora) Wang is a Data Scientist at AWS Generative AI Innovation Center, where she works with customers to architect and implement scalable Generative AI solutions that address their unique business challenges. She specializes in model customization techniques and agent-based AI systems, helping organizations harness the full potential of generative AI technology. Prior to AWS, Flora earned her Master’s degree in Computer Science from the University of Minnesota, where she developed her expertise in machine learning and artificial intelligence.
 Anila Joshi has more than a decade of experience building AI solutions. As a AWSI Geo Leader at AWS Generative AI Innovation Center, Anila pioneers innovative applications of AI that push the boundaries of possibility and accelerate the adoption of AWS services with customers by helping customers ideate, identify, and implement secure generative AI solutions.