Amazon Bedrock Knowledge Bases now supports Amazon OpenSearch Service Managed Cluster as vector store

Amazon Bedrock Knowledge Bases now supports Amazon OpenSearch Service Managed Cluster as vector store

Amazon Bedrock Knowledge Bases has extended its vector store options by enabling support for Amazon OpenSearch Service managed clusters, further strengthening its capabilities as a fully managed Retrieval Augmented Generation (RAG) solution. This enhancement builds on the core functionality of Amazon Bedrock Knowledge Bases , which is designed to seamlessly connect foundation models (FMs) with internal data sources. Amazon Bedrock Knowledge Bases automates critical processes such as data ingestion, chunking, embedding generation, and vector storage, and the application of advanced indexing algorithms and retrieval techniques, empowering users to develop intelligent applications with minimal effort.

The latest update broadens the vector database options available to users. In addition to the previously supported vector stores such as Amazon OpenSearch Serverless, Amazon Aurora PostgreSQL-Compatible Edition, Amazon Neptune Analytics, Pinecone, MongoDB, and Redis Enterprise Cloud, users can now use OpenSearch Service managed clusters. This integration enables the use of an OpenSearch Service domain as a robust backend for storing and retrieving vector embeddings, offering greater flexibility and choice in vector storage solutions.

To help users take full advantage of this new integration, this post provides a comprehensive, step-by-step guide on integrating an Amazon Bedrock knowledge base with an OpenSearch Service managed cluster as its vector store.

Why use OpenSearch Service Managed Cluster as a vector store?

OpenSearch Service provides two complementary deployment options for vector workloads: managed clusters and serverless collections. Both harness the powerful vector search and retrieval capabilities of OpenSearch Service, though each excels in different scenarios. Managed clusters offer extensive configuration flexibility, performance tuning options, and scalability that make them particularly well-suited for enterprise-grade AI applications.Organizations seeking greater control over cluster configurations, compute instances, the ability to fine-tune performance and cost, and support for a wider range of OpenSearch features and API operations will find managed clusters a natural fit for their use cases. Alternatively, OpenSearch Serverless excels in use cases that require automatic scaling and capacity management, simplified operations without the need to manage clusters or nodes, automatic software updates, and built-in high availability and redundancy. The optimal choice depends entirely on specific use case, operational model, and technical requirements. Here are some key reasons why OpenSearch Service managed clusters offer a compelling choice for organizations:

  • Flexible configuration – Managed clusters provide flexible and extensive configuration options that enable fine-tuning for specific workloads. This includes the ability to select instance types, adjust resource allocations, configure cluster topology, and implement specialized performance optimizations. For organizations with specific performance requirements or unique workload characteristics, this level of customization can be invaluable.
  • Performance and cost optimizations to meet your design criteria – Vector database performance is a trade-off between three key dimensions: accuracy, latency, and cost. Managed Cluster provides the granular control to optimize along one or a combination of these dimensions and meet the specific design criteria.
  • Early access to advanced ML features – OpenSearch Service follows a structured release cycle, with new capabilities typically introduced first in the open source project, then in managed clusters, and later in serverless offerings. Organizations that prioritize early adoption of advanced vector search capabilities might benefit from choosing managed clusters, which often provide earlier exposure to new innovation. However, for customers using Amazon Bedrock Knowledge Bases, these features become beneficial only after they have been fully integrated into the knowledge bases. This means that even if a feature is available in a managed OpenSearch Service cluster, it might not be immediately accessible within Amazon Bedrock Knowledge Bases. Nonetheless, opting for managed clusters positions organizations to take advantage of the latest OpenSearch advancements more promptly after they’re supported within Bedrock Knowledge Bases.

Prerequisites

Before we dive into the setup, make sure you have the following prerequisites in place:

  1. Data source – An Amazon S3 bucket (or custom source) with documents for knowledge base ingestion. We will assume your bucket contains supported documents types (PDFs, TXTs, etc.) for retrieval.
  2. OpenSearch Service domain (optional) – For existing domains, make sure it’s in the same Region and account where you’ll create your Amazon Bedrock knowledge base. As of this writing, Bedrock Knowledge Bases requires OpenSearch Service domains with public access; virtual private cloud (VPC)-only domains aren’t supported yet. Make sure you have the necessary permissions to create or configure domains. This guide covers setup for both new and existing domains.

Solution overview

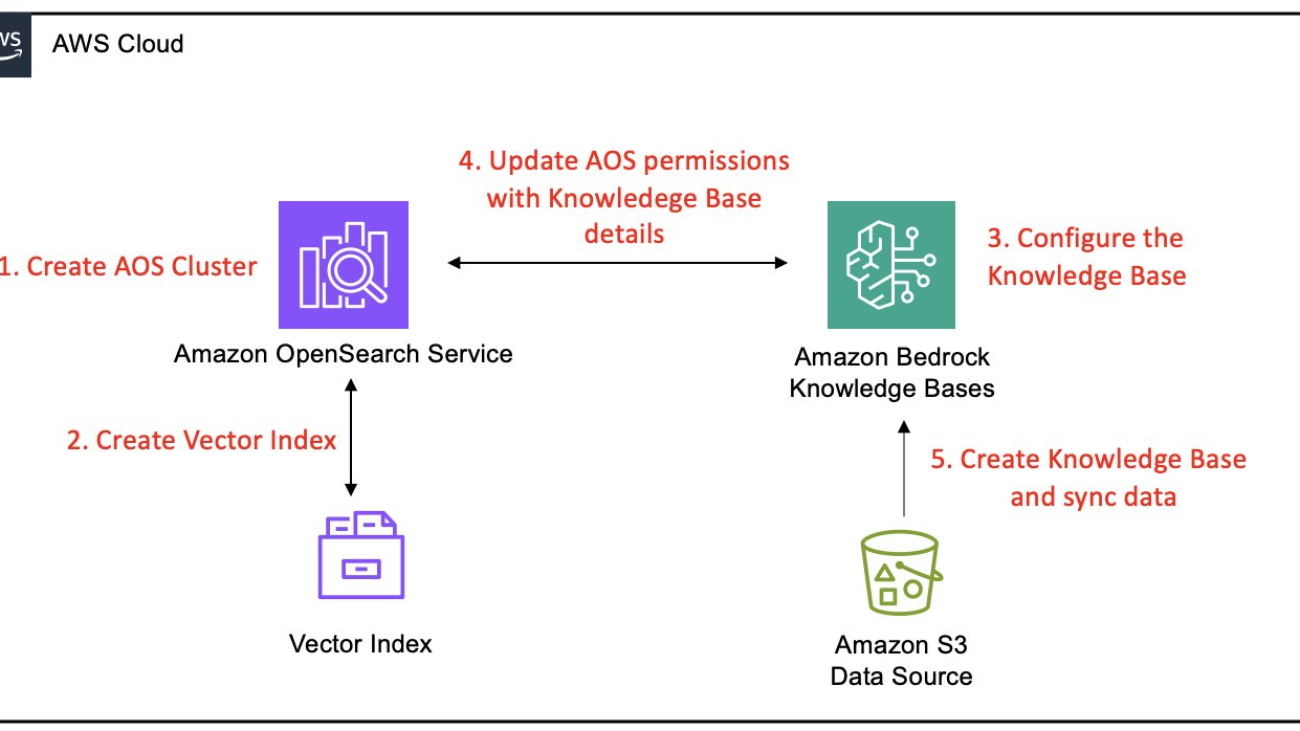
This section covers the following high-level steps to integrate an OpenSearch Service managed cluster with Amazon Bedrock Knowledge Bases:

  1. Create an OpenSearch Service domain – Set up a new OpenSearch Service managed cluster with public access, appropriate engine version, and security settings, including AWS Identity and Access Management (IAM) master user role and fine-grained access control. This step includes establishing administrative access by creating dedicated IAM resources and configuring Amazon Cognito authentication for secure dashboard access.
  2. Configure a vector index in OpenSearch Service – Create a k-nearest neighbors (k-NN) enabled index on the domain with the appropriate mappings for vector, text chunk, and metadata fields to be compatible with Amazon Bedrock Knowledge Bases.
  3. Configure the Amazon Bedrock knowledge base – Initiate the creation of an Amazon Bedrock knowledge base, enable your Amazon Simple Storage Service (Amazon S3) data source, and configure it to use your OpenSearch Service domain as the vector store with all relevant domain details.
  4. Configure fine-grained access control permissions in OpenSearch Service – Configure fine-grained access control in OpenSearch Service by creating a role with specific permissions and mapping it to the Amazon Bedrock IAM service role, facilitating secure and controlled access for the knowledge base.
  5. Complete knowledge base creation and ingest data – Initiate a sync operation in the Amazon Bedrock console to process S3 documents, generate embeddings, and store them in your OpenSearch Service index.

The following diagram illustrates these steps:

Step-by-step workflow for implementing Amazon OpenSearch Service managed cluster as vector store with Bedrock Knowledge Bases

Solution walkthrough

Here are the steps to follow in the AWS console to integrate Amazon Bedrock Knowledge Bases with OpenSearch Service Managed Cluster.

Establish administrative access with IAM master user and role

Before creating an OpenSearch Service domain, you need to create two key IAM resources: a dedicated IAM admin user and a master role. This approach facilitates proper access management for your OpenSearch Service domain, particularly when implementing fine-grained access control, which is strongly recommended for production environments. This user and role will have the necessary permissions to create, configure, and manage the OpenSearch Service domain and its integration with Amazon Bedrock Knowledge Bases.

Create an IAM admin user

The administrative user serves as the principal account for managing the OpenSearch Service configuration. To create an IAM admin user, follow these steps:

  1. Open the IAM console in your AWS account
  2. In the left navigation pane, choose Users and then choose Create user
  3. Enter a descriptive username like <opensearch-admin>
  4. On the permissions configuration page, choose Attach policies directly
  5. Search for and attach the AmazonOpenSearchServiceFullAccess managed policy, which grants comprehensive permissions for OpenSearch Service operations
  6. Review your settings and choose Create user

After creating the user, copy and save the user’s Amazon Resource name (ARN) for later use in domain configuration, replacing <ACCOUNT_ID> with your AWS account ID.

The ARN will look like this:

arn:aws:iam::<ACCOUNT_ID>:user/opensearch-admin

Create an IAM role to act as the OpenSearch Service master user

With OpenSearch Service, you can assign a master user for domains with fine-grained access control. By configuring an IAM role as the master user, you can manage access using trusted principles and avoid static usernames and passwords. To create the IAM role, follow these steps:

  1. On the IAM console, in the left-hand navigation pane, choose Roles and then choose Create role
  2. Choose Custom trust policy as the trusted entity type to precisely control which principals can assume this role
  3. In the JSON editor, paste the following trust policy that allows entities, such as your opensearch-admin user, to assume this role
   {
     "Version": "2012-10-17",
     "Statement": [
       {
         "Effect": "Allow",
         "Principal": {
           "AWS": "arn:aws:iam::<ACCOUNT_ID>:user/opensearch-admin"
         },
         "Action": "sts:AssumeRole"
       }
     ]
   }
  1. Proceed to the Add permissions page and attach the same AmazonOpenSearchServiceFullAccess managed policy you used for your admin user
  2. Provide a descriptive name such as OpenSearchMasterRole and choose Create role

After the role is created, navigate to its summary page and copy the role’s ARN. You’ll need this ARN when configuring your OpenSearch Service domain’s master user.

arn:aws:iam:: <ACCOUNT_ID>:role/OpenSearchMasterRole

Create an OpenSearch Service domain for vector search

With the administrative IAM role established, the next step is to create the OpenSearch Service domain that will serve as the vector store for your Amazon Bedrock knowledge base. This involves configuring the domain’s engine, network access, and, most importantly, its security settings using fine-grained access control.

  1. In the OpenSearch Service console, select Managed clusters as your deployment type. Then choose Create domain.
  2. Configure your domain details:
    1. Provide a domain name such as bedrock-kb-domain.
    2. For a quick and straightforward setup, choose Easy create, as shown in the following screenshot. This option automatically selects suitable instance types and default configurations optimized for development or small-scale workloads. This way, you can quickly deploy a functional OpenSearch Service domain without manual configuration. Many of these settings can be modified later as your needs evolve, making this approach ideal for experimentation or nonproduction use cases while still providing a solid foundation.

Amazon OpenSearch Domain Creation

If your workload demands higher input/output operations per second (IOPS) or throughput or involves managing substantial volumes of data, selecting Standard create is recommended. With this option enabled, you can customize instance types, storage configurations, and advanced security settings to optimize the speed and efficiency of data storage and retrieval operations, making it well-suited for production environments. For example, you can scale the baseline GP3 volume performance from 3,000 IOPS and 125 MiB/s throughput up to 16,000 IOPS and 1,000 MiB/s throughput for every 3 TiB of storage provisioned per data node. This flexibility means that you can align your OpenSearch Service domain performance with specific workload demands, facilitating efficient indexing and retrieval operations for high-throughput or large-scale applications. These settings should be fine-tuned based on the size and complexity of your OpenSearch Service workload to optimize both performance and cost.

However, although increasing your domain’s throughput and storage settings can help improve domain performance—and might help mitigate ingestion errors caused by storage or node-level bottlenecks—it doesn’t increase the ingestion speed into Amazon Bedrock Knowledge Bases as of this writing. Knowledge base ingestion operates at a fixed throughput rate for customers and vector databases, regardless of underlying domain configuration. AWS continues to invest in scaling and evolving the ingestion capabilities of Bedrock Knowledge Bases, and future improvements might offer greater flexibility.

  1. For engine version, choose OpenSearch version 2.13 or higher. If you plan to store binary embeddings, select version 2.16 or above because it’s required for binary vector indexing. It’s recommended to use the latest available version to benefit from performance improvements and feature updates.
  2. For network configuration, under Network, choose Public access, as shown in the following screenshot. This is crucial because, as of this writing, Amazon Bedrock Knowledge Bases doesn’t support connecting to OpenSearch Service domains that are behind a VPC. To maintain security, we implement IAM policies and fine-grained access controls to manage access at a granular level. Using these controls, you can define who can access your resources and what actions they can perform, adhering to the principle of least privilege. Select Dual-stack mode for network settings if prompted. This enables support for both IPv4 and IPv6, offering greater compatibility and accessibility.

Amazon OpenSearch Domain Network Access Configuration

  1. For security, enable Fine-grained access control to secure your domain by defining detailed, role-based permissions at the index, document, and field levels. This feature offers more precise control compared to resource-based policies, which operate only at the domain level.

In the fine-grained access control implementation section, we guide you through creating a custom OpenSearch Service role with specific index and cluster permissions, then authorizing Amazon Bedrock Knowledge Bases by associating its service role with this custom role. This mapping establishes a trust relationship that restricts Bedrock Knowledge Bases to only the operations you’ve explicitly permitted when accessing your OpenSearch Service domain with its service credentials, facilitating secure and controlled integration.

When enabling fine-grained access control, you must select a master user to manage the domain. You have two options:

    • Create master user (Username and Password) – This option establishes credentials in OpenSearch Service internal user database, providing quick setup and direct access to OpenSearch Dashboards using basic authentication. Although convenient for initial configuration or development environments, it requires careful management of these credentials as a separate identity from your AWS infrastructure.
    • Set IAM ARN as master user – This option integrates with the AWS identity landscape, allowing IAM based authentication. This is strongly recommended for production environments where applications and services already rely on IAM for secure access and where you need auditability and integration with your existing AWS security posture.

For this walkthrough, we choose Set IAM ARN as master user. This is the recommended approach for production environments because it integrates with your existing AWS identity framework, providing better auditability and security management.

In the text box, paste the ARN of the OpenSearchMasterRole that you created in the first step, as shown in the following screenshot. This designates the IAM role as the superuser for your OpenSearch Service domain, granting it full permissions to manage users, roles, and permissions within OpenSearch Dashboards.

Amazon OpenSearch Domain FGAC

Although setting an IAM master user is ideal for programmatic access, it’s not convenient for allowing users to log in to the OpenSearch Dashboards. In a subsequent step, after the domain is created and we’ve configured Cognito resources, we’ll revisit this security configuration to enable Amazon Cognito authentication. Then you’ll be able to create a user-friendly login experience for the OpenSearch Dashboards, where users can sign in through a hosted UI and be automatically mapped to IAM roles (such as the MasterUserRole or more limited roles), combining ease of use with robust, role-based security. For now, proceed with the IAM ARN as the master user to complete the initial domain setup.

  1. Review your settings and choose Create to launch the domain. The initialization process typically takes around 10–15 minutes. During this time, OpenSearch Service will set up the domain and apply your configurations.

After your domain becomes active, navigate to its detail page to retrieve the following information:

  • Domain endpoint – This is the HTTPS URL where your OpenSearch Service is accessible, typically following the format: https://search-<domain-name>-<unique-identifier>.<region>.es.amazonaws.com
  • Domain ARN – This uniquely identifies your domain and follows the structure: arn:aws:es:<region>:<account-id>:domain/<domain-name>

Make sure to copy and securely store both these details because you’ll need them when configuring your Amazon Bedrock knowledge base in subsequent steps. With the OpenSearch Service domain up and running, you now have an empty cluster ready to store your vector embeddings. Next, we move on to configuring a vector index within this domain.

Create an Amazon Cognito user pool

Following the creation of your OpenSearch Service domain, the next step is to configure an Amazon Cognito user pool. This user pool will provide a secure and user-friendly authentication layer for accessing the OpenSearch Dashboards. Follow these steps:

  1. Navigate to the Amazon Cognito console and choose User pools from the main dashboard. Choose Create user pool to begin the configuration process. The latest developer-focused console experience presents a unified application setup interface rather than the traditional step-by-step wizard.
  2. For OpenSearch Dashboards integration, choose Traditional web application. This application type supports the authentication flow required for dashboard access and can securely handle the OAuth flows needed for the integration.
  3. Enter a descriptive name in the Name your application field, such as opensearch-kb-app. This name will automatically become your app client name.
  4. Configure how users will authenticate with your system. For OpenSearch integration, select Email as the primary sign-in option. This allows users to sign up and sign in using their email addresses, providing a familiar authentication method. Additional options include Phone number and Username if your use case requires alternative sign-in methods.
  5. Specify the user information that must be collected during registration. At minimum, make sure Email is selected as a required attribute. This is essential for account verification and recovery processes.
  6. This step is a critical security configuration that specifies where Cognito can redirect users after successful authentication. In the Add a return URL field, enter your OpenSearch Dashboards URL in the following format: https://search-<domain-name>-<unique-identifier>.aos.<region>.on.aws/_dashboards.
  7. Choose Create user directory to provision your user pool and its associated app client.

The simplified interface automatically configures optimal settings for your selected application type, including appropriate security policies, OAuth flows, and hosted UI domain generation. Copy and save the User pool ID and App client ID values. You’ll need them to configure the Cognito identity pool and update the OpenSearch Service domain’s security settings.

Add an admin user to the user pool

After creating your Amazon Cognito user pool, you need to add an administrator user who will have access to OpenSearch Dashboards. Follow these steps:

  1. In the Amazon Cognito console, select your newly created user pool
  2. In the left navigation pane, choose Users
  3. Choose Create user
  4. Select Send an email invitation
  5. Enter an Email address for the administrator, for example, admin@example.com
  6. Choose whether to set a Temporary password or have Cognito generate one
  7. Choose Create user

Amazon Cognito User Creation

Upon the administrator’s first login, they’ll be prompted to create a permanent password. When all the subsequent setup steps are complete, this admin user will be able to authenticate to OpenSearch Dashboards.

Configure app client settings

With your Amazon Cognito user pool created, the next step is to configure app client parameters that will enable seamless integration with your OpenSearch dashboard. The app client configuration defines how OpenSearch Dashboards will interact with the Cognito authentication system, including callback URLs, OAuth flows, and scope permissions. Follow these steps:

  1. Navigate to your created user pool on the Amazon Cognito console and locate your app client in the applications list. Select your app client to access its configuration dashboard.
  2. Choose the Login tab from the app client interface. This section displays your current managed login pages configuration, including callback URLs, identity providers, and OAuth settings.
  3. To open the OAuth configuration interface, in the Managed login pages configuration section, choose Edit.
  4. Add your OpenSearch Dashboards URL in the Allowed callback URLs section from the Create an Amazon Cognito user pool section.
  5. To allow authentication using your user pool credentials, in the Identity providers dropdown list, select Cognito user pool.
  6. Select Authorization code grant from the OAuth 2.0 grant types dropdown list. This provides the most secure OAuth flow for web applications by exchanging authorization codes for access tokens server-side.
  7. Configure OpenID Connect scopes by selecting the appropriate scopes from the available options:
    1. Email: Enables access to user email addresses for identification.
    2. OpenID: Provides basic OpenID Connect (OIDC) functionality.
    3. Profile: Allows access to user profile information.

Save the configuration by choosing Save changes at the bottom of the page to apply the OAuth settings to your app client. The system will validate your configuration and confirm the updates have been successfully applied.

Update master role trust policy for Cognito integration

Before creating the Cognito identity pool, you must first update your existing OpenSearchMasterRoleto trust the Cognito identity service. This is required because only IAM roles with the proper trust policy for cognito-identity.amazonaws.com will appear in the Identity pool role selection dropdown list. Follow these steps:

  1. Navigate to IAM on the console.
  2. In the left navigation menu, choose Roles.
  3. Find and select OpenSearchMasterRole from the list of roles.
  4. Choose the Trust relationships tab.
  5. Choose Edit trust policy.
  6. Replace the existing trust policy with the following configuration that includes both your IAM user access and Cognito federated access. Replace YOUR_ACCOUNT_ID with your AWS account number. Leave PLACEHOLDER_IDENTITY_POOL_ID as is for now. You’ll update this in Step 6 after creating the identity pool:
```
{
  "Version": "2012-10-17",
  "Statement": [
    {
      "Effect": "Allow",
      "Principal": {
        "AWS": "arn:aws:iam::YOUR_ACCOUNT_ID:user/opensearch-admin"
      },
      "Action": "sts:AssumeRole"
    },
    {
      "Effect": "Allow",
      "Principal": {
        "Federated": "cognito-identity.amazonaws.com"
      },
      "Action": "sts:AssumeRoleWithWebIdentity",
      "Condition": {
        "StringEquals": {
          "cognito-identity.amazonaws.com:aud": " IDENTITY_POOL_ID"
        },
        "ForAnyValue:StringLike": {
          "cognito-identity.amazonaws.com:amr": "authenticated"
        }
      }
    }
  ]
}
```
  1. Choose Update policy to save the trust relationship configuration.

Create and configure Amazon Cognito identity pool

The identity pool serves as a bridge between your Cognito user pool authentication and AWS IAM roles so that authenticated users can assume specific IAM permissions when accessing your OpenSearch Service domain. This configuration is essential for mapping Cognito authenticated users to the appropriate OpenSearch Service access permissions. This step primarily configures administrative access to the OpenSearch Dashboards, allowing domain administrators to manage users, roles, and domain settings through a secure web interface. Follow these steps:

  1. Navigate to Identity pools on the Amazon Cognito console and choose Create identity pool to begin the configuration process.
  2. In the Authentication section, configure the types of access your identity pool will support:
    1. Select Authenticated access to enable your identity pool to issue credentials to users who have successfully authenticated through your configured identity providers. This is essential for Cognito authenticated users to be able to access AWS resources.
    2. In the Authenticated identity sources section, choose Amazon Cognito user pool as the authentication source for your identity pool.
  3. Choose Next to proceed to the permissions configuration.
  4. For the Authenticated role, select Use an existing role and choose the OpenSearchMasterRolethat you created in Establish administrative access with IAM master user and role. This assignment grants authenticated users the comprehensive permissions defined in your master role so that they can:
    1. Access and manage your OpenSearch Service domain through the dashboards interface.
    2. Configure security settings and user permissions.
    3. Manage indices and perform administrative operations.
    4. Create and modify OpenSearch Service roles and role mappings.

Amazon Cognito Identity Pool Configuration

This configuration provides full administrative access to your OpenSearch Service domain. Users who authenticate through this Cognito setup will have master-level permissions, making this suitable for domain administrators who need to configure security settings, manage users, and perform maintenance tasks.

  1. Choose Next to continue with identity provider configuration.
  2. From the dropdown list, choose the User pool you created in Create an Amazon Cognito user pool.
  3. Choose the app client you configured in the previous step from the available options in the App client dropdown list.
  4. Keep the default role setting, which will assign the OpenSearchMasterRole to authenticated users from this user pool.
  5. Choose Next.
  6. Provide a descriptive name such as OpenSearchIdentityPool.
  7. Review all configuration settings and choose Create identity pool. Amazon Cognito will provision the identity pool and establish the necessary trust relationships. After creation, copy the identity pool ID.

To update your master role’s trust policy with the identity pool ID, follow these steps:

  1. On the IAM console in the left navigation menu, choose Roles
  2. From the list of roles, find and select OpenSearchMasterRole
  3. Choose the Trust relationships tab and choose Edit trust policy
  4. Replace PLACEHOLDER_IDENTITY_POOL_ID with your identity pool ID from the previous step
  5. To finalize the configuration, choose Update policy

Your authentication infrastructure is now configured to provide secure, administrative access to OpenSearch Dashboards through Amazon Cognito authentication. Users who authenticate through the Cognito user pool will assume the master role and gain full administrative capabilities for your OpenSearch Service domain.

Enable Amazon Cognito authentication for OpenSearch Dashboards

After setting up your Cognito user pool, app client, and identity pool, the next step is to configure your OpenSearch Service domain to use Cognito authentication for OpenSearch Dashboards. Follow these steps:

  1. Navigate to the Amazon OpenSearch Service console
  2. Select the name of the domain that you previously created
  3. Choose the Security configuration tab and choose Edit
  4. Scroll to the Amazon Cognito authentication section and select Enable Amazon Cognito authentication, as shown in the following screenshot
  5. You’ll be prompted to provide the following:
    1. Cognito user pool ID: Enter the user pool ID you created in a previous step
    2. Cognito identity pool ID: Enter the identity pool ID you created
  6. Review your settings and choose Save changes

Enabling Cognito Authentication within OpenSearch

The domain will update its configuration, which might take several minutes. You’ll receive a progress pop-up, as shown in the following screenshot.

Amazon OpenSearch Domain Configuration Change

Create a k-NN vector index in OpenSearch Service

This step involves creating a vector search–enabled index in your OpenSearch Service domain for Amazon Bedrock to store document embedding vectors, text chunks, and metadata. The index must contain three essential fields: an embedding vector field that stores numerical representations of your content (in floating-point or binary format), a text field that holds the raw text chunks, and a field for Amazon Bedrock managed metadata where Amazon Bedrock tracks critical information such as document IDs and source attributions. With proper index mapping, Amazon Bedrock Knowledge Bases can efficiently store and retrieve the components of your document data.

You create this index using the Dev Tools feature in OpenSearch Dashboards. To access Dev Tools in OpenSearch Dashboards, follow these steps:

  1. Sign in to your OpenSearch Dashboards account
  2. Navigate to your OpenSearch Dashboards URL
  3. You’ll be redirected to the Cognito sign-in page
  4. Sign in using the admin user credentials you created in the Add an admin user to the user pool section
  5. Enter the email address you provided (admin@example.com)
  6. Enter your password (if this is your first sign-in, you’ll be prompted to create a permanent password)
  7. After successful authentication, you’ll be directed to the OpenSearch Dashboards home page
  8. In the left navigation pane under the Management group, choose Dev Tools
  9. Confirm you’re on the Console page, as shown in the following screenshot, where you’ll enter API commands

Amazon OpenSearch Dashboard

To define and create the index copy the following command into the Dev Tools console and replace bedrock-kb-index with your preferred index name if needed. If you’re setting up a binary vector index (for example, to use binary embeddings with Amazon Titan Text Embeddings V2), include the additional required fields in your index mapping:

  • Set “data_type“: “binary” for the vector field
  • Set “space_type“: “hamming” (instead of “l2”, which is used for float embeddings)

For more details, refer to the Amazon Bedrock Knowledge Bases setup documentation.

PUT /bedrock-kb-index
{
  "settings": {
    "index": {
      "knn": true
    }
  },
  "mappings": {
    "properties": {
      "embeddings": {
        "type": "knn_vector",
        "dimension": <<embeddings size depending on embedding model used>>,
        "space_type": "l2",
        "method": {
          "name": "hnsw",
          "engine": "faiss",
          "parameters": {
            "ef_construction": 128,
            "m": 24
          }
        }
      },
      "AMAZON_BEDROCK_TEXT_CHUNK": {
        "type": "text",
        "index": true
      },
      "AMAZON_BEDROCK_METADATA": {
        "type": "text",
        "index": false
      }
    }
  }
}

The key components of this index mapping are:

  1. k-NN enablement – Activates k-NN functionality in the index settings, allowing the use of knn_vector field type.
  2. Vector field configuration – Defines the embeddings field for storing vector data, specifying dimension, space type, and data type based on the chosen embedding model. It’s critical to match the dimension with the embedding model’s output. Amazon Bedrock Knowledge Bases offers models such as Amazon Titan Embeddings V2 (with 256, 512, or 1,024 dimensions) and Cohere Embed (1,024 dimensions). For example, using Amazon Titan Embeddings V2 with 1,024 dimensions requires setting dimension: 1024 in the mapping. A mismatch between the model’s vector size and index mapping will cause ingestion failures, so it’s crucial to verify this value.
  3. Vector method setup – Configures the hierarchical navigable small world (HNSW) algorithm with the Faiss engine, setting parameters for balancing index build speed and accuracy. Amazon Bedrock Knowledge Bases integration specifically requires the Faiss engine for OpenSearch Service k-NN index.
  4. Text chunk storage – Establishes a field for storing raw text chunks from documents, enabling potential full-text queries.
  5. Metadata field – Creates a field for Amazon Bedrock managed metadata, storing essential information without indexing for direct searches.

After pasting the command into the Dev Tools console, choose Run. If successful, you’ll receive a response similar to the one shown in the following screenshot.

Amazon OpenSearch Dashboard Index Creation

Now, you should have a new index (for example, named bedrock-kb-index) on your domain with the preceding mapping. Make a note of the index name you created, the vector field name (embeddings), the text field name (AMAZON_BEDROCK_TEXT_CHUNK), and the metadata field name (AMAZON_BEDROCK_METADATA). In the next steps, you’ll grant Amazon Bedrock permission to use this index and then plug these details into the Amazon Bedrock Knowledge Bases setup.

With the vector index successfully created, your OpenSearch Service domain is now ready to store and retrieve embedding vectors. Next, you’ll configure IAM roles and access policies to facilitate secure interaction between Amazon Bedrock and your OpenSearch Service domain.

Initiate Amazon Bedrock knowledge base creation

Now that your OpenSearch Service domain and vector index are ready, it’s time to configure an Amazon Bedrock knowledge base to use this vector store. In this step, you will:

  1. Begin creating a new knowledge base in the Amazon Bedrock console
  2. Configure it to use your existing OpenSearch Service domain as a vector store

We will pause the knowledge base creation midway to update OpenSearch Service access policies before finalizing the setup.

To create the Amazon Bedrock knowledge base in the console, follow these steps. For detailed instructions, refer to Create a knowledge base by connecting to a data source in Amazon Bedrock Knowledge Bases in the AWS documentation. The following steps provide a streamlined overview of the general process:

  1. On the Amazon Bedrock Console, go to Knowledge Bases and choose Create with vector store.
  2. Enter a name and description and choose Create and use a new service role for the runtime role. Choose Amazon S3 as the data source for the knowledge base.
  3. Provide the details for the data source, including data source name, location, Amazon S3 URI, and keep the parsing and chunking strategies as default.
  4. Choose Amazon Titan Embeddings v2 as your embeddings model to convert your data. Make sure the embeddings dimensions match what you configured in your index mappings in the Create an OpenSearch Service domain for vector search section because mismatches will cause the integration to fail.

To configure OpenSearch Service Managed Cluster as the vector store, follow these steps:

  1. Under Vector database, select Use an existing vector store and for Vector store, select OpenSearch Service Managed Cluster, as shown in the following screenshot

Bedrock Knowledge Base Vector Store Configuration

  1. Enter the details from your OpenSearch Service domain setup in the following fields, as shown in the following screenshot:
    1. Domain ARN: Provide the ARN of your OpenSearch Service domain.
    2. Domain endpoint: Enter the endpoint URL of your OpenSearch Service domain.
    3. Vector index name: Specify the name of the vector index created in your OpenSearch Service domain.
    4. Vector field name
    5. Text field name
    6. Bedrock-managed metadata field name

Bedrock Knowledge Base Configuration with OpenSearch Details

You must not choose Create yet. Amazon Bedrock will be ready to create the knowledge base, but you need to configure OpenSearch Service access permissions first. Copy the ARN of the new IAM service role that Amazon Bedrock will use for this knowledge base (the console will display the role ARN you selected or just created). Keep this ARN handy and leave the Amazon Bedrock console open (pause the creation process here).

Configure fine-grained access control permissions in OpenSearch Service

With the IAM service role ARN copied, configure fine-grained permissions in the OpenSearch dashboard. Fine-grained access control provides role-based permission management at a granular level (indices, documents, and fields), so that your Amazon Bedrock knowledge base has precisely controlled access. Follow these steps:

  1. On the OpenSearch Service console, navigate to your OpenSearch Service domain.
  2. Choose the URL for OpenSearch Dashboards. It typically looks like: https://<your-domain-endpoint>/_dashboards/
  3. From the OpenSearch Dashboards interface, in the left navigation pane, choose Security, then choose Roles.
  4. Choose Create role and provide a meaningful name, such as bedrock-knowledgebase-role.
  5. Under Cluster Permissions, enter the following permissions necessary for Amazon Bedrock operations, as shown in the following screenshot:
indices:data/read/msearch
indices:data/write/bulk*
indices:data/read/mget*

Amazon OpenSearch Dashboard Role Creation

  1. Under Index permissions:
    1. Specify the exact vector index name you created previously (for example, bedrock-kb-index).
    2. Choose Create new permission group, then choose Create new action group.
    3. Add the following specific permissions, essential for Amazon Bedrock Knowledge Bases:
      indices:admin/get indices:data/read/msearch 
      indices:data/read/search indices:data/write/index 
      indices:data/write/update indices:data/write/delete 
      indices:data/write/delete/byquery indices:data/write/bulk* 
      indices:admin/mapping/put indices:data/read/mget*

    4. Confirm by choosing Create.

To map the Amazon Bedrock IAM service role (copied earlier) to the newly created OpenSearch Service role, follow these steps:

  1. In OpenSearch Dashboards, navigate to Security and then Roles.
  2. Locate and open the role you created in the previous step (bedrock-knowledgebase-role).
  3. Choose the Mapped users tab and choose Manage mapping, as shown in the following screenshot.
  4. In the Backend roles section, paste the knowledge base’s service role ARN you copied from Amazon Bedrock (for example, arn:aws:iam::<accountId>:role/service-role/BedrockKnowledgeBaseRole). When mapping this IAM role to an OpenSearch Service role, the IAM role doesn’t need to exist in your AWS account at the time of mapping. You’re referencing its ARN to establish the association within the OpenSearch backend. This allows OpenSearch Service to recognize and authorize the role when it’s eventually created and used. Make sure that the ARN is correctly specified to facilitate proper permission mapping.​
  5. Choose Map to finalize the connection between the IAM role and OpenSearch Service permissions.

Amazon OpenSearch Dashboard Role Mapping

Complete knowledge base creation and verify resource-based policy

With fine-grained permissions in place, return to the paused Amazon Bedrock console to finalize your knowledge base setup. Confirm that all OpenSearch Service domain details are correctly entered, including the domain endpoint, domain ARN, index name, vector field name, text field name, and metadata field name. Choose Create knowledge base.

Amazon Bedrock will use the configured IAM service role to securely connect to your OpenSearch Service domain. After the setup is complete, the knowledge base status should change to Available, confirming successful integration.

Understanding access policies

When integrating OpenSearch Service Managed Cluster with Amazon Bedrock Knowledge Bases, it’s important to understand how access control works across different layers.

For same-account configurations (where both the knowledge base and OpenSearch Service domain are in the same AWS account), no updates to the OpenSearch Service domain’s resource-based policy are required as long as fine-grained access control is enabled and your IAM role is correctly mapped. In this case, IAM permissions and fine-grained access control mappings are sufficient to authorize access. However, if the domain’s resource-based policy includes deny statements targeting your knowledge base service role or principals, access will be blocked—regardless of IAM or fine-grained access control settings. To avoid unintended failures, make sure the policy doesn’t explicitly restrict access to the Amazon Bedrock Knowledge Bases service role.

For cross-account access (when the IAM role used by Amazon Bedrock Knowledge Bases belongs to a different AWS account than the OpenSearch Service domain), you must include an explicit allow statement in the domain’s resource-based policy for the external role. Without this, access will be denied even if all other permissions are correctly configured.

Bedrock Knowledge Base Sync Job

To begin using your knowledge base, select your configured data source and initiate the sync process. This action starts the ingestion of your Amazon S3 data. After synchronization is complete, your knowledge base is ready for information retrieval.

Conclusion

Integrating Amazon Bedrock Knowledge Bases with OpenSearch Service Managed Cluster offers a powerful solution for vector storage and retrieval in AI applications. In this post, we walked you through the process of setting up an OpenSearch Service domain, configuring a vector index, and connecting it to an Amazon Bedrock knowledge base. With this setup, you’re now equipped to use the full potential of vector search capabilities in your AI-driven applications, enhancing your ability to process and retrieve information from large datasets efficiently.

Get started with Amazon Bedrock Knowledge Bases and let us know your thoughts in the comments section.


About the authors

Manoj Selvakumar is a Generative AI Specialist Solutions Architect at AWS, where he helps startups design, prototype, and scale intelligent, agent-driven applications using Amazon Bedrock. He works closely with founders to turn ambitious ideas into production-ready solutions—bridging startup agility with the advanced capabilities of AWS’s generative AI ecosystem. Before joining AWS, Manoj led the development of data science solutions across healthcare, telecom, and enterprise domains. He has delivered end-to-end machine learning systems backed by solid MLOps practices—enabling scalable model training, real-time inference, continuous evaluation, and robust monitoring in production environments.

Mani Khanuja is a Tech Lead – Generative AI Specialists, author of the book Applied Machine Learning and High-Performance Computing on AWS, and a member of the Board of Directors for Women in Manufacturing Education Foundation Board. She leads machine learning projects in various domains such as computer vision, natural language processing, and generative AI. She speaks at internal and external conferences such AWS re:Invent, Women in Manufacturing West, YouTube webinars, and GHC 23. In her free time, she likes to go for long runs along the beach.

Dani Mitchell is a Generative AI Specialist Solutions Architect at AWS. He is focused on helping accelerate enterprises across the world on their generative AI journeys with Amazon Bedrock.

Juan Camilo Del Rio Cuervo is a Software Developer Engineer at Amazon Bedrock Knowledge Bases team. He is focused on building and improving RAG experiences for AWS customers.

Read More

Amazon Bedrock Knowledge Bases now supports Amazon OpenSearch Service Managed Cluster as vector store

Amazon Bedrock Knowledge Bases now supports Amazon OpenSearch Service Managed Cluster as vector store

Amazon Bedrock Knowledge Bases has extended its vector store options by enabling support for Amazon OpenSearch Service managed clusters, further strengthening its capabilities as a fully managed Retrieval Augmented Generation (RAG) solution. This enhancement builds on the core functionality of Amazon Bedrock Knowledge Bases , which is designed to seamlessly connect foundation models (FMs) with internal data sources. Amazon Bedrock Knowledge Bases automates critical processes such as data ingestion, chunking, embedding generation, and vector storage, and the application of advanced indexing algorithms and retrieval techniques, empowering users to develop intelligent applications with minimal effort.

The latest update broadens the vector database options available to users. In addition to the previously supported vector stores such as Amazon OpenSearch Serverless, Amazon Aurora PostgreSQL-Compatible Edition, Amazon Neptune Analytics, Pinecone, MongoDB, and Redis Enterprise Cloud, users can now use OpenSearch Service managed clusters. This integration enables the use of an OpenSearch Service domain as a robust backend for storing and retrieving vector embeddings, offering greater flexibility and choice in vector storage solutions.

To help users take full advantage of this new integration, this post provides a comprehensive, step-by-step guide on integrating an Amazon Bedrock knowledge base with an OpenSearch Service managed cluster as its vector store.

Why use OpenSearch Service Managed Cluster as a vector store?

OpenSearch Service provides two complementary deployment options for vector workloads: managed clusters and serverless collections. Both harness the powerful vector search and retrieval capabilities of OpenSearch Service, though each excels in different scenarios. Managed clusters offer extensive configuration flexibility, performance tuning options, and scalability that make them particularly well-suited for enterprise-grade AI applications.Organizations seeking greater control over cluster configurations, compute instances, the ability to fine-tune performance and cost, and support for a wider range of OpenSearch features and API operations will find managed clusters a natural fit for their use cases. Alternatively, OpenSearch Serverless excels in use cases that require automatic scaling and capacity management, simplified operations without the need to manage clusters or nodes, automatic software updates, and built-in high availability and redundancy. The optimal choice depends entirely on specific use case, operational model, and technical requirements. Here are some key reasons why OpenSearch Service managed clusters offer a compelling choice for organizations:

  • Flexible configuration – Managed clusters provide flexible and extensive configuration options that enable fine-tuning for specific workloads. This includes the ability to select instance types, adjust resource allocations, configure cluster topology, and implement specialized performance optimizations. For organizations with specific performance requirements or unique workload characteristics, this level of customization can be invaluable.
  • Performance and cost optimizations to meet your design criteria – Vector database performance is a trade-off between three key dimensions: accuracy, latency, and cost. Managed Cluster provides the granular control to optimize along one or a combination of these dimensions and meet the specific design criteria.
  • Early access to advanced ML features – OpenSearch Service follows a structured release cycle, with new capabilities typically introduced first in the open source project, then in managed clusters, and later in serverless offerings. Organizations that prioritize early adoption of advanced vector search capabilities might benefit from choosing managed clusters, which often provide earlier exposure to new innovation. However, for customers using Amazon Bedrock Knowledge Bases, these features become beneficial only after they have been fully integrated into the knowledge bases. This means that even if a feature is available in a managed OpenSearch Service cluster, it might not be immediately accessible within Amazon Bedrock Knowledge Bases. Nonetheless, opting for managed clusters positions organizations to take advantage of the latest OpenSearch advancements more promptly after they’re supported within Bedrock Knowledge Bases.

Prerequisites

Before we dive into the setup, make sure you have the following prerequisites in place:

  1. Data source – An Amazon S3 bucket (or custom source) with documents for knowledge base ingestion. We will assume your bucket contains supported documents types (PDFs, TXTs, etc.) for retrieval.
  2. OpenSearch Service domain (optional) – For existing domains, make sure it’s in the same Region and account where you’ll create your Amazon Bedrock knowledge base. As of this writing, Bedrock Knowledge Bases requires OpenSearch Service domains with public access; virtual private cloud (VPC)-only domains aren’t supported yet. Make sure you have the necessary permissions to create or configure domains. This guide covers setup for both new and existing domains.

Solution overview

This section covers the following high-level steps to integrate an OpenSearch Service managed cluster with Amazon Bedrock Knowledge Bases:

  1. Create an OpenSearch Service domain – Set up a new OpenSearch Service managed cluster with public access, appropriate engine version, and security settings, including AWS Identity and Access Management (IAM) master user role and fine-grained access control. This step includes establishing administrative access by creating dedicated IAM resources and configuring Amazon Cognito authentication for secure dashboard access.
  2. Configure a vector index in OpenSearch Service – Create a k-nearest neighbors (k-NN) enabled index on the domain with the appropriate mappings for vector, text chunk, and metadata fields to be compatible with Amazon Bedrock Knowledge Bases.
  3. Configure the Amazon Bedrock knowledge base – Initiate the creation of an Amazon Bedrock knowledge base, enable your Amazon Simple Storage Service (Amazon S3) data source, and configure it to use your OpenSearch Service domain as the vector store with all relevant domain details.
  4. Configure fine-grained access control permissions in OpenSearch Service – Configure fine-grained access control in OpenSearch Service by creating a role with specific permissions and mapping it to the Amazon Bedrock IAM service role, facilitating secure and controlled access for the knowledge base.
  5. Complete knowledge base creation and ingest data – Initiate a sync operation in the Amazon Bedrock console to process S3 documents, generate embeddings, and store them in your OpenSearch Service index.

The following diagram illustrates these steps:

Step-by-step workflow for implementing Amazon OpenSearch Service managed cluster as vector store with Bedrock Knowledge Bases

Solution walkthrough

Here are the steps to follow in the AWS console to integrate Amazon Bedrock Knowledge Bases with OpenSearch Service Managed Cluster.

Establish administrative access with IAM master user and role

Before creating an OpenSearch Service domain, you need to create two key IAM resources: a dedicated IAM admin user and a master role. This approach facilitates proper access management for your OpenSearch Service domain, particularly when implementing fine-grained access control, which is strongly recommended for production environments. This user and role will have the necessary permissions to create, configure, and manage the OpenSearch Service domain and its integration with Amazon Bedrock Knowledge Bases.

Create an IAM admin user

The administrative user serves as the principal account for managing the OpenSearch Service configuration. To create an IAM admin user, follow these steps:

  1. Open the IAM console in your AWS account
  2. In the left navigation pane, choose Users and then choose Create user
  3. Enter a descriptive username like <opensearch-admin>
  4. On the permissions configuration page, choose Attach policies directly
  5. Search for and attach the AmazonOpenSearchServiceFullAccess managed policy, which grants comprehensive permissions for OpenSearch Service operations
  6. Review your settings and choose Create user

After creating the user, copy and save the user’s Amazon Resource name (ARN) for later use in domain configuration, replacing <ACCOUNT_ID> with your AWS account ID.

The ARN will look like this:

arn:aws:iam::<ACCOUNT_ID>:user/opensearch-admin

Create an IAM role to act as the OpenSearch Service master user

With OpenSearch Service, you can assign a master user for domains with fine-grained access control. By configuring an IAM role as the master user, you can manage access using trusted principles and avoid static usernames and passwords. To create the IAM role, follow these steps:

  1. On the IAM console, in the left-hand navigation pane, choose Roles and then choose Create role
  2. Choose Custom trust policy as the trusted entity type to precisely control which principals can assume this role
  3. In the JSON editor, paste the following trust policy that allows entities, such as your opensearch-admin user, to assume this role
   {
     "Version": "2012-10-17",
     "Statement": [
       {
         "Effect": "Allow",
         "Principal": {
           "AWS": "arn:aws:iam::<ACCOUNT_ID>:user/opensearch-admin"
         },
         "Action": "sts:AssumeRole"
       }
     ]
   }
  1. Proceed to the Add permissions page and attach the same AmazonOpenSearchServiceFullAccess managed policy you used for your admin user
  2. Provide a descriptive name such as OpenSearchMasterRole and choose Create role

After the role is created, navigate to its summary page and copy the role’s ARN. You’ll need this ARN when configuring your OpenSearch Service domain’s master user.

arn:aws:iam:: <ACCOUNT_ID>:role/OpenSearchMasterRole

Create an OpenSearch Service domain for vector search

With the administrative IAM role established, the next step is to create the OpenSearch Service domain that will serve as the vector store for your Amazon Bedrock knowledge base. This involves configuring the domain’s engine, network access, and, most importantly, its security settings using fine-grained access control.

  1. In the OpenSearch Service console, select Managed clusters as your deployment type. Then choose Create domain.
  2. Configure your domain details:
    1. Provide a domain name such as bedrock-kb-domain.
    2. For a quick and straightforward setup, choose Easy create, as shown in the following screenshot. This option automatically selects suitable instance types and default configurations optimized for development or small-scale workloads. This way, you can quickly deploy a functional OpenSearch Service domain without manual configuration. Many of these settings can be modified later as your needs evolve, making this approach ideal for experimentation or nonproduction use cases while still providing a solid foundation.

Amazon OpenSearch Domain Creation

If your workload demands higher input/output operations per second (IOPS) or throughput or involves managing substantial volumes of data, selecting Standard create is recommended. With this option enabled, you can customize instance types, storage configurations, and advanced security settings to optimize the speed and efficiency of data storage and retrieval operations, making it well-suited for production environments. For example, you can scale the baseline GP3 volume performance from 3,000 IOPS and 125 MiB/s throughput up to 16,000 IOPS and 1,000 MiB/s throughput for every 3 TiB of storage provisioned per data node. This flexibility means that you can align your OpenSearch Service domain performance with specific workload demands, facilitating efficient indexing and retrieval operations for high-throughput or large-scale applications. These settings should be fine-tuned based on the size and complexity of your OpenSearch Service workload to optimize both performance and cost.

However, although increasing your domain’s throughput and storage settings can help improve domain performance—and might help mitigate ingestion errors caused by storage or node-level bottlenecks—it doesn’t increase the ingestion speed into Amazon Bedrock Knowledge Bases as of this writing. Knowledge base ingestion operates at a fixed throughput rate for customers and vector databases, regardless of underlying domain configuration. AWS continues to invest in scaling and evolving the ingestion capabilities of Bedrock Knowledge Bases, and future improvements might offer greater flexibility.

  1. For engine version, choose OpenSearch version 2.13 or higher. If you plan to store binary embeddings, select version 2.16 or above because it’s required for binary vector indexing. It’s recommended to use the latest available version to benefit from performance improvements and feature updates.
  2. For network configuration, under Network, choose Public access, as shown in the following screenshot. This is crucial because, as of this writing, Amazon Bedrock Knowledge Bases doesn’t support connecting to OpenSearch Service domains that are behind a VPC. To maintain security, we implement IAM policies and fine-grained access controls to manage access at a granular level. Using these controls, you can define who can access your resources and what actions they can perform, adhering to the principle of least privilege. Select Dual-stack mode for network settings if prompted. This enables support for both IPv4 and IPv6, offering greater compatibility and accessibility.

Amazon OpenSearch Domain Network Access Configuration

  1. For security, enable Fine-grained access control to secure your domain by defining detailed, role-based permissions at the index, document, and field levels. This feature offers more precise control compared to resource-based policies, which operate only at the domain level.

In the fine-grained access control implementation section, we guide you through creating a custom OpenSearch Service role with specific index and cluster permissions, then authorizing Amazon Bedrock Knowledge Bases by associating its service role with this custom role. This mapping establishes a trust relationship that restricts Bedrock Knowledge Bases to only the operations you’ve explicitly permitted when accessing your OpenSearch Service domain with its service credentials, facilitating secure and controlled integration.

When enabling fine-grained access control, you must select a master user to manage the domain. You have two options:

    • Create master user (Username and Password) – This option establishes credentials in OpenSearch Service internal user database, providing quick setup and direct access to OpenSearch Dashboards using basic authentication. Although convenient for initial configuration or development environments, it requires careful management of these credentials as a separate identity from your AWS infrastructure.
    • Set IAM ARN as master user – This option integrates with the AWS identity landscape, allowing IAM based authentication. This is strongly recommended for production environments where applications and services already rely on IAM for secure access and where you need auditability and integration with your existing AWS security posture.

For this walkthrough, we choose Set IAM ARN as master user. This is the recommended approach for production environments because it integrates with your existing AWS identity framework, providing better auditability and security management.

In the text box, paste the ARN of the OpenSearchMasterRole that you created in the first step, as shown in the following screenshot. This designates the IAM role as the superuser for your OpenSearch Service domain, granting it full permissions to manage users, roles, and permissions within OpenSearch Dashboards.

Amazon OpenSearch Domain FGAC

Although setting an IAM master user is ideal for programmatic access, it’s not convenient for allowing users to log in to the OpenSearch Dashboards. In a subsequent step, after the domain is created and we’ve configured Cognito resources, we’ll revisit this security configuration to enable Amazon Cognito authentication. Then you’ll be able to create a user-friendly login experience for the OpenSearch Dashboards, where users can sign in through a hosted UI and be automatically mapped to IAM roles (such as the MasterUserRole or more limited roles), combining ease of use with robust, role-based security. For now, proceed with the IAM ARN as the master user to complete the initial domain setup.

  1. Review your settings and choose Create to launch the domain. The initialization process typically takes around 10–15 minutes. During this time, OpenSearch Service will set up the domain and apply your configurations.

After your domain becomes active, navigate to its detail page to retrieve the following information:

  • Domain endpoint – This is the HTTPS URL where your OpenSearch Service is accessible, typically following the format: https://search-<domain-name>-<unique-identifier>.<region>.es.amazonaws.com
  • Domain ARN – This uniquely identifies your domain and follows the structure: arn:aws:es:<region>:<account-id>:domain/<domain-name>

Make sure to copy and securely store both these details because you’ll need them when configuring your Amazon Bedrock knowledge base in subsequent steps. With the OpenSearch Service domain up and running, you now have an empty cluster ready to store your vector embeddings. Next, we move on to configuring a vector index within this domain.

Create an Amazon Cognito user pool

Following the creation of your OpenSearch Service domain, the next step is to configure an Amazon Cognito user pool. This user pool will provide a secure and user-friendly authentication layer for accessing the OpenSearch Dashboards. Follow these steps:

  1. Navigate to the Amazon Cognito console and choose User pools from the main dashboard. Choose Create user pool to begin the configuration process. The latest developer-focused console experience presents a unified application setup interface rather than the traditional step-by-step wizard.
  2. For OpenSearch Dashboards integration, choose Traditional web application. This application type supports the authentication flow required for dashboard access and can securely handle the OAuth flows needed for the integration.
  3. Enter a descriptive name in the Name your application field, such as opensearch-kb-app. This name will automatically become your app client name.
  4. Configure how users will authenticate with your system. For OpenSearch integration, select Email as the primary sign-in option. This allows users to sign up and sign in using their email addresses, providing a familiar authentication method. Additional options include Phone number and Username if your use case requires alternative sign-in methods.
  5. Specify the user information that must be collected during registration. At minimum, make sure Email is selected as a required attribute. This is essential for account verification and recovery processes.
  6. This step is a critical security configuration that specifies where Cognito can redirect users after successful authentication. In the Add a return URL field, enter your OpenSearch Dashboards URL in the following format: https://search-<domain-name>-<unique-identifier>.aos.<region>.on.aws/_dashboards.
  7. Choose Create user directory to provision your user pool and its associated app client.

The simplified interface automatically configures optimal settings for your selected application type, including appropriate security policies, OAuth flows, and hosted UI domain generation. Copy and save the User pool ID and App client ID values. You’ll need them to configure the Cognito identity pool and update the OpenSearch Service domain’s security settings.

Add an admin user to the user pool

After creating your Amazon Cognito user pool, you need to add an administrator user who will have access to OpenSearch Dashboards. Follow these steps:

  1. In the Amazon Cognito console, select your newly created user pool
  2. In the left navigation pane, choose Users
  3. Choose Create user
  4. Select Send an email invitation
  5. Enter an Email address for the administrator, for example, admin@example.com
  6. Choose whether to set a Temporary password or have Cognito generate one
  7. Choose Create user

Amazon Cognito User Creation

Upon the administrator’s first login, they’ll be prompted to create a permanent password. When all the subsequent setup steps are complete, this admin user will be able to authenticate to OpenSearch Dashboards.

Configure app client settings

With your Amazon Cognito user pool created, the next step is to configure app client parameters that will enable seamless integration with your OpenSearch dashboard. The app client configuration defines how OpenSearch Dashboards will interact with the Cognito authentication system, including callback URLs, OAuth flows, and scope permissions. Follow these steps:

  1. Navigate to your created user pool on the Amazon Cognito console and locate your app client in the applications list. Select your app client to access its configuration dashboard.
  2. Choose the Login tab from the app client interface. This section displays your current managed login pages configuration, including callback URLs, identity providers, and OAuth settings.
  3. To open the OAuth configuration interface, in the Managed login pages configuration section, choose Edit.
  4. Add your OpenSearch Dashboards URL in the Allowed callback URLs section from the Create an Amazon Cognito user pool section.
  5. To allow authentication using your user pool credentials, in the Identity providers dropdown list, select Cognito user pool.
  6. Select Authorization code grant from the OAuth 2.0 grant types dropdown list. This provides the most secure OAuth flow for web applications by exchanging authorization codes for access tokens server-side.
  7. Configure OpenID Connect scopes by selecting the appropriate scopes from the available options:
    1. Email: Enables access to user email addresses for identification.
    2. OpenID: Provides basic OpenID Connect (OIDC) functionality.
    3. Profile: Allows access to user profile information.

Save the configuration by choosing Save changes at the bottom of the page to apply the OAuth settings to your app client. The system will validate your configuration and confirm the updates have been successfully applied.

Update master role trust policy for Cognito integration

Before creating the Cognito identity pool, you must first update your existing OpenSearchMasterRoleto trust the Cognito identity service. This is required because only IAM roles with the proper trust policy for cognito-identity.amazonaws.com will appear in the Identity pool role selection dropdown list. Follow these steps:

  1. Navigate to IAM on the console.
  2. In the left navigation menu, choose Roles.
  3. Find and select OpenSearchMasterRole from the list of roles.
  4. Choose the Trust relationships tab.
  5. Choose Edit trust policy.
  6. Replace the existing trust policy with the following configuration that includes both your IAM user access and Cognito federated access. Replace YOUR_ACCOUNT_ID with your AWS account number. Leave PLACEHOLDER_IDENTITY_POOL_ID as is for now. You’ll update this in Step 6 after creating the identity pool:
```
{
  "Version": "2012-10-17",
  "Statement": [
    {
      "Effect": "Allow",
      "Principal": {
        "AWS": "arn:aws:iam::YOUR_ACCOUNT_ID:user/opensearch-admin"
      },
      "Action": "sts:AssumeRole"
    },
    {
      "Effect": "Allow",
      "Principal": {
        "Federated": "cognito-identity.amazonaws.com"
      },
      "Action": "sts:AssumeRoleWithWebIdentity",
      "Condition": {
        "StringEquals": {
          "cognito-identity.amazonaws.com:aud": " IDENTITY_POOL_ID"
        },
        "ForAnyValue:StringLike": {
          "cognito-identity.amazonaws.com:amr": "authenticated"
        }
      }
    }
  ]
}
```
  1. Choose Update policy to save the trust relationship configuration.

Create and configure Amazon Cognito identity pool

The identity pool serves as a bridge between your Cognito user pool authentication and AWS IAM roles so that authenticated users can assume specific IAM permissions when accessing your OpenSearch Service domain. This configuration is essential for mapping Cognito authenticated users to the appropriate OpenSearch Service access permissions. This step primarily configures administrative access to the OpenSearch Dashboards, allowing domain administrators to manage users, roles, and domain settings through a secure web interface. Follow these steps:

  1. Navigate to Identity pools on the Amazon Cognito console and choose Create identity pool to begin the configuration process.
  2. In the Authentication section, configure the types of access your identity pool will support:
    1. Select Authenticated access to enable your identity pool to issue credentials to users who have successfully authenticated through your configured identity providers. This is essential for Cognito authenticated users to be able to access AWS resources.
    2. In the Authenticated identity sources section, choose Amazon Cognito user pool as the authentication source for your identity pool.
  3. Choose Next to proceed to the permissions configuration.
  4. For the Authenticated role, select Use an existing role and choose the OpenSearchMasterRolethat you created in Establish administrative access with IAM master user and role. This assignment grants authenticated users the comprehensive permissions defined in your master role so that they can:
    1. Access and manage your OpenSearch Service domain through the dashboards interface.
    2. Configure security settings and user permissions.
    3. Manage indices and perform administrative operations.
    4. Create and modify OpenSearch Service roles and role mappings.

Amazon Cognito Identity Pool Configuration

This configuration provides full administrative access to your OpenSearch Service domain. Users who authenticate through this Cognito setup will have master-level permissions, making this suitable for domain administrators who need to configure security settings, manage users, and perform maintenance tasks.

  1. Choose Next to continue with identity provider configuration.
  2. From the dropdown list, choose the User pool you created in Create an Amazon Cognito user pool.
  3. Choose the app client you configured in the previous step from the available options in the App client dropdown list.
  4. Keep the default role setting, which will assign the OpenSearchMasterRole to authenticated users from this user pool.
  5. Choose Next.
  6. Provide a descriptive name such as OpenSearchIdentityPool.
  7. Review all configuration settings and choose Create identity pool. Amazon Cognito will provision the identity pool and establish the necessary trust relationships. After creation, copy the identity pool ID.

To update your master role’s trust policy with the identity pool ID, follow these steps:

  1. On the IAM console in the left navigation menu, choose Roles
  2. From the list of roles, find and select OpenSearchMasterRole
  3. Choose the Trust relationships tab and choose Edit trust policy
  4. Replace PLACEHOLDER_IDENTITY_POOL_ID with your identity pool ID from the previous step
  5. To finalize the configuration, choose Update policy

Your authentication infrastructure is now configured to provide secure, administrative access to OpenSearch Dashboards through Amazon Cognito authentication. Users who authenticate through the Cognito user pool will assume the master role and gain full administrative capabilities for your OpenSearch Service domain.

Enable Amazon Cognito authentication for OpenSearch Dashboards

After setting up your Cognito user pool, app client, and identity pool, the next step is to configure your OpenSearch Service domain to use Cognito authentication for OpenSearch Dashboards. Follow these steps:

  1. Navigate to the Amazon OpenSearch Service console
  2. Select the name of the domain that you previously created
  3. Choose the Security configuration tab and choose Edit
  4. Scroll to the Amazon Cognito authentication section and select Enable Amazon Cognito authentication, as shown in the following screenshot
  5. You’ll be prompted to provide the following:
    1. Cognito user pool ID: Enter the user pool ID you created in a previous step
    2. Cognito identity pool ID: Enter the identity pool ID you created
  6. Review your settings and choose Save changes

Enabling Cognito Authentication within OpenSearch

The domain will update its configuration, which might take several minutes. You’ll receive a progress pop-up, as shown in the following screenshot.

Amazon OpenSearch Domain Configuration Change

Create a k-NN vector index in OpenSearch Service

This step involves creating a vector search–enabled index in your OpenSearch Service domain for Amazon Bedrock to store document embedding vectors, text chunks, and metadata. The index must contain three essential fields: an embedding vector field that stores numerical representations of your content (in floating-point or binary format), a text field that holds the raw text chunks, and a field for Amazon Bedrock managed metadata where Amazon Bedrock tracks critical information such as document IDs and source attributions. With proper index mapping, Amazon Bedrock Knowledge Bases can efficiently store and retrieve the components of your document data.

You create this index using the Dev Tools feature in OpenSearch Dashboards. To access Dev Tools in OpenSearch Dashboards, follow these steps:

  1. Sign in to your OpenSearch Dashboards account
  2. Navigate to your OpenSearch Dashboards URL
  3. You’ll be redirected to the Cognito sign-in page
  4. Sign in using the admin user credentials you created in the Add an admin user to the user pool section
  5. Enter the email address you provided (admin@example.com)
  6. Enter your password (if this is your first sign-in, you’ll be prompted to create a permanent password)
  7. After successful authentication, you’ll be directed to the OpenSearch Dashboards home page
  8. In the left navigation pane under the Management group, choose Dev Tools
  9. Confirm you’re on the Console page, as shown in the following screenshot, where you’ll enter API commands

Amazon OpenSearch Dashboard

To define and create the index copy the following command into the Dev Tools console and replace bedrock-kb-index with your preferred index name if needed. If you’re setting up a binary vector index (for example, to use binary embeddings with Amazon Titan Text Embeddings V2), include the additional required fields in your index mapping:

  • Set “data_type“: “binary” for the vector field
  • Set “space_type“: “hamming” (instead of “l2”, which is used for float embeddings)

For more details, refer to the Amazon Bedrock Knowledge Bases setup documentation.

PUT /bedrock-kb-index
{
  "settings": {
    "index": {
      "knn": true
    }
  },
  "mappings": {
    "properties": {
      "embeddings": {
        "type": "knn_vector",
        "dimension": <<embeddings size depending on embedding model used>>,
        "space_type": "l2",
        "method": {
          "name": "hnsw",
          "engine": "faiss",
          "parameters": {
            "ef_construction": 128,
            "m": 24
          }
        }
      },
      "AMAZON_BEDROCK_TEXT_CHUNK": {
        "type": "text",
        "index": true
      },
      "AMAZON_BEDROCK_METADATA": {
        "type": "text",
        "index": false
      }
    }
  }
}

The key components of this index mapping are:

  1. k-NN enablement – Activates k-NN functionality in the index settings, allowing the use of knn_vector field type.
  2. Vector field configuration – Defines the embeddings field for storing vector data, specifying dimension, space type, and data type based on the chosen embedding model. It’s critical to match the dimension with the embedding model’s output. Amazon Bedrock Knowledge Bases offers models such as Amazon Titan Embeddings V2 (with 256, 512, or 1,024 dimensions) and Cohere Embed (1,024 dimensions). For example, using Amazon Titan Embeddings V2 with 1,024 dimensions requires setting dimension: 1024 in the mapping. A mismatch between the model’s vector size and index mapping will cause ingestion failures, so it’s crucial to verify this value.
  3. Vector method setup – Configures the hierarchical navigable small world (HNSW) algorithm with the Faiss engine, setting parameters for balancing index build speed and accuracy. Amazon Bedrock Knowledge Bases integration specifically requires the Faiss engine for OpenSearch Service k-NN index.
  4. Text chunk storage – Establishes a field for storing raw text chunks from documents, enabling potential full-text queries.
  5. Metadata field – Creates a field for Amazon Bedrock managed metadata, storing essential information without indexing for direct searches.

After pasting the command into the Dev Tools console, choose Run. If successful, you’ll receive a response similar to the one shown in the following screenshot.

Amazon OpenSearch Dashboard Index Creation

Now, you should have a new index (for example, named bedrock-kb-index) on your domain with the preceding mapping. Make a note of the index name you created, the vector field name (embeddings), the text field name (AMAZON_BEDROCK_TEXT_CHUNK), and the metadata field name (AMAZON_BEDROCK_METADATA). In the next steps, you’ll grant Amazon Bedrock permission to use this index and then plug these details into the Amazon Bedrock Knowledge Bases setup.

With the vector index successfully created, your OpenSearch Service domain is now ready to store and retrieve embedding vectors. Next, you’ll configure IAM roles and access policies to facilitate secure interaction between Amazon Bedrock and your OpenSearch Service domain.

Initiate Amazon Bedrock knowledge base creation

Now that your OpenSearch Service domain and vector index are ready, it’s time to configure an Amazon Bedrock knowledge base to use this vector store. In this step, you will:

  1. Begin creating a new knowledge base in the Amazon Bedrock console
  2. Configure it to use your existing OpenSearch Service domain as a vector store

We will pause the knowledge base creation midway to update OpenSearch Service access policies before finalizing the setup.

To create the Amazon Bedrock knowledge base in the console, follow these steps. For detailed instructions, refer to Create a knowledge base by connecting to a data source in Amazon Bedrock Knowledge Bases in the AWS documentation. The following steps provide a streamlined overview of the general process:

  1. On the Amazon Bedrock Console, go to Knowledge Bases and choose Create with vector store.
  2. Enter a name and description and choose Create and use a new service role for the runtime role. Choose Amazon S3 as the data source for the knowledge base.
  3. Provide the details for the data source, including data source name, location, Amazon S3 URI, and keep the parsing and chunking strategies as default.
  4. Choose Amazon Titan Embeddings v2 as your embeddings model to convert your data. Make sure the embeddings dimensions match what you configured in your index mappings in the Create an OpenSearch Service domain for vector search section because mismatches will cause the integration to fail.

To configure OpenSearch Service Managed Cluster as the vector store, follow these steps:

  1. Under Vector database, select Use an existing vector store and for Vector store, select OpenSearch Service Managed Cluster, as shown in the following screenshot

Bedrock Knowledge Base Vector Store Configuration

  1. Enter the details from your OpenSearch Service domain setup in the following fields, as shown in the following screenshot:
    1. Domain ARN: Provide the ARN of your OpenSearch Service domain.
    2. Domain endpoint: Enter the endpoint URL of your OpenSearch Service domain.
    3. Vector index name: Specify the name of the vector index created in your OpenSearch Service domain.
    4. Vector field name
    5. Text field name
    6. Bedrock-managed metadata field name

Bedrock Knowledge Base Configuration with OpenSearch Details

You must not choose Create yet. Amazon Bedrock will be ready to create the knowledge base, but you need to configure OpenSearch Service access permissions first. Copy the ARN of the new IAM service role that Amazon Bedrock will use for this knowledge base (the console will display the role ARN you selected or just created). Keep this ARN handy and leave the Amazon Bedrock console open (pause the creation process here).

Configure fine-grained access control permissions in OpenSearch Service

With the IAM service role ARN copied, configure fine-grained permissions in the OpenSearch dashboard. Fine-grained access control provides role-based permission management at a granular level (indices, documents, and fields), so that your Amazon Bedrock knowledge base has precisely controlled access. Follow these steps:

  1. On the OpenSearch Service console, navigate to your OpenSearch Service domain.
  2. Choose the URL for OpenSearch Dashboards. It typically looks like: https://<your-domain-endpoint>/_dashboards/
  3. From the OpenSearch Dashboards interface, in the left navigation pane, choose Security, then choose Roles.
  4. Choose Create role and provide a meaningful name, such as bedrock-knowledgebase-role.
  5. Under Cluster Permissions, enter the following permissions necessary for Amazon Bedrock operations, as shown in the following screenshot:
indices:data/read/msearch
indices:data/write/bulk*
indices:data/read/mget*

Amazon OpenSearch Dashboard Role Creation

  1. Under Index permissions:
    1. Specify the exact vector index name you created previously (for example, bedrock-kb-index).
    2. Choose Create new permission group, then choose Create new action group.
    3. Add the following specific permissions, essential for Amazon Bedrock Knowledge Bases:
      indices:admin/get indices:data/read/msearch 
      indices:data/read/search indices:data/write/index 
      indices:data/write/update indices:data/write/delete 
      indices:data/write/delete/byquery indices:data/write/bulk* 
      indices:admin/mapping/put indices:data/read/mget*

    4. Confirm by choosing Create.

To map the Amazon Bedrock IAM service role (copied earlier) to the newly created OpenSearch Service role, follow these steps:

  1. In OpenSearch Dashboards, navigate to Security and then Roles.
  2. Locate and open the role you created in the previous step (bedrock-knowledgebase-role).
  3. Choose the Mapped users tab and choose Manage mapping, as shown in the following screenshot.
  4. In the Backend roles section, paste the knowledge base’s service role ARN you copied from Amazon Bedrock (for example, arn:aws:iam::<accountId>:role/service-role/BedrockKnowledgeBaseRole). When mapping this IAM role to an OpenSearch Service role, the IAM role doesn’t need to exist in your AWS account at the time of mapping. You’re referencing its ARN to establish the association within the OpenSearch backend. This allows OpenSearch Service to recognize and authorize the role when it’s eventually created and used. Make sure that the ARN is correctly specified to facilitate proper permission mapping.​
  5. Choose Map to finalize the connection between the IAM role and OpenSearch Service permissions.

Amazon OpenSearch Dashboard Role Mapping

Complete knowledge base creation and verify resource-based policy

With fine-grained permissions in place, return to the paused Amazon Bedrock console to finalize your knowledge base setup. Confirm that all OpenSearch Service domain details are correctly entered, including the domain endpoint, domain ARN, index name, vector field name, text field name, and metadata field name. Choose Create knowledge base.

Amazon Bedrock will use the configured IAM service role to securely connect to your OpenSearch Service domain. After the setup is complete, the knowledge base status should change to Available, confirming successful integration.

Understanding access policies

When integrating OpenSearch Service Managed Cluster with Amazon Bedrock Knowledge Bases, it’s important to understand how access control works across different layers.

For same-account configurations (where both the knowledge base and OpenSearch Service domain are in the same AWS account), no updates to the OpenSearch Service domain’s resource-based policy are required as long as fine-grained access control is enabled and your IAM role is correctly mapped. In this case, IAM permissions and fine-grained access control mappings are sufficient to authorize access. However, if the domain’s resource-based policy includes deny statements targeting your knowledge base service role or principals, access will be blocked—regardless of IAM or fine-grained access control settings. To avoid unintended failures, make sure the policy doesn’t explicitly restrict access to the Amazon Bedrock Knowledge Bases service role.

For cross-account access (when the IAM role used by Amazon Bedrock Knowledge Bases belongs to a different AWS account than the OpenSearch Service domain), you must include an explicit allow statement in the domain’s resource-based policy for the external role. Without this, access will be denied even if all other permissions are correctly configured.

Bedrock Knowledge Base Sync Job

To begin using your knowledge base, select your configured data source and initiate the sync process. This action starts the ingestion of your Amazon S3 data. After synchronization is complete, your knowledge base is ready for information retrieval.

Conclusion

Integrating Amazon Bedrock Knowledge Bases with OpenSearch Service Managed Cluster offers a powerful solution for vector storage and retrieval in AI applications. In this post, we walked you through the process of setting up an OpenSearch Service domain, configuring a vector index, and connecting it to an Amazon Bedrock knowledge base. With this setup, you’re now equipped to use the full potential of vector search capabilities in your AI-driven applications, enhancing your ability to process and retrieve information from large datasets efficiently.

Get started with Amazon Bedrock Knowledge Bases and let us know your thoughts in the comments section.


About the authors

Manoj Selvakumar is a Generative AI Specialist Solutions Architect at AWS, where he helps startups design, prototype, and scale intelligent, agent-driven applications using Amazon Bedrock. He works closely with founders to turn ambitious ideas into production-ready solutions—bridging startup agility with the advanced capabilities of AWS’s generative AI ecosystem. Before joining AWS, Manoj led the development of data science solutions across healthcare, telecom, and enterprise domains. He has delivered end-to-end machine learning systems backed by solid MLOps practices—enabling scalable model training, real-time inference, continuous evaluation, and robust monitoring in production environments.

Mani Khanuja is a Tech Lead – Generative AI Specialists, author of the book Applied Machine Learning and High-Performance Computing on AWS, and a member of the Board of Directors for Women in Manufacturing Education Foundation Board. She leads machine learning projects in various domains such as computer vision, natural language processing, and generative AI. She speaks at internal and external conferences such AWS re:Invent, Women in Manufacturing West, YouTube webinars, and GHC 23. In her free time, she likes to go for long runs along the beach.

Dani Mitchell is a Generative AI Specialist Solutions Architect at AWS. He is focused on helping accelerate enterprises across the world on their generative AI journeys with Amazon Bedrock.

Juan Camilo Del Rio Cuervo is a Software Developer Engineer at Amazon Bedrock Knowledge Bases team. He is focused on building and improving RAG experiences for AWS customers.
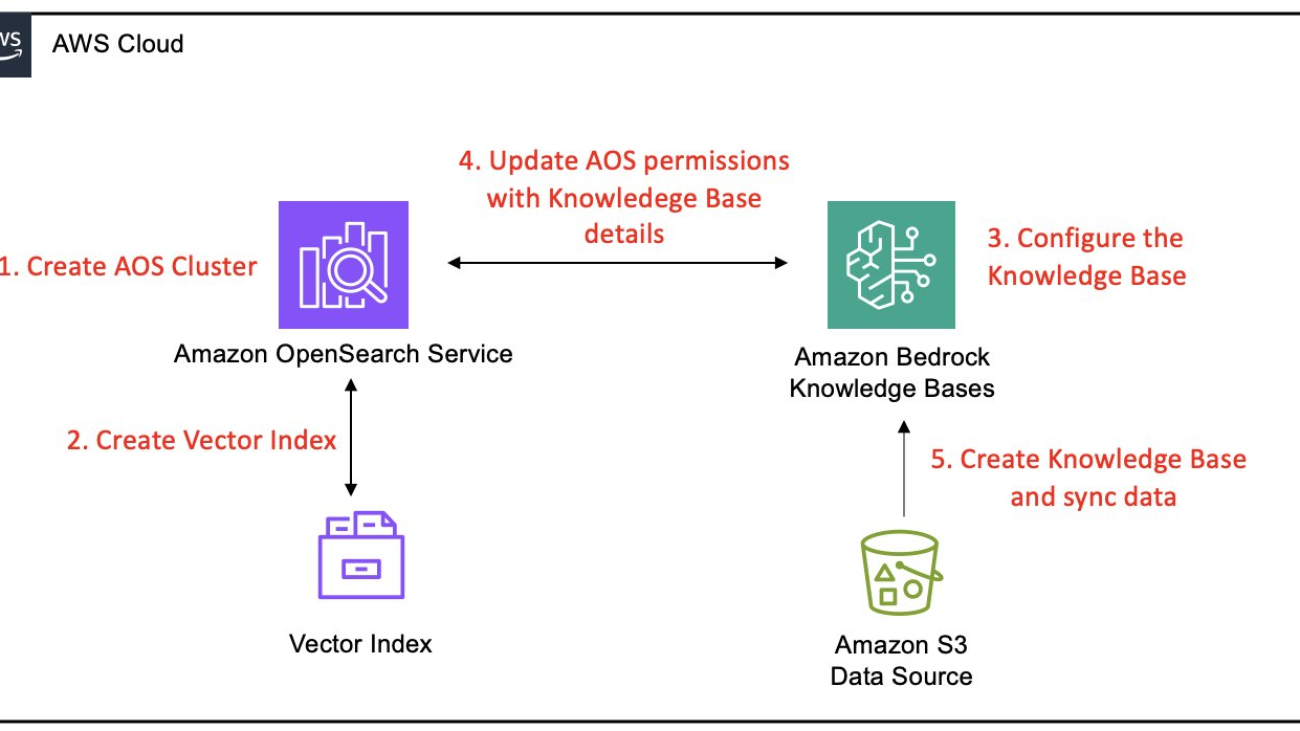
Read More

Monitor agents built on Amazon Bedrock with Datadog LLM Observability

Monitor agents built on Amazon Bedrock with Datadog LLM Observability

This post was co-written with Mohammad Jama, Yun Kim, and Barry Eom from Datadog.

The emergence of generative AI agents in recent years has transformed the AI landscape, driven by advances in large language models (LLMs) and natural language processing (NLP). The focus is shifting from simple AI assistants to Agentic AI systems that can think, iterate, and take actions to solve complex tasks. These Agentic AI systems may use multiple agents, interact with tools both within and outside organizational boundaries to make decisions, and connect with knowledge sources to learn about processes. While these autonomous systems help organizations improve workplace productivity, streamline business workflows, and transform research and more, they introduce additional operational requirements. To ensure reliability, performance, and responsible AI use, teams need observability solutions purpose-built for tracking agent behavior, coordination, and execution flow.

The multi-agentic system collaboration capabilities of Amazon Bedrock Agents make it straightforward and fast to build these systems. Developers can configure a set of coordinated agents by breaking down complex user requests into multiple steps, calling internal APIs, accessing knowledge bases, and maintaining contextual conversations—all without managing the logic themselves.

In order for organizations to scale Agentic AI systems they need robust observability solutions to ensure reliability, performance, and responsible use of AI technology.

Datadog LLM Observability helps teams operate production-grade LLM applications with confidence by monitoring performance, quality, and security issues—such as latency spikes, hallucinations, tool selection, or prompt injection attempts. With full visibility into model behavior and application context, developers can identify, troubleshoot, and resolve issues faster.

We’re excited to announce a new integration between Datadog LLM Observability and Amazon Bedrock Agents that helps monitor agentic applications built on Amazon Bedrock. Beyond tracking the overall health of agentic applications, developers can track step-by-step agent executions across complex workflows and monitor foundational model calls, tool invocations, and knowledge base interactions.

In this post, we’ll explore how Datadog’s LLM Observability provides the visibility and control needed to successfully monitor, operate, and debug production-grade agentic applications built on Amazon Bedrock Agents.

Solution Overview

Datadog’s integration with Amazon Bedrock Agents offers comprehensive observability tailored for agentic Generative AI applications that programmatically invoke agents by using the InvokeAgent API. This integration captures detailed telemetry from each agent execution, enabling teams to monitor, troubleshoot, and optimize their LLM applications effectively.

Optimize Performance and Control Costs

As teams scale their agentic applications, each agent interaction—whether it’s retrieving knowledge, invoking tools, or calling models—can impact latency and cost. Without visibility into how these resources are used, it’s difficult to pinpoint inefficiencies or control spend as workflows grow more complex. For applications built on Bedrock Agents, Datadog automatically captures and provides:

  • Latency monitoring: Track the time taken for each step and overall execution to identify bottlenecks
  • Error rate tracking: Observe the frequency and types of errors encountered to improve reliability and debug issues
  • Token usage analysis: Monitor the number of tokens consumed during processing to manage costs
  • Tool invocation details: Gain insights into external API calls made by agents, such as Lambda functions or knowledge base queries
LLM Observability dashboard displaying key performance indicators, usage trends, and topic distribution for an AI-powered support chatbot.

This LLM Observability dashboard presents a detailed overview of an AI-powered support chatbot’s performance and usage patterns.

Monitor Complex Agentic Workflows

Agents can perform specific tasks, invoke tools, access knowledge bases, and maintain contextual conversations. Datadog provides comprehensive visibility into agent workflows by capturing detailed telemetry from Amazon Bedrock Agents, enabling teams to monitor, troubleshoot, and optimize their LLM applications effectively, providing:

  • End-to-end execution visibility: Visualize each operation of agent’s workflow, from pre-processing through post-processing, including orchestration and guardrail evaluations
  • Efficient troubleshooting: Debug with detailed execution insights to quickly pinpoint failure points and understand error contexts
Travel agent bot trace details displaying bedrock runtime invocation, model calls, and location suggestion tool execution.

This LLM Observability trace details the execution of a travel agent bot using Amazon Bedrock.

Evaluate output, tool selection, and overall quality

In agentic applications, it’s not enough to know that a task completed, you also need to know how well it was completed. For example, are generated summaries accurate and on-topic? Are user-facing answers clear, helpful, and free of harmful content? Did an agent select the right tool? Without visibility into these questions, silent failures can slip through and undercut intended outcomes—like reducing handoffs to human agents or automating repetitive decisions.

Datadog LLM Observability helps teams assess the quality and safety of their LLM applications by evaluating the inputs and outputs of model calls—both at the root level and within nested steps of a workflow. With this integration, you can:

  • Run built-in evaluations: Detect quality, safety, and security, issues like prompt injection, off-topic completions, or toxic content, with Datadog LLM Observability Evaluations
  • Submit custom evaluations: Visualize domain-specific quality metrics, such as whether an output matched expected formats or adhered to policy guidelines
  • Monitor guardrails: Inspect when and why content filters are triggered during execution.

These insights appear directly alongside latency, cost, and trace data—helping teams identify not just how an agent behaved, but whether it produced the right result.

How to get started

Datadog Bedrock Agent Observability is initially available for Python applications, with additional language support on the roadmap. Tracing Bedrock Agent invocations is handled by integrating Datadog’s ddtrace library into your application.

Prerequisites

  1. An AWS account with Bedrock access enabled.
  2. A python-base application using Amazon Bedrock. If needed, please see the examples in amazon-bedrock-samples.
  3. A Datadog account and api key.

Instrumentation is accomplished with just a few steps, please consult the latest LLM Observability Python SDK Reference for full details. In most cases only 2 lines are required to add ddtrace to your application:

from ddtrace.llmobs import LLMObs
LLMObs.enable()

The ddtrace library can be configured using environment variables or at runtime passing values to the enable function. Please consult the SDK reference above and also the setup documentation for more details and customization options.

Finally, be sure to stop or remove any applications when you are finished to manage costs.

Conclusion

Datadog is an AWS Specialization Partner and AWS Marketplace Seller that has been building integrations with AWS services for over a decade, amassing a growing catalog of 100+ integrations. This new Amazon Bedrock Agents integration builds upon Datadog’s strong track record of AWS partnership success. For organizations looking to implement generative AI solutions, this capability provides essential observability tools to ensure their agentic AI applications built on AWS Bedrock Agents perform optimally and deliver business value.

To get started, see Datadog LLM Observability.

To learn more about how Datadog integrates with Amazon AI/ML services, see Monitor Amazon Bedrock with Datadog and Monitoring Amazon SageMaker with Datadog.

If you don’t already have a Datadog account, you can sign up for a free 14-day trial today.


About the authors

Nina ChenNina Chen is a Customer Solutions Manager at AWS specializing in leading software companies to leverage the power of the AWS cloud to accelerate their product innovation and growth. With over 4 years of experience working in the strategic Independent Software Vendor (ISV) vertical, Nina enjoys guiding ISV partners through their cloud transformation journeys, helping them optimize their cloud infrastructure, driving product innovation, and delivering exceptional customer experiences.

Sujatha KuppurajuSujatha Kuppuraju is a Principal Solutions Architect at AWS, specializing in Cloud and, Generative AI Security. She collaborates with software companies’ leadership teams to architect secure, scalable solutions on AWS and guide strategic product development. Leveraging her expertise in cloud architecture and emerging technologies, Sujatha helps organizations optimize offerings, maintain robust security, and bring innovative products to market in an evolving tech landscape.

Jason MimickJason Mimick is a Partner Solutions Architect at AWS supporting top customers and working closely with product, engineering, marketing, and sales teams daily. Jason focuses on enabling product development and sales success for partners and customers across all industries.

Mohammad JamaMohammad Jama is a Product Marketing Manager at Datadog. He leads go-to-market for Datadog’s AWS integrations, working closely with product, marketing, and sales to help companies observe and secure their hybrid and AWS environments.

Yun KimYun Kim is a software engineer on Datadog’s LLM Observability team, where he specializes on developing client-side SDKs and integrations. He is excited about the development of trustworthy, transparent Generative AI models and frameworks.

Barry EomBarry Eom is a Product Manager at Datadog, where he has launched and leads the development of AI/ML and LLM Observability solutions. He is passionate about enabling teams to create and productionize ethical and humane technologies.

Read More

How PayU built a secure enterprise AI assistant using Amazon Bedrock

How PayU built a secure enterprise AI assistant using Amazon Bedrock

This is a guest post co-written with Rahul Ghosh, Sandeep Kumar Veerlapati, Rahmat Khan, and Mudit Chopra from PayU.

PayU offers a full-stack digital financial services system that serves the financial needs of merchants, banks, and consumers through technology.

As a Central Bank-regulated financial institution in India, we recently observed a surge in our employees’ interest in using public generative AI assistants. Our teams found these AI assistants helpful for a variety of tasks, including troubleshooting technical issues by sharing error or exception details, generating email responses, and rephrasing English content for internal and external communications. However, this growing reliance on public generative AI tools quickly raised red flags for our Information Security (Infosec) team. We became increasingly concerned about the risks of sensitive data—such as proprietary system information, confidential customer details, and regulated documentation—being transmitted to and processed by external, third-party AI providers. Given our strict compliance requirements and the critical importance of data privacy in the financial sector, we made the decision to restrict access to these public generative AI systems. This move was necessary to safeguard our organization against potential data leaks and regulatory breaches, but it also highlighted the need for a secure, compliance-aligned alternative that would allow us to harness the benefits of generative AI without compromising on security policies.

In this post, we explain how we equipped the PayU team with an enterprise AI solution and democratized AI access using Amazon Bedrock, without compromising on data residency requirements.

Solution overview

As a regulated entity, we were required to keep all our data within India and securely contained within our PayU virtual private cloud (VPC). Therefore, we sought a solution that could use the power of generative AI to foster innovation and enhance operational efficiency, while simultaneously enabling robust data security measures and geo-fencing of the utilized data. Beyond foundational use cases like technical troubleshooting, email drafting, and content refinement, we aimed to equip teams with a natural language interface to query enterprise data across domains. This included enabling self-service access to business-critical insights—such as loan disbursement trends, repayment patterns, customer demographics, and transaction analytics—as well as HR policy clarifications, through intuitive, conversational interactions. Our vision was to empower employees with instant, AI-driven answers derived from internal systems without exposing sensitive data to external systems, thereby aligning with India’s financial regulations and our internal governance frameworks.

We chose Amazon Bedrock because it is a fully managed service that provides access to a wide selection of high-performing foundation models (FMs) from industry leaders such as AI21 Labs, Anthropic, Cohere, DeepSeek, Luma, Meta, Mistral AI, poolside (coming soon), Stability AI, TwelveLabs (coming soon), Writer, and Amazon. The models are accessible through a single, unified API. Amazon Bedrock also offers a comprehensive suite of features that align with our requirements, including Amazon Bedrock Agents for workflow automation and Amazon Bedrock Knowledge Bases for enterprise data integration. In addition, Amazon Bedrock Guardrails provides essential safeguards across model, prompt, and application levels for blocking undesirable and harmful multimodal content and helped filter hallucinated responses in our Retrieval Augmented Generation (RAG) and agentic workflows.

For the frontend, we selected Open WebUI, an open-source solution known for its extensibility, rich feature set, and intuitive, user-friendly interface, so our teams can interact seamlessly with the AI capabilities we’ve integrated.

The following diagram illustrates the solution architecture.

PayU AI Assistant Solution Architecture

In the following sections, we discuss the key components to the solution in more detail.

Open WebUI

We use Open WebUI as our browser-based frontend application. Open WebUI is an open source, self-hosted application designed to provide a user-friendly and feature-rich interface for interacting with large language models (LLMs). It supports integration with a wide range of models and can be deployed in private environments to help protect data privacy and security. Open WebUI supports enterprise features like single sign-on (SSO), so users can authenticate seamlessly using their organization’s identity provider, streamlining access and reducing password-related risks. The service also offers role-based access control (RBAC), so administrators can define granular user roles—such as admin and user—so that permissions, model access, and data visibility can be tailored to organizational needs. This supports the protection of sensitive information.

We connected Open WebUI with our identity provider for enabling SSO. RBAC was implemented by defining functional roles—such as loan operations or HR support—directly tied to user job functions. These roles govern permissions to specific agents, knowledge bases, and FMs so that teams only access tools relevant to their responsibilities. Configurations, user conversation histories, and usage metrics are securely stored in a persistent Amazon Relational Database Service (Amazon RDS) for PostgreSQL database, enabling audit readiness and supporting compliance. For deployment, we containerized Open WebUI and orchestrated it on an Amazon Elastic Kubernetes Service (Amazon EKS) cluster, using automatic scaling to dynamically adjust resources based on demand while maintaining high availability.

Access Gateway

Access Gateway serves as an intermediary between Open WebUI and Amazon Bedrock, translating Amazon Bedrock APIs to a compatible schema for Open WebUI. This component enables the frontend to access FMs, Amazon Bedrock Agents, and Amazon Bedrock Knowledge Bases.

Amazon Bedrock

Amazon Bedrock offers a diverse selection of FMs, which we have integrated into the web UI to enable the PayU workforce to efficiently perform tasks such as text summarization, email drafting, and technical troubleshooting. In addition, we developed custom AI agents using Amazon Bedrock Agents and Amazon Bedrock Knowledge Bases, using our organizational data. These tailored agents are also accessible through the frontend application.

To enable secure, role-based access to organizational insights, we deployed specialized agents tailored to specific business functions—including hr-policy-agent, credit-disbursal-agent, collections-agent, and payments-demographics-agent. Access to these agents is governed by user roles and job functions. These agents follow a combination of RAG and text-to-SQL approaches. For example, hr-policy-agent uses RAG, querying a vectorized knowledge base in Amazon OpenSearch Service, whereas credit-disbursal-agent uses a text-to-SQL pipeline, translating natural language queries into structured SQL commands to extract insights from an Amazon Simple Storage Service (Amazon S3) based data lake. These approaches provide precise, context-aware responses while maintaining data governance. Implementation details of the text-to-SQL workflow is described in the following diagram.

PayU text-to-sql with Bedrock Agents and Knowledgebases

The workflow consists of the following steps:

  1. We maintain our business-specific datamarts in the data lakehouse in Amazon S3, enriched with rich metadata and presented in a highly denormalized form. This data lakehouse, internally referred to as Luna, is built using Apache Spark and Apache Hudi. The datamarts are crucial for achieving higher accuracy and improved performance in our systems. The data is exposed as AWS Glue tables, which function as the Hive Metastore, and can be queried using Amazon Athena, enabling efficient access and analytical capabilities for our business needs.
  2. HR policy documents are stored in another S3 bucket. Using Amazon Bedrock Knowledge Bases, these are vectorized and stored in OpenSearch Service.
  3. Depending on their role, employees can access FMs and agents through the Open WebUI interface. They have the option to choose either an FM or an agent from a dropdown menu. When a user selects an FM, their question is answered directly using the model’s pre-trained knowledge, without involving an agent. If an agent is selected, the corresponding agent is invoked to handle the request.
  4. To facilitate orchestration, an instruction prompt is given to the Amazon Bedrock agent. The agent interprets this prompt and manages the workflow by delegating specific actions to the underlying LLM. Through this process, the Amazon Bedrock agent coordinates task execution, so that each step is handled appropriately based on the input received and the orchestration logic defined for the workflow. The orchestration step can extract context from the knowledge base or invoke an action group. An instruction prompt is supplied to the Amazon Bedrock agent to guide the orchestration process. The agent interprets this prompt and coordinates the workflow by assigning specific tasks to the LLM. For example, while invoking actions for the text-to-SQL agent, it has been instructed to check syntaxes first and fix the query by reading the error then only execute the final query.
  5. An instruction prompt is supplied to the Amazon Bedrock agent to guide the orchestration process. The agent interprets this prompt and coordinates the workflow by assigning specific tasks to the LLM.
  6. The primary function of an action group in an Amazon Bedrock agent is to organize and execute multiple actions in response to a user’s input or request. This enables the agent to carry out a sequence of coordinated steps to effectively meet the user’s needs, rather than being limited to a single action. Each action group includes a schema, which defines the required format and parameters. This schema allows the agent to interact accurately with the compute layer, such as an AWS Lambda function, by supplying the required structure for communication.
  7. The Lambda function serves as the execution engine, running SQL queries and connecting with Athena to process data. To enable secure and efficient operation, it is essential to configure resource policies and permissions correctly, which helps maintain the integrity of the serverless compute environment.
  8. Athena is a serverless query service that analyzes Amazon S3 data using standard SQL, with AWS Glue managing the data catalog. AWS Glue reads data from Amazon S3, creates queryable tables for Athena, and stores query results back in Amazon S3. This integration, supported by crawlers and the AWS Glue Data Catalog, streamlines data management and analysis.
  9. For questions related to HR policies and other enterprise documents, the system uses Amazon Bedrock Knowledge Bases. These knowledge bases are built from the HR policy documents stored in Amazon S3, with semantic search capabilities powered by vector embeddings in OpenSearch Service.

Private access to foundation models

Given that our organizational data was included as context in prompts sent to Amazon Bedrock and the generated responses could contain sensitive information, we needed a robust solution to help prevent exposure of this data to the public internet. Our goal was to establish a secure data perimeter that would help mitigate potential risks associated with internet-facing communication. To achieve this, we implemented AWS PrivateLink, creating a private and dedicated connection between our VPC and Amazon Bedrock. With this configuration, Amazon Bedrock is accessible as though it resides within our own VPC, removing the need for an internet gateway or NAT gateway. By setting up an interface endpoint with PrivateLink, we provisioned a network interface directly in our VPC subnet, so that data remains securely within the AWS network. This architecture not only strengthens our security posture by minimizing external exposure but also streamlines connectivity for our internal applications.

The following diagram illustrates this architecture.

PayU Bedrock Secure Access with AWS PrivateLink

Conclusion

The introduction of this application has generated significant interest in generative AI within PayU. Employees are now more aware of AI’s potential to address complex business challenges. This enthusiasm has led to the addition of multiple business workflows to the application. Collaboration between business units and the technical team has accelerated digital transformation efforts. After the rollout, internal estimates revealed a 30% improvement in the productivity of the business analyst team. This boost in efficiency has made it possible for analysts to focus on more strategic tasks and reduced turnaround times. Overall, the application has inspired a culture of innovation and continuous learning across the organization.

Ready to take your organization’s AI capabilities to the next level? Dive into the technical details of Amazon Bedrock, Amazon Bedrock Agents, and Amazon Bedrock Guardrails in the Amazon Bedrock User Guide, and explore hands-on examples in the Amazon Bedrock Agent GitHub repo to kickstart your implementation.


About the authors

Deepesh Dhapola Deepesh Dhapola is a Senior Solutions Architect at AWS India, where he architects high-performance, resilient cloud solutions for financial services and fintech organizations. He specializes in using advanced AI technologies—including generative AI, intelligent agents, and the Model Context Protocol (MCP)—to design secure, scalable, and context-aware applications. With deep expertise in machine learning and a keen focus on emerging trends, Deepesh drives digital transformation by integrating cutting-edge AI capabilities to enhance operational efficiency and foster innovation for AWS customers. Beyond his technical pursuits, he enjoys quality time with his family and explores creative culinary techniques.

Rahul Ghosh Rahul Ghosh is a seasoned Data & AI Engineer with deep expertise in cloud-based data architectures, large-scale data processing, and modern AI technologies, including generative AI, LLMs, Retrieval Augmented Generation (RAG), and agent-based systems. His technical toolkit spans across Python, SQL, Spark, Hudi, Airflow, Kubeflow, and other modern orchestration frameworks, with hands-on experience in AWS, Azure, and open source systems. Rahul is passionate about building reliable, scalable, and ethically grounded solutions at the intersection of data and intelligence. Outside of work, he enjoys mentoring budding technologists and doing social work rooted in his native rural Bengal.

Sandeep Kumar Veerlapati Sandeep Kumar Veerlapati is an Associate Director – Data Engineering at PayU Finance, where he focuses on building strong, high-performing teams and defining effective data strategies. With expertise in cloud data systems, data architecture, and generative AI, Sandeep brings a wealth of experience in creating scalable and impactful solutions. He has a deep technical background with tools like Spark, Airflow, Hudi, and the AWS Cloud. Passionate about delivering value through data, he thrives on leading teams to solve real-world challenges. Outside of work, Sandeep enjoys mentoring, collaborating, and finding new ways to innovate with technology.

Mudit Chopra Mudit Chopra is a skilled DevOps Engineer and generative AI enthusiast, with expertise in automating workflows, building robust CI/CD pipelines, and managing cloud-based infrastructures across systems. With a passion for streamlining delivery pipelines and enabling cross-team collaboration, they facilitate seamless product deployments. Dedicated to continuous learning and innovation, Mudit thrives on using AI-driven tools to enhance operational efficiency and create smarter, more agile systems. Always staying ahead of tech trends, he is dedicated to driving digital transformation and delivering impactful solutions.

Rahmat Khan Rahmat Khan is a driven AI & Machine Learning Engineer and entrepreneur, with a deep focus on building intelligent, real-world systems. His work spans the full ML lifecycle—data engineering, model development, and deployment at scale—with a strong grounding in practical AI applications. Over the years, he has explored everything from generative models to multimodal systems, with an eye toward creating seamless user experiences. Driven by curiosity and a love for experimentation, he enjoys solving open-ended problems, shipping fast, and learning from the edge of what’s possible. Outside of tech, he’s equally passionate about nurturing ideas, mentoring peers, and staying grounded in the bigger picture of why we build.

Saikat DeySaikat Dey is a Technical Account Manager (TAM) at AWS India, supporting strategic fintech customers in harnessing the power of the cloud to drive innovation and business transformation. As a trusted advisor, he bridges technical and business teams, delivering architectural best practices, proactive guidance, and strategic insights that enable long-term success on AWS. With a strong passion for generative AI, Saikat partners with customers to identify high-impact use cases and accelerate their adoption of generative AI solutions using services like Amazon Bedrock and Amazon Q. Outside of work, he actively explores emerging technologies, follows innovation trends, and enjoys traveling to experience diverse cultures and perspectives.

Read More

CollabLLM: Teaching LLMs to collaborate with users

CollabLLM: Teaching LLMs to collaborate with users

CollabLLM blog hero | flowchart diagram starting in the upper left corner with an icon of two overlapping chat bubbles; arrow pointing right to an LLM network node icon; branching down to show three simulated users; right arrow to a

Large language models (LLMs) can solve complex puzzles in seconds, yet they sometimes struggle over simple conversations. When these AI tools make assumptions, overlook key details, or neglect to ask clarifying questions, the result can erode trust and derail real-world interactions, where nuance is everything.

A key reason these models behave this way lies in how they’re trained and evaluated. Most benchmarks use isolated, single-turn prompts with clear instructions. Training methods tend to optimize for the model’s next response, not its contribution to a successful, multi-turn exchange. But real-world interaction is dynamic and collaborative. It relies on context, clarification, and shared understanding.

User-centric approach to training 

To address this, we’re exploring ways to train LLMs with users in mind. Our approach places models in simulated environments that reflect the back-and-forth nature of real conversations. Through reinforcement learning, these models improve through trial and error, for example, learning when to ask questions and how to adapt tone and communication style to different situations. This user-centric approach helps bridge the gap between how LLMs are typically trained and how people actually use them.  

This is the concept behind CollabLLM (opens in new tab), recipient of an ICML (opens in new tab) Outstanding Paper Award (opens in new tab). This training framework helps LLMs improve through simulated multi-turn interactions, as illustrated in Figure 1. The core insight behind CollabLLM is simple: in a constructive collaboration, the value of a response isn’t just in its immediate usefulness, but in how it contributes to the overall success of the conversation. A clarifying question might seem like a delay but often leads to better outcomes. A quick answer might appear useful but can create confusion or derail the interaction.

Figure 1 compares two training strategies for Large Language Models: a standard non-collaborative method and our proposed collaborative method (CollabLLM). On the left, the standard method uses a preference/reward dataset with single-turn evaluations, resulting in a model that causes ineffective interactions. The user gives feedback, but the model generates multiple verbose and unsatisfactory responses, requiring many back-and-forth turns. On the right, CollabLLM incorporates collaborative simulation during training, using multi-turn interactions and reinforcement learning. After training, the model asks clarifying questions (e.g., tone preferences), receives focused user input, and quickly generates tailored, high-impact responses.
Figure 1. Diagram comparing two training approaches for LLMs. (a) The standard method lacks user-agent collaboration and uses single-turn rewards, leading to an inefficient conversation. (b) In contrast, CollabLLM simulates multi-turn user-agent interactions during training, enabling it to learn effective collaboration strategies and produce more efficient dialogues.

CollabLLM puts this collaborative approach into practice with a simulation-based training loop, illustrated in Figure 2. At any point in a conversation, the model generates multiple possible next turns by engaging in a dialogue with a simulated user.

Figure 2 illustrates the overall training procedure of CollabLLM. For a given conversational input, the LLM and a user simulator are used to sample conversation continuations. The sampled conversations are then scored using a reward model that utilizes various multiturn-aware rewards, which are then in turn used to update parameters of the LLM.
Figure 2: Simulation-based training process used in CollabLLM

The system uses a sampling method to extend conversations turn by turn, choosing likely responses for each participant (the AI agent or the simulated user), while adding some randomness to vary the conversational paths. The goal is to expose the model to a wide variety of conversational scenarios, helping it learn more effective collaboration strategies.

Spotlight: Microsoft research newsletter

Microsoft Research Newsletter

Stay connected to the research community at Microsoft.


To each simulated conversation, we applied multiturn-aware reward (MR) functions, which assess how the model’s response at the given turn influences the entire trajectory of the conversation. We sampled multiple conversational follow-ups from the model, such as statements, suggestions, questions, and used MR to assign a reward to each based on how well the conversation performed in later turns. We based these scores on automated metrics that reflect key factors like goal completion, conversational efficiency, and user engagement.

To score the sampled conversations, we used task-specific metrics and metrics from an LLM-as-a-judge framework, which supports efficient and scalable evaluation. For metrics like engagement, a judge model rates each sampled conversation on a scale from 0 to 1.

The MR of each model response was computed by averaging the scores from the sampled conversations, originating from the model response. Based on the score, the model updates its parameters using established reinforcement learning algorithms like Proximal Policy Optimization (PPO) or Direct Preference Optimization (DPO).

We tested CollabLLM through a combination of automated and human evaluations, detailed in the paper. One highlight is a user study involving 201 participants in a document co-creation task, shown in Figure 3. We compared CollabLLM to a baseline trained with single-turn rewards and to a second, more proactive baseline prompted to ask clarifying questions and take other proactive steps. CollabLLM outperformed both, producing higher-quality documents, better interaction ratings, and faster task completion times.

Figure 3 shows the main results of our user study on a document co-creation task, by comparing a baseline, a proactive baseline, and CollabLLM. CollabLLM outperformed the two baselines. Relative to the best baseline, CollabLLM yields improved document quality rating (+0.12), interaction rating (+0.14), and a reduction of average time spent by the user (-129 seconds).
Figure 3: Results of the user study in a document co-creation task comparing CollabLLM to a baseline trained with single-turn rewards.

Designing for real-world collaboration

Much of today’s AI research focuses on fully automated tasks, models working without input from or interaction with users. But many real-world applications depend on people in the loop: as users, collaborators, or decision-makers. Designing AI systems that treat user input not as a constraint, but as essential, leads to systems that are more accurate, more helpful, and ultimately more trustworthy.

This work is driven by a core belief: the future of AI depends not just on intelligence, but on the ability to collaborate effectively. And that means confronting the communication breakdowns in today’s systems.

We see CollabLLM as a step in that direction, training models to engage in meaningful multi-turn interactions, ask clarifying questions, and adapt to context. In doing so, we can build systems designed to work with people—not around them.

The post CollabLLM: Teaching LLMs to collaborate with users appeared first on Microsoft Research.

Read More

CollabLLM: Teaching LLMs to collaborate with users

CollabLLM: Teaching LLMs to collaborate with users

CollabLLM blog hero | flowchart diagram starting in the upper left corner with an icon of two overlapping chat bubbles; arrow pointing right to an LLM network node icon; branching down to show three simulated users; right arrow to a

Large language models (LLMs) can solve complex puzzles in seconds, yet they sometimes struggle over simple conversations. When these AI tools make assumptions, overlook key details, or neglect to ask clarifying questions, the result can erode trust and derail real-world interactions, where nuance is everything.

A key reason these models behave this way lies in how they’re trained and evaluated. Most benchmarks use isolated, single-turn prompts with clear instructions. Training methods tend to optimize for the model’s next response, not its contribution to a successful, multi-turn exchange. But real-world interaction is dynamic and collaborative. It relies on context, clarification, and shared understanding.

User-centric approach to training 

To address this, we’re exploring ways to train LLMs with users in mind. Our approach places models in simulated environments that reflect the back-and-forth nature of real conversations. Through reinforcement learning, these models improve through trial and error, for example, learning when to ask questions and how to adapt tone and communication style to different situations. This user-centric approach helps bridge the gap between how LLMs are typically trained and how people actually use them.  

This is the concept behind CollabLLM (opens in new tab), recipient of an ICML (opens in new tab) Outstanding Paper Award (opens in new tab). This training framework helps LLMs improve through simulated multi-turn interactions, as illustrated in Figure 1. The core insight behind CollabLLM is simple: in a constructive collaboration, the value of a response isn’t just in its immediate usefulness, but in how it contributes to the overall success of the conversation. A clarifying question might seem like a delay but often leads to better outcomes. A quick answer might appear useful but can create confusion or derail the interaction.

Figure 1 compares two training strategies for Large Language Models: a standard non-collaborative method and our proposed collaborative method (CollabLLM). On the left, the standard method uses a preference/reward dataset with single-turn evaluations, resulting in a model that causes ineffective interactions. The user gives feedback, but the model generates multiple verbose and unsatisfactory responses, requiring many back-and-forth turns. On the right, CollabLLM incorporates collaborative simulation during training, using multi-turn interactions and reinforcement learning. After training, the model asks clarifying questions (e.g., tone preferences), receives focused user input, and quickly generates tailored, high-impact responses.
Figure 1. Diagram comparing two training approaches for LLMs. (a) The standard method lacks user-agent collaboration and uses single-turn rewards, leading to an inefficient conversation. (b) In contrast, CollabLLM simulates multi-turn user-agent interactions during training, enabling it to learn effective collaboration strategies and produce more efficient dialogues.

CollabLLM puts this collaborative approach into practice with a simulation-based training loop, illustrated in Figure 2. At any point in a conversation, the model generates multiple possible next turns by engaging in a dialogue with a simulated user.

Figure 2 illustrates the overall training procedure of CollabLLM. For a given conversational input, the LLM and a user simulator are used to sample conversation continuations. The sampled conversations are then scored using a reward model that utilizes various multiturn-aware rewards, which are then in turn used to update parameters of the LLM.
Figure 2: Simulation-based training process used in CollabLLM

The system uses a sampling method to extend conversations turn by turn, choosing likely responses for each participant (the AI agent or the simulated user), while adding some randomness to vary the conversational paths. The goal is to expose the model to a wide variety of conversational scenarios, helping it learn more effective collaboration strategies.

on-demand event

Microsoft Research Forum Episode 4

Learn about the latest multimodal AI models, advanced benchmarks for AI evaluation and model self-improvement, and an entirely new kind of computer for AI inference and hard optimization.


To each simulated conversation, we applied multiturn-aware reward (MR) functions, which assess how the model’s response at the given turn influences the entire trajectory of the conversation. We sampled multiple conversational follow-ups from the model, such as statements, suggestions, questions, and used MR to assign a reward to each based on how well the conversation performed in later turns. We based these scores on automated metrics that reflect key factors like goal completion, conversational efficiency, and user engagement.

To score the sampled conversations, we used task-specific metrics and metrics from an LLM-as-a-judge framework, which supports efficient and scalable evaluation. For metrics like engagement, a judge model rates each sampled conversation on a scale from 0 to 1.

The MR of each model response was computed by averaging the scores from the sampled conversations, originating from the model response. Based on the score, the model updates its parameters using established reinforcement learning algorithms like Proximal Policy Optimization (PPO) or Direct Preference Optimization (DPO).

We tested CollabLLM through a combination of automated and human evaluations, detailed in the paper. One highlight is a user study involving 201 participants in a document co-creation task, shown in Figure 3. We compared CollabLLM to a baseline trained with single-turn rewards and to a second, more proactive baseline prompted to ask clarifying questions and take other proactive steps. CollabLLM outperformed both, producing higher-quality documents, better interaction ratings, and faster task completion times.

Figure 3 shows the main results of our user study on a document co-creation task, by comparing a baseline, a proactive baseline, and CollabLLM. CollabLLM outperformed the two baselines. Relative to the best baseline, CollabLLM yields improved document quality rating (+0.12), interaction rating (+0.14), and a reduction of average time spent by the user (-129 seconds).
Figure 3: Results of the user study in a document co-creation task comparing CollabLLM to a baseline trained with single-turn rewards.

Designing for real-world collaboration

Much of today’s AI research focuses on fully automated tasks, models working without input from or interaction with users. But many real-world applications depend on people in the loop: as users, collaborators, or decision-makers. Designing AI systems that treat user input not as a constraint, but as essential, leads to systems that are more accurate, more helpful, and ultimately more trustworthy.

This work is driven by a core belief: the future of AI depends not just on intelligence, but on the ability to collaborate effectively. And that means confronting the communication breakdowns in today’s systems.

We see CollabLLM as a step in that direction, training models to engage in meaningful multi-turn interactions, ask clarifying questions, and adapt to context. In doing so, we can build systems designed to work with people—not around them.

The post CollabLLM: Teaching LLMs to collaborate with users appeared first on Microsoft Research.

Read More

Unsupervised, generalizable method for doing anomaly detection

Unsupervised, generalizable method for doing anomaly detection


Unsupervised, generalizable method for doing anomaly detection

An ensemble of models, weighted according to their reluctance to flag anomalies, outperforms its predecessors.

Machine learning

July 15, 12:17 PMJuly 15, 12:17 PM

In many of todays industrial and online applications, identifying anomalies rare, unexpected events in real-time data streams is essential. Anomalies can indicate manufacturing defects, system failures, security breaches, or other significant events.

The typical machine-learning-based anomaly detection system is trained in a supervised manner, using labeled examples. But in many online settings, the data is so diverse, and its distribution changes so constantly, that collecting and labeling data is prohibitively expensive.

Moreover, no single anomaly detection (AD) model works best across all data types. For instance, we observed that certain AD models worked well for one type of customer, while different models worked well for another type of customer. But it is not a priori obvious which model to deploy for a given customer, since customer workloads often change over time, and, consequently, so does the best-performing AD model.

In a paper were presenting at the 2025 International Conference on Machine Learning (ICML), we attempt to address these problems with an approach we call SEAD, for streaming ensemble of anomaly detectors. SEAD uses an ensemble of anomaly detection models, so it always has recourse to the best model for each data type, and it operates in an unsupervised manner, so it doesn’t need labeled anomaly data during training. It works efficiently in an online setting, processing data as it streams in, and it adapts dynamically to changes in the data.

To evaluate SEAD, we compared it to three previous anomaly detection models, each with four hyperparameter settings, and a rule-based method, for a total of 13 baselines. On 15 different tasks, SEAD had the highest average ranking (5.07) and the lowest variance (6.64).

Rewarding reticence

The fundamental insight behind SEAD is that anomalies are rare. SEAD thus assigns higher weights to the models or base detectors in the ensemble that consistently produce lower anomaly scores. Since the different base detectors use different scoring systems, SEAD normalizes their scores by assigning them to different quantiles, according to the distribution of past scores.

The SEAD architecture.

To compute the weights, we use the multiplicative weights update (MWU) mechanism, a standard method in expert systems. With MWU, each base detector is initialized with a starting weight. At the end of each round, each base detectors new weight is the product of its old weight and a negative exponential of the learning rate times the normalized anomaly score that it output during that round.

After all the base detectors have been updated in this way, their weights are normalized so that they sum to 1. Through this process, detectors that consistently output larger scores will start getting lower weights. The technical insight of our work is to apply this classical MWU idea, originally proposed for the supervised setting, to the unsupervised setting of anomaly detection.

During the model evaluation, we were able to see the algorithm reweight base detectors on the basis of the input data. On one dataset, SEAD assigned high weights to two different models, both of which consistently identified anomalies during a phase of the testing that involved truly anomalous data. After that phase, however, on clean data, one of the models continued firing, and SEAD quickly reduced its weight.

The weights assigned to two models over time, during the testing of SEAD. Once the model corresponding to the orange line began flagging false positives, SEAD quickly reduced its weight.

To further investigate SEADs ability to weight models appropriately, we augmented the 13 models in our ensemble with 13 additional algorithms, which simply generated scores at random. On our test set, SEADs accuracy dropped by only 0.88%, indicating that our update algorithm did a good job of quickly weeding out the unreliable models.

Computational efficiency

One drawback to ensemble approaches like SEAD is that running multiple models at once incurs computational overhead. To address this, we experimented with an approach, dubbed SEAD++, that randomly sampled a subset of the ensemble models, with a probability proportional to their weights. This resulted in a roughly a twofold speedup relative to the original SEAD, with minimal accuracy trade-offs. SEAD++ is thus a promising alternative in use cases where computational resources are at a premium.

SEAD represents a significant advancement in the field of anomaly detection for streaming data. By intelligently selecting the best-performing model from a pool of candidates in real time, it ensures reliable and efficient anomaly detection. Its unsupervised, online nature, combined with its adaptability, makes it a valuable tool for a range of applications, setting a new standard for anomaly detection in streaming environments.

Research areas: Machine learning

Tags: Anomaly detection

Read More

Supercharge generative AI workflows with NVIDIA DGX Cloud on AWS and Amazon Bedrock Custom Model Import

Supercharge generative AI workflows with NVIDIA DGX Cloud on AWS and Amazon Bedrock Custom Model Import

This post is co-written with Andrew Liu, Chelsea Isaac, Zoey Zhang, and Charlie Huang from NVIDIA.

DGX Cloud on Amazon Web Services (AWS) represents a significant leap forward in democratizing access to high-performance AI infrastructure. By combining NVIDIA GPU expertise with AWS scalable cloud services, organizations can accelerate their time-to-train, reduce operational complexity, and unlock new business opportunities. The platform’s performance, security, and flexibility position it as a foundational element for those seeking to stay at the forefront of AI innovation.

In this post, we explore a powerful end-to-end development workflow using NVIDIA DGX Cloud on AWS, Run:ai, and Amazon Bedrock Custom Model Import. We demonstrate how to fine-tune the open source Llama 3.1-70b model using NVIDIA DGX Cloud’s high performance multi-GPU compute orchestrated with Run:ai, and we deploy the fine-tuned model using Custom Model Import in Amazon Bedrock for scalable serverless inference.

NVIDIA DGX Cloud on AWS

Organizations aim for rapid deployment of generative AI and agentic AI solutions to gain business value quickly. AWS and NVIDIA have been partnering together to provide AI infrastructure, software, and services. The two companies have co-engineered NVIDIA DGX Cloud on AWS: a fully managed, high-performance AI training platform with flexible, short-term access to large GPU clusters. DGX Cloud on AWS is optimized for faster time to train at every layer of the full stack platform to deliver productivity from day one. With DGX Cloud on AWS, organizations can use the latest NVIDIA architectures, including Amazon EC2 P6e-GB200 UltraServer accelerated by NVIDIA Grace Blackwell GB200 Superchip (coming soon to DGX Cloud on AWS). DGX Cloud on AWS also includes access to NVIDIA AI and cloud experts, as well as 24/7 support, to help enterprises deliver maximum return on investment (ROI) and available in AWS Marketplace.

Amazon Bedrock Custom Model Import

Amazon Bedrock is a fully managed service that offers a choice of high-performing foundation models (FMs) from leading AI companies like AI21 Labs, Anthropic, Cohere, Meta, Mistral AI, Stability AI, and Amazon through a single API, along with a broad set of capabilities to build generative AI applications with security, privacy, and responsible AI. Amazon Bedrock offers a serverless experience, so you can get started quickly, privately customize FMs with your own data, and integrate and deploy them into your applications using AWS tools without having to manage infrastructure. With Amazon Bedrock Custom Model Import, customers can access their imported custom models on demand in a serverless manner, freeing them from the complexities of deploying and scaling models themselves. They can accelerate generative AI application development by using built-in tools and features such as Amazon Bedrock Knowledge Bases, Amazon Bedrock Guardrails, Amazon Bedrock Agents, and more—all through a unified and consistent developer experience.

NVIDIA DGX Cloud on AWS architecture overview

DGX Cloud is a fully managed platform from NVIDIA co-engineered with AWS for customers that need to train or fine-tune a model. DGX Cloud on AWS uses p5.48xlarge instances, each with 8 H100 GPUs, 8 x 3.84 TB NVMe storage, and 32 network interfaces, providing a total network bandwidth of 3200 Gbps. DGX Cloud on AWS organizes node instances into optimal layouts for artificial intelligence and machine learning (AI/ML) cluster workloads and placed in contiguous clusters, resulting in lower latency and faster results. DGX Cloud uses Amazon Elastic Kubernetes Service (Amazon EKS) and NVIDIA software such as NVIDIA NeMo and NVIDIA Run:ai to deploy and optimize Kubernetes clusters. Each cluster uses an Amazon FSx for Lustre file system for high-performance shared storage. DGX Cloud on AWS also uses Run:ai for workload orchestration, software as a service (SaaS) that provides intelligent workload scheduling, prioritization, and preemption to maximize GPU utilization.

The application plane, which includes the p5 instances and FSx for Lustre file system, operates as a single tenant dedicated to each customer, providing complete isolation and dedicated performance for AI workloads. In addition, DGX Cloud also offers two private access connectivity options for customers who want a secure and direct connection from the cluster to their own AWS account: private access with AWS PrivateLink and private access with AWS Transit Gateway. With private access with AWS PrivateLink, private links are set up with endpoints into a customer’s AWS account to connect to the Kubernetes API, Run:ai control plane, and for cluster ingress. With private access with AWS Transit Gateway, traffic into and out of the DGX Cloud cluster will go through a customer’s transit gateway. The Run:ai control plane will still be connected through a PrivateLink endpoint.

The following diagram illustrates the solution architecture.

Setting up NVIDIA DGX Cloud on AWS

After you get access to your DGX Cloud cluster on AWS, you can start setting up your cluster to run workloads. A cluster admin first needs to create departments and projects for users to run their workloads in. A default department can be provided when you get initial access to your cluster. Projects allow for additional granular quota management beyond the quota set at the department level. After departments and projects are set up, users can then use their allocated quota to run workloads.

The following figure illustrates the Run:ai interface in DGX Cloud on AWS.

In this example, an interactive Jupyter notebook workspace running the nvcr.io/nvidia/nemo:25.02 image is needed to preprocess and manage the code. You’ll need 8 GPUs and at least 20 TBs of mounted storage provided by Amazon FSx for Lustre. This should look like the following image. An Amazon Simple Storage Service (Amazon S3) bucket can also be mounted to directly connect your data to your Amazon account. To learn more about how to create a notebook with NVIDIA NeMo, refer to Interactive NeMo Workload Job.

Fine-tuning the Llama3 model on NVIDIA DGX Cloud

After your Jupyter notebook is created, you can access it and upload our example notebook to download the dataset and Hugging Face model. Using the terminal function, copy the code into your PersistentVolumeClaim (PVC) from the NVIDIA NeMo Run repo. After this is downloaded, to run the notebook, you’ll need a Hugging Face account and create a Hugging Face token with access to the Llama 3.1 70b model on Hugging Face. To use the NVIDIA NeMo framework, convert the Hugging Face tensors to the .nemo format. We’re fine-tuning this model to follow user generated instructions using the open source daring-anteater dataset. This dataset is focused on instruction tuning and covers a wide range of tasks and scenarios. When your data and model finish downloading, you’re ready to train your model.

The following figure illustrates the sample notebook to fine-tune Llama model in DGX Cloud on AWS.

Use NeMo-Run to launch the training job in the cluster. Four H100 nodes (EC2 P5 instances) with 8 GPUs each were used to fine-tune our model in this example. To launch this training, you need to create an application token and secret. After your training is launched, you can click the launched workload to look at its event history, metrics, and logs. The metrics will show the GPU compute and memory utilization. The logs for the master node will show the progress of the fine-tuning job.

The following figure illustrates the sample metrics in DGX Cloud on AWS.

When the model is finished pre-training, return to your Jupyter notebook to convert the model back to Hugging Face safetensors and move the model to Amazon S3. This requires your AWS access key and an S3 bucket. With the tensors and tokens moved, you’re ready to import this model using Amazon Bedrock Custom Model Import.

The following figure illustrates the sample Amazon S3 bucket.

Import your custom model to Amazon Bedrock

To import your custom model, follow these steps:

  1. On the Amazon Bedrock console in the navigation pane, choose Foundation models and then choose Imported model.
  2. In Model details, enter a name such as CustomModelName, as shown in the following screenshot.

  1. For each custom model you import, you can supply an Import job name or use the identifier that is already supplied, which you can use to track and monitor the import of your model.
  2. Scroll down to Model Import Settings, where you can create your custom model by importing the model weights from an S3 bucket or importing a model directly from Amazon SageMaker. For demonstration, you can import Meta’s Llama 3.1 70B model from Amazon S3 by choosing Browse S3 and navigating to your model files.

  1. Verify your model, configuration, and tokenizer, and select any other files associated with your model.

The following figure illustrates the model import setting in Amazon Bedrock.

  1. After you’ve selected your model files, you can choose to encrypt your model using a customer managed key by selecting Customize encryption settings and selecting your AWS Key Management Store (AWS KMS) key. By default, Amazon Bedrock encrypts custom models with AWS owned keys. You can’t view, manage, or use AWS owned keys or audit their use. However, you don’t have to take action or change programs to protect the keys that encrypt your data. Under Service access, you can choose to associate an AWS Identity and Access Management (IAM) role that you’ve created, but you can leave the default selected for Amazon Bedrock to create a default role for you.
  2. When your settings are complete, choose Import model.

To monitor the progress of your importing job, choose Jobs in the Imported models section, as shown in the following screenshot.

After your model has been imported, it should be listed on the Models tab, as shown in the following screenshot.

Model inference using Amazon Bedrock

The Amazon Bedrock playgrounds are a tool in the AWS Management Console that provide a visual interface to experiment with running inference on different models and using different configurations. You can use the playgrounds to test different models and values before you integrate them into your application. The following steps demonstrate how to use the custom model that you imported into Amazon Bedrock and submit a prompt in the playground:

  1. In the Amazon Bedrock navigation pane, choose Chat/text and then choose the Mode you wish to test.
  2. Choose Select model and under Custom & managed endpoints, choose your model to test and choose Apply, as shown in the following screenshot.

  1. With the model loaded into the playground, you can begin by sending your first prompt. Enter a description to create the request and choose Run.

The following screenshot shows a sample prompt to write an email to a wine expert, requesting a guest article contribution for your wine blog.

Clean up

Use the following steps to clean up the infrastructure created for this post and avoid incurring ongoing costs.

  1. Delete the imported model:

aws bedrock delete-imported-model --model-identifier Demo-Mode

  1. Delete the AWS KMS key created:

aws kms schedule-key-deletion --key-id <key-id-or-arn>

Conclusion

In this post, we discussed how NVIDIA DGX Cloud on AWS, combined with Amazon Bedrock Custom Model Import for scalable deployment, offers a powerful end-to-end solution for developing, fine-tuning, and operationalizing generative and agentic AI applications. This approach is particularly advantageous for organizations seeking to accelerate time to market, minimize operational overhead, and foster rapid innovation. Enterprise developers can start with NVIDIA DGX Cloud on AWS today. For more NVIDIA DGX Cloud recipes, check out the examples in dgxc-benchmarking GitHub repo.

Resources


About the authors

Vara Bonthu is a Principal Open Source Specialist SA leading Data on EKS and AI on EKS at AWS, driving open source initiatives and helping AWS customers to diverse organizations. He specializes in open source technologies, data analytics, AI/ML, and Kubernetes, with extensive experience in development, DevOps, and architecture. Vara focuses on building highly scalable data and AI/ML solutions on Kubernetes, enabling customers to maximize cutting-edge technology for their data-driven initiatives.

Chad Elias is a Senior Solutions Architect for AWS. He’s passionate about helping organizations modernize their infrastructure and applications through AI/ML solutions. When not designing the next generation of cloud architectures, Chad enjoys contributing to open source projects, mentoring junior engineers, and exploring the latest technologies.

Brian Kreitzer is a Partner Solutions Architect at Amazon Web Services (AWS). He is responsible for working with partners to create accelerators and solutions for AWS customers, engages in technical co-sell opportunities, and evangelizes accelerator and solution adoption to the technical community.

Timothy Ma is a Principal Specialist in generative AI at AWS, where he collaborates with customers to design and deploy cutting-edge machine learning solutions. He also leads go-to-market strategies for generative AI services, helping organizations harness the potential of advanced AI technologies.

Andrew Liu is the manager of the DGX Cloud Technical Marketing Engineering team, focusing on showcasing the use cases and capabilities of DGX Cloud by creating technical assets and collateral. His goal is to demonstrate how DGX Cloud empowers NVIDIA and the ecosystem to create world-class AI solutions. In his free time, Andrew enjoys being outdoors and going mountain biking and skiing.

Chelsea Isaac is a Senior Solutions Architect for DGX Cloud at NVIDIA. She’s passionate about helping enterprise customers and partners deploy and scale AI solutions in the cloud. In her free time, she enjoys working out, traveling, and reading.

Zoey Zhang is a Technical Marketing Engineer on DGX Cloud at NVIDIA. She works on integrating machine learning models into large-scale compute clusters on the cloud and uses her technical expertise to bring NVIDIA products to market.

Charlie Huang is a senior product marketing manager for Cloud AI at NVIDIA. Charlie is responsible for taking NVIDIA DGX Cloud to market with cloud partners. He has vast experience in AI/ML, cloud and data center solutions, virtualization, and security.

Read More