Subword tokenization requires balancing computational efficiency and vocabulary coverage, which often leads to suboptimal performance on languages and scripts not prioritized during training. We propose to augment pretrained language models with a vocabulary-free encoder that generates input embeddings from text rendered as pixels. Through experiments on English-centric language models, we demonstrate that our approach substantially improves machine translation performance and facilitates effective cross-lingual transfer, outperforming tokenizer-based methods. Furthermore, we find that…Apple Machine Learning Research
Enabling Differentially Private Federated Learning for Speech Recognition: Benchmarks, Adaptive Optimizers, and Gradient Clipping
While federated learning (FL) and differential privacy (DP) have been extensively studied, their application to automatic speech recognition (ASR) remains largely unexplored due to the challenges in training large transformer models. Specifically, large models further exacerbate issues in FL as they are particularly susceptible to gradient heterogeneity across layers, unlike the relatively uniform gradient behavior observed in shallow models. As a result, prior works struggle to converge with standard optimization techniques, even in the absence of DP mechanisms. To the best of our knowledge…Apple Machine Learning Research
AXLearn: Modular Large Model Training on Heterogeneous Infrastructure
We design and implement AXLearn, a production deep learning system that facilitates scalable and high-performance training of large deep learning models. Compared to other state-of-art deep learning systems, AXLearn has a unique focus on modularity and support for heterogeneous hardware infrastructure. AXLearn’s internal interfaces between software components follow strict encapsulation, allowing different components to be assembled to facilitate rapid model development and experimentation on heterogeneous compute infrastructure. We introduce a novel method of quantifying modularity via…Apple Machine Learning Research
ILuvUI: Instruction-Tuned Language-Vision Modeling of UIs from Machine Conversations
Multimodal Vision-Language Models (VLMs) enable powerful applications from their fused understanding of images and language, but
many perform poorly on UI tasks due to the lack of UI training data. In this paper, we adapt a recipe for generating paired text-image
training data for VLMs to the UI domain by combining existing pixel-based methods with a Large Language Model (LLM). Unlike
prior art, our method requires no human-provided annotations, and it can be applied to any dataset of UI screenshots. We generate a
dataset of 335K conversational examples paired with UIs that cover Q&A, UI…Apple Machine Learning Research

Advanced fine-tuning methods on Amazon SageMaker AI
This post provides the theoretical foundation and practical insights needed to navigate the complexities of LLM development on Amazon SageMaker AI, helping organizations make optimal choices for their specific use cases, resource constraints, and business objectives.
We also address the three fundamental aspects of LLM development: the core lifecycle stages, the spectrum of fine-tuning methodologies, and the critical alignment techniques that provide responsible AI deployment. We explore how Parameter-Efficient Fine-Tuning (PEFT) methods like LoRA and QLoRA have democratized model adaptation, so organizations of all sizes can customize large models to their specific needs. Additionally, we examine alignment approaches such as Reinforcement Learning from Human Feedback (RLHF) and Direct Preference Optimization (DPO), which help make sure these powerful systems behave in accordance with human values and organizational requirements. Finally, we focus on knowledge distillation, which enables efficient model training through a teacher/student approach, where a smaller model learns from a larger one, while mixed precision training and gradient accumulation techniques optimize memory usage and batch processing, making it possible to train large AI models with limited computational resources.
Throughout the post, we focus on practical implementation while addressing the critical considerations of cost, performance, and operational efficiency. We begin with pre-training, the foundational phase where models gain their broad language understanding. Then we examine continued pre-training, a method to adapt models to specific domains or tasks. Finally, we discuss fine-tuning, the process that hones these models for particular applications. Each stage plays a vital role in shaping large language models (LLMs) into the sophisticated tools we use today, and understanding these processes is key to grasping the full potential and limitations of modern AI language models.
If you’re just getting started with large language models or looking to get more out of your current LLM projects, we’ll walk you through everything you need to know about fine-tuning methods on Amazon SageMaker AI.
Pre-training
Pre-training represents the foundation of LLM development. During this phase, models learn general language understanding and generation capabilities through exposure to massive amounts of text data. This process typically involves training from scratch on diverse datasets, often consisting of hundreds of billions of tokens drawn from books, articles, code repositories, webpages, and other public sources.
Pre-training teaches the model broad linguistic and semantic patterns, such as grammar, context, world knowledge, reasoning, and token prediction, using self-supervised learning techniques like masked language modeling (for example, BERT) or causal language modeling (for example, GPT). At this stage, the model is not tailored to any specific downstream task but rather builds a general-purpose language representation that can be adapted later using fine-tuning or PEFT methods.
Pre-training is highly resource-intensive, requiring substantial compute (often across thousands of GPUs or AWS Trainium chips), large-scale distributed training frameworks, and careful data curation to balance performance with bias, safety, and accuracy concerns.
Continued pre-training (also known as domain-adaptive pre-training or intermediate pre-training) is the process of taking a pre-trained language model and further training it on domain-specific or task-relevant corpora before fine-tuning. Unlike full pre-training from scratch, this approach builds on the existing capabilities of a general-purpose model, allowing it to internalize new patterns, vocabulary, or context relevant to a specific domain.
This step is particularly useful when the models must handle specialized terminology or unique syntax, particularly in fields like law, medicine, or finance. This approach is also essential when organizations need to align AI outputs with their internal documentation standards and proprietary knowledge bases. Additionally, it serves as an effective solution for addressing gaps in language or cultural representation by allowing focused training on underrepresented dialects, languages, or regional content.
To learn more, refer to the following resources:
- Pre-training genomic language models using AWS HealthOmics and Amazon SageMaker
- Customize models in Amazon Bedrock with your own data using fine-tuning and continued pre-training
Alignment methods for LLMs
The alignment of LLMs represents a crucial step in making sure these powerful systems behave in accordance with human values and preferences. AWS provides comprehensive support for implementing various alignment techniques, each offering distinct approaches to achieving this goal. The following are the key approaches.
Reinforcement Learning from Human Feedback
Reinforcement Learning from Human Feedback (RLHF) is one of the most established approaches to model alignment. This method transforms human preferences into a learned reward signal that guides model behavior. The RLHF process consists of three distinct phases. First, we collect comparison data, where human annotators choose between different model outputs for the same prompt. This data forms the foundation for training a reward model, which learns to predict human preferences. Finally, we fine-tune the language model using Proximal Policy Optimization (PPO), optimizing it to maximize the predicted reward.
Constitutional AI represents an innovative approach to alignment that reduces dependence on human feedback by enabling models to critique and improve their own outputs. This method involves training models to internalize specific principles or rules, then using these principles to guide generation and self-improvement. The reinforcement learning phase is similar to RLHF, except that pairs of responses are generated and evaluated by an AI model, as opposed to a human.
To learn more, refer to the following resources:
- Fine-tune large language models with reinforcement learning from human or AI feedback
- Machine-learning improving your LLMs with RLHF on Amazon Sagemaker
- High-quality human feedback for your generative AI applications from Amazon SageMaker Ground Truth Plus
Direct Preference Optimization
Direct Preference Optimization (DPO) is an alternative to RLHF, offering a more straightforward path to model alignment. DPO alleviates the need for explicit reward modeling and complex RL training loops, instead directly optimizing the model’s policy to align with human preferences through a modified supervised learning approach.
The key innovation of DPO lies in its formulation of preference learning as a classification problem. Given pairs of responses where one is preferred over the other, DPO trains the model to assign higher probability to preferred responses. This approach maintains theoretical connections to RLHF while significantly simplifying the implementation process. When implementing alignment methods, the effectiveness of DPO heavily depends on the quality, volume, and diversity of the preference dataset. Organizations must establish robust processes for collecting and validating human feedback while mitigating potential biases in label preferences.
For more information about DPO, see Align Meta Llama 3 to human preferences with DPO Amazon SageMaker Studio and Amazon SageMaker Ground Truth.
Fine-tuning methods on AWS
Fine-tuning transforms a pre-trained model into one that excels at specific tasks or domains. This phase involves training the model on carefully curated datasets that represent the target use case. Fine-tuning can range from updating all model parameters to more efficient approaches that modify only a small subset of parameters. Amazon SageMaker HyperPod offers fine-tuning capabilities for supported foundation models (FMs), and Amazon SageMaker Model Training offers flexibility for custom fine-tuning implementations along with training the models at scale without the need to manage infrastructure.
At its core, fine-tuning is a transfer learning process where a model’s existing knowledge is refined and redirected toward specific tasks or domains. This process involves carefully balancing the preservation of the model’s general capabilities while incorporating new, specialized knowledge.
Supervised Fine-Tuning
Supervised Fine-Tuning (SFT) involves updating model parameters using a curated dataset of input-output pairs that reflect the desired behavior. SFT enables precise behavioral control and is particularly effective when the model needs to follow specific instructions, maintain tone, or deliver consistent output formats, making it ideal for applications requiring high reliability and compliance. In regulated industries like healthcare or finance, SFT is often used after continued pre-training, which exposes the model to large volumes of domain-specific text to build contextual understanding. Although continued pre-training helps the model internalize specialized language (such as clinical or legal terms), SFT teaches it how to perform specific tasks such as generating discharge summaries, filling documentation templates, or complying with institutional guidelines. Both steps are typically essential: continued pre-training makes sure the model understands the domain, and SFT makes sure it behaves as required.However, because it updates the full model, SFT requires more compute resources and careful dataset construction. The dataset preparation process requires careful curation and validation to make sure the model learns the intended patterns and avoids undesirable biases.
For more details about SFT, refer to the following resources:
Parameter-Efficient Fine-Tuning
Parameter-Efficient Fine-Tuning (PEFT) represents a significant advancement in model adaptation, helping organizations customize large models while dramatically reducing computational requirements and costs. The following table summarizes the different types of PEFT.
| PEFT Type | AWS Service | How It Works | Benefits | |
| LoRA | LoRA (Low-Rank Adaptation) | SageMaker Training (custom implementation) | Instead of updating all model parameters, LoRA injects trainable rank decomposition matrices into transformer layers, reducing trainable parameters | Memory efficient, cost-efficient, opens up possibility of adapting larger models |
| QLoRA (Quantized LoRA) | SageMaker Training (custom implementation) | Combines model quantization with LoRA, loading the base model in 4-bit precision while adapting it with trainable LoRA parameters | Further reduces memory requirements compared to standard LoRA | |
| Prompt Tuning | Additive | SageMaker Training (custom implementation) | Prepends a small set of learnable prompt tokens to the input embeddings; only these tokens are trained | Lightweight and fast tuning, good for task-specific adaptation with minimal resources |
| P-Tuning | Additive | SageMaker Training (custom implementation) | Uses a deep prompt (tunable embedding vector passed through an MLP) instead of discrete tokens, enhancing expressiveness of prompts | More expressive than prompt tuning, effective in low-resource settings |
| Prefix Tuning | Additive | SageMaker Training (custom implementation) | Prepends trainable continuous vectors (prefixes) to the attention keys and values in every transformer layer, leaving the base model frozen | Effective for long-context tasks, avoids full model fine-tuning, and reduces compute needs |
The selection of a PEFT method significantly impacts the success of model adaptation. Each technique presents distinct advantages that make it particularly suitable for specific scenarios. In the following sections, we provide a comprehensive analysis of when to employ different PEFT approaches.
Low-Rank Adaptation
Low-Rank Adaptation (LoRA) excels in scenarios requiring substantial task-specific adaptation while maintaining reasonable computational efficiency. It’s particularly effective in the following use cases:
- Domain adaptation for enterprise applications – When adapting models to specialized industry vocabularies and conventions, such as legal, medical, or financial domains, LoRA provides sufficient capacity for learning domain-specific patterns while keeping training costs manageable. For instance, a healthcare provider might use LoRA to adapt a base model to medical terminology and clinical documentation standards.
- Multi-language adaptation – Organizations extending their models to new languages find LoRA particularly effective. It allows the model to learn language-specific nuances while preserving the base model’s general knowledge. For example, a global ecommerce platform might employ LoRA to adapt their customer service model to different regional languages and cultural contexts.
To learn more, refer to the following resources:
- Accelerating Mixtral MOE fine-tuning on Amazon SageMaker with QLoRA
- Fast and cost-effective LLaMA 2 fine-tuning with AWS Trainium
- PEFT fine tuning of Llama 3 on SageMaker HyperPod with AWS Trainium
- Efficient and cost-effective multi-tenant LoRA serving with Amazon SageMaker
Prompt tuning
Prompt tuning is ideal in scenarios requiring lightweight, switchable task adaptations. With prompt tuning, you can store multiple prompt vectors for different tasks without modifying the model itself. A primary use case could be when different customers require slightly different versions of the same basic functionality: prompt tuning allows efficient switching between customer-specific behaviors without loading multiple model versions. It’s useful in the following scenarios:
- Personalized customer interactions – Companies offering software as a service (SaaS) platform with customer support or virtual assistants can use prompt tuning to personalize response behavior for different clients without retraining the model. Each client’s brand tone or service nuance can be encoded in prompt vectors.
- Task switching in multi-tenant systems – In systems where multiple natural language processing (NLP) tasks (for example, summarization, sentiment analysis, classification) need to be served from a single model, prompt tuning enables rapid task switching with minimal overhead.
For more information, see Prompt tuning for causal language modeling.
P-tuning
P-tuning extends prompt tuning by representing prompts as continuous embeddings passed through a small trainable neural network (typically an MLP). Unlike prompt tuning, which directly learns token embeddings, P-tuning enables more expressive and non-linear prompt representations, making it suitable for complex tasks and smaller models. It’s useful in the following use cases:
- Low-resource domain generalization – A common use case includes low-resource settings where labeled data is limited, yet the task requires nuanced prompt conditioning to steer model behavior. For example, organizations operating in low-data regimes (such as niche scientific research or regional dialect processing) can use P-tuning to extract better task-specific performance without the need for large fine-tuning datasets.
To learn more, see P-tuning.
Prefix tuning
Prefix tuning prepends trainable continuous vectors, also called prefixes, to the key-value pairs in each attention layer of a transformer, while keeping the base model frozen. This provides control over the model’s behavior without altering its internal weights. Prefix tuning excels in tasks that benefit from conditioning across long contexts, such as document-level summarization or dialogue modeling. It provides a powerful compromise between performance and efficiency, especially when serving multiple tasks or clients from a single frozen base model. Consider the following use case:
- Dialogue systems – Companies building dialogue systems with varied tones (for example, friendly vs. formal) can use prefix tuning to control the persona and coherence across multi-turn interactions without altering the base model.
For more details, see Prefix tuning for conditional generation.
LLM optimization
LLM optimization represents a critical aspect of their development lifecycle, enabling more efficient training, reduced computational costs, and improved deployment flexibility. AWS provides a comprehensive suite of tools and techniques for implementing these optimizations effectively.
Quantization
Quantization is a process of mapping a large set of input values to a smaller set of output values. In digital signal processing and computing, it involves converting continuous values to discrete values and reducing the precision of numbers (for example, from 32-bit to 8-bit). In machine learning (ML), quantization is particularly important for deploying models on resource-constrained devices, because it can significantly reduce model size while maintaining acceptable performance. One of the most used techniques is Quantized Low-Rank Adaptation (QLoRA).QLoRA is an efficient fine-tuning technique for LLMs that combines quantization and LoRA approaches. It uses 4-bit quantization to reduce model memory usage while maintaining model weights in 4-bit precision during training and employs double quantization for further memory reduction. The technique integrates LoRA by adding trainable rank decomposition matrices and keeping adapter parameters in 16-bit precision, enabling PEFT. QLoRA offers significant benefits, including up to 75% reduced memory usage, the ability to fine-tune large models on consumer GPUs, performance comparable to full fine-tuning, and cost-effective training of LLMs. This has made it particularly popular in the open-source AI community because it makes working with LLMs more accessible to developers with limited computational resources.
To learn more, refer to the following resources:
- Interactively fine-tune Falcon-40B and other LLMs on Amazon SageMaker Studio notebooks using QLoRA
- Fine-tune Llama 2 using QLoRA and deploy it on Amazon SageMaker with AWS Inferentia2
Knowledge distillation
Knowledge distillation is a groundbreaking model compression technique in the world of AI, where a smaller student model learns to emulate the sophisticated behavior of a larger teacher model. This innovative approach has revolutionized the way we deploy AI solutions in real-world applications, particularly where computational resources are limited. By learning not only from ground truth labels but also from the teacher model’s probability distributions, the student model can achieve remarkable performance while maintaining a significantly smaller footprint. This makes it invaluable for various practical applications, from powering AI features on mobile devices to enabling edge computing solutions and Internet of Things (IoT) implementations. The key feature of distillation lies in its ability to democratize AI deployment—making sophisticated AI capabilities accessible across different platforms without compromising too much on performance. With knowledge distillation, you can run real-time speech recognition on smartphones, implement computer vision systems in resource-constrained environments, optimize NLP tasks for faster inference, and more.
For more information about knowledge distillation, refer to the following resources:
- A guide to Amazon Bedrock Model Distillation (preview)
- Use Llama 3.1 405B for synthetic data generation and distillation to fine-tune smaller models
Mixed precision training
Mixed precision training is a cutting-edge optimization technique in deep learning that balances computational efficiency with model accuracy. By intelligently combining different numerical precisions—primarily 32-bit (FP32) and 16-bit (FP16) floating-point formats—this approach revolutionizes how we train complex AI models. Its key feature is selective precision usage: maintaining critical operations in FP32 for stability while using FP16 for less sensitive calculations, resulting in a balance of performance and accuracy. This technique has become a game changer in the AI industry, enabling up to three times faster training speeds, a significantly reduced memory footprint, and lower power consumption. It’s particularly valuable for training resource-intensive models like LLMs and complex computer vision systems. For organizations using cloud computing and GPU-accelerated workloads, mixed precision training offers a practical solution to optimize hardware utilization while maintaining model quality. This approach has effectively democratized the training of large-scale AI models, making it more accessible and cost-effective for businesses and researchers alike.
To learn more, refer to the following resources:
- Mixed precision training with FP8 on P5 instances using Transformer Engine
- Mixed precision training with half-precision data types using PyTorch FSDP
- Efficiently train models with large sequence lengths using Amazon SageMaker model parallel
Gradient accumulation
Gradient accumulation is a powerful technique in deep learning that addresses the challenges of training large models with limited computational resources. Developers can simulate larger batch sizes by accumulating gradients over multiple smaller forward and backward passes before performing a weight update. Think of it as breaking down a large batch into smaller, more manageable mini batches while maintaining the effective training dynamics of the larger batch size. This method has become particularly valuable in scenarios where memory constraints would typically prevent training with optimal batch sizes, such as when working with LLMs or high-resolution image processing networks. By accumulating gradients across several iterations, developers can achieve the benefits of larger batch training—including more stable updates and potentially faster convergence—without requiring the enormous memory footprint typically associated with such approaches. This technique has democratized the training of sophisticated AI models, making it possible for researchers and developers with limited GPU resources to work on cutting-edge deep learning projects that would otherwise be out of reach. For more information, see the following resources:
- Efficiently fine-tune the ESM 2 protein language model with Amazon SageMaker
- End-to-end LLM training on instance clusters with over 100 nodes using AWS Trainium
Conclusion
When fine-tuning ML models on AWS, you can choose the right tool for your specific needs. AWS provides a comprehensive suite of tools for data scientists, ML engineers, and business users to achieve their ML goals. AWS has built solutions to support various levels of ML sophistication, from simple SageMaker training jobs for FM fine-tuning to the power of SageMaker HyperPod for cutting-edge research.
We invite you to explore these options, starting with what suits your current needs, and evolve your approach as those needs change. Your journey with AWS is just beginning, and we’re here to support you every step of the way.
About the authors
 Ilan Gleiser is a Principal GenAI Specialist at AWS on the WWSO Frameworks team, focusing on developing scalable generative AI architectures and optimizing foundation model training and inference. With a rich background in AI and machine learning, Ilan has published over 30 blog posts and delivered more than 100 machine learning and HPC prototypes globally over the last 5 years. Ilan holds a master’s degree in mathematical economics.
 Prashanth Ramaswamy is a Senior Deep Learning Architect at the AWS Generative AI Innovation Center, where he specializes in model customization and optimization. In his role, he works on fine-tuning, benchmarking, and optimizing models by using generative AI as well as traditional AI/ML solutions. He focuses on collaborating with Amazon customers to identify promising use cases and accelerate the impact of AI solutions to achieve key business outcomes.
De eksha Razdan is an Applied Scientist at the AWS Generative AI Innovation Center, where she specializes in model customization and optimization. Her work resolves around conducting research and developing generative AI solutions for various industries. She holds a master’s in computer science from UMass Amherst. Outside of work, Deeksha enjoys being in nature.
Streamline machine learning workflows with SkyPilot on Amazon SageMaker HyperPod
This post is co-written with Zhanghao Wu, co-creator of SkyPilot.
The rapid advancement of generative AI and foundation models (FMs) has significantly increased computational resource requirements for machine learning (ML) workloads. Modern ML pipelines require efficient systems for distributing workloads across accelerated compute resources, while making sure developer productivity remains high. Organizations need infrastructure solutions that are not only powerful but also flexible, resilient, and straightforward to manage.
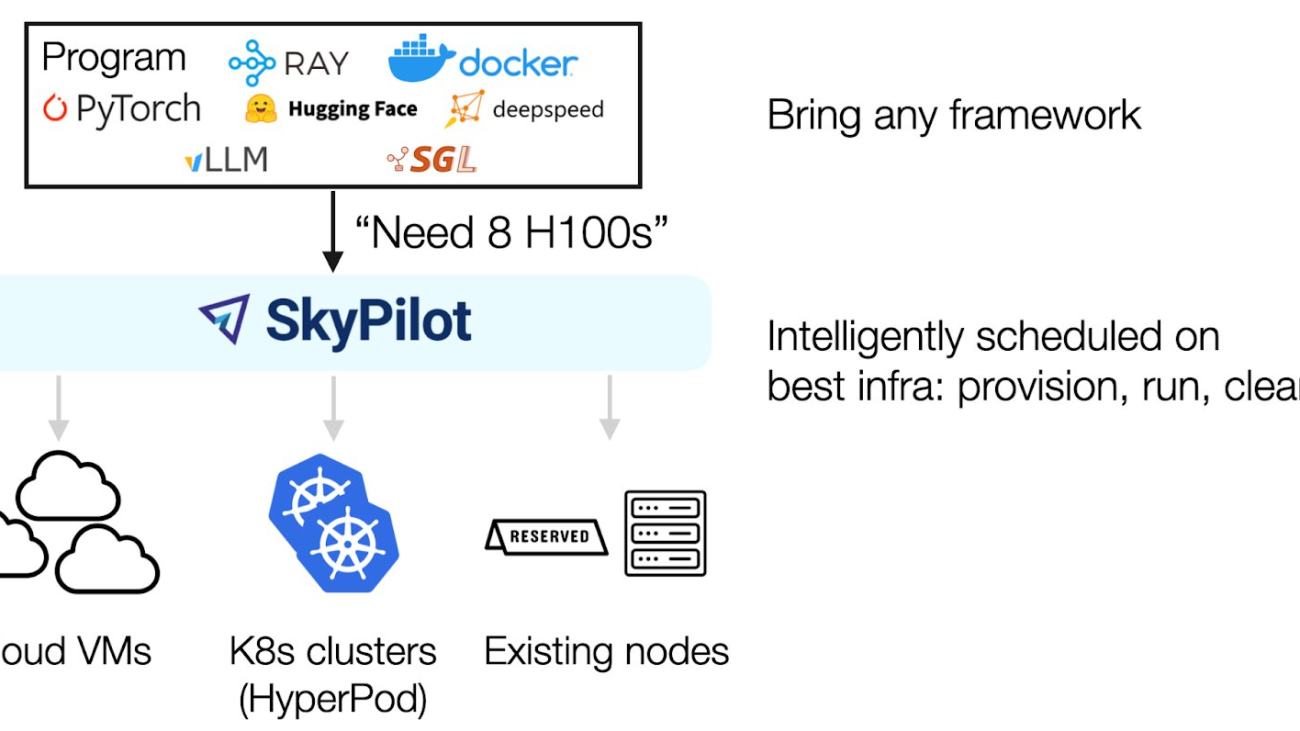
SkyPilot is an open source framework that simplifies running ML workloads by providing a unified abstraction layer that helps ML engineers run their workloads on different compute resources without managing underlying infrastructure complexities. It offers a simple, high-level interface for provisioning resources, scheduling jobs, and managing distributed training across multiple nodes.
Amazon SageMaker HyperPod is a purpose-built infrastructure to develop and deploy large-scale FMs. SageMaker HyperPod not only provides the flexibility to create and use your own software stack, but also provides optimal performance through same spine placement of instances, as well as built-in resiliency. Combining the resiliency of SageMaker HyperPod and the efficiency of SkyPilot provides a powerful framework to scale up your generative AI workloads.
In this post, we share how SageMaker HyperPod, in collaboration with SkyPilot, is streamlining AI development workflows. This integration makes our advanced GPU infrastructure more accessible to ML engineers, enhancing productivity and resource utilization.
Challenges of orchestrating machine learning workloads
Kubernetes has become popular for ML workloads due to its scalability and rich open source tooling. SageMaker HyperPod orchestrated on Amazon Elastic Kubernetes Service (Amazon EKS) combines the power of Kubernetes with the resilient environment of SageMaker HyperPod designed for training large models. Amazon EKS support in SageMaker HyperPod strengthens resilience through deep health checks, automated node recovery, and job auto-resume capabilities, providing uninterrupted training for large-scale and long-running jobs.
ML engineers transitioning from traditional VM or on-premises environments often face a steep learning curve. The complexity of Kubernetes manifests and cluster management can pose significant challenges, potentially slowing down development cycles and resource utilization.
Furthermore, AI infrastructure teams faced the challenge of balancing the need for advanced management tools with the desire to provide a user-friendly experience for their ML engineers. They required a solution that could offer both high-level control and ease of use for day-to-day operations.
SageMaker HyperPod with SkyPilot
To address these challenges, we partnered with SkyPilot to showcase a solution that uses the strengths of both platforms. SageMaker HyperPod excels at managing the underlying compute resources and instances, providing the robust infrastructure necessary for demanding AI workloads. SkyPilot complements this by offering an intuitive layer for job management, interactive development, and team coordination.
Through this partnership, we can offer our customers the best of both worlds: the powerful, scalable infrastructure of SageMaker HyperPod, combined with a user-friendly interface that significantly reduces the learning curve for ML engineers. For AI infrastructure teams, this integration provides advanced management capabilities while simplifying the experience for their ML engineers, creating a win-win situation for all stakeholders.
SkyPilot helps AI teams run their workloads on different infrastructures with a unified high-level interface and powerful management of resources and jobs. An AI engineer can bring in their AI framework and specify the resource requirements for the job; SkyPilot will intelligently schedule the workloads on the best infrastructure: find the available GPUs, provision the GPU, run the job, and manage its lifecycle.

Solution overview
Implementing this solution is straightforward, whether you’re working with existing SageMaker HyperPod clusters or setting up a new deployment. For existing clusters, you can connect using AWS Command Line Interface (AWS CLI) commands to update your kubeconfig and verify the setup. For new deployments, we guide you through setting up the API server, creating clusters, and configuring high-performance networking options like Elastic Fabric Adapter (EFA).
The following diagram illustrates the solution architecture.

In the following sections, we show how to run SkyPilot jobs for multi-node distributed training on SageMaker HyperPod. We go over the process of creating a SageMaker HyperPod cluster, installing SkyPilot, creating a SkyPilot cluster, and deploying a SkyPilot training job.
Prerequisites
You must have the following prerequisites:
- An existing SageMaker HyperPod cluster with Amazon EKS (to create one, refer to Deploy Your HyperPod Cluster). You must provision a single ml.p5.48xlarge instance for the code samples in the following sections.
- Access to the AWS CLI and
kubectlcommand line tools. - A Python environment for installing SkyPilot.
Create a SageMaker HyperPod cluster
You can create an EKS cluster with a single AWS CloudFormation stack following the instructions in Using CloudFormation, configured with a virtual private cloud (VPC) and storage resources.
To create and manage SageMaker HyperPod clusters, you can use either the AWS Management Console or AWS CLI. If you use the AWS CLI, specify the cluster configuration in a JSON file and choose the EKS cluster created from the CloudFormation stack as the orchestrator of the SageMaker HyperPod cluster. You then create the cluster worker nodes with NodeRecovery set to Automatic to enable automatic node recovery, and for OnStartDeepHealthChecks, add InstanceStress and InstanceConnectivity to enable deep health checks. See the following code:
You can add InstanceStorageConfigs to provision and mount additional Amazon Elastic Block Store (Amazon EBS) volumes on SageMaker HyperPod nodes.
To create the cluster using the SageMaker HyperPod APIs, run the following AWS CLI command:
You are now ready to set up SkyPilot on your SageMaker HyperPod cluster.
Connect to your SageMaker HyperPod EKS cluster
From your AWS CLI environment, run the aws eks update-kubeconfig command to update your local kube config file (located at ~/.kube/config) with the credentials and configuration needed to connect to your EKS cluster using the kubectl command (provide your specific EKS cluster name):
aws eks update-kubeconfig --name $EKS_CLUSTER_NAME
You can verify that you are connected to the EKS cluster by running the following command:
kubectl config current-context
Install SkyPilot with Kubernetes support
Use the following code to install SkyPilot with Kubernetes support using pip:
pip install skypilot[kubernetes]
This installs the latest build of SkyPilot, which includes the necessary Kubernetes integrations.
Verify SkyPilot’s connection to the EKS cluster
Check if SkyPilot can connect to your Kubernetes cluster:
sky check k8s
The output should look similar to the following code:
If this is your first time using SkyPilot with this Kubernetes cluster, you might see a prompt to create GPU labels for your nodes. Follow the instructions by running the following code:
python -m sky.utils.kubernetes.gpu_labeler --context <your-eks-context>
This script helps SkyPilot identify what GPU resources are available on each node in your cluster. The GPU labeling job might take a few minutes depending on the number of GPU resources in your cluster.
Discover available GPUs in the cluster
To see what GPU resources are available in your SageMaker HyperPod cluster, use the following code:
sky show-gpus --cloud k8s
This will list the available GPU types and their counts. We have two p5.48xlarge instances, each equipped with 8 NVIDIA H100 GPUs:
Launch an interactive development environment
With SkyPilot, you can launch a SkyPilot cluster for interactive development:
sky launch -c dev --gpus H100
This command creates an interactive development environment (IDE) with a single H100 GPU and will sync the local working directory to the cluster. SkyPilot handles the pod creation, resource allocation, and setup of the IDE.
After it’s launched, you can connect to your IDE:
ssh dev
This gives you an interactive shell in your IDE, where you can run your code, install packages, and perform ML experiments.
Run training jobs
With SkyPilot, you can run distributed training jobs on your SageMaker HyperPod cluster. The following is an example of launching a distributed training job using a YAML configuration file.
First, create a file named train.yaml with your training job configuration:
Then launch your training job:
sky launch -c train train.yaml
This creates a training job on a single p5.48xlarge nodes, equipped with 8 H100 NVIDIA GPUs. You can monitor the output with the following command:
sky logs train
Running multi-node training jobs with EFA
Elastic Fabric Adapter (EFA) is a network interface for Amazon Elastic Compute Cloud (Amazon EC2) instances that enables you to run applications requiring high levels of inter-node communications at scale on AWS through its custom-built operating system bypass hardware interface. This enables applications to communicate directly with the network hardware while bypassing the operating system kernel, significantly reducing latency and CPU overhead. This direct hardware access is particularly beneficial for distributed ML workloads where frequent inter-node communication during gradient synchronization can become a bottleneck. By using EFA-enabled instances such as p5.48xlarge or p6-b200.48xlarge, data scientists can scale their training jobs across multiple nodes while maintaining the low-latency, high-bandwidth communication essential for efficient distributed training, ultimately reducing training time and improving resource utilization for large-scale AI workloads.
The following code snippet shows how to incorporate this into your SkyPilot job:
Clean up
To delete your SkyPilot cluster, run the following command:
sky down <cluster_name>
To delete the SageMaker HyperPod cluster created in this post, you can user either the SageMaker AI console or the following AWS CLI command:
aws sagemaker delete-cluster --cluster-name <cluster_name>
Cluster deletion will take a few minutes. You can confirm successful deletion after you see no clusters on the SageMaker AI console.
If you used the CloudFormation stack to create resources, you can delete it using the following command:
aws cloudformation delete-stack --stack-name <stack_name>
Conclusion
By combining the robust infrastructure capabilities of SageMaker HyperPod with SkyPilot’s user-friendly interface, we’ve showcased a solution that helps teams focus on innovation rather than infrastructure complexity. This approach not only simplifies operations but also enhances productivity and resource utilization across organizations of all sizes. To get started, refer to SkyPilot in the Amazon EKS Support in Amazon SageMaker HyperPod workshop.
About the authors
 Roy Allela is a Senior AI/ML Specialist Solutions Architect at AWS. He helps AWS customers—from small startups to large enterprises—train and deploy foundation models efficiently on AWS. He is passionate about computational optimization problems and improving the performance of AI workloads.
 Zhanghao Wu is a co-creator of the SkyPilot open source project and holds a PhD in computer science from UC Berkeley. He works on SkyPilot core, client-server architecture, managed jobs, and improving the AI experience on diverse cloud infrastructure in general.
 Ankit Anand is a Senior Foundation Models Go-To-Market (GTM) Specialist at AWS. He partners with top generative AI model builders, strategic customers, and AWS service teams to enable the next generation of AI/ML workloads on AWS. Ankit’s experience includes product management expertise within the financial services industry for high-frequency and low-latency trading and business development for Amazon Alexa.
Intelligent document processing at scale with generative AI and Amazon Bedrock Data Automation
Extracting information from unstructured documents at scale is a recurring business task. Common use cases include creating product feature tables from descriptions, extracting metadata from documents, and analyzing legal contracts, customer reviews, news articles, and more. A classic approach to extracting information from text is named entity recognition (NER). NER identifies entities from predefined categories, such as persons and organizations. Although various AI services and solutions support NER, this approach is limited to text documents and only supports a fixed set of entities. Furthermore, classic NER models can’t handle other data types such as numeric scores (such as sentiment) or free-form text (such as summary). Generative AI unlocks these possibilities without costly data annotation or model training, enabling more comprehensive intelligent document processing (IDP).
AWS recently announced the general availability of Amazon Bedrock Data Automation, a feature of Amazon Bedrock that automates the generation of valuable insights from unstructured multimodal content such as documents, images, video, and audio. This service offers pre-built capabilities for IDP and information extraction through a unified API, alleviating the need for complex prompt engineering or fine-tuning, and making it an excellent choice for document processing workflows at scale. To learn more about Amazon Bedrock Data Automation, refer to Simplify multimodal generative AI with Amazon Bedrock Data Automation.
Amazon Bedrock Data Automation is the recommended approach for IDP use case due to its simplicity, industry-leading accuracy, and managed service capabilities. It handles the complexity of document parsing, context management, and model selection automatically, so developers can focus on their business logic rather than IDP implementation details.
Although Amazon Bedrock Data Automation meets most IDP needs, some organizations require additional customization in their IDP pipelines. For example, companies might need to use self-hosted foundation models (FMs) for IDP due to regulatory requirements. Some customers have builder teams who might prefer to maintain full control over the IDP pipeline instead of using a managed service. Finally, organizations might operate in AWS Regions where Amazon Bedrock Data Automation is not available (available in us-west-2 and us-east-1 as of June 2025). In such cases, builders might use Amazon Bedrock FMs directly or perform optical character recognition (OCR) with Amazon Textract.
This post presents an end-to-end IDP application powered by Amazon Bedrock Data Automation and other AWS services. It provides a reusable AWS infrastructure as code (IaC) that deploys an IDP pipeline and provides an intuitive UI for transforming documents into structured tables at scale. The application only requires the user to provide the input documents (such as contracts or emails) and a list of attributes to be extracted. It then performs IDP with generative AI.
The application code and deployment instructions are available on GitHub under the MIT license.
Solution overview
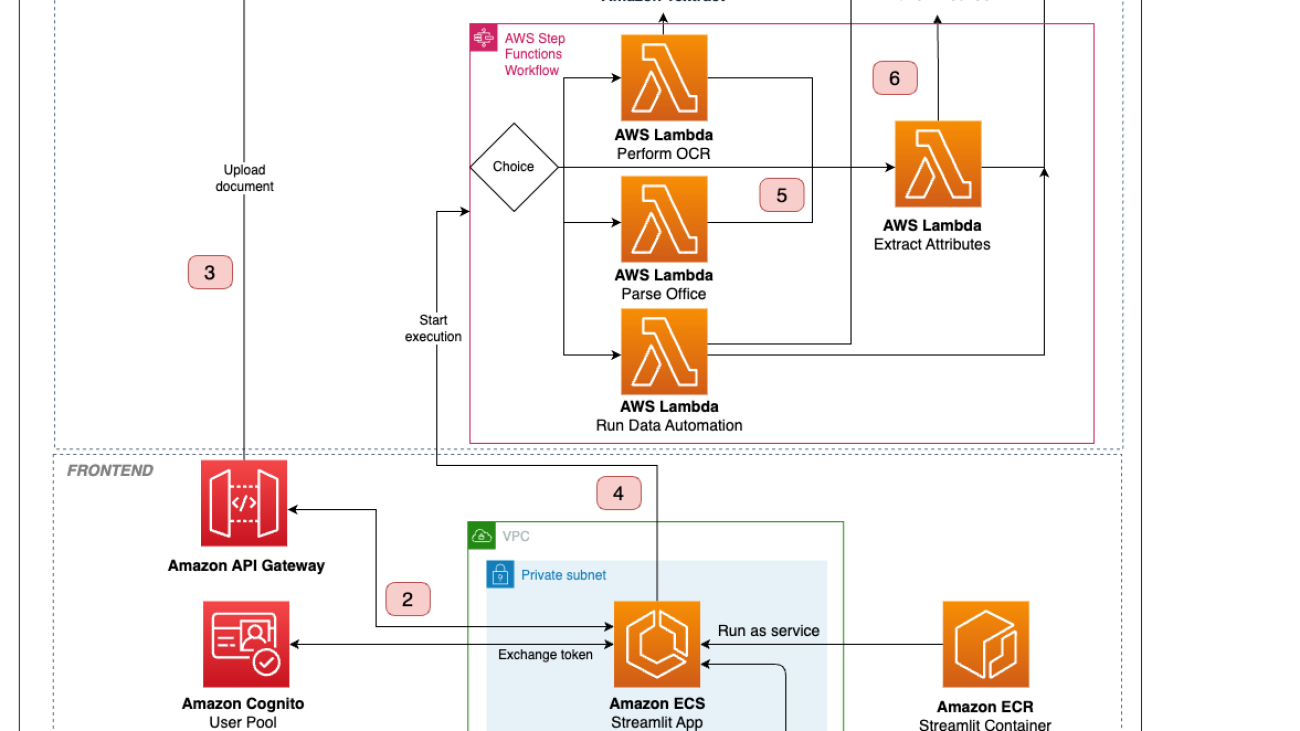
The IDP solution presented in this post is deployed as IaC using the AWS Cloud Development Kit (AWS CDK). Amazon Bedrock Data Automation serves as the primary engine for information extraction. For cases requiring further customization, the solution also provides alternative processing paths using Amazon Bedrock FMs and Amazon Textract integration.
We use AWS Step Functions to orchestrate the IDP workflow and parallelize processing for multiple documents. As part of the workflow, we use AWS Lambda functions to call Amazon Bedrock Data Automation or Amazon Textract and Amazon Bedrock (depending on the selected parsing mode). Processed documents and extracted attributes are stored in Amazon Simple Storage Service (Amazon S3).
A Step Functions workflow with the business logic is invoked through an API call performed using an AWS SDK. We also build a containerized web application running on Amazon Elastic Container Service (Amazon ECS) that is available to end-users through Amazon CloudFront to simplify their interaction with the solution. We use Amazon Cognito for authentication and secure access to the APIs.
The following diagram illustrates the architecture and workflow of the IDP solution.

The IDP workflow includes the following steps:
- A user logs in to the web application using credentials managed by Amazon Cognito, selects input documents, and defines the fields to be extracted from them in the UI. Optionally, the user can specify the parsing mode, LLM to use, and other settings.
- The user starts the IDP pipeline.
- The application creates a pre-signed S3 URL for the documents and uploads them to Amazon S3.
- The application triggers Step Functions to start the state machine with the S3 URIs and IDP settings as inputs. The Map state starts to process the documents concurrently.
- Depending on the document type and the parsing mode, it branches to different Lambda functions that perform IDP, save results to Amazon S3, and send them back to the UI:
- Amazon Bedrock Data Automation – Documents are directed to the “Run Data Automation” Lambda function. The Lambda function creates a blueprint with the user-defined fields schema and launches an asynchronous Amazon Bedrock Data Automation job. Amazon Bedrock Data Automation handles the complexity of document processing and attribute extraction using optimized prompts and models. When the job results are ready, they’re saved to Amazon S3 and sent back to the UI. This approach provides the best balance of accuracy, ease of use, and scalability for most IDP use cases.
- Amazon Textract – If the user specifies Amazon Textract as a parsing mode, the IDP pipeline splits into two steps. First, the “Perform OCR” Lambda function is invoked to run an asynchronous document analysis job. The OCR outputs are processed using the amazon-textract-textractor library and formatted as Markdown. Second, the text is passed to the “Extract attributes” Lambda function (Step 6), which invokes an Amazon Bedrock FM given the text and the attributes schema. The outputs are saved to Amazon S3 and sent to the UI.
- Handling office documents – Documents with suffixes like .doc, .ppt, and .xls are processed by the “Parse office” Lambda function, which uses LangChain document loaders to extract the text content. The outputs are passed to the “Extract attributes” Lambda function (Step 6) to proceed with the IDP pipeline.
- If the user chooses an Amazon Bedrock FM for IDP, the document is sent to the “Extract attributes” Lambda function. It converts a document into a set of images, which are sent to a multimodal FM with the attributes schema as part of a custom prompt. It parses the LLM response to extract JSON outputs, saves them to Amazon S3, and sends it back to the UI. This flow supports .pdf, .png, and .jpg documents.
- The web application checks the state machine execution results periodically and returns the extracted attributes to the user when they are available.
Prerequisites
You can deploy the IDP solution from your local computer or from an Amazon SageMaker notebook instance. The deployment steps are detailed in the solution README file.
If you choose to deploy using a SageMaker notebook, which is recommended, you will need access to an AWS account with permissions to create and launch a SageMaker notebook instance.
Deploy the solution
To deploy the solution to your AWS account, complete the following steps:
- Open the AWS Management Console and choose the Region in which you want to deploy the IDP solution.
- Launch a SageMaker notebook instance. Provide the notebook instance name and notebook instance type, which you can set to
ml.m5.large. Leave other options as default. - Navigate to the Notebook instance and open the IAM role attached tothe notebook. Open the role on the AWS Identity and Access Management (IAM) console.
- Attach an inline policy to the role and insert the following policy JSON:
{
  "Version": "2012-10-17",
  "Statement": [
    {
      "Effect": "Allow",
      "Action": [
        "cloudformation:*",
        "s3:*",
        "iam:*",
        "sts:AssumeRole"
      ],
      "Resource": "*"
    },
    {
      "Effect": "Allow",
      "Action": [
        "ssm:GetParameter",
        "ssm:GetParameters"
      ],
      "Resource": "arn:aws:ssm:*:*:parameter/cdk-bootstrap/*"
    }
  ]
}
- When the notebook instance status is marked as InService, choose Open JupyterLab.
- In the JupyterLab environment, choose File, New, and Terminal.
- Clone the solution repository by running the following commands:
cd SageMaker
git clone https://github.com/aws-samples/intelligent-document-processing-with-amazon-bedrock.git- Navigate to the repository folder and run the script to install requirements:
cd intelligent-document-processing-with-amazon-bedrock
sh install_deps.sh- Run the script to create a virtual environment and install dependencies:
sh install_env.sh
source .venv/bin/activate- Within the repository folder, copy the
config-example.ymlto aconfig.ymlto specify your stack name. Optionally, configure the services and indicate the modules you want to deploy (for example, to disable deploying a UI, changedeploy_streamlittoFalse). Make sure you add your user email to the Amazon Cognito users list. - Configure Amazon Bedrock model access by opening the Amazon Bedrock console in the Region specified in the
config.ymlfile. In the navigation pane, choose Model Access and make sure to enable access for the model IDs specified inconfig.yml. - Bootstrap and deploy the AWS CDK in your account:
cdk bootstrap
cdk deploy
Note that this step may take some time, especially on the first deployment. Once deployment is complete, you should see the message as shown in the following screenshot. You can access the Streamlit frontend using the CloudFront distribution URL provided in the AWS CloudFormation outputs. The temporary login credentials will be sent to the email specified in config.yml during the deployment.

Using the solution
This section guides you through two examples to showcase the IDP capabilities.
Example 1: Analyzing financial documents
In this scenario, we extract key features from a multi-page financial statement using Amazon Bedrock Data Automation. We use a sample document in PDF format with a mixture of tables, images, and text, and extract several financial metrics. Complete the following steps:
- Upload a document by attaching a file through the solution UI.

- On the Describe Attributes tab, either manually list the names and descriptions of the attributes or upload these fields in JSON format. We want to find the following metrics:
- Current cash in assets in 2018
- Current cash in assets in 2019
- Operating profit in 2018
- Operating profit in 2019

- Choose Extract attributes to start the IDP pipeline.
The provided attributes are integrated into a custom blueprint with the inferred attributes list, which is then used to invoke a data automation job on the uploaded documents.
After the IDP pipeline is complete, you will see a table of results in the UI. It includes an index for each document in the _doc column, a column for each of the attributes you defined, and a file_name column that contains the document name.

From the following statement excerpts, we can see that Amazon Bedrock Data Automation was able to correctly extract the values for current assets and operating profit.


The IDP solution is also able to do complex calculations beyond well-defined entities. Let’s say we want to calculate the following accounting metrics:
- Liquidity ratios (Current assets/Current liabilities)
- Working capitals (Current assets – Current liabilities)
- Revenue increase ((Revenue year 2/Revenue year 1) – 1)
We define the attributes and their formulas as parts of the attributes’ schema. This time, we choose an Amazon Bedrock LLM as a parsing mode to demonstrate how the application can use a multimodal FM for IDP. When using an Amazon Bedrock LLM, starting the IDP pipeline will now combine the attributes and their description into a custom prompt template, which is sent to the LLM with the documents converted to images. As a user, you can specify the LLM powering the extraction and its inference parameters, such as temperature.

The output, including the full results, is shown in the following screenshot.


Example 2: Processing customer emails
In this scenario, we want to extract multiple features from a list of emails with customer complaints due to delays in product shipments using Amazon Bedrock Data Automation. For each email, we want to find the following:
- Customer name
- Shipment ID
- Email language
- Email sentiment
- Shipment delay (in days)
- Summary of issue
- Suggested response
Complete the following steps:
- Upload input emails as .txt files. You can download sample emails from GitHub.

- On the Describe Attributes tab, list names and descriptions of the attributes.

You can add few-shot examples for some fields (such as delay) to explain to the LLM how these fields values should be extracted. You can do this by adding an example input and the expected output for the attribute to the description.
- Choose Extract attributes to start the IDP pipeline.
The provided attributes and their descriptions will be integrated into a custom blueprint with the inferred attributes list, which is then used to invoke a data automation job on the uploaded documents. When the IDP pipeline is complete, you will see the results.

The application allows downloading the extraction results as a CSV or a JSON file. This makes it straightforward to use the results for downstream tasks, such as aggregating customer sentiment scores.
Pricing
In this section, we calculate cost estimates for performing IDP on AWS with our solution.
Amazon Bedrock Data Automation provides a transparent pricing schema depending on the input document size (number of pages, images, or minutes). When using Amazon Bedrock FMs, pricing depends on the number of input and output tokens used as part of the information extraction call. Finally, when using Amazon Textract, OCR is performed and priced separately based on the number of pages in the documents.
Using the preceding scenarios as examples, we can approximate the costs depending on the selected parsing mode. In the following table, we show costs using two datasets: 100 20-page financial documents, and 100 1-page customer emails. We ignore costs of Amazon ECS and Lambda.
| AWS service |
Use case 1 (100 20-page financial documents) |
Use case 2 (100 1-page customer emails) |
| IDP option 1: Amazon Bedrock Data Automation | ||
| Amazon Bedrock Data Automation (custom output) | $20.00 | $1.00 |
| IDP option 2: Amazon Bedrock FM | ||
| Amazon Bedrock (FM invocation, Anthropic’s Claude 4 Sonnet) | $1.79 | $0.09 |
| IDP option 3: Amazon Textract and Amazon Bedrock FM | ||
| Amazon Textract (document analysis job with layout) | $30.00 | $1.50 |
| Amazon Bedrock (FM invocation, Anthropic’s Claude 3.7 Sonnet) | $1.25 | $0.06 |
| Orchestration and storage (shared costs) | ||
| Amazon S3 | $0.02 | $0.02 |
| AWS CloudFront | $0.09 | $0.09 |
| Amazon ECS | – | – |
| AWS Lambda | – | – |
| Total cost: Amazon Bedrock Data Automation | $20.11 | $1.11 |
| Total cost: Amazon Bedrock FM | $1.90 | $0.20 |
| Total cost: Amazon Textract and Amazon Bedrock FM | $31.36 | $1.67 |
The cost analysis suggests that using Amazon Bedrock FMs with a custom prompt template is a cost-effective method for IDP. However, this approach requires a bigger operational overhead, because the pipeline needs to be optimized depending on the LLM, and requires manual security and privacy management. Amazon Bedrock Data Automation offers a managed service that uses a choice of high-performing FMs through a single API.
Clean up
To remove the deployed resources, complete the following steps:
- On the AWS CloudFormation console, delete the created stack. Alternatively, run the following command:
cdk destroy --region <YOUR_DEPLOY_REGION> - On the Amazon Cognito console, delete the user pool.
Conclusion
Extracting information from unstructured documents at scale is a recurring business task. This post discussed an end-to-end IDP application that performs information extraction using multiple AWS services. The solution is powered by Amazon Bedrock Data Automation, which provides a fully managed service for generating insights from documents, images, audio, and video. Amazon Bedrock Data Automation handles the complexity of document processing and information extraction, optimizing for both performance and accuracy without requiring expertise in prompt engineering. For extended flexibility and customizability in specific scenarios, our solution also supports IDP using Amazon Bedrock custom LLM calls and Amazon Textract for OCR.
The solution supports multiple document types, including text, images, PDF, and Microsoft Office documents. At the time of writing, accurate understanding of information in documents rich with images, tables, and other visual elements is only available for PDF and images. We recommend converting complex Office documents to PDFs or images for best performance. Another solution limitation is the document size. As of June 2025, Amazon Bedrock Data Automation supports documents up to 20 pages for custom attributes extraction. When using custom Amazon Bedrock LLMs for IDP, the 300,000-token context window of Amazon Nova LLMs allows processing documents with up to roughly 225,000 words. To extract information from larger documents, you would currently need to split the file into multiple documents.
In the next versions of the IDP solution, we plan to keep adding support for state-of-the-art language models available through Amazon Bedrock and iterate on prompt engineering to further improve the extraction accuracy. We also plan to implement techniques for extending the size of supported documents and providing users with a precise indication of where exactly in the document the extracted information is coming from.
To get started with IDP with the described solution, refer to the GitHub repository. To learn more about Amazon Bedrock, refer to the documentation.
About the authors
 Nikita Kozodoi, PhD, is a Senior Applied Scientist at the AWS Generative AI Innovation Center, where he works on the frontier of AI research and business. With rich experience in Generative AI and diverse areas of ML, Nikita is enthusiastic about using AI to solve challenging real-world business problems across industries.
 Zainab Afolabi is a Senior Data Scientist at the Generative AI Innovation Centre in London, where she leverages her extensive expertise to develop transformative AI solutions across diverse industries. She has over eight years of specialised experience in artificial intelligence and machine learning, as well as a passion for translating complex technical concepts into practical business applications.
 Aiham Taleb, PhD, is a Senior Applied Scientist at the Generative AI Innovation Center, working directly with AWS enterprise customers to leverage Gen AI across several high-impact use cases. Aiham has a PhD in unsupervised representation learning, and has industry experience that spans across various machine learning applications, including computer vision, natural language processing, and medical imaging.
 Liza (Elizaveta) Zinovyeva is an Applied Scientist at AWS Generative AI Innovation Center and is based in Berlin. She helps customers across different industries to integrate Generative AI into their existing applications and workflows. She is passionate about AI/ML, finance and software security topics. In her spare time, she enjoys spending time with her family, sports, learning new technologies, and table quizzes.
 Nuno Castro is a Sr. Applied Science Manager at AWS Generative AI Innovation Center. He leads Generative AI customer engagements, helping hundreds of AWS customers find the most impactful use case from ideation, prototype through to production. He has 19 years experience in AI in industries such as finance, manufacturing, and travel, leading AI/ML teams for 12 years.
 Ozioma Uzoegwu is a Principal Solutions Architect at Amazon Web Services. In his role, he helps financial services customers across EMEA to transform and modernize on the AWS Cloud, providing architectural guidance and industry best practices. Ozioma has many years of experience with web development, architecture, cloud and IT management. Prior to joining AWS, Ozioma worked with an AWS Advanced Consulting Partner as the Lead Architect for the AWS Practice. He is passionate about using latest technologies to build a modern financial services IT estate across banking, payment, insurance and capital markets.
 Eren Tuncer is a Solutions Architect at Amazon Web Services focused on Serverless and building Generative AI applications. With more than fifteen years experience in software development and architecture, he helps customers across various industries achieve their business goals using cloud technologies with best practices. As a builder, he’s passionate about creating solutions with state-of-the-art technologies, sharing knowledge, and helping organizations navigate cloud adoption.
 Francesco Cerizzi is a Solutions Architect at Amazon Web Services exploring tech frontiers while spreading generative AI knowledge and building applications. With a background as a full stack developer, he helps customers across different industries in their journey to the cloud, sharing insights on AI’s transformative potential along the way. He’s passionate about Serverless, event-driven architectures, and microservices in general. When not diving into technology, he’s a huge F1 fan and loves Tennis.

Build a conversational data assistant, Part 2 – Embedding generative business intelligence with Amazon Q in QuickSight
In Part 1 of this series, we explored how Amazon’s Worldwide Returns & ReCommerce (WWRR) organization built the Returns & ReCommerce Data Assist (RRDA)—a generative AI solution that transforms natural language questions into validated SQL queries using Amazon Bedrock Agents. Although this capability improves data access for technical users, the WWRR organization’s journey toward truly democratized data doesn’t end there.
For many stakeholders across WWRR, visualizing trends and patterns is far more valuable than working with raw data. These users need quick insights to drive decisions without having to interpret SQL results. Although we maintain pre-built Amazon QuickSight dashboards for commonly tracked metrics, business users frequently require support for long-tail analytics—the ability to conduct deep dives into specific problems, anomalies, or regional variations not covered by standard reports.
To bridge this gap, we extended our RRDA solution beyond SQL generation to include visualization capabilities. In this post, we dive into how we integrated Amazon Q in QuickSight to transform natural language requests like “Show me how many items were returned in the US over the past 6 months” into meaningful data visualizations. We demonstrate how combining Amazon Bedrock Agents with Amazon Q in QuickSight creates a comprehensive data assistant that delivers both SQL code and visual insights through a single, intuitive conversational interface—democratizing data access across the enterprise.
Intent and domain classification for visual analytics
The overall architecture diagram of the RRDA system has two parts. In Part 1, we focused on the upper pathway that generates SQL; for Part 2, we explore the lower pathway (highlighted in red in the following diagram) that connects users directly to visual insights through Amazon Q in QuickSight.

RRDA Architecture Overview highlighting the visualization pathway (shown in red) that processes SHOW_METRIC intents through Q topic retrieval and selection to deliver embedded Amazon Q in QuickSight visualizations.
As mentioned in Part 1, RRDA routes user queries through intent and domain classification systems that determine how each request should be processed. When a query is classified as SHOW_METRIC (triggered by phrases like “show me” or “display,” or questions about visualizing trends), the system routes to our Amazon Q in QuickSight integration pathway instead of generating SQL. Simultaneously, our domain classifier identifies business contexts like Returns Processing or Promotions to focus the search scope. This dual classification makes it possible to seamlessly switch the user experience between receiving code and receiving visual insights while maintaining business context.
For example, when a user asks “Show me the trend for how many items were returned for the past quarter,” our system identifies both the visualization intent and the Returns Processing business domain, allowing subsequent LLMs to search within domain-specific Amazon QuickSight Q topics rather than across the entire catalog. After the user intent is classified, RRDA notifies the user that it’s searching for relevant metrics in Amazon Q in QuickSight and initiates the domain-filtered Q topic selection process described in the next section.
Q topic retrieval and selection
After the user intent is classified as SHOW_METRIC and the relevant business domain is identified, RRDA must now determine which specific Q topic can best visualize the requested information. Q topics are specialized configurations that enable business users to ask natural language questions about specific datasets. Each Q topic contains metadata about available metrics, dimensions, time periods, and synonyms—making topic selection a critical step in delivering accurate visual insights. The challenge lies in intelligently mapping user requests to the most appropriate Q topics from our catalog of over 50 specialized configurations. To solve this problem, RRDA employs a two-step approach: first retrieving semantically relevant Q topics using vector search with metadata filtering to narrow down candidates efficiently, then selecting the best matches using an Amazon Bedrock foundation model (FM) to evaluate each candidate’s ability to address the specific metrics and dimensions in the user’s query.
We implemented this retrieval-then-selection approach by building a dedicated Q topic knowledge base using Amazon Bedrock Knowledge Bases, a fully managed service that you can use to store, search, and retrieve organization-specific information for use with large language models (LLMs). The metadata for each Q topic—including name, description, available metrics, dimensions, and sample questions—is converted into a searchable document and embedded using the Amazon Titan Text Embeddings V2 model. When a user asks a question, RRDA extracts the core query intent and specified domain, then performs a vector similarity search against our Q topic knowledge base. The system applies domain filters to the vector search configuration when a specific business domain is identified, making sure that only relevant Q topics are considered. From this retrieved list, a lightweight Amazon Bedrock FM analyzes the candidates and identifies the most relevant Q topic that can address the user’s specific question, considering factors like metric availability, dimension support, and query compatibility.
The following diagram illustrates the Q topic retrieval and selection workflow.

Q topic retrieval and selection workflow illustrating how RRDA identifies relevant visualization sources through vector search, then optimizes user questions for Amazon Q in QuickSight using Amazon Bedrock.
Continuing our previous example, when a user asks “Show me the trend for how many items were returned for the past quarter,” our system first detects the intent as SHOW_METRIC, then determines whether a domain like Returns Processing or Promotions is specified. The query is then passed to our Q topic retrieval function, which uses the Retrieve API to search for Q topics with relevant metadata. The search returns a ranked list of 10 candidate Q topics, each containing information about its capabilities, supported metrics, and visualization options.
This retrieval mechanism solves a critical problem in enterprise business intelligence (BI) environments—discovering which report or dataset has information to answer the user’s question. Rather than requiring users to know which of our more than 50 Q topics to query, our system automatically identifies the relevant Q topics based on semantic understanding of the request. This intelligent Q topic selection creates a frictionless experience where business users can focus on asking questions in natural language while RRDA handles the complexity of finding the right data sources behind the scenes.
Question rephrasing for optimal Q topic results
After RRDA identifies relevant Q topics, we face another critical challenge: bridging the gap between how users naturally ask questions and the optimal format that Amazon Q in QuickSight expects. Without this crucial step, even with the right Q topic selected, users might receive suboptimal visualizations.
The question rephrasing challenge
Business users express their data needs in countless ways:
- Imprecise time frames: “How many items were returned lately?”
- Complex multi-part questions: “Compare how many items were returned between NA & EU for Q1”
- Follow-up questions: “Write a SQL query for how many returned items are currently being processed in the returns center” and after RRDA responds with the SQL query, then “Great! Now show me this metric for this year”
Although Amazon Q in QuickSight is designed to handle natural language, it is a generative Q&A system rather than a conversational interface, and it performs best with clear, well-structured questions. The right phrasing significantly improves response quality by making sure Amazon Q in QuickSight precisely understands what to visualize.
Structured question generation with the Amazon Bedrock Converse API
To solve this challenge, we implemented a question rephrasing system using the Amazon Bedrock Converse API with structured outputs. This approach makes sure user queries are transformed into optimal formats for Amazon Q in QuickSight while preserving critical filters and parameters.
First, we define Pydantic data models to structure the FM output:
The Converse API tool use capability makes it possible to structure responses using these defined data models so our code can parse them reliably. Our system passes the user query, conversation history, and retrieved Q topic metadata to the Amazon Bedrock FM, which formulates questions following validated patterns:
- “Show me the [specific metric(s)] for/over [user filters]”
- “How has [specific metric] changed from [start time frame] to [end time frame]?”
- “Compare [metric A] to [metric B] for [time frame]”
- “What is [specific metric] for [user filters]?”
These formats consistently produce optimal results in Amazon Q in QuickSight across our business domains while preserving critical business context—including domain-specific terminology, time filters, dimensional constraints, and comparative elements. For example, after reviewing SQL results for a resolution index metric, a user might ask the follow-up question “Now show me how this metric trended over the last 6 months,” which our system rephrases to “Show me how the resolution index trended over the last 6 months” while selecting only Amazon Q topics related to the Returns Processing business domain.
Embedding Amazon Q in QuickSight visualizations within the chat interface
When users ask to visualize data in the RRDA chat interface, the system seamlessly embeds Amazon Q in QuickSight directly within the conversation. Using the QuickSight embedding functionality, RRDA generates a secure embedding URL that renders interactive visualizations directly in the chat window. Users can view data visualizations without leaving the conversation flow. The system automatically selects the appropriate Q topic and rephrases the user’s question for optimal results, then passes this information to the embedded QuickSight component, which generates and displays the visualization. The following screenshot shows a view (with sample data) of what this embedded experience looks like. For detailed information about the embedding capabilities used, see Embedding the Amazon Q in QuickSight Generative Q&A experience.

Sample Q Topic showing embedded visualization capabilities within RRDA’s chat interface, demonstrating how users can seamlessly transition from natural language questions to interactive data visualizations.
Direct Q topic suggestions for visualization requests
When users ask visualization-oriented questions with the SHOW_METRIC intent (for example, “Show me how many items were returned over the past 3 months”), RRDA presents relevant Q topics as interactive suggestion cards within the conversation flow. Each suggestion includes the topic name (like “Returns Processing – Sample Topic”), along with an optimized question format that the user can choose to immediately generate the visualization.

These suggestions appear with a clear heading: “Here are the most relevant questions and Amazon QuickSight Q topics:” so it’s straightforward for users to identify which data source will best answer their question. The system formats these suggestions as clickable prompts that, when selected, automatically trigger the embedded Amazon QuickSight generative Q&A modal illustrated in the previous section.
Contextual follow-up visualizations in conversations
RRDA proactively suggests relevant visualizations even when users are engaged in regular text conversations with the Amazon Bedrock agent described in Part 1. For example, when a user asks for information about a specific metric (“What is the resolution index metric? Explain it to me in 1-2 sentences”), the system provides a text explanation (which is blurred out in the following screenshot) but also automatically identifies opportunities for visual analysis. These suggestions appear as “Get related insights from Amazon Q in QuickSight:” followed by relevant questions like “What is resolution index for the last 3 months?” This creates a seamless bridge between learning about metrics and visualizing them—users can start with simple queries about metric definitions and quickly transition to data exploration without reformulating their requests. This contextual awareness makes sure users discover valuable visualizations they might not have otherwise known to request, enhancing the overall analytics experience.

Automating Q topic metadata management
Behind RRDA’s ability to suggest relevant visualizations is a knowledge base of over 50 Q topics and their metadata. To keep this knowledge base up-to-date as our analytics landscape grows, we’ve implemented an automated metadata management workflow using AWS Step Functions that refreshes daily, pictured in the following diagram.

Automated Q topic metadata management workflow using AWS Step Functions that refreshes daily to keep the knowledge base current with the latest QuickSight Q topic configurations and validated questions.
The workflow begins with our FetchQTopicMetadata AWS Lambda function, which connects to QuickSight and gathers essential information about each Q topic—what metrics it tracks, what filters users can apply, and importantly, what questions it has successfully answered in the past. We specifically use the DescribeTopic and ListTopicReviewedAnswers APIs, and store the resulting metadata in Amazon DynamoDB, a NoSQL key-value database. This creates a powerful feedback loop—when Q topic authors review and validate questions from users, these validated questions are automatically incorporated into our knowledge base, making sure the system continuously learns from user interactions and expert curation.
For the next step in the workflow, the BatchSummarizeQTopics function generates a concise summary of this collected metadata using Amazon Bedrock FMs. This step is necessary because raw Q topic configurations often exceed token limits for context windows in FMs. The function extracts essential information—metrics, measures, dimensions, and example questions—into compact summaries that can be effectively processed during vector retrieval and question formulation.
The final step in our workflow is the SyncQTopicsKnowledgeBase function, which transforms this enriched metadata into vector-searchable documents, one for each Q topic with explicit business domain tags that enable domain-filtered retrieval. The function triggers Amazon Bedrock knowledge base ingestion to rebuild vector embeddings (numerical representations that capture semantic meaning), completing the cycle from Q topic configuration to searchable knowledge assets. This pipeline makes sure RRDA consistently has access to current, comprehensive Q topic metadata without requiring manual updates, significantly reducing operational overhead while improving the quality of Q topic recommendations.
Best practices
Based on our experience extending RRDA with visualization capabilities through Amazon Q in QuickSight, the following are some best practices for implementing generative BI solutions in the enterprise:
- Anticipate analytical needs with intelligent suggestions – Use AI to predict what visualizations users potentially expect, automatically surfacing relevant charts during conversations about metrics or SQL. This alleviates discovery barriers and empowers users with insights they might not have thought initially, seamlessly bridging the gap between understanding data and visualizing trends.
- Build an automatic translation layer when connecting disparate AI systems – Use AI to automatically reformat natural language queries into the structured patterns that systems expect, rather than requiring users to learn precise system-specific phrasing. Preserve the user’s original intent and context while making sure each system receives input in its preferred format.
- Design feedback loops – Create automated systems that collect validated content from user interactions and feed it back into your knowledge bases. By harvesting human-reviewed questions from tools like Amazon Q in QuickSight, your system continuously improves through better retrieval data without requiring model retraining.
- Implement retrieval before generation – Use vector search with domain filtering to narrow down relevant visualization sources before employing generative AI to select and formulate the optimal question, dramatically improving response quality and reducing latency.
- Maintain domain context across modalities – Make sure that business domain context carries through the entire user journey, whether users are receiving SQL code or visualizations, to maintain consistency in metric definitions and data interpretation.
For comprehensive guidance on building production-ready generative AI solutions, refer to the AWS Well-Architected Framework Generative AI Lens for best practices across security, reliability, performance efficiency, cost optimization, operational excellence, and sustainability.
Conclusion
In this two-part series, we explored how Amazon’s Worldwide Returns & ReCommerce organization built RRDA, a conversational data assistant that transforms natural language into both SQL queries and data visualizations. By combining Amazon Bedrock Agents for orchestration and SQL generation with Amazon Q in QuickSight for visual analytics, our solution democratizes data access across the organization. The domain-aware architecture, intelligent question rephrasing, and automated metadata management alleviate barriers between business questions and data insights, significantly reducing the time required to make data-driven decisions. As we continue enhancing RRDA with additional capabilities based on user feedback and advancements in FMs, we remain focused on our mission of creating a seamless bridge between natural language questions and actionable business insights.
About the authors
 Dheer Toprani is a System Development Engineer within the Amazon Worldwide Returns and ReCommerce Data Services team. He specializes in large language models, cloud infrastructure, and scalable data systems, focusing on building intelligent solutions that enhance automation and data accessibility across Amazon’s operations. Previously, he was a Data & Machine Learning Engineer at AWS, where he worked closely with customers to develop enterprise-scale data infrastructure, including data lakes, analytics dashboards, and ETL pipelines.
 Nicolas Alvarez is a Data Engineer within the Amazon Worldwide Returns and ReCommerce Data Services team, focusing on building and optimizing recommerce data systems. He plays a key role in developing advanced technical solutions, including Apache Airflow implementations and front-end architecture for the team’s web presence. His work is crucial in enabling data-driven decision making for Amazon’s reverse logistics operations and improving the efficiency of end-of-lifecycle product management.
 Lakshdeep Vatsa is a Senior Data Engineer within the Amazon Worldwide Returns and ReCommerce Data Services team. He specializes in designing, building, and optimizing large-scale data and reporting solutions. At Amazon, he plays a key role in developing scalable data pipelines, improving data quality, and enabling actionable insights for Reverse Logistics and ReCommerce operations. He is deeply passionate about enhancing self-service experiences for users and consistently seeks opportunities to utilize generative BI capabilities to solve complex customer challenges.
 Karam Muppidi is a Senior Engineering Manager at Amazon Retail, leading data engineering, infrastructure, and analytics teams within the Worldwide Returns and ReCommerce organization. He specializes in using LLMs and multi-agent architectures to transform data analytics and drive organizational adoption of AI tools. He has extensive experience developing enterprise-scale data architectures, analytics services, and governance strategies using AWS and third-party tools. Prior to his current role, Karam developed petabyte-scale data and compliance solutions for Amazon’s Fintech and Merchant Technologies divisions.
 Sreeja Das is a Principal Engineer in the Returns and ReCommerce organization at Amazon. In her 10+ years at the company, she has worked at the intersection of high-scale distributed systems in eCommerce and Payments, Enterprise services, and Generative AI innovations. In her current role, Sreeja is focusing on system and data architecture transformation to enable better traceability and self-service in Returns and ReCommerce processes. Previously, she led architecture and tech strategy of some of Amazon’s core systems including order and refund processing systems and billing systems that serve tens of trillions of customer requests everyday.
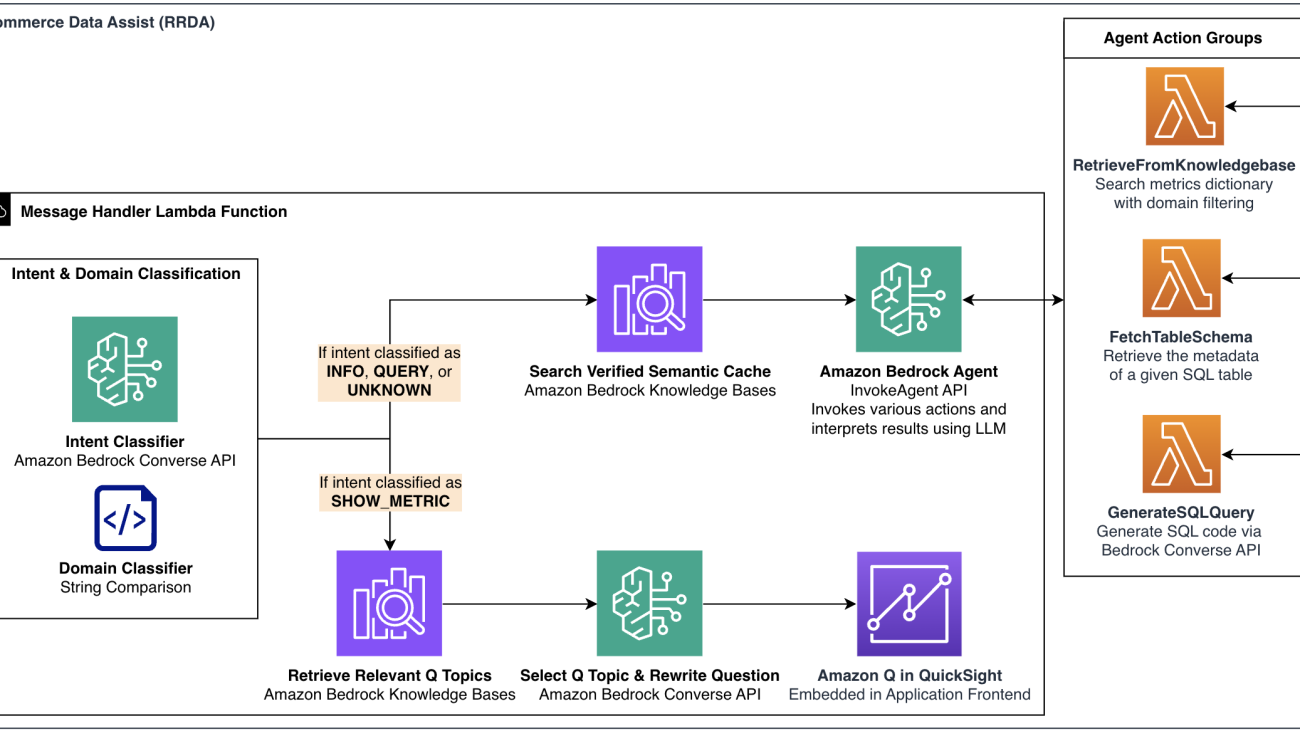
Build a conversational data assistant, Part 1: Text-to-SQL with Amazon Bedrock Agents
What if you could replace hours of data analysis with a minute-long conversation? Large language models can transform how we bridge the gap between business questions and actionable data insights. For most organizations, this gap remains stubbornly wide, with business teams trapped in endless cycles—decoding metric definitions and hunting for the correct data sources to manually craft each SQL query. Simple business questions can become multi-day ordeals, with analytics teams drowning in routine requests instead of focusing on strategic initiatives.
Amazon’s Worldwide Returns & ReCommerce (WWRR) organization faced this challenge at scale. With users executing over 450,000 SQL queries annually against our petabyte-scale Amazon Redshift data warehouses, our business intelligence and analytics teams had become a critical bottleneck. We needed a self-serve solution that could handle enterprise complexities: thousands of interconnected tables, proprietary business terminology and evolving metrics definitions that vary across business domains, and strict governance requirements.
This post series outlines how WWRR developed the Returns & ReCommerce Data Assist (RRDA), a generative AI-powered conversational interface that transformed data access across all levels of the organization. RRDA empowers over 4000 non-technical users to identify correct metrics, construct validated SQL, and generate complex visualizations—all through natural conversation. The results: 90% faster query resolution (from hours to minutes) with zero dependency on business intelligence teams.
In Part 1, we focus on building a Text-to-SQL solution with Amazon Bedrock, a managed service for building generative AI applications. Specifically, we demonstrate the capabilities of Amazon Bedrock Agents. Part 2 explains how we extended the solution to provide business insights using Amazon Q in QuickSight, a business intelligence assistant that answers questions with auto-generated visualizations.
The fundamentals of Text-to-SQL
Text-to-SQL systems transform natural language questions into database queries through a multi-step process. At its core, these systems must bridge the gap between human communication and structured query language by:
- Understanding user intent and extracting key entities from natural language
- Matching these entities to database schema components (tables, columns, relationships)
- Generating syntactically correct SQL that accurately represents the user’s question
Enterprise implementations face additional challenges, including ambiguous terminology, complex schema relationships, domain-specific business metrics, and real-time query validation. Let’s explore how RRDA implements these principles.
RRDA architecture overview
RRDA uses a WebSocket connection through Amazon API Gateway to connect users to AWS Lambda for real-time serverless processing. The following diagram shows the overall architecture of RRDA, highlighting how the user’s messages flow through the system to generate either SQL queries or metric visualizations.

This architecture overview diagram illustrates the system’s dual processing pathways: the upper path handles SQL generation through Amazon Bedrock Agents, while the lower path manages visualization requests via Amazon Q in QuickSight.
In the architecture diagram, the input from the user is classified as an intent and then routed to the most appropriate processing pathway. The architecture features two primary processing pathways:
- For a conversational experience (
INFO,QUERY, andUNKNOWNintents), the system checks our semantic cache for verified responses before routing to an Amazon Bedrock agent that orchestrates between action groups. These action groups are components that define specific operations the agent can help perform:- Retrieve metric definitions with domain filtering
- Fetch SQL table metadata and schemas from Amazon DynamoDB
- Generate SQL code and validate query syntax
- For visualization requests (
SHOW_METRICintent), the system retrieves relevant Amazon QuickSight Q topics, rewrites the question appropriately, then displays visualizations using Amazon Q in QuickSight.
For Part 1 of this post, we focus on the Amazon Bedrock agent that is capable of answering questions about metrics and generating validated SQL. Part 2 will cover the metric visualization pathway using Amazon Q in QuickSight.
Intent and domain classification
RRDA classifies incoming user messages by user intent and relevant business domain. Intent and domain classification occurs simultaneously in parallel threads to minimize latency. The solution categorizes queries into four distinct intents, and routes requests to our agent or Amazon Q in QuickSight accordingly:
- INFO – For informational questions about metrics, definitions, table schemas, and so on (for example, “Explain the resolution index metric”)
- QUERY – For SQL query generation (for example, “Write a query for US resolution index for the past 6 months”)
- SHOW_METRIC – For requests to display visualizations from Amazon Q in QuickSight (for example, “Show me the resolution index in US over the past 6 months”)
- UNKNOWN – For requests that don’t match a known pattern
Intent classification uses a lightweight foundation model (FM) through the Amazon Bedrock Converse API. The system uses a specialized prompt containing numerous examples of each intent type and analyzes both the current user message and recent conversation history to determine the most appropriate category. The system uses structured outputs to constrain the model’s response to one of the four predefined intents.
The following screenshot is an example of a QUERY intent message where a user requests a SQL query for the resolution index metric: “Give me a query for RP resolution index for May 2025 and US marketplace.”

In this example, the system identifies “RP” in the user’s message and correctly maps it to the Returns Processing domain, enabling it to access only the specific tables and metric definitions that uniquely apply to the Returns Processing domain-specific definition of the resolution index metric.
Business domain classification is crucial because enterprises can have metrics that might be calculated differently across different programs, teams, or departments. Our domain classification system uses string comparison to pattern match against a predefined dictionary that maps variations, abbreviations, and aliases to canonical domain names (for example, "rp", "returns-processing", and "return-process" substrings in a user message map to the Returns Processing domain; and "promos" to the Promotions domain). The system tokenizes user messages and identifies whole-word or phrase matches rather than partial string matching to help avoid false positives. This domain context persists across conversation turns, enabling targeted knowledge retrieval and domain-specific processing that improves the response accuracy of our agent.
Amazon Bedrock agent overview
At the core of RRDA’s architecture is an Amazon Bedrock agent powered by Anthropic’s Claude 3.5 Haiku on Amazon Bedrock. This agent serves as the intelligent decision-maker that orchestrates between the following action groups and interprets results:
- RetrieveFromKnowledgeBase – Searches the WWRR metrics dictionary for domain-specific metric definitions, calculation logic, and data sources using metadata filtering
- FetchTableSchema – Gets table information from DynamoDB, providing the agent with up-to-date table schema, column definitions, dimensions for categorical columns, and example queries for that table
- GenerateSQLQuery – Delegates complex SQL generation tasks to Anthropic’s Claude 3.7 Sonnet, passing along retrieved knowledge base information, table schemas, and user requirements
The following sequence diagram shows how the agent orchestrates between different action groups using intent.

Sequence diagram illustrating RRDA’s hybrid model architecture where Anthropic’s Claude 3.5 Haiku orchestrates agent actions for fast retrieval and interaction, while delegating complex SQL generation tasks to Anthropic’s Claude 3.7 Sonnet.
The diagram illustrates how we use a hybrid model architecture that optimizes for both performance and adaptability: Anthropic’s Claude 3.5 Haiku orchestrates the agent for fast information retrieval and interactive responses, while delegating complex SQL generation to Anthropic’s Claude 3.7 Sonnet, which excels at code generation tasks. This balanced approach delivers both responsive interactions and high-quality output.
Metrics dictionary with business domain filtering
RRDA’s metrics dictionary serves as the source of truth for over 1,000 metrics across WWRR’s business domains. Each metric is encoded as a JSON object with metadata (business domain, category, name, definition) and metric usage details (SQL expression, source datasets, filters, granularity). This structure maps business terminology directly to technical implementation for accurate SQL translation.
Each metric object is ingested as an individual chunk into our metrics knowledge base with domain metadata tags. When a user asks “Explain the RP resolution index metric,” RRDA detects Returns Processing as the domain and invokes the RetrieveFromKnowledgeBase action group. This action group retrieves only metrics within that specific business domain by applying a domain filter to the vector search configuration.
For domain-ambiguous queries, the action group identifies potentially relevant domains, and instructs the agent to ask the user to confirm the correct one. The following screenshot is an example of a user interaction where the domain could not be classified.

RRDA demonstrating domain classification and knowledge base retrieval. The system identifies multiple domains with “resolution index” metrics, asks for clarification, then provides detailed metric definitions for the selected Returns Processing domain.
The system’s response short-listed potentially relevant domains that contain the “resolution index” metric. After a domain is detected, subsequent searches are refined with the confirmed domain filter. This targeted retrieval makes sure RRDA accesses only domain-appropriate metric definitions, improving response accuracy while reducing latency by limiting the search space.
Table schema retrieval
The agent invokes the FetchTableSchema action group to get SQL table metadata with low latency. When the agent needs to understand a table’s structure, this action retrieves column definitions, example queries, and usage instructions from the DynamoDB table metadata store. The following screenshot shows an interaction where the user asks for details about a table.

RRDA providing detailed categorical dimension values for the RP aggregate dataset. The agent retrieves and categorizes status buckets from the table metadata, helping users understand available filter options and providing practical usage recommendations.
The agent responded with specific categorical dimension values (for example, “In Warehouse, Quality Check Complete”) that the user can filter by. These distinct values are important context for the agent to generate valid SQL that aligns with business terminology and database structure. However, these distinct values are not available directly through the table schema—but are collected using the workflow in the following diagram.
We created an AWS Step Functions workflow that enriches the DynamoDB table metadata store with rich metadata including table schemas, dimensions, and example queries.

AWS Step Functions workflow for automated table metadata enrichment, updating the DynamoDB metadata store with schema information, categorical dimensions, and usage examples.
The workflow orchestrates the metadata refresh process, running daily to keep information current. The workflow synchronizes schemas from the AWS Glue Data Catalog, uses Amazon Bedrock FMs to identify categorical dimensions worth extracting, populates top K distinct values by running targeted Redshift queries (for example, SELECT DISTINCT column_name FROM table_name ORDER BY COUNT(*) DESC LIMIT K;), and incorporates example usage patterns from Redshift query logs. This automated pipeline reduces manual metadata maintenance while making sure that the table metadata store reflects current data structures, business terminology, and usage patterns.
SQL generation and validation
The heart of our solution is how RRDA actually creates and validates SQL queries. Rather than generating SQL in one step, we designed a smarter approach using the Amazon Bedrock Agents return of control capability, which works like a conversation between different parts of our system. When a user asks a question like “Write a query to find the resolution index for electronics in the US last quarter,” the process unfolds in several steps:
- Our agent consults its knowledge base to identify the correct metric and where this data lives. If anything is unclear, it asks the user follow-up questions like “Are you interested in resolution index for electronics in the US marketplace or North America region?” to verify it understands exactly what’s needed.
- When the agent knows which data source to use, it fetches the detailed schema of that table—column names, data types, dimensions, and example queries—so it knows how the data is organized.
- The
GenerateSQLQueryaction group invokes Anthropic’s Claude 3.7 Sonnet with a specialized prompt for SQL generation using the Amazon Bedrock Converse API. The response returns SQL code with an explanation. - Our system intercepts the action group response using return of control. It extracts the generated SQL and validates it against our Redshift database using an EXPLAIN command, which checks for syntax errors without actually running the query. If the system finds syntax problems, it automatically sends the query back to the Amazon Bedrock FM with specific error information, allowing it to fix itself before proceeding.
- After a valid query is confirmed, the agent receives it and presents it to the user with a clear explanation in simple language. The agent explains what the query does, what filters are applied, and how the results should be interpreted—and is able to answer follow-up questions as needed.
This approach delivers immediate business value: users receive syntactically correct queries that execute on the first attempt, without needing SQL expertise or database schema knowledge. By validating queries using Redshift’s EXPLAIN command—rather than executing them—RRDA maintains security boundaries while ensuring reliability. Users execute validated queries through their existing tools with proper authentication, preserving enterprise access controls while eliminating the trial-and-error cycle of manual SQL development.
Designing a user experience to earn trust
To build trust with users across our organization, we prioritized creating an interface where users can quickly verify RRDA’s reasoning process. When users receive a response, they can choose View agent actions to see exactly which knowledge bases were searched and which table schemas were accessed.

For SQL generation—where accuracy is paramount—we display validation status badges that clearly indicate when queries have passed Redshift syntax verification, building confidence in the output’s reliability.

We also maintain a question bank of curated and verified answers that we serve to users through our semantic cache if a similar question is asked.
![]()
Real-time status indicators keep users informed of each step the agent takes during complex operations, alleviating uncertainty about what’s happening behind the scenes.
![]()
Best practices
Based on our experience building RRDA, the following are best practices for implementing agentic Text-to-SQL solutions:
- Implement domain-aware context – Use business domain classification to retrieve domain-specific metric definitions, making sure that SQL generation respects how metrics are calculated differently across business units.
- Adopt a hybrid model architecture – Use smaller, faster models for orchestration and user interaction, while reserving more powerful models for complex SQL generation tasks to balance performance and accuracy.
- Validate without execution – Implement real-time SQL validation using lightweight commands like Redshift EXPLAIN to catch syntax issues without executing the query. Separating query generation from execution reduces errors while preserving existing authentication boundaries.
- Automate metadata maintenance – Build pipelines that continuously refresh metadata, such as schema information and dimensions, without manual intervention to make sure the system references up-to-date information.
- Design for transparency and user engagement – Build trust by exposing agent reasoning, intermediate steps, and providing clear explanations of generated SQL. Implement real-time status indicators and progress updates for multi-step processes with response times of 15–60 seconds. Transparent processing feedback maintains user engagement and builds confidence during complex operations like SQL generation and knowledge retrieval.
Conclusion
The Returns & ReCommerce Data Assist transforms data access at WWRR by converting natural language into validated SQL queries through Amazon Bedrock. With our domain-aware approach with real-time validation, business users can retrieve accurate data without SQL expertise, dramatically shortening the path from questions to insights. This Text-to-SQL capability is just the first step—Part 2 will explore extending the solution with automated visualization using Amazon Q in QuickSight.
About the authors
Dheer Toprani is a System Development Engineer within the Amazon Worldwide Returns and ReCommerce Data Services team. He specializes in large language models, cloud infrastructure, and scalable data systems, focusing on building intelligent solutions that enhance automation and data accessibility across Amazon’s operations. Previously, he was a Data & Machine Learning Engineer at AWS, where he worked closely with customers to develop enterprise-scale data infrastructure, including data lakes, analytics dashboards, and ETL pipelines.
Nicolas Alvarez is a Data Engineer within the Amazon Worldwide Returns and ReCommerce Data Services team, focusing on building and optimizing recommerce data systems. He plays a key role in developing advanced technical solutions, including Apache Airflow implementations and front-end architecture for the team’s web presence. His work is crucial in enabling data-driven decision making for Amazon’s reverse logistics operations and improving the efficiency of end-of-lifecycle product management.
Lakshdeep Vatsa is a Senior Data Engineer within the Amazon Worldwide Returns and ReCommerce Data Services team. He specializes in designing, building, and optimizing large-scale data and reporting solutions. At Amazon, he plays a key role in developing scalable data pipelines, improving data quality, and enabling actionable insights for Reverse Logistics and ReCommerce operations. He is deeply passionate about enhancing self-service experiences for users and consistently seeks opportunities to utilize generative BI capabilities to solve complex customer challenges.
Karam Muppidi is a Senior Engineering Manager at Amazon Retail, leading data engineering, infrastructure, and analytics teams within the Worldwide Returns and ReCommerce organization. He specializes in using LLMs and multi-agent architectures to transform data analytics and drive organizational adoption of AI tools. He has extensive experience developing enterprise-scale data architectures, analytics services, and governance strategies using AWS and third-party tools. Prior to his current role, Karam developed petabyte-scale data and compliance solutions for Amazon’s Fintech and Merchant Technologies divisions.
Sreeja Das is a Principal Engineer in the Returns and ReCommerce organization at Amazon. In her 10+ years at the company, she has worked at the intersection of high-scale distributed systems in eCommerce and Payments, Enterprise services, and Generative AI innovations. In her current role, Sreeja is focusing on system and data architecture transformation to enable better traceability and self-service in Returns and ReCommerce processes. Previously, she led architecture and tech strategy of some of Amazon’s core systems including order and refund processing systems and billing systems that serve tens of trillions of customer requests everyday.

Implement user-level access control for multi-tenant ML platforms on Amazon SageMaker AI
Managing access control in enterprise machine learning (ML) environments presents significant challenges, particularly when multiple teams share Amazon SageMaker AI resources within a single Amazon Web Services (AWS) account. Although Amazon SageMaker Studio provides user-level execution roles, this approach becomes unwieldy as organizations scale and team sizes grow. Refer to the Operating model whitepaper for best practices on account structure.
In this post, we discuss permission management strategies, focusing on attribute-based access control (ABAC) patterns that enable granular user access control while minimizing the proliferation of AWS Identity and Access Management (IAM) roles. We also share proven best practices that help organizations maintain security and compliance without sacrificing operational efficiency in their ML workflows.
Challenges with resource isolation across workloads
Consider a centralized account structure at a regulated enterprise such as finance or healthcare: a single ML platform team manages a comprehensive set of infrastructure that serves hundreds of data science teams across different business units. With such a structure, the platform team can implement consistent governance policies that enforce best practices. By centralizing these resources and controls, you can achieve better resource utilization, maintain security compliance and audit trials, and unify operational standards across ML initiatives. However, the challenge lies in maintaining workload isolation between teams and managing permissions between users of the same team.
With SageMaker AI, platform teams can create dedicated Amazon SageMaker Studio domains for each business unit, thereby maintaining resource isolation between workloads. Resources created within a domain are visible only to users within the same domain, and are tagged with the domain Amazon Resource Names (ARNs). With tens or hundreds of domains, using a team-level or domain-level role compromises security and impairs auditing, whereas maintaining user-level roles lead to hundreds of roles to create and manage, and often runs into IAM service quotas.
We demonstrate how to implement ABAC that uses IAM policy variables to implement user-level access controls while maintaining domain-level execution roles, so you can scale IAM in SageMaker AI securely and effectively. We share some of the common scenarios and sample IAM policies to solve permissions management, however, the patterns can be extended to other services as well.
Key concepts
In this solution, we use two key IAM concepts: source identity and context keys.
An IAM source identity is a custom string that administrators can require be passed on a role assumption, that is used to identify the person or application that is performing these actions. The source identity is logged to AWS CloudTrail and also persists through role chaining, which takes place when a role is assumed by a second role through the AWS Command Line Interface (AWS CLI) or API (refer to Roles terms and concepts for additional information).
In SageMaker Studio, if the domain is set up to use a source identity, the user profile name is passed as the source identity to any API calls made by the user from a user’s private space using signed requests (using AWS Signature Version 4). Source identity enables auditability as API requests from the assumed execution role will contain in the session context the attached source identity. If external AWS credentials (such as access keys) are used to access AWS services from the SageMaker Studio environment, the SourceIdentity from the execution role assumption will not be set for those credentials.
SageMaker Studio supports two condition context keys: sagemaker:DomainId and sagemaker:UserProfileName for certain actions related to SageMaker domains. These context keys are powerful IAM policy variables that make it possible for admins to create dynamic ABAC policies that automatically scope permissions based on a user’s identity and domain. As the name implies, the DomainId key can be used to scope actions to specific domains, and the UserProfileName key enables user-specific resource access patterns.
Although the source identity and sagemaker:UserProfileName can be used interchangeably in IAM policies, there are key differences:
- Only
SourceIdentityhelps in auditing by tracking the user on CloudTrail - SageMaker AI context keys don’t persist on role chaining, whereas
SourceIdentitydoes - SageMaker AI context keys are available only within SageMaker Studio
- If only using the SageMaker AI context keys,
sts:SourceIdentitydoesn’t have to be set in the execution role’s trust policy
In the following sections, we explore a few common scenarios and share IAM policy samples using the preceding principles. With this approach, you can maintain user-level resource isolation without using user-level IAM roles, and adhere to principles of least privilege.
Prerequisites
Before implementing this solution, make sure your SageMaker Studio domain meets the following criteria:
- Roles used with SageMaker AI (both SageMaker Studio and roles passed to SageMaker pipelines or processing jobs) have the
sts:SetSourceIdentitypermission in their trust policy. For example:
SourceIdentityis enabled at the SageMaker Studio domain level during creation or update (see Monitoring user resource access from SageMaker AI Studio Classic with sourceIdentity). For example:
- Roles used with SageMaker Studio have
sagemaker:AddTagspermission to enable the role to set tags on the SageMaker AI resources created by the role. The following policy example with a condition enables the role to only add tags at resource creation, and it can’t add or modify tags on existing SageMaker AI resources:
When using ABAC-based approaches with SageMaker AI, access to the sagemaker:AddTags action must be tightly controlled, otherwise ownership of resources and therefore access to resources can be modified by changing the SageMaker AI resource tags.
Solution overview
In this post, we demonstrate how to use IAM policy variables and source identity to implement scalable, user-level access control in SageMaker AI. With this approach, you can do the following:
- Implement user-level access control without user-level IAM roles
- Enforce resource isolation between users
- Maintain least privilege access principles
- Maintain user-level access control to associated resources like Amazon Simple Storage Service (Amazon S3) buckets and AWS Secrets Manager secrets
- Scale policy management and governance
In the following sections, we share some common scenarios for implementing access control and how it can be achieved using the SourceIdentity and policy variables.
It is recommended that you align SageMaker user profile names with other internal user identifiers to make sure these user profile names are aligned with platform users and are unique in this aspect.
SageMaker AI access control
When managing a shared SageMaker Studio domain with multiple users, administrators often need to implement resource-level access controls to prevent users from accessing or modifying each other’s resources. For instance, you might want to make sure data scientists can’t accidentally delete another team member’s endpoints or access SageMaker training jobs they don’t own. In such cases, the sagemaker:DomainId and sagemaker:UserProfileName keys can be used to place this restriction. See the following sample policy:
You can also write a similar policy using a source identity. The only limitation is that in this case, the domain ID must be specified or left as a wildcard. See the following example:
Amazon S3 access control
Amazon S3 is the primary storage service for SageMaker AI, and is deeply integrated across different job types. It enables efficient reading and writing of datasets, code, and model artifacts. Amazon S3 features like lifecycle policies, encryption, versioning, and IAM controls help keep SageMaker AI workflow data secure, durable, and cost-effective. Using a source identity with IAM identity policies, we can restrict users in SageMaker Studio and the jobs they launch to allow access only their own S3 prefix:
You can also implement deny policies on resource policies such as S3 bucket policies to make sure they can only be accessed by the appropriate user. The following is an example S3 bucket policy that only allows get, put, and delete object actions for user-a and user-b SageMaker Studio user profiles:
Secrets Manager secret access control
With Secrets Manager, you can securely store and automatically rotate credentials such as database passwords, API tokens, and Git personal access tokens (PATs). With SageMaker AI, you can simply request the secret at runtime, so your notebooks, training jobs, and inference endpoints stay free of hard-coded keys. Secrets stored in AWS Secrets Manager are encrypted by AWS Key Management Service (AWS KMS) keys that you own and control. By granting the SageMaker AI execution role GetSecretValue permission on the specific secret ARN, your code can pull it with one API call, giving you audit trails in CloudTrail for your secrets access. Using the source identity, you can allow access to a user-specific hierarchy level of secrets, such as in the following example:
Amazon EMR cluster access control
SageMaker Studio users can create, discover, and manage Amazon EMR clusters directly from SageMaker Studio. The following policy restricts SageMaker Studio users access to EMR clusters by requiring that the cluster be tagged with a user key matching the user’s SourceIdentity. When SageMaker Studio users connect to EMR clusters, this makes sure they can only access clusters explicitly assigned to them through the tag, preventing unauthorized access and enabling user-level access control (refer to IAM policies for tag-based access to clusters and EMR notebooks and Connect to an Amazon EMR cluster from SageMaker Studio or Studio Classic).
File system access control in SageMaker training jobs
SageMaker training jobs can use file systems such as Amazon Elastic File System (Amazon EFS) or Amazon FSx for Lustre to efficiently handle large-scale data processing and model scaling workloads. This is particularly valuable when dealing with large datasets that require high throughput, when multiple training jobs need concurrent access to the same data, or when you want to maintain a persistent storage location that can be shared across different training jobs. This can be provided to the SageMaker training job using a FileSystemDataStore parameter.
When using a common file system across users, administrators might want to restrict access to specific folders, so users don’t overwrite each other’s work or data. This can be achieved using a condition called sagemaker:FileSystemDirectoryPath. In this pattern, each user has a directory on the file system that’s the same as their user profile name. You can then use an IAM policy such as the following to make sure the training jobs they run are only able to access their directory:
Monitor user access with the source identity
The previous examples demonstrate how the source identity can serve as a global context key to control which AWS resources a SageMaker Studio user can access, such as SageMaker training jobs or S3 prefixes. In addition to access control, the source identity is also valuable for monitoring individual user resource access from SageMaker Studio.
The source identity enables precise tracking of individual user actions in CloudTrail logs by propagating the SageMaker Studio user profile name as the sourceIdentity within the SageMaker Studio execution role session or a chained role. This means that API calls made from SageMaker Studio notebooks, SageMaker training and processing jobs, and SageMaker pipelines include the specific user’s identity in CloudTrail events. For more details on the supported scenarios, refer to Considerations when using sourceIdentity.
As a result, administrators can monitor and audit resource access at the individual user level rather than only by the IAM role, providing clearer visibility and stronger security even when users share the same execution role.
Monitor access to the AWS Glue Data Catalog with AWS Lake Formation permissions
You can also use source identity auditing capabilities to track which specific SageMaker Studio user accessed the AWS Glue Data Catalog with AWS Lake Formation permissions. When a user accesses an AWS Glue table governed by Lake Formation, the lakeformation:GetDataAccess API call is logged in CloudTrail. This event records not only the IAM role used, but also the sourceIdentity propagated from the SageMaker Studio user profile, enabling precise attribution of data access to the individual user.
By reviewing these CloudTrail logs, administrators can see which SageMaker Studio user (using the sourceIdentity field) accessed which Data Catalog resources, enhancing auditability and compliance. Refer to Apply fine-grained data access controls with Lake Formation and Amazon EMR from SageMaker Studio for additional information.
Accessing an AWS Glue table with Amazon Athena
When a SageMaker Studio user queries an AWS Glue table through Amazon Athena using a library like the AWS SDK for Pandas, such as running a simple SELECT query from a SageMaker Studio notebook or from a SageMaker processing or training job, this access is logged by Lake Formation in CloudTrail as a GetDataAccess event. The event captures key details, including the IAM role used, the propagated sourceIdentity (which corresponds to the SageMaker Studio user profile name), the AWS Glue table and database accessed, the permissions used (for example, SELECT), and metadata like the Athena query ID.
The following is a typical CloudTrail log entry for this event (simplified for readability):
Accessing an AWS Glue table with Amazon EMR
When a SageMaker Studio user queries an AWS Glue table through Amazon EMR (PySpark), such as running a simple SELECT query from a SageMaker Studio notebook connected to an EMR cluster with IAM runtime roles (see Configure IAM runtime roles for EMR cluster access in Studio) or from a SageMaker pipeline with an Amazon EMR step, this access is logged by Lake Formation in CloudTrail as a GetDataAccess event. The event captures key details, including the IAM role used, the propagated sourceIdentity (which corresponds to the SageMaker Studio user profile name), the AWS Glue table and database accessed, and the permissions used (for example, SELECT).
The following is a typical CloudTrail log entry for this event (simplified for readability):
Best practices
To effectively secure and manage access in environments using ABAC, it’s important to follow proven best practices that enhance security, simplify administration, and maintain clear auditability. The following guidelines can help you implement ABAC with a source identity in a scalable and maintainable way:
- Use consistent naming conventions – Use consistent naming conventions for resources and tags to make sure policies can reliably reference and enforce permissions based on attributes. Consistent tagging enables effective use of ABAC by matching
sourceIdentityvalues with resource tags, simplifying policy management and reducing errors. - Enforce least privilege access – Apply least privilege access by granting only the permissions required to perform a task. Start with AWS managed policies for common use cases, then refine permissions by creating managed policies tailored to your specific needs. Use ABAC with
sourceIdentityto dynamically restrict access based on user attributes, maintaining fine-grained, least-privilege permissions aligned with IAM best practices. - Audit user access – Regularly audit user access by reviewing CloudTrail logs that include source identity, which captures individual SageMaker Studio user actions even when roles are shared. This provides precise visibility into who accessed which resources and when. For details, see Monitoring user resource access from SageMaker AI Studio Classic with sourceIdentity.
- Standardize identity-based policies with conditions – Standardize policies incorporating condition context keys to maintain consistent and precise access control while simplifying management across your SageMaker AI environment. For examples and best practices on creating identity-based policies with conditions, refer to Amazon SageMaker AI identity-based policy examples.
Refer to SageMaker Studio Administration Best Practices for additional information on identity and permission management.
Conclusion
In this post, we demonstrated how to implement user-level access control in SageMaker Studio without the overhead of managing individual IAM roles. By combining SageMaker AI resource tags, SageMaker AI context keys, and source identity propagation, you can create dynamic IAM policies that automatically scope permissions based on user identity while maintaining shared execution roles. We showed how to apply these patterns across various AWS services, including SageMaker AI, Amazon S3, Secrets Manager, and Amazon EMR. Additionally, we discussed how the source identity enhances monitoring by propagating the SageMaker Studio user profile name into CloudTrail logs, enabling precise tracking of individual user access to resources like SageMaker jobs and Data Catalog tables. This includes access using Athena and Amazon EMR, providing administrators with clear, user-level visibility for stronger security and compliance across shared execution roles. We encourage you to implement these user-level access control techniques today and experience the benefits of simplified administration and compliance tracking.
About the authors
 Durga Sury is a Senior Solutions Architect at Amazon SageMaker, where she helps enterprise customers build secure and scalable AI/ML platforms. When she’s not architecting solutions, you can find her enjoying sunny walks with her dog, immersing herself in murder mystery books, or catching up on her favorite Netflix shows.
 Itziar Molina Fernandez is a Machine Learning Engineer in the AWS Professional Services team. In her role, she works with customers building large-scale machine learning platforms and generative AI use cases on AWS. In her free time, she enjoys cycling, reading, and exploring new places.
 Will Parr is a Machine Learning Engineer at AWS Professional Services, helping customers build scalable ML platforms and production-ready generative AI solutions. With deep expertise in MLOps and cloud-based architecture, he focuses on making machine learning reliable, repeatable, and impactful. Outside of work, he can be found on a tennis court or hiking in the mountains.