Streamline GitHub workflows with generative AI using Amazon Bedrock and MCP

Streamline GitHub workflows with generative AI using Amazon Bedrock and MCP

Customers are increasingly looking to use the power of large language models (LLMs) to solve real-world problems. However, bridging the gap between these LLMs and practical applications has been a challenge. AI agents have appeared as an innovative technology that bridges this gap.

The foundation models (FMs) available through Amazon Bedrock serve as the cognitive engine for AI agents, providing the reasoning and natural language understanding capabilities essential for interpreting user requests and generating appropriate responses. You can integrate these models with various agent frameworks and orchestration layers to create AI applications that can understand context, make decisions, and take actions. You can build with Amazon Bedrock Agents or other frameworks like LangGraph and the recently launched Strands Agent SDK.

This blog post explores how to create powerful agentic applications using the Amazon Bedrock FMs, LangGraph, and the Model Context Protocol (MCP), with a practical scenario of handling a GitHub workflow of issue analysis, code fixes, and pull request generation.

For teams seeking a managed solution to streamline GitHub workflows, Amazon Q Developer in GitHub offers native integration with GitHub repositories. It provides built-in capabilities for code generation, review, and code transformation without requiring custom agent development. While Amazon Q Developer provides out-of-the-box functionality for common development workflows, organizations with specific requirements or unique use cases may benefit from building custom solutions using Amazon Bedrock and agent frameworks. This flexibility allows teams to choose between a ready-to-use solution with Amazon Q Developer or a customized approach using Amazon Bedrock, depending on their specific needs, technical requirements, and desired level of control over the implementation.

Challenges with the current state of AI agents

Despite the remarkable advancements in AI agent technology, the current state of agent development and deployment faces significant challenges that limit their effectiveness, reliability, and broader adoption. These challenges span technical, operational, and conceptual domains, creating barriers that developers and organizations must navigate when implementing agentic solutions.

One of the significant challenges is tool integration. Although frameworks like Amazon Bedrock Agents, LangGraph, and the Strands Agent SDK provide mechanisms for agents to interact with external tools and services, the current approaches often lack standardization and flexibility. Developers must create custom integrations for each tool, define precise schemas, and handle a multitude of edge cases in tool invocation and response processing. Furthermore, the rigid nature of many tool integration frameworks means that agents struggle to adapt to changes in tool interfaces or to discover and use new capabilities dynamically.

How MCP helps in creating agents

Appearing as a response to the limitations and challenges of current agent architectures, MCP provides a standardized framework that fundamentally redefines the relationship between FMs, context management, and tool integration. This protocol addresses many of the core challenges that have hindered the broader adoption and effectiveness of AI agents, particularly in enterprise environments and complex use cases.

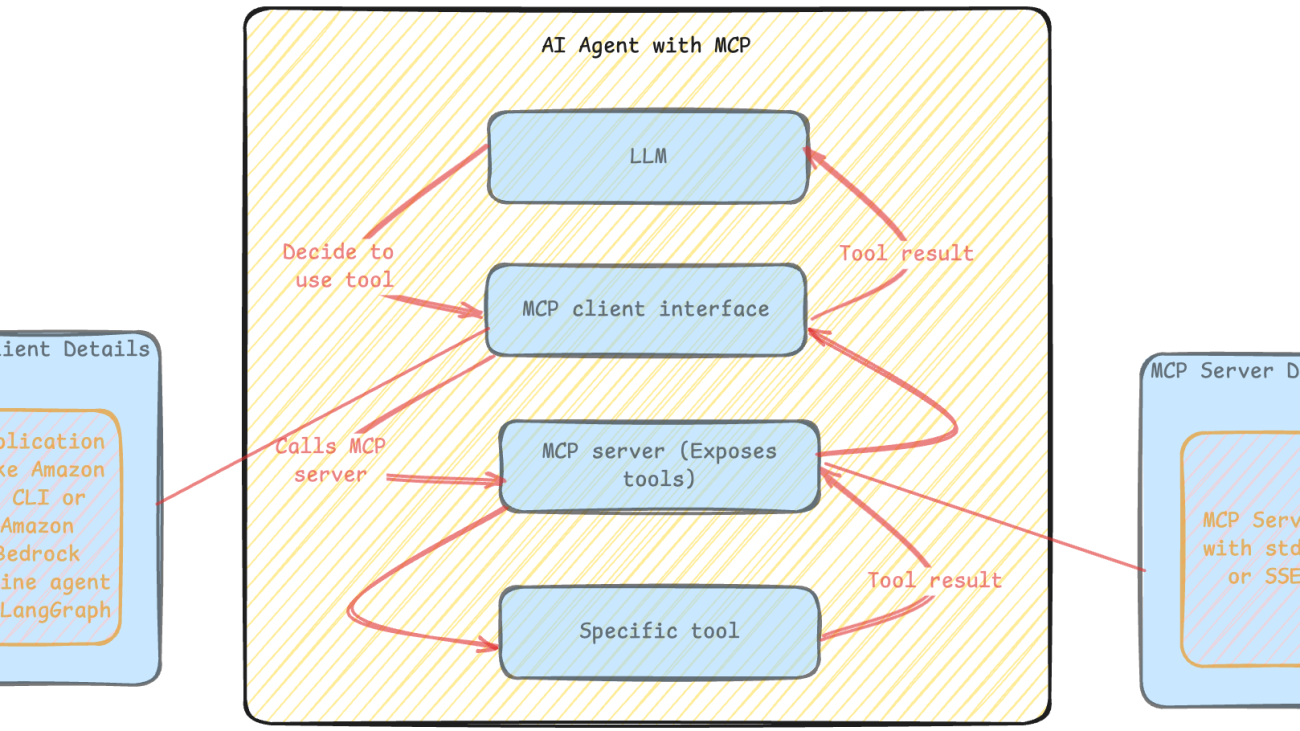
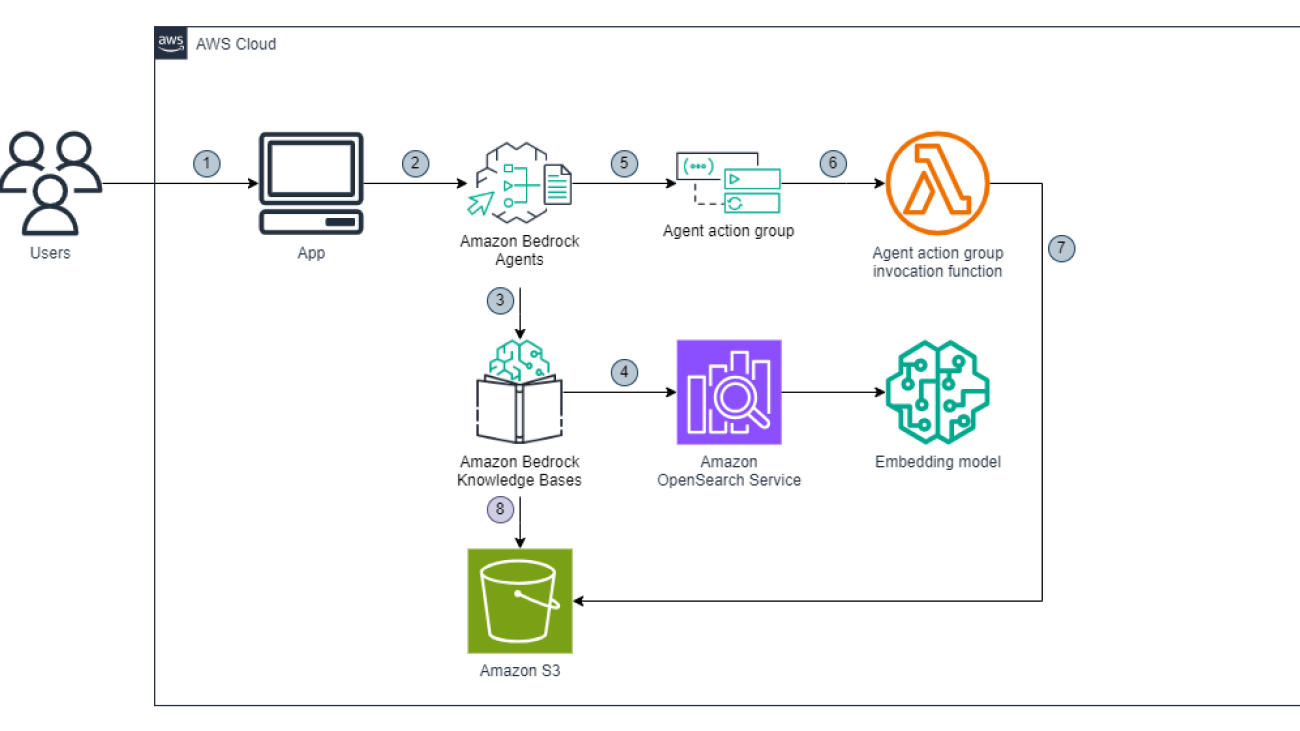
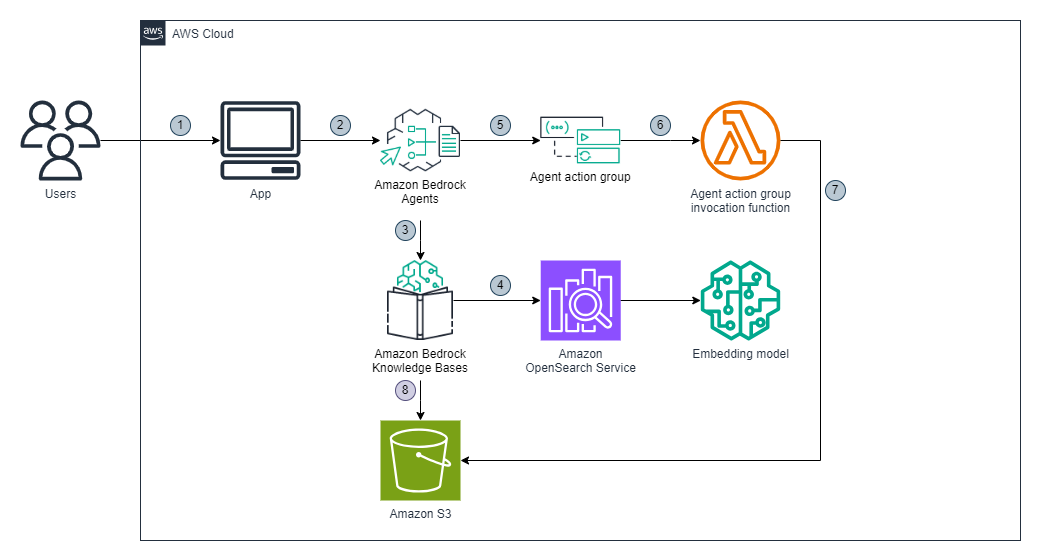
The following diagram illustrates an example architecture.

AI Agent with MCP

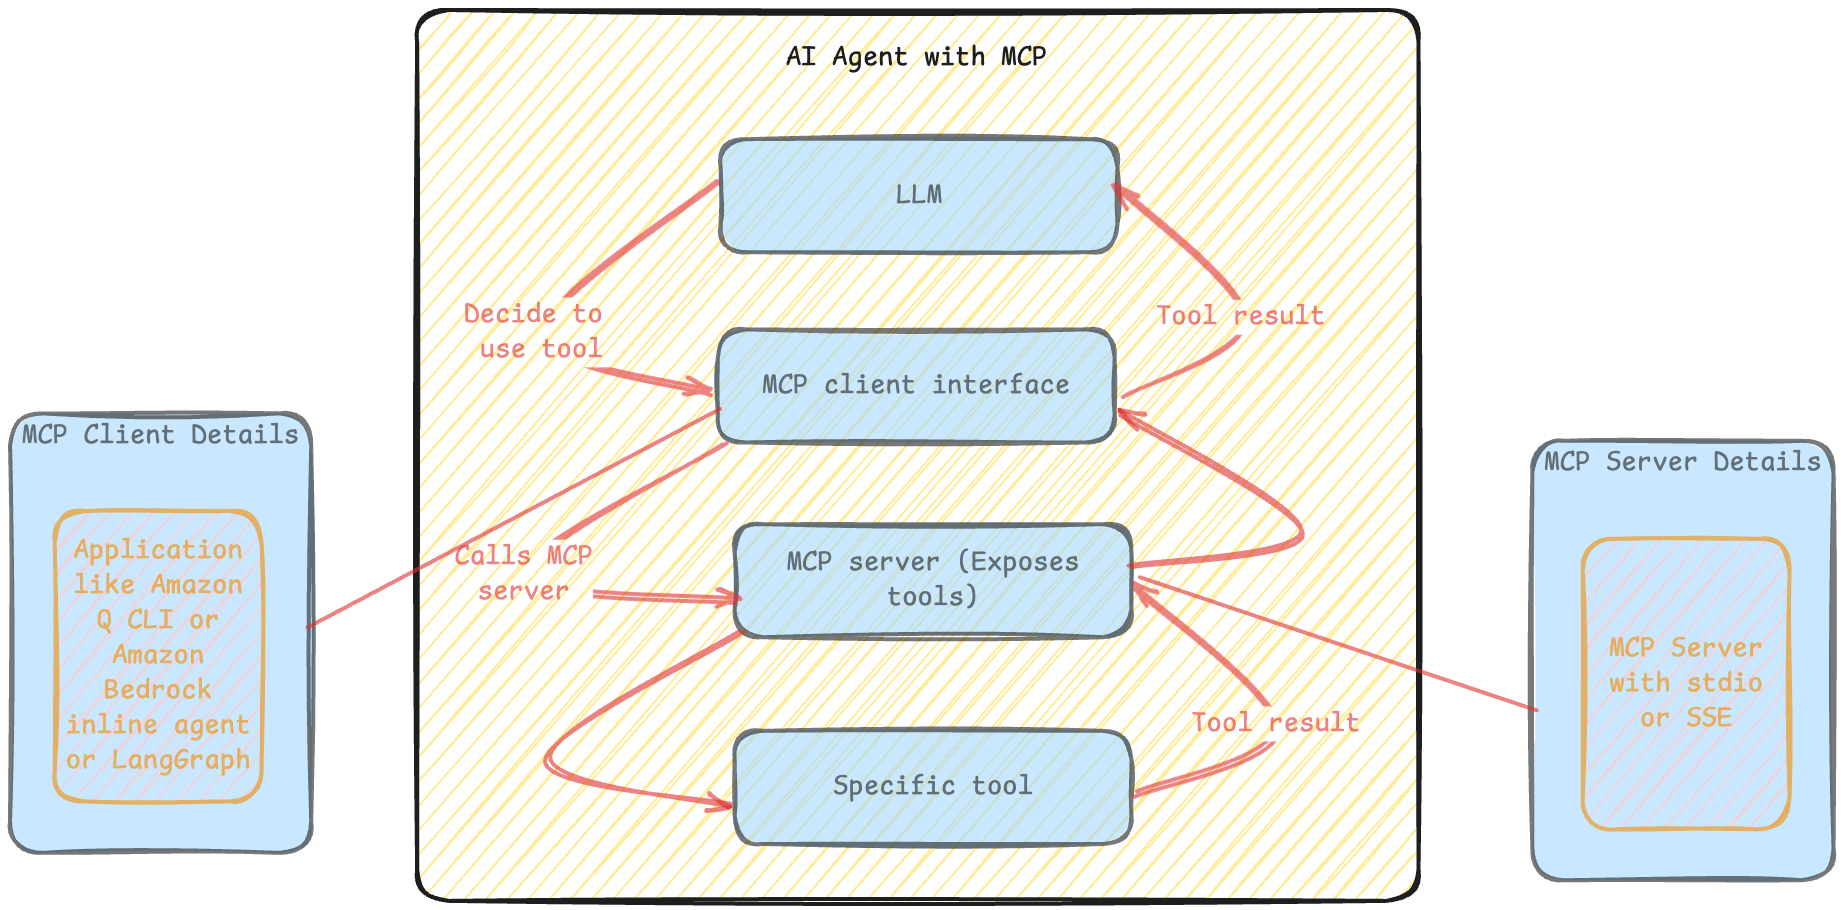
Tool integration is dramatically simplified through MCP’s Tool Registry and standardized invocation patterns. Developers can register tools with the registry using a consistent format, and the protocol manages the complexities of tool selection, parameter preparation, and response processing. This not only reduces the development effort required to integrate new tools but also enables more sophisticated tool usage patterns, such as tool chaining and parallel tool invocation, that are challenging to implement in current frameworks.

This combination takes advantage of the strengths of each technology—high-quality FMs in Amazon Bedrock, MCP’s context management capabilities, and LangGraph’s orchestration framework—to create agents that can tackle increasingly complex tasks with greater reliability and effectiveness.

Imagine your development team wakes up to find yesterday’s GitHub issues already analyzed, fixed, and waiting as pull requests — all handled autonomously overnight.

Recent advances in AI, particularly LLMs with code generation capabilities, have resulted in an impactful approach to development workflows. By using agents, development teams can automate simple changes—such as dependency updates or straightforward bug fixes.

Solution Overview

Amazon Bedrock is a fully managed service that makes high-performing FMs from leading AI companies and Amazon available through a unified API. Amazon Bedrock also offers a broad set of capabilities to build generative AI applications with security, privacy, and responsible AI.

LangGraph orchestrates agentic workflows through a graph-based architecture that handles complex processes and maintains context across agent interactions. It uses supervisory control patterns and memory systems for coordination. For more details, refer to Build multi-agent systems with LangGraph and Amazon Bedrock.

The Model Context Protocol (MCP) is an open standard that empowers developers to build secure, two-way connections between their data sources and AI-powered tools. The GitHub MCP Server is an MCP server that provides seamless integration with GitHub APIs. It offers a standard way for AI tools to work with GitHub’s repositories. Developers can use it to automate tasks, analyze code, and improve workflows without handling complex API calls.

This post uses these three technologies in a complementary fashion. Amazon Bedrock offers the AI capabilities for understanding issues and generating code fixes. LangGraph orchestrates the end-to-end workflow, managing the state and decision-making throughout the process. The GitHub MCP Server interfaces with GitHub repositories, providing context to the FM and implementing the generated changes. Together, these technologies enable an automation system that can understand and analyze GitHub issues, extract relevant code context, generate code fixes, create well-documented pull requests, and integrate seamlessly with existing GitHub workflows.

The figure below shows high-level view of how LangGraph integrates with GitHub through MCP while leveraging LLMs from Amazon Bedrock.

MCP Integration

In the following sections, we explore the technical approach for building an AI-powered automation system, using Amazon Bedrock, LangGraph, and the GitHub MCP Server. We discuss the core concepts of building the solution; we don’t focus on deploying the agent or running the MCP server in the AWS environment. For a detailed explanation, refer to the GitHub repository.

Prerequisites

You must have the following prerequisites before you can deploy this solution. For this post, we use the us-west-2 AWS Region. For details on available Regions, see Amazon Bedrock endpoints and quotas.

Environment configuration and setup

The MCP server acts as a bridge between our LangGraph agent and GitHub’s API. Instead of directly calling GitHub APIs, we use the containerized the GitHub MCP Server, which provides standardized tool interfaces.

You need to define the MCP configuration using the personal access token that you defined in the prerequisites. This configuration will start the GitHub MCP Server using Docker or Finch.

mcp_config = {
    "mcp": {
        "inputs": [
            {
                "type": "promptString",
                "id": "github_token",
                "description": "GitHub Personal Access Token",
                "password": "true",
            }
        ],
        "servers": {
            "github": {
                "command": "/usr/local/bin/docker",
                "args": [
                    "run",
                    "-i",
                    "--rm",
                    "-e",
                    "GITHUB_PERSONAL_ACCESS_TOKEN",
                    "ghcr.io/github/github-mcp-server",
                ],
                "env": {
                    "GITHUB_PERSONAL_ACCESS_TOKEN": os.environ.get("GITHUB_TOKEN")
                },
            }
        },
    }
}

Agent state

LangGraph needs a shared state object that flows between the nodes in the workflow. This state acts as memory, allowing each step to access data from earlier steps and pass results to later ones.

class AgentState(TypedDict):
    issues: List[Dict[str, Any]] 
    current_issue_index: int 
    analysis_result: Optional[Dict[str, Any]] 
    action_required: Optional[str]

Structured output

Instead of parsing free-form LLM responses, we use Pydantic models to enforce consistent, machine-readable outputs. This reduces parsing errors and make sure downstream nodes receive data in expected formats. The Field descriptions guide the LLM to provide exactly what we need.

class IssueAnalysis(BaseModel):
    """Analysis of the GitHub issue."""
    analysis: str = Field(
        description="Brief summary of the issue's core problem or request."
    )
    action_required: str = Field(
        description="Decision on next step. Must be one of: 'code_change_required', 'no_change_needed', 'needs_clarification'."
    )

MCP tools integration

The load_mcp_tools function from the LangChain’s MCP adapter automatically converts the MCP server capabilities into LangChain-compatible tools. This abstraction makes it possible to use the GitHub operations (list issues, create branches, update files) as if they were built-in LangChain tools.

async def get_mcp_tools(session: ClientSession) -> List[Any]:
     """Loads tools from the connected MCP session."""
     tools = await load_mcp_tools(session)
     return tools 

Workflow structure

Each node is stateless — it takes the current state, performs one specific task, and returns state updates. This makes the workflow predictable, testable, and straightforward to debug. These nodes are connected using edges or conditional edges. Not every GitHub issue requires code changes. Some might be documentation requests, duplicates, or need clarification. The routing functions use the structured LLM output to dynamically decide the next step, making the workflow adaptive rather than rigid.

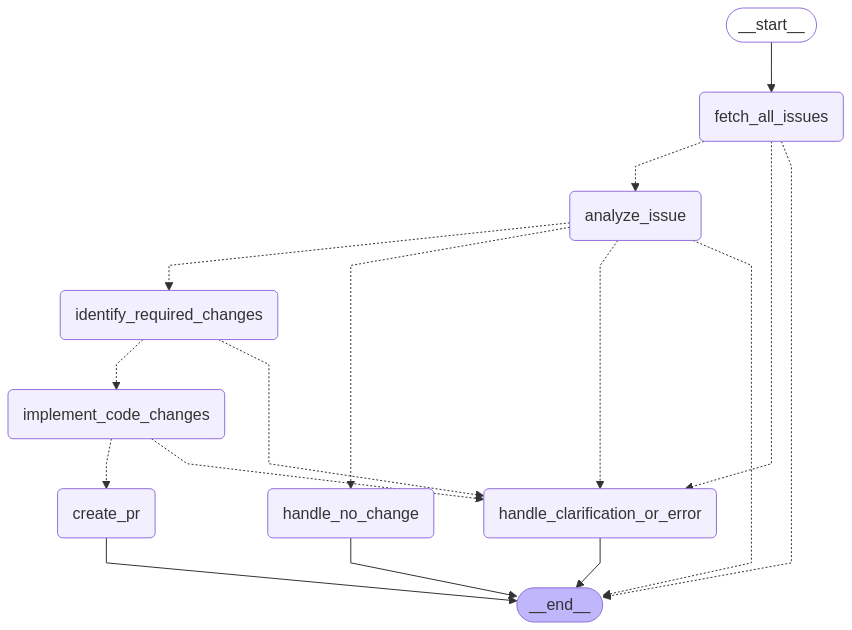
Finally, we start the agent by invoking the compiled graph with an initial state. The agent then follows the steps and decisions defined in the graph. The following diagram illustrates the workflow.

Workflow

Agent Execution and Result

We can invoke the compiled graph with the initial_state and recursion_limit. It will fetch open issues from the given GitHub repository, analyze them one at a time, make the code changes if needed and then create the pull request in GitHub.

Considerations

To enable automated workflows, Amazon EventBridge offers an integration with GitHub through its SaaS partner event sources. After it’s configured, EventBridge receives these GitHub events in near real-time. You can create rules that match specific issue patterns and route them to various AWS services like AWS Lambda functions, AWS Step Functions state machines, or Amazon Simple Notification Service (Amazon SNS) topics for further processing. This integration enables automated workflows that can trigger your analysis pipelines or code generation processes when relevant GitHub issue activities occur.

When deploying the system, consider a phased rollout strategy. Start with a pilot phase in two or three non-critical repositories to confirm effectiveness and find issues. During this pilot phase, it’s crucial to thoroughly evaluate the solution across a diverse set of code files. This test should cover different programming languages, frameworks, formats (such as – Jupyter notebook), and varying levels of complexity in number and size of code files. Gradually expand to more repositories, prioritizing those with high maintenance burdens or standardized code patterns.

Infrastructure best practices include containerization, designing for scalability, providing high availability, and implementing comprehensive monitoring for application, system, and business metrics. Security considerations are paramount, including operating with least privilege access, proper secrets management, input validation, and vulnerability management through regular updates and security scanning.

It is crucial to align with your company’s generative AI operations and governance frameworks. Prior to deployment, verify alignment with your organization’s AI safety protocols, data handling policies, and model deployment guidelines. Although this architectural pattern offers significant benefits, you should adapt implementation to fit within your organization’s specific AI governance structure and risk management frameworks.

Clean up

Clean up your environment by completing the following steps:

  1. Delete IAM roles and policies created specifically for this post.
  2. Delete the local copy of this post’s code.
  3. If you no longer need access to an Amazon Bedrock FM, you can remove access to it. For instructions, see Add or remove access to Amazon Bedrock foundation models.
  4. Delete the personal access token. For instructions, see Deleting a personal access token.

Conclusion

The integration of Amazon Bedrock FMs with the MCP and LangGraph is a significant advancement in the field of AI agents. By addressing the fundamental challenges of context management and tool integration, this combination enables the development of more sophisticated, reliable, and powerful agentic applications.

The GitHub issues workflow scenario demonstrates benefits that include productivity enhancement, consistency improvement, faster response times, scalable maintenance, and knowledge amplification. Important insights include the role of FMs as development partners, the necessity of workflow orchestration, the importance of repository context, the need for confidence assessment, and the value of feedback loops for continuous improvement.

The future of AI-powered development automation will see trends like multi-agent collaboration systems, proactive code maintenance, context-aware code generation, enhanced developer collaboration, and ethical AI development. Challenges include skill evolution, governance complexity, quality assurance, and integration complexity, whereas opportunities include developer experience transformation, accelerated innovation, knowledge democratization, and accessibility improvements. Organizations can prepare by starting small, investing in knowledge capture, building feedback loops, developing AI literacy, and experimenting with new capabilities. The goal is to enhance developer capabilities, not replace them, fostering a collaborative future where AI and human developers work together to build better software.

For the example code and demonstration discussed in this post, refer to the accompanying GitHub repository.

Refer to the following resources for additional guidance to get started:


About the authors

Jagdeep Singh Soni is a Senior Partner Solutions Architect at AWS based in the Netherlands. He uses his passion for generative AI to help customers and partners build generative AI applications using AWS services. Jagdeep has 15 years of experience in innovation, experience engineering, digital transformation, cloud architecture, and ML applications.

Ajeet Tewari is a Senior Solutions Architect for Amazon Web Services. He works with enterprise customers to help them navigate their journey to AWS. His specialties include architecting and implementing scalable OLTP systems and leading strategic AWS initiatives.

Mani Khanuja is a Tech Lead – Generative AI Specialists, author of the book Applied Machine Learning and High-Performance Computing on AWS, and a member of the Board of Directors for Women in Manufacturing Education Foundation Board. She leads machine learning projects in various domains such as computer vision, natural language processing, and generative AI. She speaks at internal and external conferences such AWS re:Invent, Women in Manufacturing West, YouTube webinars, and GHC 23. In her free time, she likes to go for long runs along the beach.

Read More

Mistral-Small-3.2-24B-Instruct-2506 is now available on Amazon Bedrock Marketplace and Amazon SageMaker JumpStart

Mistral-Small-3.2-24B-Instruct-2506 is now available on Amazon Bedrock Marketplace and Amazon SageMaker JumpStart

Today, we’re excited to announce that Mistral-Small-3.2-24B-Instruct-2506—a 24-billion-parameter large language model (LLM) from Mistral AI that’s optimized for enhanced instruction following and reduced repetition errors—is available for customers through Amazon SageMaker JumpStart and Amazon Bedrock Marketplace. Amazon Bedrock Marketplace is a capability in Amazon Bedrock that developers can use to discover, test, and use over 100 popular, emerging, and specialized foundation models (FMs) alongside the current selection of industry-leading models in Amazon Bedrock.

In this post, we walk through how to discover, deploy, and use Mistral-Small-3.2-24B-Instruct-2506 through Amazon Bedrock Marketplace and with SageMaker JumpStart.

Overview of Mistral Small 3.2 (2506)

Mistral Small 3.2 (2506) is an update of Mistral-Small-3.1-24B-Instruct-2503, maintaining the same 24-billion-parameter architecture while delivering improvements in key areas. Released under Apache 2.0 license, this model maintains a balance between performance and computational efficiency. Mistral offers both the pretrained (Mistral-Small-3.1-24B-Base-2503) and instruction-tuned (Mistral-Small-3.2-24B-Instruct-2506) checkpoints of the model under Apache 2.0.

Key improvements in Mistral Small 3.2 (2506) include:

  • Improves in following precise instructions with 84.78% accuracy compared to 82.75% in version 3.1 from Mistral’s benchmarks
  • Produces twice as fewer infinite generations or repetitive answers, reducing from 2.11% to 1.29% according to Mistral
  • Offers a more robust and reliable function calling template for structured API interactions
  • Now includes image-text-to-text capabilities, allowing the model to process and reason over both textual and visual inputs. This makes it ideal for tasks such as document understanding, visual Q&A, and image-grounded content generation.

These improvements make the model particularly well-suited for enterprise applications on AWS where reliability and precision are critical. With a 128,000-token context window, the model can process extensive documents and maintain context throughout longer conversation.

SageMaker JumpStart overview

SageMaker JumpStart is a fully managed service that offers state-of-the-art FMs for various use cases such as content writing, code generation, question answering, copywriting, summarization, classification, and information retrieval. It provides a collection of pre-trained models that you can deploy quickly, accelerating the development and deployment of machine learning (ML) applications. One of the key components of SageMaker JumpStart is model hubs, which offer a vast catalog of pre-trained models, such as Mistral, for a variety of tasks.

You can now discover and deploy Mistral models in Amazon SageMaker Studio or programmatically through the Amazon SageMaker Python SDK, deriving model performance and MLOps controls with SageMaker features such as Amazon SageMaker Pipelines, Amazon SageMaker Debugger, or container logs. The model is deployed in a secure AWS environment and under your virtual private cloud (VPC) controls, helping to support data security for enterprise security needs.

Prerequisites

To deploy Mistral-Small-3.2-24B-Instruct-2506, you must have the following prerequisites:

  • An AWS account that will contain all your AWS resources.
  • An AWS Identity and Access Management (IAM) role to access SageMaker. To learn more about how IAM works with SageMaker, see Identity and Access Management for Amazon SageMaker.
  • Access to SageMaker Studio, a SageMaker notebook instance, or an interactive development environment (IDE) such as PyCharm or Visual Studio Code. We recommend using SageMaker Studio for straightforward deployment and inference.
  • Access to accelerated instances (GPUs) for hosting the model.

If needed, request a quota increase and contact your AWS account team for support. This model requires a GPU-based instance type (approximately 55 GB of GPU RAM in bf16 or fp16) such as ml.g6.12xlarge.

Deploy Mistral-Small-3.2-24B-Instruct-2506 in Amazon Bedrock Marketplace

To access Mistral-Small-3.2-24B-Instruct-2506 in Amazon Bedrock Marketplace, complete the following steps:

  1. On the Amazon Bedrock console, in the navigation pane under Discover, choose Model catalog.
  2. Filter for Mistral as a provider and choose the Mistral-Small-3.2-24B-Instruct-2506 model.

The model detail page provides essential information about the model’s capabilities, pricing structure, and implementation guidelines. You can find detailed usage instructions, including sample API calls and code snippets for integration.The page also includes deployment options and licensing information to help you get started with Mistral-Small-3.2-24B-Instruct-2506 in your applications.

  1. To begin using Mistral-Small-3.2-24B-Instruct-2506, choose Deploy.
  2. You will be prompted to configure the deployment details for Mistral-Small-3.2-24B-Instruct-2506. The model ID will be pre-populated.
    1. For Endpoint name, enter an endpoint name (up to 50 alphanumeric characters).
    2. For Number of instances, enter a number between 1–100.
    3. For Instance type, choose your instance type. For optimal performance with Mistral-Small-3.2-24B-Instruct-2506, a GPU-based instance type such as ml.g6.12xlarge is recommended.
    4. Optionally, configure advanced security and infrastructure settings, including VPC networking, service role permissions, and encryption settings. For most use cases, the default settings will work well. However, for production deployments, review these settings to align with your organization’s security and compliance requirements.
  3. Choose Deploy to begin using the model.

When the deployment is complete, you can test Mistral-Small-3.2-24B-Instruct-2506 capabilities directly in the Amazon Bedrock playground, a tool on the Amazon Bedrock console to provide a visual interface to experiment with running different models.

  1. Choose Open in playground to access an interactive interface where you can experiment with different prompts and adjust model parameters such as temperature and maximum length.

The playground provides immediate feedback, helping you understand how the model responds to various inputs and letting you fine-tune your prompts for optimal results.

To invoke the deployed model programmatically with Amazon Bedrock APIs, you need to get the endpoint Amazon Resource Name (ARN). You can use the Converse API for multimodal use cases. For tool use and function calling, use the Invoke Model API.

Reasoning of complex figures

VLMs excel at interpreting and reasoning about complex figures, charts, and diagrams. In this particular use case, we use Mistral-Small-3.2-24B-Instruct-2506 to analyze an intricate image containing GDP data. Its advanced capabilities in document understanding and complex figure analysis make it well-suited for extracting insights from visual representations of economic data. By processing both the visual elements and accompanying text, Mistral Small 2506 can provide detailed interpretations and reasoned analysis of the GDP figures presented in the image.

We use the following input image.

We have defined helper functions to invoke the model using the Amazon Bedrock Converse API:

def get_image_format(image_path):
    with Image.open(image_path) as img:
        # Normalize the format to a known valid one
        fmt = img.format.lower() if img.format else 'jpeg'
        # Convert 'jpg' to 'jpeg'
        if fmt == 'jpg':
            fmt = 'jpeg'
    return fmt

def call_bedrock_model(model_id=None, prompt="", image_paths=None, system_prompt="", temperature=0.6, top_p=0.9, max_tokens=3000):
    
    if isinstance(image_paths, str):
        image_paths = [image_paths]
    if image_paths is None:
        image_paths = []
    
    # Start building the content array for the user message
    content_blocks = []

    # Include a text block if prompt is provided
    if prompt.strip():
        content_blocks.append({"text": prompt})

    # Add images as raw bytes
    for img_path in image_paths:
        fmt = get_image_format(img_path)
        # Read the raw bytes of the image (no base64 encoding!)
        with open(img_path, 'rb') as f:
            image_raw_bytes = f.read()

        content_blocks.append({
            "image": {
                "format": fmt,
                "source": {
                    "bytes": image_raw_bytes
                }
            }
        })

    # Construct the messages structure
    messages = [
        {
            "role": "user",
            "content": content_blocks
        }
    ]

    # Prepare additional kwargs if system prompts are provided
    kwargs = {}
    
    kwargs["system"] = [{"text": system_prompt}]

    # Build the arguments for the `converse` call
    converse_kwargs = {
        "messages": messages,
        "inferenceConfig": {
            "maxTokens": 4000,
            "temperature": temperature,
            "topP": top_p
        },
        **kwargs
    }

    
    converse_kwargs["modelId"] = model_id

    # Call the converse API
    try:
        response = client.converse(**converse_kwargs)
    
        # Parse the assistant response
        assistant_message = response.get('output', {}).get('message', {})
        assistant_content = assistant_message.get('content', [])
        result_text = "".join(block.get('text', '') for block in assistant_content)
    except Exception as e:
        result_text = f"Error message: {e}"
    return result_text

Our prompt and input payload are as follows:

import boto3
import base64
import json
from PIL import Image
from botocore.exceptions import ClientError

# Create a Bedrock Runtime client in the AWS Region you want to use.
client = boto3.client("bedrock-runtime", region_name="us-west-2")

system_prompt='You are a Global Economist.'
task = 'List the top 5 countries in Europe with the highest GDP'
image_path = './image_data/gdp.png'

print('Input Image:nn')
Image.open(image_path).show()

response = call_bedrock_model(model_id=endpoint_arn, 
                   prompt=task, 
                   system_prompt=system_prompt,
                   image_paths = image_path)

print(f'nResponse from the model:nn{response}')

The following is a response using the Converse API:

Based on the image provided, the top 5 countries in Europe with the highest GDP are:

1. **Germany**: $3.99T (4.65%)
2. **United Kingdom**: $2.82T (3.29%)
3. **France**: $2.78T (3.24%)
4. **Italy**: $2.07T (2.42%)
5. **Spain**: $1.43T (1.66%)

These countries are highlighted in green, indicating their location in the Europe region.

Deploy Mistral-Small-3.2-24B-Instruct-2506 in SageMaker JumpStart

You can access Mistral-Small-3.2-24B-Instruct-2506 through SageMaker JumpStart in the SageMaker JumpStart UI and the SageMaker Python SDK. SageMaker JumpStart is an ML hub with FMs, built-in algorithms, and prebuilt ML solutions that you can deploy with just a few clicks. With SageMaker JumpStart, you can customize pre-trained models to your use case, with your data, and deploy them into production using either the UI or SDK.

Deploy Mistral-Small-3.2-24B-Instruct-2506 through the SageMaker JumpStart UI

Complete the following steps to deploy the model using the SageMaker JumpStart UI:

  1. On the SageMaker console, choose Studio in the navigation pane.
  2. First-time users will be prompted to create a domain. If not, choose Open Studio.
  3. On the SageMaker Studio console, access SageMaker JumpStart by choosing JumpStart in the navigation pane.

  1. Search for and choose Mistral-Small-3.2-24B-Instruct-2506 to view the model card.

  1. Click the model card to view the model details page. Before you deploy the model, review the configuration and model details from this model card. The model details page includes the following information:
  • The model name and provider information.
  • A Deploy button to deploy the model.
  • About and Notebooks tabs with detailed information.
  • The Bedrock Ready badge (if applicable) indicates that this model can be registered with Amazon Bedrock, so you can use Amazon Bedrock APIs to invoke the model.

  1. Choose Deploy to proceed with deployment.
    1. For Endpoint name, enter an endpoint name (up to 50 alphanumeric characters).
    2. For Number of instances, enter a number between 1–100 (default: 1).
    3. For Instance type, choose your instance type. For optimal performance with Mistral-Small-3.2-24B-Instruct-2506, a GPU-based instance type such as ml.g6.12xlarge is recommended.

  1. Choose Deploy to deploy the model and create an endpoint.

When deployment is complete, your endpoint status will change to InService. At this point, the model is ready to accept inference requests through the endpoint. You can invoke the model using a SageMaker runtime client and integrate it with your applications.

Deploy Mistral-Small-3.2-24B-Instruct-2506 with the SageMaker Python SDK

Deployment starts when you choose Deploy. After deployment finishes, you will see that an endpoint is created. Test the endpoint by passing a sample inference request payload or by selecting the testing option using the SDK. When you select the option to use the SDK, you will see example code that you can use in the notebook editor of your choice in SageMaker Studio.

To deploy using the SDK, start by selecting the Mistral-Small-3.2-24B-Instruct-2506 model, specified by the model_id with the value mistral-small-3.2-24B-instruct-2506. You can deploy your choice of the selected models on SageMaker using the following code. Similarly, you can deploy Mistral-Small-3.2-24B-Instruct-2506 using its model ID.

from sagemaker.jumpstart.model import JumpStartModel 
accept_eula = True 
model = JumpStartModel(model_id="huggingface-vlm-mistral-small-3-2-24b-instruct-2506") 
predictor = model.deploy(accept_eula=accept_eula)
This deploys the model on SageMaker with default configurations, including the default instance type and default VPC configurations. You can change these configurations by specifying non-default values in JumpStartModel. The EULA value must be explicitly defined as True to accept the end-user license agreement (EULA).

After the model is deployed, you can run inference against the deployed endpoint through the SageMaker predictor:

prompt = "Hello!"
payload = {
    "messages": [
        {
            "role": "user",
            "content": prompt
        }
    ],
    "max_tokens": 4000,
    "temperature": 0.15,
    "top_p": 0.9,
}
    
response = predictor.predict(payload)
print(response['choices'][0]['message']['content'])
We get following response:

Hello! 😊 How can I assist you today?

Vision reasoning example

Using the multimodal capabilities of Mistral-Small-3.2-24B-Instruct-2506, you can process both text and images for comprehensive analysis. The following example highlights how the model can simultaneously analyze a tuition ROI chart to extract visual patterns and data points. The following image is the input chart.png.

Our prompt and input payload are as follows:

# Read and encode the image
image_path = "chart.png"
with open(image_path, "rb") as image_file:
base64_image = base64.b64encode(image_file.read()).decode('utf-8')


# Create a prompt focused on visual analysis of the box plot chart
visual_prompt = """Please analyze this box plot chart showing the relationship between Annual Tuition (x-axis) and 
40-Year Net Present Value (y-axis) in US$. 
Describe the key trend between tuition and net present value shown in this chart. What's one notable insight?"""

# Create payload with image input
payload = {
"messages": [
{
"role": "user",
"content": [
{"type": "text", "text": visual_prompt},
{"type": "image_url", "image_url": {"url": f"data:image/png;base64,{base64_image}"}}
]
}
],
"max_tokens": 800,
"temperature": 0.15
}

# Make a prediction
response = predictor.predict(payload)

# Display the visual analysis
message = response['choices'][0]['message']
if message.get('content'):
print("Vision Analysis:")
print(message['content'])

We get following response:

Vision Analysis:
This box plot chart illustrates the relationship between annual tuition costs (x-axis) and the 40-year net present value (NPV) in US dollars (y-axis). Each box plot represents a range of annual tuition costs, showing the distribution of NPV values within that range.

### Key Trend:
1. **General Distribution**: Across all tuition ranges, the median 40-year NPV (indicated by the line inside each box) appears to be relatively consistent, hovering around the $1,000,000 mark.
2. **Variability**: The spread of NPV values (indicated by the height of the boxes and whiskers) is wider for higher tuition ranges, suggesting greater variability in outcomes for more expensive schools.
3. **Outliers**: There are several outliers, particularly in the higher tuition ranges (e.g., 35-40k, 40-45k, and >50k), indicating that some individuals experience significantly higher or lower NPVs.

### Notable Insight:
One notable insight from this chart is that higher tuition costs do not necessarily translate into a higher 40-year net present value. For example, the median NPV for the highest tuition range (>50k) is not significantly higher than that for the lowest tuition range (<5k). This suggests that the return on investment for higher tuition costs may not be proportionally greater, and other factors beyond tuition cost may play a significant role in determining long-term financial outcomes.

This insight highlights the importance of considering factors beyond just tuition costs when evaluating the potential return on investment of higher education.

Function calling example

This following example shows Mistral Small 3.2’s function calling by demonstrating how the model identifies when a user question needs external data and calls the correct function with proper parameters.Our prompt and input payload are as follows:

# Define a simple weather function
weather_function = {
"type": "function",
"function": {
"name": "get_weather",
"description": "Get weather for a location",
"parameters": {
"type": "object",
"properties": {
"location": {
"type": "string",
"description": "City name"
}
},
"required": ["location"]
}
}
}

# User question
user_question = "What's the weather like in Seattle?"

# Create payload
payload = {
"messages": [{"role": "user", "content": user_question}],
"tools": [weather_function],
"tool_choice": "auto",
"max_tokens": 200,
"temperature": 0.15
}

# Make prediction
response = predictor.predict(payload)

# Display raw response to see exactly what we get
print(json.dumps(response['choices'][0]['message'], indent=2))

# Extract function call information from the response content
message = response['choices'][0]['message']
content = message.get('content', '')

if '[TOOL_CALLS]' in content:
print("Function call details:", content.replace('[TOOL_CALLS]', ''))

We get following response:

{
"role": "assistant",
"reasoning_content": null,
"content": "[TOOL_CALLS]get_weather{"location": "Seattle"}",
"tool_calls": []
}
Function call details: get_weather{"location": "Seattle"}

Clean up

To avoid unwanted charges, complete the following steps in this section to clean up your resources.

Delete the Amazon Bedrock Marketplace deployment

If you deployed the model using Amazon Bedrock Marketplace, complete the following steps:

  1. On the Amazon Bedrock console, under Tune in the navigation pane, select Marketplace model deployment.
  2. In the Managed deployments section, locate the endpoint you want to delete.
  3. Select the endpoint, and on the Actions menu, choose Delete.
  4. Verify the endpoint details to make sure you’re deleting the correct deployment:
    1. Endpoint name
    2. Model name
    3. Endpoint status
  5. Choose Delete to delete the endpoint.
  6. In the deletion confirmation dialog, review the warning message, enter confirm, and choose Delete to permanently remove the endpoint.

Delete the SageMaker JumpStart predictor

After you’re done running the notebook, make sure to delete the resources that you created in the process to avoid additional billing. For more details, see Delete Endpoints and Resources. You can use the following code:

predictor.delete_model()
predictor.delete_endpoint()

Conclusion

In this post, we showed you how to get started with Mistral-Small-3.2-24B-Instruct-2506 and deploy the model using Amazon Bedrock Marketplace and SageMaker JumpStart for inference. This latest version of the model brings improvements in instruction following, reduced repetition errors, and enhanced function calling capabilities while maintaining performance across text and vision tasks. The model’s multimodal capabilities, combined with its improved reliability and precision, support enterprise applications requiring robust language understanding and generation.

Visit SageMaker JumpStart in Amazon SageMaker Studio or Amazon Bedrock Marketplace now to get started with Mistral-Small-3.2-24B-Instruct-2506.

For more Mistral resources on AWS, check out the Mistral-on-AWS GitHub repo.


About the authors

Niithiyn Vijeaswaran is a Generative AI Specialist Solutions Architect with the Third-Party Model Science team at AWS. His area of focus is AWS AI accelerators (AWS Neuron). He holds a Bachelor’s degree in Computer Science and Bioinformatics.

Breanne Warner is an Enterprise Solutions Architect at Amazon Web Services supporting healthcare and life science (HCLS) customers. She is passionate about supporting customers to use generative AI on AWS and evangelizing model adoption for first- and third-party models. Breanne is also Vice President of the Women at Amazon board with the goal of fostering inclusive and diverse culture at Amazon. Breanne holds a Bachelor’s of Science in Computer Engineering from the University of Illinois Urbana-Champaign.

Koushik Mani is an Associate Solutions Architect at AWS. He previously worked as a Software Engineer for 2 years focusing on machine learning and cloud computing use cases at Telstra. He completed his Master’s in Computer Science from the University of Southern California. He is passionate about machine learning and generative AI use cases and building solutions.

Read More

Generate suspicious transaction report drafts for financial compliance using generative AI

Generate suspicious transaction report drafts for financial compliance using generative AI

Financial regulations and compliance are constantly changing, and automation of compliance reporting has emerged as a game changer in the financial industry. Amazon Web Services (AWS) generative AI solutions offer a seamless and efficient approach to automate this reporting process. The integration of AWS generative AI into the compliance framework not only enhances efficiency but also instills a greater sense of confidence and trust in the financial sector by promoting precision and timely delivery of compliance reports. These solutions help financial institutions avoid the costly and reputational consequences of noncompliance. This, in turn, contributes to the overall stability and integrity of the financial ecosystem, benefiting both the industry and the consumers it serves.

Amazon Bedrock is a managed generative AI service that provides access to a wide array of advanced foundation models (FMs). It includes features that facilitate the efficient creation of generative AI applications with a strong focus on privacy and security. Getting a good response from an FM relies heavily on using efficient techniques for providing prompts to the FM. Retrieval Augmented Generation (RAG) is a pivotal approach to augmenting FM prompts with contextually relevant information from external sources. It uses vector databases such as Amazon OpenSearch Service to enable semantic searching of the contextual information.

Amazon Bedrock Knowledge Bases, powered by vector databases such as Amazon OpenSearch Serverless, helps in implementing RAG to supplement model inputs with relevant information from factual resources, thereby reducing potential hallucinations and increasing response accuracy.

Amazon Bedrock Agents enables generative AI applications to execute multistep tasks using action groups and enable interaction with APIs, knowledge bases, and FMs. Using agents, you can design intuitive and adaptable generative AI applications capable of understanding natural language queries and creating engaging dialogues to gather details required for using the FMs effectively.

A suspicious transaction report (STR) or suspicious activity report (SAR) is a type of report that a financial organization must submit to a financial regulator if they have reasonable grounds to suspect any financial transaction that has occurred or was attempted during their activities. There are stipulated timelines for filing these reports and it typically takes several hours of manual effort to create one report for one customer account.

In this post, we explore a solution that uses FMs available in Amazon Bedrock to create a draft STR. We cover how generative AI can be used to automate the manual process of draft generation using account information, transaction details, and correspondence summaries as well as creating a knowledge base of information about fraudulent entities involved in such transactions.

Solution overview

The solution uses Amazon Bedrock Knowledge Bases, Amazon Bedrock Agents, AWS Lambda, Amazon Simple Storage Service (Amazon S3), and OpenSearch Service. The workflow is as follows:

  1. The user requests for creation of a draft STR report through the business application.
  2. The application calls Amazon Bedrock Agents, which has been preconfigured with detailed instructions to engage in a conversational flow with the user. The agent follows these instructions to gather the required information from the user, completes the missing information by using actions groups to invoke the Lambda function, and generates the report in the specified format.
  3. Following its instructions, the agent invokes Amazon Bedrock Knowledge Bases to find details about fraudulent entities involved in the suspicious transactions.
  4. Amazon Bedrock Knowledge Bases queries OpenSearch Service to perform semantic search for the entities required for the report. If the information about fraudulent entities is available in Amazon Bedrock Knowledge Bases, the agent follows its instructions to generate a report for the user.
  5. If the information isn’t found in the knowledge base, the agent uses the chat interface to prompt the user to provide the website URL that contains the relevant information. Alternatively, the user can provide a description about the fraudulent entity in the chat interface.
  6. If the user provides a URL for a publicly accessible website, the agent follows its instructions to call the action group to invoke a Lambda function to crawl the website URL. The Lambda function scrapes the information from the website and returns it to the agent for use in the report.
  7. The Lambda function also stores the scraped content in an S3 bucket for future use by the search index.
  8. Amazon Bedrock Knowledge Bases can be programmed to periodically scan the S3 bucket to index the new content in OpenSearch Service.

The following diagram illustrates the solution architecture and workflow.

Architecture showing interaction between users, Bedrock Agents, OpenSearch, and S3 storage with numbered workflow steps

You can use the full code available in GitHub to deploy the solution using the AWS Cloud Development Kit (AWS CDK). Alternatively, you can follow a step-by-step process for manual deployment. We walk through both approaches in this post.

Prerequisites

To implement the solution provided in this post, you must enable model access in Amazon Bedrock for Amazon Titan Text Embeddings V2 and Anthropic Claude 3.5 Haiku.

Deploy the solution with the AWS CDK

To set up the solution using the AWS CDK, follow these steps:

  1. Verify that the AWS CDK has been installed in your environment. For installation instructions, refer to the AWS CDK Immersion Day Workshop.
  2. Update the AWS CDK to version 36.0.0 or higher:
npm install -g aws-cdk
  1. Initialize the AWS CDK environment in the AWS account:
cdk bootstrap
  1. Clone the GitHub repository containing the solution files:
git clone https://github.com/aws-samples/suspicious-financial-transactions-reporting
  1. Navigate to the solution directory:
cd financial-transaction-report-drafting-for-compliance
  1. Create and activate the virtual environment:
python3 -m venv .venv
source .venv/bin/activate

Activating the virtual environment differs based on the operating system. Refer to the AWS CDK workshop for information about activating in other environments.

  1. After the virtual environment is activated, install the required dependencies:
pip install -r requirements.txt
  1. Deploy the backend and frontend stacks:
cdk deploy -a ./app.py --all
  1. When the deployment is complete, check these deployed stacks by visiting the AWS CloudFormation console, as shown in the following two screenshots.

CloudFormation console showing str-stack resources with UPDATE_COMPLETE and CREATE_COMPLETE statuses

Stack resources panel displaying str-stack-app components with creation and update statuses

Manual deployment

To implement the solution without using the AWS CDK, complete the following steps:

  1. Set up an S3 bucket.
  2. Create a Lambda function.
  3. Set up Amazon Bedrock Knowledge Bases.
  4. Set up Amazon Bedrock Agents.

Visual layouts in some screenshots in this post might look different than those on your AWS Management Console.

Set up an S3 bucket

Create an S3 bucket with a unique bucket name for the document repository, as shown in the following screenshot. This will be a data source for Amazon Bedrock Knowledge Bases.

Create the website scraper Lambda function

Create a new Lambda function called Url-Scraper using the Python 3.13 runtime to crawl and scrape the website URL provided by Amazon Bedrock Agents. The function will scrape the content, send the information to the agent, and store the contents in the S3 bucket for future references.

Lambda function setup page with runtime and architecture options

Error handling has been skipped in this code snippet for brevity. The full code is available in GitHub.

Create a new file called search_suspicious_party.py with the following code snippet:

import boto3
from bs4 import BeautifulSoup
import os
import re
import urllib.request
BUCKET_NAME = os.getenv('S3_BUCKET')
s3 = boto3.client('s3')
def get_receiving_entity_from_url(start_url):
    response = urllib.request.urlopen(
        urllib.request.Request(url=start_url, method='GET'),
        timeout=5)
    soup = BeautifulSoup(response.read(), 'html.parser')
    # Extract page title
    title = soup.title.string if soup.title else 'Untitled'
    # Extract page content for specific HTML elements
    content = ' '.join(p.get_text() for p in soup.find_all(['p', 'h1', 'h2', 'h3', 'h4', 'h5', 'h6']))
    content = re.sub(r's+', ' ', content).strip()
    s3.put_object(Body=content, Bucket=BUCKET_NAME, Key=f"docs/{title}.txt")
return content

Replace the default generated code in lambda_function.py with the following code:

import json
from search-suspicious-party import *
def lambda_handler(event, context):
    # apiPath should match the path specified in action group schema
    if event['apiPath'] == '/get-receiving-entity-details':
        # Extract the property from request data
        start_url = get_named_property(event, 'start_url')
        scraped_text = get_receiving_entity_from_url(start_url)
        action_response = {
            'actionGroup': event['actionGroup'],
            'apiPath': event['apiPath'],
            'httpMethod': event['httpMethod'],
            'httpStatusCode': 200,
            'responseBody': {
                'application/json': {
                    'body': json.dumps({'scraped_text': scraped_text})
                }
            }
        }
        return {'response': action_response}
    # Return an error if apiPath is not recognized
    return {
        'statusCode': 400,
        'body': json.dumps({'error': 'Invalid API path'})
    }
def get_named_property(event, name):
    return next(
        item for item in
        event['requestBody']['content']['application/json']['properties']
        if item['name'] == name
    )['value']

Configure the Lambda function

Set up a Lambda environment variable S3_BUCKET, as shown in the following screenshot. For Value, use the S3 bucket you created previously.

Increase the timeout duration for Lambda function to 30 seconds. You can adjust this value based on the time it takes for the crawler to complete its work.

Set up Amazon Bedrock Knowledge Bases

Complete the following steps to create a new knowledge base in Amazon Bedrock. This knowledge base will use OpenSearch Serverless to index the fraudulent entity data stored in Amazon S3. For more information, refer to Create a knowledge base by connecting to a data source in Amazon Bedrock Knowledge Bases.

  1. On the Amazon Bedrock console, choose Knowledge bases in the navigation pane and choose Create knowledge base.
  2. For Knowledge base name, enter a name (for example, str-knowledge-base).
  3. For Service role name, keep the default system generated value.

Knowledge base configuration form for name and description

  1. Select Amazon S3 as the data source.

Data source selection interface for AWS Bedrock

  1. Configure the Amazon S3 data source:
    1. For Data source name, enter a name (for example, knowledge-base-data-source-s3).
    2. For S3 URI, choose Browse S3 and choose the bucket where information scraped by web crawler about fraudulent entities is available for the knowledge base to use.
    3. Keep all other default values.

  1. For Embeddings model, choose Titan Text Embeddings V2.

AWS Bedrock configuration interface showing embeddings model selection and vector store setup

  1. For Vector database, select Quick create a new vector store to create a default vector store with OpenSearch Serverless.

  1. Review the configurations and choose Create knowledge base.

After the knowledge base is successfully created, you can see the knowledge base ID, which you will need when creating the agent in Amazon Bedrock.

  1. Select knowledge-base-data-source-s3 from the list of data sources and choose Sync to index the documents.

Set up Amazon Bedrock Agents

To create a new agent in Amazon Bedrock, complete the following steps. For more information, refer to Create and configure agent manually.

  1. On the Amazon Bedrock console, choose Agents in the navigation pane and choose Create Agent.
  2. For Name, enter a name (for example, agent-str).
  3. Choose Create.

Create agent interface with name input and multi-agent collaboration settings

  1. For Agent resource role, keep the default setting (Create and use a new service role).
  2. For Select model, choose a model provider and model name (for example, Anthropic’s Claude 3.5 Haiku)
  3. For Instructions for the Agent, provide the instructions that allow the agent to invoke the large language model (LLM).

You can download the instructions from the agent-instructions.txt file in the GitHub repo. Refer to next section in this post to understand how to write the instructions.

  1. Keep all other default values.
  2. Choose Save.

Agent builder showing role selection, model choice, and instruction input for STR reporting

  1. Under Action groups, choose Add to create a new action group.

An action is a task the agent can perform by making API calls. A set of actions comprises an action group.

  1. Provide an API schema that defines all the APIs in the action group.
  2. For Action group details, enter an action group name (for example, agent-group-str-url-scraper).
  3. For Action group type, select Define with API schemas.
  4. For Action group invocation, select Select an existing Lambda function, which is the Lambda function that you created previously.

Action group configuration interface with Lambda function selection and API schema options

  1. For Action group schema, choose Define via in-line schema editor.
  2. Replace the default sample code with the following example to define the schema to specify the input parameters with default and mandatory values:
openapi: 3.0.0
info:
  title: Gather suspicious receiving entity details from website
  version: 1.0.0
paths:
  /:
    post:
      description: Get details about suspicious receiving entity from the URL
      operationId: getReceivingEntityDetails
      requestBody:
        required: true
        content:
          application/json:
            schema:
              $ref: "#/components/schemas/ScrapeRequest"
      responses:
        "200":
          description: Receiving entity details gathered successfully
components:
  schemas:
    ScrapeRequest:
      type: object
      properties:
        :
          type: string
          description: The URL to start scraping from
      required:
        - start_url
  1. Choose Create.
  2. Under Knowledge bases, choose Add.

  1. For Select knowledge base, choose knowledge-base-str, which you created previously, and add the following instructions:

Use the information in the knowledge-base-str knowledge base to select transaction reports.

  1. Choose Save to save all changes.
  2. Finally, choose Prepare to prepare this agent to get it ready for testing.

You can also create a Streamlit application to create a UI for this application. The source code is available in GitHub.

Agent instructions

Agent instructions for Amazon Bedrock Agents provide the mechanism for a multistep user interaction to gather the inputs an agent needs to invoke the LLM with a rich prompt to generate the response in the required format. Provide logical instructions in plain English. There are no predefined formats for these instructions.

  1. Provide an overview of the task including the role:
You are a financial user creating Suspicious Transaction Report (STR) draft for a financial compliance use case.
  1. Provide the message that the agent can use for initiating the user interaction:
Greet the user with the message “Hi <name>. Welcome to STR report drafting. How can I help?”
Ask the user to provide the transactions details. From the transaction details, capture the response in the <answer> tag and include the <thinking> tag to understand the rationale behind the response.
  1. Specify the processing that needs to be done on the output received from the LLM:
For the transaction input provided by user, create a narrative description for financial risk reporting of the provided bank account and transaction details.
1. Add a summary of correspondence logs that includes title, summary, correspondence history, and analysis in the narrative description.
2. Add the details about the receiving entity in the narrative description. You can get details about receiving entities from the agent action group.
  1. Provide the optional messages that the agent can use for a multistep interaction to gather the missing inputs if required:
If you don't have knowledge about Receiving entity, you should ask the Human for more details about it with a message “Unfortunately I do not have enough context or details about the receiving entity <entity name> to provide an accurate risk assessment or summary. Can you please provide some additional background information about <entity name>? What is the URL of the <entity name> or the description?”
  1. Specify the actions that the agent can take to process the user input using action groups:
If user provides the URL of <entity name>, call the action group <add action group name> to get the details. If user provides the description of <entity name>, then summarize and add it to the narrative description as a receiving entity.
  1. Specify how the agent should provide the response, including the format details:
Once you have all the necessary input (financial transaction details and receiving entity details), create a detailed well-formatted draft report for financial risk reporting of the provided bank account and transaction details containing the following sections:
1. Title
2. Summary of transactions
3. Correspondence History & Analysis
4. Receiving entity summary

Test the solution

To test the solution, follow these steps:

  1. Choose Test to start testing the agent.
  2. Initiate the chat and observe how the agent uses the instructions you provided in the configuration step to ask for required details for generating the report.
  3. Try different prompts, such as “Generate an STR for an account.”

The following screenshot shows an example chat.

AI assistant conversation requesting details for Suspicious Transaction Report generation

The following screenshot shows an example chat with the prompt, “Generate an STR for account number 49179-180-2092803.”

AI assistant conversation requesting details for Suspicious Transaction Report generation

Another option is to provide all the details at the same time, for example, “Generate an STR for account number 12345-999-7654321 with the following transactions.”

  1. Copy and paste the sample transactions from the sample-transactions.txt file in GitHub.

The agent keeps asking for missing information, such as account number, transaction details, and correspondence history. After it has all the details, it will generate a draft STR document.

The code in GitHub also contains a sample StreamLit application that you can use to test the application.

Clean up

To avoid incurring unnecessary future charges, clean up the resources you created as part of this solution. If you created the solution using the GitHub code sample and the AWS CDK, empty the S3 bucket and delete the CloudFormation stack. If you created the solution manually, complete the following steps:

  1. Delete the Amazon Bedrock agent.
  2. Delete the Amazon Bedrock knowledge base.
  3. Empty and delete the S3 bucket if you created one specifically for this solution.
  4. Delete the Lambda function.

Conclusion

In this post, we showed how Amazon Bedrock offers a robust environment for building generative AI applications, featuring a range of advanced FMs. This fully managed service prioritizes privacy and security while helping developers create AI-driven applications efficiently. A standout feature, RAG, uses external knowledge bases to enrich AI-generated content with relevant information, backed by OpenSearch Service as its vector database. Additionally, you can include metadata fields in the knowledge base and agent session context with Amazon Verified Permissions to pass fine-grained access context for authorization.

With careful prompt engineering, Amazon Bedrock minimizes inaccuracies and makes sure that AI responses are grounded in factual documentation. This combination of advanced technology and data integrity makes Amazon Bedrock an ideal choice for anyone looking to develop reliable generative AI solutions. You can now explore extending this sample code to use Amazon Bedrock and RAG for reliably generating draft documents for compliance reporting.


About the Authors

Divyajeet (DJ) Singh is a Senior Solutions Architect at AWS Canada. He loves working with customers to help them solve their unique business challenges using the cloud. Outside of work, he enjoys spending time with family and friends and exploring new places.

Parag Srivastava is a Senior Solutions Architect at AWS, where he has been helping customers successfully apply generative AI to real-life business scenarios. During his professional career, he has been extensively involved in complex digital transformation projects. He is also passionate about building innovative solutions around geospatial aspects of addresses.

Sangeetha Kamatkar is a Senior Solutions Architect at AWS who helps customers with successful cloud adoption and migration. She works with customers to craft highly scalable, flexible, and resilient cloud architectures that address customer business problems. In her spare time, she listens to music, watches movies, and enjoys gardening during summertime.

Vineet KachhawahaVineet Kachhawaha is a Senior Solutions Architect at AWS focusing on AI/ML and generative AI. He co-leads the AWS for Legal Tech team within AWS. He is passionate about working with enterprise customers and partners to design, deploy, and scale AI/ML applications to derive business value.

Read More

Fine-tune and deploy Meta Llama 3.2 Vision for generative AI-powered web automation using AWS DLCs, Amazon EKS, and Amazon Bedrock

Fine-tune and deploy Meta Llama 3.2 Vision for generative AI-powered web automation using AWS DLCs, Amazon EKS, and Amazon Bedrock

Fine-tuning of large language models (LLMs) has emerged as a crucial technique for organizations seeking to adapt powerful foundation models (FMs) to their specific needs. Rather than training models from scratch—a process that can cost millions of dollars and require extensive computational resources—companies can customize existing models with domain-specific data at a fraction of the cost. This approach has become particularly valuable as organizations across healthcare, finance, and technology sectors look to use AI for specialized tasks while maintaining cost-efficiency. However, implementing a production-grade fine-tuning solution presents several significant challenges. Organizations must navigate complex infrastructure setup requirements, enforce robust security measures, optimize performance, and establish reliable model hosting solutions.

In this post, we present a complete solution for fine-tuning and deploying the Llama-3.2-11B-Vision-Instruct model for web automation tasks. We demonstrate how to build a secure, scalable, and efficient infrastructure using AWS Deep Learning Containers (DLCs) on Amazon Elastic Kubernetes Service (Amazon EKS). By using AWS DLCs, you can gain access to well-tested environments that come with enhanced security features and pre-installed software packages, significantly simplifying the optimization of your fine-tuning process. This approach not only accelerates development, but also provides robust security and performance in production environments.

Solution overview

In this section, we explore the key components of our architecture for fine-tuning a Meta Llama model and using it for web task automation. We explore the benefits of different components and how they interact with each other, and how we can use them to build a production-grade fine-tuning pipeline.

AWS DLCs for training and hosting AI/ML workloads

At the core of our solution are AWS DLCs, which provide optimized environments for machine learning (ML) workloads. These containers come preconfigured with essential dependencies, including NVIDIA drivers, CUDA toolkit, and Elastic Fabric Adapter (EFA) support, along with preinstalled frameworks like PyTorch for model training and hosting. AWS DLCs tackle the complex challenge of packaging various software components to work harmoniously with training scripts, so you can use optimized hardware capabilities out of the box. Additionally, AWS DLCs implement unique patching algorithms and processes that continuously monitor, identify, and address security vulnerabilities, making sure the containers remain secure and up-to-date. Their pre-validated configurations significantly reduce setup time and reduce compatibility issues that often occur in ML infrastructure setup.

AWS DLCs, Amazon EKS, and Amazon EC2 for seamless infrastructure management

We deploy these DLCs on Amazon EKS, creating a robust and scalable infrastructure for model fine-tuning. Organizations can use this combination to build and manage their training infrastructure with unprecedented flexibility. Amazon EKS handles the complex container orchestration, so you can launch training jobs that run within DLCs on your desired Amazon Elastic Compute Cloud (Amazon EC2) instance, producing a production-grade environment that can scale based on training demands while maintaining consistent performance.

AWS DLCs and EFA support for high-performance networking

AWS DLCs come with pre-configured support for EFA, enabling high-throughput, low-latency communication between EC2 nodes. An EFA is a network device that you can attach to your EC2 instance to accelerate AI, ML, and high performance computing applications. DLCs are pre-installed with EFA software that is tested and compatible with the underlying EC2 instances, so you don’t have to go through the hassle of setting up the underlying components yourself. For this post, we use setup scripts to create EKS clusters and EC2 instances that will support EFA out of the box.

AWS DLCs with FSDP for enhanced memory efficiency

Our solution uses PyTorch’s built-in support for Fully Sharded Data Parallel (FSDP) training, a cutting-edge technique that dramatically reduces memory requirements during training. Unlike traditional distributed training approaches where each GPU must hold a complete model copy, FSDP shards model parameters, optimizer states, and gradients across workers. The optimized implementation of FSDP within AWS DLCs makes it possible to train larger models with limited GPU resources while maintaining training efficiency.

For more information, see Scale LLMs with PyTorch 2.0 FSDP on Amazon EKS – Part 2.

Model deployment on Amazon Bedrock

For model deployment, we use Amazon Bedrock, a fully managed service for FMs. Although we can use AWS DLCs for model hosting, we use Amazon Bedrock for this post to demonstrate diversity in service utilization.

Web automation integration

Finally, we implement the SeeAct agent, a sophisticated web automation tool, and demonstrate its integration with our hosted model on Amazon Bedrock. This combination creates a powerful system capable of understanding visual inputs and executing complex web tasks autonomously, showcasing the practical applications of our fine-tuned model.In the following sections, we demonstrate how to:

  1. Set up an EKS cluster for AI workloads.
  2. Use AWS DLCs to fine-tune Meta Llama 3.2 Vision using PyTorch FSDP.
  3. Deploy the fine-tuned model on Amazon Bedrock.
  4. Use the model with SeeAct for web task automation.

Prerequisites

You must have the following prerequisites:

  • An AWS account.
  • An AWS Identity and Access Management (IAM) role with appropriate policies. Because this post deals with creating clusters, nodes, and infrastructure, administrator-level permissions would work well. However, if you must have restricted permissions, you should at least have the following permissions: AmazonEC2FullAccess, AmazonSageMakerFullAccess, AmazonBedrockFullAccess, AmazonS3FullAccess, AWSCloudFormationFullAccess, AmazonEC2ContainerRegistryFullAccess. For more information about other IAM policies needed, see Minimum IAM policies.
  • The necessary dependencies installed for Amazon EKS. For instructions, see Set up to use Amazon EKS.
  • For this post, we use P5 instances. To request a quota increase, see Requesting a quota increase.
  • An EC2 key pair. For instructions, see Create a key pair for your Amazon EC2 instance.

Run export AWS_REGION=<region_name> in your bash script from where you are running the commands.

Set up the EKS cluster

In this section, we walk through the steps to create your EKS cluster and install the necessary plugins, operators, and other dependencies.

Create an EKS cluster

The simplest way to create an EKS cluster is to use the cluster configuration YAML file. You can use the following sample configuration file as a base and customize it as needed. Provide the EC2 key pair created as a prerequisite. For more configuration options, see Using Config Files.

---
apiVersion: eksctl.io/v1alpha5
kind: ClusterConfig

metadata:
  name: MyCluster
  region: us-west-2

managedNodeGroups: 
  - name: p5
    instanceType: p5.48xlarge
    minSize: 0
    maxSize: 2
    desiredCapacity: 2
    availabilityZones: ["us-west-2a"]
    volumeSize: 1024
    ssh:
      publicKeyName: <your-ec2-key-pair>
    efaEnabled: true
    privateNetworking: true
    ## In case you have an On Demand Capacity Reservation (ODCR) and want to use it, uncomment the lines below.
    # capacityReservation:
    #   capacityReservationTarget:
    #     capacityReservationResourceGroupARN: arn:aws:resource-groups:us-west-2:897880167187:group/eks_blog_post_capacity_reservation_resource_group_p5

Run the following command to create the EKS cluster:

eksctl create cluster --config-file cluster.yamlThe following is an example output:

YYYY-MM-DD HH:mm:SS [ℹ] eksctl version x.yyy.z
YYYY-MM-DD HH:mm:SS [ℹ] using region <region_name>
...
YYYY-MM-DD HH:mm:SS [✔] EKS cluster "<cluster_name>" in "<region_name>" region is ready

Cluster creation might take between 15–30 minutes. After it’s created, your local ~/.kube/config file gets updated with connection information to your cluster.

Run the following command line to verify that the cluster is accessible:

kubectl get nodes

Install plugins, operators, and other dependencies

In this step, you install the necessary plugins, operators and other dependencies on your EKS cluster. This is necessary to run the fine-tuning on the correct node and save the model.

  1. Install the NVIDIA Kubernetes device plugin:
kubectl create -f https://raw.githubusercontent.com/NVIDIA/k8s-device-plugin/v0.17.0/deployments/static/nvidia-device-plugin.yml
  1. Install the AWS EFA Kubernetes device plugin:
helm repo add eks https://aws.github.io/eks-charts
git clone -b v0.0.190 https://github.com/aws/eks-charts.git
cd  eks-charts/stable
helm install efa ./aws-efa-k8s-device-plugin -n kube-system
cd ../..
  1. Delete aws-efa-k8s-device-plugin-daemonset by running the following command:
kubectl delete daemonset aws-efa-k8s-device-plugin-daemonset -n kube-system
  1. Clone the code locally that with help with setup and fine-tuning:
git clone https://github.com/aws-samples/aws-do-eks.git
cd aws-do-eks
git checkout f59007ee50117b547305f3b8475c8e1b4db5a1d5
curl -L -o patch-aws-do-eks.tar.gz https://github.com/aws/deep-learning-containers/raw/refs/heads/master/examples/dlc-llama-3-finetuning-and-hosting-with-agent/patch-aws-do-eks.tar.gz
ftar -xzf patch-aws-do-eks.tar.gz
cd patch-aws-do-eks/
git am *.patch
cd ../..
  1. Install etcd for running distributed training with PyTorch:
kubectl apply -f aws-do-eks/Container-Root/eks/deployment/etcd/etcd-deployment.yaml
  1. Deploy the FSx CSI driver for saving the model after fine-tuning:
    1. Enter into the fsx folder:
      cd aws-do-eks/Container-Root/eks/deployment/csi/fsx/

    2. Edit the fsx.conf file to modify the CLUSTER_NAME, CLUSTER_REGION, and CLUSTER_ZONE values to your cluster specific data:
      vi fsx.conf

    3. Deploy the FSX CSI driver:
      ./deploy.sh

  2. Deploy the Kubeflow Training Operator that will be used to run the fine-tuning job:
    1. Change the location to the following:
      cd aws-do-eks/Container-Root/eks/deployment/kubeflow/training-operator/

    2. Deploy the Kubeflow Training Operator:
      ./deploy.sh

  3. Deploy the Kubeflow MPI Operator for running NCCL tests:
    1. Run deploy.sh from the following GitHub repo.
    2. Change the location to the following:
      cd aws-do-eks/Container-Root/eks/deployment/kubeflow/mpi-operator/

    3. Deploy the Kubeflow MPI Operator:
      ./deploy.sh

Fine-tune Meta Llama 3.2 Vision using DLCs on Amazon EKS

This section outlines the process for fine-tuning the Meta Llama 3.2 Vision model using PyTorch FSDP on Amazon EKS. We use the DLCs as the base image to run our training jobs.

Configure the setup needed for fine-tuning

Complete the following steps to configure the setup for fine-tuning:

  1. Create a Hugging Face account and get a Hugging Face security token.
  2. Enter into the fsdp folder:
cd Container-Root/eks/deployment/distributed-training/pytorch/pytorchjob/fsdp
  1. Create a Persistent Volume Claim (PVC) that will use the underlying FSx CSI driver that you installed earlier:
kubectl apply -f pvc.yaml

Monitor kubectl get pvc fsx-claim and make sure it reached BOUND status. You can then go to the Amazon EKS console to see an unnamed volume created without a name. You can let this happen in the background, but before you run the ./run.sh command to run the fine-tuning job in a later step, make sure the BOUND status is achieved.

  1. To configure the environment, open the .env file and modify the following variables:
    1. HF_TOKEN: Add the Hugging Face token that you generated earlier.
    2. S3_LOCATION: Add the Amazon Simple Storage Service (Amazon S3) location where you want to store the fine-tuned model after the training is complete.
  2. Create the required resource YAMLs:
./deploy.sh

This line uses the values in the .env file to generate new YAML files that will eventually be used for model deployment.

  1. Build and push the container image:
./login-dlc.sh
./build.sh
./push.sh

Run the fine-tuning job

In this step, we use the upstream DLCs and add the training scripts within the image for running the training.

Make sure that you have requested access to the Meta Llama 3.2 Vision model on Hugging Face. Continue to the next step after permission has been granted.

Execute the fine-tuning job:

./run.sh

For our use case, the job took 1.5 hours to complete. The script uses the following PyTorch command that’s defined in the .env file within the fsdp folder:

```
bash
torchrun --nnodes 1 --nproc_per_node 8  
recipes/quickstart/finetuning/finetuning.py 
--enable_fsdp --lr 1e-5  --num_epochs 5 
--batch_size_training 2 
--model_name meta-llama/Llama-3.2-11B-Vision-Instruct 
--dist_checkpoint_root_folder ./finetuned_model 
--dist_checkpoint_folder fine-tuned  
--use_fast_kernels 
--dataset "custom_dataset" --custom_dataset.test_split "test" 
--custom_dataset.file "recipes/quickstart/finetuning/datasets/mind2web_dataset.py"  
--run_validation False --batching_strategy padding
```

You can use the ./logs.sh command to see the training logs in both FSDP workers.

After a successful run, logs from fsdp-worker will look as follows:

Sharded state checkpoint saved to /workspace/llama-recipes/finetuned_model_mind2web/fine-tuned-meta-llama/Llama-3.2-11B-Vision-Instruct
Checkpoint Time = 85.3276

Epoch 5: train_perplexity=1.0214, train_epoch_loss=0.0211, epoch time 706.1626197730075s
training params are saved in /workspace/llama-recipes/finetuned_model_mind2web/fine-tuned-meta-llama/Llama-3.2-11B-Vision-Instruct/train_params.yaml
Key: avg_train_prep, Value: 1.0532150745391846
Key: avg_train_loss, Value: 0.05118955448269844
Key: avg_epoch_time, Value: 716.0386156642023
Key: avg_checkpoint_time, Value: 85.34336999000224
fsdp-worker-1:78:5593 [0] NCCL INFO [Service thread] Connection closed by localRank 1
fsdp-worker-1:81:5587 [0] NCCL INFO [Service thread] Connection closed by localRank 4
fsdp-worker-1:85:5590 [0] NCCL INFO [Service thread] Connection closed by localRank 0
I0305 19:37:56.173000 140632318404416 torch/distributed/elastic/agent/server/api.py:844] [default] worker group successfully finished. Waiting 300 seconds for other agents to finish.
I0305 19:37:56.173000 140632318404416 torch/distributed/elastic/agent/server/api.py:889] Local worker group finished (WorkerState.SUCCEEDED). Waiting 300 seconds for other agents to finish
I0305 19:37:56.177000 140632318404416 torch/distributed/elastic/agent/server/api.py:902] Done waiting for other agents. Elapsed: 0.0037238597869873047 seconds

Additionally:

[rank8]:W0305 19:37:46.754000 139970058049344 torch/distributed/distributed_c10d.py:2429] _tensor_to_object size: 2817680 hash value: 9260685783781206407
fsdp-worker-0:84:5591 [0] NCCL INFO [Service thread] Connection closed by localRank 7
I0305 19:37:56.124000 139944709084992 torch/distributed/elastic/agent/server/api.py:844] [default] worker group successfully finished. Waiting 300 seconds for other agents to finish.
I0305 19:37:56.124000 139944709084992 torch/distributed/elastic/agent/server/api.py:889] Local worker group finished (WorkerState.SUCCEEDED). Waiting 300 seconds for other agents to finish
I0305 19:37:56.177000 139944709084992 torch/distributed/elastic/agent/server/api.py:902] Done waiting for other agents. Elapsed: 0.05295562744140625 seconds

Run the processing model and store output in Amazon S3

After the jobs are complete, the fine-tuned model will exist in the FSx file system. The next step is to convert the model into Hugging Face format and save it in Amazon S3 so you can access and deploy the model in the upcoming steps:kubectl apply -f model-processor.yaml

The preceding command deploys a pod on your instance that will read the model from FSx, convert it to Hugging Face type, and push it to Amazon S3. It takes approximately 8–10 minutes for this pod to run. You can monitor the logs for this using ./logs.sh or kubectl logs -l app=model-processor.

Get the location where your model has been stored in Amazon S3. This is the same Amazon S3 location that was mentioned the .env file in an earlier step. Run the following command (provide the Amazon S3 location):aws s3 cp tokenizer_config.json <S3_LOCATION>://tokenizer_config.json

This is the tokenizer config that is needed by Amazon Bedrock to import Meta Llama models so they work with the Amazon Bedrock Converse API. For more details, see Converse API code samples for custom model import.

For this post, we use the Mind2Web dataset. We have implemented code that has been adapted from the Mind2Web code for fine-tuning. The adapted code is as follows:

git clone https://github.com/meta-llama/llama-cookbook && 
cd llama-cookbook && 
git checkout a346e19df9dd1a9cddde416167732a3edd899d09 && 
curl -L -o patch-llama-cookbook.tar.gz https://raw.githubusercontent.com/aws/deep-learning-containers/master/examples/dlc-llama-3-finetuning-and-hosting-with-agent/patch-llama-cookbook.tar.gz && 
tar -xzf patch-llama-cookbook.tar.gz && 
cd patch-llama-cookbook && 
git config --global user.email "you@example.com" && 
git am *.patch && 
cd .. && 
cat recipes/quickstart/finetuning/datasets/mind2web_dataset.py

Deploy the fine-tuned model on Amazon Bedrock

After you fine-tune your Meta Llama 3.2 Vision model, you have several options for deployment. This section covers one deployment method using Amazon Bedrock. With Amazon Bedrock, you can import and use your custom trained models seamlessly. Make sure your fine-tuned model is uploaded to an S3 bucket, and it’s converted to Hugging Face format. Complete the following steps to import your fine-tuned Meta Llama 3.2 Vision model:

  1. On the Amazon Bedrock console, under Foundation models in the navigation pane, choose Imported models.
  2. Choose Import model.
  3. For Model name, enter a name for the model.

  1. For Model import source, select Amazon S3 bucket.
  2. For S3 location, enter the location of the S3 bucket containing your fine-tuned model.

  1. Configure additional model settings as needed, then import your model.

The process might take 10–15 minutes depending on the model size to complete.

After you import your custom model, you can invoke it using the same Amazon Bedrock API as the default Meta Llama 3.2 Vision model. Just replace the model name with your imported model’s Amazon Resource Name (ARN). For detailed instructions, refer to Amazon Bedrock Custom Model Import.

You can follow the prompt formats mentioned in the following GitHub repo. For example:

What are the steps to build a docker image?<|eot_id|><|start_header_id|>assistant<|end_header_id|>

Run the agent workload using the hosted Amazon Bedrock model

Running the agent workload involves using the SeeAct framework and browser automation to start an interactive session with the AI agent and perform the browser operations. We recommend completing the steps in this section on a local machine for browser access.

Clone the SeeAct repository

Clone the customized SeeAct repository, which contains example code that can work with Amazon Bedrock, as well as a couple of test scripts:

git clone https://github.com/OSU-NLP-Group/SeeAct.git

Set up SeeAct in a local runtime environment

Complete the following steps to set up SeeAct in a local runtime environment:

  1. Create a Python virtual environment for this demo. We use Python 3.11 in the example, but you can change to other Python versions.
python3.11 -m venv seacct-python-3-11
source seacct-python-3-11/bin/activate
  1. Apply a patch to add the code change needed for this demo:
cd SeeAct
curl -O https://raw.githubusercontent.com/aws/deep-learning-containers/master/examples/dlc-llama-3-finetuning-and-hosting-with-agent/patch-seeact.patch
git checkout 2fdbf373f58a1aa5f626f7c5931fe251afc69c0a
git apply patch-seeact.patch
  1. Run the following commands to install the SeeAct package and dependencies:
cd SeeAct/seeact_package
pip install .
pip install -r requirements.txt
pip install -U boto3
playwright install

Make sure you’re using the latest version of Boto3 for these steps.

Validate the browser automation tool used by SeeAct

We added a small Python script to verify the functionality of Playwright, the browser automation tool used by SeeAct:

cd SeeAct/src
python test_playwright.py

You should see a browser launched and closed after a few seconds. You should also see a screenshot being captured in SeeAct/src/example.png showing google.com.

Test Amazon Bedrock model availability

Modify the content of test_bedrock.py. Update the MODEL_ID to be your hosted Amazon Bedrock model ARN and set up the AWS connection.

export AWS_ACCESS_KEY_ID="replace with your aws credential"
export AWS_SECRET_ACCESS_KEY="replace with your aws credential"
export AWS_SESSION_TOKEN="replace with your aws credential"

Run the test:

cd SeeAct
python test_bedrock.py

After a successful invocation, you should see a log similar to the following in your terminal:

The image shows a dog lying down inside a black pet carrier, with a leash attached to the dog's collar.

If the botocore.errorfactory.ModelNotReadyException error occurs, retry the command in a few minutes.

Run the agent workflow

The branch has already added support for BedrockEngine and SGLang for running inference with the fine-tuned Meta Llama 3.2 Vision model. The default option uses Amazon Bedrock inference.

To run the agent workflow, update self.model from src/demo_utils/inference_engine.py at line 229 to your Amazon Bedrock model ARN. Then run the following code:

cd SeeAct/src
python seeact.py -c config/demo_mode.toml 

This will launch a terminal prompt like the following code, so you can input the task you want the agent to do:

Please input a task, and press Enter. 
Or directly press Enter to use the default task: Find pdf of paper "GPT-4V(ision) is a Generalist Web Agent, if Grounded" from arXiv
Task: 

In the following screenshot, we asked the agent to search for the website for DLCs.

Clean up

Use the following code to clean the resources you created as part of this post:

cd Container-Root/eks/deployment/distributed-training/pytorch/pytorchjob/fsdp
kubectl delete -f ./fsdp.yaml ## Deletes the training fsdp job
kubectl delete -f ./etcd.yaml ## Deletes etcd
kubectl delete -f ./model-processor.yaml ## Deletes model processing YAML

cd aws-do-eks/Container-Root/eks/deployment/kubeflow/mpi-operator/
./remove.sh

cd aws-do-eks/Container-Root/eks/deployment/kubeflow/training-operator/
./remove.sh

## [VOLUME GETS DELETED] - If you want to delete the FSX volume
kubectl delete -f ./pvc.yaml ## Deletes persistent volume claim, persistent volume and actual volume

To stop the P5 nodes and release them, complete the following steps:

  1. On the Amazon EKS console, choose Clusters in the navigation pane.
  2. Choose the cluster that contains your node group.
  3. On the cluster details page choose the Compute tab.
  4. In the Node groups section, select your node group, then choose Edit.
  5. Set the desired size to 0.

Conclusion

In this post, we presented an end-to-end workflow for fine-tuning and deploying the Meta Llama 3.2 Vision model using the production-grade infrastructure of AWS. By using AWS DLCs on Amazon EKS, you can create a robust, secure, and scalable environment for model fine-tuning. The integration of advanced technologies like EFA support and FSDP training enables efficient handling of LLMs while optimizing resource usage. The deployment through Amazon Bedrock provides a streamlined path to production, and the integration with SeeAct demonstrates practical applications in web automation tasks. This solution serves as a comprehensive reference point for engineers to develop their own specialized AI applications, adapt the demonstrated approaches, and implement similar solutions for web automation, content analysis, or other domain-specific tasks requiring vision-language capabilities.

To get started with your own implementation, refer to our GitHub repo. To learn more about AWS DLCs, see the AWS Deep Learning Containers Developer Guide. For more details about Amazon Bedrock, see Getting started with Amazon Bedrock.

For deeper insights into related topics, refer to the following resources:

Need help or have questions? Join our AWS Machine Learning community on Discord or reach out to AWS Support. You can also stay updated with the latest developments by following the AWS Machine Learning Blog.


About the Authors

Shantanu Tripathi is a Software Development Engineer at AWS with over 4 years of experience in building and optimizing large-scale AI/ML solutions. His experience spans developing distributed AI training libraries, creating and launching DLCs and Deep Learning AMIs, designing scalable infrastructure for high-performance AI workloads, and working on generative AI solutions. He has contributed to AWS services like Amazon SageMaker HyperPod, AWS DLCs, and DLAMIs, along with driving innovations in AI security. Outside of work, he enjoys theater and swimming.

Junpu Fan is a Senior Software Development Engineer at Amazon Web Services, specializing in AI/ML Infrastructure. With over 5 years of experience in the field, Junpu has developed extensive expertise across the full cycle of AI/ML workflows. His work focuses on building robust systems that power ML applications at scale, helping organizations transform their data into actionable insights.

Harish Rao is a Senior Solutions Architect at AWS, specializing in large-scale distributed AI training and inference. He helps customers harness the power of AI to drive innovation and solve complex challenges. Outside of work, Harish embraces an active lifestyle, enjoying the tranquility of hiking, the intensity of racquetball, and the mental clarity of mindfulness practices.

Arindam Paul is a Sr. Product Manager in SageMaker AI team at AWS responsible for Deep Learning workloads on SageMaker, EC2, EKS, and ECS. He is passionate about using AI to solve customer problems. In his spare time, he enjoys working out and gardening.

Read More

Measuring the effectiveness of software development tools and practices

Measuring the effectiveness of software development tools and practices


Measuring the effectiveness of software development tools and practices

New cost-to-serve-software metric that accounts for the full software development lifecycle helps determine which software development innovations provide quantifiable value.

Economics

July 29, 12:05 PMJuly 29, 01:18 PM

At Amazon, we constantly seek ways to optimize software development tools, processes, and practices in order to improve outcomes and experiences for our customers. Internally, Amazon has the variety of businesses, team sizes, and technologies to enable research on engineering practices that span a wide variety of circumstances. Recently, we’ve been exploring how generative artificial intelligence (genAI) affects our cost-to-serve-software (CTS-SW) metric. This post delves into the research that led to CTS-SWs development, how various new AI-powered tools can lower CTS-SW, and our future plans in this exciting area.

Understanding CTS-SW

We developed cost to serve software as a metric to quantify how investments in improving the efficiency of building and supporting software enable teams to easily, safely, and continually deploy software to customers. It bridges the gap between our existing framework, which tracks many metrics (similar to DORA and SPACE), and the quantifiable bottom-line impact on the business. It allows developer experience teams to express their business benefits in either effective capacity (engineering years saved) or the monetary value of those savings. In a recent blog post on the AWS Cloud Enterprise Strategy Blog, we described how CTS-SW can evaluate how initiatives throughout the software development lifecycle affect the ability to deliver for customers.

At a high level, CTS-SW tracks the dollars spent per unit of software reaching customers (i.e., released for use by customers). The best unit of software to use varies based on the software architecture. Deployment works well for microservices. Code reviews or pull requests that are shipped to a customer work well for monolith-based teams or software whose release is dictated by a predetermined schedule. Finally, commits that reach customers make sense for teams that contribute updates to a central code trunk. We currently use deployments, as it fits our widespread use of service-oriented architecture patterns and our local team ownership.

CTS-SW is based on the same theory that underlies the cost-to-serve metric in Amazons fulfillment network, i.e., that the delivery of a product to a customer is the result of an immeasurably complex and highly varied process and would be affected by the entirety of any changes to it. That process is so complex, and it changes so much over time, that the attempt to quantify each of its steps and assign costs to them, known as activity-based costing, is likely to fail. This is especially true of software engineering today, as new AI tools are changing the ways software engineers do their jobs.

Cost to serve simplifies this complex process by modeling only the input costs and the output units. We can then work backwards to understand drivers and opportunities for improvement.

This equation represents the high-level CTS-SW setup.

In the context of software development, working backwards means that we investigate changes that could affect the metric, beyond the core coding experience of working in an IDE and writing logic. We also include continuous integration/continuous delivery (CI/CD) practices, work planning, incident management practices, maintenance of existing systems, searching for information, and many other factors that characterize software development at Amazon. By working backwards, we look across the collective software builder experience and investigate how changes in different areas, such as reducing the number of alarms engineers receive, affects developers ability to build new experiences for customers. We have used a variety of research methods to explore these relationships, but we have primarily relied on mathematical models.

From a science perspective, Amazon is an interesting place in which to build these models because of our established culture of small software teams that manage their own services. A longstanding Amazon principle is that these teams should be small enough to be fed by two pizzas, so we refer to them as two-pizza teams. This local-ownership model has led to the creation of thousands of distinct services solving customer problems across the company.

Amazons practice of working backwards from the best possible customer experience means software teams choose the optimal combination of tooling and technology to enable that experience. These choices have led to the implementation of many different software architectures at Amazon. That variety offers an opportunity to explore how different architectures affect CTS-SW.

The Amazon Software Builder Experience (ASBX) team, our internal developer experience team, has access to rich telemetry data about these architectures and different ways of working with them. Using this data, we created a panel dataset representing the work of thousands of two-pizza teams over the past five years and including features we thought could affect CTS-SW. We model CTS-SW using the amount of developer time the largest component of CTS-SW per deployment. This data offers an opportunity for modeling the complete process from inception to delivery at a scale rarely seen in developer experience research.

Last year, as a first exploration of this dataset, we fit a set of linear mixed models to CTS-SW, to identify other metrics and behaviors that are highly correlated with it. Within ASBX, we were looking for input metrics that teams could optimize to lower CTS-SW. Correlations with linear mixed models can also help establish causal links between factors in the linear mixed models and CTS-SW. Linear mixed models are a good fit for this sort of problem because they have two components, one that captures the underlying relation between the outcome variable and the predictors, irrespective of team, and one that captures differences across teams.

Once wed fit our models, we found that the following input metrics stood out as being the largest potential drivers of CTS-SW after a sensitivity analysis:

  • Team velocity: This measures how many code reviews (CRs) a software team merges each week per developer on the team. Teams that check in more code have a lower CTS-SW. Our science validates that software is a team sport, and framing this as a team-level outcome instead of an individual one prevents using CR flow as a performance metric for individual engineers. Having strong engineering onboarding and deployment safety helps teams reach and sustain high velocity. This was our largest single predictor of CTS-SW.
  • Delivery health (interventions per deploy, rollback rates): We find that teams that have implemented CI/CD with automation and change safety best practices have better CTS-SW outcomes. Our data demonstrates that when you spend less time wrestling with deployment friction and more time creating value, both productivity and job satisfaction improve.
  • Pages per on-call builder: This measures how many pages a team gets per week. We find that an increase in paging leads to lower CTS-SW, as paging can result in a deployment to production. However, we believe that work done in this reactive way may not be the most useful to customers in the long term. Understanding how this urgent, unplanned work interacts with new-feature delivery is an area for future research.

Our research has shown strong relationships between development factors and CTS-SW, making it an effective tool for measuring software development efficiency. We are working to expand the data we use in these models to better capture the ways in which teams build and operate their services. With this data, we will investigate the effects of software architecture decisions, informing architecture recommendations for teams across Amazon.

Validating linear mixed models with causal inference

Once we found that model fitting implied a correlation between team velocity and CTS-SW, we started looking for natural experiments that would help us validate the correlation with causal evidence. The rapidly emerging set of generative AI-powered tools provided that set of natural experiments.

The first of these tools adopted at scale across Amazon was Amazon Q Developer. This tool automatically generates code completions based on existing code and comments. We investigated the tools effect on CR velocity by building a panel regression model with dynamic two-way fixed effects.

This model uses time-varying covariates based on observations of software builder teams over multiple time periods during a nine-month observation window, and it predicts either CR velocity or deployment velocity. We specify the percentage of the team using Q Developer in each week and pass that information to the model as well.

We also evaluate other variables passed to the model to make sure they are exogenous, i.e., not influenced by Q Developer usage, to ensure that we can make claims of a causal relationship between Q Developer usage and deployment or CR velocity. These variables include data on rollbacks and manual interventions in order to capture the impact of production and deployment incidents, which may affect the way builders are writing code.

Heres our model specification:

In this equation,

is the normalized deployments per builder week or team weekly velocity for team at time ,

is the team-specific fixed effect,

is the time-specific fixed effect,

,1

is the lagged normalized deployments or team velocity,

is the vector of time-varying covariates (Q Developer usage rate, rollback rate, manual interventions),

is the persistence of our dependent variable over time (i.e., it shows how much of the past value of carries over into the current period), and

is the error term.

Early evidence shows that Q Developer has accelerated CR velocity and deployment velocity. More important, we found causal evidence that the launch of a new developer tool can lower CTS-SW for adopting teams and that we can measure that impact. As agentic AI grows, there will be agents for a range of tasks that engineers perform, beyond just writing code. That will require a unit of measurement that can capture their contributions holistically, without overly focusing on one area. CTS-SW enables us to measure the effects of AI across the software development lifecycle, from agents giving feedback on design docs to agents suggesting fixes to failed builds and deployments.

The road ahead

We recognize that combining experimental results can sometimes overstate an interventions true impact. To address this, we’re developing a baseline model that we can use to normalize our tool-based approach to ensure that our estimates of AI impact are as accurate as possible.

Looking ahead, we plan to expand our analysis to include AI’s impact on more aspects of the developer experience. By leveraging CTS-SW and developing robust methodologies for measuring AI’s impact, we’re ensuring that our AI adoption is truly customer obsessed, in that it makes Amazons software development more efficient. As we continue to explore and implement AI solutions, we remain committed to using data-driven approaches to improve outcomes and experiences for our customers. We look forward to sharing them with you at a later date.

yit = ai + t + yi,t-1 + Xit + it

Research areas: Economics

Tags: Causal inference

Read More