Model using ASR hypotheses as extra inputs reduces word error rate of human transcriptions by almost 11%.Read More
Easy Machine Learning for On-Device Audio
Posted by Luiz GUStavo Martins, Developer Advocate
At Google I/O, we shared a set of tutorials to help you use machine learning on audio. In this blog post you’ll find resources to help you develop and customize an audio classification model for your app, and a couple of real world examples for inspiration.
Machine learning for audio
Sound and audio are sometimes used interchangeably, but they have a key difference. Sound is in essence what you can hear while audio is the sound’s electronic representation. That’s why we usually use the term audio when talking about machine learning.
Machine Learning for audio can be used to:
- Understand speech
- Understand musical instruments
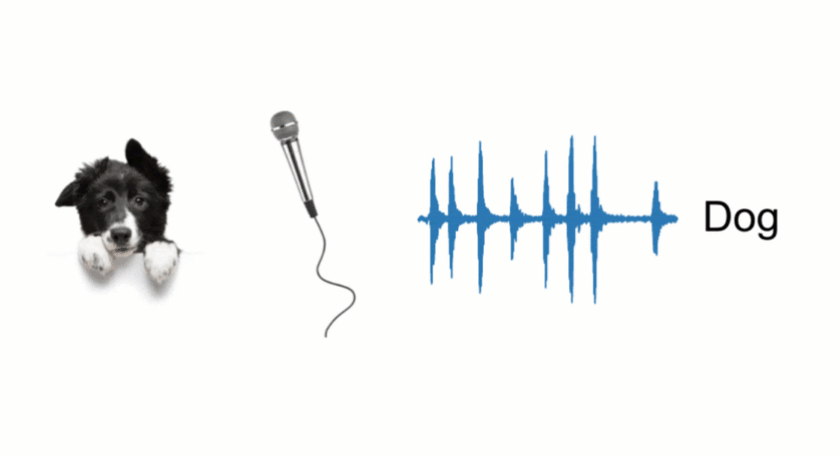
- Classify events (which bird is that?)
- Detect pitch
- Generate music
In this post we will focus on audio classification of events, a common scenario in practice with many real world applications like NOAA creating a humpback whale acoustic detector, and the Zoological Society of London using audio recognition to protect wildlife.
A number of classification models are available for you to try right now on TensorFlow Hub (YAMNet, Whale detection).
Audio recognition can also run completely on-device. For example, Android has a sound notifications feature that provides push notification for important sounds around you. It can also detect which music is playing, or even help with an ML-powered audio recorder app that can transcribe conversations on-device.
Having the models is only the beginning. Now you might ask:
- How do I use them on my app?
- How do I customize them for my audio use case?
Deploying machine learning models on-device
Imagine you have an audio classification model ready, such as a pretrained one from TF-Hub, how would you use this in a mobile app? To help you integrate audio classification into your app we created the TensorFlow Lite Task Library. The Audio Classifier component was released and you only need a couple of lines of code to add audio classification to your application:
// Initialization
val classifier = AudioClassifier.createFromFile(this, modelPath)

// Start recording
val record = classifier.createAudioRecord()
record.startRecording()

// Load latest audio samples
val tensor = classifier.createInputTensorAudio()
tensor.load(record);

// Run inference
val output = classifier.classify(tensor)
The library takes care of loading the model to memory, to create the audio recorder with the proper model specifications (sample rate, bit rate) and the classification method to get the model’s inference results. Here you can find a full sample to get some inspiration.
Customizing the models
What if you need to recognize audio events that are not in the set provided by the pretrained models? Or if you need to specialize them to fewer classes? In these situations, you need to fine tune the model using a technique called Transfer Learning.
This is a very popular process and you don’t need to be an expert on machine learning to be able to do it. You can use Model Maker to help you with this.
spec = audio_classifier.YamNetSpec()
data = audio_classifier.DataLoader.from_folder(spec, DATA_DIR)

train_data, validation_data = data.split(0.8)
model = audio_classifier.create(train_data, spec, validation_data)

model.export(models_path)
You can find complete code here. The output model can be directly loaded by the Task Library. And Model Maker can customize models not only for audio but also for image, text and recommendation system
Summary
Machine learning for audio is an exciting field and with many possibilities, enabling many new features. Doing ML on-device is getting easier and faster with tools like TensorFlow Lite Task Library and customization can be done without expertise in the field with Model Maker.
You can learn more about it on our new On-Device Machine Learning website (the audio path is here). You’ll find tutorials, codelabs and lots of resources on how to do not only audio related tasks but also for image (classification, object detection) and text (classification, entity extraction, question and answer)
You can share with us what you build by adding #TensorFlow on your social network post with your project, or submit it for the TensorFlow community spotlight program. And if you have any questions, you can ask them on discuss.tensorflow.org.
Spring 2021 Amazon Research Awards recipients announced
The 26 awardees represent 25 universities in 11 countries. Recipients have access to more than 250 Amazon public datasets, and can utilize AWS AI/ML services and tools.Read More
How to make on-device speech recognition practical
Branching encoder networks make operation more efficient, while “neural diffing” reduces bandwidth requirements for model updates.Read More
This Googler’s team is making shopping more inclusive
There’s a lot to love about online shopping: It’s fast, it’s easy and there are a ton of options to choose from. But there’s one obvious challenge — you can’t try anything on. This is something Google product manager Debbie Biswas noticed, as a tech industry veteran and startup founder herself. “Historically, the fashion industry only celebrates people of a certain size and skin color,” she says. “This was something I wanted to change.”
Debbie grew up in India and moved to the U.S. after she graduated college. “I started a company in the women’s apparel space, where I learned to solve user pain points around shopping for clothes, sizing and styling.” While working on her startup, Debbie realized how hard shopping was for women, including herself — the models in the images didn’t show her how something would look on her.
“When I got an opportunity to work at Google Shopping, I realized I could solve so many of these problems at scale using the best AI/ML tech in the industry,” she says. “As a woman of color, and someone who doesn’t conform to the ‘traditional beautiful size,’ I feel very motivated to solve apparel shopping problems for people like me.”
The science behind Amazon Prime
Amazon’s scientists have developed a variety of scientific models to help customers get the most out of their membership.Read More
BMW Quantum Computing Challenge seeks new solutions to automotive hurdles
Challenge is open to researchers in industry and academia around the globe; the deadline for submissions is Sept. 24, 2021.Read More
3D Pose Detection with MediaPipe BlazePose GHUM and TensorFlow.js
Posted by Ivan Grishchenko, Valentin Bazarevsky, Eduard Gabriel Bazavan, Na Li, Jason Mayes, Google
Pose detection is an important step in understanding more about the human body in videos and images. Our existing models have supported 2D pose estimation for some time, which many of you may have already tried.
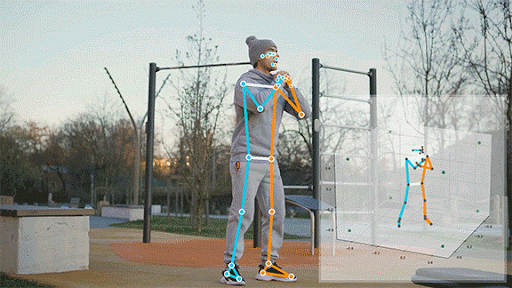
Today, we are launching our first 3D model in TF.js pose-detection API. 3D pose estimation opens up new design opportunities for applications such as fitness, medical, motion capture and beyond – in many of these areas we’ve seen a growing interest from the TensorFlow.js community. A great example of this is 3D motion capture to drive a character animation in the browser.
 |
|
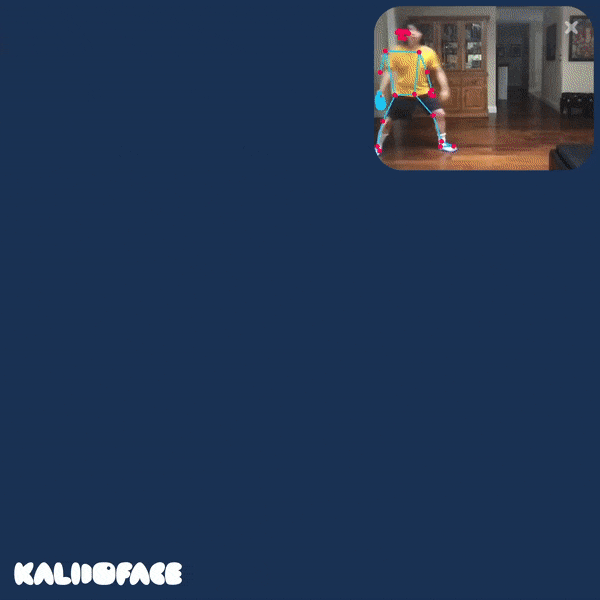
3D motion capture with BlazePose GHUM by Richard Yee (used with permission, live demo available at 3d.kalidoface.com) |
This community demo uses multiple models powered by MediaPipe and TensorFlow.js (namely FaceMesh, BlazePose and HandPose). Even better, no app install is needed as you just need to visit a webpage to enjoy the experience. So with that in mind, let’s learn more and see this new model in action!
|
| Try out the live demo! |
Installation
The pose-detection API provides two runtimes for BlazePose GHUM, namely MediaPipe runtime and TensorFlow.js runtime.
To install the API and runtime library, you can either use the <script> tag in your html file or use NPM.
Through script tag:
<script src="https://cdn.jsdelivr.net/npm/@tensorflow-models/pose-detection"></script>
<!-- Include below scripts if you want to use TF.js runtime. -->
<script src="https://cdn.jsdelivr.net/npm/@tensorflow/tfjs-core"></script>
<script src="https://cdn.jsdelivr.net/npm/@tensorflow/tfjs-converter"></script>
<script src="https://cdn.jsdelivr.net/npm/@tensorflow/tfjs-backend-webgl"></script>

<!-- Optional: Include below scripts if you want to use MediaPipe runtime. -->
<script src="https://cdn.jsdelivr.net/npm/@mediapipe/pose"></script>
Through NPM:
yarn add @tensorflow-models/pose-detection

# Run below commands if you want to use TF.js runtime.
yarn add @tensorflow/tfjs-core @tensorflow/tfjs-converter
yarn add @tensorflow/tfjs-backend-webgl

# Run below commands if you want to use MediaPipe runtime.
yarn add @mediapipe/pose
To reference the API in your JS code, it depends on how you installed the library.
If installed through script tag, you can reference the library through the global namespace poseDetection.
If installed through NPM, you need to import the libraries first:
import * as poseDetection from '@tensorflow-models/pose-detection';
// Uncomment the line below if you want to use TF.js runtime.
// import '@tensorflow/tfjs-backend-webgl';
// Uncomment the line below if you want to use MediaPipe runtime.
// import '@mediapipe/pose';
Try it yourself!
First, you need to create a detector:
const model = poseDetection.SupportedModels.BlazePose;
const detectorConfig = {
  runtime: 'mediapipe', // or 'tfjs'
  modelType: 'full'
};
detector = await poseDetection.createDetector(model, detectorConfig);
Choose a modelType that fits your application needs, there are three options for you to choose from: lite, full, and heavy. From lite to heavy, the accuracy increases while the inference speed decreases. Please try our live demo to compare different configurations.
Once you have a detector, you can pass in a video stream to detect poses:
const video = document.getElementById('video');
const poses = await detector.estimatePoses(video);
How to use the output? poses represent an array of detected pose predictions in the image frame. For each pose, it contains keypoints and keypoints3D. The keypoints are the same as the 2D model we launched before, it is an array of 33 keypoint objects, each object has x, y in pixel units.
keypoints3D is an additional array with 33 keypoint objects, each object has x, y, z. The x, y, z are in meter units. The person is modeled as if they were in a 2m x 2m x 2m cubic space. The range for each axis goes from -1 to 1 (therefore 2m total delta). The origin of this 3D space is the hip center (0, 0, 0). From the origin, z is positive if moving closer to the camera, and negative if moving away from the camera. See below output snippet for example:
[
  {
    score: 0.8,
    keypoints: [
      {x: 230, y: 220, score: 0.9, name: "nose"},
      {x: 212, y: 190, score: 0.8, name: "left_eye"},
      ...
    ],
    keypoints3D: [
      {x: 0.5, y: 0.9, z: 0.06 score: 0.9, name: "nose"},
      ...
    ]
  }
]
You can refer to our ReadMe for more details about the API.
As you begin to play and develop with BlazePose GHUM, we would appreciate your feedback and contributions. If you make something using this model, tag it with #MadeWithTFJS on social media so we can find your work, as we would love to see what you create.
Model deep dive
The key challenge to build the 3D part of our pose model was obtaining realistic, in-the-wild 3D data. In contrast to 2D, which can be obtained via human annotation, accurate manual 3D annotation becomes a uniquely challenging task. It requires either a lab setup or specialised hardware with depth sensors for 3D scans – which introduce additional challenges to preserve a good level of human and environment diversity in the dataset. Another alternative, which many researchers choose – to build a completely synthetic dataset, which introduces yet another challenge of domain adaptation to real-world pictures.
Our approach is based on a statistical 3D human body model called GHUM, which is built using a large corpus of human shapes and motions. To obtain 3D human body pose ground truth, we fitted the GHUM model to our existing 2D pose dataset and extended it with a real world 3D keypoint coordinates in metric space. During the fitting process the shape and the pose variables of GHUM were optimized such that the reconstructed model aligns with the image evidence. This includes 2D keypoint and silhouette semantic segmentation alignment as well as shape and pose regularization terms. For more details see related work on 3D pose and shape inference (HUND, THUNDR).
 |
| Sample GHUM fitting for an input image. From left to right: original image, 3D GHUM reconstruction (different viewpoint) and blended result projected on top of the original image. |
Due to the nature of 3D to 2D projection, multiple points in 3D can have the same projection in 2D (i.e. with the same X and Y but different Z). So the fitting can result in several realistic 3D body poses for the given 2D annotation. To minimize this ambiguity, in addition to a 2D body pose, we asked annotators to provide depth order between pose skeleton edges where they are certain (check the figure below). This task proved to be an easy one (compared to a real depth annotation) showing high consistency between annotators (98% on cross-validation) and helped to reduce the depth ordering errors for the fitted GHUM reconstructions from 25% to 3%.
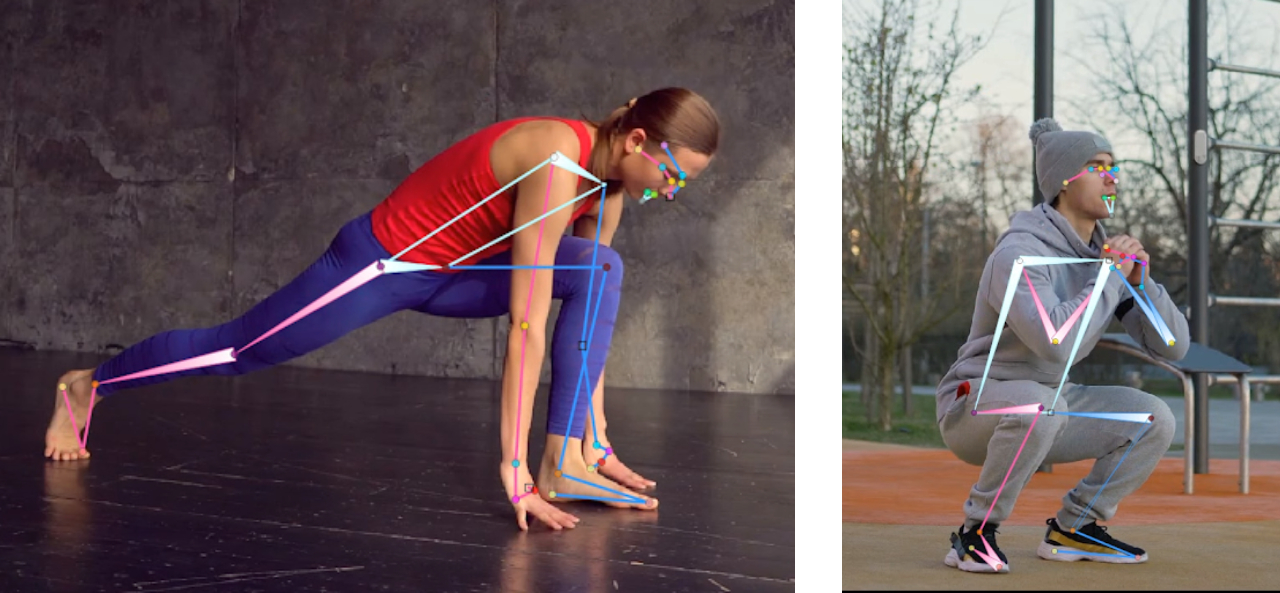 |
| “Depth order” annotation: the wider edge corner denotes the corner closer to the camera (e.g. the person’s right shoulder is closer to camera than left shoulder on both examples) |
BlazePose GHUM utilizes a two-step detector-tracker approach where the tracker operates on a cropped human image. Thus the model is trained to predict 3D body pose in relative coordinates of a metric space with origin in the subject’s hips center.
MediaPipe vs. TF.js runtime
There are some pros and cons of using each runtime. As shown in the performance table below, the MediaPipe runtime provides faster inference speed on desktop, laptop and android phones. The TF.js runtime provides faster inference speed on iPhones and iPads. The TF.js runtime is also about 1 MB smaller than the MediaPipe runtime.
|
MacBook Pro 15” 2019. Intel core i9. AMD Radeon Pro Vega 20 Graphics. (FPS) |
iPhone 11 (FPS) |
Pixel 5 (FPS) |
Desktop Intel i9-10900K. Nvidia GTX 1070 GPU. (FPS) |
|
|
MediaPipe Runtime With WASM & GPU Accel. |
75 | 67 | 34 |
9 | 6 | N/A |
25 | 21 | 8 |
150 | 130 | 97 |
|
TFJS Runtime With WebGL backend. |
52 | 40 | 24 |
43 | 32 | 22 |
14 | 10 | 4 |
42 | 35 | 29 |
Inference speed of BlazePose GHUM across different devices and runtimes. The first number in each cell is for the lite model, and the second number is for the full model, the third number is for the heavy model.
Acknowledgements
We would like to acknowledge our colleagues, who participated in creating BlazePose GHUM 3D: Andrei Zanfir, Cristian Sminchisescu, Tyler Zhu, the other contributors to MediaPipe: Chuo-Ling Chang, Michael Hays, Ming Guang Yong, Matthias Grundmann, along with those involved with the TensorFlow.js pose-detection API: Ahmed Sabie and Ping Yu, and of course the community who are making amazing work with these models: Richard Yee.
Improved Halo Body technology allows customers to take scans in tighter spaces
Scientists updated the system to accurately measure body fat percentage and create personalized 3D models even if there’s not enough room to take a full-body photo.Read More
Alexa & Friends features Yang Liu, principal applied scientist, Alexa AI
Liu discusses her work in speech recognition and understanding, prosody modeling, summarization, and natural language processing.Read More