Foundational vision models and visual prompt engineering for autonomous driving applications

Foundational vision models and visual prompt engineering for autonomous driving applications

Prompt engineering has become an essential skill for anyone working with large language models (LLMs) to generate high-quality and relevant texts. Although text prompt engineering has been widely discussed, visual prompt engineering is an emerging field that requires attention. Visual prompts can include bounding boxes or masks that guide vision models in generating relevant and accurate outputs. In this post, we explore the basics of visual prompt engineering, its benefits, and how it can be used to solve a specific use case: image segmentation for autonomous driving.

In recent years, the field of computer vision has witnessed significant advancements in the area of image segmentation. One such breakthrough is the Segment Anything Model (SAM) by Meta AI, which has the potential to revolutionize object-level segmentation with zero-shot or few-shot training. In this post, we use the SAM model as an example foundation vision model and explore its application to the BDD100K dataset, a diverse autonomous driving dataset for heterogeneous multitask learning. By combining the strengths of SAM with the rich data provided by BDD100K, we showcase the potential of visual prompt engineering with different versions of SAM. Inspired by the LangChain framework for language models, we propose a visual chain to perform visual prompting by combining object detection models with SAM.

Although this post focuses on autonomous driving, the concepts discussed are applicable broadly to domains that have rich vision-based applications such as healthcare and life sciences, and media and entertainment. Let’s begin by learning a little more about what’s under the hood of a foundational vision model like SAM. We used Amazon SageMaker Studio on an ml.g5.16xlarge instance for this post.

Segment Anything Model (SAM)

Foundation models are large machine learning (ML) models trained on vast quantity of data and can be prompted or fine-tuned for task-specific use cases. Here, we explore the Segment Anything Model (SAM), which is a foundational model for vision, specifically image segmentation. It is pre-trained on a massive dataset of 11 million images and 1.1 billion masks, making it the largest segmentation dataset as of writing. This extensive dataset covers a wide range of objects and categories, providing SAM with a diverse and large-scale training data source.

The SAM model is trained to understand objects and can output segmentation masks for any object in images or video frames. The model allows for visual prompt engineering, enabling you to provide inputs such as text, points, bounding boxes, or masks to generate labels without altering the original image. SAM is available in three sizes: base (ViT-B, 91 million parameters), large (ViT-L, 308 million parameters), and huge (ViT-H, 636 million parameters), catering to different computational requirements and use cases.

The primary motivation behind SAM is to improve object-level segmentation with minimal training samples and epochs for any objects of interest. The power of SAM lies in its ability to adapt to new image distributions and tasks without prior knowledge, a feature known as zero-shot transfer. This adaptability is achieved through its training on the expansive SA-1B dataset, which has demonstrated impressive zero-shot performance, surpassing many prior fully supervised results.

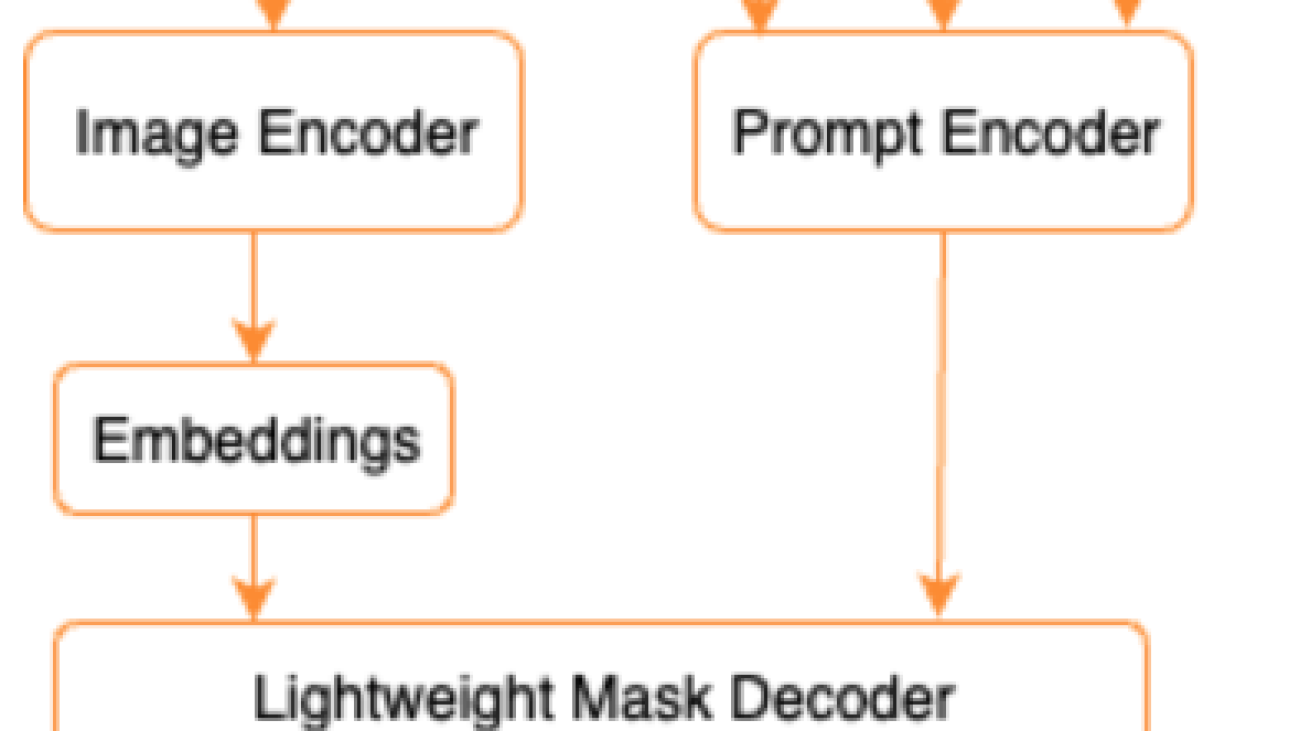
As shown in the following architecture for SAM, the process of generating segmentation masks involves three steps:

  1. An image encoder produces a one-time embedding for the image.
  2. A prompt encoder converts any prompt into an embedding vector for the prompt.
  3. The lightweight decoder combines the information from the image encoder and the prompt encoder to predict segmentation masks.

As an example, we can provide an input with an image and bounding box around an object of interest in that image (e.g. Silver car or driving lane)  and SAM model would produce segmentation masks for that object.

Visual prompt engineering

Prompt engineering refers to structuring inputs to a model that makes the model understand the intent and produces desired outcome. With textual prompt engineering, you can structure the input text through modifications such as choice of words, formatting, ordering, and more to get the desired output. Visual prompt engineering assumes that the user is working in a visual modality (image or video), and provides inputs. The following is a non-exhaustive list of potential ways to provide input to the generative AI model in the visual domain:

  • Point – A singular (x, y) coordinate point in the image plane
  • Points – Multiple (x, y) coordinate points, not necessarily related to each other
  • Bounding box – A set of four values (x, y, w, h) that define a rectangular region in the image plane
  • Contour – A set of (x, y) coordinate points in the image plane that form a closed shape
  • Mask – An array the same size as the image with a partial mask of the object of interest

With the visual prompt engineering techniques in mind, let’s explore how this can be applied to the SAM pre-trained model. We have use the base version of the pre-trained model.

Zero-shot prompting with the pre-trained SAM model

To start with, let’s explore the zero-shot approach. The following is a sample image from the training dataset taken from a vehicle’s front camera.

We can get segmentation masks for all objects from the image without any explicit visual prompting by automatically generating masks with just an input image. In the following image, we see parts of the car, road, traffic sign, license plates, flyover, pillars, signs, and more are segmented.

However, this output is not immediately useful for the following reasons:

  • The cars are not segmented as a whole, but in parts. For most perception models, for example, we don’t really care about each of the tires having separate output masks. This is true when looking for other known objects of interest as well, such as road, vegetation, signs, and so on.
  • Parts of the image that are useful for downstream tasks like drivable area are split up, with no explanation. On the other hand, similar instances are identified separately, and we may be interested in grouping similar objects (panoptic vs. instance segmentation).

Visual prompt engineering with the pre-trained SAM model

Fortunately, SAM supports providing input prompts, and we can use points, point arrays, and bounding boxes as inputs. With these specific instructions, we expect SAM to do better with segmentations focusing on specific points or areas. This can be compared with the language prompt template
"What is a good name for a company that makes {product}?"
where the input along with this prompt template from the user is the {product}. {product} is an input slot. In visual prompting, the bounding boxes, points, or masks are the input slots.

The following image provides the original ground truth bounding box around vehicles, and the drivable area patch from BDD100K ground truth data. The image also shows an input point (a yellow X) at the center of the green bounding box that we will refer to in the next few sections.

Let’s try to generate a mask for the car on the left with the green bounding box as an input to SAM. As shown in the following example, the base model of SAM doesn’t really find anything. This is also seen in the low segmentation score. When we look at the segmentation masks more closely, we see that there are small regions returned as masks (pointed at using red arrows) that aren’t really usable for any downstream application.

Let’s try a combination of a bounding box and a point as the input visual prompt. The yellow cross in the preceding image is the center of the bounding box. Providing this point’s (x,y) coordinates as the prompt along with the bounding box constraint gives us the following mask and a slightly higher score. This is still not usable by any means.

Finally, with the base pre-trained model, we can provide just the input point as a prompt (without the bounding box). The following images show two of the top three masks we thought were interesting.

Mask 1 segments the full car, whereas Mask 3 segments out an area that holds the car’s number plate close to the yellow cross (input prompt). Mask 1 is still not a tight, clean mask around the car; this points to the quality of the model, which we can assume increases with model size.

We can try larger pre-trained models with the same input prompt. The following images show our results. When using the huge SAM pre-trained model, Mask 3 is the entire car, whereas Mask 1 and 2 can be used to extract the number plate.

The large version of the SAM model also provides similar outputs.

The process we went through here is similar to manual prompt engineering for text prompts that you may already be familiar with. Note that a recent improvement in the SAM model to segment anything in high quality provides much better object- and context-specific outputs. In our case, we find that zero-shot prompting with text and visual prompts (point, box, and point and box inputs) don’t improve results drastically as we saw above.

Prompt templates and visual chains

As we can see from the preceding zero-shot examples, SAM struggles to identify all the objects in the scene. This is a good example of where we can take advantage of prompt templates and visual chains. Visual chain is inspired by the chain concept in the popular LangChain framework for language applications. It helps chain the data sources and an LLM to produce the output. For example, we can use an API chain to call an API and invoke an LLM to answer the question based on the API response.

Inspired by LangChain, we propose a sequential visual chain that looks like the following figure. We use a tool (like a pre-trained object detection model) to get initial bounding boxes, calculate the point at the center of the bounding box, and use this to prompt the SAM model with the input image.

For example, the following image shows the segmentation masks as a result of running this chain.

Another example chain can involve a text input of the object the user is interested in identifying. To implement this, we built a pipeline using Grounding DINO, an object detection model to prompt SAM for segmentation.

Grounding DINO is a zero-shot object detection model that can perform object detection with text providing category names (such as “traffic lights” or “truck”) and expressions (such as “yellow truck”). It accepts pairs of text and image to perform the object detection. It’s based on a transformer architecture and enables cross modalities with text and image data. To learn more about Grounding DINO, refer to Grounding DINO: Marrying DINO with Grounded Pre-Training for Open-Set Object Detection. This generates bounding boxes and labels and can be processed further to generate center points, filter based on labels, thresholds, and more. This is used (boxes or points) as a prompt to SAM for segmentation, which outputs masks.

The following are some examples showing the input text, DINO output (bounding boxes), and the final SAM output (segmentation masks).

The following images show the output for “yellow truck.”

The following images show the output for “silver car.”

The following image shows the output for “driving lane.”

We can use this pipeline to build a visual chain. The following code snippet explains this concept:

pipeline = [object_predictor, segment_predictor]
image_chain = ImageChain.from_visual_pipeline(pipeline, image_store, verbose=True)
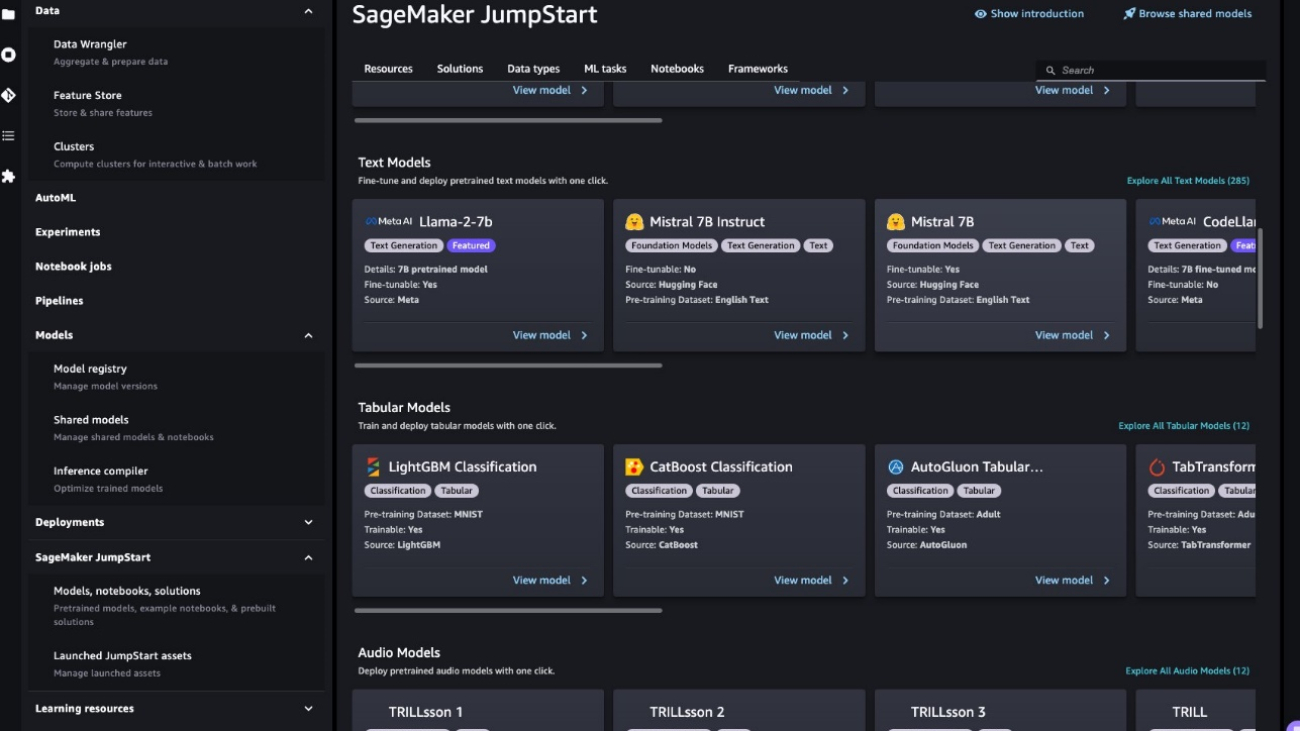
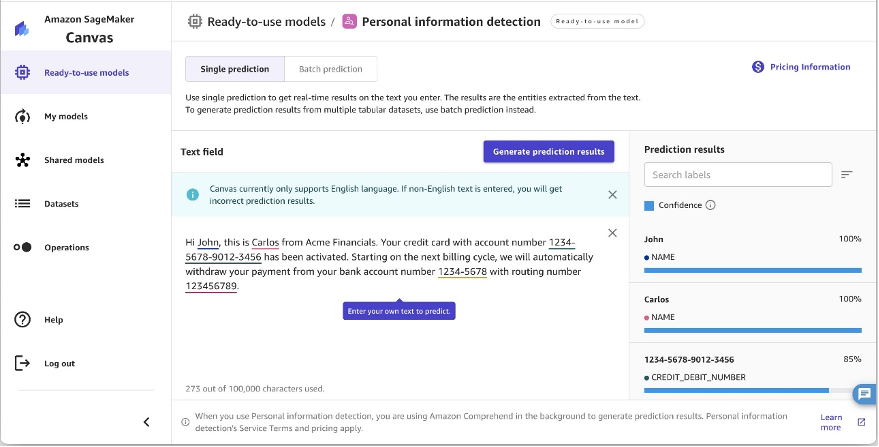
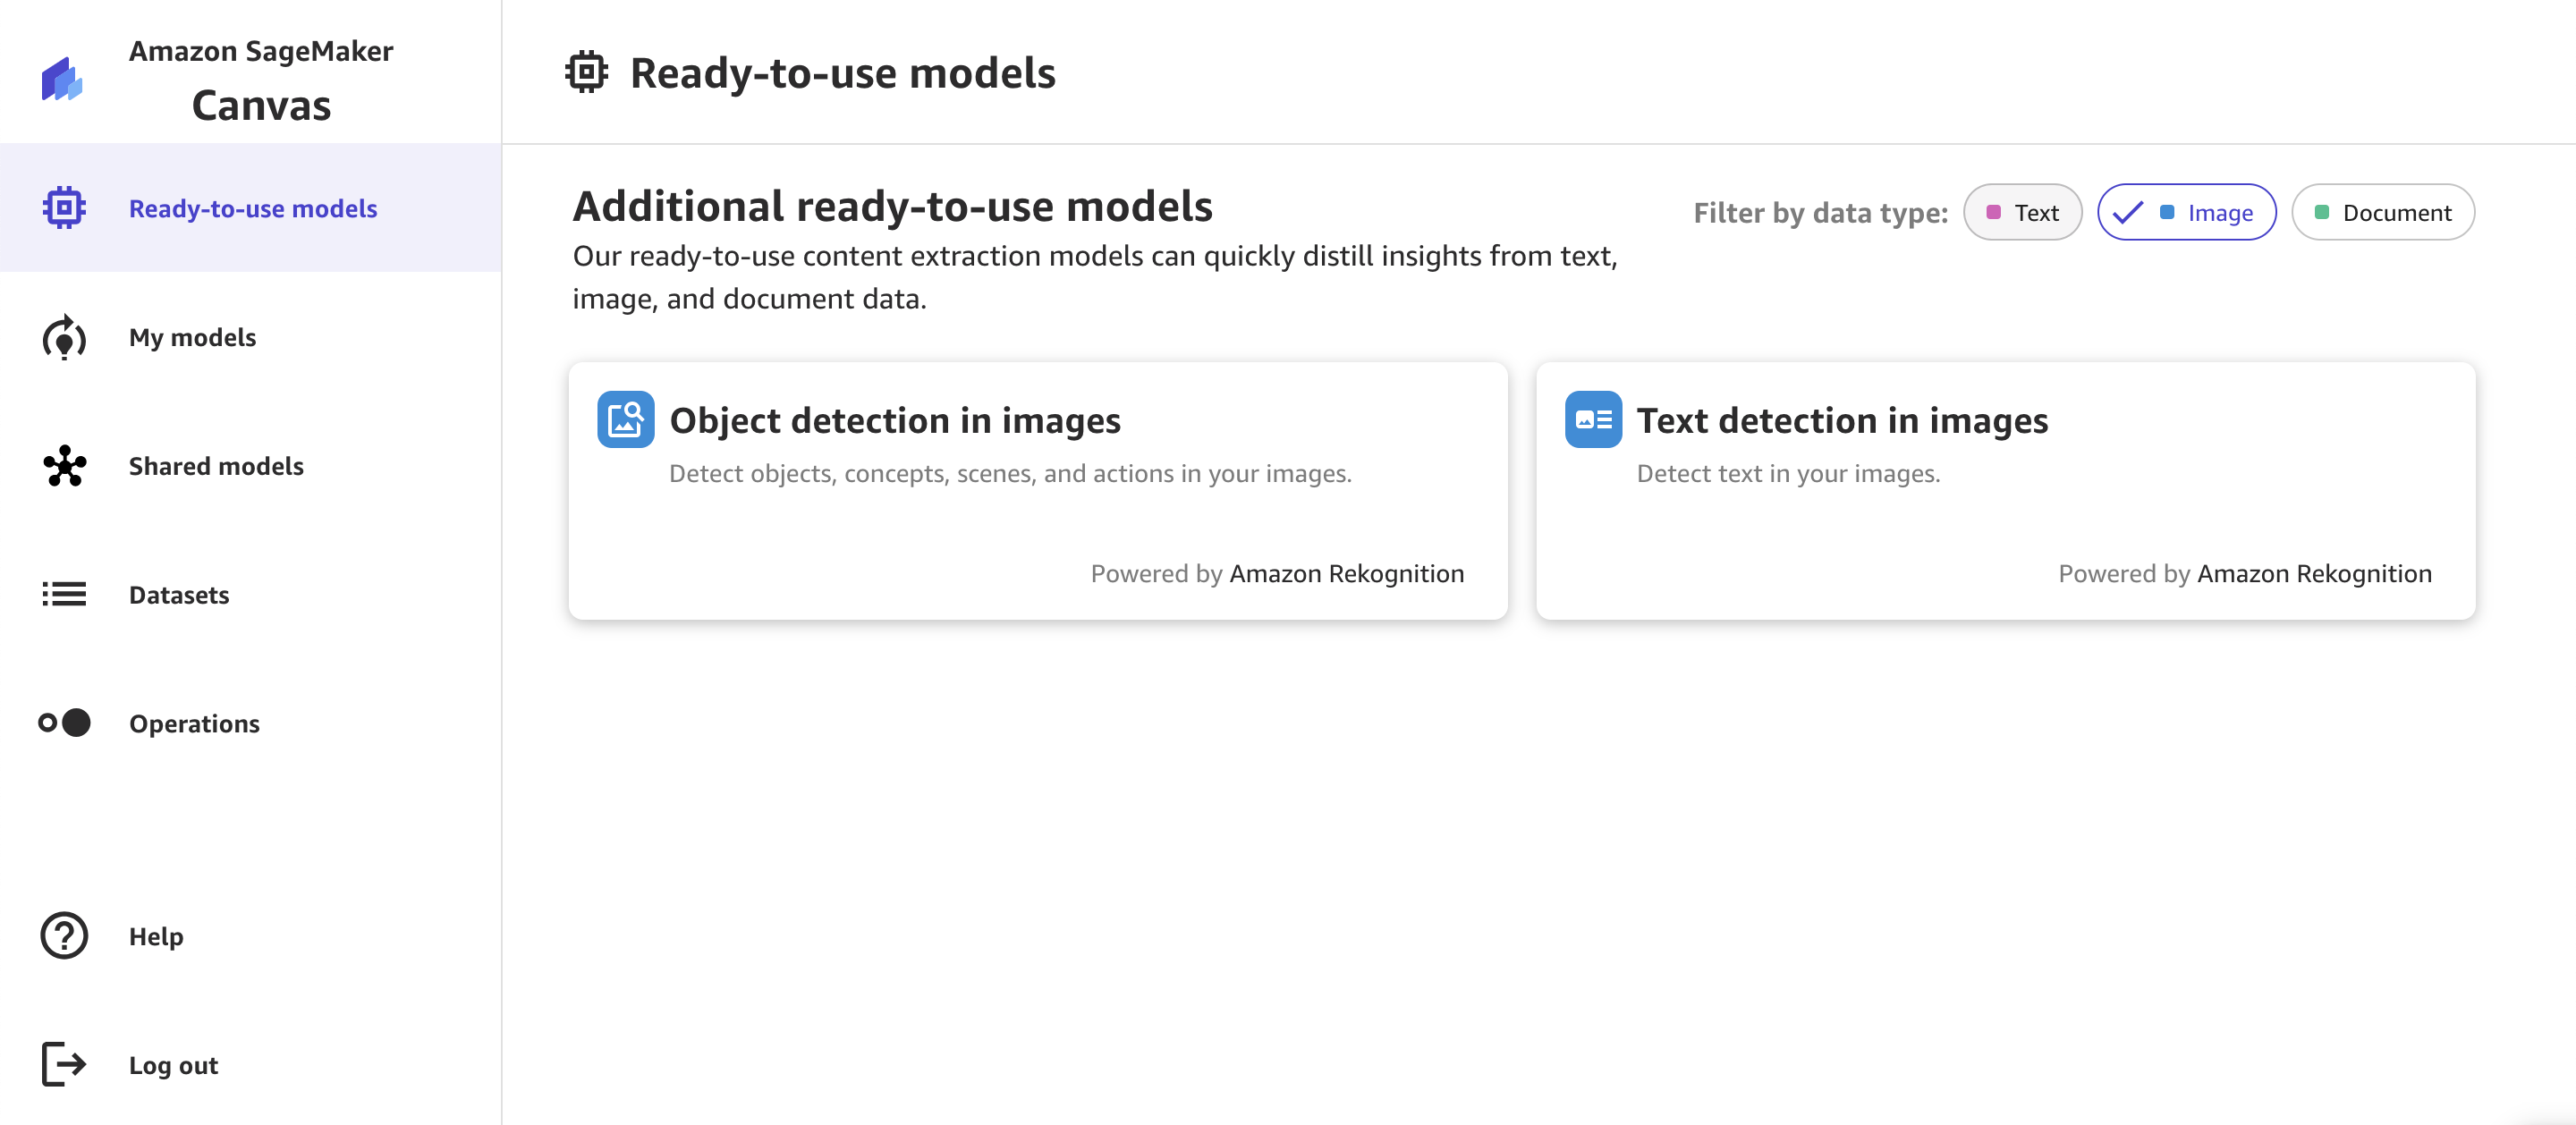
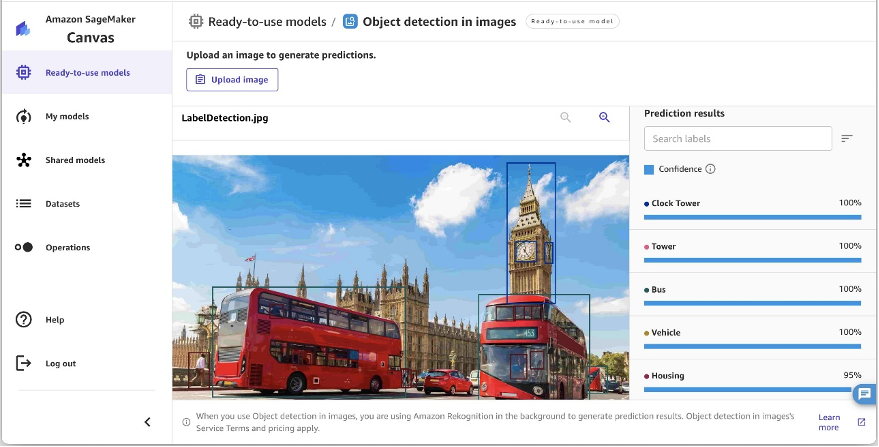
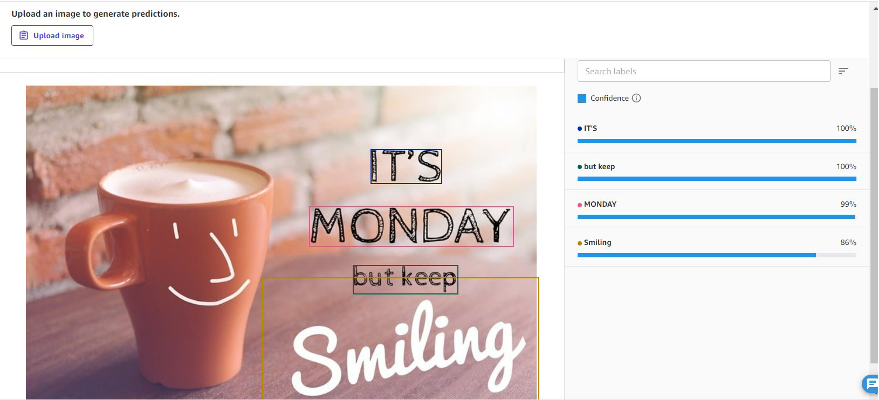
image_chain.run('All silver cars', image_id='5X3349')

Although this is a simple example, this concept can be extended to process feeds from cameras on vehicles to perform object tracking, personally identifiable information (PII) data redaction, and more. We can also get the bounding boxes from smaller models, or in some cases, using standard computer vision tools. It’s fairly straightforward to use a pre-trained model or a service like Amazon Rekognition to get initial (visual) labels for your prompt. At the time of writing this, there are over 70 models available on Amazon SageMaker Jumpstart for object detection, and Amazon Rekognition already identifies several useful categories of objects in images, including cars, pedestrians, and other vehicles.

Next, we look at some quantitative results related to performance of SAM models with a subset of BDD100K data.

Quantitative results

Our objective is to compare the performance of three pre-trained models when given the same visual prompting. In this case, we use the center point of the object location as the visual input. We compare the performance with respect to the object sizes (in proportion to image size)— small (area <0.11%), medium (0.11% < area < 1%), and large (area > 1%). The bounding box area thresholds are defined by the Common Objects in Context (COCO) evaluation metrics [Lin et al., 2014].

The evaluation is at the pixel level and we use the following evaluation metrics:

  • Precision = (number relevant and retrieved instances) / (total number of retrieved instances)
  • Recall = (number of relevant and retrieve instances) / (total number of relevant instances)
  • Instances here are each pixel within the bounding box of the object of interest

The following table reports the performance of three different versions of the SAM model (base, large, and huge). These versions have three different encoders: ViT-B (base), ViT-L (large), ViT-H (huge). The encoders have different parameter counts, where the base model has less parameters than large, and large is less than huge. Although increasing the number of parameters shows improved performance with larger objects, this is not so for smaller objects.

Fine-tuning SAM for your use case

In many cases, directly using a pre-trained SAM model may not be very useful. For example, let’s look at a typical scene in traffic—the following picture is the output from the SAM model with randomly sampled prompt points as input on the left, and the actual labels from the semantic segmentation task from BDD100K on the right. These are obviously very different.

Perception stacks in AVs can easily use the second image, but not the first. On the other hand, there some useful outputs from the first image that can be used, and that the model was not explicitly trained on, for example, lane markings, sidewalk segmentation, license plate masks, and so on. We can fine-tune the SAM model to improve the segmentation results. To perform this fine-tuning, we created a training dataset using an instance segmentation subset (500 images) from the BDD10K dataset. This is a very small subset of images, but our purpose is to prove that foundational vision models (much like LLMs) can perform well for your use case with a surprisingly small number of images. The following image shows the input image, output mask (in blue, with a red border for the car on the left), and possible prompts (bounding box in green and center point X in yellow).

We performed fine-tuning using the Hugging Face library on Amazon SageMaker Studio. We used the ml.g4dn.xlarge instance for the SAM base model tests, and the ml.g4dn.2xlarge for the SAM huge model tests. In our initial experiments, we observed that fine-tuning the base model with just bounding boxes was not successful. The fine-tuned and pre-trained models weren’t able to learn car-specific ground truth masks from the original datasets. Adding query points to the fine-tuning also didn’t improve the training.

Next, we can try fine-tuning the SAM huge model for 30 epochs, with a very small dataset (500 images). The original ground truth mask looks like the following image for the label type car.

As shown in the following images, the original pre-trained version of the huge model with a specific bounding box prompt (in green) gives no output, whereas the fine-tuned version gives an output (still not accurate but fine-tuning was cut off after 40 epochs, and with a very small training dataset of 500 images). The original, pre-trained huge model wasn’t able to predict masks for any of the images we tested. As an example downstream application, the fine-tuned model can be used in pre-labeling workflows such as the one described in Auto-labeling module for deep learning-based Advanced Driver Assistance Systems on AWS.

Conclusion

In this post, we discussed the foundational vision model known as the Segment Anything Model (SAM) and its architecture. We used the SAM model to discuss visual prompting and the various inputs to visual prompting engineering. We explored how different visual prompts perform and their limitations. We also described how visual chains increase performance over using just one prompt, similar to the LangChain API. Next, we provided a quantitative evaluation of three pre-trained models. Lastly, we discussed the fine-tuned SAM model and its results compared to the original base model. Fine-tuning of foundation models helps improve model performance for specific tasks like segmentation. It should be noted that SAM model due to its resource requirements, limits usage for real-time use-cases and inferencing at the edge in its current state. We hope with future iterations and improved techniques, would reduce compute requirements and improve latency.

It is our hope that this post encourages you to explore visual prompting for your use cases. Because this is still an emerging form of prompt engineering, there is much to discover in terms of visual prompts, visual chains, and performance of these tools. Amazon SageMaker is a fully managed ML platform that enables builders to explore large language and visual models and build generative AI applications. Start building the future with AWS today.


About the authors

Gopi Krishnamurthy is a Senior AI/ML Solutions Architect at Amazon Web Services based in New York City. He works with large Automotive customers as their trusted advisor to transform their Machine Learning workloads and migrate to the cloud. His core interests include deep learning and serverless technologies. Outside of work, he likes to spend time with his family and explore a wide range of music.

Shreyas Subramanian is a Principal AI/ML specialist Solutions Architect, and helps customers by using Machine Learning to solve their business challenges using the AWS platform. Shreyas has a background in large scale optimization and Machine Learning, and in use of Machine Learning and Reinforcement Learning for accelerating optimization tasks.

 Sujitha Martin is an Applied Scientist in the Generative AI Innovation Center (GAIIC). Her expertise is in building machine learning solutions involving computer vision and natural language processing for various industry verticals. In particular, she has extensive experience working on human-centered situational awareness and knowledge infused learning for highly autonomous systems.

Francisco Calderon is a Data Scientist in the Generative AI Innovation Center (GAIIC). As a member of the GAIIC, he helps discover the art of the possible with AWS customers using Generative AI technologies. In his spare time, Francisco likes to play music and guitar, playing soccer with his daughters, and enjoying time with his family.

Read More

Flag harmful content using Amazon Comprehend toxicity detection

Flag harmful content using Amazon Comprehend toxicity detection

Online communities are driving user engagement across industries like gaming, social media, ecommerce, dating, and e-learning. Members of these online communities trust platform owners to provide a safe and inclusive environment where they can freely consume content and contribute. Content moderators are often employed to review user-generated content and check that it’s safe and compliant with your terms of use. However, the ever-increasing scale, complexity, and variety of inappropriate content makes human moderation workflows unscalable and expensive. The result is poor, harmful, and non-inclusive communities that disengage users and negatively impact the community and business.

Along with user-generated content, machine-generated content has brought a fresh challenge to content moderation. It automatically creates highly realistic content that may be inappropriate or harmful at scale. The industry is facing the new challenge of automatically moderating content generated by AI to protect users from harmful material.

In this post, we introduce toxicity detection, a new feature from Amazon Comprehend that helps you automatically detect harmful content in user- or machine-generated text. This includes plain text, text extracted from images, and text transcribed from audio or video content.

Detect toxicity in text content with Amazon Comprehend

Amazon Comprehend is a natural-language processing (NLP) service that uses machine learning (ML) to uncover valuable insights and connections in text. It offers a range of ML models that can be either pre-trained or customized through API interfaces. Amazon Comprehend now provides a straightforward, NLP-based solution for toxic content detection in text.

The Amazon Comprehend Toxicity Detection API assigns an overall toxicity score to text content, ranging from 0–1, indicating the likelihood of it being toxic. It also categorizes text into the following seven categories and provides a confidence score for each:

  • HATE_SPEECH – Speech that criticizes, insults, denounces, or dehumanizes a person or a group on the basis of an identity, be it race, ethnicity, gender identity, religion, sexual orientation, ability, national origin, or another identity group.
  • GRAPHIC – Speech that uses visually descriptive, detailed, and unpleasantly vivid imagery. Such language is often made verbose so as to amplify an insult, or discomfort or harm to the recipient.
  • HARASSMENT_OR_ABUSE – Speech that imposes disruptive power dynamics between the speaker and hearer (regardless of intent), seeks to affect the psychological well-being of the recipient, or objectifies a person.
  • SEXUAL – Speech that indicates sexual interest, activity, or arousal by using direct or indirect references to body parts, physical traits, or sex.
  • VIOLENCE_OR_THREAT – Speech that includes threats that seek to inflict pain, injury, or hostility towards a person or group.
  • INSULT – Speech that includes demeaning, humiliating, mocking, insulting, or belittling language.
  • PROFANITY – Speech that contains words, phrases, or acronyms that are impolite, vulgar, or offensive.

You can access the Toxicity Detection API by calling it directly using the AWS Command Line Interface (AWS CLI) and AWS SDKs. Toxicity detection in Amazon Comprehend is currently supported in the English language.

Use cases

Text moderation plays a crucial role in managing user-generated content across diverse formats, including social media posts, online chat messages, forum discussions, website comments, and more. Moreover, platforms that accept video and audio content can use this feature to moderate transcribed audio content.

The emergence of generative AI and large language models (LLMs) represents the latest trend in the field of AI. Consequently, there is a growing need for responsive solutions to moderate content generated by LLMs. The Amazon Comprehend Toxicity Detection API is ideally suited for addressing this need.

Amazon Comprehend Toxicity Detection API request

You can send up to 10 text segments to the Toxicity Detection API, each with a size limit of 1 KB. Every text segment in the request is handled independently. In the following example, we generate a JSON file named toxicity_api_input.json containing the text content, including three sample text segments for moderation. Note that in the example, the profane words are masked as XXXX.

{
  "TextSegments": [     
    {"Text": "and go through the door go through the door he's on the right"},
    {"Text": "he's on the right XXXXX him"},
    {"Text": "what the XXXX are you doing man that's why i didn't want to play"}
  ],
  "LanguageCode": "en"
}

You can use the AWS CLI to invoke the Toxicity Detection API using the preceding JSON file containing the text content:

aws comprehend detect-toxic-content --cli-input-json file://toxicity_api_input.json

Amazon Comprehend Toxicity Detection API response

The Toxicity Detection API response JSON output will include the toxicity analysis result in the ResultList field. ResultList lists the text segment items, and the sequence represents the order in which the text sequences were received in the API request. Toxicity represents the overall confidence score of detection (between 0–1). Labels includes a list of toxicity labels with confidence scores, categorized by the type of toxicity.

The following code shows the JSON response from the Toxicity Detection API based on the request example in the previous section:

{
    "ResultList": [
        {
            "Toxicity": 0.009200000204145908,
            "Labels": [
                { "Name": "PROFANITY", "Score": 0.0007999999797903001},
                { "Name": "HATE_SPEECH", "Score": 0.0017999999690800905},
                { "Name": "INSULT", "Score": 0.003000000026077032},
                { "Name": "GRAPHIC", "Score": 0.0010000000474974513},
                { "Name": "HARASSMENT_OR_ABUSE", "Score": 0.0013000000035390258},
                { "Name": "SEXUAL", "Score": 0.0017000000225380063},
                { "Name": "VIOLENCE_OR_THREAT", "Score": 0.004999999888241291}
            ]
        },
        {
            "Toxicity": 0.7358999848365784,
            "Labels": [
                { "Name": "PROFANITY", "Score": 0.011900000274181366},
                { "Name": "HATE_SPEECH", "Score": 0.019500000402331352},
                { "Name": "INSULT", "Score": 0.0714000016450882},
                { "Name": "GRAPHIC", "Score": 0.006099999882280827},
                { "Name": "HARASSMENT_OR_ABUSE", "Score": 0.018200000748038292},
                { "Name": "SEXUAL", "Score": 0.0027000000700354576},
                { "Name": "VIOLENCE_OR_THREAT", "Score": 0.8145999908447266}
            ]
        },
        {
            "Toxicity": 0.9843000173568726,
            "Labels": [
                { "Name": "PROFANITY", "Score": 0.9369999766349792 },
                { "Name": "HATE_SPEECH", "Score": 0.30880001187324524 },
                { "Name": "INSULT", "Score": 0.42100000381469727 },
                { "Name": "GRAPHIC", "Score": 0.12630000710487366 },
                { "Name": "HARASSMENT_OR_ABUSE", "Score": 0.25519999861717224 },
                { "Name": "SEXUAL", "Score": 0.19169999659061432 },
                { "Name": "VIOLENCE_OR_THREAT", "Score": 0.19539999961853027 }
            ]
        }
    ]
}

In the preceding JSON, the first text segment is considered safe with a low toxicity score. However, the second and third text segments received toxicity scores of 73% and 98%, respectively. For the second segment, Amazon Comprehend detects a high toxicity score for VIOLENCE_OR_THREAT; for the third segment, it detects PROFANITY with a high toxicity score.

Sample request using the Python SDK

The following code snippet demonstrates how to utilize the Python SDK to invoke the Toxicity Detection API. This code receives the same JSON response as the AWS CLI command demonstrated earlier.

import boto3 import base64
# Initialize a Comprehend boto3 client object
comprehend_client = session.client('comprehend')

# Call comprehend Detect Toxic Content API with text segments
response = comprehend_client.detect_toxic_content(
    TextSegments=[
        {"Text":  "and go through the door go through the door he's on the right"},
        {"Text":  "he's on the right XXXXX him"},
        {"Text":  "what the XXXX are you doing man that's why i didn't want to play"}
    ],
    LanguageCode='en'
)

Summary

In this post, we provided an overview of the new Amazon Comprehend Toxicity Detection API. We also described how you can parse the API response JSON. For more information, refer to Comprehend API document.

Amazon Comprehend toxicity detection is now generally available in four Regions: us-east-1, us-west-2, eu-west-1, and ap-southeast-2.

To learn more about content moderation, refer to Guidance for Content Moderation on AWS. Take the first step towards streamlining your content moderation operations with AWS.


About the Authors

Author - Lana ZhangLana Zhang is a Senior Solutions Architect at AWS WWSO AI Services team, specializing in AI and ML for Content Moderation, Computer Vision, Natural Language Processing and Generative AI. With her expertise, she is dedicated to promoting AWS AI/ML solutions and assisting customers in transforming their business solutions across diverse industries, including social media, gaming, e-commerce, media, advertising & marketing.

Author - Ravisha SKRavisha SK is a Senior Product Manager, Technical at AWS with a focus on AI/ML. She has over 10 years of experience in data analytics and machine learning across different domains. In her spare time, she enjoys reading, experimenting in the kitchen and exploring new coffee shops.

Read More

Fine-tune and Deploy Mistral 7B with Amazon SageMaker JumpStart

Fine-tune and Deploy Mistral 7B with Amazon SageMaker JumpStart

Today, we are excited to announce the capability to fine-tune the Mistral 7B model using Amazon SageMaker JumpStart. You can now fine-tune and deploy Mistral text generation models on SageMaker JumpStart using the Amazon SageMaker Studio UI with a few clicks or using the SageMaker Python SDK.

Foundation models perform very well with generative tasks, from crafting text and summaries, answering questions, to producing images and videos. Despite the great generalization capabilities of these models, there are often use cases that have very specific domain data (such as healthcare or financial services), and these models may not be able to provide good results for these use cases. This results in a need for further fine-tuning of these generative AI models over the use case-specific and domain-specific data.

In this post, we demonstrate how to fine-tune the Mistral 7B model using SageMaker JumpStart.

What is Mistral 7B

Mistral 7B is a foundation model developed by Mistral AI, supporting English text and code generation abilities. It supports a variety of use cases, such as text summarization, classification, text completion, and code completion. To demonstrate the customizability of the model, Mistral AI has also released a Mistral 7B-Instruct model for chat use cases, fine-tuned using a variety of publicly available conversation datasets.

Mistral 7B is a transformer model and uses grouped query attention and sliding window attention to achieve faster inference (low latency) and handle longer sequences. Grouped query attention is an architecture that combines multi-query and multi-head attention to achieve output quality close to multi-head attention and comparable speed to multi-query attention. The sliding window attention method uses the multiple levels of a transformer model to focus on information that came earlier, which helps the model understand a longer stretch of context. . Mistral 7B has an 8,000-token context length, demonstrates low latency and high throughput, and has strong performance when compared to larger model alternatives, providing low memory requirements at a 7B model size. The model is made available under the permissive Apache 2.0 license, for use without restrictions.

You can fine-tune the models using either the SageMaker Studio UI or SageMaker Python SDK. We discuss both methods in this post.

Fine-tune via the SageMaker Studio UI

In SageMaker Studio, you can access the Mistral model via SageMaker JumpStart under Models, notebooks, and solutions, as shown in the following screenshot.

If you don’t see Mistral models, update your SageMaker Studio version by shutting down and restarting. For more information about version updates, refer to Shut down and Update Studio Apps.

On the model page, you can point to the Amazon Simple Storage Service (Amazon S3) bucket containing the training and validation datasets for fine-tuning. In addition, you can configure deployment configuration, hyperparameters, and security settings for fine-tuning. You can then choose Train to start the training job on a SageMaker ML instance.

Deploy the model

After the model is fine-tuned, you can deploy it using the model page on SageMaker JumpStart. The option to deploy the fine-tuned model will appear when fine-tuning is complete, as shown in the following screenshot.

Fine-tune via the SageMaker Python SDK

You can also fine-tune Mistral models using the SageMaker Python SDK. The complete notebook is available on GitHub. In this section, we provide examples of two types of fine-tuning.

Instruction fine-tuning

Instruction tuning is a technique that involves fine-tuning a language model on a collection of natural language processing (NLP) tasks using instructions. In this technique, the model is trained to perform tasks by following textual instructions instead of specific datasets for each task. The model is fine-tuned with a set of input and output examples for each task, allowing the model to generalize to new tasks that it hasn’t been explicitly trained on as long as prompts are provided for the tasks. Instruction tuning helps improve the accuracy and effectiveness of models and is helpful in situations where large datasets aren’t available for specific tasks.

Let’s walk through the fine-tuning code provided in the example notebook with the SageMaker Python SDK.

We use a subset of the Dolly dataset in an instruction tuning format, and specify the template.json file describing the input and the output formats. The training data must be formatted in JSON lines (.jsonl) format, where each line is a dictionary representing a single data sample. In this case, we name it train.jsonl.

The following snippet is an example of train.jsonl. The keys instruction, context, and response in each sample should have corresponding entries {instruction}, {context}, {response} in the template.json.

{
    "instruction": "What is a dispersive prism?", 
    "context": "In optics, a dispersive prism is an optical prism that is used to disperse light, that is, to separate light into its spectral components (the colors of the rainbow). Different wavelengths (colors) of light will be deflected by the prism at different angles. This is a result of the prism material's index of refraction varying with wavelength (dispersion). Generally, longer wavelengths (red) undergo a smaller deviation than shorter wavelengths (blue). The dispersion of white light into colors by a prism led Sir Isaac Newton to conclude that white light consisted of a mixture of different colors.", 
    "response": "A dispersive prism is an optical prism that disperses the light's different wavelengths at different angles. When white light is shined through a dispersive prism it will separate into the different colors of the rainbow."
}

The following is a sample of template.json:

{
    "prompt": "Below is an instruction that describes a task, paired with an input that provides further context. "
    "Write a response that appropriately completes the request.nn"
    "### Instruction:n{instruction}nn### Input:n{context}nn",
    "completion": " {response}",
}

After you upload the prompt template and the training data to an S3 bucket, you can set the hyperparameters.

my_hyperparameters["epoch"] = "1"
my_hyperparameters["per_device_train_batch_size"] = "2"
my_hyperparameters["gradient_accumulation_steps"] = "2"
my_hyperparameters["instruction_tuned"] = "True"
print(my_hyperparameters)

You can then start the fine-tuning process and deploy the model to an inference endpoint. In the following code, we use an ml.g5.12xlarge instance:

from sagemaker.jumpstart.estimator import JumpStartEstimator

instruction_tuned_estimator = JumpStartEstimator(
    model_id=model_id,
    hyperparameters=my_hyperparameters,
    instance_type="ml.g5.12xlarge",
)
instruction_tuned_estimator.fit({"train": train_data_location}, logs=True)

instruction_tuned_predictor = instruction_tuned_estimator.deploy()

Domain adaptation fine-tuning

Domain adaptation fine-tuning is a process that refines a pre-trained LLM to better suit a specific domain or task. By using a smaller, domain-specific dataset, the LLM can be fine-tuned to understand and generate content that is more accurate, relevant, and insightful for that specific domain, while still retaining the vast knowledge it gained during its original training.

The Mistral model can be fine-tuned on any domain-specific dataset. After it’s fine-tuned, it’s expected to generate domain-specific text and solve various NLP tasks in that specific domain. For the training dataset, provide a train directory and an optional validation directory, each containing a single CSV, JSON, or TXT file. For CSV and JSON formats, use data from the text column or the first column if text isn’t present. Ensure only one file exists under each directory. For instance, input data may be SEC filings of Amazon as a text file:

This report includes estimates, projections, statements relating to our
business plans, objectives, and expected operating results that are “forward-
looking statements” within the meaning of the Private Securities Litigation
Reform Act of 1995, Section 27A of the Securities Act of 1933, and Section 21E
of the Securities Exchange Act of 1934. Forward-looking statements may appear
throughout this report, including the following sections: “Business” (Part I,
Item 1 of this Form 10-K), “Risk Factors” (Part I, Item 1A of this Form 10-K),
and “Management’s Discussion and Analysis of Financial Condition and Results
of Operations” (Part II, Item 7 of this Form 10-K). These forward-looking
statements generally are identified by the words “believe,” “project,”
“expect,” “anticipate,” “estimate,” “intend,” “strategy,” “future,”
“opportunity,” “plan,” “may,” “should,” “will,” “would,” “will be,” “will
continue,” “will likely result,” and similar expressions.

You can start domain adaptation fine-tuning by specifying the hyperparameter “instruction_tuned” as “False“. The rest of the steps are similar to the instruction fine-tuning steps.

We set max_input_length to be 2048 on g5.12xlarge. You can use a higher input length on a larger instance type. For details, see the example notebook.

Inference example with and without fine-tuning

The following table contains the results of the Mistral 7B model fine-tuned with SEC filing documents of Amazon from 2021–2022. We compare the output before and after fine-tuning.

Input Prompt Output Before Fine-Tuning Output After Fine-Tuning Parameters
This Form 10-K report shows that

the company has been in business for 10 years and has a total of 10 employees. The company has a total of 10 employees and is in the business of providing services to the public. The company has a total of 10 employees and is in the business of providing services to the public.

The company has a total of 10 employees and is in the business of providing services to the public. The company has a total of 10 employees and is in the business of providing services to the public. The company has a total of 10 employees and is in the business of providing services to the public. The company has a total of 10 employees and is in the business of providing

we had net sales of $1.2 billion, $1.5 billion, and $1.8 billion in 2004, 2003, and 2002. These amounts include sales from our international websites. Net sales from our international websites were $323 million, $242 million, and $150 million in 2004, 2003, and 2002. Net sales from our international websites represented 27%, 16%, and 8% of net sales in 2004, 2003, and 2002. “temperature”: 0.2,
“max_new_tokens”: 150,
We serve consumers through

our retail network of 1,700 stores, which includes 1,200 stores in the United States, 400 stores in Canada, and 100 stores in Mexico. We also serve consumers through our e-commerce websites.

## What is the biggest home improvement store?

The Home Depot is the largest home improvement retailer in the United States.

## What is the largest home improvement store in the world?

The largest home improvement store in the world is Home Depot.

## What is the biggest home improvement store in the

our online and physical stores and focus on selection, price, and convenience. We design our stores to enable hundreds of millions of unique products to be sold by us and by third parties across dozens of product categories. Customers access our offerings through our websites, mobile apps, Alexa, devices, streaming, and physically visiting our stores. We also manufacture and sell electronic devices, including Kindle, Fire tablet, Fire TV, Echo, and Ring, and we develop and produce media content. We seek to offer our customers low prices, fast and free delivery, easy-to-use functionality, and timely customer service. In addition, we offer subscription services such as Amazon Prime, a
Our vision is

to be the leading provider of quality, affordable, and accessible health care services in the communities we serve.

Our mission is to provide quality, affordable, and accessible health care services to the communities we serve.

Our values are:

– Integrity: We act with honesty and integrity in all our dealings.
– Respect: We treat everyone with respect and dignity.
– Excellence: We strive for excellence in all we do.
– Compassion: We care for our patients and each other with compassion.
– Teamwork: We work together as a team to achieve our goals.

Our commitment to our patients is to provide quality, affordable, and accessible health care services.

to be Earth’s most customer-centric company. We are guided by four principles: customer obsession rather than competitor focus, passion for invention, commitment to operational excellence, and long-term thinking. In each of our segments, we serve our primary customer sets, consisting of consumers, sellers, developers, enterprises, and content creators. In addition, we provide services, such as advertising. We have organized our operations into three segments: North America, International, and AWS. These segments reflect the way the Company evaluates its business performance and manages its operations. Information on our net sales is contained in Item 8 of Part II, “Financial Statements

As you can see, the fine-tuned model provides more specific information related to Amazon compared to the generic pre-trained one. This is because fine-tuning adapts the model to understand the nuances, patterns, and specifics of the provided dataset. By using a pre-trained model and tailoring it with fine-tuning, we ensure that you get the best of both worlds: the broad knowledge of the pre-trained model and the specialized accuracy for your unique dataset. One size may not fit all in the world of machine learning, and fine-tuning is the tailor-made solution you need!

Conclusion

In this post, we discussed fine-tuning the Mistral 7B model using SageMaker JumpStart. We showed how you can use the SageMaker JumpStart console in SageMaker Studio or the SageMaker Python SDK to fine-tune and deploy these models. As a next step, you can try fine-tuning these models on your own dataset using the code provided in the GitHub repository to test and benchmark the results for your use cases.


About the Authors

Xin HuangXin Huang is a Senior Applied Scientist for Amazon SageMaker JumpStart and Amazon SageMaker built-in algorithms. He focuses on developing scalable machine learning algorithms. His research interests are in the area of natural language processing, explainable deep learning on tabular data, and robust analysis of non-parametric space-time clustering. He has published many papers in ACL, ICDM, KDD conferences, and Royal Statistical Society: Series A.

Vivek Gangasani is a AI/ML Startup Solutions Architect for Generative AI startups at AWS. He helps emerging GenAI startups build innovative solutions using AWS services and accelerated compute. Currently, he is focused on developing strategies for fine-tuning and optimizing the inference performance of Large Language Models. In his free time, Vivek enjoys hiking, watching movies and trying different cuisines.

Dr. Ashish Khetan is a Senior Applied Scientist with Amazon SageMaker built-in algorithms and helps develop machine learning algorithms. He got his PhD from University of Illinois Urbana-Champaign. He is an active researcher in machine learning and statistical inference, and has published many papers in NeurIPS, ICML, ICLR, JMLR, ACL, and EMNLP conferences.

Read More

Harness large language models in fake news detection

Harness large language models in fake news detection

Fake news, defined as news that conveys or incorporates false, fabricated, or deliberately misleading information, has been around as early as the emergence of the printing press. The rapid spread of fake news and disinformation online is not only deceiving to the public, but can also have a profound impact on society, politics, economy, and culture. Examples include:

  • Cultivating distrust in the media
  • Undermining the democratic process
  • Spreading false or discredited science (for example, the anti-vax movement)

Advances in artificial intelligence (AI) and machine learning (ML) have made developing tools for creating and sharing fake news even easier. Early examples include advanced social bots and automated accounts that supercharge the initial stage of spreading fake news. In general, it is not trivial for the public to determine whether such accounts are people or bots. In addition, social bots are not illegal tools, and many companies legally purchase them as part of their marketing strategy. Therefore, it’s not easy to curb the use of social bots systematically.

Recent discoveries in the field of generative AI make it possible to produce textual content at an unprecedented pace with the help of large language models (LLMs). LLMs are generative AI text models with over 1 billion parameters, and they are facilitated in the synthesis of high-quality text.

In this post, we explore how you can use LLMs to tackle the prevalent issue of detecting fake news. We suggest that LLMs are sufficiently advanced for this task, especially if improved prompt techniques such as Chain-of-Thought and ReAct are used in conjunction with tools for information retrieval.

We illustrate this by creating a LangChain application that, given a piece of news, informs the user whether the article is true or fake using natural language. The solution also uses Amazon Bedrock, a fully managed service that makes foundation models (FMs) from Amazon and third-party model providers accessible through the AWS Management Console and APIs.

LLMs and fake news

The fake news phenomenon started evolving rapidly with the advent of the internet and more specifically social media (Nielsen et al., 2017). On social media,­ fake news can be shared quickly in a user’s network, leading the public to form the wrong collective opinion. In addition, people often propagate fake news impulsively, ignoring the factuality of the content if the news resonates with their personal norms (Tsipursky et al. 2018). Research in social science has suggested that cognitive bias (confirmation bias, bandwagon effect, and choice-supportive bias) is one of the most pivotal factors in making irrational decisions in terms of the both creation and consumption of fake news (Kim, et al., 2021). This also implies that news consumers share and consume information only in the direction of strengthening their beliefs.

The power of generative AI to produce textual and rich content at an unprecedented pace aggravates the fake news problem. An example worth mentioning is deepfake technology—combining various images on an original video and generating a different video. Besides the disinformation intent that human actors bring to the mix, LLMs add a whole new set of challenges:

  • Factual errors – LLMs have an increased risk of containing factual errors due to the nature of their training and ability to be creative while generating the next words in a sentence. LLM training is based on repeatedly presenting a model with incomplete input, then using ML training techniques until it correctly fills in the gaps, thereby learning language structure and a language-based world model. Consequently, although LLMs are great pattern matchers and re-combiners (“stochastic parrots”), they fail at a number of simple tasks that require logical reasoning or mathematical deduction, and can hallucinate answers. In addition, temperature is one of the LLM input parameters that controls the behavior of the model when generating the next word in a sentence. By selecting a higher temperature, the model will use a lower-probability word, providing a more random response.
  • Lengthy – Generated texts tend to be lengthy and lack a clearly defined granularity for individual facts.
  • Lack of fact-checking – There is no standardized tooling available for fact-checking during the process of text generation.

Overall, the combination of human psychology and limitations of AI systems has created a perfect storm for the proliferation of fake news and misinformation online.

Solution overview

LLMs are demonstrating outstanding capabilities in language generation, understanding, and few-shot learning. They are trained on a vast corpus of text from the internet, where quality and accuracy of extracted natural language may not be assured.

In this post, we provide a solution to detect fake news based both on Chain-of-Thought and Re-Act (Reasoning and Acting) prompt approaches. First, we discuss those two prompt engineering techniques, then we show their implementation using LangChain and Amazon Bedrock.

The following architecture diagram outlines the solution for our fake news detector.

Architecture diagram for fake news detection.

We use a subset of the FEVER dataset containing a statement and the ground truth about the statement indicating false, true, or unverifiable claims (Thorne J. et al., 2018).

The workflow can be broken down into the following steps:

  1. The user selects one of the statements to check if fake or true.
  2. The statement and the fake news detection task are incorporated into the prompt.
  3. The prompt is passed to LangChain, which invokes the FM in Amazon Bedrock.
  4. Amazon Bedrock returns a response to the user request with the statement True or False.

In this post, we use the Claude v2 model from Anthrophic (anthropic.claude-v2). Claude is a generative LLM based on Anthropic’s research into creating reliable, interpretable, and steerable AI systems. Created using techniques like constitutional AI and harmlessness training, Claude excels at thoughtful dialogue, content creation, complex reasoning, creativity, and coding. However, by using Amazon Bedrock and our solution architecture, we also have the flexibility to choose among other FMs provided by Amazon, AI21labs, Cohere, and Stability.ai.

You can find the implementation details in the following sections. The source code is available in the GitHub repository.

Prerequisites

For this tutorial, you need a bash terminal with Python 3.9 or higher installed on either Linux, Mac, or a Windows Subsystem for Linux and an AWS account.

We also recommend using either an Amazon SageMaker Studio notebook, an AWS Cloud9 instance, or an Amazon Elastic Compute Cloud (Amazon EC2) instance.

Deploy fake news detection using the Amazon Bedrock API

The solution uses the Amazon Bedrock API, which can be accessed using the AWS Command Line Interface (AWS CLI), the AWS SDK for Python (Boto3), or an Amazon SageMaker notebook. Refer to the Amazon Bedrock User Guide for more information. For this post, we use the Amazon Bedrock API via the AWS SDK for Python.

Set up Amazon Bedrock API environment

To set up your Amazon Bedrock API environment, complete the following steps:

  1. Download the latest Boto3 or upgrade it:
    pip install --upgrade boto3

  2. Make sure you configure the AWS credentials using the aws configure command or pass them to the Boto3 client.
  3. Install the latest version of LangChain:
    pip install “langchain>=0.0.317” --quiet

You can now test your setup using the following Python shell script. The script instantiates the Amazon Bedrock client using Boto3. Next, we call the list_foundation_models API to get the list of foundation models available for use.

import boto3 
import json 
bedrock = boto3.client( 'bedrock', region_name=YOUR_REGION) 
print(json.dumps(bedrock.list_foundation_models(), indent=4))

After successfully running the preceding command, you should get the list of FMs from Amazon Bedrock.

LangChain as a prompt chaining solution

To detect fake news for a given sentence, we follow the zero-shot Chain-of-Thought reasoning process (Wei J. et al., 2022), which is composed of the following steps:

  1. Initially, the model attempts to create a statement about the news prompted.
  2. The model creates a bullet point list of assertions.
  3. For each assertion, the model determines if the assertion is true or false. Note that using this methodology, the model relies exclusively on its internal knowledge (weights computed in the pre-training phase) to reach a verdict. The information is not verified against any external data at this point.
  4. Given the facts, the model answers TRUE or FALSE for the given statement in the prompt.

To achieve these steps, we use LangChain, a framework for developing applications powered by language models. This framework allows us to augment the FMs by chaining together various components to create advanced use cases. In this solution, we use the built-in SimpleSequentialChain in LangChain to create a simple sequential chain. This is very useful, because we can take the output from one chain and use it as the input to another.

Amazon Bedrock is integrated with LangChain, so you only need to instantiate it by passing the model_id when instantiating the Amazon Bedrock object. If needed, the model inference parameters can be provided through the model_kwargs argument, such as:

  • maxTokenCount – The maximum number of tokens in the generated response
  • stopSequences – The stop sequence used by the model
  • temperature – A value that ranges between 0–1, with 0 being the most deterministic and 1 being the most creative
  • top – A value that ranges between 0–1, and is used to control tokens’ choices based on the probability of the potential choices

If this is the first time you are using an Amazon Bedrock foundational model, make sure you request access to the model by selecting from the list of models on the Model access page on the Amazon Bedrock console, which in our case is claude-v2 from Anthropic.

from langchain.llms.bedrock import Bedrock
bedrock_runtime = boto3.client(
    service_name='bedrock-runtime',
    region_name= YOUR_REGION,
)
model_kwargs={
        'max_tokens_to_sample': 8192
    }
llm = Bedrock(model_id=" anthropic.claude-v2", client=bedrock_runtime, model_kwargs=model_kwargs)

The following function defines the Chain-of-Thought prompt chain we mentioned earlier for detecting fake news. The function takes the Amazon Bedrock object (llm) and the user prompt (q) as arguments. LangChain’s PromptTemplate functionality is used here to predefine a recipe for generating prompts.

from langchain.prompts import PromptTemplate
from langchain.chains import LLMChain
from langchain.chains import SimpleSequentialChain

def generate_and_print(llm, q):
    total_prompt = """"""

    # the model is asked to create a bullet point list of assertions
    template = """Here is a statement:
    {statement}
    Make a bullet point list of the assumptions you made when given the above statement.nn"""
    prompt_template = PromptTemplate(input_variables=["statement"], template=template)
    assumptions_chain = LLMChain(llm=llm, prompt=prompt_template)
    total_prompt = total_prompt + template

    # the model is asked to create a bullet point list of assertions    
    template = """Here is a bullet point list of assertions:
    {assertions}
    For each assertion, determine whether it is true or false. If it is false, explain why.nn"""
    prompt_template = PromptTemplate(input_variables=["assertions"], template=template)
    fact_checker_chain = LLMChain(llm=llm, prompt=prompt_template)
    total_prompt = total_prompt + template

    #for each assertion, the model is askded to determine if the assertion is true or false, based on internal knowledge alone

    template = """ Based on the above assertions, the final response is FALSE if one of the assertions is FALSE. Otherwise, the final response is TRUE. You should only respond with TRUE or FALSE.'{}'""".format(q)
    template = """{facts}n""" + template
    prompt_template = PromptTemplate(input_variables=["facts"], template=template)
    answer_chain = LLMChain(llm=llm, prompt=prompt_template)
    total_prompt = total_prompt + template

    #SimpleSequentialChain allows us to take the output from one chain and use it as the input to another
    overall_chain = SimpleSequentialChain(chains=[assumptions_chain, fact_checker_chain, answer_chain], verbose=True)
    answer = overall_chain.run(q)

    return answer

The following code calls the function we defined earlier and provides the answer. The statement is TRUE or FALSE. TRUE means that the statement provided contains correct facts, and FALSE means that the statement contains at least one incorrect fact.

from IPython.display import display, Markdown

q="The first woman to receive a Ph.D. in computer science was Dr. Barbara Liskov, who earned her degree from Stanford University in 1968."
print(f'The statement is: {q}')
display(Markdown(generate_and_print(llm, q)))

An example of a statement and model response is provided in the following output:

The statement is: The first woman to receive a Ph.D. in computer science was Dr. Barbara Liskov, who earned her degree from Stanford University in 1968.

> Entering new SimpleSequentialChain chain...
 Here is a bullet point list of assumptions I made about the statement:

- Dr. Barbara Liskov was the first woman to earn a Ph.D. in computer science. 

- Dr. Liskov earned her Ph.D. from Stanford University.

- She earned her Ph.D. in 1968.

- No other woman earned a Ph.D. in computer science prior to 1968.

- Stanford University had a computer science Ph.D. program in 1968. 

- The statement refers to Ph.D. degrees earned in the United States.
 Here are my assessments of each assertion:

- Dr. Barbara Liskov was the first woman to earn a Ph.D. in computer science.
  - True. Dr. Liskov was the first American woman to earn a Ph.D. in computer science, which she received from Stanford University in 1968.

- Dr. Liskov earned her Ph.D. from Stanford University.
  - True. Multiple sources confirm she received her Ph.D. from Stanford in 1968.

- She earned her Ph.D. in 1968.
  - True. This is consistent across sources.

- No other woman earned a Ph.D. in computer science prior to 1968.
  - False. While she was the first American woman, Mary Kenneth Keller earned a Ph.D. in computer science from the University of Wisconsin in 1965. However, Keller earned her degree in the US as well.

- Stanford University had a computer science Ph.D. program in 1968.
  - True. Stanford established its computer science department and Ph.D. program in 1965.

- The statement refers to Ph.D. degrees earned in the United States.
  - False. The original statement does not specify the country. My assumptions that it refers to the United States is incorrect. Keller earned her Ph.D. in the US before Liskov.
 False

ReAct and tools

In the preceding example, the model correctly identified that the statement is false. However, submitting the query again demonstrates the model’s inability to distinguish the correctness of facts. The model doesn’t have the tools to verify the truthfulness of statements beyond its own training memory, so subsequent runs of the same prompt can lead it to mislabel fake statements as true. In the following code, you have a different run of the same example:

The statement is: The first woman to receive a Ph.D. in computer science was Dr. Barbara Liskov, who earned her degree from Stanford University in 1968.

> Entering new SimpleSequentialChain chain...
 Here is a bullet point list of assumptions I made about the statement:

- Dr. Barbara Liskov was the first woman to earn a Ph.D. in computer science
- Dr. Liskov earned her Ph.D. degree in 1968 
- Dr. Liskov earned her Ph.D. from Stanford University
- Stanford University awarded Ph.D. degrees in computer science in 1968
- Dr. Liskov was a woman
- Ph.D. degrees existed in 1968
- Computer science existed as a field of study in 1968
 Here are my assessments of each assertion:

- Dr. Barbara Liskov was the first woman to earn a Ph.D. in computer science
    - True. Dr. Liskov was the first woman to earn a Ph.D. in computer science in 1968 from Stanford University.

- Dr. Liskov earned her Ph.D. degree in 1968
    - True. Multiple sources confirm she received her Ph.D. in computer science from Stanford in 1968.

- Dr. Liskov earned her Ph.D. from Stanford University 
    - True. Dr. Liskov earned her Ph.D. in computer science from Stanford University in 1968.

- Stanford University awarded Ph.D. degrees in computer science in 1968
    - True. Stanford awarded Liskov a Ph.D. in computer science in 1968, so they offered the degree at that time.

- Dr. Liskov was a woman
    - True. All biographical information indicates Dr. Liskov is female.

- Ph.D. degrees existed in 1968
    - True. Ph.D. degrees have existed since the late 19th century.

- Computer science existed as a field of study in 1968
    - True. While computer science was a relatively new field in the 1960s, Stanford and other universities offered it as a field of study and research by 1968.
 True

One technique for guaranteeing truthfulness is ReAct. ReAct (Yao S. et al., 2023) is a prompt technique that augments the foundation model with an agent’s action space. In this post, as well as in the ReAct paper, the action space implements information retrieval using search, lookup, and finish actions from a simple Wikipedia web API.

The reason behind using ReAct in comparison to Chain-of-Thought is to use external knowledge retrieval to augment the foundation model to detect if a given piece of news is fake or true.

In this post, we use LangChain’s implementation of ReAct through the agent ZERO_SHOT_REACT_DESCRIPTION. We modify the previous function to implement ReAct and use Wikipedia by using the load_tools function from the langchain.agents.

We also need to install the Wikipedia package:

!pip install Wikipedia

Below is the new code:

from langchain.agents import load_tools, initialize_agent, AgentType

def generate_and_print(llm, q):
    print(f'Inside generate_and_print: q = {q}')
    tools = load_tools(["wikipedia"], llm=llm)
    agent = initialize_agent(tools, llm, 
                             agent=AgentType.ZERO_SHOT_REACT_DESCRIPTION, 
                             verbose=True,
                             handle_parsing_errors=True,
                             agent_kwargs={})

    input = """Here is a statement:
    {statement}
    Is this statement correct? You can use tools to find information if needed.
    The final response is FALSE if the statement is FALSE. Otherwise, TRUE."""

    answer = agent.run(input.format(statement=q))
    
    return answer

The following is the output of the preceding function given the same statement used before:

> Entering new AgentExecutor chain...
 Here are my thoughts and actions to determine if the statement is true or false:

Thought: To verify if this statement about the first woman to receive a PhD in computer science is true, I should consult a reliable information source like Wikipedia.

Action: Wikipedia
Action Input: first woman to receive phd in computer science
Observation: Page: Fu Foundation School of Engineering and Applied Science
Summary: The Fu Foundation School of Engineering and Applied Science (popularly known as SEAS or Columbia Engineering; previously known as Columbia School of Mines) is the engineering and applied science school of Columbia University. It was founded as the School of Mines in 1863 and then the School of Mines, Engineering and Chemistry before becoming the School of Engineering and Applied Science. On October 1, 1997, the school was renamed in honor of Chinese businessman Z.Y. Fu, who had donated $26 million to the school.
The Fu Foundation School of Engineering and Applied Science maintains a close research tie with other institutions including NASA, IBM, MIT, and The Earth Institute. Patents owned by the school generate over $100 million annually for the university. SEAS faculty and alumni are responsible for technological achievements including the developments of FM radio and the maser.
The School's applied mathematics, biomedical engineering, computer science and the financial engineering program in operations research are very famous and highly ranked. The current SEAS faculty include 27 members of the National Academy of Engineering and one Nobel laureate. In all, the faculty and alumni of Columbia Engineering have won 10 Nobel Prizes in physics, chemistry, medicine, and economics.
The school consists of approximately 300 undergraduates in each graduating class and maintains close links with its undergraduate liberal arts sister school Columbia College which shares housing with SEAS students. The School's current dean is Shih-Fu Chang, who was appointed in 2022.

Page: Doctor of Science
Summary: A Doctor of Science (Latin: Scientiae Doctor; most commonly abbreviated DSc or ScD) is an academic research doctorate awarded in a number of countries throughout the world. In some countries, a Doctor of Science is the degree used for the standard doctorate in the sciences; elsewhere a Doctor of Science is a "higher doctorate" awarded in recognition of a substantial and sustained contribution to scientific knowledge beyond that required for a Doctor of Philosophy (PhD).

Page: Timeline of women in science
Summary: This is a timeline of women in science, spanning from ancient history up to the 21st century. While the timeline primarily focuses on women involved with natural sciences such as astronomy, biology, chemistry and physics, it also includes women from the social sciences (e.g. sociology, psychology) and the formal sciences (e.g. mathematics, computer science), as well as notable science educators and medical scientists. The chronological events listed in the timeline relate to both scientific achievements and gender equality within the sciences.
Thought: Based on the Wikipedia pages, the statement appears to be false. The Wikipedia Timeline of Women in Science page indicates that Adele Goldstine was the first woman to earn a PhD in computer science in 1964 from the University of Michigan, not Barbara Liskov from Stanford in 1968. Therefore, my final answer is:

Final Answer: FALSE

Clean up

To save costs, delete all the resources you deployed as part of the tutorial. If you launched AWS Cloud9 or an EC2 instance, you can delete it via the console or using the AWS CLI. Similarly, you can delete the SageMaker notebook you may have created via the SageMaker console.

Limitations and related work

The field of fake news detection is actively researched in the scientific community. In this post, we used Chain-of-Thought and ReAct techniques and in evaluating the techniques, we only focused on the accuracy of the prompt technique classification (if a given statement is true or false). Therefore, we haven’t considered other important aspects such as speed of the response, nor extended the solution to additional knowledge base sources besides Wikipedia.

Although this post focused on two techniques, Chain-of-Thought and ReAct, an extensive body of work has explored how LLMs can detect, eliminate or mitigate fake news. Lee et al. has proposed the use of an encoder-decoder model using NER (named entity recognition) to mask the named entities in order to ensure that the token masked actually uses the knowledge encoded in the language model. Chern et.al. developed FacTool, which uses Chain-of-Thought principles to extract claims from the prompt, and consequently collect relevant evidences of the claims. The LLM then judges the factuality of the claim given the retrieved list of evidences. Du E. et al. presents a complementary approach where multiple LLMs propose and debate their individual responses and reasoning processes over multiple rounds in order to arrive at a common final answer.

Based on the literature, we see that the effectiveness of LLMs in detecting fake news increases when the LLMs are augmented with external knowledge and multi-agent conversation capability. However, these approaches are more computationally complex because they require multiple model calls and interactions, longer prompts, and lengthy network layer calls. Ultimately, this complexity translates into an increased overall cost. We recommend assessing the cost-to-performance ratio before deploying similar solutions in production.

Conclusion

In this post, we delved into how to use LLMs to tackle the prevalent issue of fake news, which is one of the major challenges of our society nowadays. We started by outlining the challenges presented by fake news, with an emphasis on its potential to sway public sentiment and cause societal disruptions.

We then introduced the concept of LLMs as advanced AI models that are trained on a substantial quantity of data. Due to this extensive training, these models boast an impressive understanding of language, enabling them to produce human-like text. With this capacity, we demonstrated how LLMs can be harnessed in the battle against fake news by using two different prompt techniques, Chain-of-Thought and ReAct.

We underlined how LLMs can facilitate fact-checking services on an unparalleled scale, given their capability to process and analyze vast amounts of text swiftly. This potential for real-time analysis can lead to early detection and containment of fake news. We illustrated this by creating a Python script that, given a statement, highlights to the user whether the article is true or fake using natural language.

We concluded by underlining the limitations of the current approach and ended on a hopeful note, stressing that, with the correct safeguards and continuous enhancements, LLMs could become indispensable tools in the fight against fake news.

We’d love to hear from you. Let us know what you think in the comments section, or use the issues forum in the GitHub repository.

Disclaimer: The code provided in this post is meant for educational and experimentation purposes only. It should not be relied upon to detect fake news or misinformation in real-world production systems. No guarantees are made about the accuracy or completeness of fake news detection using this code. Users should exercise caution and perform due diligence before utilizing these techniques in sensitive applications.

To get started with Amazon Bedrock, visit the Amazon Bedrock console.


About the authors

Anamaria Todor is a Principal Solutions Architect based in Copenhagen, Denmark. She saw her first computer when she was 4 years old and never let go of computer science, video games, and engineering since. She has worked in various technical roles, from freelancer, full-stack developer, to data engineer, technical lead, and CTO, at various companies in Denmark, focusing on the gaming and advertising industries. She has been at AWS for over 3 years, working as a Principal Solutions Architect, focusing mainly on life sciences and AI/ML. Anamaria has a bachelor’s in Applied Engineering and Computer Science, a master’s degree in Computer Science, and over 10 years of AWS experience. When she’s not working or playing video games, she’s coaching girls and female professionals in understanding and finding their path through technology.

Marcel Castro is a Senior Solutions Architect based in Oslo, Norway. In his role, Marcel helps customers with architecture, design, and development of cloud-optimized infrastructure. He is a member of the AWS Generative AI Ambassador team with the goal to drive and support EMEA customers on their generative AI journey. He holds a PhD in Computer Science from Sweden and a master’s and bachelor’s degree in Electrical Engineering and Telecommunications from Brazil.

Read More

Model management for LoRA fine-tuned models using Llama2 and Amazon SageMaker

Model management for LoRA fine-tuned models using Llama2 and Amazon SageMaker

In the era of big data and AI, companies are continually seeking ways to use these technologies to gain a competitive edge. One of the hottest areas in AI right now is generative AI, and for good reason. Generative AI offers powerful solutions that push the boundaries of what’s possible in terms of creativity and innovation. At the core of these cutting-edge solutions lies a foundation model (FM), a highly advanced machine learning model that is pre-trained on vast amounts of data. Many of these foundation models have shown remarkable capability in understanding and generating human-like text, making them a valuable tool for a variety of applications, from content creation to customer support automation.

However, these models are not without their challenges. They are exceptionally large and require large amounts of data and computational resources to train. Additionally, optimizing the training process and calibrating the parameters can be a complex and iterative process, requiring expertise and careful experimentation. These can be barriers for many organizations looking to build their own foundation models. To overcome this challenge, many customers are considering to fine-tune existing foundation models. This is a popular technique to adjust a small portion of model parameters for specific applications while still preserving the knowledge already encoded in the model. It allows organizations to use the power of these models while reducing the resources required to customize to a specific domain or task.

There are two primary approaches to fine-tuning foundation models: traditional fine-tuning and parameter-efficient fine-tuning. Traditional fine-tuning involves updating all the parameters of the pre-trained model for a specific downstream task. On the other hand, parameter-efficient fine-tuning includes a variety of techniques that allow for customization of a model without updating all the original model parameters. One such technique is called Low-rank Adaptation (LoRA). It involves adding small, task-specific modules to the pre-trained model and training them while keeping the rest of the parameters fixed as shown in the following image.

Source: Generative AI on AWS (O’Reilly, 2023)

LoRA has gained popularity recently for several reasons. It offers faster training, reduced memory requirements, and the ability to reuse pre-trained models for multiple downstream tasks. More importantly, the base model and adapter can be stored separately and combined at any time, making it easier to store, distribute, and share fine-tuned versions. However, this introduces a new challenge: how to properly manage these new types of fine-tuned models. Should you combine the base model and adapter or keep them separate? In this post, we walk through best practices for managing LoRA fine-tuned models on Amazon SageMaker to address this emerging question.

Working with FMs on SageMaker Model Registry

In this post, we walk through an end-to-end example of fine-tuning the Llama2 large language model (LLM) using the QLoRA method. QLoRA combines the benefits of parameter efficient fine-tuning with 4-bit/8-bit quantization to further reduce the resources required to fine-tune a FM to a specific task or use case. For this, we will use the pre-trained 7 billion parameter Llama2 model and fine-tune it on the databricks-dolly-15k dataset. LLMs like Llama2 have billions of parameters and are pretrained on massive text datasets. Fine-tuning adapts an LLM to a downstream task using a smaller dataset. However, fine-tuning large models is computationally expensive. This is why we will use the QLoRA method to quantize the weights during finetuning to reduce this computation cost.

In our examples, you will find two notebooks (llm-finetune-combined-with-registry.ipynb and llm-finetune-separate-with-registry.ipynb). Each works through a different way to handle LoRA fine-tuned models as illustrated in the following diagram:

  1. First, we download the pre-trained Llama2 model with 7 billion parameters using SageMaker Studio Notebooks. LLMs, like Llama2, have shown state-of-the-art performance on natural language processing (NLP) tasks when fine-tuned on domain-specific data.
  2. Next, we fine-tune Llama2 on the databricks-dolly-15k dataset using the QLoRA method. QLoRA reduces the computational cost of fine-tuning by quantizing model weights.
  3. During fine-tuning, we integrate SageMaker Experiments Plus with the Transformers API to automatically log metrics like gradient, loss, etc.
  4. We then version the fine-tuned Llama2 model in SageMaker Model Registry using two approaches:
    1. Storing the full model
    2. Storing the adapter and base model separately.
  5. Finally, we host the fine-tuned Llama2 models using Deep Java Library (DJL) Serving on a SageMaker Real-time endpoint.

In the following sections, we will dive deeper into each of these steps, to demonstrate the flexibility of SageMaker for different LLM workflows and how these features can help improve the operations of your models.

Prerequisites

Complete the following prerequisites to start experimenting with the code.

  • Create a SageMaker Studio Domain: Amazon SageMaker Studio, specifically Studio Notebooks, is used to kick off the Llama2 fine-tuning task then register and view models within SageMaker Model Registry. SageMaker Experiments is also used to view and compare Llama2 fine-tuning job logs (training loss/test loss/etc.).
  • Create an Amazon Simple Storage Service (S3) bucket: Access to an S3 bucket to store training artifacts and model weights is required. For instructions, refer to Creating a bucket. The sample code used for this post will use the SageMaker default S3 bucket but you can customize it to use any relevant S3 bucket.
  • Set up Model Collections (IAM permissions): Update your SageMaker Execution Role with permissions to resource-groups as listed under Model Registry Collections Developer Guide to implement Model Registry grouping using Model Collections.
  • Accept the Terms & Conditions for Llama2: You will need to accept the end-user license agreement and acceptable use policy for using the Llama2 foundation model.

The examples are available in the GitHub repository. The notebook files are tested using Studio notebooks running on PyTorch 2.0.0 Python 3.10 GPU Optimized kernel and ml.g4dn.xlarge instance type.

Experiments plus callback integration

Amazon SageMaker Experiments lets you organize, track, compare and evaluate machine learning (ML) experiments and model versions from any integrated development environment (IDE), including local Jupyter Notebooks, using the SageMaker Python SDK or boto3. It provides the flexibility to log your model metrics, parameters, files, artifacts, plot charts from the different metrics, capture various metadata, search through them and support model reproducibility. Data scientists can quickly compare the performance and hyperparameters for model evaluation through visual charts and tables. They can also use SageMaker Experiments to download the created charts and share the model evaluation with their stakeholders.

Training LLMs can be a slow, expensive, and iterative process. It is very important for a user to track LLM experimentation at scale to prevent an inconsistent model tuning experience. HuggingFace Transformer APIs allow users to track metrics during training tasks through Callbacks. Callbacks are “read only” pieces of code that can customize the behavior of the training loop in the PyTorch Trainer that can inspect the training loop state for progress reporting, logging on TensorBoard or SageMaker Experiments Plus via custom logic (which is included as a part of this codebase).

You can import the SageMaker Experiments callback code included in this post’s code repository as shown in the following code block:

# imports a custom implementation of Experiments Callback
from smexperiments_callback import SageMakerExperimentsCallback
...
...
# Create Trainer instance with SageMaker experiments callback
trainer = Trainer(
    model=model,
    args=training_args,
    train_dataset=train_dataset,
    eval_dataset=validation_dataset,
    data_collator=default_data_collator,
    callbacks=[SageMakerExperimentsCallback] # Add our Experiments Plus Callback function
)

This callback will automatically log the following information into SageMaker Experiments as a part of the training run:

  • Training Parameters and Hyper-Parameters
  • Model Training and Validation loss at Step, Epoch and Final
  • Model Input and Output artifacts (training dataset, validation dataset, model output location, training debugger and more)

The following graph shows examples of the charts you can display by using that information.

This allows you to compare multiple runs easily using the Analyze feature of SageMaker Experiments. You can select the experiment runs you want to compare, and they will automatically populate comparison graphs.

Register fine-tuned models to Model Registry Collections

Model Registry Collections is a feature of SageMaker Model Registry that allows you to group registered models that are related to each other and organize them in hierarchies to improve model discoverability at scale. We will use Model Registry Collections to keep track of the base model and fine-tuned variants.

Full Model Copy method

The first method combines the base model and LoRA adapter and saves the full fine-tuned model. The following code illustrates the model merging process and saves the combined model using model.save_pretrained().

if args.merge_weights:
        
    trainer.model.save_pretrained(temp_dir, safe_serialization=False)
    # clear memory
    del model
    del trainer
    torch.cuda.empty_cache()
    
    from peft import AutoPeftModelForCausalLM

    # load PEFT model in fp16
    model = AutoPeftModelForCausalLM.from_pretrained(
        temp_dir,
        low_cpu_mem_usage=True,
        torch_dtype=torch.float16,
    )  
    # Merge LoRA and base model and save
    model = model.merge_and_unload()        
    model.save_pretrained(
        args.sm_model_dir, safe_serialization=True, max_shard_size="2GB"
    )

Combining the LoRA adapter and base model into a single model artifact after fine-tuning has advantages and disadvantages. The combined model is self-contained and can be independently managed and deployed without needing the original base model. The model can be tracked as its own entity with a version name reflecting the base model and fine-tuning data. We can adopt a nomenclature using the base_model_name + fine-tuned dataset_name to organize the model groups. Optionally, model collections could associate the original and fine-tuned models, but this may not be necessary since the combined model is independent.  The following code snippet shows you how to register the fine-tuned model.

# Model Package Group Vars
ft_package_group_name = f"{model_id.replace('/', '--')}-{dataset_name}"
ft_package_group_desc = "QLoRA for model Mikael110/llama-2-7b-{dataset_name}-fp16"
...
...
...
model_package_group_input_dict = {
    "ModelPackageGroupName" : ft_package_group_name,
    "ModelPackageGroupDescription" : ft_package_group_desc,
    "Tags": ft_tags
}
create_model_pacakge_group_response = sm_client.create_model_package_group(
**model_package_group_input_dict
)

You can use the training estimator to register the model into Model Registry.

inference_image_uri = sagemaker.image_uris.retrieve(
    "djl-deepspeed", region=region, version="0.23.0"
)
print(f"Image going to be used is ---- > {inference_image_uri}")

model_package = huggingface_estimator.register(
    content_types=["application/json"],
    response_types=["application/json"],
    inference_instances=[
        "ml.p2.16xlarge", 
...
...
...
    ],
    image_uri = inference_image_uri,
    customer_metadata_properties = {"training-image-uri": huggingface_estimator.training_image_uri()},  #Store the training image url
    model_package_group_name=ft_model_pkg_group_name,
    approval_status="Approved"
)

model_package_arn = model_package.model_package_arn
print("Model Package ARN : ", model_package_arn)

From Model Registry, you can retrieve the model package and deploy that model directly.

endpoint_name = f"{name_from_base(model_group_for_base)}-endpoint"

model_package.deploy(
    initial_instance_count=1,
    instance_type="ml.g5.12xlarge",
    endpoint_name=endpoint_name
)

However, there are drawbacks to this approach. Combining the models leads to storage inefficiency and redundancy since the base model is duplicated in each fine-tuned version. As model size and the number of fine-tuned models increase, this exponentially inflates storage needs. Taking the llama2 7b model as an example, the base model is approximately 13 GB and the fine-tuned model is 13.6 GB. 96% percent of the model needs to be duplicated after each fine tuning. Additionally, distributing and sharing very large model files also becomes more difficult and presents operational challenges as file transfer and management cost increases with increasing model size and fine-tune jobs.

Separate adapter and base method

The second method focuses on separation of base weights and adapter weights by saving them as separate model components and loading them sequentially at runtime.

    ..
    ..
    ..
    else:   
        # save finetuned LoRA model and then the tokenizer for inference
        trainer.model.save_pretrained(
            args.sm_model_dir, 
            safe_serialization=True
        )
    tokenizer.save_pretrained(
        args.sm_model_dir
    )

Saving base and adapter weights has advantages and disadvantages, similar to the Full Model Copy method. One advantage is that it can save storage space. The base weights, which are the largest component of a fine-tuned model, are only saved once and can be reused with other adapter weights that are tuned for different tasks. For example, the base weights of Llama2-7B are about 13 GB, but each fine-tuning task only needs to store about 0.6 GB of adapter weights, which is a 95% space savings. Another advantage is that base weights can be managed separately from adapter weights using a base weights only model registry. This can be useful for SageMaker domains that are running in a VPC only mode without an internet gateway, since the base weights can be accessed without having to go through the internet.

Create Model Package Group for base weights

### Create Model Package Group
base_package_group_name = model_id.replace('/', '--')
base_package_group_desc = "Source: https://huggingface.co/Mikael110/llama-2-7b-guanaco-fp16"
...
...
...
model_package_group_input_dict = {
    "ModelPackageGroupName" : base_package_group_name,
    "ModelPackageGroupDescription" : base_package_group_desc,
    "Tags": base_tags
}
create_model_pacakge_group_response = sm_client.create_model_package_group(
**model_package_group_input_dict
)

>>>
Created ModelPackageGroup Arn : arn:aws:sagemaker:us-west-2:376678947624:model-package-group/Mikael110--llama-2-7b-guanaco-fp16
...
...
...

### Register Base Model Weights
from sagemaker.huggingface import HuggingFaceModel

# create Hugging Face Model Class
huggingface_model = HuggingFaceModel(
    transformers_version='4.28',
    pytorch_version='2.0',
    py_version='py310',
    model_data=model_data_uri, # this is an S3 path to your base weights as *.tar.gz
    role=role,
)

_response = huggingface_model.register(
    content_types=["application/json"],
    response_types=["application/json"],
    inference_instances=[
    "ml.p2.16xlarge",
    ...
    ],
    transform_instances=[
    "ml.p2.16xlarge",
    ...
    ],
    model_package_group_name=base_model_pkg_group_name,
    approval_status="Approved"
 )

Create Model Package Group for QLoRA weights

The following code shows how to tag QLoRA weights with the dataset/task type and register fine-tuned delta weights into a separate model registry and track the delta weights separately.

### Create Model Package Group for delta weights
ft_package_group_name = f"{model_id.replace('/', '--')}-finetuned-sql"
ft_package_group_desc = "QLoRA for model Mikael110/llama-2-7b-guanaco-fp16"
ft_tags = [
    {
    "Key": "modelType",
    "Value": "QLoRAModel"
    },
    {
    "Key": "fineTuned",
    "Value": "True"
    },
    {
    "Key": "sourceDataset",
    "Value": f"{dataset_name}"
    }
]
model_package_group_input_dict = {
    "ModelPackageGroupName" : ft_package_group_name,
    "ModelPackageGroupDescription" : ft_package_group_desc,
    "Tags": ft_tags
}
create_model_pacakge_group_response = sm_client.create_model_package_group(
**model_package_group_input_dict
)
print(f'Created ModelPackageGroup Arn : {create_model_pacakge_group_response["ModelPackageGroupArn"]}')
ft_model_pkg_group_name = create_model_pacakge_group_response["ModelPackageGroupArn"]

>>> 
Created ModelPackageGroup Arn : arn:aws:sagemaker:us-east-1:811828458885:model-package-group/mikael110--llama-2-7b-guanaco-fp16-finetuned-sql

...
...
...

### Register Delta Weights QLoRA Model Weights
huggingface_model = HuggingFaceModel(
    transformers_version='4.28',
    pytorch_version='2.0',  
    py_version='py310',
    model_data="s3://sagemaker-us-east-1-811828458885/huggingface-qlora-2308180454/output/model.tar.gz", OR #huggingface_estimator.model_data
    role=role,
)

_response = huggingface_model.register(
    content_types=["application/json"],
    response_types=["application/json"],
    inference_instances=[
    "ml.p2.16xlarge",
    ...
    ],
    transform_instances=[
    "ml.p2.16xlarge",
    ...
    ],
    model_package_group_name=ft_model_pkg_group_name,
    approval_status="Approved"
)

>>>
Model collection creation status: {'added_groups': ['arn:aws:sagemaker:us-east-1:811828458885:model-package-group/mikael110--llama-2-7b-guanaco-fp16-finetuned-sql'], 'failure': []}

The following snippet shows a view from the Model Registry where the models are split into base and fine-tuned weights.

Managing models, datasets, and tasks for hyper-personalized LLMs can quickly become overwhelming. SageMaker Model Registry Collections can help you group related models together and organize them in a hierarchy to improve model discoverability. This makes it easier to track the relationships between base weights, adapter weights, and fine-tuning task datasets. You can also create complex relationships and linkages between models.

Create a new Collection and add your base model weights to this Collection

# create model collection
base_collection = model_collector.create(
    collection_name=model_group_for_base # ex: "Website_Customer_QnA_Bot_Model"
)

# Add the base weights at first level of model collections as all future models 
# are going to be tuned from the base weights
_response = model_collector.add_model_groups(
    collection_name=base_collection["Arn"],
    model_groups=[base_model_pkg_group_name]
)
print(f"Model collection creation status: {_response}")

>>>
Model collection creation status: {'added_groups': ['arn:aws:sagemaker:us-west-2:376678947624:model-package-group/Mikael110--llama-2-7b-guanaco-fp16'], 'failure': []}

Link all your Fine-Tuned LoRA Adapter Delta Weights to this collection by task and/or dataset

# create model collection for finetuned and link it back to the base
finetuned_collection = model_collector.create(
    collection_name=model_group_for_finetune,
    parent_collection_name=model_group_for_base
)

# add finetuned model package group to the new finetuned collection
_response = model_collector.add_model_groups(
    collection_name=model_group_for_finetune,
    model_groups=[ft_model_pkg_group_name]
)
print(f"Model collection creation status: {_response}")

>>>
Model collection creation status: {'added_groups': ['arn:aws:sagemaker:us-east-1:811828458885:model-package-group/mikael110--llama-2-7b-guanaco-fp16-finetuned-sql'], 'failure': []}

This will result in a collection hierarchy which are linked by model/task type and the dataset used to fine tune the base model.

This method of separating the base and adapter models has some drawbacks. One drawback is complexity in deploying the model. Because there are two separate model artifacts, you need additional steps to repackage the model instead of deploy directly from Model Registry. In the following code example, download and repack the latest version of the base model first.

!aws s3 cp {base_model_package.model_data} .

!tar -xvf {model_tar_filename} -C ./deepspeed/

!mv ./deepspeed/{model_id} ./deepspeed/base

!rm -rf ./deepspeed/{model_id}

Then download and repack the latest fine-tuned LoRA adapter weights.

!aws s3 cp {LoRA_package.model_data} .

!mkdir -p ./deepspeed/lora/

!tar -xzf model.tar.gz -C ./deepspeed/lora/

Since you will be using DJL serving with deepspeed to host the model, your inference directory should look like the following.

deepspeed
    |-serving.properties
    |-requirements.txt
    |-model.py
    |-base/
        |-...
    |-lora/
        |-...

Finally, package the custom inference code, base model, and LoRA adaptor in a single .tar.gz file for deployment.

!rm -f model.tar.gz
!tar czvf model.tar.gz -C deepspeed .
s3_code_artifact_deepspeed = sagemaker_session.upload_data("model.tar.gz", default_bucket, f"{s3_key_prefix}/inference")
print(f"S3 Code or Model tar for deepspeed uploaded to --- > {s3_code_artifact_deepspeed}")

Clean up

Clean up your resources by following the instructions in the cleanup section of the notebook. Refer to Amazon SageMaker Pricing for details on the cost of the inference instances.

Conclusion

This post walked you through best practices for managing LoRA fine-tuned models on Amazon SageMaker. We covered two main methods: combining the base and adapter weights into one self-contained model, and separating the base and adapter weights. Both approaches have tradeoffs, but separating weights helps optimize storage and enables advanced model management techniques like SageMaker Model Registry Collections. This allows you to build hierarchies and relationships between models to improve organization and discoverability. We encourage you to try the sample code on GitHub repository to experiment with these methods yourself. As generative AI progresses rapidly, following model management best practices will help you track experiments, find the right model for your task, and manage specialized LLMs efficiently at scale.

References


About the authors

James Wu is a Senior AI/ML Specialist Solution Architect at AWS. helping customers design and build AI/ML solutions. James’s work covers a wide range of ML use cases, with a primary interest in computer vision, deep learning, and scaling ML across the enterprise. Prior to joining AWS, James was an architect, developer, and technology leader for over 10 years, including 6 years in engineering and 4 years in marketing & advertising industries.

Pranav Murthy is an AI/ML Specialist Solutions Architect at AWS. He focuses on helping customers build, train, deploy and migrate machine learning (ML) workloads to SageMaker. He previously worked in the semiconductor industry developing large computer vision (CV) and natural language processing (NLP) models to improve semiconductor processes. In his free time, he enjoys playing chess and traveling.

Mecit Gungor is an AI/ML Specialist Solution Architect at AWS helping customers design and build AI/ML solutions at scale. He covers a wide range of AI/ML use cases for Telecommunication customers and currently focuses on Generative AI, LLMs, and training and inference optimization. He can often be found hiking in the wilderness or playing board games with his friends in his free time.

Shelbee Eigenbrode is a Principal AI and Machine Learning Specialist Solutions Architect at Amazon Web Services (AWS). She has been in technology for 24 years spanning multiple industries, technologies, and roles. She is currently focusing on combining her DevOps and ML background into the domain of MLOps to help customers deliver and manage ML workloads at scale. With over 35 patents granted across various technology domains, she has a passion for continuous innovation and using data to drive business outcomes. Shelbee is a co-creator and instructor of the Practical Data Science specialization on Coursera. She is also the Co-Director of Women In Big Data (WiBD), Denver chapter. In her spare time, she likes to spend time with her family, friends, and overactive dogs.

Read More

Implement real-time personalized recommendations using Amazon Personalize

Implement real-time personalized recommendations using Amazon Personalize

At a basic level, Machine Learning (ML) technology learns from data to make predictions. Businesses use their data with an ML-powered personalization service to elevate their customer experience. This approach allows businesses to use data to derive actionable insights and help grow their revenue and brand loyalty.

Amazon Personalize accelerates your digital transformation with ML, making it easier to integrate personalized recommendations into existing websites, applications, email marketing systems, and more. Amazon Personalize enables developers to quickly implement a customized personalization engine, without requiring ML expertise. Amazon Personalize provisions the necessary infrastructure and manages the entire machine learning (ML) pipeline, including processing the data, identifying features, using the most appropriate algorithms, and training, optimizing, and hosting the models. You receive results through an API and pay only for what you use, with no minimum fees or upfront commitments.

The post Architecting near real-time personalized recommendations with Amazon Personalize shows how to architect near real-time personalized recommendations using Amazon Personalize and AWS purpose-built data services. In this post, we walk you through a reference implementation of a real-time personalized recommendation system using Amazon Personalize.

Solution overview

The real-time personalized recommendations solution is implemented using Amazon Personalize, Amazon Simple Storage Service (Amazon S3), Amazon Kinesis Data Streams, AWS Lambda, and Amazon API Gateway.

The architecture is implemented as follows:

  1. Data preparation – Start by creating a dataset group, schemas, and datasets representing your items, interactions, and user data.
  2. Train the model – After importing your data, select the recipe matching your use case, and then create a solution to train a model by creating a solution version. When your solution version is ready, you can create a campaign for your solution version.
  3. Get near real-time recommendations – When you have a campaign, you can integrate calls to the campaign in your application. This is where calls to the GetRecommendations or GetPersonalizedRanking APIs are made to request near real-time recommendations from Amazon Personalize.

For more information, refer to Architecting near real-time personalized recommendations with Amazon Personalize.

The following diagram illustrates the solution architecture.

Implementation

We demonstrate this implementation with a use case about making real-time movie recommendations to an end user based on their interactions with the movie database over time.

The solution is implemented using the following steps:

  1. Prerequisite (Data preparation)
  2. Setup your development environment
  3. Deploy the solution
  4. Create a solution version
  5. Create a campaign
  6. Create an event tracker
  7. Get recommendations
  8. Ingest real-time interactions
  9. Validate real-time recommendations
  10. Cleanup

Prerequisites

Before you get started, make sure you have the following prerequisites:

  • Prepare your training data – Prepare and upload the data to an S3 bucket using the instructions. For this particular use case, you will be uploading interactions data and items data. An interaction is an event that you record and then import as training data. Amazon Personalize generates recommendations primarily based on the interactions data you import into an Interactions dataset. You can record multiple event types, such as click, watch, or like. Although the model created by Amazon Personalize can suggest based on a user’s past interactions, the quality of these suggestions can be enhanced when the model possesses data about the associations among users or items . If a user has engaged with movies categorized as Drama in the item dataset, Amazon Personalize will suggest movies (items) with the same genre.
  • Setup your development environment Install the AWS Command Line Interface (AWS CLI).
  • Configure CLI with your Amazon accountConfigure the AWS CLI with your AWS account information.
  • Install and bootstrap AWS Cloud Development Kit (AWS CDK)

Deploy the solution

To deploy the solution, do the following:

  • Clone the repository to a new folder on your desktop.
  • Deploy the stack to your AWS environment.

Create a solution version

A solution refers to the combination of an Amazon Personalize recipe, customized parameters, and one or more solution versions (trained models). When you deploy the CDK project in the previous step, a solution with a User-Personalization recipe is created for you automatically. A solution version refers to a trained machine learning model. Create a solution version for the implementation.

Create a campaign

A campaign deploys a solution version (trained model) with a provisioned transaction capacity for generating real-time recommendations. Create a campaign for the implementation.

Create an event tracker

Amazon Personalize can make recommendations based on real-time event data only, historical event data only, or both. Record real-time events to build out your interactions data and allow Amazon Personalize to learn from your user’s most recent activity. This keeps your data fresh and improves the relevance of Amazon Personalize recommendations. Before you can record events, you must create an event tracker. An event tracker directs new event data to the Interactions dataset in your dataset group. Create and event tracker for the implementation.

Get recommendations

In this use case, the interaction dataset is composed of movie IDs. Consequently, the recommendations presented to the user will consist of movie IDs that align most closely with their personal preferences, determined from their historical interactions. You can use the getRecommendations API to retrieve personalized recommendations for a user by sending its associated userID, the number of results for recommendations that you need for the user as well as the campaign ARN. You can find the campaign ARN in the Amazon Personalize console menu.

For example, the following request will retrieve 5 recommendations for the user whose userId is 429:

curl --location 'https://{your-api-id}.execute-api.{your-region}.amazonaws.com/prod/getRecommendations?campaignArn={campaignArn}&userId=429&numResults=5'

The response from the request will be:

{
	"$metadata": {
		"httpStatusCode": 200,
		"requestId": "7159c128-4e16-45a4-9d7e-cf19aa2256e8",
		"attempts": 1,
		"totalRetryDelay": 0
	},
	"itemList": [
	{
		"itemId": "596",
		"score": 0.0243044
	},
	{
		"itemId": "153",
		"score": 0.0151695
	},
	{
		"itemId": "16",
		"score": 0.013694
	},
	{
		"itemId": "261",
		"score": 0.013524
	},
	{
		"itemId": "34",
		"score": 0.0122294
	}
	],
	"recommendationId": "RID-1d-40c1-8d20-dfffbd7b0ac7-CID-06b10f"
}

The items returned by the API call are the movies that Amazon Personalize recommends to the user based on their historical interactions.

The score values provided in this context represent floating-point numbers that range between zero and 1.0. These values correspond to the current campaign and the associated recipes for this use case. They are determined based on the collective scores assigned to all items present in your comprehensive dataset.

Ingest real-time interactions

In the previous example, recommendations were obtained for the user with an ID of 429 based on their historical interactions with the movie database. For real-time recommendations, the user interactions with the items must be ingested into Amazon Personalize in real-time. These interactions are ingested into the recommendation system through the Amazon Personalize Event Tracker. The type of interaction, also called EventType, is given by the column of the same name in the interaction data dataset (EVENT_TYPE). In this example, the events can be of type “watch” or “click”, but you can have your own types of events according to the needs of your application.

In this example, the exposed API that generates the events of the users with the items receives the “interactions” parameter that corresponds to the number of events (interactions) of a user (UserId) with a single element (itemId) right now. The trackingId parameter can be found in the Amazon Personalize console and in the response of the creation of Event Tracker request.

This example shows a putEvent request: Generate 1 interactions of click type, with an item id of ‘185’ for the user id ‘429’, using the current timestamp. Note that in production, the ‘sentAt’ should be set to the time of the user’s interaction. In the following example, we set this to the point in time in epoch time format when we wrote the API request for this post. The events are sent to Amazon Kinesis Data Streams through an API Gateway which is why you need to send the stream-name and PartitionKey parameters.

curl --location 'https://iyxhva3ll6.execute-api.us-west-2.amazonaws.com/prod/data' --header 'Content-Type: application/json' --data '{ "stream-name": "my-stream","Data": {"userId" : "429", "interactions": 1, "itemId": "185", "trackingId" : "c90ac6d7-3d89-4abc-8a70-9b09c295cbcd", "eventType": "click", "sentAt":"1698711110"},"PartitionKey":"userId"}'

You will receive a confirmation response similar to the following:

{
	"Message": "Event sent successfully",
	"data": {
		"EncryptionType": "KMS",
		"SequenceNumber": "49..........1901314",
		"ShardId": "shardId-xxxxxxx"
	}
}

Validate real-time recommendations

Because the interaction dataset has been updated, the recommendations will be automatically updated to consider the new interactions. To validate the recommendations updated in real-time, you can call the getRecommendations API again for the same user id 429, and the result should be different from the previous one. The following results show a new recommendation with an id of 594 and the recommendations with the id’s of 16, 596, 153and 261 changed their scores. These items brought in new movie genre (‘Animation|Children|Drama|Fantasy|Musical’) the top 5 recommendations.

Request:

curl --location 'https://{your-api-id}.execute-api.{your-region}.amazonaws.com/prod/getRecommendations?campaignArn={campaignArn} &userId=429&numResults=5'

Response:

{
	"$metadata": {
		"httpStatusCode": 200,
		"requestId": "680f2be8-2e64-47d7-96f7-1c4aa9b9ac9d",
		"attempts": 1,
		"totalRetryDelay": 0
	},
	"itemList": [
	{
		"itemId": "596",
		"score": 0.0288085
	},
	{
		"itemId": "16",
		"score": 0.0134173
	},
	{
		"itemId": "594",
		"score": 0.0129357
	},
	{
		"itemId": "153",
		"score": 0.0129337
	},
	{
		"itemId": "261",
		"score": 0.0123728
	}
	],
	"recommendationId": "RID-dc-44f8-a327-482fb9e54921-CID-06b10f"
}

The response shows that the recommendation provided by Amazon Personalize was updated in real-time.

Clean up

To avoid unnecessary charges, clean up the solution implementation by using Cleaning up resources.

Conclusion

In this post, we showed you how to implement a real-time personalized recommendations system using Amazon Personalize. The interactions with Amazon Personalize to ingest real-time interactions and get recommendations were executed through a command line tool called curl but these API calls can be integrated into a business application and derive the same outcome.

To choose a new recipe for your use case, refer to Real-time personalization. To measure the impact of the recommendations made by Amazon Personalize, refer to Measuring impact of recommendations.


About the Authors

Cristian Marquez is a Senior Cloud Application Architect. He has vast experience designing, building, and delivering enterprise-level software, high load and distributed systems and cloud native applications. He has experience in backend and frontend programming languages, as well as system design and implementation of DevOps practices. He actively assists customers build and secure innovative cloud solutions, solving their business problems and achieving their business goals.

Anand Komandooru is a Senior Cloud Architect at AWS. He joined AWS Professional Services organization in 2021 and helps customers build cloud-native applications on AWS cloud. He has over 20 years of experience building software and his favorite Amazon leadership principle is “Leaders are right a lot.

Read More

Improve LLM responses in RAG use cases by interacting with the user

Improve LLM responses in RAG use cases by interacting with the user

One of the most common applications of generative AI and large language models (LLMs) is answering questions based on a specific external knowledge corpus. Retrieval-Augmented Generation (RAG) is a popular technique for building question answering systems that use an external knowledge base. To learn more, refer to Build a powerful question answering bot with Amazon SageMaker, Amazon OpenSearch Service, Streamlit, and LangChain.

Traditional RAG systems often struggle to provide satisfactory answers when users ask vague or ambiguous questions without providing sufficient context. This leads to unhelpful responses like “I don’t know” or incorrect, made-up answers provided by an LLM. In this post, we demonstrate a solution to improve the quality of answers in such use cases over traditional RAG systems by introducing an interactive clarification component using LangChain.

The key idea is to enable the RAG system to engage in a conversational dialogue with the user when the initial question is unclear. By asking clarifying questions, prompting the user for more details, and incorporating the new contextual information, the RAG system can gather the necessary context to provide an accurate, helpful answer—even from an ambiguous initial user query.

Solution overview

To demonstrate our solution, we have set up an Amazon Kendra index (composed of the AWS online documentation for Amazon Kendra, Amazon Lex, and Amazon SageMaker), a LangChain agent with an Amazon Bedrock LLM, and a straightforward Streamlit user interface.

Prerequisites

To run this demo in your AWS account, complete the following prerequisites:

  1. Clone the GitHub repository and follow the steps explained in the README.
  2. Deploy an Amazon Kendra index in your AWS account. You can use the following AWS CloudFormation template to create a new index or use an already running index. Deploying a new index might add additional charges to your bill, therefore we recommend deleting it if you don’t longer need it. Note that the data within the index will be sent to the selected Amazon Bedrock foundation model (FM).
  3. The LangChain agent relies on FMs available in Amazon Bedrock, but this can be adapted to any other LLM that LangChain supports.
  4. To experiment with the sample front end shared with the code, you can use Amazon SageMaker Studio to run a local deployment of the Streamlit app. Note that running this demo will incur some additional costs.

Implement the solution

Traditional RAG agents are often designed as follows. The agent has access to a tool that is used to retrieve documents relevant to a user query. The retrieved documents are then inserted into the LLM prompt, so that the agent can provide an answer based on the retrieved document snippets.

In this post, we implement an agent that has access to KendraRetrievalTool and derives relevant documents from the Amazon Kendra index and provides the answer given the retrieved context:

# tool for Kendra retrieval

kendra_tool = Tool(
    name="KendraRetrievalTool",
    func=retrieval_qa_chain,
    description="Use this tool first to answer human questions. The input to this tool should be the question.",
)
# traditional RAG agent

traditional_agent = initialize_agent(
    agent=AgentType.ZERO_SHOT_REACT_DESCRIPTION,
    tools=[kendra_tool]
    llm=llm,
    early_stopping_method="generate",
    memory=conversational_memory,
)

# user question
answer = traditional_agent.run("How many GPUs does my EC2 instance have?")

Refer to the GitHub repo for the full implementation code. To learn more about traditional RAG use cases, refer to Question answering using Retrieval Augmented Generation with foundation models in Amazon SageMaker JumpStart.

Consider the following example. A user asks “How many GPUs does my EC2 instance have?” As shown in the following screenshot, the agent is looking for the answer using KendraRetrievalTool. However, the agent realizes it doesn’t know which Amazon Elastic Compute Cloud (Amazon EC2) instance type the user is referencing and therefore provides no helpful answer to the user, leading to a poor customer experience.

Regular RAG Response

To address this problem, we define an additional custom tool called AskHumanTool and provide it to the agent. The tool instructs an LLM to read the user question and ask a follow-up question to the user if KendraRetrievalTool is not able to return a good answer. This implies that the agent will now have two tools at its disposal:

# tool for asking human
human_ask_tool = CustomAskHumanTool()

# RAG agent with two tools
improved_agent = initialize_agent(
    agent=AgentType.ZERO_SHOT_REACT_DESCRIPTION,
    tools=[kendra_tool, human_ask_tool],
    llm=llm,
    early_stopping_method="generate",
    memory=conversational_memory,
)

# user question
answer = improved_agent.run("How many GPUs does my EC2 instance have?")

This allows the agent to either refine the question or provide additional context that is needed to respond to the prompt. To guide the agent to use AskHumanTool for this purpose, we provide the following tool description to the LLM:

Use this tool if you don’t find an answer using the KendraRetrievalTool. 
Ask the human to clarify the question or provide the missing information. 
The input should be a question for the human.

As illustrated in the following screenshot, by using AskHumanTool, the agent is now identifying vague user questions and returning a follow-up question to the user asking to specify what EC2 instance type is being used.

RAG Follow up question

After the user has specified the instance type, the agent is incorporating the additional answer into the context for the original question, before deriving the correct answer.

RAG improved final answer

Note that the agent can now decide whether to use KendraRetrievalTool to retrieve the relevant documents or ask a clarifying question using AskHumanTool. The agent’s decision is based on whether it finds the document snippets inserted into the prompt sufficient to provide the final answer. This flexibility allows the RAG system to support different queries a user may submit, including both well-formulated and vague questions.

In our example, the full agent workflow is as follows:

  1. The user makes a request to the RAG app, asking “How many GPUs does my EC2 instance have?”
  2. The agent uses the LLM to decide what action to take: Find relevant information to answer the user’s request by calling the KendraRetrievalTool.
  3. The agent retrieves information from the Amazon Kendra index using the tool. The snippets from the retrieved documents are inserted into the agent prompt.
  4. The LLM (of the agent) derives that the retrieved documents from Amazon Kendra aren’t helpful or don’t contain enough context to provide an answer to the user’s request.
  5. The agent uses AskHumanTool to formulate a follow-up question: “What is the specific EC2 instance type you are using? Knowing the instance type would help answer how many GPUs it has.” The user provides the answer “ml.g5.12xlarge,” and the agent calls KendraRetrievalTool again, but this time adding the EC2 instance type into the search query.
  6. After running through Steps 2–4 again, the agent derives a useful answer and sends it back to the user.

The following diagram illustrates this workflow.RAG improved architecture

The example described in this post illustrates how the addition of the custom AskHumanTool allows the agent to request clarifying details when needed. This can improve the reliability and accuracy of the responses, leading to a better customer experience in a growing number of RAG applications across different domains.

Clean up

To avoid incurring unnecessary costs, delete the Amazon Kendra index if you’re not using it anymore and shut down the SageMaker Studio instance if you used it to run the demo.

Conclusion

In this post, we showed how to enable a better customer experience for the users of a RAG system by adding a custom tool that enables the system to ask a user for a missing piece of information. This interactive conversational approach represents a promising direction for improving traditional RAG architectures. The ability to resolve vagueness through a dialogue can lead to delivering more satisfactory answers from a knowledge base.

Note that this approach is not limited to RAG use cases; you can use it in other generative AI use cases that depend on an agent at its core, where a custom AskHumanTool can be added.

For more information about using Amazon Kendra with generative AI, refer to Quickly build high-accuracy Generative AI applications on enterprise data using Amazon Kendra, LangChain, and large language models.


About the authors

Antonia Wiebeler is a Data Scientist at the AWS Generative AI Innovation Center, where she enjoys building proofs of concept for customers. Her passion is exploring how generative AI can solve real-world problems and create value for customers. While she is not coding, she enjoys running and competing in triathlons.

Nikita Kozodoi is an Applied Scientist at the AWS Generative AI Innovation Center, where he develops ML solutions to solve customer problems across industries. In his role, he focuses on advancing generative AI to tackle real-world challenges. In his spare time, he loves playing beach volleyball and reading.

Read More

Build trust and safety for generative AI applications with Amazon Comprehend and LangChain

Build trust and safety for generative AI applications with Amazon Comprehend and LangChain

We are witnessing a rapid increase in the adoption of large language models (LLM) that power generative AI applications across industries. LLMs are capable of a variety of tasks, such as generating creative content, answering inquiries via chatbots, generating code, and more.

Organizations looking to use LLMs to power their applications are increasingly wary about data privacy to ensure trust and safety is maintained within their generative AI applications. This includes handling customers’ personally identifiable information (PII) data properly. It also includes preventing abusive and unsafe content from being propagated to LLMs and checking that data generated by LLMs follows the same principles.

In this post, we discuss new features powered by Amazon Comprehend that enable seamless integration to ensure data privacy, content safety, and prompt safety in new and existing generative AI applications.

Amazon Comprehend is a natural language processing (NLP) service that uses machine learning (ML) to uncover information in unstructured data and text within documents. In this post, we discuss why trust and safety with LLMs matter for your workloads. We also delve deeper into how these new moderation capabilities are utilized with the popular generative AI development framework LangChain to introduce a customizable trust and safety mechanism for your use case.

Why trust and safety with LLMs matter

Trust and safety are paramount when working with LLMs due to their profound impact on a wide range of applications, from customer support chatbots to content generation. As these models process vast amounts of data and generate humanlike responses, the potential for misuse or unintended outcomes increases. Ensuring that these AI systems operate within ethical and reliable boundaries is crucial, not just for the reputation of businesses that utilize them, but also for preserving the trust of end-users and customers.

Moreover, as LLMs become more integrated into our daily digital experiences, their influence on our perceptions, beliefs, and decisions grows. Ensuring trust and safety with LLMs goes beyond just technical measures; it speaks to the broader responsibility of AI practitioners and organizations to uphold ethical standards. By prioritizing trust and safety, organizations not only protect their users, but also ensure sustainable and responsible growth of AI in society. It can also help to reduce risk of generating harmful content, and help adhere to regulatory requirements.

In the realm of trust and safety, content moderation is a mechanism that addresses various aspects, including but not limited to:

  • Privacy – Users can inadvertently provide text that contains sensitive information, jeopardizing their privacy. Detecting and redacting any PII is essential.
  • Toxicity – Recognizing and filtering out harmful content, such as hate speech, threats, or abuse, is of utmost importance.
  • User intention – Identifying whether the user input (prompt) is safe or unsafe is critical. Unsafe prompts can explicitly or implicitly express malicious intent, such as requesting personal or private information and generating offensive, discriminatory, or illegal content. Prompts may also implicitly express or request advice on medical, legal, political, controversial, personal, or financial

Content moderation with Amazon Comprehend

In this section, we discuss the benefits of content moderation with Amazon Comprehend.

Addressing privacy

Amazon Comprehend already addresses privacy through its existing PII detection and redaction abilities via the DetectPIIEntities and ContainsPIIEntities APIs. These two APIs are backed by NLP models that can detect a large number of PII entities such as Social Security numbers (SSNs), credit card numbers, names, addresses, phone numbers, and so on. For a full list of entities, refer to PII universal entity types. DetectPII also provides character-level position of the PII entity within a text; for example, the start character position of the NAME entity (John Doe) in the sentence “My name is John Doe” is 12, and the end character position is 19. These offsets can be used to perform masking or redaction of the values, thereby reducing risks of private data propagation into LLMs.

Addressing toxicity and prompt safety

Today, we are announcing two new Amazon Comprehend features in the form of APIs: Toxicity detection via the DetectToxicContent API, and prompt safety classification via the ClassifyDocument API. Note that DetectToxicContent is a new API, whereas ClassifyDocument is an existing API that now supports prompt safety classification.

Toxicity detection

With Amazon Comprehend toxicity detection, you can identify and flag content that may be harmful, offensive, or inappropriate. This capability is particularly valuable for platforms where users generate content, such as social media sites, forums, chatbots, comment sections, and applications that use LLMs to generate content. The primary goal is to maintain a positive and safe environment by preventing the dissemination of toxic content.

At its core, the toxicity detection model analyzes text to determine the likelihood of it containing hateful content, threats, obscenities, or other forms of harmful text. The model is trained on vast datasets containing examples of both toxic and nontoxic content. The toxicity API evaluates a given piece of text to provide toxicity classification and confidence score. Generative AI applications can then use this information to take appropriate actions, such as stopping the text from propagating to LLMs. As of this writing, the labels detected by the toxicity detection API are HATE_SPEECH, GRAPHIC, HARRASMENT_OR_ABUSE, SEXUAL, VIOLENCE_OR_THREAT, INSULT, and PROFANITY. The following code demonstrates the API call with Python Boto3 for Amazon Comprehend toxicity detection:

import boto3
client = boto3.client('comprehend')
response = client.detect_toxic_content(
    	TextSegments=[{"Text": "What is the capital of France?"},
                      {"Text": "Where do I find good baguette in France?"}],
    	LanguageCode='en')
print(response)

Prompt safety classification

Prompt safety classification with Amazon Comprehend helps classify an input text prompt as safe or unsafe. This capability is crucial for applications like chatbots, virtual assistants, or content moderation tools where understanding the safety of a prompt can determine responses, actions, or content propagation to LLMs.

In essence, prompt safety classification analyzes human input for any explicit or implicit malicious intent, such as requesting personal or private information and generation of offensive, discriminatory, or illegal content. It also flags prompts looking for advice on medical, legal, political, controversial, personal, or financial subjects. Prompt classification returns two classes, UNSAFE_PROMPT and SAFE_PROMPT, for an associated text, with an associated confidence score for each. The confidence score ranges between 0–1 and combined will sum up to 1. For instance, in a customer support chatbot, the text “How do I reset my password?” signals an intent to seek guidance on password reset procedures and is labeled as SAFE_PROMPT. Similarly, a statement like “I wish something bad happens to you” can be flagged for having a potentially harmful intent and labeled as UNSAFE_PROMPT. It’s important to note that prompt safety classification is primarily focused on detecting intent from human inputs (prompts), rather than machine-generated text (LLM outputs). The following code demonstrates how to access the prompt safety classification feature with the ClassifyDocument API:

import boto3
client = boto3.client('comprehend')
response = self.client.classify_document(
           		Text=prompt_value, 
EndpointArn=endpoint_arn)
print(response)

Note that endpoint_arn in the preceding code is an AWS-provided Amazon Resource Number (ARN) of the pattern arn:aws:comprehend:<region>:aws:document-classifier-endpoint/prompt-safety, where <region> is the AWS Region of your choice where Amazon Comprehend is available.

To demonstrate these capabilities, we built a sample chat application where we ask an LLM to extract PII entities such as address, phone number, and SSN from a given piece of text. The LLM finds and returns the appropriate PII entities, as shown in the image on the left.

With Amazon Comprehend moderation, we can redact the input to the LLM and output from the LLM. In the image on the right, the SSN value is allowed to be passed to the LLM without redaction. However, any SSN value in the LLM’s response is redacted.

The following is an example of how a prompt containing PII information can be prevented from reaching the LLM altogether. This example demonstrates a user asking a question that contains PII information. We use Amazon Comprehend moderation to detect PII entities in the prompt and show an error by interrupting the flow.

The preceding chat examples showcase how Amazon Comprehend moderation applies restrictions on data being sent to an LLM. In the following sections, we explain how this moderation mechanism is implemented using LangChain.

Integration with LangChain

With the endless possibilities of the application of LLMs into various use cases, it has become equally important to simplify the development of generative AI applications. LangChain is a popular open source framework that makes it effortless to develop generative AI applications. Amazon Comprehend moderation extends the LangChain framework to offer PII identification and redaction, toxicity detection, and prompt safety classification capabilities via AmazonComprehendModerationChain.

AmazonComprehendModerationChain is a custom implementation of the LangChain base chain interface. This means that applications can use this chain with their own LLM chains to apply the desired moderation to the input prompt as well as to the output text from the LLM. Chains can be built by merging numerous chains or by mixing chains with other components. You can use AmazonComprehendModerationChain with other LLM chains to develop complex AI applications in a modular and flexible manner.

To explain it further, we provide a few samples in the following sections. The source code for the AmazonComprehendModerationChain implementation can be found within the LangChain open source repository. For full documentation of the API interface, refer to the LangChain API documentation for the Amazon Comprehend moderation chain. Using this moderation chain is as simple as initializing an instance of the class with default configurations:

from langchain_experimental.comprehend_moderation import AmazonComprehendModerationChain

comprehend_moderation = AmazonComprehendModerationChain()

Behind the scenes, the moderation chain performs three consecutive moderation checks, namely PII, toxicity, and prompt safety, as explained in the following diagram. This is the default flow for the moderation.

The following code snippet shows a simple example of using the moderation chain with the Amazon FalconLite LLM (which is a quantized version of the Falcon 40B SFT OASST-TOP1 model) hosted in Hugging Face Hub:

from langchain import HuggingFaceHub
from langchain import PromptTemplate, LLMChain
from langchain_experimental.comprehend_moderation import AmazonComprehendModerationChain

template = """Question: {question}
Answer:"""
repo_id = "amazon/FalconLite"
prompt = PromptTemplate(template=template, input_variables=["question"])
llm = HuggingFaceHub(
repo_id=repo_id, 
model_kwargs={"temperature": 0.5, "max_length": 256}
)
comprehend_moderation = AmazonComprehendModerationChain(verbose=True)
chain = (
    prompt 
    | comprehend_moderation 
    | { "input" : (lambda x: x['output']) | llm }  
    | comprehend_moderation
)

try:
    response = chain.invoke({"question": "An SSN is of the format 123-45-6789. Can you give me John Doe's SSN?"})
except Exception as e:
    print(str(e))
else:
    print(response['output'])

In the preceding example, we augment our chain with comprehend_moderation for both text going into the LLM and text generated by the LLM. This will perform default moderation that will check PII, toxicity, and prompt safety classification in that sequence.

Customize your moderation with filter configurations

You can use the AmazonComprehendModerationChain with specific configurations, which gives you the ability to control what moderations you wish to perform in your generative AI–based application. At the core of the configuration, you have three filter configurations available.

  1. ModerationPiiConfig – Used to configure PII filter.
  2. ModerationToxicityConfig – Used to configure toxic content filter.
  3. ModerationIntentConfig – Used to configure intent filter.

You can use each of these filter configurations to customize the behavior of how your moderations behave. Each filter’s configurations have a few common parameters, and some unique parameters, that they can be initialized with. After you define the configurations, you use the BaseModerationConfig class to define the sequence in which the filters must apply to the text. For example, in the following code, we first define the three filter configurations, and subsequently specify the order in which they must apply:

from langchain_experimental.comprehend_moderation 
import (BaseModerationConfig, 
ModerationPromptSafetyConfig, 
ModerationPiiConfig, 
ModerationToxicityConfig)

pii_config = ModerationPiiConfig(labels=["SSN"],
   redact=True,
   mask_character="X")
toxicity_config = ModerationToxicityConfig(threshold=0.6)
prompt_safety_config = ModerationPromptSafetyConfig(threshold=0.8)
moderation_config = BaseModerationConfig(filters=[ toxicity_config, 
      pii_config, 
      prompt_safety_config])
comprehend_moderation = AmazonComprehendModerationChain(moderation_config=moderation_config)

Let’s dive a little deeper to understand what this configuration achieves:

  • First, for the toxicity filter, we specified a threshold of 0.6. This means that if the text contains any of the available toxic labels or entities with a score greater than the threshold, the whole chain will be interrupted.
  • If there is no toxic content found in the text, a PII check is In this case, we’re interested in checking if the text contains SSN values. Because the redact parameter is set to True, the chain will mask the detected SSN values (if any) where the SSN entitiy’s confidence score is greater than or equal to 0.5, with the mask character specified (X). If redact is set to False, the chain will be interrupted for any SSN detected.
  • Finally, the chain performs prompt safety classification, and will stop the content from propagating further down the chain if the content is classified with UNSAFE_PROMPT with a confidence score of greater than or equal to 0.8.

The following diagram illustrates this workflow.

In case of interruptions to the moderation chain (in this example, applicable for the toxicity and prompt safety classification filters), the chain will raise a Python exception, essentially stopping the chain in progress and allowing you to catch the exception (in a try-catch block) and perform any relevant action. The three possible exception types are:

  1. ModerationPIIError
  2. ModerationToxicityError
  3. ModerationPromptSafetyError

You can configure one filter or more than one filter using BaseModerationConfig. You can also have the same type of filter with different configurations within the same chain. For example, if your use case is only concerned with PII, you can specify a configuration that must interrupt the chain if in case an SSN is detected; otherwise, it must perform redaction on age and name PII entities. A configuration for this can be defined as follows:

pii_config1 = ModerationPiiConfig(labels=["SSN"],
    redact=False)
pii_config2 = ModerationPiiConfig(labels=["AGE", "NAME"],
    redact=True, 
    mask_character="X")
moderation_config = BaseModerationConfig(filters=[ pii_config1, 
      pii_config2])
comprehend_moderation = AmazonComprehendModerationChain(moderation_config=moderation_config)

Using callbacks and unique identifiers

If you’re familiar with the concept of workflows, you may also be familiar with callbacks. Callbacks within workflows are independent pieces of code that run when certain conditions are met within the workflow. A callback can either be blocking or nonblocking to the workflow. LangChain chains are, in essence, workflows for LLMs. AmazonComprehendModerationChain allows you to define your own callback functions. Initially, the implementation is limited to asynchronous (nonblocking) callback functions only.

This effectively means that if you use callbacks with the moderation chain, they will run independently of the chain’s run without blocking it. For the moderation chain, you get options to run pieces of code, with any business logic, after each moderation is run, independent of the chain.

You can also optionally provide an arbitrary unique identifier string when creating an AmazonComprehendModerationChain to enable logging and analytics later. For example, if you’re operating a chatbot powered by an LLM, you may want to track users who are consistently abusive or are deliberately or unknowingly exposing personal information. In such cases, it becomes necessary to track the origin of such prompts and perhaps store them in a database or log them appropriately for further action. You can pass a unique ID that distinctly identifies a user, such as their user name or email, or an application name that is generating the prompt.

The combination of callbacks and unique identifiers provides you with a powerful way to implement a moderation chain that fits your use case in a much more cohesive manner with less code that is easier to maintain. The callback handler is available via the BaseModerationCallbackHandler, with three available callbacks: on_after_pii(), on_after_toxicity(), and on_after_prompt_safety(). Each of these callback functions is called asynchronously after the respective moderation check is performed within the chain. These functions also receive two default parameters:

  • moderation_beacon – A dictionary containing details such as the text on which the moderation was performed, the full JSON output of the Amazon Comprehend API, the type of moderation, and if the supplied labels (in the configuration) were found within the text or not
  • unique_id – The unique ID that you assigned while initializing an instance of the AmazonComprehendModerationChain.

The following is an example of how an implementation with callback works. In this case, we defined a single callback that we want the chain to run after the PII check is performed:

from langchain_experimental.comprehend_moderation import BaseModerationCallbackHandler

class MyModCallback(BaseModerationCallbackHandler):
    async def on_after_pii(self, output_beacon, unique_id):
        import json
        moderation_type = output_beacon['moderation_type']
        chain_id = output_beacon['moderation_chain_id']
        with open(f'output-{moderation_type}-{chain_id}.json', 'w') as file:
            data = { 'beacon_data': output_beacon, 'unique_id': unique_id }
            json.dump(data, file)
    
    '''
    # implement this callback for toxicity
    async def on_after_toxicity(self, output_beacon, unique_id):
        pass

    # implement this callback for prompt safety
    async def on_after_prompt_safety(self, output_beacon, unique_id):
        pass
    '''

my_callback = MyModCallback()

We then use the my_callback object while initializing the moderation chain and also pass a unique_id. You may use callbacks and unique identifiers with or without a configuration. When you subclass BaseModerationCallbackHandler, you must implement one or all of the callback methods depending on the filters you intend to use. For brevity, the following example shows a way to use callbacks and unique_id without any configuration:

comprehend_moderation = AmazonComprehendModerationChain(
moderation_callback = my_callback,
unique_id = 'john.doe@email.com')

The following diagram explains how this moderation chain with callbacks and unique identifiers works. Specifically, we implemented the PII callback that should write a JSON file with the data available in the moderation_beacon and the unique_id passed (the user’s email in this case).

In the following Python notebook, we have compiled a few different ways you can configure and use the moderation chain with various LLMs, such as LLMs hosted with Amazon SageMaker JumpStart and hosted in Hugging Face Hub. We have also included the sample chat application that we discussed earlier with the following Python notebook.

Conclusion

The transformative potential of large language models and generative AI is undeniable. However, their responsible and ethical use hinges on addressing concerns of trust and safety. By recognizing the challenges and actively implementing measures to mitigate risks, developers, organizations, and society at large can harness the benefits of these technologies while preserving the trust and safety that underpin their successful integration. Use Amazon Comprehend ContentModerationChain to add trust and safety features to any LLM workflow, including Retrieval Augmented Generation (RAG) workflows implemented in LangChain.

For information on building RAG based solutions using LangChain and Amazon Kendra’s highly accurate, machine learning (ML)-powered intelligent search, see – Quickly build high-accuracy Generative AI applications on enterprise data using Amazon Kendra, LangChain, and large language models. As a next step, refer to the code samples we created for using Amazon Comprehend moderation with LangChain. For full documentation of the Amazon Comprehend moderation chain API, refer to the LangChain API documentation.


About the authors

Wrick Talukdar is a Senior Architect with the Amazon Comprehend Service team. He works with AWS customers to help them adopt machine learning on a large scale. Outside of work, he enjoys reading and photography.

Anjan Biswas is a Senior AI Services Solutions Architect with a focus on AI/ML and Data Analytics. Anjan is part of the world-wide AI services team and works with customers to help them understand and develop solutions to business problems with AI and ML. Anjan has over 14 years of experience working with global supply chain, manufacturing, and retail organizations, and is actively helping customers get started and scale on AWS AI services.

Nikhil Jha is a Senior Technical Account Manager at Amazon Web Services. His focus areas include AI/ML, and analytics. In his spare time, he enjoys playing badminton with his daughter and exploring the outdoors.

Chin Rane is an AI/ML Specialist Solutions Architect at Amazon Web Services. She is passionate about applied mathematics and machine learning. She focuses on designing intelligent document processing solutions for AWS customers. Outside of work, she enjoys salsa and bachata dancing.

Read More

Use machine learning without writing a single line of code with Amazon SageMaker Canvas

Use machine learning without writing a single line of code with Amazon SageMaker Canvas

In the recent past, using machine learning (ML) to make predictions, especially for data in the form of text and images, required extensive ML knowledge for creating and tuning of deep learning models. Today, ML has become more accessible to any user who wants to use ML models to generate business value. With Amazon SageMaker Canvas, you can create predictions for a number of different data types beyond just tabular or time series data without writing a single line of code. These capabilities include pre-trained models for image, text, and document data types.

In this post, we discuss how you can use pre-trained models to retrieve predictions for supported data types beyond tabular data.

Text data

SageMaker Canvas provides a visual, no-code environment for building, training, and deploying ML models. For natural language processing (NLP) tasks, SageMaker Canvas integrates seamlessly with Amazon Comprehend to allow you to perform key NLP capabilities like language detection, entity recognition, sentiment analysis, topic modeling, and more. The integration eliminates the need for any coding or data engineering to use the robust NLP models of Amazon Comprehend. You simply provide your text data and select from four commonly used capabilities: sentiment analysis, language detection, entities extraction, and personal information detection. For each scenario, you can use the UI to test and use batch prediction to select data stored in Amazon Simple Storage Service (Amazon S3).

Analyzing text data on SageMaker Canvas

Sentiment analysis

With sentiment analysis, SageMaker Canvas allows you to analyze the sentiment of your input text. It can determine if the overall sentiment is positive, negative, mixed, or neutral, as shown in the following screenshot. This is useful in situations like analyzing product reviews. For example, the text “I love this product, it’s amazing!” would be classified by SageMaker Canvas as having a positive sentiment, whereas “This product is horrible, I regret buying it” would be labeled as negative sentiment.

Sentiment Analysis on SageMaker Canvas

Entities extraction

SageMaker Canvas can analyze text and automatically detect entities mentioned within it. When a document is sent to SageMaker Canvas for analysis, it will identify people, organizations, locations, dates, quantities, and other entities in the text. This entity extraction capability enables you to quickly gain insights into the key people, places, and details discussed in documents. For a list of supported entities, refer to Entities.

Entites Extraction on SageMaker Canvas

Language detection

SageMaker Canvas can also determine the dominant language of text using Amazon Comprehend. It analyzes text to identify the main language and provides confidence scores for the detected dominant language, but doesn’t indicate percentage breakdowns for multilingual documents. For best results with long documents in multiple languages, split the text into smaller pieces and aggregate the results to estimate language percentages. It works best with at least 20 characters of text.

Language Detection on SageMaker Canvas

Personal information detection

You can also protect sensitive data using personal information detection with SageMaker Canvas. It can analyze text documents to automatically detect personally identifiable information (PII) entities, allowing you to locate sensitive data like names, addresses, dates of birth, phone numbers, email addresses, and more. It analyzes documents up to 100 KB and provides a confidence score for each detected entity so you can review and selectively redact the most sensitive information. For a list of entities detected, refer to Detecting PII entities.

PII Detection on SageMaker Canvas

Image data

SageMaker Canvas provides a visual, no-code interface that makes it straightforward for you to use computer vision capabilities by integrating with Amazon Rekognition for image analysis. For example, you can upload a dataset of images, use Amazon Rekognition to detect objects and scenes, and perform text detection to address a wide range of use cases. The visual interface and Amazon Rekognition integration make it possible for non-developers to harness advanced computer vision techniques.

Analyzing image data on SageMaker Canvas

Object detection in images

SageMaker Canvas uses Amazon Rekognition to detect labels (objects) in an image. You can upload the image from the SageMaker Canvas UI or use the Batch Prediction tab to select images stored in an S3 bucket. As shown in the following example, it can extract objects in the image such as clock tower, bus, buildings, and more. You can use the interface to search through the prediction results and sort them.

Object Detection in Images on SageMaker Canvas

Text detection in images

Extracting text from images is a very common use case. Now, you can perform this task with ease on SageMaker Canvas with no code. The text is extracted as line items, as shown in the following screenshot. Short phrases within the image are classified together and identified as a phrase.

Text Detection in Images on SageMaker Canvas

You can perform batch predictions by uploading a set of images, extract all the images in a single batch job, and download the results as a CSV file. This solution is useful when you want to extract and detect text in images.

Document data

SageMaker Canvas offers a variety of ready-to-use solutions that solve your day-to-day document understanding needs. These solutions are powered by Amazon Textract. To view all the available options for documents, choose to Ready-to-use models in the navigation pane and filter by Documents, as shown in the following screenshot.

Analyzing Document Data on SageMaker Canvas

Document analysis

Document analysis analyzes documents and forms for relationships among detected text. The operations return four categories of document extraction: raw text, forms, tables, and signatures. The solution’s capability of understanding the document structure gives you extra flexibility in the type of data you want to extract from the documents. The following screenshot is an example of what table detection looks like.

Document Analysis on SageMaker Canvas

This solution is able to understand layouts of complex documents, which is helpful when you need to extract specific information in your documents.

Identity document analysis

This solution is designed to analyze documents like personal identification cards, driver’s licenses, or other similar forms of identification. Information such as middle name, county, and place of birth, together with its individual confidence score on the accuracy, will be returned for each identity document, as shown in the following screenshot.

Identity Document Analysis on SageMaker Canvas

There is an option to do batch prediction, whereby you can bulk upload sets of identification documents and process them as a batch job. This provides a quick and seamless way to transform identification document details into key-value pairs that can be used for downstream processes such as data analysis.

Expense analysis

Expense analysis is designed to analyze expense documents like invoices and receipts. The following screenshot is an example of what the extracted information looks like.

Expense Analysis on SageMaker Canvas

The results are returned as summary fields and line item fields. Summary fields are key-value pairs extracted from the document, and contain keys such as Grand Total, Due Date, and Tax. Line item fields refer to data that is structured as a table in the document. This is useful for extracting information from the document while retaining its layout.

Document queries

Document queries are designed for you to ask questions about your documents. This is a great solution to use when you have multi-page documents and you want to extract very specific answers from your documents. The following is an example of the types of questions you can ask and what the extracted answers look like.

Document Queries on SageMaker Canvas

The solution provides a straightforward interface for you to interact with your documents. This is helpful when you want to get specific details within large documents.

Conclusion

SageMaker Canvas provides a no-code environment to use ML with ease across various data types like text, images, and documents. The visual interface and integration with AWS services like Amazon Comprehend, Amazon Rekognition, and Amazon Textract eliminates the need for coding and data engineering. You can analyze text for sentiment, entities, languages, and PII. For images, object and text detection enables computer vision use cases. Finally, document analysis can extract text while preserving its layout for downstream processes. The ready-to-use solutions in SageMaker Canvas make it possible for you to harness advanced ML techniques to generate insights from both structured and unstructured data. If you’re interested using no-code tools with ready-to-use ML models, try out SageMaker Canvas today. For more information, refer to Getting started with using Amazon SageMaker Canvas.


About the authors

Julia Ang is a Solutions Architect based in Singapore. She has worked with customers in a range of fields, from health and public sector to digital native businesses, to adopt solutions according to their business needs. She has also been supporting customers in Southeast Asia and beyond to use AI & ML in their businesses. Outside of work, she enjoys learning about the world through traveling and engaging in creative pursuits.

Loke Jun Kai is a Specialist Solutions Architect for AI/ML based in Singapore. He works with customer across ASEAN to architect machine learning solutions at scale in AWS. Jun Kai is an advocate for Low-Code No-Code machine learning tools. In his spare time, he enjoys being with the nature.

Read More