
Our customers’ key strategic objectives are cost savings and building secure and resilient infrastructure. At AWS, we’re dedicated to helping you meet these critical goals with our unparalleled expertise and industry-leading tools. One of the most valuable resources we offer is the AWS Trusted Advisor detailed report, which provides deep insights into cost optimization, security enhancement, infrastructure resilience, performance optimization, and service limit management. This comprehensive analysis is invaluable for customers of all sizes and across diverse business units and teams. However, the complexity of modern cloud environments can make it challenging to efficiently identify, prioritize, and address the hundreds of Trusted Advisor risks (and each risk might have thousands of affected resources) that might be impacting your operations.
In this post, we demonstrate how Amazon Q Business can empower you to efficiently identify, prioritize, and address Trusted Advisor risks.
Amazon Q Business is a generative AI–powered assistant that can answer questions, provide summaries, generate content, and securely complete tasks based on data and information in your enterprise systems. It empowers employees to be more creative, data-driven, efficient, prepared, and productive.
Trusted Advisor helps you optimize costs, increase performance, improve security and resilience, and operate at scale in the cloud. Trusted Advisor continuously evaluates your AWS environment using best practice checks across the categories of cloud cost optimization, performance, resilience, security, operational excellence, and service limits, and it recommends actions to remediate deviations from best practices.
Jira is a project management and issue tracking tool that helps teams plan, track, and manage work. By integrating Jira with Amazon Q Business, you can effortlessly create Jira tasks using natural language.
By taking advantage of the capabilities of Amazon Q Business, you can gain faster and more actionable insights into your detailed Trusted Advisor data. This can enable you to proactively take targeted actions on Trusted Advisor risks that could otherwise significantly impact your business.
Solution overview
The solution uses the following components:
- AWS IAM Identity Center serves as our SAML 2.0-compliant identity provider (IdP). Make sure you have enabled an IAM Identity Center instance, provisioned at least one user, and provided each user with a valid email address. For more details, see Configure user access with the default IAM Identity Center directory.
- Amazon Q Business empowering you to create intuitive chat interfaces so users can access and interpret data insights through natural language conversations.
- Trusted Advisor detailed report data in an Excel or CSV file.
- Jira integration to create Jira tasks.
The following diagram illustrates the solution architecture.

Prerequisites
Complete the following prerequisite steps:
- Set up Amazon Q Business.
- Configure an IAM Identity Center instance.
- Create IAM Identity Center users and groups.
- Have a Trusted Advisor detailed report (Excel or CSV).
- Have the following Jira resources:
- A Jira account URL (site base URL) from your Jira account settings. For example,
https://company.atlassian.net/ - Access to the Jira Developer Console.
- A Jira project for creating Jira tasks.
- A Jira account URL (site base URL) from your Jira account settings. For example,
Create the Amazon Q Business application
Complete the following steps to create the Amazon Q Business application:
- On the Amazon Q Business console, choose Create application.
- For Application name, enter a name (for example,
TrustedAdvisorGenAIApplication). - For Access management method, IAM Identity Center is the recommended method. You can also use the other option available: AWS IAM Identity Provider.
- For Quick Start user, use the Select User dropdown menu to choose either an individual user or a group containing the users you want to use the application with.
- Choose a subscription for users or groups using the Select Subscription dropdown menu.
- Expand Application details, and for Choose a method to authorize Amazon Q Business, select Create and use a new service-linked role (SLR).
- For Web experience settings in Choose a method to authorize Amazon Q Business, select Create and use a new service role, or you can also use an existing role by using the option Use an existing service role. Refer to IAM roles for Amazon Q Business for more details.
- Choose Create.


After the application is created, you will see application details similar to those in the following screenshot.
Make note of the value for Deployed URL because you will use it to chat with Amazon Q Business.

Create an index
Indexing in Amazon Q Business is done before configuring the data sources to establish a secure and organized framework for data management. This pre-configuration makes sure proper access controls are in place and creates an efficient structure for categorizing and retrieving information, similar to creating a library’s organizational system before adding books.
Complete the following steps to enable indexing:
- On the application details page, choose Data sources.
- Choose Add an index.
- For Index name, enter a name for your index.
- For Index provisioning, select an index option:
- Enterprise is ideal for production workloads that are deployed in a Multi-AZ setup for enhanced fault tolerance.
- Starter is ideal for workloads such as proofs of concept, development, and testing that are deployed in a single Availability Zone.
- For Units, enter the number of units depending on your needs.
- Choose Add an index.

Under Data sources, you will see the index has been added and is active.

Configure a data source
Now that you created an index, you can add a data source. Complete the following steps:
- Under Data sources, choose Add data source.
- Choose Upload files, because we will be using a spreadsheet. Other data source options are available, which you can select depending on your business requirements.
- Choose the file you want to upload using Choose files.
- Choose Upload.

Amazon Q Business can handle embedded tables in PDF, Word, HTML, and tables in CSV and Excel.
- Choose Done.
You will see that the file has been successfully uploaded.

The following screenshot is a sample of a few rows and columns that are part of the dataset.

To get the detailed Trusted Advisor report, you can coordinate with your technical account managers or refer to Organizational view for AWS Trusted Advisor to understand the prerequisites and steps for generating a similar report.
Configure the Jira Cloud plugin
In this section, we walk through the steps to set up Jira Cloud and the Jira plugin.
Set up Jira Cloud
Complete the following steps to set up Jira Cloud:
- Access the Jira Cloud Developer console.
- Choose Create and choose OAuth 2.0 integration from the dropdown menu.

- Enter a name and choose Create.

- On the Permissions tab, choose Add under Action for Jira API and then choose Configure.


- Edit scopes (Classic and Granular) to add the following required scopes:
- read:jira-work
- write:jira-work
- manage:jira-project
- read:sprint:jira-software
- write:sprint:jira-software
- delete:sprint:jira-software
- read:board-scope:jira-software
- read:project:jira

- On the Authorization tab, for Callback URL, enter <q-web-url-endpoint>/oauth/callback.

Set up the Jira plugin
Gather the following information, which will be needed to set up the Jira plugin:
- Domain URL of your Jira Cloud instance:
https://api.atlassian.com/ex/jira/<Instance ID>, where the instance ID is retrieved usinghttps://<your namespace>.atlassian.net/_edge/tenant_info - Access token URL:
https://auth.atlassian.com/oauth/token - Authorization URL:
https://auth.atlassian.com/authorize - Client ID and secret from your OAuth 2.0 application: To get the client ID and secret, navigate to the Settings tab from your OAuth 2.0 application

Complete the following steps to set up the Jira plugin:
- On the Amazon Q Business console, navigate to your application.
- In the navigation pane, under Actions, choose Plugins.

- Choose Add plugin.
- Choose the plus sign for Jira Cloud.

- Enter a name for Plugin name and a URL for Domain URL.

- Under OAuth2.0 authorization, select Create and use a new secret.
- Enter values for Secret name, Client ID, Client secret, and Redirect URL, then choose Create.

- For Service access, select Create and use a new service role.

- Choose Add.
The Jira plugin will be added, as shown in the following screenshot.

Customize the web experience
You can choose Customize web experience and change the title, subtitle, and welcome message. Also, you can display sample prompts by selecting Display sample prompts.


Now, when you open the application, it will show you the title, subtitle, and welcome message you set.

Access the Amazon Q application’s web experience endpoint
In the next steps, we interact with the chat interface of the TrustedAdvisorGenAIApplication application to get faster insights and make it actionable by creating a Jira task.
- On the Amazon Q Business console, navigate to the
TrustedAdvisorGenAIApplicationapplication. - In the Web experience settings section, copy the deployed URL of the application. This will be the UI of Amazon Q application, as shown in the following screenshot.

Interact with the Amazon Q application
Now, let’s see the TrustedAdvisorGenAIApplication application in action.
We enter the following prompt to get insights: “Top 5 Lambda functions with Function Name from Lambda over-provisioned functions for memory size.”
The following screenshot shows the prompt output given by our Amazon Q Business application.

We got the insights we wanted, but insights alone aren’t enough—we need to transform that knowledge into tangible results. Amazon Q Business has features where you can use plugins with powerful project management tools (like Jira), streamlining remediation efforts and enabling maximum impact.
Let’s ask the Amazon Q Business application to create a Jira task using the preceding output information. We use the following prompt and ask Amazon Q to create a Jira task with the insights we got earlier: “Using the above important function details, create a JIRA task in amazonqbusiness project.”
During the first use of the Jira plugin, Amazon Q Business will authenticate the user through the Jira login interface, as shown in the following screenshot. For users who have already authenticated through enterprise single sign-on (SSO) or directly using their Jira login, only an API access approval will be requested.
Choose Authorize and then choose Accept.


The application will ask for details to create the Jira task. Enter information if needed and choose Submit. The Amazon Q Business application will create the task in the Jira project you specified.

You will see that the Jira task has been created, as shown in the following screenshot.

Queries will be automatically routed to the plugins you have configured. Users will not need to invoke a plugin in the conversation window and then run the queries.
Clean up
After you’re done testing the solution, you can delete the resources to avoid incurring charges. Follow the instructions in Managing Amazon Q Business applications to delete the application. See Amazon Q Business pricing for more pricing information.
Conclusion
In this post, we showed how to create an application using Amazon Q Business with Jira integration that used a dataset containing a Trusted Advisor detailed report. This solution demonstrates how to use new generative AI services like Amazon Q Business to get data insights faster and make them actionable.
You can expand this solution to use other data sources and use natural language to get data insights faster, which will help you make data-driven decisions.
To learn more about Amazon Q, see the Amazon Q main product page, Amazon Q Developer, and Getting started with Amazon Q. Additionally, check out the following blog posts:
- Accelerate application upgrades with Amazon Q Developer agent for code transformation
- Elevate workforce productivity through seamless personalization in Amazon Q Business
- Build a generative AI assistant to enhance employee experience using Amazon Q Business
- Build private and secure enterprise generative AI applications with Amazon Q Business using IAM Federation
- Enabling generative AI for better customer experience can be easy with Amazon Connect
About the author
 Satish Bhonsle is a Senior Technical Account Manager at AWS. He is passionate about customer success and technology. He loves working backwards by quickly understanding strategic customer objectives, aligning them to software capabilities and effectively driving customer success.


 Yanyan Zhang is a Senior Generative AI Data Scientist at Amazon Web Services, where she has been working on cutting-edge AI/ML technologies as a Generative AI Specialist, helping customers use generative AI to achieve their desired outcomes. Yanyan graduated from Texas A&M University with a PhD in Electrical Engineering. Outside of work, she loves traveling, working out, and exploring new things.
 Ishan Singh is a Generative AI Data Scientist at Amazon Web Services, where he helps customers build innovative and responsible generative AI solutions and products. With a strong background in AI/ML, Ishan specializes in building Generative AI solutions that drive business value. Outside of work, he enjoys playing volleyball, exploring local bike trails, and spending time with his wife and dog, Beau.
 Sovik Kumar Nath is an AI/ML and Generative AI senior solution architect with AWS. He has extensive experience designing end-to-end machine learning and business analytics solutions in finance, operations, marketing, healthcare, supply chain management, and IoT. He has double masters degrees from the University of South Florida, University of Fribourg, Switzerland, and a bachelors degree from the Indian Institute of Technology, Kharagpur. Outside of work, Sovik enjoys traveling, taking ferry rides, and watching movies.
 Karel Mundnich is a Sr. Applied Scientist in AWS Agentic AI. He has previously worked in AWS Lex and AWS Bedrock, where he worked in speech recognition, speech LLMs, and LLM fine-tuning. He holds a PhD in Electrical Engineering from the University of Southern California. In his free time, he enjoys skiing, hiking, and cycling.
 Marcelo Aberle is a Sr. Research Engineer at AWS Bedrock. In recent years, he has been working at the intersection of science and engineering to enable new AWS service launches. This includes various LLM projects across Titan, Bedrock, and other AWS organizations. Outside of work, he keeps himself busy staying up-to-date on the latest GenAI startups in his adopted home city of San Francisco, California.
 Jiayu Li is an Applied Scientist at AWS Bedrock, where he contributes to the development and scaling of generative AI applications using foundation models. He holds a Ph.D. and a Master’s degree in computer science from Syracuse University. Outside of work, Jiayu enjoys reading and cooking.
 Fang Liu is a principal machine learning engineer at Amazon Web Services, where he has extensive experience in building AI/ML products using cutting-edge technologies. He has worked on notable projects such as Amazon Transcribe and Amazon Bedrock. Fang Liu holds a master’s degree in computer science from Tsinghua University.


 Mona Mona currently works as a Sr World Wide Gen AI Specialist Solutions Architect at Amazon focusing on Gen AI Solutions. She was a Lead Generative AI specialist in Google Public Sector at Google before joining Amazon. She is a published author of two books – Natural Language Processing with AWS AI Services and Google Cloud Certified Professional Machine Learning Study Guide. She has authored 19 blogs on AI/ML and cloud technology and a co-author on a research paper on CORD19 Neural Search which won an award for Best Research Paper at the prestigious AAAI (Association for the Advancement of Artificial Intelligence) conference.
 Davide Gallitelli is a Senior Worldwide Specialist Solutions Architect for Generative AI at AWS, where he empowers global enterprises to harness the transformative power of AI. Based in Europe but with a worldwide scope, Davide partners with organizations across industries to architect custom AI agents that solve complex business challenges using AWS ML stack. He is particularly passionate about democratizing AI technologies and enabling teams to build practical, scalable solutions that drive organizational transformation.
 Surya Kari is a Senior Generative AI Data Scientist at AWS, specializing in developing solutions leveraging state-of-the-art foundation models. He has extensive experience working with advanced language models including DeepSeek-R1, the Llama family, and Qwen, focusing on their fine-tuning and optimization for specific scientific applications. His expertise extends to implementing efficient training pipelines and deployment strategies using AWS SageMaker, enabling the scaling of foundation models from development to production. He collaborates with customers to design and implement generative AI solutions, helping them navigate model selection, fine-tuning approaches, and deployment strategies to achieve optimal performance for their specific use cases.
 Giuseppe Zappia is a Principal Solutions Architect at AWS, with over 20 years of experience in full stack software development, distributed systems design, and cloud architecture. In his spare time, he enjoys playing video games, programming, watching sports, and building things.
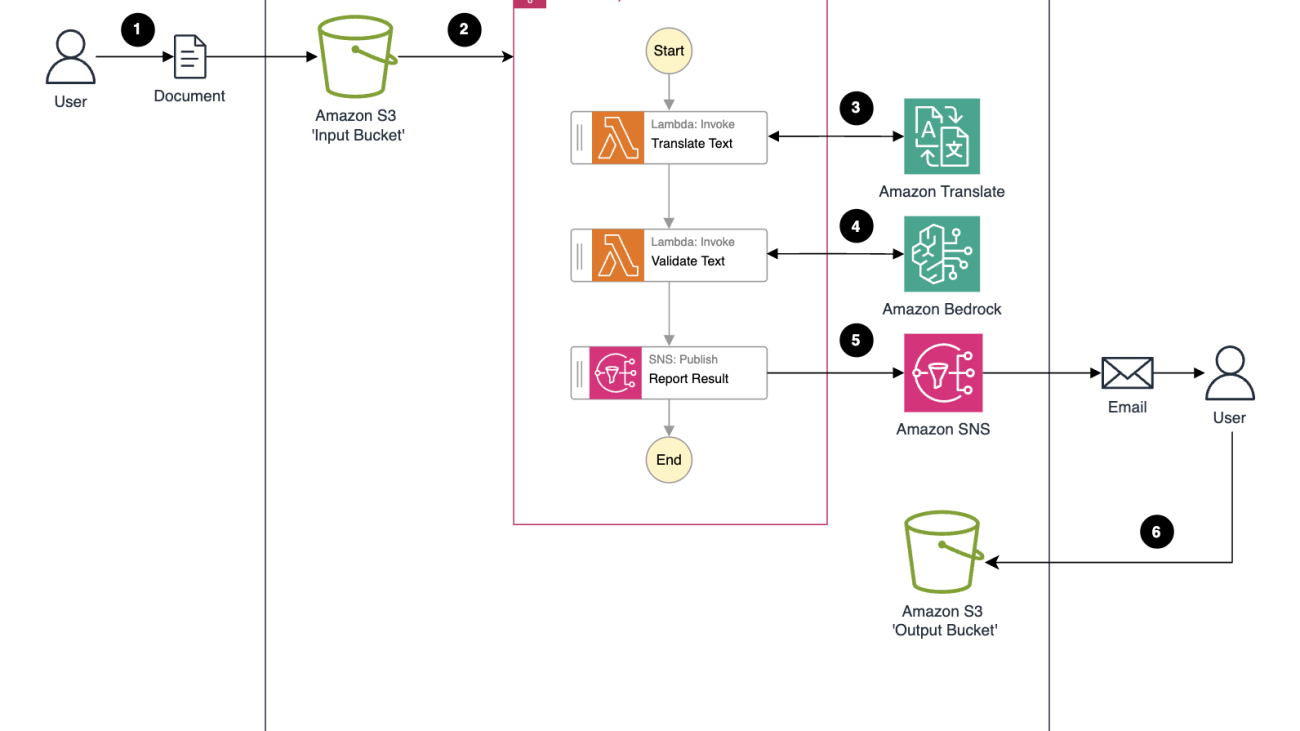


 Nadhya Polanco is an Associate Solutions Architect at AWS based in Brussels, Belgium. In this role, she supports organizations looking to incorporate AI and Machine Learning into their workloads. In her free time, Nadhya enjoys indulging in her passion for coffee and exploring new destinations.
 Steve Bell is a Senior Solutions Architect at AWS based in Amsterdam, Netherlands. He helps enterprise organizations navigate the complexities of migration, modernization and multicloud strategy. Outside of work he loves walking his labrador, Lily, and practicing his amateur BBQ skills.


 Wrick Talukdar is a Tech Lead – Generative AI Specialist focused on Intelligent Document Processing. He leads machine learning initiatives and projects across business domains, leveraging multimodal AI, generative models, computer vision, and natural language processing. He speaks at conferences such as AWS re:Invent, IEEE, Consumer Technology Society(CTSoc), YouTube webinars, and other industry conferences like CERAWEEK and ADIPEC. In his free time, he enjoys writing and birding photography.
 Jady Liu is a Senior AI/ML Solutions Architect on the AWS GenAI Labs team based in Los Angeles, CA. With over a decade of experience in the technology sector, she has worked across diverse technologies and held multiple roles. Passionate about generative AI, she collaborates with major clients across industries to achieve their business goals by developing scalable, resilient, and cost-effective generative AI solutions on AWS. Outside of work, she enjoys traveling to explore wineries and distilleries.
 Farshad Bidanjiri is a Solutions Architect focused on helping startups build scalable, cloud-native solutions. With over a decade of IT experience, he specializes in container orchestration and Kubernetes implementations. As a passionate advocate for generative AI, he helps emerging companies leverage cutting-edge AI technologies to drive innovation and growth.
 Keith Mascarenhas leads worldwide GTM strategy for Generative AI at AWS, developing enterprise use cases and adoption frameworks for Amazon Bedrock. Prior to this, he drove AI/ML solutions and product growth at AWS, and held key roles in Business Development, Solution Consulting and Architecture across Analytics, CX and Information Security.
 Jessie-Lee Fry is a Product and Go-to Market (GTM) Strategy executive specializing in Generative AI and Machine Learning, with over 15 years of global leadership experience in Strategy, Product, Customer success, Business Development, Business Transformation and Strategic Partnerships. Jessie has defined and delivered a broad range of products and cross-industry go- to-market strategies driving business growth, while maneuvering market complexities and C-Suite customer groups. In her current role, Jessie and her team focus on helping AWS customers adopt Amazon Bedrock at scale enterprise use cases and adoption frameworks, meeting customers where they are in their Generative AI Journey.
 Raj Jayaraman is a Senior Generative AI Solutions Architect at AWS, bringing over a decade of experience in helping customers extract valuable insights from data. Specializing in AWS AI and generative AI solutions, Raj’s expertise lies in transforming business solutions through the strategic application of AWS’s AI capabilities, ensuring customers can harness the full potential of generative AI in their unique contexts. With a strong background in guiding customers across industries in adopting AWS Analytics and Business Intelligence services, Raj now focuses on assisting organizations in their generative AI journey—from initial demonstrations to proof of concepts and ultimately to production implementations.
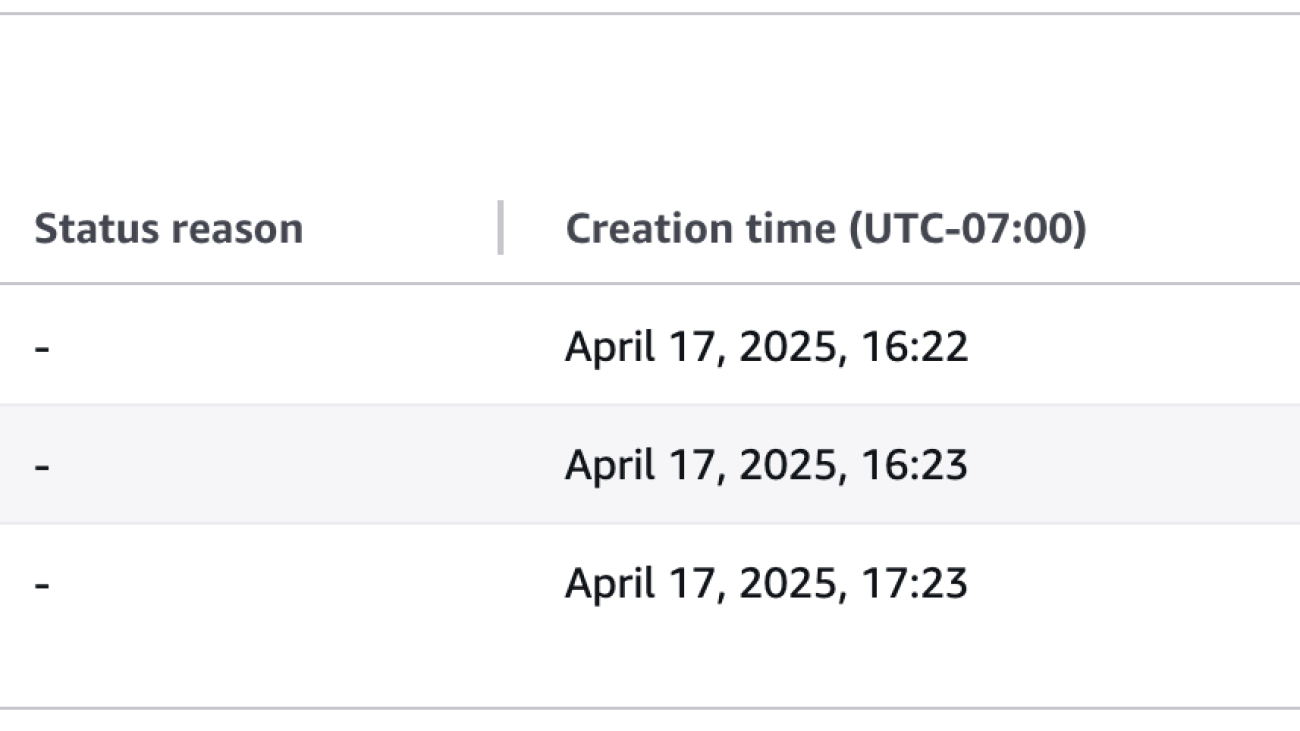


 Ishan Singh is a Generative AI Data Scientist at Amazon Web Services, where he helps customers build innovative and responsible generative AI solutions and products. With a strong background in AI/ML, Ishan specializes in building generative AI solutions that drive business value. Outside of work, he enjoys playing volleyball, exploring local bike trails, and spending time with his wife and dog, Beau.
 Yijun Tian is an Applied Scientist II at AWS Agentic AI, where he focuses on advancing fundamental research and applications in Large Language Models, Agents, and Generative AI. Prior to joining AWS, he obtained his Ph.D. in Computer Science from the University of Notre Dame.
 Yawei Wang is an Applied Scientist at AWS Agentic AI, working at the forefront of generative AI technologies to build next-generation AI products within AWS. He also collaborates with AWS business partners to identify and develop machine learning solutions that address real-world industry challenges.
 David Yan is a Senior Research Engineer at AWS Agentic AI, leading efforts in Agent Customization and Optimization. Prior to that, he was in AWS Bedrock, leading model distillation effort to help customers optimize LLM latency, cost and accuracy. His research interest includes AI agent, planning and prediction and inference optimization. Before joining AWS, David worked on planning and behavior prediction for autonomous driving in Waymo. Before that, he worked on nature language understanding for knowledge graph at Google. David received a M.S. in Electrical Engineering from Stanford University and a B.S. in Physics from Peking University.
 Panpan Xu is a Principal Applied Scientist at AWS Agentic AI, leading a team working on Agent Customization and Optimization. Prior to that, she lead a team in AWS Bedrock working on research and development of inference optimization techniques for foundation models, covering modeling level techniques such as model distillation and sparsification to hardware-aware optimization. Her past research interest covers a broad range of topics including model interpretability, graph neural network, human-in-the-loop AI and interactive data visualization. Prior to joining AWS, she was a lead research scientist at Bosch Research and obtained her PhD in computer science from Hong Kong University of Science and Technology.
 Shreeya Sharma is a Senior Technical Product Manager at AWS, where she has been working on leveraging the power of generative AI to deliver innovative and customer-centric products. Shreeya holds a master’s degree from Duke University. Outside of work, she loves traveling, dancing, and singing.


 Vishnu Elangovan is a Worldwide Generative AI Solution Architect with over seven years of experience in Applied AI/ML. He holds a master’s degree in Data Science and specializes in building scalable artificial intelligence solutions. He loves building and tinkering with scalable AI/ML solutions and considers himself a lifelong learner. Outside his professional pursuits, he enjoys traveling, participating in sports, and exploring new problems to solve.
 Jean-Pierre Dodel is a Principal Product Manager for Amazon Q Business, responsible for delivering key strategic product capabilities including structured data support in Q Business, RAG. and overall product accuracy optimizations. He brings extensive AI/ML and Enterprise search experience to the team with over 7 years of product leadership at AWS.


 Dr. Giorgio Pessot is a Machine Learning Engineer at Amazon Web Services Professional Services. With a background in computational physics, he specializes in architecting enterprise-grade AI systems at the confluence of mathematical theory, DevOps, and cloud technologies, where technology and organizational processes converge to achieve business objectives. When he’s not whipping up cloud solutions, you’ll find Giorgio engineering culinary creations in his kitchen.
 Daniel Zagyva is a Senior ML Engineer at AWS Professional Services. He specializes in developing scalable, production-grade machine learning solutions for AWS customers. His experience extends across different areas, including natural language processing, generative AI and machine learning operations.
 Nicolò Cosimo Albanese is a Data Scientist and Machine Learning Engineer at Amazon Web Services Professional Services. With a Master of Science in Engineering and postgraduate degrees in Machine Learning and Biostatistics, he specializes in developing AI/ML solutions that drive business value for enterprise customers. His expertise lies at the intersection of statistical modeling, cloud technologies, and scalable machine learning systems.
 Subhro Bose is a Data Architect in Emergent Technologies and Intelligence Platform in Amazon. He loves working on ways for emergent technologies such as AI/ML, big data, quantum, and more to help businesses across different industry verticals succeed within their innovation journey.
 Diar Sabri is a Machine Learning Engineer at AWS who helps organizations transform their business through innovative AI solutions. With experience across multiple industries, he excels at bridging the gap between strategic vision and practical technology implementation, enabling customers to achieve meaningful business outcomes.
 Aamna Najmi is a GenAI and Data Specialist at AWS. She assists customers across industries and regions in operationalizing and governing their generative AI systems at scale, ensuring they meet the highest standards of performance, safety, and ethical considerations, bringing a unique perspective of modern data strategies to complement the field of AI. In her spare time, she pursues her passion of experimenting with food and discovering new places.
 Anwar Rizal is a Senior Machine Learning consultant for AWS Professional Services based in Paris. He works with AWS customers to develop data and AI solutions to sustainably grow their business.
 Amer Elhabbash is a Senior Data & AI Delivery Consultant with AWS Professional Services. With over 25 years of international experience in IT spanning multiple fields and domains; Telecommunication, Software Engineering , Database, Data Analytics and AI. He helps AWS’ customers migrating their legacy data systems and building innovative cloud-native data-driven solutions.
 Hassen Riahi is a Delivery Practice Manager Data & AI at AWS Professional Services. He holds a PhD in Mathematics & Computer Science on large-scale data management. He collaborates with AWS customers to build data-driven solutions.
 Dr. Marco Guerriero leads Data and GenAI at AWS Professional Services for France and Europe South, holding a Ph.D. in Electrical and Computer Engineering from the University of Connecticut. His expertise spans machine learning, statistical inference, and mathematical optimization, with experience at organizations like NATO, GE, and ABB across defense, manufacturing, energy, and industrial automation sectors. With over 60 publications and five US patents to his name, Dr. Guerriero focuses on leveraging emerging technologies like GenAI and Quantum computing to drive business innovation across industries.
 Sri Elaprolu is Director of the AWS Generative AI Innovation Center, where he leads a global team implementing cutting-edge AI solutions for enterprise and government organizations. During his 12-year tenure at AWS, he has led ML science teams partnering with organizations like the NFL, Cerner, and NASA. Prior to AWS, he spent 14 years at Northrop Grumman in product development and software engineering leadership roles. Sri holds a Master’s in Engineering Science and an MBA.
 Dragica Boca is Managing Director of Professional Services EMEA at Amazon Web Services (AWS), leading enterprise cloud migration and generative AI transformation initiatives. With 30 years of technology consulting experience across Microsoft and IBM Global Business Services, she specializes in implementing production-ready AI solutions for Public Sector and Financial Services organizations. Dragica currently oversees large-scale GenAI implementations across EMEA, helping enterprises navigate the complexities of responsible AI deployment, scalable architecture, and sustainable adoption patterns.