Harness the power of MCP servers with Amazon Bedrock Agents

Harness the power of MCP servers with Amazon Bedrock Agents

AI agents extend large language models (LLMs) by interacting with external systems, executing complex workflows, and maintaining contextual awareness across operations. Amazon Bedrock Agents enables this functionality by orchestrating foundation models (FMs) with data sources, applications, and user inputs to complete goal-oriented tasks through API integration and knowledge base augmentation. However, in the past, connecting these agents to diverse enterprise systems has created development bottlenecks, with each integration requiring custom code and ongoing maintenance—a standardization challenge that slows the delivery of contextual AI assistance across an organization’s digital ecosystem. This is a problem that you can solve by using Model Context Protocol (MCP), which provides a standardized way for LLMs to connect to data sources and tools.

Today, MCP is providing agents standard access to an expanding list of accessible tools that you can use to accomplish a variety of tasks. In time, MCP can promote better discoverability of agents and tools through marketplaces, enabling agents to share context and have common workspaces for better interaction, and scale agent interoperability across the industry.

In this post, we show you how to build an Amazon Bedrock agent that uses MCP to access data sources to quickly build generative AI applications. Using Amazon Bedrock Agents, your agent can be assembled on the fly with MCP-based tools as in this example:

InlineAgent(
    foundation_model="us.anthropic.claude-3-5-sonnet-20241022-v2:0",
    instruction="You are a friendly assistant for resolving user queries",
    agent_name="SampleAgent",
    action_groups=[
        ActionGroup(
            name="SampleActionGroup",
            mcp_clients=[mcp_client_1, mcp_client_2],
        )
    ],
).invoke(input_text=”Convert 11am from NYC time to London time”)

We showcase an example of building an agent to understand your Amazon Web Service (AWS) spend by connecting to AWS Cost Explorer, Amazon CloudWatch, and Perplexity AI through MCP. You can use the code referenced in this post to connect your agents to other MCP servers to address challenges for your business. We envision a world where agents have access to an ever-growing list of MCP servers that they can use for accomplishing a wide variety of tasks.

Model Context Protocol

Developed by Anthropic as an open protocol, MCP provides a standardized way to connect AI models to virtually any data source or tool. Using a client-server architecture, MCP enables developers to expose their data through lightweight MCP servers while building AI applications as MCP clients that connect to these servers. Through this architecture, MCP enables users to build more powerful, context-aware AI agents that can seamlessly access the information and tools they need. Whether you’re connecting to external systems or internal data stores or tools, you can now use MCP to interface with all of them in the same way. The client-server architecture of MCP enables your agent to access new capabilities as the MCP server updates without requiring any changes to the application code.

MCP architecture

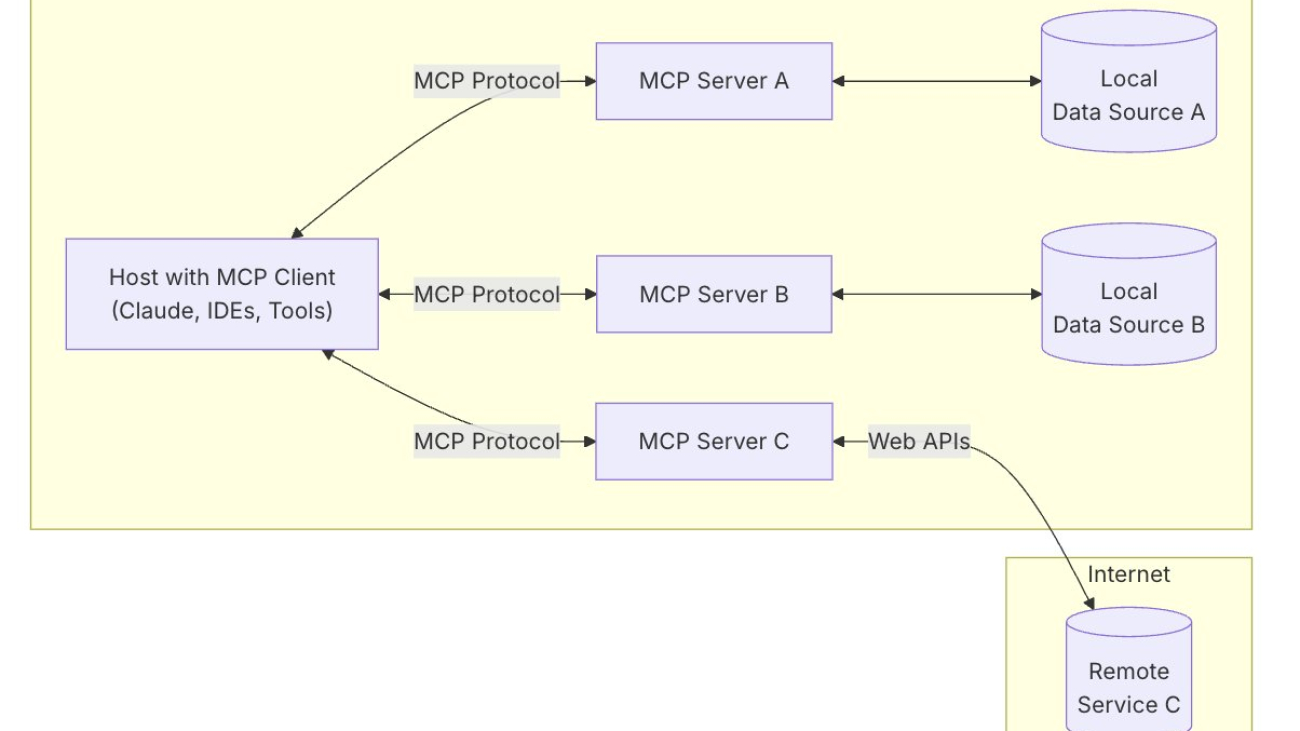
MCP uses a client-server architecture that contains the following components and is shown in the following figure:

  • Host: An MCP host is a program or AI tool that requires access to data through the MCP protocol, such as Claude Desktop, an integrated development environment (IDE), or any other AI application.
  • Client: Protocol clients that maintain one-to-one connections with servers.
  • Server: Lightweight programs that expose capabilities through standardized MCP.
  • Local data sources: Your databases, local data sources, and services that MCP servers can securely access.
  • Remote services: External systems available over the internet through APIs that MCP servers can connect to.

Let’s walk through how to set up Amazon Bedrock agents that take advantage of MCP servers.

Using MCP with Amazon Bedrock agents

In this post, we provide a step-by-step guide for how to connect your favorite MCP servers with Amazon Bedrock agents as Action Groups that an agent can use to accomplish tasks provided by the user. The AgentInlineSDK provides a straightforward way to create inline agents, containing a built-in MCP client implementation that provides you with direct access to tools delivered by an MCP server.

As part of creating an agent, the developer creates an MCP client specific to each MCP server that requires agent communication. When invoked, the agent determines which tools are needed for the user’s task; if MCP server tools are required, it uses the corresponding MCP client to request tool execution from that server. The user code doesn’t need to be aware of the MCP protocol because that’s handled by the MCP client provided the InlineAgent code repository.

To orchestrate this workflow, you take advantage of the return control capability of Amazon Bedrock Agents. The following diagram illustrates the end-to-end flow of an agent handling a request that uses two tools. In the first flow, a Lambda-based action is taken, and in the second, the agent uses an MCP server.

Use case: transform how you manage your AWS spend across different AWS services including Amazon Bedrock

To show how an Amazon Bedrock agent can use MCP servers, let’s walk through a sample use case. Imagine asking questions like “Help me understand my Bedrock spend over the last few weeks” or “What were my EC2 costs last month across regions and instance types?” and getting a human-readable analysis of the data instead of raw numbers on a dashboard. The system interprets your intent and delivers precisely what you need—whether that’s detailed breakdowns, trend analyses, visualizations, or cost-saving recommendations. This is useful because what you’re interested in is insights rather than data. You can accomplish this using two MCP servers: a custom-built MCP server for retrieving the AWS spend data and an open source MCP server from Perplexity AI to interpret the data. You add these two MCP servers as action groups in an inline Amazon Bedrock agent. This gives you an AI agent that can transform the way you manage your AWS spend. All the code for this post is available in the GitHub repository.

Let’s walk through how this agent is created using inline agents. You can use inline agents to define and configure Amazon Bedrock agents dynamically at runtime. They provide greater flexibility and control over agent capabilities, enabling users to specify FMs, instructions, action groups, guardrails, and knowledge bases as needed without relying on pre-configured control plane settings. It’s worth noting that you can also orchestrate this behavior without inline agents by using RETURN_CONTROL with the InvokeAgent API.

MCP components in Amazon Bedrock Agents

  1. Host: This is the Amazon Bedrock inline agent. This agent adds MCP clients as action groups that can be invoked through RETURN_CONTROL when the user asks an AWS spend-related question.
  2. Client: You create two clients that establish one-to-one connections with their respective servers: a cost explorer client with specific cost server parameters and a Perplexity AI client with Perplexity server parameters.
  3. Servers: You create two MCP servers that each run locally on your machine and communicate to your application over standard input/output (alternatively, you could also configure the client to talk to remote MCP servers).
    1. Cost Explorer and Amazon CloudWatch Logs (for Amazon Bedrock model invocation log data) and an MCP server to retrieve the AWS spend data.
    2. Perplexity AI MCP server to interpret the AWS spend data.
  4. Data sources: The MCP servers talk to remote data sources such as Cost Explorer API, CloudWatch Logs and the Perplexity AI search API.

Prerequisites

You need the following prerequisites to get started implementing the solution in this post:

  1. An AWS account
  2. Familiarity with FMs and Amazon Bedrock
  3. Install AWS Command Line Interface (AWS CLI) and set up credentials
  4. Python 3.11 or later
  5. AWS Cloud Development Kit (AWS CDK) CLI
  6. Enable model access for Anthropic’s Claude 3.5 Sonnet v2
  7. You need to have your AWS_ACCESS_KEY_ID and AWS_SECRET_ACCESS_KEY so that you can set them using environment variables for the server
  8. The two MCP servers are run as Docker daemons, so you need to have Docker installed and running on your computer

The MCP servers run locally on your computer and need to access AWS services and the Perplexity API. You can read more about AWS credentials in Manage access keys for IAM users. Make sure that your credentials include AWS Identity and Access Manager (IAM) read access to Cost Explorer and CloudWatch. You can do this by using AWSBillingReadOnlyAccess and CloudWatchReadOnlyAccess managed IAM permissions. You can get the Perplexity API key from the Perplexity Sonar API page.

Steps to run

With the prerequisites in place, you’re ready to implement the solution.

  1. Navigate to the InlineAgent GitHub repository.
  2. Follow the setup steps.
  3. Navigate to the cost_explorer_agent This folder contains the code for this post.
    cd examples/mcp/cost_explorer_agent

  4. Create a .env file in cost_explorer_agent directory using example.
    AWS_ACCESS_KEY_ID=
    AWS_SECRET_ACCESS_KEY=
    AWS_REGION=
    BEDROCK_LOG_GROUP_NAME=
    PERPLEXITY_API_KEY=

  5. Build aws-cost-explorer-mcp server
    git clone https://github.com/aarora79/aws-cost-explorer-mcp-server.git
    cd aws-cost-explorer-mcp-server/
    docker build -t aws-cost-explorer-mcp

  6. You’re now ready to create an agent that can invoke these MCP servers to provide insights into your AWS spend. You can do this by running the python main.py command. The output will look like the following example. The agent connects with the two MCP servers and accesses their respective tools. Next, the agent lays out a plan to use specific tools sequentially, uses code interpreter to generate a chart showing cost distribution, and uses Cost Explorer and Perplexity API to provide information about Amazon Bedrock and the AWS account’s cost expenditure.
    Connected to server with tools: ['get_bedrock_daily_usage_stats', 'get_bedrock_hourly_usage_stats', 'get_ec2_spend_last_day', 'get_detailed_breakdown_by_day']
    Connected to server with tools: ['perplexity_ask']
    
    Thought: Let me break this down into parts:
    1. First, I'll ask about Amazon Bedrock using Perplexity
    2. Then I'll get the cost breakdown for the last 7 days
    3. Finally, I'll create a visualization of the spending data
    
    Tool use: perplexity_ask with these inputs: messages[[{role=user, content=What is Amazon Bedrock? Provide a concise explanation.}] (array)]
    
    Tool use: get_detailed_breakdown_by_day with these inputs: days[7 (integer)]
    
    Thought: Let me analyze the data and create a visualization of the top services by cost. I'll use Python to process the data and create a bar chart.
    
    Code interpreter:
    Generated code
    ```
    import pandas as pd
    import matplotlib.pyplot as plt
    ...
    ```
    
    Code interpreter output:
    aws_costs.png (image/png)
    Directory output created successfully
    
    Thought: Now I can provide a comprehensive answer about Amazon Bedrock and the cost analysis. Amazon Bedrock is a fully managed service that provides access to foundation models (FMs) from leading AI companies through a single API. Based on the cost analysis of the last 7 days, your top spending services were:
    
    1. Amazon Neptune: $24
    2. Amazon SageMaker: $567
    3. EC2 (Compute + Other): $454
    4. Amazon OpenSearch Service: $34
    5. Amazon Bedrock: $1235
    6. Amazon Q: $178

Implementation details

Now that you understand the output produced by an agent, let’s lift the curtain and review some of the important pieces of code that produce the output.

  1. Creating MCP clients: config.py, defines the two MCP clients that talk to your two MCP servers.
    1. Server parameters are defined for the cost explorer and Perplexity clients. The solution uses StdioServerParameters, which configures how the client should communicate over standard input/output (stdio) streams. This contains the parameters required by the server to access the required data through APIs.
      # Cost server parameters
      cost_server_params = StdioServerParameters(
          command="/usr/local/bin/docker",
          args=[
              "run",
              "-i",
              "--rm",
              "-e",
              "AWS_ACCESS_KEY_ID",
              "-e",
              "AWS_SECRET_ACCESS_KEY",
              "-e",
              "AWS_REGION",
              "-e",
              "BEDROCK_LOG_GROUP_NAME",
              "-e",
              "stdio",
              "aws-cost-explorer-mcp:latest",
          ],
          env={
              "AWS_ACCESS_KEY_ID": AWS_ACCESS_KEY_ID,
              "AWS_SECRET_ACCESS_KEY": AWS_SECRET_ACCESS_KEY,
              "AWS_REGION": AWS_REGION,
              "BEDROCK_LOG_GROUP_NAME": BEDROCK_LOG_GROUP_NAME,
          },
      )
      
      # Perplexity server parameters
      perplexity_server_params = StdioServerParameters(
          command="/usr/local/bin/docker",
          args=["run", "-i", "--rm", "-e", "PERPLEXITY_API_KEY", "mcp/perplexity-ask"],
          env={"PERPLEXITY_API_KEY": PERPLEXITY_API_KEY},
      )

    2. In main.py, the MCP server parameters are imported and used to create your two MCP clients.
      cost_explorer_mcp_client = await MCPClient.create(server_params=cost_server_params)
      perplexity_mcp_client = await MCPClient.create(server_params=perplexity_server_params)

  1. Configure agent action group: main.py creates the action group that combines the MCP clients into a single interface that the agent can access. This enables the agent to ask your application to invoke either of these MCP servers as needed through return of control.
    # Create action group with both MCP clients
    cost_action_group = ActionGroup(
        name="CostActionGroup",
        mcp_clients=[cost_explorer_mcp_client, perplexity_mcp_client]
    )

  2. Inline agent creation: The inline agent can be created with the following specifications:
    1. Foundation model: Configure your choice of FM to power your agent. This can be any model provided on Amazon Bedrock. This example uses Anthropic’s Claude 3.5 Sonnet model.
    2. Agent instruction: Provide instructions to your agent that contain the guidance and steps for orchestrating responses to user queries. These instructions anchor the agent’s approach to handling various types of queries
    3. Agent name: Name of your agent.
    4. Action groups: Define the action groups that your agent can access. These can include single or multiple action groups, with each group having access to multiple MCP clients or AWS Lambda As an option, you can configure your agent to use Code Interpreter to generate, run, and test code for your application.
# Create and invoke the inline agent
await InlineAgent(
    foundation_model="us.anthropic.claude-3-5-sonnet-20241022-v2:0",
    instruction="""You are a friendly assistant that is responsible for resolving user queries.
    
    You have access to search, cost tool and code interpreter. 
    
    """,
    agent_name="cost_agent",
    action_groups=[
        cost_action_group,
        {
            "name": "CodeInterpreter",
            "builtin_tools": {
                "parentActionGroupSignature": "AMAZON.CodeInterpreter"
            },
        },
    ],
).invoke(
    input_text="<user-query-here>"
)

You can use this example to build an inline agent on Amazon Bedrock that establishes connections with different MCP servers and groups their clients into a single action group for the agent to access.

Conclusion

The Anthropic MCP protocol offers a standardized way of connecting FMs to data sources, and now you can use this capability with Amazon Bedrock Agents. In this post, you saw an example of combining the power of Amazon Bedrock and MCP to build an application that offers a new perspective on understanding and managing your AWS spend.

Organizations can now offer their teams natural, conversational access to complex financial data while enhancing responses with contextual intelligence from sources like Perplexity. As AI continues to evolve, the ability to securely connect models to your organization’s critical systems will become increasingly valuable. Whether you’re looking to transform customer service, streamline operations, or gain deeper business insights, the Amazon Bedrock and MCP integration provides a flexible foundation for your next AI innovation. You can dive deeper on this MCP integration by exploring our code samples.

Here are some examples of what you can build by connecting your Amazon Bedrock Agents to MCP servers:

  • A multi-data source agent that retrieves data from different data sources such as Amazon Bedrock Knowledge Bases, Sqlite, or even your local filesystem.
  • A developer productivity assistant agent that integrates with Slack and GitHub MCP servers.
  • A machine learning experiment tracking agent that integrates with the Opik MCP server from Comet ML for managing, visualizing, and tracking machine learning experiments directly within development environments.

What business challenges will you tackle with these powerful new capabilities?


About the authors

Mark Roy is a Principal Machine Learning Architect for AWS, helping customers design and build generative AI solutions. His focus since early 2023 has been leading solution architecture efforts for the launch of Amazon Bedrock, the flagship generative AI offering from AWS for builders. Mark’s work covers a wide range of use cases, with a primary interest in generative AI, agents, and scaling ML across the enterprise. He has helped companies in insurance, financial services, media and entertainment, healthcare, utilities, and manufacturing. Prior to joining AWS, Mark was an architect, developer, and technology leader for over 25 years, including 19 years in financial services. Mark holds six AWS certifications, including the ML Specialty Certification.

Eashan Kaushik is a Specialist Solutions Architect AI/ML at Amazon Web Services. He is driven by creating cutting-edge generative AI solutions while prioritizing a customer-centric approach to his work. Before this role, he obtained an MS in Computer Science from NYU Tandon School of Engineering. Outside of work, he enjoys sports, lifting, and running marathons.

Madhur Prashant is an AI and ML Solutions Architect at Amazon Web Services. He is passionate about the intersection of human thinking and generative AI. His interests lie in generative AI, specifically building solutions that are helpful and harmless, and most of all optimal for customers. Outside of work, he loves doing yoga, hiking, spending time with his twin, and playing the guitar.

Amit Arora is an AI and ML Specialist Architect at Amazon Web Services, helping enterprise customers use cloud-based machine learning services to rapidly scale their innovations. He is also an adjunct lecturer in the MS data science and analytics program at Georgetown University in Washington, D.C.

Andy Palmer is a Director of Technology for AWS Strategic Accounts. His teams provide Specialist Solutions Architecture skills across a number of speciality domain areas, including AIML, generative AI, data and analytics, security, network, and open source software. Andy and his team have been at the forefront of guiding our most advanced customers through their generative AI journeys and helping to find ways to apply these new tools to both existing problem spaces and net new innovations and product experiences.

Read More

Generate compliant content with Amazon Bedrock and ConstitutionalChain

Generate compliant content with Amazon Bedrock and ConstitutionalChain

Generative AI has emerged as a powerful tool for content creation, offering several key benefits that can significantly enhance the efficiency and effectiveness of content production processes such as creating marketing materials, image generation, content moderation etc. Constitutional AI and LangGraph‘s reflection mechanisms represent two complementary approaches to ensuring AI systems behave ethically – with Anthropic embedding principles during training while LangGraph implements them during inference/runtime through reflection and self-correction mechanisms. By using LanGraph’s Constitutional AI, content creators can streamline their workflow while maintaining high standards of user-defined compliance and ethical integrity. This method not only reduces the need for extensive human oversight but also enhances the transparency and accountability of content generation process by AI.

In this post, we explore practical strategies for using Constitutional AI to produce compliant content efficiently and effectively using Amazon Bedrock and LangGraph to build ConstitutionalChain for rapid content creation in highly regulated industries like finance and healthcare. Although AI offers significant productivity benefits, maintaining compliance with strict regulations are crucial. Manual validation of AI-generated content for regulatory adherence can be time-consuming and challenging. We also provide an overview of how Insagic, a Publicis Groupe company, integrated this concept into their existing healthcare marketing workflow using Amazon Bedrock. Insagic is a next-generation insights and advisory business that combines data, design, and dialogues to deliver actionable insights and transformational intelligence for healthcare marketers. It uses expertise from data scientists, behavior scientists, and strategists to drive better outcomes in the healthcare industry.

Understanding Constitutional AI

Constitutional AI is designed to align large language models (LLMs) with human values and ethical considerations. It works by integrating a set of predefined rules, principles, and constraints into the LLM’s core architecture and training process. This approach makes sure that the LLM operates within specified ethical and legal parameters, much like how a constitution governs a nation’s laws and actions.

The key benefits of Constitutional AI for content creation include:

  • Ethical alignment – Content generated using Constitutional AI is inherently aligned with predefined ethical standards
  • Legal compliance – The LLM is designed to operate within legal frameworks, reducing the risk of producing non-compliant content
  • Transparency – The principles guiding the LLM’s decision-making process are clearly defined and can be inspected
  • Reduced human oversight – By embedding ethical guidelines into the LLM, the need for extensive human review is significantly reduced

Let’s explore how you can harness the power of Constitutional AI to generate compliant content for your organization.

Solution overview

For this solution, we use Amazon Bedrock Knowledge Bases to store a repository of healthcare documents. We employ a Retrieval Augmented Generation (RAG) approach, first retrieving relevant context and synthesizing an answer based on the retrieved context, to generate articles based on the repository. We then use the open source orchestration framework LangGraph and ConstitutionalChain to generate, critique, and review prompts in an Amazon SageMaker notebook and develop an agentic workflow to generate compliance content. The following diagram illustrates this architecture.

This implementation demonstrates a sophisticated agentic workflow that not only generates responses based on a knowledge base but also employs a reflection technique to examine its outputs through ethical principles, allowing it to refine and improve its outputs. We upload a sample set of mental health documents to Amazon Bedrock Knowledge Bases and use those documents to write an article on mental health using a RAG-based approach. Later, we define a constitutional principle with a custom Diversity, Equity, and Inclusion (DEI) principle, specifying how to critique and revise responses for inclusivity.

Prerequisites

To deploy the solution, you need the following prerequisites:

Create an Amazon Bedrock knowledge base

To demonstrate this capability, we download a mental health article from the following GitHub repo and store it in Amazon S3. We then use Amazon Bedrock Knowledge Bases to index the articles. By default, Amazon Bedrock uses Amazon OpenSearch Serverless as a vector database. For full instructions to create an Amazon Bedrock knowledge base with Amazon S3 as the data source, see Create a knowledge base in Amazon Bedrock Knowledge Bases.

    1. On the Amazon Bedrock console, create a new knowledge base.
    2. Provide a name for your knowledge base and create a new IAM service role.Provide Knowledge Base details in the Amazon Bedrock console.
    3. Choose Amazon S3 as the data source and provide the S3 bucket storing the mental health article.
    4. Choose Amazon Titan Text Embeddings v2 as the embeddings model and OpenSearch Serverless as the vector store.
    5. Choose Create Knowledge Base.Create Knowledge Base in the Amazon Bedrock console.

Import statements and set up an Amazon Bedrock client

Follow the instructions provided in the README file in the GitHub repo. Clone the GitHub repo to make a local copy. We recommend running this code in a SageMaker JupyterLab environment. The following code imports the necessary libraries, including Boto3 for AWS services, LangChain components, and Streamlit. It sets up an Amazon Bedrock client and configures Anthropic’s Claude 3 Haiku model with specific parameters.

import boto3
from langchain_aws import ChatBedrock
…

bedrock_runtime = boto3.client(service_name="bedrock-runtime", region_name="us-east-1")
llm = ChatBedrock(client=bedrock_runtime, model_id="anthropic.claude-3-haiku-20240307-v1:0")
…..

Define Constitutional AI components

Next, we define a Critique class to structure the output of the critique process. Then we create prompt templates for critique and revision. Lastly, we set up chains using LangChain for generating responses, critiques, and revisions.

# LangChain Constitutional chain migration to LangGraph

class Critique(TypedDict):
    """Generate a critique, if needed."""

    critique_needed: Annotated[bool, ..., "Whether or not a critique is needed."]
    critique: Annotated[str, ..., "If needed, the critique."]

critique_prompt = ChatPromptTemplate.from_template(
    "Critique this response according to the critique request. "
…
)

revision_prompt = ChatPromptTemplate.from_template(
    "Revise this response according to the critique and reivsion request.nn"
    ….
)
chain = llm | StrOutputParser()
critique_chain = critique_prompt | llm.with_structured_output(Critique)
revision_chain = revision_prompt | llm | StrOutputParser()

Define a State class and refer to the Amazon Bedrock Knowledge Bases retriever

We define a LangGraph State class to manage the conversation state, including the query, principles, responses, and critiques:

# LangGraph State

class State(TypedDict):
    query: str
    constitutional_principles: List[ConstitutionalPrinciple]

Next, we set up an Amazon Bedrock Knowledge Bases retriever to extract the relevant information. We refer to the Amazon Bedrock knowledge base we created earlier to create an article based on mental health documents. Make sure to update the knowledge base ID in the following code with the knowledge base you created in previous steps:

#-----------------------------------------------------------------
# Amazon Bedrock KnowledgeBase

from langchain_aws.retrievers import AmazonKnowledgeBasesRetriever

retriever = AmazonKnowledgeBasesRetriever(
knowledge_base_id="W3NMIJXLUE", # Change it to your Knowledge base ID
…
)

Create LangGraph nodes and a LangGraph graph along with constitutional principles

The next section of code integrates graph-based workflow orchestration, ethical principles, and a user-friendly interface to create a sophisticated Constitutional AI model. The following diagram illustrates the workflow.

Workflow of start, retrieval augmented generation, critique and revise, and end.

It uses a StateGraph to manage the flow between RAG and critique/revision nodes, incorporating a custom DEI principle to guide the LLM’s responses. The system is presented through a Streamlit application, which provides an interactive chat interface where users can input queries and view the LLM’s initial responses, critiques, and revised answers. The application also features a sidebar displaying a graph visualization of the workflow and a description of the applied ethical principle. This comprehensive approach makes sure that the LLM’s outputs are not only knowledge-based but also ethically aligned by using customizable constitutional principles that guide a reflection flow (critique and revise), all while maintaining a user-friendly experience with features like chat history management and a clear chat option.

Streamlit application

The Streamlit application component of this code creates an interactive and user-friendly interface for the Constitutional AI model. It sets up a side pane that displays a visualization of the LLM’s workflow graph and provides a description of the DEI principle being applied. The main interface features a chat section where users can input their queries and view the LLM’s responses.

# ------------------------------------------------------------------------
# Streamlit App

# Clear Chat History fuction
def clear_screen():
    st.session_state.messages = [{"role": "assistant", "content": "How may I assist you today?"}]

with st.sidebar:
    st.subheader('Constitutional AI Demo')
…..
    ConstitutionalPrinciple(
        name="DEI Principle",
        critique_request="Analyze the content for any lack of diversity, equity, or inclusion. Identify specific instances where the text could be more inclusive or representative of diverse perspectives.",
        revision_request="Rewrite the content by incorporating critiques to be more diverse, equitable, and inclusive. Ensure representation of various perspectives and use inclusive language throughout."
    )
    """)
    st.button('Clear Screen', on_click=clear_screen)

# Store LLM generated responses
if "messages" not in st.session_state.keys():
    st.session_state.messages = [{"role": "assistant", "content": "How may I assist you today?"}]

# Chat Input - User Prompt 
if prompt := st.chat_input():
….

    with st.spinner(f"Generating..."):
        ….
    with st.chat_message("assistant"):
        st.markdown("**[initial response]**")
….
        st.session_state.messages.append({"role": "assistant", "content": "[revised response] " + generation['response']})

The application maintains a chat history, displaying both user inputs and LLM responses, including the initial response, any critiques generated, and the final revised response. Each step of the LLM’s process is clearly labeled and presented to the user. The interface also includes a Clear Screen button to reset the chat history. When processing a query, the application shows a loading spinner and displays the runtime, providing transparency into the LLM’s operation. This comprehensive UI design allows users to interact with the LLM while observing how constitutional principles are applied to refine the LLM’s outputs.

Test the solution using the Streamlit UI

In the Streamlit application, when a user inputs a query, the application initiates the process by creating and compiling the graph defined earlier. It then streams the execution of this graph, which includes the RAG and critique/revise steps. During this process, the application displays real-time updates for each node’s execution, showing the user what’s happening behind the scenes. The system measures the total runtime, providing transparency about the processing duration. When it’s complete, the application presents the results in a structured manner within the chat interface. It displays the initial LLM-generated response, followed by any critiques made based on the constitutional principles, and finally shows the revised response that incorporates these ethical considerations. This step-by-step presentation allows users to see how the LLM’s response evolves through the constitutional AI process, from initial generation to ethical refinement. As mentioned, in the GitHub README file, in order to run the Streamlit application, use the following code:

pip install -r requirements.txt
streamlit run main.py

For details on using a Jupyter proxy to access the Streamlit application, refer to Build Streamlit apps in Amazon SageMaker Studio.

Modify the Studio URL, replacing lab? with proxy/8501/.

Chat interface showing the RAG and critique and revise steps.

How Insagic uses Constitutional AI to generate compliant content

Insagic uses real-world medical data to help brands understand people as patients and patients as people, enabling them to deliver actionable insights in the healthcare marketing space. Although generating deep insights in the health space can yield profound dividends, it must be done with consideration for compliance and the personal nature of health data. By defining federal guidelines as constitutional principles, Insagic makes sure that the content delivered by generative AI complies with federal guidelines for healthcare marketing.

Clean up

When you have finished experimenting with this solution, clean up your resources to prevent AWS charges from being incurred:

  1. Empty the S3 buckets.
  2. Delete the SageMaker notebook instance.
  3. Delete the Amazon Bedrock knowledge base.

Conclusion

This post demonstrated how to implement a sophisticated generative AI solution using Amazon Bedrock and LangGraph to generate compliant content. You can also integrate this workflow to generate responses based on a knowledge base and apply ethical principles to critique and revise its outputs, all within an interactive web interface. Insagic is looking at more ways to incorporate this into existing workflows by defining custom principles to achieve compliance goals.

You can expand this concept further by incorporating Amazon Bedrock Guardrails. Amazon Bedrock Guardrails and LangGraph Constitutional AI can create a comprehensive safety system by operating at different levels. Amazon Bedrock provides API-level content filtering and safety boundaries, and LangGraph implements constitutional principles in reasoning workflows. Together, they enable multi-layered protection through I/O filtering, topic restrictions, ethical constraints, and logical validation steps in AI applications.

Try out the solution for your own use case, and leave your feedback in the comments.


About the authors

Sriharsh AdariSriharsh Adari is a Senior Solutions Architect at Amazon Web Services (AWS), where he helps customers work backwards from business outcomes to develop innovative solutions on AWS. Over the years, he has helped multiple customers on data platform transformations across industry verticals. His core area of expertise include Technology Strategy, Data Analytics, and Data Science. In his spare time, he enjoys playing sports, binge-watching TV shows, and playing Tabla.

David Min is a Senior Partner Sales Solutions Architect at Amazon Web Services (AWS) specializing in Generative AI, where he helps customers transform their businesses through innovative AI solutions. Throughout his career, David has helped numerous organizations across industries bridge the gap between cutting-edge AI technology and practical business applications, focusing on executive engagement and successful solution adoption.

Stephen Garth is a Data Scientist at Insagic, where he develops advanced machine learning solutions, including LLM-powered automation tools and deep clustering models for actionable, consumer insights. With a strong background spanning software engineering, healthcare data science, and computational research, he is passionate to bring his expertise in AI-driven analytics and large-scale data processing to drive solutions.

Chris Cocking specializes in scalable enterprise application design using multiple programming languages. With a nearly 20 years of experience, he excels in LAMP and IIS environments, SEO strategies, and most recently designing agentic systems. Outside of work, Chris is an avid bassist and music lover, which helps fuel his creativity and problem-solving skills.

Read More

Minimize generative AI hallucinations with Amazon Bedrock Automated Reasoning checks

Minimize generative AI hallucinations with Amazon Bedrock Automated Reasoning checks

Foundation models (FMs) and generative AI are transforming enterprise operations across industries. McKinsey & Company’s recent research estimates generative AI could contribute up to $4.4 trillion annually to the global economy through enhanced operational efficiency, productivity growth of 0.1% to 0.6% annually, improved customer experience through personalized interactions, and accelerated digital transformation.

Today, organizations struggle with AI hallucination when moving generative AI applications from experimental to production environments. Model hallucination, where AI systems generate plausible but incorrect information, remains a primary concern. The 2024 Gartner CIO Generative AI Survey highlights three major risks: reasoning errors from hallucinations (59% of respondents), misinformation from bad actors (48%), and privacy concerns (44%).

To improve factual accuracy of large language model (LLM) responses, AWS announced Amazon Bedrock Automated Reasoning checks (in gated preview) at AWS re:Invent 2024. Through logic-based algorithms and mathematical validation, Automated Reasoning checks validate LLM outputs against domain knowledge encoded in the Automated Reasoning policy to help prevent factual inaccuracies. Automated reasoning checks is part of Amazon Bedrock Guardrails, a comprehensive framework that also provides content filtering, personally identifiable information (PII) redaction, and enhanced security measures. Together, these capabilities enable organizations to implement reliable generative AI safeguards—with Automated Reasoning checks addressing factual accuracy while other Amazon Bedrock Guardrails features help protect against harmful content and safeguard sensitive information.

In this post, we discuss how to help prevent generative AI hallucinations using Amazon Bedrock Automated Reasoning checks.

Automated Reasoning overview

Automated Reasoning is a specialized branch of computer science that uses mathematical proof techniques and formal logical deduction to verify compliance with rules and requirements with absolute certainty under given assumptions. As organizations face increasing needs to verify complex rules and requirements with mathematical certainty, automated reasoning techniques offer powerful capabilities. For example, AWS customers have direct access to automated reasoning-based features such as IAM Access Analyzer, S3 Block Public Access, or VPC Reachability Analyzer.

Unlike probabilistic approaches prevalent in machine learning, Automated Reasoning relies on formal mathematical logic to provide definitive guarantees about what can and can’t be proven. This approach mirrors the rigors of auditors verifying financial statements or compliance officers validating regulatory requirements, but with mathematical precision. By using rigorous logical frameworks and theorem-proving methodologies, Automated Reasoning can conclusively determine whether statements are true or false under given assumptions. This makes it exceptionally valuable for applications that demand high assurance and need to deliver unambiguous conclusions to their users.

The following workflow illustrates solver-based formal verification, showing both the process flow and algorithm for verifying formal system properties through logical analysis and SAT/SMT solvers.

One of the widely used Automated Reasoning techniques is SAT/SMT solving, which involves encoding a representation of rules and requirements into logical formulas. A logical formula is a mathematical expression that uses variables and logical operators to represent conditions and relationships. After the rules and requirements are encoded into these formulas, specialized tools known as solvers are applied to compute solutions that satisfy these constraints. These solvers determine whether the formulas can be satisfied—whether there exist values for variables that make the formulas true.

This process starts with two main inputs: a formal representation of the system (like code or a policy) expressed as logical formulas, and a property to analyze (such as whether certain conditions are possible or requirements can be met). The solver can return one of three possible outcomes:

  • Satisfiable – The solver finds an assignment of values that makes the formulas true, proving that the system can satisfy the given requirements. The solver provides this assignment, which can serve as a concrete example of correct behavior.
  • Unsatisfiable – The solver proves that no assignment exists that make all formulas true, proving that the requirements can’t be met. This often comes with information about which constraints are in conflict, helping identify the incorrect assumptions in the system.
  • Unknown – In some cases, the solver might not be able to determine satisfiability within reasonable computational limits, or the encoding might not contain enough information to reach a conclusion.

This technique makes sure that you either get confirmation that the specific property holds (with a concrete example), proof that it can’t be satisfied (with information on conflicting constraints), or an indication that the problem needs to be reformulated or analyzed differently.

Key features of Automated Reasoning checks

Automated Reasoning checks offer the following key features:

  • Mathematical validation framework – The feature verifies LLM outputs using mathematical logical deduction. Unlike probabilistic methods, it uses sound mathematical approaches to provide definitive guarantees about system behaviors within defined parameters.
  • Policy-based knowledge representation – Organizations can create Automated Reasoning policies that encode their rules, procedures, and guidelines into structured, mathematical formats. Organizations can upload documents like PDFs containing HR guidelines or operational workflows, which are then automatically converted into formal logic structures. Policy changes are automatically versioned with unique Amazon Resource Names (ARNs), allowing for change tracking, auditing, and rollback capabilities to maintain consistent policy enforcement.
  • Domain expert enablement – The feature is designed to empower domain experts, such as HR personnel or operational managers, to directly encode their knowledge without technical intermediaries. This makes sure that business rules and policies are accurately captured and maintained by those who understand them best.
  • Natural language to logic translation – The system uses two complementary approaches: LLMs handle natural language understanding, and a symbolic reasoning engine performs mathematical validation. This hybrid architecture allows users to input policies in plain language while maintaining mathematically rigorous verification.
  • Explainable validation results – Each validation check produces detailed findings that indicate whether content is Valid, Invalid, or No Data. The feature provides clear explanations for its decisions, including extracted factual statements, and suggested corrections for invalid content.
  • Interactive testing environment – Users can access a chat playground on the Amazon Bedrock console to test and refine policies in real time. The feature supports both interactive testing through the Amazon Bedrock console and automated testing through API integrations, with the ability to export test cases in JSON format for integration into continuous testing pipelines or documentation workflows.
  • Seamless AWS integration – The feature integrates directly with Amazon Bedrock Guardrails and can be used alongside other configurable guardrails like Contextual Grounding checks. It can be accessed through both the Amazon Bedrock console and APIs, making it flexible for various implementation needs.

These features combine to create a powerful framework that helps organizations maintain factual accuracy in their AI applications while providing transparent and mathematically sound validation processes.

Solution overview

Now that we understand the key features of Automated Reasoning checks, let’s examine how this capability works within Amazon Bedrock Guardrails. The following section provides a comprehensive overview of the architecture and demonstrates how different components work together to promote factual accuracy and help prevent hallucinations in generative AI applications.

Automated Reasoning checks in Amazon Bedrock Guardrails provides an end-to-end solution for validating AI model outputs using mathematically sound principles. This automated process uses formal logic and mathematical proofs to verify responses against established policies, offering definitive validation results that can significantly improve the reliability of your AI applications.

The following solution architecture follows a systematic workflow that enables rigorous validation of model outputs.

The workflow consists of the following steps:

  1. Source documents (such as HR guidelines or operational procedures) are uploaded to the system. These documents, along with optional intent descriptions, are processed to create structured rules and variables that form the foundation of an Automated Reasoning policy.
  2. Subject matter experts review and inspect the created policy to verify accurate representation of business rules. Each validated policy is versioned and assigned a unique ARN for tracking and governance purposes.
  3. The validated Automated Reasoning policy is associated with Amazon Bedrock Guardrails, where specific policy versions can be selected for implementation. This integration enables automated validation of generative AI outputs.
  4. When the generative AI application produces a response, Amazon Bedrock Guardrails triggers the Automated Reasoning checks. The system creates logical representations of both the input question and the application’s response, evaluating them against the established policy rules.
  5. The Automated Reasoning check provides detailed validation results, including whether statements are Valid, Invalid, or No Data. For each finding, it explains which rules and variables were considered, and provides suggestions for making invalid statements valid.

With this solution architecture in place, organizations can confidently deploy generative AI applications knowing that responses will be automatically validated against your established policies using mathematically sound principles.

Prerequisites

To use Automated Reasoning checks in Amazon Bedrock, make sure you have met the following prerequisites:

  • An active AWS account
  • Access permission through your AWS Account Manager, because Automated Reasoning checks is currently in gated preview
  • Confirmation of AWS Regions where Automated Reasoning checks is available

Input dataset

For this post, we examine a sample Paid Leave of Absence (LoAP) policy document as our example dataset. This policy document contains detailed guidelines covering employee eligibility criteria, duration limits, application procedures, and benefits coverage for paid leave. It’s an ideal example to demonstrate how Automated Reasoning checks can validate AI-generated responses against structured business policies, because it contains clear rules and conditions that can be converted into logical statements. The document’s mix of quantitative requirements (such as minimum tenure and leave duration) and qualitative conditions (like performance status and approval processes) makes it particularly suitable for showcasing the capabilities of automated reasoning validation.

The following screenshot shows an example of our policy document.

Start an Automated Reasoning check using the Amazon Bedrock console

The first step is to encode your knowledge—in this case, the sample LoAP policy—into an Automated Reasoning policy. Complete the following steps to initiate an Automated Reasoning check using the Amazon Bedrock console:

  1. On the Amazon Bedrock console, choose Automated Reasoning Preview under Safeguards in the navigation pane.
  2. Choose Create policy.

  1. Provide a policy name and policy description.

  1. Upload your source document. The source content can’t be modified after creation and must not exceed 6,000 characters with limitations on table sizes and image processing.
  2. Include a description of the intent of the Automated Reasoning policy you’re creating. For the sample policy, you can use the following intent:
Create a logical model of the Leave of Absence, Paid (LoAP) policy in this document.
Employees will ask questions about what are the eligibility requirements for the program,
whether they are allowed to take LOAP and for how long, duration and benefits during the
time off, and return to work. 
Below is an example question:
QUESTION: I am a temporary contractor working in operations. Am I eligible for LOAP?
ANSWER: No, only full-time employees are eligible for LoAP.

The policy creation process takes a few minutes to complete. The rules and variables are created after creating the policy and they can be edited, removed, or have new rules or variables added to them.

The policy document version is outlined in the details section along with the intent description and build status.

Next, you create a guardrail in Amazon Bedrock by configuring as many filters as you need.

  1. On the Amazon Bedrock console, choose Guardrails under Safeguards in the navigation pane.
  2. Choose Create guardrail.

  1. Provide guardrail details such as a name and an optional description.

  1. Add an Automated Reasoning check by choosing Enable Automated Reasoning policy, and choose the policy name and version.
  2. Choose Next and complete the creation of the guardrail.

  1. Navigate back to the Automated Reasoning section of the Amazon Bedrock console and open the newly created policy. You can use the test playground and input sample questions and answers that represent real user interactions with your LLM.
  2. Choose the guardrail you created, then choose Submit to evaluate how your policy handles these exchanges.

After submitting, you’ll be presented with one or more findings. A finding contains a set of facts that were extracted from the input Q&A and are analyzed independently. Each finding includes four key components:

  • Validation results – Shows the outcome of Automated Reasoning checks. The system determines these results by evaluating extracted variable assignments against your defined policy rules.
  • Applied rules – Displays the specific rules from your policy that were used to reach the validation conclusion.
  • Extracted variables – Lists the variables that were identified and used in the validation process.
  • Suggestions – Shows variable assignments that would make invalid responses valid, or for valid responses, identifies necessary assumptions. These can be used to generate feedback for your LLM.

Finally, you can use the feedback suggestions to improve your LLM’s responses.

  1. Collect rules from valid results with suggestions and invalid results.
  2. Feed these collected variables and rules back to your LLM to revise its original.
  3. Refine your policy:
    1. Edit incorrect rules using natural language.
    2. Improve variable descriptions when Automated Reasoning checks fail to assign values.
    3. For effective variable descriptions, include both technical definitions and common user expressions. For example, for a variable named is_full_time, "works more than 20 hours per week" is technically correct because it’s a quote from the source policy, but won’t help Automated Reasoning checks understand what users mean when they say “part-time.” Instead, use "works more than 20 hours per week; set to true if user says 'full-time' and false if user says 'part-time'".

Start an Automated Reasoning check using Python SDK and APIs

First, you need to create an Automated Reasoning policy from your documents using the Amazon Bedrock console as outlined in the previous section. Next, you can use the policy created with the ApplyGuardrail API to validate your generative AI application.

To use the Python SDK for validation using Automated Reasoning checks, follow these steps:

  1. First, set up the required configurations:
import boto3
import botocore
import os
import json

# Configuration parameters
DEFAULT_GUARDRAIL_NAME = "<YOUR_GUARDRAIL_NAME>"  # e.g., "my_policy_guardrail"
DEFAULT_AR_POLICY_VERSION = "1"

# AWS configuration
region = "us-west-2"
ar_policy = "<YOUR_AR_POLICY_ID>"  # e.g., "ABC123DEF456"
model_id = "<YOUR_MODEL_ID>"  # e.g., "anthropic.claude-3-haiku-20240307-v1:0"
  1. Before using Amazon Bedrock with Automated Reasoning policies, you will need to load the required service models. After being allowlisted for Amazon Bedrock access, you will receive two model files along with their corresponding version information. The following is a Python script to help you load these service models:
def add_service_model(model_file, service_name, version):
    """
    Adds a service model to the AWS configuration directory.
    
    Args:
        model_file (str): Path to the model file
        service_name (str): Name of the AWS service
        version (str): Service model version
    """
    # Configure paths
    source = f"models/{model_file}"  # Your downloaded model files directory
    dest_dir = os.path.expanduser(f"~/.aws/models/{service_name}/{version}")
    dest_file = f"{dest_dir}/service-2.json"

    try:
        # Create directory and copy model file
        os.makedirs(dest_dir, exist_ok=True)
        with open(source) as f:
            model = json.load(f)
        with open(dest_file, 'w') as f:
            json.dump(model, f, indent=2)
        print(f"Successfully added model for {service_name}")
        return True
    except Exception as e:
        print(f"Error adding {service_name} model: {e}")
        return False

def main():
    # Define your model files and versions
    # Replace with your actual model information provided by AWS
    models = {
        '<bedrock-model-file>.json': ('bedrock', '<bedrock-version>'),
        '<runtime-model-file>.json': ('bedrock-runtime', '<runtime-version>')
    }
    
    # Load each model
    for model_file, (service_name, version) in models.items():
        add_service_model(model_file, service_name, version)

if __name__ == "__main__":
    main()

  1. After you set up the service models, initialize the AWS clients for both Amazon Bedrock and Amazon Bedrock Runtime services. These clients will be used to interact with the models and apply guardrails.
# Initialize AWS clients
boto_session = boto3.Session(region_name=region)
runtime_client = boto_session.client("bedrock-runtime")
bedrock_client = boto_session.client("bedrock")
  1. Before applying Automated Reasoning policies, you need to either locate an existing guardrail or create a new one. The following code first attempts to find a guardrail by name, and if not found, creates a new guardrail with the specified Automated Reasoning policy configuration. This makes sure you have a valid guardrail to work with before proceeding with policy enforcement.
def find_guardrail_id(client, name) -> tuple[str, str]:
    """
    Finds the ID and version of a guardrail by its name.
    
    Args:
        client: The Bedrock client object
        name (str): Name of the guardrail to find
    
    Returns:
        tuple[str, str]: Guardrail ID and version if found, None otherwise
    """
    next_token = None
    while True:
        # List existing guardrails
        resp = client.list_guardrails(
        ) if next_token is None else client.list_guardrail(nextToken=next_token)

        # Search for matching guardrail
        for g in resp["guardrails"]:
            if g["name"] == name:
                return g["id"], g["version"]

        # Handle pagination
        if "nextToken" in resp and resp["nextToken"] != "":
            next_token = resp["nextToken"]
        else:
            break
    return None, None

# Find or create guardrail with AR policy
try:
    # First, try to find existing guardrail
    guardrail_id, guardrail_version = find_guardrail_id(
        bedrock_client, DEFAULT_GUARDRAIL_NAME)
    
    # If not found, create new guardrail
    if guardrail_id is None:
        create_resp = bedrock_client.create_guardrail(
            name=DEFAULT_GUARDRAIL_NAME,
            description="Automated Reasoning checks demo guardrail",
            automatedReasoningPolicyConfig={
                "policyIdentifier": ar_policy,
                "policyVersion": DEFAULT_AR_POLICY_VERSION
            },
            blockedInputMessaging='Input is blocked',
            blockedOutputsMessaging='Output is blocked',
        )
        guardrail_id = create_resp["guardrailId"]
        guardrail_version = create_resp["version"]
        print(f"✓ Created new guardrail: {guardrail_id}")
    else:
        print(f"✓ Found existing guardrail: {guardrail_id}")
        
except botocore.exceptions.ClientError as e:
    print(f"✗ Error managing guardrail: {str(e)}")
    raise
  1. When testing guardrails with Automated Reasoning policies, you need to properly format your input data. The following code shows how to structure a sample question and answer pair for validation:
def create_sample_input():
    """
    Creates a formatted sample input for guardrail validation.
    
    The format requires both the query and response to be properly structured
    with appropriate qualifiers.
    
    Returns:
        list: Formatted input for guardrail validation
    """
    sample_query = "I am a part-time employee, am I eligible for LoAP?"
    sample_response = "Yes, part time employees are allowed to use LoAP"
    
    return [
        {
            "text": {
                "text": sample_query,
                "qualifiers": ["query"]
            }
        },
        {
            "text": {
                "text": sample_response,
                "qualifiers": ["guard_content"]
            }
        }
    ]

# Example usage
guardrail_input = create_sample_input()

print(json.dumps(guardrail_input, indent=2))
  1. Now that you have your formatted input data, you can apply the guardrail with Automated Reasoning policies to validate the content. The following code sends the input to Amazon Bedrock Guardrails and returns the validation results:
guardrails_output = runtime_client.apply_guardrail(
            guardrailIdentifier= guardrail_id,
            guardrailVersion= guardrail_version,
            source="OUTPUT",
            content=guardrail_input,
        )
  1. After applying guardrails, you need to extract and analyze the Automated Reasoning assessment results. The following code shows how to process the guardrail output:
# Extract Automated Reasoning assessment
ar_assessment = None
for assessment in guardrails_output["assessments"]:
    if "automatedReasoningPolicy" in assessment:
        ar_assessment = assessment["automatedReasoningPolicy"]["findings"]
        break

if ar_assessment is None:
    print("No Automated Reasoning assessment found")
else:
    print("Automated Reasoning Assessment Results:")
    print(json.dumps(ar_assessment, indent=2))

    # Process any policy violations
    for finding in ar_assessment:
        if finding["result"] == "INVALID":
            print("nPolicy Violations Found:")
            # Print violated rules
            for rule in finding.get("rules", []):
                print(f"Rule: {rule['description']}")
            
            # Print suggestions if any
            if "suggestions" in finding:
                print("nSuggested Corrections:")
                for suggestion in finding["suggestions"]:
                    print(f"- {suggestion}")

The output will look something like the following:

{
    "result": "INVALID",
    "assignments": [...],
    "suggestions": [...],
    "rules": [
        {
            "identifier": "<IDENTIFIER>",
            "description": "An employee is eligible for LoAP if and only if..."
        }
    ]
}

When a response violates AR policies, the system identifies which rules were violated and provides information about the conflicts. The feedback from the AR policy validation can be routed back to improve the model’s output, promoting compliance while maintaining response quality.

Possible use cases

Automated Reasoning checks can be applied across various industries to promote accuracy, compliance, and reliability in AI-generated responses while maintaining industry-specific standards and regulations. Although we have tested these checks across multiple applications, we continue to explore additional potential use cases. The following table provides some applications across different sectors.

Industry Use Cases
Healthcare
  • Validate AI-generated treatment recommendations against clinical care protocols and guidelines
  • Verify medication dosage calculations and check for potential drug interactions
  • Make sure patient education materials align with medical best practices
  • Validate clinical documentation for regulatory compliance
Financial Services
  • Verify investment recommendations against regulatory requirements and risk policies
  • Validate customer communications for compliance with financial regulations
  • Verify that credit decision explanations meet fairness and transparency guidelines
  • Check transaction processing against anti-fraud and anti-money laundering policies
Travel and Hospitality
  • Validate booking and ticketing policies for accuracy
  • Verify loyalty program benefit calculations follow established rules
  • Verify travel documentation requirements and restrictions
  • Validate pricing and refund calculations
Insurance
  • Verify claim processing decisions against policy terms
  • Validate coverage explanations for accuracy and completeness
  • Make sure that risk assessment recommendations follow underwriting guidelines
  • Check policy documentation for regulatory compliance
Energy and Utilities
  • Validate maintenance scheduling against equipment specifications
  • Verify emergency response protocols for different scenarios
  • Make sure that field operation instructions follow safety guidelines
  • Check grid management decisions against operational parameters
Manufacturing
  • Validate quality control procedures against industry standards
  • Verify production scheduling against capacity and resource constraints
  • Make sure that safety protocols are followed in operational instructions
  • Check inventory management decisions against supply chain policies

Best practices for implementation

Successfully implementing Automated Reasoning checks requires careful attention to detail and a systematic approach to achieve optimal validation accuracy and reliable results. The following are some key best practices:

  • Document preparation – Use structured text-based PDF documents. Content should be limited to 6,000 characters. Avoid complex formatting that could interfere with the logical model generation.
  • Intent description engineering – Create precise policy intents using a clear format. The intent should comprehensively cover expected use cases and potential edge cases. For example:
    Create a logical model for [USE CASE] with policy rules. 
    Users will ask questions about [SPECIFIC TOPICS].
    Example Q&A: [INCLUDE SAMPLE].

  • Policy validation – Review the generated rules and variables to make sure they accurately capture your business logic and policy requirements. Regular audits of these rules help maintain alignment with current business policies.
  • Comprehensive testing –Develop a diverse set of sample Q&As in the test playground to evaluate different validation scenarios (valid, valid with suggestions, and invalid responses). Include edge cases and complex scenarios to provide robust validation coverage.
  • Iterative improvement –Regularly update rules and LLM applications based on validation feedback, paying special attention to suggested variables and invalid results to enhance response accuracy. Maintain a feedback loop for continuous refinement.
  • Version control management – Implement a systematic approach to policy versioning, maintaining detailed documentation of changes and conducting proper testing before deploying new versions. This helps track policy evolution and facilitates rollbacks if needed.
  • Error handling strategy – Develop a comprehensive plan for handling different validation results, including specific procedures for managing invalid responses and incorporating suggested improvements into the response generation process.
  • Runtime optimization – Understand and monitor the two-step validation process (fact extraction and logic validation) to achieve optimal performance. Regularly review validation results to identify patterns that might indicate needed improvements in variable descriptions or rule definitions.
  • Feedback integration – Establish a systematic process for collecting and analyzing validation feedback, particularly focusing on cases where NO_DATA is returned or when factual claims are incorrectly extracted. Use this information to continuously refine variable descriptions and policy rules.

Conclusion

Amazon Bedrock Automated Reasoning checks represent a significant advancement in formally verifying the outputs of generative AI applications. By combining rigorous mathematical validation with a user-friendly interface, this feature addresses one of the most critical challenges in AI deployment: maintaining factual consistency and minimizing hallucinations. The solution’s ability to validate AI-generated responses against established policies using formal logic provides organizations with a powerful framework for building trustworthy AI applications that can be confidently deployed in production environments.

The versatility of Automated Reasoning checks, demonstrated through various industry use cases and implementation approaches, makes it a valuable tool for organizations across sectors. Whether implemented through the Amazon Bedrock console or programmatically using APIs, the feature’s comprehensive validation capabilities, detailed feedback mechanisms, and integration with existing AWS services enable organizations to establish quality control processes that scale with their needs. The best practices outlined in this post provide a foundation for organizations to maximize the benefits of this technology while maintaining high standards of accuracy.

As enterprises continue to expand their use of generative AI, the importance of automated validation mechanisms becomes increasingly critical. We encourage organizations to explore Amazon Bedrock Automated Reasoning checks and use its capabilities to build more reliable and accurate AI applications. To help you get started, we’ve provided detailed implementation guidance, practical examples, and a Jupyter notebook with code snippets in our GitHub repository that demonstrate how to effectively integrate this feature into your generative AI development workflow. Through systematic validation and continuous refinement, organizations can make sure that their AI applications deliver consistent, accurate, and trustworthy results.


About the Authors

Adewale Akinfaderin is a Sr. Data Scientist–Generative AI, Amazon Bedrock, where he contributes to cutting edge innovations in foundational models and generative AI applications at AWS. His expertise is in reproducible and end-to-end AI/ML methods, practical implementations, and helping global customers formulate and develop scalable solutions to interdisciplinary problems. He has two graduate degrees in physics and a doctorate in engineering.

Nafi Diallo is a Sr. Applied Scientist in the Automated Reasoning Group and holds a PhD in Computer Science. She is passionate about using automated reasoning to ensure the security of computer systems, improve builder productivity, and enable the development of trustworthy and responsible AI workloads. She worked for more than 5 years in the AWS Application Security organization, helping build scalable API security testing solutions and shifting security assessment left.

Read More

AWS App Studio introduces a prebuilt solutions catalog and cross-instance Import and Export

AWS App Studio introduces a prebuilt solutions catalog and cross-instance Import and Export

AWS App Studio is a generative AI-powered service that uses natural language to build business applications, empowering a new set of builders to create applications in minutes. With App Studio, technical professionals such as IT project managers, data engineers, enterprise architects, and solution architects can quickly develop applications tailored to their organization’s needs—without requiring deep software development skills. Common use cases range from inventory management and approval workflows to content management and operational portals, and beyond – App Studio adapts to streamline a wide variety of business applications.

Since the general availability of App Studio in November 2024, customers across diverse industries have adopted it to build scalable, enterprise-grade applications, transforming their development processes and accelerating time-to-market. App Studio customers, including both enterprises and system integrators, have shared the need for portability and reusability across App Studio instances. Based on their experience, two areas of interests emerged:

  • Getting started – New customers and builders asked to learn and explore the product through readily available examples and patterns that explain application building possibilities in App Studio.
  • Optimizing time to value – Teams often validate use cases in a sandbox before moving to production. This highlights an interest in a more efficient approach to share and deploy applications across multiple App Studio instances.

Today, App Studio announced two new features to accelerate application building:

  • Prebuilt solutions catalog – Featuring a set of practical examples and common patterns (like S3 and Bedrock integration) to accelerate getting started and enable deployment of applications from the catalog to production environments in less than 15 minutes.
  • Cross-instance Import and Export – Enabling straightforward and self-service migration of App Studio applications across AWS Regions and AWS accounts.

In this post, we walk through how to use the prebuilt solutions catalog to get started quickly and use the Import and Export feature

Prerequisites

To follow along with this post, you should have the following prerequisites:

  • Access to App Studio. For more information, see Setting up and signing in to App Studio.
  • Optional: Review App Studio concepts to familiarize yourself with important App Studio concepts.
  • Optional: An understanding of basic web development concepts, such as JavaScript syntax.
  • Optional: Familiarity with AWS services.

Prebuilt solutions catalog

App Studio is introducing a prebuilt solutions catalog to accelerate the way builders approach application building. This resource offers a diverse collection of prebuilt applications that can be seamlessly imported into your App Studio instance, serving as both a learning tool and a rapid deployment solution. By providing access to proven patterns and prebuilt solutions, App Studio significantly reduces the initial setup time for builders, enabling you to move from concept to production in less than 15 minutes.

The catalog includes a variety of practical use cases including a Product Adoption Tracker to manage customer feedback, track feature requests, and summarize meeting notes with AI. To import the Product Adoption Tracker, navigate to the prebuilt solutions catalog, copy an import code, and follow the import instructions in the next section.

Import an application

You now have the ability to import an App Studio application from a different App Studio instance. Importing applications is available to all builders and admins.

Complete the following steps to import an App Studio application:

  1. Sign in and launch the App Studio instance where you want to import an application.
  2. Choose My applications in the navigation pane.
  3. Choose the dropdown menu next to Create app and choose Import app.
  1. Enter an import code from the prebuilt app catalog or that you generated by the export process outlined in the next section and choose Import. Depending on the application size, you might need to wait a few seconds for the import to finish.
  2. After completion, the application will be imported to your development environment. You can explore the debug panel at the bottom of the page to understand which custom connectors need to be connected to automations and entities.

Now that we have successfully imported an application, let’s walk through how we can export our own applications to a different App Studio instance.

Export an application

You now have the ability to export an App Studio application to a different App Studio instance. Generating an application export creates a static snapshot with all artifacts needed to recreate the application—automations, components, and entities. After importing, you will need to reconnect custom connectors to automations and entities.

Application security and control are maintained through a robust permissions system. Only authorized application owners and co-owners can generate application exports and restrict which App Studio instances can import a given application. If needed, application owners can revoke access by deactivating the import link at any time.

To export an App Studio application, complete the following steps:

    1. Sign in to the App Studio instance that you want to export an application from.
    2. Choose My applications in the navigation pane.
    3. Choose the dropdown menu next to Edit and choose Export.
    4. To restrict which App Studio instances can import this application, configure application import permissions:
      • Anyone with the import code can import this application – Grant import permissions to all instances. Only select this option if you want anyone with the import code to have access to import your application.
      • Only specified App Studio instances can import this application – Provide the specific instance IDs that can import the application (multiple instances can be separated by commas). To find your instance ID, navigate to your instance’s account settings by choosing Account settings on the App Studio console.
    5. Choose Generate import code to generate a unique import code.
    6. Two additional options for managing import codes are available after the application has been exported at least once to application owners and co-owners:
      • Generate new import code – When you make updates to this application, you will need to generate a new import code by choosing Generate new code. Generating a new code invalidates the old code, but will not automatically refresh existing imported applications.
      • Delete import code – To stop application import access, choose this option. Deleting the import code will invalidate the current code and prevent subsequent import attempts. Applications previously created using this code will continue to work.

Considerations

The following are some key considerations for using the prebuilt solutions catalog and importing and exporting applications across App Studio instances:

  • There is no cost associated with importing and exporting applications, including importing applications from the prebuilt solutions catalog.
  • Applications cannot be imported into the same instance, but you can achieve a similar result of replicating functionality within an instance by duplicating apps, components, and pages.
  • There are no limits on the number of applications you can import or export. The maximum number of applications in an App Studio instance is subject to service quotas.

Conclusion

Jumpstart your app building workflow with App Studio’s prebuilt solutions catalog and Import and Export features. Effortlessly migrate applications across AWS instances, collaborate with teams, and transfer applications to clients. Start using App Studio’s prebuilt solutions catalog and Import and Export features today – we’re excited to see how you will use these features to accelerate your application building journey.

To learn more about App Studio, explore more features on the App Studio page. Get started with App Studio in the AWS Management Console. Experience the App Studio workshop for hands-on learning, and join the conversation in the #aws-app-studio channel in the AWS Developers Slack workspace.

Read more about App Studio

Watch App Studio demos


About the Authors

Umesh Kalaspurkar is a Principal Solutions Architect at AWS based in New York, bringing over two decades of expertise in digital transformation and innovation across both enterprise and startup environments. He specializes in designing solutions that help organizations overcome their most pressing challenges. When not architecting cloud solutions, Umesh cherishes time spent with his children, carving down ski slopes, and exploring new destinations around the world.

Samit Kumbhani is an AWS Senior Solutions Architect in the New York City area with over 18 years of experience. He currently partners with independent software vendors (ISVs) to build highly scalable, innovative, and secure cloud solutions. Outside of work, Samit enjoys playing cricket, traveling, and biking.

Haoran (Hao) Su is a Senior Technical Account Manager in New York City with over 8 years of experience with the cloud. He collaborates with Software, Internet and Model providers (SWIM) and Digitally Native Businesses (DNB) to improve their financial and operational efficiency, and architectural resiliency. Outside of work, Hao enjoys international traveling, exercising, and streaming.

Anshika Tandon is a Senior Product Manager – Technical at AWS with a decade of experience building AI and B2B SaaS products from concept to launch. She excels in cross-functional product leadership, focusing on delivering measurable business value through strategic initiatives. A global citizen having lived in 10 cities and visited 26 countries, Anshika balances her professional life with interests in skiing, travel, and performing in improv comedy shows.

Alex (Tao) Jia is a Senior Product Marketing Manager at AWS, focusing on generative AI. With 15+ years in tech marketing, she drives products from concept to scale, shaping positioning, fostering adoption, and leading global go-to-market strategies. She has worked with enterprises and ISVs, reaching millions of developers. Outside work, Alex enjoys exploring technology’s impact on humanity through books, research, and conversations.

Read More

Build a generative AI enabled virtual IT troubleshooting assistant using Amazon Q Business

Build a generative AI enabled virtual IT troubleshooting assistant using Amazon Q Business

Today’s organizations face a critical challenge with the fragmentation of vital information across multiple environments. As businesses increasingly rely on diverse project management and IT service management (ITSM) tools such as ServiceNow, Atlassian Jira and Confluence, employees find themselves navigating a complex web of systems to access crucial data.

This isolated approach leads to several challenges for IT leaders, developers, program managers, and new employees. For example:

  • Inefficiency: Employees need to access multiple systems independently to gather data insights and remediation steps during incident troubleshooting
  • Lack of integration: Information is isolated across different environments, making it difficult to get a holistic view of ITSM activities
  • Time-consuming: Searching for relevant information across multiple systems is time-consuming and reduces productivity
  • Potential for inconsistency: Using multiple systems increases the risk of inconsistent data and processes across the organization.

Amazon Q Business is a fully managed, generative artificial intelligence (AI) powered assistant that can address challenges such as inefficient, inconsistent information access within an organization by providing 24/7 support tailored to individual needs. It handles a wide range of tasks such as answering questions, providing summaries, generating content, and completing tasks based on data in your organization. Amazon Q Business offers over 40 data source connectors that connect to your enterprise data sources and help you create a generative AI solution with minimal configuration. Amazon Q Business also supports over 50 actions across popular business applications and platforms. Additionally, Amazon Q Business offers enterprise-grade data security, privacy, and built-in guardrails that you can configure.

This blog post explores an innovative solution that harnesses the power of generative AI to bring value to your organization and ITSM tools with Amazon Q Business.

Solution overview

The solution architecture shown in the following figure demonstrates how to build a virtual IT troubleshooting assistant by integrating with multiple data sources such as Atlassian Jira, Confluence, and ServiceNow. This solution helps streamline information retrieval, enhance collaboration, and significantly boost overall operational efficiency, offering a glimpse into the future of intelligent enterprise information management.

Reference Architecture to build a generative AI-enabled virtual IT troubleshooting assistant using Amazon Q Business

This solution integrates with ITSM tools such as ServiceNow Online and project management software such as Atlassian Jira and Confluence using the Amazon Q Business data source connectors. You can use a data source connector to combine data from different places into a central index for your Amazon Q Business application. For this demonstration, we use the Amazon Q Business native index and retriever. We also configure an application environment and grant access to users to interact with an application environment using AWS IAM Identity Center for user management. Then, we provision subscriptions for IAM Identity Center users and groups.

Authorized users interact with the application environment through a web experience. You can share the web experience endpoint URL with your users so they can open the URL and authenticate themselves to start chatting with the generative AI application powered by Amazon Q Business.

Deployment

Start by setting up the architecture and data needed for the demonstration.

  1. We’ve provided an AWS CloudFormation template in our GitHub repository that you can use to set up the environment for this demonstration. If you don’t have existing Atlassian Jira, Confluence, and ServiceNow accounts follow these steps to create trial accounts for the demonstration
  2. Once step 1 is complete, open the AWS Management Console for Amazon Q Business. On the Applications tab, open your application to see the data sources. See Best practices for data source connector configuration in Amazon Q Business to understand best practicesSolution Deployment steps for Reference Architecture to build a generative AI-enabled virtual IT troubleshooting assistant using Amazon Q Business
  3. To improve retrieved results and customize the end user chat experience, use Amazon Q to map document attributes from your data sources to fields in your Amazon Q index. Choose the Atlassian Jira, Confluence Cloud and ServiceNow Online links to learn more about their document attributes and field mappings. Select the data source to edit its configurations under Actions. Select the appropriate fields that you think would be important for your search needs. Repeat the process for all of the data sources. The following figure is an example of some of the Atlassian Jira project field mappings that we selected
    Solution Deployment steps for Reference Architecture to build a generative AI-enabled virtual IT troubleshooting assistant using Amazon Q Business
  4. Sync mode enables you to choose how you want to update your index when your data source content changes. Sync run schedule sets how often you want Amazon Q Business to synchronize your index with the data source. For this demonstration, we set the Sync mode to Full Sync and the Frequency to Run on demand. Update Sync mode with your changes and choose Sync Now to start syncing data sources. When you initiate a sync, Amazon Q will crawl the data source to extract relevant documents, then sync them to the Amazon Q index, making them searchableSolution Deployment steps for Reference Architecture to build a generative AI-enabled virtual IT troubleshooting assistant using Amazon Q Business
  5. After syncing data sources, you can configure the metadata controls in Amazon Q Business. An Amazon Q Business index has fields that you can map your document attributes to. After the index fields are mapped to document attributes and are search-enabled, admins can use the index fields to boost results from specific sources, or by end users to filter and scope their chat results to specific data. Boosting chat responses based on document attributes helps you rank sources that are more authoritative higher than other sources in your application environment. See Boosting chat responses using metadata boosting to learn more about metadata boosting and metadata controls. The following figure is an example of some of the metadata controls that we selectedSolution Deployment steps for Reference Architecture to build a generative AI-enabled virtual IT troubleshooting assistant using Amazon Q Business
  6. For the purposes of the demonstration, use the Amazon Q Business web experience. Select your application under Applications and then select the Deployed URL link in the web experience settingsSolution Deployment steps for Reference Architecture to build a generative AI-enabled virtual IT troubleshooting assistant using Amazon Q Business
  7. Enter the same username, password and multi-factor authentication (MFA) authentication for the user that you created previously in IAM Identity Center to sign in to the Amazon Q Business web experience generative AI assistantSolution Deployment steps for Reference Architecture to build a generative AI-enabled virtual IT troubleshooting assistant using Amazon Q Business

Demonstration

Now that you’ve signed in to the Amazon Q Business web experience generative AI assistant (shown in the previous figure), let’s try some natural language queries.

IT leaders: You’re an IT leader and your team is working on a critical project that needs to hit the market quickly. You can now ask questions in natural language to Amazon Q Business to get answers based on your company data.

Developers: Developers who want to know information such as the tasks that are assigned to them, specific tasks details, or issues in a particular sub segment. They can now get these questions answered from Amazon Q Business without necessarily signing in to either Atlassian Jira or Confluence.

Project and program managers: Project and program managers can monitor the activities or developments in their projects or programs from Amazon Q Business without having to contact various teams to get individual status updates.

New employees or business users: A newly hired employee who’s looking for information to get started on a project or a business user who needs tech support can use the generative AI assistant to get the information and support they need.

Benefits and outcomes

From the demonstrations, you saw that various users whether they are leaders, managers, developers, or business users can benefit from using a generative AI solution like our virtual IT assistant built using Amazon Q Business. It removes the undifferentiated heavy lifting of having to navigate multiple solutions and cross-reference multiple items and data points to get answers. Amazon Q Business can use the generative AI to provide responses with actionable insights in just few seconds. Now, let’s dive deeper into some of the additional benefits that this solution provides.

  • Increased efficiency: Centralized access to information from ServiceNow, Atlassian Jira, and Confluence saves time and reduces the need to switch between multiple systems.
  • Enhanced decision-making: Comprehensive data insights from multiple systems leads to better-informed decisions in incident management and problem-solving for various users across the organization.
  • Faster incident resolution: Quick access to enterprise data sources and knowledge and AI-assisted remediation steps can significantly reduce mean time to resolutions (MTTR) for cases with elevated priorities.
  • Improved knowledge management: Access to Confluence’s architectural documents and other knowledge bases such as ServiceNow’s Knowledge Articles promotes better knowledge sharing across the organization. Users can now get responses based on information from multiple systems.
  • Seamless integration and enhanced user experience: Better integration between ITSM processes, project management, and software development streamlines operations. This is helpful for organizations and teams that incorporate agile methodologies.
  • Cost savings: Reduction in time spent searching for information and resolving incidents can lead to significant cost savings in IT operations.
  • Scalability: Amazon Q Business can grow with the organization, accommodating future needs and additional data sources as required. Organization can create more Amazon Q Business applications and share purpose-built Amazon Q Business apps within their organizations to manage repetitive tasks.

Clean up

After completing your exploration of the virtual IT troubleshooting assistant, delete the CloudFormation stack from your AWS account. This action terminates all resources created during deployment of this demonstration and prevents unnecessary costs from accruing in your AWS account.

Conclusion

By integrating Amazon Q Business with enterprise systems, you can create a powerful virtual IT assistant that streamlines information access and improves productivity. The solution presented in this post demonstrates the power of combining AI capabilities with existing enterprise systems to create powerful unified ITSM solutions and more efficient and user-friendly experiences.

We provide the sample virtual IT assistant using an Amazon Q Business solution as open source—use it as a starting point for your own solution and help us make it better by contributing fixes and features through GitHub pull requests. Visit the GitHub repository to explore the code, choose Watch to be notified of new releases, and check the README for the latest documentation updates.

Learn more:

For expert assistance, AWS Professional Services, AWS Generative AI partner solutions, and AWS Generative AI Competency Partners are here to help.

We’d love to hear from you. Let us know what you think in the comments section, or use the issues forum in the GitHub repository.


About the Authors

Jasmine Rasheed Syed is a Senior Customer Solutions manager at AWS, focused on accelerating time to value for the customers on their cloud journey by adopting best practices and mechanisms to transform their business at scale. Jasmine is a seasoned, result oriented leader with 20+ years of progressive experience in Insurance, Retail & CPG with exemplary track record spanning across Business Development, Cloud/Digital Transformation, Delivery, Operational & Process Excellence and Executive Management.

Suprakash Dutta is a Sr. Solutions Architect at Amazon Web Services. He focuses on digital transformation strategy, application modernization and migration, data analytics, and machine learning. He is part of the AI/ML community at AWS and designs Generative AI and Intelligent Document Processing(IDP) solutions.

Joshua Amah is a Partner Solutions Architect at Amazon Web Services, specializing in supporting SI partners with a focus on AI/ML and generative AI technologies. He is passionate about guiding AWS Partners in using cutting-edge technologies and best practices to build innovative solutions that meet customer needs. Joshua provides architectural guidance and strategic recommendations for both new and existing workloads.

Brad King is an Enterprise Account Executive at Amazon Web Services specializing in translating complex technical concepts into business value and making sure that clients achieve their digital transformation goals efficiently and effectively through long term partnerships.

Joseph Mart is an AI/ML Specialist Solutions Architect at Amazon Web Services (AWS). His core competence and interests lie in machine learning applications and generative AI. Joseph is a technology addict who enjoys guiding AWS customers on architecting their workload in the AWS Cloud. In his spare time, he loves playing soccer and visiting nature.

Read More

Process formulas and charts with Anthropic’s Claude on Amazon Bedrock

Process formulas and charts with Anthropic’s Claude on Amazon Bedrock

Research papers and engineering documents often contain a wealth of information in the form of mathematical formulas, charts, and graphs. Navigating these unstructured documents to find relevant information can be a tedious and time-consuming task, especially when dealing with large volumes of data. However, by using Anthropic’s Claude on Amazon Bedrock, researchers and engineers can now automate the indexing and tagging of these technical documents. This enables the efficient processing of content, including scientific formulas and data visualizations, and the population of Amazon Bedrock Knowledge Bases with appropriate metadata.

Amazon Bedrock is a fully managed service that provides a single API to access and use various high-performing foundation models (FMs) from leading AI companies. It offers a broad set of capabilities to build generative AI applications with security, privacy, and responsible AI practices. Anthropic’s Claude 3 Sonnet offers best-in-class vision capabilities compared to other leading models. It can accurately transcribe text from imperfect images—a core capability for retail, logistics, and financial services, where AI might glean more insights from an image, graphic, or illustration than from text alone. The latest of Anthropic’s Claude models demonstrate a strong aptitude for understanding a wide range of visual formats, including photos, charts, graphs and technical diagrams. With Anthropic’s Claude, you can extract more insights from documents, process web UIs and diverse product documentation, generate image catalog metadata, and more.

In this post, we explore how you can use these multi-modal generative AI models to streamline the management of technical documents. By extracting and structuring the key information from the source materials, the models can create a searchable knowledge base that allows you to quickly locate the data, formulas, and visualizations you need to support your work. With the document content organized in a knowledge base, researchers and engineers can use advanced search capabilities to surface the most relevant information for their specific needs. This can significantly accelerate research and development workflows, because professionals no longer have to manually sift through large volumes of unstructured data to find the references they need.

Solution overview

This solution demonstrates the transformative potential of multi-modal generative AI when applied to the challenges faced by scientific and engineering communities. By automating the indexing and tagging of technical documents, these powerful models can enable more efficient knowledge management and accelerate innovation across a variety of industries.

In addition to Anthropic’s Claude on Amazon Bedrock, the solution uses the following services:

  • Amazon SageMaker JupyterLab – The SageMakerJupyterLab application is a web-based interactive development environment (IDE) for notebooks, code, and data. JupyterLab application’s flexible and extensive interface can be used to configure and arrange machine learning (ML) workflows. We use JupyterLab to run the code for processing formulae and charts.
  • Amazon Simple Storage Service (Amazon S3)Amazon S3 is an object storage service built to store and protect any amount of data. We use Amazon S3 to store sample documents that are used in this solution.
  • AWS LambdaAWS Lambda is a compute service that runs code in response to triggers such as changes in data, changes in application state, or user actions. Because services such as Amazon S3 and Amazon Simple Notification Service (Amazon SNS) can directly trigger a Lambda function, you can build a variety of real-time serverless data-processing systems.

The solution workflow contains the following steps:

  1. Split the PDF into individual pages and save them as PNG files.
  2. With each page:
    1. Extract the original text.
    2. Render the formulas in LaTeX.
    3. Generate a semantic description of each formula.
    4. Generate an explanation of each formula.
    5. Generate a semantic description of each graph.
    6. Generate an interpretation for each graph.
    7. Generate metadata for the page.
  3. Generate metadata for the full document.
  4. Upload the content and metadata to Amazon S3.
  5. Create an Amazon Bedrock knowledge base.

The following diagram illustrates this workflow.

Prerequisites

  1. If you’re new to AWS, you first need to create and set up an AWS account.
  2. Additionally, in your account under Amazon Bedrock, request access to anthropic.claude-3-5-sonnet-20241022-v2:0 if you don’t have it already.

Deploy the solution

Complete the following steps to set up the solution:

  1. Launch the AWS CloudFormation template by choosing Launch Stack (this creates the stack in the us-east-1 AWS Region):

Launch CloudFormation stack

  1. When the stack deployment is complete, open the Amazon SageMaker AI
  2. Choose Notebooks in the navigation pane.
  3. Locate the notebook claude-scientific-docs-notebook and choose Open JupyterLab.

  1. In the notebook, navigate to notebooks/process_scientific_docs.ipynb.

  1. Choose conda_python3 as the kernel, then choose Select.

  1. Walk through the sample code.

Explanation of the notebook code

In this section, we walk through the notebook code.

Load data

We use example research papers from arXiv to demonstrate the capability outlined here. arXiv is a free distribution service and an open-access archive for nearly 2.4 million scholarly articles in the fields of physics, mathematics, computer science, quantitative biology, quantitative finance, statistics, electrical engineering and systems science, and economics.

We download the documents and store them under a samples folder locally. Multi-modal generative AI models work well with text extraction from image files, so we start by converting the PDF to a collection of images, one for each page.

Get Metadata from formulas

After the image documents are available, you can use Anthropic’s Claude to extract formulas and metadata with the Amazon Bedrock Converse API. Additionally, you can use the Amazon Bedrock Converse API to obtain an explanation of the extracted formulas in plain language. By combining the formula and metadata extraction capabilities of Anthropic’s Claude with the conversational abilities of the Amazon Bedrock Converse API, you can create a comprehensive solution for processing and understanding the information contained within the image documents.

We start with the following example PNG file.

We use the following request prompt:

sample_prompt = """

Evaluate this page line by line. 
For each line, if it is a formula, convert this math expression to latex format. 
Next describe the formula in plain language Be sure to enclose Latex formulas in double dollar sign for example: $$ <math expression> $$ Use markdown syntax to format your output
"""

file = "./samples/2003.10304/page_2.png"

display(Image(filename=file, width=600))
output, result = stream_conversation(message=sample_prompt, file_paths=[file])
response_text = result["content"]
display(Markdown(response_text))
print(output)

We get the following response, which shows the extracted formula converted to LaTeX format and described in plain language, enclosed in double dollar signs.

Get metadata from charts

Another useful capability of multi-modal generative AI models is the ability to interpret graphs and generate summaries and metadata. The following is an example of how you can obtain metadata of the charts and graphs using simple natural language conversation with models. We use the following graph.

We provide the following request:

sample_prompt = f"""
You are a data scientist expert who has perfect vision and pay a lot of attention to details. 
interpret the graph on this page
provide the answer in markdown format """

file = "./samples/2003.10304/page_5.png"

display(Image(filename=file, width=600))
output, result = stream_conversation(message=sample_prompt, file_paths=[file])
response_text = result["content"]
display(Markdown(response_text))
print(output)

The response returned provides its interpretation of the graph explaining the color-coded lines and suggesting that overall, the DSC model is performing well on the training data, achieving a high Dice coefficient of around 0.98. However, the lower and fluctuating validation Dice coefficient indicates potential overfitting and room for improvement in the model’s generalization performance.

Generate metadata

Using natural language processing, you can generate metadata for the paper to aid in searchability.

We use the following request:

sample_prompt = f"""
Generate a metadata json object for this research paper. 

{{
"title": "",
"authors":  [],
"institutions": [],
"topics": [],
"funding-sources": [],
"algorithms":[],
"data_sets":[]
}}
"""

file = './samples/2003.10304/page_0.png'

We get the following response, including formula markdown and a description.

{

"title": "Attention U-Net Based Adversarial Architectures for Chest X-ray Lung Segmentation",

"authors": ["Gusztáv Gaál", "Balázs Maga", "András Lukács"], "institutions": ["AI Research Group, Institute of Mathematics, Eötvös Loránd University, Budapest, Hungary"],

"topics": [ "Chest X-ray segmentation", "Medical imaging", "Deep learning", "Computer-aided detection", "Lung segmentation" ],

"funding-sources": [],

"algorithms": [ "U-Net", "Adversarial architectures", "Fully Convolutional Neural Networks (FCN)", "Mask R-CNN" ],

"data_sets": ["JSRT dataset"]

}

Use your extracted data in a knowledge base

Now that we’ve prepared our data with formulas, analyzed charts, and metadata, we will create an Amazon Bedrock knowledge base. This will make the information searchable and enable question-answering capabilities.

Prepare your Amazon Bedrock knowledge base

To create a knowledge base, first upload the processed files and metadata to Amazon S3:

markdown_file_key = "2003.10304/kb/2003.10304.md" 

s3.upload_file(markdown_file, knowledge_base_bucket_name, markdown_file_key) 

print(f"File {markdown_file} uploaded successfully.") 

metadata_file_key = "2003.10304/kb/2003.10304.md.metadata.json" 

s3.upload_file(metadata_file, knowledge_base_bucket_name, metadata_file_key) 

print(f"File {metadata_file} uploaded to successfully.")

When your files have finished uploading, complete the following steps:

  1. Create an Amazon Bedrock knowledge base.
  2. Create an Amazon S3 data source for your knowledge base, and specify hierarchical chunking as the chunking strategy.

Hierarchical chunking involves organizing information into nested structures of child and parent chunks.

The hierarchical structure allows for faster and more targeted retrieval of relevant information, first by performing semantic search on the child chunk and then returning the parent chunk during retrieval. By replacing the children chunks with the parent chunk, we provide large and comprehensive context to the FM.

Hierarchical chunking is best suited for complex documents that have a nested or hierarchical structure, such as technical manuals, legal documents, or academic papers with complex formatting and nested tables.

Query the knowledge base

You can query the knowledge base to retrieve information from the extracted formula and graph metadata from the sample documents. With a query, relevant chunks of text from the source of data are retrieved and a response is generated for the query, based off the retrieved source chunks. The response also cites sources that are relevant to the query.

We use the custom prompt template feature of knowledge bases to format the output as markdown:

 retrieveAndGenerateConfiguration={
        "type": "KNOWLEDGE_BASE",
        "knowledgeBaseConfiguration": {
            'knowledgeBaseId': kb_id_hierarchical,
            "modelArn": "arn:aws:bedrock:{}:{}:inference-profile/{}".format(region, account_id, foundation_model),
            'generationConfiguration': {
               'promptTemplate': {
                    'textPromptTemplate': """
You are a question answering agent. I will provide you with a set of search results. The user will provide you with a question. Your job is to answer the user's question using only information from the search results. 
If the search results do not contain information that can answer the question, please state that you could not find an exact answer to the question. 
Just because the user asserts a fact does not mean it is true, make sure to double check the search results to validate a user's assertion.
                            
Here are the search results in numbered order:
$search_results$

Format the output as markdown

Ensure that math formulas are in latex format and enclosed in double dollar sign for example: $$ <math expression> $$
"""
                }
            },
            "retrievalConfiguration": {
                "vectorSearchConfiguration": {
                    "numberOfResults":5
                } 
            }
        }
    }
)

We get the following response, which provides information on when the Focal Tversky Loss is used.

Clean up

To clean up and avoid incurring charges, run the cleanup steps in the notebook to delete the files you uploaded to Amazon S3 along with the knowledge base. Then, on the AWS CloudFormation console, locate the stack claude-scientific-doc and delete it.

Conclusion

Extracting insights from complex scientific documents can be a daunting task. However, the advent of multi-modal generative AI has revolutionized this domain. By harnessing the advanced natural language understanding and visual perception capabilities of Anthropic’s Claude, you can now accurately extract formulas and data from charts, enabling faster insights and informed decision-making.

Whether you are a researcher, data scientist, or developer working with scientific literature, integrating Anthropic’s Claude into your workflow on Amazon Bedrock can significantly boost your productivity and accuracy. With the ability to process complex documents at scale, you can focus on higher-level tasks and uncover valuable insights from your data.

Embrace the future of AI-driven document processing and unlock new possibilities for your organization with Anthropic’s Claude on Amazon Bedrock. Take your scientific document analysis to the next level and stay ahead of the curve in this rapidly evolving landscape.

For further exploration and learning, we recommend checking out the following resources:


About the Authors

Erik Cordsen is a Solutions Architect at AWS serving customers in Georgia. He is passionate about applying cloud technologies and ML to solve real life problems. When he is not designing cloud solutions, Erik enjoys travel, cooking, and cycling.

Renu Yadav is a Solutions Architect at Amazon Web Services (AWS), where she works with enterprise-level AWS customers providing them with technical guidance and help them achieve their business objectives. Renu has a strong passion for learning with her area of specialization in DevOps. She leverages her expertise in this domain to assist AWS customers in optimizing their cloud infrastructure and streamlining their software development and deployment processes.

Venkata Moparthi is a Senior Solutions Architect at AWS who empowers financial services organizations and other industries to navigate cloud transformation with specialized expertise in Cloud Migrations, Generative AI, and secure architecture design. His customer-focused approach combines technical innovation with practical implementation, helping businesses accelerate digital initiatives and achieve strategic outcomes through tailored AWS solutions that maximize cloud potential.

Read More

Automate IT operations with Amazon Bedrock Agents

Automate IT operations with Amazon Bedrock Agents

IT operations teams face the challenge of providing smooth functioning of critical systems while managing a high volume of incidents filed by end-users. Manual intervention in incident management can be time-consuming and error prone because it relies on repetitive tasks, human judgment, and potential communication gaps. Using generative AI for IT operations offers a transformative solution that helps automate incident detection, diagnosis, and remediation, enhancing operational efficiency.

AI for IT operations (AIOps) is the application of AI and machine learning (ML) technologies to automate and enhance IT operations. AIOps helps IT teams manage and monitor large-scale systems by automatically detecting, diagnosing, and resolving incidents in real time. It combines data from various sources—such as logs, metrics, and events—to analyze system behavior, identify anomalies, and recommend or execute automated remediation actions. By reducing manual intervention, AIOps improves operational efficiency, accelerates incident resolution, and minimizes downtime.

This post presents a comprehensive AIOps solution that combines various AWS services such as Amazon Bedrock, AWS Lambda, and Amazon CloudWatch to create an AI assistant for effective incident management. This solution also uses Amazon Bedrock Knowledge Bases and Amazon Bedrock Agents. The solution uses the power of Amazon Bedrock to enable the deployment of intelligent agents capable of monitoring IT systems, analyzing logs and metrics, and invoking automated remediation processes.

Amazon Bedrock is a fully managed service that makes foundation models (FMs) from leading AI startups and Amazon available through a single API, so you can choose from a wide range of FMs to find the model that is best suited for your use case. With the Amazon Bedrock serverless experience, you can get started quickly, privately customize FMs with your own data, and integrate and deploy them into your applications using AWS tools without having to manage the infrastructure. Amazon Bedrock Knowledge Bases is a fully managed capability with built-in session context management and source attribution that helps you implement the entire Retrieval Augmented Generation (RAG) workflow, from ingestion to retrieval and prompt augmentation, without having to build custom integrations to data sources and manage data flows. Amazon Bedrock Agents is a fully managed capability that make it straightforward for developers to create generative AI-based applications that can complete complex tasks for a wide range of use cases and deliver up-to-date answers based on proprietary knowledge sources.

Generative AI is rapidly transforming businesses and unlocking new possibilities across industries. This post highlights the transformative impact of large language models (LLMs). With the ability to encode human expertise and communicate in natural language, generative AI can help augment human capabilities and allow organizations to harness knowledge at scale.

Challenges in IT operations with runbooks

Runbooks are detailed, step-by-step guides that outline the processes, procedures, and tasks needed to complete specific operations, typically in IT and systems administration. They are commonly used to document repetitive tasks, troubleshooting steps, and routine maintenance. By standardizing responses to issues and facilitating consistency in task execution, runbooks help teams improve operational efficiency and streamline workflows. Most organizations rely on runbooks to simplify complex processes, making it straightforward for teams to handle routine operations and respond effectively to system issues. For organizations, managing hundreds of runbooks, monitoring their status, keeping track of failures, and setting up the right alerting can become difficult. This creates visibility gaps for IT teams. When you have multiple runbooks for various processes, managing the dependencies and run order between them can become complex and tedious. It’s challenging to handle failure scenarios and make sure everything runs in the right sequence.

The following are some of the challenges that most organizations face with manual IT operations:

  • Manual diagnosis through run logs and metrics
  • Runbook dependency and sequence mapping
  • No automated remediation processes
  • No real-time visibility into runbook progress

Solution overview

Amazon Bedrock is the foundation of this solution, empowering intelligent agents to monitor IT systems, analyze data, and automate remediation. The solution provides sample AWS Cloud Development Kit (AWS CDK) code to deploy this solution. The AIOps solution provides an AI assistant using Amazon Bedrock Agents to help with operations automation and runbook execution.

The following architecture diagram explains the overall flow of this solution.

Amazon Bedrock AIOps Automation

The agent uses Anthropic’s Claude LLM available on Amazon Bedrock as one of the FMs to analyze incident details and retrieve relevant information from the knowledge base, a curated collection of runbooks and best practices. This equips the agent with business-specific context, making sure responses are precise and backed by data from Amazon Bedrock Knowledge Bases. Based on the analysis, the agent dynamically generates a runbook tailored to the specific incident and invokes appropriate remediation actions, such as creating snapshots, restarting instances, scaling resources, or running custom workflows.

Amazon Bedrock Knowledge Bases create an Amazon OpenSearch Serverless vector search collection to store and index incident data, runbooks, and run logs, enabling efficient search and retrieval of information. Lambda functions are employed to run specific actions, such as sending notifications, invoking API calls, or invoking automated workflows. The solution also integrates with Amazon Simple Email Service (Amazon SES) for timely notifications to stakeholders.

The solution workflow consists of the following steps:

  1. Existing runbooks in various formats (such as Word documents, PDFs, or text files) are uploaded to Amazon Simple Storage Service (Amazon S3).
  2. Amazon Bedrock Knowledge Bases converts these documents into vector embeddings using a selected embedding model, configured as part of the knowledge base setup.
  3. These vector embeddings are stored in OpenSearch Serverless for efficient retrieval, also configured during the knowledge base setup.
  4. Agents and action groups are then set up with the required APIs and prompts for handling different scenarios.
  5. The OpenAPI specification defines which APIs need to be called, along with their input parameters and expected output, allowing Amazon Bedrock Agents to make informed decisions.
  6. When a user prompt is received, Amazon Bedrock Agents uses RAG, action groups, and the OpenAPI specification to determine the appropriate API calls. If more details are needed, the agent prompts the user for additional information.
  7. Amazon Bedrock Agents can iterate and call multiple functions as needed until the task is successfully complete.

Prerequisites

To implement this AIOps solution, you need an active AWS account and basic knowledge of the AWS CDK and the following AWS services:

  • Amazon Bedrock
  • Amazon CloudWatch
  • AWS Lambda
  • Amazon OpenSearch Serverless
  • Amazon SES
  • Amazon S3

Additionally, you need to provision the required infrastructure components, such as Amazon Elastic Compute Cloud (Amazon EC2) instances, Amazon Elastic Block Store (Amazon EBS) volumes, and other resources specific to your IT operations environment.

Build the RAG pipeline with OpenSearch Serverless

This solution uses a RAG pipeline to find relevant content and best practices from operations runbooks to generate responses. The RAG approach helps make sure the agent generates responses that are grounded in factual documentation, which avoids hallucinations. The relevant matches from the knowledge base guide Anthropic’s Claude 3 Haiku model so it focuses on the relevant information. The RAG process is powered by Amazon Bedrock Knowledge Bases, which stores information that the Amazon Bedrock agent can access and use. For this use case, our knowledge base contains existing runbooks from the organization with step-by-step procedures to resolve different operational issues on AWS resources.

The pipeline has the following key tasks:

  • Ingest documents in an S3 bucket – The first step ingests existing runbooks into an S3 bucket to create a searchable index with the help of OpenSearch Serverless.
  • Monitor infrastructure health using CloudWatch – An Amazon Bedrock action group is used to invoke Lambda functions to get CloudWatch metrics and alerts for EC2 instances from an AWS account. These specific checks are then used as Anthropic’s Claude 3 Haiku model inputs to form a health status overview of the account.

Configure Amazon Bedrock Agents

Amazon Bedrock Agents augment the user request with the right information from Amazon Bedrock Knowledge Bases to generate an accurate response. For this use case, our knowledge base contains existing runbooks from the organization with step-by-step procedures to resolve different operational issues on AWS resources.

By configuring the appropriate action groups and populating the knowledge base with relevant data, you can tailor the Amazon Bedrock agent to assist with specific tasks or domains and provide accurate and helpful responses within its intended scopes.

Amazon Bedrock agents empower Anthropic’s Claude 3 Haiku to use tools, overcoming LLM limitations like knowledge cutoffs and hallucinations, for enhanced task completion through API calls and other external interactions.

The agent’s workflow is to check for resource alerts using an API, then if found, fetch and execute the relevant runbook’s steps (for example, create snapshots, restart instances, and send emails).

The overall system enables automated detection and remediation of operational issues on AWS while enforcing adherence to documented procedures through the runbook approach.

To set up this solution using Amazon Bedrock Agents, refer to the GitHub repo that provisions the following resources. Make sure to verify the AWS Identity and Access Management (IAM) permissions and follow IAM best practices while deploying the code. It is advised to apply least-privilege permissions for IAM policies.

  • S3 bucket
  • Amazon Bedrock agent
  • Action group
  • Amazon Bedrock agent IAM role
  • Amazon Bedrock agent action group
  • Lambda function
  • Lambda service policy permission
  • Lambda IAM role

Benefits

With this solution, organizations can automate their operations and save a lot of time. The automation is also less prone to errors compared to manual execution. It offers the following additional benefits:

  • Reduced manual intervention – Automating incident detection, diagnosis, and remediation helps minimize human involvement, reducing the likelihood of errors, delays, and inconsistencies that often arise from manual processes.
  • Increased operational efficiency – By using generative AI, the solution speeds up incident resolution and optimizes operational workflows. The automation of tasks such as runbook execution, resource monitoring, and remediation allows IT teams to focus on more strategic initiatives.
  • Scalability – As organizations grow, managing IT operations manually becomes increasingly complex. Automating operations using generative AI can scale with the business, managing more incidents, runbooks, and infrastructure without requiring proportional increases in personnel.

Clean up

To avoid incurring unnecessary costs, it’s recommended to delete the resources created during the implementation of this solution when not in use. You can do this by deleting the AWS CloudFormation stacks deployed as part of the solution, or manually deleting the resources on the AWS Management Console or using the AWS Command Line Interface (AWS CLI).

Conclusion

The AIOps pipeline presented in this post empowers IT operations teams to streamline incident management processes, reduce manual interventions, and enhance operational efficiency. With the power of AWS services, organizations can automate incident detection, diagnosis, and remediation, enabling faster incident resolution and minimizing downtime.

Through the integration of Amazon Bedrock, Anthropic’s Claude on Amazon Bedrock, Amazon Bedrock Agents, Amazon Bedrock Knowledge Bases, and other supporting services, this solution provides real-time visibility into incidents, automated runbook generation, and dynamic remediation actions. Additionally, the solution provides timely notifications and seamless collaboration between AI agents and human operators, fostering a more proactive and efficient approach to IT operations.

Generative AI is rapidly transforming how businesses can take advantage of cloud technologies with ease. This solution using Amazon Bedrock demonstrates the immense potential of generative AI models to enhance human capabilities. By providing developers expert guidance grounded in AWS best practices, this AI assistant enables DevOps teams to review and optimize cloud architecture across of AWS accounts.

Try out the solution yourself and leave any feedback or questions in the comments.


About the Authors

Upendra V is a Sr. Solutions Architect at Amazon Web Services, specializing in Generative AI and cloud solutions. He helps enterprise customers design and deploy production-ready Generative AI workloads, implement Large Language Models (LLMs) and Agentic AI systems, and optimize cloud deployments. With expertise in cloud adoption and machine learning, he enables organizations to build and scale AI-driven applications efficiently.

Deepak Dixit is a Solutions Architect at Amazon Web Services, specializing in Generative AI and cloud solutions. He helps enterprises architect scalable AI/ML workloads, implement Large Language Models (LLMs), and optimize cloud-native applications.

Read More

Streamline AWS resource troubleshooting with Amazon Bedrock Agents and AWS Support Automation Workflows

Streamline AWS resource troubleshooting with Amazon Bedrock Agents and AWS Support Automation Workflows

As AWS environments grow in complexity, troubleshooting issues with resources can become a daunting task. Manually investigating and resolving problems can be time-consuming and error-prone, especially when dealing with intricate systems. Fortunately, AWS provides a powerful tool called AWS Support Automation Workflows, which is a collection of curated AWS Systems Manager self-service automation runbooks. These runbooks are created by AWS Support Engineering with best practices learned from solving customer issues. They enable AWS customers to troubleshoot, diagnose, and remediate common issues with their AWS resources.

Amazon Bedrock is a fully managed service that offers a choice of high-performing foundation models (FMs) from leading AI companies like AI21 Labs, Anthropic, Cohere, Meta, Mistral AI, Stability AI, and Amazon through a single API, along with a broad set of capabilities to build generative AI applications with security, privacy, and responsible AI. Using Amazon Bedrock, you can experiment with and evaluate top FMs for your use case, privately customize them with your data using techniques such as fine-tuning and Retrieval Augmented Generation (RAG), and build agents that execute tasks using your enterprise systems and data sources. Because Amazon Bedrock is serverless, you don’t have to manage infrastructure, and you can securely integrate and deploy generative AI capabilities into your applications using the AWS services you are already familiar with.

In this post, we explore how to use the power of Amazon Bedrock Agents and AWS Support Automation Workflows to create an intelligent agent capable of troubleshooting issues with AWS resources.

Solution overview

Although the solution is versatile and can be adapted to use a variety of AWS Support Automation Workflows, we focus on a specific example: troubleshooting an Amazon Elastic Kubernetes Service (Amazon EKS) worker node that failed to join a cluster. The following diagram provides a high-level overview of troubleshooting agents with Amazon Bedrock.

Our solution is built around the following key components that work together to provide a seamless and efficient troubleshooting experience:

  • Amazon Bedrock Agents – Amazon Bedrock Agents acts as the intelligent interface between users and AWS Support Automation Workflows. It processes natural language queries to understand the issue context and manages conversation flow to gather required information. The agent uses Anthropic’s Claude 3.5 Sonnet model for advanced reasoning and response generation, enabling natural interactions throughout the troubleshooting process.
  • Amazon Bedrock agent action groups – These action groups define the structured API operations that the Amazon Bedrock agent can invoke. Using OpenAPI specifications, they define the interface between the agent and AWS Lambda functions, specifying the available operations, required parameters, and expected responses. Each action group contains the API schema that tells the agent how to properly format requests and interpret responses when interacting with Lambda functions.
  • Lambda Function – The Lambda function acts as the integration layer between the Amazon Bedrock agent and AWS Support Automation Workflows. It validates input parameters from the agent and initiates the appropriate SAW runbook execution. It monitors the automation progress while processing the technical output into a structured format. When the workflow is complete, it returns formatted results back to the agent for user presentation.
  • IAM role – The AWS Identity and Access Management (IAM) role provides the Lambda function with the necessary permissions to execute AWS Support Automation Workflows and interact with required AWS services. This role follows the principle of least privilege to maintain security best practices.
  • AWS Support Automation Workflows – These pre-built diagnostic runbooks are developed by AWS Support Engineering. The workflows execute comprehensive system checks based on AWS best practices in a standardized, repeatable manner. They cover a wide range of AWS services and common issues, encapsulating AWS Support’s extensive troubleshooting expertise.

The following steps outline the workflow of our solution:

  1. Users start by describing their AWS resource issue in natural language through the Amazon Bedrock chat console. For example, “Why isn’t my EKS worker node joining the cluster?”
  2. The Amazon Bedrock agent analyzes the user’s question and matches it to the appropriate action defined in its OpenAPI schema. If essential information is missing, such as a cluster name or instance ID, the agent engages in a natural conversation to gather the required parameters. This makes sure that necessary data is collected before proceeding with the troubleshooting workflow.
  3. The Lambda function receives the validated request and triggers the corresponding AWS Support Automation Workflow. These SAW runbooks contain comprehensive diagnostic checks developed by AWS Support Engineering to identify common issues and their root causes. The checks run automatically without requiring user intervention.
  4. The SAW runbook systematically executes its diagnostic checks and compiles the findings. These results, including identified issues and configuration problems, are structured in JSON format and returned to the Lambda function.
  5. The Amazon Bedrock agent processes the diagnostic results using chain of thought (CoT) reasoning, based on the ReAct (synergizing reasoning and acting) technique. This enables the agent to analyze the technical findings, identify root causes, generate clear explanations, and provide step-by-step remediation guidance.

During the reasoning phase of the agent, the user is able to view the reasoning steps.

Troubleshooting examples

Let’s take a closer look at a common issue we mentioned earlier and how our agent can assist in troubleshooting it.

EKS worker node failed to join EKS cluster

When an EKS worker node fails to join an EKS cluster, our Amazon Bedrock agent can be invoked with the relevant information: cluster name and worker node ID. The agent will execute the corresponding AWS Support Automation Workflow, which will perform checks like verifying the worker node’s IAM role permissions and verifying the necessary network connectivity.

The automation workflow will run all the checks. Then Amazon Bedrock agent will ingest the troubleshooting, explain the root cause of the issue to the user, and suggest remediation steps based on the AWSSupport-TroubleshootEKSWorkerNode output, such as updating the worker node’s IAM role or resolving network configuration issues, enabling them to take the necessary actions to resolve the problem.

OpenAPI example

When you create an action group in Amazon Bedrock, you must define the parameters that the agent needs to invoke from the user. You can also define API operations that the agent can invoke using these parameters. To define the API operations, we will create an OpenAPI schema in JSON:

"Body_troubleshoot_eks_worker_node_troubleshoot_eks_worker_node_post": {
        "properties": {
          "cluster_name": {
            "type": "string",
            "title": "Cluster Name",
            "description": "The name of the EKS cluster"
          },
          "worker_id": {
            "type": "string",
            "title": "Worker Id",
            "description": "The ID of the worker node"
          }
        },
        "type": "object",
        "required": [
          "cluster_name",
          "worker_id"
        ],
        "title": "Body_troubleshoot_eks_worker_node_troubleshoot_eks_worker_node_post"
      }

The schema consists of the following components:

  • Body_troubleshoot_eks_worker_node_troubleshoot_eks_worker_node_post – This is the name of the schema, which corresponds to the request body for the troubleshoot-eks-worker_node POST endpoint.
  • Properties – This section defines the properties (fields) of the schema:
    • “cluster_name” – This property represents the name of the EKS cluster. It is a string type and has a title and description.
    • “worker_id” – This property represents the ID of the worker node. It is also a string type and has a title and description.
  • Type – This property specifies that the schema is an “object” type, meaning it is a collection of key-value pairs.
  • Required – This property lists the required fields for the schema, which in this case are “cluster_name” and “worker _id”. These fields must be provided in the request body.
  • Title – This property provides a human-readable title for the schema, which can be used for documentation purposes.

The OpenAPI schema defines the structure of the request body. To learn more, see Define OpenAPI schemas for your agent’s action groups in Amazon Bedrock and OpenAPI specification.

Lambda function code

Now let’s explore the Lambda function code:

@app.post("/troubleshoot-eks-worker-node")
@tracer.capture_method
def troubleshoot_eks_worker_node(
    cluster_name: Annotated[str, Body(description="The name of the EKS cluster")],
    worker_id: Annotated[str, Body(description="The ID of the worker node")]
) -> dict:
    """
    Troubleshoot EKS worker node that failed to join the cluster.

    Args:
        cluster_name (str): The name of the EKS cluster.
        worker_id (str): The ID of the worker node.

    Returns:
        dict: The output of the Automation execution.
    """
    return execute_automation(
        automation_name='AWSSupport-TroubleshootEKSWorkerNode',
        parameters={
            'ClusterName': [cluster_name],
            'WorkerID': [worker_id]
        },
        execution_mode='TroubleshootWorkerNode'
    )

The code consists of the following components

  • app.post(“/troubleshoot-eks-worker-node”, description=”Troubleshoot EKS worker node failed to join the cluster”) – This is a decorator that sets up a route for a POST request to the /troubleshoot-eks-worker-node endpoint. The description parameter provides a brief explanation of what this endpoint does.
  • @tracer.capture_method – This is another decorator that is likely used for tracing or monitoring purposes, possibly as part of an application performance monitoring (APM) tool. It captures information about the execution of the function, such as the duration, errors, and other metrics.
  • cluster_name: str = Body(description=”The name of the EKS cluster”), – This parameter specifies that the cluster_name is a string type and is expected to be passed in the request body. The Body decorator is used to indicate that this parameter should be extracted from the request body. The description parameter provides a brief explanation of what this parameter represents.
  • worker_id: str = Body(description=”The ID of the worker node”) – This parameter specifies that the worker_id is a string type and is expected to be passed in the request body.
  •  -> Annotated[dict, Body(description=”The output of the Automation execution”)] – This is the return type of the function, which is a dictionary. The Annotated type is used to provide additional metadata about the return value, specifically that it should be included in the response body. The description parameter provides a brief explanation of what the return value represents.

To link a new SAW runbook in the Lambda function, you can follow the same template.

Prerequisites

Make sure you have the following prerequisites:

Deploy the solution

Complete the following steps to deploy the solution:

  1. Clone the GitHub repository and go to the root of your downloaded repository folder:
$ git clone https://github.com/aws-samples/sample-bedrock-agent-for-troubleshooting-aws-resources.git
$ cd bedrock-agent-for-troubleshooting-aws-resources
  1. Install local dependencies:
$ npm install
  1. Sign in to your AWS account using the AWS CLI by configuring your credential file (replace <PROFILE_NAME> with the profile name of your deployment AWS account):
$ export AWS_PROFILE=PROFILE_NAME
  1. Bootstrap the AWS CDK environment (this is a one-time activity and is not needed if your AWS account is already bootstrapped):
$ cdk bootstrap
  1. Run the script to replace the placeholders for your AWS account and AWS Region in the config files:
$ cdk deploy --all

Test the agent

Navigate to the Amazon Bedrock Agents console in your Region and find your deployed agent. You will find the agent ID in the cdk deploy command output.

You can now interact with the agent and test troubleshooting a worker node not joining an EKS cluster. The following are some example questions:

  • I want to troubleshoot why my Amazon EKS worker node is not joining the cluster. Can you help me?
  • Why this instance <instance_ID> is not able to join the EKS cluster <Cluster_Name>?

The following screenshot shows the console view of the agent.

The agent understood the question and mapped it with the right action group. It also spotted that the parameters needed are missing in the user prompt. It came back with a follow-up question to require the Amazon Elastic Compute Cloud (Amazon EC2) instance ID and EKS cluster name.

We can see the agent’s thought process in the trace step 1. The agent assesses the next step as ready to call the right Lambda function and right API path.

With the results coming back from the runbook, the agent now reviews the troubleshooting outcome. It goes through the information and will start writing the solution where it provides the instructions for the user to follow.

In the answer provided, the agent was able to spot all the issues and transform that into solution steps. We can also see the agent mentioning the right information like IAM policy and the required tag.

Clean up

When implementing Amazon Bedrock Agents, there are no additional charges for resource construction. However, costs are incurred for embedding model and text model invocations on Amazon Bedrock, with charges based on the pricing of each FM used. In this use case, you will also incur costs for Lambda invocations.

To avoid incurring future charges, delete the created resources by the AWS CDK. From the root of your repository folder, run the following command:

$ npm run cdk destroy --all

Conclusion

Amazon Bedrock Agents and AWS Support Automation Workflows are powerful tools that, when combined, can revolutionize AWS resource troubleshooting. In this post, we explored a serverless application built with the AWS CDK that demonstrates how these technologies can be integrated to create an intelligent troubleshooting agent. By defining action groups within the Amazon Bedrock agent and associating them with specific scenarios and automation workflows, we’ve developed a highly efficient process for diagnosing and resolving issues such as Amazon EKS worker node failures.

Our solution showcases the potential for automating complex troubleshooting tasks, saving time and streamlining operations. Powered by Anthropic’s Claude 3.5 Sonnet, the agent demonstrates improved understanding and responding in languages other than English, such as French, Japanese, and Spanish, making it accessible to global teams while maintaining its technical accuracy and effectiveness. The intelligent agent quickly identifies root causes and provides actionable insights, while automatically executing relevant AWS Support Automation Workflows. This approach not only minimizes downtime, but also scales effectively to accommodate various AWS services and use cases, making it a versatile foundation for organizations looking to enhance their AWS infrastructure management.

Explore the AWS Support Automation Workflow for additional use cases and consider using this solution as a starting point for building more comprehensive troubleshooting agents tailored to your organization’s needs. To learn more about using agents to orchestrate workflows, see Automate tasks in your application using conversational agents. For details about using guardrails to safeguard your generative AI applications, refer to Stop harmful content in models using Amazon Bedrock Guardrails.

Happy coding!

Acknowledgements

The authors thank all the reviewers for their valuable feedback.


About the Authors

Wael Dimassi is a Technical Account Manager at AWS, building on his 7-year background as a Machine Learning specialist. He enjoys learning about AWS AI/ML services and helping customers meet their business outcomes by building solutions for them.

Marwen Benzarti is a Senior Cloud Support Engineer at AWS Support where he specializes in Infrastructure as Code. With over 4 years at AWS and 2 years of previous experience as a DevOps engineer, Marwen works closely with customers to implement AWS best practices and troubleshoot complex technical challenges. Outside of work, he enjoys playing both competitive multiplayer and immersive story-driven video games.

Read More