New method extends virtual adversarial training to sequence-labeling tasks, which assign different labels to different words of an input sentence.Read More
Alexa & Friends features Dilek Hakkani-Tür, Alexa AI senior principal scientist
Watch the replay of the live interview with Alexa evangelist Jeff Blankenburg.Read More
Collaboration between Amazon and UC Berkeley advances AI and machine learning
For two years now, Amazon has been collaborating with the University of California Berkeley Artificial Intelligence Research (BAIR) Lab, giving students the opportunity to work on challenging, real-world problems.Read More
Building a custom Angular application for labeling jobs with Amazon SageMaker Ground Truth
As a data scientist attempting to solve a problem using supervised learning, you usually need a high-quality labeled dataset before starting your model building. Amazon SageMaker Ground Truth makes dataset building for a different range of tasks, like text classification and object detection, easier and more accessible to everyone.
Ground Truth also helps you build datasets for custom user-defined tasks that let you annotate anything. This capability is powered by the following:
- Custom AWS Lambda functions that can be triggered between labeling steps. This allows you to have custom logic pre-labeling like filtering examples or augmenting them with metadata using other services like Amazon Translate or Amazon Rekognition, and post-labeling logic for label consolidation or quality control.
- Custom web templates that let you build unique user interfaces using HTML and Javascript that integrate perfectly with Ground Truth workflows. These templates are easy to build with Crowd HTML Elements, which are a set of common UI elements used for text, video, and audio labeling jobs that you can arrange like blocks in your custom template.
- Availability of a large set of skilled and specialized workforces in the AWS Marketplace and in Amazon Mechanical Turk if you need to augment your private teams of subject matter experts. Vetted partners in the AWS Marketplace cover numerous languages as well as specific skills in video and image annotations that fit different industry needs (like medical labeling).
For complex labeling tasks, such as complex taxonomy classification, extreme multi-class classifications, or autonomous driving labeling tasks, you may need to build a more complex front-end application for your labeling workforce. Front-end frameworks like Angular are helpful in these cases because they bring useful design patterns like model-view-controller (MVC), which makes your codebase more robust and maintainable for a larger team composed of UX/UI designers and software developers.
This post walks you through using Angular and Angular Elements to create fully customizable solutions that work nicely with Ground Truth. This walkthrough assumes that you’re familiar with running a custom labeling job with Ground Truth and Crowd HTML Elements. For more information, see Build a custom data labeling workflow with Amazon SageMaker Ground Truth.
The approach described in this post also works with Amazon Augmented AI (Amazon A2I), which makes it easy to build the workflows required for human review of machine learning predictions. This is possible because Amazon A2I uses Crowd HTML Elements to create custom worker templates. For more information, see Create Custom Worker Templates.
Building a custom UI for complex taxonomy classification
If you manage large supply chains and interact with different types of suppliers, like global food restaurants or automotive manufacturers, you likely receive invoices in different formats and languages. To keep track of your operations and drive financial efficiencies, you need teams behind the scenes to map invoices and receipts to large categories of products and organize them in hierarchical taxonomies.
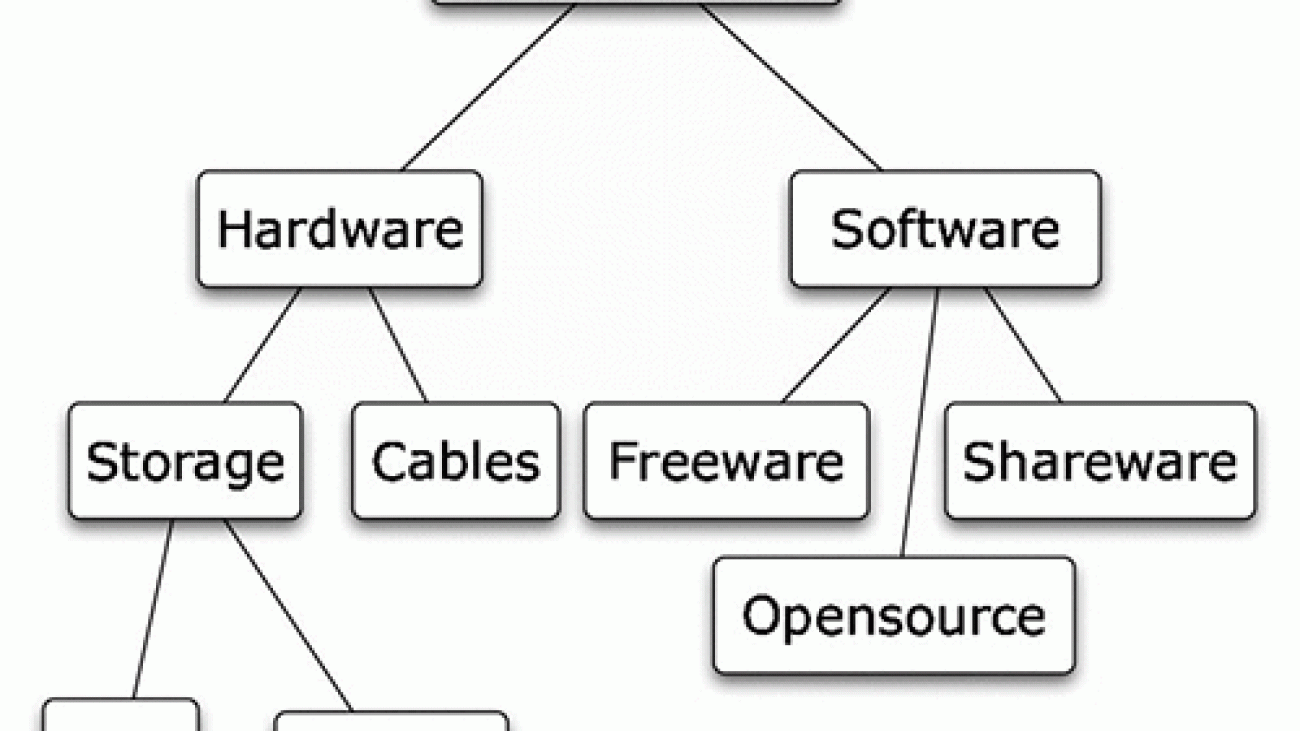
The following diagram illustrates a hierarchical taxonomy of computer components.

The following diagram illustrates a hierarchical taxonomy of types of food.

Hierarchical taxonomies can have thousands of categories at their leaf level. Such examples can include web directories (the Yahoo! Directory or the Open Directory Project), library classification schemes (Dewey Decimal or Library of Congress), or the classification schemes used in natural science, legal, or medical applications.
What if a natural language processing (NLP) model could help you automatically tag every invoice to the proper category? What if text labeling tools could extract categories from invoices?
Even if accurate classification over large sets of closely related classes is inherently difficult, it all starts with constructing a high-quality dataset in the most cost-efficient manner.
Taxonomy labeling with Angular Elements
For the following use case, you are one of the biggest fast food chains operating and sourcing materials across the world. To build a dataset for your NLP model, you came up with a single-page web app based on UX research that helps your workforce read an invoice description and select the corresponding category in the taxonomy. See the following screenshot.

This implementation makes use of Angular Materials tabs and a filter box that makes navigating the categories easy. It also displays an English translation of your invoice description so that the workers can labels invoices from across the world. Moreover, because it’s built on a framework like Angular, you can improve it down the line with more elements, such as drop-downs for the higher levels of the taxonomy or dynamic content like images or videos based on third-party APIs.
For more information about this application, see the GitHub repo.
The application is built using Angular Elements, which creates Angular components packaged as custom elements (also called web components), a web standard for defining new HTML elements in a framework-agnostic way. This enables you to integrate smoothly with Crowd HTML Elements later on.
Angular Elements inputs and outputs
In this use case, your Angular component expects two inputs: an invoice description and an invoice translation. These are passed to it using tag attributes in the <ng-home> (the directive that designates the root element of the application). The values are then captured by the @Input() annotations defined in the Angular Controller in src/app/home.ts. See the following code:
<ng-home source='10牛ステーキ-20パッケージ-ブランドX' translation='10 beef steak - 20 packages - brand X' id="home">loading</ng-home>

export class Home implements OnInit {

  @Input() invoice = '';
  @Input() translation = '';

  ...
The values are rendered using two-binding in the placehoders {{source}} and {{translation}} in the Angular View in src/app/home.html. See the following code:
<!-- Invoice Description -->
<div class="card" >
    <div class="card-header">
        <h3>Invoice Description</h3>
    </div>
    <div>
        <p id="step1">
        <span>Invoice Description: <br />
        <b>{{ invoice }}</b></span>
        </p>
        <p style='font-weight: small; color: gray;' id="step2">
        <span>English Translation: <br /> {{ translation }}</span>
        </p>
    </div>
</div>
The following screenshot shows the Meats tab on the Food Categories page.

When you choose a category and choose Submit, the Angular component should also broadcast a Javascript event contaning the category ID to its parent DOM element. This is achieved using the @Output() in the Angular Controller in src/app/home.ts. See the following code:
<button mat-button color="primary" (click)="onSubmit()" id="submitButton">Submit</button>

<table>
    ...
    <tr mat-row *matRowDef="let row; columns: displayedColumns;"
        (click)="selectRow(row)" [ngClass]="{ 'highlight': row === selectedRow }">
    </tr>
</table>
@Output('rowselected') rowselected = new EventEmitter<any>();

#called when user click on a row in the table ("selecting" a category)
selectRow(row) {
      this.selectedRow = row;
}

#called when user click on Submit button
onSubmit(){
    this.rowselected.emit(this.selectedRow);
}
Angular integration with Crowd HTML Elements
Communication between Angular Elements and Crowd HTML Elements happens through the mechanism described in the preceding section.
Following the steps described in Build a custom data labeling workflow with Amazon SageMaker Ground Truth, you can adapt how to pass the text to annotate and how to catch the broadcasted event from Angular Elements to create your custom template.
The following code shows the full Liquid HTML template to use in your job creations. This file should also be your index.html root file of the Angular app under src/ folder. (Make sure to use the index.html file under the dist folder that has the minified .js files injected into it with the right Amazon Simple Storage Service (Amazon S3) path to host your app.)
<!doctype html>
<html lang="en">
<html>
  <head>
    <script src="https://assets.crowd.aws/crowd-html-elements.js"></script>
  </head>
  <body>

    <crowd-form style="display: none;">
        <input name="annotations" id="annotations" type="hidden">
        <input name="timeElapsed" id="timeElapsed" type="hidden">
         <!-- Prevent crowd-form from creating its own button -->
        <crowd-button form-action="submit" style="display: none;"></crowd-button>
    </crowd-form>

    <div class="mat-app-background basic-container">
      <!-- Dev Mode to test the Angular Element -->
      <!-- <ng-home source='10牛ステーキ-20パッケージ-ブランドX' translation='10 beef steak - 20 packages - brand X' id="home">loading</ng-home> -->
      <ng-home source='{{ task.input.source }}' translation='{{ task.input.translatedDesc }}'>loading</ng-home>
    </div>

    <script src="<your-s3-bucket-angular-app>/runtime-es2015.js" type="module"></script>
    <script src="<your-s3-bucket-angular-app>/runtime-es5.js" nomodule defer></script>
    <script src="<your-s3-bucket-angular-app>/polyfills-es5.js" nomodule defer></script>
    <script src="<your-s3-bucket-angular-app>/polyfills-es2015.js" type="module"></script>
    <script src="<your-s3-bucket-angular-app>/styles-es2015.js" type="module"></script>
    <script src="<your-s3-bucket-angular-app>/styles-es5.js" nomodule defer></script>
    <script src="<your-s3-bucket-angular-app>/vendor-es2015.js" type="module"></script>
    <script src="<your-s3-bucket-angular-app>/vendor-es5.js" nomodule defer></script>
    <script src="<your-s3-bucket-angular-app>/main-es2015.js" type="module"></script>
    <script src="<your-s3-bucket-angular-app>/main-es5.js" nomodule defer></script>
</body>
</html>

<script>

  document.addEventListener("DOMContentLoaded", function(event) {
    // Counter
    var enterDate = new Date();
    function secondsSinceEnter()
    {
      return (new Date() - enterDate) / 1000;
    }

    // GT Form Submitting
    const component = document.querySelector('ng-home').addEventListener('rowselected', (event) => {
      // alert(event.detail.CODE);
      document.getElementById('annotations').value = event.detail.CODE;
      document.getElementById('timeElapsed').value = secondsSinceEnter();
      document.querySelector('crowd-form').submit();
    });

  });

</script>
<style>
  .body {
    background-color: #fafafa;
  }

  .header {
    background: #673ab7;
      color: #fff;
      padding: 0 16px;
      margin: 20px 20px 0px 20px;
      padding: 20px;
  }

  .cards {
    display: grid;
    grid-template-columns: 30% auto;
    grid-auto-rows: auto;
    grid-gap: 1rem;
    margin: 20px 20px 0px 20px;
  }

  .card {
    box-shadow: 0 2px 1px -1px rgba(0,0,0,.2), 0 1px 1px 0 rgba(0,0,0,.14), 0 1px 3px 0 rgba(0,0,0,.12);
    transition: box-shadow 280ms cubic-bezier(.4,0,.2,1);
    display: block;
    position: relative;
    padding: 16px;
    border-radius: 4px;
    /* margin: 20px 0px 0px 20px; */
    border: 2px solid #e7e7e7;
    border-radius: 4px;
  }

  .highlight-step {
    background-color: #2515424a;
    margin: 0px -15px 0px -15px;
    padding: 15px;
  }
</style>
Creating the template
To create the preceding template, complete the following steps:
- Add the
crowd-html-element.jsscript at the top of the template so you can use Crowd HTML Elements:<script src="https://assets.crowd.aws/crowd-html-elements.js"></script> - Inject the text to annotate and the associated metadata coming from the pre-processing Lambda function to the user interface using the Liquid templating language directly in root element
<ng-home>:<ng-home source='{{ task.input.source }}' translation='{{ task.input.translated }}' id="home">loading</ng-home> - Use the
<crowd-form />element, which submits the annotations to Ground Truth. The element is hidden because the submission happens in the background. See the following code:<crowd-form style="display: none;"> <input name="annotations" id="annotations" type="hidden"> <input name="timeElapsed" id="timeElapsed" type="hidden"> <!-- Prevent crowd-form from creating its own button --> <crowd-button form-action="submit" style="display: none;"></crowd-button> </crowd-form> - Instead of using Crowd HTML Elements to submit the annotation, include a small script to integrate the Angular Element with
<crowd-form />:ocument.addEventListener("DOMContentLoaded", function(event) { var enterDate = new Date(); function secondsSinceEnter() { return (new Date() - enterDate) / 1000; } const component = document.querySelector('ng-home').addEventListener('rowselected', (event) => document.getElementById('annotations').value = event.detail.CODE; document.getElementById('timeElapsed').value = secondsSinceEnter(); document.querySelector('crowd-form').submit(); }); });
For this use case, I’m also keeping a counter to monitor the time it takes a worker to complete the annotation.
The following diagram illustrates the data flow between each element.

Conclusion
This post showed how to build custom labeling UI with Angular and Ground Truth. The solution can handle communication between the different scopes in the custom template provided in the labeling job creation. The ability to use a custom front-end framework like Angular enables you to easily create modern web applications that serve your exact needs when tapping into public, private, or vendor labeling workforces.
For more information about hierarchical taxonomies in Ground Truth, see Creating hierarchical label taxonomies using Amazon SageMaker Ground Truth.
If you have any comments or questions about this post, please use the comments section. Happy labeling!
About the Authors
 Yassine Landa is a Data Scientist at AWS. He holds an undergraduate degree in Math and Physics, and master’s degrees from French universities in Computer Science and Data Science, Web Intelligence, and Environment Engineering. He is passionate about building machine learning and artificial intelligence products for customers, and has won multiple awards for machine learning products he has built with tech startups and as a startup founder.
Amazon Scholar Kathleen McKeown takes stock of natural language processing; where we are, and where we’re going
After nearly 40 years of research, this year’s ACL 2020 keynote speaker sees big improvements coming in three key areas.Read More
Amazon scientist Matthias Seeger receives ICML “test of time” award
Seeger and three coauthors are honored for paper that forged durable links between previously separate domains.Read More
Adversarial training improves product discovery
Method automatically generates negative training examples for deep-learning model.Read More
Amazon at ACL: Old standards and new forays
Amazon researchers coauthor 17 conference papers, participate in seven workshops.Read More
2019 Q4 AWS Machine Learning Research Awards recipients announced
The AWS Machine Learning Research Awards (MLRA) is pleased to announce the 28 recipients of the 2019 Q4 call-for-proposal cycle.Read More

2019 Q4 recipients of AWS Machine Learning Research Awards
The AWS Machine Learning Research Awards (MLRA) aims to advance machine learning (ML) by funding innovative research and open-source projects, training students, and providing researchers with access to the latest technology. Since 2017, MLRA has supported over 180 research projects from 73 schools and research institutes in 13 countries, with topics such as ML algorithms, computer vision, natural language processing, medical research, neuroscience, social science, physics, and robotics.
On February 18, 2020, we announced the winners of MLRA’s 2019 Q2/Q3 call-for-proposal cycles. We’re now pleased to announce 28 new recipients of MLRA’s 2019 Q4 call-for-proposal cycle. The MLRA recipients represent 26 universities in six countries. The funded projects aim to develop open-source tools and research that benefit the ML community at large, or create impactful research using AWS ML solutions, such as Amazon SageMaker, AWS AI Services, and Apache MXNet on AWS. The following are the 2019 Q4 award recipients:
| Recipient | University | Research Title |
| Anasse Bari | New York University | Predicting the 2020 Elections Using Big Data, Analyzing What the World Wants Using Twitter and Teaching Next Generation of Thinkers How to Apply AI for Social Good |
| Andrew Gordon Wilson | New York University | Scalable Numerical Methods and Probabilistic Deep Learning with Applications to AutoML |
| Bo Li | University of Illinois at Urbana-Champaign | Trustworthy Machine Learning as Services via Robust AutoML and Knowledge Enhanced Logic Inference |
| Dawn Song | University of California, Berkeley | Protecting the Public Against AI-Generated Fakes |
| Dimosthenis Karatzas | Universitat Autónoma de Barcelona | Document Visual Question Answer (DocVQA) for Large-Scale Document Collections |
| Dit-Yan Yeung | Hong Kong University of Science and Technology | Temporally Misaligned Spatiotemporal Sequence Modeling |
| Lantao Liu | Indiana University Bloomington | Environment-Adaptive Sensing and Modeling using Autonomous Robots |
| Leonidas Guibas | Stanford University | Learning Canonical Spaces for Object-Centric 3D Perception |
| Maryam Rahnemoonfar | University of Maryland, Baltimore | Combining Model-Based and Data Driven Approaches to Study Climate Change via Amazon SageMaker |
| Mi Zhang | Michigan State University | DA-NAS: An AutoML Framework for Joint Data Augmentation and Neural Architecture Search |
| Michael P. Kelly | Washington University | Web-Based Machine Learning for Surgeon Benchmarking in Pediatric Spine Surgery |
| Ming Zhao | Arizona State University | Enabling Deep Learning across Edge Devices and Cloud Resources |
| Nianwen Xue | Brandeis University | AMR2KB: Construct a High-Quality Knowledge by Parsing Meaning Representations |
| Nicholas Chia | Mayo Clinic | Massively-Scaled Inverse Reinforcement Learning Approach for Reconstructing the Mutational History of Colorectal Cancer |
| Oswald Lanz | Fondazione Bruno Kessler | Structured Representation Learning for Video Recognition and Question Answering |
| Pierre Gentine | Columbia University | Learning Fires |
| Pratik Chaudhari | University of Pennsylvania | Offline and Off-Policy Reinforcement Learning |
| Pulkit Agrawal | Massachusetts Institute of Technology | Curiosity Baselines for the Reinforcement Learning Community |
| Quanquan Gu | University of California, Los Angeles | Towards Provably Efficient Deep Reinforcement Learning |
| Shayok Chakraborty | Florida State University | Active Learning with Imperfect Oracles |
| Soheil Feizi | University of Maryland, College Park | Explainable Deep Learning: Accuracy, Robustness and Fairness |
| Spyros Makradakis | University of Nicosia | Clustered Ensemble of Specialist Amazon GluonTS Models for Time Series Forecasting |
| Xin Jin | Johns Hopkins University | Making Sense of Network Performance for Distributed Machine Learning |
| Xuan (Sharon) Di | Columbia University | Multi-Autonomous Vehicle Driving Policy Learning for Efficient and Safe Traffic |
| Yi Yang | University of Technology Sydney | Efficient Video Analysis with Limited Supervision |
| Yun Raymond Fu | Northeastern University | Generative Feature Transformation for Multi-Viewed Domain Adaptation |
| Zhangyang (Atlas) Wang | Texas A&M University | Mobile-Captured Wound Image Analysis and Dynamic Modeling for Post-Discharge Monitoring of Surgical Site Infection |
| Zhi-Li Zhang | University of Minnesota | Universal Graph Embedding Neural Networks for Learning Graph-Structured Data |
Congratulations to all MLRA recipients! We look forward to supporting your research.
For more information about MLRA, see AWS Machine Learning Research Awards or send an email to aws-ml-research-awards@amazon.com.
About the Author
 Seo Yeon Shin is a program manager for the AWS AI Academic Programs.